Ergotron StyleView Vertical Lift, Patient Room Guía del usuario
- Categoría
- Soportes de pared para panel plano
- Tipo
- Guía del usuario

1/14
ABCDEFGHI J
1
2
3
4
5
6
7
8
1/2"
7.825
198.755
2.088
53.023
30.125
765.175
12.000
304.800
.888
22.543
27.750
704.850
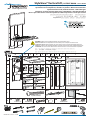
4X Ø .500
PILOT HOLE
12.700
PILOT HOLE
X
OUTLINE OF 9"
VERTICAL LIFT SYSTEM
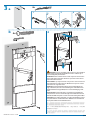
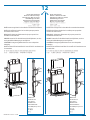
MOUNTING HEIGHT EQUATION FOR SITTING
APPLICATIONS:
52.00 (1321MM) - X = H
X = DISTANCE FROM THE TOP OF THE MONITOR
SCREEN TO THE CENTER OF THE MOUNTING
SCREW PATTERN (SEE PICTORIAL)
H = HEIGHT FROM FLOOR TO MOUNTING HEIGHT
LINE (ABOVE)
MOUNTING HEIGHT LINE:
(OBTAINED BY SOLVING
EQUATION BELOW)
MOUNTING HEIGHT EQUATION FOR STANDING
APPLICATIONS:
67.50 (1715MM) - X = H
X = DISTANCE FROM THE TOP OF THE MONITOR
SCREEN TO THE CENTER OF THE MOUNTING
SCREW PATTERN
H = HEIGHT FROM FLOOR TO MOUNTING HEIGHT
LINE (ABOVE)
1. REFER TO THE MANUAL.
2. MEASURE THE DISTANCE FROM THE TOP OF THE MONITOR
SCREEN TO THE CENTER OF THE MOUNTING SCREW PATTERN.
3. DETERMINE ERGONOMICLLY CORRECT VIEWING HEIGHT BY
USING EQUATION ABOVE (OR BELOW).
4. MARK THE DETERMINED VALUE FOR H, ON THE WALL.
5. ALIGN MOUNTING HEIGHT LINE TO MARK ON THE WALL.
USING A LEVEL, LEVEL THE TEMPLATE, THEN TACK IN PLACE.
6. CLEARLY MARK THE POSITIONS FOR FOUR PILOT HOLES
INTO THE WALL.
7. DRILL THE FOUR PILOT HOLES.
H
H
ERGOTrON
SIZE
DWG. NO.
D
REV.
DATE
DRAWN
CHECKED
TITLE
C
888-122
MJS
1/21/99
MANUAL,VISUAL GUIDE,TEMPLATE,
TO MOUNT 9" VERTICAL LIFT SYSTEM
TO WALL
OBSOLETE
PART NUMBER
888-122
STATUS
888-122-01
ACTIVE - AS SHOWN
HCS
2
1
1/2"
5/32"
3/32"
3/16"
Ø 1/2" (12.8 mm)
1x
1x
1x
1x
1x
1x
1x
2x
2x 2x 1x
1x
1x
1x
1x 1x
1x
1x
8-32 x 1/4"
M4 x 6mm
M4 x 10mm
M4 x 20mm
M4 x 10mm
1/4-20 x 1-1/2"
4x 4x 1x 5x
4x 12x4x4x4x4x
2.5mm
StyleView® Vertical Lift, PATIENT ROOM User's Guide
Soporte de pared StyleView, habitación de pacientes - Guía del usuario
Ajustement vertical StyleView, chambre du patient - Manuel de l’utilisateur
StyleView Vertical Lift, Patientenzimmer - Gebruikersgids
StyleView® verticale monitorophanging, patiëntkamer - Benutzerhandbuch
Braccio per sollevamento verticale StyleView, stanza del paziente - Guida per l’utente
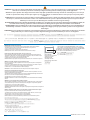
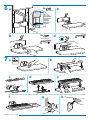
CAUTION: Do Not remove cardboard spacer until instructed to do so.
PRECAUCIÓN: No retire el separador de cartón hasta que lo indiquen las instrucciones.
ATTENTION : NE PAS retirer l’espaceur en carton tant qu’il ne vous est pas demandé de le faire.
VORSICHT: Entfernen Sie die Abstandshalter aus Pappe erst, wenn Sie dazu aufgefordert werden.
ATTENZIONE: non rimuovere il distanziale in cartone fi nché non si arriva all’istruzione specifi ca.
888-60-503-G-00 rev. C • 12/08
1x
1/2"
www.ergotron.com
La página se está cargando ...

3/14
Learn more about ergonomic computer use at:
Más información sobre el uso ergonómico de ordenadores:
Apprenez-en plus sur l’utilisation ergonomique d’un ordinateur sur :
Weitere Informationen zur ergonomischen Computernutzung nden Sie unter:
Leer meer over ergonomisch computergebruik op:
Per ulteriori informazioni sull’uso ergonomico del computer:
www.computingcomfort.org
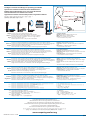
Height Position top of screen slightly below eye level.
Position keyboard at about elbow height with wrists at.
Distance Position screen an arm's length from face—at least 20” (508mm).
Position keyboard close enough to create a 90˚ angle in elbow.
Angle Tilt screen to eliminate glare.
Tilt the keyboard back 10° so that your wrists remain at.
Altura Coloque el borde superior de la pantalla ligeramente por debajo de la altura de sus ojos.
Coloque el teclado aproximadamente a la altura de los codos con las muñecas planas.
Distancia Coloque la pantalla a una distancia de un brazo desde la cara, esto es, unos 50 cm (20 pulgadas).
Coloque el teclado lo su cientemente cerca para que el codo forme un ángulo de 90º.
Ángulo Incline la pantalla para eliminar los re ejos.
Incline el teclado 10º hacia atrás para que las muñecas sigan en posición plana.
Hauteur Positionnez l’écran du haut légèrement en dessous du niveau du regard.
Positionnez le clavier à peu près à la même hauteur que vos coudes, pour que vos poignets soient à plat.
Distance Positionnez l’écran à un bras de distance de votre visage, à au moins 508 mm (20 pouces).
Positionnez le clavier assez près pour que vos coudes forment un angle de 90°.
Angle Inclinez l’écran pour ne pas être ébloui.
Inclinez le clavier vers l’arrière de 10° pour que vos poignets soient à plat.
Höhe Positionieren Sie die obere Kante des Bildschirms knapp unter Augenhöhe.
Positionieren Sie die Tastatur bei ach aufgelegten Handgelenken auf Ellenbogenhöhe.
Abstand Positionieren Sie den Bildschirm mindestens eine Armlänge (50 cm) von Ihrem Gesicht entfernt.
Positionieren Sie die Tastatur nahe genug, um einen Ellenbogenwinkel von 90 ˚ zu ermöglichen.
Winkel Neigen Sie den Bildschirm so, dass ein Spiegele ekt vermieden wird.
Neigen Sei die Tastatur um 10 ° nach hinten, sodass Ihre Handgelenke ach au iegen.
Hoogte Zet de bovenkant van het scherm iets boven ooghoogte.
Plaats het toetsenbord op ongeveer ellebooghoogte met de polsen plat.
Afstand Plaats het scherm op een armlengte van uw gezicht — op ten minste 508 mm (20 in).
Zet uw toetsenbord zo dichtbij dat u een hoek van 90° in de ellebogen hebt.
Hoek Kantel het scherm om weerspiegeling te elimineren.
Kantel het toetsenbord 10° naar achteren, zodat uw polsen plat blijven liggen.
Altezza Posizionare la parte superiore dello schermo leggermente sotto il livello degli occhi.
Posizionare la tastiera circa all’altezza dei gomiti, in modo che i polsi siano piatti.
Distanza Posizionare lo schermo a un braccio di distanza dal viso, almeno a 20" (508 mm) di distanza.
Posizionare la tastiera a nché sia abbastanza vicina da costringere i gomiti a un angolo di 90˚.
Angolazione Inclinare lo schermo in modo da eliminare i ri essi.
Inclinare la tastiera indietro di 10° in modo che i polsi rimangano piatti.
°
To Reduce Fatigue
Breathe - Breathe deeply through your nose.
Blink - Blink often to avoid dry eyes.
Break • 2 to 3 minutes every 20 minutes
• 15 to 20 minutes every 2 hours.
Para reducir la fatiga
Respirar - Respire hondo por la nariz.
Parpadear - Parpadee a menudo para que no se sequen los
ojos.
Descansar • 2 o 3 minutos cada 20 minutos
• 15 o 20 minutos cada 2 horas.
Pour réduire la fatigue
Respirez - Respirez profondément par votre nez.
Clignez des yeux - Clignez souvent des yeux pour ne pas avoir
les yeux secs.
Faites des pauses • 2 à 3 minutes toutes les 20 minutes
• 15 à 20 minutes toutes les 2 heures.
Vermeiden von Ermüdungserscheinungen
Atmen - Atmen Sie tief durch die Nase ein und aus.
Blinzeln - Blinzeln Sie so oft wie möglich, um trockene Augen
zu vermeiden.
Pausen • Machen Sie alle 20 Minuten eine Pause von 2-3 Mi-
nuten
• Machen Sie alle 2 Stunden eine Pause von 15-20 Minuten.
Om vermoeidheid te verminderen
Ademen - Adem diep door uw neus in en uit.
Knipperen - Knipper regelmatig om droge ogen te vermijden.
Pauzes nemen • 2 tot 3 minuten elke 20 minuten
• 15 tot 20 minuten elke 2 uur.
Per ridurre l’a aticamento
Respirazione - Respirare profondamente dal naso.
Battito delle palpebre - Battere spesso le palpebre per evitare
che gli occhi si asciughino.
Pause • Fare una pausa di 2 - 3 minuti ogni 20 minuti
• Fare una pausa di 15 - 20 minuti ogni 2 ore.
•
•
Set Your Workstation to Work For YOU!
Con gure su estación de trabajo para que trabaje para USTED.
Ajustez votre station de travail en fonction de VOS besoins !
Richten Sie Ihren Arbeitsplatz so ein, dass er für SIE arbeitet!
Stel uw werkstation zo in dat het voor U werkt!
Approntare la stazione di lavoro nella posizione ergonomica ottimale.
888-60-503-G-00 rev. C • 12/08
La página se está cargando ...
La página se está cargando ...

6/14
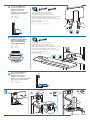
4x
4x
4x
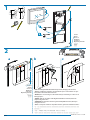
4
a
b
M4 x 20mm
3/32"
M4 x 10mm
M4 x 10mm
4x 4x
8-32 x 1/4"
5
1
2
34
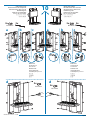
WARNING: The monitor will not be securely attached to the 9" Vertical Lift until the Locking Pin passes through the tab on the Quick Release Bracket. Do not
leave the monitor unsupported until you are certain the Locking Pin is in place.
ADVERTENCIA: El monitor no quedará bien fi jado al soporte de pared de 9" mientras no se haya insertado el pasador de bloqueo a través de la lengüeta de la
abrazadera de liberación rápida. No suelte el monitor mientras no esté seguro de que el pasador de bloqueo está colocado.
AVERTISSEMENT : le moniteur ne sera pas correctement fi xé à 9 pouces d’ajustement vertical tant que la tige de blocage ne passe pas à travers la languette sur
le support à dégagement rapide. Ne pas laisser le moniteur sans soutien tant que vous n’êtes pas certain que la tige de blocage est en place.
WARNUNG: Der Monitor ist erst sicher am 9"-Vertical Lift befestigt, wenn der Sicherungsstift in der Öffnung am der Quick Release-Bügel eingerastet ist. Sichern
Sie den Monitor, bis Sie sich vergewissert haben, dass der Sicherungsstift eingerastet ist.
WAARSCHUWING: De monitor is pas stevig aan de 9" verticale monitorophanging bevestigd als de veiligheidspin door de opening in de quick release-beugel is
gestoken. Laat de monitor niet zonder ondersteuning hangen tot u zeker weer dat de veiligheidspin goed aangebracht is.
AVVERTENZA: il monitor non è fi ssato bene al braccio per sollevamento verticale da 23 cm fi nché la spina di bloccaggio non è inserita nella linguetta sulla staffa
a sbloccaggio rapido. Non lasciare il monitor senza sostegno fi nché non si è certi che la sp
Recessed
Empotrado
Encastré
Aussparung
Verzonken
Incassata
888-60-503-G-00 rev. C • 12/08
La página se está cargando ...
La página se está cargando ...
La página se está cargando ...
La página se está cargando ...
La página se está cargando ...
La página se está cargando ...

13/14
12
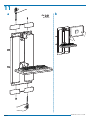
NOTE: Leave enough slack in the cables for unrestricted movement.
NOTA: Deje sufi ciente longitud en los cables para que puedan
moverse sin restricciones.
REMARQUE : Laissez aux câbles assez de jeu pour pouvoir les
manœuvrer sans diffi culté.
HINWEIS: Lassen Sie für die Kabel ausreichend Spielraum, um eine
uneingeschränkte Bewegung zu ermöglichen.
OPMERKING: Laat genoeg kabelruimte over voor onbeperkte
beweging.
NOTA: lasciare suffi cienti tratti liberi di cavo affi nché il movimento non
sia ostacolato.
Back View
Vista trasera
Vue arrière
Rückansicht
Achteraanzicht
Vista dalla parte posteriore
Back View
Vista trasera
Vue arrière
Rückansicht
Achteraanzicht
Vista dalla parte posteriore
Route cables downward
Enrute los cables hacia abajo
Acheminer les câbles vers le bas
Kabelführung nach unten
Kabels naar beneden geleiden
Disporre i cavi verso il basso
Route cables upward
Enrute los cables hacia arriba
Acheminer les câbles vers le haut
Kabelführung nach oben
Kabels naar boven geleiden
Disporre i cavi verso l’alto
888-60-503-G-00 rev. C • 12/08
La página se está cargando ...
Transcripción de documentos
StyleView® Vertical Lift, PATIENT ROOM - User's Guide www.ergotron.com Soporte de pared StyleView, habitación de pacientes - Guía del usuario Ajustement vertical StyleView, chambre du patient - Manuel de l’utilisateur StyleView Vertical Lift, Patientenzimmer - Gebruikersgids StyleView® verticale monitorophanging, patiëntkamer - Benutzerhandbuch Braccio per sollevamento verticale StyleView, stanza del paziente - Guida per l’utente スタイルビュー縦型リフト、病室 ユーザーガイド StyleView 垂直升降支架,病房 用户指南 StyleView 수직 리프트, 진료실 사용자 안내서 CAUTION: Do Not remove cardboard spacer until instructed to do so. PRECAUCIÓN: No retire el separador de cartón hasta que lo indiquen las instrucciones. ATTENTION : NE PAS retirer l’espaceur en carton tant qu’il ne vous est pas demandé de le faire. VORSICHT: Entfernen Sie die Abstandshalter aus Pappe erst, wenn Sie dazu aufgefordert werden. ATTENZIONE: non rimuovere il distanziale in cartone finché non si arriva all’istruzione specifica. 注意: 段ボールのスペーサーは指示があるまで取り外さないでください。 小心: 除非要求,否则请勿取下纸垫片。 주의: 별도의 지시가 있기 전까지는 카드보드 스페이서를 제거하지 마십시오. A B C D E G H I J 1x 1x 1x 1 F 1x 198.755 7.825 2 1x 1x 2x 2x 1x 1x 1x 1x 53.023 2.088 22.543 .888 H 1x 1x H 12.700 4X Ø .500 PILOT HOLE MOUNTING HEIGHT LINE: (OBTAINED BY SOLVING EQUATION BELOW) MOUNTING HEIGHT EQUATION FOR STANDING APPLICATIONS: 67.50 (1715MM) - X = H X = DISTANCE FROM THE TOP OF THE MONITOR SCREEN TO THE CENTER OF THE MOUNTING SCREW PATTERN X H = HEIGHT FROM FLOOR TO MOUNTING HEIGHT LINE (ABOVE) 3 1. REFER TO THE MANUAL. 2. MEASURE THE DISTANCE FROM THE TOP OF THE MONITOR SCREEN TO THE CENTER OF THE MOUNTING SCREW PATTERN. 3. DETERMINE ERGONOMICLLY CORRECT VIEWING HEIGHT BY USING EQUATION ABOVE (OR BELOW). 4. MARK THE DETERMINED VALUE FOR H, ON THE WALL. 5. ALIGN MOUNTING HEIGHT LINE TO MARK ON THE WALL. USING A LEVEL, LEVEL THE TEMPLATE, THEN TACK IN PLACE. 6. CLEARLY MARK THE POSITIONS FOR FOUR PILOT HOLES INTO THE WALL. 7. DRILL THE FOUR PILOT HOLES. 704.850 27.750 765.175 30.125 2x 4 MOUNTING HEIGHT EQUATION FOR SITTING APPLICATIONS: 52.00 (1321MM) - X = H X = DISTANCE FROM THE TOP OF THE MONITOR SCREEN TO THE CENTER OF THE MOUNTING SCREW PATTERN (SEE PICTORIAL) H = HEIGHT FROM FLOOR TO MOUNTING HEIGHT LINE (ABOVE) 1x 1x 5 OUTLINE OF 9" VERTICAL LIFT SYSTEM 3/32" 3/16" PILOT HOLE ERGOTrON TITLE 1x 6 MANUAL,VISUAL GUIDE,TEMPLATE, TO MOUNT 9" VERTICAL LIFT SYSTEM TO WALL 1x SIZE DWG. NO. MJS PART NUMBER 888-122 888-122-01 REV. 888-122 D DRAWN 304.800 12.000 DATE 1/21/99 CHECKED C HCS STATUS OBSOLETE ACTIVE - AS SHOWN 2.5mm 5/32" 4x 4x 1x 5x 7 1/4-20 x 1-1/2" 8 4x 4x 8-32 x 1/4" 1/2" 4x M4 x 20mm 4x 4x M4 x 10mm M4 x 10mm M4 x 6mm Ø 1/2" (12.8 mm) 1/2" 1/2" 12x 2 1 888-60-503-G-00 rev. C • 12/08 1/14 Set Your Workstation to Work For YOU! Configure su estación de trabajo para que trabaje para USTED. Ajustez votre station de travail en fonction de VOS besoins ! Richten Sie Ihren Arbeitsplatz so ein, dass er für SIE arbeitet! Stel uw werkstation zo in dat het voor U werkt! Approntare la stazione di lavoro nella posizione ergonomica ottimale. 一人ひとりにピッタリのワークステーション! 按照您自身的需要设置工作站! Height Position top of screen slightly below eye level. Position keyboard at about elbow height with wrists flat. Distance Position screen an arm's length from face—at least 20” (508mm). Position keyboard close enough to create a 90˚ angle in elbow. Angle Tilt screen to eliminate glare. Tilt the keyboard back 10° so that your wrists remain flat. To Reduce Fatigue Breathe - Breathe deeply through your nose. Blink - Blink often to avoid dry eyes. Break • 2 to 3 minutes every 20 minutes • 15 to 20 minutes every 2 hours. Altura Coloque el borde superior de la pantalla ligeramente por debajo de la altura de sus ojos. Coloque el teclado aproximadamente a la altura de los codos con las muñecas planas. Distancia Coloque la pantalla a una distancia de un brazo desde la cara, esto es, unos 50 cm (20 pulgadas). Coloque el teclado lo suficientemente cerca para que el codo forme un ángulo de 90º. Ángulo Incline la pantalla para eliminar los reflejos. Incline el teclado 10º hacia atrás para que las muñecas sigan en posición plana. Para reducir la fatiga Respirar - Respire hondo por la nariz. Parpadear - Parpadee a menudo para que no se sequen los ojos. Descansar • 2 o 3 minutos cada 20 minutos • 15 o 20 minutos cada 2 horas. Hauteur Positionnez l’écran du haut légèrement en dessous du niveau du regard. Positionnez le clavier à peu près à la même hauteur que vos coudes, pour que vos poignets soient à plat. Distance Positionnez l’écran à un bras de distance de votre visage, à au moins 508 mm (20 pouces). Positionnez le clavier assez près pour que vos coudes forment un angle de 90°. Angle Inclinez l’écran pour ne pas être ébloui. Inclinez le clavier vers l’arrière de 10° pour que vos poignets soient à plat. Pour réduire la fatigue Respirez - Respirez profondément par votre nez. Clignez des yeux - Clignez souvent des yeux pour ne pas avoir les yeux secs. Faites des pauses • 2 à 3 minutes toutes les 20 minutes • 15 à 20 minutes toutes les 2 heures. Höhe Positionieren Sie die obere Kante des Bildschirms knapp unter Augenhöhe. Positionieren Sie die Tastatur bei flach aufgelegten Handgelenken auf Ellenbogenhöhe. Abstand Positionieren Sie den Bildschirm mindestens eine Armlänge (50 cm) von Ihrem Gesicht entfernt. Positionieren Sie die Tastatur nahe genug, um einen Ellenbogenwinkel von 90 ˚ zu ermöglichen. Winkel Neigen Sie den Bildschirm so, dass ein Spiegeleffekt vermieden wird. Neigen Sei die Tastatur um 10 ° nach hinten, sodass Ihre Handgelenke flach aufliegen. Vermeiden von Ermüdungserscheinungen Atmen - Atmen Sie tief durch die Nase ein und aus. Blinzeln - Blinzeln Sie so oft wie möglich, um trockene Augen zu vermeiden. Pausen • Machen Sie alle 20 Minuten eine Pause von 2-3 Minuten • Machen Sie alle 2 Stunden eine Pause von 15-20 Minuten. Hoogte Zet de bovenkant van het scherm iets boven ooghoogte. Plaats het toetsenbord op ongeveer ellebooghoogte met de polsen plat. Afstand Plaats het scherm op een armlengte van uw gezicht — op ten minste 508 mm (20 in). Zet uw toetsenbord zo dichtbij dat u een hoek van 90° in de ellebogen hebt. Hoek Kantel het scherm om weerspiegeling te elimineren. Kantel het toetsenbord 10° naar achteren, zodat uw polsen plat blijven liggen. Om vermoeidheid te verminderen Ademen - Adem diep door uw neus in en uit. Knipperen - Knipper regelmatig om droge ogen te vermijden. Pauzes nemen • 2 tot 3 minuten elke 20 minuten • 15 tot 20 minuten elke 2 uur. Altezza Posizionare la parte superiore dello schermo leggermente sotto il livello degli occhi. Posizionare la tastiera circa all’altezza dei gomiti, in modo che i polsi siano piatti. Distanza Posizionare lo schermo a un braccio di distanza dal viso, almeno a 20" (508 mm) di distanza. Posizionare la tastiera affinché sia abbastanza vicina da costringere i gomiti a un angolo di 90˚. Angolazione Inclinare lo schermo in modo da eliminare i riflessi. Inclinare la tastiera indietro di 10° in modo che i polsi rimangano piatti. Per ridurre l’affaticamento Respirazione - Respirare profondamente dal naso. Battito delle palpebre - Battere spesso le palpebre per evitare che gli occhi si asciughino. Pause • Fare una pausa di 2 - 3 minuti ogni 20 minuti • Fare una pausa di 15 - 20 minuti ogni 2 ore. 高さ スクリーンの上端が目よりわずかに下に来るようにします。 キーボードが、手首を水平に伸ばした状態でひじとほぼ同じ高さに来るようにします。 距離 スクリーンを顔から腕の長さ分(少なくとも508mm)離します。 ひじが直角になる位置にキーボードを置きます。 角度 反射光をなくすようにスクリーンの角度を調整します。 キーボードを後方に 10° 傾けて、手首が水平になるようにします。 疲れを軽減する方法 呼吸 - 鼻から深く呼吸します。 まばたき - 目の乾燥を防ぐために頻繁にまばたきしてく ださい。 休憩 • 20分ごとに2∼3分 • 2時間ごとに15∼20分 高度 屏幕顶端的位置要稍低于视线高度。 将键盘放置在大约肘部的高度并且手腕要能放平。 距离 将屏幕摆放在距离面部一臂长的位置——至少 508mm (20”)。 键盘的位置要够近,以使肘部形成直角。 角度 倾斜屏幕以消除眩光。 将键盘向后倾斜 10 度,使手腕能保持放平。 为了减轻疲劳 呼吸 - 通过鼻子深呼吸。 眨眼 - 经常眨眼可避免眼睛干涩。 休息 • 每隔 20 分钟休息 2 至 3 分钟 • 每隔 2 小时休息 15 至 20 分钟. Learn more about ergonomic computer use at: Más información sobre el uso ergonómico de ordenadores: Apprenez-en plus sur l’utilisation ergonomique d’un ordinateur sur : Weitere Informationen zur ergonomischen Computernutzung finden Sie unter: Leer meer over ergonomisch computergebruik op: Per ulteriori informazioni sull’uso ergonomico del computer: 人間工学的なコンピュータの使用法については次のサイトを参照してください 想进一步了解以符合人体工程学的方式使用计算机的知识,请访问: www.computingcomfort.org 888-60-503-G-00 rev. C • 12/08 3/14 4 4x 8-32 x 1/4" 3/32" a 4x M4 x 10mm 4x b M4 x 10mm Recessed Empotrado Encastré Aussparung Verzonken Incassata くぼみつき 凹入 우묵하게 설치 5 4x 4x M4 x 20mm 1 2 3 4 WARNING: The monitor will not be securely attached to the 9" Vertical Lift until the Locking Pin passes through the tab on the Quick Release Bracket. Do not leave the monitor unsupported until you are certain the Locking Pin is in place. ADVERTENCIA: El monitor no quedará bien fijado al soporte de pared de 9" mientras no se haya insertado el pasador de bloqueo a través de la lengüeta de la abrazadera de liberación rápida. No suelte el monitor mientras no esté seguro de que el pasador de bloqueo está colocado. AVERTISSEMENT : le moniteur ne sera pas correctement fixé à 9 pouces d’ajustement vertical tant que la tige de blocage ne passe pas à travers la languette sur le support à dégagement rapide. Ne pas laisser le moniteur sans soutien tant que vous n’êtes pas certain que la tige de blocage est en place. WARNUNG: Der Monitor ist erst sicher am 9"-Vertical Lift befestigt, wenn der Sicherungsstift in der Öffnung am der Quick Release-Bügel eingerastet ist. Sichern Sie den Monitor, bis Sie sich vergewissert haben, dass der Sicherungsstift eingerastet ist. WAARSCHUWING: De monitor is pas stevig aan de 9" verticale monitorophanging bevestigd als de veiligheidspin door de opening in de quick release-beugel is gestoken. Laat de monitor niet zonder ondersteuning hangen tot u zeker weer dat de veiligheidspin goed aangebracht is. AVVERTENZA: il monitor non è fissato bene al braccio per sollevamento verticale da 23 cm finché la spina di bloccaggio non è inserita nella linguetta sulla staffa a sbloccaggio rapido. Non lasciare il monitor senza sostegno finché non si è certi che la sp 警告: ロッキングピンがクリックリリースブラケットのタブを貫通していないとモニターは9"縦型リフトにしっかりと固定されません。 ロッキング ピンが確実に貫通するまではモニターを支えなしで放置しないでください。 警告: 必须将锁定销穿过快脱型托架上的接孔,显示器才能安全可靠地安装在 9" 垂直升降支架上。 在确定锁定销已经装入之前,不要让显示器处于 不受支撑的状态。 경고: 잠금 핀이 퀵 릴리스 브래킷의 탭을 통과하기 전까지는 모니터는 9" 수직 리프트에 안전하게 연결되지 않습니다. 잠금 핀이 제자리에 있다는 확신이 들기 전까지는 모니터를 지지하지 않은 상태로 두지 마십시오. 888-60-503-G-00 rev. C • 12/08 6/14 12 Route cables downward Enrute los cables hacia abajo Acheminer les câbles vers le bas Kabelführung nach unten Kabels naar beneden geleiden Disporre i cavi verso il basso ケーブルを下に向かって配線 电缆向下走线 아래쪽에 케이블 정리 Route cables upward Enrute los cables hacia arriba Acheminer les câbles vers le haut Kabelführung nach oben Kabels naar boven geleiden Disporre i cavi verso l’alto ケーブルを上に向かって配線 电缆向上走线 위쪽에 케이블 정리 NOTE: Leave enough slack in the cables for unrestricted movement. NOTE: Leave enough slack in the cables for unrestricted movement. NOTA: Deje suficiente longitud en los cables para que puedan moverse sin restricciones. NOTA: Deje suficiente longitud en los cables para que puedan moverse sin restricciones. REMARQUE : Laissez aux câbles assez de jeu pour pouvoir les manœuvrer sans difficulté. REMARQUE : Laissez aux câbles assez de jeu pour pouvoir les manœuvrer sans difficulté. HINWEIS: Lassen Sie für die Kabel ausreichend Spielraum, um eine uneingeschränkte Bewegung zu ermöglichen. HINWEIS: Lassen Sie für die Kabel ausreichend Spielraum, um eine uneingeschränkte Bewegung zu ermöglichen. OPMERKING: Laat genoeg kabelruimte over voor onbeperkte beweging. OPMERKING: Laat genoeg kabelruimte over voor onbeperkte beweging. NOTA: lasciare sufficienti tratti liberi di cavo affinché il movimento non sia ostacolato. NOTA: lasciare sufficienti tratti liberi di cavo affinché il movimento non sia ostacolato. 注: ケーブルがある程度自由に動くよう、緩めに縛ります。 注: ケーブルがある程度自由に動くよう、緩めに縛ります。 注意: 电缆要足够松驰,以确保移动不受限制。 注意: 电缆要足够松驰,以确保移动不受限制。 Back View Vista trasera Vue arrière Rückansicht Achteraanzicht Vista dalla parte posteriore 背面図 后视图 뒤쪽 Back View Vista trasera Vue arrière Rückansicht Achteraanzicht Vista dalla parte posteriore 背面図 后视图 뒤쪽 888-60-503-G-00 rev. C • 12/08 13/14-
 1
1
-
 2
2
-
 3
3
-
 4
4
-
 5
5
-
 6
6
-
 7
7
-
 8
8
-
 9
9
-
 10
10
-
 11
11
-
 12
12
-
 13
13
-
 14
14


Ergotron StyleView Vertical Lift, Patient Room Guía del usuario
- Categoría
- Soportes de pared para panel plano
- Tipo
- Guía del usuario
En otros idiomas
- français: Ergotron StyleView Vertical Lift, Patient Room Mode d'emploi
- italiano: Ergotron StyleView Vertical Lift, Patient Room Guida utente
- English: Ergotron StyleView Vertical Lift, Patient Room User guide
- Deutsch: Ergotron StyleView Vertical Lift, Patient Room Benutzerhandbuch
- Nederlands: Ergotron StyleView Vertical Lift, Patient Room Gebruikershandleiding
Documentos relacionados
-
Ergotron 33-310-060 Guía del usuario
-
-
-
-
-
-
-
-
Ergotron 45-252-216 Guía de instalación
-