
RM-V7.3-856-604-12 (1). No.1
RM-V7.3-856-604-12 (1). NO.1
Sony Corporation © 1996 Printed in Malaysia
RM-V7
WARNING
This equipment has been tested and found to
comply with the limits for a Class B digital device,
pursuant to Part 15 of the FCC Rules. These limits
are designed to provide reasonable protection
against harmful interference in a residential
installation. This equipment generates, uses, and
can radiate radio frequency energy and, if not
installed and used in accordance with the
instructions, may cause harmful interference to
radio communications. However, there is no
guarantee that interference will not occur in a
particular installation. If this equipment does
cause harmful interference to radio or television
reception, which can be determined by turning the
equipment off and on, the user is encouraged to try
to correct the interference by one or more of the
following measures:
•Reorient or relocate the receiving antenna.
•Increase the separation between the equipment
and receiver.
•Connect the equipment into an outlet on a circuit
different from that to which the receiver is
connected.
•Consult the dealer or an experienced radio/TV
technician for help.
You are cautioned that any changes or
modifications not expressly approved in this
manual could void your authority to operate this
equipment.
About This Remote
Commander
This Remote Commander can operate any of the
following video components. If you’re using this
Commander with a Sony brand TV and a Sony
brand VHS VCR, you won’t need to preset the
Commander before you start using it. However,
you will need to set up the Commander if it cannot
operate even a Sony brand component and you
have a cable box. Each component is assigned a
different button on the Commander:
* You can assign your TV/VCR combo on either of
these buttons.
If You Do Not Have Sony
Components...
You’ll need to follow the instructions in this manual
to preset the Remote Commander with the correct
code numbers for each of your components.
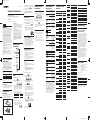
Installing the
Batteries
Slide open the battery compartment and insert two
size AA batteries (not supplied).
Be sure to line up the ] and } on the batteries with
the ] and } on the battery compartment.
5 Press and release the ENT (Enter) button to store
the code number in the Commander’s memory.
6 Go to “Step 2: Checking if the Code Number
Works” to finish setting up.
If you press a wrong button in step 4
Press and release the S (Set) button and then go
back to step 2.
Step 2: Checking if the Code
Number Works
1
Power on the component you want to set up
using the component's power switch.
2 Aim the Remote Commander at the component
and press the POWER button.
The component should power off.
3 When the component powers off, check that the
Commander is operating the other functions of
your component, such as channel and volume
control.
If the Commander Doesn’t
Seem to Be Working...
•First, try repeating these setup procedures using
the other codes listed for your component.
•If – after trying all the codes listed for your
component – you still cannot get the Commander
to work properly, try the search method described
under “Searching for the Correct Code”.
•If you still cannot get the Commander to work
properly, see “Troubleshooting”.
If the Commander Seems to
Be Working Properly...
•You’re finished setting up the Commander for this
component.
•If you’re setting up more than one component (or
a TV/VCR combination), you’ll need to complete
these procedures for each component you plan to
use with the Commander.
•Use the label (supplied) to write down the code
numbers of your components. Then affix the label
to the back of the Commander.
Searching for the Correct
Code
If you’ve tried all the code numbers listed for your
component and you still cannot get the Commander
to work, try these steps.
1 Using the component’s original remote control
(or the power switch on the component itself),
power on/off the component.
Turn the power of the TV or cable box on and
the VCR off.
2 Press and release the S (Set) button.
3 Press the button of the component on the
Commander that you want to set up.
4 Press and release the CH + button. Then press
and release the POWER button.
5 Repeat step 4 until your component powers on/
off.
Pressing CH + and POWER repeatedly will try
every available code until the correct one is
found. Be patient as you do this; it may take 40
or 50 tries until the correct code number is
located.
6 When the power of the TV or cable box goes off
or the power of the VCR comes on, press and
release the ENT (Enter) button to store the code
number in the Commander's memory.
7 Check that the Commander is operating the
other functions of your component. Press the
channel and volume control buttons. If it seems
to be working properly, you’re done setting up
the Commander.
If you still cannot get the Commander to work
properly, see “Troubleshooting”.
Using the Remote
Commander
Turning On/Off a Component
1
Press the button of the component on the
Commander that you want to turn on/off.
2 Point the Commander directly at the
component.
3 Press the POWER button to power on/off the
component.
Note: There may be cases you may turn on/off the
cable box by pressing the CH + or CH – button on
the Commander.
Operating a Component
1 Press the button of the component on the
Commander that you want to operate.
2 Point the Commander directly at the
component.
3 Press the button for the function you want to
use.
See “Remote Button Descriptions” for complete
descriptions of the buttons on the Commander.
Remote
Button
Operates
TV
VCR
TV
VCR
Cable box
TV
VCR
Cable box
VCR
Cable box
TV
TV
VCR
Cable box
TV
VCR
TV
VCR
Cable box
VCR
VCR
VCR
VCR
VCR
VCR
TV
VCR
Cable box
TV
TV
TV
Cable box
TV
Function
Changes the input
mode
Switches the signals
supplied to the TV
(from the antenna or
from the VCR)
Used for setting up the
Commander to operate
your TV, VCR or cable
box
Turns on and off the
component
Use this button to
change to the specific
component that you
want to operate.
Changes the channel.
For example, to go to
channel 5, press 0 and 5
(or, press 5 and ENT.)
You can also change the
channel with CH +/–.
Displays the current
channel on TV
Displays the on-screen
menu (Sony VCR only)
Used with 0-9 buttons
to change channels. For
example, to go to
channel 5, press 5 and
ENT. You can also
change the channel
with CH +/–.
Rewind
Play
Fast-forward
Record
To record, press (
while pressing r. First
release (, then release
r .
Stop
Pause
Channel up: +
Channel down: –
Volume up: +
Volume down: –
Mutes volume on TV
Press again to turn
muting off.
Functions as the JUMP,
FLASHBACK or
CHANNEL RETURN
button, depending on
the TV’s manufacturer.
Used for operating a
Sleep function on TV
(works only for TV with
a Sleep function)
3-856-604-12 (1)
Remote Commander
Operating Instructions
Manual de instrucciones (parte posterior)
Component Code
Numbers
TV and VCR Codes
Cable Box Codes
Brand
Hamlin/Regal
Jerrold/G.I.
Oak
Panasonic
Pioneer
Scientific Atlanta
Tocom
Zenith
Code No.
22, 23, 24, 25, 26
01, 02, 03, 04, 05, 06, 07, 08,
18
27, 28, 29
19, 20, 21
14, 15
09, 10, 11
16, 17
12, 13
Troubleshooting
If you’re having problems
setting up or using the
Remote Commander:
•When setting up the Commander, carefully go
through the procedures described under “Setting
Up the Commander”. If the code that’s listed first
for your component doesn’t work, try all the
codes listed for your component – in the order in
which they’re listed. If all the codes fail to work
(or if your component is not listed in this manual),
try using the procedures under “Searching for the
Correct Code”.
•When setting up the component, if you press the
wrong button, press and release the S (Set) button.
Then enter the correct code number again.
•Check that you’re aiming the Commander directly
at the component, and that there are no
obstructions between the Commander and the
component.
•Make sure the batteries you’re using are not worn
out, and that they’re inserted correctly. Note that
whenever you remove the batteries – to replace
them, for example – the preset codes are erased
from memory and must be reset.
•Check that the component has infrared remote
capability. For example, if your component
didn’t come with a remote, it probably isn’t
capable of being controlled by a Remote
Commander.
Specifications
Operable distance Approx. 7 m (23 ft.) (varies depending
on the component of each
manufacturer)
Power requirements Two size AA batteries (not supplied)
Battery life Approx. 6 months (varies depending
on frequency of use)
Dimensions 67 x 180 x 30 mm (w/h/d)
(2
3
/4 x 7
1
/8 x 1
1
/4 in.)
Mass Approx. 100 g (3.5 oz.) (not including
batteries)
Supplied Accessories
Label (1)
Design and specifications are subject to change without
notice.
It will be useful to write down the code numbers of your
components in the chart above, so that you can refer to
them when registering the code numbers with the
Commander.
Component
TV
Cable Box
VCR
No.
TV/VIDEO
S
POWER
Remote Button
Descriptions
Component
Type
TV
VCR
Cable box
Button
TV*
VCR*
CABLE
Factory
Preset
Sony TV
Sony VHS VCR
–
Notes on Batteries
•Under normal conditions, batteries will last up to
six months. If the Remote Commander does not
operate properly, the batteries might be worn out.
When replacing batteries, replace both of them
with new ones.
•Do not mix old batteries with new ones or mix
different types of batteries together.
•Whenever you remove the batteries – to replace
them, for example – the code numbers you’ve set
are automatically erased and must be reset.
•If the electrolyte inside the battery should leak,
wipe the contaminated area of the battery
compartment with a cloth and replace the old
batteries with new ones. To prevent the
electrolyte from leaking, remove the batteries
when you plan to not use the Commander for a
long period of time.
Setting Up the
Commander
Step 1: Entering the Code
Number
1
Press and release the S (Set) button.
2 Press the button of the component that you
want to set up.
3 Refer to “Component Code Numbers” and find
the two-digit code number for your component.
If more than one code number is listed, use the
number that’s listed first to complete the steps
that follow.
For example, if you’re setting up a Philips VCR,
you would use code number 13.
If your component is not listed, see “Searching
for the Correct Code”.
4 Enter the component’s code number.
For example, if you’re entering the code for a
Philips VCR, you would press and release 1,
then press and release 3.
#
S
VCR CABLE TV
ENT
POWER
#
English
POWER
VOL CH
Press TV,
VCR or
CABLE
Enter code
Aim at your
component
NO
YES
OK?
Done
S
# #
ENT
VCR CABLE TV
POWER
CH
S
ENT
VOL CH
VCR CABLE TV
POWER
VCR
VCR CABLE TV
Your Code Number
CABLE
TV
to
1 9
0
DISP
ENT
)
)
REC
p
P
CH
VOL
MUTING
RECALL
SLEEP
Notes on Using the Remote Commander
•Using this Commander will not increase the
functions of your TV, VCR or cable box. The
functions of the Commander are limited to the
functions of the components themselves. For
example, if your TV does not have a Recall
function, the RECALL button on this Commander
will not function with your TV.
•If your cable box can control volume, be sure to
set its volume switch to a medium position. If the
volume on the cable box is turned down
completely, you will not be able to adjust your
TV’s volume with the Commander.
Brand
Philips
Component
VCR
Code No.
13, 11, 12
Component
VCR
TV
VCR
TV
VCR
TV
VCR
VCR
TV
VCR
TV
VCR
VCR
VCR
TV
TV
VCR
TV
VCR
TV
TV/VCR Combo
TV
VCR
VCR
VCR
TV
TV/VCR Combo
VCR
TV
VCR
VCR
TV
TV/VCR Combo
VCR
TV
TV/VCR Combo
VCR
TV
VCR
VCR
VCR
TV
VCR
TV
VCR
TV
VCR
TV
VCR
TV
TV/VCR Combo
VCR
VCR
VCR
VCR
Code No.
01 (VTR1: Beta)
02 (VTR2: 8 mm)
03 (VTR3: VHS)
01
30
02, 14, 09
41
12
17, 40
33, 46
14, 09, 38
20, 22, 17
03, 12
12, 11
35
18, 35
22, 23, 20, 21
11
07, 41, 12
03, 19, 23
44, 15, 12
35, 36, 03, 41
36 & 44
13
17, 39, 40
07
44, 22, 23, 19, 20,
21, 41
22, 13, 20, 21, 23,
03, 15, 42
21 & 23, 22
33, 37, 38, 36
25
41
32, 07, 12
02, 18, 03, 07
27 & 24, 25
35
03, 13, 12, 30, 46
TV code & 35
11, 07, 08
31, 13, 03, 32
15
12, 11
12, 08, 07, 33, 17,
39, 40
03, 02, 30, 07
17, 47, 48, 49, 39,
40
28, 29
17, 39, 35, 40
33, 13, 03, 23, 34
41, 35, 08, 36, 37,
33, 38
02, 03, 11, 25, 19,
12
13, 11, 12, 10
11, 12, 13, 03, 43,
47
11, 18, 47 & 12, 13
17, 39, 40
35
12, 38
08, 07
Brand
Sony
Admiral
(M.Wards)
Aiwa
AOC
Audio Dynamic
Bell & Howell
(M. Wards)
Brocsonic
Canon
Citizen
Craig
Croslex
Curtis Mathis
Daewoo
Daytron
DBX
Dimensia
Emerson
Fisher
Funai
General Electric
Goldstar
Hitachi
HQ
Instant Replay
JC Penny
JVC
Kenwood
KTV
LXI (Sears)
Magnavox
Marantz
Marta
Memorex
Minolta
Brand
Mitsubishi/MGA
Multitech
NEC
Olympic
Optimus
Panasonic
Pentax
Philco
Philips
Pioneer
Portland
Quasar
Radio Shack
RCA/PROSCAN
Realistic
Sansui
Singer
Samsung
Sanyo
Scott
Sharp
Shintom
Signature 2000
(M. Wards)
Sylvania
Symphonic
Tashiro
Tatung
Teac
Technics
Toshiba
Videch
Wards
Yamaha
Zenith
Component
VCR
TV
VCR
VCR
TV
VCR
VCR
VCR
TV
TV/VCR Combo
VCR
VCR
TV
VCR
TV
VCR
TV
TV
VCR
TV
TV/VCR Combo
TV
VCR
TV
TV/VCR Combo
VCR
VCR
VCR
VCR
TV
TV/VCR Combo
VCR
TV
VCR
TV
VCR
TV
VCR
VCR
TV
VCR
TV
VCR
TV
TV/VCR Combo
VCR
VCR
VCR
VCR
VCR
TV
TV
VCR
TV
VCR
VCR
TV
Code No.
26, 27, 28, 29
24, 03, 12
28, 41, 24
17, 39, 40
03, 12
12, 11
27
09, 10, 11, 12
18, 16, 17, 07, 49
18 & 11, 12
08, 07
11, 12
11, 13, 03
13, 11, 12
11
11
37, 18, 19
03, 08
11, 12, 09, 10, 06
18, 07, 48
18, 48 & 12, 09, 10
02, 12, 24, 23
07, 08, 11, 12, 13,
14, 15, 16
02, 03, 04, 05, 06,
07, 08, 44, 45
18 & 11
12, 33, 31, 38, 27,
41
17
18
25, 16, 24
26, 12, 13, 03
23, 27 & 24, 25, 29
33, 38
25
15, 16, 24, 38, 26,
27, 28, 29
23, 12
30, 31
14, 13, 15
18
41, 30
14, 09
13, 11, 12, 41
11, 12, 03
41
23, 39, 40
23 & 41
35
17, 39, 40
17, 39, 41, 40
12, 11
15, 14
19, 14
31, 03, 12
30, 31, 38, 34, 35
13, 03, 15, 12
33, 17, 39, 40
34
09, 10

RM-V7.3-856-604-12 (1). No.2
RM-V7.3-856-604-12 (1). NO.2
ADVERTENCIA
Este equipo ha sido probado y se ha encontrado que
cumple con los límites para dispositivos digitales de
Clase B, de acuerdo con la Parte 15 de las normas de
la FCC. Estos límites han sido diseñados para
proporcionar una protección razonable contra
interferencias perjudiciales en una instalación
residencial. Este equipo genera, utiliza, y puede
radiar energía de radiofrecuencia y, si no se instala
y utiliza de acuerdo con las instrucciones, puede
causar interferencias perjudiciales en las
radiocomunicaciones. Sin embargo, no existe
ninguna garantía de que tales interferencias no se
produzcan en una instalación particular. Si este
equipo causa interferencias perjudiciales, lo que
podrá determinarse desconectando y volviendo a
conectar su alimentación, se ruega que el usuario
corrija las interferencias tomando una o más de las
medidas siguientes:
•Reorientación o reubicación de la antena
receptora.
•Aumento de la separación entre el equipo y el
receptor.
•Conexión del equipo a un tomacorriente diferente
del utilizado por el receptor.
•Solicitud de ayuda al proveedor o a un técnico de
radio/televisión experimentado.
Tenga en cuenta que cualquier cambio o
modificación no expresamente aprobado en este
manual puede anular su autoridad para utilizar este
equipo.
Acerca de este
telemando
Este telemando podrá controlar cualquiera de los
componentes de vídeo siguientes. Si está utilizando
este telemando con un televisor, una
videograbadora VHS Sony, no necesitará
programarlo antes de comenzar a utilizarlo. Sin
embargo, tendrá que programarlo si no puede
utilizarlo incluso con un componente Sony y posee
un adaptador para cablevisión. Cada componente
tiene asignada una tecla diferente del telemando.
* Usted podrá asignar su combinación de televisor/
videograbadora a cualquiera de estas teclas.
Si no posee componentes
Sony...
Tendrá que seguir las instrucciones de este manual
para programar en el telemando los números de
código correctos para cada uno de sus
componentes.
Colocación de las
pilas
Deslice y abra el compartimiento de las pilas, e
inserte dos pilas de tamaño AA (no suministradas).
Cerciórese de alinear ] y } de las pilas con ] y }
del compartimiento de las mismas.
Notas sobre las pilas
•En condiciones normales, las pilas durarán hasta
seis meses. Si el telemando no funciona
adecuadamente, es posible que las pilas estén
agotadas. Cuando cambie las pilas, reemplace
ambas por otras nuevas.
•No mezcle una pila nueva con otra vieja, ni dos de
tipos diferentes.
•Cuando extraiga las pilas, para reemplazarlas, por
ejemplo, los números de código que haya
almacenado se borrará automáticamente y tendrá
que volver a almacenarlos.
•Si se fuga el electrólito de las pilas, limpie la parte
contaminada del compartimiento de las pilas con
un paño y reemplace las pilas viejas por otras
nuevas. Para evitar la fuga del electrólito, extraiga
las pilas cuando no vaya a utilizar el telemando
durante mucho tiempo.
Si el telemando parece que
no trabaja...
•En primer lugar, repita estos procedimientos
utilizando los otros códigos de la lista para su
componente.
•Si, después de haber probado todos los códigos de
la lista para su componente, el telemando sigue
sin trabajar adecuadamente, pruebe el método de
búsqueda descrito en “Búsqueda del código
correcto”.
•Si el telemando sigue sin trabajar adecuadamente,
consulte “Solución de problemas”.
Si el telemando parece que
trabaja adecuadamente...
•Habrá finalizado la programación del telemando
para este componente.
•Si desea programar más de un componente (o una
combinación de televisor/videograbadora),
tendrá que completar estos procedimientos para
cada uno de los componentes que planee gobernar
con el telemando.
•Utilice la etiqueta (suministrada) para escribir los
números de código de sus componentes. Después
pegue la etiqueta en la parte posterior del
telemando.
Búsqueda del código correcto
Si ha probado todos lo números de código de la
lista para su componente y el telemando sigue sin
trabajar, pruebe estos puntos.
1 Utilizando el telemando original del
componente (o el interruptor de alimentación
del propio componente), conecte/desconecte la
alimentación de tal componente.
Desconecte la alimentación del televisor o del
adaptador para cablevisión y de la
videograbadora.
2 Presione y suelte la tecla S.
3 Presione la tecla del componente que desee
programar.
4 Presione y suelte la tecla CH+. Después
presione y suelte la tecla POWER.
5 Repita el punto 4 hasta que se conecte/
desconecte la alimentación de su componente.
Al presionar repetidamente CH+ y POWER se
probará todos los códigos disponibles hasta
encontrar el correcto. Tenga paciencia cuando
haga esto; es posible que tenga que realizar de
40 a 50 intentos hasta localizar el número de
código correcto.
6 Cuando se desconecte la alimentación del
televisor o del adaptador para cablevisión, o
cuando se conecte la alimentación de la
videograbadora, presione y suelte la tecla ENT
para almacenar el número de código en la
memoria del telemando.
7 Compruebe si el telemando gobierna las demás
funciones de su componente. Presione las
teclas de selección de canal y de control de
volumen. Si parece trabajar adecuadamente,
habrá finalizado la programación del
telemando.
Si el telemando sigue sin trabajar adecuadamente,
consulte “Solución de problemas”.
Tecla del
telemando
Controla
Televisor
Videograbadora
Televisor
Videograbadora
Adaptador
para
cablevisión
Televisor
Videograbadora
Adaptador
para
cablevisión
Videograbadora
Adaptador
para
cablevisión
Televisor
Televisor
Videograbadora
Adaptador
para
cablevisión
Televisor
Videograbadora
Televisor
Videograbadora
Adaptador
para
cablevisión
Videograbadora
Videograbadora
Videograbadora
Videograbadora
Videograbadora
Videograbadora
Televisor
Videograbadora
Adaptador
para
cablevisión
Televisor
Televisor
Adaptador
para
cablevisión
Televisor
Adaptador
para
cablevisión
Televisor
Función
Cambia el modo de
entrada.
Cambia las señales
suministradas al
televisor (desde la
antena o desde la
videograbadora).
Se utiliza para
programar el
telemando para
controlar su televisor,
videograbadora, o
adaptador para
cablevisión.
Conecta y desconecta la
alimentación del
componente.
Utilice esta tecla para
cambiar al componente
específico que desee
controlar.
Cambia el canal. Por
ejemplo, para pasar al
canal 5, presione 0 y 5
(o presione 5 y ENT).
Usted también podrá
cambiar el canal con
CH+/–.
Visualiza el canal actual
en el televisor.
Visualiza el mená en
pantalla
(videograbadora Sony
solamente).
Se utiliza con las teclas
0-9 para cambiar los
canales. Por ejemplo,
para ir al canal 5,
presione 5 y ENT.
Usted también podrá
cambiar el canal con CH
+/–.
Rebobinado
Reproducción
Avance rápido
Grabación
Para grabar, presione
( manteniendo
pulsada r. Suelte en
primer lugar (, y
después r.
Parada
Pausa
Canal superior: +
Canal inferior: –
Aumento del volumen:
+
Reducción del
volumen: –
Silencia el volumen del
televisor.
Para desactivar el
silenciamiento, vuelva a
presionarla.
Funciona como JUMP,
FLASHBACK o
CHANNEL RETURN,
dependiendo del
fabricante del televisor.
Se utiliza para la
función de
cronodesconexión del
televisor (trabaja
solamente para
televisor con función de
cronodesconexión).
Números de código
de componentes
Códigos de televisores y
videograbadoras
Adaptadores para
cablevisión
Marca
Hamlin/Regal
Jerrold/G.I.
Oak
Panasonic
Pioneer
Scientific Atlanta
Tocom
Zenith
Núm. de código
22, 23, 24, 25, 26
01, 02, 03, 04, 05, 06, 07, 08,
18
27, 28, 29
19, 20, 21
14, 15
09, 10, 11
16, 17
12, 13
Solución de
problemas
Si tiene problemas al
programar o utilizar el
telemando:
•Cuando programe el telemando, siga
cuidadosamente los procedimientos descritos en
“Programación del telemando”. Si el primer
código de la lista para su componente no trabaja,
pruebe los demÜL de la lista para dicho
componente, en el orden de la lista. Si no trabaja
ninguno de los códigos (o si su componente no
está en la lista de este manual), pruebe a utilizar el
procedimiento de “Búsqueda del código
correcto”.
•Cuando programe el componente, si presiona una
tecla errónea, presione y suelte la tecla S. Después
introduzca de nuevo el número de código
correcto.
•Compruebe si está apuntando directamente hacia
el componente, y que no haya obstá©ulos entre el
telemando y el componente.
•Cerciórese de que las pilas que está utilizando no
estén agotadas y de que estén insertadas
correctamente. Tenga en cuanta que, cuando
extraiga las pilas, para reemplazarlas, por
ejemplo, los códigos programados se borrarán de
la memoria y tendrá que volver a almacenarlos.
•Compruebe que el componente pueda controlarse
con rayos infrarrojos. por ejemplo, si su
componente no vino con telemando,
probablemente no podrá controlarse con un
telemando.
Especificaciones
Alcance de control Aprox. 7 m (puede variar
dependiendo del fabricante de cada
componente)
Alimentación Dos pilas de tamaño AA (no
suministradas)
Duración de las pilas
Aprox. 6 meses (puede variar
dependiendo de la frecuencia de
utilización)
Dimensiones 67 x 180 x 30 mm (an/al/prf)
Masa Aprox. 100 g (excluyendo las pilas)
Accesorios suministrados
Etiqueta (1)
El diseño y las especificaciones está sujetos a cambio sin
previo aviso.
Esta tabla será muy útil para escribir los números de código
de sus componentes a fin de poder consultarla cuando
introduzca tales números en el telemando.
Utilización del
telemando
Conexión/desconexión de la
alimentación de un
componente
1
Presione la tecla del telemando correspondiente
al componente cuya alimentación desee
conectar/desconectar.
2 Apunte con el telemando hacia el componente.
3 Presione la tecla POWER para conectar/
desconectar la alimentación del componente.
Nota: Es posible que a veces no pueda conectar/
desconectar la alimentación del adaptador para
cablevisión presionando la tecla CH+ o CH– del
telemando.
Control de un componente
1 Presione la tecla del telemando correspondiente
al componente que desee controlar.
2 Apunte con el telemando hacia el componente.
3 Presione la tecla correspondiente a la función
que desee utilizar.
Con respecto a la descripción completa de las
teclas del telemando, consulte “Descripción de
las teclas del telemando”.
Descripción de las
teclas del telemando
Componente
Televisor
Adaptador para cablevisión
Videograbadora
Núm.
TV/VIDEO
Español
Tipo de
componente
Televisor
Videograbadora
Adaptador de
cablevisión
Tecla
TV*
VCR*
CABLE
Ajuste de
fábrica
Televisor Sony
Videograbadora
VHS Sony
–
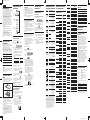
Programación del
telemando
Paso 1: Introducción del
número de código
1
Presione y suelte la tecla S.
2 Presione la tecla del componente que desee
programar.
3 Consulte “Números de código de
componentes” y busque el número de codigo
de dos dígitos de su componente.
Si en la lista hay más de un número de código,
utilice el primero de la lista hasta finalizar los
pasos siguientes.
Por ejemplo, si está programando una
videograbadora Philips, utilice el número de
código 13.
Si su componente no está en la lista, consulte
“Búsqueda del código correcto”.
4 Introduzca el número de código del
componente.
Por ejemplo, para introducir el código para una
videograbadora Philips, presione y suelte 1, y
después presione y suelte 3.
5 Para almacenar el número de código en la
memoria del telemando, presione y suelte la
tecla ENT.
6 para finalizar la programación, vaya al “Paso 2:
Comprobación del funcionamiento de un
número de código”.
Si ha presionado una tecla errónea en el
punto 4
Presione y suelte la tecla S, y vuelva al punto 2.
Paso 2: Comprobación del
funcionamiento de un
número de código
1
Conecte la alimentación del componente que
desea programar utilizando el interruptor de
alimentación del mismo.
2 Apunte con el telemando hacia el componente y
presione la tecla POWER.
La alimentación del componente deberá
desconectarse.
3 Cuando se desconecte la alimentación del
componente, compruebe si el telemando
gobierna las demÜL funciones de su
componente, tales como la selección de canal y
el control de volumen.
#
S
VCR CABLE TV
ENT
POWER
#
Presione TV,
VCR, o
CABLE.
Introduzca
el código
Apunte hacia
su componente.
NO
OK?
Fin
SI
S
S
VCR CABLE TV
ENT
POWER
VOL CH
VCR CABLE TV
POWER
CH
ENT
VOL CH
POWER
VCR CABLE TV
# #
Su número de código
Notas sobre la utilización del telemando
•la utilización de este telemando no aumentará las
funciones de su televisor, videograbadora, ni
adaptador para cablevisión. Las funciones del
telemando estará limitadas a las de los propios
componentes. Por ejemplo, si su televisor no
posee función de invocación, la tecla RECALL de
este telemando no trabajará con su televisor.
•Si su adaptador para cablevisión puede controlar
el volumen, cerciórese de ajustar su control de
volumen a la posición central. Si redujese al
mínimo el volumen del adaptador para
cablevisión, no podría ajustar el volumen del
televisor con el telemando.
S
POWER
CABLE
VCR
TV
VOL
1 9
0
a
DISP
ENT
)
)
REC
p
P
CH
MUTING
RECALL
SLEEP
Componente
VCR
TV
VCR
TV
VCR
TV
VCR
VCR
TV
VCR
TV
VCR
VCR
VCR
TV
TV
VCR
TV
VCR
TV
TV/VCR Combo
TV
VCR
VCR
VCR
TV
TV/VCR Combo
VCR
TV
VCR
VCR
TV
TV/VCR Combo
VCR
TV
TV/VCR Combo
VCR
TV
VCR
VCR
VCR
TV
VCR
TV
VCR
TV
VCR
TV
VCR
TV
TV/VCR Combo
VCR
VCR
VCR
VCR
Núm. de
código
01 (VTR1: Beta)
02 (VTR2: 8 mm)
03 (VTR3: VHS)
01
30
02, 14, 09
41
12
17, 40
33, 46
14, 09, 38
20, 22, 17
03, 12
12, 11
35
18, 35
22, 23, 20, 21
11
07, 41, 12
03, 19, 23
44, 15, 12
35, 36, 03, 41
36 & 44
13
17, 39, 40
07
44, 22, 23, 19, 20,
21, 41
22, 13, 20, 21, 23,
03, 15, 42
21 & 23, 22
33, 37, 38, 36
25
41
32, 07, 12
02, 18, 03, 07
27 & 24, 25
35
03, 13, 12, 30, 46
TV code & 35
11, 07, 08
31, 13, 03, 32
15
12, 11
12, 08, 07, 33, 17,
39, 40
03, 02, 30, 07
17, 47, 48, 49, 39,
40
28, 29
17, 39, 35, 40
33, 13, 03, 23, 34
41, 35, 08, 36, 37,
33, 38
02, 03, 11, 25, 19,
12
13, 11, 12, 10
11, 12, 13, 03, 43,
47
11, 18, 47 & 12, 13
17, 39, 40
35
12, 38
08, 07
marca
Sony
Admiral
(M.Wards)
Aiwa
AOC
Audio Dynamic
Bell & Howell
(M. Wards)
Brocsonic
Canon
Citizen
Craig
Croslex
Curtis Mathis
Daewoo
Daytron
DBX
Dimensia
Emerson
Fisher
Funai
General Electric
Goldstar
Hitachi
HQ
Instant Replay
JC Penny
JVC
Kenwood
KTV
LXI (Sears)
Magnavox
Marantz
Marta
Memorex
Minolta
marca
Mitsubishi/MGA
Multitech
NEC
Olympic
Optimus
Panasonic
Pentax
Philco
Philips
Pioneer
Portland
Quasar
Radio Shack
RCA/PROSCAN
Realistic
Sansui
Singer
Samsung
Sanyo
Scott
Sharp
Shintom
Signature 2000
(M. Wards)
Sylvania
Symphonic
Tashiro
Tatung
Teac
Technics
Toshiba
Videch
Wards
Yamaha
Zenith
Componente
VCR
TV
VCR
VCR
TV
VCR
VCR
VCR
TV
TV/VCR Combo
VCR
VCR
TV
VCR
TV
VCR
TV
TV
VCR
TV
TV/VCR Combo
TV
VCR
TV
TV/VCR Combo
VCR
VCR
VCR
VCR
TV
TV/VCR Combo
VCR
TV
VCR
TV
VCR
TV
VCR
VCR
TV
VCR
TV
VCR
TV
TV/VCR Combo
VCR
VCR
VCR
VCR
VCR
TV
TV
VCR
TV
VCR
VCR
TV
Núm. de
código
26, 27, 28, 29
24, 03, 12
28, 41, 24
17, 39, 40
03, 12
12, 11
27
09, 10, 11, 12
18, 16, 17, 07, 49
18 & 11, 12
08, 07
11, 12
11, 13, 03
13, 11, 12
11
11
37, 18, 19
03, 08
11, 12, 09, 10, 06
18, 07, 48
18, 48 & 12, 09, 10
02, 12, 24, 23
07, 08, 11, 12, 13,
14, 15, 16
02, 03, 04, 05, 06,
07, 08, 44, 45
18 & 11
12, 33, 31, 38, 27,
41
17
18
25, 16, 24
26, 12, 13, 03
23, 27 & 24, 25, 29
33, 38
25
15, 16, 24, 38, 26,
27, 28, 29
23, 12
30, 31
14, 13, 15
18
41, 30
14, 09
13, 11, 12, 41
11, 12, 03
41
23, 39, 40
23 & 41
35
17, 39, 40
17, 39, 41, 40
12, 11
15, 14
19, 14
31, 03, 12
30, 31, 38, 34, 35
13, 03, 15, 12
33, 17, 39, 40
34
09, 10
Marca
Philips
Componente
Videograbadora
Núm. de
código
13, 11, 12
-
 1
1
-
 2
2

