Martin Yale P7400 Manual de usuario
- Categoría
- Máquinas plegables
- Tipo
- Manual de usuario
Este manual también es adecuado para

251 Wedcor Ave. • Wabash, IN 46992
Customer service: (800)225-5644 • www.martinyale.com
11/10/09
IT
Bergheimer Strasse 6-12, D-88677 Markdorf, Germany
www.martinyale.de
*Nota: utilizar el eliminador estático de la compañía Martin Yale (Static Eliminator) - modelo 300 - para quitar la fuerza estática y
aumentar el rendimiento de la máquina. Use Usted el Martin Yale Rubber Roller Cleaner (limpiador de rodillos de goma) (Typ 200)
para aumentar el rendimiento de plegado y la vida útil del rodillo.
TRANSPORTE MANUAL DE CONJUNTOS DE HOJAS (obligatorio al plegar conjuntos de varias hojas de
papel)
1. A fin de prevenir atascos, quitar todo el papel contenido en el dispositivo de
papel antes de ajustar a mano.
2. Para transportar conjuntos de hasta 3 hojas de papel (apiladas o no apiladas),
encuadrar primero el papel golpeando en la superficie de la mesa.
3. Colocar el papel en la ranura para el transporte manual que está en la parte
superior de la máquina (como se muestra en las figuras 13 y 14). No instalar
conjuntos de varias hoja de papel en la bandeja de transporte porque se
producirán atascos.
4. Conecte la plegadora pulsaldo el interruptor de conexión verde grande. El inter-
ruptor se ilumina entonces mostrando que el aparato se encuentra listo para el
servicio. Pulse la tecla I del interruptor basculante I-O. La plegadora se para
durante un lapso después de que se halla retirado el papel de ella. No hacer fun-
cionar la máquina por largo tiempo sin tener papel en la bandeja de papel, esto
desgastaría el anillo de goma de transporte. NOTA: es posible que la pila de
papel se arrugue debido al espesor del conjunto de varias hojas de papel.
Corregir moviendo hacia fuera el tope para la primera bandeja de plegado unos
1/8". Por ejemplo, si la primera bandeja de plegado está ajustada a 7 3/8" para
plegar cartas, el usuario deberá reajustar a 7 ½" para el conjunto de varias hojas.
ATASCOS DE PAPEL
1. Desenchufar la máquina. Comprobar si es posible solucionar el atasco quitando una de las bandejas de plegado.
2. En caso contrario, es decir si no se puede eliminar el atasco de este modo, utilizar un destornillador de cabeza plana para girar
a mano los rodillos de plegado, empleando el orificio de acceso en el lado izquierdo de la máquina. Es posible que el papel
sobresalga de la máquina.
3. Usted tiene que retirar la cubierta de plástico superior para extraer el papel atascado.
ELIMINACION DE ERRORES
PROBLEMA: Atascos de papel en la máquina.
SOLUCION: 1. Si el transporte es manual, asegurarse de que no hay papel en la bandeja de papel.
2. Realinear las guías de papel y verificar los ajustes de la mesa de plegado.
3. Comprobar si el papel corresponde a las especificaciones (8 1/2" ó A4, 16-28 libras por pila ó 60-105 g/m²).
4. Retirar la cubierta superior y limpiar los rodillos con el limpiador de rodillos de goma de la compañía Martin Yale
(Rubber Roller Cleaner) - modelo 200 -.
5. Utilizar el eliminador estático de la compañía Martin Yale (Static Eliminator) - modelo 300 -.
PROBLEMA: El papel no se transporta correctamente.
SOLUCION: 1. Las guías de papel demasiado apretadas o no paralelas una con respecto a la otra. Ajustar las guías de papel
como descrito en la sección Alinear las guías de papel de esta documentación.
2. En el caso de transporte manual, asegurarse de que el papel está alineado apropiadamente antes de colocar-
lo en la ranura.
3. En el caso de transporte manual, colocar el conjunto de varias hojas en la ranura antes de enchufar la máquina.
4. Realinear las guías de papel.
5. Comprobar si el papel corresponde a las especificaciones (8 1/2" ó A4, 16-28 libras por pila ó 60-105 g/m²).
6. Verificar si el anillo de goma está desgastado. Reemplazar.
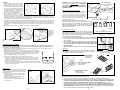
Colocar la pila de
hojas de papel aquí
Fig. 12
Nota: el papel
está puesto en
forma encuadra-
da. El papel no
está desplegado
La plegadora trans-
porta el folio de arri-
ba. Sólo el folio de
arriba deberá estar
en contacto con la
rueda de transporte
Fig. 13
Vista lateral del papel cargado
Ranura para el
transporte manual
utilizada para con-
juntos de varias
hojas de papel
RapidFold
Fig. 14
SPECIFICATIONS
• Folds 8.5” x 11”, 8.5” x 14”, or A4
size paper
• Creates four different folds
• Operates at a speed of 4000
sheets/hr
• Accepts 16-28 lb. bond paper
(60-105 gsm)
• Folds 1 sheet at a time automati-
cally, or up to
3 sheets at a time manually
• Automatic shut off
• Automatic jam detection
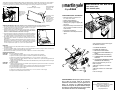
Your P7400 comes with the following components:
A. RapidFold Folding Machine
B. Paper Guides (2)
C. Front Fold Table
D. Back Fold Table (hidden from
view)
E. Metal Brackets (2)
F. DC Power Supply
G. Exit Tray Connector Set (3)
(exit tray connectors contain
3 top plastic pieces,
3 bottom plastic pieces, and
6 connector screws)
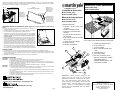
INSTRUCTION MANUAL
Model P7400 (110V)
Model P740022 (220V)
RapidFOLD
D
WARNING! Never connect power to the
folder until you are ready to set up and
operate the machine. During set up, opera-
tion, and maintenance keep hands, hair,
loose clothing, and jewelry away from all
moving parts. Serious bodily injury could
result. Service or disassembly of folder
should only be attempted with the power
disconnected.
Manufactured in Taiwan for:
Martin Yale Industries, Inc.
251 Wedcor Avenue • Wabash, IN 46992
e-mail: [email protected]
webseite: www.martinyale.com
Fax (260) 563-4575
E
G
C
A
B
F
Instructions de service
Modèle P7400 (110V)
Modèle P740022 (220V)
Manual de instrucciones
Modelo P7400 (110V)
ModeloP740022 (220V)

Excepción: al hacer un plegado simple, la bandeja de
plegado trasera se meterá con el extremo cerrado
primero. Ver abajo la sección de Plegado Simple).
NOTA: a muchos usuarios les parece más fácil insta-
lar las bandejas de plegado mirándolas desde la parte
inferior (como se ve en la figura 8).
COMO
AJUSTAR LAS BANDEJAS DE PLEGADO
Nota: la plegadora rápida RAPIDFOLD
TM
(versión de
110 voltios) sale de fábrica con un ajuste previo para
plegar hojas de papel con un formato de 8 1/2" x 11"
para un plegado apropiado para sobres estándares de
negocios. Las máquinas de 230 voltios (Europa, incl.
Gran Bretaña) salen de fábrica con un ajuste previo
para plegar hojas de papel con un formato A4.
Antes de intentar ajustar la P7400 para plegar de un modo
diferente al ajustado en fábrica, es imprescindible comprender los
diferentes tipos de plegados (ver figura 9 con ejemplo de los diversos
plegados típicos y sus iconos correspondientes). Un plegado simple
requiere solamente el ajuste y uso de la primera bandeja de plegado.
Todos los otros plegados requieren el ajuste y uso de ambas bandejas
de plegado.
Oper
ación de plegado doble
Todas las operaciones de plegado, a parte del plegado simple,
requieren por lo menos dos bandejas de plegado puestos en las hojas
de papel. Por ejemplo el plegado en la carta típica o en el plegado en
zigzag (o en Z). La segunda bandeja de plegado deberá estar en la
posición de plegado doble (posicionar como recibida) para realizar estos plegados.
Proceda como sigue para crear los diferentes tipos de plegados:
1. Aflojar ambos botones de bloqueo que se hallan en ambas bandejas de plegado
para soltar los topes de papel.
2. Localizar los iconos en las regletas de la bandeja de plegado donde se indica el
tipo de plegado que el usuario desea.
3. Mover los topes de papel hacia las flechas correspondientes junto a los iconos
deseados.
Indicación: los iconos de los tamaños de papel estándar se han codificado
cromáticamente. El icono del papel de 8 ½" x 11 " es amarillo, el del papel de
8 ½" x 14" es rosa y el del papel A4 es azul.
4. Apretar los botones de bloqueo para los topes de papel hacia abajo para bloquear
los topes de papel en posición.
Plegado simple
A fin de ajustar la máquina para un plegado simple, se ha de retirar la bandeja de
plegado trasera, darle la vuelta y volverla a insertar (extremo cerrado primero), ver
figura 11. Ajustar la bandeja de plegado frontal como descrito en paso 3 arriba.
TRANSPORTE AAUTOMATICO DDE HHOJAS SSUELTAS
Proceda como sigue para transportar perfecta y automáticamente el papel:
1. Encuadrar una pila de hasta 50 hojas de papel golpeándola por todos los lados sobre una superficie plana como la de una mesa.
2. Cargar la pila encuadrada de hojas de papel en la bandeja de transporte P7400, la hoja de arriba de papel deberá estar en con-
tacto con el anillo negro de goma de transporte. NOTA: al cargar el papel, la pila de hojas de papel tiene que "empujarse" sola-
mente en el mecanismo de transporte con unligero toque. Colocar la pila de papel utilizando la fuerza causa problemas de trans-
porte. Ver figuras 12 y 13.
3. Conecte la plegadora pulsaldo el interruptor de conexión verde grande. INDICACION: la plegadora funciona un momento
entonces en fase de calentamiento (esto es, si pulsa Usted el interruptor verde), se trata por lo tanto de algo normal y no sig-
nifica que tenga lugar una perturbación eléctrica. Tan pronto como el aparato se encuentre dispuesto para el servicio, lo cual se
señaliza por medio de la luz verde del interruptor, puede pulsar Usted la tecla I del interruptor basculante I-O para iniciar el ser-
vicio de plegado.
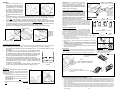
Entalladuras frontales sobre ban-
dejas de plegado van alrededor
de los pins
Varilla de unión de
color plata
Recortes en las
bandejas de ple-
gados se apoyan
sobre la parte
superior de las
varillas de unión
Fig. 8
Vista inferior de la bandeja de plegado instalada
DOBLE
PARALELO
En ZIGZAGSIMPLE
CARTA
Fig. 9
Tipos posibles de plegado en la P7400
Fig. 10
Ejemplo del ajuste de un PLEGADO EN
ZIGZAG para una carta de los EE.UU.
con un papel de formato 8,5" X 11".
U.S.
8½" 8½"
X 14" X 11"
Escala
metrica A4
1. Sacar la bandeja de plegado trasera
levantar y empujar fuera de la máquina
2. Dar la vuelta a la bandeja los
botones deberán estar mirando
hacia arriba
3. Volver a insertar en la máquina
extremo cerrado primero, botones siguen mirando
hacia arriba
Fig. 111
11
ASSEMBLY
1. Remove the black plastic nuts and
clear spacers from the paper guides.
Insert the paper guides into the paper
tray as shown in Fig. 1. Once insert-
ed, install the clear spacers on the
paper guides. Screw the nuts back
onto the paper guides and tighten.
The paper guides should now be
attached to the machine as shown in
Fig. 2.
2. To assemble the exit tray, you will need a #2 Philips screwdriver, the two (2) metal brackets, and the three
(3) exit tray connector sets. Assemble each exit tray connector set onto the metal brackets as shown in
Fig. 3. Hint:
It may be easier to assemble the middle connector set first, as noted below.
3. The assembled exit tray should fit underneath the machine (Fig. 4). It does not snap into place, the weight
of the machine will hold it in position. Push the tray so it is against the tabletop
. Many users find it easi-
er to attach the first connector to one (1) metal bracket and screw halfway together. The other metal brack-
et may then be installed to the plastic connector and screwed together completely.
4. Insert the DC power supply plug into the back of the machine, and then into an electrical outlet.
ALIGNING
THE PAPER GUIDES
NOTE: Paper guide placement is a critical and often overlooked factor in machine set-up.
Please follow the instructions below carefully to assure trouble free paper feeding.
1. Loosen the 4 plastic thumbscrews under the feed table (see Fig. 1 for thumbscrew location) to loosen
paper guides.
2. For standard U.S. 8 1/2” X 11” and 8 1/2” X 14” legal paper, move both
paper guides in so that their inside edges align with the straight marks on
the feed table denoted LS (see Fig. 5 for mark location). For A4 paper, align
the outside edges of the paper guides with the straight marks denoted A4.
Tighten both thumbscrews (Note: Do not over tighten thumbscrews).
3. Slide a single piece of paper between the paper guides, check for:
a. Pinching - the paper should slide freely between the paper guides with
a small amount of clearance to feed freely. Loosen thumbscrews and
adjust paper guides if necessary to correct. Setting the paper guides too
tight will result in feed hesitation.
b. Skewing - the paper should be exactly square to the feeding roller.
Loosen thumbscrews and adjust paper guides if necessary to correct.
F
old Tables
The front and back fold tables should come already
inserted in the machine. If you need to remove them
for jam removal, insert them back into the machine as
shown in Fig. 6 & 7.
• Slots on the ends of both fold tables fit onto the
two (2) silver colored fold table pins inside the
machine (Fig. 8).
• The fold tables should rest on top
of the silver tie
rods (see Fig. 8).
• The tables should go into the machine open end
first.
Fig. 1
Fig. 2
Fig . 4
Fig . 3
Assemble this Set first
Position this
set near the
front of the
Exit Tray for
better stack-
ing
LS
LS
Fig . 5
Paper Guides Aligned to
LS Marks
Fig . 6
FRONT FOLD TABLE
Fig . 7
BACK FOLD TABLE
2
La página se está cargando...

4
Especificaciones
• Plegados 8,5" x 11", 8.5” x 14” o for-
mato A4 de papel
• Produce cuatro plegados diferentes
• Opera a una velocidad de 4000
hojas/hora
• Acepta hojas apiladas de papel de
16-28 libras (60-105 g/m²)
• Pliega 1 hoja de una vez automática-
mente o hasta 3 hojas
de una vez manualmente
• Cierre automático
• Reconocimiento automático de atas-
camiento de hojas
Su máquina P7400 se entrega con los
siguientes componentes:
A. PLEGADORA RÁPIDA RAPIDFOLD
B. GUÍAS DE PAPEL (2)
C. BANDEJA FRONTAL DE PLEGA-
DO
D. BANDEJA TRASERA DE PLEGA-
DO (no visible)
E. ESTRIBOS DE METAL (2)
F. SUMINISTRO DE CORRIENTE
CONTINUA
G. JUEGO DE CONECTADORES DEL
DISPOSITIVO DE SALIDA (3)
(los conectadores del dispositivo de
salida contienen
3 piezas de plástico superiores,
3 piezas de plástico inferiores y
6 tornillos de conectador)
Manual de instrucciones
Modelo P7400 (110V)
ModeloP740022 (220V)
RapidFOLD
¡Atención! No conecte nunca la plegadora
hasta haber leído y comprendido el ajuste y el
funcionamiento de la máquina. Durante el
ajuste, el funcionamiento y el mantenimiento
mantenga fuera de alcance de piezas móviles
las manos, el pelo así como ropa suelta y
joyas. En caso contrario es posible que se
produzcan graves heridas. Los trabajos de
servicio y desmontaje se deberán realizar
únicamente con la plegadora desconectada.
Fabricado en Taiwan por:
Martin Yale Industries, Inc.
251 Wedcor Avenue • Wabash, IN 46992
e-mail: [email protected]
Página Web: www.martinyale.com
Fax (260) 563-4575
*Note: Use Martin Yale Static Eliminator (model 300) to remove static and improve machine performance. Also
use Martin Yale Rubber Roller Cleaner (model 200) for better folding performance and longer roller life.
HAND FEEDING OF SETS (Mandatory when folding multiple sheet sets of paper)
1. To prevent jams, remove all paper from the paper tray before feeding
sets by hand.
2. For feeding sets of up to 3 sheets (stapled or unstapled), first square
the paper against a tabletop.
3. Place the paper into the manual feed slot on the top of the machine
(as shown in Fig. 13 & 14). Do not install multiple sheet sets in
the feed table; a jam will result.
4. Turn folder power on by pushing the large green pushbutton switch.
The pushbutton will illuminate to indicate a power on condition.
Press the I portion of the I-O rocker switch. The folder will stop run-
ning a few moments after the paper clears the folder.
5. Do not run machine for long periods of time without paper in the
paper tray, this could wear down the feed tire. HINT: Creasing of the
stock may be encountered due to the thickness of multiple sheet
sets. Correct this by moving the 1st fold table stop out approximate-
ly 1/8”. For example, if the 1st fold table were set at 7 3/8” for a letter fold, the user would reset it to 7 1/2” for
the multiple sheet set.
PAPER JAMS
1. Unplug the machine. Check to see if you can clear the jam by removing one of the fold tables.
2. If you cannot remove the jam, use a flathead screwdriver to manually turn the folding rollers, using the access
hole in the left side of the machine. The paper should eventually emerge from the machine.
3. You may need to remove the top plastic cover to extract the jammed paper.
TROUBLESHOOTING
PROBLEM
: The paper jams in the machine.
SOLUTION : 1. If feeding by hand, make sure there is no paper in the paper tray.
2. Re-align the paper guides and check fold table settings.
3. Check to see if paper is within specifications (81/2” x 11” or A4, 16-28 lb. bond or 60-105 gsm).
4. Remove top cover and clean rollers with Martin Yale Rubber Roller Cleaner (model 200).
5. Use Martin Yale Static Eliminator (model 300) to remove static in paper.
PROBLEM: Paper will not feed correctly.
SOLUTION: 1. Paper guides too tight or not parallel to each other. Adjust the paper guides as described in
Aligning the Paper Guides section of this instruction manual.
2. If feeding by hand, make sure the paper is properly aligned before placing it in the slot.
3. If feeding by hand, place the set in the slot before turning the machine on.
4. Re-align the paper guides.
5. Check to see if paper is within specifications (81/2” x 11” or A4, 16-28 lb. bond or 60-105 gsm).
6. The feed tire could be worn. Replace.
Place stack of
paper here
Fig 12
Note: Paper is
placed in folder
square. Paper
is not fanned
Folder feeds the
top sheet. Only
the top sheet of
paper should be
in contact with
feed wheel
Fig 13
Side view of paper loaded
Manual feed slot
used for multiple
sheet sets of
paper.
RapidFold
Fig 14
4
D
E
G
C
A
B
F
La página se está cargando...
La página se está cargando...
Transcripción de documentos
*Nota: utilizar el eliminador estático de la compañía Martin Yale (Static Eliminator) - modelo 300 - para quitar la fuerza estática y aumentar el rendimiento de la máquina. Use Usted el Martin Yale Rubber Roller Cleaner (limpiador de rodillos de goma) (Typ 200) para aumentar el rendimiento de plegado y la vida útil del rodillo. Fig. 12 Ranura para el transporte manual utilizada para conjuntos de varias hojas de papel Fig. 13 Vista lateral del papel cargado Colocar la pila de hojas de papel aquí Nota: el papel está puesto en forma encuadrada. El papel no está desplegado La plegadora transporta el folio de arriba. Sólo el folio de arriba deberá estar en contacto con la rueda de transporte TRANSPORTE MANUAL DE CONJUNTOS DE HOJAS (obligatorio al plegar conjuntos de varias hojas de papel) 1. A fin de prevenir atascos, quitar todo el papel contenido en el dispositivo de papel antes de ajustar a mano. 2. Para transportar conjuntos de hasta 3 hojas de papel (apiladas o no apiladas), encuadrar primero el papel golpeando en la superficie de la mesa. 3. Colocar el papel en la ranura para el transporte manual que está en la parte superior de la máquina (como se muestra en las figuras 13 y 14). No instalar conjuntos de varias hoja de papel en la bandeja de transporte porque se producirán atascos. 4. Conecte la plegadora pulsaldo el interruptor de conexión verde grande. El interruptor se ilumina entonces mostrando que el aparato se encuentra listo para el servicio. Pulse la tecla I del interruptor basculante I-O. La plegadora se para durante un lapso después de que se halla retirado el papel de ella. No hacer funcionar la máquina por largo tiempo sin tener papel en la bandeja de papel, esto desgastaría el anillo de goma de transporte. NOTA: es posible que la pila de Fig. 14 papel se arrugue debido al espesor del conjunto de varias hojas de papel. Corregir moviendo hacia fuera el tope para la primera bandeja de plegado unos 1/8". Por ejemplo, si la primera bandeja de plegado está ajustada a 7 3/8" para plegar cartas, el usuario deberá reajustar a 7 ½" para el conjunto de varias hojas. Rapid Fold ATASCOS DE PAPEL 1. Desenchufar la máquina. Comprobar si es posible solucionar el atasco quitando una de las bandejas de plegado. 2. En caso contrario, es decir si no se puede eliminar el atasco de este modo, utilizar un destornillador de cabeza plana para girar a mano los rodillos de plegado, empleando el orificio de acceso en el lado izquierdo de la máquina. Es posible que el papel sobresalga de la máquina. 3. Usted tiene que retirar la cubierta de plástico superior para extraer el papel atascado. ELIMINACION DE ERRORES PROBLEMA: Atascos de papel en la máquina. SOLUCION: 1. Si el transporte es manual, asegurarse de que no hay papel en la bandeja de papel. 2. Realinear las guías de papel y verificar los ajustes de la mesa de plegado. 3. Comprobar si el papel corresponde a las especificaciones (8 1/2" ó A4, 16-28 libras por pila ó 60-105 g/m²). 4. Retirar la cubierta superior y limpiar los rodillos con el limpiador de rodillos de goma de la compañía Martin Yale (Rubber Roller Cleaner) - modelo 200 -. 5. Utilizar el eliminador estático de la compañía Martin Yale (Static Eliminator) - modelo 300 -. PROBLEMA: El papel no se transporta correctamente. SOLUCION: 1. Las guías de papel demasiado apretadas o no paralelas una con respecto a la otra. Ajustar las guías de papel como descrito en la sección Alinear las guías de papel de esta documentación. 2. En el caso de transporte manual, asegurarse de que el papel está alineado apropiadamente antes de colocarlo en la ranura. 3. En el caso de transporte manual, colocar el conjunto de varias hojas en la ranura antes de enchufar la máquina. 4. Realinear las guías de papel. 5. Comprobar si el papel corresponde a las especificaciones (8 1/2" ó A4, 16-28 libras por pila ó 60-105 g/m²). 6. Verificar si el anillo de goma está desgastado. Reemplazar. 251 Wedcor Ave. • Wabash, IN 46992 Customer service: (800)225-5644 • www.martinyale.com TI Bergheimer Strasse 6-12, D-88677 Markdorf, Germany www.martinyale.de 11/10/09 INSTRUCTION MANUAL Model P7400 (110V) Model P740022 (220V) RapidFOLD Instructions de service Modèle P7400 (110V) Modèle P740022 (220V) Manual de instrucciones Modelo P7400 (110V) ModeloP740022 (220V) SPECIFICATIONS • Folds 8.5” x 11”, 8.5” x 14”, or A4 size paper • Creates four different folds • Operates at a speed of 4000 sheets/hr • Accepts 16-28 lb. bond paper (60-105 gsm) • Folds 1 sheet at a time automatically, or up to Your P7400 comes with the following components: 3 sheets at a time manually • Automatic shut off A. RapidFold Folding Machine • Automatic jam detection B. Paper Guides (2) C. Front Fold Table B D. Back Fold Table (hidden from A view) E. Metal Brackets (2) F. DC Power Supply D G. Exit Tray Connector Set (3) (exit tray connectors contain 3 top plastic pieces, 3 bottom plastic pieces, and 6 connector screws) C F G E WARNING! Never connect power to the folder until you are ready to set up and operate the machine. During set up, operation, and maintenance keep hands, hair, loose clothing, and jewelry away from all moving parts. Serious bodily injury could result. Service or disassembly of folder should only be attempted with the power disconnected. Manufactured in Taiwan for: Martin Yale Industries, Inc. 251 Wedcor Avenue • Wabash, IN 46992 e-mail: [email protected] webseite: www.martinyale.com Fax (260) 563-4575 ASSEMBLY 1. Remove the black plastic nuts and clear spacers from the paper guides. Insert the paper guides into the paper tray as shown in Fig. 1. Once inserted, install the clear spacers on the paper guides. Screw the nuts back onto the paper guides and tighten. The paper guides should now be Fig. 1 Fig. 2 attached to the machine as shown in Fig. 2. 2. To assemble the exit tray, you will need a #2 Philips screwdriver, the two (2) metal brackets, and the three (3) exit tray connector sets. Assemble each exit tray connector set onto the metal brackets as shown in Fig. 3. Hint: It may be easier to assemble the middle connector set first, as noted below. 3. The assembled exit tray should fit underneath the machine (Fig. 4). It does not snap into place, the weight of the machine will hold it in position. Push the tray so it is against the tabletop. Many users find it easier to attach the first connector to one (1) metal bracket and screw halfway together. The other metal bracket may then be installed to the plastic connector and screwed together completely. 4. Insert the DC power supply plug into the back of the machine, and then into an electrical outlet. Fig . 3 Position this set near the front of the Exit Tray for better stacking Fig . 4 Assemble this Set first ALIGNING THE PAPER GUIDES NOTE: Paper guide placement is a critical and often overlooked factor in machine set-up. Please follow the instructions below carefully to assure trouble free paper feeding. 1. Loosen the 4 plastic thumbscrews under the feed table (see Fig. 1 for thumbscrew location) to loosen paper guides. 2. For standard U.S. 8 1/2” X 11” and 8 1/2” X 14” legal paper, move both paper guides in so that their inside edges align with the straight marks on the feed table denoted LS (see Fig. 5 for mark location). For A4 paper, align the outside edges of the paper guides with the straight marks denoted A4. Tighten both thumbscrews (Note: Do not over tighten thumbscrews). 3. Slide a single piece of paper between the paper guides, check for: LS LS a. Pinching - the paper should slide freely between the paper guides with a small amount of clearance to feed freely. Loosen thumbscrews and adjust paper guides if necessary to correct. Setting the paper guides too Fig . 5 tight will result in feed hesitation. Paper Guides Aligned to b. Skewing - the paper should be exactly square to the feeding roller. LS Marks Loosen thumbscrews and adjust paper guides if necessary to correct. Fold Tables The front and back fold tables should come already inserted in the machine. If you need to remove them for jam removal, insert them back into the machine as shown in Fig. 6 & 7. • Slots on the ends of both fold tables fit onto the two (2) silver colored fold table pins inside the machine (Fig. 8). • The fold tables should rest on top of the silver tie rods (see Fig. 8). • The tables should go into the machine open end first. Entalladuras frontales sobre bandejas de plegado van alrededor de los pins COMO AJUSTAR LAS BANDEJAS DE PLEGADO Nota: la plegadora rápida RAPIDFOLDTM (versión de 110 voltios) sale de fábrica con un ajuste previo para plegar hojas de papel con un formato de 8 1/2" x 11" para un plegado apropiado para sobres estándares de negocios. Las máquinas de 230 voltios (Europa, incl. Gran Bretaña) salen de fábrica con un ajuste previo para plegar hojas de papel con un formato A4. Antes de intentar ajustar la P7400 para plegar de un modo diferente al ajustado en fábrica, es imprescindible comprender los diferentes tipos de plegados (ver figura 9 con ejemplo de los diversos plegados típicos y sus iconos correspondientes). Un plegado simple requiere solamente el ajuste y uso de la primera bandeja de plegado. Todos los otros plegados requieren el ajuste y uso de ambas bandejas de plegado. Varilla de unión de color plata Recortes en las bandejas de plegados se apoyan sobre la parte superior de las varillas de unión Fig. 8 Vista inferior de la bandeja de plegado instalada SIMPLE En ZIGZAG DOBLE CARTA PARALELO Operación de plegado doble Todas las operaciones de plegado, a parte del plegado simple, Fig. 9 requieren por lo menos dos bandejas de plegado puestos en las hojas Tipos posibles de plegado en la P7400 de papel. Por ejemplo el plegado en la carta típica o en el plegado en zigzag (o en Z). La segunda bandeja de plegado deberá estar en la U.S. Escala posición de plegado doble (posicionar como recibida) para realizar estos plegados. 8½" 8½" metrica A4 Proceda como sigue para crear los diferentes tipos de plegados: X 14" X 11" 1. Aflojar ambos botones de bloqueo que se hallan en ambas bandejas de plegado para soltar los topes de papel. 2. Localizar los iconos en las regletas de la bandeja de plegado donde se indica el tipo de plegado que el usuario desea. 3. Mover los topes de papel hacia las flechas correspondientes junto a los iconos deseados. Indicación: los iconos de los tamaños de papel estándar se han codificado cromáticamente. El icono del papel de 8 ½" x 11 " es amarillo, el del papel de 8 ½" x 14" es rosa y el del papel A4 es azul. 4. Apretar los botones de bloqueo para los topes de papel hacia abajo para bloquear los topes de papel en posición. Plegado simple A fin de ajustar la máquina para un plegado simple, se ha de retirar la bandeja de plegado trasera, darle la vuelta y volverla a insertar (extremo cerrado primero), ver figura 11. Ajustar la bandeja de plegado frontal como descrito en paso 3 arriba. 2. Dar la vuelta a la bandeja los botones deberán estar mirando hacia arriba Fig. 10 Ejemplo del ajuste de un PLEGADO EN ZIGZAG para una carta de los EE.UU. con un papel de formato 8,5" X 11". Fig. 111 1. Sacar la bandeja de plegado trasera levantar y empujar fuera de la máquina 3. Volver a insertar en la máquina extremo cerrado primero, botones siguen mirando hacia arriba Fig . 6 FRONT FOLD TABLE Fig . 7 BACK FOLD TABLE 2 Excepción: al hacer un plegado simple, la bandeja de plegado trasera se meterá con el extremo cerrado primero. Ver abajo la sección de Plegado Simple). NOTA: a muchos usuarios les parece más fácil instalar las bandejas de plegado mirándolas desde la parte inferior (como se ve en la figura 8). TRANSPORTE AUTOMATICO DE HOJAS SUELTAS Proceda como sigue para transportar perfecta y automáticamente el papel: 1. Encuadrar una pila de hasta 50 hojas de papel golpeándola por todos los lados sobre una superficie plana como la de una mesa. 2. Cargar la pila encuadrada de hojas de papel en la bandeja de transporte P7400, la hoja de arriba de papel deberá estar en contacto con el anillo negro de goma de transporte. NOTA: al cargar el papel, la pila de hojas de papel tiene que "empujarse" solamente en el mecanismo de transporte con unligero toque. Colocar la pila de papel utilizando la fuerza causa problemas de transporte. Ver figuras 12 y 13. 3. Conecte la plegadora pulsaldo el interruptor de conexión verde grande. INDICACION: la plegadora funciona un momento entonces en fase de calentamiento (esto es, si pulsa Usted el interruptor verde), se trata por lo tanto de algo normal y no significa que tenga lugar una perturbación eléctrica. Tan pronto como el aparato se encuentre dispuesto para el servicio, lo cual se señaliza por medio de la luz verde del interruptor, puede pulsar Usted la tecla I del interruptor basculante I-O para iniciar el servicio de plegado. 11 *Note: Use Martin Yale Static Eliminator (model 300) to remove static and improve machine performance. Also use Martin Yale Rubber Roller Cleaner (model 200) for better folding performance and longer roller life. Fig 12 Place stack of paper here Manual de instrucciones Manual feed slot used for multiple sheet sets of paper. Fig 13 Side view of paper loaded Note: Paper is placed in folder square. Paper is not fanned Folder feeds the top sheet. Only the top sheet of paper should be in contact with feed wheel HAND FEEDING OF SETS (Mandatory when folding multiple sheet sets of paper) 1. To prevent jams, remove all paper from the paper tray before feeding sets by hand. 2. For feeding sets of up to 3 sheets (stapled or unstapled), first square the paper against a tabletop. 3. Place the paper into the manual feed slot on the top of the machine (as shown in Fig. 13 & 14). Do not install multiple sheet sets in the feed table; a jam will result. 4. Turn folder power on by pushing the large green pushbutton switch. The pushbutton will illuminate to indicate a power on condition. Press the I portion of the I-O rocker switch. The folder will stop running a few moments after the paper clears the folder. 5. Do not run machine for long periods of time without paper in the Fig 14 paper tray, this could wear down the feed tire. HINT: Creasing of the stock may be encountered due to the thickness of multiple sheet sets. Correct this by moving the 1st fold table stop out approximately 1/8”. For example, if the 1st fold table were set at 7 3/8” for a letter fold, the user would reset it to 7 1/2” for the multiple sheet set. Rapid Fold Modelo P7400 (110V) ModeloP740022 (220V) RapidFOLD Especificaciones • Plegados 8,5" x 11", 8.5” x 14” o formato A4 de papel • Produce cuatro plegados diferentes • Opera a una velocidad de 4000 hojas/hora • Acepta hojas apiladas de papel de 16-28 libras (60-105 g/m²) • Pliega 1 hoja de una vez automáticamente o hasta 3 hojas de una vez manualmente • Cierre automático • Reconocimiento automático de atascamiento de hojas B PAPER JAMS 1. Unplug the machine. Check to see if you can clear the jam by removing one of the fold tables. 2. If you cannot remove the jam, use a flathead screwdriver to manually turn the folding rollers, using the access hole in the left side of the machine. The paper should eventually emerge from the machine. 3. You may need to remove the top plastic cover to extract the jammed paper. A D TROUBLESHOOTING PROBLEM: The paper jams in the machine. SOLUTION : 1. If feeding by hand, make sure there is no paper in the paper tray. 2. Re-align the paper guides and check fold table settings. 3. Check to see if paper is within specifications (81/2” x 11” or A4, 16-28 lb. bond or 60-105 gsm). 4. Remove top cover and clean rollers with Martin Yale Rubber Roller Cleaner (model 200). 5. Use Martin Yale Static Eliminator (model 300) to remove static in paper. PROBLEM: SOLUTION: Paper will not feed correctly. 1. Paper guides too tight or not parallel to each other. Adjust the paper guides as described in Aligning the Paper Guides section of this instruction manual. 2. If feeding by hand, make sure the paper is properly aligned before placing it in the slot. 3. If feeding by hand, place the set in the slot before turning the machine on. 4. Re-align the paper guides. 5. Check to see if paper is within specifications (81/2” x 11” or A4, 16-28 lb. bond or 60-105 gsm). 6. The feed tire could be worn. Replace. 4 C F G E ¡Atención! No conecte nunca la plegadora hasta haber leído y comprendido el ajuste y el funcionamiento de la máquina. Durante el ajuste, el funcionamiento y el mantenimiento mantenga fuera de alcance de piezas móviles las manos, el pelo así como ropa suelta y joyas. En caso contrario es posible que se produzcan graves heridas. Los trabajos de servicio y desmontaje se deberán realizar únicamente con la plegadora desconectada. Su máquina P7400 se entrega con los siguientes componentes: A. PLEGADORA RÁPIDA RAPIDFOLD B. GUÍAS DE PAPEL (2) C. BANDEJA FRONTAL DE PLEGADO D. BANDEJA TRASERA DE PLEGADO (no visible) E. ESTRIBOS DE METAL (2) F. SUMINISTRO DE CORRIENTE CONTINUA G. JUEGO DE CONECTADORES DEL DISPOSITIVO DE SALIDA (3) (los conectadores del dispositivo de salida contienen 3 piezas de plástico superiores, 3 piezas de plástico inferiores y 6 tornillos de conectador) Fabricado en Taiwan por: Martin Yale Industries, Inc. 251 Wedcor Avenue • Wabash, IN 46992 e-mail: [email protected] Página Web: www.martinyale.com Fax (260) 563-4575-
 1
1
-
 2
2
-
 3
3
-
 4
4
-
 5
5
-
 6
6


Martin Yale P7400 Manual de usuario
- Categoría
- Máquinas plegables
- Tipo
- Manual de usuario
- Este manual también es adecuado para
en otros idiomas
- français: Martin Yale P7400 Manuel utilisateur
- English: Martin Yale P7400 User manual
Artículos relacionados
-
MyBinding Martin Yale 1611 AutoFolder Paper Folding Machine Manual de usuario
-
Martin Yale 1711 Instrucciones de operación
-
-
Martin Yale 2051 SmartFold Setup Instructions
-
-
-
-