
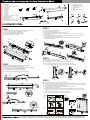
Parts included :
1. Brackets (2X)
1-1.
Center bracket (1X for 39,46 sizes only)
2. Square End
3. Round End
4. Flat-Blade Key
5. Case Rail
6. Fabric Roll
7. Round Pin
8. PVC Spline
9. Square Pin
10. Temporary Pin - Dispose aer cung
11. Boom Axial Rod
12. Rubberized Rod Cover
13. Boom Rail
14. Tap-in Anchors (4X for 27,33 ; 6X for 39,46)
15. Screws (4X for 27,33 ; 6X for 39,46)
Tools needed (not included) :
1. Flathead Screwdriver
2. Philips-head Screwdriver
3. Measuring Tape
4. Pencil
5. Drill and Bits 1/4” and 1/8”
6. Level
STEP 2
Note Before Starng: This is a resizable product. Ask a store associate to trim your Cordless Zebra Shade if needed.
STEP 1
1A. Place Case Rail⑤ and Roller Fabric⑥ next to each other on a flat surface
making sure Square End② and Square Pin⑨, are aligned.
1B. Take Temporary Pin⑩ out from Fabric Roll⑥.
1C. Unfasten Case Rail⑤ with Flat-Blade Screw Key④.
1D. Adjust Case Rail⑤ to desired length.
1A
1B
1D
1C
This Cordless Zebra Shade is not washable. To remove dust, use a vacuum cleaner with a dust brush aachment end.
For cleaning any soiled areas, try gently rubbing the fabric using a water dampened cloth with a mild detergent only.
2A. Disassemble Boom Rail⑬ to reveal Rubberized Rod Cover⑫.
2B. loosen the Boom Rail⑬ with Flat-Blade Key④.
2C. Remove with scissors any excess of Rubberized Rod Cover⑫, so the Boom
Axial Rod⑪ spans desired length of Boom Rail⑬.
2D. Assemble Rubberized Rod Cover⑫ to Boom Rail⑬.
2E. Adjust both ends of the Boom Rail⑬ using Flat-Blade Key④.
2A
2B
2D
2C
2E
24
23
22
21
20
25
24
23
22
21
20
25
24
23
22
21
20
25
24
23
22
21
20
25
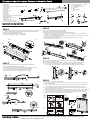
Inside Mount
Outside Mount
5B
5A
5C
1/4”
1/8”
Drywall
Wood or Studs
5D
20
21
22
23
24
25
26
27
28
29
30
31
20
21
22
23
24
25
26
27
28
29
26
27
28
29
30
31
23
24
25
26
27
28
29
5E
1-1
24
23
22
21
20
25
24
23
25
24
23
22
21
20
25
24
23
22
21
20
25
STEP 5
5A. Determine whether to measure for inside or outside mount.
5B. Place Brackets against wall at desired locaon, use tape measure and level to align, and mark screw holes.
5C-1. For mounng to drywall, ceiling or paneling, pre-drill pilot holes using 1/4" drill bit, insert Tap-In Anchors.
Install Brackets by fastening Screws into Tap-In Anchors.
5C-2. If mounng directly into wood or studs, pre-drill pilot holes with 1/8” drill bit.
Install Brackets with Screws provided.
5D. Slide the Case Rail into the Brackets at a slightly inclined angle while gently pushing it to contract the
springs of the Brackets. Keeping the springs of the Brackets contracted, finish the coupling moving the
Case Rail upwards. When doing so, you should hear a "click" sound.
5E. To operate properly, always pull from the center of the Boom Rail.
STEP 4
4A. Slide end of fabric through the middle of the fully assembled Boom Rail.
4B. Extend the fabric towards the Top Rail.
4C. Fold the fabric slowly twice, so that the end of the PVC Spline⑧ faces you.
4D. Insert the fabric into the back channel of the Case Rail using the PVC Spline.
Pull on fabric slightly to make sure it is secure. The product assembly is complete.
STEP 3
3A. Loosen Case Rail with Flat-Blade Key④.
3B. Extend Case Rail to desired length.
3C. Locate the Fabric Roll⑥ to be inserted into the Case Rail.
3D. Match the Case Rail and Fabric Roll so that the Square End of the case rail is inserted into the Square
Tip of the Roll⑨.
3E. Complete the inseron of the Fabric Roll into the Case Rail⑤ by matching Round End of Case Rail is
inserted into the Round Pin of the Fabric Roll.
3F. Adjust Case Rail with Flat-Blade Key④, leaving a small amount of space for part to operate
smoothly without jamming.
4A
4B
4C
4D
24
25
26
27
23
3C
3D
3F
3E
3A
3B
28
29
28
29
1-1

Instrucciones de montaje:
Limpieza y cuidado:
Partes incluídas :
1. Soportes (2X)
1-1. Soporte Central (1X exclusivamente para el tamaño 39,46)
2. Tope Cuadrado
3. Tope Redondo
4. Llave Plana
5. Cenefa-Riel Superior
6. Rollo de Tela
7. Pin Redondo
8. Guía de PVC
9. Pin Cuadrado
10. Pin Temporal - Descartar después de cortar
11. Varilla Axial Inferior
12. Cubierta de Varilla de Goma
13. Riel Inferior
14. Anclaje de Encastre
(4X para 27,33; 6X para 39,46)
15. Tornillos (4X para 27,33; 6X para 39,46)
Herramientas necesarias (no incluidas):
1. Destornillador plano
2. Destornillador de cabeza cruz
3. Cinta métrica
4. Lápiz
5. Brocas 1/4"y 1/8"
6. Nivel
PASO 2
Nota antes de comenzar: Este es un producto de tamaño ajustable. Pídale a un empleado de la enda que recorte su Persiana Cebra Inalámbrica de ser necesario.
PASO 1
1A. Coloque la Cenefa-Riel Superior⑤ y el Rollo de Tela⑥ uno al lado del otro en una superficie
plana asegurándose de que el Tope Cuadrado② y el Pin Cuadrado⑨ estén alineados.
1B. Rere el Pin Temporal⑩ del Rollo de Tela⑥.
1C. Afloje la Cenefa-Riel Superior⑤ con la Llave Plana④.
1D. Ajuste la Cenefa-Riel Superior⑤ a la longitud deseada.
1A
1B
1D
1C
Esta Persiana Inalámbrica Cebra no es lavable. Para eliminar el polvo, use una aspiradora con un extremo de cepillo
para polvo.Para limpiar cualquier área sucia, intente frotar suavemente la tela con un paño humedecido con agua
solamente, junto con un detergente suave.
2A. Desmonte el Riel Inferior⑬ para revelar la Cubierta de Varilla de Goma⑫.
2B. Afloje el Riel Inferior⑬ ulizando la Llave Plana④.
2C. Rere con jeras cualquier exceso de Cubierta de Varilla de Goma⑫, de modo que
la Varilla Axial inferior ⑪ cubra la longitud deseada del Riel Inferior⑬.
2D. Ensamble la Cubierta de la Varilla de Goma⑫ en el Riel Inferior⑬.
2E. Ajuste ambos extremos del Riel Inferior⑬ usando la Llave Plana④.
2A
2B
2D
2C
2E
24
23
22
21
20
25
24
23
22
21
20
25
24
23
22
21
20
25
24
23
22
21
20
25
Montaje interior
Montaje exterior
5B
5A
5C
1/4”
1/8”
Drywall
Madera
5D
20
21
22
23
24
25
26
27
28
29
30
31
20
21
22
23
24
25
26
27
28
29
26
27
28
29
30
31
23
24
25
26
27
28
29
5E
1-1
24
23
22
21
20
25
24
23
25
24
23
22
21
20
25
24
23
22
21
20
25
PASO 5
5A. Escoja entre montaje interior o montaje exterior.
5B. Coloque los Soportes contra la pared en la ubicación deseada, use cinta métrica y nivel para alinear, y marque
los orificios de los tornillos.
5C-1. Para el montaje en paneles de yeso, o techo, perfore previamente los orificios piloto con una broca de 1/4" e
inserte los Anclajes de Encastre. Instale los Soportes sujetando los Tornillos en los Anclajes de Encastre.
5C-2. Si está montando directamente en madera, perfore previamente los orificios piloto con una broca de 1/8”.
Instale los Soportes con los Tornillos provistos.
5D. Acople la Cenefa-Riel Superior en los Soportes en un ángulo ligeramente inclinado mientras la empuja genlmente
para contraer los resortes de los Soportes. Manteniendo los resortes de los Soportes contraidos,termine el
acoplamiento moviendo la Cenefa-Riel Superior hacia arriba. Al hacerlo, se debe escuchar un sonido de "click".
5E. Para operar correctamente, siempre jale desde el centro del Riel Inferior.
PASO 4
4A. Deslice el extremo de la tela a través de la mitad del Riel Inferior completamente ensamblado.
4B. Exenda la tela hacia el Riel Superior.
4C. Doble la tela lentamente dos veces, de modo que el extremo de la Guía de PVC⑧ quede hacia usted
4D. Inserte la tela en el canal posterior del riel de la Cenefa-Riel Superior ulizando la Guía de PVC⑧.
Tire de la tela ligeramente para asegurarse de que esté segura. El montaje del producto está completo.
PASO 3
3A. Afloje la Cenefa-Riel Superior⑤ con la Llave Plana④.
3B. Exenda Cenefa-Riel Superior⑤ a la longitud deseada.
3C. Ubique el Rollo de Tela⑥ para ser introducido en la Cenefa-Riel Superior⑤.
3D. Empareje la Cenefa-Riel Superior y el Rollo de Tela de forma que el Tope Cuadrado de la Cenefa-Riel Superior
se inserte en el Pin Cuadrado del Rollo de Tela⑨.
3E. Complete la insercion de ambos lados de la Cenefa-Riel Superior⑤ acoplando el Tope Redondo de la Cenefa-Riel
Superior y el Pin Redondo del Rollo de Tela.
3F. Ajuste suavemente la Cenefa-Riel Superior con la Llave Plana④, dejando espacio para que la pieza
funcione sin problemas y sin atascarse.
4A
4B
4C
4D
24
25
26
27
23
3C
3D
3F
3E
3A
3B
28
29
28
29
1-1
Gracias por adquirir nuestra Persiana Inalámbrica Cebra
-
 1
1
-
 2
2


