Elkay BLR153 Guía de instalación
- Categoría
- Fregaderos de cocina
- Tipo
- Guía de instalación

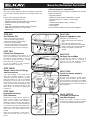
What You Will Need
The tools you will need to install your stainless steel sink
are few and commonly found in the average home tool
box.
Here is a list of what you will need:
• Caulking for mounting sink rim
•Plumbers putty for mounting faucet and strainers
•Yardstick or Rule (at least 3-feet long).
•Flashlight
• Long, thin screwdriver (shank at least six inches).
• Adjustable wrenches (2), or open ends.
•Pipe wrench.
¿Que es lo que va a necesitar?
Las herramientas que necesita para instalarlo son las más
usadas comunmente.
• Empaques/Silicón
• Masilla de plomero para instalar llaves y céspol
•Cinta de medir (por lo menos 1 mt. de largo)
•Linterna
• Desarmador delgado y largo (15.24cm.)
•Llave ajustable
•Llave Inglesa
Los tornillos de instalación vienen con el fregadero.
Illustration Instructions
Manual Con Illustraciones Para Instalar
STEP ONE
Out With the Old
Here's how to remove the old sink:
1. Shut off the water supply valves.
2. Disconnect the water supply fittings.
3. Disconnect the drain fittings.
4. From the underside of the sink, loosen
and remove the frame or rim fasteners.
5. Lift the entire sink out of the countertop.
PASO UNO
Saque el fregadero viejo
Para quitar el fregadero viejo:
1. Cierre la llave general de entrada de
agua.
2. Desconecte las tuberías y llaves.
3. Desconecte el céspol que va al drenaje.
4. Afloje y remueva el marco del fregadero.
5. Levante el fregadero y sáquelo del
mueble.
STEP TWO
Check Your Dimensions
Check the countertop cut-out opening to be
sure it is sized properly.
The sink rim must
set uniformly on the countertop. If the sink
does not fit, enlarge the cut-out opening
with a sabre saw, or keyhole saw.
(If you are installing a new countertop,
follow the directions on Page 2.)
PASO DOS
Verifique las medidas
Las Medidas del espacio cortado en la
cubierta deberán ser las correctas y
coincidir
con
las
del
fregadero
nuevo.
Hacer correcciones si es necesario.
LENGTH / LARG
O
WIDTH / ANCHO
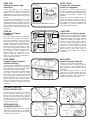
PASO CUATRO
Ensamble y instalé los
tornillos de ajuste
Ponga los tornillos de ajuste como se
muestra en el grabado.
Coloque los tornillos
de manera que queden dentro del canal.
STEP FOUR
Assemble and Insert
Sink Fasteners
Assemble the screws into the clamps as
shown. (Note: Screws are designed to
insert into the clamps with backward
threading, so that in mounting, they will turn
the normal direction.) Locate the fasteners
in the position
as shown. Hand tighten each
fastener onto
the channel so that the clamp
“teeth” point
is the same direction as the
channel.
(If the cut-out is undersize, you will have to
insert the fasteners after the sink is in
place.)
CLAMP
ABRAZADERA
BACKWARD
THREAD
ROSCA
IZQUIERDA
SPEED
SCREW
TORNILLO DE
AJUSTE
TURN "SPEED SCREW" CLOCKWISE
TO HAND TIGHTEN
GIRE HACIA LA DERECHA PARA
ASEGURAR LOS TORNILLOS
CHANNEL
CANAL
STEP THREE
Attach Faucet, Drain Fittings
and Accessories
If you are installing a new faucet and/or
drain fitting, garbage disposer or other
accessory, follow the directions provided
with these products. If you are re-installing
the fittings you had on the old sink, mount
them on the new sink using putty or caulk
under the faucet base and top flange of the
drain. Attach your supply riser tubes to the
faucet at this time. Trim to fit supply pipe
connections.
PASO TRES
Instale las llaves, céspol y
accesorios
Si está usted instalando nuevas llaves,
triturador u otro accesorio siga las instruc-
ciones que trae ese producto. Si va a utilizar
las mismas llaves use masilla de plomeria.
Es más fácil hacer las conecciones antes de
fijar el fregadero.
PLUMBERS PUTTY
MASILLA DE PLOMERO

4.
COUNTERTOP
CUBIERTA
CUT ON INSIDE
OF INSIDE LINE
CORTE A TODO LO LARGO
DE LA LINEA INTERIOR
PASO SEIS
Apriete los tornillos de ajuste
Utilize la linterna para alumbrar por debajo
del fregadero, con el desarmador voltée las
abrazaderas para que los dientes de éstas
queden por debajo del mueble como se
indica en la ilustración. Empiece atornil-
lando los tornillos colocados en medio de
cada lado. Termine de apretar los demás
hasta que no quede ningun espacio sin
sellar. Es posible que tenga que mover
algun tornillo de lugar para nivelar el
fregadero. Tenga cuidado de no apretar
demasiado.
STEP SIX
Engage and Tighten
Fasteners
With your flashlight and long screwdriver,
get under the sink to tighten the fasteners.
First twist the clamps so their teeth swing
under the counter. Next, push the screw
upward to engage the clamp flange with the
channel and tighten. Begin with the
fasteners located in the middle of each
side, tighten the remaining fasteners until
the entire rim is sealed with no gaps. It may
be necessary to slide a fastener to a
different position to compensate for an
uneven counter. (Be careful not to over-
tighten. It is only necessary to draw the rim
down snugly to the counter.)
SINK
FREGADERO
TURN CLOCKWISE
TO TIGHTEN
APRIETE HACIA LA
DERECHA PARA
ASEGURAR
ROTATE CLAMP
90∞ TO CHANNEL
AJUSTE LA
ABRAZADERA A
90∞ DEL CANAL
SCREW DRIVER
DESARMADOR
COUNTER TOP
CUBIERTA
COUNTER TOP
CUBIERTA
COUNTER TOP
CUBIERTA
COUNTER TOP
CUBIERTA
DROP INTO CUT OUT WITH
CLAMP PARALLEL TO
CHANNEL
COLOQUE EL FREGADERO EN
LA APRETURA DE LA CUBIERTA
CON LAS ABRAZADERAS
PARELAS AL CANAL
SINK
FREGADERO
STEP SEVEN
Connect Faucet Supplies
and Drain Fittings
In reverse order of STEP ONE...connect the
drain trap fittings, connect the faucet supply
fittings and turn on the water supply. Check
for possible leaks at these locations:
(1) Supply riser tubes to faucet, and (2) Supply
riser tubes to shut-off valves (or, lower
connections). Next fill the sink bowl with
water and check for possible leaks around
the drain flange(s). This would show up as
dripping into the cabinet below. Release
water from sink and check for possible leaks
at drain connections. Tighten any joints
which leak.
PASO SIETE
Conecte llaverías y drenaje
Siguiendo el orden opuesto del PASO 1
...conecte los tubos de drenaje, luego las
llaves de paso y posteriormente abra la
llave general del agua. Verifique que no
haya fugas:
1) en la llavería y llaves de paso y 2) en las
conecciones. Llene el fregadero de agua y
verifique que no haya fugas y goteras en la
conexión del drenaje. Vacíe el fregadero y
apriete las conexiones que gotéen.
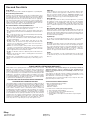
BOTTOM VIEW
VISTA DESDE ABAJO
CHANNEL
CANAL
FASTENER
ABRAZADERA
SINK RIM
MARCO DEL
FREGADERO
CAULK AROUND THE RIM OF
THE SINK OUTSIDE OF CHANNEL
PONGA UNA CAPA DE EMPAQUE EN TODO EL
MARCO DEL FREGADERO ENTRE EL CANAL Y EL
BORDE, PARA QUE SIRVA DE SELLADOR.
FASTENERS
ABRAZADERAS
POSITION THE FASTENERS IN THE
CHANNELS UNIFORMLY AROUND SINK
COLOQUE EL FREGADERO EN EL MUEBLE, ASEGÚRESE QUE ESTÉ DERECHO
Y EL MARCO COINCIDA CON LA LINEA DEL BORDE DE LA CUBIERTA.
CHANNEL
CANAL
PASO CINCO
Coloque los tornillos de
ajuste y el fregadero
El número de tornillos varía según el
modelo de fregadero. Asegúrese que haya
uno en medio de cada lado. Distribuya los
demás uniformemente alrededor del
fregadero.
Ponga una capa de empaque en todo el
marco del fregadero entre el canal y el
borde, para que sirva de sellador. Coloque
el fregadero en el mueble, asegúrese que
esté derecho y el marco coincida con la
linea del borde de la cubierta.
STEP FIVE
Position Fasteners and
Insert Sink
Locate the fasteners in the positions
shown. (Number of fasteners vary between
models, but be sure to locate one
approximately in the middle of each side.)
Distribute other fasteners uniformly around
the sink.
Now place a continuous bead of caulk
around the entire perimeter of the rim,
between the channel and edge, to serve as
a watertight seal. Pick up the sink and set it
square into the countertop cut-out opening.
Line up the front rim with the edge of the
countertop.
FOR NEW COUNTER
INSTALLATIONS ONLY
The following instructions are to be used if
you are installing a new countertop along
with your new sink. NOTE: If the countertop
has not yet been anchored to the cabinets,
you will find it much easier to make the cut-
out and install the sink first, while it is in an
"easier-to-work" position.
INSTALANDO EN
UN MUEBLE NUEVO
Las siguientes instrucciones son para la
instalación de su fregadero en un mueble
nuevo. Si la cubierta no ha sido aún puesta
será mas fácil hacer el corte.
3.
DRILL STARTING
HOLE ON THE INSIDE
OF THE INSIDE LINE
TALADRE PARA
EMPEZAR EL CORTE
EN LA LINEA INTERIOR
COUNTERTOP
CUBIERTA
2.
1-1/2" RADIUS
38.1 mm RADIO
5/16"
7.93
mm
5/16"
7.93 mm
CUT LINE
LINEA DE CORTE
1-1/2" RADIUS
AT CORNERS
38.1 mm DE RADIO
EN LAS ESQUINAS
DRAW SECOND
LINE INSIDE SINK
OUTLINE (CUT LINE)
TRACE UNA
SEGUNDA LINEA
DENTRO DE LA
PRIMERA. ESTÁ
SERÁ LA LINEA
DE CORTE.
COUNTERTOP
CUBIERTA
TRACE COMPLETELY AROUND EDGE OF SINK
MARQUE COMPLETAMENTE TO EL CONTORNO
DEL FREGADERO
1
.

Elkay
2222 Camden Court
Oak Brook, IL 60523
©2008 Elkay
elkayusa.com
74180136
Satin Finish
Regular cleaning is important to maintain the appearance of your Elkay sink.
Easy Cleaning Instructions
Rinsing is the most important part of sink care. An Elkay stainless steel
sink finish will retain its original bright appearance if the sink is rinsed
thoroughly after each use. “Thorough” rinsing can be done by running the
water throughout the sink for a few minutes after each use. Typically, a
rinse and towel drying after each use takes care of most everyday clean
ups. For everyday cleaning we recommend using Elkay’s Stainless Butler
Stainless Steel Cleaner + Polisher. The non-abrasive formula is safe and
effective for day to day cleaning. Your sink will shine like new!
Recommendations for Proper Maintenance
• Do...Use only a mild liquid dishwashing detergent withasoft
sponge to clean and then thoroughly rinse the sink.
• Do... Rinse thoroughly after each use. “Thorough” rinsing can be done
by running water for a few minutes and rubbing the cleaned area with a
sponge.
• Do... Towel dry after each use to
prevent mineral deposits from build-
ing up on the surface of the sink.
• Do Not
...Allow liquid soap or other household cleansers to dry on the sur-
face of the sink. Most brands contain chemical additives which will
affect the original finish.
• Do Not...Use solutions of chlorine bleach and water in the sink.
Chlorides, which are found in most soaps, detergents, bleaches, and
cleansers, are very aggressive to stainless steel. If left on the sink too
long they can cause surface pitting.
• Do Not...Useasteel wool pad to clean your sink. Steel wool pads have
a tendency to break apart and small particles of steel can become
embedded in the surface of the sink. The steel particles will rust and will
give the appearance that the sink itself is rusting.
• Do Not...Use abrasive cleansers or abrasive pads as it will scratch the
surface.
• Do Not...Leave wet sponges, cloths, or cleaning pads on the sink. This
can lead to surface rust.
Following these recommendations for the care and cleaning of your
stainless steel sink will insure that it will provide you with many years of
service.
Chlorides
Today, chlorides are found in most all soap, detergents, bleaches and
cleansers; chlorides can be oppressive to stainless steel. However, chlo-
rides are very water soluable. Therefore, THOROUGH RINSING of your
sink after each use to remove any chloride residue andaweekly scouring
is all that is required to keep your sink looking bright and shiny.
Water Quality
The quality of your water can affect your sink’s appearance. If your water
has a high iron content, a brown surface stain can form on the sink giving
the appearance of rust. Additionally, in areas with a high concentration
of minerals, or with over-softened water, a white film may develop on the
sink. To combat these problems, we suggest that the sink be towel dried
after use.
Discoloration, Rust and Possible Pitting
Wet sponges, cloths, cleaning pads and rubber mats left on the sink can
lead to discoloration. Steel wool pads should never be used to clean your
sink as they leav
e small iron particles in the grain lines which rust and can
damage the sink. Continued usage in this manner may eventually lead to
the sink itself rusting and pitting.
Liquid Soap
Do not allow concentrated liquid detergent to dry on your sink. Most
brands contain chemical additives which will affect the original finish.
Spotting
The quality of your water can affect your sink’s appearance. In areas with
hard water,abrown surface stain can form on the sink giving the appear-
ance of rust. This phenomena also occurs in water with high iron content.
Additionally, in areas withahigh concentration of minerals, or with over-
softened water, a white film may develop on the sink. To combat this
problem, we suggest that the sink be towel dried after use.
Foods
Heavy salt concentration or foods containing high levels of salt should
not be allowed to dry onto the sink surface. Rinse your sink thoroughly
after use.
Use and Care Hints
ELKAY LIMITED LIFETIME SINK WARRANTY
Elkay warrants to the original purchaser of an Elkay stainless steel sink that
Elkay will, at its option, replace or repair, without charge, such product if it
fails due to a manufacturing defect for a lifetime of normal residential use.
Product replacement does not include transportation cost or labor installa-
tion cost. This warranty covers only stainless steel self-rimming drop-in sinks
installed in a conventional countertop surface and stainless steel under-
mount sinks installed in a conven
tional solid surface countertop and applies
to residential installations only. Elkay reserves the right to examine product
in question and its installation prior to replacement.
WASTE FITTINGS AND ACCESSORIES ARE NOT WARRANTED
OTHER WARRANTY CONDITIONS ON SINKS
This warranty applies to sinks purchased after March 1st 2001 as shown on
the purchaser’s dated receipt. For sinks purchased prior to March 1st 2001,
the applicable warranty at that time will be in effect. Our w
arranty does not
cover product failure or damage caused by the use of optional Elkay acces-
sories, abusive treatment, misuse, environmental factors, normal wear
including dents and scratches, improper care and cleaning, use of aggres-
sive and abrasive cleaners, damage due to handling or failure to follow the
recommended procedures for installation, care and maintenance as detailed
in the installation and care guide provided with every sink. This warranty is
extend
ed only to the original consumer purchaser of the product. This war-
ranty does not cover shipping costs, labor costs, or any other charges for
such items as installation or replacement of the sink, diagnosis or replace-
ment of any faucet or component part, or any other expense or loss.
All incidental or consequential damages are specifically excluded. No
additional warranties, express or implied are given, including but not
limited to, any implied warranty of merchanta
bility or fitness for a par-
ticular purpose.
Some states do not allow the exclusion or limitation of incidental or conse-
quential damages or limitations on how long an implied warranty lasts, so the
above limitations or exclusions may not apply to you.
This warranty gives you specific legal rights, and you may also have other
rights which vary from state to state.
TO OBTAIN SERVICE UNDER WARRANTY
1. Write to: Elkay Manufacturing Company
Attention: Consumer Services
2222 C
amden Court
Oak Brook, IL 60523
2. Include a letter containing the following information:
a. Date of purchase and installation
b. Proof of Purchase (copy of original dated invoice)
c. Description of nature of defect
d. Model number or description of model and/or component part if
possible.

Elkay
2222 Camden Court
Oak Brook, IL 60523
©2008 Elkay
elkayusa.com
74180136
Sugerencias para el uso y cuidado del fregadero
GARANTÍA LIMITADA POR LA VIDA DEL FREGADERO QUE OFRECE ELKAY
Terminado satinado
La limpieza a intervalos regulares es importante para mantener la buena
apariencia de su fregadero Elkay.
Instrucciones para la limpieza fácil
Lo más importante en el cuidado del fregadero es el enjuague. Un
fregadero Elkay con terminado de acero inoxidable retendrá su apariencia
y brillo original si el fregadero se enjuaga completamente después de
cada uso. Un enjuague total puede hacerse dejando que el agua circule a
través del fregadero por unos pocos minutos después de cada uso.
Normalmente, un enjuague y un secado con toalla después de cada uso
es todo lo que se necesita como limpieza diaria. Para la limpieza diaria
recomendamos el uso del Limpiador y Brillador de Acero Inoxidable
“Stainless Butler” de Elkay. Esta fórmula no abrasiva es segura y efectiva
para la limpieza de día a día. ¡Así, su fregadero brillará como nuevo!
Recomendaciones para un mantenimiento apropiado
• Use ... únicamente un detergente líquido suave para el lavado de platos,
con una esponja blanda para limpiar el fregadero y, luego, enjuáguelo
completamente
• Enjuague ... completamente el fregadero después de cada uso. El
enjuague completo puede hacerse dejando pasar agua por el fregadero
por unos pocos minutos y, luego, frotando el área enjuagada con una
esponja.
• Seque ... el fregadero con una toalla después de cada uso para evitar la
acumulación de depósitos de minerales en la superficie del fregadero.
• No Permita ... que jabón líquido u otros limpiadores caseros se sequen
en la superficie del fregadero. La mayor parte de estos líquidos contiene
aditivos químicos que afectan el terminado original.
• No Use ... en el fregadero soluciones de blanqueadores de cloro en
agua. Los cloruros que se encuentran en la mayor parte de los jabones,
detergentes, blanqueadores y limpiadores atacan el acero inoxidable. Si
se dejan en el fregadero por un lapso prologado pueden causar el
picado de la superficie
• No Use ... almohadillas de viruta de acero para limpiar el fregadero. Las
almohadillas de viruta de acero tienen la tendencia de desintegrarse y
desprender pequeñas partículas de acero que se incrustan en la superfi-
cie del fregadero. Las partículas de acero se oxidarán y darán la
impresión de que la superficie del fregadero se está oxidando.
• No Use ... limpiadores abrasivos o almohadillas abrasivas pues estos
rayarán la superficie del fregadero.
• No Deje ... esponjas, paños o almohadillas de limpieza húmedas en el
fregadero. Esto puede crear oxidación en la superficie. El seguir estas
recomendaciones en el cuidado y limpieza de su fregadero le asegurará
que la unidad le proporcionará muchos años de servicio.
Cloruros
Actualmente, los cloruros se encuentran en la mayor parte de los jabones,
detergentes, blanqueadores y limpiadores; los cuales pueden atacar el
acero inoxidable. Sin embargo, los cloruros son muy solubles en agua.
Por lo tanto un LAVADO COMPLETO de su fregadero después de cada
uso puede remover cualquier residuo de cloruro y un fregado semanal de
la unidad es todo lo que se necesita para mantener el fregadero luciendo
limpio y brillante.
Calidad del agua
La calidad del agua que usted usa puede afectar la apariencia de su
fregadero. Si el agua tiene un alto contenido de hierro, puede formarse
una mancha marrón en el fregadero dando la apariencia de oxidación.
Además, en zonas donde el agua tiene una alta concentración de
minerales, o ha sido suavizada en exceso, puede formarse una película
blanca en el fregadero. Para combatir estos problemas le sugerimos que
seque el fregadero con una toalla después de usarlo.
Descoloración, oxidación y posible picado
Esponjas, almohadillas de limpieza, esterillas de caucho o paños
húmedos, cuando se dejan en el fregadero por algún tiempo, pueden
causar la descoloración del fregadero. Las almohadillas de viruta de
acero no deben usarse nunca para limpiar el fregadero, pues estas dejan
pequeñas partículas de hierro en las líneas de textura del acero inoxidable
las cuales pueden oxidar y dañar la superficie del fregadero. El uso
continuado de estas prácticas pueden eventualmente causar que el
fregadero mismo se oxide y su superficie se pique.
Jabón líquido
No permita que el líquido concentrado de un detergente se seque en el
fregadero. Las marcas más conocidas de estos líquidos contienen
aditivos químicos que afectarán el terminado original.
Manchado
La calidad del agua que usted usa puede afectar la apariencia de su
fregadero. En lugares donde el agua es dura, puede formarse una
mancha marrón en la superficie, dando la impresión de que el fregadero
se está oxidando. Este fenómeno también ocurre cuando el agua tiene un
alto contenido de hierro. Además, en áreas de alta concentración de
minerales o agua suavizada en exceso se puede crear una película blanca
en la superficie del fregadero. Para combatir este problema, le sugerimos
que seque el fregadero con una toalla después de usarlo.
Alimentos
Una alta concentración de sal o alimentos que contengan altos niveles de
sal no deben dejarse secar en la superficie del fregadero. Enjuáguelo
completamente después de usarlo con este tipo de alimentos.
fregadero. Esta garantía se extiende únicamente al comprador y usuario
original del producto. La garantía no cubre costos de transporte, costos de
mano de obra o cualesquiera otros costos por conceptos tales como la
instalación o reemplazo del fregadero, diagnóstico o reemplazo de cualquier
grifo o pieza componente o cualquier otra pérdida o gasto.
Todos los daños incidentales o consecuenciales se excluyen específica-
mente. No se ofrecen otras garantías adicionales expresas o implícitas
incluyendo, pero no limitándose a, cualquier garantía implícita de comercia-
bilidad o aptitud para un propósito en particular.
Algunos Estados no permiten la exclusión o limitación de daños incidentales o
consecuenciales o limitaciones en cuanto a la duración de una garantía
implícita, por lo tanto las exclusiones o limitaciones anteriores pueden no ser
aplicables a usted.. Esta garantía le otorga derechos legales específicos y usted
puede también tener otros derechos que pueden variar de un Estado a otro.
PARA OBTENER SERVICIO BAJO GARANTÍA
1. Escriba a: Elkay Manufacturing Company
Atención: Servicios al Consumidor
2222 Camden Court
Oak Brook, IL 60523
2. Incluya una carta que contenga la siguiente información:
a. Fecha de compra e instalación
b. Prueba de Compra (una copia del recibo original de compra, fechado)
c. Descripción de la naturaleza del defecto
d. Número de modelo o descripción del modelo y de su pieza
componente, si es posible.
Elkay garantiza al comprador original del fregadero de acero inoxidable
Elkay, que Elkay, a su opción, reemplazará o reparará, sin cargo, dicho
producto si éste falla debido a un defecto de fabricación, durante su vida útil
en uso residencial corriente. El reemplazo del producto no incluye los costos
de transporte o el costo de la mano de obra necesaria para su instalación.
Esta garantía cubre únicamente los fregaderos de acero inoxidable de
reborde integrado de colocación a través del mostrador, instalados en la
superficie superior convencional del mostrador y los fregaderos de acero
inoxidable instalados bajo una superficie fuerte, convencional, del mostrador
para ser usados en instalaciones residenciales únicamente. Elkay se reserva
el derecho de examinar el producto en cuestión y su instalación antes de
reemplazarlo.
ACCESORIOS DE TUBERIAS DE DESAGÜE Y OTROS
ACCESORIOS NO ESTÁN GARANTIZADOS
OTRAS CONDICIONES DE LA GARANTÍA DE FREGADEROS
Esta garantía se aplica a fregaderos que han sido comprados después de 1°
de marzo de 2001, según la fecha registrada en el recibo del comprador. En
cuanto a fregaderos comprados antes del 1° de Marzo de 2001, la garantía
aplicable será la que estaba en vigencia en la fecha de compra. Nuestra
garantía no cubre la falla o daño del producto causado por: uso de acceso-
rios opcionales de Elkay, tratamiento abusivo, uso inapropiado, factores
ambientales, desgaste normal incluyendo rayones y hendiduras, limpieza y
cuidado inapropiados, uso de limpiadores abrasivos o que atacan la superfi-
cie de la unidad, daños debidos al manejo o a la falla en seguir los proced-
imientos de instalación recomendados o el cuidado y mantenimiento que se
detallan en la guía de instalación y cuidado que se incluyen con cada
-
 1
1
-
 2
2
-
 3
3
-
 4
4


Elkay BLR153 Guía de instalación
- Categoría
- Fregaderos de cocina
- Tipo
- Guía de instalación
En otros idiomas
- English: Elkay BLR153 Installation guide
Documentos relacionados
-
Elkay HD3322EK2 Guía de instalación
-
Dayton HDDB332284QI Guía de instalación
-
Elkay HD3322EK2 Guía de instalación
-
-
-
-
-
Elkay CR33214 Guía de instalación
-
Elkay LRAD2219653 Guía de instalación
-
Elkay PSRADQ191955L3 Guía de instalación