
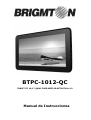
BTPC-1012-QC
TABLET PC 10,1”-QUAD CORE-WIFI-BLUETOOTH-A 4.2
Manual de Instrucciones

1
INTRODUCCIÓN
Gracias por haber elegido nuestro modelo de tablet. Por favor lea y conserve todas
las instrucciones de funcionamiento antes de utilizar la unidad, no asumimos
ninguna responsabilidad que surja por un uso incorrecto.
SEGURIDAD
1. Evite que la unidad se caiga o reciba golpes. Evite movimientos bruscos ya que la
pantalla puede ser dañada.
2. No utilice objetos metálicos para tocar la pantalla.
3. Por favor, realice copias de seguridad de sus datos. La firma no se hará cargo de
ninguna responsabilidad causada por la pérdida de datos.
4. No desmonte el equipo.
5. No desconecte la unidad mientras se está formateando o cargando/ descargando
ya que se pueden producir errores.
6. Evite el contacto con el agua u otros líquidos.
7. No utilice la unidad en lugares de altas temperaturas como el interior de un coche
al sol, o en lugares con alta humedad como sitios con vapor.
8. Las especificaciones están sujetas a cambios y mejoras sin previo aviso.
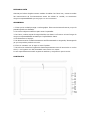
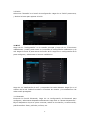
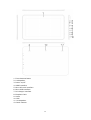
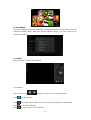
CONTROLES

2
1. Cámara frontal
2. Altavoz
3. Botón ON/OFF
4. Salida HDMI
5. Entrada tarjetas MicroSD
6. Entrada Micro-USB
7. Entrada DC
8. Entrada de auriculares
9. Botón HOME
10. Micrófono
11. Altavoz
12. Cámara trasera
FUNCIONES
1. Funcionamiento básico
1.1. Encendido / Apagado
Encendido: Mantenga pulsado el botón de encendido durante 5 segundos, la unidad
mostrará la imagen de la puesta en marcha y entrará en el modo de trabajo.
Apagado: Mantenga pulsado el botón de encendido durante 3 segundos para apagar
la unidad.
Inactividad: Mientras que el dispositivo se encuentra en estado de funcionamiento,
pulse brevemente el botón de encendido para entra en el modo de espera y la
pantalla se apagará. Pulse el interruptor de nuevo para cambiar al modo normal.
Usted puede utilizar esta función cuando no vaya a usar el dispositivo para ahorrar
energía.

3
1.2. Carga
Cuando el dispositivo indique que la batería es baja o insuficiente, cárguela con el
cargador suministrado.
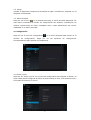
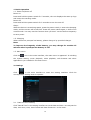
1.3. Menú Principal
Haga clic en el icono en la interfaz principal, el menú principal aparecerá. En
este menú encontrará la función de configuración del sistema, reproducción de
música, reproducción de vídeo, navegador web y otras aplicaciones que vienen
instaladas en el menú principal.
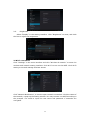
2. Configuración
Haga clic en el icono de configuración en el menú principal para entrar en la
interfaz de configuración. Haga clic en las opciones de configuración
correspondientes para ajustar los parámetros.
2.1 Fecha y Hora
Haga clic en "Fecha y hora" en el menú de configuración para ajustar la fecha y la
hora. Usted puede configurar la fecha, la zona horaria, la hora, el formato de hora y
el formato de fecha en el menú.

4
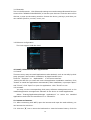
2.2 Brillo
Seleccione "Pantalla" en el menú de configuración. Haga clic en "Brillo" para entrar,
y deslice la barra para ajustar el brillo.
3. Wi-Fi
Haga clic en "Configuración" en la interfaz principal y haga clic en "Conexiones
inalámbricas y redes" para entrar en la interfaz de configuración inalámbrica y de
red. Haga clic en Wi-Fi para activar la función Wi-Fi. Haga clic en configuración Wi-Fi
para configurar y administrar el acceso inalámbrico.
Haga clic en "Notificación de red" y compruebe las redes abiertas. Haga clic en el
nombre de la red. Deberá introducir el nombre de usuario y la contraseña si las
redes están protegidas.
3.1 Bluetooth
Encienda la función Bluetooth, haga clic en Configuración de Bluetooth para
configurar y administrar dispositivos Bluetooth. Haga click en "Buscar dispositivos".
Elija el dispositivo al que se quiere conectar, realice la vinculación y a continuación,
podrá transferir fotos, películas, música, etc.

5
4. Instalar, desinstalar y ejecutar aplicaciones
4.1 Instalar: Hay muchas formas de instalar aplicaciones en Android, como por
ejemplo a través de USB, por programas de terceros, etc.
Haga clic en el "Explorer" o "Apkinstaller" en la interfaz principal.
Seleccione el archivo APK que desee e introduzca la interfaz de instalación de la
aplicación. Haga clic en "Instalar" para instalar la aplicación automáticamente.
Después de la instalación, se le pedirá "Abrir" y "Finalizar". Haga clic en "Abrir" para
abrir la aplicación. Haga clic en "Finalizar" para salir.
4.2 Desinstalar: Seleccione "Configuración/Aplicaciones/Administrar aplicaciones"
para seleccionar las aplicaciones instaladas y comprobar la que desea desinstalar.
5. Conectarse a Internet
5.1 Tras activar la función WIFI, abra el navegador y escriba la dirección web.
5.2 Haga clic en el icono para entrar en el marcador para ver el historial de
exploración. Haga clic en la página web que desea abrir.
Para guardar la página web en favoritos, puede hacer clic en la entrada y haga clic
en "añadir" para salvarlo.
6. Reproducción de audio y vídeo
6.1. Reproducción de audio: Haga clic en "Música" en el menú principal para entrar
en la interfaz de reproducción de audio. En él se enumeran los archivos de audio en
el dispositivo, y podrá hacer clic en el nombre del archivo para reproducirlo. En la
interfaz de reproducción de audio, haga clic en los iconos para
reproducir/pausar/aumento de volumen/bajar volumen, etc.

6
6.2 Reproducción de video: Haga clic en "Video" en el menú principal para entrar en
la interfaz de reproducción de vídeo. En él se enumeran los archivos de vídeo en el
dispositivo, y usted puede hacer clic en el nombre del archivo para reproducirlo. En
la interfaz de reproducción de vídeo, toque la pantalla para desplegar los iconos de
operación y haga clic en los iconos para reproducir/pausar/aumento de
volumen/disminución de volumen/pasar al archivo siguiente, etc.
7. Visor de Vídeo
Haga clic en "Galería" en el menú principal para entrar en la lista de carpetas de
imagen. Seleccione y haga clic en la carpeta a la que desea entrar, se mostrarán en
miniatura las imágenes contenidas. Haga clic en la miniatura de la imagen para
verlo.
Toque la pantalla para desplegar los iconos de funcionamiento, mientras se visualiza
la imagen, puede hacer zoom in/zoom out/pasar imagen/pasar a la imagen
anterior/girar/eliminar la imagen, etc.

7
8. DONGLE 3G
El dispositivo es compatible con 3G Dongle externo, conecte el dongle 3G al
dispositivo a través del cable de transferencia externa OTG (no incluido),
compruebe las luces del dispositivo para comprobar la conexión.
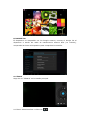
9. Cámara
Haga clic en "Cámara" en la interfaz principal.
9.1 Fotos: Seleccione foto o vídeo con

8
Haga clic aquí para hacer una foto.
Haga clic para establecer el modo de escena, el tamaño de imagen, calidad de
imagen, etc.
Haga clic para establecer el balance de blancos.
Haga clic para activar la cámara trasera o delantera.
9.2 Vídeos: Active el modo vídeo
Haga clic aquí para iniciar un vídeo.
Haga clic para seleccionar ajustes de vídeo.
Haga clic para activar la cámara trasera o delantera.
10. Conéctate con dispositivo externo
10.1. Conexión a PC: Conecte el dispositivo al ordenador mediante el cable USB. En
el PC aparecerán dos símbolos uno de la memoria interna y otro de la tarjeta
microSD.

9
10.2. USB y OTG: El dispositivo es compatible con dispositivos móviles con formato
FAT32. Conecte el dispositivo móvil a la tablet. (NOTA: sólo compatibilidad con
dispositivos USB 2.0 de alta velocidad)
10.3 Aplicaciones: Si se instala algún software de terceros en el dispositivo, por
favor, consulte las instrucciones correspondientes.
11. Solución de problemas
1. ¿Qué pasa si el dispositivo tiene un funcionamiento anormal?
1). Reinicie el dispositivo.
2). Cargar la batería.
2. ¿Duración de la batería?
El tiempo de uso de la batería puede depender de muchos factores como por
ejemplo la temperatura. Si la temperatura es demasiado alta o demasiado baja, el
tiempo de uso de la batería puede verse afectado. Se recomienda no usar en muy
altas o bajas temperaturas.
“Las especificaciones pueden cambiar sin previo aviso”

10
IMPORTADO
I.R.P., S.L.
AVDA. SANTA CLARA DE CUBA 5
SEVILLA, SPAIN
DECLARACIÓN DE CONFORMIDAD
I.R.P., S.L. declara bajo su responsabilidad que el aparato indicado cumple los
requisitos de las siguientes directivas:
DIRECTIVAS EMC
EN60950-1:2006/A11:2009/A1:2010
EN 62311: 2088
EN 301 489-1 V1.9.2:2011-09
EN 301 489-17 V2.1.1:2009-05
EN 300 328 V1.7.1: 2006-10
ETSI EN 301 489-1 V1.9.2(2011-09)
ETSI EN 301 489-17 V2.1.1(2009-05)
Descripción del aparato:
Modelo BRIGMTON BTPC-1012-QC
Dispositivo de conexión a internet
Importador: I.R.P., S.L.
Dirección: Avda. Santa Clara de Cuba 5, 41007, Sevilla.

11
BTPC-1012-QC
TABLET PC 10,1”-QUAD CORE-WIFI-BLUETOOTH-A 4.2
Instruction Manual

12
Preface
Thank you for buying the MID. We wish you enjoy using it.
Please read and retain all the operating instructions before operating the unit, we do
not assume any liability arising out of improper operation or incidental damages.
For better services, the content of this operation manual may be changed.
If the actual setup and usage of the unit are different from this operation manual,
please view the website of our company to inquire about the latest product
information.
Do not allow water or foreign objects to enter the unit.
Note:
1. Avoid the unit being dropped. Avoid the display been shake seriously, or the
display will be damaged or unusual.
2. Do not use metal object to touch the device to prevent it from short circuit.
3. Please backup your data in case your important data is lost, especially before you
upgrade the firmware. The company will not take charge in any loss that caused
by lost of data.
4. Do not disassemble. Do not wipe the surface of the unit by alcohol, thinner or
benzene.
5. Do not disconnect the unit while it is formatting or uploading/downloading, or the
procedures may lead to errors
6. We do not take responsibility to the flash damage caused by product broken,
repair or other reasons. Please operate strictly as per the user guide.
7. Avoid water or foreign objects enter the unit.
8. Do not use the unit in places that are extremely hot, cold, dusty, or humid.
9. Avoid the unit being dropped. Avoid the display been shake seriously, or the
display will be damaged or unusual.
10. Specifications are subject to change and improvement without notice
II. Introduction of cover:

13
1. Front Camera Reset
2. Loudspeaker
3. Power on/off
4. HDMI interface
5. Micro SD card interface
6. Micro USB interface
7. DC charger interface
8. Earphone Jack
9. Home
10. MIC
11. Loudspeaker
12. Back Camera

14
1. Basic Operation
1.1. Power on/Power off
Power on:
Press and hold the power switch for 5 seconds; the unit displays the start-up logo
and enters the working mode.
Power off:
Press and hold the power switch for 3 seconds to turn the unit off.
Sleep:
While the device is at working status, press the power switch, it enters the sleeping
mode, and the screen will be off then. Press the power switch again, it shift to the
normal mode. You may use this function when you don’t’ use the device temporary
to save power.
1.2. Charging
When the device prompts low battery, please charge it by provided charger.
Note:
To improve the longevity of the battery, you may charge for another 15
minutes after it prompts the battery is full.
1.3. Main menu
Click the icon in the main interface, the main menu is appeared. It including
the system setting, music playback, video playback, web browser and other
applications you installed in the main menu.
2. Settings
Click “ ” in the main interface to enter the setting interface. Click the
corresponding setting items to operate.
2.1.Date and Time Setting
Click “Date & Time” in the setting interface to set the date and time. You may set the
date, time zone, time, time format and date format etc. in the menu.

15
2.2. Brightness
Select “Display” in the setting interface. Click “Brightness” to enter, and slide
the bar to adjust the brightness.
3. Wi-Fi connection
Click “Settings” in the main interface and click “Wireless & network” to enter the
wireless and network setting interface. Click Wi-Fi to turn on the WIFI. Click Wi-Fi
setting to set and manage wireless access.
Click “Network Notification”, it lists the open network it searched. Click the name of
the network; it pops up the setting window. You may connect it to WIFI according to
the prompts. You need to input the user name and password if networks are
encrypted.

16
3.1 Bluetooth
Turn on the Bluetooth,Click Bluetooth setting to set and manage Bluetooth Devices
access.Click “SEARCH FOR DEVICES”, it lists the open devices. Click the name of the
devices; it pops up the setting window. Choose the device, pairing it, and then you
can transfer pictures, movies, music, etc.
3.2 Ethernet configuration
The Unit support USB-Net-Card.
4. Install, Uninstall and Run applications
4.1 Install
There are many ways to install applications under Android, such as via USB, by third
party program. We introduce installation by Apps Installer here.
Click the “Explorer”or “Apkinstaller” in the main interface.
Select the APK file you want and enter the application installation interface. Click
“Install” to install the application automatically. After installation, it prompts “Open”
and “Finish”. Click “Open” to open the application. Click “Finish” to exit.
4.2 Uninstall
You may use the corresponding third party software management tool or the
installed application management software of the device to install applications.
Select “Setting/Applications/Manage applications” to select the installed
applications and check the attribute of it or uninstall it.
5. Connect to internet
5.1. After connecting with WIFI, open the browser and input the web address, you
can browse the web then.
5.2. Click the
icon to enter the bookmark to view the browse history. Click the

17
web page you want to open it.
To save the web page into bookmark, you may click to enter and click “add”
to save it.
6. Audio and video playback
6.1. Audio playback
Click the “Music” in the main menu to enter the audio playback interface. It lists the
audio files in the device, and you may click the file name to play it. In the audio
playing interface, click the icons to play/pause/ increase volume/ decrease volume/
FF/ REW….
6.2. Video Playback
Click the “Video” in the main menu to enter the video playback interface. It lists the
video files in the device, and you may click the file name to play it. In the video
playing interface, touch the screen to pop-up the operation icons and click the icons
to play/pause/ increase volume/ decrease volume/ skip to next file/skip to previous
file….
7. Picture viewing
Click “Gallery” in the main menu to enter the picture folder list. Select and click the
folder you want to enter, it displays the click the thumbnail of the picture to view it.
Touch the screen to pop-up the operation icons while viewing the picture, you may
zoom in/zoom out/ skip to next picture/skip to previous picture/ rotate/ delete the
picture…

18
8. 3G DONGLE
The device supports external 3G Dongle, connect the 3G dongle to the device via the
external transfer cable, after the dongle indicator lights, you may use the 3G
network normally.
9. Camera
Click “Camera” in the main interface.
9.1 Camera
If the cursor is at position, the device is at Camera mode.
Click to take picture.
Click to set the scene mode, Picture size, Picture quality, and color effect.
Click
to set white balance.
Click to select back or front camera.

19
9.2 DV If the cursor is at position, the device is at DV mode.
Click to take picture.
Click to set the color effect or restore to default settings.
Click to select back or front camera.
10. Connect with external device
10.1. Connect with PC
Connect the device with the PC via the USB cable. The PC appears two new disk
symbols after connected successfully. One is the TF card, and the other is the
built-in flash.
10.2. Use of OTG and USB host
It supports the movable device with FAT32 format, such as U disk and MP3.
Connect the movable device to the MID. (Note: only OTG could support USB mouse
and keyboard, USB HOST only support USB2.0 High speed device)

20
10.3. Applications
For convenient usage, we installed some third party software in the MID. For
detailed operation methods, please check the corresponding instruction. Some of
the software may be able to be used in some area because of network service.
Troubleshooting
1. What if the device is abnormal during operation?
Answer: 1). Reboot the device to see if it works OK.
2). Charge the device by the charger to activate the battery. Make sure it has
power before you operate it.
3). It is suggested to upgrade the OS of the device by professional.
2. Why the standby time is so short sometimes?
Answer: the use time of the battery is all depend on the temperature and use
instance. If the temperature is too high or too low, the use time of the battery might
be effected. It is suggest using the device in normal temperature.
The using time is also affected by increased volume and frequently operation.
“Features can change without notice”
Imported: I.R.P., S.L.
Avda. Santa Clara de Cuba 5
41007 Sevilla
Spain

21
DECLARATION OF CONFORMITY
I.R.P., SL declare under our responsibility that the equipment meets the
requirements indicated in the following directives:
EMC DIRECTIVES
EN60950-1:2006/A11:2009/A1:2010
EN 62311: 2088
EN 301 489-1 V1.9.2:2011-09
EN 301 489-17 V2.1.1:2009-05
EN 300 328 V1.7.1: 2006-10
ETSI EN 301 489-1 V1.9.2(2011-09)
ETSI EN 301 489-17 V2.1.1(2009-05)
Description of apparatus:
BRIGMTON Model BTPC-1012-QC
Movile Internet Device
Importer: I.R.P., SL
Address: Avenida Santa Clara de Cuba 5, 41007, Sevilla.
-
 1
1
-
 2
2
-
 3
3
-
 4
4
-
 5
5
-
 6
6
-
 7
7
-
 8
8
-
 9
9
-
 10
10
-
 11
11
-
 12
12
-
 13
13
-
 14
14
-
 15
15
-
 16
16
-
 17
17
-
 18
18
-
 19
19
-
 20
20
-
 21
21
-
 22
22


Brigmton BTPC-1012-QC El manual del propietario
- Tipo
- El manual del propietario
- Este manual también es adecuado para
en otros idiomas
- English: Brigmton BTPC-1012-QC Owner's manual
Artículos relacionados
-
Brigmton BTPC-9070 DC Manual de usuario
-
-
-
-
-
-
-
-
Brigmton BTPC-1014 QC HD El manual del propietario
-