MAAX 105288-L-000-002 TS-3060 Guía de instalación
- Tipo
- Guía de instalación

105288 141267
TS 3060 TS 3660
TS 3060
105288-R-000 (Right Hand Drain)
105288-L-000 (Left Hand Drain) (Shown)
TS 3060
105288-R-000 (Desagüe a la derecha)
105288-L-000 (Desagüe a la izquierda) (Ilustración)
TS 3660
141267-R-000 (Right Hand Drain)
141267-L-000 (Left Hand Drain) (Shown)
TS 3660
141267-R-000 (Desagüe a la derecha)
141267-L-000 (Desagüe a la izquierda) (Ilustración)
TO BE REMOVED FOR USE BY THE OCCUPANT - RETIRER DE L’UNITÉ AVANT L’UTILISATION - RETIRE DE LA UNIDAD ANTES DE USAR
INSTALLATION INSTRUCTIONS
GUIDE D’INSTALLATION
GUÍA DE INSTALACIÓN
SAVE THIS GUIDE FOR FUTURE REFERENCE.
CONSERVER POUR UN USAGE ULTÉRIEUR.
CONSERVE ESTE MANUAL COMO REFERENCIA.
Read all instructions carefully before proceeding.
Lire toutes les instructions attentivement avant de commencer
l’installation.
Leer detenidamente todas las instrucciones antes de comenzar
la instalación.
Serial number • Numéro de série • Número de Serie
IMPORTANT • Record the serial number
IMPORTANT • Noter le numéro de série
IMPORTANTE • Registre el número de serie

Special Notes to Installer
It is the sole responsibility of the installer to determine, prior to
the installation, the requirements necessary for compliance with
all codes involving the unit or the installation.
All paperwork packaged with the unit and any associated options
or accessories should be saved and presented to the homeowner
upon completion of the installation.
HANDLE THE UNIT BY THE SHELL ONLY! Never lift any unit by
the attachments or the grab bars on the shell.
All published unit dimensions are for reference only. Any critical
measurements required for installation should be taken directly
from the unit being installed.
Any independent changes made to the unit (or to any options
and accessories supplied with the unit) beyond those required for
normal installation can void all warranties. (Refer to the Limited
Warranty on page 11 for further information.)
Inspection guidelines
A careful check of the unit should be conducted upon receipt. Notify
your supplier immediately if any questions or problems are encoun-
tered during this process.
DO NOT INSTALL ANY UNIT WITHOUT FIRST ADDRESSING
ANY QUESTIONS THAT ARISE DURING THE INSPECTION!
Basic Module Check
ü Check unit drain for match to bathroom drain location.
ü Check for unit surface damage.
ü Check wall section(s) and base for color match.
ü Check for proper options and accessories.
Options/Accessories Check
An individual check list is included with the assembly and installa-
tion guidelines of factory authorized options. Refer to listed publica-
tions for further information before continuing.
Notas Especiales para el Instalador
Es responsabilidad exclusiva del instalador, antes de realizar la insta-
lación, determinar cuáles son los requisitos necesarios para cumplir
con todos los códigos aplicables a la unidad o a la instalación.
Toda la documentación que se incluya en el paquete de la unidad
o de las opciones o accesorios de la misma, se deberá conservar
y entregar al propietario una vez completada la instalación.
¡MANIPULAR LA UNIDAD ÚNICAMENTE POR EL ARMAZÓN!
Nunca levante la unidad sosteniéndose de un accesorio ni agar-
rándose de las barras del armazón.
Las dimensiones de la unidad que se encuentran publicadas sir-
ven solamente de referencia. ¡Toda dimensión crítica necesaria
para la instalación deberá tomarse directamente de la unidad a
instalar!
Cualquier cambio independiente que se realice a la unidad (o a
cualquier opción o accesorio proporcionado con la unidad) más
allá de los cambios necesarios para la instalación normal podrá
invalidar todas las garantías. (Para más información, consultar
las garantías.)
Instrucciones para la Inspección
Una vez recibida la unidad, se deberá realizar una inspección cui-
dadosa de la misma. Si surgen cuestiones o problemas durante
este proceso, notique inmediatamente a su proveedor.
¡NO INSTALE NINGUNA UNIDAD SIN ANTES RESOLVER LAS
CUESTIONES QUE SURJAN DURANTE LA INSPECCIÓN!
Inspección Básica del Módulo
ü Comprobar que el desagüe de la unidad coincida con la ubi-
cación del desagüe del baño.
ü Comprobar que la supercie de la unidad no esté dañada.
ü Comprobar que el color de la base sea el mismo que el de los
paneles murales.
ü Comprobar que las opciones y los accesorios sean adecuados.
Inspección de Opciones y/o Accesorios
Junto con las instrucciones de montaje e instalación de las opcio-
nes aprobadas por el fabricante, se incluye una lista de control
indivi-dual. Para obtener mayor información antes de continuar,
consulte las publicaciones a las que se hace referencia.
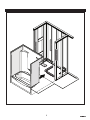
2

2-1/4"
60"
55-1/2"
8" 52"
77-1/4"
57-1/4"
Overflow
Center
13-1/2"
18-1/2"
2" (ABFLR Option)
36-1/4"
75-3/4"
Ø 3-3/8"
Drain
14-1/2"
1-1/2"
30"
31-1/2"
15-1/2"
Finished Unit Depth
Minimum Alcove Depth
Unit Rough-In Depth
Drain Center
Drain Center
Alcove Length / Unit Length
Drain Cut-Out
Drain
Cut-Out
5"
11-1/2"
NOTE: Left End Drain
Installation Illustrated
Drain Cut-Out
Fixture
Blocks
105288
TS-3060
76 1/8"
15 7/8"
25 1/4"
65 1/4"
13 1/2"
1"
56"
1 1/2"
(ABFLR Option)
59 7/8"
36 3/4"
8 1/4"
18 5/8"
35 7/8"
A
B
E
C
D
141267
TS-3660
Figure 1 - Unit Data and Dimensional Guidelines
(Tolerance: +0/ -3/8 inch)
Figura 1 - Datos de la Unidad y Guía de Dimensiones
(Tolerancia : +0/ -3 /8 de pulgada)
Note: All models are available with ABFLR (drain above the oor) option.
Nota : Todos los modelos se encuentran disponibles con la opción
de desagüe arriba del piso.
Model A B C D E
105288 60" 31½" 30" 8" 14½"
141267 59⅞" 36¾" 35⅞" 8¼" 18⅝"
3

Framing Requirements
Due to individual site variations, exact guidelines for every situation
cannot be supplied. The recommended framing and dimensional
requirements shown are for a typical application and may vary, de-
pending on site requirements.
CAUTION: It is advisable to protect the unit surface with
a thin sheet of plywood or cardboard shield while
the ange is being fastened to the framing.
Water Supply and Drain Connections
Refer to and follow the assembly and installation instructions pro-
vided with the supply valves and drain system. Carefully check all
ttings and connections for leaks.
Access
At least 30” x 15” (75 cm x 40 cm) of space must be made for easy
access to the plumbing and whirlpool system pump to allow repairs
to these components or to take them easily apart if needed. Consult
local building codes to ensure that the installation complies with
standards in your area.
WARNING! BEFORE STEPPING INSIDE THE UNIT, YOU
SHOULD CLEAR THE BOTTOM OF ALL POTENTIALLY
DAMAGING DEBRIS AND ENSURE THAT THE
SURFACE IS ADEQUATELY PROTECTED.
Requisitos de la Estructura
Es imposible proporcionar instrucciones exactas para cada situación
ya que cada lugar de instalación puede presentar características dife-
rentes. Las recomendaciones para la estructura y las dimensiones nec-
esarias que aparecen en las ilustraciones sirven para una instalación
estándar y pueden variar según los requisitos del lugar de instalación.
PRECAUCIÓN : Se recomienda proteger la supercie de la uni-
dad con madera contrachapada na o cartón mientras se sujeta
el reborde a la estructura.
Conexiones de Toma de Agua y Desagüe
Por favor consulte y siga las instrucciones de montaje e instalación
proporcionadas con el sistema de válvulas y desagüe. Verique
cuidadosamente que la grifería, accesorios y conexiones no tengan
pérdidas de agua.
Acceso
Prevea un acceso mínimo de 30” x 15” (75 x 40 cm) para la
plomería o la bomba del sistema de torbellino para reparar o des-
montar dichas piezas, si es necesario. Consulte los códigos de
construcción de su región para asegurarse de que la instalación
respete las normas locales.
ADVERTENCIA : ANTES DE PONER PIE DENTRO DE
LA UNIDAD, LA BASE DEBE ESTAR LIBRE DE ESCOMBROS
QUE PUEDAN CAUSAR DA—OS Y LA SUPERFICIE DEBE
ESTAR PROTEGIDA.
4

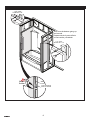
STEP 1 - SHOWER POSITIONNING / ETAPA 1 - POSITIONAR DE LA DUCHA
5

1 1/4" screw
Tornillo de 1 1/4”
1 1/4" screw
Tornillo de 1 1/4”
Shims
Cuñas
Wall
Pared
Level the flange
Nivel el reborde
Start from the bottom going up
and around.
Empezar desde la parte inferior
va hacia arriba y alrededor.
STEP 2 - SHOWER INSTALLATION / ETAPA 2 - INSTALACIÓN DE LA DUCHA
6

Wall framing
Marco de la Pared
Fastening flange
Reborde de Fijación
Furring strip or shim material
Listón de Enrasar o
Material de Relleno
Waterproof sealant
Sellador Impermeable
Water resistant underlayment
Revestimiento Resistente al Agua
STEP 3 - FINISHING GUIDELINES / ETAPA 3 - DIRECTRICES DE ACABADO
Unit Surface Care
WARNING!
NEVER USE ABRASIVE MATERIALS OR ABRASIVE
CLEANERS ON THE UNIT SURFACE!
READ AND FOLLOW ALL PACKAGE LABELS
AND INSTRUCTIONS!
As a result of routine use, residual soap, bath additives and natural body oils
can collect on the surface of the unit. Additional deposits can also build up
from minerals or other particles found in the water.
After each use, wipe the excess water from the unit. This practice will reduce
the build-up of deposits and help maintain the natural lustre of the unit.
Following a thorough surface cleaning, an application of quality automo-
tive wax will help prevent the accumulation of deposits. The frequency of
cleaning and waxing will depend on unit usage and water quality.
WARNING!
AVOID APPLYING WAX TO THE UNIT BOTTOM!
• Routine Cleaning: Mild, non-abrasive cleaner specically formu-
lated for gelcoat and acrylic surfaces recommended. (Rinse surface
thoroughly.)
• Heavy Soap Deposits: Liquid ammonia household cleaner,
applied full strength. (Rinse surface thoroughly.)
• Stubborn Stains: Liquid household cleaner or hydrogen perox-
ide, applied full strength. Place a saturated clean rag directly on
stain and let stand several hours. (Rinse surface thoroughly.)
For extreme cases, bu area with white automotive polishing com-
pound until stain disappears, and apply a quality automotive wax
to surface.
• Hard Water Scale: Liquid scale remover or white vinegar,
applied full strength. (Rinse surface thoroughly.)
• Mold/Mildew: Liquid mildew remover or baking soda and water
paste. Apply paste and allow to zz several minutes. (Rinse
surface thoroughly.)
• Construction Adhesive: Soften adhesive with handheld dryer and
peel o adhesive. (Caution is advised when using any electrical
device near water.)
For stubborn cases, apply rubbing alcohol or nail polish remover,
full strength, to adhesive. (Rinse surface thoroughly.)
WARNING!
BATH MATS OR OTHER ITEMS HELD IN PLACE USING
SUCTION MUST BE REMOVED FROM THE FLOOR OF THE
UNIT AFTER EACH USE.
OVER A PROLONGED PERIOD, FAILURE TO REMOVE
THESE TYPES OF ITEMS FROM THE BOTTOM OF THE UNIT
CAN RESULT IN SURFACE DAMAGE.
Cuidado y Limpieza de la Supercie de la Unidad
LEER Y RESPETAR TODAS LAS ETIQUETAS E INSTRUCCIO-
NES INCLUIDAS CON EL EMBALAJE
Como resultado del uso normal, la supercie de la unidad puede acu-
mular restos de jabón, productos para el baño y aceites naturales del
cuerpo. Es posible que se acumulen también ciertos minerales y otras
partículas que se encuentran en el agua.
Después de cada uso, secar el exceso de agua de la unidad. Esto reducirá la
acumulación de depósitos y ayudará a conservar el brillo natural de la unidad.
Tras realizar una limpieza a fondo, la aplicación de cera líquida para
automoviles ayudará a reducir las acumulaciones. La frequencia de limp-
ieza y encerado dependerá del uso de la unidad y de la calidad del agua.
• Limpieza Normal : Se recomienda utilizar limpiadores suaves, no
abrasivos, que estén formulados especialmente para supercies
de acrílico o de gelcoat. (Enjuagar bien la supercie.)
• Depósitos Abundantes de Jabón : Utilizar líquido limpiador con
amoníaco, sin diluir. (Enjuagar bien la supercie.)
• Manchas Rebeldes : Utilizar limpiador líquido de uso doméstio
o agua oxigenada, sin diluir. Colocar un paño embebido directa-
mente sobre la mancha y dejar actuar durante varias horas. (En-
juagar bien la supercie.)
En casos extremos, pulir la zona con compuesto blanco para pulido
de automóvil hasta que la mancha desaparezca y luego aplicar
cera para automóvil de buena calidad sobre la supercie.
• Sarro : Utilizar líquido removedor de sarro o vinagre blanco, sin
diluir. (Enjuagar bien la supercie.)
• Moho y Hongos : Utilizar líquido removedor de moho o hacer una
pasta con bicarbonato de sodio y agua. Aplicar la pasta y dejarla
burbujear durante varios minutos. (Enjuagar bien la supercie.)
• Adhesivo para Construcción : Ablandar el adhesivo con un seca-
dor de mano y despegarlo. (Se recomienda extrema precaución
cuando se utiliza un aparato eléctrico cerca del agua.)
Para casos difíciles aplicar alcohol de fricción o quitaesmalte, sin
disolver, sobre el adhesivo. (Enjuagar bien la supercie.)
¡ADVERTENCIA! :
LAS ALFOMBRAS DE BAÑO O CUALQUIER OTRO ACCESO-
RIO QUE SE ADHIERA A LA SUPERFICIE DE LA UNIDAD POR
MEDIO DE VENTOSAS SE DEBERÁ RETIRAR DEL PISO DE
LA UNIDAD DESPUÉS DE CADA USO.
SI ESTE TIPO DE ACCESORIOS PERMANECEN ADHERIDOS
AL PISO DE LA UNIDAD DURANTE PERÍODOS PROLONGA-
DOS, PUEDEN DAÑAR LA SUPERFICIE DE LA MISMA.
¡ADVERTENCIA! :
NUNCA UTILIZAR MATERIALES NI LIMPIADORES
ABRASIVOS EN LA SUPERFICIE DE LA UNIDAD.
¡ADVERTENCIA! :
¡NO APLICAR CERA EN EL PISO DE LA UNIDAD!

8
LIMITED WARRANTY — UNITED STATES
MAAX Bath Inc. oers express limited warranty on each of its products. This warranty extends only to the original owner/end-user for personal
household use. For commercial uses, additional limitations apply.
For accessing product Limited warranty please visit:
www.maax.com/us-warranty
MAAX Bath Inc. oers express limited warranty on each of its products. This warranty extends only to the original owner/end-user for personal
household use. For commercial uses, additional limitations apply.
For accessing product Limited warranty please visit:
www.maax.com/ca-warranty
LIMITED WARRANTY — CANADA
GARANTIE LIMITÉE — CANADA
MAAX Bath Inc. ore une garantie limitée expresse sur chacun de ses produits. Cette garantie s’adresse uniquement au propriétaire/
utilisateur original pour un usage personnel domestique. Des restrictions additionnelles s’appliquent aux utilisations commerciales
Pour accéder à la garantie limitée de votre produit, veuillez consulter le site :
www.maax.com/garantie
© MAAX Bath Inc., 2020 2020-10-16 10040036
www.maax.com
Technical Services / Service technique / Servicio técnico
T. 1 877 GET-MAAX (1 877 438-6229)
F. 1 888 361-2045
-
 1
1
-
 2
2
-
 3
3
-
 4
4
-
 5
5
-
 6
6
-
 7
7
-
 8
8


MAAX 105288-L-000-002 TS-3060 Guía de instalación
- Tipo
- Guía de instalación
en otros idiomas
Artículos relacionados
-
MAAX 141000 Guía de instalación
-
MAAX 106788-000-002 SPL 3850 Guía de instalación
-
MAAX 141501-000-002 Via SH-4834 Guía de instalación
-
-
MAAX 141502-000-002-103 Guía de instalación
-
MAAX 105919-000-001 Camelia SH-4834 (1-piece) Guía de instalación
-
MAAX 105621-SL-000-001 Figaro II (2-Piece AFR) Guía de instalación