Gibraltar Building Products FG2410WWB Instrucciones de operación
- Tipo
- Instrucciones de operación

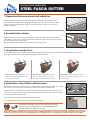
Remove old gutters and inspect fascia board and metal drip edge, repair or replace the
fascia/drip edge if needed. Tack a string to the fascia board 4 or 5 inches below the rooine
so that it is straight, level and taut. Drop one end of the string 1/4 inch per 10 ft., sloping
toward downspout.
DOWNSPOUT
DOWNSPOUT
1. Preparation: Measure and mark with a chalk line
Begin assembling your gutter system on the ground starting at end furthest from the down-
spout. Adhere an end cap to the rst piece of gutter, then join gutter sections using slip connec-
tors secured with screws or pop rivets.
Waterproof all joins with sealant, and secure with screws or pop rivets.
2. Assemble Gutter Sections
3. Hang Gutters onto the Fascia
4. Attach Mitres, Drop Outlets and Downspouts
Spike & Ferrule Insert ferrule into gutter lined
up with a rafter, hammer spike through gutter
and drip edge into the fascia.
Hidden Hanger Hook the hanger under the
front lip of the gutter. Drive a nail or screw
through the hole in the hanger into the fascia.
Strap Hanger Hook the hanger under the front
lip of the gutter. Carefully lift shingles then nail
into the roof deck.
Locate and mark the end of each rafter on the fascia board (Typically 24 inches). Use one of the following methods to hang your
gutter. Be sure that the drip edge hangs into the gutter and not behind it.
Attach mitres to fascia board at the corners. Connect mitres to gutter with slip connectors. Secure
with screws or pop rivets. Apply sealant to the inside seams to protect against leaks.
Connect elbows (a) and downspout (b) with the crimped ends pointing down. Secure the joints
with screws (c). Attach the downspout to the outlet then attach an elbow at the bottom to direct
rainwater away from the foundation.
Fasten downspout snugly to the wall with downspout bands.
Use 2 downspout bands for each 8-10 foot section of downspout.
SEALANT
HANGERS
a
a
b
b
c
Gutter material has sharp edges. Always use leather gloves and eye protection.
Working above grade is inherently dangerous, observe OSHA Regulations, Fall
Protection Systems Criteria and Practices (1926.502).
SECURE
AND SEAL
CONNECTOR
#RJ3FHA-SP
STEEL FASCIA GUTTER
INSTALLATION GUIDELINES
These basic installation guidelines are for use with typical or standard applications. It is always recommended to seek advice from a licensed
professional, and to check with your local building inspector or building permit office for approvals and possible variations that may apply.

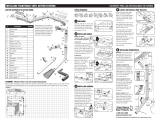
1. Retire las canaletas antiguas y revise la tabla frontal; repárela si es necesario. Fije una
cuerda a la tabla frontal y establezca una línea de nivel. Baje la cuerda 2,54 cm cada 12 m,
con inclinación hacia el bajante pluvial.
2. Comience en el extremo más alejado del bajante pluvial. Fije una tapa de extremo a la
primera parte de la canaleta, luego una las secciones siguientes de la canaleta. Imperme-
abilice todas las uniones con sellador y je con tornillos o remaches.
3. Cuelgue la canaleta ensamblada a la tabla frontal cada 60,96 cm.
4. Coloque ingletes en las esquinas. Conecte los ingletes a la canaleta con conectores
deslizantes. Fije con tornillos, soldadura o remaches. Selle con masilla.
Coloque codos para bajante pluvial. Las piezas se unen colocando el extremo más grande en el
extremo más pequeño aplicando fuerza entre ellos para una sujeción rme. Los bajantes
pluviales deben colocarse rmemente contra la pared. Coloque el codo en la parte inferior para
dirigir el agua lejos de los cimientos.
SELLADOR
GANCHOS
a
a
b
b
c
SELLADOR
CONECTOR
BAJANTES
BAJANTES
#RJ3FHA-SP
CANALETA DE ACERO PARA TABLA FRONTAL
PAUTAS DE INSTALACIÓN BÁSICA
El material de la canaleta tiene bordes losos. Siempre use guantes de cuero y lentes de protección.
Trabajar en niveles superiores es inherentemente peligroso, siga la normativa de OSHA, Prácticas y Criterios de los Sistemas de
Protección contra Caídas (1926.502).
Estas pautas básicas de instalación son para uso con aplicaciones típicas o estándar. Siempre se recomienda buscar el asesoramiento de un
profesional con licencia y consultar con el inspector local de su edificio o la oficina de permisos de construcción para obtener aprobaciones y
posibles variaciones que puedan aplicarse.
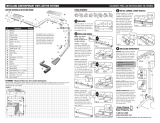
1. Preparación: Medir la distancia con un cordel entizado
2. Montar las secciones del desagüe
3. Colgar los desagües sobre a fascia
4. Añadir ingletes, salidas en caída y tubos de bajada
-
 1
1
-
 2
2


Gibraltar Building Products FG2410WWB Instrucciones de operación
- Tipo
- Instrucciones de operación
en otros idiomas
Artículos relacionados
Otros documentos
-
Unbranded M0728 Instrucciones de operación
-
Unbranded 4AEDBZ Instrucciones de operación
-
Amerimax Home Products M0504 Instrucciones de operación
-
-
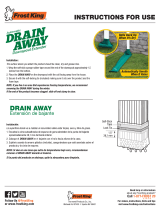 Frost King DE46 Guía de instalación
-
 Amerimax M0723 Instrucciones de operación
-
-
EasyHeat ADKS Roof & Gutter De-Icing Kit, 11629 001 El manual del propietario
-
 Amerimax T0473 Guía de instalación
-


