
Date Issued: 11/10/17 IS-49873-US
We’re here to help 866-558-5706
Hrs: M-F 9am to 5pm EST
CAUTION – RISK OF SHOCK –
Disconnect Power at the main circuit breaker panel or main
fusebox before starting and during the installation.
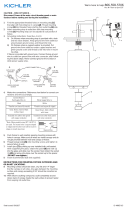
1) Find the appropriate threaded holes on mounting strap[1]
that align with hole distance in canopy[2] Thread mounting
screws[3] into threaded holes starting from outlet box[4] side.
2) Attach mounting strap to outlet box with strap mounting
screws[5]. Mounting strap can be adjusted to suit position of
xture.
3) Grounding instructions: (See Illus. A or B)
A) Onxtureswheremountingstrapisprovidedwithahole
and two raise dimples. Wrap ground wire from outlet box
around green ground screw, and thread into hole.
B) Onxtureswhereacuppedwasherisprovided.Put
ground wire from outlet box under cupped washer and
green ground screw and thread screw into hole in mount-
ing strap.
Ifxtureisprovidedwithgroundwire.Connectxtureground
wire to outlet box ground wire with wire connector, after follow-
ingtheabovesteps.Neverconnectgroundwiretoblackor
white power supply wires.
4) Makewireconnections.Referencechartbelowforcorrectcon-
nections and wire accordingly
5) Pushxturetowallcarefullypassingmountingscrewswith
holesincanopy.Makesureallwiresareinsidecanopyanddo
notgetpinchedbetweenwallandcanopyofxture.
6) Threadlockupknobs[6] onto mounting screws and tighten to
securexturetowall.
7) Install the glass panels[8] sliding down into the inside of the
xtureintothechannelatthebottomandusingtheglass
bracket[9] and the screw[10], secure the glass into place as
shown.
8) Insert recommended bulb (not supplied).
9) Install the top using the supplied screws[7].
INSTRUCTIONS FOR MOUNTING FIXTURE OUTDOORS AND/
OR IN WET LOCATIONS.
10) Mountingsurfaceshouldbeclean,dry,atand1/4”larger
that the canopy on all sides. Any gaps between the mounting
surfaceandcanopyexceeding3/16”shouldbecorrectedas
required.
11) Withsiliconecaulkingcompound,caulkcompletelyaround
wherebackofcanopymeetsthewallsurfacetopreventwater
from seeping into outlet box.
GREEN GROUND
SCREW
CUPPED
WASHER
OUTLET BOX
GROUND
FIXTURE
GROUND
DIMPLES
WIRE CONNECTOR
OUTLET BOX
GROUND
GREEN GROUND
SCREW
FIXTURE
GROUND
A
B
Connect Black or Red
Supply Wire to:
Connect White Supply Wire to:
Blac
kW
hite
*Parallel cord (round & smooth)
*Parallel cord (square & ridged)
Clear, Brown, Gold or Black
without Tracer
Clear, Brown, Gold or Black
with Tracer
Insulated wire (other than green)
with copper conductor
Insulated wire (other than green)
with silver conductor
*Note: When parallel wire (SPT I & SPT II)
are used. The neutral wire is square shaped or
ridged and the other wire will be round in
shape or smooth (see illus.)
Neutral Wire
4
5
1
3
2
6
7
8
9
10

Date Issued: 11/10/17 IS-49873-US
Estamos aquí para ayudarle 866-558-5706
Horario: Lunes-Viernes 9am a 5pm EST (hora ocial del este)
1) Encuentrelosoriciosroscadosadecuadosenlacorreade
montaje[1]quesealineanconladistanciadelagujeroenel
dosel[2]Enrosquelostornillosdemontaje[3]enlosoricios
roscadosdesdeelladodelacajadesalida[4].
2) Fijelacorreademontajealacajadesalidaconlostornillosde
jacióndelacorrea[5].Lacorreademontajesepuedeajustar
paraadaptarsealaposicióndelaparato.
3) Instruccionesparaponeratierra:(VerIlustracionesAoB).
A) Enartefactosdondesesuministralaabrazaderade
montajeconunagujeroydosdepresionesonduladas.
Envuelvaelconductordetierradelacajadesalida
alrededordeltornillodetierraverdeyatornilleenel
agujero.
B) Enartefactosdondesesuministraunaarandela
cóncava.Fijeelconductordetierradelacajadesalida
debajodelaarandelacóncavayeltornillodetierra
verdeyenrosqueenlaabrazaderademontaje.
Sisesuministraelartefactoconconductordetierra.Conecte
elconductordetierradelartefactoalconductordetierrade
lacajadesalidaconconectordetierradespuésdeseguirlos
pasosanteriores.Nuncaconecteelconductordetierraalos
alambresdealimentacióneléctricanegrosoblancos.
4) Hagalasconexionesdelosalambres.Reérasealatablade
abajopararealizarlasconexionescorrectasdeloscables.
5) Empujelajaciónalaparedpasandocuidadosamentelos
tornillosdemontajeconlosoricioseneldosel.Asegúresede
quetodosloscablesesténdentrodeldoselyquenoqueden
atrapadosentrelaparedyeldoseldelaparato.
6) Controlesdebloqueodelhilo[6]enlostornillosdemontajey
apriételosparajareljadoralapared.
7) Instalelospanelesdevidrio[8]deslizándosehaciaabajoenel
interiordelaccesorioenelcanalenlaparteinferioryutilizan-
doelsoportedevidrio[9]yeltornillo[10],asegureelvidrioen
sulugarcomosemuestra.
8) Insertelabombillarecomendada(noincluido).
9) Vuelvaainstalarlapartesuperiorinvirtiendoelnúmero8ante-
rior.
INSTRUCCIONES PARA MONTAJE DE LA ALMACENAMIENTO
AL AIRE LIBRE Y / O EN LUGARES MOJADOS.
10) Lasuperciedemontajedebeestarlimpia,seca,planay1/4
“másgrandequeeltoldoentodosloslados.Losespacios
entrelasuperciedemontajeylacubiertasuperiora3/16
“debencorregirsesegúnseanecesario.
11) Conelcompuestodecalafateodesilicona,calafatearcomple-
tamentealrededordedondelaparteposteriordeldoselse
encuentraconlasuperciedelaparedparaevitarqueelagua
seltreenlacajadesalida.
PRECAUCIÓN – RIESGO DE DESCARGA ELÉCTRICA –
Desconecte la electricidad en el panel principal del interruptor
automático o caja principal de fusibles antes de comenzar y
durante la instalación.
ARANDELA
CONCAVA
TIERRA DE LA
CAJA DE SALIDA
TORNILLO DE TIERRA,
VERDE
DEPRESIONES
TIERRA
ARTEFACTO
CONECTOR DE ALAMBRE
TIERRA DE LA
CAJA DE SALIDA
TORNILLO DE TIERRA,
VERDE
TIERRA
ARTEFACTO
A
B
Conectar el alambre de
suministro negro o rojo al
Conectar el alambre de
suministro blanco al
Negro Blanco
*Cordon paralelo (redondo y liso)
*Cordon paralelo (cuadrado y
estriado)
Claro, marrón, amarillio o negro
sin hebra identificadora
Claro, marrón, amarillio o negro
con hebra identificadora
Alambre aislado (diferente del
verde) con conductor de cobre
Alambre aislado (diferente del
verde) con conductor de plata
*Nota: Cuando se utiliza alambre paralelo
(SPT I y SPT II). El alambre neutro es de forma
cuadrada o estriada y el otro alambre será de
forma redonda o lisa. (Vea la ilustracíón).
Hilo Neutral
4
5
1
3
2
6
7
8
9
10
-
 1
1
-
 2
2


Kichler Lighting 49874WZC Manual de usuario
- Tipo
- Manual de usuario
- Este manual también es adecuado para
en otros idiomas
Artículos relacionados
-
Kichler Lighting 45888OZ Manual de usuario
-
 Kichler Lighting 49892OZ Manual de usuario
-
 Kichler Lighting 49865WZC Manual de usuario
-
Kichler Lighting 49961AVI Manual de usuario
-
 Kichler Lighting 42589BK Manual de usuario
-
 Kichler Lighting 49872WZC Manual de usuario
-
 Kichler Lighting 45690NI Manual de usuario
-
 Kichler Lighting 45890NI Manual de usuario
-
 Kichler Lighting 45891NI Manual de usuario
-
 Kichler Lighting 45689NI Manual de usuario


