RAMSET 16950 Manual de usuario
- Categoría
- Herramientas eléctricas
- Tipo
- Manual de usuario

Questions or Concerns? Call our Technical Department
at 1-877-ITW-BRANDS (1-877-489-2726)
¿Preguntas o comentarios? Llama al Departamento de
Servicio Técnico al 1-877-ITW-BRANDS (1-877-489-2726)
1
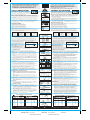
TO AVOID SERIOUS INJURY OR DEATH
SAFETY PRECAUTIONS
Available Power Levels:
Power Level No. Color
1. Gray Weakest
2. Brown
3. Green
4. Yellow Strongest
THIS TOOL IS FOR USE ONLY BY LICENSED OPERATORS. YOU
MUST OBTAIN A LICENSE BEFORE USING IT. TO OBTAIN YOUR
LICENSE AND ACTIVATE THE WARRANTY, READ THE ENTIRE
MANUAL AND SUCCESSFULLY COMPLETE THE POWDER
ACTUATED TOOL LICENSING EXAM AT: www.ramset.com
OR SCAN THE QR CODE WITH YOUR MOBILE DEVICE.
THIS TOOL IS FOR USE ONLY BY LICENSED OPERATORS.
YOU MUST OBTAIN A
LICENSE
BEFORE USING
IT
.
A
TOOL OPERATOR'S CARD WILL BE
ISSUED TO
YOU
AFTER SUCCESSFULLY COMPLETING THE ENCLOSED
EXAM AND RETURNING IT
TO
RECEIVE
YOUR CARD
AND ACTIVATE YOUR WARRANTY
.
OPERATOR'S
LICENSE CAN ALSO
BE
OBT
AINED AT:
www
.ramset.com
LOW
VELOCITY
POWDER ACTUATED TOOL
Operator's Instruction & Training Manual
•
The
Ramset
TriggerShot™ is a
light
duty tool
designed
for applications
such
as
small room additions and basement remodels. Tool life will vary depending on work
site
conditions
and application.
• The
TriggerShot™ is
a
low
velocity piston
type fastening
tool.
It
is designed for
use with
Ramset
.22 caliber
CW
powder loads
and
Ramset fasteners.
• Do
not
operate the
TriggerShot™ before studying this
manual carefully
and
thoroughly
understanding the
material contained herein.
IMPOR
TANT
: The
tool warranty
is
only activated upon
receipt by ITW
Brands
of the
completed
Operator's
Exam.
Rev. 09/09
MANUAL
PRINTED
IN TAIWAN RD v00
Warning! The following pages contain detailed warnings, cautions, and
rules of safe operation with which the operator must be familiar and
follow to avoid serious injury or death.
Before Loading and Firing Protect Yourself and Others
1. Never place your hand or fingers over the front muzzle of the tool - the fastener
or piston can seriously injure your hand in the event of an accidental discharge.
2. Always use only Ramset fasteners and loads at all times for consistent tool
functioning.
3. Operators and bystanders must wear eye and hearing protection at all times.
Serious eye injury and hearing loss can result if proper gear is not worn.
4. Keep work area clear and where required always post warning signs when
using the tool. Sign should state, "Powder Actuated Tool in Use" and can be
obtained by contacting Technical Services at 1-877-ITW-BRANDS
(1-877-489-2726).
Prepare for Loading
Prior to using the tool, make sure it is
unloaded and then do the functional check:
Check the functioning of the tool, without a
powder load or fastener, by pushing down
against the work surface and pulling the
trigger. The trigger mechanism will make an
audible click. Release the tool from the work
surface and fully extend the barrel to reset the piston.
Always check the material being fastened into, by performing the Center
Punch Test: Using a fastener as a center punch, strike the fastener against the
work surface using an average hammer blow and check the results. Wear eye
protection while performing this test.
If the base material is suitable for powder actuated fasteners, make a test
fastening into a suitable base material with a number 1 (gray) load. If the
number 1 load does not fully set the fastener, try the next higher power load
until the proper level is found. Failure to properly test fire to determine
correct power level may result in
overpowering the fastener, causing it
to pass completely through the work
material, injuring someone on the
other side. Overpowering the fastener
may also damage the tool.
NOTE: Ramset loads are designed
for use with Ramset tools.
Do not attempt to use other power loads. Doing so may lead to unintentional
load discharge as well as damage to the tool. This tool is NOT designed to
use red (5) or purple (6) power level loads. Using red (5) or purple (6) loads
can result in serious injury to the operator or bystanders.
Operating the Tool
1. Always point the tool away from people and in a safe direction.
2. Never use tool when explosives or flammable materials are nearby.
3. Never fire the tool without a fastener. The piston will protrude from the
muzzle of the tool, enter the work surface and possibly cause injury to
the operator or a bystander. Firing without a fastener may also damage
the tool.
4. Always hold the tool perpendicular to the work surface to avoid serious
injury or death from ricocheting fasteners. Use a spall guard* whenever
possible.
*To order optional spall guard, call 1-877-ITW-BRANDS (1-877-489-2726)
5. Never set a fastener too close to another fastening or a free edge. This
can cause the fastener to ricochet. Always follow the minimum spacing
and edge distance requirements.
6. Never fire into very hard or brittle materials such as cast iron, tile, glass
or rock. These materials can shatter, causing sharp fragments and/or the
fastener to fly freely.
7. Never fasten into structural steel base material thinner than 3/16". Never
fasten into concrete base material thinner than 3 times shank
penetration. Always maintain minimum penetration requirements.
8. Fastening into block and masonry is not recommended. When it is
necessary to fasten into masonry walls, it is recommended that fasteners
be driven into the horizontal joints only. Published holding values for
these materials is not available due to the inconsistency of the materials.
9. Never fasten through or into a hole. Always maintain at least 1/2"
distance from any pre-drilled or pre-punched hole.
10. Should you decide not to make a fastening after the tool has been
loaded, always remove the powder load first, then the fastener. Never
attempt to pry an unfired load out of the tool. Call The Technical
Department at 1-877-ITW-BRANDS (1-877-489-2726) for assistance.
Handling Tool and Powder Loads
11. Never leave a loaded tool unattended. Someone may pick it up, not
know it is loaded and accidentally discharge the tool causing serious
injury or death. Never load the tool until you are prepared to complete
the fastening. Always store loads and tool, unloaded, under lock and
key.
12. Never carry fasteners or other hard objects in the same pocket or
container with powder loads. The loads could be set off, causing serious
injury or death.
13. A person that is color blind must be extra careful when loading the tool.
One must only take a load from a box that is identified by powder load
number. Never use loose loads that can be misidentified.
14. Powder loads must never be used in firearms. They are more powerful
than the charges normally used in small firearms. This could result in
serious injury or death.
Fasteners
15. A powder actuated fastener, after it has been installed, is considered a
permanent fastening. Do not attempt to pull a fastener out of concrete
or steel. Attempting to do so may result in serious injury.
Operating Problems
16. If the tool fails to fire, hold the tool firmly against the material for 30
seconds. Remove the tool from the work surface, open the barrel to
reset the piston. Re-chamber the load and repeat firing sequence. If the
tool fails to fire again, hold for 30 seconds, unload the tool, and then
discard the load into a bucket of water. Never attempt to pry an unfired
load out of the tool. Call The Technical Department at
1-877-ITW-BRANDS (1-877-489-2726) for assistance.
17. Never unload or disassemble a jammed, stuck or broken tool which
contains a live powder load. This may cause the tool to fire unintention-
ally. Always point a jammed tool away from yourself and other people.
Immediately store a jammed or broken tool in a locked container after
tagging it "Defective - Do Not Use". Call 1-877-ITW-BRANDS
(1-877-489-2726) for technical assistance.
.300 Head
Plastic Fluted
Drive Pins with 7/8" Washer
Shank Shank
Length Diameter
1" .145
1-1/4" .145
1-1/2" .145
2" .145
.145
3" .145
2-1/2"
Shank Shank
Length Diameter
1/2" .145
5/8" .145
3/4" .145
1" .145
1-1/4" .145
1-1/2" .145
1-3/4" .145
2" .145
2-3/8" .145
.145
3" .145
2-1/2"
.300 Head
Plastic Fluted Drive Pins
Ramset Fastener Selection Guide
PARA EVITAR LESIONES SERIAS O LA MUERTE
MEDIDAS DE SEGURIDAD
Niveles de potencia disponibles:
Nivel de potencia No.
Color
1. Gris Menos potente
2. Café
3. Verde
4. Amarillo Más potente
ESTA HERRAMIENTA ES SÓLO PARA USO POR OPERADORES CON
LICENCIA. DEBES OBTENER UNA LICENCIA ANTES DE USARLA.
PARA OBTENER TU LICENCIA Y ACTIVAR LA GARANTÍA, LEE EL
MANUAL COMPLETO Y COMPLETA SATISFACTORIAMENTE EL
EXAMEN DE LICENCIATURA DE HERRAMIENTAS ACCIONADAS POR
ELECTRICIDAD EN: www.ramset.com
O ESCANEA EL CÓDIGO QR CON TU DISPOSITIVO MÓVIL.
THIS TOOL IS FOR USE ONLY BY LICENSED OPERATORS.
YOU MUST OBTAIN A
LICENSE
BEFORE USING
IT
.
A
TOOL OPERATOR'S CARD WILL BE
ISSUED TO
YOU
AFTER SUCCESSFULLY COMPLETING THE ENCLOSED
EXAM AND RETURNING IT
TO
RECEIVE
YOUR CARD
AND ACTIVATE YOUR WARRANTY
.
OPERATOR'S
LICENSE CAN ALSO
BE
OBT
AINED AT:
www
.ramset.com
LOW
VELOCITY
POWDER ACTUATED TOOL
Operator's Instruction & Training Manual
•
The
Ramset
TriggerShot™ is a
light
duty tool
designed
for applications
such
as
small room additions and basement remodels. Tool life will vary depending on work
site
conditions
and application.
• The
TriggerShot™ is
a
low
velocity piston
type fastening
tool.
It
is designed for
use with
Ramset
.22 caliber
CW
powder loads
and
Ramset fasteners.
• Do
not
operate the
TriggerShot™ before studying this
manual carefully
and
thoroughly
understanding the
material contained herein.
IMPOR
TANT
: The
tool warranty
is
only activated upon
receipt by ITW
Brands
of the
completed
Operator's
Exam.
Rev. 09/09
MANUAL
PRINTED
IN TAIWAN RD v00
¡Advertencia! Las siguientes páginas contienen avisos de advertencia y
precaución, así como reglas para operar con seguridad la herramienta, todo lo cual
debe conocer y seguir el operador para evitar sufrir lesiones serias o la muerte.
Antes de cargar y disparar protéjase usted mismo y a los demás
1.
Nunca coloque la mano ni los dedos en el extremo de la boca de la herramienta
cargada; el sujetador o el pistón pueden lesionarle seriamente la mano en caso de
una descarga accidental.
2. Para lograr un funcionamiento uniforme de la herramienta, siempre use sólo
sujetadores y cargas Ramset.
3. Los operadores y circunstantes deben tener puesta protección para los ojos y los
oídos en todo momento. Pueden producirse lesiones en los ojos y pérdida de oído
si no se lleva puesto el equipo adecuado.
4. Mantenga despejada el área de trabajo y, donde se requiera, siempre coloque
avisos de advertencia al usar la herramienta. El aviso debe decir “Herramienta de
Pólvora en Uso” ("Powder Actuated Tool in Use"), y puede obtenerse en el Depto.
de Servicios Técnicos, llamando al 1-877-ITW-BRANDS (1-877-489-2726).
Preparación para la carga
Antes de usar la herramienta asegúrese de que esté descargada y entonces
realice la revisión de funcionamiento siguiente:
Revise el funcionamiento de la herramienta sin
carga de pólvora ni sujetador; Revise el
funcionamiento de la herramienta sin carga de
pólvora ni sujetador en ella; para ello, empújela
contra la superficie de trabajo y tire del gatillo. El
mecanismo del gatillo emite un chasquido. Retire
la herramienta de la superficie de trabajo y extienda el barril para reajustar el
pistón. Siempre revise el material en el que vaya a fijar; para ello efectúe la
Prueba del Punzón de Marcar. Usando un sujetador como punzón de marcar,
pique la superficie de trabajo con un golpe de martillo común y verifique los
resultados. Tenga puesta protección para los ojos mientras efectúa esta prueba.
Si el material base es adecuado para sujetadores fijados con herramienta de
pólvora, realice una prueba fijando un sujetador en un material base adecuado
con una carga del número 1 (gris). Si la carga del número 1 no clava
completamente el sujetador, pruebe con una carga del siguiente número más
alto hasta que encuentre el nivel adecuado. Si no realiza disparos de prueba para
determinar el nivel de potencia correcto,
puede aplicar una fuerza excesiva al
sujetador, causando que éste atraviese el
material de trabajo y pueda lesionar a
alguien situado al otro lado. Si aplica una
fuerza excesiva al sujetador también
puede dañar la herramienta.
NOTA: Las cargas Ramset están
fabricadas para usarse con
herramientas de dicha marca.
No intente usar otras cargas. Si lo hace puede causar una descarga accidental
con los consecuentes daños a la herramienta. Esta herramienta NO está
fabricada para usar cargas rojas (5) ni moradas (6). Si se utilizan cargas rojas (5)
o moradas (6), el operador o los circunstantes pueden sufrir lesiones.
Manejo de la herramienta
1. Siempre apunte la herramienta lejos de las personas y en una dirección segura.
2.
Nunca use la herramienta cuando haya cerca explosivos o materiales inflamables.
3.
Nunca
dispare la herramienta sin tener un sujetador puesto. El pistón saldrá
por el extremo de la boca de la herramienta, penetrará la superficie de trabajo
y posiblemente cause lesiones al operador o a un espectador. Si dispara sin
tener un sujetador puesto, también puede dañar la herramienta.
4. Siempre mantenga la herramienta perpendicular a la superficie de trabajo para
evitar sufrir lesiones serias o la muerte a causa de sujetadores que reboten.
Siempre que sea posible utilice un protector contra descascaramiento*.
*
Para pedir el protector contra descascaramiento optativo, llame al
1-877-ITW-BRANDS (1-877-489-2726)
5.
Nunca
set a fastener too close to another fastening or a free edge. This can
cause the fastener to ricochet. Always follow the minimum spacing and edge
distance requirements.
6.
Nunca
fire into very hard or brittle materials such as cast iron, tile, glass or
rock. These materials can shatter, causing sharp fragments and/or the
fastener to fly freely.
7.
Nunca
fije nada en material base de acero estructural de un espesor inferior a
3/16". Nunca fije nada en material base de concreto de un espesor inferior a
3 veces la longitud de penetración del sujetador. Siempre respete los
requisitos mínimos de penetración.
8. No se recomienda fijar en bloc o en mampostería. Cuando es necesario fijar
en paredes de mampostería, se recomienda introducir los sujetadores sólo en
las uniones horizontales. No hay valores de fuerza de sujeción publicados de
estos materiales debido a la falta de uniformidad de éstos.
9.
Nunca
fije ningún sujetador en un agujero o a través de éste. Siempre
mantenga una distancia mínima de 1/2" de cualquier aguero previamente
taladrado o perforado.
10. Si decide no realizar la fijación despuésde haber cargado la herramienta,
siempre retire primero la carga de pólvora, y luego el sujetador. Nunca
intente extraer de la herramienta la carga a fuerza. Para recibirayuda, llame
al Depto. Técnico, al 1-877-ITW-BRANDS (1-877-489-2726).
Manejo de la herramienta y de las cargas de pólvora
11.
Nunca
deje desatendida una herramienta cargada. Alguien puede
tomarla, sin saber que está cargada, dispararla accidentalmente, y
causar lesiones serias o la muerte. Nunca cargue la herramienta sino
hasta que esté preparado para fijar el sujetador. Siempre guarde la
herramienta (descargada) y las cargas bajo llave.
12.
Nunca
lleve sujetadores ni otros objetos duros en el mismo bolsillo o
recipiente donde tenga cargas de pólvora. Las cargas podrían
dispararse y causar lesiones serias o la muerte.
13. Las personas que padecen daltonismo deben tener extremo cuidado al
cargar la herramienta. Debe tomar la carga sólo de una caja
identificada con el número de la carga de pólvora. Nunca use cargas
sueltas que puedan identificarse de manera errónea.
14.
Nunca
deben usarse las cargas de pólvora con armas de fuego. Son
más potentes que las cargas usadas normalmente con armas de fuego.
Podrían producirse lesiones serias o la muerte.
Sujetadores
15. Una vez instalado con herramienta de pólvora un sujetador, se considera
fijado de forma permanente. No intente extraer de concreto o acero un
sujetador instalado. Si lo intenta puede causarse lesiones serias.
Problemas en el funcionamiento de la herramienta
16. Si la herramienta no dispara, manténgala firmemente puesta contra el
material por 30 segundos. Retire la herramienta de la superficie de
trabajo y abra el barril para reajustar el pistón. Vuelva a colocar la carga
en la camara y repita la secuencia de disparo. Si la herramienta no
dispara de nuevo, manténgala en su lugar por 30 segundos,
descárguela y luego deseche la carga en un balde de agua. Nunca
intente extraer de la herramienta la carga a fuerza. Para recibir ayuda,
llame al Depto. Técnico, al 1-877-ITW-BRANDS (1-877-489-2726).
17.
Nunca
descargue ni desarme la herramienta si está trabada, pegada o
descompuesta y contiene una carga de pólvora en buen estado. La
herramienta podría dispararse accidentalmente. Siempre apunte toda
herramienta trabada lejos de usted y de las demás personas. De
inmediato guarde la herramienta trabada o descompuesta en un
recipiente con cerradura de llave después de ponerle una etiqueta de
"Defectuosa - No Usar" ("Defective - Do Not Use").
Clavos con cabeza de
0.300”, estrías de
plástico y arandela de 7/8"
1" .145
1-1/4" .145
1-1/2" .145
2" .145
2-1/2" .145
3" .145
Longitud Diámetro
del tallo del tallo
Longitud Diámetro
del tallo del tallo
1/2" .145
5/8" .145
3/4" .145
1" .145
1-1/4" .145
1-1/2" .145
1-3/4" .145
2" .145
2-3/8" .145
.145
3" .145
2-1/2"
Clavos con cabeza
de 0.300”
y estrías de plástico
Guía Para Seleccionar Sujetadores Ramset
STEEL
CONCRETE
1
2
3
4
1
2
3
4
5
6
7
8
9
10
11
12
13
14
15
16
17
(Typical base materials: poured concrete, structural steel and masonry.)
(Materiales base típicos: concreto vaciado, acero estructural y mampostería.)
1. If the fastener point
is blunted, material
is too hard.
2. If material cracks or
shatters, material is
too brittle.
3. If the fastener
penetrates the
material easily,
material is too soft.
4. If the fastener makes
small indentation into
material, material is
suitable for fastening.
1. Si se embota la
punta del sujetador,
significa que el
material es
demasiado duro.
2. Si el material se
agrieta o rompe,
significa que es
demasiado
quebradizo
3. Si el sujetador
penetra con
facilidad, significa
que el material es
demasiado blando.
4.
Si el sujetador hace
una pequeña muesca
en el material, significa
que éste es adecuado
para fijación.
OVERALL SIZE: 8.5” x 21” FOLD SIZE: 8.5” x 1.614” 13 Panels
(215.9 mm x 533 mm) (215.9 mm x 41 mm)

Questions or Concerns? Call our Technical Department
at 1-877-ITW-BRANDS (1-877-489-2726)
¿Preguntas o comentarios? Llama al Departamento de
Servicio Técnico al 1-877-ITW-BRANDS (1-877-489-2726)
2
Read Reverse Side First
Caution!
Be sure to read and understand all safety precautions and
complete the Operator's Exam before attempting to operate the tool.
Check to be sure the tool is unloaded and no foreign objects or fasteners
are in the barrel. Perform daily function test before operating.
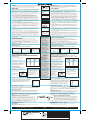
OPERATION
Check the functioning of the tool, without a powder load or fastener in
the tool, by pushing down against the work surface, checking to be sure
the groove portion of the barrel aligns with the arrows on the tool body.
Function unloaded tool several times and insure that the breech parts
and firing mechanism operate freely before fastening with the tool.
1. Point the tool in a safe direction and slide the barrel forward with your
other hand. This action resets the piston for the next fastening. Loss of
power may be the result of an improperly reset piston.
2. Place a fastener, point out, into the front end of the barrel until the
plastic fluted tip fits inside. Always load the fastener before
inserting the power load to prevent accidental discharge. Do not
use excessive force when inserting the fastener. Stop if excessive
force is required and call 1-877 ITW-BRANDS for technical assistance.
3. Insert the powder load after making sure the chamber is clear. The
powder load will not fully set until the tool is compressed against the
work surface. Always start with the lowest level and increase until the
proper level is found. Note: Overpowering a fastener into steel or
concrete is dangerous.
Note: Before making the fastening, the base material should be center
punch tested for suitability of powder actuated fastenings (see pg. 1).
4. Close tool by pulling the barrel back to the semi-closed position. Never
attempt to close the tool by exerting force on the front of the barrel.
Never place your fingers or hands over the muzzle end of the barrel.
The proper position of the hands and fingers are shown in the
illustration.
5. With the tool in the semi-closed position, place it against the material to
be fastened. Hold the tool firmly at 90º with one hand and completely
depress, check to be sure the groove on the barrel aligns with the
marking on the receiver.
6. Using a one pound hammer, strike the firing pin button with a sharp,
firm blow. If the tool fails to fire, follow the misfire procedure on page 1.
Note: It is important to strike the firing pin button firmly and squarely. A
light blow or one off-center may not activate the load, however it will jar
the piston out of position which will cause a reduction in power. (See
Troubleshooting below.)
7. To prepare for the next fastening, point the tool in a safe direction, and
slide the barrel firmly forward. This action ejects the fired load out of
the tool and properly resets the piston. The tool is now ready for the
next fastening.
TROUBLESHOOTING
Tool operator must carefully follow all operating instructions and
precautions to successfully operate the tool. Following is a list of
potential situations an operator may encounter and the probable causes:
• If a tool problem occurs and technical assistance is required, please
call 1-877-ITW-BRANDS (1-877-489-2726)
WARNING: Do not operate a tool that is not functioning properly.
CORRECTING DIFFICULTIES
ALWAYS CHECK INSTRUCTION MANUAL FOR PROPER ASSEMBLY OF PARTS
Tool Fails to Fire
There are three causes for most all misfires:
1. Firing pin button struck 2. Firing pin button 3. Tool not completely
too lightly struck off center compressed
Inconsistent Fastener Setting
The major reason for inconsistent fastening is the improper
position of the piston. There are two reasons for an improperly
positioned piston:
1. Failure to completely reset the piston.
2. A missed hit of the rear button.
In both cases the barrel must be fully
extended to reset the piston.
Note: It is a good practice to fully
extend the barrel and re-chamber the
load after the tool is improperly struck
causing a misfire, and after the misfire
procedure has been followed.
Piston Overdrive
Piston overdrive is a problem that
occurs after the tool is fired. The piston
may extend into the work surface as
much as 1/2". Piston overdrive can
occur because of several reasons:
• Powder load too strong
• Soft base material
•
Void in the masonry
material that you're
fastening into.
• Incorrect fastener selection.
Caution: Constant overdrive will damage the tool beyond repair. For technical
assistance or service information call 1-877-ITW-BRANDS (1-877-489-2726).
Note: When overdrive occurs, the piston may jam into the
front barrel. In this case be sure the tool is unloaded, turn
the tool upside down and place on the work surface.
Strike the exposed piston with a hammer until it moves
downward into the barrel. Reset the piston. Wear safety
goggles when performing this task.
Fastening to Concrete
When fastening into concrete always maintain a minimum 3" spacing
between fastenings and 3" from any free edge. Penetration into concrete
should always be 1" minimum. The concrete thickness should be at least 3
times the penetration depth.
Fastening to Steel
When fastening into steel always maintain a minimum 1-1/2" spacing
between fastenings and 1/2" from any free edge. Fastener length should be
long enough to penetrate the steel completely. Steel thickness is limited to
3/16" to 5/16".
PROPER MAINTENANCE AND CLEANING INSTRUCTIONS
Make sure the tool is not loaded prior to attempting disassembly or
cleaning.
Daily Maintenance And Cleaning
Wear eye protection when cleaning the tool. Check all areas of
tool for debris or rust that could restrict safe operation of
moving parts. Do not operate any tool that shows signs of rust
on any surface as this may interfere with the safe operation of the tool.
Call 1-877-ITW-BRANDS (1-877-489-2726) for technical assistance.
The barrel assembly and housing should be cleaned
of excess dirt and debris on a daily basis. After each use, spray a
quality penetrating lubricant on indicated areas before storing tool.
REPLACEMENT PARTS
Description
Note: There are no user serviceable replacement parts for this tool. It is
designed for light duty applications.
Lee el reverso primero
¡PRECAUCIÓN!
Asegúrese de leer y comprender todas las medidas de
seguridad y conteste el Examen del Operador antes de hacer funcionar la
herramienta. Revise para asegurarse de que esté descargada la herramienta y de
que no haya objetos extraños ni sujetadores en el barril. Efectúe la prueba diaria de
funcionamiento antes de utilizar la herramienta.
FUNCIONAMIENTO
Revise el funcionamiento de la herramienta sin carga de pólvora ni sujetador en
ésta; para ello, empújela contra la superficie de trabajo, revisando para
asegurarse de que la parte de la ranura del barril se alinee con las flechas del
cuerpo de la herramienta. Accione varias veces la herramienta sin cargar y
asegúrese de que las partes del cierre y el mecanismo de disparo funcionen
libremente antes de fijar el sujetador con la herramienta.
1.
Apunte la herramienta en una dirección segura y deslice el barril hacia adelante con
la otra mano. Con este movimiento se reajusta el pistón para el siguiente disparo.
Una pérdida de potencia puede ser resultado de un reajuste inadecuado del pistón.
2. Coloque un sujetador, con la punta hacia afuera, en el extremo delantero del
barril hasta que la punta con las estrías de plástico se acomode en el interior.
Siempre cargue el sujetador antes de introducir la carga de pólvora para
impedir una descarga accidental. Deténgase si se requiere una fuerza
excesiva y llame al 1-877-ITW-BRANDS, donde recibirá asistencia técnica.
3.
Introduzca la carga de pólvora después de asegurarse de que esté despejada la
camara. La carga de pólvora no se asienta completamente hasta que no se presiona la
herramienta contra la superficie de trabajo. Siempre comience con el nivel de potencia
más bajo y vaya aumentándolo hasta encontrar el nivel adecuado. Nota:
Es peligroso
aplicar una fuerza excesiva al introducir el sujetador en acero u concreto.
Nota: Antes de fijar el sujetador, debe someterse el material base a la prueba del punzón
de marcar para ver su idoneidad para fijarle sujetadores fijados con herramienta de
pólvora (ver pág. 1)
4. Cierre la herramienta; para ello, estire el barril hacia atrás a la posición
semicerrada. Nunca intente cerrar la herramienta ejerciendo fuerza en la parte
delantera del barril. Nunca coloque los dedos ni la mano en el extremo de la
boca del barril. La posición correcta de las manos y dedos se muestra en la
ilustración.
5.
Teniendo la herramienta en la posición semicerrada, colóquela contra el material
que va a fijar. Sujete la herramienta firmemente a 90º con una mano, presiónela
completamente contra la superficie de trabajo, y verifique para asegurarse de que
la ranura del barril se alinee con la marca del receptor.
6. Con un martillo de una libra golpee el botón del percutor con un golpe fuerte y
firme. Si la herramienta no dispara, siga el procedimiento para estos casos
indicado en la página 1.
Nota: Es importante golpear el botón del percutor firmemente y en línea recta. Si
el golpe es leve o fuera de centro puede no activar la carga; no obstante, saca de
su posición al pistón, lo cual causará una disminución en la fuerza. (Ver Solución
de problemas a continuación.)
7. Para prepararse para la siguiente operación de fijación, apunte la herramienta
en una dirección segura, y deslice firmemente el barril hacia adelante. Con este
movimiento se expulsa de la herramienta la carga disparada y se reajusta el
pistón. La herramienta queda lista para la siguiente operación de fijación.
CORRECCIÓN DE PROBLEMAS
El operador de la herramienta debe seguir cuidadosamente todas las
instrucciones de funcionamiento y medidas de seguridad para utilizarla de
forma correcta. A continuación aparece una lista de posibles situaciones que
puede encontrar el operador y las causas probables:
• Si ocurre un problema con una herramienta y se requiere asistencia técnica,
llame por favor al 1-877-ITW-BRANDS (1-877-489-2726)
ADVERTENCIA: No utilice la herramienta si no está funcionando correctamente.
CORRECCIÓN DE PROBLEMAS-SIEMPRE CONSULTE EL MANUAL DE INSTRUC-
CIONES PARA VER LA FORMA CORRECTA DE ENSAMBLAR LAS PIEZAS.
La Herramienta No Dispara
La mayoría de los disparos fallidos se debe a tres causas:
1. Se golpeó el botón del 2. Se golpeó el botón del 3. La herramienta no se
percutor demasiado percutor fuera presionó
levemente de centro completamente
Fijación No Uniforme del Sujetador
La razón principal de la fijación no uniforme es la posición
incorrecta del pistón. Hay dos razones por las cuales se coloca
de manera incorrecta el pistón:
1. No reajustar completamente el pistón.
2. No se golpeó el botón posterior.
En ambos casos debe deslizarse el
barril hacia adelante completamente
para reajustar el pistón.
Nota: Es una buena práctica deslizar el
barril hacia adelante completamente y
volver a poner la carga en la recámara
después de que se golpeó
incorrectamente la herramienta y se
causó un disparo fallido, y después de
seguir el procedimiento indicado
después de tal falla.
Sobreimpulsión del pistón
La sobreimpulsión del pistón es un
problema que ocurre después de
disparar la herramienta. El pistón puede
salirse e introducirse en la superficie de
trabajo hasta 1/2". La sobreimpulsión del
pistón puede ocurrir por varias razones:
• Carga de pólvora
demasiado potente.
• Material base
muy blando.
•
Un hueco en el
material de
mampostería en cual
usted está fijando.
• Se escogió un sujetador incorrecto.
Precaución: Si se sobreimpulsa constantemente el pistón se daña permanente-
mente la herramienta. Si desea asistencia técnica o información sobre el servicio,
llame al 1-877-ITW-BRANDS (1-877-489-2726).
Nota: Cuando suceda una sobreimpulsión del pistón, éste
puede trabarse en la parte delantera del barril. En este
caso asegúrese de que esté descargada la herramienta,
póngala en posición vertical invertida y colóquela en la
superficie de trabajo. Ya expuesto el pistón, golpéelo con
un martillo hasta que se desplace hacia abajo hacia
adentro del barril. Reajuste el pistón. Tenga puestas
gafas de seguridad mientras efectúa esta prueba.
Fijación sobre Concreto
Siempre mantenga un espacio de 3 pulgadas como mínimo entre los elementos de
fijación y otras 3 pulgadas alejado de los bordes o extremos cuando se efectúen
fijaciones sobre en concreto. La profundidad de penetración en concreto siempre
debe ser 1" mínimo , “Cómo seleccionar un sujetador para herramienta de pólvora”.
El espesor del concreto debe ser por lo menos tres veces la profundidad de
penetración.
Fijación sobre Acero
Cuando se efectúen fijaciones sobre acero, siempre mantenga un espacio mínimo
de 1-1/2 pulgada entre los elementos de fijación y 1/2 pulgada de distancia de
cualquier borde. El sujetador debe tener suficiente longitud para penetrar el acero
completamente (ver pág. 15). El espesor del acero debe estar entre 3/16" y 5/16".
INSTRUCCIONES DE MANTENIMIENTO Y LIMPIEZA
Asegúrese de que no esté cargada la herramienta antes de intentar desarmarla
o limpiarla.
Limpieza Y Mantenimiento Diarios
Tenga puesta protección para los ojos al limpiar la herramienta. Revise
todas las áreas de la herramienta para ver si hay suciedad o herrumbre que
pudieran limitar el funcionamiento seguro de las piezas móviles. No utilice la
herramienta si muestra señales de herrumbre en cualquier superficie ya
que éste puede interferir en el funcionamiento seguro de la herramienta.
Para solicitar asistencia técnica, llame al 1-877-ITW-BRANDS
(1-877-489-2726). Debe limpiarse diariamente toda suciedad presente en
el ensamble del barril y en el alojamiento. Después de cada uso rocíe con lubricante
penetrante de alta calidad en las áreas indicadas antes de guardar la herramienta.
PIEZAS DE REPUESTO DISPONIBLES
Descripción
Nota: Esta herramienta no contiene piezas que puedan ser reparadas por el
usuario. Está diseñada para uso en trabajos ligeros.
WARRANTY
IMPORTANT: The tool
warranty is only activated
upon receipt by ITW Brands
of the completed Operator's
Exam.
All warranties of the
products described herein,
expressed or implied,
including the warranty of
merchantability and fitness
for particular purposes are
specifically excluded,
except for the following:
ITW Brands will repair or
replace at its sole option
any tool part or fastener
which within 90 days after
sale by ITW Brands is found
by ITW Brands to be
defective in material or
workmanship, normal wear
and tear excluded. This is
the sole warranty of ITW
Brands and the sole remedy
available to the buyer.
For warranty returns
contact: ITW Brands,
Attn: QA Department,
1575 Hunter Road, Suite A,
Hanover Park, IL 60133;
Phone: (877) 489-2726.
GARANTÍA
NOTA IMPORTANTE: La
garantía de esta
herramienta se activa
solamente al recibir ITW
Brands el Examen del
Operador contestado
completamente.
Todas las garantías de los
productos descritos aquí,
expresas o implícitas,
incluida la garantía de
comerciabilidad e idoneidad
para ciertos propósitos en
particular, quedan excluidas
de manera específica,
excepto lo siguiente: ITW
Brands reparará o
reemplazará a su sola
discreción cualquier pieza de
la herramienta o sujetador
que, dentro de un plazo de
90 días después de la venta
esta compañía encuentre
que está defectuoso en los
materiales o en la mano de
obra; el desgaste normal
queda excluido. Ésta es la
única garantía de ITW
Brands y el único recurso a
disposición del comprador.
Para devoluciones bajo
garantía, comuníquese
con: ITW Brands,
Attn: QA Department,
1575 Hunter Road, Suite A,
Hanover Park, IL 60133;
Phone: (877) 489-2726.
1
2
3
5
6
7
Semi-close
position
4
To Avoid Piston Overdrive
• Decrease power level. Note:
Always make test fastenings
with lightest load and increase
until proper level is found.
• Make sure base material is
checked according to the
Center Punch Test.
• When fastening into masonry,
always make fastenings into
horizontal joints.
Para evitar una sobreimpul-
sión del pistón
• Disminuya el nivel de potencia.
Nota: Siempre efectúe pruebas de
fijación con la carga menos potente
y vaya aumentándola hasta
encontrar el nivel adecuado.
• Asegúrese de revisar el material
base con la Prueba del Punzón
de Marcar.
• Al fijar en mampostería, siempre
efectúe la fijación en las uniones
horizontales.
1
2
3
5-19-15
ITW Renovation and Remodeling
Ramset Reduced Size Manuals
ITW04715
Prints One Color Black
HammerShot Reduced Size Manual.ai
1440 Maple Avenue, Suite 5A
Lisle, IL 60532
ph: 630-512-0963
e: riversedgedesigninc.com
Transcripción de documentos
THIS TOOL IS FOR USE ONLY BY LICENSED OPERATORS. YOU MUST OBTAIN A LICENSE BEFORE USING IT. TO OBTAIN YOUR LICENSE AND ACTIVATE THE WARRANTY, READ THE ENTIRE MANUAL AND SUCCESSFULLY COMPLETE THE POWDER ACTUATED TOOL LICENSING EXAM AT: www.ramset.com OR SCAN THE QR CODE WITH YOUR MOBILE DEVICE. SAFETY PRECAUTIONS ESTA HERRAMIENTA ES SÓLO PARA USO POR OPERADORES CON LICENCIA. DEBES OBTENER UNA LICENCIA ANTES DE USARLA. PARA OBTENER TU LICENCIA Y ACTIVAR LA GARANTÍA, LEE EL MANUAL COMPLETO Y COMPLETA SATISFACTORIAMENTE EL EXAMEN DE LICENCIATURA DE HERRAMIENTAS ACCIONADAS POR ELECTRICIDAD EN: www.ramset.com O ESCANEA EL CÓDIGO QR CON TU DISPOSITIVO MÓVIL. MEDIDAS DE SEGURIDAD . OPERATORS IT. A USING YOU BY LICENSED TO BEFORE ONLY USE BE ISSUEDENCLOSED A LICENSE IS FOR CARD WILL G THE TOOL OBTAIN 'S YOUR THIS 'S CARD MUST RECEIVE YOU OPERATOR LLY COMPLETIN t.com . OPERATOR IT TO TOOL SUCCESSFU WARRANTY AT: www.ramse AFTER AND RETURNING YOUR EXAM ACTIVATE BE OBTAINED ALSO AND CAN LICENSE TOOL Y POWDER LOW VELOCIT or's tion Instruc ED l ACTUAT g Manua & Trainin Operat as such on work for applications depending designedwill vary for tool life duty designed Tool It is a light remodels. tool. ™ is fastening fasteners. and basement TriggerShot and type Ramset carefully and Ramset piston application. manual loads of the • The room additions and velocity this low Brands powder small is a CW studying herein. by ITW site conditions ™ caliber 09/09 ™ beforecontained Rev. v00 receipt TriggerShot .22 RD upon • The with Ramset TriggerShot material the activated ng the use is only not operate understandi Exam. • Do warranty thoroughly : The tool Operator's IMPORTANT completed TO AVOID SERIOUS INJURY OR DEATH MANUAL PRINTED PARA EVITAR LESIONES SERIAS O LA MUERTE IN TAIWAN Warning! The following pages contain detailed warnings, cautions, and rules of safe operation with which the operator must be familiar and follow to avoid serious injury or death. . OPERATORS IT. A USING YOU BY LICENSED TO BEFORE ONLY USE BE ISSUEDENCLOSED A LICENSE IS FOR CARD WILL G THE TOOL OBTAIN 'S YOUR THIS 'S CARD MUST RECEIVE YOU OPERATOR LLY COMPLETIN t.com . OPERATOR IT TO TOOL SUCCESSFU WARRANTY AT: www.ramse AFTER AND RETURNING YOUR EXAM ACTIVATE BE OBTAINED ALSO AND CAN LICENSE ED TOOL Y POWDER LOW VELOCIT or's tion ACTUAT l g Manua & Trainin Instruc Operat as such on work for applications depending designedwill vary for tool life duty designed Tool It is a light remodels. tool. ™ is fastening fasteners. and basement TriggerShot and type Ramset carefully and Ramset piston application. manual loads of the • The room additions and velocity this low Brands powder small is a CW studying herein. by ITW site conditions ™ caliber 09/09 ™ beforecontained Rev. v00 receipt TriggerShot .22 RD upon • The with Ramset TriggerShot material the activated ng the use is only not operate understandi Exam. • Do warranty thoroughly : The tool Operator's IMPORTANT completed MANUAL PRINTED IN TAIWAN ¡Advertencia! Las siguientes páginas contienen avisos de advertencia y precaución, así como reglas para operar con seguridad la herramienta, todo lo cual debe conocer y seguir el operador para evitar sufrir lesiones serias o la muerte. 1 Antes de cargar y disparar protéjase usted mismo y a los demás Before Loading and Firing Protect Yourself and Others 1. Never place your hand or fingers over the front muzzle of the tool - the fastener or piston can seriously injure your hand in the event of an accidental discharge. 2. Always use only Ramset fasteners and loads at all times for consistent tool functioning. 3. Operators and bystanders must wear eye and hearing protection at all times. Serious eye injury and hearing loss can result if proper gear is not worn. 4. Keep work area clear and where required always post warning signs when using the tool. Sign should state, "Powder Actuated Tool in Use" and can be obtained by contacting Technical Services at 1-877-ITW-BRANDS (1-877-489-2726). 1. Nunca coloque la mano ni los dedos en el extremo de la boca de la herramienta cargada; el sujetador o el pistón pueden lesionarle seriamente la mano en caso de una descarga accidental. 2. Para lograr un funcionamiento uniforme de la herramienta, siempre use sólo sujetadores y cargas Ramset. 3. Los operadores y circunstantes deben tener puesta protección para los ojos y los oídos en todo momento. Pueden producirse lesiones en los ojos y pérdida de oído si no se lleva puesto el equipo adecuado. 4. Mantenga despejada el área de trabajo y, donde se requiera, siempre coloque avisos de advertencia al usar la herramienta. El aviso debe decir “Herramienta de Pólvora en Uso” ("Powder Actuated Tool in Use"), y puede obtenerse en el Depto. de Servicios Técnicos, llamando al 1-877-ITW-BRANDS (1-877-489-2726). 2 3 Preparación para la carga Prepare for Loading Prior to using the tool, make sure it is unloaded and then do the functional check: Check the functioning of the tool, without a powder load or fastener, by pushing down against the work surface and pulling the trigger. The trigger mechanism will make an audible click. Release the tool from the work surface and fully extend the barrel to reset the piston. Always check the material being fastened into, by performing the Center Punch Test: Using a fastener as a center punch, strike the fastener against the work surface using an average hammer blow and check the results. Wear eye protection while performing this test. Antes de usar la herramienta asegúrese de que esté descargada y entonces realice la revisión de funcionamiento siguiente: Revise el funcionamiento de la herramienta sin carga de pólvora ni sujetador; Revise el funcionamiento de la herramienta sin carga de pólvora ni sujetador en ella; para ello, empújela contra la superficie de trabajo y tire del gatillo. El mecanismo del gatillo emite un chasquido. Retire la herramienta de la superficie de trabajo y extienda el barril para reajustar el pistón. Siempre revise el material en el que vaya a fijar; para ello efectúe la Prueba del Punzón de Marcar. Usando un sujetador como punzón de marcar, pique la superficie de trabajo con un golpe de martillo común y verifique los resultados. Tenga puesta protección para los ojos mientras efectúa esta prueba. 4 1 1. If the fastener point is blunted, material is too hard. 2. If material cracks or shatters, material is too brittle. 3. If the fastener penetrates the material easily, material is too soft. 4. If the fastener makes small indentation into material, material is suitable for fastening. (Typical base materials: poured concrete, structural steel and masonry.) If the base material is suitable for powder actuated fasteners, make a test fastening into a suitable base material with a number 1 (gray) load. If the number 1 load does not fully set the fastener, try the next higher power load until the proper level is found. Failure to properly test fire to determine correct power level may result in overpowering the fastener, causing it Available Power Levels: to pass completely through the work Power Level No. Color material, injuring someone on the 1. Gray Weakest other side. Overpowering the fastener 2. Brown may also damage the tool. 3. Green 4. Yellow Strongest NOTE: Ramset loads are designed for use with Ramset tools. Do not attempt to use other power loads. Doing so may lead to unintentional load discharge as well as damage to the tool. This tool is NOT designed to use red (5) or purple (6) power level loads. Using red (5) or purple (6) loads can result in serious injury to the operator or bystanders. 1. Si se embota la punta del sujetador, significa que el material es demasiado duro. 2 3 4 Manejo de la herramienta 5 6 7 CONCRETE STEEL 8 9 11. Nunca deje desatendida una herramienta cargada. Alguien puede tomarla, sin saber que está cargada, dispararla accidentalmente, y causar lesiones serias o la muerte. Nunca cargue la herramienta sino hasta que esté preparado para fijar el sujetador. Siempre guarde la herramienta (descargada) y las cargas bajo llave. 12. Nunca lleve sujetadores ni otros objetos duros en el mismo bolsillo o recipiente donde tenga cargas de pólvora. Las cargas podrían dispararse y causar lesiones serias o la muerte. 13. Las personas que padecen daltonismo deben tener extremo cuidado al cargar la herramienta. Debe tomar la carga sólo de una caja identificada con el número de la carga de pólvora. Nunca use cargas sueltas que puedan identificarse de manera errónea. 14. Nunca deben usarse las cargas de pólvora con armas de fuego. Son más potentes que las cargas usadas normalmente con armas de fuego. Podrían producirse lesiones serias o la muerte. 10 11 12 Fasteners Sujetadores 15. A powder actuated fastener, after it has been installed, is considered a permanent fastening. Do not attempt to pull a fastener out of concrete or steel. Attempting to do so may result in serious injury. 15. Una vez instalado con herramienta de pólvora un sujetador, se considera fijado de forma permanente. No intente extraer de concreto o acero un sujetador instalado. Si lo intenta puede causarse lesiones serias. Operating Problems 16. If the tool fails to fire, hold the tool firmly against the material for 30 seconds. Remove the tool from the work surface, open the barrel to reset the piston. Re-chamber the load and repeat firing sequence. If the tool fails to fire again, hold for 30 seconds, unload the tool, and then discard the load into a bucket of water. Never attempt to pry an unfired load out of the tool. Call The Technical Department at 1-877-ITW-BRANDS (1-877-489-2726) for assistance. 17. Never unload or disassemble a jammed, stuck or broken tool which contains a live powder load. This may cause the tool to fire unintentionally. Always point a jammed tool away from yourself and other people. Immediately store a jammed or broken tool in a locked container after tagging it "Defective - Do Not Use". Call 1-877-ITW-BRANDS (1-877-489-2726) for technical assistance. .300 Head Plastic Fluted Drive Pins Shank Length Shank Diameter 1/2" 5/8" 3/4" 1" 1-1/4" 1-1/2" 1-3/4" 2" 2-3/8" 2-1/2" 3" .145 .145 .145 .145 .145 .145 .145 .145 .145 .145 .145 Problemas en el funcionamiento de la herramienta 13 16. Si la herramienta no dispara, manténgala firmemente puesta contra el material por 30 segundos. Retire la herramienta de la superficie de trabajo y abra el barril para reajustar el pistón. Vuelva a colocar la carga en la camara y repita la secuencia de disparo. Si la herramienta no dispara de nuevo, manténgala en su lugar por 30 segundos, descárguela y luego deseche la carga en un balde de agua. Nunca intente extraer de la herramienta la carga a fuerza. Para recibir ayuda, llame al Depto. Técnico, al 1-877-ITW-BRANDS (1-877-489-2726). 17. Nunca descargue ni desarme la herramienta si está trabada, pegada o descompuesta y contiene una carga de pólvora en buen estado. La herramienta podría dispararse accidentalmente. Siempre apunte toda herramienta trabada lejos de usted y de las demás personas. De inmediato guarde la herramienta trabada o descompuesta en un recipiente con cerradura de llave después de ponerle una etiqueta de "Defectuosa - No Usar" ("Defective - Do Not Use"). 14 15 Ramset Fastener Selection Guide Guía Para Seleccionar Sujetadores Ramset .300 Head Plastic Fluted Drive Pins with 7/8" Washer Shank Length Shank Diameter 1" 1-1/4" 1-1/2" 2" 2-1/2" 3" .145 .145 .145 .145 .145 .145 Questions or Concerns? Call our Technical Department at 1-877-ITW-BRANDS (1-877-489-2726) 1. Siempre apunte la herramienta lejos de las personas y en una dirección segura. 2. Nunca use la herramienta cuando haya cerca explosivos o materiales inflamables. 3. Nunca dispare la herramienta sin tener un sujetador puesto. El pistón saldrá por el extremo de la boca de la herramienta, penetrará la superficie de trabajo y posiblemente cause lesiones al operador o a un espectador. Si dispara sin tener un sujetador puesto, también puede dañar la herramienta. 4. Siempre mantenga la herramienta perpendicular a la superficie de trabajo para evitar sufrir lesiones serias o la muerte a causa de sujetadores que reboten. Siempre que sea posible utilice un protector contra descascaramiento*. * Para pedir el protector contra descascaramiento optativo, llame al 1-877-ITW-BRANDS (1-877-489-2726) 5. Nunca set a fastener too close to another fastening or a free edge. This can cause the fastener to ricochet. Always follow the minimum spacing and edge distance requirements. 6. Nunca fire into very hard or brittle materials such as cast iron, tile, glass or rock. These materials can shatter, causing sharp fragments and/or the fastener to fly freely. 7. Nunca fije nada en material base de acero estructural de un espesor inferior a 3/16". Nunca fije nada en material base de concreto de un espesor inferior a 3 veces la longitud de penetración del sujetador. Siempre respete los requisitos mínimos de penetración. 8. No se recomienda fijar en bloc o en mampostería. Cuando es necesario fijar en paredes de mampostería, se recomienda introducir los sujetadores sólo en las uniones horizontales. No hay valores de fuerza de sujeción publicados de estos materiales debido a la falta de uniformidad de éstos. 9. Nunca fije ningún sujetador en un agujero o a través de éste. Siempre mantenga una distancia mínima de 1/2" de cualquier aguero previamente taladrado o perforado. 10. Si decide no realizar la fijación despuésde haber cargado la herramienta, siempre retire primero la carga de pólvora, y luego el sujetador. Nunca intente extraer de la herramienta la carga a fuerza. Para recibirayuda, llame al Depto. Técnico, al 1-877-ITW-BRANDS (1-877-489-2726). Manejo de la herramienta y de las cargas de pólvora Handling Tool and Powder Loads 11. Never leave a loaded tool unattended. Someone may pick it up, not know it is loaded and accidentally discharge the tool causing serious injury or death. Never load the tool until you are prepared to complete the fastening. Always store loads and tool, unloaded, under lock and key. 12. Never carry fasteners or other hard objects in the same pocket or container with powder loads. The loads could be set off, causing serious injury or death. 13. A person that is color blind must be extra careful when loading the tool. One must only take a load from a box that is identified by powder load number. Never use loose loads that can be misidentified. 14. Powder loads must never be used in firearms. They are more powerful than the charges normally used in small firearms. This could result in serious injury or death. 4. Si el sujetador hace una pequeña muesca en el material, significa que éste es adecuado para fijación. (Materiales base típicos: concreto vaciado, acero estructural y mampostería.) * To order optional spall guard, call 1-877-ITW-BRANDS (1-877-489-2726) 5. Never set a fastener too close to another fastening or a free edge. This can cause the fastener to ricochet. Always follow the minimum spacing and edge distance requirements. 6. Never fire into very hard or brittle materials such as cast iron, tile, glass or rock. These materials can shatter, causing sharp fragments and/or the fastener to fly freely. 7. Never fasten into structural steel base material thinner than 3/16". Never fasten into concrete base material thinner than 3 times shank penetration. Always maintain minimum penetration requirements. 8. Fastening into block and masonry is not recommended. When it is necessary to fasten into masonry walls, it is recommended that fasteners be driven into the horizontal joints only. Published holding values for these materials is not available due to the inconsistency of the materials. 9. Never fasten through or into a hole. Always maintain at least 1/2" distance from any pre-drilled or pre-punched hole. 10. Should you decide not to make a fastening after the tool has been loaded, always remove the powder load first, then the fastener. Never attempt to pry an unfired load out of the tool. Call The Technical Department at 1-877-ITW-BRANDS (1-877-489-2726) for assistance. 3. Si el sujetador penetra con facilidad, significa que el material es demasiado blando. Si el material base es adecuado para sujetadores fijados con herramienta de pólvora, realice una prueba fijando un sujetador en un material base adecuado con una carga del número 1 (gris). Si la carga del número 1 no clava completamente el sujetador, pruebe con una carga del siguiente número más alto hasta que encuentre el nivel adecuado. Si no realiza disparos de prueba para determinar el nivel de potencia correcto, puede aplicar una fuerza excesiva al Niveles de potencia disponibles: sujetador, causando que éste atraviese el Nivel de potencia No. Color material de trabajo y pueda lesionar a 1. Gris Menos potente alguien situado al otro lado. Si aplica una fuerza excesiva al sujetador también 2. Café puede dañar la herramienta. 3. Verde 4. Amarillo Más potente NOTA: Las cargas Ramset están fabricadas para usarse con herramientas de dicha marca. No intente usar otras cargas. Si lo hace puede causar una descarga accidental con los consecuentes daños a la herramienta. Esta herramienta NO está fabricada para usar cargas rojas (5) ni moradas (6). Si se utilizan cargas rojas (5) o moradas (6), el operador o los circunstantes pueden sufrir lesiones. Operating the Tool 1. Always point the tool away from people and in a safe direction. 2. Never use tool when explosives or flammable materials are nearby. 3. Never fire the tool without a fastener. The piston will protrude from the muzzle of the tool, enter the work surface and possibly cause injury to the operator or a bystander. Firing without a fastener may also damage the tool. 4. Always hold the tool perpendicular to the work surface to avoid serious injury or death from ricocheting fasteners. Use a spall guard* whenever possible. 2. Si el material se agrieta o rompe, significa que es demasiado quebradizo Clavos con cabeza de 0.300” y estrías de plástico Longitud Diámetro del tallo del tallo 16 1/2" 5/8" 3/4" 1" 1-1/4" 1-1/2" 1-3/4" 2" 2-3/8" 2-1/2" 3" 17 1 .145 .145 .145 .145 .145 .145 .145 .145 .145 .145 .145 Clavos con cabeza de 0.300”, estrías de plástico y arandela de 7/8" Longitud del tallo 1" 1-1/4" 1-1/2" 2" 2-1/2" 3" Diámetro del tallo .145 .145 .145 .145 .145 .145 ¿Preguntas o comentarios? Llama al Departamento de Servicio Técnico al 1-877-ITW-BRANDS (1-877-489-2726) OVERALL SIZE: 8.5” x 21” FOLD SIZE: 8.5” x 1.614” (215.9 mm x 533 mm) (215.9 mm x 41 mm) 13 Panels Read Reverse Side First Lee el reverso primero Caution! Be sure to read and understand all safety precautions and complete the Operator's Exam before attempting to operate the tool. Check to be sure the tool is unloaded and no foreign objects or fasteners are in the barrel. Perform daily function test before operating. ¡PRECAUCIÓN! Asegúrese de leer y comprender todas las medidas de seguridad y conteste el Examen del Operador antes de hacer funcionar la herramienta. Revise para asegurarse de que esté descargada la herramienta y de que no haya objetos extraños ni sujetadores en el barril. Efectúe la prueba diaria de funcionamiento antes de utilizar la herramienta. 1 OPERATION Check the functioning of the tool, without a powder load or fastener in the tool, by pushing down against the work surface, checking to be sure the groove portion of the barrel aligns with the arrows on the tool body. Function unloaded tool several times and insure that the breech parts and firing mechanism operate freely before fastening with the tool. 1. Point the tool in a safe direction and slide the barrel forward with your other hand. This action resets the piston for the next fastening. Loss of power may be the result of an improperly reset piston. 2. Place a fastener, point out, into the front end of the barrel until the plastic fluted tip fits inside. Always load the fastener before inserting the power load to prevent accidental discharge. Do not use excessive force when inserting the fastener. Stop if excessive force is required and call 1-877 ITW-BRANDS for technical assistance. 3. Insert the powder load after making sure the chamber is clear. The powder load will not fully set until the tool is compressed against the work surface. Always start with the lowest level and increase until the proper level is found. Note: Overpowering a fastener into steel or concrete is dangerous. Note: Before making the fastening, the base material should be center punch tested for suitability of powder actuated fastenings (see pg. 1). 4. Close tool by pulling the barrel back to the semi-closed position. Never attempt to close the tool by exerting force on the front of the barrel. Never place your fingers or hands over the muzzle end of the barrel. The proper position of the hands and fingers are shown in the illustration. 5. With the tool in the semi-closed position, place it against the material to be fastened. Hold the tool firmly at 90º with one hand and completely depress, check to be sure the groove on the barrel aligns with the marking on the receiver. 6. Using a one pound hammer, strike the firing pin button with a sharp, firm blow. If the tool fails to fire, follow the misfire procedure on page 1. Note: It is important to strike the firing pin button firmly and squarely. A light blow or one off-center may not activate the load, however it will jar the piston out of position which will cause a reduction in power. (See Troubleshooting below.) 7. To prepare for the next fastening, point the tool in a safe direction, and slide the barrel firmly forward. This action ejects the fired load out of the tool and properly resets the piston. The tool is now ready for the next fastening. TROUBLESHOOTING Tool operator must carefully follow all operating instructions and precautions to successfully operate the tool. Following is a list of potential situations an operator may encounter and the probable causes: • If a tool problem occurs and technical assistance is required, please call 1-877-ITW-BRANDS (1-877-489-2726) WARNING: Do not operate a tool that is not functioning properly. CORRECTING DIFFICULTIES ALWAYS CHECK INSTRUCTION MANUAL FOR PROPER ASSEMBLY OF PARTS Tool Fails to Fire There are three causes for most all misfires: 1. Firing pin button struck 2. Firing pin button too lightly struck off center 3. Tool not completely compressed Inconsistent Fastener Setting The major reason for inconsistent fastening is the improper position of the piston. There are two reasons for an improperly positioned piston: 1. Failure to completely reset the piston. 2. A missed hit of the rear button. In both cases the barrel must be fully extended to reset the piston. Note: It is a good practice to fully extend the barrel and re-chamber the load after the tool is improperly struck causing a misfire, and after the misfire procedure has been followed. Piston Overdrive Piston overdrive is a problem that occurs after the tool is fired. The piston may extend into the work surface as much as 1/2". Piston overdrive can occur because of several reasons: • Powder load too strong • Soft base material • Void in the masonry material that you're fastening into. To Avoid Piston Overdrive • Decrease power level. Note: Always make test fastenings with lightest load and increase until proper level is found. • Make sure base material is checked according to the Center Punch Test. • When fastening into masonry, always make fastenings into horizontal joints. • Incorrect fastener selection. Caution: Constant overdrive will damage the tool beyond repair. For technical assistance or service information call 1-877-ITW-BRANDS (1-877-489-2726). FUNCIONAMIENTO 2 3 4 Semi-close position 5 6 7 WARRANTY IMPORTANT: The tool warranty is only activated upon receipt by ITW Brands of the completed Operator's Exam. All warranties of the products described herein, expressed or implied, including the warranty of merchantability and fitness for particular purposes are specifically excluded, except for the following: ITW Brands will repair or replace at its sole option any tool part or fastener which within 90 days after sale by ITW Brands is found by ITW Brands to be defective in material or workmanship, normal wear and tear excluded. This is the sole warranty of ITW Brands and the sole remedy available to the buyer. For warranty returns contact: ITW Brands, Attn: QA Department, 1575 Hunter Road, Suite A, Hanover Park, IL 60133; Phone: (877) 489-2726. GARANTÍA NOTA IMPORTANTE: La garantía de esta herramienta se activa solamente al recibir ITW Brands el Examen del Operador contestado completamente. Todas las garantías de los productos descritos aquí, expresas o implícitas, incluida la garantía de comerciabilidad e idoneidad para ciertos propósitos en particular, quedan excluidas de manera específica, excepto lo siguiente: ITW Brands reparará o reemplazará a su sola discreción cualquier pieza de la herramienta o sujetador que, dentro de un plazo de 90 días después de la venta esta compañía encuentre que está defectuoso en los materiales o en la mano de obra; el desgaste normal queda excluido. Ésta es la única garantía de ITW Brands y el único recurso a disposición del comprador. Para devoluciones bajo garantía, comuníquese con: ITW Brands, Attn: QA Department, 1575 Hunter Road, Suite A, Hanover Park, IL 60133; Phone: (877) 489-2726. Note: When overdrive occurs, the piston may jam into the front barrel. In this case be sure the tool is unloaded, turn the tool upside down and place on the work surface. Strike the exposed piston with a hammer until it moves downward into the barrel. Reset the piston. Wear safety goggles when performing this task. Revise el funcionamiento de la herramienta sin carga de pólvora ni sujetador en ésta; para ello, empújela contra la superficie de trabajo, revisando para asegurarse de que la parte de la ranura del barril se alinee con las flechas del cuerpo de la herramienta. Accione varias veces la herramienta sin cargar y asegúrese de que las partes del cierre y el mecanismo de disparo funcionen libremente antes de fijar el sujetador con la herramienta. 1. Apunte la herramienta en una dirección segura y deslice el barril hacia adelante con la otra mano. Con este movimiento se reajusta el pistón para el siguiente disparo. Una pérdida de potencia puede ser resultado de un reajuste inadecuado del pistón. 2. Coloque un sujetador, con la punta hacia afuera, en el extremo delantero del barril hasta que la punta con las estrías de plástico se acomode en el interior. Siempre cargue el sujetador antes de introducir la carga de pólvora para impedir una descarga accidental. Deténgase si se requiere una fuerza excesiva y llame al 1-877-ITW-BRANDS, donde recibirá asistencia técnica. 3. Introduzca la carga de pólvora después de asegurarse de que esté despejada la camara. La carga de pólvora no se asienta completamente hasta que no se presiona la herramienta contra la superficie de trabajo. Siempre comience con el nivel de potencia más bajo y vaya aumentándolo hasta encontrar el nivel adecuado. Nota: Es peligroso aplicar una fuerza excesiva al introducir el sujetador en acero u concreto. Nota: Antes de fijar el sujetador, debe someterse el material base a la prueba del punzón de marcar para ver su idoneidad para fijarle sujetadores fijados con herramienta de pólvora (ver pág. 1) 4. Cierre la herramienta; para ello, estire el barril hacia atrás a la posición semicerrada. Nunca intente cerrar la herramienta ejerciendo fuerza en la parte delantera del barril. Nunca coloque los dedos ni la mano en el extremo de la boca del barril. La posición correcta de las manos y dedos se muestra en la ilustración. 5. Teniendo la herramienta en la posición semicerrada, colóquela contra el material que va a fijar. Sujete la herramienta firmemente a 90º con una mano, presiónela completamente contra la superficie de trabajo, y verifique para asegurarse de que la ranura del barril se alinee con la marca del receptor. 6. Con un martillo de una libra golpee el botón del percutor con un golpe fuerte y firme. Si la herramienta no dispara, siga el procedimiento para estos casos indicado en la página 1. Nota: Es importante golpear el botón del percutor firmemente y en línea recta. Si el golpe es leve o fuera de centro puede no activar la carga; no obstante, saca de su posición al pistón, lo cual causará una disminución en la fuerza. (Ver Solución de problemas a continuación.) 7. Para prepararse para la siguiente operación de fijación, apunte la herramienta en una dirección segura, y deslice firmemente el barril hacia adelante. Con este movimiento se expulsa de la herramienta la carga disparada y se reajusta el pistón. La herramienta queda lista para la siguiente operación de fijación. CORRECCIÓN DE PROBLEMAS El operador de la herramienta debe seguir cuidadosamente todas las instrucciones de funcionamiento y medidas de seguridad para utilizarla de forma correcta. A continuación aparece una lista de posibles situaciones que puede encontrar el operador y las causas probables: • Si ocurre un problema con una herramienta y se requiere asistencia técnica, llame por favor al 1-877-ITW-BRANDS (1-877-489-2726) ADVERTENCIA: No utilice la herramienta si no está funcionando correctamente. CORRECCIÓN DE PROBLEMAS-SIEMPRE CONSULTE EL MANUAL DE INSTRUCCIONES PARA VER LA FORMA CORRECTA DE ENSAMBLAR LAS PIEZAS. La Herramienta No Dispara La mayoría de los disparos fallidos se debe a tres causas: 1. Se golpeó el botón del percutor demasiado levemente 2. Se golpeó el botón del percutor fuera de centro 3. La herramienta no se presionó completamente Fijación No Uniforme del Sujetador La razón principal de la fijación no uniforme es la posición incorrecta del pistón. Hay dos razones por las cuales se coloca de manera incorrecta el pistón: 1. No reajustar completamente el pistón. 2. No se golpeó el botón posterior. En ambos casos debe deslizarse el barril hacia adelante completamente para reajustar el pistón. Nota: Es una buena práctica deslizar el barril hacia adelante completamente y volver a poner la carga en la recámara después de que se golpeó incorrectamente la herramienta y se causó un disparo fallido, y después de seguir el procedimiento indicado después de tal falla. Sobreimpulsión del pistón La sobreimpulsión del pistón es un problema que ocurre después de disparar la herramienta. El pistón puede salirse e introducirse en la superficie de trabajo hasta 1/2". La sobreimpulsión del pistón puede ocurrir por varias razones: • Carga de pólvora demasiado potente. • Material base muy blando. • Un hueco en el material de mampostería en cual usted está fijando. • Se escogió un sujetador incorrecto. Para evitar una sobreimpulsión del pistón • Disminuya el nivel de potencia. Nota: Siempre efectúe pruebas de fijación con la carga menos potente y vaya aumentándola hasta encontrar el nivel adecuado. • Asegúrese de revisar el material base con la Prueba del Punzón de Marcar. • Al fijar en mampostería, siempre efectúe la fijación en las uniones horizontales. Precaución: Si se sobreimpulsa constantemente el pistón se daña permanentemente la herramienta. Si desea asistencia técnica o información sobre el servicio, llame al 1-877-ITW-BRANDS (1-877-489-2726). Nota: Cuando suceda una sobreimpulsión del pistón, éste puede trabarse en la parte delantera del barril. En este caso asegúrese de que esté descargada la herramienta, póngala en posición vertical invertida y colóquela en la superficie de trabajo. Ya expuesto el pistón, golpéelo con un martillo hasta que se desplace hacia abajo hacia adentro del barril. Reajuste el pistón. Tenga puestas gafas de seguridad mientras efectúa esta prueba. Fastening to Concrete Fijación sobre Concreto When fastening into concrete always maintain a minimum 3" spacing between fastenings and 3" from any free edge. Penetration into concrete should always be 1" minimum. The concrete thickness should be at least 3 times the penetration depth. Fastening to Steel Siempre mantenga un espacio de 3 pulgadas como mínimo entre los elementos de fijación y otras 3 pulgadas alejado de los bordes o extremos cuando se efectúen fijaciones sobre en concreto. La profundidad de penetración en concreto siempre debe ser 1" mínimo , “Cómo seleccionar un sujetador para herramienta de pólvora”. El espesor del concreto debe ser por lo menos tres veces la profundidad de penetración. When fastening into steel always maintain a minimum 1-1/2" spacing between fastenings and 1/2" from any free edge. Fastener length should be long enough to penetrate the steel completely. Steel thickness is limited to 3/16" to 5/16". Fijación sobre Acero PROPER MAINTENANCE AND CLEANING INSTRUCTIONS Cuando se efectúen fijaciones sobre acero, siempre mantenga un espacio mínimo de 1-1/2 pulgada entre los elementos de fijación y 1/2 pulgada de distancia de cualquier borde. El sujetador debe tener suficiente longitud para penetrar el acero completamente (ver pág. 15). El espesor del acero debe estar entre 3/16" y 5/16". INSTRUCCIONES DE MANTENIMIENTO Y LIMPIEZA Make sure the tool is not loaded prior to attempting disassembly or cleaning. Daily Maintenance And Cleaning 3 Wear eye protection when cleaning the tool. Check all areas of tool for debris or rust that could restrict safe operation of moving parts. Do not operate any tool that shows signs of rust on any surface as this may interfere with the safe operation of the tool. Call 1-877-ITW-BRANDS (1-877-489-2726) for technical assistance. The barrel assembly and housing should be cleaned of excess dirt and debris on a daily basis. After each use, spray a quality penetrating lubricant on indicated areas before storing tool. Limpieza Y Mantenimiento Diarios 1 Tenga puesta protección para los ojos al limpiar la herramienta. Revise todas las áreas de la herramienta para ver si hay suciedad o herrumbre que pudieran limitar el funcionamiento seguro de las piezas móviles. No utilice la herramienta si muestra señales de herrumbre en cualquier superficie ya que éste puede interferir en el funcionamiento seguro de la herramienta. Para solicitar asistencia técnica, llame al 1-877-ITW-BRANDS (1-877-489-2726). Debe limpiarse diariamente toda suciedad presente en el ensamble del barril y en el alojamiento. Después de cada uso rocíe con lubricante penetrante de alta calidad en las áreas indicadas antes de guardar la herramienta. PIEZAS DE REPUESTO DISPONIBLES Descripción REPLACEMENT PARTS Description Nota: Esta herramienta no contiene piezas que puedan ser reparadas por el usuario. Está diseñada para uso en trabajos ligeros. Note: There are no user serviceable replacement parts for this tool. It is designed for light duty applications. Questions or Concerns? Call our Technical Department at 1-877-ITW-BRANDS (1-877-489-2726) Asegúrese de que no esté cargada la herramienta antes de intentar desarmarla o limpiarla. 2 2 ¿Preguntas o comentarios? Llama al Departamento de Servicio Técnico al 1-877-ITW-BRANDS (1-877-489-2726) ITW Renovation and Remodeling 1440 Maple Avenue, Suite 5A Lisle, IL 60532 ph: 630-512-0963 e: riversedgedesigninc.com 5-19-15 Ramset Reduced Size Manuals ITW04715 HammerShot Reduced Size Manual.ai Prints One Color Black-
 1
1
-
 2
2


RAMSET 16950 Manual de usuario
- Categoría
- Herramientas eléctricas
- Tipo
- Manual de usuario
En otros idiomas
- English: RAMSET 16950 User manual
Documentos relacionados
-
RAMSET RAM 30 30 Instrucciones de operación
-
-
-
-
-
-
-
-
-
RAMSET 06171 Manual de usuario