Schon SC70010 Instrucciones de operación
- Categoría
- Artículos sanitarios
- Tipo
- Instrucciones de operación
La página se está cargando ...

2
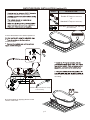
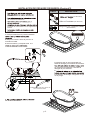
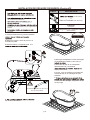
Instrucciones generales
Instrucciones generales . . . . . . . . . . . . . . . . . . . . . . . . . . . . . 2
Antes de comenzar . . . . . . . . . . . . . . . . . . . . . . . . . . . . . . . . 2
Herramientas requeridas.. . . . . . . .. . . . . . . . . . . . . . . . . . . . . 2
Instalación del baño . . . . . . . . . . . . . . . . . . .. . . . . . . . . . . . . 3
Instalación del grifo en la bañera (opcional)...................
. . . . 4
Responsabilidades del consumidor . . . . . . . . . . . . . . . . . . . . . 5
Solicitud de servicios................................................................ 5
Mantenimiento . . . . . . . . . . . .. . . .. . . . . . . . . . . . . . . . . . . . . 5
Garantía limitada de 5 años . . . . ... . . . . . . . . . . . . . . . . . . . . 6
Instrucciones generales
comenzar la instalación.
no dude en comunicarse con nosotros:
SERVICIO AL CLIENTE:1-800-880-8164
Antes de comenzar:
Todas las instalaciones de plomería deben ser realizadas
por un plomero/instalador profesional.
Observe todos los códigos de plomería y de construcción
locales.
Atención:
Se necesitan al menos dos personas para instalar este
producto correctamente.
Riesgo de lesiones personales. No sostenga ni levante la
bañera por el borde. Coloque un soporte adecuado debajo de
los pies.
El DISTRIBUTOR
no se responsabiliza de ningún daño a la unidad ni a
propiedades personales causados por la instalación
inadecuada. Si usted ignora las advertencias de instalación,
perderá la garantía y podría sufrir daños causados
por fuga de
agua.
cualquier daño. Vuelva a colocar la bañera en el cartón hasta
que esté listo para instalarla.
nivelado.
acceso a las conexiones finales de plomería.
Herramientas requeridas:
Herramientas comunes de taller.
TABLE OF CONTENTS
General instructions . . . . . . . . . . . . . . . . . . . . . . . . . . . . . . . . . . . . 2
Before you begin . . . . . . . . . . . . . . . . . . . . . . . . . . . . . . . . . . . . . . 2
Required tools . . . . . . . . . . . . . . . . . . . . . . . . . . . . . . . . . . . . . . . . 2
Bath installation . . . . . . . . . . . . . . . . . . . . . . . . . . . .
. . . . .
. . . . . . 3
Faucet installation on the bath (optional) . . . . . . . . .
. . . . . . . . . . . 4
Consumer responsibilities . . . . . . . . . . . . . . . . . . . . . . . . . . . . . . . 5
Requesting service . . . . . . . . . . . . . . . . . . . . . . . . . . . . . . . . . . . . 5
Maintenance .. . . . . . . . . . . . . . . . . . . . . . . . . . . . . . . . . . . . . . . . 5
Limited 5 years warranty . . . . . .
. . . . . . . . . . . . . . . . . . . . . . . . . . 6
General instructions
installation.
hesitate to contact us:
CUSTOMER SERVICE: 1-800-880-8164
Before you begin:
All plumbing installations should be done by a licensed
professional plumber/installer.
Observe all local plumbing and building codes.
Caution:
You will need at least two people to install this product properly.
Risk of personal injury. Do not support or lift the bath by the rim.
Provide an adequate support under the feet.
THD DISTRIBUTOR
is not responsible for any damage to the unit or personal
property caused by improper installation. If you disregard
instructional warnings, you will void your warranty and possibly deal
with water damage.
to the carton until you are ready to install.
plumbing connections.
Adjustable keys
Tape measure
Pencil
Level
Silicone
Drill
Hole saw
Plus : Fabric cloth to protect the bath
Conventional workshop tools.

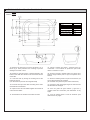
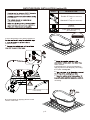
3
1A. Saque la bañera del cartón y colóquela sobre un
cubrecama u otro material de protección para evitar
daños a la bañera o al piso.
1B. Coloque una tela o material similar en el fondo de la
bañera. Tenga cuidado para no rayar la superficie de la
bañera.
1C. Nivele la bañera girando los pies de nivelación que
se encuentran debajo de la bañera.
(Se necesitan dos personas para realizar esta tarea).
1D. Conecte el sifón al desagüe según las instrucciones
del fabricante del desagüe.
1E. Abra los grifos de agua caliente y agua fría y
verifique todas las conexiones
para determinar si hay
fugas.
1F. Llene la bañera hasta el nivel de desborde para
determinar si hay fugas.
1A. Remove the bath from its carton and place it on a
throw rug or other protective floor covering to prevent
damage to the bath or floor.
1B. Position a clean drop cloth or similar material in the
bottom of the bath. Be careful not to scratch the surface
of the bath.
1C. Level the bath by turning the leveling feet at the
bottom of the tub.
(You will need two persons to mange this task)
1D. Connect the trap to the drain according to the drain
manufacturer’s instructions.
1E. Open the hot and co
ld water supplies and check all
connections for leaks.
1F. Fill the bath to the overflow and check for leaks.
1 .
Instalación de la bañera
/
Bath installation
Drain
Desagüe
Ø50 mm
Ø2''
Over Flow
Nivel de desborde
100 mm X 30 mm
3.9'' X 1.2''
Capacity
Volumen
0.26 m3
15866 in3
Bathtub's weight (empty)
Peso de la bañera (vacío)
38 kgs
83.8 lbs
Bathtub's weight (filled)
El peso de la bañera (lleno)
298 kgs
657 lbs
Measures:
millimeter
Medidas:
inch
milímetros
pulgadas

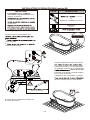
4
2A. Desenrosque los pernos que se encuentran debajo de
la bañera usando una llave ajustable. Luego saque
cuidadosamente la parte de arriba de la bañera y
colóquela sobre un cubrecama u otro material protector
para evitar daños a la bañera o al piso.
2B. Perfore los agujeros para los grifos en la bañera en el
sitio deseado. Luego instale los grifos según las
instrucciones del fabricante de los grifos.
Notas:
asegurarse de que no haya fugas.
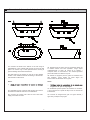
2C. Ensamble la parte superior de la bañera con el faldón,
y fije los pernos en la parte de abajo como se muestra en
la ilustración.
2D. Conecte la manguera del grifo con agua caliente y
agua fría y verifique si hay fugas.
2A. Unscrew the bolts at the bottom of the tub using an
adjustable key. Then carefully take out the top of the tub and
place it on a throw rug or other protective floor covering to
prevent damage to the bath and the floor.
2B. Drill holes for the faucets on the tub a
t the desired
location. Then install the faucets according to the faucets’
manufacturer’s instructions.
Notes:
occurs.
2C. Assemble the top of the tub with the skirt, and secure
the bolts at the bottom as shown in the illustration.
2D. Connect the faucet hose with hot and cold water
supply and check for leaks.
2 .
Instalación del grifo en la bañera (opcional)
/Faucet installation on the bath (optional)

CONSUMER RESPONSIBILITIES
The DISTRIBUTOR bath Products will remain beautiful for many years if you
properly care for them. Some of the waterproofed plastic strips and other seals
will need to be replaced when they show signs of wear, yellowing or are no
longer watertight. Water conditions in various parts of the country will determine
any extra cleaning attention needed for your new bath.
The DISTRIBUTOR does not recommend the use of harsh abrasive cleansers
on any of its products. Harsh cleansers will damage the nish of your bathtub.
MAINTENANCE
R For daily maintenance, use a wet cloth and a soft liquid cleaner. containing
acetone, chlorine.
R Never use abrasive cleaners or strong bleach, scrapers, metallic brushes,
orother objects or any products which can graze or tarnish surfaces.
LIMITED 5 YEARS WARRANTY
This warranty extends only to the original owner user for personal household
use only. For commercial uses, additional limitations may apply.
► The DISTRIBUTOR warrants acrylic surface against blistering or cracking
and chipping resulting from defect in the acrylic surface material when
used under normal condition and service for a period of ve (5) years from
the purchase date.
► The DISTRIBUTOR warrants your satisfaction with each bathtub. Should
any bathtub not meet your satisfaction due to a visual defect, simply return
it to your retailer with the original packaging, PRIOR TO INSTALLATION,
for a replacement.
► The DISTRIBUTOR warrants, bathtubs to be free from defects in
workmanship and materials under normal use and service for a period of
ve (5) years.
► The DISTRIBUTOR will, at its election, repair, replace, or make
appropriate adjustment where the DISTRIBUTOR optional inspection
discloses any such defects occurring in normal usage within the warrantee
periods.
► Please note that the DISTRIBUTOR is not responsible for installation or
removal costs.
► Modication of any bath enclosure components may void the warranty.
This warranty does not cover any claim arising from abuse, misuse,
negligence, accident, improper installation or operations on the part of the
purchaser. This warranty is void if the DISTRIBUTOR product is subject to
alterations, or if repairs were done to the bath unit.
► This warranty does not extend to any plumbing or components installed by
dealers, installers or by any party other than the DISTRIBUTOR.
► Implied warranties, including that of merchantability or tness for a
particular purpose, are expressly limited in duration to the duration of this
warranty.
► The DISTRIBUTOR disclaims any liability for special, incidental or
consequential damages.
THE SOLE REMEDY PROVIDED BY THIS WARRANTY IS THE REPAIR
OR REPLACEMENT OF DEFECTIVE PRODUCTS.
THIS WARRANTY DOES NOT COVER THE COST OF REMOVAL OR
INSTALLATION OF NEW PRODUCTS. THE WARRANTY WILL BE VOID
IF THIS ITEM IS INSTALLED WITH OBVIOUS VISUAL DEFECTS.
RESPONSABILIDADES DEL CONSUMIDOR
Los productos de bañera del DISTRIBUTOR permanecerán hermosos durante
muchos años si los cuida correctamente. Algunos de las tiras de plástico
resistentes al agua tendrán que ser remplazados cuando muestran signos
de desgaste, se vuelven amarillentos o ya no tienen resistencia al gua. Las
condiciones del agua en muchas regiones del país determinarán la necesidad
de limpiezas adicionales a su bañera nueva.
El DISTRIBUTOR no recomienda el uso de limpiadores abrasivos ásperos en
ninguno de sus productos. Los limpiadores ásperos dañarán acabado de su
bañera.
MANTENIMIENTO
R Para mantenimiento diario, utilice un paño húmedo y un limpiador líquido
suave.
R Nunca utilice abrasivos o limpiadores que contenga acetona, cloro o
blanqueadores fuertes, espátulas o cepillos de cerdas metálicas, ni
objetos o productos que puedan raspar o deslucir las supercies.
TADA DE 5 AÑOS
Esta garantía se aplica únicamente al propietario/usuario original para nes
domésticos solamente. Para usos comerciales algunas limitaciones adicionales
pueden aplicarse.
► El DISTRIBUTOR garantizas las supercies acrílicas contra ampollas o
cuarteada y desconchada resultantes de defectos en el material de la
supercie de acrílico cuando se usa bajo condiciones y servicios normales
por un periodo de cinco (5) años a partir de la fecha de compra.
► El DISTRIBUTOR garantiza su satisfacción con cada bañera. Si cualquier
bañera no es satisfactoria debido a un defecto visual, sólo tiene que
devolverlo en su empaque original a su vendedor, ANTES DE LA
INSTALACIÓN, para que sea remplazado.
► El DISTRIBUTOR garantiza que las bañeras están libresde defectos en
mano de obra y materiales bajo uso y servicio normales, por un periodo
de cinco (5) años.
► El DISTRIBUTOR, a su elección, reparará, remplazará o hará los ajustes
apropiados en caso de que la inspección opcional del DISTRIBUTOR
revele la presencia de cualquiera de esos defectos que haya ocurrido en
condiciones normales de uso dentro de los periodos de la garantía.
► Sírvase notar que el DISTRIBUTOR no es responsable de los costos de
instalación ni de desinstalación.
► La modicación de cualquiera de los componentes de contención de la
bañera puede anular la garantía. Esta garantía no cubre reclamaciones
surgidas de abuso, mal uso, negligencia, accidente, instalación u
operación inapropiada por parte del comprador. Esta garantía será nula si
el producto del DISTRIBUTOR es sujeto a alteraciones, o si se ha hecho
reparaciones a la bañera.
► Esta garantía no se extiende a ninguna pieza ni componente de plomería
instalados por vendedores, instaladores o por cualquier otro diferente del
DISTRIBUTOR.
► Garantías implícitas. Incluyendo aquellas de viabilidad comercial o
conveniencia para un n particular, las garantías quedan expresamente
limitadas a la duración de esta garantía.
► El DISTRIBUTOR se deslinda de toda responsabilidad por daños
cuanticables, incidentales o indirectos.
EL ÚNICO REMEDIO PROPORCIONADO POR ESTA GARANTÍA ES LA
REPARACIÓN O EL REMPLAZO DE PRODUCTOS DEFECTUOSOS.
ESTA GARANTÍA NO CUBRE COSTOS DE DESINTALACIÓN NI DE
INSTALACIÓN DEL NUEVO PRODUCTO. LA GARANTÍA SERÁ NULA
SI ESTE ARTÍCULO ES INSTALADO CON DEFECTOS VISUALES
OBVIOS.
La página se está cargando ...
La página se está cargando ...
La página se está cargando ...
La página se está cargando ...

p. 5
INSTALACIÓN DE DESAGÜE DE BAÑERA (Opción #1)
PIEZA DESCRIPCIÓN
(NO INCLUIDO)
o
Sifón en P estándar
(NO INCLUIDO)
Desagüe de piso y anillo de sellado
(NO INCLUIDO)
1. Coloque la bañera en la posición deseada
2. Marque el contorno sobre el piso con un
marcador borrable.
3. Retire la bañera y colóquela sobre una
4. Instale el sifón en P enroscándolo a la
salida de desagüe pre-instalado de la bañera.
se muestra en la ilustración, conéctelo al
desagüe de piso existente.
5.
la instalación del desagüe. Asegúrese de que
no haya fuga.
6.
del contorno de la base.
24h
IMPORTANTE
instalación.
de comenzar la instalación.
instalado de conformidad con los reglamentos
locales.
incluidos.
La instalación con sifón en P de PVC se
hace de manera similar.

p. 6
PIEZA DESCRIPCIÓN
(NO INCLUIDO)
o
Sifón en P estándar
(NO INCLUIDO)
Adaptador
(INCLUIDO)
Desagüe de piso y anillo de sellado
(NO INCLUIDO)
4. Enrosque el adaptador incluido al desagüe
pre-instalado de la bañera. Use cinta y/o
5. Ensamble el sifón en P al adaptador
aplicando silicona y conectando
seque por 24 horas.
6. Luego, como se muestra en la ilustración,
conecte el sifón en P al desagüe de piso
existente.
7.
la instalación del desagüe. Asegúrese de que
no haya fuga.
INSTALACIÓN DE DESAGÜE DE BAÑERA (Opción #2)
8.
del contorno de la base.
24h
La instalación con sifón en P de PVC se
hace de manera similar.
IMPORTANTE
instalación.
de comenzar la instalación.
instalado de conformidad con los reglamentos
locales.
incluidos.
1. Coloque la bañera en la posición deseada
2. Marque el contorno sobre el piso con un
marcador borrable.
3. Retire la bañera y colóquela sobre una
Transcripción de documentos
Instrucciones generales TABLE OF CONTENTS General instructions . . . . . . . . . . . . . . . . . . . . . . . . . . . . . . . . . . . . 2 Before you begin . . . . . . . . . . . . . . . . . . . . . . . . . . . . . . . . . . . . . . 2 Required tools . . . . . . . . . . . . . . . . . . . . . . . . . . . . . . . . . . . . . . . . 2 Bath installation . . . . . . . . . . . . . . . . . . . . . . . . . . . . . . . . . . . . . . . 3 Faucet installation on the bath (optional) . . . . . . . . . . . . . . . . . . . . 4 Consumer responsibilities . . . . . . . . . . . . . . . . . . . . . . . . . . . . . . . 5 Requesting service . . . . . . . . . . . . . . . . . . . . . . . . . . . . . . . . . . . . 5 Maintenance .. . . . . . . . . . . . . . . . . . . . . . . . . . . . . . . . . . . . . . . . 5 Limited 5 years warranty . . . . . . . . . . . . . . . . . . . . . . . . . . . . . . . . 6 Instrucciones generales . . . . . . . . . . . . . . . . . . . . . . . . . . . . . 2 Antes de comenzar . . . . . . . . . . . . . . . . . . . . . . . . . . . . . . . . 2 Herramientas requeridas.. . . . . . . .. . . . . . . . . . . . . . . . . . . . . 2 Instalación del baño . . . . . . . . . . . . . . . . . . .. . . . . . . . . . . . . 3 Instalación del grifo en la bañera (opcional).................... . . . 4 Responsabilidades del consumidor . . . . . . . . . . . . . . . . . . . . . 5 Solicitud de servicios................................................................ 5 Mantenimiento . . . . . . . . . . . .. . . .. . . . . . . . . . . . . . . . . . . . . 5 Garantía limitada de 5 años . . . . ... . . . . . . . . . . . . . . . . . . . . 6 Instrucciones generales General instructions comenzar la instalación. installation. no dude en comunicarse con nosotros: SERVICIO AL CLIENTE:1-800-880-8164 hesitate to contact us: CUSTOMER SERVICE: 1-800-880-8164 Antes de comenzar: Before you begin: All plumbing installations should be done by a licensed professional plumber/installer. Observe all local plumbing and building codes. Todas las instalaciones de plomería deben ser realizadas por un plomero/instalador profesional. Observe todos los códigos de plomería y de construcción locales. Atención: Caution: Se necesitan al menos dos personas para instalar este producto correctamente. You will need at least two people to install this product properly. Risk of personal injury. Do not support or lift the bath by the rim. Provide an adequate support under the feet. THD DISTRIBUTOR is not responsible for any damage to the unit or personal property caused by improper installation. If you disregard instructional warnings, you will void your warranty and possibly deal with water damage. Riesgo de lesiones personales. No sostenga ni levante la bañera por el borde. Coloque un soporte adecuado debajo de los pies. El DISTRIBUTOR no se responsabiliza de ningún daño a la unidad ni a propiedades personales causados por la instalación inadecuada. Si usted ignora las advertencias de instalación, perderá la garantía y podría sufrir daños causados por fuga de agua. to the carton until you are ready to install. cualquier daño. Vuelva a colocar la bañera en el cartón hasta que esté listo para instalarla. plumbing connections. nivelado. acceso a las conexiones finales de plomería. Herramientas requeridas: Adjustable keys Tape measure Pencil Level Silicone Drill Hole saw Plus : Fabric cloth to protect the bath Conventional workshop tools. Herramientas comunes de taller. 2 1 . Bath installation / Instalación de la bañera Measures: Medidas: millimeter inch milímetros pulgadas Drain Desagüe Over Flow Nivel de desborde Capacity Volumen Bathtub's weight (empty) Peso de la bañera (vacío) Bathtub's weight (filled) El peso de la bañera (lleno) Ø50 mm Ø2'' 100 mm X 30 mm 3.9'' X 1.2'' 0.26 m3 15866 in3 38 kgs 83.8 lbs 298 kgs 657 lbs 1A. Remove the bath from its carton and place it on a throw rug or other protective floor covering to prevent damage to the bath or floor. 1A. Saque la bañera del cartón y colóquela sobre un cubrecama u otro material de protección para evitar daños a la bañera o al piso. 1B. Position a clean drop cloth or similar material in the bottom of the bath. Be careful not to scratch the surface of the bath. 1B. Coloque una tela o material similar en el fondo de la bañera. Tenga cuidado para no rayar la superficie de la bañera. 1C. Level the bath by turning the leveling feet at the bottom of the tub. (You will need two persons to mange this task) 1C. Nivele la bañera girando los pies de nivelación que se encuentran debajo de la bañera. (Se necesitan dos personas para realizar esta tarea). 1D. Connect the trap to the drain according to the drain manufacturer’s instructions. 1D. Conecte el sifón al desagüe según las instrucciones del fabricante del desagüe. 1E. Open the hot and cold water supplies and check all connections for leaks. 1E. Abra los grifos de agua caliente y agua fría y verifique todas las conexiones para determinar si hay fugas. 1F. Fill the bath to the overflow and check for leaks. 1F. Llene la bañera hasta el nivel de desborde para determinar si hay fugas. 3 2. Faucet installation on the bath (optional) / Instalación del grifo en la bañera (opcional) 2A. Unscrew the bolts at the bottom of the tub using an adjustable key. Then carefully take out the top of the tub and place it on a throw rug or other protective floor covering to prevent damage to the bath and the floor. 2B. Drill holes for the faucets on the tub at the desired location. Then install the faucets according to the faucets’ manufacturer’s instructions. 2A. Desenrosque los pernos que se encuentran debajo de la bañera usando una llave ajustable. Luego saque cuidadosamente la parte de arriba de la bañera y colóquela sobre un cubrecama u otro material protector para evitar daños a la bañera o al piso. 2B. Perfore los agujeros para los grifos en la bañera en el sitio deseado. Luego instale los grifos según las instrucciones del fabricante de los grifos. Notes: Notas: occurs. asegurarse de que no haya fugas. 2C. Assemble the top of the tub with the skirt, and secure the bolts at the bottom as shown in the illustration. 2C. Ensamble la parte superior de la bañera con el faldón, y fije los pernos en la parte de abajo como se muestra en la ilustración. 2D. Connect the faucet hose with hot and cold water supply and check for leaks. 2D. Conecte la manguera del grifo con agua caliente y agua fría y verifique si hay fugas. 4 CONSUMER RESPONSIBILITIES RESPONSABILIDADES DEL CONSUMIDOR The DISTRIBUTOR bath Products will remain beautiful for many years if you properly care for them. Some of the waterproofed plastic strips and other seals will need to be replaced when they show signs of wear, yellowing or are no longer watertight. Water conditions in various parts of the country will determine any extra cleaning attention needed for your new bath. Los productos de bañera del DISTRIBUTOR permanecerán hermosos durante muchos años si los cuida correctamente. Algunos de las tiras de plástico resistentes al agua tendrán que ser remplazados cuando muestran signos de desgaste, se vuelven amarillentos o ya no tienen resistencia al gua. Las condiciones del agua en muchas regiones del país determinarán la necesidad de limpiezas adicionales a su bañera nueva. The DISTRIBUTOR does not recommend the use of harsh abrasive cleansers on any of its products. Harsh cleansers will damage the finish of your bathtub. MAINTENANCE RR For daily maintenance, use a wet cloth and a soft liquid cleaner. containing acetone, chlorine. RR Never use abrasive cleaners or strong bleach, scrapers, metallic brushes, orother objects or any products which can graze or tarnish surfaces. LIMITED 5 YEARS WARRANTY This warranty extends only to the original owner user for personal household use only. For commercial uses, additional limitations may apply. ►► The DISTRIBUTOR warrants acrylic surface against blistering or cracking and chipping resulting from defect in the acrylic surface material when used under normal condition and service for a period of five (5) years from the purchase date. ►► The DISTRIBUTOR warrants your satisfaction with each bathtub. Should any bathtub not meet your satisfaction due to a visual defect, simply return it to your retailer with the original packaging, PRIOR TO INSTALLATION, for a replacement. ►► The DISTRIBUTOR warrants, bathtubs to be free from defects in workmanship and materials under normal use and service for a period of five (5) years. ►► The DISTRIBUTOR will, at its election, repair, replace, or make appropriate adjustment where the DISTRIBUTOR optional inspection discloses any such defects occurring in normal usage within the warrantee periods. ►► Please note that the DISTRIBUTOR is not responsible for installation or removal costs. ►► Modification of any bath enclosure components may void the warranty. This warranty does not cover any claim arising from abuse, misuse, negligence, accident, improper installation or operations on the part of the purchaser. This warranty is void if the DISTRIBUTOR product is subject to alterations, or if repairs were done to the bath unit. ►► This warranty does not extend to any plumbing or components installed by dealers, installers or by any party other than the DISTRIBUTOR. ►► Implied warranties, including that of merchantability or fitness for a particular purpose, are expressly limited in duration to the duration of this warranty. ►► The DISTRIBUTOR disclaims any liability for special, incidental or consequential damages. El DISTRIBUTOR no recomienda el uso de limpiadores abrasivos ásperos en ninguno de sus productos. Los limpiadores ásperos dañarán acabado de su bañera. MANTENIMIENTO RR Para mantenimiento diario, utilice un paño húmedo y un limpiador líquido suave. RR Nunca utilice abrasivos o limpiadores que contenga acetona, cloro o blanqueadores fuertes, espátulas o cepillos de cerdas metálicas, ni objetos o productos que puedan raspar o deslucir las superficies. TADA DE 5 AÑOS Esta garantía se aplica únicamente al propietario/usuario original para fines domésticos solamente. Para usos comerciales algunas limitaciones adicionales pueden aplicarse. ►► El DISTRIBUTOR garantizas las superficies acrílicas contra ampollas o cuarteada y desconchada resultantes de defectos en el material de la superficie de acrílico cuando se usa bajo condiciones y servicios normales por un periodo de cinco (5) años a partir de la fecha de compra. ►► El DISTRIBUTOR garantiza su satisfacción con cada bañera. Si cualquier bañera no es satisfactoria debido a un defecto visual, sólo tiene que devolverlo en su empaque original a su vendedor, ANTES DE LA INSTALACIÓN, para que sea remplazado. ►► El DISTRIBUTOR garantiza que las bañeras están libresde defectos en mano de obra y materiales bajo uso y servicio normales, por un periodo de cinco (5) años. ►► El DISTRIBUTOR, a su elección, reparará, remplazará o hará los ajustes apropiados en caso de que la inspección opcional del DISTRIBUTOR revele la presencia de cualquiera de esos defectos que haya ocurrido en condiciones normales de uso dentro de los periodos de la garantía. ►► Sírvase notar que el DISTRIBUTOR no es responsable de los costos de instalación ni de desinstalación. ►► La modificación de cualquiera de los componentes de contención de la bañera puede anular la garantía. Esta garantía no cubre reclamaciones surgidas de abuso, mal uso, negligencia, accidente, instalación u operación inapropiada por parte del comprador. Esta garantía será nula si el producto del DISTRIBUTOR es sujeto a alteraciones, o si se ha hecho reparaciones a la bañera. ►► Esta garantía no se extiende a ninguna pieza ni componente de plomería instalados por vendedores, instaladores o por cualquier otro diferente del DISTRIBUTOR. ►► Garantías implícitas. Incluyendo aquellas de viabilidad comercial o conveniencia para un fin particular, las garantías quedan expresamente limitadas a la duración de esta garantía. ►► El DISTRIBUTOR se deslinda de toda responsabilidad por daños cuantificables, incidentales o indirectos. THE SOLE REMEDY PROVIDED BY THIS WARRANTY IS THE REPAIR OR REPLACEMENT OF DEFECTIVE PRODUCTS. THIS WARRANTY DOES NOT COVER THE COST OF REMOVAL OR INSTALLATION OF NEW PRODUCTS. THE WARRANTY WILL BE VOID IF THIS ITEM IS INSTALLED WITH OBVIOUS VISUAL DEFECTS. EL ÚNICO REMEDIO PROPORCIONADO POR ESTA GARANTÍA ES LA REPARACIÓN O EL REMPLAZO DE PRODUCTOS DEFECTUOSOS. ESTA GARANTÍA NO CUBRE COSTOS DE DESINTALACIÓN NI DE INSTALACIÓN DEL NUEVO PRODUCTO. LA GARANTÍA SERÁ NULA SI ESTE ARTÍCULO ES INSTALADO CON DEFECTOS VISUALES OBVIOS. INSTALACIÓN DE DESAGÜE DE BAÑERA (Opción #1) IMPORTANTE PIEZA DESCRIPCIÓN instalación. (NO INCLUIDO) o Sifón en P estándar (NO INCLUIDO) de comenzar la instalación. Desagüe de piso y anillo de sellado instalado de conformidad con los reglamentos locales. (NO INCLUIDO) incluidos. 1. Coloque la bañera en la posición deseada 2. Marque el contorno sobre el piso con un marcador borrable. 3. Retire la bañera y colóquela sobre una 4. Instale el sifón en P enroscándolo a la salida de desagüe pre-instalado de la bañera. se muestra en la ilustración, conéctelo al desagüe de piso existente. 5. la instalación del desagüe. Asegúrese de que no haya fuga. La instalación con sifón en P de PVC se hace de manera similar. 24h 6. del contorno de la base. p. 5 INSTALACIÓN DE DESAGÜE DE BAÑERA (Opción #2) IMPORTANTE PIEZA DESCRIPCIÓN instalación. (NO INCLUIDO) o Sifón en P estándar (NO INCLUIDO) de comenzar la instalación. Adaptador instalado de conformidad con los reglamentos locales. (INCLUIDO) Desagüe de piso y anillo de sellado (NO INCLUIDO) incluidos. 1. Coloque la bañera en la posición deseada 2. Marque el contorno sobre el piso con un marcador borrable. 3. Retire la bañera y colóquela sobre una 4. Enrosque el adaptador incluido al desagüe pre-instalado de la bañera. Use cinta y/o 5. Ensamble el sifón en P al adaptador aplicando silicona y conectando seque por 24 horas. 6. Luego, como se muestra en la ilustración, conecte el sifón en P al desagüe de piso existente. 7. la instalación del desagüe. Asegúrese de que no haya fuga. La instalación con sifón en P de PVC se hace de manera similar. 24h 8. del contorno de la base. p. 6-
 1
1
-
 2
2
-
 3
3
-
 4
4
-
 5
5
-
 6
6
-
 7
7
-
 8
8
-
 9
9
-
 10
10
-
 11
11


Schon SC70010 Instrucciones de operación
- Categoría
- Artículos sanitarios
- Tipo
- Instrucciones de operación
En otros idiomas
- English: Schon SC70010 Operating instructions

