Samsung HW-T400 Manual de usuario
- Categoría
- Altavoces de la barra de sonido
- Tipo
- Manual de usuario

HW-T400
FULL MANUAL
Imagine the possibilities
Thank you for purchasing this Samsung product.
To receive more complete service, please register
your product at www.samsung.com/register

ENG - 2
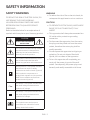
SAFETY INFORMATION
SAFETY WARNINGS
TO REDUCE THE RISK OF ELECTRIC SHOCK, DO
NOT REMOVE THE COVER (OR BACK).
NO USER-SERVICEABLE PARTS ARE INSIDE.
REFER SERVICING TO QUALIFIED SERVICE
PERSONNEL.
Refer to the table below for an explanation of
symbols which may be on your Samsung product.
CAUTION
RISK OF ELECTRIC SHOCK.
DO NOT OPEN.
This symbol indicates that high voltage
is present inside. It is dangerous to
make any kind of contact with any
internal part of this product.
This symbol indicates that this product
has included important literature
concerning operation and maintenance.
Class II product : This symbol indicates
that it does not require a safety
connection to electrical earth (ground).
If this symbol is not present on a
product with a power cord, the product
MUST have a reliable connection to
protective earth (ground).
AC voltage : This symbol indicates that
the rated voltage marked with the
symbol is AC voltage.
DC voltage : This symbol indicates that
the rated voltage marked with the
symbol is DC voltage.
Caution, Consult instructions for use :
This symbol instructs the user to
consult the user manual for further
safety related information.
WARNING
• To reduce the risk of re or electric shock, do
not expose this appliance to rain or moisture.
CAUTION
• TO PREVENT ELECTRIC SHOCK, MATCH WIDE
BLADE OF PLUG TO WIDE SLOT, FULLY
INSERT.
• This apparatus shall always be connected to a
AC outlet with a protective grounding
connection.
• To disconnect the apparatus from the mains,
the plug must be pulled out from the mains
socket, therefore the mains plug shall be
readily operable.
• Do not expose this apparatus to dripping or
splashing. Do not put objects lled with
liquids, such as vases on the apparatus.
• To turn this apparatus off completely, you
must pull the power plug out of the wall
socket. Consequently, the power plug must
be easily and readily accessible at all times.

ENG - 3
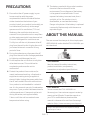
PRECAUTIONS
1. Ensure that the AC power supply in your
house complies with the power
requirements listed on the identication
sticker located on the bottom of your
product. Install your product horizontally, on
a suitable base (furniture), with enough
space around it for ventilation (7~10 cm).
Make sure the ventilation slots are not
covered. Do not place the unit on ampliers
or other equipment which may become hot.
This unit is designed for continuous use.
To fully turn off the unit, disconnect the AC
plug from the wall outlet. Unplug the unit if
you intend to leave it unused for a long
period of time.
2. During thunderstorms, disconnect the AC
plug from the wall outlet. Voltage peaks due
to lightning could damage the unit.
3. Do not expose the unit to direct sunlight or
other heat sources. This could lead to
overheating and cause the unit to
malfunction.
4. Protect the product from moisture (i.e.
vases), and excess heat (e.g. a replace) or
equipment creating strong magnetic or
electric elds. Unplug the power cable from
the AC wall socket if the unit malfunctions.
Your product is not intended for industrial
use. It is for personal use only. Condensation
may occur if your product has been stored in
cold temperatures. If transporting the unit
during the winter, wait approximately
2 hours until the unit has reached room
temperature before using.
5. The battery used with this product contains
chemicals that are harmful to the
environment. Do not dispose of the battery
in the general household trash. Do not
expose the battery to excess heat, direct
sunlight, or re. Do not short circuit,
disassemble, or overheat the battery.
Danger of explosion if the battery is replaced
incorrectly. Replace only with the same or
equivalent type.
ABOUT THIS MANUAL
The user manual has two parts: this simple paper
USER MANUAL and a detailed FULL MANUAL you
can download.
USER MANUAL
See this manual for safety instructions,
product installation, components,
connections, and product specications.
FULL MANUAL
You can access the FULL MANUAL on
Samsung’s on-line customer support center by
scanning the QR code. To see the manual on
your PC or mobile device, download the
manual in document format from Samsung’s
website. (http://www.samsung.com/support)
Design and specications are subject to change
without prior notice.

ENG - 4
CONTENTS
01 Checking the Components 6
Inserting battery (AAA) into the Remote Control ------------------------- 6
02 Product Overview 7
Front / Right Side Panel of the Soundbar ------------------------- 7
Bottom Panel of the Soundbar ------------------------- 8
03 The Remote Control 9
Using the Hidden Buttons (Buttons with more than one function)
-------------------------
10
Adjusting the Soundbar volume with a TV remote control
-------------------------
12
04 Connecting the Soundbar 13
Connecting Electrical Power
-------------------------
13
05 Connecting to a TV 14
Connecting using an Optical Cable
-------------------------
14
Connecting a TV or Bluetooth Device via Bluetooth
-------------------------
16
Connecting a Soundbar to a mobile device via NFC function
-------------------------
17
06 Connecting an External Device 20
Connecting using an Optical Cable
-------------------------
20
Connecting using an Analog Audio (AUX) Cable
-------------------------
21
07 Connecting a USB Storage Device 22
Setting Repeat Play Options
-------------------------
23

ENG - 5
08 System Initialize 25
09 Installing the Wall Mount (Optional) 26
Installation Precautions
-------------------------
26
Wall mount Components
-------------------------
26
10 Software Update 29
Update Procedure
-------------------------
29
When update fails
-------------------------
30
11 Troubleshooting 31
12 License 32
13 Open Source License Notice 32
14 Important Notes About Service 32
15 SpecicationsandGuide 33
Specications
-------------------------
33

ENG - 6
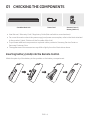
01 CHECKING THE COMPONENTS
Soundbar Main Unit Power Cord Remote Control /
Battery (AAA x 1)
• User Manual / Warranty Card / Regulatory Guide (Not available in some locations).
• For more information about the power supply and power consumption, refer to the label attached
to the product. (Label : Bottom of the Soundbar Main Unit)
• To purchase additional components or optional cables, contact a Samsung Service Center or
Samsung Customer Care.
• The appearance of the accessories may differ slightly from the illustrations above.
Inserting battery (AAA) into the Remote Control
Match the polarity of the battery to the symbols on the battery compartment.
1
1
3
2
2

ENG - 7
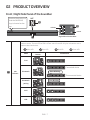
02 PRODUCT OVERVIEW
Front / Right Side Panel of the Soundbar
AUX IN
POWER
DIGITAL AUDIO IN
(OPTICAL)
USB (5V 0.5A)
AUX IN
POWER
DIGITAL AUDIO IN
(OPTICAL)
USB (5V 0.5A)
Volume
Power
Position the product so
that the SAMSUNG
logo is located on the
top.
Right Side of the Soundbar
NFC
LED
indicator
The LED Indicator ashes, glows, or changes color depending on the Soundbar's current
mode or status. The color of the LED indicator and the number of lights indicate the active
mode as described below.
W
White LED
B
Blue LED
R
Red LED
G
Green LED
Mode
Remote control
Button
LED indicator
D.IN
W
Bluetooth
B
Connected status
B
Slow-Blinking
Disconnected status
Bluetooth
pairing
B
Fast-Blinking
AUX
W W
USB
W W W

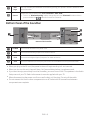
ENG - 8
NFC
Logo
You can activate your Bluetooth connection by placing your phone in the NFC detection area
of the Soundbar.
Source
Selects the source input mode. (D.IN / Bluetooth / AUX / USB)
• To turn on “Bluetooth pairing” mode, change the source to “Bluetooth” mode and then
press and hold the button for more than 5 seconds.
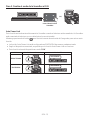
Bottom Panel of the Soundbar
Bottom of the Soundbar
AUX IN
POWER
DIGITAL AUDIO IN
(OPTICAL)
USB (5V 0.5A)
POWER
AUX IN
DIGITAL AUDIO IN
(OPTICAL)
USB (5V 0.5A)
POWER
AUX IN
DIGITAL AUDIO IN
(OPTICAL)
USB (5V 0.5A)
POWER Connect the Soundbar's AC power cord.
AUX Connect to the Analog output of an external device.
D.IN Connect to the digital (optical) output of an external device.
USB Connect a USB device here to play music les on the USB device through the Soundbar.
•
When you plug in the AC cord, the power button will begin working in 4 to 6 seconds.
•
When you turn on this unit, there will be a 4 to 5 second delay before it produces sound.
•
If you want to enjoy sound only from the Soundbar, you must turn off the TV’s speakers in the Audio
Setup menu of your TV. Refer to the owner’s manual supplied with your TV.
•
When disconnecting the power cord from a wall outlet, pull the plug. Do not pull the cable.
•
Do not connect this unit or other components to an AC outlet until all connections between
components are complete.

ENG - 9
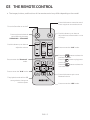
03 THE REMOTE CONTROL
• The images, buttons, and functions of the remote control may differ depending on the model.
Turns the Soundbar on and off.
Press this button to mute the sound.
Press it again to unmute the sound.
Press this button to pair a new
Bluetooth device.
Press to enter the "USB" mode.
Push this button up or down to
adjust the bass volume within a -6 to
+6 range.
Press to enter the "AUX" mode.
Press the
button to select the
previous music le.
Press the
button to play/pause
a music le.
Press the
button to select the
next music le.
Press to select the desired
sound effect by choosing
SURROUND or STANDARD.
Push this button up or down to
adjust the volume.
The playback mode of the USB
storage device changes to
random repeat.
Press to enter the “D.IN” mode.
Press to enter the “Bluetooth”
mode.

ENG - 10
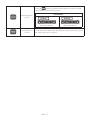
Using the Hidden Buttons (Buttons with more than one function)
Hidden Button
How to Use the Remote Control
Remote Control
Button
Function
Auto Power
Down On/Off
(AUX mode)
– D.IN / Bluetooth / USB / AUX Mode : If there is no audio signal for
18 minutes.
– If there is no KEY input for 8 hours when the Audio (AUX) Cable
is connected. (Auto Power Down function can be turned off
only in that case.)
– To turn off Auto Power Down function, while in “AUX” mode,
press and hold the button for 5 seconds.
LED indicator
W W
G
Blinking
Auto Power Down On
W W
R
Blinking
Auto Power Down Off
Initialize
(Standby)
Press the button for 5 seconds in the standby power off station to
trigger the system initial function.
– This operation will not clear Bluetooth paired history.
LED indicator
W W W W
R
Blinking X 2
TV remote
control On/Off
(Standby)
For detailed information about TV remote control, please see "Adjusting
the Soundbar volume with a TV remote control" on page 12.
TV Connect
(Bluetooth mode)
For detailed information about TV Connect, please see "Disconnecting
the Soundbar from the TV” on page 17.

ENG - 11
Bluetooth Power
On/Off
Press the button for 5 seconds in the power on station to trigger
the Bluetooth Power On/Off function.
LED indicator
B
W
G
Blinking
Bluetooth Power On
B
W
R
Blinking
Bluetooth Power Off
Auto Power Link
On/Off
For detailed information about Auto Power Link On/Off function, please
see “Auto Power Link” on page 15.

ENG - 12
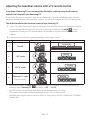
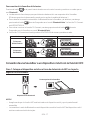
Adjusting the Soundbar volume with a TV remote control
If you have a Samsung TV, you can adjust the Soundbar’s volume using the IR remote
control that came with your Samsung TV.
First use the TV menu to set the TV audio on your Samsung TV to external speakers, then use your
Samsung remote to control the Soundbar’s volume. For more information, see the TV’s user manual.
The default mode for this function is control by a Samsung TV.
1. If your TV is not a Samsung TV and you want your TV’s remote to control the Soundbar’s volume,
you can change the settings of this function by pressing and holding the BASS button
repeatedly. To have your TV’s remote adjust the Soundbar’s volume, follow Steps 1 through
3 below.
2. If you want to turn off this function completely, follow Steps 1 and 2.
Mode Remote control Button LED indicator
1.
Turn off
All LED’s Off
2.
“Off” mode
5 Sec
W W W W
Blinking
3.
“All TV” mode
5 Sec
W W W W
Blinking
4.
“Samsung TV” mode
(Default mode)
5 Sec
W W W W
Blinking
– Each time you press the BASS button and hold it for 5 seconds, the mode switches in the
following order:
“Samsung TV” (Default mode) → “Off” → “All TV”.
– The LED’s blink for 3~4 seconds, then return to the standby power off mode.
– This function may not be available, depending on your TV`s remote control.
– Manufacturers supporting this function: VIZIO, LG, Sony, Sharp, PHILIPS, PANASONIC, TOSHIBA,
Hisense, RCA

ENG - 13
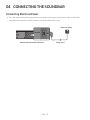
04 CONNECTING THE SOUNDBAR
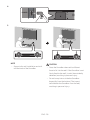
Connecting Electrical Power
• For information about the required electrical power and power consumption, refer to the label
attached to the product. (Label : Bottom of the Soundbar Main Unit)
AUX IN
POWER
DIGITAL AUDIO IN
(OPTICAL)
USB (5V 0.5A)
POWER
Power Cord
Electrical Outlet
Bottom of the Soundbar Main Unit

ENG - 14
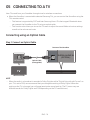
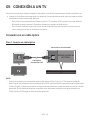
05 CONNECTING TO A TV
Hear TV sound from your Soundbar through wired or wireless connections.
• When the Soundbar is connected to selected Samsung TVs, you can control the Soundbar using the
TV’s remote control.
– This feature is supported by 2017 and later Samsung Smart TVs that support Bluetooth when
you connect the Soundbar to the TV using an optical cable.
– This function also allows you to use the TV menu to adjust the sound eld and various settings
as well as the volume and mute.
Connecting using an Optical Cable
Step 1. Connect an Optical Cable
USB (5V 0.5A)
AUX IN
DIGITAL AUDIO IN
(OPTICAL)
OPTICAL OUT
Optical Cable
(not supplied)
Bottom of the Soundbar
NOTE
– When the audio in a broadcast is encoded in Dolby Digital and the “Digital Output Audio Format” on
your TV is set to PCM, we recommend that you change the setting to Dolby Digital. When the
setting on the TV is changed, you will experience better sound quality. (The TV menu may use
different words for Dolby Digital and PCM depending on the TV manufacturer.)

ENG - 15
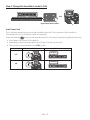
Step 2. Change the Soundbar’s mode to D.IN
Right Side of the Soundbar
(OR)
W
Auto Power Link
This Function automatically turns on the Soundbar when the TV is turned on if the Soundbar is
connected to the TV by an Optical Cable (not supplied).
Press and hold the button on the remote control for more than 5 seconds to toggle this function.
• Auto Power Link is set to ON by default.
• Depending on the connected device, Auto Power Link may not function.
• This function is only available in the “D.IN” mode.
Mode Remote control Button LED indicator
OFF
5 Sec
W W
R
Blinking
ON
5 Sec
W W
G
Blinking

ENG - 16
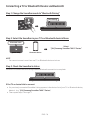
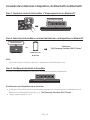
Connecting a TV or Bluetooth Device via Bluetooth
Step 1. Change the Soundbar mode to “Bluetooth Pairing”
B
Fast-Blinking
Step 2. Select the Soundbar in your TV’s or Bluetooth device’s Menu
Select
“[AV] Samsung Soundbar T400 T-Series”
Bluetooth device
(OR)
Bluetooth menu
NOTE
– You cannot connect more than one TV or Bluetooth device at a time.
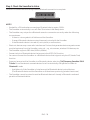
Step 3. Check the Soundbar’s status
The blue LED should not be blinking once the Bluetooth connection is complete.
B
If the TV or device fails to connect
• If a previously connected Soundbar listing appears in the device list of your TV or Bluetooth device,
delete it. (e.g. “[AV] Samsung Soundbar T400 T-Series”)
• Then repeat steps 1 through 3.

ENG - 17
Disconnecting the Soundbar from the TV
Press the button on the right side panel or on the remote control and switch to any mode but
“Bluetooth”.
• Disconnecting takes time because the TV must receive a response from the Soundbar.
(The time required may differ, depending on the TV model.)
• To cancel the automatic Bluetooth connection between the Soundbar and TV, press and hold
button for 5 seconds in “Bluetooth Ready” mode. TV Connect is turned OFF.
• To turn TV Connect back on, press and hold the button for 5 seconds with the Soundbar in
“Bluetooth Ready” mode.
• TV Connect is set to ON by default.
Mode Remote control Button LED indicator
TV Connect-OFF
5 Sec
B
W W
R
Blinking
TV Connect-ON
5 Sec
B
W W
G
Blinking
Connecting a Soundbar to a mobile device via NFC function
Step 1. Place your mobile device in the NFC detection area on top of the Soundbar
Bluetooth device
NFC
Top of the Soundbar
NOTES
– Make sure that your mobile device has the NFC function turned on and that the screen is active.
– Bluetooth connection is unavailable when NFC of the mobile device is in card emulation mode.

ENG - 18
Step 2. Check the Soundbar’s status
The blue LED should not be blinking once the Bluetooth connection is complete.
B
NOTES
– If asked for a PIN code when connecting a Bluetooth device, enter <0000>.
– The Soundbar automatically turns off after 18 minutes in the Ready state.
– The Soundbar may not perform Bluetooth search or connection correctly under the following
circumstances:
– If there is a strong electrical eld around the Soundbar.
– If several Bluetooth devices are simultaneously paired with the Soundbar.
– If the Bluetooth device is turned off, not in place, or malfunctions.
– Electronic devices may cause radio interference. Devices that generate electromagnetic waves
must be kept away from the Soundbar main unit - e.g., microwaves, wireless LAN devices, etc.
– The Soundbar supports SBC data (44.1kHz, 48kHz).
– Connect only to a Bluetooth device that supports the A2DP (AV) function.
– You cannot connect the Soundbar to a Bluetooth device that supports only the HF (Hands Free)
function.
– Once you have paired the Soundbar to a Bluetooth device, selecting “[AV] Samsung Soundbar T400
T-Series” from the device’s scanned devices list will automatically change the Soundbar to
“Bluetooth” mode.
– Available only if the Soundbar is listed among the Bluetooth device’s paired devices.
(The Bluetooth device and the Soundbar must have been previously paired at least once.)
– The Soundbar cannot be paired to another Bluetooth device if already in Bluetooth mode and
paired to a Bluetooth device.

ENG - 19
Bluetooth Power On/Off
If a previously paired Bluetooth device tries to pair with the Soundbar when the Bluetooth Power
function is on and the Soundbar is turned off, the Soundbar turns on automatically.
Press and hold the button for more than 5 seconds in the power on station to trigger/shut off
Bluetooth Power On function. For more information about Bluetooth Power On/Off, see page 11.
• Bluetooth Power function is set to On by default.
More About Bluetooth
Bluetooth is a technology that enables Bluetooth-compliant devices to interconnect easily with each
other using a short wireless connection.
• A Bluetooth device may cause noise or malfunction, depending on usage, if:
– A part of your body is in contact with the receiving/transmitting system of the Bluetooth device
or the Soundbar.
– It is subject to electrical variation from obstructions caused by a wall, corner, or ofce partition.
– It is exposed to electrical interference from same frequency-band devices including medical
equipment, microwave ovens, and wireless LANs.
• Pair the Soundbar with the Bluetooth device while they are close together.
• The further the distance between the Soundbar and Bluetooth device, the worse the quality is.
If the distance exceeds the Bluetooth operational range, the connection is lost.
• In poor reception areas, the Bluetooth connection may not work properly.
• The Bluetooth connection only works when it is close to the unit. The connection will be
automatically cut off if the Bluetooth device is out of range. Even within range, the sound quality
may be degraded by obstacles such as walls or doors.
• This wireless device may cause electric interference during its operation.

ENG - 20
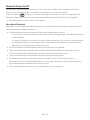
06 CONNECTING AN EXTERNAL DEVICE
Connect to an external device via an optical cable or analog cable to play the external device’s sound
through the Soundbar.
Connecting using an Optical Cable
Step 1. Connect using an Optical Cable
AUX IN
DIGITAL AUDIO IN
(OPTICAL)
OPTICAL OUT
Bottom of the Soundbar
Optical Cable
(not supplied)
BD / DVD player / Set-top box /
Game console
Step 2. Change the Soundbar’s mode to D.IN
Right Side of the Soundbar
(OR)
W

ENG - 21
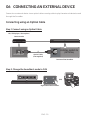
Connecting using an Analog Audio (AUX) Cable
Step 1. Connect using an Analog Audio (AUX) Cable
AUX IN
DIGITAL AUDIO IN
(OPTICAL)
- AUDIO -
R L
AUX IN
DIGITAL AUDIO IN
(OPTICAL)
- AUDIO -
R L
Bottom of the Soundbar
Audio (AUX) Cable
(not supplied)
BD / DVD player / Set-top box /
Game console
Step 2. Change the Soundbar’s mode to AUX
Right Side of the Soundbar
(OR)
W W

ENG - 22
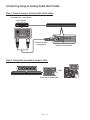
07 CONNECTING A USB STORAGE DEVICE
Step 1. Connect a USB Drive
USB (5V 0.5A)
Bottom of the Soundbar
NOTE
– The Soundbar automatically turns off (Auto Power Off) if you do not connect a USB device to the
Soundbar within 18 minutes.
Step 2. Change the Soundbar’s mode to USB
Right Side of the Soundbar
(OR)
W W W

ENG - 23
Setting Repeat Play Options
Repeat play
When the Soundbar is in “USB” mode, each time you press the button the “USB” mode changes
how it plays tracks in the following order: “Repeat - Off” > “Repeat - 1 song” > “Repeat - All songs”.
See the table below for details.
Mode Remote control Button LED indicator
Repeat - Off
W W W
Repeat - 1 song
W W W
Blinking
Repeat - All songs
W W W
Blinking
Repeat play at Random
When the Soundbar is in “USB” mode, once you press the button, the “USB” mode changes how it
plays tracks to “Repeat - Random”.
See the table below for details.
Mode Remote control Button LED indicator
Repeat - Random
W W W
Blinking

ENG - 24
File Format Type Compatibility list
Extension Codec Sampling Rate Bitrate
*.mp3 MPEG 1 Layer2 16kHz ~ 48kHz 80kbps~320kbps
MPEG 1 Layer3 16kHz ~ 48kHz 80kbps~320kbps
MPEG 2 Layer3 16kHz ~ 48kHz 80kbps~320kbps
MPEG 2.5 Layer3 16kHz ~ 48kHz 80kbps~320kbps
*.wma Wave_Format_MSAudio1 16kHz ~ 48kHz 56kbps~128kbps
Wave_Format_MSAudio2 16kHz ~ 48kHz 56kbps~128kbps
*.aac AAC 16kHz ~ 96kHz 48kbps~320kbps
A AC-LC 16kHz ~ 96kHz
128kbps~192kbps
5.1ch 320kbps
HE-AAC 24kHz ~ 96kHz
48kbps~64kbps
5.1ch 160kbps
*.wav - 16kHz ~ 48kHz up to 3000kbps
*.ac FLAC 1.1.0, FLAC 1.2.1 16kHz ~ 96kHz up to 3000kbps
• If there are too many folders and les stored on the USB device, it may take the Soundbar some
time to access and play les.

ENG - 25
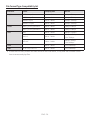
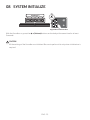
08 SYSTEM INITIALIZE
W W W W
R
AUX IN
POWER
DIGITAL AUDIO IN
(OPTICAL)
USB (5V 0.5A)
Right Side of the Soundbar
5 Sec
Blinking X 2
With the Soundbar on, press the (Volume) buttons on the body at the same time for at least
5 seconds.
CAUTION
– All the settings of the Soundbar are initialized. Be sure to perform this only when initialization is
required.

ENG - 26
09 INSTALLING THE WALL MOUNT
(OPTIONAL)
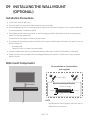
Installation Precautions
• Install on a vertical wall only.
• Do not install in a place with high temperature or humidity.
• Verify whether the wall is strong enough to support the product’s weight. If not, reinforce the wall
or choose another installation point.
• Purchase and use the xing screws or anchors appropriate for the kind of wall you have (plaster
board, iron board, wood, etc.).
If possible, x the support screws into wall studs.
• Purchase wall mounting screws according to the type and thickness of the wall you want to mount
the Soundbar on.
– Diameter: M4
– Length: 40 mm or longer recommended.
• Connect cables from the unit to external devices before you install the Soundbar on the wall.
• Make sure the unit is turned off and unplugged before you install it. Otherwise, it may cause an
electric shock.
Wall mount Components
5 cm or more
For Installation on Concrete Walls
(not supplied)
A
B C D
x 2 (M4 x L40)
A
B
C D
x 2
40 mm or longer
4 mm
8 mm
Recommendedspecication
NOTE
– Installations on other types of walls will require
different kinds of screws.

ENG - 27
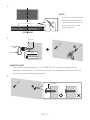
1.
------ 370 mm------
CENTER LINE
NOTES
– If your TV is installed on the
wall, install the Soundbar
5 cm or more below your TV.
– Use a pencil to mark the
holes’ positions.
2.
6 mm
50 mm
A
B
C D
IMPORTANT NOTE
– The installation method shown here is for CONCRETE walls. Installation methods will vary
depending on the wall type. For installation on dry wall, we strongly recommend you drill screw
support holes into the underlying wood studs.
3.
A
B C D
10.5mm

ENG - 28
4.
AUX IN
POWER
DIGITAL AUDIO IN
(OPTICAL)
USB (5V 0.5A)
POWER
AUX IN
POWER
DIGITAL AUDIO IN
(OPTICAL)
USB (5V 0.5A)
POWER
5.
NOTE
– Supports for wall installation are built
into the back of the Soundbar.
CAUTION
– Press the Soundbar down with sufcient
force to x it to the wall. If the Soundbar is not
rmly xed to the wall, it could be accidently
detached, resulting in personal injury.
– Do not bump into or strike the Soundbar
(especially from the bottom). The impact
could detach the Soundbar from the wall,
resulting in personal injury.

ENG - 29
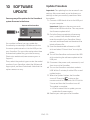
10 SOFTWARE
UPDATE
Samsung may offer updates for the Soundbar’s
systemrmwareinthefuture.
USB (5V 0.5A)
Bottom of the Soundbar
If an update is offered, you can update the
rmware by connecting a USB device with the
rmware update stored on it to the USB port on
your Soundbar. For more information about how
to download update les, go to the Samsung
Electronics website at (www.samsung.com
Support).
Then, select the product type or enter the model
number of your Soundbar, select the Software &
Apps option, and then Downloads. Note that the
option names can vary.
Update Procedure
Important: The updating function erases all user
settings. We recommend you write down your
settings so that you can easily reset them after
the update.
1. Connect a USB thumb drive to the USB port
on your computer.
Important: Make sure there are no music
les on the USB thumb drive. This may cause
the rmware update to fail.
2. Go to the Samsung website at (samsung.
com)
select Enter Model Number and
enter the model of your Soundbar. Select
manuals and downloads and download the
latest software le.
3. Save the downloaded software to a USB
stick and select “Extract Here” to unzip the
folder.
4. Turn off the Soundbar and connect the USB
stick containing the software update to the
USB port.
5. Disconnect the power cord, reconnect it, and
then turn on the Soundbar.
6. Turn on the Soundbar and select mode to
USB. Within 3 minutes, 4 white LEDs on and
update begins.
7. When the update nishes, the Soundbar
turns off. Press the button on the
remote control for 5 seconds. All LEDs blink
2 times and then the Soundbar turns off.
The update is complete.
• If the rmware fails to update, you can
update the rmware again.
8. Restore your settings on the Soundbar.

ENG - 30
When update fails
1. Turn off the Soundbar, disconnect and then
reconnect the USB storage device that
contains the update les to the Soundbar’s
USB port.
2. Disconnect the Soundbar’s power cord,
reconnect it, and then turn on the Soundbar.
NOTES
– The rmware update may not work properly
if audio les supported by the Soundbar are
stored in the USB storage device.
– Do not disconnect the power or remove the
USB device while updates are being applied.
The main unit will turn off automatically after
completing the rmware update.
– After the update is completed, the user setup
in the Soundbar is initialized so you can reset
your settings. We recommend you write
down your settings so that you can easily
reset them after the update. If the software
update fails, check if the USB stick is
defective.
– Mac OS users should use MS-DOS (FAT) as the
USB format.
– Updating via USB may not be available,
depending on the USB storage device
manufacturer.

ENG - 31
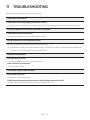
11 TROUBLESHOOTING
Before seeking assistance, check the following.
The unit will not turn on.
Isthepowercordrmlypluggedintothewalloutlet?
; Unplug and reconnect the power cord to the wall outlet to make sure the connection is secure.
A function does not work when the button is pressed.
Istherestaticelectricityintheair?
; Disconnect the power plug and connect it again.
Sound dropouts occur in Bluetooth mode.
; See the Bluetooth connection sections on pages 16 ~ 19.
; In Bluetooth connection mode, the Bluetooth connection will be lost if the distance between the
Soundbar and the Bluetooth device exceeds 10m.
Sound is not produced.
IstheMutefunctionon?
; Press the VOL button to cancel the function.
Isthevolumesettominimum?
; Adjust the Volume.
The remote control does not work.
Isthebatterydrained?
; Replace with new batteries.
IsthedistancebetweentheremotecontrolandSoundbarmainunittoofar?
; Move the remote control closer to the Soundbar main unit.

ENG - 32
12 LICENSE
Manufactured under license from Dolby
Laboratories. Dolby, Dolby Audio, and the
double-D symbol are trademarks of Dolby
Laboratories.
For DTS patents, see http://patents.dts.com.
Manufactured under license from DTS
Licensing Limited. DTS, the Symbol, DTS in
combination with the Symbol, and DTS 2.0
Channel are registered trademarks or
trademarks of DTS, Inc. in the United States
and/or other countries. © DTS, Inc. All Rights
Reserved.
The Bluetooth® word mark and logos are
registered trademarks owned by the Bluetooth
SIG, Inc. and any use of such marks by Samsung
Electronics Co., Ltd. is under license. Other
trademarks and trade names are those of their
respective owners.
13 OPEN SOURCE
LICENSE NOTICE
To send inquiries and requests regarding open
sources, contact Samsung via Email
(oss.request@samsung.com).
14 IMPORTANT
NOTES ABOUT
SERVICE
Figures and illustrations in this User Manual are
provided for reference only and may differ from
actual product appearance.

ENG - 33
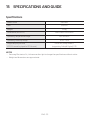
15 SPECIFICATIONS AND GUIDE
Specications
Model Name HW-T400
USB 5V/0.5A
Weight 2.0 kg
Dimensions (W x H x D) 641.0 x 65.0 x 107.0 mm
Operating Temperature Range +5°C to +35°C
Operating Humidity Range 10 % ~ 75 %
Supported play formats
(DTS 2.0 sound is played in DTS format.)
LPCM 2ch, Dolby Audio™
(supporting Dolby® Digital), DTS
NOTES
– Samsung Electronics Co., Ltd reserves the right to change the specications without notice.
– Weight and dimensions are approximate.

SPA - 2
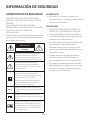
INFORMACIÓN DE SEGURIDAD
ADVERTENCIAS DE SEGURIDAD
PARA REDUCIR EL PELIGRO DE DESCARGA
ELÉCTRICA, NO RETIRE LA TAPA (NI LA PARTE
TRASERA).
NO CONTIENE ELEMENTOS QUE DEBA
REEMPLAZAR EL USUARIO. EN CASO DE AVERÍA,
SOLICITE LA AYUDA DE PERSONAL
ESPECIALIZADO.
Consulte la tabla a continuación para obtener una
explicación de los símbolos que podrían aparecer
en su producto Samsung.
PRECAUCIÓN
RIESGO DE ELECTROCUCION.
NO ABRIR.
Este símbolo indica que el dispositivo
contiene alto voltaje. Es peligroso
establecer cualquier tipo de contacto
con cualquier parte interna del producto.
Este símbolo indica que con este
producto se incluye documentación
importante relativa a la operación y el
mantenimiento.
Producto de Clase II: Este símbolo indica
que no es necesaria una conexión
eléctrica de seguridad (toma de tierra).
Si un producto con un cable de
alimentación no tiene este símbolo, el
producto DEBE tener una conexión
segura a una puesta a tierra.
Voltaje CA: Este símbolo indica que la
tensión nominal marcada con el símbolo
es CA.
Voltaje CC: Este símbolo indica que la
tensión nominal marcada con el símbolo
es CC.
Precaución, consulte las instrucciones
antes de usar: Este símbolo indica que
se debe consultar el manual del usuario
para obtener información relacionada
con la seguridad.
ADVERTENCIA
• Para reducir el riesgo de incendio o de
descarga eléctrica, no exponga este aparato a
la lluvia ni a lahumedad.
PRECAUCIÓN
• PARA EVITAR DESCARGAS ELÉCTRICA S,
INTRODUZCA TOTALMENTE EL ENCHUFE.
• Este aparato deberá conectarse siempre a
una toma de alimentación principal con una
conexión a tierra de protección.
• Para desconectar el aparato de la fuente de
alimentación, el enchufe deberá ser
desconectado de la toma principal, lo que
signica que deberá disponer de fácil acceso
al enchufe principal.
• No debe exponer este aparato a gotas ni
salpicaduras de agua. No coloque en el
aparato objetos con líquido, como jarrones.
• Para apagar completamente este aparato,
debe desconectar su enchufe de la toma de
corriente. Por tanto, el enchufe debe estar
accesible en todo momento.

SPA - 3
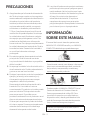
PRECAUCIONES
1. Asegúrese de que la fuente de alimentación
de CA de su hogar cumpla con los requisitos
mencionados en la etiqueta de identicación
ubicada en la parte inferior del producto.
Instale el producto horizontalmente, sobre
una base adecuada (mueble), con espacio
suciente a su alrededor para ventilación
7~10 cm. Asegúrese de que los oricios de
ventilación no queden tapados. No coloque
la unidad sobre amplicadores o cualquier
otro equipo que pueda generar calor. Esta
unidad se ha diseñado para utilizarse de
forma continua. Para apagar completamente
la unidad, desconecte el enchufe de CA de la
toma de corriente. Desenchufe la unidad si
no va utilizarla durante un tiempo
prolongado.
2. Durante tormentas, desconecte el enchufe
principal de CA de la toma de corriente.
Los picos de tensión debidos a rayos podrían
dañar la unidad.
3. No exponga la unidad a la luz directa del sol ni a
otras fuentes de calor. Podrían sobrecalentarla
y provocar una avería en la unidad.
4. Proteja el reproductor contra la humedad por
ejemplo, jarrones) y calor excesivo (p. ej.:
chimeneas) o equipos que creen campos
magnéticos o eléctricos potentes.
Desconecte el cable de alimentación de la
fuente de CA si la unidad no funciona
correctamente. El producto no ha sido creado
para uso industrial. Este producto es sólo
para uso personal. Es posible que se
produzca condensación en el producto o en el
disco en situaciones de temperaturas bajas.
Si tiene que transportar el producto durante
el invierno, espere 2 horas aproximadamente
antes de usarlo hasta que la unidad haya
alcanzado la temperatura de la sala.
5. Las pilas utilizadas en este producto contienen
productos químicos que son peligrosos para el
medio ambiente. No tire las pilas con el resto
de la basura doméstica. No deseche las pilas en
el fuego. No cortocircuite, desmonte ni
sobrecaliente las baterías. Si las pilas se
reemplazan de manera incorrecta existe
peligro de explosión. Reemplácelas únicamente
por el mismo tipo o un tipo equivalente.
INFORMACIÓN
SOBRE ESTE MANUAL
El manual del usuario tiene dos partes: este
MANUAL DEL USUARIO sencillo y un MANUAL
COMPLETO detallado que puede descargar.
MANUAL DEL USUARIO
Consulte este manual para obtener información
sobre instrucciones de seguridad, instalación
del producto, componentes, conexiones y
especicaciones del producto.
MANUAL COMPLETO
Puede acceder al MANUAL COMPLETO en el
Centro de Atención al Cliente en línea de
Samsung escaneando el código QR. Para
consultar el manual en su computadora o
dispositivo móvil, descárguelo desde el sitio
web de Samsung en formato de documento.
(http://www.samsung.com/support)
El diseño y las especicaciones están sujetos a
cambio sin previo aviso.

SPA - 4
ÍNDICE
01 VericacióndelosComponentes 6
Colocación de la batería (AAA) en el control remoto ------------------------- 6
02 DescripcióndelProducto 7
Panel frontal/lateral derecho de la Soundbar ------------------------- 7
Panel inferior de la Soundbar ------------------------- 8
03 Elcontrolremoto 9
Uso de los botones ocultos (botones con más de una función)
-------------------------
10
Ajuste del volumen de la Soundbar con el control remoto de un televisor
-------------------------
12
04 ConexióndelaSoundbar 13
Conexión del suministro eléctrico
-------------------------
13
05 ConexiónaunTV 14
Conexión con un cable óptico
-------------------------
14
Conexión de un televisor o dispositivo con Bluetooth vía Bluetooth
-------------------------
16
Conexión de una Soundbar a un dispositivo móvil con la función NFC
-------------------------
17
06 ConexióndeunDispositivoExterno 20
Conexión con un cable óptico
-------------------------
20
Conexión con un cable de audio analógico (AUX)
-------------------------
21
07 Conexióndeundispositivodealmacenamiento
USB 22
Conguración de las opciones de repetición
-------------------------
23

SPA - 5
08 IniciodelSistema 25
09 Instalacióndelsoportedemontajeenlapared
(opcional) 26
Precauciones para la instalación
-------------------------
26
Componentes de soporte
-------------------------
26
10 ActualizacióndelSoftware 29
Procedimiento de actualización
-------------------------
29
Si no aparece la opción UPDATE
-------------------------
30
11 SolucióndeProblemas 31
12 Licencia 32
13 AvisoSobreLicenciadecódigoabierto 32
14 NotaImportanteSobreelServicio 32
15 EspecicacionesyGuía 33
Especicaciones
-------------------------
33

SPA - 6
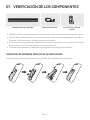
01 VERIFICACIÓN DE LOS COMPONENTES
UnidadprincipaldelaSoundbar Cabledealimentación Controlremoto/Batería
(1xAAA)
• Manual del usuario/Tarjeta de garantía/Guía de normativas (No están disponibles en algunos lugares).
• Para la fuente de alimentación y el consumo de energía, consulte la etiqueta pegada en el producto.
(Etiqueta : Parte inferior de la unidad principal de la Soundbar)
• Para comprar componentes adicionales o cables optativos, comuníquese con un Centro de Servicios
de Samsung o con el Centro de Atención al Cliente de Samsung.
• El aspecto de los accesorios puede diferir ligeramente de las ilustraciones anteriores.
Colocacióndelabatería(AAA)enelcontrolremoto
La polaridad de las pilas debe coincidir con los símbolos del compartimiento de las pilas.
1
1
3
2
2

SPA - 7
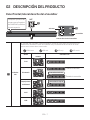
02 DESCRIPCIÓN DEL PRODUCTO
Panelfrontal/lateralderechodelaSoundbar
AUX IN
POWER
DIGITAL AUDIO IN
(OPTICAL)
USB (5V 0.5A)
AUX IN
POWER
DIGITAL AUDIO IN
(OPTICAL)
USB (5V 0.5A)
Volumen
Encendido
Coloque el producto de
manera que el logotipo
de SAMSUNG quede en
la parte superior.
LateralderechodelaSoundbar
NFC
Indicador
LED
El indicador led parpadea, queda encendido o cambia de color según el modo actual y el
estado de la Soundbar. El color del indicador led y la cantidad de luces indican el modo
activo como se describe a continuación.
W
LED blanco
B
LED azul
R
LED rojo
G
LED verde
Modo
Botóndelcontrol
remoto
IndicadorLED
D.IN
W
Bluetooth
B
Estado conectado
B
Intermitencialenta
Estado sin conexión
Emparejamiento
conBluetooth
B
Intermitenciarápida
AUX
W W
USB
W W W

SPA - 8
Logotipo
deNFC
• Puede activar la conexión a través de Bluetooth colocando su teléfono en el área de
detección de NFC de la Soundbar.
Fuente
Permite seleccionar el modo de entrada. (D.IN / Bluetooth / AUX / USB)
• Para encender el modo “EmparejamientoconBluetooth”, cambie la fuente a modo
“Bluetooth” y, luego, mantenga presionado el botón durante más de 5 segundos.
PanelinferiordelaSoundbar
ParteinferiordelaSoundbar
AUX IN
POWER
DIGITAL AUDIO IN
(OPTICAL)
USB (5V 0.5A)
POWER
AUX IN
DIGITAL AUDIO IN
(OPTICAL)
USB (5V 0.5A)
POWER
AUX IN
DIGITAL AUDIO IN
(OPTICAL)
USB (5V 0.5A)
POWER Permite conectar el cable de alimentación de CA de la Soundbar.
AUX Permite conectar la Soundbar a la salida analógica de un dispositivo externo.
D.IN Permite conectar la Soundbar a la salida digital (óptica) de un dispositivo externo.
USB
Permite conectar un dispositivo USB aquí para reproducir archivos de música en el
dispositivo USB a través de la Soundbar.
• Cuando enchufe el cable de CA, la tecla de alimentación funcionará transcurridos entre 4 y 6 segundos.
• Cuando encienda la unidad, pasarán entre 4 y 5 segundos antes de poder reproducir sonido.
• Para disfrutar del sonido sólo desde Soundbar, debe apagar los altavoces del TV en el menú Audio
Setup del TV. Consulte el manual del TV que se facilita con el TV.
• Cuando desconecte el cable de alimentación de una toma de pared, tire del enchufe. No tire del cable.
• No conecte esta unidad ni ningún otro componente a una toma de CA hasta realizar todas las
conexiones entre los componentes.

SPA - 9
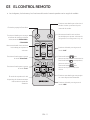
03 EL CONTROL REMOTO
• Las imágenes, los botones y las funciones del control remoto pueden variar según el modelo.
Enciende y apaga la Soundbar.
Presione este botón para silenciar el
sonido. Vuelva a presionarlo para
reanudar el sonido.
Presione este botón para emparejar
un nuevo dispositivo Bluetooth.
Presione el botón para ingresar el
modo “USB”.
Mueva este botón hacia arriba o
hacia abajo para ajustar volumen de
los graves en un rango entre -6 y +6.
Presione el botón para ingresar el
modo “AUX”.
Presione el botón para
seleccionar el archivo de música anterior.
Presione el botón
para reproducir/
pausar un archivo de música.
Presione el botón
para
seleccionar el próximo archivo de
música.
Presione el botón para escoger
el efecto de sonido que desee
seleccionando SURROUND o
STANDARD.
Mueva este botón hacia arriba o
hacia abajo para ajustar el
volumen.
El modo de reproducción del
dispositivo de almacenamiento
USB cambia a repetición
aleatoria.
Presione el botón para ingresar
el modo “D.IN”.
Presione el botón para ingresar
el modo “Bluetooth”.

SPA - 10
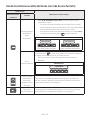
Usodelosbotonesocultos(botonesconmásdeunafunción)
Botónoculto
Cómousarelcontrolremoto
Botóndelmando
adistancia
Función
Encender/Apagar
Auto Power
Down
(modo AUX)
– Modo D.IN / Bluetooth/ USB / AUX : Si no hay señal de audio
durante 18minutos.
– Si no hay una entrada de datos clave durante 8 horas cuando
está conectado el cable de audio (AUX). (La función Auto Power
Down puede desactivarse únicamente en ese caso.)
– Para desactivar la función Auto Power Down en el modo “AUX”
mantenga presionado el botón durante 5 egundos.
IndicadorLED
W W
G
Intermitente
Auto Power Down Encendida
W W
R
Intermitente
Auto Power Down Desactivado
Iniciar
(modo de espera)
Presione el botón durante 5 segundos en la estación de apagado
en espera para activar la función inicial del sistema.
– Esto no borrará el historial de dispositivos emparejados de
Bluetooth.
IndicadorLED
W W W W
R
2parpadeos
Control remoto
del televisor
encendido/
apagado (modo
de espera)
Para obtener información detallada acerca del control remoto del
televisor, consulte “Ajuste del volumen de la Soundbar con el control
remoto de un televisor” en la página 12.
TV Connect
(modo Bluetooth)
Para obtener información detallada acerca de TV Connect, consulte
“Desconexión de la Soundbar del televisor” en la página 17.

SPA - 11
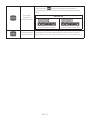
Encendido/
Apagado de
Bluetooth Power
Presione el botón durante 5 segundos en la estación de
encendido para activar la función Encendido/Apagado de Bluetooth
Power.
IndicadorLED
B
W
G
Intermitente
Bluetooth Power Encendida
B
W
R
Intermitente
Bluetooth Power Desactivado
Encender/Apagar
Auto Power Link
Para obtener información detallada acerca de la función Encender/
Apagar Auto Power Link, consulte “Auto Power Link” en la página 15.

SPA - 12
AjustedelvolumendelaSoundbarconelcontrolremotodeun
televisor
SitieneuntelevisorSamsung,puedeajustarelvolumendelaSoundbarusandoelcontrol
remotoconpuertoinfrarrojoquevieneconsutelevisorSamsung.
Primero, use el menú del televisor para congurar el audio del televisor en su televisor Samsung a
altavoces externos, luego use el control remoto Samsung para controlar el volumen de la Soundbar.
Para obtener más información, consulte el manual del usuario del televisor.
ElmodopredeterminadoparaestafunciónsecontrolaatravésdeuntelevisorSamsung.
1. Si su televisor no es Samsung y desea controlar el volumen de la Soundbar con el control remoto
del televisor, puede cambiar la conguración de esta función manteniendo presionado el botón
BASS repetidamente. Para que pueda ajustar el volumen de la Soundbar con el control
remoto del televisor, siga los pasos 1, 2 y 3 a continuación.
2. Si desea desactivar esta función completamente, siga los pasos 1 y 2.
Modo Botóndelcontrolremoto IndicadorLED
1.
Apagar
Todoslosledesapagados
2.
Modo“Desactivado”
5 Sec
W W W W
Intermitente
3.
Modo“TodoTV”
5 Sec
W W W W
Intermitente
4.
Modo“Televisor
Samsung”
(Modo
predeterminado)
5 Sec
W W W W
Intermitente
– Cada vez que mantiene presionado el botón BASS durante 5 segundos, el modo cambia en el
siguiente orden: “TelevisorSamsung” (Modo predeterminado) → “Desactivado” → “TodoTV”.
– El led parpadea entre 3 y 4 segundos y, luego, vuelve al modo De espera apagado.
– Es posible que esta función no esté disponible según el control remoto del televisor.
– Fabricantes que admiten esta función: VIZIO, LG, Sony, Sharp, PHILIPS, PANASONIC, TOSHIBA,
Hisense, RCA

SPA - 13
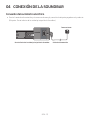
04 CONEXIÓN DE LA SOUNDBAR
Conexióndelsuministroeléctrico
• Para la fuente de alimentación y el consumo de energía, consulte la etiqueta pegada en el producto.
(Etiqueta : Parte inferior de la unidad principal de la Soundbar)
AUX IN
POWER
DIGITAL AUDIO IN
(OPTICAL)
USB (5V 0.5A)
POWER
Cabledealimentación
Tomacorriente
ParteinferiordelaunidadprincipaldelaSoundbar

SPA - 14
05 CONEXIÓN A UN TV
Escuche el sonido de su televisor desde su Soundbar a través de conexiones por cable o inalámbricas.
• Cuando la Soundbar está conectada a un televisor Samsung seleccionado, esta se puede controlar
mediante el control remoto del televisor.
– Esta función es compatible con Samsung Smart TV, modelos 2017 o posteriores, que admitan
Bluetooth cuando conecte la Soundbar al televisor usando un cable óptico.
– Esta función también le permite utilizar el menú del televisor para ajustar el campo sonoro,
varias conguraciones, el volumen y el silencio.
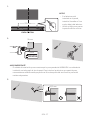
Conexiónconuncableóptico
Paso1.Conecteuncableóptico
USB (5V 0.5A)
AUX IN
DIGITAL AUDIO IN
(OPTICAL)
OPTICAL OUT
Cableóptico
(nosuministrado)
ParteinferiordelaSoundbar
NOTA
– Cuando el audio en una transmisión está codicado en Dolby Digital y el “Formato de salida de
audio digital” en su televisor está congurado en PCM, recomendamos que cambie de conguración
a Dolby Digital. Cuando se cambia la conguración en el televisor, experimentará una mejor calidad
de sonido. (En el menú del televisor se pueden usar diferentes palabras para hacer referencia a
Dolby Digital y PCM según el fabricante del televisor.)

SPA - 15
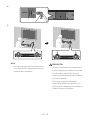
Paso2.CambieelmododelaSoundbaraD.IN
Lateralderechodela
Soundbar
(O)
W
AutoPowerLink
Esta función enciende automáticamente la Soundbar cuando el televisor está encendido si la Soundbar
está conectada al televisor con un cable óptico (no suministrado).
Mantenga presionado el botón en el control remoto durante más de 5 segundos para activar esta
función.
• La función Auto Power Link está congurada en ENCENDIDA de manera predeterminada.
• Según el dispositivo conectado, es posible que la función Auto Power Link no funcione.
• Esta función solo está disponible en modo “D.IN”.
Modo Botóndelcontrolremoto IndicadorLED
DESACTIVADO
5 Sec
W W
R
Intermitente
ENCENDIDA
5 Sec
W W
G
Intermitente

SPA - 16
ConexióndeuntelevisorodispositivoconBluetoothvíaBluetooth
Paso1.CambieelmododelaSoundbara“EmparejamientoconBluetooth”
B
Intermitenciarápida
Paso2.SeleccionelaSoundbarenelmenúdeltelevisoroeldispositivoconBluetooth
Seleccione
“[AV]SamsungSoundbarT400T-Series”
Dispositivocon
Bluetooth
(O)
MenúBluetooth
NOTA
– No puede conectar más de un televisor o dispositivo con Bluetooth a la vez.
Paso3.VeriqueelestadodelaSoundbar
El led azul no debe parpadear una vez que se completa la conexión vía Bluetooth.
B
Sieltelevisoroeldispositivonoseconectan
• Si aparece la Soundbar que se conectó anteriormente en la lista de dispositivos del televisor o el
dispositivo con Bluetooth, elimínela. (p. ej. “[AV]SamsungSoundbarT400T-Series”)
• Luego, repita los pasos 1, 2 y 3.

SPA - 17
DesconexióndelaSoundbardeltelevisor
Presione el botón en el panel lateral derecho o en el control remoto y cambie a un modo que no
sea “Bluetooth”.
• La desconexión lleva tiempo porque el televisor debe recibir una respuesta de la Soundbar.
(El tiempo que dura la desconexión puede variar según el modelo del televisor.)
• Para cancelar la conexión automática vía Bluetooth entre la Soundbar y el televisor, mantenga
presionado el botón durante 5 segundos en el modo “Bluetoothlisto”. La función TV Connect
está DESACTIVADA.
• Para volver a activar la función TV Connect, mantenga presionado el botón durante
5segundos con la Soundbar en modo “Bluetoothlisto”.
• La función TV Connect está congurada en ENCENDIDA de manera predeterminada.
Modo Botóndelcontrolremoto IndicadorLED
TVConnect-
DESACTIVADO
5 Sec
B
W W
R
Intermitente
TVConnect-
ENCENDIDA
5 Sec
B
W W
G
Intermitente
ConexióndeunaSoundbaraundispositivomóvilconlafunciónNFC
Paso1.ColoqueeldispositivomóvileneláreadedeteccióndeNFCenlaparte
superiordelaSoundbar.
DispositivoconBluetooth
NFC
PartesuperiordelaSoundbar
NOTAS
– Asegúrese de que la función NFC esté activada en el dispositivo móvil y que la pantalla esté
encendida.
– La conexión a través de Bluetooth no está disponible cuando la función NFC del dispositivo móvil
está en modo emulación de tarjeta.

SPA - 18
Paso2.VeriqueelestadodelaSoundbar
El led azul no debe parpadear una vez que se completa la conexión vía Bluetooth.
B
NOTAS
– Si le pide un código PIN mientras conecta un dispositivo Bluetooth, ingrese <0000>.
– La Soundbar se apaga automáticamente después de permanecer 18 minutos en estado Preparada.
– Es posible que la Soundbar no realice la búsqueda de dispositivos Bluetooth ni se conecte
correctamente en los siguientes casos:
– Si hay un gran campo eléctrico alrededor de la Soundbar.
– Si varios dispositivos Bluetooth se emparejan de manera simultánea con la Soundbar.
– Si el dispositivo Bluetooth se apaga, no se encuentra en el lugar o no funciona correctamente.
– Los dispositivos electrónicos pueden ocasionar interferencias de radio. Los dispositivos que
generan ondas electromagnéticas deberán mantenerse alejados de la unidad principal de la
Soundbar, p. ej., dispositivos con redes LAN inalámbricas, microondas, etc.
– La Soundbar admite datos SBC (44,1 kHz, 48 kHz).
– Conecte sólo a un dispositivo Bluetooth que admita la función A2DP (AV).
– No puede conectar la Soundbar a un dispositivo Bluetooth que admita solo la función HF (Hands
Free).
– Una vez que haya emparejado la Barra de sonido a un dispositivo Bluetooth, si selecciona
“[AV]SamsungSoundbarT400T-Series” en la lista de dispositivos explorados, cambiará
automáticamente la Barra de sonido al modo “Bluetooth”.
– Solo disponible si la Soundbar aparece en la lista de dispositivos emparejados del dispositivo
Bluetooth. (El dispositivo Bluetooth y la Soundbar deben emparejarse previamente al menos
una vez.)
– La Soundbar no puede emparejarse con otro dispositivo con Bluetooth si ya está en modo
Bluetooth y emparejada con un dispositivo.

SPA - 19
Encendido/ApagadodeBluetoothPower
Si un dispositivo con Bluetooth previamente emparejado intenta emparejarse con la Soundbar cuando
la función Bluetooth Power está encendida y la Soundbar está apagada, la Soundbar se enciende
automáticamente.
Mantenga presionado el botón durante más de 5 segundos en la estación de encendido para
activar/desactivar la función Bluetooth Power. Para obtener más información sobre la función
Encendido/Apagado de Bluetooth Power, consulte la página 11.
• La función Bluetooth Power está congurada en Encendida de manera predeterminada.
InformaciónadicionalsobreBluetooth
Bluetooth es una tecnología que permite que los dispositivos externos compatibles con Bluetooth
puedan fácilmente interconectarse entre sí utilizando una conexión inalámbrica corta.
• Un dispositivo Bluetooth puede causar ruidos o un funcionamiento defectuoso, dependiendo del
uso, cuando:
– Una parte del cuerpo está en contacto con el sistema de recepción/transmisión del dispositivo
Bluetooth o de Soundbar.
– Exista variación eléctrica por obstrucciones causadas por una pared, un rincón o paneles de
división de la ocina.
– Esté expuesto a interferencias eléctricas de dispositivos con la misma banda de frecuencia
incluido equipo médico, hornos microondas y LAN inalámbrica.
• Empareje Soundbar con el dispositivo Bluetooth a una distancia corta.
• Cuando mayor sea la distancia entre Soundbar y el dispositivo Bluetooth, peor será la calidad.
Si la distancia sobrepasa el alcance de funcionamiento de Bluetooth, se pierde la conexión.
• En áreas con sensibilidad/recepción pobre es posible que la conexión Bluetooth no funcione
correctamente.
• La conexión Bluetooth sólo funciona cuando está cerca del equipo. La conexión se corta
automáticamente si la distancia es superior a la indicada. Incluso dentro de esta distancia, es
posible que la calidad del sonido se degrade debido a obstáculos como muros o puertas.
• Este dispositivo inalámbrico puede causar interferencia eléctrica cuando está en funcionamiento.

SPA - 20
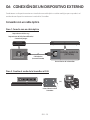
06 CONEXIÓN DE UN DISPOSITIVO EXTERNO
Conéctese a un dispositivo externo a través de una cable óptico o cable analógico para reproducir el
sonido de ese dispositivo externo a través de la Soundbar.
Conexiónconuncableóptico
Paso1.Conecteconuncableóptico
AUX IN
DIGITAL AUDIO IN
(OPTICAL)
OPTICAL OUT
ParteinferiordelaSoundbar
Cableóptico
(nosuministrado)
ReproductordeBlu-ray/
ReproductordeDVD/Decodicador/
Consoladejuegos
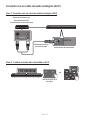
Paso2.CambieelmododelaSoundbaraD.IN
Lateralderechodela
Soundbar
(O)
W

SPA - 21
Conexiónconuncabledeaudioanalógico(AUX)
Paso1.Conexiónconuncabledeaudioanalógico(AUX)
AUX IN
DIGITAL AUDIO IN
(OPTICAL)
- AUDIO -
R L
AUX IN
DIGITAL AUDIO IN
(OPTICAL)
- AUDIO -
R L
ParteinferiordelaSoundbar
Cabledeaudio(AUX)
(nosuministrado)
ReproductordeBlu-ray/
ReproductordeDVD/
Decodicador/Consoladejuegos
Paso2.CambieelmododelaSoundbaraAUX
Lateralderechodela
Soundbar
(O)
W W

SPA - 22
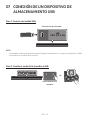
07 CONEXIÓN DE UN DISPOSITIVO DE
ALMACENAMIENTO USB
Paso1.ConecteunaunidadUSB
USB (5V 0.5A)
ParteinferiordelaSoundbar
NOTA
– La Soundbar se apaga automáticamente (Apagado automático) si no conecta un dispositivo USB a
la Soundbar en un plazo de 18 minutos.
Paso2.CambieelmododelaSoundbaraUSB
Lateralderechodela
Soundbar
(O)
W W W

SPA - 23
Conguracióndelasopcionesderepetición
Repetición
Cuando la Soundbar está en modo “USB”, cada vez que presione el botón , el modo “USB” cambia la
forma de reproducir las pistas en el siguiente orden: “Repetir-Desactivado” > “Repetir-1canción” >
“Repetir-Todaslascanciones”.
Consulte la siguiente tabla para obtener más detalles.
Modo Botóndelcontrolremoto IndicadorLED
Repetir-Desactivado
W W W
Repetir-1canción
W W W
Intermitente
Repetir-Todaslas
canciones
W W W
Intermitente
Repeticiónaleatoria
Cuando la Soundbar está en modo “USB”, cuando presiona el botón , el modo “USB” cambia la
forma de reproducir las pistas a “Repetir-Aleatorio”.
Consulte la siguiente tabla para obtener más detalles.
Modo Botóndelcontrolremoto IndicadorLED
Repetir-Aleatorio
W W W
Intermitente

SPA - 24
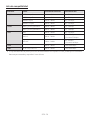
Listadecompatibilidad
Extensión Códec Velocidaddemuestreo Velocidadenbits
*.mp3 MPEG 1 Layer2 16kHz ~ 48kHz 80 ~ 320 kbps
MPEG 1 Layer3 16kHz ~ 48kHz 80 ~ 320 kbps
MPEG 2 Layer3 16kHz ~ 48kHz 80 ~ 320 kbps
MPEG 2.5 Layer3 16kHz ~ 48kHz 80 ~ 320 kbps
*.wma Wave_Format_MSAudio1 16kHz ~ 48kHz 56 ~ 128 kbps
Wave_Format_MSAudio2 16kHz ~ 48kHz 56 ~ 128 kbps
*.aac AAC 16kHz ~ 96kHz 48 ~ 320 kbps
A AC-LC 16kHz ~ 96kHz
128 ~ 192 kbps
5,1 canales 320 kbps
HE-AAC 24kHz ~ 96kHz
48 ~ 64 kbps
5,1 canales 160 kbps
*.wav - 16kHz ~ 48kHz hasta 3000 kbps
*.ac FLAC 1.1.0, FLAC 1.2.1 16kHz ~ 96kHz hasta 3000 kbps
• Si hay demasiadas carpetas y archivos almacenados en el dispositivo USB, puede que la Soundbar
demore para acceder y reproducir los archivos.

SPA - 25
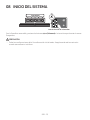
08 INICIO DEL SISTEMA
W W W W
R
AUX IN
POWER
DIGITAL AUDIO IN
(OPTICAL)
USB (5V 0.5A)
LateralderechodelaSoundbar
5 Sec
2parpadeos
Con la Soundbar encendida, presione los botones (Volumen) al mismo tiempo durante al menos
5 segundos.
PRECAUCIÓN
– Todas las conguraciones de la Soundbar están inicializadas. Asegúrese de realizar esto solo
cuando sea necesario inicializar.

SPA - 26
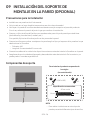
09 INSTALACIÓN DEL SOPORTE DE
MONTAJEENLAPARED(OPCIONAL)
Precaucionesparalainstalación
• Instálelo en una pared vertical únicamente.
• No lo instale en un lugar donde la temperatura sea alta o haya humedad.
• Verique si la pared es lo sucientemente resistente como para soportar el peso del producto.
Si no lo es, refuerce la pared o elija otro lugar para realizar la instalación.
• Compre y utilice tornillos de jación o pernos adecuados para el tipo de pared que usted tiene
(placa de sello, placa de hierro, madera, etc.).
Si es posible, je los tornillos de sujeción en los pernos de la pared.
• Compre tornillos para realizar montajes en la pared según el tipo y el espesor de la pared en la que
desea colocar la Soundbar.
– Diámetro: M4
– Longitud: Se recomienda 40 mm o más.
• Conecte los cables de la unidad a los dispositivos externos antes de instalar la Soundbar en la pared.
• Asegúrese de que la unidad esté apagada y desconéctela antes de instalarla. De lo contrario, se
puede producir una descarga eléctrica.
Componentesdesoporte
5cmomás
Parainstalarelproductoenparedesde
hormigón
(nosuministrado)
A
B C D
x 2 (M4 x L40)
A
B
C D
x 2
40 mm o más
4 mm
8 mm
Especicaciónrecomendada
NOTA
– Para realizar instalaciones en otros tipos de
paredes, necesitará diferentes tipos de tornillos.

SPA - 27
1.
------370 mm------
LÍNEA CENTRAL
NOTAS
– Si el televisor está
instalado en la pared,
instale la Soundbar a 5 cm
o más, debajo del televisor.
– Utilice un lápiz para marcar
la posición de los oricios.
2.
6 mm
50 mm
A
B
C D
AVISO IMPORTANTE
– El método de instalación que se muestra aquí es para paredes de HORMIGÓN. Los métodos de
instalación variarán según el tipo de pared. Para instalar el producto en una pared de yeso,
recomendamos enfáticamente que perfore oricios de soporte del tornillo en los pernos de
madera subyacentes.
3.
A
B C D
10,5 mm

SPA - 28
4.
AUX IN
POWER
DIGITAL AUDIO IN
(OPTICAL)
USB (5V 0.5A)
POWER
AUX IN
POWER
DIGITAL AUDIO IN
(OPTICAL)
USB (5V 0.5A)
POWER
5.
NOTA
– Los soportes para realizar instalaciones
en la pared están integrados en la parte
posterior de la Soundbar.
PRECAUCIÓN
– Presione la Soundbar hacia abajo con la
fuerza suciente para jarla en la pared.
Si la Soundbar no está bien ja en la
pared, se podría despegar por accidente
y provocar lesiones.
– No choque ni golpee la Soundbar
(especialmente en la parte inferior). El
impacto podría despegar la Soundbar de
la pared y provocar lesiones.

SPA - 29
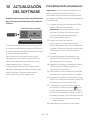
10 ACTUALIZACIÓN
DEL SOFTWARE
EsposiblequeSamsungofrezcaactualizaciones
paraelrmwaredelsistemadelaSoundbaren
elfuturo.
USB (5V 0.5A)
ParteinferiordelaSoundbar
Si le ofrecen una actualización, puede actualizar
el rmware conectando el dispositivo USB con la
actualización del rmware almacenada en mismo
al puerto USB de la Soundbar.
Para obtener más información sobre cómo
descargar los archivos de las actualizaciones,
visite el sitio web de Samsung Electronics en
(www.samsung.com
Support).
Luego, ingrese o seleccione el modelo de su
Soundbar, seleccione Software y aplicaciones y
luego Descargas. Tenga en cuenta que los
nombres de la opciones pueden variar.
Procedimientodeactualización
Importante:La función de actualización borra
todas las conguraciones del usuario. Le
recomendamos que anote sus conguraciones
para poder restablecerlas fácilmente después de
la actualización.
1. Conecte un dispositivo de memoria USB al
puerto USB de su computadora.
Importante: Asegúrese de que no haya
archivos de música en el dispositivo de
memoria USB, ya que podría fallar la
actualización del rmware.
2. Visite el sitio web de Samsung
(samsung.com)
Seleccione Ingresar
número de modelo y escriba el modelo de su
Soundbar. Seleccione Manuales y descargas
y descargue el archivo de software más
reciente.
3. Guarde el software descargado en una
memoria USB y seleccione “Extraer aquí”
para descomprimir la carpeta.
4. Apague la Soundbar y conecte en el puerto
USB la memoria USB que contiene la
actualización de software.
5. Desconecte y vuelva a conectar el cable de
alimentación. Luego, encienda la Soundbar.
6. Encienda la Soundbar y seleccione el modo
USB. En 3 minutos, se encienden 4 luces LED
blancas y comienza la actualización.
7. La Soundbar se apaga cuando naliza la
actualización. Presione el botón en el
control remoto durante 5 segundos. Todas
las luces LED parpadean 2 veces y, luego, la
Soundbar se apaga. La actualización naliza.
• Si el rmware no se actualiza, puede
volver a hacerlo.
8. Restablezca sus ajustes en la Soundbar.

SPA - 30
SinoaparecelaopciónUPDATE
1. Apague la Soundbar, desconecte y vuelva a
conectar el dispositivo de almacenamiento
que contiene los archivos actualizados al
puerto USB de la Soundbar.
2. Desconecte el cable de alimentación de la
Soundbar, vuelva a conectarlo y luego
encienda la Soundbar.
NOTAS
– La actualización de rmware tal vez no
funcione correctamente si los archivos de
audio admitidos por la Soundbar están
almacenados en el dispositivo de
almacenamiento.
– No desconecte el equipo ni quite el dispositivo
USB mientras se están aplicando
actualizaciones. La unidad principal se
apagará automáticamente una vez que
termina la actualización de rmware.
– Una vez que termina la actualización, se inicia
la conguración de usuario de la Soundbar. Le
recomendamos tomar nota de su
conguración para que pueda restablecerlas
fácilmente después de la actualización.
Si falla la actualización de software, verique
que la memora USB no esté defectuosa.
– Los usuarios con sistema operativo Mac
deben usar MS-DOS (FAT) como formato de
USB.
– Quizás no esté disponible la actualización a
través de USB, según el fabricante del
dispositivo de almacenamiento.

SPA - 31
11 SOLUCIÓN DE PROBLEMAS
Antes de buscar ayuda, controle lo siguiente.
Launidadnoenciende.
¿Elcabledealimentaciónestármementeconectadoalatomadelapared?
; Desenchufe el cable de alimentación y vuelva a conectarlo en la toma de la pared para
asegurarse de que esté bien conectado.
Nopuedeutilizarunafuncióncuandopresionaelbotón.
¿Hayelectricidadestáticaenelaire?
; Desconecte el enchufe y vuelva a conectarlo.
NoseescuchaelsonidoenelmodoBluetooth.
; Consulte las secciones de conexión vía Bluetooth en las páginas 16 a 19.
; En el modo Conexión Bluetooth, se perderá la conexión Bluetooth si la distancia entre la
Soundbar y el dispositivo Bluetooth supera los 10 m.
Noseescuchaelsonido.
¿EstáactivadalafunciónSilencio?
; Presione el botón VOL para cancelar la función.
¿Seencuentraelvolumenenmínimo?
; Ajuste el volumen.
Elcontrolremotonofunciona.
¿Seagotaronlaspilas?
; Reemplácelas por pilas nuevas.
¿ElcontrolremotoylaunidadprincipaldelaSoundbarestánmuyalejados?
; Acerque el control remoto a la unidad principal de la Soundbar.

SPA - 32
12 LICENCIA
Manufactured under license from Dolby
Laboratories. Dolby, Dolby Audio, and the
double-D symbol are trademarks of Dolby
Laboratories.
For DTS patents, see http://patents.dts.com.
Manufactured under license from DTS
Licensing Limited. DTS, the Symbol, DTS in
combination with the Symbol, and DTS 2.0
Channel are registered trademarks or
trademarks of DTS, Inc. in the United States
and/or other countries. © DTS, Inc. All Rights
Reserved.
The Bluetooth® word mark and logos are
registered trademarks owned by the Bluetooth
SIG, Inc. and any use of such marks by Samsung
Electronics Co., Ltd. is under license. Other
trademarks and trade names are those of their
respective owners.
13 AVISO SOBRE
LICENCIA DE
CÓDIGO ABIERTO
Para enviar consultas sobre fuentes abiertas,
póngase en contacto con Samsung a través del
correo electrónico (oss.request@samsung.com).
14 NOTA
IMPORTANTE
SOBRE EL
SERVICIO
Las guras e ilustraciones de este Manual del
usuario se facilitan sólo como referencia y pueden
diferir del aspecto real del producto.

SPA - 33
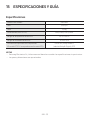
15 ESPECIFICACIONES Y GUÍA
Especicaciones
Nombre del modelo HW-T400
USB 5V/0,5A
Peso 2,0 kg
Dimensiones (An x Al x Pr) 641,0 x 65,0 x 107,0 mm
Rango de temperatura de servicio +5 °C a +35 °C
Rango de humedad de servicio 10 % a 75 %
Formatos de reproducción compatibles
(El sonido DTS 2.0 se reproduce en formato DTS).
LPCM 2ch, Dolby Audio™
(admite Dolby® Digital), DTS
NOTAS
– Samsung Electronics Co., Ltd se reserva el derecho a cambiar las especicaciones sin previo aviso.
– Los pesos y dimensiones son aproximados.

© 2020 Samsung Electronics Co., Ltd. All rights reserved.
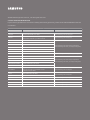
ContactSAMSUNGWORLDWIDE
If you have any questions or comments relating to Samsung products, please contact the SAMSUNG customer
care Center.
Area Contact Center
Web Site
`
Latin America
MEXICO 01-800-SAMSUNG (726-7864) www.samsung.com/mx/support
BRAZIL
0800-124-421 (Demais cidades e regiões)
4004-0000 (Capitais e grandes centros)
www.samsung.com/br/support
COSTA RICA 00-800-1-SAMSUNG (726-7864)
www.samsung.com/latin/support (Spanish)
www.samsung.com/latin_en/support (English)
DOMINICAN REPUBLIC 1-800-751-2676
ECUADOR 1-800-SAMSUN (72-6786)
EL SALVADOR 8000-SAMSUNG (726-7864)
GUATEMALA 1-800-299-0033
HONDURAS 800-2791-9111
JAMAICA 1-800-SAMSUNG (726-7864) www.samsung.com/latin_en/support (English)
NICARAGUA 001-800-5077267
www.samsung.com/latin/support (Spanish)
www.samsung.com/latin_en/support (English)
PANAMA 800-0101
PUERTO RICO 1-800-682-3180
TRINIDAD & TOBAGO 1-800-SAMSUNG (726-7864)
VENEZUELA 0-800-100-5303
COLOMBIA
Bogotá en el 600 12 72
Sin costo en todo el pais 01 8000 112 112
Y desde tu celular #726
www.samsung.com/co/support
CHILE 800-SAMSUNG (726-7864)
www.samsung.com/cl/support
BOLIVIA 800-10-7260
PERU 080077708 Desde teléfonos fi jos, públicos o celulares www.samsung.com/pe/support
ARGENTINA 0800-555-SAMS (7267) www.samsung.com/ar
URUGUAY 0800-SAMS (7267) www.samsung.com/uy
PARAGUAY 0800-11-SAMS (7267) www.samsung.com/py
-
 1
1
-
 2
2
-
 3
3
-
 4
4
-
 5
5
-
 6
6
-
 7
7
-
 8
8
-
 9
9
-
 10
10
-
 11
11
-
 12
12
-
 13
13
-
 14
14
-
 15
15
-
 16
16
-
 17
17
-
 18
18
-
 19
19
-
 20
20
-
 21
21
-
 22
22
-
 23
23
-
 24
24
-
 25
25
-
 26
26
-
 27
27
-
 28
28
-
 29
29
-
 30
30
-
 31
31
-
 32
32
-
 33
33
-
 34
34
-
 35
35
-
 36
36
-
 37
37
-
 38
38
-
 39
39
-
 40
40
-
 41
41
-
 42
42
-
 43
43
-
 44
44
-
 45
45
-
 46
46
-
 47
47
-
 48
48
-
 49
49
-
 50
50
-
 51
51
-
 52
52
-
 53
53
-
 54
54
-
 55
55
-
 56
56
-
 57
57
-
 58
58
-
 59
59
-
 60
60
-
 61
61
-
 62
62
-
 63
63
-
 64
64
-
 65
65
-
 66
66


Samsung HW-T400 Manual de usuario
- Categoría
- Altavoces de la barra de sonido
- Tipo
- Manual de usuario
en otros idiomas
- English: Samsung HW-T400 User manual
Artículos relacionados
-
Samsung HW-N300 Guía de inicio rápido
-
Samsung HW-T400 Manual de usuario
-
-
-
-
Samsung HW-M360 Manual de usuario
-
Samsung HW-M4500 Manual de usuario
-
-
Samsung HW-N450 Manual de usuario
-
Samsung HW-N650 Manual de usuario