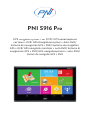
PNI S916 Pro Manual de usuario
- Categoría
- Navegantes
- Tipo
- Manual de usuario

PNI S916 Pro
GPS navigation system + car DVR/ GPS навигационна
система + DVR/ GPS-Navigaonssystem + Auto-DVR/
Sistema de navegación GPS + DVR/ Système de navigaon
GPS + DVR/ GPS navigációs rendszer + autó DVR/ Sistema di
navigazione GPS + DVR/ GPS-navigaesysteem + auto-DVR/
Sistem de navigae GPS + DVR

EN User manual ......................................................... 3
BG Ръководство за употреба ............................. 6
DE Benutzerhandbuch .............................................. 9
ES Manual de usuario ............................................... 12
FR Manuel utilisateur ............................................... 15
HU Használati utasítás .............................................. 18
IT Manuale utente .................................................. 21
NL Handleiding ........................................................ 24
PL Instrukcja obsługi ............................................... 27
RO Manual de utilizare ............................................. 30

User manual - 3
English
Safety warnings
Do not power the device at a voltage other than that recommended by the
manufacturer (5V 2A)
Do not expose the device to direct sunlight.
Do not use the device in areas with electromagnetic interference.
Do not mount the device in front of the airbags.
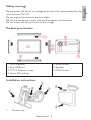
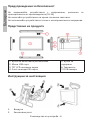
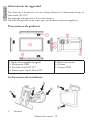
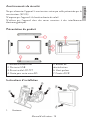
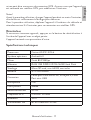
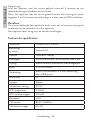
Product presentation
1. On/O button
2. Mini USB port
3. TFT LCD touch screen
4. Micro SD card slot
5. Reset button
6. Speaker
7. DVR Camera
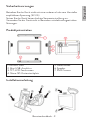
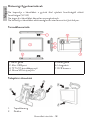
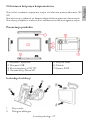
Installation instructions
1. Suction cup

User manual - 4
English
2. Locking lever
3. Angle adjustment wheel
4. GPS bracket
Instructions for use
Turn the device on
To turn on the device, long press the power button until the screen lights up.
Standby
To put the device on standby, briefly press the on/o button. The screen
turns o.
Turn the device o
To turn o the device, long press the on/o key until the control menu
appears on the screen, then press the “Power O” button.
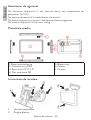
Power supply
Connect the power cable to the mini USB port of the device and insert the
cigarette lighter plug into the dedicated slot on the vehicle dashboard.
Operating instructions
How to solve GPS connection problems:
(1) Before using the device inside the car, move it in the open air. Generally,
outdoors, the device will connect to GPS satellites in about 3~5 minutes.
(2) To reduce the connection time, after starting the navigation application,
close the screen by briefly pressing the on/o button.
If you do not receive a GPS signal, check as follows:
(1) Ensure you are not inside a building, in tunnels or under bridges.
(2) In crowded cities with tall buildings, the GPS signal can be aected.
(3) If you have tinted windows, they can aect the GPS signal.
After setting the destination, if the application does not establish the route,
the reason may be a GPS connection error. Ensure the device is connected
to the GPS satellites, then set the route again.

User manual - 5
English
Note!
Before the first use, charge the device for at least 5 minutes, to provide
enough energy to start.
For the first use, move the device outside the vehicle and wait about 3~5
minutes to connect to the GPS satellites.
Reset
If an unknown error appears, press the reset button on the back of the device
with a sharp object.
The device will return to factory settings.
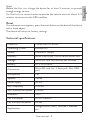
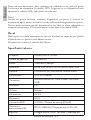
Technical specifications
Processor Cortex A53*4 1.3GHz
Operating system Android 6.0
Screen 7inch 800*480px
Memory RAM 1GB DDR3 / ROM 16GB Nand Flash
Storage Micro SD card, max 64GB, not included
Battery 3.7V 2000mAh
Connection Micro SD card slot, 3.5mm jack, Mini USB
port
Microphone Yes
Speaker Stereo
Power supply 5V 2A
WiFi frequency 2.4GHz
WiFi transmission power 100mW
Bluetooth V4.0
FM transmitter 87.50-108MHz
FM transmission power 50 nW
Applications Google search,Gmail, Youtube, Facebook
etc.

Български
Ръководство за употреба - 6
Предупреждения за безопасност
Не захранвайте устройството с напрежение, различно от
препоръчаното от производителя (5V 2A)
Не излагайте устройството на пряка слънчева светлина.
Не използвайте устройството в зони с електромагнитни смущения.
Представяне на продукта
1. Бутон за включване/изключване
2. Мини USB порт
3. TFT LCD сензорен екран
4. Слот за микро SD карта
5. Бутон за
нулиране
6. Говорител
7. DVR камера
Инструкции за инсталация
1. Вендуза
2. Заключващ лост

Български
Ръководство за употреба - 7
3. Колело за регулиране на ъгъла
4. GPS скоба
Включете устройството
За да включите устройството, натиснете продължително бутона за
захранване, докато екранът светне.
в готовност
За да поставите устройството в режим на готовност, натиснете за
кратко бутона за включване/изключване. Екранът се изключва.
Изключете устройството
За да изключите устройството, натиснете продължително бутона
за включване/изключване, докато на екрана се появи контролното
меню, след което натиснете бутона „Изключване“.
Захранване
Свържете захранващия кабел към мини USB порта на устройството
и поставете щепсела на запалката в специалния слот на таблото на
автомобила.
Инструкции за работа
Как да разрешите проблеми с GPS връзката:
(1) Преди да използвате устройството в колата, преместете го на
открито. Обикновено на открито устройството ще се свърже с GPS
сателити за около 3~5 минути.
(2) За да намалите времето за връзка, след като стартирате
навигационното приложение, затворете екрана, като натиснете за
кратко бутона за включване/изключване.
Ако не получавате GPS сигнал, проверете следното:
(1) Уверете се, че не сте вътре в сграда, в тунели или под мостове.
(2) В пренаселените градове с високи сгради GPS сигналът може да
бъде повлиян.
(3) Ако имате затъмнени стъкла, те могат да повлияят на GPS
сигнала.
След задаване на дестинацията, ако приложението не установи
маршрута, причината може да е грешка в GPS връзката. Уверете се,

Български
Ръководство за употреба - 8
че устройството е свързано с GPS сателитите, след което задайте
отново маршрута.
Забележка!
Преди първата употреба заредете устройството поне 5 минути, за
да осигурите достатъчно енергия за стартиране.
За първа употреба преместете устройството извън автомобила и
изчакайте около 3~5 минути, за да се свържете с GPS сателитите.
Нулиране
Ако се появи неизвестна грешка, натиснете бутона за нулиране на
гърба на устройството с остър предмет.
Устройството ще се върне към фабричните настройки.
Технически спецификации
Операционна система Android 6.0
Екран 7inch 800*480px
Памет RAM 1GB DDR3 / ROM 16GB Nand Flash
Съхранение Micro SD card, max 64GB, които не са
включени
Батерия 3.7V 2000mAh
Връзка Слот за микро SD карта, 3,5 мм жак,
Мини USB порт
Микрофон да
Говорител Стерео
Захранване 5V 2A
Wi честота 2.4GHz
Мощност на wi
предаване 100mW
Bluetooth V4.0
FM предавател 87.50-108MHz / 50 nW

Deutsche
Benutzerhandbuch - 9
Sicherheitswarnungen
Betreiben Sie das Gerät nicht mit einer anderen als der vom Hersteller
empfohlenen Spannung (5V 2A)
Setzen Sie das Gerät keiner direkten Sonneneinstrahlung aus.
Verwenden Sie das Gerät nicht in Bereichen mit elektromagnetischen
Störungen.
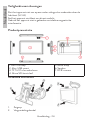
Produktpräsentation
1. Ein/Aus-Taste
2. Mini-USB-Anschluss
3. TFT-LCD-Touchscreen
4. Micro-SD-Kartensteckplatz
5. Reset button
6. Speaker
7. DVR Camera
Installationsanleitung

Deutsche
Benutzerhandbuch - 10
Gebrauchsanweisung
Schalten Sie das Gerät ein
Um das Gerät einzuschalten, drücken Sie lange auf die Einschalttaste, bis
der Bildschirm aufleuchtet.
Bereithalten
Um das Gerät in den Standby-Modus zu versetzen, drücken Sie kurz die
Ein-/Aus-Taste. Der Bildschirm schaltet sich aus.
Schalten Sie das Gerät aus
Um das Gerät auszuschalten, drücken Sie lange auf die Ein-/Aus-Taste, bis
das Steuerungsmenü auf dem Bildschirm erscheint, und drücken Sie dann
die Taste „Ausschalten“.
Stromversorgung
Schließen Sie das Netzkabel an den Mini-USB-Anschluss des Geräts an und
stecken Sie den Stecker des Zigarettenanzünders in den dafür vorgesehenen
Steckplatz am Armaturenbrett des Fahrzeugs.
Bedienungsanleitung
So lösen Sie GPS-Verbindungsprobleme:
(1) Bevor Sie das Gerät im Auto verwenden, bringen Sie es ins Freie. Im
Allgemeinen stellt das Gerät im Freien in etwa 3 bis 5 Minuten eine
Verbindung zu GPS-Satelliten her.
(2) Um die Verbindungszeit zu verkürzen, schließen Sie nach dem Start der
Navigationsanwendung den Bildschirm durch kurzes Drücken der Ein-/Aus-
Taste.
Wenn Sie kein GPS-Signal empfangen, überprüfen Sie Folgendes:
(1) Stellen Sie sicher, dass Sie sich nicht in einem Gebäude, in Tunneln oder
unter Brücken befinden.
(2) In überfüllten Städten mit hohen Gebäuden kann das GPS-Signal
beeinträchtigt werden.
(3) Getönte Scheiben können das GPS-Signal beeinträchtigen.
Wenn die Anwendung nach dem Festlegen des Ziels die Route nicht
ermittelt, kann der Grund ein GPS-Verbindungsfehler sein. Stellen Sie

Deutsche
Benutzerhandbuch - 11
sicher, dass das Gerät mit den GPS-Satelliten verbunden ist, und stellen Sie
dann die Route erneut ein.
Notiz!
Laden Sie das Gerät vor dem ersten Gebrauch mindestens 5 Minuten lang
auf, um genügend Energie zum Starten bereitzustellen.
Bewegen Sie das Gerät bei der ersten Verwendung außerhalb des Fahrzeugs
und warten Sie etwa 3 bis 5 Minuten, um eine Verbindung zu den GPS-
Satelliten herzustellen.
Zurücksetzen
Wenn ein unbekannter Fehler auftritt, drücken Sie mit einem spitzen
Gegenstand die Reset-Taste auf der Rückseite des Geräts.
Das Gerät wird auf die Werkseinstellungen zurückgesetzt.
Technische Spezifikationen
Prozessor Cortex A53*4 1.3GHz
Betriebssystem Android 6.0
Bildschirm 7inch 800*480px
Erinnerung RAM 1GB DDR3 / ROM 16GB Nand Flash
Lagerung Micro SD card, max 64GB, nicht enthalten
Batterie 3.7V 2000mAh
Verbindung Steckplatz für Micro-SD-Karte, 3,5-mm-
Buchse, Mini-USB-Anschluss
Mikrofon Ja
Lautsprecher Stereo
Stromversorgung 5V 2A
WiFi-Frequenz 2.4GHz
WLAN-Sendeleistung 100mW
Bluetooth V4.0
FM-Sender 87.50-108MHz / 50 nW

Español
Manual de usuario - 12
Advertencias de seguridad
No alimente el dispositivo con un voltaje diferente al recomendado por el
fabricante (5V 2A)
No exponga el dispositivo a la luz solar directa.
No utilice el dispositivo en áreas con interferencias electromagnéticas.
Presentacion de producto
1. Botón de encendido/apagado
2. Minipuerto USB
3. Pantalla táctil LCD TFT
4. Ranura para tarjeta Micro SD
5. Botón de reinicio
6. Altavoz
7. Cámara DVR
Instrucciones de instalación
1. Ventosa

Español
Manual de usuario - 13
2. Palanca de cierre
3. Rueda de ajuste de ángulo
4. Soporte GPS
Enciende el dispositivo
Para encender el dispositivo, mantenga presionado el botón de encendido
hasta que se encienda la pantalla.
Apoyar
Para poner el dispositivo en modo de espera, presione brevemente el botón
de encendido/apagado. La pantalla se apaga.
Apague el dispositivo
Para apagar el dispositivo, mantenga presionada la tecla de encendido/
apagado hasta que aparezca el menú de control en la pantalla, luego presione
el botón “Apagar”
Alimentación
Conecte el cable de alimentación al puerto mini USB del dispositivo e
inserte el enchufe del encendedor de cigarrillos en la ranura dedicada en el
tablero del vehículo.
Instrucciones de operación
Cómo solucionar problemas de conexión GPS:
(1) Antes de usar el dispositivo dentro del automóvil, muévalo al aire libre.
Generalmente, al aire libre, el dispositivo se conectará a los satélites GPS en
aproximadamente 3 a 5 minutos.
(2) Para reducir el tiempo de conexión, después de iniciar la aplicación
de navegación, cierre la pantalla presionando brevemente el botón de
encendido/apagado.
Si no recibe una señal de GPS, verifique lo siguiente:
(1) Asegúrese de no estar dentro de un edificio, en túneles o debajo de
puentes.
(2) En ciudades abarrotadas con edificios altos, la señal GPS puede verse
afectada.
(3) Si tiene vidrios polarizados, pueden afectar la señal del GPS.
Después de establecer el destino, si la aplicación no establece la ruta, la

Español
Manual de usuario - 14
razón puede ser un error de conexión GPS. Asegúrese de que el dispositivo
esté conectado a los satélites GPS, luego configure la ruta nuevamente.
¡Nota!
Antes del primer uso, cargue el dispositivo durante al menos 5 minutos, para
proporcionar suficiente energía para comenzar.
Para el primer uso, mueva el dispositivo fuera del vehículo y espere de 3 a 5
minutos para conectarse a los satélites GPS.
Reiniciar
Si aparece un error desconocido, presione el botón de reinicio en la parte
posterior del dispositivo con un objeto afilado.
El dispositivo volverá a la configuración de fábrica.
Especificaciones técnicas
Procesador Cortex A53*4 1.3GHz
Sistema operativo Android 6.0
Pantalla 7inch 800*480px
Memoria RAM 1GB DDR3 / ROM 16GB Nand Flash
Almacenamiento Micro SD card, max 64GB, no incluido
Batería 3.7V 2000mAh
Conexión Ranura para tarjeta MicroSD, conector de
3,5 mm, Mini puerto USB
Micrófono Sí
Altavoz Estéreo
Fuente de alimentación 5V 2A
Frecuencia wifi 2.4GHz / 100mW
Bluetooth V4.0
Transmisor FM 87.50-108MHz
Potencia de transmisión
FM 50 nW

Français
Manuel d’utilisation - 15
Avertissements de sécurité
Ne pas alimenter l’appareil à une tension autre que celle préconisée par le
constructeur (5V 2A)
N’exposez pas l’appareil à la lumière directe du soleil.
N’utilisez pas l’appareil dans des zones soumises à des interférences
électromagnétiques.
Présentation du produit
1. Bouton Marche/Arrêt
2. Port mini-USB
3. Écran tactile LCD TFT
4. Fente pour carte micro SD
5. Bouton de
réinitialisation
6. Haut-parleur
7. Caméra DVR
Instructions d’installation
1. Ventouse

Français
Manuel d’utilisation - 16
2. Levier de verrouillage
3. Molette de réglage d’angle
4. Support GPS
Allumez l’appareil
Pour allumer l’appareil, appuyez longuement sur le bouton d’alimentation
jusqu’à ce que l’écran s’allume.
Stand-by
Pour mettre l’appareil en veille, appuyez brièvement sur le bouton marche/
arrêt. L’écran s’éteint.
Éteignez l’appareil
Pour éteindre l’appareil, appuyez longuement sur la touche marche/arrêt
jusqu’à ce que le menu de contrôle apparaisse à l’écran, puis appuyez sur le
bouton “Power O”.
Source de courant
Connectez le câble d’alimentation au port mini USB de l’appareil et insérez
la prise allume-cigare dans l’emplacement dédié sur le tableau de bord du
véhicule.
Mode d’emploi
Comment résoudre les problèmes de connexion GPS:
(1) Avant d’utiliser l’appareil à l’intérieur de la voiture, déplacez-le à l’air libre.
Généralement, à l’extérieur, l’appareil se connectera aux satellites GPS en
3 à 5 minutes environ.
(2) Pour réduire le temps de connexion, après le démarrage de l’application
de navigation, fermez l’écran en appuyant brièvement sur le bouton marche/
arrêt.
Si vous ne recevez pas de signal GPS, vérifiez comme suit:
(1) Assurez-vous de ne pas vous trouver à l’intérieur d’un bâtiment, dans des
tunnels ou sous des ponts.
(2) Dans les villes surpeuplées avec de grands immeubles, le signal GPS peut
être aecté.
(3) Si vous avez des vitres teintées, elles peuvent aecter le signal GPS.
Après avoir défini la destination, si l’application n’établit pas l’itinéraire, la

Français
Manuel d’utilisation - 17
raison peut être une erreur de connexion GPS. Assurez-vous que l’appareil
est connecté aux satellites GPS, puis redéfinissez l’itinéraire.
Noter!
Avant la première utilisation, chargez l’appareil pendant au moins 5 minutes,
afin de fournir susamment d’énergie pour démarrer.
Pour la première utilisation, déplacez l’appareil à l’extérieur du véhicule et
attendez environ 3 à 5 minutes pour se connecter aux satellites GPS.
Réinitialiser
Si une erreur inconnue apparaît, appuyez sur le bouton de réinitialisation à
l’arrière de l’appareil avec un objet pointu.
L’appareil reviendra aux paramètres d’usine.
Spécifications techniques
Processeur Cortex A53*4 1.3GHz
Système opérateur Android 6.0
Filtrer 7inch 800*480px
Mémoire RAM 1GB DDR3 / ROM 16GB Nand Flash
Stockage Micro SD card, max 64GB, non inclus
Batterie 3.7V 2000mAh
Connexion Fente pour carte micro SD, Prise jack 3,5 mm
Port mini-USB
Microphone Oui
Haut-parleur Stéréo
Source de courant 5V 2A
Fréquence wi-fi 2.4GHz / 100mW
Bluetooth V4.0
Transmetteur FM 87.50-108MHz / 50 nW

Magyar
Használati utasítás - 18
Biztonsági figyelmeztetések
Ne kapcsolja a készüléket a gyártó által ajánlott feszültségtől eltérő
feszültségre (5V 2A)
Ne tegye ki a készüléket közvetlen napsugárzásnak.
Ne használja a készüléket elektromágneses interferenciával járó helyen.
Termékbemutató
1. Be/Ki gomb
2. Mini USB port
3. TFT LCD érintőképernyő
4. Micro SD kártyanyílás
5.Reset gomb
6. Hangszóró
7. DVR kamera
Telepítési útmutató
1. Tapadókorong
2. Zárókar

Magyar
Használati utasítás - 19
3. Szög beállító kerék
4. GPS tartó
Kapcsolja be a készüléket
Az eszköz bekapcsolásához nyomja meg hosszan a bekapcsológombot, amíg
a képernyő világít.
Készenlétben lévő
A készülék készenléti állapotba helyezéséhez röviden nyomja meg a be/ki
gombot. A képernyő kikapcsol.
Kapcsolja ki a készüléket
A készülék kikapcsolásához nyomja meg hosszan a be/ki gombot, amíg a
vezérlőmenü meg nem jelenik a képernyőn, majd nyomja meg a „Kikapcsolás”
gombot.
Tápegység
Csatlakoztassa a tápkábelt a készülék mini USB-portjához, és dugja be a
szivargyújtó csatlakozóját a jármű műszerfalán lévő erre a célra kialakított
nyílásba.
Használati utasítások
A GPS-kapcsolati problémák megoldása:
(1) Mielőtt a készüléket az autóban használná, vigye a szabad levegőn. A
kültéren az eszköz általában körülbelül 3-5 perc alatt csatlakozik a GPS-
műholdakhoz.
(2) A csatlakozási idő csökkentése érdekében a navigációs alkalmazás
elindítása után zárja be a képernyőt a be-/kikapcsoló gomb rövid
megnyomásával.
Ha nem kap GPS-jelet, ellenőrizze a következőket:
(1) Győződjön meg arról, hogy nincs épületben, alagutakban vagy hidak
alatt.
(2) A magas épületekkel rendelkező zsúfolt városokban a GPS-jel
befolyásolható.
(3) Ha sötétített ablakai vannak, ezek befolyásolhatják a GPS-jelet.
Ha az úticél beállítása után az alkalmazás nem állítja be az útvonalat, annak
oka GPS-kapcsolati hiba lehet. Győződjön meg arról, hogy az eszköz

Magyar
Használati utasítás - 20
csatlakozik a GPS-műholdakhoz, majd állítsa be újra az útvonalat.
Jegyzet!
Az első használat előtt töltse a készüléket legalább 5 percig, hogy elegendő
energiát biztosítson az indításhoz.
Az első használatkor vigye ki a készüléket a járműből, és várjon körülbelül
3-5 percet, hogy csatlakozzon a GPS-műholdakhoz.
Figyelem!
Ne szerelje fel a készüléket légzsák elé.
Visszaállítás
Ha ismeretlen hiba jelenik meg, nyomja meg egy éles tárggyal a készülék
hátulján található reset gombot.
A készülék visszaáll a gyári beállításokra.
Műszaki adatok
Processzor Cortex A53*4 1.3GHz
Operációs rendszer Android 6.0
Képernyő 7inch 800*480px
Memória RAM 1GB DDR3 / ROM 16GB Nand Flash
Tárolás Micro SD card, max 64GB, nem tartalmazza
Akkumulátor 3.7V 2000mAh
Kapcsolat Micro SD kártya nyílás, 3,5 mm-es jack
csatlakozó, Mini USB port
Mikrofon Igen
Hangszóró Sztereó
Tápegység 5V 2A
Wifi frekvencia 2.4GHz / 100mW
Bluetooth V4.0
FM adó 87.50-108MHz / 50 nW

Italiano
Manuale dell’utente - 21
Avvertenze di sicurezza
Non alimentare il dispositivo con una tensione diversa da quella consigliata
dal produttore (5V 2A)
Non esporre il dispositivo alla luce solare diretta.
Non utilizzare il dispositivo in aree con interferenze elettromagnetiche.
Presentazione del prodotto
1. Pulsante di accensione/spegnimento
2. Mini porta USB
3. Schermo tattile LCD TFT
4. Slot per scheda Micro SD
5. Tasto reset
6. Altoparlante
7. Telecamera DVR
Istruzioni per l’installazione
1. Ventosa
2. Leva di bloccaggio

Italiano
Manuale dell’utente - 22
3. Rotella di regolazione dell’angolo
4. Staa GPS
Accendere il dispositivo
Per accendere il dispositivo, premere a lungo il pulsante di accensione finché
lo schermo non si illumina.
Mettere il dispositivo in pausa
Per mettere il dispositivo in standby, premere brevemente il pulsante di
accensione/spegnimento. Lo schermo si spegne.
Spegnere il dispositivo
Per spegnere il dispositivo, premere a lungo il tasto di accensione/
spegnimento finché sullo schermo non viene visualizzato il menu di controllo,
quindi premere il pulsante “Spegnimento”.
Alimentazione
Collegare il cavo di alimentazione alla porta mini USB del dispositivo e
inserire la spina dell’accendisigari nell’apposita fessura sul cruscotto del
veicolo.
Istruzioni per l’uso
Come risolvere i problemi di connessione GPS:
(1) Prima di utilizzare il dispositivo all’interno dell’auto, spostarlo all’aria
aperta. Generalmente, all’aperto, il dispositivo si connette ai satelliti GPS
in circa 3~5 minuti.
(2) Per ridurre il tempo di connessione, dopo aver avviato l’applicazione
di navigazione, chiudere lo schermo premendo brevemente il pulsante di
accensione/spegnimento.
Se non ricevi un segnale GPS, controlla come segue:
(1) Assicurarsi di non trovarsi all’interno di un edificio, in tunnel o sotto ponti.
(2) In città aollate con edifici alti, il segnale GPS può risentirne.
(3) Se hai i vetri oscurati, possono influenzare il segnale GPS.
Dopo aver impostato la destinazione, se l’applicazione non stabilisce
il percorso, il motivo potrebbe essere un errore di connessione GPS.
Assicurarsi che il dispositivo sia connesso ai satelliti GPS, quindi impostare
nuovamente il percorso.

Italiano
Manuale dell’utente - 23
Nota!
Prima del primo utilizzo, caricare il dispositivo per almeno 5 minuti, per
fornire energia suciente per l’avvio.
Per il primo utilizzo, spostare il dispositivo all’esterno del veicolo e attendere
circa 3~5 minuti per connettersi ai satelliti GPS.
Ripristino
Se viene visualizzato un errore sconosciuto, premere il pulsante di ripristino
sul retro del dispositivo con un oggetto appuntito.
Il dispositivo tornerà alle impostazioni di fabbrica.
Specifiche tecniche
Processore Cortex A53*4 1.3GHz
Sistema operativo Android 6.0
Schermo 7inch 800*480px
Memoria RAM 1GB DDR3
ROM 16GB Nand Flash
Archiviazione Micro SD card, max 64GB, non inclus
Batteria 3.7V 2000mAh
Connessioni Slot per scheda microSD
Jack da 3,5 mm
Mini porta USB
Microfono Sì
Altoparlante Stereo
Alimentazione elettrica 5V 2A
Frequenza wi-fi 2.4GHz / 100mW
Bluetooth V4.0
Trasmettitore FM 87.50-108MHz / 50 nW
Potenza di trasmissione FM 50 nW

Nederlands
Handleiding - 24
Veiligheidswaarschuwingen
Sluit het apparaat niet aan op een ander voltage dan aanbevolen door de
fabrikant (5V 2A)
Stel het apparaat niet bloot aan direct zonlicht.
Gebruik het apparaat niet in gebieden met elektromagnetische
interferentie.
Productpresentatie
1. Aan / uit knop
2. Mini-USB-poort
3. TFT LCD-aanraakscherm
4. Micro SD-kaartsleuf
5. Reset knop
6. Spreker
7. DVR-camera
Installatie instructies
1. Zuignap
2. Vergrendelingshendel

Nederlands
Handleiding - 25
3. Hoekverstelwiel
4. GPS-beugel
Schakel het apparaat in
Om het apparaat in te schakelen, drukt u lang op de aan/uit-knop totdat het
scherm oplicht.
Stand-by
Om het apparaat op stand-by te zetten, drukt u kort op de aan/uit-knop.
Het scherm gaat uit.
Schakel het apparaat uit
Om het apparaat uit te schakelen, drukt u lang op de aan/uit-toets totdat
het bedieningsmenu op het scherm verschijnt en drukt u vervolgens op de
knop “Uitschakelen”.
Stroomvoorziening
Sluit de voedingskabel aan op de mini-USB-poort van het apparaat en
steek de stekker van de sigarettenaansteker in de daarvoor bestemde sleuf
op het dashboard van het voertuig.
Handleiding
Problemen met de GPS-verbinding oplossen:
(1) Voordat u het apparaat in de auto gebruikt, moet u het in de open
lucht verplaatsen. Over het algemeen zal het apparaat buitenshuis binnen
ongeveer 3 tot 5 minuten verbinding maken met GPS-satellieten.
(2) Om de verbindingstijd te verkorten, sluit u na het starten van de
navigatietoepassing het scherm door kort op de aan/uit-knop te drukken.
Als u geen GPS-signaal ontvangt, controleer dan als volgt:
(1) Zorg ervoor dat u zich niet in een gebouw, in tunnels of onder bruggen
bevindt.
(2) In drukke steden met hoge gebouwen kan het GPS-signaal worden
beïnvloed.
(3) Als u getinte ruiten heeft, kunnen deze het GPS-signaal beïnvloeden.
Als de applicatie na het instellen van de bestemming de route niet kan
bepalen, kan de reden een GPS-verbindingsfout zijn. Zorg ervoor dat het
apparaat is verbonden met de GPS-satellieten en stel vervolgens de route
opnieuw in.

Nederlands
Handleiding - 26
Opmerking!
Laad het apparaat voor het eerste gebruik minimaal 5 minuten op om
voldoende energie te hebben om te starten.
Plaats het apparaat voor het eerste gebruik buiten het voertuig en wacht
ongeveer 3 tot 5 minuten om verbinding te maken met de GPS-satellieten.
Resetten
Als er een onbekende fout optreedt, drukt u met een scherp voorwerp op de
resetknop aan de achterkant van het apparaat.
Het apparaat keert terug naar de fabrieksinstellingen.
Technische specificaties
Verwerker Cortex A53*4 1.3GHz
Besturings
systeem Android 6.0
Scherm 7inch 800*480px
Geheugen RAM 1GB DDR3 / ROM 16GB Nand Flash
Opslag Micro SD card, max 64GB, niet inbegrepen
Accu 3.7V 2000mAh
Verbinding Micro SD-kaartsleuf, 3,5 mm-aansluiting
Mini-USB-poort
Microfoon Ja
Spreker Stereo
Stroomvoorziening 5V 2A
WiFi-frequentie 2.4GHz
WiFi-zendvermogen 100mW
Bluetooth V4.0
FM-zender 87.50-108MHz
FM-zendvermogen 50 nW

Polskie
Instrukcja obsługi - 27
Ostrzeżenia dotyczące bezpieczeństwa
Nie zasilać urządzenia napięciem innym niż zalecane przez producenta (5V
2A)
Nie wystawiaj urządzenia na bezpośrednie działanie promieni słonecznych.
Nie używaj urządzenia w obszarach z zakłóceniami elektromagnetycznymi.
Prezentacja produktu
1. Włącznik / wyłącznik
2. Miniport USB
3. Ekran dotykowy LCD TFT
4. Gniazdo karty Micro SD
5. Przycisk reset
6. Głośnik
7. Kamera DVR
Instrukcje Instalacji
1. Przyssawka
2. Dźwignia blokująca

Polskie
Instrukcja obsługi - 28
3. Pokrętło regulacji kąta
4. Uchwyt GPS
Włącz urządzenie
Aby włączyć urządzenie, naciśnij i przytrzymaj przycisk zasilania, aż ekran
się zaświeci.
Czekaj
Aby przełączyć urządzenie w stan gotowości, krótko naciśnij przycisk
włączania/wyłączania. Ekran wyłącza się.
Wyłącz urządzenie
Aby wyłączyć urządzenie, naciśnij długo przycisk włączania/wyłączania, aż na
ekranie pojawi się menu sterowania, a następnie naciśnij przycisk „Wyłącz”.
Zasilacz
Podłącz kabel zasilający do portu mini USB urządzenia i włóż wtyczkę
zapalniczki samochodowej do dedykowanego gniazda na desce rozdzielczej
pojazdu.
Instrukcja obsługi
Jak rozwiązać problemy z połączeniem GPS:
(1) Przed użyciem urządzenia w samochodzie przenieś je na zewnątrz.
Ogólnie rzecz biorąc, na zewnątrz urządzenie łączy się z satelitami GPS w
ciągu około 3–5 minut.
(2) Aby skrócić czas połączenia, po uruchomieniu aplikacji nawigacyjnej
zamknij ekran, naciskając krótko przycisk włączania/wyłączania.
Jeśli nie odbierasz sygnału GPS, wykonaj następujące czynności:
(1) Upewnij się, że nie znajdujesz się w budynku, w tunelu lub pod mostem.
(2) W zatłoczonych miastach z wysokimi budynkami sygnał GPS może być
zakłócony.
(3) Jeśli masz przyciemniane szyby, mogą one wpływać na sygnał GPS.
Jeśli po ustaleniu celu podróży aplikacja nie ustala trasy, przyczyną może być
błąd połączenia GPS. Upewnij się, że urządzenie jest połączone z satelitami
GPS, a następnie ponownie ustaw trasę.
Notatka!
Przed pierwszym użyciem ładuj urządzenie przez co najmniej 5 minut, aby

Polskie
Instrukcja obsługi - 29
zapewnić wystarczającą ilość energii do uruchomienia.
Przy pierwszym użyciu wysuń urządzenie poza pojazd i odczekaj około 3~5
minut, aby połączyć się z satelitami GPS.
Resetowanie
Jeśli pojawi się nieznany błąd, naciśnij przycisk resetowania z tyłu urządzenia
ostrym przedmiotem.
Urządzenie powróci do ustawień fabrycznych.
Specyfikacja techniczna
Edytor Cortex A53*4 1.3GHz
System operacyjny Android 6.0
Ekran 7inch 800*480px
Pamięć RAM 1GB DDR3 / ROM 16GB Nand Flash
Magazynowanie Micro SD card, max 64GB, nie zawarty
Bateria 3.7V 2000mAh
Połączenie Micro SD card slot
3.5mm jack
Mini USB port
Mikrofon Yes
Głośnik Stereo
Zasilacz 5V 2A
Częstotliwość Wi-Fi 2.4GHz
Moc transmisji Wi-Fi 100mW
Bluetooth V4.0
Nadajnik FM 87.50-108MHz
Moc transmisji FM 50 nW

Romana
Manual de utilizare - 30
Atentionari de siguranta
Nu alimentati dispozitivul la alta tensiune decat cea recomandata de
producator (5V 2A)
Nu expuneti dispozitivul la razele directe ale soarelui.
Nu folositi dispozitivul in zone cu interferente electromagnetice.
Nu montati dispozitivul in fata unui airbag.
Prezentare produs
1. Buton pornire/oprire
2. Conector mini USB
3. Ecran tactil TFT LCD
4. Slot card micro SD
5. Buton reset
6. Difuzor
7. Camera
Instructiuni de instalare
1. Ventuza de prindere
2. Parghie blocare

Romana
Manual de utilizare - 31
3. Rotita reglare unghi
4. Suport GPS
Instructiuni de utilizare
Pornire
Pentru a porni dispozitivul, apasati lung butonul de pornire/oprire pana se
aprinde ecranul.
Standby
Pentru a pune dispozitivul in standby, apasati scurt butonul de pornire/
oprire. Ecranul se stinge.
Oprire
Pentru a opri dispozitivul, apasati lung tasta de pornire/oprire pana apare pe
ecran meniul de control, apoi alegeti optiunea “Power O ”.
Alimentare
Conectati cablul de alimentare in portul mini USB al dispozitivului si
introduceti mufa de bricheta in locasul dedicat din bordul vehicolului.
Operare
Nota: Dispozitivul nu include harti GPS.
Cum sa rezolvati problemele de conectare la satelitii GPS:
(1) Inainte de utilizarea in masina, scoateti dispozitivul in aer liber. In general,
in aer liber, dispozitivul se va conecta la satelitii GPS in aproximativ 3~5
minute.
(2) Pentru a reduce timpul de conectare, dupa startarea aplicatiei de
navigare, inchideti ecranul apasand scurt butonul de pornire/oprire.
Daca nu receptionati semnal GPS, verificati urmatoarele:
(1) Asigurati-va ca nu sunteti in interiorul unei cladiri, in tunele sau sub
poduri.
(2) In orasele aglomerate, cu cladiri inalte, semnalul GPS poate fi afectat.
(3) Daca aveti geamuri fumurii, acestea pot afecta semnalul GPS, in
special geamurile cu folie.

Romana
Manual de utilizare - 32
Dupa setarea destinatiei, daca aplicatia nu stabileste ruta, motivul poate
fi o eroare de conectare la satelitii GPS. Asigurati-va ca dispozitivul este
conectat la satelitii GPS, apoi setati ruta din nou.
Nota!
Inainte de prima utilizare, incarcati dispozitivul cel putin 5 minute cu
dispozitivul oprit, pentru ca acesta sa aiba suficienta energie pentru a porni.
Pentru prima utilizare, porniti dispozitivul in aer liber, in afara vehiculului si
asteptati aproximativ 3~5 minute pentru a se conecta la satelitii GPS.
Reset
Daca apare o eroare necunoscuta, apasati butonul de reset de pe spatele
dispozitivului cu ajutorul unui obiect ascutit.
Dispozitivul va reveni la setarile din fabrica.
Specificatii tehnice
Procesor Cortex A53*4 1.3GHz
Sistem de operare Android 6.0
Ecran 7 inch 800*480px
Memorie RAM 1GB DDR3 / ROM 16GB Nand Flash
Stocare Card micro SD, max 64GB, nu este inclus
Acumulator 3.7V 2000mAh
Conexiuni Slot card micro SD , Jack 3.5mm, Port mini
USB
Microfon Da
Difuzor Stereo
Alimentare 5V 2A
Bluetooth V4.0
Frecventa WiFi 2.4GHz / Putere de emisie 100mW
Frecventa
transmitator FM 87.50-108MHz / Putere de emisie 50 nW
Aplicatii Google search,Gmail, Youtube, Facebook etc.

EN:
EU Simplified Declaration of Conformity
SC ONLINESHOP SRL declares that GPS navigation system + DVR PNI S916 Pro complies with
the Directive RED 2014/53/UE. The full text of the EU declaration of conformity is available at the
following Internet address: https://www.mypni.eu/products/9017/download/certifications
BG:
Опростена декларация за съответствие на ЕС
SC ONLINESHOP SRL декларира, че GPS навигационна система + DVR PNI S916 Pro спазва
директивата RED 2014/53/UE. Пълният текст на ЕС декларацията за съответствие е
достъпен на следния интернет адрес: https://www.mypni.eu/products/9017/download/
certifications
DE:
Vereinfachte EU- Konformitätserklärung
SC ONLINESHOP SRL erklärt, dass das GPS-Navigationssystem + DVR PNI S916 Pro der
Richtlinie RED 2014/53/UE entspricht. Sie finden den ganzen Text der EU-Konformitätserklärung
an der folgenden Internetadresse: https://www.mypni.eu/products/9017/download/certifications
ES:
Declaración UE de conformidad simplificada
SC ONLINESHOP SRL declara que el Sistema de navegación GPS + DVR PNI S916 Pro cumple
con la Directiva RED 2014/53/EU. El texto completo de la declaración de conformidad de la
UE está disponible en la siguiente dirección de Internet: https://www.mypni.eu/products/9017/
download/certifications
FR
Déclaration de conformité simplifiée de l’UE
SC ONLINESHOP SRL déclare que Système de navigation GPS + DVR PNI S916 Pro est
conforme à la directive RED 2014/53/UE. Le texte complet de la déclaration de conformité UE
est disponible à l’adresse Internet suivante: https://www.mypni.eu/products/9017/download/
certifications
HU:
Egyszerűsített EU Megfelelési Közlemény
SC ONLINESHOP SRL kijelenti azt, hogy a GPS navigációs rendszer + DVR PNI S916 Pro megfelel
az RED 2014/53/UE irányelvnek. Az EU-megfelelőségi nyilatkozat teljes szövege a következő
internetes címen érhető el: https://www.mypni.eu/products/9017/download/certifications
IT:
Dichiarazione UE di conformità semplificata
SC ONLINESHOP SRL dichiara che il Sistema di navigazione GPS + DVR PNI S916 Pro è
conforme alla direttiva RED 2014/53/UE. Il testo completo della dichiarazione di conformità
europea è disponibile al seguente indirizzo Internet: https://www.mypni.eu/products/9017/
download/certifications
NL:
Vereenvoudigde EU-conformiteitsverklaring
SC ONLINESHOP SRL verklaart dat GPS-navigatiesysteem + DVR PNI S916 Pro voldoet aan de
richtlijn RED 2014/53/UE. De volledige tekst van de EU-conformiteitsverklaring is beschikbaar op
het volgende internetadres: https://www.mypni.eu/products/9017/download/certifications
PL:
Uproszczona deklaracja zgodności UE
SC ONLINESHOP SRL oświadcza, że System nawigacji GPS + DVR PNI S916 Pro jest zgodny z
dyrektywą RED 2014/53/UE. Pełny tekst deklaracji zgodności UE dostępny jest pod następującym
adresem internetowym: https://www.mypni.eu/products/9017/download/certifications
RO:
Declaratie UE de conformitate simplificata
SC ONLINESHOP SRL declara ca Sistem de navigatie GPS + DVR PNI S916 Pro este in
conformitate cu Directiva RED 2014/53/UE. Textul integral al declaratiei UE de conformitate
este disponibil la urmatoarea adresa de internet: https://www.mypni.eu/products/9017/download/
certifications

-
 1
1
-
 2
2
-
 3
3
-
 4
4
-
 5
5
-
 6
6
-
 7
7
-
 8
8
-
 9
9
-
 10
10
-
 11
11
-
 12
12
-
 13
13
-
 14
14
-
 15
15
-
 16
16
-
 17
17
-
 18
18
-
 19
19
-
 20
20
-
 21
21
-
 22
22
-
 23
23
-
 24
24
-
 25
25
-
 26
26
-
 27
27
-
 28
28
-
 29
29
-
 30
30
-
 31
31
-
 32
32
-
 33
33
-
 34
34


PNI S916 Pro Manual de usuario
- Categoría
- Navegantes
- Tipo
- Manual de usuario
en otros idiomas
- français: PNI S916 Pro Manuel utilisateur
- italiano: PNI S916 Pro Manuale utente
- Deutsch: PNI S916 Pro Benutzerhandbuch
- polski: PNI S916 Pro Instrukcja obsługi