
DP6860 Quick Start Guide
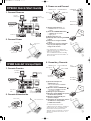
1. Connect Sources
2. Connect Power
3. Power on and Present
(1) Set the Power Switch to “ I ”.
→ POWER Indicator is turned to
orange.
(2) Press the STANDBY/ON button .
→ POWER indicator blinks.
→ lights green.
(3) Remove the Lens cap.
(4) Adjust picture size using the ZOOM
button.
(5) Adjust focus using the FOCUS
button.
(6) If necessary, press the activation
keys on your laptop to see the
image on the screen.*
* Your computer may use a different key
combination. Check your computer’s user’s
guide for more information.
Look for additional information, including
troubleshooting and contact information, on
the reverse side.
AC Inlet
Power Cord
Power outlet
AUDIO IN AUDIO
OUT
RGB 1
DIGITAL
RGB 2
RGB OUT
CONTROL
RGB IN 2
COMPO
NENT
VIDEO
S-VIDEO
VIDEO
(MONO)/L
AUDI O
R
C
B/PB
CR/PR
DIGTAL
USB
S-Video Tape
Recorder
Computer
(notebook type)
Speaker
with
amplifier
Display
Monitor
Computer
(desktop type)
DVD Player
Power Switch
Lens cap
STANDBY/ON Button
POWER Indicator
STANDBY/ON
LASER
VIDEO
BLANK
RGB
AUTO
MENU
MENU SELECT
POSITION
RESET
FREEZE
MAGNIFY
PinP
OFF
VOLUME
MUTE
ZOOMFOCUS
STANDBY/ON
Button
ZOOM button
FOCUS button
FOCUS button
ZOOM button
Laptop power
cord
DP6860 Guida dell’ Arranque Rápido
1. Conecte Fuentes
2. Conecte Alimentación
3. Conexión y Presente
(1) Ajuste el interruptor de
alimentación a “I”.
→ El color del indicador POWER
cambia a naranja.
(2) Oprima el botón STANDBY/ON .
→ El indicador POWER parpadea.
→ enciende en verde.
(3) Extraiga la tapa del objetivo.
(4) Oprima el botón ZOOM para ajustar
el tamaño de la pantalla.
(5) Oprima el botón FOCUS para
ajustar el enfoque.
(6) Asegúrese de que el Puerto externo
de video de su computadora
portátil esté activado.*
* Su computadora puede usar una
combinación de teclas diferente. Verifique la
guía del usuario de su computadora para
más información. Busque información
adicional, incluso la localización y resolución
de fallas e información del contacto, en el
lado inverso.
Entrada de
CA
Cable de
alimentación
Tomacorriente
AUDIO IN AUDIO
OUT
RGB 1
DIGITAL
RGB 2
RGB OUT
CONTROL
RGB IN 2
COMPO
NENT
VIDEO
S-VIDEO
VIDEO
(MONO)/L
AUDI O
R
C
B/PB
CR/PR
DIGTAL
USB
Grabador de
videocintas de
S-vídeo
Computer
(Notebook)
Altavoz
(con
amplificador
incorporado)
Monitor de
visualización
Computer
(Desktop)
Reproductor
DVD
Interruptor de
alimentación
Tapa del objetivo
Botón STANDBY/ON
POWER Indicator
STANDBY/ON
LASER
VIDEO
BLANK
RGB
AUTO
MENU
MENU SELECT
POSITION
RESET
FREEZE
MAGNIFY
PinP
OFF
VOLUME
MUTE
ZOOMFOCUS
Botón
STANDBY/ON
Botón ZOOM
Botón FOCUS
Botón FOCUS
Botón ZOOM
Cable de alimentación

4. Power OFF
(1) Press the STANDBY/ON button for
approximately 2 seconds.
→ POWER indicator blinks.
(2) Wait approximately 30 seconds for the
fan to stop.
→ lights orange.
(3) Set the Power Switch to “ O ”.
→ POWER Indicator is turned to orange.
(4) Attach the Lens cap.
Safety Instructions
Please read “SAFETY INSTRUCTIONS” and
“User's Guide” thoroughly to ensure correct
usage through understanding.
Troubleshooting
If a problem occurs with the equipment, first refer to
the “TROUBLESHOOTING” section of the User’s
Guide and run through the suggested checks.
If this does not resolve the problem contact
InFocus.
InFocus Corporation: 27700B SW Parkway
Avenue
Wilsonville, Oregon 97070-9215
Phone: 503-685-8888
* 1-800-294-6400
Fax: 503-685-8887
In Europe: Olympia l * NL-1213 NS Hilversum,
The Netherlands
Phone: (31)35 6474000
Fax: (31) 35 6423999
Freephone: 008000 4636287 (008000 INFOCOS)
In Asia: 238A Thomson Road
#18-01/04 Novena Square Singapore 307684
Telephone: (65)334-9005
Fax: (65)334-4525
4. Desconexión
(1) Oprima el botón STANDBY/ON durante
aproximadamente dos segundos.
→ El indicador POWER parpadea.
(2) Espere aproximadamente 30 segundos por
el entusiasta detener.
→ enciende en naranja.
(3) Ajuste el interruptor de alimentación a “o”.
→ El color del indicador POWER cambia a
naranja.
(4) Coloque la tapa del objetivo.
Instrucciones de Seuridad
Para poder utilizar este producto de manera
correxta, por favor lea “INSTRUCCIONES DE
SEURIDAD” en “MANUAL DE USUARIO”.
Localización y Solución de Problemas
Cuando tenga algún problema con el equipo,
primero consulte la sección “LOCALIZACIÓN Y
SOLICIÓN DE PROBLEMAS” de manual de
usuario y realice las inspecciones recomendadas.
Si no consigue resolver el problema, póngase en
contacto con InFocus.
InFocus Corporation: 27700B SW Parkway
Avenue
Wilsonville, Oregon 97070-9215
Phone: 503-685-8888 * 1-800-294-6400
Fax: 503-685-8887
In Europe: Olympia l * NL-1213 NS Hilversum,
The Netherlands
Phone: (31)35 6474000
Fax: (31) 35 6423999
Freephone: 008000 4636287 (008000 INFOCOS)
In Asia: 238A Thomson Road
#18-01/04 Novena Square Singapore 307684
Telephone: (65)334-9005
Fax: (65)334-4525
QR50281
Transcripción de documentos
00Quick Guide 01.7.16 4:22 PM ページ 1 DP6860 Quick Start Guide 1. Connect Sources 3. Power on and Present POWER Indicator FOCUS button Computer (desktop type) STANDBY/ON Button STANDBY/ON Button VIDEO STANDBY/ON LASER RGB BLANK ZOOM button AUTO Computer (notebook type) MENU POSITION MENU SELECT RESET PinP Power Switch FREEZE FOCUS button VOLUME MAGNIFY OFF Lens cap Display Monitor DIGTAL RGB IN S-Video Tape Recorder S-VIDEO COMPO NENT VIDEO 2 CONTROL RGB OUT VIDEO (MONO)/L AUDIO AUDIO IN RGB 1 RGB 2 DIGITAL CB/PB R USB AUDIO OUT CR/PR Speaker with amplifier DVD Player 2. Connect Power Power outlet Laptop power cord MUTE FOCUS ZOOM ZOOM button (1) Set the Power Switch to “ I ”. → POWER Indicator is turned to orange. (2) Press the STANDBY/ON button . → POWER indicator blinks. → lights green. (3) Remove the Lens cap. (4) Adjust picture size using the ZOOM button. (5) Adjust focus using the FOCUS button. (6) If necessary, press the activation keys on your laptop to see the image on the screen.* * Your computer may use a different key combination. Check your computer’s user’s guide for more information. Look for additional information, including troubleshooting and contact information, on the reverse side. AC Inlet Power Cord DP6860 Guida dell’ Arranque Rápido 1. Conecte Fuentes 3. Conexión y Presente POWER Indicator Botón FOCUS Computer (Desktop) Botón STANDBY/ON Botón STANDBY/ON VIDEO STANDBY/ON LASER RGB BLANK Botón ZOOM AUTO Computer (Notebook) MENU POSITION MENU SELECT RESET PinP Interruptor de alimentación FREEZE Botón FOCUS VOLUME MAGNIFY OFF Tapa del objetivo DIGTAL RGB IN Grabador de videocintas de S-vídeo S-VIDEO COMPO NENT VIDEO 2 Monitor de visualización CONTROL RGB OUT VIDEO (MONO)/L AUDIO USB R CB/PB AUDIO IN RGB 1 RGB 2 DIGITAL AUDIO OUT CR/PR Reproductor DVD Altavoz (con amplificador incorporado) 2. Conecte Alimentación Tomacorriente Entrada de CA Cable de alimentación Cable de alimentación MUTE FOCUS Botón ZOOM (1) Ajuste el interruptor de alimentación a “I”. → El color del indicador POWER cambia a naranja. (2) Oprima el botón STANDBY/ON . → El indicador POWER parpadea. → enciende en verde. (3) Extraiga la tapa del objetivo. (4) Oprima el botón ZOOM para ajustar el tamaño de la pantalla. (5) Oprima el botón FOCUS para ajustar el enfoque. (6) Asegúrese de que el Puerto externo de video de su computadora portátil esté activado.* * Su computadora puede usar una combinación de teclas diferente. Verifique la guía del usuario de su computadora para más información. Busque información adicional, incluso la localización y resolución de fallas e información del contacto, en el lado inverso. ZOOM 00Quick Guide 01.7.16 4:22 PM ページ 2 4. Power OFF Troubleshooting (1) Press the STANDBY/ON button for approximately 2 seconds. → POWER indicator blinks. (2) Wait approximately 30 seconds for the fan to stop. → lights orange. (3) Set the Power Switch to “ O ”. → POWER Indicator is turned to orange. (4) Attach the Lens cap. If a problem occurs with the equipment, first refer to the “TROUBLESHOOTING” section of the User’s Guide and run through the suggested checks. If this does not resolve the problem contact InFocus. Safety Instructions Please read “SAFETY INSTRUCTIONS” and “User's Guide” thoroughly to ensure correct usage through understanding. InFocus Corporation: 27700B SW Parkway Avenue Wilsonville, Oregon 97070-9215 Phone: 503-685-8888 * 1-800-294-6400 Fax: 503-685-8887 In Europe: Olympia l * NL-1213 NS Hilversum, The Netherlands Phone: (31)35 6474000 Fax: (31) 35 6423999 Freephone: 008000 4636287 (008000 INFOCOS) In Asia: 238A Thomson Road #18-01/04 Novena Square Singapore 307684 Telephone: (65)334-9005 Fax: (65)334-4525 4. Desconexión Localización y Solución de Problemas (1) Oprima el botón STANDBY/ON durante aproximadamente dos segundos. → El indicador POWER parpadea. (2) Espere aproximadamente 30 segundos por el entusiasta detener. → enciende en naranja. (3) Ajuste el interruptor de alimentación a “o”. → El color del indicador POWER cambia a naranja. (4) Coloque la tapa del objetivo. Cuando tenga algún problema con el equipo, primero consulte la sección “LOCALIZACIÓN Y SOLICIÓN DE PROBLEMAS” de manual de usuario y realice las inspecciones recomendadas. Si no consigue resolver el problema, póngase en contacto con InFocus. Instrucciones de Seuridad Para poder utilizar este producto de manera correxta, por favor lea “INSTRUCCIONES DE SEURIDAD” en “MANUAL DE USUARIO”. InFocus Corporation: 27700B SW Parkway Avenue Wilsonville, Oregon 97070-9215 Phone: 503-685-8888 * 1-800-294-6400 Fax: 503-685-8887 In Europe: Olympia l * NL-1213 NS Hilversum, The Netherlands Phone: (31)35 6474000 Fax: (31) 35 6423999 Freephone: 008000 4636287 (008000 INFOCOS) In Asia: 238A Thomson Road #18-01/04 Novena Square Singapore 307684 Telephone: (65)334-9005 Fax: (65)334-4525 QR50281-
 1
1
-
 2
2


