
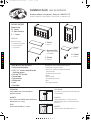
PREPARATION
Select hardware that is best suited for the
applicable wall type.
CONCRETE
Drill ¼" holes, insert #10 wall anchors and secure to
wall with #10 x 2-½" screws.
STUDS
Secure to wall with #10 x 2-½" screws.
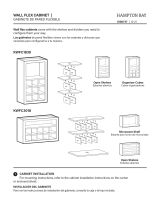
PACKAGE CONTENTS
Hardware bag:
32 - Dowels
12 - Metal shelf pins
2 - 1" screws
CONTENIDO
Bolsa de ferretería
32 - Clavijas para división
12 - Pines metálicos
2 - Tornillos de 1"
TOOLS NEEDED (NOT INCLUDED)
• Phillips head screwdriver
• #10 x 2-½" washer-head cabinet box
installation screws
• Drill with 3⁄32" drill bits
• Straight edge
• Tape measure
• Marking tool
• Level
• Stud finder
HERRAMIENTAS NECESARIAS (NO INCLUIDAS)
• Desarmador con punta Phillips
• # 10 x 2-½" tornillos con cabeza de rondana
para instalación
• Taladro con brocas de 3⁄32"
• Regla
• Cinta de medir
• Herramienta para marcar
• Nível
• Buscador de barrotes
PREPARACIÓN
Seleccione la herramienta más adecuada para
el tipo de pared.
CONCRETO
Taladre orificios de ¼", inserte anclas de
expansión #10 y fijela a la pared con tornillos
#10 x 2-½".
BARROTES
Fijelo a la pared con tornillos #10 x 2-½".
Installation Guide Guía de instalación
Questions, problems, missing parts? Please call 1-800-235-7747
Preguntas, problemas, partes faltantes? Favor de llamar al 1-800-235-7747
3 - Shelves
3 - Repisas
6 - Dividers
6 - Divisores
2 - Shelves
2 - Repisas
1 - Microwave Shelf
1 - Repisa para horno de
microondas
8 - Dividers
8 - Divisores
C
M
Y
CM
MY
CY
CMY
K
553402 Hampton Bay flex install.pdf 1 2/28/18 12:47 PM

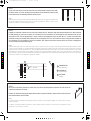
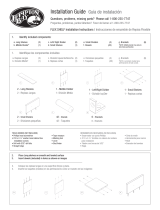
STEP 1
Using a wall stud, locate at least one wall stud at the desired height and mark the location.
For better results, use a level to keep bracket locations lined up horizontally. Mark and drill
two locations where the mounting hardware will be placed.
PASO 1
Ubique al menos un soporte de pared a la altura deseada y marque la ubicación. Para mejores resultados, utilize
un nivel de burbuja para nivelar la ubicación de los soportes horizontalmente. Marque y perfore las dos
ubicaciónes en donde se colocarán las placas de montaje
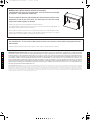
STEP 3
Shelf can be installed by inserting (4) metal shelf pins into the pre-drilled holes located on the side wall of the
cabinet and setting the self on top.
Dividers are installed by inserting (2) dowels into the holes on top side of dividers. Select divider location and insert
with attached dowels into shelf holes.
PASO 3
Las repisas pueden ser instaladas insertando (4) pines metálicos ubicados en la parte lateral del gabinete y colocando la repisa en la parte
superior de los pines.
Los divisores se instalan insertando las clavijas en los orificios del lado superior de los divisores. Selecciona la locación del divisor e inserta
los divisores en los orificios de los estantes
STEP 2
Hanging rail installation. Position the base of the wall hanging rail 63⁄8" below the upper most marked horizontal line. When installing
the wall hanging rail, make sure the angle cut is facing the wall (see illustration). Pre-drill through the wall hanging rail into the wall
studs with the 3⁄32" drill bit approximately 2" deep. Screw the wall hanging rail to the wall with 10x 2-½" washer head cabinet box
installation screws (not included) while making sure the wall hanging rail is level. Shim where necessary to keep the wall hanging rail
level and plumb. The wall hanging rail assists in installation. Each cabinet itself must be screwed to the wall. Ensure all hanging rails
are level to adjacent and previous hang rail.
PASO 2
Instalación del riel para colgar. Coloca la base del riel para colgar en la pared a 16.19 cm por debajo de la línea horizontal marcada más alta. Al instalar el riel para
colgar en la pared, asegurando el corte angular mirando hacia la pared (ver imagen). Pre-taladra, a través del riel para colgar en pared, hacia dentro de los barrotes
de pared con una broca de 3⁄32 plg hasta unos 5.1 cm de profundidad. Atornilla a la pared el riel para colgar con los tornillos (no incluidos) de 10 x 2-½ plg y cabeza
de arandela que se usan para instalar cajas de gabinete, asegurando que el riel quede nivelado. Usa cuñas donde sea necesario para mantener el riel nivelado y a
plomo. El riel para colgar en pared sirve de ayuda durante la instalación. Cada gabinete tiene que atornillarse a la pared. Asegúrate de que todos los rieles para colgar
estén al mismo nivel de los rieles adyacentes y previamente colgados.
wall - pared
3
2
1
2
3
1
horizontal line
línea horizontal
hanging rail
riel para colgar
wall studs
barrotes
6
3
⁄
8
" 16.19cm
C
M
Y
CM
MY
CY
CMY
K
553402 Hampton Bay flex install.pdf 2 2/28/18 12:47 PM

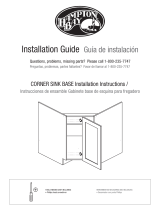
MICORWAVE SHELF INSTALLATION (For Horizontal Flex Cabinet Only)
If using Horizontal Flex cabinet as a microwave holder, secure the microwave shelf (included)
by using two 1" screws provided on hardware bag.
To install it, position the shelf back edge coincident with cabinet backing, then drill the screws
approximately 2" from the back of the cabinet . We recommend to use a drill with a Phillips
insert bit (not included) to perform this operation.
Instalación de repisa para microondas (Para Gabinete Horizontal solamente)
Si se utiliza el gabinete Horizontal para un microondas, asegure la repisa para microondas (incluida) utilizando los
dos tornillos de 25.4cm incluidos en la bolsa de ferretería.
Para su instalación, alinear el borde trasero de la repisa para microondas contra el fondo del gabinete, realice
perforaciones aproximadamente 5.08cm respecto el fondo del gabinete para insertar tornillos. Se recomienda
utilizar un taladro con una broca Phillips (no incluida) para realizar esta operación.
Limited lifetime warranty applicable to USA. The product has been manufactured by WoodCrafters Home Products, LLC 3700 Camino de Verdad, Weslaco, TX 78596 and is warranted
under normal use and service, to be free from defects in material and workmanship for as long as the original purchaser remains the owner. During this warranty period, WoodCrafters Home
Products, LLC will repair or replace at WoodCrafters Home Products, LLC sole option, free of charge. Proof of purchase, photo and the nature of the problem is required. Our warranty does
not cover damage or failure caused by abuse, misuse, abnormal usage, faulty installation, improper maintenance or any repair other than those by WoodCrafters Home Products, LLC. There
are no obligations or liabilities on the part of WoodCrafters Home Products, LLC for consequential damage or lost profits arising out of or in connection with the use or performance of the
product or any indirect damages included, but not limited to labor charges for installation or removal. This warranty gives you specific legal rights, and you may also have other rights that
may vary from jurisdiction to jurisdiction. Further information regarding this warranty may be obtained without charge by contacting WoodCrafters Home Products, LLC Customer Service. If
any parts are missing or damaged, please call WoodCrafters Home Products, LLC Customer Service at (800) 235 - 7747, between 8 a.m. and 5 p.m. C.S.T. A 1 year limited warranty covers
all the items purchased under the Easthaven Unfinished Collection.
Garantía limitada aplicable a E.U.A. El producto ha sido fabricado por WoodCrafters Home Products, LLC y tiene garantía, bajo uso y servicio normales, lo que garantiza al producto por defectos de materiales y
fabricación. Durante este periodo, WoodCrafters Home Products, LLC reparará o reemplazará, bajo su propio costo. Favor de incluir el recibo original de compra, que indique la fecha de compra y la causa del problema.
Nuestra garantía no cubre daños por el uso inapropiado o abuso que se le dé al producto, así como ningún cargo de instalación. Esta garantía tiene específicos derechos legales, así como los derechos que lleguen a
cambiar de estado a estado. Si faltara alguna parte o estuviera dañada, favor de llamar al Centro de Atención al Cliente, al número de teléfono sin costo, dentro de los Estado Unidos de América, (800) 235-7747, en
el horario de 8:00 a.m. a 5:00 p.m. tiempo del Centro. Para mayor información relacionada a esta garantía, favor de comunicarse al Centro de Atención al Cliente. Además, cubre 1 año de garantía limitada sobre todos
los artículos adquiridos en virtud de la colección “Easthaven Unfinished Collection”.
Care and maintenance. To clean surface of doors, drawers or cabinet, use non-abrasive cleaners and/or cleaning agents that do not
contain solvents.
Cuidado y limpieza. Para limpiar la superficie de las puertas, cajones o gabinete. No utilize limpiadores abrasivos.
2"
C
M
Y
CM
MY
CY
CMY
K
553402 Hampton Bay flex install.pdf 3 2/28/18 12:47 PM

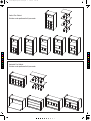
Vertical Flex Cabinet
Dividers can be positioned to fit your needs
Horizontal Flex Cabinet
Dividers can be positioned to fit your needs
February 2018 | 553402
C
M
Y
CM
MY
CY
CMY
K
553402 Hampton Bay flex install.pdf 4 2/28/18 12:47 PM
-
 1
1
-
 2
2
-
 3
3
-
 4
4


Hampton Bay CM1830X-DK Instrucciones de operación
- Tipo
- Instrucciones de operación
- Este manual también es adecuado para
en otros idiomas
Artículos relacionados
-
 Hampton Bay KWFC1830 Guía de instalación
-
 Hampton Bay CM4813H-DK Instrucciones de operación
-
Hampton Bay BT3396V-RC Instrucciones de operación
-
Hampton Bay BT9704T-WH Guía de instalación
-
 Hampton Bay CA2835C-KG Guía de instalación
-
-
Hampton Bay CM2435B-DK Guía de instalación
-
Unbranded CM1835D-DK Guía de instalación


