Black Max BMA1FLH El manual del propietario
- Tipo
- El manual del propietario

FIXED LINE
TRIMMER HEAD
BMA1FLH
WARNING:
To reduce the risk of injury, user must read and understand
the operator’s manual for their string trimmer before using this
accessory. Always wear eye protection with side shields marked
to comply with Z87.1 along with hearing protection. Ensure
compatibility and proper fit before using this accessory. Stop the
string trimmer and remove the power cord (electric products),
remove the battery pack (cordless products) or remove the spark
plug wire (gas products) before changing or adjusting accessories.
WARNING:
Do not use this accessory if a part is damaged or missing. If you
are not comfortable performing any of the functions described in
these instructions, take your unit to an authorized service center.
Use of a trimmer head that has been improperly assembled could
cause the trimmer head to come apart and/or detach from your
trimmer and result in serious personal injury and/or property
damage.
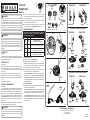
PACKING LIST
See Figure 1.
Trimmer Head, Silver Nut (M8), Black Nut (M8), Red Knob, Black
Knob, Pre-Cut pieces of 0.095 in. Line (9), Locking Pin, Adaptor, and
Operator’s Manual (not shown)
INSTALLING LINE
See Figures 2 - 3.
The trimmer head comes with 9 pieces of pre-cut of .095 in. trimmer
line. Look for replacement line where you purchased this product.
Use original manufacturer’s .095 in. replacement line for best
performance.
Hold the trimmer head upside down with the posts facing up.
Fold a piece of pre-cut line in half so each half is 6.5 in. long.
Insert the ends of the line through the eyelets in the post and pull
tight.
Repeat with remaining posts.
INSTALLING TRIMMER HEAD
See Figures 4 - 7.
This fixed line trimmer head installs differently on different string
trimmer attachments. Assembly instructions will vary based on
the style and type of attachment you have. See figures 4 and 5 to
determine if you have a curved shaft or straight shaft attachment
and if your attachment comes with or without an arbor. Refer to
the Installation Chart to determine the appropriate items for your
attachment. Be sure to follow the instructions for your attachment
style and type.
NOTE: If you cannot identify the style and type of attachment you
have, contact customer service for assistance.
WARNING:
Failure to use the correct adaptor, nut, and/or knob combination
for your trimmer could cause the string head to detach from your
trimmer and result in serious personal injury and/or property
damage.
Fig. 1
Fig. 2
Fig. 3
LOCKING
PIN
TRIMMER
HEAD
ADAPTOR
LINE
BLACK
KNOB
BLACK
NUT
SILVER
NUT
RED
KNOB
Fig. 4
STRAIGHT
SHAFT
CURVED
SHAFT
POST
LINE
EYELET
EYELET
CURVED SHAFT
CURVED SHAFT
INSTALLATION FOR MODELS WITH ARBORS
INSTALLATION FOR MODELS WITHOUT ARBORS
STRAIGHT SHAFT
STRAIGHT SHAFT
ARBOR
ARBOR
ADAPTOR
ADAPTOR
TRIMMER
HEAD
TRIMMER
HEAD
TRIMMER
HEAD
TRIMMER
HEAD
Fig. 5
Fig. 6
Fig. 7
CURVED SHAFTS STRAIGHT SHAFTS
ARBOR
ARBOR
LOCKING
PIN
BLACK
KNOB
RED
KNOB
BLACK
NUT
SILVER
NUT
Stop the unit and remove the power cord (electric products),
remove the battery pack (cordless products) or remove the spark
plug wire (gas products).
Following the instructions in the operator’s manual for your string
trimmer, remove the old trimmer head.
Locate the items required to install the trimmer head to your
attachment. Refer to the Installation Chart for details.
INSTALLATION CHART
If the trimmer head does not fit with any of the adaptors
or hardware supplied, contact Customer Service at
1-800-726-5760 for assistance.
Style Type Items Needed for Installation
Curved
Shaft
With
Arbor
Adaptor, Black Knob
and Trimmer Head Assembly
Curved
Shaft
Without
Arbor
Silver Nut and Trimmer Head Assembly
Straight
Shaft
With
Arbor
Adaptor, Red Knob
and Trimmer Head Assembly
Straight
Shaft
Without
Arbor
Black Nut, Locking Pin,
and Trimmer Head Assembly
For models with arbors:
Install line as described in Installing Line.
Install the adaptor onto the trimmer head.
NOTE: When installing, align the keys located on the underside
of the adaptor with the corresponding holes in the trimmer head.
Slide the adaptor and trimmer head onto the arbor.
Secure the trimmer head in place by pressing it down firmly and
installing the knob into the opening in the arbor.
For curved shaft models, install the black knob and turn clockwise.
Make sure knob is fully seated into arbor. Do not overtighten.
For straight shaft models, install the red knob and turn
counterclockwise. Make sure knob is fully screwed into arbor.
Do not overtighten.
For models without arbors:
Insert nut (M8) into the hex pocket in the trimmer head, then twist
trimmer head onto the attachment.
For curved shaft models, insert silver nut and turn trimmer head
clockwise to secure. If necessary, use a wrench (not provided) to
hold the flange washer while tightening the trimmer head.
For straight shaft models, insert black nut and turn trimmer
head counterclockwise to secure. If necessary, use a wrench (not
provided) or locking pin to hold the flange washer while tightening
the trimmer head.
Hart Consumer Products, Inc.
P.O. Box 1348, Anderson, SC 29622 USA
1-800-726-5760
www.blackmaxtools.com
998000026
9-13-19 (REV:01)

ADVERTENCIA:
Para reducir el riesgo de lesiones, el usuario debe leer y
comprender el manual del operador de la recortadora de hilo
antes de usar este accesorio. Siempre póngase protección ocular
con la marca de cumplimiento de la norma ANSI Z87.1 junto con
protección auditiva. Asegúrese de que sea compatible con el
producto antes de utilizar este accesorio. Apague la recortadora
de hilo y quite el cable de alimentación (productos eléctricos),
quite el paquete de baterías (productos inalámbricos) o quite el
cable de bujía (productos a gasolina) antes de cambiar o ajustar
los accesorios.
ADVERTENCIA:
No utilice este accesorio si tiene una pieza dañada o faltante.
Si no se siente preparado para realizar alguna de las funciones
que se describen en estas instrucciones, lleve la unidad a un
centro de servicio autorizado. Si usa un cabezal de recortadora
ensamblado de forma inapropiada, este podría desconectarse
de la recortadora y causar lesiones personales o daños en la
propiedad severos.
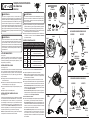
LISTA DE EMPAQUETADO
Vea la figura 1.
Cabezal de la recortadora, tuerca plata (M8), tuerca negro (M8),
perilla rojo, perilla negro, trozos de línea de 2,41 mm (0,095 in)
cortados previamente (9), pasador de fijación, adaptador, y manual
del operador (no se muestran)
INSTALACIÓN DE LA LÍNEA
Vea las figuras 2 y 3.
El cabezal de recortadora viene con 9 trozos de línea para recortadora
de 2,41 mm (0,095 in) cortados previamente. Puede conseguir línea
de repuesto donde compró el producto. Use línea de repuesto
original del fabricante de 2,41 mm (0,095 pulg.) para obtener el
mejor rendimiento.
Sostenga el cabezal de recortadora boca abajo con los postes
mirando hacia arriba.
Doble un trozo de línea cortada previamente a la mitad para que
cada mitad tenga 16,5 cm (6,5 pulg.) largo.
Inserte los extremos de la línea por los ojillos del poste y tire con
firmeza.
Repita este paso con los demás postes.
INSTALACIÓN DEL CABEZAL DEL HILO
Vea las figuras 4 a 7.
El cabezal de recortadora de línea fija se instala de forma distinta
en conexiones de recortadoras de hilo diferentes. Las instrucciones
de ensamblaje varían en función del estilo y el tipo de conexión
que usted tenga. Consulte las figuras 4 y 5 para determinar si tiene
una conexión de eje curvo o recto, y si la conexión viene o no con
un árbol. Consulte el Gráfico de instalación para determinar los
elementos apropiados para su conexión. Asegúrese de seguir las
instrucciones para el estilo y tipo de conexión que tenga.
NOTA: Si no puede identificar el estilo y tipo de conexión que tiene,
comuníquese con el Servicio de atención al cliente.
ADAPTADOR
PERILLA
NEGRO
PERILLA
ROJO
POSTE
LÍNEA
Fig. 1
Fig. 2
Fig. 3
Fig. 4
EJE
RECTO
EJE
CURVO
CABEZAL DE LA
RECORTADORA
LÍNEA
OJILLOS
OJILLOS
TUERCA
NEGRO
TUERCA
PLATA
PASADOR
DE FIJACIÓN
CABEZAL DE RECORTADORA
DE LÍNEA FIJA
BMA1FLH
ADAPTATEUR
ADAPTATEUR
EJE CURVO
EJE RECTO
Fig. 5
Fig. 6
Fig. 7
ÁRBOL
ÁRBOL
ÁRBOL
ÁRBOL
CABEZAL DE LA
RECORTADORA
CABEZAL DE LA
RECORTADORA
PASADOR
DE FIJACIÓN
EJE CURVO
EJE CURVO
INSTALACIÓN EN MODELOS CON ÁRBOLES
INSTALACIÓN EN MODELOS SIN ÁRBOLES
EJE RECTO
EJE RECTO
PERILLA
NEGRO
PERILLA
ROJO
TUERCA
NEGRO
TUERCA
PLATA
ADVERTENCIA:
Si no se utiliza la combinación correcta de adaptador, tuerca, y/o
perilla con la recortadora, el cabezal del hilo se puede separar
de la recortadora y puede provocar lesiones personales graves
y daños a la propiedad.
Apague la recortadora de hilo y quite el cable de alimentación
(productos eléctricos), quite el paquete de baterías (productos
inalámbricos) o quite el cable de bujía (productos a gasolina).
Para extraer el cabezal del hilo viejo, siga las instrucciones del
manual del operador de la recortadora de hilo.
Busque los elementos requeridos para instalar el cabezal de la
recortadora a la conexión. Consulte el Gráfico de instalación
para obtener detalles.
GRÁFICO DE INSTALACIÓN
Si el cabezal de la recortadora no encaja con ninguno de los
adaptadores o las herramientas suministrados, comuníquese
con servicio al cliente al 1-800-726-5760 para recibir asistencia.
Estilo Tipo Elementos necesarios para la instalación
Eje
curvo
Con
árbol
Adaptateur, perilla negro
y cabezal de la recortadora
Eje
curvo
Sin
árbol
Tuerca plata y cabezal de la recortadora
Eje
recto
Con
árbol
Adaptateur, perilla rojo
y cabezal de la recortadora
Eje
recto
Sin
árbol
Tuerca negro, pasador de fijación,
y cabezal de la recortadora
Para los modelos con árboles:
Instale la línea como se indica en Instalación de la línea.
Instale el adaptador en la cabezal de la recortadora.
NOTA: Al realizar la instalación, alinee las muescas ubicadas en
la parte inferior del adaptador con los orificios correspondientes
en la cabezal de la recortadora.
Deslice el adaptador y cabezal de la recortadora en el árbol.
Coloque el cabezal de recortadora en su lugar presionando hacia
abajo con firmeza e instalando la perilla en la abertura del árbol.
En los modelos de eje curvo, coloque la perilla negra y gírela en
sentido horario. Asegúrese de que la perilla esté bien colocada
en el árbol. No apriete demasiado.
En los modelos de eje recto, coloque la perilla roja y gírela en
sentido antihorario. Asegúrese de que la perilla esté totalmente
atornillada en el árbol. No apriete demasiado.
Para los modelos sin árboles:
Inserte una arandela (M8) en el receptáculo hexagonal del cabezal
de recortadora y gire el cabezal para conectar el accesorio.
En los modelos de eje curvo, inserte la arandela plateada y gire
el cabezal de recortadora en sentido horario para ajustarlo. Si es
necesario, use una llave (no provista) para sostener la arandela
de brida al ajustar el cabezal de recortadora.
En los modelos de eje recto, inserte la tuerca negra y gire el
cabezal de recortadora en sentido antihorario para ajustarlo.
Si es necesario, use una llave (no provista) o un pasador de
bloqueo para sostener la arandela de brida al ajustar el cabezal
de recortadora.

-
 1
1
-
 2
2
-
 3
3


Black Max BMA1FLH El manual del propietario
- Tipo
- El manual del propietario
en otros idiomas
- English: Black Max BMA1FLH Owner's manual