Yamaha YT100 El manual del propietario
- Categoría
- Accesorios de guitarra
- Tipo
- El manual del propietario
El Yamaha YT100 es un afinador automático de guitarra y bajo con un micrófono incorporado y una pantalla LCD fácil de leer que facilita la afinación de su instrumento. Puede utilizarlo tanto para guitarras eléctricas como para bajos, y cuenta con una variedad de funciones para ayudarle a afinar con precisión. Puede utilizarlo para afinar su instrumento con rapidez y precisión, y también puede utilizarlo para comprobar la afinación de su instrumento durante una actuación o grabación. Con su diseño compacto y ligero, el Yamaha YT100 es el afinador perfecto para músicos de todos los niveles.
El Yamaha YT100 es un afinador automático de guitarra y bajo con un micrófono incorporado y una pantalla LCD fácil de leer que facilita la afinación de su instrumento. Puede utilizarlo tanto para guitarras eléctricas como para bajos, y cuenta con una variedad de funciones para ayudarle a afinar con precisión. Puede utilizarlo para afinar su instrumento con rapidez y precisión, y también puede utilizarlo para comprobar la afinación de su instrumento durante una actuación o grabación. Con su diseño compacto y ligero, el Yamaha YT100 es el afinador perfecto para músicos de todos los niveles.

Transcripción de documentos
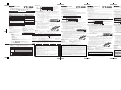
■ 各部の名称 YT-100 GUITAR/BASS AUTO TUNER 取扱説明書 e 内蔵 このたびはヤマハ・ギター/ベースオートチューナー YT-100 をお買い求めいただき、 まことにありがとうございます。 お使いになる前に、この取扱説明書をよくお読みになり、正しくご使用ください。 また、お読みになった後は、保証書と共に大切に保管してください。 マイクロホン 火災・感電・人身傷害の危険を防止するには 3. アコースティックギターをチューニングする場合は、ギターのサウンドホールに内蔵マイク ロホンeをできるだけ近付けます。 この表示を無視して誤った取扱 いをすると、人が障害を負ったり、 財産が損害を受ける危険の恐れ がある内容を示しています。 4. チューニングしたい弦を弾きます (単音で鳴らします) 。 ・ まず、弾いた弦の弦名のピッチインジケーターqが点灯するように、おおまかにチューニングします。 ・ 次に、チューニングガイドwの緑のランプが点灯するように細かくチューニングしたら完了です。 チューニングガイドwの のランプが点滅する場合は楽器のチューニングを上げ、 のランプ この機器は、 正常な通気が妨げられること のない所に設定して、使用してください。 使用後の電池は火中に捨てないでくださ い。発熱、破裂、発火の原因となります。 一般のゴミとは分けて、 決められた場所に 捨てましょう。 修理/部品の交換などで、取扱説明書に書かれている以外のことは、絶対 にしないでください。必ずサービスセンターに相談してください。 次のような場所での使用や保存はしないでください。 火災、 感電の原 因となります。 ・ 温度が極端に高い場所 (直射日光の当たる場所、 暖房機器の近く、 発熱する機器の上など) ・ 水気の近く (風呂場、洗面台、濡れた床など)や湿度の高い場所 ・ ホコリの多い場所や振動の多い場所 ※ 特に自動車内は直射日光などにより非常に高温となります。 この 機器を車内に放置しないでください。 このLEDが点灯したらチューニング完了 2. 1.5V単4形(R03/LR03)乾電池×2個を電池室にセットしてください。 ※ 電池の交換は、必ず電源/モードスイッチrをOFFにしてから行ってください。 ※ 電池の極性(+, −)を間違えないように注意してください。電池の極性を間違えてセットすると チューナー本体が壊れることがあります。 ■ ご使用になる前に ◆使用する場所 ◆お手入れ 故障の原因となりますので、 次のような場所でご使用にならない でください。 ・ 直射日光の当たる場所 ・ 温度や湿度が非常に高い場所や低い場所 ・ 砂やホコリの多い場所 外装のお手入れの際は、必ず柔らかい布で乾拭きしてくださ い。ベンジンやシンナー系の液体、強燃性のポリッシャーな どは絶対にご使用にならないでください。 ・ YT-100は、1.5V単4形(R03/LR03)乾電池×2個で作動します。 ・ ご使用にならない時は、必ず電源スイッチをOFFにしておいて ください。また、電池の液漏れを防ぐため、長時間ご使用になら ない場合は、電池を取り出しておいてください。 ・ 電池が切れたままで長時間放置しますと、電池の液漏れなど、故 障の原因となります。お早めに電池交換してください。 電池が消耗してくると、誤動作する場合がありま す。お早めに新しい電池( 1 . 5 V 単4 形( R 0 3 / L R 0 3 ) 乾電池×2 個) と交換してください。 また、電池が切れたままで長時間放置すると、電池 の液もれなど、故障の原因となりますのでご注意く ださい。 ◆保証書の手続き 製品をお買上げいただいた日より1年間は保証期間となり、 修理料金は無償とさせていただきます。 ただし、 保証書に販売 店印、 購入年月日の記入がない場合は、 保証期間中でもサービ スが有償となることがあります。 必ずお求めになった販売店 で保証書の手続きを行なった後、 大切に保管してください。 ◆取扱説明書は大切に この取扱説明書をお読みになった後は、大切に保管してください。 ◆取り扱いはやさしく ご使用済みの電池は、火の中に入れないでください。 また、電池は幼児の手の届かない所に保管してください。 スイッチや本体に無理に力を加えたり、 本体を落としたりします と、 故障の原因となります。ご注意ください。 1.5V単4形 (R03/LR03) 乾電池×2個 電池カバー 裏面 入力 :入力端子(6φモノラル) 、内蔵マイクロホン 電源 :1.5V単4形(R03/LR03)乾電池×2個 外形寸法:97(W) ×50(H) ×18(D)mm ※ 仕様および外観は、改良のため予告なく変更することがあります。 ヤマハ電気音響製品サービス拠点 (修理受付および修理品お持込み窓口) ◆ 修理のご依頼 / 修理についてのご相談窓口 ヤマハ電気音響製品修理受付センター 保証書は、販売店にて 「販売店印、お買い上げ年月日」 の押印、 記入をしてお渡し致しますので、 お買い 上げの際にご確認の上、 大切に保管ください。 ●保証期間 ナビダイヤル (全国共通番号) 受付時間 0570-012-808 月曜日〜金曜日 9:00 〜 19:00 * 一般電話・公衆電話からは、市内通話料金でご利用いただけます。 土曜日 9:00 〜 17:30 (祝祭日および弊社休業日を除く) FAX (053)463-1127 受付時間 月曜日〜金曜日 9:00 〜 17:45(祝祭日および弊社休業日を除く) ◆ 修理品お持込み窓口 * お電話は、電気音響製品修理受付センターでお受けします。 お買い上げ日から1年間です。 ●保証期間中の修理 保証書記載内容に基づいて修理いたします。 詳しくは保証書をご覧ください。 ●保証期間経過後の修理について 修理可能な部分は、ご要望により有料にて修理させて頂きます。 但し、修理料金の金額や補修部品の 保有期間の都合により、 相当品の代替購入をおすすめする場合もございます。 北海道サービスステーション 首都圏サービスセンター 浜松サービスステーション 名古屋サービスセンター 大阪サービスセンター 九州サービスステーション 〒064-8543 〒143-0006 〒435-0016 〒454-0058 〒564-0052 〒812-8508 札幌市中央区南10条西1丁目1-50 ヤマハセンター内 東京都大田区平和島2丁目1-1 景浜トラックターミナル内14号棟A-5F 浜松市東区和田町200 ヤマハ(株)和田工場内 名古屋市中川区玉川町 2丁目1-2 ヤマハ(株)名古屋倉庫3F 吹田市広芝町10-28 オーク江坂ビルディング2F 福岡市博多区博多駅前 2丁目11-4 FAX (011) 512-6109 FAX (03) 5762-2125 FAX (053) 462-9244 FAX (052) 652-0043 FAX (06) 6330-5535 FAX (092) 472-2134 ヤマハ株式会社各事業部/営業所(商品に関する問い合わせ先) 管弦打楽器事業部 GDマーケティング部 〒430-8650 管弦打楽器事業部 GDマーケティング部 営業課 LM東日本営業所 LM名古屋営業所 LM西日本営業所 〒438-0192 静岡県磐田市松之木島203 静岡県磐田市松之木島203 〒108-8568 東京都港区高輪 2-17-11 〒460-8588 名古屋市中区錦 1-18-28 〒542-0081 大阪市中央区南船場 3-12-9 心斎橋プラザビル東館 TEL (03) 5488-5471 TEL (052) 201-5199 TEL (06) 6252-5231 ※名称、住所、電話番号などは変更になる場合があります。 The tuner will automatically select the closest note name (string name) to the pitch of the plucked string. 1. For electric guitars/basses, connect the guitar cable to the Input jack t. * The built-in microphone e will not operate when a cable is plugged into the Input jack t. 2. Slide the Power/Mode switch r to select the type of instrument (GUITAR or BASS) you want to tune. (The center green LED of Tuning guide w will flash.) 3. To tune an acoustic guitar, place the tuner’s built-in microphone e as close as possible to the guitar’s sound hole. 4. Pluck the string you want to tune. (Do not pluck more than one string at a time.) • First, adjust the string so that the appropriate string name pitch indicator q lights. • Next, fine-tune the string until the tuning guide’s w green lamp lights. When the lamp on the tuning guide flashes, tighten the string to raise its pitch. When the lamp flashes, loosen the string to lower its pitch. ■ INSTALL/REPLACE THE BATTERY 1. Press down on the battery cover (located on the back of the tuner) and slide it in the direction of the arrow. 2. Install two AAA (R03/LR03) batteries in the battery compartment, making sure that the batteries are correctly aligned so that their polarity settings match the markings on the battery compartment. * Always slide the Power/Mode switch r to “OFF” before changing the battery. * Make sure that the batteries are aligned so that their polarity markings (+, –) match those on the battery compartment. Incorrect installation may result in breakdown of the unit. 3. Slide the battery cover back into place. batteries may result in irregular operation of the device. Please exchange worn batteries with new ones (two AAA (R03/ LR03)) as soon as possible. Do not leave a depleted battery in the tuner for an extended period of time as damage to the tuner caused by leaking batteries, etc may result. Bottom side Standard Pitch Input Power Source Dimensions (W x H x D) Battery cover : Pitch indicator, Tuning guides : GUITAR 7B, 6E, 5A, 4D, 3G, 2B, 1E BASS LB, 4E, 3A, 2D, 1G, HC : A4=440Hz (fixed) : Input jack (6 monaural), Built-in microphone : Two AAA (R03/LR03) batteries : 97 x 50 x 18 mm (3.8" x 2.0" x 0.71") 保証書 持込修理 ご販売店様へ ※印欄は必ずご記入してお渡しください。 FCC INFORMATION (U.S.A.) 無償修理規定 1. 正常な使用状態 (取扱説明書、本体貼り付けラベルなどの注意書に従った使用状態) で故障した場合には、 お買上げの販売店が無料修理を致します。 品名/品番 ギター/ベースオートチューナー/YT-100 2. 保証期間内に故障して無料修理をお受けになる場合は、お買上げの販売店に商品と本書をご持参のうえご 依頼ください。 保 証 期 間 本体:お買上げの日から1ヶ年間 ※お買上げ日 年 3. ご贈答品、 ご転居後の修理についてお買上げ販売店にご依頼できない場合には、最寄りのヤマハ電気音響 製品アフターサービス拠点にお問い合わせください。 ご住所 お 客 様 店 名 住 所 日 〒 お名前 電 ※ 月 様 話 ( ) 印 販 売 店 4. 保証期間内でも次の場合は有料となります。 (1) 本書のご提示がない場合。 (2) 本書にお買上げの年月日、お客様、お買上げの販売店の記入がない場合、及び本書の字句を書き替え られた場合。 (3) 使用上の誤り、他の機器から受けた障害または不当な修理や改造による故障及び損傷。 (4) お買上げ後の移動、輸送、落下などによる故障及び損傷。 (5) 火災、地震、風水害、落雷、その他の天災地変、公害、塩害、異常電圧などによる故障及び損傷。 (6) 消耗部品の交換。 (7) お客様のご要望により出張修理を行なう場合の出張料金。 5. この保証書は日本国内においてのみ有効です。 This warranty is valid only in Japan. 6. この保証書は再発行致しませんので大切に保管してください。 電 話 ( ) * この保証書にご記入いただきましたお客様のお名前、 ご住所などの情報は、本保証規定に基づく無料修理に 関する場合のみ使用いたします。 YT100̲9OM̲R4.pm Page 1 管弦打楽器事業部 GDマーケティング部 営業課 ※ この保証書は本書に示した期間、条件のもとにおいて無料修理をお約束するものです。 したがってこの保証 書によってお客様の法律上の権利を制限するものではありませんので、保証期間経過後の修理などについて ご不明の場合は、お買上げの販売店、ヤマハ電気音響製品アフターサービス拠点にお問い合わせください。 MANUAL DEL PROPIETARIO YT-100 intégré 1. IMPORTANT NOTICE: DO NOT MODIFY THIS UNIT! This product, when installed as indicated in the instructions contained in this manual, meets FCC requirements. Modifications not expressly approved by Yamaha may void your authority, granted by the FCC, to use the product. 2. IMPORTANT: When connecting this product to accessories and/or another product use only high quality shielded cables. Cable/s supplied with this product MUST be used. Follow all installation instructions. Failure to follow instructions could void your FCC authorization to use this product in the USA. 3. NOTE: This product has been tested and found to comply with the requirements listed in FCC Regulations, Part 15 for Class “B” digital devices. Compliance with these requirements provides a reasonable level of assurance that your use of this product in a residential environment will not result in harmful interference with other electronic devices. This equipment generates/uses radio frequencies and, if not installed and used according to the instructions found in the users manual, may cause interference harmful to the operation of other electronic devices. Compliance with FCC regulations does not guarantee that interference will not occur in all installations. If this product is found to be the source of interference, which can be determined by turning the unit “OFF” and “ON”, please try to eliminate the problem by using one of the following measures: Relocate either this product or the device that is being affected by the interference. Utilize power outlets that are on different branch (circuit breaker or fuse) circuits or install AC line filter/s. In the case of radio or TV interference, relocate/reorient the antenna. If the antenna lead-in is 300 ohm ribbon lead, change the lead-in to co-axial type cable. If these corrective measures do not produce satisfactory results, please contact the local retailer authorized to distribute this type of product. If you can not locate the appropriate, please contact Yamaha Corporation of America, Electronic Service Division, 6600 Orangethorpe Ave, Buena Park, CA 90620 The above statements apply ONLY to those products distributed by Yamaha Corporations of America or its subsidiaries. YT-100 Vielen Dank für den Kauf des elektronischen Gitarren/Baß-Stimmgeräts YT-100 von YAMAHA. Lesen Sie diese Anleitung bitte aufmerksam durch, und bewahren Sie sie dann zur späteren Bezugnahme gut auf. Gracias por comprar el YAMAHA YT-100 Afinador Automático de Guitarra y Bajo. Por favor lea este manual completamente y manténgalo en un lugar seguro para futuras consultas. ■ VORSICHTSMASSREGELN ■ PRECAUCIONES ◆ Verwenden Sie das Stimmgerät nicht an Orten, wo es den folgenden schädlichen Einflüssen ausgesetzt ist: • Direktes Sonnenlicht • Extreme Temperatur- und Luftfeuchtigkeitswerte • Sand und Staub ◆ Benutzen Sie nur zwei AAA-Batterien (R03/LR03) für den Dreher. ◆ Schalten Sie das Stimmgerät nach Gebrauch stets aus, um die Batterien zu schonen. ◆ Wenn verbrauchte Batterien längere Zeit im Gerät verbleiben, können sie auslaufen und Schäden verursachen. Wenn die Batterien schwächer werden, sollten Sie sie daher entnehmen und so bald wie möglich durch neue ersetzen. ◆ Schützen Sie das Stimmgerät vor starken Schlägen und Erschütterungen. Wenden Sie beim Betätigen der Bedienelemente nicht zu viel Kraft auf. ◆ Verwenden Sie zum Säubern des Stimmgeräts keine Lösungsmittel wie Benzin oder Verdünner. Entfernen Sie Staub und Schmutz mit einem weichen, trockenen Tuch. ◆ Bewahren Sie diese Anleitung nach dem Durchlesen gut auf. Achten Sie bitte auf korrekte Entsorgung verbrauchter Batterien. Batterien dürfen nicht verbrannt werden! Achten Sie bitte auch darauf, daß Batterien nicht in Kinderhände geraten. ◆ Para prevenir daños, no usar el afinador en las situaciones siguientes: • los lugares donde la unidad estará expuesto a la luz del sol directa de forma continuada; • los lugares sujetos a temperaturas y humedad extremas; • lugares que son arenosos o polvorientos. ◆ Use solamente dos baterías de AAA (R03/LR03) para alimentar al sintonizador. ◆ Para la máxima vida de la pila, asegúrese que el afinador se apaga cuando no se usa. ◆ Sí una pila gastada queda en la unidad por un periodo extendido de tiempo, puede dañar la unidad. Cuando las pilas se agotan, quítelas y reemplácelas lo más pronto posible. ◆ No someta el afinador a golpe físico fuerte o vibración. No use fuerza excesiva en cualquiera de los mandos. ◆ Nunca use disolventes como gasolina o aguarrás para limpiar el afinador. Límpielo con un paño suave y seco. ◆ Después de leer el manual, manténgalo en un lugar seguro para futuras consultas. Nunca tire las pilas usadas al fuego. También asegúrese de mantener las pilas lejos de los niños. ■ COMPONENTES w Einstellenführer r Puissance/commutateur de mode q Indicateur de l’adjustement du ton r Schalter für Strom/Modus q Tonfallindikator e Inputbuchse t Effort dynamique d’entrée w Guía del sintonizador r interruptor de Potencia/Modo q Indicador del tono e micrófono incorporado t Eingebautes Mikrofon t Enchufe de entrada ■ PROCÉDURES D’ACCORD Ce tuner sélectera automatiquement le nom de la note le plus proche (nom de la corde) pour l’adjustement du ton de la corde résonnée. ■ STIMMVORGANG Der Dreher wird den Namen der nächsten Melodie (Saitenname) zu dem Tonfall von der gezupften Saite automatisch wählen. 1. Pour les guitars électriques/basses, joindre le câble du guitar à l’effort dynamique d’entrée t. * Le microtéléphone intégré e ne marchera pas quand un câble est placé dans l’effort dynamique d’entrée t. 1. Für elektrische Gitarren/Bässe verbinden Sie das Gitarrekabel mit der Inputbuchse t. * Das eingebaute Mikrofon e wird nicht funktionieren, wenn ein Kabel in die Inputbuchse t eingesteckt wird. 2. Mettre en fonction la puissance/commutateur de mode r pour sélecter le type de l’instrument (GUITAR ou BASS) que vous voulez accorder. (Le centre vert LED de guide d’accorder w étincelera.) 3. Pour accorder un guitard acoustique, placer le microtéléphone intégré de l’utilisateur e le plus proche possible du trou du son. 4. Faire résonner la corde quelle vous voulez accorder. (Ne faire résonner pas plus d’une corde pour une fois.) • D’abord, accorder la corde donc l’indicateur de l’adjustement du ton q du nom approprié de la corde étincele. • Et puis, fin –accorder le guide d’accorder w de la corde utile la lampe verte étincele. Quand la lampe sur le guide d’accorder étincele, serrer la corde pour élever l’effort dynamique d’entrée, Quand la lampe étincele, lâcher la corde pour baisser l’effort dynamique d’entrée. 2. Schieben Sie den Schalter für Strom/Modus r, um den Typ vom Instrument (GUITAR oder BASS), das Sie einstellen möchte, zu wählen. (Das grüne zentrale LED vom Einstellensführer w wird blitzen.) 3. Um die akustische Gitarre einzustellen, stellen Sie das eingebaute Mikrofon vom dem Dreher e so nah wie möglich neben die Tonöffnung der Gitarre. 4. Zupfen Sie die Saite, die Sie einstellen möchte. (Zupfen Sie nicht mehr als eine Saite zur gleichen Zeit.) • Zuerst stellen Sie die Saite, so dass der Tonfallindikator q für den angemessenen Saiten Namen blitzt. • Dann stellen Sie die Saite ein bisschen ein, bis die grüne Lampe vom dem Einstellensführer w beleuchtet. Wenn die -Lampe auf dem Einstellensführer blitzt, spannen Sie die Saite, um ihren Tonfall zu erhöhen. Wenn die -Lampe blitzt, entspannen Sie die Saite, um ihren Tonfall zu senken. Beispiel) Die E-Saite bei einer Gitarre mit sechs Saiten einstellen. Exemple) Pour accorder la corde “E” sur un guitard de six cordes Der Saitename von der gezupften Saite beleuchtet. Le nom de la corde de la corde résonnée étincele. ■ SPECIFICATIONS Indicators Tuning Notes AFINADOR AUTOMATICO DE GUITARRA Y BAJO BEDIENUNGSANLEITUNG ■ BAUTEILE e Microtéléphone Two AAA (R03/LR03) As the batteries age, the indicator will dim. Using weak batteries * Specifications and external appearance are subject to change without notice. この度はヤマハ・ギター/ベースオートチューナーをお買上げ戴きましてありがとうございました。本書は、本書 記載内容で修理を行なう事をお約束するものです。お買上げの日から下記期間中に故障が発生した場合は、 本書をご提示の上お買上げの販売店に修理をご依頼ください。 (詳細は右項をご覧ください) ◆ Afin de ne pas endommager l’accordeur, évitez de l’utiliser dans des endroits répondant aux conditions suivantes : • plein soleil • humidité ou températures excessives. • sable ou poussière ◆ Il faut utiliser deux batteries de AAA (R03/LR03) afin de fournir la puissance pour ce tuner. ◆ Pour garantir une longévité maximale des piles, mettez toujours l’accordeur hors tension lorsque vous ne l’utilisez pas. ◆ Les piles épuisées qui restent dans l’accordeur pendant une longue période, peuvent fuir et provoquer des anomalies de fonctionnement. Lorsque les piles présentent des signes de décharge, remplacez-les dans le délai le plus bref. ◆ L’accordeur ne doit pas subir de chocs ni de vibrations importants. Ne le manipulez jamais avec une force excessive. ◆ N’utilisez jamais de solvants tels que de la benzine ou du diluant pour nettoyer l’accordeur. Essuyez-le avec un chiffon doux et sec. ◆ Après avoir lu ce mode d’emploi, conservez-le en lieu sûr pour vous y reporter ultérieurement. ELEKTRONISCHES GITARREN/BASS-STIMMGERÄT w Guide d’accorder The string name of the plucked string lights. 表示 :ピッチインジケーター、チューニングガイド 弦名 :ギター 7B, 6E, 5A, 4D, 3G, 2B, 1E ベース LB, 4E, 3A, 2D, 1G, HC 基準ピッチ : A4=440Hz(固定) ■ PRECAUTIONS ■ NOMENCLATURE example) To tune the “E” string on a six string guitar. ■ 仕様 YT-100 Ne jetez jamais les piles au feu et conservez-les toujours hors de portée des enfants. r Power/Mode switch q Pitch indicator When this LED lights, the string is tuned correctly. ■保証とアフターサービス ●保証書 w Tuning guide ■ TUNING PROCEDURES 1. 電池カバー(背面にあります)の矢印部を押してスライドすると、電池カバーがはずれます。 電池は幼児の手の届かない場所に保管し てください。 MODE D’EMPLOI t Input jack ■ 電池のセット/交換 3. 電池カバーを元の位置に戻してください。 ◆電池について ■ COMPONENTS 弾いた弦の弦名が点灯するように 本体を、 故意に投げたり落としたりしない でください。本体の故障だけでなく、思わ ぬけがの原因となることがあります。 ぐらついた台の上や傾いた所など、 不安定な場所に置かないでくだ さい。 また、 過度に積み重ねての使用はしないでください。 落ちたり 倒れたりして、けがの原因となります。 Never dispose of used batteries by burning them. Also make sure to keep batteries away from children. e Built-in microphone 例) ギターの6弦 (E) をチューニングする場合 電池は表示された極性 (+、 −)を間違えな いようにしてください。 間違えますと電池 の破裂や液もれによって、 けがや周囲を汚 損する原因となることがあります。 この機器に、 異物 (燃え易いもの、 硬貨、 針金など) や液体 (水やジュー スなど) を絶対に入れないでください。 火災、 感電の原因となります。 ◆ To prevent damage, do not use the tuner in the following locations: • places where the unit will be in direct sunlight; • places subject to temperature and humidity extremes; • places that are sandy or dusty. ◆ Use only two AAA (R03/LR03) batteries to power this tuner. ◆ For maximum battery life, always be sure the tuner is turned OFF when not in use. ◆ If an exhausted battery is left in the unit for an extended period of time, it may leak and cause malfunctioning of the unit. When the battery becomes exhausted, always remove it and replace it as soon as possible. ◆ Do not subject the tuner to strong physical shock or vibration. Do not use excessive force on any of the controls. ◆ Never use solvents such as benzene or thinner to clean the tuner. Wipe clean with a soft, dry cloth. ◆ After reading the owner's manual, keep it in a safe place for future reference. が点滅する場合は楽器のチューニングを下げます。 ACCORDEUR AUTOMATIQUE DE GUITARE/BASSE Nous vous remercions d’avoir porté votre choix sur l’accordeur automatique de guitare/basse YAMAHA YT-100. Nous vous prions de lire attentivement ce mode d’emploi et de le conserver en lieu sûr pour vous y reporter ultérieurement. ■ PRECAUTIONS 2. 電源/モードスイッチrをスライドさせてGUITARまたはBASSを選択します(チューニング ガイドwの真ん中の緑のランプが点滅します)。 禁止の行為を告げるものです。 注意 この機器を分解したり、 改造したりしないでください。 火災、感電の原因となります。 Thank you for purchasing the YAMAHA YT-100 Guitar/Bass Auto Tuner. Please read this manual thoroughly and keep it in a safe place for future reference. 1. エレキギター/エレキベースの場合は、入力端子tにギターからのコードを接続します。 ※ 入力端子tにプラグが接続されている時には、内蔵マイクロホンeは作動しません。 絵表示の意味をよく理解してから、本文をお読みください。 注意(危険・警告を含む)を促す内容があることを告げるものです。 この機器を使用する前に、以下の指示と取扱説明書をよく読んでく ださい。 q ピッチインジケーター 弾いた弦に一番近い音の音名 (弦名) と、その音に対して高いか低いかを自動的に表示します。 この 「安全へのこころがけ」 は製品を安全に正しくお使いいただき、お客様や他の人々への危 この表示を無視して誤った取扱いをすると、人が死亡又 は重傷を負う危険の恐れがある内容を示しています。 OWNER’S MANUAL ■ チューニングの方法 〜以下の指示を必ず守ってください〜 絵表示に 害や財産への損害を未然に防止するために、いろいろな絵表示を使って説明しています。 ついて 警告 GUITAR/BASS AUTO TUNER r 電源/モードスイッチ t 入力端子 安全へのこころがけ YT-100 w チューニングガイド Quand ce LED étincele, la corde est correctement accordée. ■ INSTALLATION OU REMPLACEMENT DE LA PILE 1. Ouvrir la couverture de la battrie (se trouver derrière du tuner) et placer la battrie dans le tuner d’après la direction de la flèche. 2. Installer deux battries de AAA (R03/LR03) dans le compartiment de batterie, s’assurer que les battries soient correctement alignées, donc leur arrangements de polarité accorde avec l’ inscription sur le compartiment de batterie. * Mettre toujours en fonction la puissance/ commutateur de mode r en “OFF” avant changer la batrrie. * Etre assuré que les battries sont alignées donc leur arrangements de polarité (+, –) accorde avec l’ inscription sur le compartiment de batterie. L’installation incorrecter produira une panne du tuner. 3. Glisser le dos de la couverture des piles dans la direction opposante. Quand la battrie devient ancienne, l’indicateur deux AAA devient faible. Utiliser la battrie faible cauera une (R03/LR03) batteries opération irrégulière du dispositif. Changer la battrie épuisée avec des battrie neuves Fond de (deux AAA (R03/LR03)) le plus rapidement possible. l’accordeur Ne pas laisser une battrie épuisée dans le tuner pendant une période prolongée, car cela peut produire des dommages pour le tuner. Couverture de la battrie Indicateurs Notes d’accord : Indicateur de l’adjustement du ton, Guides d’accorder : guitare 7B, 6E, 5A, 4D, 3G, 2B, 1E basse LB, 4E, 3A, 2D, 1G, HC Hauteur de son standard : A4=440Hz (fixe) Entrée : Effort dynamique d’entrée (6 monaural), Microtéléphone intégré Source d’alimentation : deux AAA (R03/LR03) batteries Dimensions (L x H x P) : 97 x 50 x 18 mm * Les spécifications et l’aspect externe peuvent être modifiés sans aucun avis. LE PRESENT APPAREIL NUMERIQUE N'EMET PAS DE BRUITS RADIOELECTRIQUES DEPASSANT LES LIMITES APPLICABLES AUX APPAREILS NUMERIQUES DE LA "CLASSE B" PRESCRITES DANS LE REGLEMENT SUR LE BROUILLAGE RADIOELECTRIQUE EDICTE PAR LE MINISTERE DES COMMUNICATIONS DU CANADA. THIS DIGITAL APPARATUS DOES NOT EXCEED THE “CLASS B” LIMITS FOR RADIO NOISE EMISSIONS FROM DIGITAL APPARATUS SET OUT IN THE RADIO INTERFERENCE REGULATION OF THE CANADIAN DEPARTMENT OF COMMUNICATIONS. 1. Drücken Sie den Deckel von der Batterie (am Rücken des Drehers gestellt) und verschieben Sie ihn in der Richtung vom Pfeil. 2. Installieren Sie zwei AAA-Batterien (R03/LR03) im Abschnitt für die Batterien. Vergewissern Sie sich, dass die Batterien richtig eingestellt werden, so dass ihre Polaritäten den Bemerkungen bei diesem Abschnitt entsprechen. * Schieben Sie den Schalter für Strom/Modus r immer zu “OFF”, bevor Sie die Batterie wechseln. * Vergewissern Sie sich, dass die Batterien eingestellt werden, so dass ihre Polaritäten (+, –) diesen Bemerkungen bei diesem Abschnitt entsprechen. Falsche Installation könnte zum Zusammenbruch dieser Einheit führen. 3. Schieben Sie den Batteriedeckel zurücken. Wenn die Batterien altert, wird der Indikator vage. Die Verwendung von gebrauchten Batterien könnte zur ungeregelten Operation von diesem Apparat führen. Ersetzen Sie die gebrauten Batterien durch die neuen (zwei AAA (R03 / LR03)) so schnell wie möglich. Lassen Sie keine gebrauchte Batterie in dem Dreher für eine lange Zeitperiode, weil das Lecken der Batterien z.B. den Dreher beschädigen könnte. Zwei AAA-Batterien (R03/LR03) Unterseite Deckel von der Batterie ■ TECHNISCHE DATEN : Tonfallindikator, Einstellenführer : E-Gitarre 7B, 6E, 5A, 4D, 3G, 2B, 1E Baß LB, 4E, 3A, 2D, 1G, HC Standardtonhohe : A4=440Hz (fest) Eingänge : Inputbuchse (6 monaural), eingebautes Mikrofon Power Source : Zwei AAA-Batterien (R03/LR03) Abmessungen (B x H x T) : 97 x 50 x 18 mm * Änderungen an Daten und Design vorbehalten. Bescheinigung des Importeurs Hiermit wird bescheinigt, daß der / die / das GUITAR/BASS AUTO TUNER Typ : YT-100 (Gerät, Typ, Bezeichnung) in Übereinstimmung mit den Bestimmungen der VERFÜGUNG 1046/84 (Amtsblattverfügung) funkentstört ist. Der Deutschen Bundespost wurde das Inverkehrbringen dieses Gerätes angezeigt und die Berechtigung zur Überprüfung der Serie auf Einhaltung der Bestimmungen eingeräumt. YAMAHA Europa GmbH Name des Importeurs Adobe PageMaker 6.5J/PPC El sintonizador seleccionará automáticamente el nombre de cuerda más cercano al tono de la cuerda arrancada. 1. Para guitarras/basses eléctricas, conecte el cable de la guitarra al enchufe de entrada t. * El micrófono incorporado e no va a funcionar cuando un cable se encuentra conectado al enchufe de entrada t. 2. Mueva el interruptor de Potencia/Modo r para seleccionar el tipo del instrumento (GUITAR o BASS) que intenta sintonizar. (El LED central de color verde del guía de sintonización w va a brillar.) 3. Para sintonizar una guitarra acústica, ponga el micrófono interno del sintonizador e tan cercano como sea posible al hueco de sonido de la guitarra. 4. Arranque la cuerda que intenta sintonizar. (No arranque más de una cuerda en una sola vez.) • Primero, ajuste la cuerda a fin de que se encienda el indicador de tono del nombre de la cuerda apropiada q. • Luego, sintonice bien la cuerda hasta que se encienda la luz verde del guéa de sintonización w. Cuando la luz en el guía de sintonización se haya encendido, atirante la cuerda para aumentar su tono. Cuando la luz de se haya encendido, relaje la cuerda para bajar su tono. Ejemplo) Sintonizar la cuerda “E” en una guitarra con seis cuerdas. ■ EINLEGEN/AUSWECHSELN DER BATTERIE Anzeigelampen Stimmnoten ■ FICHE TECHNIQUE 08.8.22, 6:23 PM Wenn dieses LED beleuchtet, wird die Saite richtig eingestellt. ■ PROCEDIMIENTOS DE AFINACIÓN El nombre de la cuerda arrancada se enciende. Cuando el LED se encienda, la cuerda ya es sintonizada correctamente. ■ INSTALACIÓN/REEMPLAZO DE LA PILA 1. Presione para abajo la tapa de la batería (se ubica en la espalda del sintonizador) y deslícela en la dirección que indica la flecha. 2. Instale dos baterías de AAA (R03/LR03) en el compartimiento de batería y asegúrese que las baterías se encuentren alineadas correctamente a fin de que sus polaridades correspondan a las marcas en el compartimiento de batería. * Siempre deslice el interruptor de Potencia/Modo r a “OFF” antes de cambiar de la batería. * Asegúrese que las baterías se encuentren alineadas correctamente a fin de que las marcas de su polaridad (+, –) correspondan a aquéllas en el compartimiento de batería. Una instalación Incorrecta puede resultar en una falla total de la unidad. Tapa de la batería 3. Deslice la tapa de batería hasta su posición inicial. Cuando las baterías están envejeciendo, el indicador se va oscureciendo. El uso de baterías impotentes puede resultar en irregular operación del dispositivo. Por favor, sustituya baterías consumidas por unas nuevas (dos AAA (R03/LR03)) tan pronto como sea posible. No deje una batería ya gastada en el sintonizador por un largo período de tiempo porque así puede resultar en daños producidos por escape de baterías u otras causas. Dos AAA (R03/LR03) baterías Lado inferior ■ ESPECIFICACIONES Indicadores Notas de afinación : indicador de tono, guías de sintonización : GUITARRA: 7B, 6E, 5A, 4D, 3G, 2B, 1E BAJO: LB, 4E, 3A, 2D, 1G, HC Tone estandar : A4=440Hz (fijo) Entradas : Enchufe de entrada (6 destinado a un solo oyente), Micrófono incorporado Alimentación : Dos AAA (R03/LR03) baterías Dimensiones (W x H x D) : 97 x 50 x 18 mm * Las especificaciones y la apariencia externa están sujetas a cambio sin previo aviso.-
 1
1

Yamaha YT100 El manual del propietario
- Categoría
- Accesorios de guitarra
- Tipo
- El manual del propietario
El Yamaha YT100 es un afinador automático de guitarra y bajo con un micrófono incorporado y una pantalla LCD fácil de leer que facilita la afinación de su instrumento. Puede utilizarlo tanto para guitarras eléctricas como para bajos, y cuenta con una variedad de funciones para ayudarle a afinar con precisión. Puede utilizarlo para afinar su instrumento con rapidez y precisión, y también puede utilizarlo para comprobar la afinación de su instrumento durante una actuación o grabación. Con su diseño compacto y ligero, el Yamaha YT100 es el afinador perfecto para músicos de todos los niveles.
en otros idiomas
- français: Yamaha YT100 Le manuel du propriétaire
- English: Yamaha YT100 Owner's manual
- Deutsch: Yamaha YT100 Bedienungsanleitung
- 日本語: Yamaha YT100 取扱説明書
Artículos relacionados
-
Yamaha YTC5 El manual del propietario
-
-
-
-
-
-
-