SilverStone FP58 El manual del propietario
- Categoría
- Carcasas HDD / SSD
- Tipo
- El manual del propietario
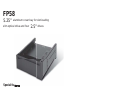
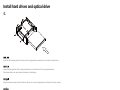
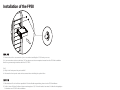
El SilverStone FP58 es una bahía para ordenador de 5,25" que permite instalar una unidad óptica de carga por ranura y cuatro unidades de 2,5". Está fabricado en aluminio de alta calidad y tiene un diseño discreto que combina con la mayoría de los ordenadores.
Además, el FP58 es compatible con la mayoría de las cajas de ordenador, lo que lo convierte en una opción versátil para ampliar el almacenamiento de tu equipo.


Transcripción de documentos
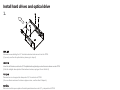
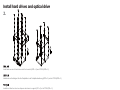
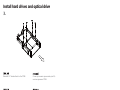
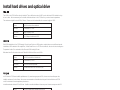
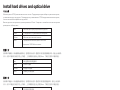
Install hard drives and optical drive 1. Unscrew screws holding the 2.5” hard drive bracket and remove from the FP58. (If you only use the slim optical drive, please go to step 4). Lösen Sie die Schrauben, welche die 2,5“-Festplattenhalterung befestigen und entfernen sie dieses aus dem FP58. (Falls Sie lediglich das optische Slim-Laufwerk nutzen, springen Sie zu Schritt 4). Dévissez les vis du support de disque dur 2,5" et sortez-le du FP58. (Si vous utilisez seulement le lecteur optique mince, veuillez aller à l'étape 4). Retire los tornillos que sujetan el bracket para discos duros de 2,5” y sáquelo de la FP58. (Si solo usa el dispositivo óptico delgado, por favor vaya al paso 4). Svitare le viti che trattengono il supporto per hard drive da 2,5” e rimuoverlo dall’FP58. (Se utilizzate soltanto il drive ottico slim, procedere al passo 4). Отвинтите винты, удерживающие кронштейн для 2,5-дюймовых жестких дисков и извлеките его из FP58. (Если используется только тонкий оптический привод, перейдите к шагу 4). 如果您要安裝2.5”硬碟,請依圖示卸除FP58上方4顆螺絲,並拆下2.5”硬碟架。 (如果只想要單獨安裝吸入式薄型光碟機,請直接跳往步驟4)。 如果您要安装2.5”硬盘,请依图标卸除FP58上方4颗螺丝,并拆下2.5”硬盘架。 (如果只想要单独安装吸入式薄型光驱,请直接跳往步骤4)。 2.5”ハードディスクドライブブラケットを固定しているネジを外し、FP58から取り外します。 (スリム光学ドライブのみの使用であれば、ステップ4へ行きます)。 2.5 인치 하드 드라이브 브래킷을 고정하고 있는 나사를 풀고 FP58에서 제거하십시오. (얇은 광학 드라이브만 사용하고 있는 경우, 단계 4로 건너뛰십시오.) 2 Install hard drives and optical drive 2. Install and secure all hard drives into the bracket (HDD x 2) and FP58 (HDD x 2). Installieren und befestigen Sie alle Festplatten in der Festplattenhalterung (HDD x 2) und im FP58 (HDD x 2). Installez et attachez tous les disques durs dans le support (DD x 2) et le FP58 (DD x 2). Instale y fije todos los discos duros en el bracket (HDD x2) y la FP58 (HDD x 2). Installare ed assicurare tutti gli hard drive nel supporto (HDD x 2) e nell’FP58 (HDD x 2). Установите все жесткие диски в кронштейн (2 шт.) и в FP58 (2 шт.), закрепите жесткие диски. 將4顆2.5”硬碟依圖示分別安裝上硬碟架(2顆硬碟)與FP58(2顆硬碟),並以內附螺絲鎖固。 将4颗2.5”硬盘依图标分别安装上硬盘架(2颗硬盘)与FP58(2颗硬盘),并以内附螺丝锁固。 ハードディスクドライブ全部をブラケット(HDD x 2)およびFP58 (HDD x 2)に取り付け、固定します。 모든 하드 드라이브를 브래킷(HDD 2개)과 FP58(HDD 2개)*에 설치하고 고정하십시오. 3 Install hard drives and optical drive 3. Reinstall 2.5” bracket back to the FP58. Снова установите кронштейн для 2,5жестких дисков в FP58. Bringen Sie die 2,5“-Halterung wieder im FP58 an. 將2.5”硬碟架裝回FP58。 Réinstallez le support 2,5" dans le FP58. 将2.5”硬盘架装回FP58。 Reinstale el bracket de 2,5” de nuevo en la FP58. 2.5”ブラケットをFP58に戻します。 Reinstallare il supporto da 2,5” nell’FP58. 2.5 인치 브래킷을 FP58에 다시 설치하십시오. 4 Install hard drives and optical drive 4. Insert the slot loading optical drive and use the appropriate screwdriver to secure the optical drive. Legen Sie das optische Slot-Loading-Laufwerk ein und benutzen Sie den entsprechenden Schraubenzieher um das optische Laufwerk zu befestigen. Insérez le lecteur optique dans la fente et utilisez un tournevis approprié pour attacher le lecteur optique. Inserte el dispositivo óptico de carga frontal y use el destornillador apropiado para fijar el dispositivo óptico. Inserire il drive ottico slot loading ed utilizzare un cacciavite appropriato per assicurare il drive ottico. Установите оптический привод со щелевой загрузкой и закрепите его при помощи подходящей отвертки. 將吸入式薄型光碟機由前方推入FP58,並鎖上右邊兩顆螺絲(螺絲比較細小,可能需要準備相對應尺寸的螺絲起子)。 将吸入式薄型光驱由前方推入FP58,并锁上右边两颗螺丝(螺丝比较细小,可能需要准备相对应尺寸的螺丝起子)。 スロットローディング光学ドライブを差し入れ、付属のネジで固定します。 슬롯 로딩 방식 광학 드라이브를 삽입하고 적절한 스크류 드라이버를 사용하여 광학 드라이브를 고정하십시오. 5 Install hard drives and optical drive 5. Secure the aluminum front with included screws, please make sure the seam on the front panel and the optical drive are properly aligned. Befestigen Sie die Aluminium-Front mit den mitgelieferten Schrauben. Bitte stellen Sie sicher, dass die Naht auf dem Frontpanel und dem optischen Laufwerk korrekt ausgerichtet sind. Attachez la face avant en aluminium avec les vis fournies, assurez-vous que le bord sur le panneau avant et le lecteur optique sont correctement alignés. Fije el frontal de aluminio con los tornillos incluidos, por favor compruebe que la juntura del panel frontal y el dispositivo óptico están correctamente alineados. Assicurare il frontalino in alluminio con le viti incluse ed verificare che il pannello frontale ed il drive ottico siano allineati. Закрепите алюминиевую переднюю панель предлагающимися винтами, правильно совместив шов между передней панелью и оптическим приводом. 將鋁面版由前方安裝(鋁面板的縫須對齊吸入式薄型光碟機吸入口),並以內附4顆螺絲鎖固。 将铝面版由前方安装(铝面板的缝须对齐吸入式薄型光驱吸入口),并以内附4颗螺丝锁固。 アルミニウム製フロントを付属のネジで固定します。 この際フロントパネルと光学ドライブの間隙をきちんと合わせてください。 제공된 나사를 사용하여 알루미늄 전면 패널을 고정하십시오. 이 경우 전면 패널의 이음새와 광학 드라이브가 제대로 정렬되었는지 확인하십시오. 6 Install hard drives and optical drive The HDD in the FP58 will be closely installed. There will be two sets of HDD’s each with two HDD installed on top of each other. We recommend you to install solid state drives in the FP58 as they run at a lower temperature. The maximum height for two HDD is 20mm. Please see the below table for common height of HDD: 7mm HDD for ultra slim notebook 9.5mm Standard 2.5” HDD 12.5mm high capacity HDD 15mm 10,000rpm+ traditional HDD Die HDD-Installation ist im FP58 beengt. Es wird zwei Sets von HDDs geben, wobei jedes aus zwei übereinander installierten HDDs besteht. Wir empfehlen, Solide State Drives im FP58 zu installieren, da sie mit einer niedrigeren Temperatur laufen. Die maximale Höhe für zwei HDDs beträgt 20 mm. Bitte beachten Sie die unten stehende Tabelle für übliche Höhen von HDDs: 7mm HDD für ultradünne Notebooks 9.5mm Standard-2,5”-HDD 12.5mm HDD mit hoher Kapazität 15mm Traditionelle HDD mit +10.000 U/min Le DD dans le FP58 sera installés parfaitement. Il y aura deux groupes de DD, chacun avec deux disques durs installés au-dessus l'un de l'autre. Nous vous recommandons d'installer des disques à état solide dans le FP58 car ils fonctionnent à une température plus basse. La taille maximale de deux DD est 20 mm. Veuillez consulter le tableau ci-dessous pour la hauteur moyenne des DD : 7mm DD pour ordinateur portable ultra-mince 9.5mm DD 2,5" standard 12.5mm DD de haute capacité 15mm DD traditionnel 10 000 tour/min El disco duro de la FP58 se instalará muy cerca. Habrá dos juegos de discos duros, cada uno con dos discos duros instalados uno encima del otro. Le recomendamos que instale discos en estado sólido en la FP58, ya que funcionan a una temperatura inferior. La altura máxima de los dos discos duros es de 20mm. Por favor, consulte la tabla inferior para la altura común de los discos duros: 7mm Disco duro para un notebook ultra Delgado 9.5mm Disco duro estándar de 2.5” 12.5mm Disco duro de alta capacidad 15mm Disco duro tradicional de 10,000rpm+ Gli HDD all’interno dell’FP58 vengono installati molto vicini tra di loro. Vi saranno due sezioni con due HDD installati uno sopra all’altro. Vi raccomandiamo di installare hard disk allo stato solido nell’FP58 in quanto opereranno a temperature inferiori. La massima altezza per due HDD è di 20mm. Fare riferimento alla seguente tabella per le comuni altezze degli HDD. 7 7mm HDD per notebook ultra slim 9.5mm HDD standard da 2.5” 12.5mm HDD ad alta capacità 15mm HDD tradizionale 10,000rpm+ Installation of the FP58 1. Please refer to the user manual of your case before installing the FP58 onto your case. 2. If your case does not have a tool-less 3.5” bay, please use the accompanied screws from the FP58 for installation. Note: long screws might interfere with the 2.5” HDD. FAQ Q: Why is the front panel not pre-installed? A: Because the front panel needs to be removed when installing the optical drive. 1. Bitte beziehen Sie sich auf ihren speziellen Fall in der Bedienungsanleitung, bevor sie das FP58 installieren. 2. Falls in Ihrem Fall das Gehäuse keinen werkzeuglosen 3,5“-Schacht besitzt, benutzen Sie bitte die beigelegten Schrauben vom FP58 für die Installation. Hinweis: lange Schrauben könnten mit der 2,5“-Festplatte kollidieren. FAQ Q: Warum ist das Frontpanel nicht vorinstalliert? A: Weil das Frontpanel entfernen werden muss, wenn sie die optischen Laufwerke installieren. 1. Référez-vous au manuel de l'utilisateur de votre boîtier avant d'installer le FP58 dans votre boîtier. 2. Si votre boîtier n'a pas une baie 3,5" utilisable sans outil, veuillez utiliser les vis fournies pour installer le FP58. Remarque: Des vis longues peuvent interférer avec le DD 2,5". FAQ Q : Pourquoi le panneau frontal n'est-il pas pré-installé? R : Car le panneau frontal a besoin d'être enlevé lorsque vous installez le lecteur optique. 1. Por favor, consulte el manual de usuario de su carcasa antes de instalar la FP58 en su carcasa. 2. Si su carcasa no tiene una bahía sin herramientas de 3,5”, por favor use los tornillos que vienen con la FP58 para la instalación. Nota: los tornillos largos podrían interferir con el disco duro de 2,5”. PF P: ¿Por qué no está preinstalado el panel frontal? R: Porque el panel frontal debe retirarse antes de instalar el dispositivo óptico. 9-
 1
1
-
 2
2
-
 3
3
-
 4
4
-
 5
5
-
 6
6
-
 7
7
-
 8
8
-
 9
9
-
 10
10
-
 11
11
-
 12
12


SilverStone FP58 El manual del propietario
- Categoría
- Carcasas HDD / SSD
- Tipo
- El manual del propietario
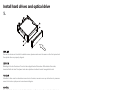
El SilverStone FP58 es una bahía para ordenador de 5,25" que permite instalar una unidad óptica de carga por ranura y cuatro unidades de 2,5". Está fabricado en aluminio de alta calidad y tiene un diseño discreto que combina con la mayoría de los ordenadores.
Además, el FP58 es compatible con la mayoría de las cajas de ordenador, lo que lo convierte en una opción versátil para ampliar el almacenamiento de tu equipo.
En otros idiomas
- français: SilverStone FP58 Le manuel du propriétaire
- italiano: SilverStone FP58 Manuale del proprietario
- English: SilverStone FP58 Owner's manual
- Deutsch: SilverStone FP58 Bedienungsanleitung
- русский: SilverStone FP58 Инструкция по применению
- 日本語: SilverStone FP58 取扱説明書
Documentos relacionados
-
SilverStone SST-ML06B El manual del propietario
-
SilverStone ML05 El manual del propietario
-
-
-
SilverStone SST-FT03S Guía de instalación
-
-
-
-
-
SilverStone TS06 El manual del propietario