Feather River Doors 131105 Guía de instalación
- Tipo
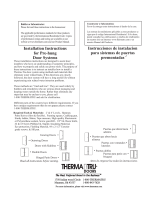
- Guía de instalación

©2015 Trinity Glass International, Inc.
DOC1INSF 6/15
1
FIBERGLASS DOOR SYSTEM
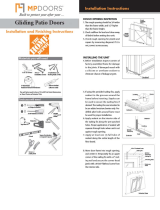
Installation Instructions
Thank you and congratulations. You have just
purchased a premier fiberglass entry door system. If
you have purchased an unfinished door system, we
recommend that you paint/stain before installation.
Refer to the finishing instructions section in this
document. Please follow the instructions carefully for
proper installation.
CAUTION: Some door units are heavy and may
require two people to lift and install. Use proper
lifting techniques and follow safe working practices.
Tools and materials needed:
Tape measure, Hammer, Square, Level, Wooden shims,
#3 Phillips screwdriver, #8 x 3" Exterior grade wood
screws, Power drill with Phillips drill bit, Safety glasses,
Caulking gun, quality clear exterior sealant, Putty
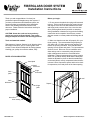
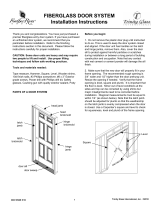
PARTS OF A DOOR SYSTEM
Before you begin:
1. Do not remove the plastic door plug until instructed
to do so. This is used to keep the door system closed
and aligned. If the door unit has handles on the latch
and hinge jambs, remove them. Also, cover the door
sill to protect against harmful particles or scratches
during installation or between a long period of building
construction and occupation. Note that any contact
with wet cement or cement powder will damage the sill
finish.
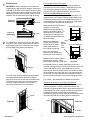
2. Make sure that the new door will properly fit in your
frame opening. The recommended rough opening is
3/4" wider and 1/2" higher than the door prehung unit.
Resize the opening if needed. Verify that the frame
opening is level, square and plumb. It is important that
the floor is level. Minor out of level conditions at the
sides and top can be corrected by using shims but
major misalignments need to be corrected before
installation. Diagonal measurements must be equal to
within 1/4" (as shown below). Note that the latch jamb
should be adjusted for plumb so that the weatherstrip
on the latch jamb is evenly compressed when the door
is closed. Use a Carpenter’s square and level to check
for squareness, level and plumb of the frame opening.
hinge
brickmold
door sill
hinge
jamb
latch
jamb
head
brickmold
door sweep
head jamb
latch
brickmold
Square
Level

©2015 Trinity Glass International, Inc.
DOC1INSF 6/15
2
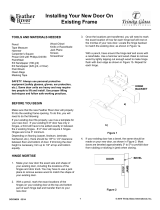
INSTALLATION:
IMPORTANT: Before setting the door unit into the
rough opening, apply generous beads of caulk to the
underside of the door sill at locations shown in Figure
1a/1b, including the bottom of jambs (or plastic jamb
adapters as shown) and brickmolds. Make sure that
at least 4 lines of bead seal the full width of the sill.
1
Figure 1a
(In-swing)
Caulk
Figure 1b
(Out-swing)
Caulk
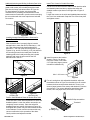
These jambs are shipped with predrilled counterbores. To
install the door unit to a door opening, simply predrill for #8
countersink holes through the counterbores per Figure 2c.
Temporarily secure the door unit by driving 3" wood screws
at top and bottom counterbores of each jamb.
Permanently fasten 3" exterior grade wood screws (not
included) through the jambs into the shim and the frame. Do
not over tighten the screws. Over tightening may cause
jambs to bow. Remove excess shims. Do not shim or fasten
the head jamb of the single door unit. Use putty to hide the
screw head. For a door unit with hand stained PVC jambs,
plug the screw holes with the screw caps that are included.
PVC Jambs – See addendum for additional information.
Additional Anchoring for Single Door with Sidelites
Shim above mullion per Figure 2d. Predrill 1/8" holes and
permanently fasten 3" exterior grade wood screws (not
included) through head jamb into the shim and the frame. For
hand stained PVC jambs, use the provided counterbores for
predrilling countersink holes for #8 wood screws as
mentioned in previous section and plug the screw holes with
the screw caps that are included. Remove excess shim.
Figure 2d
Shim
Inside
Figure 2b
Shim
Inside
For a single door, remove the bolt from the plastic
door plug. From outside, set the door unit into the
opening per Figure 2a. For a heavier door system,
get help when lifting, setting and aligning.
2
Figure 2a
Outside
From the inside, place a solid shim directly behind
each hinge between the hinge jamb (or approx.
same level as hinges on lock jamb or sidelite jamb)
and opening frame per Figure 2b. Keep the door
unit level, square and plumb on all four sides.
Remove the plastic door plug completely.
Make sure weatherstrip
contact and margin are
equal all around. Make
further adjustments for
level, square and plumb.
When adjustments are complete,
predrill 2 (3 for 8ft door)
additional equally spaced 1/8"
holes for each side of jamb. For
hand stained PVC jambs, use
the provided counterbores for
predrilling countersink holes for
#8 wood screws.
Door unit with wood or PVC jambs:
Predrill 1/8" holes at about 8" from the top and bottom of
each jamb next to a door opening. Temporarily secure the
door unit to the opening by driving 3" wood screws.
However do not drive the screws all the way at this time.
Additional shims may be used to
keep the door aligned. Test to
ensure proper operation of the door
Figure 2c
Single/Double Door
Shim
Predrill
Use 3 or 4 solid shims
between the latch jamb and
opening frame per Figure 2b.
Door unit with Hand Stained PVC jambs:
Hand
Stained
PVC
Jamb
Door with Sidelite(s)
Shim
Predrill

©2015 Trinity Glass International, Inc.
DOC1INSF 6/15
3
Additional Anchoring and Drilling for Double Door Units
Predrill 1/8" holes and permanently fasten 3" exterior
grade wood screws (not included) through the head
jamb into the frame at locations shown in Figure 2e.
For hand stained PVC jambs, use the provided
counterbores for predrilling countersink holes for #8
wood screws as mentioned in previous section and plug
the screw holes with the screw caps that are included.
Do not shim.
Inside
Screws(2)
Figure 2e
Installing Astragal Retaining Plate & Grommet for
Double Door Units
After the double door is properly aligned, use the
astragal bolts to mark and drill 3/8" diameter x 1 3/8"
min. deep hole through the head jamb and 5/8"
diameter x 1 3/8" min. deep hole through the sill, per
Figures 2f, 2g, and 2h. Pre-drill (2) 1/16" pilot holes for
the mounting screws for the head jamb. Install the
retaining plate in the head jamb using the included
hardware and insert the grommet into the 5/8"
diameter hole in the sill.
Figure 2f
Position Strike/Deadbolt Plates for Double Door Units
Close both doors. Mark desired positions for strike and
deadbolts plates. Loosen the retainer screws (do not
completely remove screws). Place the strike and
deadbolt plates into position (left image of Figure 2h)
and tighten the screws. Only use the screws that came
in the retainers. Do not use other screws as this may
cause a malfunction in the operation of the doors.
Check positions and adjust as needed.
Install Trim Covers for Double Door Units
Cut the Trim Covers so that the ends fit under both the strike
and deadbolt plates and butt up against the strike and
deadbolt retainers (as shown in the right side of Figure 2i
[1,2,3]).
Loosen the screws on the strike and deadbolt plates and slip
the Trim Cover underneath. Snap the Trim Covers into place
and tighten screws.
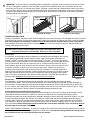
3
Install 2 screws at the location
shown in Figure 3 on the top
hinge and 1 each on the lower
2 or 3 (8ft door) hinges (screws
included in installation kit).
Figure 3
#9 x 2 1/4" screw
4
Figure 4
(In-swing only)
#3 Phillips screwdriver
Threshold
For an in-swing door with adjustable threshold, adjust the
threshold as shown in Figure 4 so that there is even contact
between the door sweep and the threshold. To test, put a
sheet of paper between door sweep and threshold, close the
door and pull. The correct adjustment would have slight
tension, but if the paper tears, the tension is too high.
Figure 2i
Figure 2g
(In-swing sill)
Figure 2h
(Out-swing sill)
1
2
3

©2015 Trinity Glass International, Inc.
DOC1INSF 6/15
Paint Finish
Tan woodgrain or unpainted/pre-painted smooth fiberglass doors are paintable with most high quality
oil based exterior paints. For the unpainted smooth doors, we recommend lightly sanding with 600-grit sandpaper for
the best results. Before applying a paint, wipe the fiberglass door and door lite frame with a damp cloth to remove any
dirt, oil, or debris. Allow the surface to fully dry before painting. Paint the door in the directions shown in Figure 6. Apply
at least two coats of paint. Follow the brand’s recommended drying time between coats.
4
Figure 6
5
IMPORTANT: To prevent moisture from getting inside the siding wall, completely caulk around the brickmolds per Figure
5a. For in-swing doors, install two corner seal pads (included in the installation kit) at each of the jamb bottoms of an
active door per Figure 5b. For a double door system, verify that a corner seal pad is installed at the bottom of the active
door side of an astragal. The corner seal pad should be tucked underneath the weatherstrip. Caulk at the intersection of
the jambs, brickmolds, threshold and floor. For out-swing doors, also caulk at the intersection of the jambs, brickmolds,
threshold and floor per Figure 5c.
Figure 5c (out-swing)
Weatherstrip
Corner
seal pad
Figure 5b (in-swing)
Caulk
Staining or painting an unfinished Feather River fiberglass door has never been easier. Our fiberglass door does not require
special stain kits or primer. Use the same exterior stain or paint you would use for finishing your home’s other trims. Note
that a tan woodgrain and unpainted smooth door must be finished within 6 months after the door is purchased.
When finishing, remove the door from the frame and place door in a flat level surface off the floor. Sidelites need to be
finished while attached to the frame.
Stain Finish
All surfaces of a tan woodgrain door are stainable. Our patented textured fiberglass door surface
yields superior stain adhesion without sanding. Select a high quality water-based stain from
Minwax
®
or Behr
®
or a high quality gel stain from Minwax
®
or Olympic
®
. Or, select a high quality
oil-based stain from Ace
®
, Minwax
®
, or Zar
®
. Before applying a stain, wipe the fiberglass door and
door lite frame with a damp cloth to remove any dirt, oil, or debris. Allow the surface to fully dry
before staining. Apply an even amount of stain with a brush or lint-free cloth in the direction of the
wood grain as shown in Figure 6. Work the stain into the surface. Lighten stain and remove
excess through wiping with a clean rag before stain dries completely. For a darker appearance,
apply a second coat after first coat dries. Follow the application instructions on the stain container
label. After stain has dried for at least 24 hours, apply three coats of high quality exterior grade
satin or low gloss polyurethane in the direction of the wood grain. Follow the label’s drying time
between coats. Important: Use polyurethane with ultraviolet (UV) inhibitors.
FINISHING INSTRUCTIONS
Caution: Paint or stain in a well ventilated area. Keep combustible paint, stain
and topcoat away from heat and flame. Keep out of reach of children.
Finishing Wood and Unfinished PVC Components
Both the pre-finished and unfinished fiberglass doors have the option to come with PVC jambs and brickmold or wood
jambs and brickmold (Primed Pine or Clear Pine).
Clear Pine Components: We recommend staining the jambs,
brickmolds and other clear wood components or stainable astragals per above stain finish instructions. Apply 2 or 3 coats
of exterior grade polyurethane with ultraviolet (UV) inhibitors. Lightly sand with 600-grit sandpaper between coats for
smoother finish. Painting Primed Wood and Unfinished PVC: Use a quality exterior grade acrylic latex or oil-base paint.
Use wood filler to putty the nail marks on the wood components before staining or painting and a PVC filler or caulk on
PVC components. Wood components must be finished within 2 weeks after installation. PVC components must be
finished within 6 months after installation.
Figure 5a
NOTE FOR STAINABLE ASTRAGAL: To protect the integrity of the wood veneer and its bonding adhesive, do not expose
the astragal to oils, thinners, solvent based cleaners or similar items. The stainable astragal should be finished prior to
being installed to the door opening and exposure to the weather.
Caulk
Caulk

Please follow our standard set of installation instructions when installing this door unit. Below are some additional tips as it relates to
installing this type of jamb system. This jamb material can be nailed or screwed to install the unit but it is highly recommended to pre-drill
this material prior to applying any fastener, especially on the pre-colored material due to the finish (may cause cracking or flaking).
1) Jamb Installation: Please follow the set of Feather River Installation Instructions included with the door unit purchased. You can
fasten the jambs by pre-drilling holes and securing with a #8- 3" exterior grade screw. See drawings below.
a. Included in this installation packet will be 10-Phillip head screw caps that complement the color of the PVC jamb system.
These tap caps press on top of a Phillips head counter sunk screw. For a pre-colored jamb (with a stain color): Also
included is a putty stick that complements the pre-colored jamb, this can also be utilized to fill any fastening points.
b. For larger jamb sizes (6-9/16" to 8-9/16") it is sometimes recommended to fasten the jamb in two locations along the
width of the jamb.
2) Brickmold Application:
a. PVC Brickmold can be applied in a similar fashion to wood. It is always recommended to use an exterior
grade finish nail and pre-drill any fastening location, especially on the pre-colored material.
b. To keep 45˚ top angle closed/tight it may be necessary to pre-drill and apply a screw or nail through top of brickmold.
c. Once installation is complete remember to caulk around the brickmold.
d. Pre-Colored Brickmold (with a stain color): Putty stick can be used to fill any fastening points.
3) Interior Trim Installation:
a. Make sure any fastening point into the pre-colored/hand stained PVC jamb system is pre-drilled prior to nailing
with a finish nail. Nail holes would be covered up using caulk or wood putty depending on type of trim being applied.
4) Storm/Security Door Application: IMPORTANT
a. Non-Vented Storm Doors will void the warranty on any Feather River Door due to the extreme heat build-up if not
properly vented.
b. If applying a storm door over this unit it is recommended that any fastening point be pre-drilled.
c. Feather River will not be responsible for any damage that may occur with the installation of a Storm/Security door setup.
Para la instalación de esta unidad, siga las instrucciones habituales. Debajo, encontrará información adicional acerca de la instalación de este tipo de sistema de marco.
Durante la instalación, pueden utilizarse clavos o tornillos directamente sobre el material del marco. Sin embargo, es recomendable taladrar o hacer los orificios con anterioridad
para proteger el acabado, en especial si el marco es de color, de lo contrario, el acabado se puede agrietar o descascarar.
1) Instalación del marco: siga las instrucciones de instalación de Feather River que vienen con la abertura. Para atornillar el marco, haga primero los agujeros con un taladro y
luego coloque un tornillo para exteriores número 8 de 3 pulgadas. Vea las ilustraciones que aparecen a continuación.
a. El paquete para la instalación incluye 10 tapas para tornillos con cabeza Phillips que se adecuan al color del marco. La tapa se coloca a presión sobre el tornillo avellanado
Phillips. Para una jamba pre-coloreado (con un color de la mancha): También se incluye un palo masilla que complementa el color de la jamba, esto puede también ser
utilizada para llenar los puntos de fijación.
b. Para marcos más grandes (6-9/16" a 8-9/16") es recomendable colocar dos tornillos a lo largo del ancho.
2) Aplicación de la moldura:
a. La moldura de PVC se coloca de manera similar a una moldura de madera. Es recomendable utilizar clavos de acabado para exteriores y
taladrar los orificios para los tornillos de antemano, especialmente en las molduras de color.
b. Para mantener el ángulo superior fijo a 45˚, es posible que necesite colocar un tornillo o un clavo a través de la parte superior de la moldura.
c. Una vez terminada la colocación, recuerde aplicar masilla alrededor de la moldura.
d. Moldura pre-coloreado (con un color de la mancha): La palo de la masilla se puede utilizar para llenar cualquier puntos de fijación.
3) Colocación del contramarco:
a. Al colocar un marco de color o pintado con tinte, asegúrese de hacer todos los orificios antes de clavar los clavos de acabado.
Los orificios de los clavos se pueden cubrir con masilla o con masilla para madera según el tipo de contramarco que haya colocado.
4) Colocación de la puerta de seguridad/contrapuerta: IMPORTANTE
a. Las puertas de seguridad sin entrada de aire invalidan la garantía de cualquier puerta Feather River debido a la cantidad excesiva
de calor que se acumula cuando no se ventilan adecuadamente.
b. Al colocar una puerta de seguridad, es recomendable que todos los orificios para los tornillos se hagan con anterioridad.
c. Feather River no se responsabiliza por los daños que puede causar la colocación de una puerta de seguridad o contrapuerta.
6/15 © 2015 Trinity Glass International, Inc.
Instalación - AnexoMarco de material PVC –
Blancas sin acabado • Pre-coloreado
PVC JAMB SYSTEMS
White Unnished • Pre-Colored
INSTALLATION
ADDENDUM PAGE
WEATHERSTRIP
Burlete
WEATHERSTRIP
Burlete
JAMB
Marco de la puerta
SHIM
Cuña
SHIM
Cuña
BRICKMOLD
Moldura
WALL STUD
Marco de la pared
SINGLE DOOR w/SIDELITE(s)
Puerta con una o más ventanas laterales
SINGLE/DOUBLE DOOR
Puerta simple o doble
BRICKMOLD
APPLICATION
(Step B above)
Moldura colocación
(Ver paso B mencionado anteriormente)
SCREW TAP CAP
Tapa para tornillo
JAMB
Marco
SHIM
Cuña
SHIM
Cuña
BRICKMOLD
Moldura
WALL STUD
Marco de la pared
PRE-DRILLING DETAILS
Detalles De Perforación Previa

On single and double doors, holes are pre-drilled and countersunk behind the weatherstripping illustrated below by the
arrows. Doors with sidelites have pre-drilled holes on the face of jambs (plugs provided). Door should still be shimmed and
installed following the regular installation instructions provided with this unit.
1) Jamb Installation: Please follow the set of Feather River Installation Instructions included with the door unit purchased.
a. See pre-drilled fastening locations shown below for Single/Double Setups and Doors w/ Sidelite(s).
b. For sidelite units screw plugs are provided.
c. For larger jamb sizes (6-9/16") it is sometimes recommended to fasten the jamb in two locations along the width of
the jamb if necessary. Any additional fastening point should be pre-drilled and can be filled with a putty stick to
complement the stain finish. (Putty stick supplied in installation packet.)
2) Brickmold Application: Brickmold supplied is a hand stained PVC material. This can be nailed into place using exterior
grade trim nails. It is recommended that any fastening point be pre-drilled since this is a stained material. Any fastening locations
can be filled with a putty stick or stained over using a touch up marker. Both complement the stain finish and are supplied in the
installation packet.
a. To keep 45˚ top angle closed/tight it may be necessary to pre-drill and apply a screw or nail through top of brickmold.
b. Once installation is complete remember to caulk around the brickmold.
c. Pre-Colored Brickmold (with a stain color): Putty stick can be used to fill any fastening points.
3) Interior Trim Installation:
a. Make sure any fastening point into the hand stained PVC jamb system is pre-drilled prior to nailing with a finish nail.
Nail holes would be covered up using caulk or wood putty depending on type of trim being applied.
4) Storm/Security Door Application: IMPORTANT
a. Non-Vented Storm Doors will void the warranty on any Feather River Door due to the extreme heat build-up if not
properly vented.
b. If applying a storm door over this unit it is recommended that any fastening point be pre-drilled since the brickmold or
mull caps are a pre-stained material.
c. Feather River will not be responsible for any damage that may occur with the installation of a Storm/Security door setup.
Note: Orders for Florida and Texas TDI Areas may not be pre-drilled due to building codes that require different fastening locations for installation.
Nota: Los pedidos de Florida y zonas de Texas TDI no pueden ser pre-perforados debido a los códigos de construcción que requieren de diferentes lugares de fijación para la instalación.
En puertas simples y dobles, los orificios se hacen con anterioridad y se avellanan detrás del burlete como muestran las flechas en la ilustración. Las puertas con ventanas laterales
traen los orificios ya hechos en las caras del marco. (Incluye tornillos.) Aún así, se deberá calzar y colocar la puerta siguiendo las instrucciones que vienen con la unidad.
1) Instalación del marco: Siga las instrucciones de instalación de Feather River que vienen con la abertura.
a. Para puertas simples o dobles con ventanas laterales, observe en la ilustración siguiente dónde se ubican los orificios para sujetar la abertura.
b. Las ventanas laterales incluyen los tapones roscados.
c. Para marcos más grandes (6-9/16") es recomendable colocar dos tornillos a lo largo del ancho. Cualquier punto de fijación adicional debe ser pre-perforados
y puede ser llenado con masilla para complementar el acabado mancha. (La palo de la masilla se suministra en paquetes de instalación.)
2) Aplicación de la moldura: La moldura está pintada a mano con tinte y realizada de PVC. Para sujetarla, se pueden utilizar clavos de acabado para exteriores.
Es recomendable que todos los orificios se hagan antes de colocarla, ya que el material está pintado con tinte. Las marcas de clavos o tornillos se pueden
tapar con el palo de la masilla o utilizando un marcador para retoques. Ambos se complementan el acabado y se suministran en el paquete de instalación.
a. Para mantener el ángulo superior fijo a 45˚, es posible que necesite colocar un tornillo o un clavo a través de la parte superior de la moldura.
b. Una vez terminada la colocación, recuerde aplicar masilla alrededor de la moldura.
c. Moldura pre-coloreado (con un color de la mancha): La palo de la masilla se puede utilizar para llenar cualquier puntos de fijación.
3) Colocación del contramarco:
a. Al colocar el marco pintado a mano, asegúrese de hacer todos los orificios antes de clavar los clavos de acabado. Los orificios
de los clavos se pueden cubrir con masilla o con masilla para madera según el tipo de moldura que haya colocado.
4) Colocación de la puerta de seguridad/contrapuerta: IMPORTANTE
a. Las puertas de seguridad sin entrada de aire invalidan la garantía de cualquier puerta Feather River debido
a la cantidad excesiva de calor que se acumula cuando no se ventilan adecuadamente.
b. Al colocar una puerta de seguridad, es recomendable que todos los orificios para los tornillos se hagan
con anterioridad ya que las molduras y los tapacantos vienen prepintados con tinte.
c. Feather River no se responsabiliza por los daños que puede causar la colocación de una puerta de
seguridad o contrapuerta.
Instalación - AnexoMarco de material PVC pintado con tinte a mano
HAND STAINED PVC JAMB SYSTEM
INSTALLATION ADDENDUM PAGE
6/15 © 2015 Trinity Glass International, Inc.
WEATHERSTRIP
Burlete
SINGLE DOOR w/SIDELITE(s)
Puerta con una o más ventanas laterales
WEATHERSTRIP
Burlete
JAMB
Marco de la
puerta
SHIM
Cuña
SHIM
Cuña
BRICKMOLD
Moldura
WALL STUD
Marco de la
pared
SINGLE/DOUBLE DOOR
Puerta simple o doble
Hole Locations
Ubicaciones agujero
BRICKMOLD
APPLICATION
(Step B above)
Moldura colocación
(Ver paso B mencionado
anteriormente)
JAMB
Marco
SHIM
Cuña
SHIM
Cuña
BRICKMOLD
Moldura
WALL STUD
Marco de la
pared
PRE-DRILLING DETAILS
Detalles De Perforación Previa
PLUG
Tapón

©2015 Trinity Glass International, Inc.
DOC1INSF 6/15
5
CARE AND MAINTENANCE
Hand stained Jambs, Brickmolds and Doors: Over time, harsh weathering will degrade even the best finish. We
recommend reapplying a UV topcoat over the existing topcoat every 2-3 years. We do not recommend stripping the
factory finish topcoat. In locations of severe weather exposure, more frequent maintenance may be required. Fading,
minor cracking and peeling are some initial signs of UV topcoat deterioration.
Painted Fiberglass Doors, PVC Components, and Wood Components:
Repaint your doors, jambs and brickmolds as
soon as deterioration occurs. Initial signs of wear are fading, cracking, bubbling, and peeling.
Weatherstrip: Replace compression weatherstrip, door sweep, and seal pads when worn or torn.
Caulking: Just as with the finish, it is imperative that deterioration of caulking/sealant is properly maintained. Any areas
of deterioration should be re-caulked based on the areas pointed out in the installation instructions (Exterior Trim to
Exterior Façade, Exterior Trim to Jamb, Jamb Base to Threshold/Sill). Note: All Feather River fiberglass door lite frames
come pre-caulked from the factory. The excess sealant on the door lite is normal and does not indicate a defective
glazing. In some cases over time, you may experience excess caulking/sealant ooze around the lite frame. In most
cases this happens during extreme heat buildup or when the door is exposed to direct sunlight. The excess sealant on
the glass can be removed by carefully scoring the excess sealant with a razor blade and peeling it off. The excess
sealant on the glass side may be better removed with the blade after scoring. However for the sealant on the finish side,
the sealant should be removed without using the blade after the initial scoring around the perimeter of the frame.
Door Lite Plugs: Every door with a lite comes with enough plugs to fill all screw holes. All screw plugs should have a
tight fit when installing to keep from falling out. To install screw plugs, line up screw plug with hole and insert at a slight
angle to get started. In some cases you may be able to push the plug into place with hand. In most cases, you will
need to take a small round head hammer and lightly tap into place or take the handle part of a screwdriver and tap into
place with a hammer. If it seems that the screw plugs are too tight to fit into the plug holes, place the screw plug packet
in a freezer for about an hour prior to installing or slightly sand or file bottom side of the plug to help plug get started in
the plug hole.
Thermal Bowing: In some areas with temperature fluctuations, your door may experience signs of bowing over a period
of days. This is typically due to the temperature difference between the exterior and interior part of the home. In most
cases the door should return back to it’s normal position. This is also common during the first couple of weeks after the
door is installed while the door becomes acclimated to the opening. However in areas or conditions of extreme
temperature exposure on the door, some permanent bowing can be expected. In the areas of extreme temperature
exposure, the effect of the temperature on the door can be reduced by following some recommendations listed below.
Door Exposure and Protection: Doors protected by the elements will obviously need less maintenance and re-finishing
vs. doors fully exposed to the elements. So overhangs will help provide long lasting protection to your entryway along
with reduced maintenance.
Color Choice: As with overhangs, door colors may help reduce periodic maintenance and help with the door
performance, especially in areas where doors receive an extreme amount of sun without protection. Dark colors will
absorb more heat than the light colors. So if a door is absorbing a lot of heat or has constant sun exposure, it is more
likely to have UV topcoat deterioration, color fading, and even issues with warping due to differential temperature. Light
colors in these situations will help reduce the amount of heat absorption and help prolong the life of the door and reduce
the overall maintenance.
Storm Doors: Our doors are energy efficient and storm door protection is not necessary. If purchasing a storm door,
keep in mind that it should be ventilated to help reduce the amount of heat buildup. Full View non-ventilated storm
doors in areas where no overhang and constant sun exposure is present will most likely lead to accelerated issues
pointed out above due to the extreme heat (UV deterioration, color fading, warping, caulk/sealant oozing).
-
 1
1
-
 2
2
-
 3
3
-
 4
4
-
 5
5
-
 6
6
-
 7
7


Feather River Doors 131105 Guía de instalación
- Tipo
- Guía de instalación
en otros idiomas
Artículos relacionados
-
Feather River Doors 722490-400 Manual de usuario
-
 Feather River Doors A42105-3A4 Guía de instalación
-
 Feather River Doors B03692 Especificación
-
Unbranded KM15012868P375 Guía de instalación
-
 Feather River Doors PM15012468P280 Guía de instalación
-
 Feather River Doors A42105-3A4 Guía del usuario
-


Otros documentos
-
Titan 1S3033EL1WHP5A Guía de instalación
-
-
-
-
 MP Doors G5068L002D350 Instrucciones de operación
-
 Therma-Tru Pre-hung Door Systems Manual de usuario
-
 MasterPiece G5068R3N2WLE Guía de instalación
-
EMCO HDPTR32WH Guía de instalación
-
Andersen 3TSN-36WH Guía de instalación
-
EMCO K900-36WH Guía de instalación


