Timex Expedition Double Shock Guía del usuario
- Categoría
- Relojes
- Tipo
- Guía del usuario
Este manual también es adecuado para

THANK YOU FOR PURCHASING YOUR TIMEX WATCH.
www.timex.com
W-154-US 939-095000
EXTENDED WARRANTY
Available in U.S. only. Extend your warranty for an additional 4 years from date of purchase
for $5. You can pay with AMEX, Discover, Visa or MasterCard by calling 1 800-448-4639 during
normal business hours. Payment must be made within 30 days of purchase. Name, address,
telephone number, purchase date, and 5-digit model number required.You can also mail a
check for $5 to: Timex Extended Warranty, P.O. Box 1676, Dept. EF, Little Rock, AR 72203.
Please read instructions carefully to understand how to operate your Timex watch.
Your model may not have all of the features described in this booklet.
FEATURES
• Analog and digital time display • Calendar clock • Daily, weekly, weekend alarms • 24-hour
countdown timer with stop or repeat options • 99-lap chronograph with 50-lap storage
• Hourly chime
BASIC OPERATIONS
Press MODE to cycle through CHRONO, TIMER,ALARM and Time of Day modes. Press INDIGLO
to illuminate watch face. To set watch hands to correct time, pull CROWN out and turn.
MERCI D’AVOIR ACHETÉ CETTE MONTRE TIMEX
Lire les instructions avec attention pour bien comprendre le fonctionnement de cette montre
Timex. Il est possible que ce modèle ne présente pas toutes les fonctions décrites dans
le dépliant.
LE AGRADECEMOS LA COMPRA DE SU RELOJ TIMEX.
Le rogamos lea atentamente las instrucciones para poner en funcionamiento su reloj Timex.
Es posible que su modelo no tenga todas las características descritas en este folleto.
DIGITAL TIME AND DATE
Press MODE until you reach Time of Day. Press and hold START/SPLIT to peek at date or time;
hold for six seconds to select date or time as normal display.
To set TIME or DATE:
1. Press and hold SET/RECALL. HOURS digits will flash.
2. Press START/SPLIT to advance or STOP/RESET to decrease HOURS digits. Go through 12
hours for AM or PM.
3. Press MODE to select MINUTES, then START/SPLIT or STOP/RESET to change.
4. Press MODE to select SECONDS, then START/SPLIT to set to 0.
5. Repeat to set DAY, MONTH, DATE, 12- or 24-hour time display format, MONTH-DATE or DATE-
MONTH format, hourly chime on/off, button beep on/off.
6. Press SET/RECALL at any time to complete and exit setting.
ALARM
1. Press MODE until ALARM appears.
2. Press SET/RECALL. HOURS digits will flash.
3. Press START/SPLIT or STOP/RESET to increase or decrease value.
4. Press MODE to select MINUTES,AM or PM, DAILY, WEEKDAY or WEEKEND alarm. At each
step, press START/SPLIT or STOP/RESET to change flashing value.
5. Press SET/RECALL at any time to complete and exit setting.
When alarm sounds, press any button to silence. If no button is pressed, alarm will sound for 20
seconds and repeat itself five minutes later. appears in time/date display when alarm is on.
COUNTDOWN TIMER
1. Press MODE until TIMER appears.
2. Press SET/RECALL to set countdown time. HOURS digits will flash.
3. Press START/SPLIT or STOP/RESET to increase or decrease value.
4. Press MODE to select MINUTES, SECONDS, and STOP at end or REPEAT at end function
(REPEAT automatically restarts Timer at end of countdown).
5. At each step, press START/SPLIT or STOP/RESET to change flashing value.
6. Press SET/RECALL at any time to complete and exit setting.
7. Press START/SPLIT to start Timer.
8. Press STOP/RESET to pause. Press START/SPLIT to resume or press STOP/RESET twice to
reset timer back to set value.
Watch will beep when countdown ends. Press any button to silence. Timer will continue to run
if you exit Timer mode. appears in time/date display when Timer is running.
CHRONOGRAPH
1. Press MODE until CHRONO appears.
2. Press START/SPLIT to start Chrono.
3. Press START/SPLIT to record lap time.
4. Time of SPLIT or LAP will display for 10 seconds. Press MODE to return to running Chrono
before 10 seconds.
5. Press STOP/RESET to pause.
6. Press START/SPLIT to resume.
7. Press STOP/RESET to stop.
8. To recall a workout, press SET/RECALL, then press START/SPLIT or STOP/RESET to move
forward or backward between laps or splits.
9. Press and hold STOP/RESET to clear workout.
appears in time/date display when Chrono is running.
Tip: To change display format, press SET/RECALL; the word FORMAT will appear and will then
switch to a blinking LAP or SPLIT. Press START/SPLIT to select Lap or Split as display.
INDIGLO
START/
SPLIT
MODE
CROWN
SET/
RECALL
STOP/
RESET
FONCTIONS
• Affichage analogue et numérique • Horloge calendrier • Alarme quotidienne, hebdomadaire,
week-end • Minuterie 24 heures avec options arrêt ou rappel • Chronomètre 99 temps inter-
médiaires avec capacité de stockage de 50 tours • Carillon horaire
OPÉRATIONS DE BASE
Appuyer sur MODE pour afficher successivement les modes CHRONO, TIMER (minuterie),
ALARM et Heures. Appuyer sur INDIGLO pour illuminer la face de la montre. Pour régler les
aiguilles de la montre, tirer sur la COURONNE et tourner.
AFFICHAGE NUMÉRIQUE DE L'HEURE ET DU JOUR
Appuyer sur MODE jusqu'à afficher l'Heure du jour. Tenir START/SPLIT enfoncé pour afficher
brièvement la date ou l'heure ; tenir enfoncé pendant six secondes pour sélectionner la date
ou l'heure en affichage normal.
Réglage de l'HEURE ou de la DATE :
1. Tenir SET/RECALL enfoncé. Les chiffres des HEURES clignotent.
2. Appuyer sur START/SPLIT pour faire avancer les chiffres des HEURES ou STOP/RESET pour
les faire reculer. Faire défiler 12 heures pour alterner entre AM (matin) et PM (après-midi).
3. Appuyer sur MODE pour sélectionner les MINUTES, puis sur START/SPLIT ou sur
STOP/RESET pour les régler.
4. Appuyer sur MODE pour sélectionner les SECONDES, puis sur START/SPLIT pour remettre à
zéro.
5. Répéter pour régler le JOUR, le MOIS, la DATE et l'affichage de l'heure sur 12 ou 24 heures, le
format MOIS-DATE ou DATE-MOIS, la mise en marche ou l'arrêt (on/off) du carillon horaire et
la mise en marche ou l'arrêt (on/off) du bip sonore.
6. Appuyer sur SET/RECALL en tout temps pour valider et quitter un mode.
MINUTERIE
1. Appuyer sur MODE jusqu’à afficher TIMER.
2. Appuyer sur SET/RECALL pour régler la durée de la minuterie. Les chiffres des HEURES
clignotent.
3. Appuyer sur START/SPLIT ou sur STOP/RESET pour augmenter ou diminuer le nombre.
4. Appuyer sur MODE pour sélectionner les MINUTES, les SECONDES et la fonction STOP à la
fin ou REPEAT à la fin (REPEAT remet automatiquement la minuterie en marche à la fin du
compte à rebours).
5. À chaque étape, appuyer sur START/SPLIT ou sur STOP/RESET pour modifier le nombre
clignotant.
6. Appuyer sur SET/RECALL en tout temps pour valider et quitter un mode.
7. Appuyer sur START/SPLIT pour démarrer le compte à rebours.
8. Appuyer sur STOP/RESET pour marquer une pause. Appuyer sur START/SPLIT pour
remettre en marche ou appuyer deux fois sur STOP/RESET pour remettre la minuterie
au nombre initial.
La montre émet un bip à la fin du compte à rebours. Appuyer sur n’importe quel bouton pour
l'arrêter. Le compte à rebours se poursuit lorsque vous quittez le mode Timer (minuterie).
apparaît dans l'affichage de l'heure et de la date lorsque la minuterie (Timer) est en marche.
CHRONOMÈTRE
1. Appuyer sur MODE jusqu’à afficher CHRONO.
2. Appuyer sur START/SPLIT pour faire démarrer le chronomètre.
3. Appuyer sur START/SPLIT pour enregistrer le temps au tour.
4. Le temps intermédiaire (SPLIT) ou au tour (LAP) s'affiche pendant 10 secondes.Appuyer sur
MODE pour retourner à la minuterie en marche avant 10 secondes.
5. Appuyer sur STOP/RESET pour marquer une pause.
6. Appuyer sur START/SPLIT pour redémarrer.
7. Appuyer sur STOP/RESET pour arrêter.
8. Pour rappeler les temps d'une séance d'exercice, appuyer sur SET/RECALL, puis appuyer
sur START/SPLIT ou STOP/RESET pour faire avancer ou reculer les temps au tour ou inter-
médiaires.
9. Tenir STOP/RESET enfoncé pour effacer les temps en mémoire.
apparaît dans l'affichage de l'heure et de la date lorsque le Chrono est en marche.
Suggestion : Pour modifier le format de l'affichage, appuyer sur SET/RECALL ; le mot FORMAT
s'affiche, puis les mots LAP ou SPLIT clignotent. Appuyer sur START/SPLIT pour
sélectionner l'affichage des temps au tour (Lap) ou intermédiaires (Split).
FUNCIONES
• Pantalla de hora digital y análoga • Calendario • Alarma diaria, semanal y de fin de semana •
Contador de cuenta regresiva hasta 24-horas con opciones para detener o repetir • Cronógrafo
de 99 vueltas con capacidad de guardar 50 vueltas • Timbre cada hora
OPERACIONES BÁSICAS
Oprima MODE para recorrer los modos CHRONO (cronógrafo), TIMER (contador), ALARM (alar-
ma) y Time of Day (Hora del día). Oprima INDIGLO para iluminar la cara del reloj. Para fijar las
manecillas del reloj en la hora correcta, jale CROWN (corona) y gírela.
HORA DIGITAL Y FECHA
Oprima MODE hasta que llegue a Time of Day (hora del día). Oprima y sostenga START/SPLIT
para dar un vistazo a la hora o fecha, sostenga por seis segundos para seleccionar hora o
fecha como pantalla normal.
Para fijar HORA o FECHA:
1. Oprima y sostenga SET/RECALL. Los dígitos de HORAS se iluminarán.
2. Oprima START/SPLIT para avanzar o STOP/RESET para retroceder los dígitos de HORAS.
Recorra 12 horas para fijar AM (mañana) o PM (tarde).
3. Oprima MODE para seleccionar MINUTOS, luego START/SPLIT o STOP/RESET para cambiar.
4. Oprima MODE para seleccionar SEGUNDOS, luego START/SPLIT para fijarlos en 0.
5. Repita el procedimiento para fijar DÍA, MES, FECHA, pantalla en formato de 12- o 24-horas,
formato de MES-FECHA o FECHA-MES, activar o desactivar el timbre cada hora, botón para
encender/apagar el sonido.
6. Oprima SET/RECALL en cualquier momento para completar el ajuste y salir.
ALARMA
1. Oprima MODE hasta que aparezca ALARM.
2. Oprima SET/RECALL. Los dígitos de HORAS se iluminarán.
3. Oprima START/SPLIT o STOP/RESET para aumentar o disminuir el valor.
4. Oprima MODE para seleccionar MINUTOS, AM (mañana) o PM (tarde), las alarmas DAILY
(diaria), WEEKDAY (semanal) o WEEKEND (fin de semana). En cada paso, oprima START/SPLIT
o STOP/RESET para cambiar el valor intermitente.
5. Oprima SET/RECALL en cualquier momento para completar el ajuste y salir.
Cuando suene la alarma, oprima cualquier botón para silenciarla. Si ningún botón se oprime, la
alarma sonará por 20 segundos y se repetirá automáticamente cinco minutos más tarde.
aparece en la pantalla de hora/fecha cuando la alarma está activada.
CONTADOR DE CUENTA REGRESIVA
1. Oprima MODE hasta que TIMER aparezca.
2. Oprima SET/RECALL para fijar el conteo regresivo. Los dígitos de HORAS se iluminarán.
3. Oprima START/SPLIT o STOP/RESET para aumentar o disminuir el valor.
4. Oprima MODE para seleccionar MINUTOS, SEGUNDOS, y PARAR al final o REPETIR al final de
la función (REPETIR reinicia automáticamente el Contador al final del conteo regresivo).
5. En cada paso, oprima START/SPLIT o STOP/RESET para cambiar el valor intermitente.
6. Oprima SET/RECALL en cualquier momento para completar el ajuste y salir.
7. Oprima START/SPLIT para iniciar el Contador.
8. Oprima STOP/RESET para pausarlo. Oprima START/SPLIT para reanudarlo u oprima
STOP/RESET dos veces para regresar el contador a un nuevo ajuste.
El reloj sonará cuando termine el conteo regresivo. Oprima cualquier botón para silenciarlo. El
Contador seguirá funcionando si usted sale del modo Timer. aparece en la pantalla de
hora/fecha cuando el Contador está funcionando.
CRONÓGRAFO
1. Oprima MODE hasta que aparezca CHRONO (cronógrafo).
2. Oprima START/SPLIT para iniciar el Cronógrafo.
3. Oprima START/SPLIT para registrar el tiempo de vuelta.
4. SPLIT (tomar una fracción) o LAP (tiempo de vuelta) se verá durante 10 segundos. Oprima
MODE para volver al Cronógrafo en funcionamiento antes de 10 segundos.
5. Oprima STOP/RESET para pausarlo.
6. Oprima START/SPLIT para reanudarlo.
7. Oprima STOP/RESET para detenerlo.
8. Para revisar una actividad, oprima SET/RECALL, oprima luego START/SPLIT o STOP/RESET
para avanzar o retroceder entre tiempos de vuelta o fracciones.
9. Oprima y sostenga STOP/RESET para borrar la actividad.
aparece en la pantalla time/date (hora/fecha) cuando el Cronógrafo está funcionando.
Sugerencia: Para cambiar el formato de la pantalla, oprima SET/RECALL; la palabra FORMAT
(formato) aparecerá y luego cambiará a LAP (vuelta) o SPLIT (fracción) intermitentes.
Oprima START/SPLIT para seleccionar Lap (vuelta) o Split (fracción) como pantalla.
INDIGLO
START/
SPLIT
MODE
CROWN
SET/
RECALL
STOP/
RESET
INDIGLO
START/
SPLIT
MODE
CROWN
SET/
RECALL
STOP/
RESET

TIMEX INTERNATIONAL WARRANTY
(U.S. – LIMITED WARRANTY – PLEASE SEE FRONT OF INSTRUCTION BOOKLET
FOR TERMS OF EXTENDED WARRANTY OFFER)
Your TIMEX watch is warranted against manufacturing defects by Timex Corporation for a period of ONE YEAR
from the original purchase date. Timex and its worldwide affiliates will honor this International Warranty.
Please note that Timex may, at its option, repair your watch by installing new or thoroughly reconditioned and
inspected components or replace it with an identical or similar model. IMPORTANT — PLEASE NOTE THAT THIS
WARRANTY DOES NOT COVER DEFECTS OR DAMAGES TO YOUR WATCH:
1) after the warranty period expires;
2) if the watch was not originally purchased from an authorized Timex retailer;
3) from repair services not performed by Timex;
4) from accidents, tampering or abuse; and
5) lens or crystal, strap or band, watch case, attachments or battery. Timex may charge you for replacing any
of these parts.
THIS WARRANTY AND THE REMEDIES CONTAINED HEREIN ARE EXCLUSIVE AND IN LIEU OF ALL OTHER
WARRANTIES, EXPRESS OR IMPLIED, INCLUDING ANY IMPLIED WARRANTY OF MERCHANTABILITY OR FITNESS FOR
PARTICULAR PURPOSE. TIMEX IS NOT LIABLE FOR ANY SPECIAL, INCIDENTAL OR CONSEQUENTIAL DAMAGES.
Some countries and states do not allow limitations on implied warranties and do not allow exclusions or
limitations on damages, so these limitations may not apply to you. This warranty gives you specific legal rights
and you may also have other rights which vary from country to country and state to state.
To obtain warranty service, please return your watch to Timex, one of its affiliates or the Timex retailer where
the watch was purchased, together with a completed original Watch Repair Coupon or, in the U.S. and Canada
only, the completed original Watch Repair Coupon or a written statement identifying your name, address,
telephone number and date and place of purchase. Please include the following with your watch to cover
postage and handling (this is not a repair charge): a US$ 7.50 check or money order in the U.S.; a CAN$6.00
cheque or money order in Canada; and a UK£2.50 cheque or money order in the U.K. In other countries, Timex
will charge you for postage and handling. NEVER INCLUDE A SPECIAL WATCHBAND OR ANY OTHER ARTICLE OF
PERSONAL VALUE IN YOUR SHIPMENT.
For the U.S., please call 1-800-448-4639 for additional warranty information. For Canada, call 1-800-263-0981. For
Brazil, call 0800-168787. For Mexico, call 01-800-01-060-00. For Central America, the Caribbean, Bermuda and the
Bahamas, call (501) 370-5775 (U.S.). For Asia, call 852-2815-0091. For the U.K., call 44 208 687 9620. For Portugal,
call 351 212 946 017. For France, call 33 3 81 63 42 00. For Germany, call +43 662 88 92130. For the Middle East
and Africa, call 971-4-310850. For other areas, please contact your local Timex retailer or Timex distributor for
warranty information. In the U.S. and in certain other locations, participating Timex retailers can provide you with
a postage-paid, pre-addressed Watch Repair Mailer for your convenience in obtaining factory service.
GARANTIE INTERNATIONALE TIMEX
(É.-U. – GARANTIE LIMITÉE – VEUILLEZ CONSULTER LA COUVERTURE DU LIVRET D’INSTRUCTIONS POUR LES
MODALITÉS DE L’OFFRE DE GARANTIE PROLONGÉE)
Votre montre TIMEX est garantie contre les défauts de fabrication pour une période d’UN AN, à compter de la
date d’achat. Timex ainsi que ses affiliés honoreront cette garantie internationale.
Timex se réserve le droit de réparer votre montre en y installant des composants neufs ou révisés, ou bien de
la remplacer avec un modèle identique ou similaire. IMPORTANT : CETTE GARANTIE NE COUVRE PAS VOTRE
MONTRE :
1) après l’expiration de la période de garantie,
2) si elle n’a pas été achetée chez un revendeur Timex agréé,
3) si la réparation n’a pas été faite par Timex,
4) s’il s’agit d’un accident, falsification ou abus,
5) s’il s’agit du verre, du bracelet, du boîtier ou des piles; Timex peut effectuer les réparations mais celles-ci
seront payantes.
CETTE GARANTIE AINSI QUE LES RECOURS INDIQUÉS DANS LES PRÉSENTES SONT EXCLUSIFS ET REMPLACENT
TOUTE AUTRE GARANTIE, IMPLICITE OU EXPLICITE, Y COMPRIS MAIS NON EXCLUSIVEMENT TOUTE GARANTIE
IMPLICITE DE COMMERCIALISATION OU D’APTITUDE À UN USAGE PARTICULIER. TIMEX N’EST RESPONSABLE
D’AUCUN DOMMAGE PARTICULIER, ACCESSOIRE OU INDIRECT. Certains pays et juridictions interdisent les
limitations des garanties implicites et les exclusions ou restrictions sur les dommages ; les présentes restrictions
peuvent donc ne pas vous être applicables. Cette garantie vous confère des droits légaux précis. Il se peut que
vous bénéficiez d’autres droits, lesquels varieront selon le pays et la juridiction.
Pour obtenir le service garanti, retourner la montre à Timex, une de ses filiales ou le détaillant Timex qui vous a
vendu la montre. Inclure le Coupon de réparation original rempli ou, pour les É.-U. ou le Canada seulement, ce
même coupon rempli ou une feuille comprenant votre nom, adresse, numéro de téléphone ainsi que la date et le
lieu de l’achat. Afin de couvrir les frais de retour de la montre (ce ne sont pas des frais de réparation), prière
d’inclure un chèque ou un mandat-poste de 7,50 $US (É.-U.), de 6,00 $ (Canada) ou de 2,50 £ (Royaume-Uni).
Pour les autres pays, Timex vous demandera de couvrir les frais de poste et de manutention. NE JAMAIS
INCLURE DANS VOTRE ENVOI UN BRACELET SPÉCIAL OU TOUT ARTICLE AYANT UNE VALEUR SENTIMENTALE.
Pour les Etats-Unis, vous pouvez appeler le 1 800 448 4639 pour plus de renseignements. Pour le Canada,
appelez le 1 800 263 0981. Pour le Brésil, appelez le 0800 168787. Pour le Mexique, appelez le 01 800 01 060 00.
Pour l’Amérique Centrale, les Caraïbes, les Bermudes et les Bahamas, appelez le 501 370 5775 (É.-U.). Pour
l’Asie, appelez le 852 2815 0091. Pour le Royaume-Uni, appelez le 44 208 687 9620. Pour le Portugal, appelez le
351 212 946 017. Pour la France, appelez le 33 3 81 63 42 00. Pour l'Allemagne, appelez le +43 662 88 92130.
Pour le Moyen-Orient et l'Afrique, appelez le 971 4 310850. Pour les autres régions, veuillez contacter votre
revendeur ou le distributeur Timex local pour toute information concernant la garantie. Aux Etats-Unis et dans
d’autres pays, vous pouvez disposer d’un emballage pré-payé, pré-adressé.
GARANTIA INTERNACIONAL TIMEX
(Garantia limitada USA - Lea por favor el folleto de instrucciones para los detalles
de la Oferta de extensión de la Garantía).
Su reloj TIMEX está garantizado contra cualquier defecto de fabricación por TIMEX Corporation durante un
período de UN AÑO a partir de la fecha de compra. TIMEX y sus compañías subsidiarias en todo el mundo
aceptarán esta Garantía Internacional.
TIMEX notifica que, a nuestra discreción, su reloj será reparado con piezas nuevas o reacondicionado totalmente
con componentes debidamente revisados o será cambiado por otro reloj idéntico o similar. IMPORTANTE: ESTA
GARANTIA NO CUBRE LOS SIGUIENTES DEFECTOS O FALTAS DE SU RELOJ:
1. Si el período de garantía ha vencido.
2. Si su reloj no ha sido comprado en una agencia o tienda oficial TIMEX.
3. Si su reloj ha sido manipulado fuera del Servicio Técnico Oficial TIMEX.
4. Si su reloj evidencia pruebas de golpes, accidentes o abusos.
5. Si el cristal, correa, caja, pila o accesorios aparecen dañados o gastados. En estos casos TIMEX efectuará
la reparación y facturará su costo.
ESTA GARANTÍA Y LOS DERECHOS Y ACCIONES CONTENIDOS EN EL PRESENTE SON EXCLUSIVOS Y SUSTITUYEN A
TODAS LAS DEMÁS GARANTÍAS, EXPRESAS O IMPLÍCITAS, INCLUYENDO CUALESQUIERA GARANTÍAS IMPLÍCITAS
DE COMERCIABILIDAD O ADECUACIDAD PARA UN PROPÓSITO PARTICULAR. TIMEX NO ES RESPONSABLE DE
CUALQUIER DAÑO ESPECIAL, INCIDENTAL O EVENTUALES. Algunos países y estados no permiten limitaciones
sobre garantías implícitas y no permiten exclusiones o limitaciones sobre daños, por lo tanto estas limitaciones
pueden no corresponderle a usted. Esta garantía le ofrece derechos legales específicos y usted también puede
tener otros derechos que varían de país en país y de estado a estado.
Para obtener servicio cubierto por la garantía, por favor envíe su reloj a Timex, una de sus filiales o a la tienda
donde compró el reloj, conjuntamente con un Cupón de Reparación de Reloj original completado, o en los EE.UU.
y Canadá solamente, el Cupón de Reparación de reloj original completado o una declaración escrita indicando su
nombre, dirección, número de teléfono y fecha y lugar de la compra. Sírvase incluir lo siguiente con su reloj para
cubrir el franqueo y gastos administrativos (esto no es un cargo de reparación): un cheque o giro postal de
US$7.50 en los EE.UU., un cheque o giro postal de US$6.00 en Canadá; y un cheque o giro postal de UK£2.50 en
el Reino Unido y en otros países. Timex le cobrará por franqueo y gastos administrativos. NUNCA INCLUYA UNA
CORREA DE RELOJ ESPECIAL O CUALQUIER OTRO ARTÍCULO DE VALOR PERSONAL EN EL ENVÍO.
Para los EE.UU. llame por favor al 1-800-448-4639 para información adicional de su garantía. Para Canadá llame
al 1-800-263-0981. Para Brasil llame al 0800-168787. Para México 01-800-01-060-00. Para América Central,
Caribe, Bermudas y Bahamas llame al (501) 370-5775 (US). Para Asia llame al 852-2815-0091. Para el Reino
Unido, llame al 44 208 687 9620. Para Portugal, llame al 351 212 946 017. Para Francia, llame al 33 3 81 63 42 00.
Para Alemania, llame al +43 662 88 92130. Para el Medio Oriente y Africa, llame al 971-4-310850. Para otras
regiones, si desea información sobre la garantía, por favor comuníquese con el representante de Timex o el
distribuidor de Timex de su zona. En los EE.UU. y otros países, las tiendas autorizadas TIMEX le podrán informar y
facilitar pagos postales o sobres para envíos especiales de reparación de relojes TIMEX y ayudarle a conseguir
dicho servicio de fábrica.
BATTERY
Timex strongly recommends that a retailer or jeweler replace battery. If applicable, push
reset button when replacing battery. Battery type is indicated on caseback. Battery life esti-
mates are based on certain assumptions regarding usage; battery life may vary depending on
actual usage.
DO NOT DISPOSE OF BATTERY IN FIRE. DO NOT RECHARGE. KEEP LOOSE BATTERIES
AWAY FROM CHILDREN.
If your watch is water-resistant, meter marking or ( ) is indicated.
Water-Resistance Depth p.s.i.a.* Water Pressure Below Surface
30m/98ft 60
50m/164ft 86
100m/328 ft. 160
*pounds per square inch absolute
WATER RESISTANCE
WARNING: TO MAINTAIN WATER-RESISTANCE, DO NOT PRESS ANY BUTTONS UNDER
WATER.
1. Watch is water-resistant only as long as lens, push buttons and case remain intact.
2. Watch is not a diver watch and should not be used for diving.
3. Rinse watch with fresh water after exposure to salt water.
INDIGLO® NIGHT-LIGHT WITH NIGHT-MODE® FEATURE
A. Press INDIGLO to activate light.
Electroluminescent technology used in the INDIGLO® night-light illuminates watch face at
night and in low light conditions.
B. Press and hold iNDIGLO for three seconds (beep will sound) to activate or de-activate
NIGHT-MODE® feature.
C. While in NIGHT-MODE® feature, press any button to illuminate watch face for 3 seconds.
INDIGLO is a registered trademark of Indiglo Corporation in the U.S. and other countries.
PILE
Timex recommande fortement de faire changer la pile par un détaillant ou un bijoutier.
Le cas échéant, appuyer sur le bouton de remise à zéro lors du changement de la pile. Le type
de pile est indiqué sur le dos du boîtier. L’estimation de la durée de service de la pile est basée
sur certaines hypothèses quant à l’usage ; la durée réelle peut varier selon l’utilisation de la
montre.
NE PAS JETER LA PILE AU FEU. NE PAS RECHARGER LA PILE. GARDER LES PILES HORS DE
LA PORTÉE DES ENFANTS.
Si la montre est étanche, la profondeur maximale ou le symbole ( ) est indiqué.
Profondeur d’étanchéité p.s.i.a.Pression de l’eau sous la surface en p.s.i.a.*
30m/98 pi 60
50m/164 pi 86
100m/328 pi 160
*livres par pouce carré (abs.)
ÉTANCHÉITÉ
MISE EN GARDE : POUR PRÉSERVER L’ÉTANCHÉITÉ, NE PAS ENFONCER LES BOUTONS
SOUS L’EAU.
1. La montre est étanche aussi longtemps que le verre, les boutons et le boîtier sont intacts.
2. La montre n’est pas conçue pour la plongée. Ne pas l’utiliser dans ces conditions.
3. Rincer la montre à l’eau douce après tout contact avec l’eau de mer.
VEILLEUSE INDIGLO® À FONCTION NIGHT-MODE®
A. Appuyer sur INDIGLO pour activer l’éclairage. La technologie électroluminescente
utilisée dans la veilleuse INDIGLO® permet
d’illuminer la face de la montre la nuit et dans des conditions de faible éclairage.
B. Tenir INDIGLO enfoncé pendant trois secondes (jusqu’au bip sonore) pour activer ou désac-
tiver la fonction NIGHT-MODE®.
C. Dans NIGHT-MODE®, appuyer sur tout bouton pour illuminer la montre pendant 3 secondes.
INDIGLO est une marque déposée d’Indiglo Corporation aux États-Unis et dans d’autres pays.
PILA
Timex recomienda encarecidamente que un minorista o un joyero cambien la pila. Si
procede, oprima el botón de restablecimiento cuando cambie la pila. El tipo de pila se indica en
la parte de atrás de la caja. Las estimaciones de duración de la pila se basan en ciertas suposi-
ciones relacionadas con el uso; la duración de la pila puede variar dependiendo del uso real.
NO TIRE LA PILA AL FUEGO. NO LA RECARGUE. MANTENGA LAS PILAS SUELTAS FUERA
DEL ALCANCE DE LOS NIÑOS.
Si su reloj es resistente al agua, se indicarán los metros o aparecerá el símbolo ( ).
Profundidad de Resistencia al Agua p.s.i.a.* Presión bajo la superficie del agua
30m/98pies 60
50m/164pies 86
100m/328pies 160
*libras por pulgada cuadrada absoluta
RESISTENCIA AL AGUA
ADVERTENCIA: PARA MANTENER LA RESISTENCIA AL AGUA, NO OPRIMA NINGÚN BOTÓN
BAJO EL AGUA.
1. El reloj es resistente al agua solamente mientras el cristal, los botones y la caja permanez-
can intactos.
2. El reloj no es un reloj de submarinista y no debe utilizarse para realizar submarinismo.
3. Enjuague el reloj con agua fresca después de haber estado expuesto al agua salada.
LUZ NOCTURNA INDIGLO® CON NIGHT-MODE®
A. Oprima INDIGLO para activar la luz. La tecnología electroluminiscente
utilizada en la luz nocturna INDIGLO® ilumina toda la cara
del reloj por la noche y en condiciones de poca luz.
B. Oprima y sostenga INDIGLO durante tres segundos (se emitirá un sonido) para activar o
desactivar el modo nocturno NIGHT-MODE®.
C. Mientras está en el modo NIGHT-MODE®, oprima cualquier botón para iluminar la cara del
reloj durante 3 segundos.
INDIGLO es una marca registrada de Indiglo Corporation en los EE.UU. y otros países.
ALARME
1. Appuyer sur MODE jusqu’à afficher ALARM.
2. Appuyer sur SET/RECALL. Les chiffres des HEURES clignotent.
3. Appuyer sur START/SPLIT ou sur STOP/RESET pour augmenter ou diminuer le nombre.
4. Appuyer sur MODE pour sélectionner l'alarme MINUTES, AM (matin) ou PM (après-midi),
JOUR DE LA SEMAINE ou WEEK-END. À chaque étape, appuyer sur START/SPLIT ou sur
STOP/RESET pour modifier le nombre clignotant.
5. Appuyer sur SET/RECALL en tout temps pour valider et quitter un mode.
Appuyer sur n’importe quel bouton pour couper l’alarme. Si on n'appuie sur aucun bouton,
l'alarme sonne pendant 20 secondes et se déclenche à nouveau cinq minutes plus tard.
apparaît dans l'affichage de l'heure et de la date lorsque l'alarme est en marche.

THANK YOU FOR PURCHASING YOUR TIMEX WATCH.
EXTENDED WARRANTY
Available in U.S. only. Extend your warranty for an additional 4 years
from date of purchase for $5. You can pay with AMEX, Discover, Visa or
MasterCard by calling 1 800-448-4639 during normal business hours.
Payment must be made within 30 days of purchase. Name, address, tele-
phone number, purchase date, and 5-digit model number required. You
can also mail a check for $5 to: Timex Extended Warranty, P.O. Box 1676,
Dept. EF, Little Rock, AR 72203.
Please read instructions carefully to understand how to operate
your Timex watch. Your model may not have all of the features
described in this booklet.
www.timex.com
W-154-EU 939-095002
MERCI D’AVOIR ACHETÉ CETTE MONTRE TIMEX
Lire les instructions avec attention pour bien comprendre le fonctionnement
de cette montre Timex. Il est possible que ce modèle ne présente
pas toutes les fonctions décrites dans le dépliant.
LE AGRADECEMOS LA COMPRA DE SU RELOJ TIMEX.
Le rogamos lea atentamente las instrucciones para poner en
funcionamiento su reloj Timex. Es posible que su modelo no
tenga todas las características descritas en este folleto.
OBRIGADO POR TER COMPRADO O SEU RELÓGIO TIMEX.
Leia cuidadosamente as instruções para compreender como é que o
seu relógio Timex trabalha. O seu modelo poderá não ter todas as
funções descritas neste folheto.
If your watch is water-resistant, meter marking or ( ) is indicated.
Water-Resistance Depth p.s.i.a.* Water Pressure Below Surface
30m/98ft 60
50m/164ft 86
100m/328ft 160
*pounds per square inch absolute
WATER RESISTANCE
FEATURES
• Analog and digital time display • Calendar clock • Daily, weekly, week-
end alarms • 24-hour countdown timer with stop or repeat options
• 99-lap chronograph with 50-lap storage • Hourly chime
BASIC OPERATIONS
Press MODE to cycle through CHRONO, TIMER, ALARM and Time of Day
modes. Press INDIGLO to illuminate watch face. To set watch hands to
correct time, pull CROWN out and turn.
DIGITAL TIME AND DATE
Press MODE until you reach Time of Day. Press and hold START/SPLIT
to peek at date or time; hold for six seconds to select date or time as
normal display.
To set TIME or DATE:
1. Press and hold SET/RECALL. HOURS digits will flash.
2. Press START/SPLIT to advance or STOP/RESET to decrease HOURS
digits. Go through 12 hours for AM or PM.
3. Press MODE to select MINUTES, then START/SPLIT or STOP/RESET to
change.
4. Press MODE to select SECONDS, then START/SPLIT to set to 0.
5. Repeat to set DAY, MONTH, DATE, 12- or 24-hour time display format,
MONTH-DATE or DATE-MONTH format, hourly chime on/off, button
beep on/off.
6. Press SET/RECALL at any time to complete and exit setting.
ALARM
1.Press MODE until ALARM appears.
2. Press SET/RECALL. HOURS digits will flash.
3. Press START/SPLIT or STOP/RESET to increase or decrease value.
4. Press MODE to select MINUTES,AM or PM, DAILY, WEEKDAY or WEEK-
END alarm. At each step, press START/SPLIT or STOP/RESET to
change flashing value.
5. Press SET/RECALL at any time to complete and exit setting.
When alarm sounds, press any button to silence. If no button is pressed,
alarm will sound for 20 seconds and repeat itself five minutes later.
appears in time/date display when alarm is on.
COUNTDOWN TIMER
1. Press MODE until TIMER appears.
2. Press SET/RECALL to set countdown time. HOURS digits will flash.
3. Press START/SPLIT or STOP/RESET to increase or decrease value.
4. Press MODE to select MINUTES, SECONDS, and STOP at end or
REPEAT at end function (REPEAT automatically restarts Timer at end of
countdown).
5. At each step, press START/SPLIT or STOP/RESET to change flashing
value.
6. Press SET/RECALL at any time to complete and exit setting.
7. Press START/SPLIT to start Timer.
8. Press STOP/RESET to pause. Press START/SPLIT to resume or press
STOP/RESET twice to reset timer back to set value.
Watch will beep when countdown ends. Press any button to silence.
Timer will continue to run if you exit Timer mode. appears in
time/date display when Timer is running.
CHRONOGRAPH
1. Press MODE until CHRONO appears.
2. Press START/SPLIT to start Chrono.
3. Press START/SPLIT to record lap time.
4. Time of SPLIT or LAP will display for 10 seconds. Press MODE to
return to running Chrono before 10 seconds.
5. Press STOP/RESET to pause.
6. Press START/SPLIT to resume.
7. Press STOP/RESET to stop.
8. To recall a workout, press SET/RECALL, then press START/SPLIT or
STOP/RESET to move forward or backward between laps or splits.
9. Press and hold STOP/RESET to clear workout.
appears in time/date display when Chrono is running.
Tip: To change display format, press SET/RECALL; the word FORMAT will
appear and will then switch to a blinking LAP or SPLIT. Press
START/SPLIT to select Lap or Split as display.
BATTERY
Timex strongly recommends that a retailer or jeweler replace bat-
tery. If applicable, push reset button when replacing battery. Battery type
is indicated on caseback. Battery life estimates are based on certain
assumptions regarding usage; battery life may vary depending on actual
usage.
DO NOT DISPOSE OF BATTERY IN FIRE. DO NOT RECHARGE. KEEP
LOOSE BATTERIES AWAY FROM CHILDREN.
WARNING: TO MAINTAIN WATER-RESISTANCE, DO NOT PRESS ANY
BUTTONS UNDER WATER.
1. Watch is water-resistant only as long as lens, push buttons and case
remain intact.
2. Watch is not a diver watch and should not be used for diving.
3. Rinse watch with fresh water after exposure to salt water.
INDIGLO® NIGHT-LIGHT WITH NIGHT-MODE® FEATURE
A. Press INDIGLO to activate light. Patented (U.S. Patent Numbers
4,527,096 and 4,775,964) electroluminescent technology used in the
INDIGLO® night-light illuminates watch face at night and in low light
conditions.
B. Press and hold INDIGLO for three seconds (beep will sound) to activate
or de-activate NIGHT-MODE® feature.
C. While in NIGHT-MODE® feature, press any button to illuminate watch
face for 3 seconds.
INDIGLO is a registered trademark of Indiglo Corporation in the U.S. and
other countries.
Si su reloj es resistente al agua, se indicarán los metros o aparecerá el
símbolo ( ).
Profundidad p.s.i.a. * Presión bajo
de Resistencia al Agua la superficie del agua
30m/98pies 60
50m/164pies 86
100m/328pies 160
*libras por pulgada cuadrada absoluta
RESISTENCIA AL AGUA
FUNCIONES
• Pantalla de hora digital y análoga • Calendario • Alarma diaria, semanal
y de fin de semana • Contador de cuenta regresiva hasta 24-horas con
opciones para detener o repetir • Cronógrafo de 99 vueltas con capaci-
dad de guardar 50 vueltas • Timbre cada hora
OPERACIONES BÁSICAS
Oprima MODE para recorrer los modos CHRONO (cronógrafo), TIMER
(contador), ALARM (alarma) y Time of Day (Hora del día). Oprima
INDIGLO para iluminar la cara del reloj. Para fijar las manecillas del reloj
en la hora correcta, jale CROWN (corona) y gírela.
HORA DIGITAL Y FECHA
Oprima MODE hasta que llegue a Time of Day (hora del día). Oprima y
sostenga START/SPLIT para dar un vistazo a la hora o fecha, sostenga
por seis segundos para seleccionar hora o fecha como pantalla normal.
Para fijar HORA o FECHA:
1. Oprima y sostenga SET/RECALL. Los dígitos de HORAS se iluminarán.
2. Oprima START/SPLIT para avanzar o STOP/RESET para retroceder los
dígitos de HORAS. Recorra 12 horas para fijar AM (mañana) o PM (tarde).
3. Oprima MODE para seleccionar MINUTOS, luego START/SPLIT o
STOP/RESET para cambiar.
4. Oprima MODE para seleccionar SEGUNDOS, luego START/SPLIT para
fijarlos en 0.
5. Repita el procedimiento para fijar DÍA, MES, FECHA, pantalla en forma-
to de 12- o 24-horas, formato de MES-FECHA o FECHA-MES, activar o
desactivar el timbre cada hora, botón para encender/apagar el sonido.
6. Oprima SET/RECALL en cualquier momento para completar el ajuste
y salir.
ALARMA
1. Oprima MODE hasta que aparezca ALARM.
2. Oprima SET/RECALL. Los dígitos de HORAS se iluminarán.
3. Oprima START/SPLIT o STOP/RESET para aumentar o disminuir el
valor.
4. Oprima MODE para seleccionar MINUTOS, AM (mañana) o PM (tarde),
las alarmas DAILY (diaria), WEEKDAY (semanal) o WEEKEND (fin de
semana). En cada paso, oprima START/SPLIT o STOP/RESET para
cambiar el valor intermitente.
5. Oprima SET/RECALL en cualquier momento para completar el ajuste y
salir.
Cuando suene la alarma, oprima cualquier botón para silenciarla. Si ningún
botón se oprime, la alarma sonará por 20 segundos y se repetirá automáti-
camente cinco minutos más tarde. aparece en la pantalla de
hora/fecha cuando la alarma está activada.
CONTADOR DE CUENTA REGRESIVA
1. Oprima MODE hasta que TIMER aparezca.
2. Oprima SET/RECALL para fijar el conteo regresivo. Los dígitos de
HORAS se iluminarán.
3. Oprima START/SPLIT o STOP/RESET para aumentar o disminuir el
valor.
4. Oprima MODE para seleccionar MINUTOS, SEGUNDOS, y PARAR al final
o REPETIR al final de la función (REPETIR reinicia automáticamente el
Contador al final del conteo regresivo).
5. En cada paso, oprima START/SPLIT o STOP/RESET para cambiar el
valor intermitente.
6. Oprima SET/RECALL en cualquier momento para completar el ajuste y
salir.
7. Oprima START/SPLIT para iniciar el Contador.
8. Oprima STOP/RESET para pausarlo. Oprima START/SPLIT para
reanudarlo u oprima STOP/RESET dos veces para regresar el contador
a un nuevo ajuste.
El reloj sonará cuando termine el conteo regresivo. Oprima cualquier
botón para silenciarlo. El Contador seguirá funcionando si usted sale del
modo Timer. aparece en la pantalla de hora/fecha cuando el Contador
está funcionando.
CRONÓGRAFO
1. Oprima MODE hasta que aparezca CHRONO (cronógrafo).
2. Oprima START/SPLIT para iniciar el Cronógrafo.
3. Oprima START/SPLIT para registrar el tiempo de vuelta.
4. SPLIT (tomar una fracción) o LAP (tiempo de vuelta) se verá durante 10
segundos. Oprima MODE para volver al Cronógrafo en funcionamiento
antes de 10 segundos.
5. Oprima STOP/RESET para pausarlo.
6. Oprima START/SPLIT para reanudarlo.
7. Oprima STOP/RESET para detenerlo.
8. Para revisar una actividad, oprima SET/RECALL, oprima luego
START/SPLIT o STOP/RESET para avanzar o retroceder entre tiempos
de vuelta o fracciones.
9. Oprima y sostenga STOP/RESET para borrar la actividad.
aparece en la pantalla time/date (hora/fecha) cuando el Cronógrafo
está funcionando.
Sugerencia: Para cambiar el formato de la pantalla, oprima SET/RECALL;
la palabra FORMAT (formato) aparecerá y luego cambiará a
LAP (vuelta) o SPLIT (fracción) intermitentes. Oprima
START/SPLIT para seleccionar Lap (vuelta) o Split (fracción)
como pantalla.
PILA
Timex recomienda encarecidamente que un minorista o un joyero
cambien la pila. Si procede, oprima el botón de restablecimiento cuan-
do cambie la pila. El tipo de pila se indica en la parte de atrás de la caja.
Las estimaciones de duración de la pila se basan en ciertas suposiciones
relacionadas con el uso; la duración de la pila puede variar dependiendo
del uso real.
NO TIRE LA PILA AL FUEGO. NO LA RECARGUE. MANTENGA LAS
PILAS SUELTAS FUERA DEL ALCANCE DE LOS NIÑOS.
ADVERTENCIA: PARA MANTENER LA RESISTENCIA AL AGUA, NO
OPRIMA NINGÚN BOTÓN BAJO EL AGUA.
1. El reloj es resistente al agua solamente mientras el cristal, los botones
y la caja permanezcan intactos.
2. El reloj no es un reloj de submarinista y no debe utilizarse para
realizar submarinismo.
3. Enjuague el reloj con agua fresca después de haber estado expuesto
al agua salada.
LUZ NOCTURNA INDIGLO® CON NIGHT-MODE®
A. Oprima INDIGLO para activar la luz. La tecnología electroluminiscente
patentada (patentes de EE.UU. 4.527.096 y 4.775.964) utilizada en la
luz nocturna INDIGLO® ilumina toda la cara del reloj por la noche y en
condiciones de poca luz.
B. Oprima y sostenga INDIGLO durante tres segundos (se emitirá un
sonido) para activar o desactivar el modo nocturno NIGHT-MODE®.
C. Mientras está en el modo NIGHT-MODE®, oprima cualquier botón para
iluminar la cara del reloj durante 3 segundos.
INDIGLO es una marca registrada de Indiglo Corporation en los EE.UU. y
otros países.
Se o seu relógio for resistente à água, ele indicará os metros ou ( )
Profundidade de resistência Pressão da água abaixo da superfície
à água em p.s.i.a. *
30 m/98 pés 60
50 m/164 pés 86
100 m/328 pés 160
*pressão absoluta em libras por polegada quadrada
RESISTÊNCIA À ÁGUA
FUNÇÕES
• Mostrador das horas analógico e digital • Calendário • Alarmes diário,
semanal e de fim de semana • Temporizador de contagem decrescente
com 24 horas e opções de paragem e de repetição
• Cronógrafo de 99 voltas com memória para 50 voltas • Sinal horário
FUNÇÕES BÁSICAS
Carregue no botão MODE para passar sucessivamente pelos modos
CHRONO, TIMER, ALARM e Hora do dia. Carregue no botão INDIGLO para
iluminar o mostrador do relógio. Para acertar os ponteiros do relógio na
hora correcta, puxe a COROA para fora e rode-a.
HORA E DATA DIGITAIS
Carregue no botão MODE até aparecer a Hora do Dia. Carregue e segure
o botão START/SPLIT para ver a data ou a hora; e, segure durante seis
segundos, para seleccionar a data ou a hora como modo normal exibido
no mostrador.
Para acertar a HORA ou a DATA:
1. Carregue e segure o botão SET/RECALL. Os algarismos das HORAS
começarão a piscar.
2. Carregue no botão START/SPLIT para avançar ou no STOP/RESET
para diminuir os algarismos das HORAS. Passe pelas 12 horas para
escolher AM ou PM.
3. Carregue no botão MODE para seleccionar os MINUTOS e, depois, no
START/SPLIT ou no STOP/RESET para os mudar.
4. Carregue no botão MODE para seleccionar os SEGUNDOS e, depois,
carregue no START/SPLIT para os pôr a zero.
5. Repita para acertar o DIA, MÊS, DATA, o formato de 12 ou 24 horas, o
formato MÊS-DATA ou DATA-MÊS, ligar/desligar o sinal horário e
ligar/desligar o alarme sonoro.
6. Carregue no botão SET/RECALL en qualquer altura para terminar e
sair do modo de acerto.
ALARME (DESPERTADOR)
1. Carregue no botão MODE até aparecer ALARM.
2. Carregue no botão SET/RECALL. Os algarismos das HORAS
começarão a piscar.
3. Carregue no botão START/SPLIT ou no STOP/RESET para aumentar
ou diminuir o valor.
4. Carregue no botão MODE para seleccionar o alarme para MINUTOS,
AM ou PM, DAILY (DIÁRIO), WEEKDAY (DIA DE SEMANA) ou WEEKEND
(FIM DE SEMANA). Em cada um dos passos, carregue no botão
START/SPLIT ou no STOP/RESET para alterar o valor que estiver
a piscar.
5. Carregue no botão SET/RECALL em qualquer altura para terminar
e sair do modo de acerto.
Quando o alarme tocar, carregue em qualquer um dos botões para o
silenciar. Se não carregar em nenhum botão, o alarme tocará durante 20
segundos e, depois, repetirá o sinal cinco minutos mais tarde. O símbolo
aparece no mostrador de Hora/Data quando o alarme estiver ligado.
TEMPORIZADOR DE CONTAGEM DECRESCENTE
1. Carregue no botão MODE até aparecer TIMER.
2. Carregue no botão SET/RECALL para seleccionar o tempo para a
contagem decrescente. Os algarismos das HORAS começarão a piscar.
3. Carregue no botão START/SPLIT ou no STOP/RESET para aumentar
ou diminuir o valor.
4. Carregue no botão MODE para seleccionar a função MINUTOS,
SEGUNDOS e STOP no final ou REPEAT no final (REPEAT
automaticamente volta a iniciar o Temporizador no fim da contagem
decrescente).
5. Em cada um dos passos, carregue no botão START/SPLIT ou no
STOP/RESET para alterar o valor que estiver a piscar.
6. Carregue no botão SET/RECALL en qualquer altura para terminar e
sair do modo de acerto.
7. Carregue no botão START/SPLIT para iniciar o Temporizador.
8. Carregue no botão STOP/RESET para fazer uma pausa. Carregue no
botão START/SPLIT para continuar ou carregue no botão STOP/RESET
duas vezes para fazer voltar o temporizador ao valor inicial.
O relógio emitirá um sinal sonoro quando tiver terminado a contagem
decrescente do tempo. Carregue em qualquer um dos botões para
silenciar este sinal sonoro. O temporizador contunuará a funcionar se
sair do modo de Temporizador. O símbolo aparece no mostrador de
Hora/Data quando o Temporizador estiver a funcionar.
CRONÓGRAFO
1. Carregue no botão MODE até aparecer CHRONO.
2. Carregue no botão START/STOP para iniciar a contagem
do cronógrafo.
3. Carregue no botão START/SPLIT para registar a duração da volta.
4. A duração da volta (LAP) ou o tempo parcial (SPLIT) serão exibidos
durante 10 segundos. Carregue no botão MODE antes dos 10
segundos se quiser fazer voltar o cronógrafo à contagem.
5. Carregue no botão STOP/RESET para fazer uma pausa.
6. Carregue no botão START/SPLIT para continuar.
7. Carregue no botão STOP/RESET para parar.
8. Para chamar um evento da memória, carregue no botão SET/RECALL,
e, depois, carregue no START/SPLIT ou no STOP/RESET para se
mover para diante ou para atrás entre voltas ou tempos parciais.
9. Carregue e segure o botão STOP/RESET para apagar tempos de um
evento, armazenados em memória.
O símbolo aparece no mostrador de Hora/Data quando o Cronógrafo
estiver a funcionar.
Conselho útil: Para mudar o formato do mostrador, carregue no botão
SET/RECALL;e a palavra FORMAT irá aparecer e, logo em seguida,
mudará para uma volta (LAP) ou tempo parcial (SPLIT) que estará a
piscar. Carregue no botão START/SPLIT para seleccionar no
mostrador a exibição de Volta (Lap) ou de Tempo Intermédio (Split).
BATERIA
A Timex recomenda fortemente que mande substituir a bateria
numa relojoaria ou numa joalharia. Se for necessário, carregue no
botão “reset” (rearmar) quando substituir a bateria. O tipo da bateria
está indicado na traseira da caixa. A duração da bateria é estimada
assumindo certas características de uso; a duração da bateria variará,
dependendo do seu uso real.
NÃO DEITE A BATERIA NO FOGO. NÃO VOLTE A CARREGAR A BATE-
RIA. MANTENHA AS BATERIAS FORA DO ALCANCE DAS CRIANÇAS.
AVISO: PARA MANTER A RESISTÊNCIA À ÁGUA, NÃO CARREGUE EM
NENHUM DOS BOTÕES DEBAIXO DE ÁGUA.
1. O relógio é resistente à água apenas enquanto a lente, os botões e a
caixa se mantiverem intactos.
2. O relógio não é um relógio de mergulho e não deverá ser usado para
mergulhar.
3 Lave o relógio com água doce depois de ter estado em contacto com
a água salgada.
LUZ NOCTURNA INDIGLO® COM MODO NIGHT-MODE®
A. Carregue no botão INDIGLO para activar a luz do mostrador do
relógio.A tecnologia electroluminescente
usada na luz nocturna INDIGLO® ilumina o
mostrador completo do relógio à noite e em condições de pouca luz.
B. Carregue e segure o botão INDIGLO durante três segundos (ouvirá
um sinal sonoro), para activar ou desactivar o modo NIGHT-MODE®.
C. Enquanto estiver em NIGHT-MODE®, carregue em qualquer um dos
botões para iluminar o mostrador do relógio durante 3 segundos.
INDIGLO é uma marca registada da Indiglo Corporation nos EUA e
noutros países.
Si la montre est étanche, la profondeur maximale ou le symbole ( )
est indiqué.
Profondeur d’étanchéité p.s.i.a.Pression de l’eau
sous la surface en p.s.i.a.*
30m/98 ft 60
50m/164 ft 86
100m/328 ft 160
*livres par pouce carré (abs.)
ÉTANCHÉITÉ
FONCTIONS
• Affichage analogue et numérique • Horloge calendrier • Alarme
quotidienne, hebdomadaire, week-end • Minuterie 24 heures avec
options arrêt ou rappel • Chronomètre 99 temps intermédiaires avec
capacité de stockage de 50 tours • Carillon horaire
OPÉRATIONS DE BASE
Appuyer sur MODE pour afficher successivement les modes CHRONO,
TIMER (minuterie), ALARM et Heures.Appuyer sur INDIGLO
pour illuminer la face de la montre. Pour régler les aiguilles de la montre,
tirer sur la COURONNE et tourner.
AFFICHAGE NUMÉRIQUE DE L’HEURE ET DU JOUR
Appuyer sur MODE jusqu’à afficher l’Heure du jour. Tenir START/SPLIT
enfoncé pour afficher brièvement la date ou l’heure ; tenir enfoncé pen-
dant six secondes pour sélectionner la date ou l’heure en affichage nor-
mal.
Réglage de l’HEURE ou de la DATE :
1. Tenir SET/RECALL enfoncé. Les chiffres des HEURES clignotent.
2. Appuyer sur START/SPLIT pour faire avancer les chiffres des HEURES
ou STOP/RESET pour les faire reculer. Faire défiler 12 heures pour
alterner entre AM (matin) et PM (après-midi).
3. Appuyer sur MODE pour sélectionner les MINUTES, puis sur
START/SPLIT ou sur STOP/RESET pour les régler.
4. Appuyer sur MODE pour sélectionner les SECONDES, puis sur
START/SPLIT pour remettre à zéro.
5. Répéter pour régler le JOUR, le MOIS, la DATE et l’affichage de l’heure
sur 12 ou 24 heures, le format MOIS-DATE ou DATE-MOIS, la mise en
marche ou l’arrêt (on/off) du carillon horaire et la mise en marche ou
l’arrêt (on/off) du bip sonore.
6. Appuyer sur SET/RECALL en tout temps pour valider et quitter un
mode.
ALARME
1. Appuyer sur MODE jusqu’à afficher ALARM.
2. Appuyer sur SET/RECALL. Les chiffres des HEURES clignotent.
3. Appuyer sur START/SPLIT ou sur STOP/RESET pour augmenter ou
diminuer le nombre.
4. Appuyer sur MODE pour sélectionner l’alarme MINUTES, AM (matin)
ou PM (après-midi), JOUR DE LA SEMAINE ou WEEK-END. À chaque
étape, appuyer sur START/SPLIT ou sur STOP/RESET pour modifier le
nombre clignotant.
5. Appuyer sur SET/RECALL en tout temps pour valider et quitter un
mode.
Appuyer sur n’importe quel bouton pour couper l’alarme. Si on n’appuie
sur aucun bouton, l’alarme sonne pendant 20 secondes et se déclenche à
nouveau cinq minutes plus tard. apparaît dans l’affichage de l’heure et
de la date lorsque l’alarme est en marche.
MINUTERIE
1. Appuyer sur MODE jusqu’à afficher TIMER.
2. Appuyer sur SET/RECALL pour régler la durée de la minuterie. Les
chiffres des HEURES clignotent.
3. Appuyer sur START/SPLIT ou sur STOP/RESET pour augmenter ou
diminuer le nombre.
4. Appuyer sur MODE pour sélectionner les MINUTES, les SECONDES et
la fonction STOP à la fin ou REPEAT à la fin (REPEAT remet automa-
tiquement la minuterie en marche à la fin du compte à rebours).
5. À chaque étape, appuyer sur START/SPLIT ou sur STOP/RESET pour
modifier le nombre clignotant.
6. Appuyer sur SET/RECALL en tout temps pour valider et quitter un
mode.
7. Appuyer sur START/SPLIT pour démarrer le compte à rebours.
8. Appuyer sur STOP/RESET pour marquer une pause. Appuyer sur
START/SPLIT pour remettre en marche ou appuyer deux fois sur
STOP/RESET pour remettre la minuterie au nombre initial.
La montre émet un bip à la fin du compte à rebours.Appuyer sur n’im-
porte quel bouton pour l’arrêter. Le compte à rebours se poursuit
lorsque vous quittez le mode Timer (minuterie). apparaît dans l’af-
fichage de l’heure et de la date lorsque la minuterie (Timer) est en
marche.
CHRONOMÈTRE
1. Appuyer sur MODE jusqu’à afficher CHRONO.
2. Appuyer sur START/SPLIT pour faire démarrer le chronomètre.
3. Appuyer sur START/SPLIT pour enregistrer le temps au tour.
4. Le temps intermédiaire (SPLIT) ou au tour (LAP) s’affiche pendant 10
secondes.Appuyer sur MODE pour retourner à la minuterie en
marche avant 10 secondes.
5. Appuyer sur STOP/RESET pour marquer une pause.
6. Appuyer sur START/SPLIT pour redémarrer.
7. Appuyer sur STOP/RESET pour arrêter.
8. Pour rappeler les temps d’une séance d’exercice, appuyer sur
SET/RECALL, puis appuyer sur START/SPLIT ou STOP/RESET pour
faire avancer ou reculer les temps au tour ou intermédiaires.
9. Tenir STOP/RESET enfoncé pour effacer les temps en mémoire.
apparaît dans l’affichage de l’heure et de la date lorsque le Chrono
est en marche.
Suggestion : Pour modifier le format de l’affichage, appuyer sur
SET/RECALL ; le mot FORMAT s’affiche, puis les mots LAP
ou SPLIT clignotent. Appuyer sur START/SPLIT
pour sélectionner l’affichage des temps au tour (Lap) ou
intermédiaires (Split).
PILE
Timex recommande fortement de faire changer la pile par un
détaillant ou un bijoutier. Le cas échéant, appuyer sur le bouton de
remise à zéro lors du changement de la pile. Le type de pile est indiqué
sur le dos du boîtier. L’estimation de la durée de service de la pile est
basée sur certaines hypothèses quant à l’usage ; la durée réelle peut
varier selon l’utilisation de la montre.
NE PAS JETER LA PILE AU FEU. NE PAS RECHARGER LA PILE.
GARDER LES PILES HORS DE LA PORTÉE DES ENFANTS.
MISE EN GARDE : POUR PRÉSERVER L’ÉTANCHÉITÉ, NE PAS ENFON-
CER LES BOUTONS SOUS L’EAU.
1. La montre est étanche aussi longtemps que le verre, les boutons et le
boîtier sont intacts.
2. La montre n’est pas conçue pour la plongée. Ne pas l’utiliser dans ces
conditions.
3. Rincer la montre à l’eau douce après tout contact avec l’eau de mer.
VEILLEUSE INDIGLO® À FONCTION NIGHT-MODE®
A. Appuyer sur INDIGLO pour activer l’éclairage. La technologie électro-
luminescente brevetée (brevets américains n° 4,527,096 et 4,775,964)
utilisée dans la veilleuse INDIGLO® permet d’illuminer la face de la
montre la nuit et dans des conditions de faible éclairage.
B. Tenir INDIGLO enfoncé pendant trois secondes (jusqu’au bip sonore)
pour activer ou désactiver la fonction NIGHT-MODE®.
C. Dans NIGHT-MODE®, appuyer sur tout bouton pour illuminer la montre
pendant 3 secondes.
INDIGLO est une marque déposée d’Indiglo Corporation aux États-Unis et
dans d’autres pays.
INDIGLO
START/
SPLIT
MODE
CROWN
SET/
RECALL
STOP/
RESET
INDIGLO
START/
SPLIT
MODE
CROWN
SET/
RECALL
STOP/
RESET
INDIGLO
START/
SPLIT
MODE
CROWN
SET/
RECALL
STOP/
RESET
INDIGLO
START/
SPLIT
MODE
CROWN
SET/
RECALL
STOP/
RESET
La página se está cargando...
La página se está cargando...
La página se está cargando...
Transcripción de documentos
www.timex.com W-154-US 939-095000 THANK YOU FOR PURCHASING YOUR TIMEX WATCH. EXTENDED WARRANTY Available in U.S. only. Extend your warranty for an additional 4 years from date of purchase for $5. You can pay with AMEX, Discover, Visa or MasterCard by calling 1 800-448-4639 during normal business hours. Payment must be made within 30 days of purchase. Name, address, telephone number, purchase date, and 5-digit model number required. You can also mail a check for $5 to: Timex Extended Warranty, P.O. Box 1676, Dept. EF, Little Rock, AR 72203. Please read instructions carefully to understand how to operate your Timex watch. Your model may not have all of the features described in this booklet. MERCI D’AVOIR ACHETÉ CETTE MONTRE TIMEX Lire les instructions avec attention pour bien comprendre le fonctionnement de cette montre Timex. Il est possible que ce modèle ne présente pas toutes les fonctions décrites dans le dépliant. LE AGRADECEMOS LA COMPRA DE SU RELOJ TIMEX. Le rogamos lea atentamente las instrucciones para poner en funcionamiento su reloj Timex. Es posible que su modelo no tenga todas las características descritas en este folleto. FUNCIONES FONCTIONS • Affichage analogue et numérique • Horloge calendrier • Alarme quotidienne, hebdomadaire, week-end • Minuterie 24 heures avec options arrêt ou rappel • Chronomètre 99 temps intermédiaires avec capacité de stockage de 50 tours • Carillon horaire FEATURES • Pantalla de hora digital y análoga • Calendario • Alarma diaria, semanal y de fin de semana • Contador de cuenta regresiva hasta 24-horas con opciones para detener o repetir • Cronógrafo de 99 vueltas con capacidad de guardar 50 vueltas • Timbre cada hora OPÉRATIONS DE BASE OPERACIONES BÁSICAS • Analog and digital time display • Calendar clock • Daily, weekly, weekend alarms • 24-hour countdown timer with stop or repeat options • 99-lap chronograph with 50-lap storage • Hourly chime INDIGLO SET/ RECALL BASIC OPERATIONS INDIGLO SET/ RECALL CROWN MODE STOP/ RESET INDIGLO SET/ RECALL STOP/ RESET START/ SPLIT Press MODE to cycle through CHRONO, TIMER, ALARM and Time of Day modes. Press INDIGLO to illuminate watch face. To set watch hands to correct time, pull CROWN out and turn. DIGITAL TIME AND DATE Press MODE until you reach Time of Day. Press and hold START/SPLIT to peek at date or time; hold for six seconds to select date or time as normal display. To set TIME or DATE: 1. Press and hold SET/RECALL. HOURS digits will flash. 2. Press START/SPLIT to advance or STOP/RESET to decrease HOURS digits. Go through 12 hours for AM or PM. 3. Press MODE to select MINUTES, then START/SPLIT or STOP/RESET to change. 4. Press MODE to select SECONDS, then START/SPLIT to set to 0. 5. Repeat to set DAY, MONTH, DATE, 12- or 24-hour time display format, MONTH-DATE or DATEMONTH format, hourly chime on/off, button beep on/off. 6. Press SET/RECALL at any time to complete and exit setting. MODE STOP/ RESET START/ SPLIT CROWN MODE CROWN Appuyer sur MODE pour afficher successivement les modes CHRONO, TIMER (minuterie), ALARM et Heures. Appuyer sur INDIGLO pour illuminer la face de la montre. Pour régler les aiguilles de la montre, tirer sur la COURONNE et tourner. START/ SPLIT Oprima MODE para recorrer los modos CHRONO (cronógrafo), TIMER (contador), ALARM (alarma) y Time of Day (Hora del día). Oprima INDIGLO para iluminar la cara del reloj. Para fijar las manecillas del reloj en la hora correcta, jale CROWN (corona) y gírela. AFFICHAGE NUMÉRIQUE DE L'HEURE ET DU JOUR HORA DIGITAL Y FECHA Appuyer sur MODE jusqu'à afficher l'Heure du jour. Tenir START/SPLIT enfoncé pour afficher brièvement la date ou l'heure ; tenir enfoncé pendant six secondes pour sélectionner la date ou l'heure en affichage normal. Réglage de l'HEURE ou de la DATE : 1. Tenir SET/RECALL enfoncé. Les chiffres des HEURES clignotent. 2. Appuyer sur START/SPLIT pour faire avancer les chiffres des HEURES ou STOP/RESET pour les faire reculer. Faire défiler 12 heures pour alterner entre AM (matin) et PM (après-midi). 3. Appuyer sur MODE pour sélectionner les MINUTES, puis sur START/SPLIT ou sur STOP/RESET pour les régler. 4. Appuyer sur MODE pour sélectionner les SECONDES, puis sur START/SPLIT pour remettre à zéro. 5. Répéter pour régler le JOUR, le MOIS, la DATE et l'affichage de l'heure sur 12 ou 24 heures, le format MOIS-DATE ou DATE-MOIS, la mise en marche ou l'arrêt (on/off) du carillon horaire et la mise en marche ou l'arrêt (on/off) du bip sonore. 6. Appuyer sur SET/RECALL en tout temps pour valider et quitter un mode. Oprima MODE hasta que llegue a Time of Day (hora del día). Oprima y sostenga START/SPLIT para dar un vistazo a la hora o fecha, sostenga por seis segundos para seleccionar hora o fecha como pantalla normal. Para fijar HORA o FECHA: 1. Oprima y sostenga SET/RECALL. Los dígitos de HORAS se iluminarán. 2. Oprima START/SPLIT para avanzar o STOP/RESET para retroceder los dígitos de HORAS. Recorra 12 horas para fijar AM (mañana) o PM (tarde). 3. Oprima MODE para seleccionar MINUTOS, luego START/SPLIT o STOP/RESET para cambiar. 4. Oprima MODE para seleccionar SEGUNDOS, luego START/SPLIT para fijarlos en 0. 5. Repita el procedimiento para fijar DÍA, MES, FECHA, pantalla en formato de 12- o 24-horas, formato de MES-FECHA o FECHA-MES, activar o desactivar el timbre cada hora, botón para encender/apagar el sonido. 6. Oprima SET/RECALL en cualquier momento para completar el ajuste y salir. CRONÓGRAFO CHRONOMÈTRE CHRONOGRAPH 1. Press MODE until CHRONO appears. 2. Press START/SPLIT to start Chrono. 3. Press START/SPLIT to record lap time. 4. Time of SPLIT or LAP will display for 10 seconds. Press MODE to return to running Chrono before 10 seconds. 5. Press STOP/RESET to pause. 6. Press START/SPLIT to resume. 7. Press STOP/RESET to stop. 8. To recall a workout, press SET/RECALL, then press START/SPLIT or STOP/RESET to move forward or backward between laps or splits. 9. Press and hold STOP/RESET to clear workout. appears in time/date display when Chrono is running. Tip: To change display format, press SET/RECALL; the word FORMAT will appear and will then switch to a blinking LAP or SPLIT. Press START/SPLIT to select Lap or Split as display. COUNTDOWN TIMER 1. Press MODE until TIMER appears. 2. Press SET/RECALL to set countdown time. HOURS digits will flash. 3. Press START/SPLIT or STOP/RESET to increase or decrease value. 4. Press MODE to select MINUTES, SECONDS, and STOP at end or REPEAT at end function (REPEAT automatically restarts Timer at end of countdown). 5. At each step, press START/SPLIT or STOP/RESET to change flashing value. 6. Press SET/RECALL at any time to complete and exit setting. 7. Press START/SPLIT to start Timer. 8. Press STOP/RESET to pause. Press START/SPLIT to resume or press STOP/RESET twice to reset timer back to set value. Watch will beep when countdown ends. Press any button to silence. Timer will continue to run if you exit Timer mode. appears in time/date display when Timer is running. ALARM 1. Press MODE until ALARM appears. 2. Press SET/RECALL. HOURS digits will flash. 3. Press START/SPLIT or STOP/RESET to increase or decrease value. 4. Press MODE to select MINUTES, AM or PM, DAILY, WEEKDAY or WEEKEND alarm. At each step, press START/SPLIT or STOP/RESET to change flashing value. 5. Press SET/RECALL at any time to complete and exit setting. When alarm sounds, press any button to silence. If no button is pressed, alarm will sound for 20 seconds and repeat itself five minutes later. appears in time/date display when alarm is on. 1. Appuyer sur MODE jusqu’à afficher CHRONO. 2. Appuyer sur START/SPLIT pour faire démarrer le chronomètre. 3. Appuyer sur START/SPLIT pour enregistrer le temps au tour. 4. Le temps intermédiaire (SPLIT) ou au tour (LAP) s'affiche pendant 10 secondes. Appuyer sur MODE pour retourner à la minuterie en marche avant 10 secondes. 5. Appuyer sur STOP/RESET pour marquer une pause. 6. Appuyer sur START/SPLIT pour redémarrer. 7. Appuyer sur STOP/RESET pour arrêter. 8. Pour rappeler les temps d'une séance d'exercice, appuyer sur SET/RECALL, puis appuyer sur START/SPLIT ou STOP/RESET pour faire avancer ou reculer les temps au tour ou intermédiaires. 9. Tenir STOP/RESET enfoncé pour effacer les temps en mémoire. apparaît dans l'affichage de l'heure et de la date lorsque le Chrono est en marche. Suggestion : Pour modifier le format de l'affichage, appuyer sur SET/RECALL ; le mot FORMAT s'affiche, puis les mots LAP ou SPLIT clignotent. Appuyer sur START/SPLIT pour sélectionner l'affichage des temps au tour (Lap) ou intermédiaires (Split). MINUTERIE 1. Appuyer sur MODE jusqu’à afficher TIMER. 2. Appuyer sur SET/RECALL pour régler la durée de la minuterie. Les chiffres des HEURES clignotent. 3. Appuyer sur START/SPLIT ou sur STOP/RESET pour augmenter ou diminuer le nombre. 4. Appuyer sur MODE pour sélectionner les MINUTES, les SECONDES et la fonction STOP à la fin ou REPEAT à la fin (REPEAT remet automatiquement la minuterie en marche à la fin du compte à rebours). 5. À chaque étape, appuyer sur START/SPLIT ou sur STOP/RESET pour modifier le nombre clignotant. 6. Appuyer sur SET/RECALL en tout temps pour valider et quitter un mode. 7. Appuyer sur START/SPLIT pour démarrer le compte à rebours. 8. Appuyer sur STOP/RESET pour marquer une pause. Appuyer sur START/SPLIT pour remettre en marche ou appuyer deux fois sur STOP/RESET pour remettre la minuterie au nombre initial. La montre émet un bip à la fin du compte à rebours. Appuyer sur n’importe quel bouton pour l'arrêter. Le compte à rebours se poursuit lorsque vous quittez le mode Timer (minuterie). apparaît dans l'affichage de l'heure et de la date lorsque la minuterie (Timer) est en marche. 1. Oprima MODE hasta que aparezca CHRONO (cronógrafo). 2. Oprima START/SPLIT para iniciar el Cronógrafo. 3. Oprima START/SPLIT para registrar el tiempo de vuelta. 4. SPLIT (tomar una fracción) o LAP (tiempo de vuelta) se verá durante 10 segundos. Oprima MODE para volver al Cronógrafo en funcionamiento antes de 10 segundos. 5. Oprima STOP/RESET para pausarlo. 6. Oprima START/SPLIT para reanudarlo. 7. Oprima STOP/RESET para detenerlo. 8. Para revisar una actividad, oprima SET/RECALL, oprima luego START/SPLIT o STOP/RESET para avanzar o retroceder entre tiempos de vuelta o fracciones. 9. Oprima y sostenga STOP/RESET para borrar la actividad. aparece en la pantalla time/date (hora/fecha) cuando el Cronógrafo está funcionando. Sugerencia: Para cambiar el formato de la pantalla, oprima SET/RECALL; la palabra FORMAT (formato) aparecerá y luego cambiará a LAP (vuelta) o SPLIT (fracción) intermitentes. Oprima START/SPLIT para seleccionar Lap (vuelta) o Split (fracción) como pantalla. CONTADOR DE CUENTA REGRESIVA 1. Oprima MODE hasta que TIMER aparezca. 2. Oprima SET/RECALL para fijar el conteo regresivo. Los dígitos de HORAS se iluminarán. 3. Oprima START/SPLIT o STOP/RESET para aumentar o disminuir el valor. 4. Oprima MODE para seleccionar MINUTOS, SEGUNDOS, y PARAR al final o REPETIR al final de la función (REPETIR reinicia automáticamente el Contador al final del conteo regresivo). 5. En cada paso, oprima START/SPLIT o STOP/RESET para cambiar el valor intermitente. 6. Oprima SET/RECALL en cualquier momento para completar el ajuste y salir. 7. Oprima START/SPLIT para iniciar el Contador. 8. Oprima STOP/RESET para pausarlo. Oprima START/SPLIT para reanudarlo u oprima STOP/RESET dos veces para regresar el contador a un nuevo ajuste. El reloj sonará cuando termine el conteo regresivo. Oprima cualquier botón para silenciarlo. El Contador seguirá funcionando si usted sale del modo Timer. aparece en la pantalla de hora/fecha cuando el Contador está funcionando. ALARMA 1. Oprima MODE hasta que aparezca ALARM. 2. Oprima SET/RECALL. Los dígitos de HORAS se iluminarán. 3. Oprima START/SPLIT o STOP/RESET para aumentar o disminuir el valor. 4. Oprima MODE para seleccionar MINUTOS, AM (mañana) o PM (tarde), las alarmas DAILY (diaria), WEEKDAY (semanal) o WEEKEND (fin de semana). En cada paso, oprima START/SPLIT o STOP/RESET para cambiar el valor intermitente. 5. Oprima SET/RECALL en cualquier momento para completar el ajuste y salir. Cuando suene la alarma, oprima cualquier botón para silenciarla. Si ningún botón se oprime, la alarma sonará por 20 segundos y se repetirá automáticamente cinco minutos más tarde. aparece en la pantalla de hora/fecha cuando la alarma está activada. INDIGLO® NIGHT-LIGHT WITH NIGHT-MODE® FEATURE A. Press INDIGLO to activate light. Electroluminescent technology used in the INDIGLO® night-light illuminates watch face at night and in low light conditions. B. Press and hold iNDIGLO for three seconds (beep will sound) to activate or de-activate NIGHT-MODE® feature. C. While in NIGHT-MODE® feature, press any button to illuminate watch face for 3 seconds. INDIGLO is a registered trademark of Indiglo Corporation in the U.S. and other countries. WATER RESISTANCE If your watch is water-resistant, meter marking or ( ) is indicated. Water-Resistance Depth p.s.i.a.* Water Pressure Below Surface 30m/98ft 50m/164ft 100m/328 ft. 60 86 160 *pounds per square inch absolute WARNING: TO MAINTAIN WATER-RESISTANCE, DO NOT PRESS ANY BUTTONS UNDER WATER. 1. Watch is water-resistant only as long as lens, push buttons and case remain intact. 2. Watch is not a diver watch and should not be used for diving. 3. Rinse watch with fresh water after exposure to salt water. BATTERY Timex strongly recommends that a retailer or jeweler replace battery. If applicable, push reset button when replacing battery. Battery type is indicated on caseback. Battery life estimates are based on certain assumptions regarding usage; battery life may vary depending on actual usage. DO NOT DISPOSE OF BATTERY IN FIRE. DO NOT RECHARGE. KEEP LOOSE BATTERIES AWAY FROM CHILDREN. ALARME LUZ NOCTURNA INDIGLO® CON NIGHT-MODE® 1. Appuyer sur MODE jusqu’à afficher ALARM. 2. Appuyer sur SET/RECALL. Les chiffres des HEURES clignotent. 3. Appuyer sur START/SPLIT ou sur STOP/RESET pour augmenter ou diminuer le nombre. 4. Appuyer sur MODE pour sélectionner l'alarme MINUTES, AM (matin) ou PM (après-midi), JOUR DE LA SEMAINE ou WEEK-END. À chaque étape, appuyer sur START/SPLIT ou sur STOP/RESET pour modifier le nombre clignotant. 5. Appuyer sur SET/RECALL en tout temps pour valider et quitter un mode. Appuyer sur n’importe quel bouton pour couper l’alarme. Si on n'appuie sur aucun bouton, l'alarme sonne pendant 20 secondes et se déclenche à nouveau cinq minutes plus tard. apparaît dans l'affichage de l'heure et de la date lorsque l'alarme est en marche. VEILLEUSE INDIGLO® À FONCTION NIGHT-MODE® A. Appuyer sur INDIGLO pour activer l’éclairage. La technologie électroluminescente utilisée dans la veilleuse INDIGLO® permet d’illuminer la face de la montre la nuit et dans des conditions de faible éclairage. B. Tenir INDIGLO enfoncé pendant trois secondes (jusqu’au bip sonore) pour activer ou désactiver la fonction NIGHT-MODE®. C. Dans NIGHT-MODE®, appuyer sur tout bouton pour illuminer la montre pendant 3 secondes. INDIGLO est une marque déposée d’Indiglo Corporation aux États-Unis et dans d’autres pays. ÉTANCHÉITÉ Si la montre est étanche, la profondeur maximale ou le symbole ( ) est indiqué. Profondeur d’étanchéité p.s.i.a.Pression de l’eau sous la surface en p.s.i.a.* 30m/98 pi 50m/164 pi 100m/328 pi 60 86 160 *livres par pouce carré (abs.) MISE EN GARDE : POUR PRÉSERVER L’ÉTANCHÉITÉ, NE PAS ENFONCER LES BOUTONS SOUS L’EAU. 1. La montre est étanche aussi longtemps que le verre, les boutons et le boîtier sont intacts. 2. La montre n’est pas conçue pour la plongée. Ne pas l’utiliser dans ces conditions. 3. Rincer la montre à l’eau douce après tout contact avec l’eau de mer. A. Oprima INDIGLO para activar la luz. La tecnología electroluminiscente utilizada en la luz nocturna INDIGLO® ilumina toda la cara del reloj por la noche y en condiciones de poca luz. B. Oprima y sostenga INDIGLO durante tres segundos (se emitirá un sonido) para activar o desactivar el modo nocturno NIGHT-MODE®. C. Mientras está en el modo NIGHT-MODE®, oprima cualquier botón para iluminar la cara del reloj durante 3 segundos. INDIGLO es una marca registrada de Indiglo Corporation en los EE.UU. y otros países. RESISTENCIA AL AGUA Si su reloj es resistente al agua, se indicarán los metros o aparecerá el símbolo ( ). Profundidad de Resistencia al Agua p.s.i.a.* Presión bajo la superficie del agua 30m/98pies 50m/164pies 100m/328pies 60 86 160 *libras por pulgada cuadrada absoluta ADVERTENCIA: PARA MANTENER LA RESISTENCIA AL AGUA, NO OPRIMA NINGÚN BOTÓN BAJO EL AGUA. 1. El reloj es resistente al agua solamente mientras el cristal, los botones y la caja permanezcan intactos. 2. El reloj no es un reloj de submarinista y no debe utilizarse para realizar submarinismo. 3. Enjuague el reloj con agua fresca después de haber estado expuesto al agua salada. PILA Timex recomienda encarecidamente que un minorista o un joyero cambien la pila. Si procede, oprima el botón de restablecimiento cuando cambie la pila. El tipo de pila se indica en la parte de atrás de la caja. Las estimaciones de duración de la pila se basan en ciertas suposiciones relacionadas con el uso; la duración de la pila puede variar dependiendo del uso real. NO TIRE LA PILA AL FUEGO. NO LA RECARGUE. MANTENGA LAS PILAS SUELTAS FUERA DEL ALCANCE DE LOS NIÑOS. PILE Timex recommande fortement de faire changer la pile par un détaillant ou un bijoutier. Le cas échéant, appuyer sur le bouton de remise à zéro lors du changement de la pile. Le type de pile est indiqué sur le dos du boîtier. L’estimation de la durée de service de la pile est basée sur certaines hypothèses quant à l’usage ; la durée réelle peut varier selon l’utilisation de la montre. NE PAS JETER LA PILE AU FEU. NE PAS RECHARGER LA PILE. GARDER LES PILES HORS DE LA PORTÉE DES ENFANTS. TIMEX INTERNATIONAL WARRANTY (U.S. – LIMITED WARRANTY – PLEASE SEE FRONT OF INSTRUCTION BOOKLET FOR TERMS OF EXTENDED WARRANTY OFFER) Your TIMEX watch is warranted against manufacturing defects by Timex Corporation for a period of ONE YEAR from the original purchase date. Timex and its worldwide affiliates will honor this International Warranty. Please note that Timex may, at its option, repair your watch by installing new or thoroughly reconditioned and inspected components or replace it with an identical or similar model. IMPORTANT — PLEASE NOTE THAT THIS WARRANTY DOES NOT COVER DEFECTS OR DAMAGES TO YOUR WATCH: 1) after the warranty period expires; 2) if the watch was not originally purchased from an authorized Timex retailer; 3) from repair services not performed by Timex; 4) from accidents, tampering or abuse; and 5) lens or crystal, strap or band, watch case, attachments or battery. Timex may charge you for replacing any of these parts. THIS WARRANTY AND THE REMEDIES CONTAINED HEREIN ARE EXCLUSIVE AND IN LIEU OF ALL OTHER WARRANTIES, EXPRESS OR IMPLIED, INCLUDING ANY IMPLIED WARRANTY OF MERCHANTABILITY OR FITNESS FOR PARTICULAR PURPOSE. TIMEX IS NOT LIABLE FOR ANY SPECIAL, INCIDENTAL OR CONSEQUENTIAL DAMAGES. Some countries and states do not allow limitations on implied warranties and do not allow exclusions or limitations on damages, so these limitations may not apply to you. This warranty gives you specific legal rights and you may also have other rights which vary from country to country and state to state. To obtain warranty service, please return your watch to Timex, one of its affiliates or the Timex retailer where the watch was purchased, together with a completed original Watch Repair Coupon or, in the U.S. and Canada only, the completed original Watch Repair Coupon or a written statement identifying your name, address, telephone number and date and place of purchase. Please include the following with your watch to cover postage and handling (this is not a repair charge): a US$ 7.50 check or money order in the U.S.; a CAN$6.00 cheque or money order in Canada; and a UK£2.50 cheque or money order in the U.K. In other countries, Timex will charge you for postage and handling. NEVER INCLUDE A SPECIAL WATCHBAND OR ANY OTHER ARTICLE OF PERSONAL VALUE IN YOUR SHIPMENT. For the U.S., please call 1-800-448-4639 for additional warranty information. For Canada, call 1-800-263-0981. For Brazil, call 0800-168787. For Mexico, call 01-800-01-060-00. For Central America, the Caribbean, Bermuda and the Bahamas, call (501) 370-5775 (U.S.). For Asia, call 852-2815-0091. For the U.K., call 44 208 687 9620. For Portugal, call 351 212 946 017. For France, call 33 3 81 63 42 00. For Germany, call +43 662 88 92130. For the Middle East and Africa, call 971-4-310850. For other areas, please contact your local Timex retailer or Timex distributor for warranty information. In the U.S. and in certain other locations, participating Timex retailers can provide you with a postage-paid, pre-addressed Watch Repair Mailer for your convenience in obtaining factory service. GARANTIE INTERNATIONALE TIMEX (É.-U. – GARANTIE LIMITÉE – VEUILLEZ CONSULTER LA COUVERTURE DU LIVRET D’INSTRUCTIONS POUR LES MODALITÉS DE L’OFFRE DE GARANTIE PROLONGÉE) Votre montre TIMEX est garantie contre les défauts de fabrication pour une période d’UN AN, à compter de la date d’achat. Timex ainsi que ses affiliés honoreront cette garantie internationale. Timex se réserve le droit de réparer votre montre en y installant des composants neufs ou révisés, ou bien de la remplacer avec un modèle identique ou similaire. IMPORTANT : CETTE GARANTIE NE COUVRE PAS VOTRE MONTRE : 1) après l’expiration de la période de garantie, 2) si elle n’a pas été achetée chez un revendeur Timex agréé, 3) si la réparation n’a pas été faite par Timex, 4) s’il s’agit d’un accident, falsification ou abus, 5) s’il s’agit du verre, du bracelet, du boîtier ou des piles; Timex peut effectuer les réparations mais celles-ci seront payantes. CETTE GARANTIE AINSI QUE LES RECOURS INDIQUÉS DANS LES PRÉSENTES SONT EXCLUSIFS ET REMPLACENT TOUTE AUTRE GARANTIE, IMPLICITE OU EXPLICITE, Y COMPRIS MAIS NON EXCLUSIVEMENT TOUTE GARANTIE IMPLICITE DE COMMERCIALISATION OU D’APTITUDE À UN USAGE PARTICULIER. TIMEX N’EST RESPONSABLE D’AUCUN DOMMAGE PARTICULIER, ACCESSOIRE OU INDIRECT. Certains pays et juridictions interdisent les limitations des garanties implicites et les exclusions ou restrictions sur les dommages ; les présentes restrictions peuvent donc ne pas vous être applicables. Cette garantie vous confère des droits légaux précis. Il se peut que vous bénéficiez d’autres droits, lesquels varieront selon le pays et la juridiction. Pour obtenir le service garanti, retourner la montre à Timex, une de ses filiales ou le détaillant Timex qui vous a vendu la montre. Inclure le Coupon de réparation original rempli ou, pour les É.-U. ou le Canada seulement, ce même coupon rempli ou une feuille comprenant votre nom, adresse, numéro de téléphone ainsi que la date et le lieu de l’achat. Afin de couvrir les frais de retour de la montre (ce ne sont pas des frais de réparation), prière d’inclure un chèque ou un mandat-poste de 7,50 $US (É.-U.), de 6,00 $ (Canada) ou de 2,50 £ (Royaume-Uni). Pour les autres pays, Timex vous demandera de couvrir les frais de poste et de manutention. NE JAMAIS INCLURE DANS VOTRE ENVOI UN BRACELET SPÉCIAL OU TOUT ARTICLE AYANT UNE VALEUR SENTIMENTALE. Pour les Etats-Unis, vous pouvez appeler le 1 800 448 4639 pour plus de renseignements. Pour le Canada, appelez le 1 800 263 0981. Pour le Brésil, appelez le 0800 168787. Pour le Mexique, appelez le 01 800 01 060 00. Pour l’Amérique Centrale, les Caraïbes, les Bermudes et les Bahamas, appelez le 501 370 5775 (É.-U.). Pour l’Asie, appelez le 852 2815 0091. Pour le Royaume-Uni, appelez le 44 208 687 9620. Pour le Portugal, appelez le 351 212 946 017. Pour la France, appelez le 33 3 81 63 42 00. Pour l'Allemagne, appelez le +43 662 88 92130. Pour le Moyen-Orient et l'Afrique, appelez le 971 4 310850. Pour les autres régions, veuillez contacter votre revendeur ou le distributeur Timex local pour toute information concernant la garantie. Aux Etats-Unis et dans d’autres pays, vous pouvez disposer d’un emballage pré-payé, pré-adressé. GARANTIA INTERNACIONAL TIMEX (Garantia limitada USA - Lea por favor el folleto de instrucciones para los detalles de la Oferta de extensión de la Garantía). Su reloj TIMEX está garantizado contra cualquier defecto de fabricación por TIMEX Corporation durante un período de UN AÑO a partir de la fecha de compra. TIMEX y sus compañías subsidiarias en todo el mundo aceptarán esta Garantía Internacional. TIMEX notifica que, a nuestra discreción, su reloj será reparado con piezas nuevas o reacondicionado totalmente con componentes debidamente revisados o será cambiado por otro reloj idéntico o similar. IMPORTANTE: ESTA GARANTIA NO CUBRE LOS SIGUIENTES DEFECTOS O FALTAS DE SU RELOJ: 1. Si el período de garantía ha vencido. 2. Si su reloj no ha sido comprado en una agencia o tienda oficial TIMEX. 3. Si su reloj ha sido manipulado fuera del Servicio Técnico Oficial TIMEX. 4. Si su reloj evidencia pruebas de golpes, accidentes o abusos. 5. Si el cristal, correa, caja, pila o accesorios aparecen dañados o gastados. En estos casos TIMEX efectuará la reparación y facturará su costo. ESTA GARANTÍA Y LOS DERECHOS Y ACCIONES CONTENIDOS EN EL PRESENTE SON EXCLUSIVOS Y SUSTITUYEN A TODAS LAS DEMÁS GARANTÍAS, EXPRESAS O IMPLÍCITAS, INCLUYENDO CUALESQUIERA GARANTÍAS IMPLÍCITAS DE COMERCIABILIDAD O ADECUACIDAD PARA UN PROPÓSITO PARTICULAR. TIMEX NO ES RESPONSABLE DE CUALQUIER DAÑO ESPECIAL, INCIDENTAL O EVENTUALES. Algunos países y estados no permiten limitaciones sobre garantías implícitas y no permiten exclusiones o limitaciones sobre daños, por lo tanto estas limitaciones pueden no corresponderle a usted. Esta garantía le ofrece derechos legales específicos y usted también puede tener otros derechos que varían de país en país y de estado a estado. Para obtener servicio cubierto por la garantía, por favor envíe su reloj a Timex, una de sus filiales o a la tienda donde compró el reloj, conjuntamente con un Cupón de Reparación de Reloj original completado, o en los EE.UU. y Canadá solamente, el Cupón de Reparación de reloj original completado o una declaración escrita indicando su nombre, dirección, número de teléfono y fecha y lugar de la compra. Sírvase incluir lo siguiente con su reloj para cubrir el franqueo y gastos administrativos (esto no es un cargo de reparación): un cheque o giro postal de US$7.50 en los EE.UU., un cheque o giro postal de US$6.00 en Canadá; y un cheque o giro postal de UK£2.50 en el Reino Unido y en otros países. Timex le cobrará por franqueo y gastos administrativos. NUNCA INCLUYA UNA CORREA DE RELOJ ESPECIAL O CUALQUIER OTRO ARTÍCULO DE VALOR PERSONAL EN EL ENVÍO. Para los EE.UU. llame por favor al 1-800-448-4639 para información adicional de su garantía. Para Canadá llame al 1-800-263-0981. Para Brasil llame al 0800-168787. Para México 01-800-01-060-00. Para América Central, Caribe, Bermudas y Bahamas llame al (501) 370-5775 (US). Para Asia llame al 852-2815-0091. Para el Reino Unido, llame al 44 208 687 9620. Para Portugal, llame al 351 212 946 017. Para Francia, llame al 33 3 81 63 42 00. Para Alemania, llame al +43 662 88 92130. Para el Medio Oriente y Africa, llame al 971-4-310850. Para otras regiones, si desea información sobre la garantía, por favor comuníquese con el representante de Timex o el distribuidor de Timex de su zona. En los EE.UU. y otros países, las tiendas autorizadas TIMEX le podrán informar y facilitar pagos postales o sobres para envíos especiales de reparación de relojes TIMEX y ayudarle a conseguir dicho servicio de fábrica. MERCI D’AVOIR ACHETÉ CETTE MONTRE TIMEX LE AGRADECEMOS LA COMPRA DE SU RELOJ TIMEX. Lire les instructions avec attention pour bien comprendre le fonctionnement de cette montre Timex. Il est possible que ce modèle ne présente pas toutes les fonctions décrites dans le dépliant. Le rogamos lea atentamente las instrucciones para poner en funcionamiento su reloj Timex. Es posible que su modelo no tenga todas las características descritas en este folleto. OBRIGADO POR TER COMPRADO O SEU RELÓGIO TIMEX. Leia cuidadosamente as instruções para compreender como é que o seu relógio Timex trabalha. O seu modelo poderá não ter todas as funções descritas neste folheto. www.timex.com W-154-EU FONCTIONS 939-095002 FUNCIONES • Affichage analogue et numérique • Horloge calendrier • Alarme quotidienne, hebdomadaire, week-end • Minuterie 24 heures avec options arrêt ou rappel • Chronomètre 99 temps intermédiaires avec capacité de stockage de 50 tours • Carillon horaire FUNÇÕES • Pantalla de hora digital y análoga • Calendario • Alarma diaria, semanal y de fin de semana • Contador de cuenta regresiva hasta 24-horas con opciones para detener o repetir • Cronógrafo de 99 vueltas con capacidad de guardar 50 vueltas • Timbre cada hora • Mostrador das horas analógico e digital • Calendário • Alarmes diário, semanal e de fim de semana • Temporizador de contagem decrescente com 24 horas e opções de paragem e de repetição • Cronógrafo de 99 voltas com memória para 50 voltas • Sinal horário OPERACIONES BÁSICAS OPÉRATIONS DE BASE FUNÇÕES BÁSICAS THANK YOU FOR PURCHASING YOUR TIMEX WATCH. EXTENDED WARRANTY Available in U.S. only. Extend your warranty for an additional 4 years from date of purchase for $5. You can pay with AMEX, Discover, Visa or MasterCard by calling 1 800-448-4639 during normal business hours. Payment must be made within 30 days of purchase. Name, address, telephone number, purchase date, and 5-digit model number required. You can also mail a check for $5 to: Timex Extended Warranty, P.O. Box 1676, Dept. EF, Little Rock, AR 72203. Please read instructions carefully to understand how to operate your Timex watch. Your model may not have all of the features described in this booklet. FEATURES • Analog and digital time display • Calendar clock • Daily, weekly, weekend alarms • 24-hour countdown timer with stop or repeat options • 99-lap chronograph with 50-lap storage • Hourly chime BASIC OPERATIONS INDIGLO SET/ RECALL CROWN MODE STOP/ RESET START/ SPLIT Press MODE to cycle through CHRONO, TIMER, ALARM and Time of Day modes. Press INDIGLO to illuminate watch face. To set watch hands to correct time, pull CROWN out and turn. DIGITAL TIME AND DATE Press MODE until you reach Time of Day. Press and hold START/SPLIT to peek at date or time; hold for six seconds to select date or time as normal display. To set TIME or DATE: 1. Press and hold SET/RECALL. HOURS digits will flash. 2. Press START/SPLIT to advance or STOP/RESET to decrease HOURS digits. Go through 12 hours for AM or PM. 3. Press MODE to select MINUTES, then START/SPLIT or STOP/RESET to change. 4. Press MODE to select SECONDS, then START/SPLIT to set to 0. 5. Repeat to set DAY, MONTH, DATE, 12- or 24-hour time display format, MONTH-DATE or DATE-MONTH format, hourly chime on/off, button beep on/off. 6. Press SET/RECALL at any time to complete and exit setting. CHRONOGRAPH 1. Press MODE until CHRONO appears. 2. Press START/SPLIT to start Chrono. 3. Press START/SPLIT to record lap time. 4. Time of SPLIT or LAP will display for 10 seconds. Press MODE to return to running Chrono before 10 seconds. 5. Press STOP/RESET to pause. 6. Press START/SPLIT to resume. 7. Press STOP/RESET to stop. 8. To recall a workout, press SET/RECALL, then press START/SPLIT or STOP/RESET to move forward or backward between laps or splits. 9. Press and hold STOP/RESET to clear workout. appears in time/date display when Chrono is running. Tip: To change display format, press SET/RECALL; the word FORMAT will appear and will then switch to a blinking LAP or SPLIT. Press START/SPLIT to select Lap or Split as display. COUNTDOWN TIMER 1. Press MODE until TIMER appears. 2. Press SET/RECALL to set countdown time. HOURS digits will flash. 3. Press START/SPLIT or STOP/RESET to increase or decrease value. 4. Press MODE to select MINUTES, SECONDS, and STOP at end or REPEAT at end function (REPEAT automatically restarts Timer at end of countdown). 5. At each step, press START/SPLIT or STOP/RESET to change flashing value. 6. Press SET/RECALL at any time to complete and exit setting. 7. Press START/SPLIT to start Timer. 8. Press STOP/RESET to pause. Press START/SPLIT to resume or press STOP/RESET twice to reset timer back to set value. Watch will beep when countdown ends. Press any button to silence. Timer will continue to run if you exit Timer mode. appears in time/date display when Timer is running. ALARM 1. Press MODE until ALARM appears. 2. Press SET/RECALL. HOURS digits will flash. 3. Press START/SPLIT or STOP/RESET to increase or decrease value. 4. Press MODE to select MINUTES, AM or PM, DAILY, WEEKDAY or WEEKEND alarm. At each step, press START/SPLIT or STOP/RESET to change flashing value. 5. Press SET/RECALL at any time to complete and exit setting. When alarm sounds, press any button to silence. If no button is pressed, alarm will sound for 20 seconds and repeat itself five minutes later. appears in time/date display when alarm is on. MODE A. Press INDIGLO to activate light. Patented (U.S. Patent Numbers 4,527,096 and 4,775,964) electroluminescent technology used in the INDIGLO® night-light illuminates watch face at night and in low light conditions. B. Press and hold INDIGLO for three seconds (beep will sound) to activate or de-activate NIGHT-MODE® feature. C. While in NIGHT-MODE® feature, press any button to illuminate watch face for 3 seconds. INDIGLO is a registered trademark of Indiglo Corporation in the U.S. and other countries. MODE STOP/ RESET If your watch is water-resistant, meter marking or ( ) is indicated. Water-Resistance Depth p.s.i.a.* Water Pressure Below Surface 30m/98ft 50m/164ft 100m/328ft 60 86 160 *pounds per square inch absolute WARNING: TO MAINTAIN WATER-RESISTANCE, DO NOT PRESS ANY BUTTONS UNDER WATER. 1. Watch is water-resistant only as long as lens, push buttons and case remain intact. 2. Watch is not a diver watch and should not be used for diving. 3. Rinse watch with fresh water after exposure to salt water. BATTERY Timex strongly recommends that a retailer or jeweler replace battery. If applicable, push reset button when replacing battery. Battery type is indicated on caseback. Battery life estimates are based on certain assumptions regarding usage; battery life may vary depending on actual usage. DO NOT DISPOSE OF BATTERY IN FIRE. DO NOT RECHARGE. KEEP LOOSE BATTERIES AWAY FROM CHILDREN. STOP/ RESET CROWN MODE STOP/ RESET START/ SPLIT START/ SPLIT Appuyer sur MODE pour afficher successivement les modes CHRONO, TIMER (minuterie), ALARM et Heures. Appuyer sur INDIGLO pour illuminer la face de la montre. Pour régler les aiguilles de la montre, tirer sur la COURONNE et tourner. Oprima MODE para recorrer los modos CHRONO (cronógrafo), TIMER (contador), ALARM (alarma) y Time of Day (Hora del día). Oprima INDIGLO para iluminar la cara del reloj. Para fijar las manecillas del reloj en la hora correcta, jale CROWN (corona) y gírela. START/ SPLIT Carregue no botão MODE para passar sucessivamente pelos modos CHRONO, TIMER, ALARM e Hora do dia. Carregue no botão INDIGLO para iluminar o mostrador do relógio. Para acertar os ponteiros do relógio na hora correcta, puxe a COROA para fora e rode-a. AFFICHAGE NUMÉRIQUE DE L’HEURE ET DU JOUR HORA DIGITAL Y FECHA HORA E DATA DIGITAIS Appuyer sur MODE jusqu’à afficher l’Heure du jour. Tenir START/SPLIT enfoncé pour afficher brièvement la date ou l’heure ; tenir enfoncé pendant six secondes pour sélectionner la date ou l’heure en affichage normal. Réglage de l’HEURE ou de la DATE : 1. Tenir SET/RECALL enfoncé. Les chiffres des HEURES clignotent. 2. Appuyer sur START/SPLIT pour faire avancer les chiffres des HEURES ou STOP/RESET pour les faire reculer. Faire défiler 12 heures pour alterner entre AM (matin) et PM (après-midi). 3. Appuyer sur MODE pour sélectionner les MINUTES, puis sur START/SPLIT ou sur STOP/RESET pour les régler. 4. Appuyer sur MODE pour sélectionner les SECONDES, puis sur START/SPLIT pour remettre à zéro. 5. Répéter pour régler le JOUR, le MOIS, la DATE et l’affichage de l’heure sur 12 ou 24 heures, le format MOIS-DATE ou DATE-MOIS, la mise en marche ou l’arrêt (on/off) du carillon horaire et la mise en marche ou l’arrêt (on/off) du bip sonore. 6. Appuyer sur SET/RECALL en tout temps pour valider et quitter un mode. Oprima MODE hasta que llegue a Time of Day (hora del día). Oprima y sostenga START/SPLIT para dar un vistazo a la hora o fecha, sostenga por seis segundos para seleccionar hora o fecha como pantalla normal. Para fijar HORA o FECHA: 1. Oprima y sostenga SET/RECALL. Los dígitos de HORAS se iluminarán. 2. Oprima START/SPLIT para avanzar o STOP/RESET para retroceder los dígitos de HORAS. Recorra 12 horas para fijar AM (mañana) o PM (tarde). 3. Oprima MODE para seleccionar MINUTOS, luego START/SPLIT o STOP/RESET para cambiar. 4. Oprima MODE para seleccionar SEGUNDOS, luego START/SPLIT para fijarlos en 0. 5. Repita el procedimiento para fijar DÍA, MES, FECHA, pantalla en formato de 12- o 24-horas, formato de MES-FECHA o FECHA-MES, activar o desactivar el timbre cada hora, botón para encender/apagar el sonido. 6. Oprima SET/RECALL en cualquier momento para completar el ajuste y salir. Carregue no botão MODE até aparecer a Hora do Dia. Carregue e segure o botão START/SPLIT para ver a data ou a hora; e, segure durante seis segundos, para seleccionar a data ou a hora como modo normal exibido no mostrador. Para acertar a HORA ou a DATA: 1. Carregue e segure o botão SET/RECALL. Os algarismos das HORAS começarão a piscar. 2. Carregue no botão START/SPLIT para avançar ou no STOP/RESET para diminuir os algarismos das HORAS. Passe pelas 12 horas para escolher AM ou PM. 3. Carregue no botão MODE para seleccionar os MINUTOS e, depois, no START/SPLIT ou no STOP/RESET para os mudar. 4. Carregue no botão MODE para seleccionar os SEGUNDOS e, depois, carregue no START/SPLIT para os pôr a zero. 5. Repita para acertar o DIA, MÊS, DATA, o formato de 12 ou 24 horas, o formato MÊS-DATA ou DATA-MÊS, ligar/desligar o sinal horário e ligar/desligar o alarme sonoro. 6. Carregue no botão SET/RECALL en qualquer altura para terminar e sair do modo de acerto. CRONÓGRAFO CHRONOMÈTRE CRONÓGRAFO 1. Appuyer sur MODE jusqu’à afficher CHRONO. 2. Appuyer sur START/SPLIT pour faire démarrer le chronomètre. 3. Appuyer sur START/SPLIT pour enregistrer le temps au tour. 4. Le temps intermédiaire (SPLIT) ou au tour (LAP) s’affiche pendant 10 secondes. Appuyer sur MODE pour retourner à la minuterie en marche avant 10 secondes. 5. Appuyer sur STOP/RESET pour marquer une pause. 6. Appuyer sur START/SPLIT pour redémarrer. 7. Appuyer sur STOP/RESET pour arrêter. 8. Pour rappeler les temps d’une séance d’exercice, appuyer sur SET/RECALL, puis appuyer sur START/SPLIT ou STOP/RESET pour faire avancer ou reculer les temps au tour ou intermédiaires. 9. Tenir STOP/RESET enfoncé pour effacer les temps en mémoire. apparaît dans l’affichage de l’heure et de la date lorsque le Chrono est en marche. Suggestion : Pour modifier le format de l’affichage, appuyer sur SET/RECALL ; le mot FORMAT s’affiche, puis les mots LAP ou SPLIT clignotent. Appuyer sur START/SPLIT pour sélectionner l’affichage des temps au tour (Lap) ou intermédiaires (Split). MINUTERIE 1. Appuyer sur MODE jusqu’à afficher TIMER. 2. Appuyer sur SET/RECALL pour régler la durée de la minuterie. Les chiffres des HEURES clignotent. 3. Appuyer sur START/SPLIT ou sur STOP/RESET pour augmenter ou diminuer le nombre. 4. Appuyer sur MODE pour sélectionner les MINUTES, les SECONDES et la fonction STOP à la fin ou REPEAT à la fin (REPEAT remet automatiquement la minuterie en marche à la fin du compte à rebours). 5. À chaque étape, appuyer sur START/SPLIT ou sur STOP/RESET pour modifier le nombre clignotant. 6. Appuyer sur SET/RECALL en tout temps pour valider et quitter un mode. 7. Appuyer sur START/SPLIT pour démarrer le compte à rebours. 8. Appuyer sur STOP/RESET pour marquer une pause. Appuyer sur START/SPLIT pour remettre en marche ou appuyer deux fois sur STOP/RESET pour remettre la minuterie au nombre initial. La montre émet un bip à la fin du compte à rebours. Appuyer sur n’importe quel bouton pour l’arrêter. Le compte à rebours se poursuit lorsque vous quittez le mode Timer (minuterie). apparaît dans l’affichage de l’heure et de la date lorsque la minuterie (Timer) est en marche. ALARME 1. Appuyer sur MODE jusqu’à afficher ALARM. 2. Appuyer sur SET/RECALL. Les chiffres des HEURES clignotent. 3. Appuyer sur START/SPLIT ou sur STOP/RESET pour augmenter ou diminuer le nombre. 4. Appuyer sur MODE pour sélectionner l’alarme MINUTES, AM (matin) ou PM (après-midi), JOUR DE LA SEMAINE ou WEEK-END. À chaque étape, appuyer sur START/SPLIT ou sur STOP/RESET pour modifier le nombre clignotant. 5. Appuyer sur SET/RECALL en tout temps pour valider et quitter un mode. Appuyer sur n’importe quel bouton pour couper l’alarme. Si on n’appuie sur aucun bouton, l’alarme sonne pendant 20 secondes et se déclenche à nouveau cinq minutes plus tard. apparaît dans l’affichage de l’heure et de la date lorsque l’alarme est en marche. A. Appuyer sur INDIGLO pour activer l’éclairage. La technologie électroluminescente brevetée (brevets américains n° 4,527,096 et 4,775,964) utilisée dans la veilleuse INDIGLO® permet d’illuminer la face de la montre la nuit et dans des conditions de faible éclairage. B. Tenir INDIGLO enfoncé pendant trois secondes (jusqu’au bip sonore) pour activer ou désactiver la fonction NIGHT-MODE®. C. Dans NIGHT-MODE®, appuyer sur tout bouton pour illuminer la montre pendant 3 secondes. INDIGLO est une marque déposée d’Indiglo Corporation aux États-Unis et dans d’autres pays. ÉTANCHÉITÉ WATER RESISTANCE INDIGLO SET/ RECALL CROWN CROWN VEILLEUSE INDIGLO® À FONCTION NIGHT-MODE® INDIGLO® NIGHT-LIGHT WITH NIGHT-MODE® FEATURE INDIGLO SET/ RECALL INDIGLO SET/ RECALL Si la montre est étanche, la profondeur maximale ou le symbole ( est indiqué. Profondeur d’étanchéité ) p.s.i.a.Pression de l’eau sous la surface en p.s.i.a.* 30m/98 ft 50m/164 ft 100m/328 ft 60 86 160 *livres par pouce carré (abs.) MISE EN GARDE : POUR PRÉSERVER L’ÉTANCHÉITÉ, NE PAS ENFONCER LES BOUTONS SOUS L’EAU. 1. La montre est étanche aussi longtemps que le verre, les boutons et le boîtier sont intacts. 2. La montre n’est pas conçue pour la plongée. Ne pas l’utiliser dans ces conditions. 3. Rincer la montre à l’eau douce après tout contact avec l’eau de mer. PILE Timex recommande fortement de faire changer la pile par un détaillant ou un bijoutier. Le cas échéant, appuyer sur le bouton de remise à zéro lors du changement de la pile. Le type de pile est indiqué sur le dos du boîtier. L’estimation de la durée de service de la pile est basée sur certaines hypothèses quant à l’usage ; la durée réelle peut varier selon l’utilisation de la montre. NE PAS JETER LA PILE AU FEU. NE PAS RECHARGER LA PILE. GARDER LES PILES HORS DE LA PORTÉE DES ENFANTS. 1. Oprima MODE hasta que aparezca CHRONO (cronógrafo). 2. Oprima START/SPLIT para iniciar el Cronógrafo. 3. Oprima START/SPLIT para registrar el tiempo de vuelta. 4. SPLIT (tomar una fracción) o LAP (tiempo de vuelta) se verá durante 10 segundos. Oprima MODE para volver al Cronógrafo en funcionamiento antes de 10 segundos. 5. Oprima STOP/RESET para pausarlo. 6. Oprima START/SPLIT para reanudarlo. 7. Oprima STOP/RESET para detenerlo. 8. Para revisar una actividad, oprima SET/RECALL, oprima luego START/SPLIT o STOP/RESET para avanzar o retroceder entre tiempos de vuelta o fracciones. 9. Oprima y sostenga STOP/RESET para borrar la actividad. aparece en la pantalla time/date (hora/fecha) cuando el Cronógrafo está funcionando. Sugerencia: Para cambiar el formato de la pantalla, oprima SET/RECALL; la palabra FORMAT (formato) aparecerá y luego cambiará a LAP (vuelta) o SPLIT (fracción) intermitentes. Oprima START/SPLIT para seleccionar Lap (vuelta) o Split (fracción) como pantalla. CONTADOR DE CUENTA REGRESIVA 1. Oprima MODE hasta que TIMER aparezca. 2. Oprima SET/RECALL para fijar el conteo regresivo. Los dígitos de HORAS se iluminarán. 3. Oprima START/SPLIT o STOP/RESET para aumentar o disminuir el valor. 4. Oprima MODE para seleccionar MINUTOS, SEGUNDOS, y PARAR al final o REPETIR al final de la función (REPETIR reinicia automáticamente el Contador al final del conteo regresivo). 5. En cada paso, oprima START/SPLIT o STOP/RESET para cambiar el valor intermitente. 6. Oprima SET/RECALL en cualquier momento para completar el ajuste y salir. 7. Oprima START/SPLIT para iniciar el Contador. 8. Oprima STOP/RESET para pausarlo. Oprima START/SPLIT para reanudarlo u oprima STOP/RESET dos veces para regresar el contador a un nuevo ajuste. El reloj sonará cuando termine el conteo regresivo. Oprima cualquier botón para silenciarlo. El Contador seguirá funcionando si usted sale del modo Timer. aparece en la pantalla de hora/fecha cuando el Contador está funcionando. ALARMA 1. Oprima MODE hasta que aparezca ALARM. 2. Oprima SET/RECALL. Los dígitos de HORAS se iluminarán. 3. Oprima START/SPLIT o STOP/RESET para aumentar o disminuir el valor. 4. Oprima MODE para seleccionar MINUTOS, AM (mañana) o PM (tarde), las alarmas DAILY (diaria), WEEKDAY (semanal) o WEEKEND (fin de semana). En cada paso, oprima START/SPLIT o STOP/RESET para cambiar el valor intermitente. 5. Oprima SET/RECALL en cualquier momento para completar el ajuste y salir. Cuando suene la alarma, oprima cualquier botón para silenciarla. Si ningún botón se oprime, la alarma sonará por 20 segundos y se repetirá automáticamente cinco minutos más tarde. aparece en la pantalla de hora/fecha cuando la alarma está activada. LUZ NOCTURNA INDIGLO® CON NIGHT-MODE® A. Oprima INDIGLO para activar la luz. La tecnología electroluminiscente patentada (patentes de EE.UU. 4.527.096 y 4.775.964) utilizada en la luz nocturna INDIGLO® ilumina toda la cara del reloj por la noche y en condiciones de poca luz. B. Oprima y sostenga INDIGLO durante tres segundos (se emitirá un sonido) para activar o desactivar el modo nocturno NIGHT-MODE®. C. Mientras está en el modo NIGHT-MODE®, oprima cualquier botón para iluminar la cara del reloj durante 3 segundos. INDIGLO es una marca registrada de Indiglo Corporation en los EE.UU. y otros países. RESISTENCIA AL AGUA Si su reloj es resistente al agua, se indicarán los metros o aparecerá el símbolo ( ). Profundidad de Resistencia al Agua p.s.i.a. * Presión bajo la superficie del agua 30m/98pies 50m/164pies 100m/328pies 60 86 160 *libras por pulgada cuadrada absoluta ADVERTENCIA: PARA MANTENER LA RESISTENCIA AL AGUA, NO OPRIMA NINGÚN BOTÓN BAJO EL AGUA. 1. El reloj es resistente al agua solamente mientras el cristal, los botones y la caja permanezcan intactos. 2. El reloj no es un reloj de submarinista y no debe utilizarse para realizar submarinismo. 3. Enjuague el reloj con agua fresca después de haber estado expuesto al agua salada. PILA Timex recomienda encarecidamente que un minorista o un joyero cambien la pila. Si procede, oprima el botón de restablecimiento cuando cambie la pila. El tipo de pila se indica en la parte de atrás de la caja. Las estimaciones de duración de la pila se basan en ciertas suposiciones relacionadas con el uso; la duración de la pila puede variar dependiendo del uso real. NO TIRE LA PILA AL FUEGO. NO LA RECARGUE. MANTENGA LAS PILAS SUELTAS FUERA DEL ALCANCE DE LOS NIÑOS. 1. Carregue no botão MODE até aparecer CHRONO. 2. Carregue no botão START/STOP para iniciar a contagem do cronógrafo. 3. Carregue no botão START/SPLIT para registar a duração da volta. 4. A duração da volta (LAP) ou o tempo parcial (SPLIT) serão exibidos durante 10 segundos. Carregue no botão MODE antes dos 10 segundos se quiser fazer voltar o cronógrafo à contagem. 5. Carregue no botão STOP/RESET para fazer uma pausa. 6. Carregue no botão START/SPLIT para continuar. 7. Carregue no botão STOP/RESET para parar. 8. Para chamar um evento da memória, carregue no botão SET/RECALL, e, depois, carregue no START/SPLIT ou no STOP/RESET para se mover para diante ou para atrás entre voltas ou tempos parciais. 9. Carregue e segure o botão STOP/RESET para apagar tempos de um evento, armazenados em memória. O símbolo aparece no mostrador de Hora/Data quando o Cronógrafo estiver a funcionar. Conselho útil: Para mudar o formato do mostrador, carregue no botão SET/RECALL; e a palavra FORMAT irá aparecer e, logo em seguida, mudará para uma volta (LAP) ou tempo parcial (SPLIT) que estará a piscar. Carregue no botão START/SPLIT para seleccionar no mostrador a exibição de Volta (Lap) ou de Tempo Intermédio (Split). TEMPORIZADOR DE CONTAGEM DECRESCENTE 1. Carregue no botão MODE até aparecer TIMER. 2. Carregue no botão SET/RECALL para seleccionar o tempo para a contagem decrescente. Os algarismos das HORAS começarão a piscar. 3. Carregue no botão START/SPLIT ou no STOP/RESET para aumentar ou diminuir o valor. 4. Carregue no botão MODE para seleccionar a função MINUTOS, SEGUNDOS e STOP no final ou REPEAT no final (REPEAT automaticamente volta a iniciar o Temporizador no fim da contagem decrescente). 5. Em cada um dos passos, carregue no botão START/SPLIT ou no STOP/RESET para alterar o valor que estiver a piscar. 6. Carregue no botão SET/RECALL en qualquer altura para terminar e sair do modo de acerto. 7. Carregue no botão START/SPLIT para iniciar o Temporizador. 8. Carregue no botão STOP/RESET para fazer uma pausa. Carregue no botão START/SPLIT para continuar ou carregue no botão STOP/RESET duas vezes para fazer voltar o temporizador ao valor inicial. O relógio emitirá um sinal sonoro quando tiver terminado a contagem decrescente do tempo. Carregue em qualquer um dos botões para silenciar este sinal sonoro. O temporizador contunuará a funcionar se sair do modo de Temporizador. O símbolo aparece no mostrador de Hora/Data quando o Temporizador estiver a funcionar. ALARME (DESPERTADOR) 1. Carregue no botão MODE até aparecer ALARM. 2. Carregue no botão SET/RECALL. Os algarismos das HORAS começarão a piscar. 3. Carregue no botão START/SPLIT ou no STOP/RESET para aumentar ou diminuir o valor. 4. Carregue no botão MODE para seleccionar o alarme para MINUTOS, AM ou PM, DAILY (DIÁRIO), WEEKDAY (DIA DE SEMANA) ou WEEKEND (FIM DE SEMANA). Em cada um dos passos, carregue no botão START/SPLIT ou no STOP/RESET para alterar o valor que estiver a piscar. 5. Carregue no botão SET/RECALL em qualquer altura para terminar e sair do modo de acerto. Quando o alarme tocar, carregue em qualquer um dos botões para o silenciar. Se não carregar em nenhum botão, o alarme tocará durante 20 segundos e, depois, repetirá o sinal cinco minutos mais tarde. O símbolo aparece no mostrador de Hora/Data quando o alarme estiver ligado. LUZ NOCTURNA INDIGLO® COM MODO NIGHT-MODE® A. Carregue no botão INDIGLO para activar a luz do mostrador do relógio. A tecnologia electroluminescente usada na luz nocturna INDIGLO® ilumina o mostrador completo do relógio à noite e em condições de pouca luz. B. Carregue e segure o botão INDIGLO durante três segundos (ouvirá um sinal sonoro), para activar ou desactivar o modo NIGHT-MODE®. C. Enquanto estiver em NIGHT-MODE®, carregue em qualquer um dos botões para iluminar o mostrador do relógio durante 3 segundos. INDIGLO é uma marca registada da Indiglo Corporation nos EUA e noutros países. RESISTÊNCIA À ÁGUA Se o seu relógio for resistente à água, ele indicará os metros ou ( Profundidade de resistência à água Pressão da água abaixo da superfície em p.s.i.a. * 30 m/98 pés 50 m/164 pés 100 m/328 pés 60 86 160 ) *pressão absoluta em libras por polegada quadrada AVISO: PARA MANTER A RESISTÊNCIA À ÁGUA, NÃO CARREGUE EM NENHUM DOS BOTÕES DEBAIXO DE ÁGUA. 1. O relógio é resistente à água apenas enquanto a lente, os botões e a caixa se mantiverem intactos. 2. O relógio não é um relógio de mergulho e não deverá ser usado para mergulhar. 3 Lave o relógio com água doce depois de ter estado em contacto com a água salgada. BATERIA A Timex recomenda fortemente que mande substituir a bateria numa relojoaria ou numa joalharia. Se for necessário, carregue no botão “reset” (rearmar) quando substituir a bateria. O tipo da bateria está indicado na traseira da caixa. A duração da bateria é estimada assumindo certas características de uso; a duração da bateria variará, dependendo do seu uso real. NÃO DEITE A BATERIA NO FOGO. NÃO VOLTE A CARREGAR A BATERIA. MANTENHA AS BATERIAS FORA DO ALCANCE DAS CRIANÇAS.-
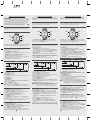 1
1
-
 2
2
-
 3
3
-
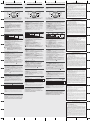 4
4
-
 5
5
-
 6
6


Timex Expedition Double Shock Guía del usuario
- Categoría
- Relojes
- Tipo
- Guía del usuario
- Este manual también es adecuado para
en otros idiomas
- français: Timex Expedition Double Shock Mode d'emploi
- italiano: Timex Expedition Double Shock Guida utente
- English: Timex Expedition Double Shock User guide
- Deutsch: Timex Expedition Double Shock Benutzerhandbuch
- Nederlands: Timex Expedition Double Shock Gebruikershandleiding
- português: Timex Expedition Double Shock Guia de usuario
Artículos relacionados
-
Timex 939-095000 Manual de usuario
-
-
-
-
Timex T5K761 Guía del usuario
-
-
-
-
-
Timex T5K654 Manual de usuario