- Categoría
- Linternas
- Tipo
- El manual del propietario

DE
Bedienungsanleitung
GB
Operating Instructions
FR
Mode d’emploi
NL
Handleiding
IT
Istruzioni per l’uso
ES
Instrucciones de uso
PT
Manual de utilização
LED-Dynamo
Art. No. 88-32000

DE
Bedienungsanleitung ..................................4
GB
Operating Instructions ..............................12
FR
Mode d’emploi .......................................... 20
NL
Handleiding ............................................... 28
IT
Istruzioni per l’uso .................................... 36
ES
Instrucciones de uso ................................ 44
PT
Manual de utilização ................................ 52

E
D
G
F
H
B
C

GEFAHR von Sachschäden!
Bauen Sie das Gerät nicht auseinander!
Wenden Sie sich im Falle eines Defekts bitte
an Ihren Fachhändler. Er nimmt mit dem Service-
Center Kontakt auf und kann das Gerät ggf. zwecks
Reparatur einschicken.
Setzen Sie das Gerät keinen Temperaturen über
60° C aus!
HINWEISE zur Reinigung
Reinigen Sie das Gerät nur äußerlich mit
einem trockenen Tuch. Benutzen Sie kei-
ne Reinigungsüssigkeit, um Schäden an
der Elektronik zu vermeiden.
Schützen Sie das Gerät vor Staub und Feuchtig-
keit! Bewahren Sie es in der mitgelieferten Tasche
oder Transportverpackung auf.
GEFAHR für Ihr Kind!
Kinder sollten das Gerät nur unter Aufsicht
benutzen. Verpackungsmaterialien (Plastik-
tüten, Gummibänder, etc.) von Kindern fernhalten!
Es besteht ERSTICKUNGSGEFAHR!
Dieses Gerät beinhaltet Elektronikteile, die über
eine Stromquelle (Netzteil und/oder Batterien) be-
trieben werden. Lassen Sie Kinder beim Umgang
mit dem Gerät nie unbeaufsichtigt! Die Nutzung
darf nur wie in der Anleitung beschrieben erfol-
gen, andernfalls besteht GEFAHR eines STROM-
SCHLAGS!
BRAND-/EXPLOSIONSGEFAHR!
Setzen Sie das Gerät keinen hohen Tem-
peraturen aus. Benutzen Sie nur das mitge-
lieferte Netzteil oder die empfohlenen Batterien.
Gerät und Batterien nicht kurzschließen oder ins
Feuer werfen! Durch übermäßige Hitze und un-
sachgemäße Handhabung können Kurzschlüsse,
Brände und sogar Explosionen ausgelöst werden!

ENTSORGUNG
Entsorgen Sie die Verpackungsmaterialien
sortenrein. Informationen zur ordnungsge-
mäßen Entsorgung erhalten Sie beim kommunalen
Entsorgungsdienstleister oder Umweltamt.
Werfen Sie Elektrogeräte nicht in den Haus-
müll!
Gemäß der Europäischen Richtlinie 2002/96/EG
über Elektro- und Elektronik-Altgeräte und deren
Umsetzung in nationales Recht müssen verbrauch-
te Elektrogeräte getrennt gesammelt und einer
umweltgerechten Wiederverwertung zugeführt
werden.
Entladene Altbatterien und Akkus müssen vom
Verbraucher in Batteriesammelgefäßen entsorgt
werden. Informationen zur Entsorgung alter Geräte
oder Batterien, die nach dem 01.06.2006 produ-
ziert wurden, erfahren Sie beim kommunalen Ent-
sorgungsdienstleister oder Umweltamt.
DE
EG-Konformitätserklärung
Die Meade Instruments Europe GmbH & Co. KG,
ansässig in 46414 Rhede/Westf., Gutenbergstr.
2, Germany, erklärt für dieses Produkt die Über-
einstimmung mit nachfolgend aufgeführten EG-
Richtlinien:
EN 55015 : 2000+A1 : 2001+A2 : 2002
EN 61547 : 1995+A1 : 2000
Produktbeschreibung: LED-Dynamo
Typ / Bezeichnung: HSD22 w. 1.5V Battery
Rhede, 03.07.2007
Meade Instruments Europe GmbH & Co. KG
Helmut Ebbert
Geschäftsführer

6
Aus diesen Teilen besteht deine Dynamo-
Taschenlampe:
1 LED-Beleuchtung (3 Stück)
2 Ein/Aus-Schalter
3 Schieber zum Feststellen des Antriebshebel
4 Antriebshebel
5 Dynamo mit Akku
6 Trageschlaufe
7 Gehäuse
Was du wissen musst
Deine Taschenlampe hat einen eingebauten Dyna-
mo (5). So etwas kennst du von deinem Fahrrad.
Dort wird auch ein Dynamo über das Rad angetrie-
ben und es wird Strom erzeugt. Du brauchst also
keine Batterien oder einen Stecker für die Steckdo-
se, damit du Licht an deinem Fahrrad hast. Das ist
wirklich praktisch, wenn du unterwegs bist … und
schont die Umwelt.
Genau so funktioniert auch deine Dynamo-Ta-
schenlampe. Nur der Dynamo wird ein bisschen
anders in Gang gesetzt. Das machst du mit deiner
Hand, in dem du den Antriebshebel (4) drückst.
Aber das erkläre ich dir später genauer.
Der Dynamo der Taschenlampe hat auch einen
Akku, der Strom speichern kann, damit du nicht
ständig drücken musst, um Licht zu haben.
Strom erzeugen und Licht einschalten
Schiebe den Schieber zum Feststellen des An-
triebshebel (3) mit dem Daumen – in Pfeilrichtung
– nach hinten. Dann springt der Antriebshebel (4)
nach unten aus dem Gehäuse (7). Wenn du nun
den Antriebshebel fest drückst, leuchtet die LED-
Beleuchtung für einen Moment auf. Gleichzeitig
hast du aber durch das Drücken auch den Akku (5)
aufgeladen.
Wichtig: Wenn du den Antriebshebel (4) benutzt,
darfst du den Schieber zum Feststellen (3) nicht
zurück entgegen der Pfeilrichtung bewegen. Sonst
könnte der Feststellmechanismus beschädigt wer-

7
DE
den. Schiebe als nächstes den Ein/Aus-Schalter
(2) in Pfeilrichtung nach vorn. Das Licht leuchtet
jetzt so lange, bis du den Schalter wieder zurück
schiebst.
Tipp: Schon mit einem Mal drücken hast du Strom
für mindestens 30 Sekunden Licht erzeugt. Das
Licht darf auch ruhig so lange eingeschaltet blei-
ben, bis es von selbst erlischt. Du kannst dann ja
sofort wieder neuen Strom „machen“.
Nach der Benutzung
Wenn du die Taschenlampe nicht mehr benutzen
möchtest, drücke den Antriebshebel (4) ins Ge-
häuse (7) und schiebe gleichzeitig den Schieber
zum Feststellen des Antriebshebel (3) entgegen
der Pfeilrichtung nach vorn zurück. Falls das Licht
noch eingeschaltet ist, solltest du auch den Ein/
Aus-Schalter (2) entgegen der Pfeilrichtung zurück
schieben. Damit schonst du die LED’s deiner Ta-
schenlampe.
Beachte:
• Drücke den Antriebshebel mit gleichmäßiger
Geschwindigkeit. Das Antriebssystem könnte
beschädigt werden und die Lebensdauer des
Produktes beeinträchtigen bei zu starker oder
schneller Bewegung.
• Um die Lebensdauer des Akkus zu erhalten und
zu erhöhen, drücke bitte den Antriebshebel sobald
das Licht beginnt schwächer zu werden um die
Batterie wieder aufzuladen.
• Um die Lebensdauer des Akkus zu erhalten und
zu erhöhen, ist es empfehlenswert das du den
Antriebshebel mindestens einmal im Monat und
nicht länger als 10 Minuten am Stück betätigst.
Bitte gehe sicher, dass das Gerät ausgeschaltet ist
wenn es nicht benutzt wird.
• Bitte das Produkt nicht in Räumen mit hohen
Temperaturen, hoher Luftfeuchtigkeit oder an
Staubigen Orten aufbewahren. Aufprall, Stöße
oder Erschütterungen sollten bei der Nutzung
vermieden werden.

8
Probleme und Mögliche Lösungen
Problem Mögliche Ursache Lösung
Wenn ich den Ein/Aus-Schalter
betätige, leuchtet das Licht nicht
Der Akku hat vielleicht keinen
Strom gespeichert
Drücke den Antriebshebel
Der Antriebshebel springt nicht
aus dem Gehäuse
Vermutlich ist der Schieber für
das Feststellen des Antriebshe-
bel noch nicht gelöst
Schiebe den Schieber zurück
Obwohl ich den Antriebshebel
gedrückt habe, leuchtet das
Licht nicht
Vielleicht hast du das Licht noch
nicht eingeschaltet
Schiebe den Ein/Aus-Schalter
nach vorn

9
DE

10
RISK of material damage!
Never take the device apart. Please consult
your dealer if there are any defects. The
dealer will contact our service centre and send the
device in for repair if needed.
Do not subject the device to temperatures excee-
ding 60 C.
TIPS on cleaning
Clean the exterior of device with a dry
cloth. Do not use cleaning uids so as
to avoid causing damage to electronic
components.
Protect the device from dust and moisture. Store
the device in the bag supplied or in its original
packaging. Batteries should be removed from the
device if it is not going to be used for a long period
of time.
DANGER to your child!
Children should only use this device under
supervision. Keep packaging materials
(plastic bags, rubber bands, etc.) away from child-
ren. There is a risk of SUFFOCATION.
This device contains electronic components that
are powered by either a mains connection or bat-
teries. Never leave a child unsupervised with this
device. The device should only be used as per the-
se instructions otherwise there is a serious RISK of
ELECTRICAL SHOCK.
DANGER of re and explosion!
Do not expose the device to high tempera-
tures. Use only the mains adapter supplied
or those battery types recommended. Never short
circuit the device or batteries or throw into a re.
Exposure to high temperatures or misuse of the
device can lead to short circuits, re or even ex-
plosion!

11
GB
DISPOSAL
Dispose of the packaging material/s as le-
gally required. Consult the local authority on
the matter if necessary.
Do not dispose of electrical equipment in
your ordinary refuse. The European guideline
2002/96/EU on Electronic and Electrical Equip-
ment Waste and relevant laws applying to it require
such used equipment to be separately collected
and recycled in an environment-friendly manner.
Empty batteries and accumulators must be dispo-
sed of separately. Information on disposing of all
such equipment made after 01 June 2006 can be
obtained from your local authority.
EEC conformity explanation
Meade Instruments Europe GmbH & Co KG, re-
sident in 46414 Rhede/Westf., Gutenbergstr. 2,
Germany, explains the agreement with in the follo-
wing specied EEC guidelines for this product:
EN 55015 : 2000+A1 : 2001+A2 : 2002
EN 61547 : 1995+A1 : 2000
Description du produit: LED-Dynamo
Type / Désignation: HSD22 w. 1.5V Battery
Rhede, 03.07.2007
Meade Instruments Europe GmbH & Co. KG
Helmut Ebbert
Managing director

12
Your Dynamo Pocket Flashlight consists of
these parts:
1. LED light (3 pieces)
2. On/Off switch
3 Slide for securing the drive lever
4. Drive lever
5. Dynamo with storage battery
6 Carrying strap
7 Casing
What you must know
Your pocket ashlight has a built-in dynamo (5).
You are probably familiar with something like this
from your bicycle. There, the wheel drives the dy-
namo, and electricity is produced. This way, you
don’t need any batteries or a plug for a power outlet
in order to have light for your bicycle. That is quite
practical, when you’re out and about ... and it helps
protect the environment, too.
Your Dynamo pocket ashlight works in exactly the
same way. The dynamo is just started up a bit dif-
ferently. You operate it with your hand, by pressing
on the drive lever (4). But I’ll explain that to you in
more detail later.
The pocket ashlight’s dynamo also has a storage
battery that can store electricity, so that you won’t
have to push the entire time in order to have light.
Generating power and turning on the light
Slide the slide for securing the drive lever (3) with
your thumbs backwards – in the direction of the ar-
row. Then the drive lever (4) will pop down out of
the casing (7). Now, if you press rmly on the drive
lever, the LED-light will illuminate for a moment. At
the same time, you’ve stored power in the storage
battery.
IMPORTANT: When using the drive lever (4), you
may not move the slide for securing (3) backward,
against the direction of the arrow.
Otherwise, the securing mechanism could be da-
maged. Next, push the On/Off switch (2) ahead,
in the direction of the arrow. The light will now be
illuminated until you push back the switch.

13
GB
TIP: If you press just one time, you have already
generated enough power for 30 seconds of light.
You may leave the light on until it goes out on its
own. Then you can just „make” some new electri-
city right away.
After Use
When you are done with your pocket ashlight,
push the drive lever (4) into the casing (7); at the
same time, slide the slide for securing the drive
lever (3) against the direction of the arrow back to
the front.
If the light is still on, you should also push the On/
Off switch (2) back against the direction of the ar-
row. That way, you’ll protect the LEDs of your po-
cket ashlight.
Note:
• Press drive lever at a uniform speed. If press too
hard or too fast, the drive system may be damaged
and then affect the service life of product.
• In order to conserve and extend the service life
of inner storage battery, please press drive lever to
charge the battery when the light begins to fade.
• In order to conserve and extend the service
life of inner storage battery, it is recommended
that you press the Drive lever at least once each
month and not exceed 10 minutes each time.
Please make sure the power is turned off during
idle period.
• Don‘t storage the product in a high temperature,
high humidity and dusty place. Collision and high
impact or vibration should be avoided when you
use it.

14
Problems and possible solutions
Problem Possible Cause Solution
When I push the On/Off switch,
the light doesn‘t come on
The storage battery may not
have any power stored
Press the drive lever
The drive lever won’t pop out of
the casing
The slide for securing the drive
lever is probably not yet
released
Slide the slide back.
Even though I’ve pushed the
drive lever, the light won’t work.
Maybe you haven’t turned the
light on yet
Push the On/Off switch
forwards

15
GB

DANGER de dommage sur le matériel !
Ne démontez jamais l’appareil! En cas
d’endommagement, adressez-vous à votre
revendeur. Il prendra contact avec le centre de ser-
vice et pourra, le cas échéant, envoyer l’appareil au
service de réparations.
N’exposez jamais l’appareil à des températures de
plus de 60° C !
REMARQUES concernant le nettoyage
Avant de procéder au nettoyage de
l’appareil, séparez-le de la source de
courant (retirez le bloc secteur de la prise
ou retirez les piles) ! Ne nettoyez que l’extérieur de
l’appareil et à l’aide d’un chiffon propre. N’utilisez
pas de liquide de nettoyage an d’éviter tout dom-
mage au système électronique. Tenez l’appareil à
l’abri de la poussière et de l’humidité! Conservez-
le dans la sacoche incluse à la livraison ou bien
dans l’emballage de transport. Retirez les piles
de l‘appareil si vous ne n’utilisez pas pendant un
certain temps !
DANGER pour votre enfant !
Les enfants ne devraient utiliser l’appareil
que sous surveillance. Gardez hors
de leur portée les matériaux d’emballage (sa-
chets en plastique, élastiques etc.) ! DANGER
D’ÉTOUFFEMENT !
Cet appareil contient des pièces électroniques
fonctionnant à l‘aide d’une source de courant
(bloc secteur et/ou piles). Ne laissez jamais
vos enfants sans surveillance utiliser cet ap-
pareil ! L’appareil doit impérativement être uti-
lisé selon les instructions du mode d’emploi :
DANGER de CHOC ÉLECTRIQUE !
DANGER D’INCENDIE/D’EXPLOSION!
N’exposez pas l’appareil à de fortes tempéra-
tures. Utilisez uniquement le bloc secteur in-
clus à la livraison ou bien les piles recommandées.
Ne court-circuitez pas l’appareil avec les piles et ne
les jetez pas dans le feu! Une chaleur excessive ou
un mauvais maniement peut provoquer des courts-
circuits, des incendies voire des explosions!

ÉLIMINATION
Éliminez les matériaux d’emballage selon le
type de produit. Pour plus d’informations con-
cernant l’élimination conforme, contactez le presta-
taire communal d’élimination des déchets ou bien
l’ofce de l’environnement.
Ne jetez pas d’appareils électriques dans les
ordures ménagères !
Selon la directive européenne 2002/96/EG re-
lative aux déchets d‘équipements électriques et
électroniques et à sa mise en œuvre au niveau du
droit national, les équipements électriques doivent
être triés et déposés à un endroit où ils seront re-
cyclés de façon écologique. Les piles et les accu-
mulateurs usagés doivent être déposés dans des
conteneurs de collectes de piles prévus à cet effet.
Pour plus d’informations concernant l’élimination
conforme d’appareils usagés et de piles usagées
produites après le 01.06.2006, contactez le pres-
tataire d’élimination communal ou bien l’ofce de
l’environnement.
FR
Certicat de conformité UE
La société Meade Instruments Europe Gmbh & Co.
KG, domiciliée à 46414 Rhede/Westf., Gutenberg-
str. 2, Allemagne, certie la conformité de ce pro-
duit avec les directives de l‘UE ci-après:
EN 55015 : 2000+A1 : 2001+A2 : 2002
EN 61547 : 1995+A1 : 2000
Description du produit: LED-Dynamo
Type / Désignation: HSD22 w. 1.5V Battery
Rhede, 03.07.2007
Meade Instruments Europe GmbH & Co. KG
Helmut Ebbert
Gérant

18
Ta lampe de poche avec dynamo est compo-
sée des pièces suivantes :
1 Eclairage LED (3 pièces)
2 Interrupteur marche/arrêt
3 Loquet de xation du levier d’entraînement
4 Levier d’entraînement
5 Dynamo avec accumulateur
6 Bandoulière
7 Boîtier
Ce que tu dois savoir
Ta lampe de poche possède une dynamo (5). Tu
connais cet objet car tu en as un sur ton vélo. Dans
ce cas précis, une dynamo est également entraî-
née sur le vélo et cela provoque de l’électricité. Tu
n’as donc pas besoin de piles ou d’une che pour
la prise pour avoir de la lumière sur ton vélo. C’est
réellement pratique quand tu te promènes…et cela
préserve l’environnement.
C’est exactement comme cela que ta lampe de
poche avec dynamo. Seul la dynamo est action-
née de manière légèrement différente. Tu dois
l’actionner avec ta main, en appuyant sur le levier
d’entraînement (4). Mais je t’expliquerai cela plus
en détails plus loin.
La dynamo de la lampe de poche a également un
accumulateur qui peut stocker l’électricité pour
t’éviter d’avoir à appuyer en continu pour avoir de
la lumière.
Produire de l’électricité et allumer la lumière
Pousse le loquet de xation du levier d’entraînement
(3) avec le pouce – dans la direction de la èche –
en arrière. Ensuite, le levier d’entraînement (4) sau-
te par le bas en dehors du boîtier (7). Maintenant, si
tu appuies fermement sur le levier d’entraînement,
le voyant LED s’éclaire pendant un moment. Mais
tu as également chargé l’accumulateur (5) en ap-
puyant.
Important: Si tu utilises le levier d’entraînement,
tu ne dois pas replacer le levier d’entraînement en
direction de la èche. Autrement, le mécanisme de
xation pourrait être endommagé. Glisse ensuite
l’interrupteur marche/arrêt (2) dans la direction de

19
FR
la èche vers l’avant. Maintenant, la lumière éclaire
jusqu’à ce que tu retires à nouveau l’interrupteur.
Conseil: déjà en appuyant une fois, tu as produit
de l’électricité pour au moins 30 secondes de lumi-
ère. Ainsi, la lumière doit également rester allumée
jusqu’à ce qu’elle s’éteigne d’elle-même. Tu peux
ensuite « refaire » une nouvelle électricité immé-
diatement.
Après l’utilisation
Si tu ne souhaites plus utiliser la lampe de poche,
appuie sur le levier d’entraînement (4) dans le boî-
tier (7) et replace en même temps le loquet de xa-
tion du levier d’entraînement (3) en direction de la
èche vers l’avant.
Si la lumière est encore allumée, tu devrais aussi
replacer l’interrupteur marche/arrêt (2) en direction
de la èche. Cela te permet d’économiser les vo-
yants LEDs de ta lampe de poche.
Attention :
• Appuyez sur le levier d’entraînement à vitesse
constante. Le système d’entraînement peut être
endommagé et la durée de vie du produit peut
être altérée en cas de mouvements trop violents
ou trop rapides.
• An de préserver et d’augmenter la durée de
vie de la batterie rechargeable, veuillez appuyer
sur le levier de d’entraînement dès que la lumière
commence à faiblir pour recharger la batterie.
• An de préserver et d’augmenter la durée de
vie de la batterie rechargeable, il est conseillé
d’actionner le levier d’entraînement au moins une
fois par mois et pas plus de 10 minutes d’aflées.
Il est impératif de s’assurer que l’appareil est à
l’arrêt lorsqu’il n’est pas utilisé.
• Ne pas stocker le produit dans des pièces
poussiéreuses où règnent des températures ou
des taux d’humidité élevés. Lors de l’utilisation de
l’appareil, il convient d’éviter les chutes, les chocs
et les secousses.

20
Problèmes et solutions possibles
Problème Causes possibles Solution
Quand j’actionne l’interrupteur
marche/arrêt, la lumière
n’éclaire pas
L’accumulateur n’a peut être pas
stocké d’électricité
Appuie sur le levier
d’entraînement
Le levier d’entraînement ne
saute pas du boîtier
Le loquet de xation du levier
d’entraînement n’est pas encore
desserré
Repousse le loquet
Bien que j’aie appuyé sur le
levier d’entraînement, la lumière
n’éclaire pas
Peut-être n’as-tu pas encore
allumé la lumière
Pousse l’interrupteur marche/
arrêt vers l’avant

21
FR

GEVAAR voor schade aan het materiaal!
Haal het apparaat niet uit elkaar! Neem
in geval van storingen contact op met de
speciaalzaak. Deze neemt contact op met het ser-
vicecentrum en kan het apparaat indien nodig ter
reparatie versturen.
Stel het apparaat niet bloot aan temperaturen bo-
ven de 60ºC!
TIPS voor het schoonmaken
Ontkoppel het apparaat vóór het schoon-
maken van de stroombron (stekker uit
het stopcontact nemen of batterijen ver-
wijderen)! Reinig het apparaat uitsluitend aan de
buitenzijde met een droge doek. Gebruik geen
reinigingsvloeistof om schade aan de elektronische
onderdelen te voorkomen. Bescherm het apparaat
tegen stof en vocht! Bewaar het in de meegelever-
de tas of verpakking. De batterijen dienen uit het
apparaat te worden verwijderd als het gedurende
langere tijd niet wordt gebruikt.
GEVAAR voor uw kind!
Kinderen mogen het apparaat uitsluitend
onder toezicht gebruiken. Houdt het verpak-
kingsmateriaal (plastic zakken, elastiekjes, e.d.)
buiten bereik van kinderen! Hierdoor kunnen ze
STIKKEN!
Dit apparaat bevat elektronische onderdelen die via
een stroombron (stroomvoorziening of batterijen)
worden aangedreven. Zorg dat kinderen tijdens
de bediening altijd onder toezicht staan! Gebruik
mag uitsluitend plaats vinden zoals in de gebruik-
saanwijzing staat omschreven, anders bestaat het
GEVAAR van een ELEKTRISCHE SCHOK!
BRAND-/EXPLOSIEGEVAAR!
Stel het apparaat niet bloot aan hoge tempe-
raturen. Gebruik uitsluitend de meegelever-
de adapter of de aanbevolen batterijen. Apparaat
en batterijen niet kortsluiten en niet in open vuur
gooien! Door overmatige hitte en onoordeelkundig
gebruik kunnen kortsluiting, brand en zelfs explo-
sies optreden!

NL
AFVALVERWERKING
Bied het verpakkingsmateriaal op soort ge-
scheiden als afval aan. Informatie over de
juiste afvalverwerking kunt u van uw plaatselijke af-
valverwerkingsbedrijf of de milieudienst krijgen.
Gooi elektrische apparaten niet weg met het
huisvuil!
Volgens de Europese Richtlijn 2002/96/EG over
afgedankte elektrische en elektronische appara-
ten alsmede de daaraan gerelateerde nationale
wetgeving moeten gebruikte elektrische apparaten
gescheiden worden ingezameld en volgens de mi-
lieurichtlijnen worden gerecycled. Lege batterijen
en accu’s moeten door de gebruiker bij inzame-
lingspunten voor batterijen worden aangeboden.
Informatie over de afvalverwerking van oude appa-
raten of batterijen die na 1 juni 2006 zijn gemaakt,
krijgt u van uw plaatselijke afvalverwerkingsbedrijf
of de milieudienst.
EU-Conformiteitsverklaring
Meade Instruments Europe GmbH & Co. KG, ge-
vestigd te 46414 Rhede/Westf., Gutenbergstr.
2, Germany, verklaart dit product conform aan de
volgende EG-richtlijnen:
EN 55015 : 2000+A1 : 2001+A2 : 2002
EN 61547 : 1995+A1 : 2000
Productbeschrijving: LED-Dynamo
Type / aanduiding: HSD22 w. 1.5V Battery
Rhede, 03.07.2007
Meade Instruments Europe GmbH & Co. KG
Helmut Ebbert
Directeur

24
Je dynamo-zaklamp bestaat uit de volgende
onderdelen:
1 LED-lamp (3 stuks)
2 Aan-/uit-schakelaar
3 Schuif om de aandrijfhendel vast te zetten
4 Aandrijfhendel
5 Dynamo met accu
6 Draaglus
7 Behuizing
Wat je moet weten
Je zaklamp heeft een ingebouwde dynamo (5). Die
ken je wel van de ets. Daarbij wordt ook een dy-
namo via het wiel aangedreven en zo stroom opge-
wekt. Daarom heb je geen batterijen of een stekker
voor een stopcontact nodig en heb je toch licht op
je ets. Dat is echt handig onderweg … en goed
voor het milieu.
Op precies dezelfde manier werkt ook je dynamo-
zaklamp. Alleen wordt de dynamo anders aange-
dreven. Hierbij doe je het met de hand door op de
aandrijfhendel (4) te drukken. Maar dat leg ik je
verderop precies uit.
De dynamo van de zaklamp heeft ook een accu die
stroom kan opslaan, zodat je niet steeds hoeft te
drukken om licht te hebben.
Stroom opwekken en licht inschakelen
Schuif met je duim de schuifvergrendeling van de
aandrijfhendel (3) met de duim – in de richting van
de pijl – naar achteren. Dan springt de aandrijf-
hendel (4) naar onderen uit de behuizing (7). Als
je de aandrijfhendel nu stevig indrukt, gaat de LED-
verlichting even aan. Maar tegelijk heb je door het
drukken ook de accu (5) opgeladen.
Belangrijk: Als je de aandrijfhendel (4) gebruikt,
mag je de schuifvergrendeling (3) niet terug bewe-
gen, tegen de richting van de pijl in. Anders kan het
vergrendelmechanisme beschadigd raken.
Schuif vervolgens de aan/uit-schakelaar (2) in de
richting van de pijl naar voren. Het licht brandt nu zo
lang, tot je de schakelaar weer terug schuift.
Tip: Met één keer drukken hebt je al stroom voor
tenminste 30 seconden licht opgewekt. Het licht

NL
25
mag ook gerust ingeschakeld blijven tot het vanzelf
uitgaat. Je kunt immers direct weer nieuwe stroom
„maken“.
Na gebruik
Als je de zaklamp niet meer nodig hebt, druk je
de aandrijfhendel (4) in de behuizing (7) terug en
schuift tegelijk de schuifvergrendeling van de aan-
drijfhendel (3) tegen de richting van de pijl in weer
naar voren.
Als het licht nog ingeschakeld was, moet je ook de
aan-/uit-schakelaar (2) tegen de richting van de pijl
in terugschuiven. Dat is beter voor de LED’s van je
zaklamp.
Denk erom:
• Knijp de hendel met gelijkmatige snelheid in.
Het aandrijfsysteem zou beschadigd kunnen
worden en de levensduur van het product kan
nadelig worden beïnvloed bij een te harde of te
snelle beweging.
• Om de levensduur van de batterij te behouden
en te verbeteren dient u de knijphendel te ge-
bruiken om de batterij op te laden zodra het licht
zwakker begint te worden.
• Om de levensduur van de batterij te behouden
en te verbeteren wordt het aanbevolen om de
knijphendel minstens eenmaal per maand en niet
langer dan 10 minuten achterelkaar te bedienen.
Zorgt u ervoor dat de zaklamp is uitgeschakeld
wanneer u hem niet gebruikt.
• De zaklamp niet bewaren in stofge, warme
of vochtige ruimtes opslaan. Schokken, stoten
of schudden dienen tijdens het gebruik van de
zaklamp vermeden worden.

26
Problemen en mogelijke oplossingen
Probleem Mogelijke oorzaak Oplossing
Als ik de aan/uit-schakelaar
gebruik, gaat het licht niet aan
De accu heeft misschien geen
stroom opgeslagen
Druk de aandrijfhendel in
De aandrijfhendel springt niet uit
de behuizing
Waarschijnlijk is de schuif waar-
mee de aandrijfhendel wordt
vergrendeld nog niet helemaal
opengeschoven
Schuif de schuifvergrendeling
naar achteren
Ook al heb ik de aandrijfhendel
ingedrukt, toch gaat het licht
niet aan
Misschien heb je het licht nog
niet aangezet
Schuif de aan/uit-schakelaar
naar voren

NL
27

PERICOLO per danni a cose!
Non smontare l’apparecchio! In caso di di-
fetti all’apparecchio rivolgersi al rivenditore
specializzato. Il rivenditore si metterà in contatto
con il servizio di assistenza clienti ed eventualmen-
te manderà l‘apparecchio in riparazione.
Non esporre l‘apparecchio a temperature superiori
ai 60°C!
AVVERTENZE per la pulizia
Per pulire l’apparecchio, scollegarlo
dalla sorgente di energia elettrica (scol-
legare l’alimentatore oppure rimuovere
le batterie)! Pulire l’apparecchio solo esternamen-
te con un panno asciutto. Non utilizzare liquido
detergente per evitare che i componenti elettro-
nici dell’apparecchio si danneggino. Proteggere
l’apparecchio da polvere e umidità! Conservarlo
nella custodia in dotazione o nella confezione
originale. Laddove l’apparecchio resti inutilizzato
per un periodo di tempo prolungato, rimuovere le
batterie.
PERICOLO per i bambini!
Non lasciare mai incustoditi i bambini quan-
do usano l’apparecchio. Tenere i materiali di
imballaggio (buste di plastica, elastici, ecc.) lonta-
no dalla portata dei bambini! PERICOLO DI SOF-
FOCAMENTO!
Il presente apparecchio contiene parti elettroniche
che funzionano con l’apporto di energia da sorgenti
elettriche (alimentatore e/o batteria). Non lasciare i
bambini incustoditi mentre utilizzano l’apparecchio!
L’utilizzo dell‘apparecchio è consentito esclusiva-
mente nel rispetto delle istruzioni per l’uso fornite.
In caso contrario sussiste il RISCHIO di SCARICHE
ELETTRICHE!
PERICOLO DI INNESCO DI INCENDI/ESPLOSIONE
Non esporre l‘apparecchio a temperature ele-
vate. Utilizzare esclusivamente l’alimentatore in
dotazione o le batterie consigliate. Non cortocircui-
tare l’apparecchio e/o le batterie e non metterli a
contatto con amme! L’esposizione a temperature ec-
cessive o un uso improprio dell‘apparecchio può pro-
vocare cortocircuiti, incendi e addirittura esplosioni!

IT
SMALTIMENTO
Smaltire i materiali di imballaggio dopo averli
suddivisi. Per informazioni sul corretto smal-
timento, si prega di rivolgersi all‘azienda munici-
pale che si occupa dello smaltimento dei riuti o
all’ufcio pubblico competente.
Non gettare apparecchi elettrici nei comuni
riuti domestici!
Secondo la direttiva europea 2002/96/CE sulle
apparecchiature elettriche ed elettroniche e ai sen-
si della legge nazionale che la recepisce, gli appa-
recchi elettrici devono essere differenziati e smaltiti
separatamente per poter essere trattati e riciclati
nel rispetto dell’ambiente.
Le batterie scariche, anche quelle ricaricabili, de-
vono essere smaltite dal consumatore presso gli
appositi punti di raccolta. Per maggiori informazioni
sullo smaltimento di apparecchi o batterie, prodotti
dopo il 01.06.2006, rivolgersi all‘azienda munici-
pale che si occupa dello smaltimento dei riuti o
all’ufcio pubblico competente.
EG-Konformitätserklärung
La Meade Instruments Europe GmbH & Co. KG,
avente sede a 46414 Rhede/Westf., Gutenbergstr.
2, Germania, dichiara che il presente prodotto è
conforme alle seguenti direttive CE:
EN 55015 : 2000+A1 : 2001+A2 : 2002
EN 61547 : 1995+A1 : 2000
Descrizione del prodotto: LED-Dynamo
Modello / Descrizione: HSD22 w. 1.5V Battery
Rhede, 03.07.2007
Meade Instruments Europe GmbH & Co. KG
Helmut Ebbert
Direttore amministrativo

30
La tua torcia a dinamo è composta dai
seguenti elementi:
1 Luce a LED (3 pezzi)
2 Interruttore ON/OFF
3 Cursore di bloccaggio della leva di azionamento
4 Leva di azionamento
5 Dinamo con batteria
6 Cordoncino
7 Corpo
Cose da sapere
La torcia ha una dinamo integrata (5), simile a quel-
la della tua bicicletta. Anche nella bici, una dinamo
viene azionata sulla ruota e produce corrente.
Per questo motivo non hai bisogno di batterie né
di una spina da inserire in una presa per avere la
luce sulla bicicletta. Il meccanismo è molto pratico
e utile per quando ti trovi in giro… e in più protegge
l‘ambiente.
La torcia a dinamo funziona allo stesso modo. Solo,
la dinamo viene azionata in modo leggermente di-
verso. Sei tu a farlo, con la tua mano, spingendo la
leva di azionamento (4). Ma questo te lo spiegherò
meglio più avanti.
La dinamo della torcia possiede anche una batteria
in grado di accumulare la corrente, così che non
sarai costretto a spingere continuamente la leva per
avere la luce.
Produrre la corrente e accendere la luce
Con il pollice, spingi indietro il cursore di bloccag-
gio della leva di azionamento (3), in direzione della
freccia. La leva di azionamento (4) si stacca così
dal corpo (7), verso il basso. Se adesso spingi forte
la leva di azionamento, la luce a LED si accende
per un attimo. Allo stesso tempo, spingendo la leva,
hai anche caricato la batteria (5).
Importante: quando usi la leva di azionamento (4),
non devi spostare il cursore di bloccaggio (3) nella
direzione opposta a quella della freccia, altrimenti il
meccanismo di bloccaggio potrebbe danneggiarsi.
Spingi poi l‘interruttore ON/OFF (2) in avanti, in
direzione della freccia. La luce ora resta acce-

IT
31
sa no a quando non spingi nuovamente indietro
l‘interruttore.
Suggerimento: basta una semplice spinta a pro-
durre corrente per almeno 30 secondi di luce. La
luce può tranquillamente restare accesa no a che
non si spegne da sola. A quel punto potrai subito
produrre nuova corrente.
Dopo l‘utilizzo
Quando hai nito di utilizzare la torcia, spingi la leva
di azionamento (4) nel corpo (7) e contemporane-
amente spingi di nuovo in avanti il cursore di bloc-
caggio della leva di azionamento (3), in direzione
opposta alla freccia.
Se la luce è ancora accesa, dovresti anche spin-
gere l‘interruttore ON/OFF (2) in direzione oppos-
ta alla freccia. Serve a proteggere i LED della tua
torcia.
Ricorda:
• Premi la leva di azionamento con velocità
uniforme. Il sistema di azionamento potrebbe dan-
neggiarsi e la durata del prodotto potrebbe essere
compromessa in caso di movimento troppo veloce
o se si esercita una forza eccessiva.
• Per garantire una lunga durata della pila ricari-
cabile, premi la leva di azionamento non appena
la luce comincia a indebolirsi per poter ricaricare
la batteria.
• Per garantire una lunga durata della pila rica-
ricabile, ti consigliamo di premere la leva di aziona-
mento almeno una volta al mese e per non più di
10 minuti alla volta. Assicurati che l‘apparecchio
sia spento quando non lo usi.
• Non conservare l’apparecchio in locali chiusi
in cui la temperatura e l‘umidità atmosferica sono
elevate né in luoghi polverosi. Si devono evitare
impatti, urti e vibrazioni durante l’utilizzo.

32
Problemi e possibili soluzioni
Problema Possibile causa Soluzione
Quando spingo l‘interruttore
ON/OFF, la luce non si
accende
Forse la batteria non ha accu-
mulato alcuna corrente
Spingi la leva di azionamento
La leva di azionamento non si
stacca dal corpo
Forse il cursore di bloccaggio
della leva di azionamento non è
ancora disinnestato
Spingi indietro il cursore
Anche se ho spinto la leva di
azionamento, la luce non si
accende
Forse non hai ancora acceso
l‘interruttore della luce
Spingi in avanti l‘interruttore
ON/OFF

IT
33

¡PELIGRO de daños materiales!
¡No desmonte el aparato! En caso de que
perciba un defecto, diríjase a su tienda es-
pecializada. En ella se pondrán en contacto con el
centro de servicio técnico y, si procede, enviarán el
aparato para que sea reparado.
¡No exponga el aparato a temperaturas superiores
a 60 °C!
INDICACIONES sobre la limpieza
Antes de limpiarlo, retire el aparato de la
fuente de alimentación eléctrica (extraer
el equipo de alimentación o retirar las
pilas). Limpie el aparato con un paño seco y sólo
por la parte exterior. No utilice ningún agente lim-
piador líquido, a n de evitar daños en el sistema
electrónico. ¡Proteja el aparato del polvo y la hu-
medad! Guárdelo en el maletín suministrado o en
el embalaje de transporte. Se recomienda retirar
las pilas del aparato si no se va a utilizar durante un
período prolongado.
¡PELIGRO para su hijo!
Los niños sólo pueden usar el aparato bajo
la supervisión de un adulto. ¡Mantener fuera
del alcance de los niños los materiales de embalaje
(bolsas de plástico, cintas de goma, etc.)! ¡Existe
PELIGRO DE ASFIXIA!
Este aparato incluye componentes electrónicos
operados a través de una fuente de electricidad
(equipo de alimentación y/o pilas). ¡No deje que
los niños manejen nunca el aparato sin su super-
visión! ¡Sólo se puede utilizar tal como se indica
en el manual de instrucciones, ya que en caso
contrario existe PELIGRO de una DESCARGA
ELÉCTRICA!
¡PELIGRO DE INCENDIO/EXPLOSIÓN!
No exponga el aparato a temperaturas eleva-
das. Utilice exclusivamente el equipo de ali-
mentación suministrado o las pilas recomendadas.
¡No poner en cortocircuito el aparato ni las pilas, ni
arrojarlos al fuego! ¡Si se calientan en exceso o se
manejan de modo inadecuado se pueden producir
cortocircuitos, incendios o incluso explosiones!

ES
ELIMINACIÓN
Elimine los materiales de embalaje separán-
dolos según su clase. Puede obtener in-
formación sobre la eliminación reglamentaria de
desechos en su proveedor de servicios de elimi-
nación de desechos municipal o bien en su ocina
de medio ambiente.
¡No deposite aparatos eléctricos en la basura
doméstica! Con arreglo a la Directiva Europea
2002/96/CE sobre aparatos eléctricos y electró-
nicos usados y a su aplicación en las respectivas
legislaciones nacionales, los aparatos eléctricos
usados deben recopilarse por separado y desti-
narse a un reciclaje adecuado desde el punto de
vista medioambiental. Las pilas y los acumuladores
gastados o descargados deben ser eliminados
por el consumidor en recipientes especiales para
pilas usadas. Puede obtener información sobre la
eliminación de pilas usadas o aparatos fabricados
después del 1 de junio de 2006 dirigiéndose a su
proveedor de servicios de eliminación de desechos
municipal o bien a su ocina de medio ambiente.
Declaración de conformidad con la UE
Meade Instruments Europe GmbH & Co. KG, con
sede en 46414 Rhede/Westf., Gutenbergstr. 2, Ale-
mania, declara que este producto está conforme con
las Directivas de la UE enumeradas a continuación:
EN 55015 : 2000+A1 : 2001+A2 : 2002
EN 61547 : 1995+A1 : 2000
Descripción del producto: LED-Dynamo
Modelo/Denominación: HSD22 w. 1.5V Battery
Rhede, 03.07.2007
Meade Instruments Europe GmbH & Co. KG
Helmut Ebbert
Gerente

36
Tu linterna dinamo se compone de los siguien-
tes elementos:
1 Lámparas LED (3 unidades)
2 Interruptor de encendido/apagado
3 Pasador de jación de la palanca de acciona-
miento
4 Palanca de accionamiento
5 Dinamo con batería
6 Lazo
7 Carcasa
Lo que debes saber
Tu linterna tiene montada una dinamo (5). Seguro
que sabes qué es una dinamo por tu bici. En ella
también se acciona una dinamo por medio de la
rueda y se genera electricidad: de este modo, no
necesitas pilas o un enchufe para tener luz en tu
bicicleta. Esto es algo realmente práctico cuando
estás fuera... y contribuye a respetar el medio am-
biente.
Tu linterna dinamo funciona exactamente igual.
No obstante, la dinamo se pone en marcha de un
modo un poco diferente. En este caso se hace con
la mano, presionando la palanca de accionamiento
(4). Pero eso ya te lo explicaré más adelante.
La dinamo de la linterna también tiene una batería
que puede acumular electricidad para que no ten-
gas que estar haciendo presión todo el tiempo para
tener luz.
Generar electricidad y encender la luz
Desliza hacia atrás (en el sentido de la echa) con
los pulgares el pasador de jación la palanca de ac-
cionamiento. La palanca de accionamiento (4) se
soltará de la carcasa hacia abajo (7). Si ahora pre-
sionas con fuerza la palanca, las lámparas LED se
iluminarán durante un instante. Al hacerlo estarás
cargando al mismo tiempo la batería (5).
Importante: si utilizas la palanca de accionamiento
(4), no puedes mover el pasador de jación (3) en
el sentido contrario al de la echa. De lo contrario
se podría dañar el mecanismo de jación. A conti-

ES
37
nuación, desliza el interruptor de encendido/apa-
gado (2) hacia adelante en el sentido de la echa.
La luz seguirá encendida hasta que vuelvas a desli-
zar el interruptor hacia atrás.
Consejo: con solo presionar una vez generarás
corriente para al menos 30 segundos de luz. La
luz también puede permanecer encendida sin pro-
blemas hasta que se apague por sí sola. En ese
momento podrás volver a «producir» nueva corri-
ente eléctrica.
Tras la utilización
Si no deseas seguir utilizando la linterna, presiona
la palanca de accionamiento (4) hasta introducirla
dentro de la carcasa (7) y a la vez vuelve a deslizar
hacia adelante el pasador de jación de la palan-
ca (3) en el sentido contrario al de la echa. Si la
luz todavía permanece encendida, deberás volver
a deslizar el interruptor de encendido/apagado
(2) en el sentido contrario al de la echa. De este
modo cuidarás los LED de tu linterna.
Ten en cuenta:
• Presiona la palanca de accionamiento con
velocidad uniforme. El sistema de accionamiento
podría sufrir desperfectos y acortar la vida útil del
producto si el movimiento es demasiado fuerte
o rápido.
• Para conservar y aumentar la vida útil de la ba-
tería, presiona la palanca de accionamiento hasta
que la luz empiece a ser más débil para volver a
cargar la batería.
• Para conservar y aumentar la vida útil de la ba-
tería, es recomendable que acciones en la pieza
la palanca de accionamiento al menos una vez al
mes y durante no más de 10 minutos. Por favor,
asegúrate de que el aparato está apagado cuando
no lo estés utilizando.
• No guardes el producto en espacios con
temperaturas elevadas, mucha humedad relativa
del aire o con polvo. Al usar el aparato, se deben
evitar impactos, golpes y sacudidas.

38
Problemas y posibles soluciones
Problema Posible causa Solución
Cuando acciono el interruptor
de encendido/apagado no se
enciende la luz
Puede que la batería no haya
acumulado corriente
Presiona la palanca de accio-
namiento
La palanca de accionamiento no
se suelta de la carcasa
Es probable que todavía no
se haya soltado el pasador
de jación de la palanca de
accionamiento
Desliza el pasador hacia atrás
Aunque he presionado la
palanca de accionamiento no se
enciende la luz
Quizá no hayas encendido
todavía el aparato
Desliza hacia adelante el inter-
ruptor de encendido/apagado

ES
39

GEFAHR von Sachschäden!
Não desmonte o aparelho! Em caso de
defeito, consulte o seu distribuidor espe-
cializado. Ele contactará o Centro de Assistência
e poderá enviar o aparelho para uma eventual re-
paração.
Não sujeite o aparelho a temperaturas superiores
a 60° C!
INDICAÇÕES sobre a limpeza
Antes de limpar a fonte de corrente, des-
ligue o aparelho (retirar a cha de rede ou
remover as pilhas)!
Limpe o aparelho apenas no exterior com um
pano seco. Não utilize produtos de limpeza, a m
de evitar danos no sistema electrónico. Proteja o
aparelho do pó e da humidade! Guarde-o na bol-
sa fornecida ou na embalagem de transporte. As
pilhas devem ser retiradas do aparelho, se este não
for usado durante algum tempo.
PERIGO para crianças!
As crianças só devem utilizar o aparelho
sob vigilância. Manter os materiais da em-
balagem (sacos de plástico, elásticos, etc.) afasta-
dos das crianças! RISCO DE ASFIXIA!
Este aparelho contém componentes electrónicos,
que são operados por uma fonte de corrente (fonte
de alimentação e/ou pilhas). Não deixe as crian-
ças sem vigilância durante o manuseamento do
aparelho! A utilização deve efectuar-se conforme
o manual, caso contrário há RISCO de CHOQUE
ELÉCTRICO!
RISCO DE INCÊNDIO/EXPLOSÃO!
Nunca sujeite o aparelho a altas temperaturas.
Utilize apenas a fonte de alimentação forne-
cida ou as pilhas recomendadas. Não curto-circui-
tar nem atirar para o fogo o aparelho nem as pilhas!
O calor excessivo e o manuseamento incorrecto
podem provocar curto-circuitos, incêndios e até
explosões!

PT
ELIMINAÇÃO
Separe os materiais da embalagem. Pode
obter mais informações sobre a reciclagem
correcta nos serviços municipais ou na agência do
meio ambiente.
Não deposite os seus aparelhos electrónicos
no lixo doméstico!
De acordo com a Directiva Europeia 2002/96/
CE sobre aparelhos eléctricos e electrónicos e sua
conversão na legislação nacional, os aparelhos
electrónicos em m de vida devem ser separados e
sujeitos a uma reciclagem ambientalmente correc-
ta. Pilhas e baterias antigas descarregadas têm de
ser depositadas pelo consumidor em recipientes
especiais de recolha para pilhas (pilhões). Pode
obter mais informações sobre aparelhos obsoletos
ou pilhas, produzidas após 01.06.2006, nos ser-
viços municipais ou na agência do meio ambiente.
Indicações de conformidade da UE
A Meade Instruments Europe GmbH & Co. KG,
estabelecida em 46414 Rhede/Westf., Guten-
bergstr. 2, Alemanha, explica o acordo para este
produto com as seguintes directrizes da UE:
EN 55015 : 2000+A1 : 2001+A2 : 2002
EN 61547 : 1995+A1 : 2000
Descrição do produto: LED-Dynamo
Tipo / Designação: HSD22 w. 1.5V Battery
Rhede, 03.07.2007
Meade Instruments Europe GmbH & Co. KG
Helmut Ebbert
Director

42
A lanterna de bolso com dínamo consiste nas
seguintes partes:
1 Iluminação por LED (3 unidades)
2 Interruptor para ligar/desligar
3 Botão corrediço para o ajuste da alavanca
de accionamento
4 Alavanca de accionamento
5 Dínamo com bateria
6 Fita de transporte
7 Caixa
O que tens de saber
A tua lanterna de bolso possui um dínamo incorpo-
rado (5). Encontrarás algo parecido na tua bicicleta.
Nela, a roda acciona um dínamo e é criada corren-
te. Não necessita de pilhas nem de nenhuma cha
para a tomada, para teres luz na tua bicicleta. Isto
é realmente prático quando estiveres em viagem …
ao mesmo tempo que protege o ambiente.
A tua lanterna de bolso também funciona desta for-
ma. Só o dínamo é que é activado de uma forma
um pouco diferente. Para isso tens de usar a tua
mão, premindo a alavanca de accionamento (4).
Mas isso será explicado mais adiante.
O dínamo da lanterna de bolso também possui
uma bateria que pode armazenar corrente, para
que não tenhas de estar sempre a premi-la para
obteres luz.
Gerar corrente e ligar a luz
Desloca o botão corrediço para o ajuste da alavan-
ca de accionamento (3) com o polegar – no senti-
do da seta – para trás. Em seguida, a alavanca de
accionamento (4) passa para baixo, para fora da
caixa (7). Se premires agora a alavanca de accio-
namento, a iluminação LED acende-se por um mo-
mento. Ao premi-la carregaste ao mesmo tempo a
bateria (5).
Importante: ao utilizares a alavanca de acciona-
mento (4), não deves mover para trás, no sentido
contrário da seta, o botão corrediço para o ajuste
(3). Caso contrário, o mecanismo de ajuste poderá
ser danicado. Em seguida, desloca o interruptor
para ligar/desligar (2) para a frente, no sentido

PT
43
da seta. A luz acende-se durante mais tempo, até
voltares a deslocar o interruptor para a posição
anterior.
Dica: ao clicares uma única vez geras luz para, pelo
menos, 30 segundos. A luz também pode perma-
necer ligada até se apagar automaticamente. Em
seguida, podes gerar novamente mais energia.
Após a utilização
Quando já não precisares de usar a lanterna de
bolso, prime a alavanca de accionamento (4) na
caixa (7) e desloca simultaneamente o botão corre-
diço para o ajuste da alavanca de accionamento (3)
para a frente, no sentido contrário da seta.
Se a luz ainda estiver ligada, deves deslocar tam-
bém o interruptor para ligar/desligar (2) para trás,
no sentido contrário da seta. Dessa forma, estás a
proteger os LEDs da tua lanterna de bolso.
Presta atenção:
• Premi la leva di azionamento con velocità
uniforme. Il sistema di azionamento potrebbe dan-
neggiarsi e la durata del prodotto potrebbe essere
compromessa in caso di movimento troppo veloce
o se si esercita una forza eccessiva.
• Per garantire una lunga durata della pila ricari-
cabile, premi la leva di azionamento non appena
la luce comincia a indebolirsi per poter ricaricare
la batteria.
• Per garantire una lunga durata della pila rica-
ricabile, ti consigliamo di premere la leva di aziona-
mento almeno una volta al mese e per non più di
10 minuti alla volta. Assicurati che l‘apparecchio
sia spento quando non lo usi.
• Non conservare l’apparecchio in locali chiusi
in cui la temperatura e l‘umidità atmosferica sono
elevate né in luoghi polverosi. Si devono evitare
impatti, urti e vibrazioni durante l’utilizzo.

44
Problemas e possíveis soluções
Problema Possível causa Solução
Quando acciono o interruptor
para ligar/desligar, a luz não
se acende
A bateria poderá não ter corren-
te armazenada
Prime a alavanca de acciona-
mento
A alavanca de accionamento
não salta para fora da caixa
Talvez o botão corrediço para o
ajuste da alavanca de acciona-
mento ainda não esteja solto
Desloca o botão corrediço
para trás
Apesar de premir a alavanca
de accionamento, a luz não se
acende
Talvez ainda não tenhas ligado
a luz
Desloca o interruptor para ligar/
desligar para a frente

PT
45

Meade Instruments Europe
GmbH & Co. KG
Gutenbergstr. 2
DE-46414 Rhede
Germany
www.bresser-junior.de
Irrtümer und technische Änderungen vorbehalten. · Errors and technical changes reserved.
Sous réserve d’erreurs et de modications techniques.
Vergissingen en technische veranderingen voorbehouden. · Con riserva di errori e modiche tecniche.
Queda reservada la posibilidad de incluir modicaciones o de que el texto contenga errores.
Erros e alterações técnicas reservados.
ANL8832000MSP0810BRESSER
Transcripción de documentos
LED-Dynamo Art. No. 88-32000 DE GB FR NL IT ES PT Bedienungsanleitung Operating Instructions Mode d’emploi Handleiding Istruzioni per l’uso Instrucciones de uso Manual de utilização DE GB FR NL IT ES PT Bedienungsanleitung...................................4 Operating Instructions...............................12 Mode d’emploi........................................... 20 Handleiding................................................ 28 Istruzioni per l’uso..................................... 36 Instrucciones de uso................................. 44 Manual de utilização................................. 52 H F E D C B G GEFAHR für Ihr Kind! Kinder sollten das Gerät nur unter Aufsicht benutzen. Verpackungsmaterialien (Plastiktüten, Gummibänder, etc.) von Kindern fernhalten! Es besteht ERSTICKUNGSGEFAHR! Dieses Gerät beinhaltet Elektronikteile, die über eine Stromquelle (Netzteil und/oder Batterien) betrieben werden. Lassen Sie Kinder beim Umgang mit dem Gerät nie unbeaufsichtigt! Die Nutzung darf nur wie in der Anleitung beschrieben erfolgen, andernfalls besteht GEFAHR eines STROMSCHLAGS! BRAND-/EXPLOSIONSGEFAHR! Setzen Sie das Gerät keinen hohen Temperaturen aus. Benutzen Sie nur das mitgelieferte Netzteil oder die empfohlenen Batterien. Gerät und Batterien nicht kurzschließen oder ins Feuer werfen! Durch übermäßige Hitze und unsachgemäße Handhabung können Kurzschlüsse, Brände und sogar Explosionen ausgelöst werden! GEFAHR von Sachschäden! Bauen Sie das Gerät nicht auseinander! Wenden Sie sich im Falle eines Defekts bitte an Ihren Fachhändler. Er nimmt mit dem ServiceCenter Kontakt auf und kann das Gerät ggf. zwecks Reparatur einschicken. Setzen Sie das Gerät keinen Temperaturen über 60° C aus! HINWEISE zur Reinigung Reinigen Sie das Gerät nur äußerlich mit einem trockenen Tuch. Benutzen Sie keine Reinigungsflüssigkeit, um Schäden an der Elektronik zu vermeiden. Schützen Sie das Gerät vor Staub und Feuchtigkeit! Bewahren Sie es in der mitgelieferten Tasche oder Transportverpackung auf. ENTSORGUNG Entsorgen Sie die Verpackungsmaterialien sortenrein. Informationen zur ordnungsgemäßen Entsorgung erhalten Sie beim kommunalen Entsorgungsdienstleister oder Umweltamt. Werfen Sie Elektrogeräte nicht in den Hausmüll! Gemäß der Europäischen Richtlinie 2002/96/EG über Elektro- und Elektronik-Altgeräte und deren Umsetzung in nationales Recht müssen verbrauchte Elektrogeräte getrennt gesammelt und einer umweltgerechten Wiederverwertung zugeführt werden. Entladene Altbatterien und Akkus müssen vom Verbraucher in Batteriesammelgefäßen entsorgt werden. Informationen zur Entsorgung alter Geräte oder Batterien, die nach dem 01.06.2006 produziert wurden, erfahren Sie beim kommunalen Entsorgungsdienstleister oder Umweltamt. EG-Konformitätserklärung Die Meade Instruments Europe GmbH & Co. KG, ansässig in 46414 Rhede/Westf., Gutenbergstr. 2, Germany, erklärt für dieses Produkt die Übereinstimmung mit nachfolgend aufgeführten EGRichtlinien: EN 55015 : 2000+A1 : 2001+A2 : 2002 EN 61547 : 1995+A1 : 2000 Produktbeschreibung: LED-Dynamo Typ / Bezeichnung: HSD22 w. 1.5V Battery Rhede, 03.07.2007 Meade Instruments Europe GmbH & Co. KG Helmut Ebbert Geschäftsführer DE Aus diesen Teilen besteht deine DynamoTaschenlampe: 1 LED-Beleuchtung (3 Stück) 2 Ein/Aus-Schalter 3 Schieber zum Feststellen des Antriebshebel 4 Antriebshebel 5 Dynamo mit Akku 6 Trageschlaufe 7 Gehäuse Was du wissen musst Deine Taschenlampe hat einen eingebauten Dynamo (5). So etwas kennst du von deinem Fahrrad. Dort wird auch ein Dynamo über das Rad angetrieben und es wird Strom erzeugt. Du brauchst also keine Batterien oder einen Stecker für die Steckdose, damit du Licht an deinem Fahrrad hast. Das ist wirklich praktisch, wenn du unterwegs bist … und schont die Umwelt. 6 Genau so funktioniert auch deine Dynamo-Taschenlampe. Nur der Dynamo wird ein bisschen anders in Gang gesetzt. Das machst du mit deiner Hand, in dem du den Antriebshebel (4) drückst. Aber das erkläre ich dir später genauer. Der Dynamo der Taschenlampe hat auch einen Akku, der Strom speichern kann, damit du nicht ständig drücken musst, um Licht zu haben. Strom erzeugen und Licht einschalten Schiebe den Schieber zum Feststellen des Antriebshebel (3) mit dem Daumen – in Pfeilrichtung – nach hinten. Dann springt der Antriebshebel (4) nach unten aus dem Gehäuse (7). Wenn du nun den Antriebshebel fest drückst, leuchtet die LEDBeleuchtung für einen Moment auf. Gleichzeitig hast du aber durch das Drücken auch den Akku (5) aufgeladen. Wichtig: Wenn du den Antriebshebel (4) benutzt, darfst du den Schieber zum Feststellen (3) nicht zurück entgegen der Pfeilrichtung bewegen. Sonst könnte der Feststellmechanismus beschädigt wer- den. Schiebe als nächstes den Ein/Aus-Schalter (2) in Pfeilrichtung nach vorn. Das Licht leuchtet jetzt so lange, bis du den Schalter wieder zurück schiebst. Tipp: Schon mit einem Mal drücken hast du Strom für mindestens 30 Sekunden Licht erzeugt. Das Licht darf auch ruhig so lange eingeschaltet bleiben, bis es von selbst erlischt. Du kannst dann ja sofort wieder neuen Strom „machen“. Nach der Benutzung Wenn du die Taschenlampe nicht mehr benutzen möchtest, drücke den Antriebshebel (4) ins Gehäuse (7) und schiebe gleichzeitig den Schieber zum Feststellen des Antriebshebel (3) entgegen der Pfeilrichtung nach vorn zurück. Falls das Licht noch eingeschaltet ist, solltest du auch den Ein/ Aus-Schalter (2) entgegen der Pfeilrichtung zurück schieben. Damit schonst du die LED’s deiner Taschenlampe. Beachte: • Drücke den Antriebshebel mit gleichmäßiger Geschwindigkeit. Das Antriebssystem könnte beschädigt werden und die Lebensdauer des Produktes beeinträchtigen bei zu starker oder schneller Bewegung. • Um die Lebensdauer des Akkus zu erhalten und zu erhöhen, drücke bitte den Antriebshebel sobald das Licht beginnt schwächer zu werden um die Batterie wieder aufzuladen. • Um die Lebensdauer des Akkus zu erhalten und zu erhöhen, ist es empfehlenswert das du den Antriebshebel mindestens einmal im Monat und nicht länger als 10 Minuten am Stück betätigst. Bitte gehe sicher, dass das Gerät ausgeschaltet ist wenn es nicht benutzt wird. • Bitte das Produkt nicht in Räumen mit hohen Temperaturen, hoher Luftfeuchtigkeit oder an Staubigen Orten aufbewahren. Aufprall, Stöße oder Erschütterungen sollten bei der Nutzung vermieden werden. 7 DE Probleme und Mögliche Lösungen 8 Problem Mögliche Ursache Lösung Wenn ich den Ein/Aus-Schalter betätige, leuchtet das Licht nicht Der Akku hat vielleicht keinen Strom gespeichert Drücke den Antriebshebel Der Antriebshebel springt nicht aus dem Gehäuse Vermutlich ist der Schieber für das Feststellen des Antriebshebel noch nicht gelöst Schiebe den Schieber zurück Obwohl ich den Antriebshebel gedrückt habe, leuchtet das Licht nicht Vielleicht hast du das Licht noch nicht eingeschaltet Schiebe den Ein/Aus-Schalter nach vorn DE 9 DANGER to your child! Children should only use this device under supervision. Keep packaging materials (plastic bags, rubber bands, etc.) away from children. There is a risk of SUFFOCATION. RISK of material damage! Never take the device apart. Please consult your dealer if there are any defects. The dealer will contact our service centre and send the device in for repair if needed. This device contains electronic components that are powered by either a mains connection or batteries. Never leave a child unsupervised with this device. The device should only be used as per these instructions otherwise there is a serious RISK of ELECTRICAL SHOCK. Do not subject the device to temperatures exceeding 60 C. DANGER of fire and explosion! Do not expose the device to high temperatures. Use only the mains adapter supplied or those battery types recommended. Never short circuit the device or batteries or throw into a fire. Exposure to high temperatures or misuse of the device can lead to short circuits, fire or even explosion! 10 TIPS on cleaning Clean the exterior of device with a dry cloth. Do not use cleaning fluids so as to avoid causing damage to electronic components. Protect the device from dust and moisture. Store the device in the bag supplied or in its original packaging. Batteries should be removed from the device if it is not going to be used for a long period of time. DISPOSAL Dispose of the packaging material/s as legally required. Consult the local authority on the matter if necessary. Do not dispose of electrical equipment in your ordinary refuse. The European guideline 2002/96/EU on Electronic and Electrical Equipment Waste and relevant laws applying to it require such used equipment to be separately collected and recycled in an environment-friendly manner. Empty batteries and accumulators must be disposed of separately. Information on disposing of all such equipment made after 01 June 2006 can be obtained from your local authority. EEC conformity explanation Meade Instruments Europe GmbH & Co KG, resident in 46414 Rhede/Westf., Gutenbergstr. 2, Germany, explains the agreement with in the following specified EEC guidelines for this product: EN 55015 : 2000+A1 : 2001+A2 : 2002 EN 61547 : 1995+A1 : 2000 Description du produit: LED-Dynamo Type / Désignation: HSD22 w. 1.5V Battery Rhede, 03.07.2007 Meade Instruments Europe GmbH & Co. KG Helmut Ebbert Managing director 11 GB Your Dynamo Pocket Flashlight consists of these parts: 1. LED light (3 pieces) 2. On/Off switch 3 Slide for securing the drive lever 4. Drive lever 5. Dynamo with storage battery 6 Carrying strap 7 Casing What you must know Your pocket flashlight has a built-in dynamo (5). You are probably familiar with something like this from your bicycle. There, the wheel drives the dynamo, and electricity is produced. This way, you don’t need any batteries or a plug for a power outlet in order to have light for your bicycle. That is quite practical, when you’re out and about ... and it helps protect the environment, too. Your Dynamo pocket flashlight works in exactly the same way. The dynamo is just started up a bit differently. You operate it with your hand, by pressing 12 on the drive lever (4). But I’ll explain that to you in more detail later. The pocket flashlight’s dynamo also has a storage battery that can store electricity, so that you won’t have to push the entire time in order to have light. Generating power and turning on the light Slide the slide for securing the drive lever (3) with your thumbs backwards – in the direction of the arrow. Then the drive lever (4) will pop down out of the casing (7). Now, if you press firmly on the drive lever, the LED-light will illuminate for a moment. At the same time, you’ve stored power in the storage battery. IMPORTANT: When using the drive lever (4), you may not move the slide for securing (3) backward, against the direction of the arrow. Otherwise, the securing mechanism could be damaged. Next, push the On/Off switch (2) ahead, in the direction of the arrow. The light will now be illuminated until you push back the switch. TIP: If you press just one time, you have already generated enough power for 30 seconds of light. You may leave the light on until it goes out on its own. Then you can just „make” some new electricity right away. After Use When you are done with your pocket flashlight, push the drive lever (4) into the casing (7); at the same time, slide the slide for securing the drive lever (3) against the direction of the arrow back to the front. If the light is still on, you should also push the On/ Off switch (2) back against the direction of the arrow. That way, you’ll protect the LEDs of your pocket flashlight. Note: • Press drive lever at a uniform speed. If press too hard or too fast, the drive system may be damaged and then affect the service life of product. • In order to conserve and extend the service life of inner storage battery, please press drive lever to charge the battery when the light begins to fade. • In order to conserve and extend the service life of inner storage battery, it is recommended that you press the Drive lever at least once each month and not exceed 10 minutes each time. Please make sure the power is turned off during idle period. • Don‘t storage the product in a high temperature, high humidity and dusty place. Collision and high impact or vibration should be avoided when you use it. 13 GB Problems and possible solutions 14 Problem Possible Cause Solution When I push the On/Off switch, the light doesn‘t come on The storage battery may not have any power stored Press the drive lever The drive lever won’t pop out of the casing The slide for securing the drive lever is probably not yet released Slide the slide back. Even though I’ve pushed the drive lever, the light won’t work. Maybe you haven’t turned the light on yet Push the On/Off switch forwards GB 15 DANGER pour votre enfant ! Les enfants ne devraient utiliser l’appareil que sous surveillance. Gardez hors de leur portée les matériaux d’emballage (sachets en plastique, élastiques etc.) ! DANGER D’ÉTOUFFEMENT ! DANGER de dommage sur le matériel ! Ne démontez jamais l’appareil! En cas d’endommagement, adressez-vous à votre revendeur. Il prendra contact avec le centre de service et pourra, le cas échéant, envoyer l’appareil au service de réparations. Cet appareil contient des pièces électroniques fonctionnant à l‘aide d’une source de courant (bloc secteur et/ou piles). Ne laissez jamais vos enfants sans surveillance utiliser cet appareil ! L’appareil doit impérativement être utilisé selon les instructions du mode d’emploi : DANGER de CHOC ÉLECTRIQUE ! N’exposez jamais l’appareil à des températures de plus de 60° C ! DANGER D’INCENDIE/D’EXPLOSION! N’exposez pas l’appareil à de fortes températures. Utilisez uniquement le bloc secteur inclus à la livraison ou bien les piles recommandées. Ne court-circuitez pas l’appareil avec les piles et ne les jetez pas dans le feu! Une chaleur excessive ou un mauvais maniement peut provoquer des courtscircuits, des incendies voire des explosions! REMARQUES concernant le nettoyage Avant de procéder au nettoyage de l’appareil, séparez-le de la source de courant (retirez le bloc secteur de la prise ou retirez les piles) ! Ne nettoyez que l’extérieur de l’appareil et à l’aide d’un chiffon propre. N’utilisez pas de liquide de nettoyage afin d’éviter tout dommage au système électronique. Tenez l’appareil à l’abri de la poussière et de l’humidité! Conservezle dans la sacoche incluse à la livraison ou bien dans l’emballage de transport. Retirez les piles de l‘appareil si vous ne n’utilisez pas pendant un certain temps ! ÉLIMINATION Éliminez les matériaux d’emballage selon le type de produit. Pour plus d’informations concernant l’élimination conforme, contactez le prestataire communal d’élimination des déchets ou bien l’office de l’environnement. Certificat de conformité UE Ne jetez pas d’appareils électriques dans les ordures ménagères ! Selon la directive européenne 2002/96/EG relative aux déchets d‘équipements électriques et électroniques et à sa mise en œuvre au niveau du droit national, les équipements électriques doivent être triés et déposés à un endroit où ils seront recyclés de façon écologique. Les piles et les accumulateurs usagés doivent être déposés dans des conteneurs de collectes de piles prévus à cet effet. Pour plus d’informations concernant l’élimination conforme d’appareils usagés et de piles usagées produites après le 01.06.2006, contactez le prestataire d’élimination communal ou bien l’office de l’environnement. EN 55015 : 2000+A1 : 2001+A2 : 2002 EN 61547 : 1995+A1 : 2000 La société Meade Instruments Europe Gmbh & Co. KG, domiciliée à 46414 Rhede/Westf., Gutenbergstr. 2, Allemagne, certifie la conformité de ce produit avec les directives de l‘UE ci-après: Description du produit: LED-Dynamo Type / Désignation: HSD22 w. 1.5V Battery Rhede, 03.07.2007 Meade Instruments Europe GmbH & Co. KG Helmut Ebbert Gérant FR Ta lampe de poche avec dynamo est composée des pièces suivantes : 1 Eclairage LED (3 pièces) 2 Interrupteur marche/arrêt 3 Loquet de fixation du levier d’entraînement 4 Levier d’entraînement 5 Dynamo avec accumulateur 6 Bandoulière 7 Boîtier Ce que tu dois savoir Ta lampe de poche possède une dynamo (5). Tu connais cet objet car tu en as un sur ton vélo. Dans ce cas précis, une dynamo est également entraînée sur le vélo et cela provoque de l’électricité. Tu n’as donc pas besoin de piles ou d’une fiche pour la prise pour avoir de la lumière sur ton vélo. C’est réellement pratique quand tu te promènes…et cela préserve l’environnement. C’est exactement comme cela que ta lampe de poche avec dynamo. Seul la dynamo est actionnée de manière légèrement différente. Tu dois 18 l’actionner avec ta main, en appuyant sur le levier d’entraînement (4). Mais je t’expliquerai cela plus en détails plus loin. La dynamo de la lampe de poche a également un accumulateur qui peut stocker l’électricité pour t’éviter d’avoir à appuyer en continu pour avoir de la lumière. Produire de l’électricité et allumer la lumière Pousse le loquet de fixation du levier d’entraînement (3) avec le pouce – dans la direction de la flèche – en arrière. Ensuite, le levier d’entraînement (4) saute par le bas en dehors du boîtier (7). Maintenant, si tu appuies fermement sur le levier d’entraînement, le voyant LED s’éclaire pendant un moment. Mais tu as également chargé l’accumulateur (5) en appuyant. Important: Si tu utilises le levier d’entraînement, tu ne dois pas replacer le levier d’entraînement en direction de la flèche. Autrement, le mécanisme de fixation pourrait être endommagé. Glisse ensuite l’interrupteur marche/arrêt (2) dans la direction de la flèche vers l’avant. Maintenant, la lumière éclaire jusqu’à ce que tu retires à nouveau l’interrupteur. Conseil: déjà en appuyant une fois, tu as produit de l’électricité pour au moins 30 secondes de lumière. Ainsi, la lumière doit également rester allumée jusqu’à ce qu’elle s’éteigne d’elle-même. Tu peux ensuite « refaire » une nouvelle électricité immédiatement. Après l’utilisation Si tu ne souhaites plus utiliser la lampe de poche, appuie sur le levier d’entraînement (4) dans le boîtier (7) et replace en même temps le loquet de fixation du levier d’entraînement (3) en direction de la flèche vers l’avant. Si la lumière est encore allumée, tu devrais aussi replacer l’interrupteur marche/arrêt (2) en direction de la flèche. Cela te permet d’économiser les voyants LEDs de ta lampe de poche. Attention : • Appuyez sur le levier d’entraînement à vitesse constante. Le système d’entraînement peut être endommagé et la durée de vie du produit peut être altérée en cas de mouvements trop violents ou trop rapides. • Afin de préserver et d’augmenter la durée de vie de la batterie rechargeable, veuillez appuyer sur le levier de d’entraînement dès que la lumière commence à faiblir pour recharger la batterie. • Afin de préserver et d’augmenter la durée de vie de la batterie rechargeable, il est conseillé d’actionner le levier d’entraînement au moins une fois par mois et pas plus de 10 minutes d’affilées. Il est impératif de s’assurer que l’appareil est à l’arrêt lorsqu’il n’est pas utilisé. • Ne pas stocker le produit dans des pièces poussiéreuses où règnent des températures ou des taux d’humidité élevés. Lors de l’utilisation de l’appareil, il convient d’éviter les chutes, les chocs et les secousses. 19 FR Problèmes et solutions possibles 20 Problème Causes possibles Solution Quand j’actionne l’interrupteur marche/arrêt, la lumière n’éclaire pas L’accumulateur n’a peut être pas stocké d’électricité Appuie sur le levier d’entraînement Le levier d’entraînement ne saute pas du boîtier Le loquet de fixation du levier d’entraînement n’est pas encore desserré Repousse le loquet Bien que j’aie appuyé sur le levier d’entraînement, la lumière n’éclaire pas Peut-être n’as-tu pas encore allumé la lumière Pousse l’interrupteur marche/ arrêt vers l’avant FR 21 GEVAAR voor uw kind! Kinderen mogen het apparaat uitsluitend onder toezicht gebruiken. Houdt het verpakkingsmateriaal (plastic zakken, elastiekjes, e.d.) buiten bereik van kinderen! Hierdoor kunnen ze STIKKEN! GEVAAR voor schade aan het materiaal! Haal het apparaat niet uit elkaar! Neem in geval van storingen contact op met de speciaalzaak. Deze neemt contact op met het servicecentrum en kan het apparaat indien nodig ter reparatie versturen. Dit apparaat bevat elektronische onderdelen die via een stroombron (stroomvoorziening of batterijen) worden aangedreven. Zorg dat kinderen tijdens de bediening altijd onder toezicht staan! Gebruik mag uitsluitend plaats vinden zoals in de gebruiksaanwijzing staat omschreven, anders bestaat het GEVAAR van een ELEKTRISCHE SCHOK! Stel het apparaat niet bloot aan temperaturen boven de 60ºC! BRAND-/EXPLOSIEGEVAAR! Stel het apparaat niet bloot aan hoge temperaturen. Gebruik uitsluitend de meegeleverde adapter of de aanbevolen batterijen. Apparaat en batterijen niet kortsluiten en niet in open vuur gooien! Door overmatige hitte en onoordeelkundig gebruik kunnen kortsluiting, brand en zelfs explosies optreden! TIPS voor het schoonmaken Ontkoppel het apparaat vóór het schoonmaken van de stroombron (stekker uit het stopcontact nemen of batterijen verwijderen)! Reinig het apparaat uitsluitend aan de buitenzijde met een droge doek. Gebruik geen reinigingsvloeistof om schade aan de elektronische onderdelen te voorkomen. Bescherm het apparaat tegen stof en vocht! Bewaar het in de meegeleverde tas of verpakking. De batterijen dienen uit het apparaat te worden verwijderd als het gedurende langere tijd niet wordt gebruikt. AFVALVERWERKING Bied het verpakkingsmateriaal op soort gescheiden als afval aan. Informatie over de juiste afvalverwerking kunt u van uw plaatselijke afvalverwerkingsbedrijf of de milieudienst krijgen. Gooi elektrische apparaten niet weg met het huisvuil! Volgens de Europese Richtlijn 2002/96/EG over afgedankte elektrische en elektronische apparaten alsmede de daaraan gerelateerde nationale wetgeving moeten gebruikte elektrische apparaten gescheiden worden ingezameld en volgens de milieurichtlijnen worden gerecycled. Lege batterijen en accu’s moeten door de gebruiker bij inzamelingspunten voor batterijen worden aangeboden. Informatie over de afvalverwerking van oude apparaten of batterijen die na 1 juni 2006 zijn gemaakt, krijgt u van uw plaatselijke afvalverwerkingsbedrijf of de milieudienst. EU-Conformiteitsverklaring Meade Instruments Europe GmbH & Co. KG, gevestigd te 46414 Rhede/Westf., Gutenbergstr. 2, Germany, verklaart dit product conform aan de volgende EG-richtlijnen: EN 55015 : 2000+A1 : 2001+A2 : 2002 EN 61547 : 1995+A1 : 2000 Productbeschrijving: LED-Dynamo Type / aanduiding: HSD22 w. 1.5V Battery Rhede, 03.07.2007 Meade Instruments Europe GmbH & Co. KG Helmut Ebbert Directeur NL Je dynamo-zaklamp bestaat uit de volgende onderdelen: 1 LED-lamp (3 stuks) 2 Aan-/uit-schakelaar 3 Schuif om de aandrijfhendel vast te zetten 4 Aandrijfhendel 5 Dynamo met accu 6 Draaglus 7 Behuizing Wat je moet weten Je zaklamp heeft een ingebouwde dynamo (5). Die ken je wel van de fiets. Daarbij wordt ook een dynamo via het wiel aangedreven en zo stroom opgewekt. Daarom heb je geen batterijen of een stekker voor een stopcontact nodig en heb je toch licht op je fiets. Dat is echt handig onderweg … en goed voor het milieu. Op precies dezelfde manier werkt ook je dynamozaklamp. Alleen wordt de dynamo anders aangedreven. Hierbij doe je het met de hand door op de aandrijfhendel (4) te drukken. Maar dat leg ik je 24 verderop precies uit. De dynamo van de zaklamp heeft ook een accu die stroom kan opslaan, zodat je niet steeds hoeft te drukken om licht te hebben. Stroom opwekken en licht inschakelen Schuif met je duim de schuifvergrendeling van de aandrijfhendel (3) met de duim – in de richting van de pijl – naar achteren. Dan springt de aandrijfhendel (4) naar onderen uit de behuizing (7). Als je de aandrijfhendel nu stevig indrukt, gaat de LEDverlichting even aan. Maar tegelijk heb je door het drukken ook de accu (5) opgeladen. Belangrijk: Als je de aandrijfhendel (4) gebruikt, mag je de schuifvergrendeling (3) niet terug bewegen, tegen de richting van de pijl in. Anders kan het vergrendelmechanisme beschadigd raken. Schuif vervolgens de aan/uit-schakelaar (2) in de richting van de pijl naar voren. Het licht brandt nu zo lang, tot je de schakelaar weer terug schuift. Tip: Met één keer drukken hebt je al stroom voor tenminste 30 seconden licht opgewekt. Het licht mag ook gerust ingeschakeld blijven tot het vanzelf uitgaat. Je kunt immers direct weer nieuwe stroom „maken“. Na gebruik Als je de zaklamp niet meer nodig hebt, druk je de aandrijfhendel (4) in de behuizing (7) terug en schuift tegelijk de schuifvergrendeling van de aandrijfhendel (3) tegen de richting van de pijl in weer naar voren. Als het licht nog ingeschakeld was, moet je ook de aan-/uit-schakelaar (2) tegen de richting van de pijl in terugschuiven. Dat is beter voor de LED’s van je zaklamp. Denk erom: • Knijp de hendel met gelijkmatige snelheid in. Het aandrijfsysteem zou beschadigd kunnen worden en de levensduur van het product kan nadelig worden beïnvloed bij een te harde of te snelle beweging. • Om de levensduur van de batterij te behouden en te verbeteren dient u de knijphendel te gebruiken om de batterij op te laden zodra het licht zwakker begint te worden. • Om de levensduur van de batterij te behouden en te verbeteren wordt het aanbevolen om de knijphendel minstens eenmaal per maand en niet langer dan 10 minuten achterelkaar te bedienen. Zorgt u ervoor dat de zaklamp is uitgeschakeld wanneer u hem niet gebruikt. • De zaklamp niet bewaren in stoffige, warme of vochtige ruimtes opslaan. Schokken, stoten of schudden dienen tijdens het gebruik van de zaklamp vermeden worden. NL 25 Problemen en mogelijke oplossingen 26 Probleem Mogelijke oorzaak Oplossing Als ik de aan/uit-schakelaar gebruik, gaat het licht niet aan De accu heeft misschien geen stroom opgeslagen Druk de aandrijfhendel in De aandrijfhendel springt niet uit de behuizing Waarschijnlijk is de schuif waarmee de aandrijfhendel wordt vergrendeld nog niet helemaal opengeschoven Schuif de schuifvergrendeling naar achteren Ook al heb ik de aandrijfhendel ingedrukt, toch gaat het licht niet aan Misschien heb je het licht nog niet aangezet Schuif de aan/uit-schakelaar naar voren NL 27 PERICOLO per i bambini! Non lasciare mai incustoditi i bambini quando usano l’apparecchio. Tenere i materiali di imballaggio (buste di plastica, elastici, ecc.) lontano dalla portata dei bambini! PERICOLO DI SOFFOCAMENTO! Il presente apparecchio contiene parti elettroniche che funzionano con l’apporto di energia da sorgenti elettriche (alimentatore e/o batteria). Non lasciare i bambini incustoditi mentre utilizzano l’apparecchio! L’utilizzo dell‘apparecchio è consentito esclusivamente nel rispetto delle istruzioni per l’uso fornite. In caso contrario sussiste il RISCHIO di SCARICHE ELETTRICHE! PERICOLO DI INNESCO DI INCENDI/ESPLOSIONE Non esporre l‘apparecchio a temperature elevate. Utilizzare esclusivamente l’alimentatore in dotazione o le batterie consigliate. Non cortocircuitare l’apparecchio e/o le batterie e non metterli a contatto con fiamme! L’esposizione a temperature eccessive o un uso improprio dell‘apparecchio può provocare cortocircuiti, incendi e addirittura esplosioni! PERICOLO per danni a cose! Non smontare l’apparecchio! In caso di difetti all’apparecchio rivolgersi al rivenditore specializzato. Il rivenditore si metterà in contatto con il servizio di assistenza clienti ed eventualmente manderà l‘apparecchio in riparazione. Non esporre l‘apparecchio a temperature superiori ai 60°C! AVVERTENZE per la pulizia Per pulire l’apparecchio, scollegarlo dalla sorgente di energia elettrica (scollegare l’alimentatore oppure rimuovere le batterie)! Pulire l’apparecchio solo esternamente con un panno asciutto. Non utilizzare liquido detergente per evitare che i componenti elettronici dell’apparecchio si danneggino. Proteggere l’apparecchio da polvere e umidità! Conservarlo nella custodia in dotazione o nella confezione originale. Laddove l’apparecchio resti inutilizzato per un periodo di tempo prolungato, rimuovere le batterie. SMALTIMENTO Smaltire i materiali di imballaggio dopo averli suddivisi. Per informazioni sul corretto smaltimento, si prega di rivolgersi all‘azienda municipale che si occupa dello smaltimento dei rifiuti o all’ufficio pubblico competente. EG-Konformitätserklärung Non gettare apparecchi elettrici nei comuni rifiuti domestici! Secondo la direttiva europea 2002/96/CE sulle apparecchiature elettriche ed elettroniche e ai sensi della legge nazionale che la recepisce, gli apparecchi elettrici devono essere differenziati e smaltiti separatamente per poter essere trattati e riciclati nel rispetto dell’ambiente. Le batterie scariche, anche quelle ricaricabili, devono essere smaltite dal consumatore presso gli appositi punti di raccolta. Per maggiori informazioni sullo smaltimento di apparecchi o batterie, prodotti dopo il 01.06.2006, rivolgersi all‘azienda municipale che si occupa dello smaltimento dei rifiuti o all’ufficio pubblico competente. EN 55015 : 2000+A1 : 2001+A2 : 2002 EN 61547 : 1995+A1 : 2000 La Meade Instruments Europe GmbH & Co. KG, avente sede a 46414 Rhede/Westf., Gutenbergstr. 2, Germania, dichiara che il presente prodotto è conforme alle seguenti direttive CE: Descrizione del prodotto: LED-Dynamo Modello / Descrizione: HSD22 w. 1.5V Battery Rhede, 03.07.2007 Meade Instruments Europe GmbH & Co. KG Helmut Ebbert Direttore amministrativo IT La tua torcia a dinamo è composta dai seguenti elementi: 1 Luce a LED (3 pezzi) 2 Interruttore ON/OFF 3 Cursore di bloccaggio della leva di azionamento 4 Leva di azionamento 5 Dinamo con batteria 6 Cordoncino 7 Corpo Cose da sapere La torcia ha una dinamo integrata (5), simile a quella della tua bicicletta. Anche nella bici, una dinamo viene azionata sulla ruota e produce corrente. Per questo motivo non hai bisogno di batterie né di una spina da inserire in una presa per avere la luce sulla bicicletta. Il meccanismo è molto pratico e utile per quando ti trovi in giro… e in più protegge l‘ambiente. La torcia a dinamo funziona allo stesso modo. Solo, la dinamo viene azionata in modo leggermente diverso. Sei tu a farlo, con la tua mano, spingendo la 30 leva di azionamento (4). Ma questo te lo spiegherò meglio più avanti. La dinamo della torcia possiede anche una batteria in grado di accumulare la corrente, così che non sarai costretto a spingere continuamente la leva per avere la luce. Produrre la corrente e accendere la luce Con il pollice, spingi indietro il cursore di bloccaggio della leva di azionamento (3), in direzione della freccia. La leva di azionamento (4) si stacca così dal corpo (7), verso il basso. Se adesso spingi forte la leva di azionamento, la luce a LED si accende per un attimo. Allo stesso tempo, spingendo la leva, hai anche caricato la batteria (5). Importante: quando usi la leva di azionamento (4), non devi spostare il cursore di bloccaggio (3) nella direzione opposta a quella della freccia, altrimenti il meccanismo di bloccaggio potrebbe danneggiarsi. Spingi poi l‘interruttore ON/OFF (2) in avanti, in direzione della freccia. La luce ora resta acce- sa fino a quando non spingi nuovamente indietro l‘interruttore. Suggerimento: basta una semplice spinta a produrre corrente per almeno 30 secondi di luce. La luce può tranquillamente restare accesa fino a che non si spegne da sola. A quel punto potrai subito produrre nuova corrente. Dopo l‘utilizzo Quando hai finito di utilizzare la torcia, spingi la leva di azionamento (4) nel corpo (7) e contemporaneamente spingi di nuovo in avanti il cursore di bloccaggio della leva di azionamento (3), in direzione opposta alla freccia. Se la luce è ancora accesa, dovresti anche spingere l‘interruttore ON/OFF (2) in direzione opposta alla freccia. Serve a proteggere i LED della tua torcia. Ricorda: • Premi la leva di azionamento con velocità uniforme. Il sistema di azionamento potrebbe danneggiarsi e la durata del prodotto potrebbe essere compromessa in caso di movimento troppo veloce o se si esercita una forza eccessiva. • Per garantire una lunga durata della pila ricaricabile, premi la leva di azionamento non appena la luce comincia a indebolirsi per poter ricaricare la batteria. • Per garantire una lunga durata della pila ricaricabile, ti consigliamo di premere la leva di azionamento almeno una volta al mese e per non più di 10 minuti alla volta. Assicurati che l‘apparecchio sia spento quando non lo usi. • Non conservare l’apparecchio in locali chiusi in cui la temperatura e l‘umidità atmosferica sono elevate né in luoghi polverosi. Si devono evitare impatti, urti e vibrazioni durante l’utilizzo. 31 IT Problemi e possibili soluzioni 32 Problema Possibile causa Soluzione Quando spingo l‘interruttore ON/OFF, la luce non si accende Forse la batteria non ha accumulato alcuna corrente Spingi la leva di azionamento La leva di azionamento non si stacca dal corpo Forse il cursore di bloccaggio della leva di azionamento non è ancora disinnestato Spingi indietro il cursore Anche se ho spinto la leva di azionamento, la luce non si accende Forse non hai ancora acceso l‘interruttore della luce Spingi in avanti l‘interruttore ON/OFF IT 33 ¡PELIGRO para su hijo! Los niños sólo pueden usar el aparato bajo la supervisión de un adulto. ¡Mantener fuera del alcance de los niños los materiales de embalaje (bolsas de plástico, cintas de goma, etc.)! ¡Existe PELIGRO DE ASFIXIA! Este aparato incluye componentes electrónicos operados a través de una fuente de electricidad (equipo de alimentación y/o pilas). ¡No deje que los niños manejen nunca el aparato sin su supervisión! ¡Sólo se puede utilizar tal como se indica en el manual de instrucciones, ya que en caso contrario existe PELIGRO de una DESCARGA ELÉCTRICA! ¡PELIGRO DE INCENDIO/EXPLOSIÓN! No exponga el aparato a temperaturas elevadas. Utilice exclusivamente el equipo de alimentación suministrado o las pilas recomendadas. ¡No poner en cortocircuito el aparato ni las pilas, ni arrojarlos al fuego! ¡Si se calientan en exceso o se manejan de modo inadecuado se pueden producir cortocircuitos, incendios o incluso explosiones! ¡PELIGRO de daños materiales! ¡No desmonte el aparato! En caso de que perciba un defecto, diríjase a su tienda especializada. En ella se pondrán en contacto con el centro de servicio técnico y, si procede, enviarán el aparato para que sea reparado. ¡No exponga el aparato a temperaturas superiores a 60 °C! INDICACIONES sobre la limpieza Antes de limpiarlo, retire el aparato de la fuente de alimentación eléctrica (extraer el equipo de alimentación o retirar las pilas). Limpie el aparato con un paño seco y sólo por la parte exterior. No utilice ningún agente limpiador líquido, a fin de evitar daños en el sistema electrónico. ¡Proteja el aparato del polvo y la humedad! Guárdelo en el maletín suministrado o en el embalaje de transporte. Se recomienda retirar las pilas del aparato si no se va a utilizar durante un período prolongado. ELIMINACIÓN Elimine los materiales de embalaje separándolos según su clase. Puede obtener información sobre la eliminación reglamentaria de desechos en su proveedor de servicios de eliminación de desechos municipal o bien en su oficina de medio ambiente. ¡No deposite aparatos eléctricos en la basura doméstica! Con arreglo a la Directiva Europea 2002/96/CE sobre aparatos eléctricos y electrónicos usados y a su aplicación en las respectivas legislaciones nacionales, los aparatos eléctricos usados deben recopilarse por separado y destinarse a un reciclaje adecuado desde el punto de vista medioambiental. Las pilas y los acumuladores gastados o descargados deben ser eliminados por el consumidor en recipientes especiales para pilas usadas. Puede obtener información sobre la eliminación de pilas usadas o aparatos fabricados después del 1 de junio de 2006 dirigiéndose a su proveedor de servicios de eliminación de desechos municipal o bien a su oficina de medio ambiente. Declaración de conformidad con la UE Meade Instruments Europe GmbH & Co. KG, con sede en 46414 Rhede/Westf., Gutenbergstr. 2, Alemania, declara que este producto está conforme con las Directivas de la UE enumeradas a continuación: EN 55015 : 2000+A1 : 2001+A2 : 2002 EN 61547 : 1995+A1 : 2000 Descripción del producto: LED-Dynamo Modelo/Denominación: HSD22 w. 1.5V Battery Rhede, 03.07.2007 Meade Instruments Europe GmbH & Co. KG Helmut Ebbert Gerente ES Tu linterna dinamo se compone de los siguientes elementos: 1 Lámparas LED (3 unidades) 2 Interruptor de encendido/apagado 3 Pasador de fijación de la palanca de accionamiento 4 Palanca de accionamiento 5 Dinamo con batería 6 Lazo 7 Carcasa Lo que debes saber Tu linterna tiene montada una dinamo (5). Seguro que sabes qué es una dinamo por tu bici. En ella también se acciona una dinamo por medio de la rueda y se genera electricidad: de este modo, no necesitas pilas o un enchufe para tener luz en tu bicicleta. Esto es algo realmente práctico cuando estás fuera... y contribuye a respetar el medio ambiente. 36 Tu linterna dinamo funciona exactamente igual. No obstante, la dinamo se pone en marcha de un modo un poco diferente. En este caso se hace con la mano, presionando la palanca de accionamiento (4). Pero eso ya te lo explicaré más adelante. La dinamo de la linterna también tiene una batería que puede acumular electricidad para que no tengas que estar haciendo presión todo el tiempo para tener luz. Generar electricidad y encender la luz Desliza hacia atrás (en el sentido de la flecha) con los pulgares el pasador de fijación la palanca de accionamiento. La palanca de accionamiento (4) se soltará de la carcasa hacia abajo (7). Si ahora presionas con fuerza la palanca, las lámparas LED se iluminarán durante un instante. Al hacerlo estarás cargando al mismo tiempo la batería (5). Importante: si utilizas la palanca de accionamiento (4), no puedes mover el pasador de fijación (3) en el sentido contrario al de la flecha. De lo contrario se podría dañar el mecanismo de fijación. A conti- nuación, desliza el interruptor de encendido/apagado (2) hacia adelante en el sentido de la flecha. La luz seguirá encendida hasta que vuelvas a deslizar el interruptor hacia atrás. Consejo: con solo presionar una vez generarás corriente para al menos 30 segundos de luz. La luz también puede permanecer encendida sin problemas hasta que se apague por sí sola. En ese momento podrás volver a «producir» nueva corriente eléctrica. Tras la utilización Si no deseas seguir utilizando la linterna, presiona la palanca de accionamiento (4) hasta introducirla dentro de la carcasa (7) y a la vez vuelve a deslizar hacia adelante el pasador de fijación de la palanca (3) en el sentido contrario al de la flecha. Si la luz todavía permanece encendida, deberás volver a deslizar el interruptor de encendido/apagado (2) en el sentido contrario al de la flecha. De este modo cuidarás los LED de tu linterna. Ten en cuenta: • Presiona la palanca de accionamiento con velocidad uniforme. El sistema de accionamiento podría sufrir desperfectos y acortar la vida útil del producto si el movimiento es demasiado fuerte o rápido. • Para conservar y aumentar la vida útil de la batería, presiona la palanca de accionamiento hasta que la luz empiece a ser más débil para volver a cargar la batería. • Para conservar y aumentar la vida útil de la batería, es recomendable que acciones en la pieza la palanca de accionamiento al menos una vez al mes y durante no más de 10 minutos. Por favor, asegúrate de que el aparato está apagado cuando no lo estés utilizando. • No guardes el producto en espacios con temperaturas elevadas, mucha humedad relativa del aire o con polvo. Al usar el aparato, se deben evitar impactos, golpes y sacudidas. 37 ES Problemas y posibles soluciones 38 Problema Posible causa Solución Cuando acciono el interruptor de encendido/apagado no se enciende la luz Puede que la batería no haya acumulado corriente Presiona la palanca de accionamiento La palanca de accionamiento no se suelta de la carcasa Es probable que todavía no se haya soltado el pasador de fijación de la palanca de accionamiento Desliza el pasador hacia atrás Aunque he presionado la palanca de accionamiento no se enciende la luz Quizá no hayas encendido todavía el aparato Desliza hacia adelante el interruptor de encendido/apagado ES 39 PERIGO para crianças! As crianças só devem utilizar o aparelho sob vigilância. Manter os materiais da embalagem (sacos de plástico, elásticos, etc.) afastados das crianças! RISCO DE ASFIXIA! Este aparelho contém componentes electrónicos, que são operados por uma fonte de corrente (fonte de alimentação e/ou pilhas). Não deixe as crianças sem vigilância durante o manuseamento do aparelho! A utilização deve efectuar-se conforme o manual, caso contrário há RISCO de CHOQUE ELÉCTRICO! RISCO DE INCÊNDIO/EXPLOSÃO! Nunca sujeite o aparelho a altas temperaturas. Utilize apenas a fonte de alimentação fornecida ou as pilhas recomendadas. Não curto-circuitar nem atirar para o fogo o aparelho nem as pilhas! O calor excessivo e o manuseamento incorrecto podem provocar curto-circuitos, incêndios e até explosões! GEFAHR von Sachschäden! Não desmonte o aparelho! Em caso de defeito, consulte o seu distribuidor especializado. Ele contactará o Centro de Assistência e poderá enviar o aparelho para uma eventual reparação. Não sujeite o aparelho a temperaturas superiores a 60° C! INDICAÇÕES sobre a limpeza Antes de limpar a fonte de corrente, desligue o aparelho (retirar a ficha de rede ou remover as pilhas)! Limpe o aparelho apenas no exterior com um pano seco. Não utilize produtos de limpeza, a fim de evitar danos no sistema electrónico. Proteja o aparelho do pó e da humidade! Guarde-o na bolsa fornecida ou na embalagem de transporte. As pilhas devem ser retiradas do aparelho, se este não for usado durante algum tempo. ELIMINAÇÃO Separe os materiais da embalagem. Pode obter mais informações sobre a reciclagem correcta nos serviços municipais ou na agência do meio ambiente. Não deposite os seus aparelhos electrónicos no lixo doméstico! De acordo com a Directiva Europeia 2002/96/ CE sobre aparelhos eléctricos e electrónicos e sua conversão na legislação nacional, os aparelhos electrónicos em fim de vida devem ser separados e sujeitos a uma reciclagem ambientalmente correcta. Pilhas e baterias antigas descarregadas têm de ser depositadas pelo consumidor em recipientes especiais de recolha para pilhas (pilhões). Pode obter mais informações sobre aparelhos obsoletos ou pilhas, produzidas após 01.06.2006, nos serviços municipais ou na agência do meio ambiente. Indicações de conformidade da UE A Meade Instruments Europe GmbH & Co. KG, estabelecida em 46414 Rhede/Westf., Gutenbergstr. 2, Alemanha, explica o acordo para este produto com as seguintes directrizes da UE: EN 55015 : 2000+A1 : 2001+A2 : 2002 EN 61547 : 1995+A1 : 2000 Descrição do produto: LED-Dynamo Tipo / Designação: HSD22 w. 1.5V Battery Rhede, 03.07.2007 Meade Instruments Europe GmbH & Co. KG Helmut Ebbert Director PT A lanterna de bolso com dínamo consiste nas seguintes partes: 1 Iluminação por LED (3 unidades) 2 Interruptor para ligar/desligar 3 Botão corrediço para o ajuste da alavanca de accionamento 4 Alavanca de accionamento 5 Dínamo com bateria 6 Fita de transporte 7 Caixa O que tens de saber A tua lanterna de bolso possui um dínamo incorporado (5). Encontrarás algo parecido na tua bicicleta. Nela, a roda acciona um dínamo e é criada corrente. Não necessita de pilhas nem de nenhuma ficha para a tomada, para teres luz na tua bicicleta. Isto é realmente prático quando estiveres em viagem … ao mesmo tempo que protege o ambiente. A tua lanterna de bolso também funciona desta forma. Só o dínamo é que é activado de uma forma um pouco diferente. Para isso tens de usar a tua 42 mão, premindo a alavanca de accionamento (4). Mas isso será explicado mais adiante. O dínamo da lanterna de bolso também possui uma bateria que pode armazenar corrente, para que não tenhas de estar sempre a premi-la para obteres luz. Gerar corrente e ligar a luz Desloca o botão corrediço para o ajuste da alavanca de accionamento (3) com o polegar – no sentido da seta – para trás. Em seguida, a alavanca de accionamento (4) passa para baixo, para fora da caixa (7). Se premires agora a alavanca de accionamento, a iluminação LED acende-se por um momento. Ao premi-la carregaste ao mesmo tempo a bateria (5). Importante: ao utilizares a alavanca de accionamento (4), não deves mover para trás, no sentido contrário da seta, o botão corrediço para o ajuste (3). Caso contrário, o mecanismo de ajuste poderá ser danificado. Em seguida, desloca o interruptor para ligar/desligar (2) para a frente, no sentido da seta. A luz acende-se durante mais tempo, até voltares a deslocar o interruptor para a posição anterior. Dica: ao clicares uma única vez geras luz para, pelo menos, 30 segundos. A luz também pode permanecer ligada até se apagar automaticamente. Em seguida, podes gerar novamente mais energia. Após a utilização Quando já não precisares de usar a lanterna de bolso, prime a alavanca de accionamento (4) na caixa (7) e desloca simultaneamente o botão corrediço para o ajuste da alavanca de accionamento (3) para a frente, no sentido contrário da seta. Se a luz ainda estiver ligada, deves deslocar também o interruptor para ligar/desligar (2) para trás, no sentido contrário da seta. Dessa forma, estás a proteger os LEDs da tua lanterna de bolso. Presta atenção: • Premi la leva di azionamento con velocità uniforme. Il sistema di azionamento potrebbe danneggiarsi e la durata del prodotto potrebbe essere compromessa in caso di movimento troppo veloce o se si esercita una forza eccessiva. • Per garantire una lunga durata della pila ricaricabile, premi la leva di azionamento non appena la luce comincia a indebolirsi per poter ricaricare la batteria. • Per garantire una lunga durata della pila ricaricabile, ti consigliamo di premere la leva di azionamento almeno una volta al mese e per non più di 10 minuti alla volta. Assicurati che l‘apparecchio sia spento quando non lo usi. • Non conservare l’apparecchio in locali chiusi in cui la temperatura e l‘umidità atmosferica sono elevate né in luoghi polverosi. Si devono evitare impatti, urti e vibrazioni durante l’utilizzo. 43 PT Problemas e possíveis soluções 44 Problema Possível causa Solução Quando acciono o interruptor para ligar/desligar, a luz não se acende A bateria poderá não ter corrente armazenada Prime a alavanca de accionamento A alavanca de accionamento não salta para fora da caixa Talvez o botão corrediço para o ajuste da alavanca de accionamento ainda não esteja solto Desloca o botão corrediço para trás Apesar de premir a alavanca de accionamento, a luz não se acende Talvez ainda não tenhas ligado a luz Desloca o interruptor para ligar/ desligar para a frente PT 45 Irrtümer und technische Änderungen vorbehalten. · Errors and technical changes reserved. Sous réserve d’erreurs et de modifications techniques. Vergissingen en technische veranderingen voorbehouden. · Con riserva di errori e modifiche tecniche. Queda reservada la posibilidad de incluir modificaciones o de que el texto contenga errores. Erros e alterações técnicas reservados. ANL8832000MSP0810BRESSER Meade Instruments Europe GmbH & Co. KG Gutenbergstr. 2 DE-46414 Rhede Germany www.bresser-junior.de-
 1
1
-
2
-
3
-
4
-
5
-
6
-
7
-
8
-
9
-
10
-
11
-
12
-
13
-
14
-
15
-
16
-
17
-
18
-
19
-
20
-
21
-
22
-
23
-
24
-
25
-
26
-
27
-
28
-
29
-
30
-
31
-
32
-
33
-
34
-
35
-
36
-
37
-
38
-
39
-
40
-
41
-
42
-
43
-
44
-
45
-
46
- Categoría
- Linternas
- Tipo
- El manual del propietario
en otros idiomas
- français: Bresser 88-32000 Le manuel du propriétaire
- italiano: Bresser 88-32000 Manuale del proprietario
- English: Bresser 88-32000 Owner's manual
- Deutsch: Bresser 88-32000 Bedienungsanleitung
- Nederlands: Bresser 88-32000 de handleiding
- português: Bresser 88-32000 Manual do proprietário
Artículos relacionados
-
Bresser Solar Window Thermometer El manual del propietario
-
-
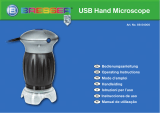 Bresser Optik 88-54000 Manual de usuario
-
-
Bresser Solar Charger 4-in-1 El manual del propietario
-

Otros documentos
-
Bresser Junior 8852200 El manual del propietario
-
Edision ML100-S2DX6 MAGLITE ML100 2x C LED Flashlight Manual de usuario
-
Shimano DH-UR705-3D Manual de usuario
-
National Geographic 9048000 El manual del propietario
-
-
Silvercrest SCR 1 A1 Operation and Safety Notes
-
Sangean MMR-77 El manual del propietario