La página se está cargando...

GB - User Manual
F - Manuel d'Utilisation - p. 7
NL - Handleiding - p. 12
D - Bedienungsanleitung - S. 17
E - Manual de Instrucciones - p. 22
HR - Upute za uporabu - s. 27
DMX Channel Chart - p. 32-33
Assembled in PRC
Designed by LOTRONIC S.A.
Av. Z. Gramme 9
B - 1480 Saintes
STAND-ALONE DMX CONTROLLED LIGHT
BAR 4-IN-1
BARRE DE LUMIERE DMX AUTONOME 4-EN-1
4-IN-1 DMX LICHTLEISTE MIT AKKU
4-IN-1 DMX LICHT BAR MET ACCU
BARRA DE ILUMINACION DMX AUTÓNOMA 4-EN-1
EVENTBAR-BAT
CODE: 16-2650

EN 2
© COPYRIGHT LOTRONIC 2020
INSTRUCTION MANUAL
STAND-ALONE DMX CONTROLLED LIGHT BAR 4-IN-1
UNPACKING INSTRUCTIONS
Immediately upon receiving a xture, carefully unpack the carton, check the contents to ensure
that all parts are present and have been received in good condition. Notify the freight company
immediately and retain packing material for inspection if any parts appear to be damaged from
shipping or the carton itself shows signs of mishandling. Keep the carton and all packing mate-
rials. In the event that a xture must be returned to the factory, it is important that the xture be
returned in the original factory box and packing.
EXPLANATION OF SYMBOLS
The triangle containing a lightning symbol is used to indicate whenever your health is at risk
(due to electrocution, for example).
An exclamation mark in a triangle indicates particular risks in handling or operating the ap-
pliance.
Class I protection: Connect only to an earthed mains outlet
The unit complies with CE standards
For indoor use only
0.5m
Minimum distance between the appliance and other objects
Don’t stare into the light beam
CAUTION
DO NOT OPEN THE HOUSING
SHOCK HAZARD
Please read this manual carefully before operating this product.
SAFETY RECOMMENDATIONS
• Please read these instructions carefully, they include important information about the installa-
tion, usage and maintenance of this product.
• Please keep this User Guide for future reference. If you sell the unit to another user, be sure that
he also receives this instruction booklet.
• Always make sure that you are connecting to the proper voltage, and that the line voltage you
are connecting to is not higher than that stated on the bottom of the xture.
• The appliance is part of class I and must exclusively connected to an earthed mains outlet.
• This product is intended for indoor use only!
• To prevent risk of re or shock, do not expose xture to rain or moisture. Make sure there are no
ammable materials close to the unit during operation.
• The unit must be installed in a location with adequate ventilation, at least 20in (50cm) from
adjacent surfaces. Be sure that no ventilation slots are blocked.
• The minimum distance luminaire from that part of the luminaire or lamp to the lighted object is
0.5m.
0.5m
• Maximum ambient temperature (Ta) is 104° F (40°C). Do not operate the xture at temperatures
higher than this.
• In the event of a serious operating problem, stop using the unit immediately. Never try to repair
the unit by yourself. Repairs carried out by unskilled people can lead to damage or malfunction.
Please contact the nearest authorized technical assistance center. Always use the same type of

EN3
WWW.AFX-LIGHT.COM
spare parts.
• Make sure the power cord is never crimped or damaged.
• Never disconnect the power cord by pulling or tugging on the cord.
• Avoid direct eye exposure to the light source while it is on as sensitive persons may suffer an
epileptic shock (especially meant for epileptics)!.
• The product is for decorative purposes only and not suitable as a household room illumination.
• If the external exible cable or cord of this luminaire is damaged, it shall be exclusively replaced
by the manufacturer or his service agent or a similar qualied person in order to avoid a hazard.
• If the lenses are visibly damaged by scratches or cracks, stop using the unit immediately and
replace the damaged lenses.
• The light source of this luminaire is not replaceable. When it reaches the end of its life time, the
whole unit must be discarded..
DISCONNECT DEVICE
Where the MAINS plug or an appliance coupler is used as the disconnect device, the disconnect
device shall remain readily operable.
FUSE REPLACEMENT
Locate and remove the unit’s power cord. Once the cord has been removed located the fuse holder
located inside the power socket. Insert a at-head screw driver into the power socket and gently
pry out the fuse holder. Remove the bad fuse and replace with a new one.
Warning: If after replacing the fuse you continue to blow fuses, STOP using the unit. Contact cus-
tomer support for further instructions. Continuing to use the unit may cause serious damage.
INSTALLATION
The unit should be mounted via its screw holes on the bracket. Always ensure that the unit is rmly
xed to avoid vibration and slipping while operating. Always ensure that the structure to which you
are attaching the unit is secure and is able to support a weight of 10 times of the unit’s weight.
Never stand directly below the device when mounting, removing or servicing the xture.
FIXTURE LINKING
You will need a serial data link to run light shows of one or more xtures using a DMX-512 control-
ler or to run synchronized shows on two or more xtures set to a master/slave operating mode.
The combined number of channels required by all xtures on a serial data link determines the nu-
mber of xtures that the data link can support.
Important: Fixtures on a serial/data link must be daisy chained in one single line. Maximum re-
commended serial data link distance: 100 meters (1640 ft.)
DATA CABLING
To link xtures together you must use data cables. If you choose to create
your own cable, please use data-grade cables that can carry a high quality
signal and are less prone to electromagnetic interference.
CABLE CONNECTORS
Cabling must have a male XLR connector on one end and a female XLR
connector on the other end.
DMX connector conguration
Termination reduces signal errors. To avoid signal transmission problems and interference, it is
always advisable to connect a DMX signal terminator.
CAUTION
Do not allow contact between the common and the xture’s chassis ground. Grounding the com-
mon can cause a ground loop, and your xture may perform erratically. Test cables with an ohm
meter to check correct polarity and to make sure the pins are not grounded or shorted to the shield
or each other.

EN 4
© COPYRIGHT LOTRONIC 2020
IMPORTANT NOTE FOR APPLIANCES CONTAINING LITHIUM-ION BATTERIES
1. PRIOR to using the unit for the rst time, please charge fully the battery
2. Charge the battery regularly after each use. Don't wait until it is discharged!
3. DON'T allow the battery to discharge completely, otherwise it will lose 20% of its capa-
city or even be totally damaged! If the voltage becomes too low, the internal circuits are not
powered anymore and it will become impossible to recharge the battery!
4. If you don't use the unit for a longer period of time, it is recommended to charge it at 40%
of its capacity and check/charge it once per month.
The life time of the battery depends on the observance of these recommendations.
** BATTERIES ARE NOT COVERED BY THE WARRANTY **
We cannot be held responsible for damaged batteries further to the non-observance of
these basic rules.
OPERATING INSTRUCTIONS
OFF /ON
12 34 5 6 77
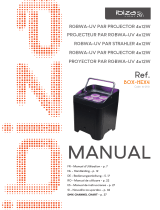
1. ON/OFF switch: Set to ON to set the xture on. The built-in battery will start charging automa-
tically and the battery charge indicators will light up to show the charge level of the battery. It
takes about 3 hours to fully charge the battery.
2. DMX IN: Connect the XLR lead to this socket and the other end to the DMX output of a DMX
controller
3. DMX OUT: Connect an XLR lead from the output of this xture to the DMX IN connector of the
following xture (master-slave connection)
4. POWER IN: Connect the supplied mains lead to this socket and the other end to a suitable mains
outlet
5. POWER OUT: Connect a power lead to this socket and the other end to the POWER IN connector
of the following xture (up to 4 xtures)
6. Display with function buttons and battery charge indicators
7. Safety hooks for additional safety rope (not included)
REMOTE CONTROL
INSERTION OF THE BATTERY IN THE REMOTE CONTROL
Pull out the battery compartment and insert a button cell (CR2025 3V)
with the positive side facing upwards. Push in the battery compartment
until it clicks into place.

EN5
WWW.AFX-LIGHT.COM
RECOMMENDATIONS FOR BATTERIES
This symbol indicates that used batteries should not be disposed of with household waste but deposited in separate collection points
for recycling.
ATTENTION
Danger of explosion if battery is incorrectly placed. Only replace by the same or equivalent type.
Keep new and old batteries out of the reach of children.
If the battery compartment doesn’t close properly, stop using the product and keep it out of the
reach of children.
WARNING
The supplied remote control contains a button cell. In case of ingestion, it might cause serious
internal burns within only 2 hours that might lead to death.
If you are in doubt whether the batteries have been swallowed or introduced into any other part
of the body, contact immediately a doctor.
BLACK: OUT: light On / Off (return the present program)
AUTO: Press to select the automatic mode.
SOUND: Press to select the sound controlled mode.
STROBE: Press STROBE button and then + / - buttons to set the strobe speed.
SPEED: Press SPEED and then + / - buttons to set the auto/sound program
speed.
SENSITIVITY
To adjust the microphone sensitivity, press <+> or <–> to either increase or
decrease sound sensitivity.
DMX/%
To enable or disallow DMX function on the product
MANUAL: Press <MANUAL> on the IRC.
Press <R>, <G>, <B>, <W>, <A>, <UV> (red, green, blue, white, amber or
UV) to choose your color. Press <+> or <–> to either increase or decrease to
choose your color.
UNIT mode: 1. Press <UNIT> on the IRC
“0” for all units on/off
“1” for BAR on/off
“2” for DERBY 1 on/off
“3” for PAR 1 on/off
“4” for PAR 2 on/off
“5” for DERBY 2 on/off
2. Press <UNIT> again to exit unit mode.
Number 1~9
To adjust the brightness
FRONT PANEL
Battery Charge Indicator
Battery charged at 100%
Battery charged at 75%
Battery charged at 50%
Battery charged at 25%
REMOTEIRC
BLACK
OUT
AUTO SOUND
STROBE
SPEED
SENSI-
TIVITY
%
DMX
MANUAL
FADE
UNIT
R
B
G
A W
P
UV
0
31 2
4 5 6
8 9
+
7

EN 6
© COPYRIGHT LOTRONIC 2020
Button Function
MENU To select the programming functions
▲
To go forward in the selected functions
To go backward in the selected functions
ENTER To conrm the selected functions
Master mode: any unit cans work for master xture,
Slave mode: must be setting DMX address value for Slave.
SETTING MENU LED DISPLAY
Mode Programming Description
DMX mode Addr
24 CH
d001-d512
3CH
Auto Auto Au 1-6 Auto program
Sound Soun So 1-6 Sound Program
Speed SPEE SP 1-9 Speed
Mic Sensitivity SEnS SE 1-9 MIC sensitivity
Dimming dIMM dI 1- dI 9 Master dimming
Silent scene SILE on/oFF Silent scene by Sound program
Slave SLAV Slave Slave
Infrared InFr on/oFF Enable or Disable IR remote
DMX CHANNEL CHART PLEASE REFER TO THE END OF THE MANUAL
CARE
Before cleaning the unit, disconnect it if from the mains. Do not use aggressive cleaning agents.
Use a clean cloth to wipe any dust or dirt from the product. We are not liable for damage arising
from incorrect handing, improper use or wear and tear. We reserve the right to make technical
modications.
SPECIFICATIONS
Power supply .................................................................................................................... 100-240V~50/60Hz
Consumption ................................................................................................................................................55W
Battery ....................................................................................................................... Lithium 12V𝌃 8800mAh
Charge time ..................................................................................................................................................... 5h
Run time on battery ................................................................................................................................. 3-12h
Fuse ................................................................................................................................................................T1A
DERBY LED .................................................................................................................................... 8 x 3W RGBW
PAR LED ............................................................................................................................. 6 x 8W RGBW 4-in-1
BAR LED ............................................................................................................................. 4 x 1W W-UV 2-in-1
Flash rate .................................................................................................................................................0-20Hz
Dimensions ..................................................................................................................... 1060 x 180 x 325mm
Weight ......................................................................................................................................................... 7.2kg
Correct Disposal of this product
This marking indicates that this product should not be disposed with other household wastes throughout the EU. To prevent possible
harm to the environment or human health from uncontrolled waste disposal, recycle it responsibly to promote the sustainable reuse
of material resources. To return your used device, please use the return and collection systems or contact the retailer where the
product was purchased. They can take this product for environmental safe recycling.

FR7
WWW.AFX-LIGHT.COM
NOTICE D’UTILISATION
BARRE DE LUMIERE DMX AUTONOME 4-EN-1
DÉBALLAGE
Dès réception de l’appareil, ouvrez le carton et vériez que le contenu est complet et en bon état.
Sinon, prévenez immédiatement le transporteur et conservez l’emballage s’il montre des signes de
mauvais traitements. Conservez le carton et tous les matériaux d’emballage an de pouvoir trans-
porter l’appareil en toute sécurité.
EXPLICATION DES SYMBOLES
L’éclair dans le triangle attire l’attention sur un danger physique (due à une électrocution p.
ex.).
Le point d’exclamation dans le triangle indique un risque dans la manipulation ou l’utilisation
de l’appareil.
L’appareil est conforme à la norme CE
Appareil de classe I: Brancher uniquement sur une prise avec terre
Uniquement pour utilisation à l’intérieur
0.5m
Distance minimale entre l’appareil et d’autres objets
Ne pas regarder directement dans le rayon lumineux
ATTENTION
NE PAS OUVRIR LE BOITIER
RISQUE DE CHOC ELECTRIQUE
Lire attentivement ce manuel avant la première mise en service.
CONSIGNES DE SECURITE
• Lisez attentivement ce manuel qui contient des informations importantes sur l’installation, l’uti-
lisation et l’entretien de cet appareil.
• Conservez le manuel pour référence ultérieure. Si l’appareil change un jour de propriétaire, assu-
rez-vous que le nouvel utilisateur est en possession du manuel.
• Assurez-vous que la tension secteur convient à cet appareil et qu’elle ne dépasse pas la tension
d’alimentation indiqué sur la plaque signalétique de l’appareil.
• Cet appareil fait partie de la classe I et doit être impérativement branché sur une prise secteur
avec terre.
• Uniquement pour utilisation à l’intérieur!
• An d’éviter tout risque d’incendie ou de choc électrique, ne pas exposer cet appareil à la pluie
ou à l’humidité. Assurez-vous qu’aucun objet inammable ne se trouve à proximité de l’appareil
pendant son fonctionnement.
• Installez l’appareil à un endroit bien ventilé à une distance minimum de 50cm de toute surface.
Assurez-vous que les fentes de ventilation ne sont pas bloquées.
• La distance minimale entre le luminaire et l’objet éclairé doit s’élever à 0,5m..
0.5m
• Débranchez l’appareil du secteur avant toute manipulation ou entretien.
• La température ambiante ne doit pas dépasser 40°C. Ne pas faire fonctionner l’appareil à des
températures supérieures.
• En cas de dysfonctionnement, arrêtez immédiatement l’appareil. N’essayez jamais de réparer
l’appareil par vous-même. Une réparation mal faite peut entraîner des dommages et des dys-
fonctionnements. Contactez un service technique agréé. Utilisez uniquement des pièces déta-
chées identiques aux pièces d’origine.

FR 8
© COPYRIGHT LOTRONIC 2020
• Assurez-vous que le cordon d’alimentation n’est jamais écrasé ni endommagé.
• Ne jamais débrancher l’appareil en tirant sur le cordon.
• Ne pas exposer vos yeux à la source lumineuse. Chez des personnes sensibles, la forte lumière
peut provoquer une crise d’épilepsie.
• Le luminaire ne doit servir qu’à des ns décoratives et ne convient pas comme éclairage domes-
tique normal.
• Si le cordon secteur de l’appareil est endommagé, il ne doit être remplacé que par le fabricant ou
son agent ou bien un technicien qualié an d’éviter tout risque d’électrocution.
• Si les lentilles présentent des dommages tels que des rayures ou des ssures, arrêtez immédia-
tement l'appareil et remplacez les lentilles endomagées.
• Les sources lumineuses de cet appareil ne sont pas rempaçables. Si elles sont endommagés, tout
l’appareil doit être mis au rebut.
DISPOSITIF DE COUPURE
Lorsqu’une che SECTEUR ou un coupleur sont utilisés pour déconnecter l’appareil du secteur, ce
dispositif doit rester facilement accessible à tout moment.
REMPLACEMENT DU FUSIBLE
• Sortez le porte-fusible de son logement à l’aide d’un tournevis.
• Sortez le fusible grillé et remplacez-le par un autre en tous points identiques (1A).
• Remettez le porte-fusible dans son logement et rebranchez l’appareil sur le secteur.
Attention: Si le fusible continue à sauter, arrêtez immédiatement d’utiliser l’appareil. Contactez
votre revendeur et demandez conseil. Si vous continuez à utiliser l’appareil, vous risquez de causer
de graves dégâts.
INSTALLATION
Fixez l’appareil au moyen des trous de vis sur l’étrier. Assurez-vous que l’appareil est solidement
xé pour éviter des vibrations et des mouvements pendant le fonctionnement. Veillez toujours à ce
que la structure qui accueille l’appareil, est sufsamment solide et capable de porter au moins 10
fois le poids propre de l’appareil.
L’appareil doit être xé par des professionnels à en endroit où il est hors de portée des personnes et
en dehors d’un chemin de passage.
CONNEXION DMX
BRANCHEMENT DE PLUSIEURS EFFETS
Vous avez besoin d’un câble de données sériel pour faire fonctionner plusieurs effets au moyen
d’une commande DMX512 ou pour faire fonctionner deux ou plusieurs effets en mode maître/es-
clave. Le nombre combiné de canaux requis par l’ensemble des appareils sur un câble de données
sériel dénit le nombre d’appareils que le câble de données peut supporter.
CÂBLAGE
Pour relier des appareils ensemble, vous devez utiliser des câbles de transmission de données. Vous
pouvez acheter des câbles DMX certiés directement chez un revendeur/distributeur ou construire
vos propres câbles. Si vous souhaitez fabriquer le câble vous-même, utilisez des câbles de données
faible capacitance de haute qualité qui sont moins sujets à des interférences électromagnétiques.
CONNECTEURS DE CABLE
Le câble doit posséder une che XLR mâle d’un côté et XLR femelle de l’autre.
Conguration des connecteurs DMX
La résistance de n de ligne réduit les erreurs de signal. Pour éviter des pro-
blèmes de transmission des signaux, il est toujours conseillé de brancher
une résistance de n de ligne DMX.

FR9
WWW.AFX-LIGHT.COM
ATTENTION
Il ne doit y avoir aucun contact entre le commun et la masse du châssis de l’appareil. La mise à la
masse du commun peut provoquer une boucle de masse et votre appareil fonctionne d’une façon
étrange. Testez les câbles à l’aide d’un ohm-mètre an de vérier la polarité et de vous assurer que
les broches ne sont pas connectées à la masse ni court-circuitées sur le blindage ou mutuellement.
NOTE IMPORTANTE CONCERNANT DES APPAREILS AVEC DES BATTERIES LITHIUM-ION
1. AVANT la première utilisation, chargez complètement la batterie.
2. Rechargez la batterie régulièrement après chaque utilisation sans attendre qu’elle soit dé-
chargée.
3. NE JAMAIS laisser décharger complètement la batterie sous peine de perdre 20 % de sa capa-
cité, voir sa perte totale! Si la tension devient trop faible, le circuit interne n’est plus alimenté et
il sera impossible de recharger la batterie !
4. Si vous n’utilisez pas le produit pendant une durée prolongée, il est recommandé de charger la
batterie à 40% et de la vérier/charger une fois par mois.
La durée de vie de la batterie dépend du bon suivi de ces conseils.
** LES BATTERIES NE SONT PAS GARANTIES **
Nous déclinons toute responsabilité pour des batteries endommagées prématurément suite au
non-respect de ces règles de base.
FONCTIONNEMENT
OFF /ON
12 34 5 6 77
1. ON/OFF: Réglez sur ON pour allumer l'appareil. La batterie intégrée commencera à se charger
automatiquement et les indicateurs de charge de la batterie s'allumeront comme ci-dessus pour
indiquer le niveau de charge de la batterie. Il faut environ 3 heures pour charger complètement
la batterie.
2. DMX IN: Connectez le cordon XLR à cette prise et l'autre extrémité à la sortie DMX d'un contrôleur
DMX
3. DMX OUT: Connectez un cordon XLR de la sortie de ce luminaire au connecteur DMX IN de l'appa-
reil suivant (connexion maître-esclave)
4. POWER IN: Connectez le cordon d'alimentation fourni à cette prise et l'autre extrémité à une
prise secteur appropriée
5. POWER OUT: Connectez un cordon d'alimentation à cette prise et l'autre extrémité au connec-
teur POWER IN de l'appareil suivant (jusqu'à 4 projecteurs max.)
6. Afcheur avec boutons de fonction et indicateurs de charge
7. Crochets pour xer une élingue de sécurité (non fournie)

FR 10
© COPYRIGHT LOTRONIC 2020
TÉLÉCOMMANDE
AVERTISSEMENT CONCERNANT LA PILE DANS LA TÉLÉCOMMANDE
Ce pictogramme indique que les piles et batteries usagées ne doivent pas être jetées avec les ordures ménagères, mais déposées
dans des points de collecte séparés pour être recyclées
ATTENTION
Danger d'explosion si la pile n'est pas remplacée correctement. Ne remplacer que par le même
type ou un type équivalent. Conserver les piles neuves et usées hors de portée des enfants. Si
le compartiment pile ne se ferme pas correctement, cesser d'utiliser le produit et tenir hors de
portée des enfants.
AVERTISSEMENT
La télécommande fournie contient une pile bouton. Si la pile bouton est avalée, elle peut provo-
quer de graves brûlures internes en 2 heures seulement et peut entraîner la mort.
En cas de doute concernant le fait que les piles pourraient avoir été avalées ou introduites dans
une partie quelconque du corps, consulter immédiatement un médecin.
INSERTION DE LA PILE DANS LA TELECOMMANDE
Retirez le compartiment à pile et insérez une pile bouton (CR2025 3V) avec
le côté positif vers le haut. Poussez le compartiment à pile jusqu'à ce qu'il
s'enclenche.
BLACK OUT : Lumière Marche/Arrêt (retour au mode en cours)
AUTO : Appuyez sur la touche AUTO pour sélectionner le fonctionnement
automatique
SOUND : Appuyez sur SOUND pour sélectionner le mode d’activation audio
STROBE : Appuyez sur STROBE et ensuite sur + ou – pour régler la vitesse des
éclairs.
SPEED : Appuyez sur SPEED et ensuite sur + ou – pour régler la vitesse
SENSITIVITY: Règle la sensibilité en mode audio et auto. Appuyez sur <SEN-
SITIVITY> sur la télécommande et ensuite sur <+> ou <–> pour augmenter
ou baisser la sensibilité.
DMX/%: Activation/désactivation de la fonction DMX
MANUAL: Appuyez sur <MANUAL> sur la télécommande.
Appuyez sur <R>, <G>, <B>, <W>, <A>, <UV> (rouge, vert, bleu, blanc, ambre
ou UV) pour choisir la couleur. Appuyez sur <+> ou <-> pour augmenter ou
diminuer l’intensité de la couleur choisie.
Mode UNIT: 1. Appuyez sur <UNIT> sur la télécommande
"0" M/A pour tous les appareils; "1" M/A pour BAR; "2" M/A pour DERBY 1
"3" M/A pour PAR 1; 4" M/A pour PAR 2; "5" M/A pour DERBY 2
2. Appuyez à nouveau sur <UNIT> pour quitter ce mode.
Touches numériques 1~9: Permettent de régler la valeur de luminosité des programmes automa-
tique, active par le son et manuel. Appuyez sur une des touches 1 – 9 pour changer la luminosité
de l’appareil.
PANNEAU DE COMMANDE
Voyant de Charge de la Batterie
Batterie chargée à 100%
Batterie chargée à 75%
Batterie chargée à 50%
Batterie chargée à 25%
REMOTEIRC
BLACK
OUT
AUTO SOUND
STROBE
SPEED
SENSI-
TIVITY
%
DMX
MANUAL
FADE
UNIT
R
B
G
A W
P
UV
0
31 2
4 5 6
8 9
+
7

FR11
WWW.AFX-LIGHT.COM
Bouton Fonction
MENU Sélection d'une fonction
▲
Avancer dans la fonction sélectionnée
Reculer dans la fonction sélectionnée
ENTER Conrmer la sélection
Mode Maître: Chaque appareil peut travailler comme maître
Mode Esclave: la valeur DMX doit être mise sur Slave
AFFICHAGE DU MENU
Mode Afchage Description
DMX mode Addr
24CH
d001-d512
3CH
Auto Auto Au 1-6 Programme automatique
Sound Soun So 1-6 Programme contrôlé par le son
Speed SPEE SP 1-9 Vitesse
Mic Sensitivity SEnS SE 1-9 Sensibilité du micro
Dimming dIMM dI 1- dI 9 Variateur général
Silent scene SILE on/oFF Scène silencieuse en mode Son
Slave SLAV Slave Esclave
Infrared InFr on/oFF Activer/désactiver la télécommande
ENTRETIEN
Avant de nettoyer l’appareil, débranchez-le du secteur. Ne pas utiliser de détergents agressifs.
Utilisez un chiffon propre et essuyez la poussière et les saletés. Nous déclinons toute responsabi-
lité pour des dommages dues à une mauvaise utilisation, manipulation et usure. Sous reserve de
modications techniques.
CARACTÉRISTIQUES TECHNIQUES
Alimentation ..................................................................................................................... 100-240V~50/60Hz
Consommation .............................................................................................................................................55W
Batterie ....................................................................................................................... Lithium 12V𝌃 8800mAh
Durée de charge............................................................................................................................................... 5h
Autonomie ................................................................................................................................................. 3-12h
Fusible ............................................................................................................................................................ T1A
DERBY LED .................................................................................................................................... 8 x 3W RGBW
PAR LED ............................................................................................................................. 6 x 8W RGBW 4-in-1
BAR LED ............................................................................................................................. 4 x 1W W-UV 2-in-1
Vitesse des ashs ....................................................................................................................................0-20Hz
Dimensions ..................................................................................................................... 1060 x 180 x 325mm
Poids ............................................................................................................................................................ 7,2kg
Mise au rebut du produit
Ce symbole indique que ce produit ne doit pas être jeté aux ordures ménagères au sein des pays de la Communauté européenne. An
de protéger l’environnement et/ou la santé humaine contre une mise aux rebuts incontrôlée, il convient de le recycler d’une manière
responsable an de soutenir une réutilisation durable des ressources. Pour le recyclage d’appareils usagés, rapportez-le à un centre de
collecte d’appareils électriques ou contactez le revendeur où vous avez acheté le produit. Ils s’assureront du recyclage écologique du
produit.

NL 12
© COPYRIGHT LOTRONIC 2020
HANDLEIDING
4-IN-1 DMX LICHT BAR MET ACCU
UITPAKKEN
Onmiddellijk naar de aankoop van het toestel, verwijder voorzichtig de verpakking en wees zeker
dat het toestel in geode toestand is. Breng direct uw dealer op de hoogte en bewaar het verpak-
kingsmateriaal indien onderdelen of het karton door het transport beschadigd zijn. Bewaar het
karton en alle verpakkingsmaterialen. Indien het toestel moet gerepareerd worden is het belangrijk
het toestel in zijn originele verpakking te versturen.
VERKLARING VAN DE TEKENS
De driehoek met een bliksemschicht wordt gebruikt om aan te geven wanneer uw gezondheid
gevaar loopt (bijvoorbeeld door elektrocutie).
Een uitroepteken in een driehoek wijst op bijzondere risico's bij het hanteren of bedienen van
het apparaat.
Elektrische veiligheidsklasse I - alleen op een stopcontact met randaarde aansluiten
Het apparaat voldoet aan de CE-normen
Alleen voor gebruik binnenshuis
0.5m
Minimale afstand tussen het apparaat en andere objecten
Staar niet in de lichtstraal
LET OP
NIET DE BEHUIZING OPENEN
GEVAAR VOOR ELECTRISCHE SCHOKKEN
Lees de handleiding aandachtig door. Ze bevat belangrijke informaties voor de installatie, gebruik
en onderhoud van dit toestel.
VEILIGHEIDSINSTRUCTIES
• Bewaar deze handleiding.
• Wees zeker dat u het toestel op de juiste spanning aansluit en dat de lichtnetspanning niet hoger
dan de op de zijde van het toestel aangegeven spanning is.
• Alleen voor gebruik binnenshuis!
• Dit apparaat behoort tot beschermingsklasse I. Het moet dus verplicht worden geaard. Een be-
voegde persoon moet de elektrische aansluiting uitvoeren.
• Om vuur en elektrische schokken te verhinderen bescherm het toestel tegen regen en vochti-
gheid. Wees zeker dat geen ontvlambare materialen in de buurt van het toestel zijn tijdens de
werking.
• Plaats het toestel in een ruimte met voldoende ventilatie en in tenminste 50cm afstand van op-
pervlakken.
• Wees zeker dat de ventilatie openingen niet geblokkeerd zijn.
• Verwijder het stopcontact alvorens u het toestel onderhoud of de zekering vervangt. Gebruik
alleen een zekering met dezelfde specicaties.
• Gebruik het toestel niet in ruimtes met een temperatuur van meer dan 40°C.
• In geval van een ernstig probleem stopt het toestel direct. Verzoek nooit het toestel zelfs te re-
pareren. Alle reparaties moeten van een ervarene technicus doorgevoerd worden. Gebruik alleen
onderdelen met dezelfde specicaties.
• Sluit het toestel niet op een dimmer pack aan.
• Nooit het netsnoer beschadigen of platdrukken.

NL13
WWW.AFX-LIGHT.COM
• Nooit aan de kabel trekken.
• Nooit in de lichtbron kijken. Gevoelige personen kunnen een epileptische shock ondergaan
(vooral bedoeld voor epileptica)
• Het product is uitsluitend bedoeld voor decoratieve doeleinden en niet geschikt als verlichting
van de huiskamer.
• Als de externe exibele kabel of het snoer van deze armatuur beschadigd is, wordt deze uitsluitend
vervangen door de fabrikant of zijn onderhoudsvertegenwoordiger of een soortgelijk gekwali-
ceerd persoon om gevaar te voorkomen.
• Als de lenzen zichtbaar beschadigd zijn door krassen of scheuren, stop dan onmiddellijk met het
gebruik van het apparaat en vervang de beschadigde lenzen.
• De lichtbronnen van de lichteffecten zijn niet vervangbaar. Als een lichtbron defect is, moet het
lichteffect worden weggegooid.
ONTKOPPELING VAN HET NET
a) Indien het toestel via het stopcontact wordt uitgeschakeld, moet de contactdoos altijd gemak-
kelijk bereikbaar zijn
b) Indien het toestel via een schakelaar wordt uitgeschakeld, moet deze duidelijk gemarkeerd en
gemakkelijk bereikbaar zijn.
VERVANGING VAN DE ZEKERING
• Trek de voedingskabel uit het stopcontact alvorens U de zekering vervangt. Gebruik alleen een
zekering met dezelfde specicaties
• Verwijder de zekeringshouder d.m.v. een platte schroevendraaier uit de behuizing.
• Verwijder de oude zekering en zet een nieuwe zekering met dezelfde specicaties in (1A).
• Plaats de zekeringshouder terug in zijn behuizing en sluit de voedingskabel op een stopcontact
aan.
Waarschuwing: Als de zekering na vervanging blijft blazen, STOP dan met het gebruik van het ap-
paraat. Neem contact op met de klantenservice voor verdere instructies. Als u doorgaat met het
gebruik van het apparaat, kan dit ernstige schade veroorzaken.
INSTALLATIE
Bevestig het toestel via de schroef gaten op de houder. Wees zeker dat het toestel vast geïnstalleerd
is om trillingen en afglijden tijdens de werking te vermijden. Wees zeker dat de truss waaraan u het
toestel bevestigd, stabiel is en 10 keer het gewicht van het toestel kan dragen.
Het toestel moet van een vakman op een plaats monteert worden waar het buiten het bereik van
mensen is en niemand onder kan staan.
AANSLUITEN VAN MEERDERE TOESTELLEN
Indien U meerdere toestellen via een DMX controller of gesynchroniseerde lichtshows in een mas-
ter/slave modus wilt sturen hebt U een seriële date kabel nodig. Het gecombineerde aantal van
kanalen die alle toestellen in een seriële verbinding nodig hebben bepaalt de hoeveelheid van toes-
tellen die de data verbinding kan ondersteunen.
DATA AANSLUITING
Gebruik data kabels om toestellen met elkaar te verbinden. Indien U uw eigen kabel bouwen wilt
gebruik hoogwaardige kabels die het signaal goed overdragen en niet gevoelig zijn voor elektro-
magnetische interferenties.
KABELCONNECTOREN
De kabel moet een XLR stekker op één eind en een XLR contra op het andere eind hebben.
DMX connector conguratie
De eindweerstand vermindert signaalfouten. Om transmissie problemen
en storingen te voorkomen is het aanbevolen een DMX signaal eindweers-
tand aan te sluiten.
LET OP: Geen contact maken tussen common en chassis massa. Indien de

NL 14
© COPYRIGHT LOTRONIC 2020
common op de massa aangesloten is kan een aardlus ontstaan en het toestel werkt willekeurig.
Controleer de kabels d.m.v. een ohmmeter om de polariteit te controleren en te waarborgen dat de
pins niet op aarde aangesloten of met elkaar kortgesloten zijn.
LET OP: VOOR APPARATEN DIE LITHIUM-ION BATTERIJEN BEVATTEN
1. ALVORENS u het apparaat voor de eerste keer gebruikt, laad de batterij geheel op.
2. Laad de batterij na elk gebruik regelmatig op. Wacht niet tot het is ontladen!
3. NOOIT de batterij volledig ontladen! Anders verliest het 20% van zijn capaciteit of is het zelfs
volledig beschadigd! Als de spanning te laag wordt, worden de interne circuits niet meer gevoed
en het is onmogelijk om de batterij opnieuw op te laden!
4. Als u het apparaat voor een langere periode niet gebruikt, LAAD DE BATTERIJ TOT 40% VAN
HAAR CAPACITEIT OP en controleer / laad ze eenmaal per maand.
De levensduur van de batterij is afhankelijk van het naleven van deze aanbevelingen.
** BATTERIJEN ZIJN NIET GEDEKT DOOR DE GARANTIE **
Wij zijn niet aansprakelijk voor beschadigde batterijen als gevolg van het niet naleven van deze
basisregels.
INSTRUCTIES
OFF /ON
12 34 5 6 77
1. ON / OFF-schakelaar: Zet op ON om het apparaat aan te zetten. De ingebouwde batterij begint
automatisch op te laden en de batterijlaadindicators zullen oplichten zoals hierboven om het
laadniveau van de batterij aan te geven. Het duurt ongeveer 3 uur om de batterij volledig op te
laden.
2. DMX IN: gebruik een 3-pin XLR-kabel om het apparaat met de DMX-controller te verbinden
3. DMX OUT: gebruik een 3-pin XLR-kabel om het volgende apparaat te verbinden en een DMX-si-
gnaal door te sturen (master-slave verbinding)
4. POWER IN: Sluit het meegeleverde netsnoer aan op dit stopcontact en het andere uiteinde op een
geschikt stopcontact
5. POWER OUT: Sluit een voedingskabel aan op deze aansluiting en het andere uiteinde op de
POWER IN-connector van het volgende apparaat (t/m max. 4 projectoren)
6. Display met functie toetsen en batterij indicaties
7. Veiligheidsoog voor een extra staalkabel (niet inbegrepen)
Afstandsbediening
BATTERIJ IN DE AFSTANDSBEDIENING PLAATSEN
Trek het batterijcompartiment naar buiten en plaats een knoopcel (CR2025
3V) met de positieve kant naar boven. Duw het in het batterijcompartiment
totdat het op zijn plaats klikt.

NL15
WWW.AFX-LIGHT.COM
WAARSCHUWINGEN VOOR DE BATTERIJ IN DE AFSTANDSBEDIENING
Dit symbool geeft aan dat gebruikte batterijen en accu’s niet bij het huisvuil mogen worden wegge-
gooid, maar moeten worden gedeponeerd in gescheiden inzamelpunten voor recycling
LET OP
Er is explosiegevaar als de batterij verkeerd is geplaatst. Alleen vervangen door hetzelfde
of een vergelijkbaar type. Houd nieuwe en oude batterijen buiten het bereik van kinderen.
Als het batterijcompartiment niet goed sluit, stop dan met het gebruik van het product en
houd het buiten het bereik van kinderen.
WAARSCHUWING
• De meegeleverde afstandsbediening bevat een knopcel. In geval van inslikken kan het
binnen slechts 2 uren ernstige interne brandwonden veroorzaken die tot de dood kunnen
leiden.
• Als u twijfelt of de batterijen zijn ingeslikt of in een ander deel van het lichaam zijn inge-
bracht, neem dan onmiddellijk contact op met een arts.
BLACK OUT : Licht aan/uit (in de gekozen modus)
REMOTEIRC
BLACK
OUT
AUTO SOUND
STROBE
SPEED
SENSI-
TIVITY
%
DMX
MANUAL
FADE
UNIT
R
B
G
A W
P
UV
0
31 2
4 5 6
8 9
+
7
AUTO : Kiest de automatische werking
SOUND : Kiest de geluid geactiveerde modus
STROBE : Eerst STROBE drukken en dan met + en – de itssnelheid ins-
tellen.
SPEED : Eerst SPEED drukken en dan met + en – de snelheid instellen
SENSITIVITY: Instelling van de microfoon gevoeligheid voor de geluid
geactiveerde modus
Eerst SENSITIVITY drukken en dan met + en – de gevoeligheid instellen
DMX/% : Activeert/deactiveert de DMX modus
MANUAL : Handmatige instelling van de kleuren
<R>, <G>, <B>, <W>, <A>, <UV (rood, groen, blauw, wit, amber of UV)
drukken, om de kleur te kiezen
Met <+> of <–> de kleur versterken of verminderen.
UNIT-modus: 1. Druk op <UNIT> op de afstandsbediening
"0": aan/uit voor alle toestellen; "1" : aan/uit voor BAR aan/uit
"2": aan/uit voor DERBY 1 aan/uit; "3" aan/uit voor PAR 1 aan/uit
"4" aan/uit voor PAR 2 aan/uit; "5" aan/uit voor DERBY 2 aan/uit
2. Druk nogmaals op <UNIT> om de eenheidsmodus te verlaten.
Cijfertoetsen 1~9
Stelt de helderheid van de automatische, geluid geactiveerde en hand-
matige programma in.
Druk <1> tot <9> om de helderheid van de kleur in te stellen
CONTROLE PANEEL
Batterij laad indicatie
Batterij opgeladen met 100%
Batterij opgeladen met 75%
Batterij opgeladen met 50%
Batterij opgeladen met 25%

NL 16
© COPYRIGHT LOTRONIC 2020
Toets Functie
MENU Kies een functie
▲
Waarde verhogen/naar boven gaan
Waarde minderen/naar beneden gaan
ENTER Selectie bevestigen
Mastermodus: elk apparaat kan werken als een master
Slave-modus: de DMX-waarde moet worden ingesteld op Slave.
INSTELMENU OP DE LED DISPLAY
Modus Display Omschrijving
DMX mode Addr
24CH
d001-d512
3CH
Auto Auto Au 1-6 Automatische programma
Sound Soun So 1-6 Geluidsbestuurde programma
Speed SPEE SP 1-9 Snelheid
Mic Sensitivity SEnS SE 1-9 Microfoon gevoeligheid
Dimming dIMM dI 1- dI 9 Master dimmer
Silent scene SILE on/oFF Stille scène in het geluidsprogramma
Slave SLAV Slave Slave
Infrared InFr on/oFF IR afstandsbediening activeren of de-activeren
DMX KANAALTABEL ZIE AAN HET EIND VAN DE HANDLEIDING
ONDERHOUD
Voordat u het apparaat reinigt, moet u het loskoppelen van het elektriciteitsnet. Gebruik geen
agressieve schoonmaakmiddelen. Gebruik een schone doek om stof en vuil van het product te verwi-
jderen. Wij zijn niet aansprakelijk voor schade die voortvloeit uit onjuiste overdracht, oneigenlijk
gebruik of slijtage. We behouden ons het recht voor technische wijzigingen aan te brengen.
SPECIFICATIES
Voeding .............................................................................................................................. 100-240V~50/60Hz
Opgenomen vermogen ................................................................................................................................55W
Batterij ....................................................................................................................... Lithium 12V𝌃 8800mAh
Oplaadduur ................................................................................................................................................5 uren
Looptijd op accu ..................................................................................................................................3-12 uren
Zekering.......................................................................................................................................................... T1A
DERBY LED .................................................................................................................................... 8 x 3W RGBW
PAR LED ............................................................................................................................. 6 x 8W RGBW 4-in-1
BAR LED ............................................................................................................................. 4 x 1W W-UV 2-in-1
Afmetingen ..................................................................................................................... 1060 x 180 x 325mm
Gewicht ........................................................................................................................................................ 7.2kg
Correcte verwijdering van dit product
Deze markering geeft aan dat dit product niet met ander huishoudelijk afval in de hele EU mag worden weggegooid. Om mogelijke
schade aan het milieu of de menselijke gezondheid door ongecontroleerde afvalverwijdering te voorkomen, moet u deze op ve-
rantwoorde wijze recyclen om duurzaam hergebruik van materiaalbronnen te bevorderen. Als u uw gebruikt apparaat wilt retourneren,
gebruikt u de retour- en verzamelsystemen of neemt u contact op met de winkel waar het product is gekocht. Ze zullen voor milieuvei-
lige recycling zorgen.

DE17
WWW.AFX-LIGHT.COM
BEDIENUNGSANLEITUNG
4-IN-1 DMX LICHTLEISTE MIT AKKU
AUSPACKEN
Sofort nach Empfang vorsichtig den Karton auspacken und den Inhalt überprüfen. Alle Teile müssen
vollzählig und in einwandfreiem Zustand sein. Sofort die Transportrma benachrichtigen und das
Verpackungsmaterial aufbewahren, wenn Teile Transportschäden aufweisen. Verpackungsmate-
rial auch für späteren Transport des Geräts aufbewahren.
ZEICHENERKLÄRUNG
Der Blitz im Dreieck weist auf Gesundheitsrisiken hin (z.B. Stromschlag)
Das Ausrufezeichen im Dreieck weist auf besondere Gefahren im Umgang oder Betrieb des
Geräts hin.
Schutzklasse I: Nur an eine geerdete Netzsteckdose mit Schutzkontakt anschließen
Das Gerät entspricht der CE Norm
Nur für Innengebrauch
0.5m
Mindestabstand zwischen dem Gerät und andere Gegenständen
VORSICHT
NICHT DAS GEHÄUSE ÖFFNEN
STROMSCHLAGGEFAHR
VOR DER ERSTEN INBETRIEBNAHME DES GERÄTS SORGFÄLTIG DIE ANLEITUNG
DURCHLESEN.
SICHERHEITSHINWEISE
• Diese Anleitung sorgfältig vor der ersten Inbetriebnahme lesen. Sie enthält wichtige Informa-
tionen über Installation, Gebrauch und Instandhaltung des Geräts.
• Die Anleitung für spätere Bezugnahme aufbewahren und an den nächsten Bediener weitergeben.
• Stets die Netzspannung vor Anschluss des Geräts überprüfen Sie muss mit der auf der Rückseite
des Geräts angegebenen Spannung übereinstimmen und darf auf keinen Fall höher sein.
• Das Gerät gehört zur Schutzklasse 1 und darf nur an eine Steckdose mit Schutzkontakt
angeschlossen werden.
• Dieses Gerät ist nur für Innengebrauch!
• Um Brand und Stromschlag zu vermeiden, das Gerät vor Regen und Feuchtigkeit schützen. Keine
brennbaren Materialien während des Betriebs in der Nähe des Geräts lassen.
• Das Gerät muss an einem gut belüfteten Ort und in mindestens 50cm Entfernung
0.5m
zur
nächsten Fläche angebracht werden. Darauf achten, dass die Belüftungsschlitze nicht blockiert
oder verstopft sind.
• Immer erst das Gerät vom Netz trennen, bevor es gewartet oder die Sicherung ersetzt wird. Die
Sicherung nur durch eine identische ersetzen.
• Die Raumtemperatur darf 40°C nicht überschreiten. Das Gerät niemals bei höheren Temperatu-
ren betreiben.
• Bei Betriebsstörungen das Gerät sofort ausschalten.
• Das Gerät niemals selbst reparieren. Reparaturen dürfen nur von einem Fachmann vorgenom-
men werden.
• Alle verwendeten Ersatzteile müssen mit den Originalteilen identisch sein.
• Vergewissern Sie sich, dass das Netzkabel nicht zerquetscht oder beschädigt werden kann.

DE 18
© COPYRIGHT LOTRONIC 2020
• Beim Abziehen des Netzsteckers nur am Stecker ziehen, niemals am Kabel.
• Niemals direkt in die Lichtquelle blicken. Das kann bei empndlichen Menschen zu epileptischen
Anfällen führen.
• Das Gerät ist nur für dekorative Zwecke und nicht als normale Haushaltsbeleuchtung geignet.
• Wenn das Stromkabel beschädigt ist, muss es sofort durch ein Neues ersetzt werden.
• Die Leuchtmittel sind nicht ersetzbar. Wenn ein Gerät defekt ist, muss es entsorgt werden.
NETZTRENNUNGSVORRICHTUNGEN
Wenn das Gerät über den Netzstecker ausgeschaltet wird, muss die Steckdose jederzeit leicht
zugänglich bleiben.
AUSWECHSELN DER SICHERUNG
Vor Auswechseln der Sicherung Gerät vom Netz trennen. Nur eine identische Sicherung benutzen.
Mit einem Schraubendreher den Sicherungshalter aus seinem Gehäuse entfernen.
Die durchgebrannte Sicherung aus dem Halter nehmen und durch eine identische Sicherung (1A)
ersetzen.
Den Sicherungshalter zurück ins Gehäuse setzen und Netz wieder anschließen.
Achtung: Wenn die neue Sicherung auch wieder durchbrennt, schalten Sie das Gerät aus und fra-
gen Sie Ihren Fachhändler zu Rat. Benutzen Sie dans Gerät auf keinen Fall, da es stark beschädigt
werden könnte.
INSTALLATION
Das Gerät kann in jeder beliebigen Stellung montiert werden, solange für ausreichende Belüftung
gesorgt ist. Der Ventilator und die Belüftungsschlitze dürfen auf keinen Fall behindert werden. Bei
der Wahl des Anbringungsortes darauf achten, dass das Gerät leicht zugänglich für Wartungs- und
Reinigungsarbeiten bleibt. Das Gerät muss fest und sicher installiert werden, um Erschütterungen
und Spielraum während der Bewegungen zu vermeiden. Die Montageäche muss stabil sein und
mindestens 10-mal das Gewicht des Geräts tragen können. Das Gerät darf nur von einem Fach-
mann installiert werden. Es muss an einer Stelle installiert werden, wo es für Menschen unzugän-
glich ist und niemand unter dem Montagebereich stehen oder gehen kann.
HINTEREINANDERSCHALTEN MEHRERER GERÄTE
Wenn mehrere Geräte über einen DMX Controller gesteuert werden oder zwei und mehr Geräte im
Master/Slave Betrieb arbeiten sollen, wird ein serielles Datenkabel benötigt. Die kombinierte An-
zahl von Kanälen, die von allen Geräten in einer seriellen Datenverbindung benötigt werden, bes-
timmt die Anzahl von Geräten, die die Datenverbindung unterstützen kann.
VERKABELUNG
Für den Anschluss der Geräte muss spezielles Datenkabel verwendet werden. Sie können solche
DMX Kabel direkt im Fachhandel erwerben oder selbst ein Kabel fertigen. Wenn Sie Ihr Kabel sel-
bst herstellen möchten, benutzen Sie bitte Datenkabel, dass eine hochwertige Signalübertragung
gewährleistet und weniger anfällig für elektromagnetische Störfelder ist.
KABELVERBINDER
Die Kabel müssen einen XLR Stecker auf der einen und eine XLR Buchse auf der anderen Seite be-
sitzen.
DMX Steckerbelegung
Ein DMX Endwiderstand muss an den XLR Verbinder des letzten Geräts
angeschlossen werden. Es handelt sich um einen 120 Ohm Abschlusswi-
derstand, der zwischen Stift 2 und 3 geschlossen wird.
ACHTUNG: Es darf kein Kontakt zwischen dem Neutralleiter und der Gehäu-
semasse des Geräts bestehen. Das Erden des Neutralleiters kann zu einer
Masseschleife führen, und Ihr Gerät arbeitet auf seltsame Weise. Testen Sie
die Kabel mit einem Ohmmeter, um die Polarität zu prüfen, und stellen Sie sicher, dass die Stifte
weder geerdet noch kurzgeschlossen sind oder sich gegenseitig berühren.

DE19
WWW.AFX-LIGHT.COM
ACHTUNG! FÜR GERÄTE MIT LITHIUM-ION-BATTERIEN
1. VOR der ersten Inbetriebnahme bitte die Batterie vollständig auaden.
2. Nach jedem Gebrauch die Batterie auaden. Nicht warten bis die Batterie entladen ist!
3. NIEMALS die Batterie vollständig entladen. Dadurch verliert sie 20% ihrer Kapazität und kann
sogar unwiderruichen Schaden nehmen! Unter einem gewissen Spannungspegel werden die
Schaltungen nicht mehr versorgt und die Batterie kann dann gar nicht mehr aufgeladen werden.
4. Bei längerem Nichtgebrauch sollte die Batterie auf 40% ihrer Kapazität aufgeladen und einmal
im Monat geprüft bzw. nachgeladen werden.
Bitte befolgen Sie diese Hinweise, um die Batterie lange in gutem Zustand zu erhalten
** BATTERIEN SIND VOM GARANTIEANSPRUCH AUSGESCHLOSSEN **
Wir übernehmen keine Haftung für Batterien, die durch die Nichtbeachtung dieser Grundregeln
Schaden genommen haben.
BEDIENUNGSANLEITUNG
OFF /ON
12 34 5 6 77
1. EIN / AUS-Schalter: Auf ON stellen, um das Gerät einzuschalten. Der eingebaute Akku wird au-
tomatisch aufgeladen und die Batterieladeanzeigen leuchten, um den Ladezustand des Akkus
anzuzeigen. Das vollständige Auaden des Akkus dauert ca. 3 Stunden.
2. DMX IN: Schließen Sie das XLR-Kabel an diese Buchse und das andere Ende an den DMX-Ausgang
eines DMX-Controllers an
3. DMX OUT: Schließen Sie ein XLR-Kabel vom DMX Ausgang dieses Geräts an den DMX IN-Anschluss
des folgenden Geräts an (Master-Slave-Verbindung).
4. POWER IN: Schließen Sie das mitgelieferte Netzkabel an diese Steckdose und das andere Ende
an eine geeignete Netzsteckdose an
5. POWER OUT: Schließen Sie ein Stromkabel an diese Buchse und das andere Ende an den POWER
IN-Anschluss des folgenden Geräts (bis zu max. 4 Strahlern) an.
6. Bedienfeld mit Funktionstasten und Batterieladezustandsanzeigern
7. Sicherheitshaken für ein zusätzliches Stahlkabel (nicht enthalten)
HINWEISE FÜR DIE BATTERIE IN DER FERNBEDIENUNG
Dieses Symbol weist darauf hin, dass verbrauchte Batterien und Akkus nicht mit dem Hausmüll entsorgt werden dürfen, sondern
zu separaten Sammelstellen für das Recycling gebracht werden müssen.
ACHTUNG: Batterie nur durch eine gleichwertige ersetzen.
• Alte und neue Batterie von Kindern fernhalten.
• Wenn das Batteriefach nicht richtig schließt, darf das Gerät nicht mehr benutzt und muss
außerhalb der Reichweite von Kindern aufbewahrt werden.
WARNUNG
• Die mitgelieferte Fernbedienung enthält eine Knopfzelle, die, wenn sie verschluckt wird, in-
nerhalb von nur 2 Stunden schwere innere Verbrennungen mit Todesfolge verursachen kann.
• Wenn Sie Zweifel haben, ob die Batterie verschluckt oder in irgendein anderes Körperteil ein-
geführt wurde, rufen Sie sofort ärztliche Hilfe.

DE 20
© COPYRIGHT LOTRONIC 2020
EINSETZEN DER BATTERIE IN DIE FERNBEDIENUNG
• Legen Sie die Fernbedienung mit der Vorderseite nach unten auf eine ebene
Fläche.
• Schieben Sie die Abdeckung des Fachs in Pfeilrichtung.
• Schieben Sie das Batteriefach auf.
• Entfernen Sie die alte Batterie und setzen Sie die neue (CR2032) mit dem Pluszeichen (+) nach
oben ein.
• Schieben Sie das Batteriefach vorsichtig zu. Es rastet automatisch ein.
FERNBEDIENUNG
REMOTEIRC
BLACK
OUT
AUTO SOUND
STROBE
SPEED
SENSI-
TIVITY
%
DMX
MANUAL
FADE
UNIT
R
B
G
A W
P
UV
0
31 2
4 5 6
8 9
+
7
1. BLACKOUT Taste drücken, um die Lampen in der laufenden Betriebsart
auszuschalten. Erneut drücken, um die Lampen wieder einzuschalten
AUTO: In dieser Betriebsart laufen die eingebauten Programme ab.
1. <AUTO> Taste auf der Fernbedienung drücken.
2. Mit <+> und <–> zwischen den verschiedenen Programmen wählen.
SOUND: In dieser Betriebsart reagiert das Gerät auf Musik.
1. <SOUND> Taste auf der Fernbedienung drücken.
2. Mit <+> und <–> zwischen den verschiedenen SOUND Programmen
wählen.
STROBE: Zur Einstellung der Blitzgeschwindigkeit in der automatischen und
musikaktivierten Betriebsart.
1. <STROBE> Taste auf der Fernbedienung drücken.
2. Mit <+> und <–> die Geschwindigkeit des Programms einstellen.
3. <STROBE> Taste drücken, um die Einstellung zu beenden.
SPEED: Zur Einstellung der Geschwindigkeit in der automatischen und mu-
sikaktivierten Betriebsart.
1. <SPEED> Taste auf der Fernbedienung drücken.
2. Mit <+> und <–> die Geschwindigkeit des Programms einstellen.
SENSITIVITY: Stellt die Klangempndlichkeit des musikaktivierten Betriebs ein
1. <SENSITIVITY> Taste auf der Fernbedienung drücken.
2. Mit <+> und <–> die Klangempndlichkeit einstellen.
DMX/%: Aktiviert bzw. desaktiviert den DMX Betrieb
MANUAL: Zur manuellen Einstellung des RGB Anteils :
1. <MANUAL> Taste auf der Fernbedienung drücken.
2. <R>, <G>, or <B> (rot, grün oder blau) drücken, um die Farbe zu wählen.
UNIT-Modus: Drücken Sie <UNIT> auf der Fernbedienung
"0" : Ein/Aus von allen Geräten; "1" : Ein/Aus von BAR; "2" : Ein/Aus von DERBY 1
"3" : Ein/Aus von PAR 1; 4" : Ein/Aus von PAR 2 ; 5" : Ein/Aus von DERBY 2
2. Drücken Sie erneut <UNIT>, um den Modus zu verlassen.
Nummerntasten 1-9: Zur Einstellung der Helligkeit.
BEDIENTEIL
Batterieladezustandsanzeiger
Batterie zu 100% geladen
Batterie zu 75% geladen
Batterie zu 50% geladen
Batterie zu 25% geladen

DE21
WWW.AFX-LIGHT.COM
LED DISPLAY
Taste Funktion
MENU Gibt Zugang zum Menü oder schaltet zurück zum vorigen Menü
▲
Durchlauf durch die Optionen in aufsteigender Reihenfolge
Durchlauf durch die Optionen in rückläuger Reihenfolge
ENTER Zur Auswahl und Speicherung des laufenden Menüs oder der Option im Menü
Master Gerät: Jedes Gerät kann als Master arbeiten
Slave Geräte: Die DMX Adresse muss auf Slave eingestellt sein
EINSTELLUNGEN ÜBER DAS LED DISPLAY
Betriebsart Anzeige Beschreibung
DMX mode Addr
24CH
d001-d512
3CH
Auto Auto Au 1-6 Automatikprogramme
Sound Soun So 1-6 Musikgesteuerte Programme
Speed SPEE SP 1-9 Geschwindigkeit
Mic Sensitivity SEnS SE 1-9 Mikrofonempndlichkeit
Dimming dIMM dI 1- dI 9 Masterdimmer
Silent scene SILE on/oFF Stumme Szene im Sound-Programm
Slave SLAV Slave Slave
Infrared InFr on/oFF Fernbedienung aktivieren/deaktivieren
DIE DETAILLIERTE DMX KANALTABELLE FINDEN SIE AM ENDE DER ANLEITUNG
PFLEGE
Vor dem Reinigen das Gerät vom Netz trennen. Keine scharfen Reinigungsmittel benutzen. Staub
und Schmutz mit einem sauberen Tuch abwischen. Wir übernehmen keine Haftung für Schäden,
die durch unsachgemässen Gebrauch, falsche Bedienung und Abnutzung entstanden sind. Tech-
nische Veränderungen vorbehalten.
TECHNISCHE DATEN
Versorgung ........................................................................................................................ 100-240V~50/60Hz
Verbrauch ......................................................................................................................................................55W
Akku ............................................................................................................................ Lithium 12V𝌃 8800mAh
Ladedauer ...................................................................................................................................................5 Std.
Laufzeit auf Akku .................................................................................................................................3-12 Std.
Sicherung ....................................................................................................................................................... T1A
DERBY LED .................................................................................................................................... 8 x 3W RGBW
PAR LED ............................................................................................................................. 6 x 8W RGBW 4-in-1
BAR LED ............................................................................................................................. 4 x 1W W-UV 2-in-1
Abmessungen ................................................................................................................. 1060 x 180 x 325mm
Gewicht ........................................................................................................................................................ 7.2kg
Ordnungsgemäße Entsorgung des Geräts
Dieses Zeichen bedeutet, dass das Gerät innerhalb der europäischen Gemeinschaft nicht in den normalen Hausmüll geworfen werden
darf. Um Umwelt- und Gesundheitsschäden durch unkontrollierte Müllabfuhr zu vermeiden, muss das Gerät verantwortungsbewusst
entsorgt und für dauerhafte Wiederverwertung der Rohstoffe recycelt werden. Bitte bringen Sie das alte Gerät zu einer Sammelstelle
für elektrische und elektronische Geräte bzw. zu Ihrem Fachhändler, wo Sie das Gerät gekauft haben, damit eine umweltfreundliche
Entsorgung gewährleistet ist.

ES 22
© COPYRIGHT LOTRONIC 2020
MANUAL DE INSTRUCCIONES
BARRA DE ILUMINACION DMX AUTÓNOMA 4-EN-1
DESEMBALAJE
Cuándo reciba el equipo, abra el embalaje y verique que el contenido está completo y en buen es-
tado. Si no fuera así, comuníquelo inmediatamente al transportista y conserve el embalaje si este
muestra daños. Conserve el embalaje y todos los materiales de embalaje para poder transportar
el equipo con toda seguridad.
EXPLICACION DE LOS SIMBOLOS DEL EQUIPO
El rayo dentro de un triángulo avisa al usuario de un daño físico (Riesgo de electrocución, por
ejemplo).
El punto de exclamación dentro del triángulo indica un riesgo en la manipulación o instalación
del equipo.
Clase de aislamiento I
El equipo es conforme a la norma CE
Únicamente para su uso en interiores
0.5m
Distancia mínima entre el equipo y otros objetos
ATENCION
NO ABRIR LA CARCASA
PELIGRO DE ELECTROCUCION
INSTRUCCIONES DE SEGURIDAD
Lea atentamente este manual que contiene informaciones importantes de la instalación, uso y
mantenimiento de este equipo.
• Conserve el manual para consultas futuras. Si el equipo cambia de propietario algún día ase-
gúrese de que recibe el manual.
• Asegúrese de que la tensión del enchufe, se corresponde con las necesidades del equipo y no su-
pera el Voltaje requerido por el equipo e indicado en la placa indicadora del mismo.
• Este equipo forma parte de la classe y debe ser conectado obligatoriamente a una toma de cor-
riente con toma de tierra.
• Únicamente para ser usado en interiores!
• Para evitar cualquier riesgo de incendio o descarga eléctrica, no exponga el equipo a la lluvia o
la humedad. Asegúrese de que ningún objeto inamable se encuentra cerca del equipo durante
el funcionamiento del mismo.
• Instale el equipo en un lugar bien ventilado a una distancia como mínimo de 1 metro de cualquier
supercie. Asegúrese de que las rejillas de ventilación del equipo, no quedan obstruidas.
• La distancia mínima entre el proyector y el objeto a iluminar debe ser superior a 0,5m.
0.5m
.
• Ne haga funcionar el equipo durante más de 8 horas seguidas. Déjelo enfriar antes de utilizarlo
de nuevo, con el n de prolongar su vida.
• Desenchufe el equipo de la corriente antes de cualquier manipulación o mantenimiento. Cuándo
usted cambie un fusible, hágalo por uno de idénticas características al original.
• La temperatura ambiente no debe pasar de 40°C. No haga funcionar el equipo a temperaturas
superiores.
• En caso de malfuncionamiento, pare inmediatamente el equipo. No intente jamás reparar usted
mismo el equipo. Una reparación mal efectuada, puede provocar daños y malfuncionamientos.
Contacte con un servicio autorizado. Haga que utilicen únicamente recambios originales.

ES23
WWW.AFX-LIGHT.COM
• Asegúrese de que le cable de corriente nunca esté dañado o pellizcado.
• Jamás desenchufe el equipo tirando del cable, hágalo desde la propia clavija y con cuidado.
• No exponga los ojos a la fuente luminosa. En ciertas personas sensibles, la fuerte luminosidad
puede provocar una crisis de epilepsia
• La luminaria no se ha de usar con nes decorativos y no es adecuada como iluminación domes-
tica normal.
• Si el cable de corriente del equipo está dañado, este debe ser reemplazado por el fabricante o por
un técnico cualicado, para evitar cualquier riesgo de electrocución.
• La fuente luminosa de este equipo, no es reemplazable. Si estas se dañan, todo el equipo ha de
ser tirado a la basura.
DISPOSITVO DE CORTE
Cuándo el cable de corriente o el interruptor del equipo, sean utilizados como método de des-
conexión, este dispositivo debe permanecer fácilmente accesible;
CAMBIO DE FUSIBLE
Desenchufe el equipo de la corriente. Saque el porta fusible de su ubicación, con la ayuda de un
destornillador. Saque el fusible quemado y reemplácelo por uno de idénticas características (1A).
Vuelva a colocar el porta fusiles y conecte el equipo a la corriente.
Atención: Si el fusible vuelve a saltar, deje de usar el equipo inmediatamente. Contacte con su
vendedor y pídale consejo. Si sigue usando el equipo corre el riesgo de causar graves daños al
equipo.
INSTALACION
Fije el equipo por medio de los agujeros de tornillo en el soporte. Asegúrese de que su equipo está
sólidamente jado para evitar vibraciones y movimientos durante el funcionamiento. Compruebe
siempre que la estructura que soporta el equipo sea sucientemente sólida y capaz de soportar al
menos 10 veces el peso del equipo.
El equipo debe ser jado por profesionales en un lugar dónde no está al alcance de las personas y
no pase nadie por debajo de el o encima de un camino de personas.
CONEXIONADO DE MAS EFECTOS
Necesitará un cable de datos en serie para poder hacer funcionar más efectos por medio de una
controladora DMX512 o para hacer funcionar 2 o más efectos en modo Maestro/Esclavo. El núme-
ro combinado de canales requerido por el conjunto de equipos en un cable de datos en serie dene
el número de equipos que el cable de datos puede soportar.
CÂBLEADO
Para conectar los equipos juntos, debe de utilizar cables de transmisión de datos. Usted puede
comprar los cables DMX certicados directamente a su vendedor/distribuidor o construir sus pro-
pios cables. Si usted quiere construirlos usted mismo, utilice los cables de datos de alta calidad
que estarán más protegidos de las interferencias electromagnéticas.
CONECTORES DE CABLE
El cable debe de tener una conexión XLR macho en uno de los lados y una conexión XLR Hembra al
otro lado.
CONFIGURACIÓN DE LOS CONECTORES DMX
Una resistencia de nal de línea reduce los errores de señal. Para evitar
problemas de transmisión de señales, es aconsejable de conectar una
resistencia de n de línea DMX.
ATENCION
No debe de haber ningún contacto entre el común y la masa del chasis
del equipo. La conexión de la masa del común puede provocar un bucle de masa y su equipo fun-
cionará de manera extraña. Compruebe los cbles con la ayuda de un óhmetro para conrmar la

ES 24
© COPYRIGHT LOTRONIC 2020
polaridad y asegurarse que las tomas no están conectadas a masa ni cortocircuitadas con el blin-
daje o mutuamente.
RECORDATORIO: PRODUCTOS QUE CONTIENEN BATERÍAS DE LITÍO-ION
1. ANTES del primer uso, cargue COMPLETAMENTE la batería.
2. Recargue regularmente la batería después de cada uso, sin esperar a que estas se descargue
3. NUNCA permita que la batería se descargue por completo, ya que perderá primeramente el
20% de su capacidad, para nalmente perder totalmente la capacidad de carga de la misma.
Si la tensión es demasiado baja, el circuito no se podrá alimentar y será imposible recargar
la batería.
4. Si usted no va a utilizar el equipo por un tiempo prolongado, se recomienda vericar y cargar
la batería, al 40% aproximadamente, como mínimo una vez al mes.
La duración de la batería depende en buena parte de que siga estos consejos de utilización.
** LAS BATERIAS NO ESTAN CUBIERTAS POR LA GARANTIA**
No aceptamos ninguna responsabilidad por baterías dañadas prematuramente debido al in-
cumplimiento de estas reglas básicas.
INSTRUCCIONES
OFF /ON
12 34 5 6 77
1. Interruptor de ENCENDIDO / APAGADO: ajuste a ON para encender el dispositivo. La batería in-
corporada comenzará a cargarse automáticamente y los indicadores de carga de la batería se
iluminarán para mostrar el nivel de carga de la batería. Se tarda aproximadamente 3 horas en
cargar completamente la batería.
2. DMX IN: conecte el cable XLR a este zócalo y el otro extremo a la salida DMX de un controlador
DMX
3. DMX OUT: conecte un cable XLR de la salida de este dispositivo al conector DMX IN del siguiente
dispositivo (conexión maestro-esclavo)
4. POWER IN: conecte el cable de alimentación suministrado a esta toma y el otro extremo a una
toma de corriente adecuada
5. POWER OUT: conecte un cable de alimentación a esta toma y el otro extremo al conector POWER
IN del siguiente dispositivo (hasta máx. 4 proyectores)
6. Pantalla con botones de función e indicadores de carga de la batería
7. Ganchos de seguridad para la cuerda de seguridad adicional (no incluidos)
MANDO A DISTANCIA
INSTALACIÓN DE LAS PILAS EN EL MANDO A DISTANCIA
• Coloque el control remoto boca abajo sobre una supercie plana.
• Empuje la tapa del compartimiento en la dirección de la echa.
• Deslice el compartimento de la batería para abrirlo.
• Retire la batería vieja e instale la nueva (CR2032) con el símbolo más (+) hacia arriba.
• Deslice suavemente el compartimento de la batería para cerrarlo. Se bloquea automáticamente

ES25
WWW.AFX-LIGHT.COM
ADVERTENCIAS CONCERNIENTE A LA PILA DEL MANDO A DISTANCIA
Este pictograma indica que las pilas y baterias usadas no deben ser tiradas a la basura doméstica si no que las debe llevar a un punto
de recogida para que puedan ser recicladas
ATENCION
Peligro de explosión si la pila no se cambia correctamente. Reemplazar únicamente por una pila
de idénticas características. Conservar las pilas nuevas y usar las pilas fuera del alcance de los
niños. Si el compartimento de la pila no se cierra correctamente, deje de usar el equipo y mante-
ner fuera del alcance de los niños.
ADVERTENCIA
El mando a distancia incluido contiene una pila de botón. Si la pila de botón es tragada, esta
puede provocar graves quemaduras internas y provocar la muerte en menos de 2 horas.
En caso de duda de si las baterías pueden haber sido ingeridas o introducidas en cualquier parte
del cuerpo, consulte a un médico de inmediato.
REMOTEIRC
BLACK
OUT
AUTO SOUND
STROBE
SPEED
SENSI-
TIVITY
%
DMX
MANUAL
FADE
UNIT
R
B
G
A W
P
UV
0
31 2
4 5 6
8 9
+
7
BLACK OUT: Luz Encendida/Apagada (Vuelta al modo en curso)
AUTO: Apriete en la tecla AUTO para seleccionar el funcionamiento automá-
tico
SOUND: Apriete en SOUND para seleccionar el modo de activación de audio
STROBE: Apriete en STROBE y además en + o – para ajustar la velocidad de
los destellos.
SPEED: Apriete en SPEED y además en + o – para ajustar la velocidad
SENSIBILIDAD: Ajuste de la sensibilidad en modo audio
1. Apriete en <SENSITIVITY> del mando a distancia
2. Apriete en <+> o <–> para aumentar o bajar la sensibilidad.
DMX/% : Activación/Desactivación de la función DMX
Apriete en <DMX> del mando a distancia y el equipo funcionará en DMX
MANUAL
1. Apriete en <MANUAL> del mando a distancia.
2. Apriete en <R>, <G>, <B>, <W>, <A>, <UV> (rojo, verde, azul, blanco o
ámbar) para seleccionar el color.
Modo UNIT: Presione <UNIDAD> en el mando a distancia
"0": encendido / apagado para todas las unidades; "1": encendido / apagado para BAR
"2": encendido / apagado para DERBY 1; "3": encendido / apagado para PAR 1
"4": encendido / apagado para PAR 2; "5": encendido / apagado para DERBY 2
Presione <Unidad> de nuevo para salir del modo de unidad.
Numero 1 ~ 9
Para ajustar el valor de brillo
PANEL DE CONTROL
Indicador de carga de batería
Batería cargada al 100%
Batería cargada al 75%
Batería cargada al 50%
Batería cargada al 25%

ES 26
© COPYRIGHT LOTRONIC 2020
DISPLAY DE LED
El display cuenta con 4 botones: MENU / UP / DOWN / ENTER
Botón Función
MENU Para seleccionar las funciones de programación
▲
Para avanzar en las funciones seleccionadas
Para retroceder en las funciones seleccionadas
ENTER Para conrmar las funciones seleccionadas
Modo maestro: cualquier unidad de latas funciona para el equipo
maestro,
Modo Esclavo: debe estar congurando el valor de la dirección DMX
para Esclavo.
MENU
Modo Display Descripción
DMX mode Addr
24CH
d001-d512
3CH
Auto Auto Au 1-6 Programa automático
Sound Soun So 1-6 Programa de sonido
Speed SPEE SP 1-9 Velocidad
Mic Sensitivity SEnS SE 1-9 Sensibilidad MIC
Dimming dIMM dI 1- dI 9 Oscurecimiento maestro
Silent scene SILE on/oFF Escena silenciosa en el programa de sonido
Slave SLAV Slave Esclavo
Infrared InFr on/oFF Habilitar o deshabilitar el control remoto IR
MANTENIMIENTO
Antes de limpiar el equipo, desenchúfelo de la corriente, no utilice detergentes agresivos. Utilice un
paño seco para quitar el polvo. Declinamos cualquier responsabilidad por daños causados por un
uso indebido, manipulación o modicación. Bajo reserva de modicaciones técnicas.
CARACTÉRISTICAS TECNICAS
Alimentación ................................................................................................................... 100-240V~50/60Hz
Consumo .......................................................................................................................................................55W
Batería ....................................................................................................................... Lithium 12V𝌃 8800mAh
Duración de la carga ...................................................................................................................................... 5h
Autonomía ................................................................................................................................................ 3-12h
Fusible ............................................................................................................................................................ T1A
DERBY LED .................................................................................................................................... 8 x 3W RGBW
PAR LED ............................................................................................................................. 6 x 8W RGBW 4-in-1
BAR LED ............................................................................................................................. 4 x 1W W-UV 2-in-1
La velocidad del ash..............................................................................................................................0-20Hz
Dimensions ..................................................................................................................... 1060 x 180 x 325mm
Peso ............................................................................................................................................................. 7,2kg
Eliminación del producto
Este símbolo indica que este producto no debe desecharse en la basura doméstica en los países de la Comunidad Europea. Para
proteger el medio ambiente y / o la salud humana de la eliminación no controlada, debe reciclarse de manera responsable para
apoyar la reutilización sostenible de los recursos. Para reciclar el equipo usado, llévelo a un centro de recolección de electrodomésticos
o comuníquese con el distribuidor donde adquirió el producto. Asegurarán el reciclaje ecológico del producto.

HR27
WWW.AFX-LIGHT.COM
UPUTE ZA UPORABU
SAMOSTALNA DMX KONTROLIRANA SVJETLOSNA ŠIPKA 4-IN-1
UPUTE ZA RASPAKIRANJE
Odmah po primanju učvršćenja, pažljivo raspakirajte karton, provjerite sadržaj kako biste bili sigurni da
su svi dijelovi prisutni i da su primljeni u dobrom stanju. Odmah obavijestite tvrtku za prijevoz tereta i
zadržite materijal za pakiranje na pregled ako se čini da su neki dijelovi oštećeni prilikom otpreme ili da
karton sam pokazuje znakove lošeg rukovanja. Zadržite karton i sav materijal za pakiranje. U slučaju
da se armatura mora vratiti u tvornicu, važno je da se armatura vrati u originalnoj tvorničkoj kutiji i
pakiranju.
OBJAŠNJENJE SIMBOLA
Trokut koji sadrži simbol munje koristi se za označavanje kad god je vaše zdravlje ugroženo (na primjer,
zbog strujnog udara).
Uskličnik u trokutu ukazuje na posebne rizike prilikom rukovanja ili rukovanja uređajem.
Uređaj je u skladu s CE standardima
Samo za unutarnju upotrebu
Zaštitna klasa I. Zahtijeva uzemljenje
0.5m
Minimalna udaljenost između uređaja i drugih predmeta
Ne zurite u zraku svjetlosti
PAŽNJA
NE OTVARATI KUĆIŠTE
OPASNOST OD ELEKTRIČNOG UDARA
VAŽNE SIGURNOSNE UPUTE I UPOZORENJA NA OPASNOST
• Molimo pažljivo pročitajte ove upute, one sadrže važne informacije o instalaciji, korištenju i održavanju ovog
proizvoda.
• Molimo vas da ovaj Korisnički vodič sačuvate za buduću upotrebu. Ako prodate jedinicu drugom korisniku,
budite sigurni da je i on dobio ovu knjižicu s uputama.
• Uvijek provjerite povezujete li se s odgovarajućim naponom i da mrežni napon na koji se spajate ne bude veći
od navedenog na naljepnici ili na stražnjoj ploči učvršćenja.
• Ovaj je proizvod namijenjen samo za unutarnju upotrebu!
• Bitno je da je uređaj uzemljen. Električni priključak mora provesti kvalicirana osoba.
• Kako biste spriječili rizik od požara ili šoka, ne izlažite uređaj kiši ili vlazi. Pripazite da u blizini jedinice nema
zapaljivih materijala.
• Uređaj mora biti instaliran na mjestu s odgovarajućom ventilacijom, najmanje 50 cm od susjednih površina.
Pazite da nisu blokirani otvori za ventilaciju.
• Uvijek odspojite izvor napajanja prije servisiranja ili zamjene osigurača i obavezno ga zamijenite istom
veličinom i tipom osigurača.
• Osigurajte učvršćenje na pričvrsnom uređaju pomoću sigurnosnog lanca. Nikada ne nosite uređaj samo za
glavu. Upotrijebite ručke za nošenje.
• Maksimalna temperatura okoline (Ta) je 40°C. Ne koristite uređaj s temperaturama višim od ove.
• U slučaju ozbiljnih problema s radom odmah prestanite koristiti jedinicu. Nikada nemojte pokušavati sami
popraviti jedinicu. Popravci koje obavljaju nekvalicirane osobe mogu dovesti do oštećenja ili kvara. Molimo
kontaktirajte najbliži ovlašteni centar za tehničku pomoć. Uvijek koristite istu vrstu rezervnih dijelova.
• Ne spajajte uređaj na prigušeni paket.
• Pazite da kabel za napajanje nikada ne bude presovan ili oštećen.
• Nikada nemojte odspajati kabel za napajanje povlačenjem ili povlačenjem kabela.
• Izbjegavajte izravno izlaganje očiju izvoru svjetlosti dok je uključen.
• Proizvod je samo u dekorativne svrhe i nije prikladan za osvjetljenje soba u domaćinstvu.
• Izvor svjetlosti ove svjetiljke nije zamjenjiv; kada izvor svjetlosti dođe do kraja svog života, cijela svjetiljka
mora se zamijeniti.
• DISKONEKTNI UREĐAJ: Ako se glavni uređaj ili spojnica uređaja koriste kao uređaj za odspajanje, uređaj za
odspajanje mora ostati lako funkcionalan.

HR 28
© COPYRIGHT LOTRONIC 2020
MONTAŽA
Uvijek osigurajte da je jedinica čvrsto učvršćena kako biste izbjegli vibracije i klizanje tijekom rada. Uvijek osigu
-
rajte da je konstrukcija na koju pričvršćujete jedinicu sigurna i sposobna podnijeti težinu 10 puta veću od težine
jedinice. Također uvijek koristite sigurnosni kabel koji može držati 12 puta veću težinu jedinice kada instalirate
učvršćenje.
Opremu moraju popraviti profesionalci na mjestu koje je nedostupno ljudima i gdje nitko ne može proći pored nje
ili ispod nje.
ZAMJENA OSIGURAČA
• Odvijačem s ravnom glavom izvucite držač osigurača iz njegova kućišta.
• Izvadite oštećeni osigurač iz držača i zamijenite potpuno istim osiguračem.
• Vratite držač osigurača na svoje mjesto i ponovno spojite napajanje.
• Osigurač se nalazi unutar ovog pretinca. Skinite pomoću odvijača s ravnom glavom.
POVEZIVANJE UČVRŠĆENJA
Trebat će vam serijska podatkovna veza za pokretanje svjetlosnih emisija jednog ili više čvora pomoću DMX-512
kontrolera ili za pokretanje sinkroniziranih emisija na dva ili više čvora postavljenih u glavni / podređeni način
rada. Kombinirani broj kanala potrebnih za sve uređaje na serijskoj podatkovnoj vezi određuje broj uređaja koji
podatkovna veza može podržati.
Console Light1 Light2 Light3
VAŽNO: Uređaji na serijskoj / podatkovnoj vezi moraju biti povezani lancima u jedan redak. Maksimalna preporu-
čena udaljenost serijske podatkovne veze: 100 metara. Maksimalni preporučeni broj čvora na serijskoj podatkov-
noj vezi: 32 čvora
KABELSKI PRIKLJUČCI
Kabliranje mora imati muški XLR konektor na jednom kraju i ženski XLR konektor na drugom kraju.
KONFIGURACIJA DMX KONEKTORA
INPUT
COMMON
DMX +
DMX-
Resistance 120 ohm
1/ 4w between pin 2
(DMX-) and pin 3
(DMX+) of the last
fixture.
Završetak smanjuje pogreške u signalu. Da biste izb-
jegli probleme s prijenosom signala i smetnje, uvijek
je poželjno spojiti DMX terminator signala.
OPREZ
Ne dopustite kontakt između zajedničkog i podnožja
kućišta učvršćenja. Uzemljenje zajedničkog može uzrokovati petlju uzemljenja, a vaš uređaj može raditi pogreš-
no. Ispitajte kabele mjeračem ohma kako biste provjerili ispravan polaritet i osigurali da pinovi nisu uzemljeni ili
kratko spojeni na štit ili međusobno.
Zamjena osigurača
Pronađite i uklonite kabel za napajanje jedinice. Nakon uklanjanja kabela, smjestite držač osigurača
unutar utičnice. Umetnite plosnati odvijač u utičnicu i lagano izvucite držač osigurača. Uklonite loši
osigurač i zamijenite novim.
Upozorenje: Ako nakon zamjene osigurača nastavite pregarati osigurače, PRESTANITE koristiti uređaj.
Za daljnje upute obratite se korisničkoj podršci. Nastavak uporabe jedinice može prouzročiti ozbiljnu
štetu.

HR29
WWW.AFX-LIGHT.COM
VAŽNA NAPOMENA ZA UREĐAJE KOJI SADRŽE LITIJ-IONSKE BATERIJE
1. PRIJE PRVE UPORABE UREĐAJA, napunite bateriju do kraja
2. Redovito punite bateriju nakon svake uporabe. Ne čekajte dok se ne isprazni!
3. NEMOJTE dopustiti da se baterija potpuno isprazni, jer će u protivnom izgubiti 20% svog kapacite-
ta ili čak biti potpuno oštećena! Ako napon postane prenizak, unutarnji krugovi se više ne napajaju i
postat će nemoguće napuniti bateriju!
4. Ako jedinicu ne upotrebljavate dulje vrijeme, preporučuje se punjenje do 40% kapaciteta i provje-
ravanje / punjenje jednom mjesečno.
Životni vijek baterije ovisi o poštivanju ovih preporuka.
** JAMSTVO NE POKRIVA BATERIJE **
Ne možemo biti odgovorni za oštećene baterije zbog nepoštivanja ovih osnovnih pravila.
UPUTE ZA UPORABU
OFF /ON
12 34 5 6 77
1. Prekidač ON / OFF: Postavite na ON da biste uključili uređaj. Ugrađena baterija automatski će se početi
puniti, a indikatori napunjenosti baterije zasvijetlit će kako bi pokazali razinu napunjenosti baterije.
Potrebno je oko 3 sata da se baterija potpuno napuni.
2. DMX IN: Spojite XLR kabel na ovu utičnicu, a drugi kraj na DMX izlaz DMX kontrolera
3. DMX OUT: Spojite XLR kabel s izlaza ovog učvršćenja na DMX IN konektor sljedećeg učvršćenja (veza
master-slave)
4. POWER IN: Spojite isporučeni mrežni kabel na ovu utičnicu, a drugi kraj na odgovarajuću mrežnu
utičnicu
5. POWER OUT: Spojite kabel napajanja na ovu utičnicu, a drugi kraj na POWER IN priključak sljedećeg
učvršćenja (do 4 čvora)
6. Zaslon s funkcijskim tipkama i indikatorima napunjenosti baterije
7. Sigurnosne kuke za dodatno sigurnosno uže (nisu uključene)
DALJINSKI UPRAVLJAČ
UMETANJE BATERIJE U DALJINSKI UPRAVLJAČ
Izvucite odjeljak za bateriju i umetnite ćeliju gumba (CR2025 3V) s pozitivnom
stranom okrenutom prema gore. Gurnite odjeljak za baterije dok ne klikne na
svoje mjesto.

HR 30
© COPYRIGHT LOTRONIC 2020
PREPORUKE ZA BATERIJE
Ovaj simbol označava da se istrošene baterije ne smiju odlagati s kućnim otpadom, već ih odlagati pravilno u skladu
s lokalnim propisima.
Baterije ne smiju biti izložene prekomjernoj toplini, poput sunca, vatre ili slično.
Kad se unutarnje baterije ne smiju koristiti, uklonite ih kako biste izbjegli oštećenja uzrokovana curenjem ili korozijom bate
-
rija.
PAŽNJA: Opasnost od eksplozije ako je baterija pogrešno postavljena. Zamijenite je samo istim ili ekvivalentnim tipom
UPOZORENJE :Nove i stare baterije držite izvan dohvata djece.
Ako se odjeljak za baterije ne zatvori pravilno, prestanite koristiti proizvod i držite ga izvan dohvata djece.
Ako sumnjate jesu li baterije progutane ili unesene u bilo koji drugi dio tijela, odmah se obratite liječniku.
CRNO: IZLAZ: svjetlo uključeno / isključeno (povratak trenutnog programa)
AUTO: Pritisnite za odabir automatskog načina rada.
ZVUK: Pritisnite za odabir načina upravljanja zvukom.
STROB: Pritisnite tipku STROBE, a zatim tipke + / - za podešavanje brzine stroba.
BRZINA: Pritisnite SPEED, a zatim tipke + / - za podešavanje brzine automatskog / zvučnog programa.
OSJETLJIVOST: Za podešavanje osjetljivosti mikrofona pritisnite <+> ili <–> da biste povećali ili
smanjili osjetljivost zvuka.
DMX /%: Da biste omogućili ili onemogućili DMX funkciju na proizvodu
MANUAL: Pritisnite <MANUAL> na IRC-u.
Pritisnite <R>, <G>, <B>, <W>, <A>, <UV> (crvena, zelena, plava, bijela, jantarna ili UV) da biste
odabrali svoju boju. Pritisnite <+> ili <–> da biste povećali ili smanjili da biste odabrali boju.
NAČIN JEDINICE: 1. Pritisnite <UNIT> na IRC-u
"0" za sve jedinice uključene / isključene
"1" za uključivanje / isključivanje BAR-a
"2" za uključivanje / isključivanje DERBY 1
"3" za uključivanje / isključivanje PAR 1
"4" za uključivanje / isključivanje PAR 2
"5" za uključivanje / isključivanje DERBY 2
2. Ponovno pritisnite <UNIT> za izlaz iz načina rada jedinice.
Broj 1 ~ 9
Za podešavanje svjetline
PREDNJA PLOČA
Pokazatelj napunjenosti baterije
Baterija napunjena 100%
Baterija napunjena 75%
Baterija napunjena 50%
Baterija napunjena 25%

HR31
WWW.AFX-LIGHT.COM
Dugme Funkcija
MENU Za odabir programskih funkcija
▲ Za pomicanje naprijed u odabranim funkcijama
t
Za povratak u odabranim funkcijama
ENTER Za potvrdu odabranih funkcija
Glavni način: bilo koja limenka može raditi za glavnu učvršćenje,
Slave način: mora postavljati vrijednost DMX adrese za Slave.
POSTAVLJANJE IZBORNIKA LED ZASLON
Način rada Programiranje Opis
DMX mode Addr
24 CH
d001-d512
3CH
Auto Auto Au 1-6 Automatski program
Sound Soun So 1-6 Zvučni program
Speed SPEE SP 1-9 Ubrzati
Mic Sensitivity SEnS SE 1-9 MIC osjetljivost
Dimming dIMM dI 1- dI 9 Master zatamnjenje
Silent scene SILE on/oFF Tiha scena po programu Sound
Slave SLAV Slave Rob
Infrared InFr on/oFF Omogućite ili onemogućite IR daljinski upravljač
DIJAGRAM DMX KANALA POGLEDAJTE NA KRAJU PRIRUČNIKA
NJEGA
Prije čišćenja jedinice odvojite je od električne mreže. Ne koristite agresivna sredstva za čišćenje. Čis-
tom krpom obrišite svu prašinu ili prljavštinu s proizvoda. Ne odgovaramo za štetu koja nastane nepra-
vilnim rukovanjem, nepravilnom uporabom ili trošenjem. Zadržavamo pravo tehničkih izmjena.
TEHNIČKI PODACI
Napajanje .................................................................................................................... 100-240V ~ 50 / 60Hz
Potrošnja .................................................................................................................................................55W
Baterija .......................................................................................................................... Litij 12V𝌃 8800mAh
Vrijeme punjenja ........................................................................................................................................ 5h
Vrijeme rada na bateriji ........................................................................................................................3-12h
Osigurač ................................................................................................................................................... T1A
DERBY LED ............................................................................................................................... 8 x 3W RGBW
PAR LED .......................................................................................................................... 6 x 8W RGBW 4-u-1
ŠIPKA LED ........................................................................................................................ 4 x 1W W-UV 2-u-1
Brzina bljeska ......................................................................................................................................0-20Hz
Dimenzije ..................................................................................................................... 1060 x 180 x 325mm
Težina ................................................................................................................................................... 7,2 kg
Električni proizvodi ne smiju se odlagati u kućni otpad. Molimo vas da ih odnesete u centar za reciklažu. Pitajte lokalne vlasti ili pro-
davača o načinu na koji trebate postupiti.

EN 32
© COPYRIGHT LOTRONIC 2020WWW.AFX-LIGHT.COM
24CH DMX VALUES
CH1 0-255 Master dimming (0-100%)
CH2 0-255 PAR Stroboscope (Rate 0-100%)
CH3 0-255 Red (0-100%)
PAR1
CH4 0-255 Green (0-100%)
CH5 0-255 Blue (0-100%)
CH6 0-255 White (0-100%)
CH7 0-255 Red (0-100%)
PAR2
CH8 0-255 Green (0-100%)
CH9 0-255 Blue (0-100%)
CH10 0-255 White (0-100%)
CH11 10-255 DERBY Stroboscope (Rate 0-100%)
CH12 0-255 Red (0-100%)
DERBY1
CH13 0-255 Green (0-100%)
CH14 0-255 Blue (0-100%)
CH15 0-255 White (0-100%)
CH16 0-255 Red (0-100%)
DERBY2
CH17 0-255 Green (0-100%)
CH18 0-255 Blue (0-100%)
CH19 0-255 White (0-100%)
CH20
0-9 No function
10-255 DERBY Motor Speed (Slow-fast)
CH21 10-255 BAR Stroboscope (Rate 0-100%)
BAR
CH22
0-9 No function
10-19 BAR white LED ON
20-29 BAR UV LED ON
30-39 BAR white and UV LED ON
40-159 Different case
160-255 Different case running (Slow-fast)
CH23
0-9 No function
10-29 Auto program 1
30-49 Auto program 2
50-69 Auto program 3
70-89 Auto program 4
90-109 Auto program 5
110-129 Auto program 6
130-149 Sound program1
150-169 Sound program2
170-189 Sound program3
190-209 Sound program4
210-229 Sound program5
230-255 Sound program6
CH24 0-255 Auto and Sound program speed (Slow-fast)

EN33
WWW.AFX-LIGHT.COM
3CH DMX VALUES
CH1 0-255 Master dimming (0-100%)
CH2
0-9 No function
10-29 Auto program 1
30-49 Auto program 2
50-69 Auto program 3
70-89 Auto program 4
90-109 Auto program 5
110-129 Auto program 6
130-149 Sound program1
150-169 Sound program2
170-189 Sound program3
190-209 Sound program4
210-229 Sound program5
230-255 Sound program6
CH3 0-255 Auto and Sound program speed (Slow-fast)

© COPYRIGHT LOTRONIC 2020
1/34