AEG SFE818E9ZC Manual de usuario
- Categoría
- Frigoríficos combinados
- Tipo
- Manual de usuario


CONTENTS
1. SAFETY INFORMATION......................................................................................2
2. SAFETY INSTRUCTIONS.................................................................................... 4
3. INSTALLATION.....................................................................................................6
4. CONTROL PANEL................................................................................................9
5. DAILY USE......................................................................................................... 11
6. HINTS AND TIPS................................................................................................13
7. CARE AND CLEANING...................................................................................... 17
8. TROUBLESHOOTING........................................................................................18
9. NOISES...............................................................................................................22
10. TECHNICAL DATA........................................................................................... 22
11. INFORMATION FOR TEST INSTITUTES........................................................ 23
FOR PERFECT RESULTS
Thank you for choosing this AEG product. We have created it to give you
impeccable performance for many years, with innovative technologies that help
make life simpler – features you might not find on ordinary appliances. Please
spend a few minutes reading to get the very best from it.
Visit our website to:
Get usage advice, brochures, trouble shooter, service and repair information:
www.aeg.com/support
Register your product for better service:
www.registeraeg.com
Buy Accessories, Consumables and Original spare parts for your appliance:
www.aeg.com/shop
CUSTOMER CARE AND SERVICE
Always use original spare parts.
When contacting our Authorised Service Centre, ensure that you have the
following data available: Model, PNC, Serial Number.
The information can be found on the rating plate.
Warning / Caution-Safety information
General information and tips
Environmental information
Subject to change without notice.
1. SAFETY INFORMATION
Before the installation and use of the appliance, carefully
read the supplied instructions. The manufacturer is not
responsible for any injuries or damage that are the result
of incorrect installation or usage. Always keep the
www.aeg.com2

instructions in a safe and accessible location for future
reference.
1.1 Children and vulnerable people safety
• This appliance can be used by children aged from 8
years and above and persons with reduced physical,
sensory or mental capabilities or lack of experience
and knowledge if they have been given supervision or
instruction concerning the use of the appliance in a
safe way and understand the hazards involved.
• Children aged from 3 to 8 years are allowed to load
and unload the appliance provided that they have
been properly instructed.
• This appliance may be used by persons with very
extensive and complex disabilities provided that they
have been properly instructed.
• Children of less than 3 years of age should be kept
away from the appliance unless continuously
supervised.
• Do not let children play with the appliance.
• Children shall not carry out cleaning and user
maintenance of the appliance without supervision.
• Keep all packaging away from children and dispose of
it appropriately.
1.2 General Safety
• This appliance is intended to be used in household
and similar applications such as:
– Farm houses; staff kitchen areas in shops, offices
and other working environments;
– By clients in hotels, motels, bed and breakfast and
other residential type environments.
• To avoid contamination of food respect the following
instructions:
– do not open the door for long periods;
– clean regularly surfaces that can come in contact
with food and accessible drainage systems;
ENGLISH 3

– store raw meat and fish in suitable containers in the
refrigerator, so that it is not in contact with or drip
onto other food.
• WARNING: Keep ventilation openings, in the
appliance enclosure or in the built-in structure, clear of
obstruction.
• WARNING: Do not use mechanical devices or other
means to accelerate the defrosting process, other than
those recommended by the manufacturer.
• WARNING: Do not damage the refrigerant circuit.
• WARNING: Do not use electrical appliances inside the
food storage compartments of the appliance, unless
they are of the type recommended by the
manufacturer.
• Do not use water spray and steam to clean the
appliance.
• Clean the appliance with a moist soft cloth. Only use
neutral detergents. Do not use abrasive products,
abrasive cleaning pads, solvents or metal objects.
• When the appliance is empty for long period, switch it
off, defrost, clean, dry and leave the door open to
prevent mould from developing within the appliance.
• Do not store explosive substances such as aerosol
cans with a flammable propellant in this appliance.
• If the supply cord is damaged, it must be replaced by
the manufacturer, its Authorised Service Centre or
similarly qualified persons in order to avoid a hazard.
2. SAFETY INSTRUCTIONS
2.1 Installation
WARNING!
Only a qualified person must
install this appliance.
• Remove all the packaging.
• Do not install or use a damaged
appliance.
• Do not use the appliance before
installing it in the built-in structure due
to safety manner.
• Follow the installation instructions
supplied with the appliance.
• Always take care when moving the
appliance as it is heavy. Always use
safety gloves and enclosed footwear.
• Make sure the air can circulate
around the appliance.
• At first installation or after reversing
the door wait at least 4 hours before
connecting the appliance to the power
supply. This is to allow the oil to flow
back in the compressor.
www.aeg.com4

• Before carrying out any operations on
the appliance (e.g. reversing the
door), remove the plug from the
power socket.
• Do not install the appliance close to
radiators or cookers, ovens or hobs.
• Do not expose the appliance to the
rain.
• Do not install the appliance where
there is direct sunlight.
• Do not install this appliance in areas
that are too humid or too cold.
• When you move the appliance, lift it
by the front edge to avoid scratching
the floor.
• The appliance contains a bag of
desiccant. This is not a toy. This is not
food. Please dispose of it
immediately.
2.2 Electrical connection
WARNING!
Risk of fire and electric
shock.
WARNING!
When positioning the
appliance, ensure the supply
cord is not trapped or
damaged.
WARNING!
Do not use multi-plug
adapters and extension
cables.
• The appliance must be earthed.
• Make sure that the parameters on the
rating plate are compatible with the
electrical ratings of the mains power
supply.
• Always use a correctly installed
shockproof socket.
• Make sure not to cause damage to
the electrical components (e.g. mains
plug, mains cable, compressor).
Contact the Authorised Service
Centre or an electrician to change the
electrical components.
• The mains cable must stay below the
level of the mains plug.
• Connect the mains plug to the mains
socket only at the end of the
installation. Make sure that there is
access to the mains plug after the
installation.
• Do not pull the mains cable to
disconnect the appliance. Always pull
the mains plug.
2.3 Use
WARNING!
Risk of injury, burns, electric
shock or fire.
The appliance contains flammable
gas, isobutane (R600a), a natural gas
with a high level of environmental
compatibility. Be careful not to cause
damage to the refrigerant circuit
containing isobutane.
• Do not change the specification of this
appliance.
• Do not put electrical appliances (e.g.
ice cream makers) in the appliance
unless they are stated applicable by
the manufacturer.
• If damage occurs to the refrigerant
circuit, make sure that there are no
flames and sources of ignition in the
room. Ventilate the room.
• Do not let hot items to touch the
plastic parts of the appliance.
• Do not put soft drinks in the freezer
compartment. This will create
pressure on the drink container.
• Do not store flammable gas and liquid
in the appliance.
• Do not put flammable products or
items that are wet with flammable
products in, near or on the appliance.
• Do not touch the compressor or the
condenser. They are hot.
• Do not remove or touch items from
the freezer compartment if your hands
are wet or damp.
• Do not freeze again food that has
been thawed.
• Follow the storage instructions on the
packaging of frozen food.
• Wrap the food in any food contact
material before putting it in the freezer
compartment.
ENGLISH 5

2.4 Internal lighting
WARNING!
Risk of electric shock.
• Concerning the lamp(s) inside this
product and spare part lamps sold
separately: These lamps are intended
to withstand extreme physical
conditions in household appliances,
such as temperature, vibration,
humidity, or are intended to signal
information about the operational
status of the appliance. They are not
intended to be used in other
applications and are not suitable for
household room illumination.
2.5 Care and cleaning
WARNING!
Risk of injury or damage to
the appliance.
• Before maintenance, deactivate the
appliance and disconnect the mains
plug from the mains socket.
• This appliance contains hydrocarbons
in the cooling unit. Only a qualified
person must do the maintenance and
the recharging of the unit.
• Regularly examine the drain of the
appliance and if necessary, clean it. If
the drain is blocked, defrosted water
collects in the bottom of the
appliance.
2.6 Service
• To repair the appliance contact the
Authorised Service Centre. Use
original spare parts only.
• Please note that self-repair or non-
professional repair can have safety
consequences and might void the
guarantee.
• The following spare parts will be
available for 7 years after the model
has been discontinued: thermostats,
temperature sensors, printed circuit
boards, light sources, door handles,
door hinges, trays and baskets.
Please note that some of these spare
parts are only available to
professional repairers, and that not all
spare parts are relevant for all
models.
• Door gaskets will be available for 10
years after the model has been
discontinued.
2.7 Disposal
WARNING!
Risk of injury or suffocation.
• Disconnect the appliance from the
mains supply.
• Cut off the mains cable and discard it.
• Remove the door to prevent children
and pets to be closed inside of the
appliance.
• The refrigerant circuit and the
insulation materials of this appliance
are ozone-friendly.
• The insulation foam contains
flammable gas. Contact your
municipal authority for information on
how to discard the appliance
correctly.
• Do not cause damage to the part of
the cooling unit that is near the heat
exchanger.
3. INSTALLATION
WARNING!
Refer to Safety chapters.
WARNING!
Refer to installation
instruction document to
install your appliance.
WARNING!
Fix the appliance in
accordance with installation
instruction document to
avoid a risk of instability of
the appliance.
www.aeg.com6

3.1 Dimensions
B
A
H1
W1
D1
W2
D2
W3
D3
Overall dimensions ¹
H1 mm 1769
W1 mm 556
D1 mm 549
¹ the height, width and depth of the
appliance without the handle and feet
Space required in use ²
H2 (A+B) mm 1816
W2 mm 560
Space required in use ²
D2 mm 552
A mm 1780
B mm 36
² the height, width and depth of the
appliance including the handle, plus the
space necessary for free circulation of
the cooling air
Overall space required in use ³
H3 (A+B) mm 1816
ENGLISH 7

Overall space required in use ³
W3 mm 780
D3 mm 1085
³ the height, width and depth of the
appliance including the handle, plus the
space necessary for free circulation of
the cooling air, plus the space necessary
to allow door opening to the minimum
angle permitting removal of all internal
equipment
3.2 Location
To ensure appliance's best functionality,
you should not install the appliance in the
nearby of the heat source (oven, stoves,
radiators, cookers or hobs) or in a place
with direct sunlight. Make sure that air
can circulate freely around the back of
the cabinet.
This appliance should be installed in a
dry, well ventilated indoor position.
This appliance is intended to be used at
ambient temperature ranging from 10°C
to 38°C.
The correct operation of the
appliance can only be
guaranteed within the
specified temperature range.
If you have any doubts
regarding where to install the
appliance, please turn to the
vendor, to our customer
service or to the nearest
Authorised Service Centre.
It must be possible to
disconnect the appliance
from the mains power
supply. The plug must
therefore be easily
accessible after installation.
3.3 Electrical connection
• Before plugging in, ensure that the
voltage and frequency shown on the
rating plate correspond to your
domestic power supply.
• The appliance must be earthed. The
power supply cable plug is provided
with a contact for this purpose. If the
domestic power supply socket is not
earthed, connect the appliance to a
separate earth in compliance with
current regulations, consulting a
qualified electrician.
• The manufacturer declines all
responsibility if the above safety
precautions are not observed.
• This appliance complies with the
E.E.C. Directives.
3.4 Ventilation requirements
The airflow behind the appliance must be
sufficient.
5 cm
min.
200 cm
2
min.
200 cm
2
CAUTION!
Refer to the installation
instructions for the
installation.
3.5 Door reversibility
Please refer to the separate document
with instructions on installation and door
reversal.
CAUTION!
At every stage of reversing
the door protect the floor
from scratching with a
durable material.
www.aeg.com8

4. CONTROL PANEL
56 4 3 2
1
1
Display
2
Temperature warmer button
3
Temperature colder button
4
OK
5
Mode
6
ON/OFF
It is possible to change predefined sound
of buttons by pressing together Mode
and temperature colder button for a few
seconds. Change is reversible.
4.1 Display
min
A B C D E
FGH
A. Timer indicator
B. Coolmatic function
C. LongFresh function
D. Frostmatic function
E. Temperature indicator
F. Alarm indicator
G. ChildLock function
H. DrinksChill function
4.2 Switching on
1. Connect the mains plug to the power
socket.
2. Press the appliance ON/OFF if the
display is off. The temperature
indicators show the set default
temperature.
To select a different set temperature
refer to "Temperature regulation".
If "dEMo" appears on the display, refer to
"Troubleshooting" .
4.3 Switching off
1. Press the appliance ON/OFF for 3
seconds.
The display switches off.
2. Disconnect the mains plug from the
power socket.
4.4 Temperature regulation
Set the temperature of the appliance by
pressing the temperature regulators.
Recommended set temperature is:
• +4°C for the fridge
• -18°C for the freezer
The temperature range may vary
between -15°C and -24°C for freezer and
between 2°C and 8°C for fridge.
The temperature indicators show the set
temperature.
The set temperature will be
reached within 24 hours.
After a power failure the set
temperature remains stored.
ENGLISH 9

4.5 Coolmatic function
If you need to insert in the fridge
compartment a large amount of warm
food, for example after doing the grocery
shopping, we suggest activating the
Coolmatic function to chill the products
more rapidly and to avoid warming the
other food which is already in the
refrigerator.
1. Press the Mode until the
corresponding icon appears.
The Coolmatic indicator flashes.
2. Press the OK to confirm.
The Coolmatic indicator is shown.
This function stops automatically after
approximately 6 hours.
You can deactivate the Coolmatic
function before its automatic end by
repeating the procedure or by selecting a
different fridge set temperature.
4.6 LongFresh compartment
setting
The storage temperature and the relative
humidity in LongFresh compartment
provide optimal conditions for the storage
of various kinds of fresh food (like fish,
meat, seafood, etc.) as it preserves its
high nutritional values, as well as high
humidity level much longer than regular
refrigerator.
1. Press Mode until the corresponding
icon appears.
The display shows 3. This is the default
setting that ensures the most effective
performance.
The possible settings can vary from 1
(the coldest) to 5 (the warmest).
Settings from 1 to 3 are suitable for fish
and meat.
Settings 4 and 5 are suitable for
vegetables and fruits. In these settings
the compartment works similarly to the
fridge compartment.
2. Press the temperature buttons on the
control panel to select the required
setting.
3. Press OK to confirm the setting.
The indicator returns to the fridge
temperature setting in a few seconds.
4.7 Frostmatic function
The Frostmatic is used to perform pre-
freezing and fast freezing in sequence of
Freezer compartment. This function
accelerates the freezing of fresh food
and, at the same time, protects
foodstuffs already stored from
undesirable warming.
To freeze fresh food activate
the Frostmatic function at
least 24 hours before placing
the food to complete pre-
freezing.
1. To activate this function press the
Mode button until the corresponding
icon appears.
The Frostmatic indicator flashes.
2. Press the OK button to confirm.
The Frostmatic indicator is shown.
This function stops automatically after 28
hours.
You can deactivate the Frostmatic
function before its automatic end by
repeating the procedure until the
Frostmatic indicator turns off or by
selecting a different set temperature.
4.8 ChildLock function
Activate the ChildLock function to lock
the buttons from unintentional operation.
1. Press Mode until the corresponding
icon appears.
The ChildLock indicator flashes.
2. Press OK to confirm.
The ChildLock indicator is shown.
To deactivate the ChildLock function,
repeat the procedure until the ChildLock
indicator goes off.
4.9 DrinksChill function
The DrinksChill function is to be used to
set an acoustic alarm at the preferred
time, useful for example when a recipe
requires to cool down food products for a
certain period of time.
It is also useful when a reminder is
needed in order not to forget the bottles
or cans placed in the freezer for fast
cooling.
www.aeg.com10

1. Press Mode until the corresponding
icon appears.
The DrinksChill indicator flashes.
The Timer shows the set value (30
minutes) for a few seconds.
2. Press the Timer regulator to change
the Timer set value from 1 to 90
minutes.
3. Press OK to confirm.
The DrinksChill indicator is shown.
The Timer starts to flash (min).
At the end of the countdown the "0 min"
indicator flashes and an audible alarm
sounds. Press OK to switch off the sound
and terminate the function.
To switch off the function repeat the
procedure until the DrinksChill goes off.
It is possible to change the
time at any time during the
countdown and at the end by
pressing the Temperature
colder button and the
Temperature warmer button.
4.10 Door open alarm
If the fridge door is left open for
approximately 5 minutes, the sound is on
and alarm indicator flashes.
The alarm stops after closing the door.
During the alarm, the sound can be
muted by pressing any button.
If you do not press any
button, the sound switches
off automatically after
around one hour to avoid
disturbing.
5. DAILY USE
5.1 Positioning the door
shelves
To permit storage of food packages of
various sizes, the door shelves can be
placed at different heights.
1. Gradually pull the shelf up until it
comes free.
2. Reposition as required.
This model is equipped with a variable
storage box which can be moved
sideways.
ENGLISH 11

5.2 Movable shelves
The walls of the refrigerator are equipped
with a series of runners so that the
shelves can be positioned as desired.
This appliance is also equipped with a
shelf consisting of two parts. The front
half of the shelf can be placed under the
second half to make better use of space.
To fold the shelf:
1. Take out the front half gently.
2. Slide it into the lower rail and under
the second half.
1
2
Do not move the glass shelf
above the vegetable drawer
to ensure correct air
circulation.
5.3 LongFresh compartment
The storage temperature and the relative
humidity in this compartment provide
optimal conditions for the storage of
various kinds of food.
To learn about the temperature settings
in the LongFresh compartment please
refer to the “LongFresh compartment
setting” section.
LongFresh compartment is suitable for
the storage of a variety of fresh food (like
fish, meat, seafood, etc.) as it preserves
its high nutritional values as well as high
humidity level much longer in comparison
to the regular refrigerator.
5.4 Humidity control
The LongFresh compartment has stops
that prevent the drawers from falling out
when fully extended. To remove the
drawer:
1. Pull the drawer to the maximum.
2. Lift and pull out the drawer.
The drawers marked with water drop
symbols: and can be used
according to the desired storage
conditions independently of each other
with lower or higher humidity.
Regulation for each drawer is separate
and is controlled using the slide valve at
the front of the drawer.
• “Dry”: low relative humidity.
This humidity level is reached when
both sliders are set into this position
and the ventilation openings are
wide open.
• “Humid”: high relative humidity.
This humidity level is reached when
both sliders are set in this position
and the ventilation openings are
closed. Humidity is kept and can not
escape.
5.5 DYNAMICAIR
The refrigerator compartment is
equipped with a device that allows rapid
cooling of foods and keeps more uniform
temperature in the compartment.
This device activates automatically when
needed.
www.aeg.com12

The fan operates only when
the door is closed.
5.6 Freezing fresh food
The freezer compartment is suitable for
freezing fresh food and storing frozen
and deep-frozen food for a long time.
To freeze fresh food activate the
Frostmatic function at least 24 hours
before placing the food to be frozen in
the freezer compartment.
Store the fresh food evenly distributed in
the bottom part of the freezer
compartment.
The maximum amount of food that can
be frozen without adding other fresh food
during 24 hours is specified on the rating
plate (a label located inside the
appliance).
When the freezing process is complete,
the appliance automatically returns to the
previous temperature setting (see
"Frostmatic Function").
5.7 Storage of frozen food
When activating an appliance for the first
time or after a period out of use, before
putting the products in the compartment
let the appliance run at least 3 hours with
the Frostmatic function switched on.
Keep the food no closer than 15 mm
from the door.
CAUTION!
In the event of accidental
defrosting, for example due
to a power failure, if the
power has been off for
longer than the value shown
on rating plate under "rising
time", the defrosted food
must be consumed quickly
or cooked immediately then
cooled and then re-frozen.
5.8 Thawing
Deep-frozen or frozen food, prior to
being consumed, can be thawed in the
refrigerator or inside a plastic bag under
cold water.
This operation depends on the time
available and on the type of food. Small
pieces may even be cooked still frozen.
6. HINTS AND TIPS
6.1 Hints for energy saving
• Fridge: Most efficient use of energy is
ensured in the configuration with the
drawers in the bottom part of the
appliance and shelves evenly
distributed. Position of the door bins
does not affect energy consumption.
• Do not open the door frequently or
leave it open longer than necessary.
• Freezer: The colder the temperature
setting, the higher the energy
consumption.
• Fridge: Do not set too high
temperature to save energy unless it
is required by the characteristics of
the food.
• Ensure a good ventilation. Do not
cover the ventilation grilles or holes.
• Make sure that food products inside
the appliance allow air circulation
through dedicated holes in the rear
interior of the appliance.
6.2 Hints for freezing
• Activate Frostmatic function at least
24 hours before placing the food
inside the freezer compartment.
• Before freezing wrap and seal fresh
food in: aluminium foil, plastic film or
bags, airtight containers with lid.
• For more efficient freezing and
thawing divide food into small
portions.
• It is recommended to put labels and
dates on all your frozen food. This will
help to identify foods and to know
when they should be used before their
deterioration.
• The food should be fresh when being
frozen to preserve good quality.
Especially fruits and vegetables
ENGLISH 13

should be frozen after the harvest to
preserve all of their nutrients.
• Do not freeze bottles or cans with
liquids, in particular drinks containing
carbon dioxide - they may explode
during freezing.
• Do not put hot food in the freezer
compartment. Cool it down at room
temperature before placing it inside
the compartment.
• To avoid increase in temperature of
already frozen food, do not place
fresh unfrozen food directly next to it.
Place food at room temperature in the
part of the freezer compartment
where there is no frozen food.
• Do not eat ice cubes, water ices or ice
lollies immediately after taking them
out of the freezer. Risk of frostbites.
• Do not re-freeze defrosted food. If the
food has defrosted, cook it, cool it
down and then freeze it.
6.3 Hints for storage of
frozen food
• Freezer compartment is the one
marked with .
• Good temperature setting that
ensures preservation of frozen food
products is a temperature less than or
equal to -18°C.
Higher temperature setting inside the
appliance may lead to shorter shelf
life.
• The whole freezer compartment is
suitable for storage of frozen food
products.
• Leave enough space around the food
to allow air to circulate freely.
• For adequate storage refer to food
packaging label to see the shelf life of
food.
• It is important to wrap the food in such
a way that prevents water, humidity or
condensation from getting inside.
6.4 Shopping tips
After grocery shopping:
• Ensure that the packaging is not
damaged - the food could be
deteriorated. If the package is swollen
or wet, it might have not been stored
in the optimal conditions and
defrosting may have already started.
• To limit the defrosting process buy
frozen goods at the end of your
grocery shopping and transport them
in a thermal and insulated cool bag.
• Place the frozen foods immediately in
the freezer after coming back from the
shop.
• If food has defrosted even partially, do
not re-freeze it. Consume it as soon
as possible.
• Respect the expiry date and the
storage information on the package.
6.5 Shelf life for freezer compartment
Type of food Shelf life (months)
Bread 3
Fruits (except citrus) 6 - 12
Vegetables 8 - 10
Leftovers without meat 1 - 2
Dairy food:
Butter
Soft cheese (e.g. mozzarella)
Hard cheese (e.g. parmesan, cheddar)
6 - 9
3 - 4
6
Seafood:
www.aeg.com14

Type of food Shelf life (months)
Fatty fish (e.g. salmon, mackerel)
Lean fish (e.g. cod, flounder)
Shrimps
Shucked clams and mussels
Cooked fish
2 - 3
4 - 6
12
3 - 4
1 - 2
Meat:
Poultry
Beef
Pork
Lamb
Sausage
Ham
Leftovers with meat
9 - 12
6 - 12
4 - 6
6 - 9
1 - 2
1 - 2
2 - 3
6.6 Hints for fresh food
refrigeration
• Good temperature setting that
ensures preservation of fresh food is
a temperature less than or equal to
+4°C.
Higher temperature setting inside the
appliance may lead to shorter shelf
life of food.
• Cover the food with packaging to
preserve its freshness and aroma.
• Always use closed containers for
liquids and for food, to avoid flavours
or odours in the compartment.
• To avoid the cross-contamination
between cooked and raw food, cover
the cooked food and separate it from
the raw one.
• It is recommended to defrost the food
inside the fridge.
• Do not insert hot food inside the
appliance. Make sure it has cooled
down at room temperature before
inserting it.
• To prevent food waste the new stock
of food should always be placed
behind the old one.
6.7 Hints for food
refrigeration
• Fresh food compartment is the one
marked (on the rating plate) with .
• Meat (all types): wrap in a suitable
packaging and place it on the glass
shelf above the vegetable drawer.
Store meat for at most 1-2 days.
• Fruit and vegetables: clean thoroughly
(eliminate the soil) and place in a
special drawer (vegetable drawer).
• It is advisable not to keep the exotic
fruits like bananas, mangos, papayas
etc. in the refrigerator.
• Vegetables like tomatoes, potatoes,
onions, and garlic should not be kept
in the refrigerator.
• Butter and cheese: place in an airtight
container or wrap in an aluminium foil
or a polythene bag to exclude as
much air as possible.
• Bottles: close them with a cap and
place them on the door bottle shelf, or
(if available) on the bottle rack.
• Always refer to the expiry date of the
products to know how long to keep
them.
ENGLISH 15

6.8 Hints for fresh food storage in LongFresh compartment
Type of food Air humidity adjustment Storage time
Butter
“dry”
up to 1 month
Beef, venison, small meat
cuts, poultry
“dry”
up to 7 days
Tomato sauce
“dry”
up to 4 days
Fish, shellfish, cooked meat
products
“dry”
up to 3 days
Cooked seafood
“dry”
up to 2 days
Salad, vegetables
Carrots, herbs, brussels
sprouts, celery
“humid”
up to 1 month
Artichokes, cauliflower,
chicory, iceberg lettuce, en‐
dive, lamb’s lettuce, lettuce,
leeks, radicchio
“humid”
up to 21 days
Broccoli, Chinese leaves,
kale, cabbage, radishes,
Savoy cabbage
“humid”
up to 14 days
Peas, kohlrabi
“humid”
up to 10 days
Spring onions, radishes, as‐
paragus, spinach
“humid”
up to 7 days
Fruit
Pears, dates (fresh), straw‐
berries, peaches
“humid”
up to 1 month
Plums
rhubarb, gooseberries
“humid”
up to 21 days
Apples (not sensitive to
cold), quinces
“humid”
up to 20 days
Apricots, cherries
“humid”
up to 14 days
Damsons, grapes
“humid”
up to 10 days
Blackberries, currants
“humid”
up to 8 days
Figs (fresh)
“humid”
up to 7 days
Blueberries, raspberries
“humid”
up to 5 days
www.aeg.com16

Cakes containing cream and other kinds
of pastry products can be stored in the
LongFresh compartment for 2 or 3 days.
Not to be placed in the LongFresh
compartment:
• Cold sensitive fruit which have to be
stored at cellar or room temperature
like pineapple, bananas, grapefruit,
melons, mango, papaya, oranges,
lemons, kiwi fruit.
• Vegetables which have to be stored at
room temperature like tomatoes,
potatoes, onions, and garlic.
• The types of food not mentioned
above should be stored in the
refrigerator compartment (e.g. all
sorts of cheese, cold cuts, etc.).
The level of air humidity in
the drawers depends on the
content of humidity in the
stored food, vegetable and
fruit and on the frequency of
door opening.
The LongFresh compartment is also
suitable for slow thawing of food. In this
case the thawed food can be stored in
the LongFresh compartment for up to
two days.
• Pay attention to the freshness of the
food, especially on the expiry date.
Quality and freshness influence the
storage time.
• The whole storage cycle time will
depend on the preservation conditions
made prior to the final storage in the
fridge.
• Any type of food, fruit, vegetable or
animal food shall always be packed or
wrapped up before storage.
• Food rich in proteins will go bad
quicker. This means seafood will spoil
before fish which in turn will spoil
before meat. While storing food in a
LongFresh compartment storage time
for that kind of food can be increased
by up to three times as well without
loss on quality.
• All food stored in a LongFresh
compartment should be taken out of
the drawers roughly 15 - 30 min
before consumption, particularly fruit
and vegetables to be consumed
without any additional cooking
process. Allowing fruit and vegetables
to return to room temperature will
improve the texture and flavour.
7. CARE AND CLEANING
WARNING!
Refer to Safety chapters.
7.1 Cleaning the interior
Before using the appliance for the first
time, the interior and all internal
accessories should be washed with
lukewarm water and some neutral soap
to remove the typical smell of a brand-
new product, then dried thoroughly.
CAUTION!
Do not use detergents,
abrasive powders, chlorine
or oil-based cleaners as they
will damage the finish.
CAUTION!
The accessories and parts of
the appliance are not
suitable for washing in a
dishwasher.
7.2 Periodic cleaning
The equipment has to be cleaned
regularly:
1. Clean the inside and accessories
with lukewarm water and some
neutral soap.
2. Regularly check the door seals and
wipe them clean to ensure they are
clean and free from debris.
3. Rinse and dry thoroughly.
ENGLISH 17

7.3 Defrosting of the
refrigerator
Defrosting of the fridge compartment is
automatic. The water that condenses
flows into a recipient on the compressor
and evaporates. The recipient cannot be
removed.
7.4 Defrosting of the freezer
CAUTION!
Never use sharp metal tools
to scrape off frost from the
evaporator as you could
damage it.
Do not use a mechanical
device or any artificial
means to speed up the
thawing process other than
those recommended by the
manufacturer.
About 12 hours prior to
defrosting set a lower
temperature in order to build
up sufficient chill reserve in
case of any interruption in
operation.
A certain amount of frost will always form
on the freezer shelves and around the
top compartment.
Defrost the freezer when the frost layer
reaches a thickness of about 3-5 mm.
1. Switch off the appliance or pull out
electrical plug from the wall socket.
2. Remove any stored food and put it in
a cool place.
CAUTION!
A temperature rise of the
frozen food packs during
defrosting may shorten
their safe storage life.
Do not touch frozen
goods with wet hands.
Hands can freeze to the
goods.
3. Leave the door open. Protect the
floor from the defrosting water e.g.
with a cloth or a flat vessel.
4. In order to speed up the defrosting
process, place a pot of warm water in
the freezer compartment. In addition,
remove pieces of ice that break away
before defrosting is complete.
5. When defrosting is complete, dry the
interior thoroughly.
6. Switch on the appliance and close
the door.
7. Set the temperature regulator to
obtain the maximum coldness and
run the appliance for at least 3 hours
using this setting.
Only after this time put the food back into
the freezer compartment.
7.5 Period of non-operation
When the appliance is not in use for long
period, take the following precautions:
1. Disconnect the appliance from
electricity supply.
2. Remove all food.
3. Defrost the appliance.
4. Clean the appliance and all
accessories.
5. Leave the doors open to prevent
unpleasant smells.
8. TROUBLESHOOTING
WARNING!
Refer to Safety chapters.
www.aeg.com18

8.1 What to do if...
Problem Possible cause Solution
The appliance does not op‐
erate.
The appliance is switched
off.
Switch on the appliance.
The mains plug is not con‐
nected to the mains socket
correctly.
Connect the mains plug to
the mains socket correctly.
There is no voltage in the
mains socket.
Connect a different electrical
appliance to the mains sock‐
et. Contact a qualified elec‐
trician.
The appliance is noisy. The appliance is not suppor‐
ted properly.
Check if the appliance
stands stable.
Acoustic or visual alarm is
on.
The cabinet has been re‐
cently switched on.
Refer to "Door Open Alarm"
or "High Temperature
Alarm".
The temperature in the appli‐
ance is too high.
Refer to "Door Open Alarm"
or "High Temperature
Alarm".
The door is left open. Close the door.
The compressor operates
continually.
Temperature is set incorrect‐
ly.
Refer to "Control Panel"
chapter.
Many food products were
put in at the same time.
Wait a few hours and then
check the temperature
again.
The room temperature is too
high.
Refer to "Installation" chap‐
ter.
Food products placed in the
appliance were too warm.
Allow food products to cool
to room temperature before
storing.
The door is not closed cor‐
rectly.
Refer to "Closing the door"
section.
The Frostmatic function is
switched on.
Refer to "Frostmatic func‐
tion" section.
The Coolmatic function is
switched on.
Refer to "Coolmatic function"
section.
The compressor does not
start immediately after
pressing the "Frostmatic" or
"Coolmatic", or after chang‐
ing the temperature.
The compressor starts after
a period of time.
This is normal, no error has
occurred.
ENGLISH 19

Problem Possible cause Solution
Door is misaligned or inter‐
feres with ventilation grill.
The appliance is not level‐
led.
Refer to installation instruc‐
tions.
Door does not open easily. You attempted to re-open
the door immediately after
closing.
Wait a few seconds between
closing and re-opening of
the door.
The lamp does not work. The lamp is in stand-by
mode.
Close and open the door.
The lamp is defective. Contact the nearest Author‐
ized Service Centre.
There is too much frost and
ice.
The door is not closed cor‐
rectly.
Refer to "Closing the door"
section.
The gasket is deformed or
dirty.
Refer to "Closing the door"
section.
Food products are not wrap‐
ped properly.
Wrap the food products bet‐
ter.
Temperature is set incorrect‐
ly.
Refer to "Control Panel"
chapter.
Appliance is fully loaded and
is set to the lowest tempera‐
ture.
Set a higher temperature.
Refer to "Control Panel"
chapter.
Temperature set in the appli‐
ance is too low and the am‐
bient temperature is too
high.
Set a higher temperature.
Refer to "Control Panel"
chapter.
Water flows on the rear plate
of the refrigerator.
During the automatic de‐
frosting process, frost melts
on the rear plate.
This is correct.
There is too much con‐
densed water on the rear
wall of the refrigerator.
Door was opened too fre‐
quently.
Open the door only when
necessary.
Door was not closed com‐
pletely.
Make sure the door is closed
completely.
Stored food was not wrap‐
ped.
Wrap food in suitable pack‐
aging before storing it in the
appliance.
Water flows on the floor. The melting water outlet is
not connected to the evapo‐
rative tray above the com‐
pressor.
Attach the melting water out‐
let to the evaporative tray.
www.aeg.com20

Problem Possible cause Solution
Temperature cannot be set. The "Frostmatic function" or
"Coolmatic function" is
switched on.
Switch off "Frostmatic func‐
tion" or "Coolmatic function"
manually, or wait until the
function deactivates auto‐
matically to set the tempera‐
ture. Refer to "Frostmatic
function" or "Coolmatic func‐
tion" section.
The temperature in the appli‐
ance is too low/too high.
The temperature is not set
correctly.
Set a higher/lower tempera‐
ture.
The door is not closed cor‐
rectly.
Refer to "Closing the door"
section.
The food products' tempera‐
ture is too high.
Let the food products tem‐
perature decrease to room
temperature before storage.
Many food products are stor‐
ed at the same time.
Store less food products at
the same time.
The thickness of the frost is
greater than 4-5 mm.
Defrost the appliance.
The door has been opened
often.
Open the door only if neces‐
sary.
The Frostmatic function is
switched on.
Refer to "Frostmatic func‐
tion" section.
The Coolmatic function is
switched on.
Refer to "Coolmatic function"
section.
Some specific surfaces in‐
side the fridge compartment
are warmer at some times.
This is a normal state.
DEMO appears on the dis‐
play.
The appliance is in demon‐
stration mode.
Keep the OK key pressed for
approximately 10 seconds
until a long sound is heard
and the display turns off for
a short time.
A or or symbol is
shown instead of numbers
on the temperature display.
Temperature sensor prob‐
lem.
Contact the nearest Author‐
ized Service Centre (the
cooling system will continue
to keep food products cold,
but temperature adjustment
will not be possible).
ENGLISH 21

If the advice does not lead to
the desired result, call the
nearest Authorized Service
Centre.
8.2 Replacing the lamp
The appliance is equipped with a longlife
LED interior light.
Only service is allowed to replace the
lighting device. Contact your Authorised
Service Centre.
8.3 Closing the door
1. Clean the door gaskets.
2. If necessary, adjust the door. Refer
to installation instructions.
3. If necessary, replace the defective
door gaskets. Contact the Authorised
Service Centre.
9. NOISES
SSSRRR!
CLICK!
HISSS!
BRRR!
BLUBB!
10. TECHNICAL DATA
The technical information is situated in
the rating plate on the internal side of the
appliance and on the energy label.
The QR code on the energy label
supplied with the appliance
provides a web link to the information
related to the performance of the
appliance in the EU EPREL database.
Keep the energy label for reference
together with the user manual and all
other documents provided with this
appliance.
It is also possible to find the same
information in EPREL using the link
https://eprel.ec.europa.eu
and the model
name and product number that you find
on the rating plate of the appliance.
www.aeg.com22

See the link
www.theenergylabel.eu
for
detailed information about the energy
label.
11. INFORMATION FOR TEST INSTITUTES
Installation and preparation of the
appliance for any EcoDesign verification
shall be compliant with EN 62552.
Ventilation requirements, recess
dimensions and minimum rear
clearances shall be as stated in this User
Manual at Chapter 3. Please contact the
manufacturer for any other further
information, including loading plans.
12. ENVIRONMENTAL CONCERNS
Recycle materials with the symbol .
Put the packaging in relevant containers
to recycle it. Help protect the
environment and human health by
recycling waste of electrical and
electronic appliances. Do not dispose of
appliances marked with the symbol
with the household waste. Return the
product to your local recycling facility or
contact your municipal office.
ENGLISH 23

CONTENIDO
1. INFORMACIÓN SOBRE SEGURIDAD...............................................................24
2. INSTRUCCIONES DE SEGURIDAD..................................................................27
3. INSTALACIÓN.................................................................................................... 29
4. PANEL DE MANDOS..........................................................................................32
5. USO DIARIO.......................................................................................................34
6. CONSEJOS........................................................................................................ 37
7. MANTENIMIENTO Y LIMPIEZA......................................................................... 41
8. SOLUCIÓN DE PROBLEMAS............................................................................43
9. RUIDOS.............................................................................................................. 47
10. DATOS TÉCNICOS.......................................................................................... 47
11. INFORMACIÓN PARA LOS INSTITUTOS DE PRUEBAS...............................47
PARA UNOS RESULTADOS PERFECTOS
Gracias por elegir este producto AEG. Lo hemos creado para brindarle un
rendimiento impecable durante muchos años, con tecnologías innovadoras que
lo ayudan a simplificar la vida, características que quizás no encuentre en los
electrodomésticos comunes. Dedique unos minutos a leer este documento para
sacarle el máximo partido.
Visite nuestro sitio web para:
Obtener consejos, folletos, soluciones a problemas e información de servicio y
reparación:
www.aeg.com/support
Registrar su producto para recibir un mejor servicio:
www.registeraeg.com
Comprar accesorios, artículos de consumo y piezas de recambio originales
para su aparato:
www.aeg.com/shop
ATENCIÓN AL CLIENTE Y SERVICIO
Le recomendamos que utilice recambios originales.
Cuando se ponga en contacto con nuestro Centro de servicio técnico, asegúrese
de tener los siguientes datos disponibles: Modelo, código numérico del producto
(PNC), número de serie.
La información se encuentra en la placa de características.
Advertencia / Precaución - Información sobre seguridad
Información general y consejos
Información relativa al medioambiente
Salvo modificaciones.
1. INFORMACIÓN SOBRE SEGURIDAD
Antes de instalar y utilizar el aparato, lea atentamente
las instrucciones facilitadas. El fabricante no se hace
www.aeg.com24

responsable de lesiones o daños producidos como
resultado de una instalación o un uso incorrectos.
Conserve siempre estas instrucciones en lugar seguro y
accesible para futuras consultas.
1.1 Seguridad de niños y personas vulnerables
• Este aparato puede ser utilizado por niños de 8 años
en adelante y personas cuyas capacidades físicas,
sensoriales o mentales estén disminuidas o que
carezcan de la experiencia y conocimientos
suficientes para manejarlo, siempre que cuenten con
las instrucciones o la supervisión sobre el uso del
electrodoméstico de forma segura y comprendan los
riesgos.
• Los niños de 3 a 8 años pueden cargar y descargar el
aparato siempre que hayan sido debidamente
instruidos.
• Este aparato puede ser utilizado por personas con
discapacidades muy extensas y complejas, siempre
que hayan sido instruidas adecuadamente.
• Es necesario mantener alejados del aparato a los
niños de menos de 3 años salvo que estén bajo
supervisión continua.
• No deje que los niños jueguen con el aparato.
• La limpieza y mantenimiento de usuario del aparato
no podrán ser realizados por niños sin supervisión.
• Mantenga todo el material de embalaje fuera del
alcance de los niños y deséchelo de forma adecuada.
1.2 Seguridad general
• Este aparato está concebido para utilizarse en
aplicaciones domésticas y similares, tales como:
– Granjas; áreas de cocina para el personal en
tiendas, oficinas y otros entornos de trabajo;
– Por clientes en hoteles, moteles, pensiones y otros
entornos de tipo residencial.
• Para evitar la contaminación alimentaria, respete las
siguientes instrucciones:
ESPAÑOL 25

– no abra la puerta durante largos periodos de
tiempo;
– limpie regularmente las superficies que pueden
entrar en contacto con los alimentos y los sistemas
de drenaje accesibles;
– guarde la carne y el pescado crudos en recipientes
adecuados en el frigorífico, de manera que no
estén en contacto con otros alimentos ni goteen
sobre ellos.
• ADVERTENCIA: Mantenga libres de obstrucciones las
aberturas de ventilación del alojamiento del aparato o
de la estructura empotrada.
• ADVERTENCIA: No utilice dispositivos mecánicos ni
medios artificiales para acelerar el proceso de
descongelación, excepto los recomendados por el
fabricante.
• ADVERTENCIA: No dañe el circuito del refrigerante.
• ADVERTENCIA: No utilice dispositivos eléctricos
dentro de los compartimientos para alimentos del
aparato, salvo si son del tipo recomendado por el
fabricante.
• No utilice pulverizadores ni vapor de agua para limpiar
el aparato.
• Limpie el aparato con un paño suave humedecido.
Utilice solo detergentes neutros. No utilice productos
abrasivos, estropajos duros, disolventes ni objetos
metálicos.
• Cuando el aparato esté vacío durante un largo
período, apáguelo, descongélelo, límpielo, séquelo y
deje la puerta abierta para evitar que se desarrolle
moho en el interior del aparato.
• No almacene sustancias explosivas tales como latas
de aerosol con un propulsor inflamable en este
aparato.
• Si el cable eléctrico sufre algún daño, el fabricante, su
servicio técnico autorizado o un profesional cualificado
tendrán que cambiarlo para evitar riesgos.
www.aeg.com26

2. INSTRUCCIONES DE SEGURIDAD
2.1 Instalación
ADVERTENCIA!
Sólo un técnico cualificado
puede instalar el aparato.
• Retire todo el embalaje.
• No instale ni utilice un aparato
dañado.
• No utilice el aparato antes de
instalarlo en la estructura empotrada
por motivos de seguridad.
• Siga las instrucciones de instalación
suministradas con el aparato.
• Tenga cuidado al mover el aparato,
porque es pesado. Utilice siempre
guantes de protección y calzado
cerrado.
• Asegúrese de que el aire pueda
circular alrededor del aparato.
• En la primera instalación otras invertir
el sentido de apertura de la puerta,
espere al menos 4 horas antes de
conectar el aparato a la alimentación
eléctrica. Esto es para permitir que el
aceite regrese al compresor.
• Desenchufe siempre el aparato antes
de llevar a cabo cualquier operación,
por ejemplo cambiar el sentido de
apertura de la puerta.
• No instale el aparato cerca de
radiadores, cocinas, hornos o placas
de cocción.
• No exponga el aparato a la lluvia.
• No instale el aparato donde reciba luz
solar directa.
• No instale este aparato en áreas
excesivamente húmedas o frías.
• Al mover el aparato, levántelo por el
borde frontal para no arañar el suelo.
• El aparato contiene una bolsa de
desecante. No se trata de un juguete.
No es un alimento. No olvide
desecharlo inmediatamente.
2.2 Conexión eléctrica
ADVERTENCIA!
Riesgo de incendios y
descargas eléctricas.
ADVERTENCIA!
Al colocar el producto,
asegúrese de que el cable
de alimentación no queda
atrapado o doblado.
ADVERTENCIA!
No utilice adaptadores de
enchufes múltiples ni cables
prolongadores.
• El aparato debe conectarse a tierra.
• Asegúrese de que los parámetros de
la placa de características son
compatibles con los valores eléctricos
del suministro eléctrico.
• Utilice siempre una toma con
aislamiento de conexión a tierra
correctamente instalada.
• Asegúrese de no provocar daños en
los componentes eléctricos (como
enchufe, cable de alimentación,
compresor). Póngase en contacto con
un electricista o con el servicio
técnico autorizado para cambiar los
componentes eléctricos.
• El cable de alimentación debe estar
por debajo del nivel del enchufe de
alimentación.
• Conecte el enchufe a la toma de
corriente únicamente cuando haya
terminado la instalación. Asegúrese
de tener acceso al enchufe del
suministro de red una vez finalizada
la instalación.
• No desconecte el aparato tirando del
cable de conexión a la red. Tire
siempre del enchufe.
2.3 Uso del aparato
ADVERTENCIA!
Existe riesgo de lesiones,
quemaduras, descargas
eléctricas o incendios.
El aparato contiene un gas
inflamable, isobutano (R600a), un gas
natural con alto grado de compatibilidad
medioambiental. Tenga cuidado para no
dañar el circuito de refrigerante que
contiene isobutano.
ESPAÑOL 27

• No cambie las especificaciones de
este aparato.
• No utilice otros aparatos eléctricos
(como máquinas de hacer helados)
dentro de aparatos de refrigeración,
salvo que el fabricante haya
autorizado su utilización.
• Si se daña el circuito del refrigerante,
evite las llamas y fuentes de ignición
en la habitación. Ventile la habitación.
• No toque con elementos calientes las
piezas de plástico del aparato.
• No coloque bebidas con gas en el
congelador. Se creará presión en el
contenedor de la bebida.
• No almacene gas ni líquido inflamable
en el aparato.
• No coloque productos inflamables ni
objetos mojados con productos
inflamables dentro, cerca o encima
del aparato.
• No toque el compresor ni el
condensador. Están calientes.
• No retire ni toque elementos del
compartimento congelador con las
manos húmedas o mojadas.
• No vuelva a congelar alimentos que
se hayan descongelado.
• Siga las instrucciones del envase de
los alimentos congelados.
• Envuelva los alimentos en cualquier
material adecuado antes de ponerlos
en el congelador.
2.4 Luces interiores
ADVERTENCIA!
Riesgo de descarga
eléctrica.
• En cuanto a la(s) bombilla(s) de este
producto y las de repuesto vendidas
por separado: Estas bombillas están
destinadas a soportar condiciones
físicas extremas en los aparatos
domésticos, como la temperatura, la
vibración, la humedad, o están
destinadas a señalar información
sobre el estado de funcionamiento del
aparato. No están destinadas a
utilizarse en otras aplicaciones y no
son adecuadas para la iluminación de
estancias domésticas.
2.5 Mantenimiento y limpieza
ADVERTENCIA!
Podría sufrir lesiones o
dañar el aparato.
• Antes de proceder con el
mantenimiento, apague el aparato y
desconecte el enchufe de la red.
• Este equipo contiene hidrocarburos
en la unidad de refrigeración. Solo
una persona cualificada debe realizar
el mantenimiento y la recarga de la
unidad.
• Examine periódicamente el desagüe
del aparato y límpielo si fuera
necesario. Si el desagüe se bloquea,
el agua descongelada se acumulará
en la base del aparato.
2.6 Asistencia
• Para reparar el aparato, póngase en
contacto con el centro de servicio
autorizado. Utilice solamente piezas
de recambio originales.
• Tenga en cuenta que la
autorreparación o la reparación no
profesional puede tener
consecuencias de seguridad y podría
anular la garantía.
• Las siguientes piezas de repuesto
estarán disponibles durante 7 años
después de que el modelo se haya
retirado: termostatos, sensores de
temperatura, placas de circuitos
impresos, fuentes de luz, manijas de
puertas, bisagras de puertas,
bandejas y cestas. Tenga en cuenta
que algunas de estas piezas de
recambio solo están disponibles para
los reparadores profesionales, y que
no todas las piezas de recambio son
relevantes para todos los modelos.
• Las juntas de las puertas estarán
disponibles durante 10 años después
de que el modelo se haya retirado.
2.7 Desecho
ADVERTENCIA!
Existe riesgo de lesiones o
asfixia.
• Desconecte el aparato de la red.
• Corte el cable de conexión a la red y
deséchelo.
www.aeg.com28

• Retire la puerta para evitar que los
niños y las mascotas queden
encerrados en el aparato.
• El circuito del refrigerante y los
materiales aislantes de este aparato
no dañan la capa de ozono.
• La espuma aislante contiene gas
inflamable. Póngase en contacto con
las autoridades locales para saber
cómo desechar correctamente el
aparato.
• No dañe la parte de la unidad de
refrigeración que está cerca del
intercambiador de calor.
3. INSTALACIÓN
ADVERTENCIA!
Consulte los capítulos sobre
seguridad.
ADVERTENCIA!
Consulte el documento de
instrucciones de instalación
para instalar su aparato.
ADVERTENCIA!
Fije el aparato de acuerdo
con las instrucciones de
instalación para evitar el
riesgo de inestabilidad.
ESPAÑOL 29

3.1 Dimensiones
B
A
H1
W1
D1
W2
D2
W3
D3
Dimensiones generales ¹
H1 mm 1769
W1 mm 556
D1 mm 549
¹ la altura, anchura y profundidad del
aparato sin el mango y las patas
Espacio necesario en uso ²
H2 (A+B) mm 1816
W2 mm 560
Espacio necesario en uso ²
D2 mm 552
A mm 1780
B mm 36
² la altura, anchura y profundidad del
aparato, incluyendo la manija, más el
espacio necesario para la libre
circulación del aire de refrigeración
Espacio total necesario en uso ³
H3 (A+B) mm 1816
www.aeg.com30

Espacio total necesario en uso ³
W3 mm 780
D3 mm 1085
³ la altura, anchura y profundidad del
aparato, incluido el mango, más el
espacio necesario para la libre
circulación del aire de refrigeración, más
el espacio necesario para permitir la
apertura de la puerta hasta el ángulo
mínimo que permita la extracción de
todo el equipo interno
3.2 Ubicación
Para garantizar el mejor funcionamiento
del aparato, no debe instalarlo en las
proximidades de la fuente de calor
(horno, estufas, radiadores, cocinas o
fogones) ni en un lugar con luz solar
directa. Asegúrese de que el aire pueda
circular libremente alrededor de la parte
posterior del gabinete.
Este aparato debe instalarse en una
ubicación interior seca y bien ventilada.
Este aparato está destinado a ser
utilizado a una temperatura ambiente
que oscila entre 10°C y 38°C.
Solo se puede garantizar el
correcto funcionamiento del
aparato dentro del rango de
temperatura especificado.
Si tiene cualquier duda
respecto al lugar de
instalación del aparato,
consulte al vendedor, a
nuestro servicio de atención
al cliente o al servicio
técnico autorizado más
cercano.
Puede que en algún
momento sea necesario
desenchufar el aparato de la
toma de corriente. por lo que
el enchufe debe quedar
accesible tras la instalación
del aparato.
3.3 Conexión eléctrica
• Antes de conectar el aparato,
compruebe que el voltaje y la
frecuencia indicados en la placa de
datos técnicos se corresponden con
el suministro de la vivienda.
• El aparato debe conectarse a tierra.
El enchufe del cable de alimentación
se suministra con un contacto para tal
fin. Si la toma de red de la vivienda
carece de conexión a tierra, conecte
el aparato a una toma de tierra
conforme con la normativa, después
de consultar a un electricista
profesional
• El fabricante declina toda
responsabilidad si no se toman las
precauciones antes indicadas.
• Este aparato cumple las directivas
CEE.
3.4 Requisitos de ventilación
El flujo de aire detrás del aparato debe
ser suficiente.
5 cm
min.
200 cm
2
min.
200 cm
2
PRECAUCIÓN!
Consulte las instrucciones
para realizar la instalación.
3.5 Cambio del sentido de
apertura de la puerta
Consulte el documento separado con
instrucciones de instalación y de
inversión de la puerta.
ESPAÑOL 31

PRECAUCIÓN!
En todas las fases del
cambio de sentido de la
puerta, proteja la puerta de
arañazos con un material
resistente.
4. PANEL DE MANDOS
56 4 3 2
1
1
Pantalla
2
Botón de calentamiento de
temperatura
3
Botón de enfriamiento de
temperatura
4
OK
5
Mode
6
ON/OFF
Se puede cambiar el sonido predefinido
de los botones manteniendo pulsadas al
mismo tiempo unos segundos la tecla
Mode y la de menor temperatura. El
cambio es reversible.
4.1 Pantalla
min
A B C D E
FGH
A. Indicador de temporizador
B. Coolmatic función
C. Función LongFresh
D. Función Frostmatic
E. Indicador de temperatura
F. Indicador de alarma
G. Función ChildLock
H. Función DrinksChill
4.2 Encendido
1. Conecte el enchufe a la toma de
corriente.
2. Pulse ON/OFF del aparato si la
pantalla está apagada. Los
indicadores de temperatura muestran
la temperatura predeterminada
programada.
Para programar otra temperatura,
consulte la sección "Regulación de la
temperatura".
Si "dEMo" aparece en la pantalla,
consulte "Solución de problemas".
4.3 Apagado
1. Pulse ON/OFF en el aparato durante
3 segundos.
La pantalla se apaga.
2. Desenchufe el aparato de la toma de
corriente.
www.aeg.com32

4.4 Regulación de
temperatura
Ajuste la temperatura del aparato
pulsando los reguladores de
temperatura.
La temperatura recomendada es:
• +4 °C para el frigorífico
• -18 °C para el congelador
El rango de temperatura puede variar
entre -15 °C y -24 °C para el congelador
y entre 2 °C y 8 °C para el frigorífico.
Los indicadores de temperatura
muestran la temperatura programada.
La temperatura programada
se alcanza en un plazo de
24 horas.
Después de un corte del
suministro eléctrico, la
temperatura ajustada
permanece almacenada.
4.5 Función Coolmatic
Si necesita introducir en el frigorífico una
gran cantidad de alimentos calientes, por
ejemplo después de hacer la compra, se
aconseja activar la función Coolmatic
para enfriarlos más rápidamente y evitar
que suba la temperatura de los que ya
están almacenados en el frigorífico.
1. Pulse Mode hasta que aparezca el
icono correspondiente.
El indicador Coolmatic parpadea.
2. Pulse OK para confirmar.
Aparece el indicador Coolmatic.
Esta función se detiene
automáticamente después de unas 6
horas.
Puede desactivar la función Coolmatic
antes de su finalización automática
repitiendo el procedimiento o
seleccionando una temperatura de
ajuste diferente en el frigorífico.
4.6 Ajuste del compartimento
LongFresh
La temperatura de almacenamiento y la
humedad relativa en el compartimento
LongFresh proporcionan unas
condiciones óptimas para el
almacenamiento de diversos tipos de
alimentos frescos (como pescado, carne,
marisco, etc.) ya que conserva sus altos
valores nutricionales, así como un alto
nivel de humedad durante mucho más
tiempo que un frigorífico normal.
1. Pulse Mode hasta que aparezca el
icono correspondiente.
En la pantalla aparece 3. Se trata del
ajuste predeterminado que garantiza los
mejores resultados.
Los ajustes posibles pueden variar entre
1 (el más frío) y 5 (el más cálido).
Los ajustes del 1 al 3 son adecuados
para el pescado y la carne.
Los ajustes 4 y 5 son adecuados para
las verduras y las frutas. En estos
ajustes el compartimento funciona de
forma similar al compartimento del
frigorífico.
2. Pulse los botones de temperatura del
panel de control para seleccionar el
ajuste necesario.
3. Pulse OK para confirmar el ajuste.
El indicador vuelve al ajuste de
temperatura del frigorífico en unos
segundos.
4.7 Función Frostmatic
Frostmatic se utiliza para realizar la
precongelación y la congelación rápida
en secuencia en el compartimiento del
congelador. Esta función acelera la
congelación de alimentos frescos e
impide que se calienten los alimentos ya
almacenados.
Para congelar alimentos
frescos, active la función
Frostmatic al menos 24
horas antes de introducir los
alimentos para completar la
precongelación.
1. Para activar la función, pulse el
botón Mode hasta que aparezca el
icono correspondiente.
El indicador Frostmatic parpadea.
2. Pulse el botón OK para confirmar.
Aparece el indicador Frostmatic.
La función se para automáticamente
después de 28 horas.
Puede desactivar la función Frostmatic
antes de su finalización automática
repitiendo el procedimiento hasta que se
apaga el indicador Frostmatic o
ESPAÑOL 33

seleccionando una temperatura de
ajuste diferente.
4.8 Función ChildLock
Active la función ChildLock para
bloquear los botones frente a
pulsaciones accidentales.
1. Pulse Mode hasta que aparezca el
icono correspondiente.
El indicador ChildLock parpadea.
2. Pulse OK para confirmar.
Aparece el indicador ChildLock.
Para activar la función ChildLock, repita
el procedimiento hasta que el indicador
ChildLock se apague.
4.9 Función DrinksChill
La función DrinksChill debe utilizarse
para ajustar una alarma acústica a la
hora deseada, algo útil por ejemplo para
recetas en las que deben enfriarse los
alimentos durante un tiempo
determinado.
También resulta útil cuando se necesita
un recordatorio para no olvidar que se
han colocado botellas o latas en el
congelador para que se enfríen
rápidamente.
1. Pulse Mode hasta que aparezca el
icono correspondiente.
El indicador DrinksChill parpadea.
El temporizador muestra el tiempo
programado (30 minutos) durante unos
segundos.
2. Pulse el regulador del temporizador
para programar un valor entre 1 y 90
minutos.
3. Pulse OK para confirmar.
Aparece el indicador DrinksChill.
El temporizador empieza a parpadear
(min).
Al terminar la cuenta atrás, parpadea el
indicador "0 min" y suena la alarma.
Pulse OK para apagar el sonido y
desactivar la función.
Para apagar la función, repita el
procedimiento hasta que DrinksChill se
apague.
El tiempo puede modificarse
en cualquier momento
durante la cuenta atrás y al
finalizar, pulsando los
botones de enfriamiento o
calentamiento de
temperatura.
4.10 Alarma de puerta abierta
Si la puerta del frigorífico se deja abierta
durante aproximadamente 5 minutos, el
sonido se activa y el indicador de alarma
parpadea.
La alarma se detiene después de cerrar
la puerta. Durante la alarma, el sonido se
puede desactivar pulsando cualquier
botón.
Si no se pulsa ningún botón,
el sonido se apaga
automáticamente después
de aproximadamente una
hora para evitar molestias.
5. USO DIARIO
5.1 Colocación de los
estantes de la puerta
Para permitir el almacenamiento de
paquetes de alimentos de varios
tamaños, los estantes de las puertas se
pueden colocar a diferentes alturas.
1. Tire gradualmente del estante hacia
arriba hasta que se suelte.
2. Reposición según sea necesario.
www.aeg.com34

Este modelo cuenta con una caja de
almacenamiento variable que se puede
desplazar lateralmente.
5.2 Estantes móviles
Las paredes del frigorífico cuentan con
una serie de guías para colocar los
estantes del modo que se prefiera.
Este aparato también está equipado con
un estante que consta de dos partes. La
mitad delantera del estante puede
colocarse bajo la segunda mitad para
aprovechar mejor el espacio.
Para plegar el estante:
1. Saque la mitad delantera con
cuidado.
2. Deslícela en la guía inferior bajo la
segunda mitad.
1
2
No coloque el estante de
vidrio por encima del cajón
de verduras para no impedir
la correcta circulación del
aire.
5.3 compartimento
LongFresh
La temperatura de almacenamiento y la
humedad relativa en este compartimento
ofrecen las condiciones óptimas para
almacenar distintas clases de alimentos.
Para informarse sobre los ajustes de
temperatura del compartimento
LongFresh, consulte la sección “Ajuste
del compartimento LongFresh”.
El compartimento LongFresh es
apropiado para el almacenamiento de
distintos alimentos frescos (como
pescado, carne, marisco, etc.), ya que
conserva su alto valor nutricional y su
elevado nivel de humedad durante
mucho más tiempo que un frigorífico
normal.
5.4 Control de humedad
El compartimento LongFresh dispone de
topes para evitar que los cajones se
caigan cuando se extienden totalmente.
Para retirar el cajón:
1. Tire del cajón hasta el tope.
2. Levante y extraiga el cajón.
Los cajones marcados con símbolos de
gotas de agua: y pueden
usarse de acuerdo con las condiciones
de almacenamiento deseadas, siendo un
cajón independiente del otro, con mayor
o menor humedad.
La regulación de cada cajón es
independiente y se controla con la
válvula deslizante de la parte frontal.
• “Seco”: baja humedad relativa.
ESPAÑOL 35

Este nivel de humedad se obtiene
deslizando ambos pestillos a la
posición y las aberturas de
ventilación totalmente abiertas.
• “Húmedo”: alta humedad relativa.
Este nivel de humedad se obtiene
deslizando ambos pestillos a la
posición y las aberturas de
ventilación cerradas. La humedad se
mantiene y no puede salir.
5.5 DYNAMICAIR
El compartimento frigorífico cuenta con
un dispositivo que permite enfriar los
alimentos con rapidez y mantiene una
temperatura más uniforme dentro del
compartimento.
Este dispositivo se activa
automáticamente cuando es necesario.
El ventilador solo funciona
con la puerta cerrada.
5.6 Congelación de alimentos
frescos
El compartimento del congelador es
adecuado para congelar alimentos
frescos y conservar a largo plazo los
alimentos congelados y ultracongelados.
Para congelar alimentos frescos, active
la Frostmatic función al menos 24 horas
antes de introducir los alimentos en el
compartimento congelador.
Guarde los alimentos frescos distribuidos
uniformemente en la parte inferior del
compartimento congelador.
La cantidad máxima de alimentos que
pueden congelarse sin añadir otros
alimentos frescos durante 24 horas, se
indica en la placa de datos técnicos (una
etiqueta situada en el interior del
aparato).
Cuando haya finalizado el proceso de
congelación, el aparato vuelve
automáticamente al ajuste de
temperatura anterior (consulte
"Frostmatic Función").
5.7 Almacenamiento de
alimentos congelados
Al activar un aparato por primera vez o
después de un periodo sin uso, déjelo en
marcha al menos durante 3 horas antes
de colocar productos en el
compartimento con la función Frostmatic
encendida.
Todos los alimentos deben estar como
mínimo a 15 mm de la puerta.
PRECAUCIÓN!
En caso de que se produzca
una descongelación
accidental, por ejemplo, por
un corte del suministro
eléctrico, si la interrupción
ha sido más prolongada que
el valor indicado en la placa
de características bajo el
"tiempo de elevación", los
alimentos descongelados se
deben consumir
rápidamente o cocinar de
inmediato y luego volverse a
congelar.
5.8 Descongelación
Los alimentos ultracongelados o
congelados, antes de consumirlos,
pueden descongelarse en el frigorífico o
dentro de una bolsa de plástico bajo
agua fría.
Esta operación depende del tiempo
disponible y del tipo de alimento. Los
trozos pequeños pueden incluso
cocinarse aún congelados.
www.aeg.com36

6. CONSEJOS
6.1 Consejos para ahorrar
energía
• Frigorífico: Se garantiza el consumo
más eficiente de energía en la
configuración con los cajones en la
parte inferior del aparato y los
estantes distribuidos uniformemente.
La posición de los contenedores de la
puerta no afecta al consumo de
energía.
• No abra la puerta con frecuencia ni la
deje abierta más tiempo del
necesario.
• Congelador: Cuanto más frío sea el
ajuste de la temperatura, mayor será
el consumo de energía.
• Frigorífico: No fije una temperatura
demasiado alta para ahorrar energía,
a menos que lo requieran las
características del alimento.
• Asegure una buena ventilación. No
cubra las rejillas o los orificios de
ventilación.
• Asegúrese de que los productos
alimenticios dentro del aparato
permitan la circulación de aire a
través de los orificios dedicados al
efecto en el interior trasero del
aparato.
6.2 Consejos sobre la
congelación
• Active la función Frostmatic al menos
24 horas antes de colocar los
alimentos en dentro del congelador.
• Antes de congelar, envuelva y selle
los alimentos frescos en: papel de
aluminio, film o bolsas de plástico,
envases herméticos con tapa.
• Para congelar y descongelar con más
eficacia, divida la comida en
porciones pequeñas.
• Se recomienda poner etiquetas y
fechas en todos sus alimentos
congelados. Esto ayudará a identificar
los alimentos y a saber cuándo deben
utilizarse antes de su deterioro.
• Los alimentos deben ser frescos al
congelarlos para preservar la buena
calidad. Especialmente las frutas y
verduras deben ser congeladas
después de cosecharlos para
preservar todos sus nutrientes.
• No congele las botellas o latas con
líquidos, en particular las bebidas que
contienen dióxido de carbono, ya que
pueden explotar durante la
congelación.
• No coloque alimentos calientes en el
compartimiento del congelador.
Enfríelos a temperatura ambiente
antes de colocarlos dentro del
compartimento.
• Para evitar aumentos en la
temperatura de comida ya congelada,
no coloque comida no congelada
justo al lado. Coloque los alimentos a
temperatura ambiente en la parte del
compartimento del congelador donde
no hay alimentos congelados.
• No coma cubitos de hielo, sorbetes o
helados inmediatamente después de
sacarlos del congelador. Existe riesgo
de quemaduras.
• No vuelva a congelar los alimentos
descongelados. Si la comida se ha
descongelado, cocínela, enfríela y
luego congélela.
6.3 Consejos para el
almacenamiento de
alimentos congelados
• El compartimento congelador es el
marcado con .
• Un buen ajuste de la temperatura que
garantice la conservación de los
alimentos congelados es una
temperatura inferior o igual a -18 °C.
Una temperatura más alta en el
interior del aparato puede reducir la
vida útil.
• Todo el compartimento congelador es
adecuado para el almacenamiento de
alimentos congelados.
• Deje suficiente espacio alrededor de
los alimentos para permitir que el aire
circule libremente.
• Para un almacenamiento adecuado,
consulte la etiqueta de los envases de
los alimentos para ver su vida útil.
• Es importante envolver los alimentos
de tal manera que se evite que el
ESPAÑOL 37

agua, la humedad o la condensación
entren en su interior.
6.4 Consejos de compra
Después de la compra:
• Asegúrese de que el envase no esté
dañado - los alimentos podrían estar
deteriorados. Si el paquete está
hinchado o mojado, es posible que no
se haya almacenado en condiciones
óptimas y que la descongelación ya
haya comenzado.
• Para limitar el proceso de
descongelación, compre los
productos congelados al final de su
compra en el supermercado y
transpórtelos en una bolsa térmica y
aislada.
• Ponga los alimentos congelados
inmediatamente en el congelador
después de volver de la tienda.
• Si la comida se ha descongelado
aunque sea parcialmente, no la
vuelva a congelar. Se debe consumir
lo antes posible.
• Respete la fecha de caducidad y la
información de almacenamiento del
paquete.
6.5 Vida útil en el congelador
Tipo de alimento Vida útil (meses)
Pan 3
Frutas (excepto cítricos) 6 - 12
Verduras 8 - 10
Sobras sin carne 1 - 2
Lácteos:
Mantequilla
Queso blando (p. ej. mozzarella)
Queso duro (p. ej. parmesano, cheddar)
6 - 9
3 - 4
6
Marisco:
Pescado graso (p. ej. salmón, caballa)
Pescado magro (p. ej. bacalao, platija)
Langostinos
Almejas y mejillones desconchados
Pescado cocinado
2 - 3
4 - 6
12
3 - 4
1 - 2
Carne:
Aves
Vacuno
Cerdo
Cordero
Salchichas
Jamón
Sobras con carne
9 - 12
6 - 12
4 - 6
6 - 9
1 - 2
1 - 2
2 - 3
www.aeg.com38

6.6 Consejos para la
refrigeración de alimentos
frescos
• Un buen ajuste de temperatura que
asegure la conservación de los
alimentos frescos es una temperatura
menor o igual a +4°C.
Una temperatura más alta en el
interior del aparato puede reducir la
vida útil de los alimentos.
• Cubra el alimento con el envase para
preservar su frescura y aroma.
• Utilice siempre recipientes cerrados
para líquidos y para alimentos, para
evitar sabores u olores en el
compartimento.
• Para evitar la contaminación cruzada
entre alimentos cocidos y crudos,
cubra la comida cocinada y sepárela
de la cruda.
• Se recomienda descongelar los
alimentos dentro de la nevera.
• No coloque alimentos calientes dentro
del aparato. Asegúrese de que se
haya enfriado a temperatura ambiente
antes de introducirla.
• Para evitar el desperdicio de
alimentos, los alimentos más
recientes deben colocarse siempre
detrás de los viejos.
6.7 Consejos para la
refrigeración de alimentos
• El compartimento de alimentos
frescos es el marcado (en la placa de
características) con .
• Carne (cualquier variedad): guárdela
en un envoltorio adecuado y
colóquela en el estante de vidrio,
sobre el cajón de las verduras.
Almacene la carne durante un
máximo de 1-2 días.
• Frutas y verduras: límpielas a fondo
(elimine la suciedad) y colóquelas en
un cajón especial (cajón para
verduras).
• Es aconsejable no guardar en el
frigorífico las frutas exóticas como
plátanos, mangos, papayas, etc.
• Las verduras como tomates, patatas,
cebollas y ajos no deben guardarse
en el frigorífico.
• Queso y mantequilla: colóquelo en un
recipiente hermético, o envuélvalo en
papel de aluminio o en bolsas de
polietileno para eliminar todo el aire
posible.
• Botellas: ciérrelas con un tapón y
colóquelas en el estante para botellas
de la puerta o en el botellero (si
dispone de él).
• Consulte siempre la fecha de
caducidad de los productos para
saber cuánto tiempo debe
conservarlos.
6.8 Consejos para la conservación de alimentos frescos en el
compartimento LongFresh
Tipo de alimento Ajuste de la humedad del
aire
Tiempo de almacenamiento
Mantequilla
“seco”
hasta 1 mes
Vacuno, corzo/ciervo, cor‐
tes de carne pequeños,
aves
“seco”
hasta 7 días
Salsa de tomate
“seco”
hasta 4 días
ESPAÑOL 39

Tipo de alimento Ajuste de la humedad del
aire
Tiempo de almacenamiento
Pescado, marisco, carnes
cocinadas
“seco”
hasta 3 días
Marisco cocinado
“seco”
hasta 2 días
Ensaladas, verduras
Zanahorias, hierbas, coles
de Bruselas, apio
“húmedo”
hasta 1 mes
Alcachofas, coliflor, endi‐
vias, lechuga iceberg, endi‐
vias, canónigos, lechuga,
puerros, achicoria
“húmedo”
hasta 21 días
Brécol, col china, col rizada,
repollo, rábanos, berza de
Saboya
“húmedo”
hasta 14 días
Guisantes, colinabo
“húmedo”
hasta 10 días
Cebolletas, rábanos, espá‐
rragos, espinacas
“húmedo”
hasta 7 días
Fruta
Peras, dátiles (frescos), fre‐
sas, melocotones
“húmedo”
hasta 1 mes
Ciruelas
ruibarbo, grosellas
“húmedo”
hasta 21 días
Manzanas (no sensibles al
frío), membrillos
“húmedo”
hasta 20 días
Albaricoques, cerezas
“húmedo”
hasta 14 días
Ciruelas, uvas
“húmedo”
hasta 10 días
Moras, pasas
“húmedo”
hasta 8 días
Higos (frescos)
“húmedo”
hasta 7 días
Arándanos, frambuesas
“húmedo”
hasta 5 días
Los pasteles que contienen crema y
otros tipos de repostería se pueden
guardar en el compartimento LongFresh
durante 2 o 3 días.
No debe colocarse en el compartimento
LongFresh:
• La fruta sensible al frío que deba
guardarse en sótanos o a
temperatura ambiente, como la piña,
el plátanos, la uva, el melón, el
mango, la papaya, la naranja, el limón
o el kiwi.
• Verduras que deben ser conservarse
a temperatura ambiente como
tomates, patatas, cebollas y ajo.
• Los tipos de alimentos no
mencionados arriba deben guardarse
www.aeg.com40

en el compartimento frigorífico (p. ej.,
todos los tipos de queso, los
embutidos, etc.).
El nivel de humedad del aire
en los cajones depende del
contenido de humedad de
los alimentos guardados, las
verduras y las frutas, así
como de la frecuencia de
apertura de la puerta.
El compartimento LongFresh también es
adecuado para la descongelación lenta
de los alimentos. En este caso, el
alimento descongelado se puede
guardar en el compartimento LongFresh
hasta dos días.
• Preste atención a la frescura de los
alimentos, especialmente a la fecha
de caducidad. La calidad y la frescura
afectan al tiempo de almacenamiento.
• La duración total del ciclo de
almacenamiento dependerá de la
condiciones de conservación
practicadas antes del
almacenamiento final en el frigorífico.
• Todos los tipos de alimentos, frutas,
verduras o de origen animal deben
siempre embalarse o taparse antes
de guardarse.
• Los alimentos ricos en proteínas se
estropean antes. Esto significa que el
marisco se estropea antes que el
pescado y éste antes que la carne. Al
guardar los alimentos en un
compartimento LongFresh se puede
aumentar el tiempo de
almacenamiento para ese tipo de
alimentos hasta tres veces sin perder
calidad.
• Todos los alimentos guardados en un
compartimento LongFresh deben
sacarse de los cajones unos 15 - 30
min antes del consumo,
especialmente la fruta y las verduras
para consumirse sin ningún proceso
de cocción adicional. Si se deja que
las frutas y verduras recuperen la
temperatura ambiente, mejorará la
textura y el sabor.
7. MANTENIMIENTO Y LIMPIEZA
ADVERTENCIA!
Consulte los capítulos sobre
seguridad.
7.1 Limpieza del interior
Antes de utilizar el aparato por primera
vez, lave su interior y todos los
accesorios internos con agua templada y
jabón neutro para eliminar el típico olor
de los productos nuevos. A continuación,
seque todo bien.
PRECAUCIÓN!
No utilice detergentes,
polvos abrasivos ni
limpiadores a base de cloro
o aceite, ya que podrían
dañar el acabado.
PRECAUCIÓN!
Los accesorios y las piezas
del aparato no deben
lavarse en el lavavajillas.
7.2 Limpieza periódica
El equipo debe limpiarse de forma
regular:
1. Limpie el interior y los accesorios con
agua templada y un jabón neutro.
2. Revise y limpie periódicamente las
juntas de la puerta para mantenerlas
limpias y sin restos.
3. Aclare y seque a fondo.
7.3 Descongelación del
frigorífico
La descongelación del compartimento
frigorífico es automática. El agua que se
condensa fluye a un recipiente del
compresor y se evapora. El recipiente no
se puede quitar.
ESPAÑOL 41

7.4 Descongelación del
congelador
PRECAUCIÓN!
No utilice herramientas
metálicas afiladas para
raspar la escarcha del
evaporador, ya que podría
dañarlo.
No utilice dispositivos
mecánicos ni medios
artificiales para acelerar el
proceso de descongelación,
excepto los recomendados
por el fabricante.
Unas 12 horas antes de
realizar la descongelación,
ajuste una temperatura más
baja con el fin de acumular
frío suficiente en caso de
una interrupción del
funcionamiento.
Siempre se forma un poco de escarcha
en los estantes del congelador y en torno
al compartimento superior.
Descongele el congelador cuando la
capa de escarcha alcance un grosor de
unos 3-5 mm.
1. Apague el aparato o desconecte el
enchufe de la toma de corriente.
2. Retire cualquier alimento
almacenado y póngalo en un lugar
fresco.
PRECAUCIÓN!
El aumento de la
temperatura de los
paquetes de alimentos
congelados durante la
descongelación puede
acortar su tiempo de
almacenamiento.
No toque los alimentos
congelados con las
manos mojadas. Podrían
congelarse al contacto
con los alimentos.
3. Deje la puerta abierta. Proteja el
suelo del agua de la descongelación
p. ej., con un paño o recipiente
plano.
4. Para acelerar el proceso de
descongelación, coloque un
recipiente con agua tibia en el
compartimento congelador. Además,
retire los trozos de hielo que se
desprendan antes de que finalice la
descongelación.
5. Cuando la descongelación haya
terminado, seque a fondo el interior
del aparato.
6. Encienda el aparato y cierre la
puerta.
7. Ajuste el regulador de temperatura
para obtener el máximo frío y haga
funcionar el aparato durante al
menos 3 horas con dicho ajuste.
Solo después de este tiempo vuelva a
poner la comida en el congelador.
7.5 Periodos sin
funcionamiento
Si el aparato no se utiliza durante un
tiempo prolongado, tome las siguientes
precauciones
1. Desconecte el aparato de la red
eléctrica.
2. Extraiga todos los alimentos.
3. Descongele el aparato.
4. Limpie el aparato y todos los
accesorios.
5. Deje las puertas abiertas para evitar
olores desagradables.
www.aeg.com42

8. SOLUCIÓN DE PROBLEMAS
ADVERTENCIA!
Consulte los capítulos sobre
seguridad.
8.1 Qué hacer si...
Problema Posible causa Solución
El aparato no funciona. El aparato está apagado. Encienda el aparato.
El enchufe no está bien co‐
nectado a la toma de co‐
rriente.
Conecte el aparato a la toma
de corriente correctamente.
No hay tensión en la toma
de corriente.
Conecte un aparato diferen‐
te a la de corriente. Póngase
en contacto con un electri‐
cista cualificado.
El aparato hace ruido. El aparato no está bien apo‐
yado.
Compruebe que los soportes
del aparato están estables.
La alarma audible o visual
está activada.
El armario se ha encendido
hace poco.
Consulte "Alarma de puerta
abierta" o "Alarma de tempe‐
ratura alta".
La temperatura del aparato
es demasiado alta.
Consulte "Alarma de puerta
abierta" o "Alarma de tempe‐
ratura alta".
La puerta se queda abierta. Cierre la puerta.
El compresor funciona conti‐
nuamente.
La temperatura se ha ajusta‐
do incorrectamente.
Consulte el capítulo "Panel
de control".
Se han introducido muchos
alimentos al mismo tiempo.
Espere unas horas y vuelva
a comprobar la temperatura.
La temperatura ambiente es
demasiado alta.
Consulte el capítulo "Instala‐
ción".
Los alimentos introducidos
en el aparato estaban dema‐
siado calientes.
Deje que los alimentos se
enfríen a temperatura am‐
biente antes de guardarlos.
La puerta no está bien cerra‐
da.
Consulte la sección "Cierre
de la puerta".
La función Frostmatic está
activada.
Consulte la sección “Función
Frostmatic”.
La función Coolmatic está
activada.
Consulte la sección “Función
Coolmatic”.
ESPAÑOL 43

Problema Posible causa Solución
El compresor no se pone en
marcha inmediatamente
después de pulsar “Frostma‐
tic” o “Coolmatic”, o tras
cambiar la temperatura.
El compresor se pone en
marcha al cabo de cierto
tiempo.
Esto es normal, no se ha
producido ningún error.
La puerta está mal alineada
o interfiere con la rejilla de
ventilación.
El aparato no está nivelado. Consulte las instrucciones
de instalación.
La puerta no se abre fácil‐
mente.
Ha intentado volver a abrir la
puerta inmediatamente des‐
pués de cerrarla.
Espere unos segundos entre
el cierre y la reapertura de la
puerta.
La bombilla no funciona. La bombilla está en modo de
espera.
Cierre y abra la puerta.
La bombilla es defectuosa. Póngase en contacto con el
servicio técnico autorizado
más cercano.
Hay demasiada escarcha y
hielo.
La puerta no está bien cerra‐
da.
Consulte la sección "Cierre
de la puerta".
La junta de la puerta está
sucia o deformada.
Consulte la sección "Cierre
de la puerta".
Los alimentos no están bien
envueltos.
Envuelva mejor los produc‐
tos.
La temperatura se ha ajusta‐
do incorrectamente.
Consulte el capítulo "Panel
de control".
El aparato está completa‐
mente cargado y ajustado a
la temperatura más baja.
Seleccione una temperatura
más alta. Consulte el capítu‐
lo "Panel de control".
La temperatura ajustada en
el aparato es demasiado ba‐
ja y la temperatura ambiente
demasiado alta.
Seleccione una temperatura
más alta. Consulte el capítu‐
lo "Panel de control".
El agua fluye por la placa
posterior del frigorífico.
Durante el proceso de des‐
congelación automática, la
escarcha se derrite en la
placa posterior.
Es correcto.
Hay demasiada agua de
condensación en la pared
posterior del frigorífico.
La puerta se abre con dema‐
siada frecuencia.
Abra la puerta solo cuando
sea necesario.
La puerta no se cierra com‐
pletamente.
Asegúrese de que la puerta
está cerrada completamen‐
te.
www.aeg.com44

Problema Posible causa Solución
Los alimentos guardados no
están envueltos correcta‐
mente.
Envuelva los alimentos co‐
rrectamente antes de guar‐
darlos en el aparato.
El agua fluye por el suelo. La salida de agua de des‐
congelación no está conec‐
tada a la bandeja de evapo‐
ración situada sobre el com‐
presor.
Acople la salida de agua de
descongelación a la bandeja
de evaporación.
No se puede ajustar la tem‐
peratura.
La “función Frostmatic” o la
“función Coolmatic” está ac‐
tivada.
Apague la “función Frostma‐
tic” o la “función Coolmatic”
manualmente, o espere has‐
ta que la función se desacti‐
ve automáticamente antes
de ajustar la temperatura.
Consulte la sección “Función
Frostmatic” o “Función Cool‐
matic”.
La temperatura del aparato
es demasiado baja/alta.
La temperatura no se ha
ajustado correctamente.
Seleccione una temperatura
más alta/más baja.
La puerta no está bien cerra‐
da.
Consulte la sección "Cierre
de la puerta".
La temperatura de los pro‐
ductos es demasiado alta.
Deje que la temperatura de
los alimentos descienda a la
temperatura ambiente antes
de guardarlos.
Se han guardado muchos
alimentos al mismo tiempo.
Guarde menos alimentos al
mismo tiempo.
El grosor de la escarcha es
superior a 4-5 mm.
Descongele el aparato.
La puerta se ha abierto con
frecuencia.
Abra la puerta sólo si es ne‐
cesario.
La función Frostmatic está
activada.
Consulte la sección “Función
Frostmatic”.
La función Coolmatic está
activada.
Consulte la sección “Función
Coolmatic”.
Algunas superficies específi‐
cas dentro del comparti‐
miento frigorífico están más
calientes en algunos mo‐
mentos.
Es un estado normal.
ESPAÑOL 45

Problema Posible causa Solución
DEMO aparece en la panta‐
lla.
El aparato está en modo de
demostración.
Mantenga pulsada la tecla
OK durante aproximada‐
mente 10 segundos hasta
que se oiga un sonido largo
y la pantalla se apague un
breve instante.
Se muestra un símbolo ,
o en lugar de núme‐
ros en la pantalla de tempe‐
ratura.
Problema del sensor de tem‐
peratura.
Póngase en contacto con el
servicio técnico autorizado
más cercano (el sistema de
refrigeración seguirá mante‐
niendo fríos los alimentos,
pero no podrá ajustar la tem‐
peratura).
Si el consejo anterior no
ofrece resultados, llame al
servicio técnico autorizado
más cercano.
8.2 Cambio de la bombilla
El aparato está equipado con una luz
LED interior de larga duración.
El dispositivo de iluminación solo debe
ser sustituido por el servicio técnico.
Póngase en contacto con el servicio
técnico.
8.3 Cierre de la puerta
1. Limpie las juntas de la puerta.
2. Si es necesario, ajuste la puerta.
Consulte las instrucciones de
instalación.
3. Si es necesario, cambie las juntas
defectuosas. Póngase en contacto
con el servicio técnico autorizado.
www.aeg.com46

9. RUIDOS
SSSRRR!
CLICK!
HISSS!
BRRR!
BLUBB!
10. DATOS TÉCNICOS
La información técnica se encuentra en
la placa de datos técnicos situada en el
interior del aparato y en la etiqueta de
consumo energético.
El código QR de la etiqueta energética
suministrada con el aparato proporciona
un enlace web a la información
relacionada con el rendimiento del
aparato en la base de datos EPREL de
la UE. Guarde la etiqueta energética
como referencia junto con el manual de
usuario y todos los demás documentos
que se proporcionan con este aparato.
También puede encontrar la misma
información en EPREL accediendo
desde el enlace
https://
eprel.ec.europa.eu
e introduciendo el
nombre del modelo y el número de
producto que se encuentran en la placa
de datos técnicos del aparato.
Consulte el enlace
www.theenergylabel.eu
para obtener
información detallada sobre la etiqueta
energética.
11. INFORMACIÓN PARA LOS INSTITUTOS DE
PRUEBAS
La instalación y la preparación del
aparato para cualquier verificación de
EcoDiseño deberá cumplir con EN
62552. Los requisitos de ventilación, las
dimensiones de los huecos y las
distancias mínimas traseras serán los
indicados en el Capítulo 3 de este
Manual de Usuario. Por favor, póngase
ESPAÑOL 47

en contacto con el fabricante para
cualquier otra información adicional,
incluyendo los planos de carga.
12. ASPECTOS MEDIOAMBIENTALES
Recicle los materiales con el símbolo .
Coloque el material de embalaje en los
contenedores adecuados para su
reciclaje. Ayude a proteger el medio
ambiente y la salud pública, así como a
reciclar residuos de aparatos eléctricos y
electrónicos. No deseche los aparatos
marcados con el símbolo junto con los
residuos domésticos. Lleve el producto a
su centro de reciclaje local o póngase en
contacto con su oficina municipal.
*
www.aeg.com48


www.aeg.com/shop
222378986-A-512020
-
 1
1
-
 2
2
-
 3
3
-
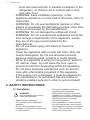 4
4
-
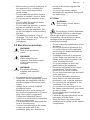 5
5
-
 6
6
-
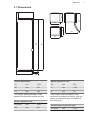 7
7
-
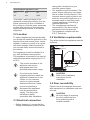 8
8
-
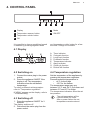 9
9
-
 10
10
-
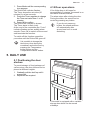 11
11
-
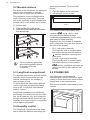 12
12
-
 13
13
-
 14
14
-
 15
15
-
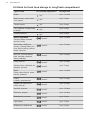 16
16
-
 17
17
-
 18
18
-
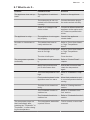 19
19
-
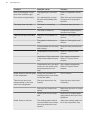 20
20
-
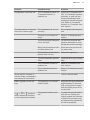 21
21
-
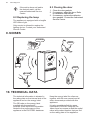 22
22
-
 23
23
-
 24
24
-
 25
25
-
 26
26
-
 27
27
-
 28
28
-
 29
29
-
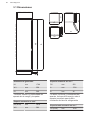 30
30
-
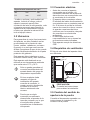 31
31
-
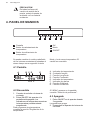 32
32
-
 33
33
-
 34
34
-
 35
35
-
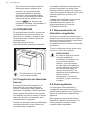 36
36
-
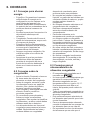 37
37
-
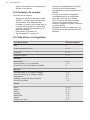 38
38
-
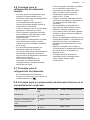 39
39
-
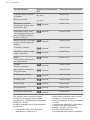 40
40
-
 41
41
-
 42
42
-
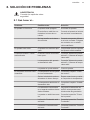 43
43
-
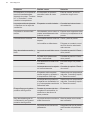 44
44
-
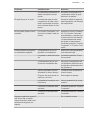 45
45
-
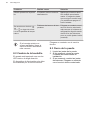 46
46
-
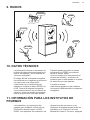 47
47
-
 48
48
-
 49
49
-
 50
50
-
 51
51
-
 52
52


AEG SFE818E9ZC Manual de usuario
- Categoría
- Frigoríficos combinados
- Tipo
- Manual de usuario
en otros idiomas
- English: AEG SFE818E9ZC User manual
Artículos relacionados
-
AEG SCE81921TS Manual de usuario
-
-
AEG SFB412F1AS Manual de usuario
-
-
AEG SCE618F6TS Manual de usuario
-
-
AEG SCB614F1LS Manual de usuario
-
AEG SDB414F1AS Manual de usuario
-
-
AEG SCE81826ZC Manual de usuario
Otros documentos
-
Haier H3F285WEH1(UK) Manual de usuario
-
Aeg-Electrolux SKZ81200F0 Manual de usuario
-
-
-
-
-
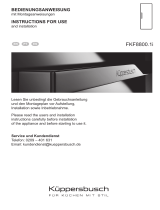 Küppersbusch FKF8800.1I Manual de usuario
-
 Küppersbusch FKF8800.1I Manual de usuario
-
-
Whirlpool ARG 18081 A++ Program Chart

