HP Deskjet F4200 All-in-One Printer series Guía de instalación
- Categoría
- Impresoras láser / LED
- Tipo
- Guía de instalación
Este manual también es adecuado para

HP Deskjet F4200 All-in-One series
*CB670-90011*
*CB670-90011*
*CB670-90011*
1
2
a.
b.
c.
*
USB
FR
FR
FR
ES
ES
ES
EN
EN
EN
FR
ES
EN
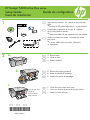
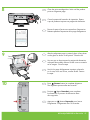
Véri ez le contenu du carton. Le contenu du carton
peut varier.
* Si aucun câble USB n’est fournit, achetez-en
un séparément.
Retirez l’adhésif.a.
Retirez le matériau d’emballage.b.
Guide de con guration
Fermez la porte d’accès.c.
Porte d’accès
FR
Guía de instalación
Compruebe el contenido de la caja. El contenido
de su caja puede ser distinto.
* Compre un cable USB por separado si no está incluido.
Quite la cinta.a.
Retire el material de embalaje.b.
Cierre con rmeza la puerta de acceso interior.c.
Puerta de
acceso interior
ES
Verify the box contents. The contents of your box may
differ.
* Purchase a USB cable separately if it is not included.
Remove the packing material.b.
Remove tape.a.
Setup Guide
Close the inner access door rmly.c.
Inner access door
EN

4
2 • HP Deskjet F4200 All-in-One series
c.
a.
b.
3
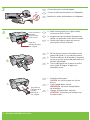
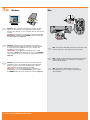
Conecte el cable de alimentación y el adaptador.
USB
FR
FR
FR
ES
ES
ES
EN
EN
EN
FR
ES
EN
Bac à papier
Rallonge du
bac à papier
Porte d’accès
Tirez la rallonge du bac à papier et vériez
que le guide de largeur du papier est
entièrement ouvert.
b.
Chargez du papier blanc ordinaire.
ATTENTION : ne poussez pas le papier trop
loin dans le bac.
c.
Branchez le cordon d’alimentation et l’adaptateur.
Vériez que le bac à papier est ouvert et
que la porte d’accès est fermée.
a.
Bandeja de papel
Extensión de la
bandeja
Puerta de
acceso interior
Asegúrese de que la bandeja de papel está
abierta y la puerta de acceso interior cerrada.
a.
Tire de la extensión de la bandeja y asegúrese
de que la guía de anchura del papel esté en la
posición más alejada.
b.
Cargue papel blanco normal.
PRECAUCIÓN: No fuerce el papel dentro
de la bandeja.
c.
Paper tray
Tray extension
Inner access door
Make sure the paper tray is open and the
inner access door is closed.
a.
Pull out the tray extension and make sure the
paper-width guide is in its outermost position.
b.
Load plain white paper.
CAUTION: Do not force paper too far into
the tray.
c.
Connect the power cord and adapter.

HP Deskjet F4200 All-in-One series • 3
6
5
FR
FR
ES
ES
EN
EN
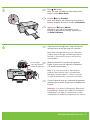
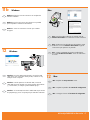
Ouvrez la porte d’accès aux cartouches d’impression.
Attendez que le chariot d’impression se déplace vers
la droite.
Remarque : si le chariot ne bouge pas, débranchez
le périphérique. Retirez tout l’adhésif et le matériau
d’emballage (voir étape 2). Rebranchez le câble
d’alimentation et mettez le périphérique sous tension.
Appuyez sur (bouton Marche).
Remarque : pour plus d’informations sur les
boutons du panneau de contrôle, reportez-vous
au Guide d’utilisation.
Chariot d’impression
Abra la puerta de los cartuchos de impresión.
Espere a que el carro de impresión se desplace
a la derecha del producto.
Nota: Si el carro no se mueve, desconecte el
producto. Retire toda la cinta y el material de
embalaje, consulte el paso 2. Vuelva a conectar
el cable de alimentación y encienda el producto.
Presione (botón Encender).
Nota: Para obtener más información acerca de los
botones del panel de control, consulte la Guía básica.
Carro de impresión
Press (On button).
Note: For more information on the control panel
buttons, see the Basics Guide.
Open the print cartridge door. Wait until the print
carriage moves to the right side of the product.
Note: If the carriage does not move, unplug the
product. Remove all tape and packing material,
see step 2. Reconnect the power cord and turn
on the product.
Print carriage
La página se está cargando...

8
9
10
HP Deskjet F4200 All-in-One series • 5
FR
FR
FR
ES
ES
ES
EN
EN
EN
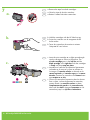
Fermez la porte d’accès aux cartouches d’impression.
Patientez pendant l’impression de la page d’alignement.
Une fois la page d’alignement imprimée, placez-la
sur la vitre, face vers le bas, comme illustré. Fermez
le capot.
Appuyez sur (bouton Reprendre) pour lancer
l’alignement. L’alignement dure 10 secondes.
Cierre la puerta del cartucho de impresión. Espere
a que el producto imprima una página de alineación.
Una vez que se haya impreso la página de alineación,
colóquela boca abajo sobre el cristal como se muestra
en la imagen. Cierre la tapa.
Presione (botón Reanudar) para completar
la alineación. El proceso de alineación dura
diez segundos.
Close the print cartridge door. Wait until the product
prints an alignment page.
After the alignment page is printed, place it face down
on the glass as shown in the picture. Close the lid.
Press (Resume button) to complete alignment.
The alignment process takes ten seconds.

11a
Windows: Mac:
6 • HP Deskjet F4200 All-in-One series
FR
FR
ES
ES
EN
EN
Mac : branchez le câble USB au port arrière
du périphérique, puis à n’importe quel port USB
de l’ordinateur.
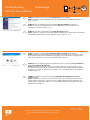
Windows : après la mise sous tension et le démarrage de
l’ordinateur, placez le CD-ROM du produit dans le lecteur.
Patientez jusqu’à ce que l’écran de démarrage s’afche.
Cette opération peut durer plusieurs secondes.
IMPORTANT : si l’écran de démarrage ne s’afche pas,
double-cliquez sur l’icône Poste de travail, puis sur l’icône
du CD-ROM ayant le logo HP et enn sur le chier setup.exe.
Mac: conecte el cable USB al puerto ubicado en la parte
posterior del producto y, a continuación, a cualquier
puerto USB del equipo.
Windows: introduzca el CD del software del producto en
el equipo después de haberlo encendido e iniciado. Espere
a que aparezca la pantalla de inicio en su equipo. Esto
puede durar varios segundos.
IMPORTANTE: Si no aparece la pantalla de inicio, haga
doble clic en Mi PC, haga doble clic en el icono del CD-ROM
con el logotipo de HP y, a continuación, haga doble clic en
setup.exe.
Windows: Insert the product software CD into the computer
after it has been turned on and started up. Wait until the
startup screen displays on your computer. This can take several
seconds.
IMPORTANT: If the startup screen does not appear, double-click
My Computer, double-click the CD-ROM icon with the HP logo,
and then double-click setup.exe.
Mac: Connect the USB cable to the port on the back of the
product, and then to any USB port on the computer.

11b
Windows: Mac:
12
Windows:
Mac:
HP Deskjet F4200 All-in-One series • 7
12
FR
FR
FR
FR
ES
ES
ES
ES
EN
EN
EN
EN
Mac : insérez le CD-ROM du produit. Double-cliquez
sur l’icône HP All-in-One Installer. Suivez les instructions
à l’écran.
Mac : renseignez l’écran de l’assistant de conguration.
Windows : suivez les instructions à l’écran pour installer
le logiciel.
Windows : à l’invite USB, branchez le câble USB au port arrière
du périphérique, puis à n’importe quel port USB de l’ordinateur.
Mac: introduzca el CD del software del producto. Haga
doble clic en el icono HP All-in-One Installer. Siga las
instrucciones que aparecen en pantalla.
Mac: complete la pantalla del asistente de conguración.
Windows: siga las instrucciones que aparecen en pantalla
para completar la instalación del software.
Windows: cuando aparezca el indicador USB, conecte el
cable USB al puerto ubicado en la parte posterior del producto
y, a continuación, a cualquier puerto USB del equipo.
Windows: Follow the onscreen instructions to complete the
software installation.
Windows: Once the USB prompt appears, connect the USB
cable to the port on the back of the product, and then to any
USB port on the computer.
Mac: Insert the product software CD. Double-click the
HP All-in-One Installer icon. Follow the onscreen instructions.
Mac: Complete the Setup Assistant screen.

2008 Hewlett-Packard Development Company, L.P.
Windows is a registered trademark of Microsoft Corporation.
www.hp.com/support
FR
FR
ES
ES
EN
EN
Problème : (Windows uniquement) l’écran Ajout de matériel s’afche.
Action : cliquez sur Annuler sur tous les écrans afchés. Débranchez le câble USB, puis introduisez
le CD-ROM du produit dans le lecteur. Reportez-vous aux étapes 11 et 12.
Problème : (Windows uniquement) l’écran La conguration du périphérique ne s’est pas
achevée s’afche.
Action : débranchez le produit, puis rebranchez-le. Vériez que l’imprimante est sous tension.
Vériez toutes les connexions. Assurez-vous que le câble USB est branché à l’ordinateur. Ne
branchez pas le câble USB au clavier ni à un concentrateur USB sans alimentation autonome.
Reportez-vous à l’étape 12.
Dépannage
Problema: (sólo en Windows) aparece la pantalla Agregar hardware de Microsoft.
Acción: cierre todas las pantallas. Desconecte el cable USB y vuelva a introducir el CD
del software. Consulte los pasos 11 y 12.
Problema: (sólo en Windows) aparece la pantalla en la que se indica que se ha producido un
error en la instalación del dispositivo.
Acción: desconecte el producto y vuelva a conectarlo. Asegúrese de que la impresora está
encendida. Compruebe todas las conexiones. Asegúrese de que el cable USB está conectado
al equipo. No conecte el cable USB a un teclado ni a un concentrador USB sin alimentación.
Consulte el paso 12.
Solución de problemas
Problem: (Windows only) The Device Setup Has Failed To Complete screen displays.
Action: Unplug the product and plug it in again. Make sure that the printer is turned on. Check
all connections. Make sure the USB cable is plugged into the computer. Do not plug the USB
cable into a keyboard or a non-powered USB hub. Refer to Step 12.
Problem: (Windows only) The Microsoft Add Hardware screens display.
Action: Cancel all screens. Unplug the USB cable, and then insert the software CD. Refer to
Steps 11 and 12.
Troubleshooting
Printed in <country>
Printed in <country>
Transcripción de documentos
HP Deskjet F4200 All-in-One series Setup Guide Guía de instalación Guide de configuration 1 EN Verify the box contents. The contents of your box may differ. * Purchase a USB cable separately if it is not included. ES Compruebe el contenido de la caja. El contenido de su caja puede ser distinto. * Compre un cable USB por separado si no está incluido. * FR Vérifiez le contenu du carton. Le contenu du carton peut varier. * Si aucun câble USB n’est fournit, achetez-en un séparément. USB 2 a. b. c. Inner access door Puerta de acceso interior Porte d’accès EN ES FR *CB670-90011* *CB670-90011* *CB670-90011* EN a. Remove tape. ES a. Quite la cinta. FR a. Retirez l’adhésif. EN b. Remove the packing material. ES b. Retire el material de embalaje. FR b. Retirez le matériau d’emballage. EN c. Close the inner access door firmly. ES c. Cierre con firmeza la puerta de acceso interior. FR c. Fermez la porte d’accès. 3 USB 4 a. Inner access door Puerta de acceso interior Porte d’accès EN Connect the power cord and adapter. ES Conecte el cable de alimentación y el adaptador. FR Branchez le cordon d’alimentation et l’adaptateur. EN ES FR Paper tray Bandeja de papel Bac à papier EN ES b. FR EN c. ES Tray extension Extensión de la bandeja Rallonge du bac à papier 2 • HP Deskjet F4200 All-in-One series FR a. Make sure the paper tray is open and the inner access door is closed. a. Asegúrese de que la bandeja de papel está abierta y la puerta de acceso interior cerrada. a. Vérifiez que le bac à papier est ouvert et que la porte d’accès est fermée. b. Pull out the tray extension and make sure the paper-width guide is in its outermost position. b. Tire de la extensión de la bandeja y asegúrese de que la guía de anchura del papel esté en la posición más alejada. b. Tirez la rallonge du bac à papier et vérifiez que le guide de largeur du papier est entièrement ouvert. c. Load plain white paper. CAUTION: Do not force paper too far into the tray. c. Cargue papel blanco normal. PRECAUCIÓN: No fuerce el papel dentro de la bandeja. c. Chargez du papier blanc ordinaire. ATTENTION : ne poussez pas le papier trop loin dans le bac. 5 EN ES FR 6 EN Press (On button). Note: For more information on the control panel buttons, see the Basics Guide. Presione (botón Encender). Nota: Para obtener más información acerca de los botones del panel de control, consulte la Guía básica. Appuyez sur (bouton Marche). Remarque : pour plus d’informations sur les boutons du panneau de contrôle, reportez-vous au Guide d’utilisation. Open the print cartridge door. Wait until the print carriage moves to the right side of the product. Note: If the carriage does not move, unplug the product. Remove all tape and packing material, see step 2. Reconnect the power cord and turn on the product. ES Print carriage Carro de impresión Chariot d’impression Abra la puerta de los cartuchos de impresión. Espere a que el carro de impresión se desplace a la derecha del producto. Nota: Si el carro no se mueve, desconecte el producto. Retire toda la cinta y el material de embalaje, consulte el paso 2. Vuelva a conectar el cable de alimentación y encienda el producto. FR Ouvrez la porte d’accès aux cartouches d’impression. Attendez que le chariot d’impression se déplace vers la droite. Remarque : si le chariot ne bouge pas, débranchez le périphérique. Retirez tout l’adhésif et le matériau d’emballage (voir étape 2). Rebranchez le câble d’alimentation et mettez le périphérique sous tension. HP Deskjet F4200 All-in-One series • 3 8 EN ES FR 9 EN ES FR 10 EN ES FR Close the print cartridge door. Wait until the product prints an alignment page. Cierre la puerta del cartucho de impresión. Espere a que el producto imprima una página de alineación. Fermez la porte d’accès aux cartouches d’impression. Patientez pendant l’impression de la page d’alignement. After the alignment page is printed, place it face down on the glass as shown in the picture. Close the lid. Una vez que se haya impreso la página de alineación, colóquela boca abajo sobre el cristal como se muestra en la imagen. Cierre la tapa. Une fois la page d’alignement imprimée, placez-la sur la vitre, face vers le bas, comme illustré. Fermez le capot. Press (Resume button) to complete alignment. The alignment process takes ten seconds. Presione (botón Reanudar) para completar la alineación. El proceso de alineación dura diez segundos. Appuyez sur (bouton Reprendre) pour lancer l’alignement. L’alignement dure 10 secondes. HP Deskjet F4200 All-in-One series • 5 11a EN ES Windows: Mac: Windows: Insert the product software CD into the computer after it has been turned on and started up. Wait until the startup screen displays on your computer. This can take several seconds. IMPORTANT: If the startup screen does not appear, double-click My Computer, double-click the CD-ROM icon with the HP logo, and then double-click setup.exe. Windows: introduzca el CD del software del producto en el equipo después de haberlo encendido e iniciado. Espere a que aparezca la pantalla de inicio en su equipo. Esto puede durar varios segundos. IMPORTANTE: Si no aparece la pantalla de inicio, haga doble clic en Mi PC, haga doble clic en el icono del CD-ROM con el logotipo de HP y, a continuación, haga doble clic en setup.exe. EN ES FR Windows : après la mise sous tension et le démarrage de l’ordinateur, placez le CD-ROM du produit dans le lecteur. Patientez jusqu’à ce que l’écran de démarrage s’affiche. Cette opération peut durer plusieurs secondes. IMPORTANT : si l’écran de démarrage ne s’affiche pas, double-cliquez sur l’icône Poste de travail, puis sur l’icône du CD-ROM ayant le logo HP et enfin sur le fichier setup.exe. 6 • HP Deskjet F4200 All-in-One series FR Mac: Connect the USB cable to the port on the back of the product, and then to any USB port on the computer. Mac: conecte el cable USB al puerto ubicado en la parte posterior del producto y, a continuación, a cualquier puerto USB del equipo. Mac : branchez le câble USB au port arrière du périphérique, puis à n’importe quel port USB de l’ordinateur. 11b Windows: EN Windows: Follow the onscreen instructions to complete the software installation. ES Windows: siga las instrucciones que aparecen en pantalla para completar la instalación del software. FR Windows : suivez les instructions à l’écran pour installer le logiciel. Mac: EN ES 12 EN ES FR Windows: FR Windows: Once the USB prompt appears, connect the USB cable to the port on the back of the product, and then to any USB port on the computer. 12 Mac: Insert the product software CD. Double-click the HP All-in-One Installer icon. Follow the onscreen instructions. Mac: introduzca el CD del software del producto. Haga doble clic en el icono HP All-in-One Installer. Siga las instrucciones que aparecen en pantalla. Mac : insérez le CD-ROM du produit. Double-cliquez sur l’icône HP All-in-One Installer. Suivez les instructions à l’écran. Mac: EN Mac: Complete the Setup Assistant screen. ES Mac: complete la pantalla del asistente de configuración. FR Mac : renseignez l’écran de l’assistant de configuration. Windows: cuando aparezca el indicador USB, conecte el cable USB al puerto ubicado en la parte posterior del producto y, a continuación, a cualquier puerto USB del equipo. Windows : à l’invite USB, branchez le câble USB au port arrière du périphérique, puis à n’importe quel port USB de l’ordinateur. HP Deskjet F4200 All-in-One series • 7 Troubleshooting Dépannage Solución de problemas www.hp.com/support EN ES FR EN ES FR Problem: (Windows only) The Microsoft Add Hardware screens display. Action: Cancel all screens. Unplug the USB cable, and then insert the software CD. Refer to Steps 11 and 12. Problema: (sólo en Windows) aparece la pantalla Agregar hardware de Microsoft. Acción: cierre todas las pantallas. Desconecte el cable USB y vuelva a introducir el CD del software. Consulte los pasos 11 y 12. Problème : (Windows uniquement) l’écran Ajout de matériel s’affiche. Action : cliquez sur Annuler sur tous les écrans affichés. Débranchez le câble USB, puis introduisez le CD-ROM du produit dans le lecteur. Reportez-vous aux étapes 11 et 12. Problem: (Windows only) The Device Setup Has Failed To Complete screen displays. Action: Unplug the product and plug it in again. Make sure that the printer is turned on. Check all connections. Make sure the USB cable is plugged into the computer. Do not plug the USB cable into a keyboard or a non-powered USB hub. Refer to Step 12. Problema: (sólo en Windows) aparece la pantalla en la que se indica que se ha producido un error en la instalación del dispositivo. Acción: desconecte el producto y vuelva a conectarlo. Asegúrese de que la impresora está encendida. Compruebe todas las conexiones. Asegúrese de que el cable USB está conectado al equipo. No conecte el cable USB a un teclado ni a un concentrador USB sin alimentación. Consulte el paso 12. Problème : (Windows uniquement) l’écran La configuration du périphérique ne s’est pas achevée s’affiche. Action : débranchez le produit, puis rebranchez-le. Vérifiez que l’imprimante est sous tension. Vérifiez toutes les connexions. Assurez-vous que le câble USB est branché à l’ordinateur. Ne branchez pas le câble USB au clavier ni à un concentrateur USB sans alimentation autonome. Reportez-vous à l’étape 12. Windows is a registered trademark of Microsoft Corporation. 2008 Hewlett-Packard Development Company, L.P. Printed in <country> Printed in <country>-
 1
1
-
 2
2
-
 3
3
-
 4
4
-
 5
5
-
 6
6
-
 7
7
-
 8
8


HP Deskjet F4200 All-in-One Printer series Guía de instalación
- Categoría
- Impresoras láser / LED
- Tipo
- Guía de instalación
- Este manual también es adecuado para
en otros idiomas
Artículos relacionados
-
HP Deskjet F4200 All-in-One Printer series Guía del usuario
-
HP Deskjet F4224 All-in-One Printer series Guía de instalación
-
-
HP (Hewlett-Packard) F2110 Manual de usuario
-
HP Deskjet F4100 All-in-One Printer series Guía de instalación
-
HP F2235 Guía de instalación
-
HP Deskjet F300 All-in-One Printer series El manual del propietario
-
HP Deskjet 460 Mobile Printer series Guía de instalación
-
HP Deskjet 450 Mobile Printer series Guía de instalación
-