Magmaweld ID 300 MK Compact Smart Series Mag Welding Machine Manual de usuario
- Categoría
- Sistema de soldadura
- Tipo
- Manual de usuario

(+90) 444 93 53
magmaweld.com
info@magmaweld.com (+90) 538 927 12 62
USER MANUAL
COMPACT SMART SERIES

All rights reserved. It is prohibited to reproduce this documentation, or any part thereof, without the prior written
Magma Mekatronik may modify the information and the images without any prior notice.

3
MIG / MAG WELDING MACHINE EN
POSTE À SOUDER MIG / MAG FR
MÁQUINA DE SOLDAR MIG/MAG PT
MÁQUINA DE SOLDADURA MIG / MAG ES
/ AR
TR
MIG / MAG-SCHWEISSMASCHINE DE
RU

4
EN
www.magmaweld.comUSER MANUAL
COMPACT SMART SERIES
CONTENTS
1
1.1
1.2
1.3
1.4
1.5
2
2.1
2.2
2.3
2.3.1
2.3.2
2.3.3
2.3.4
3
3.1
3.2
3.3
3.4
3.5
3.6
3.7
3.8
3.9
3.10
4
4.1
4.2
4.3
5
5.1
5.2
5.3
SAFETY PRECAUTIONS
TECHNICAL INFORMATION
General Information
Machine Components
Product Label
Technical Data
Accessories
INSTALLATION
Delivery Control
Installation and Operation Recommendations
Connections
Mains Plug Connection
Connecting the Grounding Clamp to the Workpiece
Connecting the Gas Cylinder
Water Cooling Unit (for MW Models)
OPERATION
Settings in the Bag
User Interface
Remote Control
Arc Length Adjustment (ArC)
MIG Curve
Connection to Mains
Selection and Replacement of Wire Feed Rollers
Placing The Wire Spool And Wire Feeding Process
Adjustment of Gas Flow
Machine Features
MAINTENANCE AND SERVICE
Maintenance
Troubleshooting
Error Codes
ANNEX
Spare Parts Lists
Block Diagram
Water Unit Circuit Diagram
5
11
11
13
15
15
16
16
17
17
17
17
18
19
21
27
28
28
29
29
30
31
32
33
34
36
37
39
40
Contents

5
www.magmaweld.com USER MANUAL
COMPACT SMART SERIES
EN
Safety Precautions
Be Sure To Follow All Safety Rules In This Manual!
• Safety symbols found in the manual are used to identify potential hazards.
• When any one of the safety symbols are seen in this manual, it must be understood that there is
a risk of injury and the following instructions should be read carefully to avoid potential hazards.
• The possessor of the machine is responsible for preventing unauthorized persons from
accessing the equipment.
• Persons using the machine must be experienced or fully trained in welding / cutting they have to
read the user manual before operation and follow the safety instructions.
Explanation Of Safety
Information
• Read the user manual, the label on the machine and the safety instructions carefully.
• Make sure that the warning labels on the machine are in good condition. Replace missing and
damaged labels.
• Learn how to operate the machine, how to make the checks in a correct manner.
• Use your machine in suitable working environments.
• Improper changes made in your machine will negatively affect the safe operation and its
longevity.
• The manufacturer is not responsible for the consequences resulting from the operation of the
Comprehending Safety
Precautions
Explanation Of Safety
Symbols
ATTENTION
Indicates a potentially hazardous situation that could cause injury or damage.
In case if no precaution is taken, it may cause injuries or material losses / damages.
IMPORTANT
DANGER
Indicates a serious danger. In case if not avoided, severe or fatal injuries may occur.
Make certain that the installation procedures comply with national electrical standards
persons.
• Wear dry and sturdy insulated gloves and working apron. Never use wet or damaged gloves and
working aprons.
operator must be protective against sparks, splashing and arc radiation.
• Do not work alone. In case of a danger make sure you have someone for help in your working
environment.
• Do not touch the electrode with the bare hand. Do not allow the electrode holder or electrode to
come in contact with any other person or any grounded object.
• Never touch parts that carry electricity.
• Never touch the electrode if you are in contact with the electrode attached to the work surface,
material that is large enough to cut off the operator’s contact with the work surface.
• Do not connect more than one electrode to the electrode holder.
as practical.
• Check the torch before operating the machine. Make sure the torch and its cables are in good
condition. Always replace a damaged, worn torch.
• Do not touch electrode holders connected to two machines at the same time since double
• Keep the machine turned off and disconnect cables when not in use.
• Before repairing the machine, remove all power connections and / or connector plugs or turn
off the machine.
• Be careful when using a long mains cable.
Electric Shocks
May Kill
SAFETY PRECAUTIONS

6
EN
www.magmaweld.comUSER MANUAL
COMPACT SMART SERIESSafety Precautions
• Turn off the electric power.
or wires.
• Call for emergency services.
• If the victim is not breathing, Administer cardiopulmonary resuscitation (CPR) immediately
after breaking contact with the electrical source. Continue CPR (cardiac massage) until
breathing starts or until help arrives.
• Treat an electrical burn as a thermal burn by applying sterile, cold (iced) compresses. Prevent
contamination, and cover with a clean, dry dressing.
Procedures for
Electric Shock
Long-term inhalation of fumes and gases released from welding / cutting is very dangerous.
• Keep away from the moving parts.
closed and in locked position.
• Wear metal toe shoes against the possibility of heavy objects falling on to your feet.
• Burning sensations and irritations in the eyes, nose and throat are signs of inadequate
ventilation. In such a case, immediately boost the ventilation of the work area, and if the
problem persists, stop the welding / cutting process completely.
• Use a suitable fume extraction system where welding / cutting works are being carried out. If
necessary, install a system that can expel fumes and gases accumulated in the entire workshop.
cadmium, zinc, coated or painted materials, use masks that provide fresh air in addition to the
above precautions.
• If the gas tanks are grouped in a separate zone, ensure that they are well ventilated, keep the
main valves closed when gas cylinders are not in use, pay attention to possible gas leaks.
• Shielding gases such as argon are denser than air and can be inhaled instead of air if used in
• Do not perform welding / cutting operations in the presence of chlorinated hydrocarbon vapors
released during lubrication or painting operations.
• Some welded / cut parts require special ventilation. The safety rules of products that require
special ventilation should be read carefully. A suitable gas mask should be worn when
necessary.
Fumes and Gases
May Be Harmful To
Your Health
Moving Parts May
Cause Injuries
Make sure all connections are tight, clean, and dry.
• Keep cables dry, free of oil and grease, and protected from hot metal and sparks.
• Bare wiring can kill. Check all cables frequently for possible damage. If a damaged or an
uninsulated cable is detected, repair or replace it immediately.
• Insulate work clamp when not connected to workpiece to prevent contact with any metal
object.
• Make sure that the grounding of the power line is properly connected.
• Use AC output ONLY if required for the welding process.
• If AC output is required, use remote output control if present on unit.
Additional safety precautions are required when any of the following electrically hazardous
conditions are present :
• in damp locations or while wearing wet clothing,
• when in cramped positions such as sitting, kneeling, or lying,
• when there is a high risk of unavoidable or accidental contact with the workpiece or ground.
For these conditions, use the following equipment in order presented:
• Semiautomatic DC constant voltage (CV) MIG welding machine,
• DC manual MMA welding machine,

7
www.magmaweld.com USER MANUAL
COMPACT SMART SERIES
EN
Safety Precautions
• Performing works such as welding / cutting, surface grinding, and brushing cause sparks and
metal particles to splatter. Wear approved protective work goggles which have edge guards
under the welding masks to prevent sustaining possible injuries.
Sparks and Spattering
Particles May Get
Into Eyes and Cause
Damage
• Do not touch the hot parts with bare hands.
• Wait until the time required for the machine to cool down before working on its parts.
Hot Parts May Cause
Severe Burns
• Protect other naked parts of your body (arms, neck, ears, etc.) with suitable protective clothing
from these rays.
so that people around you will not sustain injuries from arc rays and hot metals.
• This machine is not used for heating of icebound pipes. This operation performed with the
Arc Light May Damage
Your Eyes and Skin
• The noise generated by some equipment and operations may damage your hearing ability.
• Wear approved personal ear protective equipment if the noise level is high.
Noise May Cause
Damage To Your
Hearing Ability
• Do not apply welding / cutting operations into completely closed tanks or pipes.
• Before welding to tanks and closed containers, open them, completely empty them, and clean
them. Pay the greatest attention possible to the welding / cutting operations you will perform in
such places.
• Do not weld in tanks and pipes which might have previously contained substances that may
• Welding / cutting equipment heats up. For this reason, do not place it on surfaces that could
easily burn or be damaged !
• Do not point the torch towards any part of the body, other persons, or any metal while
unwrapping the welding / cutting wire.
• When welding wire is run manually from the roller especially in thin diameters the wire can slip
out of your hand, like a spring or can cause damage to you or other people around, therefore you
must protect your eyes and face while working on this.
Welding Wires Can
Cause Injuries
explosions.
• Before starting the welding / cutting work, remove these materials form the environment or cover
• National and international special rules apply in these areas.
Welding Operations
May Cause Fire and
Explosion
extinguishers tubes, water, and sand in easily accessible places.
circuits. Make sure that they are periodically inspected and pay attention that they run reliably.
• Electrical equipment should not be repaired by unauthorized persons.
Errors occurred if failed to do so may result in serious injury or death when using the
equipment.
• The gas circuit elements operate under pressure; explosions may occur as a result of services
provided by unauthorized persons, users may sustain serious injuries.
• It is recommended to perform technical maintenance of the machine and its auxiliary units at
least once a year.
Maintenance Work
Persons To Machines
and Apparatus May
Cause Injuries

8
EN
www.magmaweld.comUSER MANUAL
COMPACT SMART SERIESSafety Precautions
operations, accompanied by another person.
• Avoid performing welding / cutting operations in such enclosed areas as much as possible.
• Take all necessary precautions when moving the machine. The areas where the machine to be
transported, parts to be used in transportation and the physical conditions and health of the
person carrying out the transportation works should be suitable for the transportation process.
• Some machines are extremely heavy; therefore, make sure that the necessary environmental
safety measures are taken when changing their places.
• If the machine is to be used on a platform, it must be checked that this platform has suitable load
bearing limits.
• If it is to be transported by means of a haulage vehicle (transport trolley, forklift etc.), make sure
of the durableness of the vehicle, and the connection points (carrying suspenders, straps, bolts,
nuts, wheels, etc.) that connect the machine to this vehicle.
• If the machine will be carried manually, make sure the durableness of the machine apparatuses
(carrying suspenders, straps, etc.) and connections.
• Observe the International Labor Organization’s rules on carriage weights and the transport
regulations in force in your country in order to ensure the necessary transport conditions.
from torches, cables or hoses. Be absolutely sure to carry gas cylinders separately.
• Remove all interconnections before transporting the welding / cutting equipment, each being
separately, lift and transport small ones using its handles, and the big ones from its handling
rings or by using appropriate haulage equipment, such as forklifts.
Welding / Cutting in
Failure To Take
Precautions During
Transport May Cause
Accidents
way that they would not tip over for sure.
• Allow operators to easily access settings and connections on the machine.
Falling Parts May
Cause Injuries Improper positioning of the power-supply sources or other equipment can cause serious injury
to persons and physical damage to other objects.
• Allow the machine to cool down according to operation cycle rates.
• Reduce the current or operation cycle rate before starting the welding / cutting again.
• Do not block the fronts of air vents of the machines.
Excessive Use Of The
Machine Causes
Overheating
Excessive Use Of The
Machine Causes
Overheating
• This device is in group 2, class A in EMC tests according to TS EN 55011 standard.
• This class A device is not intended for use in residential areas where electrical power is supplied
compatibility due to radio frequency interference transmitted and emitted in such places.
• Make sure that the work area complies with electromagnetic compatibility (EMC).
Electromagnetic interferences during welding / cutting operations may cause undesired effects
on your electronic devices and network; and the effects of these interferences that may occur
during these operations are under the responsibility of the user.
• If there is any interference, to ensure compliance; extra measures may be taken, such as the
use of short cables, use of shielded (armored) cables, transportation of the welding machine to
the work area under protection in terms of EMC.
• To avoid possible EMC damage, make sure to perform your welding / cutting operations as far
away from your sensitive electronic devices as possible (100 m).
connected to the low voltage network used in the home, the installer to make the
electrical connection or the person who will use the machine must be aware that
the machine has been connected in such a manner; in this case the responsibility
belongs to the user.

9
www.magmaweld.com USER MANUAL
COMPACT SMART SERIES
EN
Safety Precautions
• Ensure that your welding and/or cutting machine has been installed and situated in its place
according to the user manual.
Before installing the welding / cutting equipment, the person in charge of the operation and / or
the user must conduct an inspection of possible electromagnetic interference in the environment.
Aspects indicated below has to be taken into consideration;
a) Other supply cables, control cables, signal and telephone cables, above and below the welding
/ cutting machine and its equipment,
b) Radio and television transmitters and receivers,
c) Computer and other control hardware,
d) Critical safety equipment, e.g. protection of industrial equipment,
e) Medical apparatus for people in the vicinity, e.g. pacemakers and hearing aids,
f) Equipment used for measuring or calibration,
g) Immunity of other equipment in the environment. The user must ensure that the other
equipment in use in the environment is compatible. This may require additional protection
measures.
h) Considering the time during which the welding / cutting operations or other activities take
place during the day, the boundaries of the investigation area can be expanded according to the
size of the building, the structure of the building and other activities that are being performed
in the building.
• The appliance must be connected to the electricity supply in the recommended manner by a
tube or with an equivalent shielded cable. The housing of the power supply must be connected
and a good electrical contact between these two structures has to be provided.
• The recommended routine maintenance of the appliance must be carried out. All covers on the
body of the machine must be closed and / or locked when the device is in use. Any changes,
other than the standard settings without the written approval of the manufacturer, cannot be
possibly occur.
the work area, in a side by side manner. Welding / cutting cables should not be wound in any
way.
machine to pull metal parts on to itself. To avoid this attraction, make sure that the metal
interconnected metal materials.
• In cases where the workpiece cannot be connected to the ground due to electrical safety, or
because of its size and position (for example, in building marine vessel bodies or in steel
construction manufacturing), a connection between the workpiece and the grounding may
reduce emissions in some cases, it should be kept in mind that grounding of the workpiece may
cause users to sustain injuries or other electrical equipment in the environment to break down.
In cases where necessary, the workpiece and the grounding connection can be made as a direct
connection, but in some countries where direct connection is not permissible, the connection
can be established using appropriate capacity elements in accordance with local regulations
and ordinances.
• Screening and shielding of other devices and cables in the work area can prevent aliasing
applications.
Evaluation Of
Electromagnetic
Suitability Of The
Work Area
Electromagnetic
Interferance
Reduction Methods
(EMF).
All operators must follow the following procedures to minimize the risk of exposure to EMF;
secured as far as possible with the joining materials (tape, cable ties etc.).
• The operator’s body and head should be kept as far away from the welding / cutting machine
and cables as possible,
Electromagnetic Field
(EMF)

10
EN
www.magmaweld.comUSER MANUAL
COMPACT SMART SERIESSafety Precautions
• Choose the welding / cutting method and welding machine for the welding work you are to
perform.
• Select the welding / cutting current and/or voltage to match the material and thickness you are
going to weld.
• If you have to wait for a long time before you start your welding / cutting work, turn off the machine
after the fan has cooled it down. Our machines with smart fan control will turn off on their own.
• This device is not domestic waste. It must be directed to recycling within the framework of the
European Union directive and national laws.
• Obtain information from your dealer and authorized persons about the waste management of
your used machines.
Waste Procedure
(EMF).
All operators must follow the following procedures to minimize the risk of exposure to EMF;
secured as far as possible with the joining materials (tape, cable ties etc.).
• The operator’s body and head should be kept as far away from the welding / cutting machine
and cables as possible,
• Welding / cutting and electric cables should not be wrapped around the body of the machine in
any way,
• The body of the machine should not get caught between the welding / cutting cables. The source
cables must be kept away from the body of the machine, both being placed side by side,
• The return cable must be connected to the workpiece as close as possible to the work area,
• The welding / cutting machine should not rest against the power unit, ensconce on it and not
work too close to it,
• Welding / cutting work should not be performed when carrying the wire supply unit or power
unit.
EMF may also disrupt the operation of medical implants (materials placed inside the body), such
as pacemakers. Protective measures should be taken for people who carry medical implants. For
conducted for welders. Risk assessment should be conducted and recommendations should be
made by a medical professional for users who carry medical implants.
• Do not expose the machine to rain, prevent the machine from splashing water or
pressurized steam.
Protection
WARRANTY FORM
Please visit our website www.magmaweld.com/warranty-form/wr for warranty form.

11
www.magmaweld.com USER MANUAL
COMPACT SMART SERIES
EN
TECHNICAL INFORMATION
1.1 General Information
1.2 Machine Components
Technical Information
MIG / MAG welding machine with Pulse technology, designed for heavy conditions. It offers easy movement with
its compact structure. It offers excellent welding properties with all solid and cored wires. CC / CV power supply;
It allows you to perform MIG, TIG, MMA welding methods and carbon gouging with a single machine. Thanks
to its synergic feature, welding current and voltage are adjusted automatically after welding parameters are
determined. Its classic and smart modes make it easy for the user to adapt to the synergic mode.
Figure 1 : ID 300 MK PULSE SMART / ID 400 MK PULSE SMART
Front and Rear View
1- Digital Display
2- Adjustment Pot
3- Data Socket
4- Torch Connection
5-
6- Digital Display
7- Adjustment Pot
8- On / Off Switch
9- Electrode (+) Pole Connection
10- Gas Inlet
11- Heater Socket Socket
12- Fan
13- Water Unit Energy Socket
14- Mains Cable
15- Canister Wire Input
16- Wheel
10
14
16
15
11
12
13
1 6
7
8
9
2
3
4
5

12
EN
www.magmaweld.comUSER MANUAL
COMPACT SMART SERIES
1- Digital Display
2- Adjustment Pot
3- Data Socket
4- Torch Connection
5-
6- Digital Display
7- Adjustment Pot
8- On / Off Switch
9- Electrode (+) Pole Connection
10- Water Unit Led
11- Water Unit Hot Water Inlet
12- Water Unit Cold Water Outlet
13- Gas Inlet
14- Heater Socket Socket
15- Fan
16- Cooling System Connection
17- Mains Cable
18- Canister Wire Input
19- Wheel
Figure 2 : ID 300 MKW PULSE SMART / ID 400 MKW PULSE SMART
Front and Rear View
1 6
7
8
9
10
11
12
2
3
4
5
13
19
17
14
15
16
18
Technical Information

13
www.magmaweld.com USER MANUAL
COMPACT SMART SERIES
EN
1.3 Product Label
Technical Information

14
EN
www.magmaweld.comUSER MANUAL
COMPACT SMART SERIES
X
U
I
U
IP21
U
S
I
CC / CV
Technical Information
4 minutes should be kept idle for the machine cool down (zone 2).
Duty Cycle
6 min. 6 min.6 min.4 min. 4 min. 4 min. Time (min.)
Constant Current / Constant Voltage
MIG/MAG Welding
Current
Suitable for Operation at Hazardous
Environments
Direct Current
Duty Cycle
Open Circuit Voltage
Rated Welding Current
Mains Voltage and Frequency
Protection Class
Rated Welding Voltage
Rated Power
Rated Mains Current

15
www.magmaweld.com USER MANUAL
COMPACT SMART SERIES
EN
1.4 Technical Data
TECHNICAL DATA
Protection Class
Open Circuit Voltage
Weight
Welding Current Range
Dimensions (L x W x H)
UNIT
V
VDC
kVA
ADC
kg
mm
MK
MK
MKW
MKW
400
82
IP21S
14,7
300
1078 x 528 x 962
86
1180 x 528 x 1137
110
1078 x 528 x 962
86
1180 x 528 x 1137
110
ID 300 MK/MKW PULSE SMART
IP21S
TECHNICAL DATA UNIT
400
82
22,1
400
ID 400 MK/MKW PULSE SMART
1.5 Accessories
STANDARD ACCESSORIES QTY
1Workpiece Clamp and Cable 7905203505
7905305005
ID 300 MK/MKW
PULSE SMART
ID 400 MK/MKW
PULSE SMART
OPTIONAL ACCESSORIES QTY
1
1
1
1
1
1
1
Gas Hose
CO Heater
Gas Regulator (Mix)
Gas Regulator (CO)
Lava MIG 50W Water Cooled MIG Torch (3 m)
7907000002
7020009003
7020001004
7020001005
7120050003
ID 300 - 400 MK/MKW PULSE SMART
Technical Information
ADC
Protection Class
Open Circuit Voltage
Weight
Welding Current Range
Dimensions (L x W x H)
V
VDC
kVA
ADC
kg
mm
MK
MK
MKW
MKW
ADC

16
EN
www.magmaweld.comUSER MANUAL
COMPACT SMART SERIES
INSTALLATION
2.1 Delivery Control
Make sure that all the materials you have ordered have been received. If any material is missing or damaged,
contact your place of purchase immediately.
The standard box includes the following;
• Welding machine and connected mains cable • Workpiece clamp and cable
• Welding Wire • User manual
In case of a damaged delivery, record a report, take a picture of the damage and report to the transport
company together with a photocopy of the delivery note. If the problem persists, contact the customer service.
2.2 Installation and Operation Recommendations
• Lifting rings or forklifts should be used to move the machine. Do not lift the machine with the gas cylinder.
Place the power supply on a hard, level, smooth surface where it will not fall or tip over.
• For better performance, place the machine at least 30 cm away from surrounding objects. Pay attention to
overheating, dust and moisture near the machine. Do not operate the machine under direct sunlight. If the
• Avoid welding outdoors in windy and rainy weather circumstances. If welding is necessary in such cases,
protect the welding area and the welding machine with a curtain and canopy.
• When positioning the machine, make sure that materials such as walls, curtains, boards do not prevent easy
access to the machine’s controls and connections.
• If you weld indoors, use a suitable fume extraction system. Use breathing apparatus if there is a risk of
damage the machine and this may invalidate the warranty.
• Tighten the ground wire as close as possible to the workpiece. Do not allow the welding current to pass
through equipment other than the welding cables such as the machine itself, gas cylinder, chain and roller
bearing.
• When the gas cylinder is placed on the machine, secure the gas cylinder by connecting the chain immediately.
If you will not place the gas cylinder on the machine, secure the gas cylinder to the wall with a chain.
• The electrical outlet on the back of the machine is for the C0 heater. Never connect a device to the C0 outlet
other than the C0 heater !
Symbols and their meanings on the device
Welding may be dangerous. For welding should ensure proper working conditions, and the authorized
person should take necessary precautions. Specialists are responsible for the machine and have to be
equipped with the necessary equipment and those who are not relevant should be kept away from the
welding area.
mains used in homes, it is essential that the installer or the person who will operate the machine
to make the electrical connection must have the information on the machine’s connectivity. In this
case, the person who will perform the installation or the operator will assume responsibility.
The safety symbols and warning notes on the device and in the operating instructions must be observed
and the labels must not be removed.
Grids are intended for ventilation. The openings should not be covered to provide good cooling and no
foreign objects should be inserted.
Installation

17
www.magmaweld.com USER MANUAL
COMPACT SMART SERIES
EN
2.3 Connections
For your safety, never use the mains cord of the machine without a plug.
2.3.1 Mains Plug Connection
• No plug has been connected to the mains cable since there may different types of outlets available in plants,
the grounding cable marked with and a yellow / green color is present.
• After connecting the plug to the cable, do not attach it to the outlet at this stage.
Installation
2.3.3 Connecting the Gas Cylinder
• Use regulators and heaters that comply with international standards to work safely and achieve the best
results. Make sure the size of the hose connection of the gas regulator you are using is 3/8 .
• Open the gas cylinder valve, keeping your head and face away from the outlet of the valve and keep it open for
5 seconds. By this means, possible sediment and impurities will be discharged.
• If the CO heater to the gas cylinder. After connecting the gas
regulator to the CO heater, insert the plug of the CO heater into the CO heater outlet on the back of the
machine.
• If the CO heater will not be used, connect the gas regulator directly to the gas cylinder.
• Connect one end of the tube hose to the gas regulator and tighten the clamp. Connect the other end to the gas
inlet at the back of the machine and tighten the nut.
If you hear a noise and/or detect a smell of gas as a leak indicator, examine your connections and eliminate
leakage.
2.3.2 Connecting the Grounding Clamp to the Workpiece
• Firmly connect the grounding clamp to the workpiece as close as possible to the welding area.
1
2
5
4
3
6
7 8
9
10
Figure 3 : Gas Cylinder - Heater - Regulator Connections
1- Gas Cylinder Valve 6- Gas Regulator
2- Gas Cylinder 7- Manometer
3- CO Heater 8- Flowmeter
4- Chain 9- Flow Adjustment Valve
5- CO Heater Energy Cable 10- Gas Hose

18
EN
www.magmaweld.comUSER MANUAL
COMPACT SMART SERIESInstallation
2.3.4 Water Cooling Unit
• Unit the water cooling unit is used to cool the torch It is a closed circuit system consisting of radiator, fan,
pump coolant reservoir.
• Connect the cold (blue) water hose to the cold water outlet on the water cooling system, and the hot (red)
water hose to the hot water inlet on the water cooling system.
• Magmaweld welding machines come with Magmaweld coolant, which is produced to give the best
performance. In case of lack of coolant, open the coolant reservoir cap and add Magmaweld coolant suitable
for the temperature of the working environment. The coolant must be within the minimum and maximum
values shown on the front panel of the unit.
• Different coolant or water should not be added. Different liquid additives can cause chemical reactions or
different problems.
• Magmaweld is not responsible for the risks that may arise in case of adding different liquids. All warranty
provisions will be void if different coolant or water is added to the Magmaweld coolant.
• If it is desired to use a different brand of coolant, the inside of the coolant tank should be completely empty
and there should be no residue or liquid in it.

19
www.magmaweld.com USER MANUAL
COMPACT SMART SERIES
EN
1 2
3 4 5 6
3.1 Settings in the Bag
OPERATION
Operation
As long as the button is pressed, the wire is driven and the gas valve does not work. You can use this button to
drive the wire into the torch.
gas change.
Welding method is selected. Each press of the button enables a transition between the lines in the relevant
column. When the welding method is selected, the relevant led will light.
1-) WIRE FEEDING
2-) GAS FLOW
3-) WELDING METHOD SELECTION
Setting Range
• MIG/MAG
• Pulse MIG/MAG
Pulse welding method is only available in models with pulse. In no pulse( W/O Pulse) models,
when this line is reached, the led will not light and Pulse will not be active.
According to the welding method chosen you need to adjust your connections and accessories.
There is a separate outlet for the MMA method in front of the machine.
• MMA
In Lift TIG welding method, suitable apparatus should be used for torch connector connection.
Thanks to the special apparatus, it will be compatible with the Euro connectore.
• Lift TIG

20
EN
www.magmaweld.comUSER MANUAL
COMPACT SMART SERIES
Wire type is selected. The type of wire to be used must be selected correctly. Each press of the button enables
a transition between the lines in the relevant column. When the wire type is selected, the corresponding led
will light.
Setting Range
• Steel • AlMg
• FCW • AlSi
• CrNi • CuAl
Wire diameter is selected. The wire diameter to be used must be selected correctly. Each press of the button
enables a transition between the lines in the relevant column. When the wire type is selected,
the corresponding led will light.
Setting Range
Gas type is selected. The type of gas to be used must be selected correctly. Each press of the button enables
a transition between the lines in the relevant column. When the wire type is selected, the corresponding led
will light.
Setting Range
• CO
4-) WIRE TYPE SELECTION
5-) WIRE DIAMETER SELECTION
6-) GAS TYPE SELECTION
Operation

21
www.magmaweld.com USER MANUAL
COMPACT SMART SERIES
EN
Operation
3.2 User Interface
It displays the menu content, error messages, wire speed at idle/load time, welding current, thickness value
depending on the selected mode. All parameters are displayed on the digital display.
It displays the setting parameters of the functions and the welding voltage at the time of load or idle, depending
on the selected mode.
1-) LEFT DISPLAY
2-) RIGHT DISPLAY
Idle
Synergic Mode Welding Set Current Welding Current
Smart Mode Welding Set Current Welding Current
Classic Mode Wire Speed Welding Current
Load
Idle
Synergic Mode Welding Set Voltage Welding Voltage
Smart Mode Welding Set Voltage Welding Voltage
Classic Mode Welding Set Voltage Welding Voltage
Load
1
3
7
8
6
2
4455

22
EN
www.magmaweld.comUSER MANUAL
COMPACT SMART SERIES
Welding mode is selected. Each press of the button enables a transition between the lines in the relevant
column. When the welding mode is selected, the relevant led will light.
If you want to see which value the machine originally recommends and return to that value, simply press
the adjustment button once.
Pulse MIG/MAG welding method is only available in models with pulse.
When Pulse MIG / MAG) welding method is selected as the welding method, the modes are as follows:
3-) WELDING MODE SELECTION
The choice you make from the method tab in the bag creates a differentiation in the welding mode options.
When MIG / MAG welding method is selected as the welding method, the modes are as follows:
Setting Range
• Classic Mode
• Smart Mode
• Synergic Mode
When MMA and Lift TIG welding are selected as welding methods, there is no selection in the mode section.
Operation
CLASSIC MODE
When selected, you can adjust your wire speed and welding voltage in certain tolerance value ranges. Wire
SMART MODE
When selected, welding parameters such as wire type, wire diameter, gas type must be selected correctly.
The machine will automatically adjust the optimum voltage according to the selected welding current. You
SYNERGIC MODE
When selected, welding parameters such as wire type, wire diameter, gas type and thickness must be
selected correctly. Both the current and the voltage will be automatically adjusted according to the selected
welding parameters. The user can navigate both in the current and voltage within a certain tolerance range.
The machine will automatically recalculate the voltage according to the current value set at the specified
tolerance.

23
www.magmaweld.com USER MANUAL
COMPACT SMART SERIES
EN
4-) SETTING POT
Pot (4) is turned right and left for the setting.
• When the MMA welding method is selected, the current is set by the pot.
• When the Lift TIG welding method is selected, the current is set by the pot.
• When the classic mode is selected, the wire speed is set by the pot.
• When the smart mode is selected, the current is set by the pot, the voltage against the adjusted current is
automatically calculated.
is automatically calculated according to the set thickness.
• When you press the menu button (6) and go to the functions section, you need to press the pot once and
switch to the other function in order to record in the relevant function.
When the pre gas (PrE) function is selected; (5) if this value is desired to be saved after setting with the pot
(4) it is necessary to press the pot once and switch to the post gas, namely the other function (PoS). If the
pot (4) is not pressed and next function (PoS) is not activated, and if you return directly to the main page,
there will be no recording.
5-) SETTING POT
Pot (5) is turned right and left for the setting.
• When the classic mode is selected, the voltage value is set.
• When smart mode is selected (4), the voltage is automatically calculated against the current set with the
pot. Within certain tolerance range (5) you can set the voltage by turning the pot left and right.
• When synergic mode is selected, voltage is calculated automatically according to set parameters. Within
certain tolerance range (5) you can set the voltage by turning the pot left and right.
• When menu button is (6) selected, functions will appear. Pot related functions are set.
6-) FUNCTION SELECTION
When the button (6) is pressed once, functions will appear. To return to the main page, simply press the
button again. The selected function (5) is set by turning the pot left or right, when you want to save the
selected setting, it is necessary to move to the next function. It is enough to press the pot once to save (4)
so, the setting is saved and the next function is activated. The menu section includes the following functions
respectively:
Pre-Gas
Setting Range
Before starting the welding for the specified time, gas comes in and then the welding
starts. It provides protection of the welding pool when the welding starts.
PrE
Burn Back
Burnback adjustment is made.
Setting Range
If the value seen on the screen is “+” in backburning, the wire will come forward for the
specified time. When the welding process is completed, it prevents the welding wire from
sticking to the contact nozzle.
brn
Post-Gas
Setting Range
After the end of the welding for the specified time, gas comes and the welding ends. It
provides protection of the welding pool at the end of the welding.
PoS
Operation

24
EN
www.magmaweld.comUSER MANUAL
COMPACT SMART SERIES
Blank Time
No welding period is set when the method is selected.
Setting Range
Soft Start
Soft start setting is made.
Setting Range
When starting to weld, the wire speed gradually increases from low speed to the set speed.
In this way, knocks and splashes at the beginning of the welding are prevented.
Crater
Crater function setting is made.
Setting Range
It is the filling process to prevent cracks that will occur at the end of welding. When the
crater is active, the welding current is reduced with a certain linearity at the end of the
welding and the welding ends.
PoF
SoS
Crt
Welding Time
When the method is selected, the welding time is set.
Setting Range
Pon
Operation

25
www.magmaweld.com USER MANUAL
COMPACT SMART SERIES
EN
7-) PROGRAM SELECTION
8-) TRIGGER MODE SELECTION
It is used to record the work done. There are 3 memories. The led of whichever program is processed (7)
will burn. To save the program, it is necessary to press the button once and switch to the other program. If
you are going to record in the program number 3, it will be enough to press the button once to save your
settings after the P3 led is on. Thus, all program leds will be off. After the P3 program, there is an area that
allows the program to work without registering. While in this area, the program will not be recorded and
the program leds will be off.
Setting Range
Trigger mode selection will be made. Each time the button (8) is pressed, the other trigger mode is switched.
Setting Range
• 2 Trigger
• 4 Trigger
• Method
Operation
2 TRIGGER MODE : When the torch trigger is pressed, welding starts and the trigger will be held pressed
until the welding ends. Releasing the trigger will end the welding.
PrG : Initial Gas Time
I : Welding Current
PoG : Final Gas Time
Press the Trigger Hold the Trigger Pressed Release Trigger
• Press and hold the torch trigger.
the wire feed motor runs at a slow speed.
• Welding current increases when
the workpiece is reached.
• Release the pressed torch trigger.
• The wire feed motor will stop.
• The process ends after the final gas period.

26
EN
www.magmaweld.comUSER MANUAL
COMPACT SMART SERIES
4 TRIGGER MODE : When the torch trigger is pressed and released once, welding starts and there is no
need to hold it pressed until the welding ends. Pressing and releasing the trigger again will end the welding
process.
PrG : Initial Gas Time
I : Welding Current
PoG : Final Gas Time
• Press and hold the torch trigger.
runs at a slow speed.
• Welding current increases when the workpiece is
reached.
• Release the pressed torch trigger and the welding will
continue.
• Release the pressed torch trigger.
• The wire feed motor will stop.
• The process ends after the final gas period.
METHOD :
period. This period will continue as long as the trigger is not released.
It should be preferred when the same welding seam and penetration are desired every time. The lengths
of the welds made in Method mode will be equal.
Operation

27
www.magmaweld.com USER MANUAL
COMPACT SMART SERIES
EN
2
A
1
B
Remote Control Torch Socket
Front View
TORCH CONTROL - BROWN
TORCH CONTROL - BLACK
TORCH CONTROL - RED
TORCH CONTROL - WHITE
TORCH CONTROL - GREEN
Mode
Classic Mode
Smart Mode
Synergic Mode
Setting Range : 0.5 m/min
Setting Range : 5 A
Setting Range : 5 A
Setting Range : 0.5 V
Setting Range : 0.5 m/min
Setting Range : 5 A
Setting Range : 5 A
Setting Range : 0.5 V
Setting Range : 0.5 V
Setting Range : 0.5 V
Setting Range : 0.5 V
Setting Range : 0.5 V
1
1
1
2
2
2
A
A
A
B
B
B
Button Position
Operation
3.3 Remote Control
With a torch with suitable properties and a connector, you can also change your welding current (wire speed) /
welding voltage through the torch without going near your machine. Connect the remote control torch socket.
Socket connections are as follows :

28
EN
www.magmaweld.comUSER MANUAL
COMPACT SMART SERIES
Set Wire
Wire 0 - 25
Spot
Set Voltage
Voltage 0 - 25
Crater Open
Pre Gas
Crater Closed
Pre-Gas
Pnt Mode
On
Pnt Mode
Off
Post Gas
Pre-Gas
Crater
Crater
Burn Back
Burn Back
Burn Back
Post Gas
Post Gas
Post Gas
Burn Back
Post Gas
Set Voltage
Voltage 0 - 25
Crater Open
Pre Gas
Set Wire
Wire 0 - 25
Crater Closed
Pre-Gas
Slow Release
Off
Slow Release
On
Slow Release
On
Slow Release
Off
3.4 Arc Length Adjustment (ArC)
When you press and hold the adjustment pot (5) for 3 seconds, the arc length function will be active.
pot to the right or left. As it goes towards +7, the wire approaches the nozzle, the arc length increases. As it goes
made, the setting is exited by pressing the same pot.
3.5 MIG Curve
Value Range Factory Setting 2- Position MIG
0,0 - 9,9 sec 0,1 sec
0,0 - 9,9 sec 0,0 sec
Method / 2 / 4 2
25 - 0 - 25 0 step
Thickness
Wire Type
Trigger
0,6 - 20,0 mm 1,0 mm
Arc On Time
Arc Off Time
0,0 - 9,9 sec 0,1 sec
Wire Diameter 0,6 - 2,4 mm 1,0 mm
MIG/MAG - MMA -
LIFT TIG MIG / MAG
0,2 - 9,9 sec 0,2 sec
Steel, AlMg, FCW, AlSi, FCW-M, CuSi, CrNi, CuAl
4- Position MIG
CO₂, Ar/5-10 CO₂, Ar/15-25 CO₂, Ar/2.5 CO₂, Ar/10-15 CO₂, Argon
Synergic / Smart / Classic
Active / Passive
Passive
Method
Pre-Gas
Burn Back
Post Gas
Gas Type
Crater
Mode
Operation

29
www.magmaweld.com USER MANUAL
COMPACT SMART SERIES
EN
3.6 Connection to Mains
Figure 6 : Wire Feed Roller Placement
• Place the roller to be used so that the cavities inside the wire feed roller overlap the protrusions on the wire
feed body. Turn to the right or left to ensure that the locking sound is heard and that the wire feed rollers are
in place. Then lower the pressure rollers and lift the pressure roll lever to lock it onto the pressure roller.
• Start the machine with the on/off switch.
• Turn the machine off by turning the on / off switch back to off after hearing the fan noise and seeing the mains
lamp is illuminated.
3.7 Selection and Replacement of Wire Feed Rollers
• When you open the cover of the wire feeding section, you can adjust the free gas and wire with the button on
system structure, the wire is mechanically driven with the power applied to the four rollers. Even in
negativities such as motor heating and increased friction, the wire feed speed will not change, provides
excelent arc stability. As soon as the machine is energized, the led inside of the compartment will be active
which will make it easier to replace the roller.
• Use wire feed rollers suitable for the material and diameter of the welding wire you will use. Use
V-grooved wire feed rollers for steel and stainless steel, V-grooves type for cored wires and U-grooves
type for aluminum.
• If you need to replace the wire feed rollers, pull the pressure adjustment screw toward your side and after
lifting the roller covers, remove the existing rollers.
Figure 4 : Wire Feed System
a- Motor
b- Euro Connector
c- Pressure Adjustment Screw
d- Top Wire Feed Rollers
e- Bottom Wire Feed Reels
f- Wire Feed Rollers Locking Mechanism
• You must unlock the rollers before you can remove them.
• By reverse-turning the locking direction, the cavities inside the wire feed roller must
be overlapped with the protrusions on the wire feed body in order to unlock the lock.
• Both sides of the rollers are marked according to the wire diameter used. Place the
facing your side.
Depending on the selected Mode, welding set current
adjustment will be done with the help of the pot. The setting
will be performed by turning the pot left or right.
Connect the poles according to
the type of the welding process.
Figure 5 : Wire Feed Roller Removal
Operation
a
b
d
e
f
d
cc
(1)
(3)
(3)
(2)
(6)
(4)
(4)
(5)

30
EN
www.magmaweld.comUSER MANUAL
COMPACT SMART SERIES
3.8 Placing The Wire Spool And Wire Feeding Process
• Unscrew the screw of the wire transport system by turning it. Slide the welding wire roller onto the wire
• Pull and lower the pressure screw on the wire feed roller, which means bring the pressure rollers to idle position.
• Pass the wire through the wire entry slot without releasing the wire into the rollers and into the torch
through the rollers.
• Pull the pressure adjustment screws towards you and release the pressure on the rollers .
• Turn the on/off switch to position “1” to start the machine .
• Remove the nozzle and the contact nozzle and press the trigger until the wire comes out from the tip of the
torch, while observing that the welding wire roller rotates freely then push and release the trigger a few
times to check for any loosening of the winding .
adjustment and cut the tip of the wire .
• Find and open the welding wire end from the wire spool and cut off the end with
a side chisel.
Figure 7 : Placement of Wire Spool
Figure 8 : Feeding the Wire to Rollers
If the end of the wire is missed, the wire can jump like a spring and damage you and others.
Tightening the screw of the wire transport system prevents the
wire from being fed and may cause failures. If the screw has not been
tightened adequately this can cause the wire spool to empty
after a period of time when the wire feed has stopped. For this
reason, do not connect the screw too tightly or too loosely.
BOARD
a
b
c
Operation
(3)
(1)
(2)

31
www.magmaweld.com USER MANUAL
COMPACT SMART SERIES
EN
The following effects will occur if the pressure adjustment screw is overtightened,
left loose or if the wrong wire feed roller is used.
Make the gas adjustment and gas test by lifting the wire feed roller pressure lever!
A: Suitable wire pressure and conduit dimensions.
B: The wire is distorted since the pressure lever is too tight.
C: The roller surface is deteriorated due to excessive pressure on the pressure lever.
D: The conduit length of the roller is small for the wire used. Wire form is distorted.
E: The conduit length of the roller is big for the wire used. The wire cannot be transmitted to the welding area.
Figure 9 : Pressure Setting and Roller Selection Mistakes
3.9 Adjustment of Gas Flow
wire diameter.
For example, if the wire diameter is 0.9 mm, the gas
adjustment.
and close the wire feed unit door.
Operation
8 lt/min.
Mild Steel
and
Metal Cored
Diameter (mm)
0.8
0.9
1.0
1.2
Flux Cored Stainless
Steel Aluminium
7 lt/min. 8 lt/min. 8 lt/min.
9 lt/min. 8 lt/min. 9 lt/min. 9 lt/min.
10 lt/min. 9 lt/min. 10 lt/min. 10 lt/min.
12 lt/min. 11 lt/min. 12 lt/min. 12 lt/min.

32
EN
www.magmaweld.comUSER MANUAL
COMPACT SMART SERIES
3.10 Machine Features
CC / CV Construction
• Allows MIG, MMA and TIG welding.
Smart Performance
• Thanks to the intelligent performance control, the welding parameters of the machine are continuously
monitored and analyzed.
• If compulsory conditions occur, the machine switches to the protection mode in order to extend its life and
protect itself against malfunctions.
• This protection is indicated by a thermal led warning on the machine panel.
• The machine is reactivated after 2 minutes of safe time.
Operation with generators
• Suitable for operation with generators. The kVA operating value should be determined by referring to the
Variety of Usage Functions
Voltage Protection
• If the mains voltage is too high or too low, the machine automatically protects itself by giving an error code
on the display. By this means, no damage is caused to the machine components and long life of the machine
is ensured. After the ambient conditions have returned to normal, the machine functions will also be
activated.
Memory
• There are 3 job memories that can be saved.
Smart Fan
• The internal temperature of the machine is continuously measured. The cooling fan speed is increased or
decreased according to the measured temperature. When the temperature is below a certain degree, the
phase will be stopped completely. The amount of dust entering the machine is reduced by this function. As
the machine life is prolonged, energy will be saved. The fan provides continuous cooling performance
during welding.
Current/Voltage Control over the Torch
• With the control connection option, you can also change your welding current / welding voltage through
the torch without going near your machine.
Protection
• Protected against missing or incorrect phase.
Soft Start
• Prevents the formation of knocked and jerky start by increasing the wire speed gradually.
Magnet Compatibility
Some values can be read on the LCD panel on the machine front, while other information (Original
on the magNET platform. (Optional)
Robot Compatibility
• Provides ease of use with its robot compatible structure.
Operation

33
www.magmaweld.com USER MANUAL
COMPACT SMART SERIES
EN
MAINTENANCE AND SERVICE
responsible for accidents that may occur as a result of interventions by unauthorized persons.
• You can obtain the parts to be used in the repairs from our authorized services. The use of original spare parts
will extend the life of your machine and prevent performance losses.
• All warranty provisions will become void due to any interference not authorized by Magmaweld within the
warranty period.
• Make sure you comply with the applicable safety rules during maintenance and repair works.
• Disconnect the machine’s plugs from the mains before carrying out any repairs and wait for 10 seconds for
the capacitors to discharge.
4.1 Maintenance
Maintenance and Service
Daily Maintenance
• Wire Feeding Mechanism should be kept clean and roller surfaces should never
be oiled. Always clean the residues accumulated on the mechanism with the help
of dry air at each welding wire change.
• Consumables on the torch should be cleaned regularly. If necessary, it should be
Every 3 Months
• Do not remove the warning labels on the device. Replace worn/torn labels with
new ones. You can obtain the labels from the authorized service.
• Check your pliers and cables. Pay attention to the connections and strength of the
parts.
• Replace damaged / defective parts with new ones. Never add/repair cables.
• Make sure there is enough space for ventilation. Consumables on the optional TIG
torch should be cleaned regularly. If necessary, it should be replaced. Care should
NOTE: The above mentioned periods are the maximum ones that should be applied if no problems are
encountered in your device. Depending on the work load and contamination of your work environment,
you can repeat the above processes more frequently.
Never operate the machine when covers are open.
Every 6 Months
• Clean and tighten the connecting parts such as bolts and nuts. Check the electrode
clamp and earth clamp cables. Open the side covers of the machine and clean it
with low pressure dry air. Do not apply compressed air from close distance to
electronic components.
• Periodically renew the water in the tank of the water cooling unit with clean,
or

34
EN
www.magmaweld.comUSER MANUAL
COMPACT SMART SERIES
4.2 Troubleshooting
The following tables contain possible errors to be encountered and their solutions.
Machine is not operating
Wire feed motor failure
The wire feed motor is
operating, but the wire
is not moving further
Welding quality is not good
• Make sure that the machine is
plugged in
• Check the fuse
• Select the appropriate wire feed
roller
• Make sure that the grounding
clamps of the machine is
connected to the workpiece
• Make sure that the cables are
secure and that the connection
points are not worn
• Make sure that the parameter
and process selection are correct.
Follow the steps below according
to the process you have selected
• Make sure the welding torch is
secure
• Appropriate consumables should
be selected and the consumables
on the torch must be cleaned
regularly. Improperly selected or
worn consumables should be
replaced
• Pressure roller settings must be
made correctly
• The fuse has blown
• Check the contactor
• Check the fuse
• Check the power supply fuses,
mains cable and plug
• Electronic card failure
• Wire feed rollers were not chosen
• Cables and connection points are
worn out
• Parameter and process selection
are not correct
• Welding torch is damaged
• Consumables were selected
incorrectly or damaged
• The pressure adjustment of the
rollers is not correct
• There is a problem in the
connection of grounding clamps
of the machine
• The pressure on the wire feed
rollers is too minimal
• Check whether the mains
connections are correct
• Contact the authorized service
• Adjust the pressure roller
Failure Reason Solution
• The machine is not connected to
the mains, or the plug is not
connected
• Contactor failure
• The fuse has blown
• The power supply fuses, mains
cable or plug are problematic
• The mains connections are not
correct
Maintenance and Service

35
www.magmaweld.com USER MANUAL
COMPACT SMART SERIES
EN
• The welding parameters have
not been selected appropriately
• All parameters such as wire
type, gas type, etc. must be
selected according to your
welding method
The value 0000 / NOP will be
displayed on the screen
Fan is not operating
Machine operates noisily
welding current
Heater outlet is not operating
• Check the fuse
• Contact the authorized service
• Contact the authorized service
• Check the fuse. Contact the
authorized service
• The fuse has blown
• Contactor failure
• Diode group failure
• The fuse has blown
• Fan motor failure • Contact the authorized service
Failure Reason Solution
Maintenance and Service

36
EN
www.magmaweld.comUSER MANUAL
COMPACT SMART SERIES
Maintenance and Service
4.3 Error Codes
• There may be problems at different
points in the machine • Contact the authorized serviceE01
E02
Communication
Error
• Visually inspect the fan for proper
operation. Please contact the
authorized service if it does not
operate
• Open the air ducts
• Wait for a while to allow the machine
to cool down. If the failure
disappears, try to run the machine at
lower amperage values
• Ensure that the machine is placed
in an area where it can work operate
comfortably
• The machine’s run time rate may have
been exceeded
• Fan may not be operating
• The air inlet and outlet ducts may
have been blocked
• The machine operating environment
can be extremely hot or lack of air
E03
E04
E05
E06
Thermal
Protection
• Contact the authorized service
• The machine may have been
overloaded
Overcurrent
Failure
Low mains
voltage
Temperature
Sensor
Reading Failure
High mains
voltage
• Contact the authorized service
• Check the mains connection cables
and voltage. Make sure that the
correct voltage input is provided. If
the mains voltage is normal, contact
the authorized service
• Check the mains connection cables
and voltage. Make sure that the
correct voltage input is provided.
If the mains voltage is normal,
contact the authorized service
• Contact the authorized service
• There may be problems at different
points in the machine
• Mains voltage may have decreased
• Mains voltage may have increased
• Temperature sensor may have failed
or there may be an electrical
connection problem
Error Code Error Cause Solution

37
www.magmaweld.com USER MANUAL
COMPACT SMART SERIES
EN
Power Source
NO
1
12
4
15
7
18
10
2
13
5
16
8
19
11
3
14
6
17
9
MATERIAL CODE
Connector
Plastic Sleeve
Switch Button
Choke Coil
Wire Feeding System
Welding Socket
Power Connector
Electronic Card Rs Filter
Gas Valve Sleeve
Potency Button
Connector
K405000230
K405000313
K405000230
A308900004
A376400016
K405000254
K405000255
A378000103
A377900106
A229900003
K309002213
K405000324
A378000050
K405000262
A421050002
K405000312
A229500001
A256006069
K405000253
A378002002
1
2
3
4
5
6
7
8
9
10
11
12
13
14 15
16 17
18
19
5.1 Spare Parts Lists
ANNEX
Annex
DEFINITION

38
EN
www.magmaweld.comUSER MANUAL
COMPACT SMART SERIES
1
2
3
4
5
6
7
MATERIAL CODE
NO
Fan
1
4
7
2
5
8
3
6
A249000005
A240000006
A300190001
A245700003
A250001126
A300101011
A245700002
A260000010
DEFINITION
Water Cooling Unit
Annex
Radiator
Glass Fuse Holder
Glass Fuse Fast
Water Tank
Water Pump

39
www.magmaweld.com USER MANUAL
COMPACT SMART SERIES
EN
R
S
T
Membrane Panel
Front Panel
Line Filter Primary Recti�ier Capacitors IGBT Module High Frequency Transformer Secondary Recti�ier Output Choke
Shunt Workpiece
Hall Effect
Control Unit
Control
Line
Gas
Wire Feeding Unit
Output Filter
Welding Torch
Welding Torch
Control Line
Solenoid Valve
Control Transformer
5.2 Block Diagram
Annex

40
EN
www.magmaweld.comUSER MANUAL
COMPACT SMART SERIES
(Water Un�t Socket) GLASS FUSE FAST
WATER PUMP
Annex
5.3 Water Unit Circuit Diagram

Model
Serial Number
Dealer Name
City / Country
Phone / E-mail
Purchase Date
Name MAGMA MEKATRONİK MAKİNE SANAYİ VE TİCARET A.Ş.
Address
Company Name
City / Country
Phone / E-mail
Phone / E-mail
Contact Name
Organize Sanayi Bölgesi 5. Kısım MANİSA
+90 236 226 27 00 / info@magmaweld.com
Company Name
Technician's Name
Commissioning Date
(Warranty Start Date)
WARRANTY CARD
Please visit out web site www.magmaweld.com/warranty-terms/wt for warranty
terms.
PRODUCT INFORMATION
MANUFACTURER
PURCHASE INFORMATION
CUSTOMER INFORMATION
SERVICE INFORMATION (if applicable)


43
www.magmaweld.com MANUEL D’UTILISATION
SÉRIE SMART COMPACTE
FR
SOMMAIRE
1
1.1
1.2
1.3
1.4
1.5
2
2.1
2.2
2.3
2.3.1
2.3.2
2.3.3
2.3.4
3
3.1
3.2
3.3
3.4
3.5
3.6
3.7
3.8
3.9
3.10
4
4.1
4.2
4.3
5
5.1
5.2
5.3
CONSIGNES DE SÉCURITÉ
SPÉCIFICATIONS TECHNIQUES
Explications Générales
Composants de la Machine
Étiquette du Produit
Caractéristiques Techniques
Accessoires
INSTALLATION
Considérations Relatives à la Réception de la Machine
Conseils d’Installation et de Fonctionnement
Branchements pour le Poste de Soudage
Branchements Électriques
Connexion de la Pince de Masse à la Pièce à Travailler
Connexion de la Bouteille de Gaz
Unité de Refroidissement par Eau
UTILISATION
Interface Utilisateur
Structure du Menu
Contrôle à Distance
Réglage de la Longueur de l’Arc (ArC)
Courbe de Soudage MIG
Branchement au Réseau
Choix et Remplacement des Galets de Dévidage
Installation de la Bobine de Fil et Dévidage
Ajustement du Débit de Gaz
Caractéristiques de la Machine
MAINTENANCE ET DÉFAILLANCES
Maintenance
Dépannage
Codes d’incident
ANNEXE
Diagramme
Schéma du circuit de l’unité d’eau
44
50
50
52
54
54
55
55
56
56
56
56
57
58
60
66
67
67
68
68
69
70
71
72
73
75
76
78
79
Sommaire

44
www.magmaweld.comMANUEL D’UTILISATION
FR
SÉRIE SMART COMPACTE
dangers potentiels.
risque de blessure et que les dangers éventuels doivent être écartés en lisant attentivement les
explications fournies.
• Le propriétaire de la machine est responsable d’empêcher les personnes non autorisées
d’accéder à l’équipement.
• Toute personne appelée à travailler avec cette machine doit posséder l’expérience en soudage
/ coupage ou avoir terminé avec succès la formation requise, lire le présent manuel d’utilisation
avant de travailler et se conformer à tout moment aux consignes de sécurité.
Informations sur la
• Veuillez lire attentivement le présent manuel d’utilisation, les étiquettes et les consignes de
sécurité se trouvant sur la machine.
étiquettes manquantes ou endommagées.
• Veuillez prendre connaissance des informations concernant l’utilisation et les procédés de
• Utilisez votre machine dans des environnements de travail appropriés.
sécurité de fonctionnement et la durée de vie de votre machine.
• Le fabricant ne pourra pas être tenu responsable des conséquences du fonctionnement de
l’appareil en dehors des conditions préconisées.
Prise de connaissance
Pictogrammes de
ATTENTION
Indique une situation potentiellement dangereuse qui pourrait causer des blessures ou des
dommages. Le fait de ne pas prendre de précautions peut causer des blessures ou des pertes ou
dommages matériels.
REMARQUE
Indique des informations et des avertissements concernant l’utilisation de la machine.
DANGER
Indique une situation imminente dangereuse qui, si elle n’est pas évitée, entraînera une blessure
grave ou mortelle.
• Porter un tablier de travail et des gants de protection secs offrant une bonne isolation.
Ne jamais utiliser des gants et des tabliers de travail mouillés ou endommagés.
• Porter des vêtements de protection ignifuges contre le risque de brûlure. Les vêtements utilisés
par l’opérateur doivent être protégés contre les étincelles, les projections et le rayonnement
d’arc.
• Ne travaillez pas seul. Soyez sur d’avoir quelqu’un qui peut vous aider en cas de danger dans
votre lieu de travail
• Ne touchez pas l’électrode avec la main nue. Ne laissez pas être en contact la pince d’électrode
ou l’électrode avec quelqu’un ou avec un objet alimenté.
• Ne touchez aucun composant électrique.
• Ne touchez pas l’électrode si vous êtes en contact avec l’électrode reliée à la surface de travail,
au plancher ou à une autre machine.
• Vous pouvez vous protéger d’une électrisation potentielle en vous isolant de la surface de
travail.
entrainer la mort
CONSIGNES DE SÉCURITÉ
Consignes de Sécurité

45
www.magmaweld.com MANUEL D’UTILISATION
SÉRIE SMART COMPACTE
FR
• Ne pas laisser toucher les deux pinces de masse connectés à deux différents postes. Ceci est
dangereux vu qu’il y aura deux tensions en circuit ouvert.
• Avant de réparer la machine, retirez toutes les connexions d’alimentation et / ou les
connecteurs ou éteignez la machine.
• Soyez sur que toutes les connexions sont bien serrées, propres et seches.
également les endroits où il y aura un risque de chute.
• Le courant alternatif doit être utilisé uniquement s’il est nécessaire pour le procès de soudage.
• Si le courant alternatif est obligatoire pour votre travail, utilisez (si existe) votre télécommande
pour régler votre poste.
Les précautions additionnelles sont nécessaires si une des conditions hasardeuses
ci-dessous existe :
• Dans des endroits humides ou si vos habilles sont mouillés,
• Sur les structures mettalliques comme les escaliers, les grilles ou les échafauds.,
• Dans des positions comme assises, à genoux ou allongées,
masse.
présentation :
• Un poste à souder MMA en courant continu (DC),
• Un poste en courant continue ou alternatif avec la tension réduit à circuit ouvert (VRD).
• Arrêtez le courant électrique.
• Utilisez des matériaux non conductibles comme le bois sec pour couper le contact de la victime
• Appelez les services de secours.
• Si la victime ne respire plus, après avoir coupé le contact de la victime avec le courant, effectuez
immédiatement la réanimation cardiorespiratoire (RCP). Continuez la RCP jusqu’au moment où
la victime respire de nouveau ou les secours arrivent.,
• Traiter une brulure électrique comme une brulure thermique. Appliquez des compresses
stériles et froides.
• Gardez tous les capots de protection tels que les portes, les panneaux, les portes des machines
et des appareils fermés et verrouillés.
• Portez des chaussures à coque métallique à protection contre le risque de chute d’objets lourds.
Les pièces mobiles
peuvent causer des
blessures
• La sensation de brûlure et l’irritation au niveau des yeux, des muqueuses nasales et des voies
respiratoires sont des symptômes d’une ventilation inadéquate. Dans ce cas, veuillez
augmenter immédiatement le niveau de ventilation de la zone de travail et arrêter le processus
de soudage / coupage si le problème persiste.
• Utilisez un système d’absorption de fumée approprié à l’endroit où le soudage / coupage et le
découpage sont effectués. Si nécessaire, installez un système adéquat pour éliminer les fumées
pour éviter de polluer l’environnement lors du rejet.
du béryllium, du cadmium, du zinc, des matériaux revêtus ou peints, utilisez une protection
respiratoire autonome en plus des précautions susmentionnées.
Consignes de Sécurité

46
www.magmaweld.comMANUEL D’UTILISATION
FR
SÉRIE SMART COMPACTE
gardez les soupapes principales fermées lorsque les bouteilles de gaz ne sont pas utilisées, et
surveillez les fuites de gaz éventuelles.
• Les gaz protecteurs tels que l’argon étant plus denses que l’air, ils peuvent être inhalés à la place
de l’air s’ils sont utilisés à l’intérieur. Cela présente également un risque pour votre santé.
• Ne soudage / coupage pas dans des environnements contenant des vapeurs d’hydrocarbures
• Certaines pièces soudées / coupées nécessitent une ventilation spéciale. Aération spéciale Les
règles de sécurité des produits qui le nécessitent doivent être lues attentivement. Le masque à
gaz doit être porté Dans de tels cas, un masque à gaz approprié doit être porté.
• Les procédés tels que le soudage / coupage, le meulage, le brossage de la surface peuvent
générer des étincelles et des projections de particules métalliques. Portez des lunettes de
prévenir les blessures éventuelles.
protections de pièces
peuvent blesser vos
yeux
• Ne procédez à aucune opération de soudage / coupage e ni de découpage sur des tubes ou des
tuyaux entièrement fermés.
soudage / coupage dans ces types d’endroits.
• Ne soudez pas les tubes ou les tuyaux destinés aux substances susceptibles de provoquer une
explosion, un incendie ou d’autres réactions, même s’ils sont vides.
• L’équipement de soudage / coupage chauffe. Par conséquent, ne le placez pas sur des surfaces
qui peuvent facilement être brûlées ou endommagées !
peuvent se produire.
• Enlevez ces matériaux de l’environnement avant de commencer à soudage / coupage ou
• Le bruit créé par certains équipements et processus peut altérer l’ouïe.
• Ne maintenez pas la torche contre une partie du corps, d’autres personnes ou tout autre métal
blesser ou blesser des tiers, protégez particulièrement vos yeux et votre visage lors de cette
manipulation.
causer des blessures
• Ne touchez pas les pièces chaudes à mains nues.
• Avant d’intervenir sur les pièces de la machine, attendez un certain temps pour les laissera
refroidir.
• Si vous devez manipuler les pièces chaudes, portez des outils appropriés, gants de soudage
/ coupage à isolation thermique et vêtements résistant au feu.
Les surfaces chaudes
peuvent causer de
brûlures graves
coupage peut entraîner des
incendies et des explosions
• Pour protéger vos yeux et votre visage, utilisez un masque et un écran de protection en verre
appropriés (4 à 13 selon la norme EN 379).
• Protégez les autres parties nues de votre corps (bras, cou, oreilles, etc.) contre ces rayons à
l’aide des vêtements de protection adéquats.
l’arc et métaux chauds.
• Cette machine n’est pas destinée à chauffer des tuyaux gelés. Ce procédé provoquera une
explosion, un incendie ou des dommages à votre installation.
endommager vos yeux
et votre peau
Consignes de Sécurité

47
www.magmaweld.com MANUEL D’UTILISATION
SÉRIE SMART COMPACTE
FR
• Les étincelles générées lors du soudage peuvent provoquer un incendie. Par conséquent, gardez
un extincteur, de l’eau, du sable et autres matériaux à portée de la main.
effectuées et qu’elles fonctionnent correctement.
• Les équipements électriques ne doivent pas être réparés par des personnes non autorisées. Les
erreurs éventuelles peuvent entraîner des blessures graves, voire mortelles, lors de l’utilisation.
• Les éléments du circuit de gaz fonctionnent sous pression; l’intervention de personnes non
autorisées peut causer des explosions et des blessures graves pour les utilisateurs.
• Il est recommandé d’effectuer la maintenance technique de la machine et de ses unités
auxiliaires au moins une fois par an.
petits volumes et en compagnie d’une autre personne.
• Évitez autant que possible le soudage / coupage et le découpage dans des endroits fermés.
La maintenance des
machines et appareils par
des personnes non
des blessures
Soudage / Coupage dans
pour éviter les chutes et les renversements. Préférez les zones immobiles, mais vastes,
• Les opérateurs doivent facilement et rapidement accéder aux paramètres de commande et
connexions de la machine.
La chute de pièces
peut causer des
blessures
• Laissez la machine refroidir en fonction des cycles de fonctionnement.
• Réduisez le courant ou le taux de cycle de fonctionnement avant de recommencer le soudage.
• Ne bloquez pas les entrées de ventilation de la machine.
fabricant.
Une utilisation excessive
provoque la surchauffe
de la machine”
• Prenez toutes les précautions nécessaires pour le transport de la machine. Les zones à
transporter, les équipements à utiliser pour le transport et les conditions physiques et la santé
de la personne chargée de la manutention doivent être conformes au processus de transport.
• Certaines machines étant extrêmement lourdes, il est important de veiller à ce que les
précautions nécessaires en matière de sécurité environnementale soient prises pour la
manutention.
• Si la machine de soudage doit être utilisée sur une plateforme, la capacité de charge de la
• En cas d’utilisation d’un véhicule (chariot, chariot élévateur à fourche, etc.) lors du transport
(élingues, sangles d’arrimage, boulons, écrous, roues, etc.) reliant la machine au véhicule sont
intacts.
Internationale du Travail sur le poids du transport et les réglementations en vigueur dans votre
pays.
• Utilisez toujours des poignées ou des anneaux pour le déplacement du bloc d’alimentation. Ne
séparément.
• Avant de transporter le matériel de soudage / coupage et de découpe, débranchez toutes les
connexions intermédiaires, puis soulevez et transportez les petites pièces séparément en les
tenant par leurs poignées, et les grandes à l’aide d’un équipement de manutention approprié tel
que des anneaux de transport ou des chariots élévateurs.
Le fait de ne pas
transport peut
causer des accidents
Consignes de Sécurité

48
www.magmaweld.comMANUEL D’UTILISATION
FR
SÉRIE SMART COMPACTE
• Cet appareil appartient au groupe 2, classe A dans les tests de CEM selon la norme TS EN 55011.
• Cet appareil de classe A n’est pas destiné à une utilisation dans les zones résidentielles où
compatibilité électromagnétique en raison des interférences radioélectriques transmises et
émises dans ces endroits.
(CEM). Les interférences électromagnétiques qui peuvent se produire lors du soudage /
coupage ou du découpage peuvent causer des effets indésirables sur vos appareils
électroniques et votre secteur. Les effets qui peuvent se produire au cours du processus sont
sous la responsabilité de l’opérateur.
• Si des interférences se produisent, des mesures supplémentaires peuvent être prises pour
• Effectuez les opérations de soudage / coupage le plus loin possible (100 m) de vos appareils
électroniques sensibles pour prévenir les dommages CEM potentiels.
conformément aux consignes d’utilisation.
connecter au réseau basse tension utilisé dans les maisons, l’installateur ou la
personne qui utilisera la machine doit être familiarisé avec la connexion de la
machine, dans ce cas la responsabilité appartient à l’opérateur.
peut causer des
Avant d’installer la machine de soudage / coupage et de découpe, le responsable du site et / ou
l’environnement. Les conditions suivantes sont à considérer ;
a)
b) Émetteurs et récepteurs de radio et de télévision,
c) Matériel informatique et autre matériel de contrôle,
d) Équipements de sécurité critiques, par exemple protection de l’équipement industriel,
e) Appareils médicaux des personnes à proximité, tels que stimulateurs cardiaques et appareils
auditifs,
f) Équipement utilisé pour la mesure ou l’étalonnage,
g) Immunité des autres équipements dans l’environnement. L’opérateur doi s’assurer que tout
autre matériel utilisé dans l’environnement soit compatible. Cela peut nécessiter des mesures
de protection supplémentaires,
h) Les limites de la zone d’inspection peuvent se varier en fonction du temps pendant lequel le
procédé de soudage / coupage ou d’autres activités seront effectués pendant la journée, de la
En plus de l’évaluation des conditions de la zone, l’évaluation de l’installation des appareils peut
également être nécessaire pour résoudre l’effet perturbateur. Si nécessaire, des mesures sur site
• La machine doit être branchée à un réseau électrique tel que recommandé et par une personne
contact électrique doivent être assurés entre le blindage et le boîtier de l’alimentation.
• L’entretien de routine recommandé pour la machine doit être effectué. Lors del’utilisation de la
machine, tous les capots de protection doivent être fermées et / ou consignés. Aucun changement
l’approbation écrite du fabricant. Sinon, l’opérateur sera responsable de toutes les conséquences.
cas être enroulés autour du corps.
• Un champ magnétique se forme dans la machine lors du soudage / coupage. Cela peut amener la
que les matériaux métalliques soient à une distance de sécurité et sécurisés. L’opérateur doit être
isolé de tous ces matériaux métalliques interconnectés.
Évaluation de la com-
-
fonctionnement
Consignes de Sécurité

49
www.magmaweld.com MANUEL D’UTILISATION
SÉRIE SMART COMPACTE
FR
Le courant électrique passant par n’importe quel conducteur crée des champs électriques et
minimiser les risques engendrés par l’exposition aux CEM du circuit de soudage :
soudage / coupage doivent être rassemblés
• Le corps et la tête de l’opérateur doivent être tenus aussi loin que possible de la machine à
soudage / coupage
soudage / coupage ne doivent jamais être enroulés autour du corps
du poste à souder.
soudage / coupage
être tenus à l’écart du qq corps, côte à côte.
soudage / coupage.
• Ne vous appuyez pas sur le groupe électrogène de soudage, ne vous asseyez pas dessus et ne
travaillez pas trop près.
• Le soudage / coupage ne doit pas être effectué pendant le transport de l’unité d’alimentation en
Les CEM peuvent également perturber le fonctionnement des implants médicaux (substance
placée à l’intérieur du corps), tels que les stimulateurs cardiaques. Des mesures de protection
doivent être prises pour les personnes portant des implants médicaux. Par exemple, l’accès dans
la zone du travail pourraient être restreint pour les passants, ou des évaluations individuelles des
risques pourraient être effectuées pour les soudeurs. Une évaluation des risques doit être
effectuée par un spécialiste médical pour les utilisateurs d’implants médicaux.
(CEM)
• Toutefois, dans certains pays où la connexion directe n’est pas autorisée, la connexion peut être
établie à l’aide d’éléments de capacité appropriés, conformément aux réglementations locales
peuvent prévenir les effets perturbateurs. Le cas échéant, la connexion entre la pièce à usiner
et la terre peut être réalisée sous forme de connexion directe. Toutefois, dans certains pays
où la connexion directe n’est pas autorisée, la connexion peut être établie à l’aide d’éléments de
capacité appropriés, conformément aux réglementations locales en vigueur.
prévenir des effets perturbateurs. Le blindage de toute la zone de soudage / coupage peut être
• Choisissez la méthode et la machine de soudage / coupage appropriées pour votre soudage.
• Sélectionnez le courant et/ou la tension de soudage / coupage en fonction du matériau et de l’épais
seur auxquels vous soudez.
• Si vous devez attendre longtemps pour le soudage / coupage, éteignez la machine une fois que le
ventilateur l’a refroidie. Nos machines (produits) munies d’un système de ventilateur intelligent
s’arrêteront automatiquement.
• Cet appareil n’est pas un déchet ménager. Elle doit être déposée dans un centre de recyclage
agrée dans le cadre de la directive de l’Union Européenne et du droit national.
déchets de votre machine usagée.
• N’exposez pas la machine à la pluie, empêchez les éclaboussures d’eau ou de la vapeur
pressurisée d’y pénétrer.
Protection
Consignes de Sécurité
FORMULAIRE DE GARANTIE
Pour le formulaire de garantie, visitez notre site web www.magmaweld.fr/formulaire-de-garantie/wr.

50
www.magmaweld.comMANUEL D’UTILISATION
FR
SÉRIE SMART COMPACTE
SPÉCIFICATIONS TECHNIQUES
ID 300 MK / MKW PULSE SMART, ID 400 MK / MKW PULSE SMART est un poste de soudage MIG / MAG
à sa fonction synergique, le courant et la tension de soudage sont ajustés automatiquement après la
l’adaptation de l’utilisateur au mode synergique.
1.2 Composants de la Machine
Figure 1 : ID 300 MK PULSE SMART / ID 400 MK PULSE SMART
Vue Avant et Arrière
1-
2- Pot d’ajustement
3- Prise de données
4- Connexion de la torche
5- Connexion du pôle
6-
7- Pot d’ajustement
8- Interrupteur marche / arrêt
9- Connexion du pôle d’électrode (+)
10- Entrée de gaz
11- Prise de courant pour chauffage
12- Ventilateur
13- Prise d’énergie de l’unité d’eau
14-
15-
16- Molette
10
14
16
15
11
12
13
1 6
7
8
9
2
3
4
5

51
www.magmaweld.com MANUEL D’UTILISATION
SÉRIE SMART COMPACTE
FR
1-
2- Pot d’ajustement
3- Prise de données
4- Connexion de la torche
5- Connexion du pôle
6-
7- Pot d’ajustement
8- Interrupteur marche / arrêt
9- Connexion du pôle d’électrode (+)
10- Unité d’eau led
11- Entrée d’eau chaude de l’unité d’eau
12- Sortie d’eau froide de l’unité d’eau
13- Entrée de gaz
14- Prise de courant pour chauffage
15- Ventilateur
16- Prise d’énergie de l’unité hydroélectrique
17-
18-
19- Molette
Figure 2 : ID 300 MKW PULSE SMART / ID 400 MKW PULSE SMART
Vue Avant et Arrière
1 6
7
8
9
10
11
12
2
3
4
5
13
19
17
14
15
16
18

52
www.magmaweld.comMANUEL D’UTILISATION
FR
SÉRIE SMART COMPACTE
1.3 Étiquette du Produit

53
www.magmaweld.com MANUEL D’UTILISATION
SÉRIE SMART COMPACTE
FR
X
U
I
U
IP21
U
S
I
Transformateur Redresseur Triphasé
Courant Continu
Courant Constant / Tension Constante
Soudage MIG / MAG
Courant Alternatif Triphasé
Compatible Pour Travailler dans des
Environnements Dangereux
CC / CV
Cycle de Fonctionnement
Tension de Fonctionnement à Vide
Courant d’entrée Nominal
Tension et Fréquence du Secteur
Classe de Protection
Tension Nominale de Soudage
Tension d’entrée Assignée
Courant d’entrée Assigné
/ coupage sans arrêt (zone 1) pendant les 6 premières minutes de la période de 10 minutes. Cependant, doit
rester inactive pendant les 4 minutes suivantes pour se refroidir.
Cycle de Fonctionnement
6 min. 6 min.6 min.4 min. 4 min. 4 min. Temps (min.)

54
www.magmaweld.comMANUEL D’UTILISATION
FR
SÉRIE SMART COMPACTE
400
82
IP21S
14,7
300
1078 x 528 x 962
86
1180 x 528 x 1137
110
ID 300 MK/MKW PULSE SMART
400
22,1
ID 400 MK/MKW PULSE SMART
1.5 Accessoires
ACCESSOIRES STANDARDS QUANTITÉ
1 7905203505
7905305005
ID 300 MK/MKW
PULSE SMART
ID 400 MK/MKW
PULSE SMART
ACCESSOIRES EN OPTION QUANTITÉ
1
1
1
1
1
1
1
Tuyau de Gaz
Boite d’Accessoire MIG/MAG CO
7907000002
7020009003
7020001004
7020001005
7120050003
ID 300 - 400 MK/MKW PULSE SMART
V
VDC
kVA
ADC
ADC
kg
mm
MK
MK
MKW
MKW
SPÉCIFICATIONS TECHNIQUES UNITÉ
Alimentation Triphasé 50/60 Hz
Classe de protection
Tension d’entrée assignée
Courant de soudage nominal
Tension en circuit ouvert
Poids
Zone d’ajustement de courant de soudage
Dimensions (L X L X H)
V
kVA
SPÉCIFICATIONS TECHNIQUES UNITÉ
Alimentation Triphasé 50/60 Hz
Tension d’entrée assignée
1078 x 528 x 962
86
1180 x 528 x 1137
110
IP21S
82
400
VDC
ADC
ADC
kg
mm
MK
MK
MKW
MKW
Classe de protection
Courant de soudage nominal
Tension en circuit ouvert
Poids
Zone d’ajustement de courant de soudage
Dimensions (L X L X H)
Réchauffeur CO (24V)
Régulateur de Gaz (Mix)
Régulateur de Gaz (CO)
Lava MIG 50W (3 m) Torche MIG Refroidie à l’Eau

55
www.magmaweld.com MANUEL D’UTILISATION
SÉRIE SMART COMPACTE
FR
manquant ou endommagé, contactez immédiatement votre revendeur.
La boîte standard comprend les éléments suivants;
• Fil de soudage • Manuel d’utilisation
transporteur avec une copie du bon de livraison. Si le problème persiste, contactez le service client.
• Des anneaux de levage ou un chariot élévateur doivent être utilisés pour la manutention de la machine.
Ne soulevez pas la machine AVEC LA BOUTEILLE DE GAZ. Placez le bloc d’alimentation sur une surface stable,
plane, rigide et non inclinée.
• Pour une meilleure performance, installez votre machine à au moins 30 cm des objets environnants. Faites
attention à la surchauffe, à la poussière et à l’humidité autour de la machine. Ne pas utiliser la machine en plein
à un cycle de fonctionnement plus faible.
• Évitez de souder à l’extérieur lorsqu’il y a du vent et de la pluie. Si le soudage est nécessaire dans de tels cas,
protégez la zone de soudage et la machine de soudage avec des rideaux et des auvents.
panneaux, etc. n’empêchent pas l’accès facile aux commandes et aux connexions de la machine.
• Si vous soudez à l’intérieur, utilisez un système approprié d’absorption de fumée. Utilisez un appareil
respiratoire s’il y a un risque d’inhalation de fumée et de gaz à l’intérieur.
nombre de cycle approprié peut endommager la machine et annuler la garantie.
chaîne et le roulement.
• La prise électrique située à l’arrière de la machine est destinée au réchauffeur de gaz CO. Ne brancher jamais
un appareil autre que le réchauffeur de gaz CO à la prise CO.
INSTALLATION
Le procédé de soudage est dangereux. Les conditions de travail appropriées doivent être fournies et les
précautions nécessaires doivent être prises. Les experts sont responsables de la machine et doivent fournir
le matériel nécessaire. Les personnes non concernées doivent être tenues à l’écart de la zone de soudage.
basse tension utilisé dans les résidences, l’installateur ou la personne qui utilisera la machine doit être
familiarisé avec la connexion de la machine, dans ce cas la responsabilité appartient à l’opérateur.
bon refroidissement et aucun corps étranger ne doit être y introduit.
Il faut respecter les symboles de sécurité et les avertissements sur l’appareil et dans le manuel d’utilisation
et ne pas retirer les étiquettes.
Installation

56
www.magmaweld.comMANUEL D’UTILISATION
FR
SÉRIE SMART COMPACTE
2.3 Branchements pour le Poste de Soudage
2.3.1 Branchements Électriques
• Puisqu’il peut y avoir différentes prises en fonction de l’usine, des chantiers de construction et des ateliers, le
• Connectez la pince de masse à la pièce le plus près possible de la zone de soudage.
• Utilisez des régulateurs et des réchauffeurs conformes aux normes pour travailler en toute sécurité et obtenir
(9,5 mm).
• Ouvrez la valve de la bouteille de gaz en gardant la tête et le visage à l’écart de la sortie de la valve de la bouteille
• Si un réchauffeur de CO sera utilisé, connectez d’abord le réchauffeur de CO à la bouteille de gaz. Après avoir
connecté le régulateur de gaz au réchauffeur de CO dans la prise.
• Si un réchauffeur de CO ne sera pas utilisé, connectez d’abord le régulateur de gaz à la bouteille de gaz.
l’entrée de gaz à l’arrière de la machine et serrez l’écrou.
remédier au problème.
Figure 3 : Branchements de la Bouteille / du Réchauffeur / du Régulateur de Gaz
1- Vanne de la Bouteille de Gaz
2- Bouteille de Gaz
3- Réchauffeur de Gaz CO
4- Chaîne
5-
6- Régulateur de gaz
7- Manomètre
8- Débitmètre
9- Vanne de Régulation de Débit
10- Tuyau de gaz
1
2
5
4
3
6
7 8
9
10
Installation

57
www.magmaweld.com MANUEL D’UTILISATION
SÉRIE SMART COMPACTE
FR
• L'unité de refroidissement par eau est utilisée pour refroidir la torche. Il s'agit d'un système en circuit fermé
composé d'un radiateur, d'un ventilateur, d'un réservoir de liquide de refroidissement de la pompe.
• Connectez le tuyau d'eau froide (bleu) à la sortie d'eau froide du système de refroidissement par eau et le
tuyau d'eau chaude (rouge) à l'entrée d'eau chaude du système de refroidissement par eau.
• Les machines à souder Magmaweld sont livrées avec le liquide de refroidissement Magmaweld, qui est
produit pour donner les meilleures performances. En cas de manque de liquide de refroidissement, ouvrez
le bouchon du réservoir de liquide de refroidissement et ajoutez du liquide de refroidissement Magmaweld
adapté à la température de l'environnement de travail. Le liquide de refroidissement doit être compris dans
les valeurs minimales et maximales indiquées sur le panneau avant de l'unité.
• Un autre liquide de refroidissement ou de l'eau ne doit pas être ajouté. Différents additifs liquides peuvent
provoquer des réactions chimiques ou différents problèmes.
• Magmaweld n'est pas responsable des risques pouvant survenir en cas d'ajout de liquides différents. Toutes
les dispositions de la garantie seront annulées si un liquide de refroidissement ou de l'eau différent est ajouté
au liquide de refroidissement Magmaweld.
• Si vous souhaitez utiliser une autre marque de liquide de refroidissement, l'intérieur du réservoir de liquide
de refroidissement doit être complètement vide et il ne doit y avoir aucun résidu ou liquide à l'intérieur.
• Il n'est pas approprié d'utiliser les unités de refroidissement par eau avec des machines à souder autres que
pas fonctionner avec une alimentation externe.
Installation

58
www.magmaweld.comMANUEL D’UTILISATION
FR
SÉRIE SMART COMPACTE
1 2
3 4 5 6
pouvez utiliser ce bouton après le changement de gaz.
On Effectue le choix de la méthode de soudage. Chaque pression sur le bouton permet une transition entre
les lignes de la colonne concernée. Lorsque la méthode de soudage est sélectionnée, le voyant correspondant
s’allume.
1-) FIL LIBRE
2-) GAZ LIBRE
3-) MENU DE SÉLECTION DE LA MÉTHODE SOURCE
Plage de Réglage
• MIG/MAG
• Pulse MIG/MAG
La méthode de soudage par impulsions n’est disponible que sur les modèles aVec Pulse. Dans
les modèles non-Pulse, lorsque cette ligne est atteinte, le Voyant ne s’allume pas et Pulse ne
sera pas actif.
Vous devez ajuster vos connexions et accessoires en fonction de la méthode de soudage choisie.
Il y a une sortie séparée pour la méthode MMA à l’avant de la machine.
• MMA
Un appareil approprié doit être utilisé pour la connexion du connecteur de torche dans la
méthode de soudage Elevage TIG. Grâce à un appareil spécial, elle sera compatible à Euro
connectore.
• Lift TIG
3.1 Paramètres Dans le Sac
UTILISATION
Utilisation

59
www.magmaweld.com MANUEL D’UTILISATION
SÉRIE SMART COMPACTE
FR
On effectue le choix du type de fil est effectuée. Le type de fil à utiliser doit être correctement sélectionné.
Chaque pression sur le bouton permet une transition entre les lignes de la colonne concernée. Lorsque le
type de fil est sélectionné, le voyant correspondant s’allume.
Plage de Réglage
• Steel • AlMg
• FCW • AlSi
• CrNi • CuAl
On effectue le choix du diamètre du fil. Le diamètre du fil à utiliser doit être correctement choisi. Chaque
pression sur le bouton permet une transition entre les lignes de la colonne concernée. Lorsque le diamètre
du fil est sélectionné, le voyant correspondant s’allume.
Plage de Réglage
On effectue le choix du type de gaz. Le type de gaz à utiliser doit être correctement sélectionné.
Chaque pression sur le bouton permet une transition entre les lignes de la colonne concernée. Lorsque le
type de gaz est sélectionné, le voyant correspondant s’allume.
Plage de Réglage
• CO
• Ar/2.5 CO
• Argon
4-) MENU DE SELECTION DU TYPE DE FIL
5-) MENU DE SELECTION DU DIAMETRE DU FIL
6-) MENU DE SELECTION DU TYPE DE GAZ
Utilisation

60
www.magmaweld.comMANUEL D’UTILISATION
FR
SÉRIE SMART COMPACTE
3.2 Interface Utilisateur
sur l’écran numérique.
selon le mode sélectionné.
1-) AFFICHAGE DIGITAL
2-) AFFICHAGE DIGITAL
Sans Charge
Mode Synergique Courant de Soudage Réglé Courant de Soudage
Mode Intelligent Courant de Soudage Réglé Courant de Soudage
Mode Classique Vitesse de Fil Courant de Soudage
Sous Charge
Sans Charge
Mode Synergique Tension de Soudage Réglée Tension de Soudage
Mode Intelligent Tension de Soudage Réglée Tension de Soudage
Mode Classique Tension de Soudage Réglée Tension de Soudage
Sous Charge
Utilisation
1
3
7
8
6
2
4455

61
www.magmaweld.com MANUEL D’UTILISATION
SÉRIE SMART COMPACTE
FR
La sélection du mode de soudage est effectuée. Chaque pression sur le bouton permet une transition entre
les lignes de la colonne concernée. Lorsque le mode de soudage est sélectionné, le voyant correspondant
s’allume.
d’appuyer une fois sur le bouton de réglage.
La méthode de soudage Pulse MIG / MAG n’est disponible que sur les modèles avec impulsion.
Lorsque la méthode de soudage Pulse MIG / MAG est sélectionnée comme méthode de soudage, les modes
sont les suivants:
3-) MENU DE SELECTION DU MODE DE SOUDAGE
Le choix que vous faites à partir de l’onglet méthode du sac crée une différenciation dans les options du
mode de soudage. Lorsque la méthode de soudage MIG/MAG est sélectionnée comme méthode de soudage,
les modes sont les suivants :
Plage de Réglage
• Mode Classique
• Mode Intelligent
• Mode Synergique
Lorsque le soudage MMA et Lift TIG sont sélectionnés comme méthodes de soudage, il n’y a pas de sélection
dans la section Mode.
MODE CLASSIQUE
tolérance. La vitesse du fil est réglée entre 1 et 24 m / min et la tension de soudage entre 15 et 40 V.
MODE INTELLIGENT
Les paramètres de soudage tels que le type de fil, le diamètre du fil, le type de gaz doivent être choisis
correctement. La machine ajuste automatiquement la tension optimale en fonction du courant de soudage
certaine plage de tolérance.
MODE SYNERGIQUE
Les paramètres de soudage tels que le type de fil, le diamètre du fil, l’épaisseur doivent être choisis
correctement. Le courant et la tension s’ajustent automatiquement en fonction des paramètres de soudage
sélectionnés. L’utilisateur peut modifier le courant et la tension dans une certaine plage de tolérance. La
machine recalcule automatiquement la tension en fonction de la valeur de courant définie dans la plage de
tolérance spécifique.
Utilisation

62
www.magmaweld.comMANUEL D’UTILISATION
FR
SÉRIE SMART COMPACTE
4-) POT DE REGLAGE
Le réglage est réalisé en tournant le pot (4) vers la gauche et la droite.
• Lorsque la méthode de soudage MMA est sélectionnée, le réglage du courant est effectué par le pot.
• Lorsque la méthode de soudage Elevage TIG est sélectionnée, le réglage du courant est effectué avec le pot.
• Lorsque le mode classique est sélectionné, la vitesse du fil est ajustée avec le potentiomètre.
• Lorsque le mode intelligent est sélectionné, le courant est ajusté par le potentiomètre, la tension par
rapport au courant est ajustée et calculée automatiquement.
• Lorsque le mode synergique est sélectionné, l’épaisseur du matériau à souder avec le pot est sélectionnée,
la tension est automatiquement calculée en fonction de l’épaisseur réglée.
• Lorsque vous appuyez sur le bouton (6) du menu et que vous passez à la section des fonctions, vous devez
appuyer une fois sur le bouton et passer à l’autre fonction pour enregistrer dans la fonction correspondante.
Si la fonction gaz avant (PrE) est sélectionnée ; si on veut enregistrer cette valeur après le réglage avec le
pot (5), il est nécessaire d’appuyer une fois sur le pot (4) et de passer au dernier gaz, qui est l’autre fonction
(PoS). Si on n’appuie pas sur pot (4) pour passer à la fonction suivante (PoS) et que l’on retourne
directement à la page principale, aucun enregistrement ne sera effectué.
5-) POT DE REGLAGE
Le réglage est effectué en tourant le pot (5) vers la gauche et la droite.
• Lorsque le mode classique est sélectionné, on ajuste la valeur de la tension.
• Lorsque le mode intelligent est sélectionné (4), la tension est automatiquement calculée par rapport au
courant réglé par le potentiomètre. Vous pouvez régler la tension en tournant le potentiomètre à gauche et
à droite dans une certaine plage de tolérance (5).
• Lorsque le mode synergique est sélectionné, la tension est calculée automatiquement en fonction des
paramètres déterminés. Vous pouvez régler la tension en tournant le potentiomètre à gauche et à droite
dans une certaine plage de tolérance (5).
• Les fonctions s’ouvriront lorsque le bouton du menu (6) sera sélectionné. On assure le réglage des
fonctions liées au pot.
6-) MENU DE SELECTION DES FONCTIONS
Les fonctions seront ouvertes lorsque vous appuierez une fois sur le bouton (6). Pour revenir à la page
principale, appuyez de nouveau sur le bouton. La fonction sélectionnée est ajustée en tournant le
potentiomètre (5) vers la gauche ou vers la droite, lorsque vous souhaitez sauvegarder le réglage
sélectionné, il est nécessaire de passer à la fonction suivante. Pour sauvegarder, il suffit d’appuyer une fois
sur le pot (4) pour que le réglage soit sauvegardé et que l’on passe à la fonction suivante. Les fonctions
suivantes sont comprises dans le menu :
Gaz Avant
Réglage du gaz avant.
Plage de Réglage
Avant de commencer le soudage durant le temps spécifié, le gaz entre et le soudage
démarre. Assure la protection du bassin de soudage avant le démarrage du soudage.
PrE
Dernier Gaz
Réglage de la durée du dernier gaz.
Plage de Réglage
Entrée du gaz et fin du soudage après la fin du soudage durant le temps spécifié. Assure la
préservation du bassin de soudage à la fin du soudage.
PoS
Utilisation

63
www.magmaweld.com MANUEL D’UTILISATION
SÉRIE SMART COMPACTE
FR
Allumage
Réglage de l’allumage
Plage de Réglage
Si la valeur d’allumage affichée à l’écran est “+”, le fil s’avancera pendant le temps spécifié
le soudage est terminé, il empêche le fil de soudage de se coller à la buse de contact.
brn
Temps de vide
Le temps de soudage est réglé lorsque la méthode est choisie.
Plage de Réglage
PoF
Démarrage progressif
Réglage du démarrage progressif.
Plage de Réglage
Lors du commencement du soudage, la vitesse du fil augmente progressivement et
lentement à la vitesse réglée. De cette manière, on évite les coups et les éclaboussures au
début du soudage.
SoS
Cratère
Réglage de la fonction cratère.
Plage de Réglage
C’est le processus de remplissage pour éviter les fissurations qui se produiront à la fin du
soudage. Lorsque le cratère est actif, le courant de soudage est réduit avec une certaine
linéarité en fin de soudage.
Crt
Durée de soudage
Le temps de soudage est réglé lorsque la méthode est choisie.
Plage de Réglage
Pon
Utilisation

64
www.magmaweld.comMANUEL D’UTILISATION
FR
SÉRIE SMART COMPACTE
7-) MENU DE SELECTION DES PROGRAMMES
8-) MENU DE SÉLECTION DU MODE DE DÉCLENCHEMENT
Il est utilisé pour enregistrer le travail effectué. Il y a 3 mémoires. Le LED (7) du programme utilisé
s’allumera. Pour enregistrer le programme, il est nécessaire d’appuyer une fois sur le bouton et de passer à
l’autre programme. Si vous devez enregistrer sur le programme numéro 3, il suffira d’appuyer une fois sur
le bouton pour sauvegarder vos réglages après avoir réalisé les réglages pendant que le led P3 est allumé.
Ainsi, tous les leds des programmes seront éteints. Après le programme P3, il y a une zone qui permet de
travailler sans enregistrement de programme. Il n’y aura pas d’enregistrement dans cette zone et les leds
des programmes seront éteints.
Plage de Réglage
Utilisé pour la sélection du mode de déclenchement. Chaque fois que le bouton (8) est enfoncé, l’autre mode
de déclenchement est commuté.
Plage de Réglage
• Méthode
MODE 2 GÂCHETTES :
Appuyez sur La Gâchette Maintenez La Gâchette Relâchez La Gâchette
PrG :
I : Courant de Soudage
PoG : Temps de Gaz Final
enfoncée.
tourne à une vitesse lente.
• Le courant de soudage augmente lorsque la pièce est
atteinte.
Le moteur du dévidoir s’arrête.
réglée.
Utilisation

65
www.magmaweld.com MANUEL D’UTILISATION
SÉRIE SMART COMPACTE
FR
4 MODE GÂCHETTE:
PrG :
I : Courant de Soudage
PoG : Temps de Gaz Final
enfoncée.
tourne à une vitesse lente.
• Le courant de soudage augmente lorsque la pièce est
atteinte.
• Le moteur du dévidoir s’arrête.
réglée.
MÉTHODE : Il s’agit du mode ponctuel (soudage par points). Le soudage se poursuit pendant la durée de
et Temps inactif : 0.0 à 9.9 sec.
Cette option doit être choisie chaque fois que l’on souhaite obtenir le même cordon de soudage.
Les soudures crées en mode “méthode” seront de longueur égale.
Utilisation

66
www.magmaweld.comMANUEL D’UTILISATION
FR
SÉRIE SMART COMPACTE
la torche de la télécommande.
Les connexions de prise sont les suivantes :
2
A
1
B
Vue avant de la prise de la
torche de la télécommande
COMMANDE DE TORCHE - MARRON
COMMANDE DE TORCHE - NOIR
COMMANDE DE TORCHE - ROUGE
COMMANDE DE TORCHE - BLANC
COMMANDE DE TORCHE - VERT
Mode
Mode Classique
Mode Intelligent
Mode Synergique
Plage de réglage : 0.5 m/min
Vous pouvez réduire le courant de soudage jusqu’à la valeur de tolérance minimale
Plage de réglage : 5 A
Vous pouvez réduire le courant de soudage jusqu’à la valeur de tolérance minimale
Plage de réglage : 5 A
Vous pouvez augmenter la tension de soudage jusqu’à la valeur de tolérance maximale
Plage de réglage : 0.5 V
Plage de réglage : 0.5 m/min
Vous pouvez augmenter le courant de soudage jusqu’à la valeur de tolérance maximale
Plage de réglage : 5 A
Vous pouvez augmenter le courant de soudage jusqu’à la valeur de tolérance maximale
Plage de réglage : 5 A
Vous pouvez augmenter la tension de soudage jusqu’à la valeur de tolérance maximale
Plage de réglage : 0.5 V
Vous pouvez augmenter la tension de soudage jusqu’à la valeur de tolérance maximale
Vous pouvez réduire la tension de soudage jusqu’à la valeur de tolérance minimale
Plage de réglage : 0.5 V
Vous pouvez réduire la tension de soudage jusqu’à la valeur de tolérance minimale
Plage de réglage : 0.5 V
Vous pouvez réduire la tension de soudage jusqu’à la valeur de toléranceminimale
Plage de réglage : 0.5 V
1
1
1
2
2
2
A
A
A
B
B
B
Touche Fonction
Utilisation

67
www.magmaweld.com MANUEL D’UTILISATION
SÉRIE SMART COMPACTE
FR
Lorsque vous maintenez le bouton de réglage enfoncé pendant 3 secondes, la fonction de
du métal à souder et la longueur de l ’arc diminue. Une fois le réglage souhaité effectué, le réglage est quitté
en appuyant sur le même bouton.
3.5 Courbe de Soudage MIG
Fil
Fil 0 - 25
Points
Tension Faisceau
Tension 0 - 25
Critère Activé
Pré-Gaz
Cratère Désactivé
Pré-Gaz
Soudage
par points
Activé
Soudage
par points
*Désactivé
Gaz Final
Pré-Gaz
Cratère
Cratère
Burn Back
Burn Back
Burn Back
Gaz Final
Gaz Final
Gaz Final
Burn Back
Gaz Final
Tension Faisceau
Tension 0 - 25
Fil
Fil 0 - 25
Démarrage
Lent Activé
Démarrage
Lent Désactivé
Critère Activé
Pré-Gaz
Cratère Désactivé
Pré-Gaz
Démarrage
Lent Activé
Démarrage
Lent Désactivé
Plage de Valeurs
Réglage d’usine 2- Position MIG
0,0 - 9,9 sec 0,1 sec
0,0 - 9,9 sec 0,0 sec
Méthode / 2 / 4 2
25 - 0 - 25 0 step
Épaisseur
Type du Fil
Gâchette
0,6 - 20,0 mm 1,0 mm
Temps de Soudage
Temps İnactif
0,0 - 9,9 sec 0,1 sec
Diamètre du Fil 0,6 - 2,4 mm 1,0 mm
MIG/MAG - MMA -
LIFT TIG
MIG / MAG
0,2 - 9,9 sec 0,2 sec
Steel, AlMg, FCW, AlSi, FCW-M, CuSi, CrNi, CuAl
4- Position MIG
CO₂, Ar/5-10 CO₂, Ar/15-25 CO₂, Ar/2.5 CO₂, Ar/10-15 CO₂, Argon
Synergique / Intelligent / Classique
Activé-Désactivé
Désactivé
Méthode
Pré-Gaz
Burn Back
Gaz Final
Type du Gaz
Cratère
Mode
Utilisation

68
www.magmaweld.comMANUEL D’UTILISATION
FR
SÉRIE SMART COMPACTE
• Allumez la poste à souder en utilisant l’interrupteur Marche / Arrêt.
• Éteignez la machine en remettant l’interrupteur marche / arrêt en position d’arrêt après avoir entendu le
bruit du ventilateur et vu que la lampe principale est allumée.
les 4 poulies à fois. Ainsi le réchauffement du moteur et l’augmentation de la friction n’affectent pas la vitesse
sous tension, la led à l’intérieur sera active pour faciliter le remplacement de la poulie.
• Lorsque vous devez remplacer les poulies de dévidage, tirez la vis de réglage de la pression vers vous pour
ensuite retirer les couvercles supérieurs et enlever les poulies présentes.
Figure 4 : Système du Dévidoir
a- Moteur
b- Connecteur Euro
c- Vis de réglage de la pression
d- Poulie de dévidage supérieure
e- Poulie de dévidage inférieure
f- Mécanisme de verrouillage du système de dévidage
• Vous devez déverrouiller les poulies avant de pouvoir les retirer. Tournez la poulie
dévidage dans le sens inverse de verrouillage pour que les encoches se trouvant à la
partie intérieure de la poulie de dévidage soient chevauchés par les saillies du corps
du dévidoir, de sorte que vous déverrouillez.
utiliserez soit du côté qui vous fait face.
courant. Le réglage se fait en tournant à droite et à gauche le
bouton de réglage du potentiomètre .
Effectuez les connexions des
pôles en fonction du type de
soudage que vous allez procéder.
Utilisation
a
b
d
e
f
d
cc

69
www.magmaweld.com MANUEL D’UTILISATION
SÉRIE SMART COMPACTE
FR
dans la torche.
Figure 7 : Dévidage du Fil vers les Galets
Figure 8 : Dévidage du Fil vers les Galets
blessures.
pourrait causer des dysfonctionnements. Un serrage
lâche.
a
b
c
Figure 6 : Installation des Galets de Dévidage
• Placez la poulie que vous allez utiliser de sorte que les encoches se trouvant à la partie intérieure de la poulie
pour entendre le clic de verrouillage et pour vous assurer la poulie est en place. Abaissez ensuite les rouleaux
de pression et soulevez le levier du rouleau de pression pour ensuite le verrouiller sur le rouleau de pression.
Figure 5 : Retrait des Galets de Dévidage
Utilisation
(1)
(3)
(3)
(2)
(6)
(4)
(4)
(5)
(3)
(1)
(2)

70
www.magmaweld.comMANUEL D’UTILISATION
FR
SÉRIE SMART COMPACTE
Ce qui suit se produit lorsque la vis de réglage de la pression est trop serrée, laissée
desserrée ou lorsqu’une poulie non adaptée est utilisée.
Figure 9 : Pression de réglage et la bobine de sélection erreurs
PLANCHE
8 lt/min.
Fil Fourré En
Acier Et Métal
Non Allié
Diamètre du �il
(mm)
0.8
0.9
1.0
1.2
Fil Fourré Acier
Inoxydable Aluminium
7 lt/min. 8 lt/min. 8 lt/min.
9 lt/min. 8 lt/min. 9 lt/min. 9 lt/min.
10 lt/min. 9 lt/min. 10 lt/min. 10 lt/min.
12 lt/min. 11 lt/min. 12 lt/min. 12 lt/min.
• Appuyez sur les galets presseurs et soulevez le levier de pression .
• Démarrez la machine en tournant l’interrupteur marche / arrêt sur la position “1” .
ne se desserre pas . Si vous observez un desserrage et / ou un rembobinage, serrez un peu plus la vis du
A :
B :
C : Le levier de pression étant trop serré, la surface de la poulie est déformée.
D :
E :
soudage.
• Réglez le débit de gaz avec la vanne de régulation
de débit.
• Le débit de gaz (CO, mixe) utilisé est 10 fois le di
de 0,9 mm, le débit de gaz peut être réglé à
pour un réglage plus précis du débit.
• Après avoir réglé le débit de gaz, relevez le levier du
galet presseur et fermez le capot du dévidoir.
Utilisation

71
www.magmaweld.com MANUEL D’UTILISATION
SÉRIE SMART COMPACTE
FR
Structure CC/CV
• Permet le soudage MIG, MMA et TIG.
Smart Performance
soudage de la machine.
se protéger contre les dysfonctionnements.
• Cette protection est signalée par l’indicateur led thermique se trouvant sur le panneau de la machine.
Fonctionnement avec des Générateurs
• Le poste convient pour travailler avec des générateurs. La valeur en kVA doit être déterminée en
Diversité des Fonctions d’utilisation
• Il offre un fonctionnement convivial avec ses modes MIG / MAG classiques, intelligents et synergiques.
Protection Contre Tension
• Si la tension secteur est trop élevée ou trop basse, la machine se met automatiquement en état de
tout dommage et la longévité de la machine est garantie. Une fois que les conditions ambiantes sont
redevenues normales, les fonctions de la machine sont également activées.
Mémoire
• Il existe 3 mémoires permettant de sauvegarder le travail effectué.
Smart Fan
• La température interne de la machine est mesurée de manière permanente. La vitesse du ventilateur de
refroidissement augmente ou diminue en fonction de la température mesurée. Lorsque la température
quantité de poussière entrant dans la machine est réduite. Une durée de vie prolongée de la machine et des
économies d’énergie sont ainsi assurés. Le ventilateur se met en route pour assurer le refroidissement
pendant le soudage.
Contrôle de Courant / Tension Via la Torche
de soudage via la torche sans vous rendre près de votre machine.
Protection Contre Phase
• La machine est protégée contre les phases manquantes ou erronées.
Soft Start
Compatibilité avec Magnet
compatible avec Magnet Alors que certaines valeurs peuvent être lues à partir du panneau LCD se trouvant
Compatibilité avec l’automate
Utilisation

72
www.magmaweld.comMANUEL D’UTILISATION
FR
SÉRIE SMART COMPACTE
MAINTENANCE ET DÉFAILLANCES
• L’entretien et la réparation de la machine doivent être effectués par des personnes compétentes.
Notre société n’est pas responsable des accidents qui se produisent à la suite d’interventions par des
personnes non autorisées.
• Les pièces à utiliser pendant la réparation peuvent être obtenues auprès de nos services autorisés.
L’utilisation de pièces détachées d’origine prolongera la durée de vie de votre machine et empêchera les
pertes de rendement.
• Toute tentative non autorisée par le fabricant pendant la période de garantie annulera toutes les dispositions
de la garantie.
• Respectez scrupuleusement les consignes de sécurité applicables pendant les procédures d’entretien et de
réparation.
• Avant toute opération de réparation de la machine, déconnectez la sortie électrique de la machine du secteur
et attendez 10 secondes pour que les condenseurs se déchargent.
4.1 Maintenance
Soins quotidiens
des rouleaux ne doivent jamais être huilées. Nettoyez toujours les résidus
• Les consommables de la torche doivent être nettoyés régulièrement.
produits originaux pour une utilisation à long terme.
Tous les 6 Mois
Tous les 3 Mois
• Ne retirez pas les étiquettes d’avertissement sur l’appareil. Remplacez les
étiquettes usées/déchirées par des neuves. Vous pouvez obtenir les étiquettes
auprès du service agréé.
pièces.
• Remplacez les pièces endommagées/ défectueuses par des neuves. Ne jamais
de la torche TIG en option doivent être nettoyés régulièrement. Si nécessaire, il doit
être remplacé. Des précautions doivent être prises pour s’assurer que ces matériaux
sont des produits originaux pour une utilisation à long terme.
• Nettoyez et serrez les pièces de connexion telles que les boulons et les écrous.
N’appliquez pas d’air comprimé à proximité des composants électroniques.
• Renouvelez périodiquement l’eau du réservoir du groupe de refroidissement par
ou
Maintenance et Défaillances

73
www.magmaweld.com MANUEL D’UTILISATION
SÉRIE SMART COMPACTE
FR
Vous pouvez obtenir les étiquettes des services autorisés.
La machine ne fonctionne pas
Le moteur du dévidoir ne
onctionne pas
Le moteur d’alimentation de
n’avance pas
La soudure n’est pas bonne
correctement branchée
• Choisissez des galets
mise à la masse de la machine est
connectée à la pièce à travailler
les ports de connexion sont en
bon état
paramètre et du processus est
correcte. Suivez les étapes
processus sélectionné
• Un (ou plusieurs) fusible a sauté
• La carte électronique est
défectueuse
ne conviennent pas au diamètre
connexion sont usés
• La sélection du paramétrage et
du processus n’est pas correcte
• La connexion entre la pince de
mise à la masse et la pièce est
défaillante
• La pression appliquée sur les
très faible
secteur sont correctes
• Contactez le service agréé
• Ajustez le galet presseur
Incident Cause Solution
• La machine n’est pas connectée
au secteur
• Le contacteur est défectueux
• Un (ou plusieurs) fusible a sauté
• Les fusibles d’alimentation,
défectueux
• Les connexions réseau ne sont
pas correctes
Maintenance et Défaillances

74
www.magmaweld.comMANUEL D’UTILISATION
FR
SÉRIE SMART COMPACTE
La soudure n’est pas bonne
est correct
soudage est en bon état
• Sélectionnez le consommable
approprié et nettoyez la torche
régulièrement.
Les consommables inadaptés ou
usés doivent être remplacés
• Les réglages des galets presseurs
doivent être effectués
correctement
défaillant
• La torche de soudage est
défectueuse
• Les consommables ne sont pas
adaptés ou sont endommagés
• Le réglage de pression des galets
presseurs n’est pas correct
Incident Cause Solution
Le ventilateur ne fonctionne pas
La machine est bruyante
• Un (ou plusieurs) fusible a sauté
• Contactez le service agréé• Le contacteur est défectueux
• Le moteur de ventilateur est
défectueux • Contactez le service agréé
Le courant de soudage est instable
et / ou ne peut pas être réglé
La prise de chauffage ne
fonctionne pas
• Contactez le service agréé
• Le groupe de diodes est
défectueux
service agréé
• Un (ou plusieurs) fusible a sauté
• Les paramètres de soudage ne
sont pas correctement choisis
• Tous les paramètres tels que le
doivent être sélectionnés en
fonction de votre méthode de
soudage
La valeur 0000 / NOP apparaît à
l’écran
Maintenance et Défaillances

75
www.magmaweld.com MANUEL D’UTILISATION
SÉRIE SMART COMPACTE
FR
• Le ventilateur est en panne
• Les conduits d’entrée et de sortie d’air
sont bloqués
• La durée appropriée pour le
fonctionnement de la machine est
dépassée
E02 Protection
Thermique
fonctionnement du ventilateur. En cas
de panne, contactez le service agrée
• Libérez le passage de l’air
placée dans un endroit adapté aux
conditions d’utilisation
• L’environnement de travail de la
ventilé ou la température ambiante est
trop élevée
• Laissez la machine refroidir pendant
un certain temps. Si le défaut
disparaît, essayez d’utiliser des
ampérages inférieurs
• Contactez le service agrée
• Contactez le service agrée
• Contactez le service agrée
que la tension fournie est correcte.
Avant toute opération de réparation
de la machine, dé connectez la sortie
électrique de la machine du secteur et
attendez 10 secondes pour que les
condenseurs se déchargent
que la tension fournie est correcte.
Avant toute opération de réparation
de la machine, dé connectez la sortie
électrique de la machine du secteur et
attendez 10 secondes pour que
les condenseurs se déchargent
• Il est possible que la machine
consomme un courant excessif
• Il peut y avoir un problème électrique
à l’intérieur du poste
• La tension secteur peut être basse
• Le capteur est en panne ou le
branchement électrique est défaillant
• La tension secteur peut être élevée
E03
E04
E05
E06
Erreur de
Surintensité
Tension Secteur
Basse
Erreur de
Capteur de
Température
Tension Secteur
Élevée
• Il peut y avoir un problème électrique
à l’intérieur du poste • Contactez le service agréeE01 Erreur de
Communication
Code d’incident Incident Cause Solution
Maintenance et Défaillances

76
www.magmaweld.comMANUEL D’UTILISATION
FR
SÉRIE SMART COMPACTE
1
12
4
15
7
18
10
2
13
5
16
8
19
11
3
14
6
17
9
Connector
Union plastique
Interrupteur
Carte Électronique
Self de Choc
Carte Électronique
Carte Électronique
Triple Connexion pour Le Système de Dévidage
Dévidoir
Prise de Soudage
Connecteur d’Alimentation
Carte Électronique
Carte Électronique
Carte Électronique Filtre RS
Glande de Robinet du Gaz
Bouton Potentiel
Connecteur
Carte Électronique
Carte Électronique
Carte Électronique
K405000230
K405000313
K405000230
A308900004
A376400016
K405000254
K405000255
A378000103
A377900106
A229900003
K309002213
K405000324
A378000050
K405000262
A421050002
K405000312
A229500001
A256006069
K405000253
A378002002
1
2
3
4
5
6
7
8
9
10
11
12
13
14 15
16 17
18
19
ANNEXE
Liste Des Pièces de Rechange de l'Alimentation
MATERIAL CODEN° DESCRIPTION
Annexe

77
www.magmaweld.com MANUEL D’UTILISATION
SÉRIE SMART COMPACTE
FR
1
2
3
4
5
6
7
MATERIAL CODE
N°
Réservoir d’eau
Pompe à Eau
Raccord Rapide Rouge
Ventilateur
Fusible en verre rapide
Raccord Rapide Bleu
Radiateur
1
4
7
2
5
8
3
6
A249000005
A240000006
A300190001
A245700003
A250001126
A300101011
A245700002
A260000010
DESCRIPTION
Unité de refroidissement
Annexe

78
www.magmaweld.comMANUEL D’UTILISATION
FR
SÉRIE SMART COMPACTE
R
S
T
Panneau à membrane
Panneau en Face
Redresseur primaire Condensateurs Module IGBT
Effet Hall
Unité de contrôle
Transformateur haute fréquence Redresseur primaire
Ligne de
contrôle
Self de sortie
Gas
Unité d'alimentation de �il
Shunter
Filtre de sortie
Pièce
Torche de Soudage
Ligne de contrôle de
torche de souVdage
Électrovanne
Transformateur de contrôle
Filtre de ligne
5.2 Diagramme
Annexe

79
www.magmaweld.com MANUEL D’UTILISATION
SÉRIE SMART COMPACTE
FR
FUSİBLE VERRE RAPIDE
Pompe à eau
(F�che de l’un�té d’eau)
Vent�lateur
Vent�lateur
Annexe


Modèle
Numéro de série
Nom du revendeur
Ville / Pays
Téléphone / Courriel
Date d'achat
Nom MAGMA MEKATRONİK MAKİNE SANAYİ VE TİCARET A.Ş.
Adresse
Nom de l'entreprise
Ville / Pays
Téléphone / Courriel
Téléphone / Courriel
Nom du contact
Organize Sanayi Bölgesi 5. Kısım MANİSA
+90 236 226 27 00 / info@magmaweld.com
Nom de l'entreprise de la
mise en route
Nom du technicien
Date de la mise en route
(Date de début de garantie)
FORMULAIRE DE GARANTIE
Veuillez visiter notre site web www.magmaweld.fr/conditions-de-garantie/wt
pour les conditions de garantie.
INFORMATION PRODUIT
FABRICANT
INFORMATIONS D'ACHAT
INFORMATIONS CLIENT
INFORMATIONS SUR LA MISE EN ROUTE (le cas échéant)


83
www.magmaweld.com BEDIENUNGSANLEITUNG
KOMPAKTE SMART SERIE
DE
INHALT
1
1.1
1.2
1.3
1.4
1.5
2
2.1
2.2
2.3
2.3.1
2.3.2
2.3.3
2.3.4
3
3.1
3.2
3.3
3.4
3.5
3.6
3.7
3.8
3.9
3.10
4
4.1
4.2
4.3
5
5.1
5.2
5.3
SICHERHEITSVORSCHRIFTEN
TECHNISCHE DATEN
Allgemeine Erläuterungen
Maschinenkomponenten
Produktkennzeichnung
Zubehör
INSTALLATIONSHINWEISE
Zu beachtende Punkte beim Empfang
Empfehlungen für Installation und Betrieb
Schweißanschlüsse
Netzsteckeranschluss
Verbinden der Erdungszange mit dem Werkstück
Gasanschlüsse
Wasserkühleinheit
NUTZUNGSINFORMATIONEN
Einstellungen im Inneren der Tasche
Fernsteuerung
Einstellung der Bogenlänge (ArC)
Anschluss an das Stromnetz
Auswahl und Austausch der Drahtvorschubwalze
Positionierung der Drahtspule und Antrieb des Drahtes
WARTUNGS- UND STÖRUNGSINFORMATIONEN
Wartung
Fehlersuche
Fehlercodes
ANHÄNGE
Ersatzteillisten
Blockdiagramm
Schaltplan der Wassereinheit
84
91
91
93
95
95
96
96
97
97
97
97
98
99
101
106
107
107
108
108
109
111
111
113
114
116
117
119
120
Inhalt

84
www.magmaweld.comBEDIENUNGSANLEITUNG
DE
KOMPAKTE SMART SERIE
Befolgen Sie alle Sicherheitsvorschriften in dieser Bedienungsanleitung!
• Die Sicherheitssymbole in dieser Bedienungsanleitung werden verwendet, um potenzielle
• Bei jedem Sicherheitssymbol in dieser Bedienungsanleitung müssen Sie beachten, dass ein
Verletzungsrisiko besteht und die folgenden Erläuterungen sorgfältig lesen, um mögliche
Gefahren zu vermeiden.
• Der Maschinenbesitzer ist dafür verantwortlich, dass Unbefugte keinen Zugriff auf das Gerät
haben.
• Personen, die diese Maschine benutzen, müssen im Schweißen/Schneiden erfahren oder
geschult sein und müssen vor der Arbeit die Bedienungsanleitung lesen und die
Sicherheitshinweise beachten.
Sicherheitsinformationen
SICHERHEITSVORSCHRIFTEN
Sicherheitssymbole
VORSICHT
Weist auf eine potenziell gefährliche Situation hin, die zu Verletzungen oder Schäden führen kann.
Die Nichtbeachtung von Vorsichtsmaßnahmen kann zu Verletzungen oder
WICHTIG
Weist auf Informationen und Warnungen zur Verwendung hin.
GEFAHR
Zeigt eine ernste Gefahr an. Die Nichtbeachtung kann zum Tod oder zu schweren Verletzungen
führen.
• Lesen Sie die Bedienungsanleitung und die Kennzeichnungen und Sicherheitshinweise auf dem
Gerät sorgfältig durch.
• Vergewissern Sie sich, dass die Warnschilder an der Maschine in gutem Zustand sind. Ersetzen
Sie fehlende oder beschädigteEtiketten.
• Lernen Sie, wie man die Maschine bedient, wie man die Kontrollen richtig vornimmt.
• Verwenden Sie Ihre Maschine in einer geeigneten Arbeitsumgebung.
• Unsachgemäße Änderungen an Ihrer Maschine haben negative Auswirkungen auf den sicheren
Betrieb und die Lebensdauer IhrerMaschine.
• Der Hersteller ist nicht verantwortlich für die Folgen des Betriebs der Maschine außerhalb der
angegebenen Bedingungen.
Sicherheitshinweise
begreifen
Stellen Sie sicher, dass die Installationsverfahren den nationalen elektrischen Normen und
anderen relevanten Vorschriften entsprechen und dass die Maschine von.
• Tragen Sie trockene und robuste isolierte Handschuhe und eine Arbeitsschürze. Verwenden Sie
niemals nasse oder beschädigteHandschuhe und Arbeitsschürzen.
Bediener getragene Kleidung mussgegen Funken, Spritzer und Lichtbogenstrahlung geschützt
sein.
• Arbeiten Sie nicht allein. Vergewissern Sie sich, dass es in Ihrem Arbeitsumfeld jemanden gibt,
an den Sie sich im Falle einer Gefahr wenden können.
• Berühren Sie die Elektrode nicht mit bloßen Händen. Achten Sie darauf, dass die
Elektrodenklemme oder die Elektrode nicht miteiner Person oder einem geerdeten Gegenstand
in Berührung kommt.
• Berühren Sie niemals stromführende Teile.
Boden oder einer anderen Maschineverbunden sind.
und dem Boden isolieren. Verwenden Sie nicht brennbares, elektrisch isolierendes, trockenes
und unbeschädigtes Isoliermaterial, das groß genug ist, umden Kontakt des Bedieners mit der
• Schließen Sie nicht mehr als eine Elektrode an die Elektrodenzange an.
• Schließen Sie die Erdungszange so nah wie möglich an das Werkstück oder den Werktisch an,
Stromschlag
Sicherheitsvorschrifte

85
www.magmaweld.com BEDIENUNGSANLEITUNG
KOMPAKTE SMART SERIE
DE
• Überprüfen Sie den Brenner, bevor Sie die Maschine starten. Vergewissern Sie sich, dass der
Brenner und seineKabel in gutem Zustand sind. Ersetzen Sie immer einen beschädigten,
abgenutzten Brenner.
• Berühren Sie nicht die Elektrodenzange, die an 2 verschiedene Geräte gleichzeitig
angeschlossen ist, da sonst einedoppelte Leerlaufspannung entsteht.
• Schalten Sie die Maschine aus, wenn sie nicht benutzt wird, und ziehen Sie die Kabel ab.
• Ziehen Sie alle Stromanschlüsse und/oder Anschlussstecker ab oder schalten Sie die Maschine
aus, bevor Sie sie reparieren.
• Seien Sie vorsichtig, wenn Sie ein langes Netzkabel verwenden.
• Stellen Sie sicher, dass alle Anschlüsse fest, sauber und trocken sind.
• Stellen Sie sicher, dass die Kabel trocken, sauber und fettfrei sind. Schützen Sie sich vor heißen
Metallteilen und Funken.
• Unisolierte, blanke Kabel stellen eine tödliche Gefahr dar. Überprüfen Sie alle Kabel regelmäßig
oder ersetzen Sie es sofort.
• Wenn die Erdungszange nicht mit dem Werkstück verbunden ist, isolieren Sie sie, um den
Kontakt mit einem Metallgegenstand zu vermeiden.
• Stellen Sie sicher, dass die Stromleitung korrekt geerdet ist.
an Orten, an denen die Gefahr eines Sturzes besteht.
• Wenn Sie einen Wechselstromausgang benötigen, verwenden Sie die Fernbedienung, falls Ihre
Maschine mit einer solchen ausgestattet ist.
Treffen Sie besondere Sicherheitsvorkehrungen, wenn eine der folgenden elektrisch
• In beengten Positionen wie dem Sitzen, Knien oder Liegen,
• Wenn das Risiko eines Kontakts mit dem Werkstück oder dem Boden hoch oder unvermeidbar
ist. Die folgenden Geräte können in diesen Fällen verwendet werden;
vorhanden.
• Schalten Sie den Strom ab.
• Zur Rettung des Opfers vor einem Stromschlag durch stromführende Kabel oder Teile
• Rufen Sie den Notdienst an.
durch, nachdem der Kontakt mit der Stromquelle unterbrochen ist. Setzen Sie die HLW fort, bis
die Atmung einsetzt oder Hilfe eintrifft.
ihn wie vorgeschrieben.
• Behandeln Sie eine elektrische Verbrennung wie eine thermische Verbrennung, indem Sie eine
kalte Kompresse anlegen. Vermeiden Sie eine Infektion und decken Sie sie mit einem sauberen,
trockenen Tuch ab.
Was Sie im Falle
eines Stromschlags
tun müssen
Längeres Einatmen von Dämpfen und Gasen, die beim Schweißen und Schneiden entstehen,
ist sehr gefährlich
• Halten Sie sich von sich bewegenden Objekten fern.
• Halten Sie alle Abdeckungen, Verkleidungen, Türen usw. von Maschinen und Geräten
geschlossen und verriegelt.
• Tragen Sie Schuhe mit Metallkappen, falls schwere Gegenstände herunterfallen.
• Brennen und Reizungen der Augen, der Nase und des Rachens sind Symptome einer schlechten
Belüftung. Erhöhen Sie in einem solchen Fall sofort die Belüftung und stellen Sie das
Schweißen/Schneiden ein, wenn das Problem weiterhin besteht.
• Sorgen Sie für ein natürliches oder künstliches Belüftungssystem im Arbeitsbereich.
Dämpfe und Gase
Ihre Gesundheit sein
Sicherheitsvorschrifte

86
www.magmaweld.comBEDIENUNGSANLEITUNG
DE
KOMPAKTE SMART SERIE
• Um Ihre Augen und Ihr Gesicht zu schützen, tragen Sie eine standardisierte Schutzmaske und
• Schützen Sie andere exponierte Körperteile (Arme, Hals, Ohren usw.) durch geeignete
Schutzkleidung vor Spritzern und Lichtbogenstrahlen.
und hängen Sie Warnschilder auf, um die Menschen in Ihrer Umgebung vor Lichtbögen und
heißen Metallen zu schützen.
• Sie wird nicht zum Heizen von gefrorenen Rohren verwendet. Dieses Verfahren mit einem
schädlich für Ihre
Augen und Haut sein
und Spritzer von Metallpartikeln. Tragen Sie eine zugelassene Arbeitsschutzbrille mit
Kantenschutz unter der Schutzmaske, um mögliche Verletzungen zu vermeiden.
• Berühren Sie heiße Teile nicht mit bloßen Händen.
• Lassen Sie die Maschinenteile abkühlen, bevor Sie an ihnen arbeiten.
Schneidhandschuhe mit hoher Wärmedämmung und feuerfeste Kleidung.
schwere Verbrennungen
verursachen
• Der von einigen Maschinen und Prozessen erzeugte Lärm kann Ihr Gehör schädigen.
• Wenn der Lärmpegel hoch ist, tragen Sie einen zugelassenen Gehörschutz.
Lärm kann Ihr
• Richten Sie den Brenner beim Abwickeln der Schweißdrahtspule nicht auf einen Körperteil,
andere Personen oder Metall.
• Wenn Sie den Schweißdraht mit der Hand von der Spule abwickeln, vor allem bei dünnen
Personen in Ihrer Umgebung verletzen, schützen Sie dabei besonders Ihre Augen und Ihr
Gesicht.
• Schweißen / schneiden Sie niemals in der Nähe von brennbaren Materialien. Es kann zu
Bränden oder Explosionen kommen.
• Bevor Sie mit dem Schweißen/Schneiden beginnen, entfernen Sie diese Materialien aus der
Umgebung oder decken Sie sie mit Schutzabdeckungen ab, um zu verhindern, dass sie brennen
und sich entzünden.
• In diesen Bereichen gelten besondere nationale und internationale Vorschriften.
Schweißen / Schneiden
Explosionen führen
• Verwenden Sie beim Schweißen/Schneiden ein geeignetes Rauchabzugssystem. Installieren Sie
gegebenenfalls ein System, das die in der gesamten Werkstatt angesammelten Dämpfe und
Gase absaugen kann. Verwenden Sie ein geeignetes Filtersystem, um eine Verschmutzung der
Umwelt beim Ablassen zu vermeiden.
• Wenn Sie in engen und geschlossenen Räumen arbeiten oder Blei, Beryllium, Kadmium, Zink,
beschichtete oder lackierte Materialien schweißen, verwenden Sie zusätzlich zu den oben
genannten Vorsichtsmaßnahmen Masken, die für frische Luft sorgen.
in Gebrauch sind, und achten Sie auf Gaslecks.
• Schutzgase wie Argon sind dichter als Luft und können bei der Verwendung in geschlossenen
Räumen anstelle von Luft eingeatmet werden. Dies ist gefährlich für Ihre Gesundheit.
• Einige geschweißte/geschnittene Teile erfordern eine besondere Belüftung. Die
Sicherheitsvorschriften für Produkte, die eine besondere Belüftung erfordern, sollten Sie
sorgfältig lesen. In Fällen, in denen eine Gasmaske erforderlich ist, muss die entsprechende
Gasmaske getragen werden.
Sicherheitsvorschrifte

87
www.magmaweld.com BEDIENUNGSANLEITUNG
KOMPAKTE SMART SERIE
DE
• Schweißen/schneiden Sie keine vollständig verschlossenen Rohre oder Leitungen.
• Öffnen, entleeren, belüften und reinigen Sie Rohre und geschlossene Behälter vor dem
Schweißen/Schneiden vollständig. Gehen Sie beim Schweißen/Schneiden an solchen Stellen
mit größtmöglicher Sorgfalt vor.
• Schweißen / schneiden Sie nicht, auch nicht im leeren Zustand, an Rohren und Schläuchen, die
zuvor Stoffe enthielten, die Explosionen, Feuer oder andere Reaktionen verursachen können.
unter Druck stehende Gaskreisläufe. Stellen Sie sicher, dass diese regelmäßig überprüft werden
und ordnungsgemäß funktionieren.
• Elektrische Anlagen dürfen nicht von Unbefugten repariert werden. Infolge von hier
möglicherweise begangenen Fehlern können Explosionen auftreten und Benutzer können
schwer verletzt werden.
• Die Gaskreiselemente arbeiten unter Druck; die Wartung durch Unbefugte kann zu Explosionen
und schweren Verletzungen der Benutzer führen.
• Es wird empfohlen, die Maschine und ihre Nebenaggregate mindestens einmal pro Jahr
technisch zu warten.
Wartung von Maschinen
und Geräten durch
Unbefugte kann
Anwesenheit einer anderen Person durch.
möglich.
• Treffen Sie alle notwendigen Vorsichtsmaßnahmen, wenn Sie das Gerät transportieren. Die
Bereiche, wohin transportiert wird, die beim Transport eingesetzten Gegenstände und die
körperliche Verfassung und Gesundheit der Person, die den Transport durchführt, müssen für
den Transportvorgang geeignet sein.
• Einige Maschinen sind extrem schwer, so dass beim Umzug die notwendigen
Sicherheitsvorkehrungen für die Umwelt getroffen werden müssen.
• Wenn die Maschine von einer Plattform aus benutzt werden soll, muss geprüft werden, ob die
Plattform über geeignete Tragfähigkeitsgrenzen verfügt.
• Wenn die Maschine mit Hilfe eines Fahrzeugs (Wagen, Gabelstapler usw.) transportiert werden
soll, vergewissern Sie sich, dass das Fahrzeug und die Verbindungspunkte, die die Maschine mit
dem Fahrzeug verbinden (Tragegurt, Gurt, Schraube, Mutter, Rad usw.), stabil sind.
• Wenn Sie die Maschine von Hand transportieren müssen, vergewissern Sie sich, dass die Geräte
(Tragegurt, Gürtel usw.) und die Anschlüsse sicher sind.
• Um die notwendigen Transportbedingungen zu gewährleisten, beachten Sie die Regeln der
Internationalen Arbeitsorganisation zum Transportgewicht und die in Ihrem Land geltenden
Transportvorschriften.
• Benutzen Sie immer die Griffe oder Trageschlaufen, wenn Sie das Netzteil an einen anderen Ort
bringen. Ziehen Sie niemals am Brenner, am Kabel oder an den Schläuchen. Tragen Sie
sie an und transportieren Sie sie einzeln, kleine Geräte an den Griffen, große Geräte an den
Trageringen oder mit einem geeigneten Hebezeug wie einem Gabelstapler.
Schweißen / Schneiden
in kleinen Räumen mit
Die Nichtbeachtung
der notwendigen
Vorsichtsmaßnahmen
Unfällen führen
nicht behindern, in denen keine Gefahr besteht, über Kabel und Schläuche zu stolpern, die
unbeweglich sind, sondern große, gut belüftete, staubfreie Bereiche. Um zu verhindern, dass die
Gasplattform auf der Plattform und befestigen Sie sie mit einer Kette an der Wand, damit sie bei
festem Gebrauch nicht umkippen.
• Ermöglichen Sie den Bedienern einen einfachen Zugriff auf die Einstellungen und Anschlüsse
des Geräts.
Fallende Bruchstücke
führen
Sicherheitsvorschrifte

88
www.magmaweld.comBEDIENUNGSANLEITUNG
DE
KOMPAKTE SMART SERIE
• Lassen Sie das Gerät entsprechend den Betriebszyklen abkühlen.
• Verringern Sie den Strom oder die Einschaltdauer, bevor Sie wieder mit dem Schweißen/
Schneiden beginnen.
• Blockieren Sie nicht die Belüftungsöffnungen der Maschine.
• Installieren Sie keine Filter in den Belüftungsöffnungen der Maschine ohne die Genehmigung
des Herstellers.
Übermäßiger Gebrauch
der Maschine
Lichtbogenschweißen
kann elektromagnetische
verursachen
• Diese Maschine der Klasse A ist nicht für die Verwendung in Wohngebieten bestimmt, in denen
die Stromversorgung über das Niederspannungsnetz zustande kommt. Möglicherweise gibt es
Schwierigkeiten bei der Gewährleistung der elektromagnetischen Kompatibilität aufgrund von
Hochfrequenzstörungen, die an solchen Orten übertragen und abgestrahlt werden.
• Stellen Sie sicher, dass der Arbeitsbereich die elektromagnetische Verträglichkeit (EMV) erfüllt.
Elektromagnetische Störungen beim Schweißen/Schneiden können unerwünschte
Auswirkungen auf Ihre elektronischen Geräte und das Stromnetz haben. Der Benutzer ist für
die Auswirkungen verantwortlich, die durch diese Störungen während des Betriebs verursacht
werden können.
• Falls Störungen auftreten, können zusätzliche Maßnahmen ergriffen werden, um die Einhaltung
der Vorschriften zu gewährleisten, z. B. die Verwendung kurzer Kabel, die Verwendung
abgeschirmter (gepanzerter) Kabel, die Verlegung der Maschine, die Entfernung von Kabeln
des Arbeitsbereichs.
• Vergewissern Sie sich, dass Ihre Maschine in Übereinstimmung mit der Bedienungsanleitung
aufgestellt und positioniert ist.
in Haushalten verwendete Niederspannungsnetz angeschlossen werden soll, muss
der Installateur, der den elektrischen Anschluss vornimmt, oder die Person, die die
Maschine benutzen wird, über die Anschlussfähigkeit der Maschine informiert
werden; in diesem Fall liegt die Verantwortung beim Benutzer.
eine Prüfung auf mögliche elektromagnetische Störungen in der Umgebung durchführen. Die
folgenden Bedingungen müssen beachtet werden.
a)
b)
c) Computer und andere Kontrollgeräte,
d) Kritische Sicherheitsausrüstung, z.B. Schutz von Industrieanlagen,
e) Medizinische Geräte von Menschen in der Nachbarschaft, z.B. Herzschrittmacher und
Hörgeräte,
f) Geräte, die zur Messung oder Kalibrierung verwendet werden,
g) Störfestigkeit von anderen Geräten in der Umgebung. Der Benutzer muss sicherstellen, dass
andere in der Umgebung verwendeteGeräte kompatibel sind. Dies kann zusätzliche
Schutzmaßnahmen erfordern,
h) Die Grenzen des Inspektionsbereichs können je nach Größe der Umgebung, der
Gebäudestruktur und anderen Aktivitäten im Gebäude erweitert werden, wobei die Tageszeit,
Neben der Bewertung des Gebiets kann auch die Bewertung der Geräteinstallationen für die
Behebung der Störung erforderlich sein. Falls erforderlich, können auch Messungen vor Ort
Bewertung der Gemäß
elektromagnetischen
Verträglichkeit des
Arbeitsbereichs
• Das Gerät muss wie empfohlen und von einer autorisierten Person an das Stromnetz
angeschlossen werden. Falls Störungen auftreten, können zusätzliche Maßnahmen wie die
Filterung des Netzes angewendet werden. Die Versorgung von fest montierten
Lichtbogenschweißgeräten muss über ein Metallrohr oder ein gleichwertiges abgeschirmtes
Kabel erfolgen. Das Display und das Gehäuse des Netzteils müssen miteinander verbunden sein
und es muss ein guter elektrischer Kontakt zwischen den beiden Strukturen bestehen.
Parasiten
Sicherheitsvorschrifte

89
www.magmaweld.com BEDIENUNGSANLEITUNG
KOMPAKTE SMART SERIE
DE
• Die empfohlene routinemäßige Wartung des Geräts muss durchgeführt werden. Wenn das
Gerät in Gebrauch ist, müssen alle Luken der Motorhaube geschlossen und/oder verriegelt sein.
am Gerät vorgenommen werden, die über die Standardeinstellungen hinausgehen. Andernfalls
ist der Benutzer für die Folgen verantwortlich, die daraus entstehen können.
in keiner Weise aufgewickelt werden.
• Beim Schweißen/Schneiden wird in der Maschine ein Magnetfeld erzeugt. Dies kann dazu
führen, dass das Gerät Metallteile auf sich zieht. Um diese Anziehungskraft zu verhindern,
stellen Sie sicher, dass metallische Materialien in einem sicheren Abstand gehalten oder
gesichert werden. Der Bediener muss von all diesen miteinander verbundenen
Metallmaterialien isoliert sein.
• Wenn das Werkstück aus Gründen der elektrischen Sicherheit oder aufgrund seiner Größe und
Lage nicht geerdet ist (z. B. bei der Herstellung von Schiffsrümpfen oder im Stahlbau), kann eine
Verbindung zwischen Werkstück und Erde in einigen Fällen die Emissionen verringern.
Beachten Sie, dass die Erdung desWerkstücks zu Verletzungen der Benutzer oder zu
Fehlfunktionen anderer elektrischer Geräte in der Umgebung führen kann. Wo eserforderlich
ist, kann die Verbindung zwischen Werkstück und Erde als Direktverbindung hergestellt
werden, aber in einigen Ländern, in denen eine Direktverbindung nicht zulässig ist, kann die
Verbindung mit geeigneten Kapazitätselementen gemäß den örtlichen Vorschriften und
Bestimmungen hergestellt werden.
• Abschirmung und Umhüllung anderer Geräte und Kabel im Arbeitsbereich können helfen,
für einige spezielle Anwendungen in Betracht gezogen werden.
Felder (EMF).
minimieren;
zusammengeführt und mitVerbindungsmaterialien (Klebeband, Kabelbinder usw.) gesichert
werden.
Schneidemaschine und den Kabeln entfernt gehalten werden,
angeschlossen werden,
• Lehnen Sie sich nicht gegen das Aggregat, setzen Sie sich nicht darauf und arbeiten Sie nicht zu
nahe daran,
• Beim Transport des Aggregats oder der Drahtvorschubeinheit darf nicht geschweißt /
geschnitten werden.
EMF können auch die Funktion von medizinischen Implantaten (Material, das in den Körper
eingesetzt wird) wie Herzschrittmachern beeinträchtigen. Für Menschen mit medizinischen
Implantaten müssen Schutzmaßnahmen getroffen werden. So kann beispielsweise der Zugang
für Passanten eingeschränkt werden oder es können individuelle Risikobewertungen für die
Betreiber vorgenommen werden. Bei Benutzern mit medizinischen Implantaten sollte eine
Risikobewertung und Empfehlung durch einen Arzt erfolgen.
Elektronenmagnetisches
Feld (EMF)
den Sie durchführen möchten.
• Wählen Sie den Strom und / oder die Spannung, die für das Material und die Dicke des zu
schweißenden / schneidenden Materials geeignet sind.
• Wenn Sie längere Zeit ohne Schweißen/Schneiden warten, schalten Sie die Maschine aus, nachdem
der Ventilator die Maschine abgekühlt hat. Unsere Maschinen mit intelligenter Lüftersteuerung
stoppen von selbst.
• Setzen Sie das Gerät nicht Regen, Spritzwasser oder unter Druck stehendem Dampf aus.
Sicherheitsvorschrifte

90
www.magmaweld.comBEDIENUNGSANLEITUNG
DE
KOMPAKTE SMART SERIE
• Diese Maschine ist kein Hausmüll. Sie muss im Rahmen der Richtlinie der Europäischen Union
und des nationalen Rechts auf das Recycling ausgerichtet sein.
• Informieren Sie sich bei Ihrem Händler und bei autorisierten Personen über die Entsorgung
Ihrer gebrauchten Maschine.
Abfallverfahren
GARANTIEFORMULAR
Bitte besuchen Sie unsere Website www.magmaweld.com/warranty-form/wr für das
Garantieformular.
Sicherheitsvorschrifte

91
www.magmaweld.com BEDIENUNGSANLEITUNG
KOMPAKTE SMART SERIE
DE
TECHNISCHE DATEN
1.1 Allgemeine Erläuterungen
Technische Daten
ID 300 MK / MKW PULSE SMART, ID 400 MK / MKW PULSE SMART ist ein dreiphasiges MIG /
ist. Es bietet eine einfache Bewegung mit seiner kompakten Struktur. Es hat hervorragende
Drahttyp, Dicke und Gasart bestimmt wurden. Der klassische und der intelligente Modus erleichtern dem
Benutzer die Anpassung an den synergetischen Modus.
1.2 Maschinenkomponenten
Figur 1 : ID 300 MK PULSE SMART / ID 400 MK PULSE SMART
Vorder- und Rückansicht
1- Digitales Display
2- Einstelltopf
3- Datenbuchse
4- Brenneranschluss
5- Polanschluss
6- Digitales Display
7- Einstelltopf
8-
9- Elektrode (+) Polanschluss
10- Gaseintritt
11- Heizungssteckdose
12- Ventilator
13- Wassereinheit Energiesteckdose
14- Netzkabel
15-
16- Rad
10
14
16
15
11
12
13
1 6
7
8
9
2
3
4
5

92
www.magmaweld.comBEDIENUNGSANLEITUNG
DE
KOMPAKTE SMART SERIE
1- Digitales Display
2- Einstelltopf
3- Datenbuchse
4- Brenneranschluss
5- Polanschluss
6- Digitales Display
7- Einstelltopf
8-
9- Elektrode (+) Polanschluss
10-
11- Warmwasserzulauf Wassereinheit
12- Kaltwasserausgang Wassereinheit
13- Gaseintritt
14- Heizungssteckdose
15- Ventilator
16- Wassereinheit Energiesteckdose
17- Netzkabel
18-
19- Rad
Figur 2 : ID 300 MKW PULSE SMART / ID 400 MKW PULSE SMART
Vorder- und Rückansicht
1 6
7
8
9
10
11
12
2
3
4
5
13
19
17
14
15
16
18
Technische Daten

93
www.magmaweld.com BEDIENUNGSANLEITUNG
KOMPAKTE SMART SERIE
DE
Technische Daten

94
www.magmaweld.comBEDIENUNGSANLEITUNG
DE
KOMPAKTE SMART SERIE
Technische Daten
schweißen/schneiden. Die Maschine muss jedoch für die nächsten 4 Minuten im Leerlauf bleiben, um
abzukühlen (Zone 2).
Operationszyklus
6 Minuten 6 Minuten6 Minuten4 Minuten 4 Minuten 4 Minuten Zeit (Min.)
CC / CV
Konstantstrom / Konstantspannung
Gleichstrom
Geeignet für Arbeiten in
gefährlichen Umgebungen
X
U
I
U
IP21S
U
S
I
Operationszyklus
Nennschweißstrom
Schutzklasse
Nennschweißspannung
Strom aus dem Netz
Nennstrom aus dem Netz

95
www.magmaweld.com BEDIENUNGSANLEITUNG
KOMPAKTE SMART SERIE
DE
400
82
IP21S
14,7
300
1078 x 528 x 962
86
1180 x 528 x 1137
110
1078 x 528 x 962
86
1180 x 528 x 1137
110
ID 300 MK/MKW PULSE SMART
IP21S
400
82
22,1
400
ID 400 MK/MKW PULSE SMART
STANDARDZUBEHÖR ANZAHL
1Erdungszange und Kabel 7905203505
7905305005
ID 300 MK/MKW
PULSE SMART
ID 400 MK/MKW
PULSE SMART
OPTIONALES ZUBEHÖR ANZAHL
1
1
1
1
1
1
1
Gasschlauch
CO Heizung
Gasregulator (Mix)
Gasregulator (CO)
7907000002
7020009003
7020001004
7020001005
7120050003
ID 300 - 400 MK/MKW PULSE SMART
Technische Daten
Schutzklasse
Leerlaufspannung
Gewicht
Bereich zur Einstellung des Schweißstroms
Abmessungen (l x b x h)
V
VDC
kVA
ADC
ADC
kg
mm
MK
MK
MKW
MKW
EINHEITTECHNISCHE SPEZIFIKATIONEN
Schutzklasse
Leerlaufspannung
Gewicht
Bereich zur Einstellung des Schweißstroms
Abmessungen (l x b x h)
V
VDC
kVA
ADC
ADC
kg
mm
MK
MK
MKW
MKW
EINHEITTECHNISCHE SPEZIFIKATIONEN

96
www.magmaweld.comBEDIENUNGSANLEITUNG
DE
KOMPAKTE SMART SERIE
INSTALLATIONSHINWEISE
2.1 Zu beachtende Punkte beim Empfang
Vergewissern Sie sich, dass alle Materialien, die Sie bestellt haben, eingetroffen sind. Wenn Material fehlt oder
beschädigt ist, wenden Sie sich sofort an die Verkaufsstelle.
Die Standardbox enthält :
• Erdungszange und Kabel • Gebrauchsanweisung
• Gasschlauch • Schweißdraht
zusammen mit einer Fotokopie des Lieferscheins dem Transportunternehmen melden. Wenn das Problem
weiterhin besteht, wenden Sie sich an den Kundendienst.
2.2 Empfehlungen für Installation und Betrieb
• Für den Transport der Maschine müssen Hebeösen oder ein Gabelstapler verwendet werden. Heben Sie die
der es nicht herunterfallen oder umkippen kann.
• Um eine bessere Leistung zu erzielen, müssen Sie die Maschine in einem Abstand von mindestens 30 cm
zu umliegenden Gegenständen aufstellen. Achten Sie auf Überhitzung, Staub und Feuchtigkeit rund um die
übersteigt, lassen Sie die Maschine mit einem niedrigeren Strom oder einer niedrigeren Taktzahl laufen.
• Vermeiden Sie das Schweißen im Freien bei Wind und Regen. Wenn in solchen Situationen geschweißt
werden muss, schützen Sie den Schweißbereich und das Schweißgerät mit Vorhängen und Markisen.
• Achten Sie bei der Aufstellung des Geräts darauf, dass Materialien wie Wände, Vorhänge, Verkleidungen usw.
den einfachen Zugang zu den Bedienelementen und Anschlüssen der Maschine nicht behindern.
• Wenn Sie in geschlossenen Räumen schweißen, verwenden Sie eine geeignete Rauchabsauganlage. Wenn die
ein Atemschutzgerät.
Betriebszyklen kann die Maschine beschädigen und zum Erlöschen der Garantie führen.
• Das Versorgungskabel muss entsprechend dem angegebenen Sicherungswert verwendet werden.
• Schließen Sie das Erdungskabel so nah wie möglich an den Schweißbereich an. Achten Sie darauf, dass der
Symbole auf dem Gerät und ihre Bedeutungen
Der Schweißvorgang birgt Gefahren. Sorgen Sie für geeignete Arbeitsbedingungen und treffen Sie die
notwendigen Vorsichtsmaßnahmen. Spezialisierte Personen sind für die Maschine verantwortlich und
müssen die notwendige Ausrüstung bereitstellen. Unbeteiligte Personen sollten von der Schweißstelle
ferngehalten werden.
Niederspannungsnetz angeschlossen werden soll, muss der Installateur, der den elektrischen Anschluss
vornimmt, oder die Person, die die Maschine benutzen wird, über die Anschlussfähigkeit der Maschine
informiert werden; in diesem Fall liegt die Verantwortung beim Benutzer.
Achten Sie auf die Sicherheitssymbole und Warnhinweise auf der Maschine und in dieser
Die Gitter dienen der Belüftung. Die Öffnungen dürfen nicht abgedeckt werden, um eine gute Kühlung zu
gewährleisten, und es dürfen keine Fremdkörper hineingelassen werden.
Installationshinweise

97
www.magmaweld.com BEDIENUNGSANLEITUNG
KOMPAKTE SMART SERIE
DE
Installationshinweise
2.3 Schweißanschlüsse
• Ein Stecker ist nicht mit dem Netzkabel verbunden, da in Fabriken, auf Baustellen und in Werkstätten
Elektriker an die Steckdose angeschlossen werden. Vergewissern Sie sich, dass das Erdungskabel, das mit
und in gelber/grüner Farbe markiert ist, vorhanden ist.
• Nachdem Sie den Stecker mit dem Kabel verbunden haben, stecken Sie ihn noch nicht in die Steckdose.
• Befestigen Sie die Erdungszange fest am Werkstück, so nah wie möglich an der zu schweißenden Stelle.
2.3.3 Gasanschlüsse
• Vergewissern Sie sich, dass der Schlauchanschluss des von Ihnen verwendeten Gasreglers die Größe 3/8 hat.
fernhalten und halten Sie es 5 Sekunden lang geöffnet. Auf diese Weise werden eventuelle Ablagerungen und
Schmutz herausgeschleudert.
• Schließen Sie das eine Ende des Flaschenschlauchs an den Gasregler an und ziehen Sie die Schelle fest.
Schließen Sie das andere Ende an den Gaseinlass auf der Rückseite der Maschine an und ziehen Sie die
Mutter fest.
Gasleitung gibt. Wenn Sie ein Geräusch hören und/oder einen Gasgeruch riechen, der auf ein Leck hinweist,
überprüfen Sie Ihre Anschlüsse und beseitigen Sie das Leck.
1- Gasflaschenventil 6- Gasregulator
2- Gasflasche 7- Manometer
3- 8- Durchflussmesser
4- Kette 9-
5- 10- Schlauch
1
2
5
4
3
6
7 8
9
10

98
www.magmaweld.comBEDIENUNGSANLEITUNG
DE
KOMPAKTE SMART SERIE
2.3.4 Wasserkühleinheit
• Die Wasserkühleinheit ist ein geschlossenes Kreislaufsystem, das aus einem Kühler, einem Ventilator, einer
Pumpe und einem Kühlmitteltank besteht und zur Kühlung des Brenners dient.
• Verbinden Sie den kalten (blauen) Wasserschlauch des Zwischenpakets mit dem Kaltwasserausgang des
Wasserkühlsystems und den heißen (roten) Wasserschlauch mit dem Heißwassereinlass des
Wasserkühlsystems.
hergestellt wird. Wenn der Kühlmittelstand niedrig ist, öffnen Sie den Deckel des Kühlmitteltanks und fügen
angegeben sind.
Reaktionen oder andere Probleme verursachen.
• Magmaweld ist nicht verantwortlich für Risiken, die bei unterschiedlichen Flüssigkeitszusätzen entstehen
Kühlmittel oder Wasser hinzugefügt wird.
• Wenn Sie eine andere Kühlmittelmarke verwenden möchten, muss der Kühlmittelbehälter vollständig
• Wasserkühlgeräte sind nur für Schweißmaschinen der Firma “Magma Mekatronik Makine Sanayi ve Ticaret
Installationshinweise

99
www.magmaweld.com BEDIENUNGSANLEITUNG
KOMPAKTE SMART SERIE
DE
NUTZUNGSINFORMATIONEN
3.1 Einstellungen im Inneren der Tasche
1 2
3 4 5 6
Solange die Taste gedrückt gehalten wird, wird der Draht angetrieben und das Gasventil funktioniert nicht.
Sie können diese Taste verwenden, um den Draht in den Brenner zu treiben.
diese Taste nach dem Gaswechsel verwenden.
1-) FREIER DRAHT
2-) FREIES GAS
3-) AUSWAHL DER SCHWEISSMETHODE
Einstellbereich
• MIG/MAG
• Impuls MIG/MAG
Die Pulsschweißmethode ist nur bei Modellen mit Pulse verfügbar. Bei Modellen ohne Pulse
leuchtet die LED nicht, wenn diese Linie erreicht wird und Pulse ist nicht aktiv.
Sie müssen Ihre Anschlüsse und Ihr Zubehör entsprechend der gewählten Schweißmethode
• MMA
Bei WIG-Schweißen muss ein geeignetes Gerät für den Anschluss des Brenners verwendet
werden. Dank des speziellen Geräts ist es mit dem Euro-Anschluss kompatibel.
Nutzungsangaben

100
www.magmaweld.comBEDIENUNGSANLEITUNG
DE
KOMPAKTE SMART SERIE
Die Auswahl des Drahttyps ist getroffen. Der zu verwendende Kabeltyp muss korrekt ausgewählt werden.
Mit jedem Druck auf die Taste wechseln Sie zwischen den Zeilen der jeweiligen Spalte. Wenn der Kabeltyp
ausgewählt ist, leuchtet die entsprechende LED.
Einstellbereich
• Stahl • AlMg
• FCW • AlSi
• CrNi • CuAl
Die Auswahl des Drahtdurchmessers ist getroffen. Der zu verwendende Drahtdurchmesser muss richtig
gewählt werden. Mit jedem Druck auf die Taste wechseln Sie zwischen den Zeilen der jeweiligen Spalte.
Wenn der Drahtdurchmesser ausgewählt ist, leuchtet die entsprechende LED.
Einstellbereich
Die Auswahl der Gasart ist getroffen. Die zu verwendende Gasart muss korrekt ausgewählt werden.
Mit jedem Druck auf die Taste wechseln Sie zwischen den Zeilen der jeweiligen Spalte. Wenn die Gasart
ausgewählt ist, leuchtet die entsprechende LED.
Einstellbereich
• CO
4-) AUSWAHL DES DRAHTTYPS
5-) AUSWAHL DES DRAHTDURCHMESSERS
6-) AUSWAHL DES GASTYPS
Nutzungsangaben

101
www.magmaweld.com BEDIENUNGSANLEITUNG
KOMPAKTE SMART SERIE
DE
1
3
7
8
6
2
4455
Nutzungsangaben
Sie zeigt den Inhalt des Menüs, Fehlermeldungen, die Drahtgeschwindigkeit und den Schweißstrom im
Leerlauf/Last, je nach ausgewähltem Modus, sowie die Dicke an. Alle Parameter werden auf dem digitalen
Display angezeigt.
nach gewähltem Modus.
1-) DIGITALANZEIGE LINKS
2-) DIGITALANZEIGE RECHTS
Untätig
Synergetischer Modus Schweißsetstrom Schweißstrom
Intelligenter Modus Schweißsetstrom Schweißstrom
Klassischer Modus Drahtgeschwindigkeit Schweißstrom
Unter Spannung
Untätig
Synergetischer Modus Schweißgerätspannung Schweißspannung
Intelligenter Modus Schweißgerätspannung Schweißspannung
Klassischer Modus Schweißgerätspannung Schweißspannung
Unter Spannung

102
www.magmaweld.comBEDIENUNGSANLEITUNG
DE
KOMPAKTE SMART SERIE
Wenn Sie sehen möchten, welchen Wert das Gerät ursprünglich vorgeschlagen hat, und zu diesem Wert
zurückkehren möchten, drücken Sie einfach einmal die Einstellungstaste.
Es wird in gepulsten Modellen aktiv sein.
3-) AUSWAHL DES QUELLENMODUS
Die Auswahl, die Sie auf der Registerkarte Methode in der Tasche treffen, führt zu einer Unterscheidung in
sind die Modi wie folgt:
Einstellbereich
• Klassischer Modus
• Intelligenter Modus
• Synergetischer Modus
Abschnitt Modus.
KLASSISCHER MODUS
Wenn Sie diese Option auswählen, können Sie die Drahtgeschwindigkeit und die Schweißspannung selbst
SMART-MODUS
Bei der Auswahl müssen die Schweißparameter wie Drahttyp, Drahtdurchmesser und Gasart korrekt
ausgewählt werden. Das Gerät stellt automatisch die optimale Spannung entsprechend dem gewählten
Schweißstrom ein. Sie können die Spannung innerhalb eines bestimmten Toleranzbereichs einstellen,
SYNERGIE-MODUS
Bei der Auswahl müssen Schweißparameter wie Drahttyp, Drahtdurchmesser, Gasart und Dicke korrekt
ausgewählt werden. Sowohl Strom als auch Spannung passen sich automatisch an die gewählten
Schweißparameter an. Der Benutzer kann sowohl den Strom als auch die Spannung innerhalb eines
bestimmten Toleranzbereichs steuern. Das Gerät berechnet die Spannung automatisch entsprechend dem
eingestellten Stromwert innerhalb einer bestimmten Toleranz neu.
Nutzungsangaben

103
www.magmaweld.com BEDIENUNGSANLEITUNG
KOMPAKTE SMART SERIE
DE
Nutzungsangaben
4-) EINSTELLMETER
Die Einstellung erfolgt durch Drehen des Potentiometers (4) nach links und rechts.
• Wenn der klassische Modus gewählt ist, wird die Drahtgeschwindigkeit mit dem Potentiometer eingestellt.
• Wenn der intelligente Modus ausgewählt ist, wird der Strom mit dem Potentiometer eingestellt, die
Spannung wird automatisch anhand des eingestellten Stroms berechnet.
Potentiometer eingestellt, entsprechend der eingestellten Dicke wird die Spannung automatisch
berechnet.
• Wenn Sie die Taste (6) drücken und in den Funktionsbereich wechseln, drücken Sie einmal auf das
Potentiometer, um die entsprechende Funktion zu speichern, die Sie benötigen, um zur anderen Funktion
zu wechseln.”
Wenn Sie diesen Wert nach der Einstellung mit Potentiometer (5) speichern möchten, drücken Sie einmal
auf Potentiometer (4) und wechseln Sie zur nächsten Funktion (PoS). Wenn die Taste (4) nicht gedrückt
wird und die nächste Funktion (PoS) nicht ausgewählt ist, wird keine Speicherung vorgenommen, wenn Sie
direkt zur Hauptseite zurückkehren.
5-) EINSTELLMETER
Die Einstellung erfolgt durch Drehen des Potentiometers (5) nach links und rechts.
• Wenn der klassische Modus ausgewählt ist, wird der Spannungswert eingestellt.
Potentiometer (4) eingestellten Stroms berechnet. Sie können die Spannung innerhalb eines bestimmten
Toleranzbereichs einstellen, indem Sie das Potentiometer (5) nach links und rechts drehen.
• Wenn der synergetische Modus ausgewählt ist, wird die Spannung automatisch anhand der eingestellten
Parameter berechnet. Sie können die Spannung einstellen, indem Sie das Potentiometer (5) innerhalb
eines bestimmten Toleranzbereichs nach links und rechts drehen.
• Wenn Sie die Taste (6) wählen, werden die Funktionen geöffnet. Mit dem Potentiometer können Sie die
entsprechenden Funktionen einstellen.
6-) FUNKTIONSAUSWAHL
Wenn Sie die Taste (6) einmal drücken, werden die Funktionen geöffnet. Um zur Hauptseite
zurückzukehren, drücken Sie einfach erneut auf die Taste. Durch Drehen des Potentiometers (5) nach
links und rechts wird die Einstellung in der gewählten Funktion vorgenommen. Wenn Sie die gewählte
Einstellung speichern möchten, müssen Sie zur nächsten Funktion wechseln. Um zu speichern, genügt es,
einmal auf den Topf (4) zu drücken, damit die Einstellung gespeichert und die nächste Funktion gestartet
wird. Die folgenden Funktionen stehen Ihnen im Menübereich zur Verfügung:
Erstes Gas
Die Vordrosselzeit ist eingestellt.
Einstellbereich
Das Gas wird vor Beginn des Schweißens für die angegebene Zeit zugeführt und dann
beginnt das Schweißen. Schützt das Schweißbad zu Beginn des Schweißens.
PrE
Letztes Gas
Die letzte Gaszeit wird eingestellt.
Einstellbereich
Nach dem Ende des Schweißens für die angegebene Zeit kommt das Gas und das
Schweißen wird beendet. Es bietet Schutz für das Schweißbad am Ende des Schweißens.
PoS

104
www.magmaweld.comBEDIENUNGSANLEITUNG
DE
KOMPAKTE SMART SERIE
Rückwärtsverbrennung
Die Rückbrandeinstellung wird vorgenommen.
Einstellbereich
Wenn der auf dem Display angezeigte Wert “+” ist, kommt der Draht für die angegebene
angegebene Zeit weiter zurück. Wenn der Schweißvorgang beendet ist, wird verhindert,
dass der Schweißdraht an der Kontaktdüse festklebt.
brn
Lückenzeit
Wenn die Methode ausgewählt ist, wird die Zeit, die nicht geschweißt werden soll,
eingestellt.
Einstellbereich
PoF
Soft Start
Einstellbereich
Zu Beginn des Schweißens erhöht sich die Drahtgeschwindigkeit allmählich von einer
niedrigen Geschwindigkeit auf die eingestellte Geschwindigkeit. Auf diese Weise werden
Schläge und Spritzer zu Beginn des Schweißens verhindert.
SoS
Krater
Die Kraterfunktion ist eingestellt.
Einstellbereich
Dieses Verfahren dient dazu, Rissbildung am Ende des Schweißvorgangs zu verhindern.
Wenn der Krater aktiv ist, wird der Schweißstrom am Ende der Schweißung mit einer
gewissen Linearität reduziert und die Schweißung wird beendet.
Crt
Schweißzeit
Wenn die Methode ausgewählt ist, wird die Schweißzeit eingestellt.
Einstellbereich
Pon
7-) PROGRAMMAUSWAHL
Es wird zur Aufzeichnung der geleisteten Arbeit verwendet. Es gibt 3 Erinnerungen. Die LED (7) des
Programms, in dem der Vorgang ausgeführt wird, leuchtet auf. Um das Programm zu speichern, drücken Sie
die Taste einmal und wechseln Sie zum anderen Programm. Wenn Sie das Programm Nummer 3 speichern
möchten, reicht es aus, die Taste zum Speichern einmal zu drücken, nachdem Sie Ihre Einstellungen
ausgeschaltet. Nach dem Programm P3 gibt es einen Bereich, der den Betrieb ohne Programmaufnah
me ermöglicht. Während Sie sich in diesem Bereich befinden, erfolgt keine Programmaufnahme und die
Einstellbereich
8-) AUSWAHL DES TRIGGERMODUS
Wird zur Auswahl des Triggermodus verwendet. Mit jedem Drücken der Taste (8) wird in den anderen
Triggermodus gewechselt.
Einstellbereich
• 2 Auslöser
• 4 Auslöser
• Methode
Drücken Sie den Auslöser Drücken und halten Sie den Auslöser Lassen Sie den Auslöser los
Nutzungsangaben

105
www.magmaweld.com BEDIENUNGSANLEITUNG
KOMPAKTE SMART SERIE
DE
2 AUSLÖSEMODUS : Wenn der Brennerauslöser gedrückt wird, beginnt das Schweißen und der
Auslöser wird gedrückt gehalten, bis das Schweißen beendet ist. Das Schweißen endet, wenn der Auslöser
losgelassen wird.
PrG : Gasvorlaufzeit
I : Schweißstrom
PoG : Gasnachlaufzeit
• Drücken und halten Sie den Auslöser des Brenners,
• Der Schutzgasfluss beginnt so lange wie die Gasvorlaufzeit.
• Am Ende der Gasvorlaufzeit läuft der
Drahtvorschubmotor mit langsamer Geschwindigkeit.
• Der Schweißstrom erhöht sich, wenn das Werkstück
erreicht ist.
• Lassen Sie den gedrückten Brennerauslöser los
• und der Drahtvorschubmotor stoppt.
• Der Lichtbogen erlischt nach der eingestellten
Rückbrennzeit.
• Der Prozess endet am Ende der Gasnachlaufzeit.
4 AUSLÖSEMODUS : Sobald der Brennerauslöser gedrückt und losgelassen wird, beginnt das Schweißen
und Sie brauchen ihn nicht bis zum Ende des Schweißens gedrückt zu halten. Wenn der Auslöser gedrückt
und wieder losgelassen wird, wird die Schweißung beendet.
PrG : Gasvorlaufzeit
I : Schweißstrom
PoG : Gasnachlaufzeit
• Drücken und halten Sie den Auslöser des Brenners,
• Der Schutzgasfluss beginnt so lange wie die Gasvorlaufzeit.
• Am Ende der Gasvorlaufzeit läuft der
Drahtvorschubmotor mit langsamer Geschwindigkeit.
• Der Schweißstrom erhöht sich, wenn das Werkstück
erreicht ist.
• Lassen Sie den Brennerauslöser los und das
Schweißen wird fortgesetzt.
• Drücken Sie den Brennerauslöser und lassen Sie
ihn los.
• Drahtvorschubmotor stoppt
• Der Lichtbogen erlischt nach der eingestellten
Rückbrennzeit.
• Der Prozess endet am Ende der Gasnachlaufzeit.
METHODE: Mit dem Modus ist das Punktschweißen gemeint. Das Schweißen wird für die angegebene
Schweißzeit fortgesetzt und am Ende der Schweißzeit beendet. Wenn die angegebene Zeitlücke zu lang ist,
wird keine Schweißung durchgeführt. Dieser Zeitraum dauert so lange an, wie der Auslöser nicht betätigt
wird.
Schweißzeit :
Diese Methode ist zu bevorzugen, wenn Sie jedes Mal die gleiche Schweißnaht und den gleichen Einbrand
erzielen möchten. Schweißnähte, die nach der Methode hergestellt werden, sind gleich lang.
Nutzungsangaben

106
www.magmaweld.comBEDIENUNGSANLEITUNG
DE
KOMPAKTE SMART SERIE
2
A
1
B
Vorderansicht der Fernbedienungs-
Taschenlampenbuchse
BRENNERSTEUERUNG - BRAUN
BRENNERSTEUERUNG - SCHWARZ
BRENNERSTEUERUNG - ROT
BRENNERSTEUERUNG - WEISS
BRENNERSTEUERUNG - GRÜN
Modus
Klassischer
Modus
Intelligenter
Modus
Synergistischer
Modus
reduzieren. Einstellbereich: 0.5 m/Min.
Einstellbereich: 5 A
Einstellbereich: 5 A
Einstellbereich: 0.5 V
erhöhen. Einstellbereich: 0.5 m/Min.
Einstellbereich: 5 A
Einstellbereich: 5 A
erhöhen. Einstellbereich: 0.5 V
Einstellbereich: 0.5 V
reduzieren. Einstellbereich: 0.5 V
reduzieren. Einstellbereich: 0.5 V
reduzieren. Einstellbereich: 0.5 V
1
1
1
2
2
2
A
A
A
B
B
B
Taste Funktion
3.3 Fernsteuerung
Mit einem geeigneten Brenner und einem entsprechenden Verbinder können Sie Ihren Schweißstrom
(Drahtgeschwindigkeit) / Ihre Schweißspannung am Brenner ändern, ohne in die Nähe Ihrer Maschine zu
gehen. Sie müssen die Buchse für die Fernsteuerung der Taschenlampe anschließen.
Die Buchsenverbindungen sind unten angegeben:
Nutzungsangaben

107
www.magmaweld.com BEDIENUNGSANLEITUNG
KOMPAKTE SMART SERIE
DE
3.4 Einstellung der Bogenlänge (ArC)
Drücken Sie die Spannungseinstellungstaste für drücken und 3 Sekunden lang gedrückt halten, wird die
Funktion Bogenlänge aktiviert. Die Werkseinstellung ist 0.0. Sie können die Einstellung der Bogenlänge im
Richtung +7 rückt der Drahtkontakt näher an die Düse und die Bogenlänge wird länger. Bei der Veränderung
gewünschte Einstellung vorgenommen haben, drücken Sie die aktuelle Taste einmal, um die Einstellung zu
verlassen.
3.5 MIG-Kurve
Draht einstellen
Draht 0 - 25
Stelle
Spannung einstellen
Spannung 0 - 25
Krater geöffnet
Gasvorlauf
Krater geschlossen
Gasvorlauf
Pnt-Modus
Ein Pnt-Modus
Aus
Gasnachlauf
Gasvorlauf
Krater
Krater
Neuzündung
Neuzündung
Neuzündung
Gasnachlauf
Gasnachlauf
Gasnachlauf
Neuzündung
Gasnachlauf
Spannung einstellen
Spannung 0 - 25
Krater geöffnet
Gasvorlauf
Draht einstellen
Draht 0 - 25
Krater geschlossen
Gasvorlauf
Langsame
Freigabe aus
Langsame
Freigabe ein
Langsame
Freigabe ein
Langsame
Freigabe aus
0,0 - 9,9 Sek. 0,1 Sek.
0,0 - 9,9 Sek. 0,0 Sek.
25 - 0 - 25 0 Schritt
0,6 - 20,0 mm 1,0 mm
0,0 - 9,9 Sek. 0,1 Sek.
0,6 - 2,4 mm 1,0 mm
0,2 - 9,9 Sek. 0,2 Sek.
SG/FE, Flux Rutil, Flux Basic, AIMg 4,5Mn, AIMg5, AIsi 5, AL 99,5
82/18, 92/8, %100 Ar, %100 CO2, %97,5/2,5
Methode / 2 / 4
2
MIG / MAG - MMA
LIFT TIG MIG / MAG
Synergic / Smart / Classic
Aktiv / Passiv
Passiv
Wertebereich Werkseinstellung 2- Lokation MIG 4- Lokation MIG
Dicke
Draht-Typ
Auslöser
Dauer des Schweißens
Zeitlücke
Draht-Durchmesser
Methode
Gasvorlauf
Neuzündung
Gasnachlauf
Gasart
Krater
Modus
Nutzungsangaben

108
www.magmaweld.comBEDIENUNGSANLEITUNG
DE
KOMPAKTE SMART SERIE
• Wenn Sie das Gebläsegeräusch hören und die Netzlampe leuchtet, schalten Sie das Gerät aus, indem Sie den
Je nach gewähltem Modus werden die Drahtgeschwindigkeit und der Schweißstrom mit Hilfe des
Topfes eingestellt. Die Einstellung erfolgt durch Drehen des Topfes nach links und rechts.
Je nach gewähltem Modus werden die Drahtgeschwindigkeit und der Schweißstrom mit Hilfe des
Topfes eingestellt. Die Einstellung erfolgt durch Drehen des Topfes nach links und rechts.
• Positionieren Sie die zu verwendende Rolle so, dass die Lücken an der Innenseite der Drahtvorschubrolle die
Aussparungen am Drahtvorschubkörper überlappen. Drehen Sie nach rechts oder links und vergewissern
Sie sich, dass das Verriegelungsgeräusch zu hören ist und die Drahtantriebsrollen in Position sind. Senken Sie
dann die Andruckrollen ab und heben Sie den Andruckrollenhebel an, um ihn an der Andruckrolle zu
arretieren.
• Wenn Sie die Kappe des Drahtvorschubs öffnen, können Sie mit dem Knopf an der Seite das Gas und den
Kraft angetrieben. Auch unter schwierigen Voraussetzungen wie Motorerwärmung und erhöhter Reibung
ändert sich die Drahtvorschubgeschwindigkeit nicht. Die Bogenstabilität ist ausgezeichnet. Wenn das Gerät
unter Strom steht, leuchtet die interne LED auf und erleichtert somit das Auswechseln der Rolle.
• Verwenden Sie Drahtvorschubrollen, die für das Material und den Durchmesser des Schweißdrahtes
geeignet sind, den Sie verwenden. Verwenden Sie die V-Rille für Stahl und Edelstahl, die gerändelte
V-Rille für Fülldraht, die U-Rille für Aluminium.
• Wenn Sie die Drahtvorschubrollen ersetzen müssen, entfernen Sie die vorhandenen Rollen, nachdem Sie die
Druckeinstellschraube zu sich gezogen und die oberen Rollenabdeckungen angehoben haben.
Figur 4 : Drahtvorschubsystem
a- Motor
b- Euroverbinder
c- Druckeinstellschraube
d- Obere Drahtvorschubrollen
e- Untere Drahtvorschubrollen
f- Verriegelungsmechanismus für den Drahtvorschub
• Um die Rollen entfernen zu können, müssen Sie sie entriegeln. Durch Drehen in die
entgegengesetzte Richtung zur Verriegelungsrichtung müssen die Schlitze an der
Innenseite der Drahtvorschubrollee die Aussparungen am Drahtvorschubkörper
überlappen, wodurch die Verriegelung aufgehoben wird.
• Beide Seiten der Rollen sind entsprechend dem Drahtdurchmesser, für den sie
verwendet werden, gekennzeichnet.
• Legen Sie die Rollen so auf den Flansch, dass der Drahtdurchmesser, den Sie verwenden
werden, auf der Ihnen zugewandten Seite liegt.
a
b
d
e
f
d
cc
Nutzungsangaben

109
www.magmaweld.com BEDIENUNGSANLEITUNG
KOMPAKTE SMART SERIE
DE
Figur 6 : Platzierung der DrahtantriebswalzenFigur 5 : Entfernen der Drahtantriebswalzen
(1)
(3)
(3)
(2)
(6)
(4)
(4)
(5)
3.8 Positionierung der Drahtspule und Antrieb des Drahtes
• Drehen Sie die Schraube des Drahttransportsystems heraus. Fädeln Sie die Schweißdrahtspule auf die Welle
des Drahttransportsystems und ziehen Sie die Schraube wieder fest.
• Ziehen Sie den Druckhebel an der Drahtvorschubspule und senken Sie ihn ab, d.h. entlasten Sie die Druckspule.
• Ohne den Draht loszulassen, führen Sie den Draht durch die Drahteinführung, auf die Spulen und über die
Spulen in den Brenner.
• Entfernen Sie den Schweißdraht von der Stelle, an der die Drahtspule angeschlossen
ist, und schneiden Sie das Ende mit einem Seitenmeißel ab, ohne es zu verfehlen.
Figur 7 : Platzieren der Drahtspule
Figur 8 : Anbringen des Drahtes auf der Spule
Wenn das Ende des Drahtes verfehlt wird, kann der Draht wie eine Feder herausschießen
und Ihnen und anderen in Ihrer Umgebung Schaden zufügen.
Wenn Sie die Schraube des Drahttransportsystems zu fest
anziehen, kann der Draht nicht angetrieben werden und es
kann zu Fehlfunktionen kommen. Wenn Sie die Schraube nicht
fest genug anziehen, kann sich der Drahtkorb nach einer
Weile leeren und verheddern, wenn der Drahtvorschub
gestoppt wird. Ziehen Sie die Schraube daher weder zu fest
noch zu locker an.
a
b
c
(1)
(3)
(2)
Nutzungsangaben

110
www.magmaweld.comBEDIENUNGSANLEITUNG
DE
KOMPAKTE SMART SERIE
Wenn die Druckeinstellschraube zu fest angezogen oder zu locker gelassen wird
oder die falsche Drahtantriebsspule verwendet wird, treten folgende Effekte auf.
A: Geeignete Drahtstärke und Kanalgröße
B: Wenn der Pressarm zu stark zusammengedrückt wird, wird die Form des Drahtes verzerrt.
C:
D: Die Kanallänge der Spule ist zu klein für den verwendeten Draht. Es kommt zu Verzerrungen in der Form
des Drahtes.
E: Die Rillengröße der Spule ist groß für den verwendeten Draht. Es kann nicht in den Bereich des
Drahtschweißens verschickt werden.
Figur 9 : Fehler bei der Druckanpassung und Rollenauswahl
• Drücken Sie die Druckwalzen und heben Sie den Druckhebel .
• Drücken Sie den Auslöser, bis der Draht aus der Brennerspitze kommt. Achten Sie dabei darauf, dass sich die
Schweißdrahtspule gleichmäßig dreht, und prüfen Sie, ob sich die Wicklung lockert, indem Sie den Auslöser
mehrmals drücken und wieder loslassen . Wenn Sie eine Lockerung und/oder ein Zurückspulen
beobachten, ziehen Sie die Schraube des Drahttransportsystems noch etwas fester an.
• Wenn der Draht aus der Brennerspitze herausgezogen ist, setzen Sie die Düse und die Kontaktdüse wieder
auf den Brenner .
• Legen Sie den Draht auf ein Brett, stellen Sie den entsprechenden Drahtdruck ein und schneiden Sie das
Drahtende ab .
BOARD
Nutzungsangaben

111
www.magmaweld.com BEDIENUNGSANLEITUNG
KOMPAKTE SMART SERIE
DE
Nehmen Sie die Gaseinstellung und den Gastest vor, indem Sie den Druckhebel der
Drahtvorschubwalze absenken !
der Drahtdurchmesser z.B. 1,2 mm beträgt, kann der
werden.
• Sie können die Tabelle an der Seite verwenden, um
Hebel der Andruckrolle an und schließen die
Abdeckung der Drahtvorschubeinheit.
8 lt/min.
Unlegierter
Stahl Stahl- und
Metall-Fülldraht
Drahtdurchmesser
(mm)
0.8
0.9
1.0
1.2
Fülldraht Rostfrei
Stahl Aluminium
7 lt/min. 8 lt/min. 8 lt/min.
9 lt/min. 8 lt/min. 9 lt/min. 9 lt/min.
10 lt/min. 9 lt/min. 10 lt/min. 10 lt/min.
12 lt/min. 11 lt/min. 12 lt/min. 12 lt/min.
CC/CV-Struktur
Intelligente Leistung
• Die intelligente Leistungskontrolle überwacht und analysiert kontinuierlich die Schweißparameter der
Maschine.
• Bei zwingenden Bedingungen schützt sich die Maschine selbst, um ihre Lebensdauer zu verlängern und sie
vor Fehlfunktionen zu bewahren.
• Nach 2 Minuten Schutzzeit schaltet sich die Maschine wieder ein.
Vielfältige Nutzungsfunktionen
• Bietet eine benutzerfreundliche Bedienung mit klassischen, intelligenten und synergetischen
Speicher
• Es gibt 3 Auftragsspeicher, um die geleistete Arbeit aufzuzeichnen.
Smart Fan
• Die Innentemperatur der Maschine wird kontinuierlich gemessen. Die Geschwindigkeit des Kühlgebläses
wird entsprechend der gemessenen Temperatur erhöht oder verringert. Unterhalb einer bestimmten
Temperatur wird die Phase vollständig gestoppt. Diese Funktion reduziert die Staubmenge, die in die
Maschine gelangt. Die Lebensdauer der Maschine wird verlängert und es wird Energie gespart. Während
des Schweißens arbeitet der Ventilator, um für Kühlung zu sorgen.
Strom-/Spannungssteuerung am Brenner
• Mit der Option des Steuerungsanschlusses können Sie den Schweißstrom/die Schweißspannung am
begeben.
Soft Start
• Durch allmähliche Erhöhung der Drahtgeschwindigkeit wird die Entstehung von Klopfen und Spritzern
verhindert.
Nutzungsangaben

112
www.magmaweld.comBEDIENUNGSANLEITUNG
DE
KOMPAKTE SMART SERIE
Arbeiten mit Generatoren
• Geeignet für die Arbeit mit Generatoren. Wie viele kVA er leisten kann, sollten Sie anhand der technischen
Spannungsschutz
• Wenn die Netzspannung zu hoch oder zu niedrig ist, schützt sich die Maschine automatisch, indem sie
einen Fehlercode auf dem Display anzeigt. Auf diese Weise werden die Maschinenteile nicht beschädigt
und eine lange Lebensdauer der Maschine ist gewährleistet. Nachdem sich die Umgebungsbedingungen
normalisiert haben, werden auch die Maschinenfunktionen aktiviert.
Phasenschutz
• Geschützt gegen fehlende oder falsche Phasen.
Kompatibilität mit Magnet
Kompatibilität mit Roboter
• Seine Struktur ist mit dem Roboter kompatibel und ermöglicht eine einfache Handhabung.
Nutzungsangaben

113
www.magmaweld.com BEDIENUNGSANLEITUNG
KOMPAKTE SMART SERIE
DE
WARTUNGS- UND STÖRUNGSINFORMATIONEN
• Wartung und Reparaturen an der Maschine müssen von kompetenten Personen durchgeführt werden.
Unser Unternehmen haftet nicht für Unfälle, die durch Eingriffe von Unbefugten verursacht werden.
• Die bei der Reparatur zu verwendenden Teile erhalten Sie bei unseren autorisierten Diensten. Die
Leistungsverluste.
• Wenden Sie sich immer an den Hersteller oder eine vom Hersteller angegebene Vertragswerkstatt.
• Jeder nicht vom Hersteller autorisierte Versuch während der Garantiezeit führt zum Erlöschen aller
Garantiebestimmungen.
• Bevor Sie Reparaturarbeiten am Gerät durchführen, ziehen Sie den Netzstecker aus der Steckdose und
warten Sie 10 Sekunden, bis sich die Kondensatoren entladen haben.
Alle 3 Monate
• Entfernen Sie keine Warnhinweise auf der Maschine. Ersetzen Sie abgenutzte/
gerissene Etiketten durch neue. Sie können die Etiketten beim autorisierten Service
erhalten.
• Überprüfen Sie den Brenner, die Zange und die Kabel. Achten Sie auf die Verbindungen
und die Stabilität der Teile. Ersetzen Sie beschädigte/defekte Teile durch neue.
Nehmen Sie keine Spleißungen/Reparaturenan den Kabeln vor.
• Stellen Sie sicher, dass genügend Platz für die Belüftung vorhanden ist.
zu niedrig ist, bringen Sie sie auf den für das Schweißen geeigneten Wert.
4.1 Wartung
• Reinigen Sie Verbindungsteile wie Schrauben und Muttern und ziehen Sie sie fest.
• Überprüfen Sie die Kabel der Elektrodenklemme und der Erdungsklemme.
• Öffnen Sie die Seitenabdeckungen der Maschine und reinigen Sie sie mit trockener
Niederdruckluft. Wenden Sie Druckluft nicht aus nächster Nähe auf elektronische
Bauteile an.
• Füllen Sie das Wasser im Tank des Wasserkühlgeräts regelmäßig mit sauberem,
nicht hartem Wasser auf und schützen Sie es mit Frostschutzmittel vor dem Einfrieren.
Alle 6 Monate
oder
HINWEIS: Die oben genannten Zeiträume sind die maximalen Zeiträume, die angewendet werden
Wartungs- und Störungsinformationen

114
www.magmaweld.comBEDIENUNGSANLEITUNG
DE
KOMPAKTE SMART SERIE
Wartungs- und Störungsinformationen
4.2 Fehlersuche
Die folgenden Tabellen enthalten mögliche Fehler und Lösungsvorschläge.
Maschine arbeitet nicht
• Autorisierten Service
kontaktieren
• Überprüfen Sie den
• Prüfen Sie Netzsicherungen,
Netzkabel und Stecker
• Prüfen Sie, ob die Netzanschlüsse
korrekt sind
• Vergewissern Sie sich, dass das
Gerät an das Stromnetz
angeschlossen ist
Störung Grund Lösung
• Fehlfunktion der Elektronikkarte • Autorisierten Service
kontaktieren
nicht richtig
• Sicherung der Netzversorgung
defekt oder Netzkabel beschädigt
• Fehlerhafte Netzanschlüsse
• Der elektrische Anschluss der
Maschine ist defekt
Drahtantrieb Motor startet nicht • Elektronische Karte /
Drahtantrieb Motor defekt
Der Drahtvorschubmotor
funktioniert, aber der
Draht bewegt sich nicht
Nicht gut geschweißt
• Wählen Sie die passende
Drahtvorschubrolle
• Drahtantriebsrollen nicht
entsprechend dem
Drahtdurchmesser ausgewählt
• Zu wenig Druck auf die
Drahtantriebsrollen • Stellen Sie die richtige
Druckwalzeneinstellung ein
• Stellen Sie die richtige
Druckwalzeneinstellung ein
• Überprüfen Sie das verwendete
Gas und dessen Einstellung.
Wenn das Gas nicht eingestellt
werden kann, wenden Sie sich an
einen autorisierten Service
• Ändern Sie die Einstellungen für
die Spannung und die
Drahtgeschwindigkeit
• Ersetzen Sie die Kontaktdüse
• Schweißparameter nicht richtig
ausgewählt
• Kontaktdüsengröße falsch
gewählt oder beschädigt
• Niedriger Druck der Druckwalzen
• Zu viel oder zu wenig Schutzgas

115
www.magmaweld.com BEDIENUNGSANLEITUNG
KOMPAKTE SMART SERIE
DE
• Vergewissern Sie sich, dass die
Kabel fest sitzen und die
Anschlussstellen nicht
korrodiert sind
• Vergewissern Sie sich, dass die
korrekt ist
• Kabel und Verbindungsstellen
sind beschädigt
• Falscher Parameter und Prozess
ausgewählt
• Die Erdungszange des Geräts ist
nicht mit dem Werkstück
verbunden
• Schweißparameter nicht richtig
ausgewählt
• Ausfall der elektronischen Karte /
des Lüfters
• Alle Parameter wie Drahttyp,
Gastyp, usw. müssen
entsprechend Ihrer
Schweißmethode ausgewählt
werden
• Autorisierten Service
kontaktieren
Das Display zeigt den 0000
Wert an
Ventilator funktioniert nicht
Der Schweißstrom ist nicht
stabil und/oder nicht reguliert • Kontrollieren Sie den Pol, an den
die Elektrode angeschlossen
werden muss, und den am Gerät
einzustellenden Stromwert
• Stellen Sie sicher, dass der
Schweißbrenner sicher ist
• Stellen Sie sicher, dass die
Wolframspitze sauber ist
• Vergewissern Sie sich, dass das
Gerät mit dem Teil der
Erdungsklemme verbunden ist
• Autorisierten Service
kontaktieren
• Elektrodenpol und Stromstärke
• Schweißbrenner beschädigt
• Wolframspitze abgenutzt
• Ausfall der Elektronikplatine
Störung Grund Lösung
Wartungs- und Störungsinformationen

116
www.magmaweld.comBEDIENUNGSANLEITUNG
DE
KOMPAKTE SMART SERIE
4.3 Fehlercodes
• Es kann an verschiedenen Stellen der
Maschine Probleme geben
• Kontaktieren Sie den autorisierten
Service
E01
E02
Kommunikationsfehler
• Prüfen Sie visuell, dass der Ventilator
funktioniert. Im Falle einer Störung
wenden Sie sich bitte an den
autorisierten Service
• Öffnen Sie die Vorderseite der
Luftkanäle
• Lassen Sie die Maschine abkühlen,
indem Sie eine Weile warten. Wenn
die Störung nicht mehr auftritt,
versuchen Sie, niedrigere
Stromstärken zu verwenden
• Stellen Sie sicher, dass die Maschine
an einem Ort steht, an dem sie
bequemer arbeiten kann
• Ihre Maschine hat möglicherweise die
Aktivierungsrate überschritten
• Der Ventilator funktioniert
möglicherweise nicht
möglicherweise blockiert
• Die Arbeitsumgebung der Maschine
kann zu heiß oder stickig sein
E03
E04
E05
E06
Thermischer
Schutz
• Kontaktieren Sie den autorisierten
Service
• Die Maschine hat möglicherweise
zuviel Strom aufgenommen
Fehler
Netzspannung
niedrig
Fehler beim Lesen
des
Temperatursensors
Netzspannung
Hoch
• Kontaktieren Sie den autorisierten
Service
• Überprüfen Sie die
Netzanschlusskabel und die
Spannung. Vergewissern Sie sich,
dass der richtige Spannungseingang
vorhanden ist. Wenn die
Netzspannung normal ist, wenden
Sie sich an den autorisierten Service
• Überprüfen Sie die
Netzanschlusskabel und die
Spannung. Vergewissern Sie sich,
dass der richtige Spannungseingang
vorhanden ist. Wenn die
Netzspannung normal ist, wenden
Sie sich an den autorisierten Service
• Kontaktieren Sie den autorisierten
Service
• Es kann an verschiedenen Stellen
der Maschine Probleme geben
• Die Netzspannung ist möglicherweise
niedriger geworden
• Die Netzspannung ist möglicherweise
höher
• Der Temperatursensor ist
möglicherweise defekt oder es liegt
ein Problem mit dem elektrischen
Anschluss vor
Fehlercode Fehler Grund Lösung
Wartungs- und Störungsinformationen

117
www.magmaweld.com BEDIENUNGSANLEITUNG
KOMPAKTE SMART SERIE
DE
BESCHREIBUNG
NR
1
12
4
15
7
18
10
2
13
5
16
8
19
11
3
14
6
17
9
MATERIALCODE
Verbinder
Schaltknopf
Elektronische Karte
Drossel
Elektronische Karte
Elektronische Karte
Drahttransport Rollensystem Dreifachverbindung
Drahtzuführung System
Schweißsockel
Stromverbinder
Elektronische Karte
Elektronische Karte
Potenzschalter
Verbinder
Elektronische Karte
Elektronische Karte
Elektronische Karte
K405000230
K405000313
K405000230
A308900004
A376400016
K405000254
K405000255
A378000103
A377900106
A229900003
K309002213
K405000324
A378000050
K405000262
A421050002
K405000312
A229500001
A256006069
K405000253
A378002002
1
2
3
4
5
6
7
8
9
10
11
12
13
14 15
16 17
18
19
Anhänge
ANHÄNGE
Ersatzteilliste für die Stromversorgung

118
www.magmaweld.comBEDIENUNGSANLEITUNG
DE
KOMPAKTE SMART SERIE
1
2
3
4
5
6
7
MATERIALCODE
NR
Wassertank
Wasserpumpe
Schnellkupplung Rot
Ventilator
Glasversicherung Schnell
Schnellkupplung Blau
Heizkörper
1
4
7
2
5
8
3
6
A249000005
A240000006
A300190001
A245700003
A250001126
A300101011
A245700002
A260000010
BESCHREIBUNG
Wasser-Kühlaggregat Ersatzteilliste
Anhänge

119
www.magmaweld.com BEDIENUNGSANLEITUNG
KOMPAKTE SMART SERIE
DE
5.2 Blockdiagramm
R
S
T
Membranplatte
Frontblende
Steuereinheit
Kontrolllinie
Steuerungstransformator
Eingangsgleichrichter Kondensatoren IGBT-Modul Hochfrequenz-Transformator Ausgang Gleichrichter AusgangsdrosselEingangs�ilter
Hall-Effekt
Gas
Drahtantriebseinheit
Nebenschluss
AusgabeFilter
Werkstück
Schweißbrenner
Steuerleitung für
Schweißbrenner
Solenoidventil
Anhänge

120
www.magmaweld.comBEDIENUNGSANLEITUNG
DE
KOMPAKTE SMART SERIE
5.3 Schaltplan der Wassereinheit
380VAC WASSERPUMPE
(Wassere�nhe�t-Steckdose)
GLASSICHERUNG SCHNELL
Anhänge

Modell
Seriennummer
Name des Händlers
Stadt / Land
Telefon / E-Mail
Datum des Kaufs
Name MAGMA MEKATRONİK MAKİNE SANAYİ VE TİCARET A.Ş.
Adresse
Name der Firma
Stadt / Land
Telefon / E-Mail
Telefon / E-Mail
Name der Kontaktperson
Organize Sanayi Bölgesi 5. Kısım MANİSA
+90 236 226 27 00 / info@magmaweld.com
Name der Firma
Name des Technikers
Datum der Inbetriebnahme
(Datum des Garantiebeginns)
GARANTIEKARTE
Bitte besuchen Sie unsere Website www.magmaweld.com/warranty-terms/wt
für die Garantiebedingungen.
PRODUKTINFORMATION
HERSTELLER
KAUFINFORMATIONEN
KUNDENINFORMATIONEN
SERVICE-INFORMATIONEN (falls zutreffend)


123
www.magmaweld.com РУКОВОДСТВО ПО ЭКСПЛУАТАЦИИ
КОМПАКТНАЯ СЕРИЯ SMART
RU
1
1.1
1.2
1.3
1.4
1.5
2
2.1
2.2
2.3
2.3.1
2.3.2
2.3.3
2.3.4
3
3.1
3.2
3.3
3.4
3.5
3.6
3.7
3.8
3.9
3.10
4
4.1
4.2
4.3
5
5.1
5.2
5.3
124
131
131
133
135
135
136
136
137
137
137
137
138
139
141
148
149
149
150
150
151
153
153
155
156
158
159
161
162

124
www.magmaweld.comРУКОВОДСТВО ПО ЭКСПЛУАТАЦИИ
RU
КОМПАКТНАЯ СЕРИЯ SMART

125
www.magmaweld.com РУКОВОДСТВО ПО ЭКСПЛУАТАЦИИ
КОМПАКТНАЯ СЕРИЯ SMART
RU

126
www.magmaweld.comРУКОВОДСТВО ПО ЭКСПЛУАТАЦИИ
RU
КОМПАКТНАЯ СЕРИЯ SMART

127
www.magmaweld.com РУКОВОДСТВО ПО ЭКСПЛУАТАЦИИ
КОМПАКТНАЯ СЕРИЯ SMART
RU

128
www.magmaweld.comРУКОВОДСТВО ПО ЭКСПЛУАТАЦИИ
RU
КОМПАКТНАЯ СЕРИЯ SMART

129
www.magmaweld.com РУКОВОДСТВО ПО ЭКСПЛУАТАЦИИ
КОМПАКТНАЯ СЕРИЯ SMART
RU
a)
b)
c)
d)
e)
f)
g)
h)

130
www.magmaweld.comРУКОВОДСТВО ПО ЭКСПЛУАТАЦИИ
RU
КОМПАКТНАЯ СЕРИЯ SMART
ФОРМА ГАРАНТИИ
Пожалуйста, посетите наш сайт www.magmaweld.ru/гарантийный-талон/wr для формы
гарантии.

131
www.magmaweld.com РУКОВОДСТВО ПО ЭКСПЛУАТАЦИИ
КОМПАКТНАЯ СЕРИЯ SMART
RU
1-
2-
3-
4-
5-
6-
7-
8-
9-
10-
11-
12-
13-
14-
15-
16-
10
14
16
15
11
12
13
1 6
7
8
9
2
3
4
5

132
www.magmaweld.comРУКОВОДСТВО ПО ЭКСПЛУАТАЦИИ
RU
КОМПАКТНАЯ СЕРИЯ SMART
1-
2-
3-
4-
5-
6-
7-
8-
9-
10-
11-
12-
13-
14-
15-
16-
17-
18-
19-
1 6
7
8
9
10
11
12
2
3
4
5
13
19
17
14
15
16
18

133
www.magmaweld.com РУКОВОДСТВО ПО ЭКСПЛУАТАЦИИ
КОМПАКТНАЯ СЕРИЯ SMART
RU

134
www.magmaweld.comРУКОВОДСТВО ПО ЭКСПЛУАТАЦИИ
RU
КОМПАКТНАЯ СЕРИЯ SMART
CC / CV
X
U
I
U
IP21
U
S
I

135
www.magmaweld.com РУКОВОДСТВО ПО ЭКСПЛУАТАЦИИ
КОМПАКТНАЯ СЕРИЯ SMART
RU
400
82
IP21S
14,7
300
1078 x 528 x 962
86
1180 x 528 x 1137
110
1078 x 528 x 962
86
1180 x 528 x 1137
110
ID 300 MK/MKW PULSE SMART
IP21S
400
82
22,1
400
ID 400 MK/MKW PULSE SMART
17905203505
7905305005
ID 300 MK/MKW
PULSE SMART
ID 400 MK/MKW
PULSE SMART
1
1
1
1
1
1
1
7907000002
7020009003
7020001004
7020001005
7120050003
ID 300 - 400 MK/MKW PULSE SMART
MK
MK
MKW
MKW
MK
MK
MKW
MKW
(24V)
)

136
www.magmaweld.comРУКОВОДСТВО ПО ЭКСПЛУАТАЦИИ
RU
КОМПАКТНАЯ СЕРИЯ SMART

137
www.magmaweld.com РУКОВОДСТВО ПО ЭКСПЛУАТАЦИИ
КОМПАКТНАЯ СЕРИЯ SMART
RU
.

138
www.magmaweld.comРУКОВОДСТВО ПО ЭКСПЛУАТАЦИИ
RU
КОМПАКТНАЯ СЕРИЯ SMART
1
2
5
4
3
6
7 8
9
10
1-
2-
3-
4-
5-
6-
7-
8-
9-
10-

139
www.magmaweld.com РУКОВОДСТВО ПО ЭКСПЛУАТАЦИИ
КОМПАКТНАЯ СЕРИЯ SMART
RU
1 2
3 4 5 6
• MIG/MAG
• Pulse MIG/MAG
• MMA
• Lift TIG

140
www.magmaweld.comРУКОВОДСТВО ПО ЭКСПЛУАТАЦИИ
RU
КОМПАКТНАЯ СЕРИЯ SMART
• Steel • AlMg
• FCW • AlSi
• CrNi • CuAl
• CO
• Ar/2.5 C0
• Argon

141
www.magmaweld.com РУКОВОДСТВО ПО ЭКСПЛУАТАЦИИ
КОМПАКТНАЯ СЕРИЯ SMART
RU
1
3
7
8
6
2
4455

142
www.magmaweld.comРУКОВОДСТВО ПО ЭКСПЛУАТАЦИИ
RU
КОМПАКТНАЯ СЕРИЯ SMART

143
www.magmaweld.com РУКОВОДСТВО ПО ЭКСПЛУАТАЦИИ
КОМПАКТНАЯ СЕРИЯ SMART
RU

144
www.magmaweld.comРУКОВОДСТВО ПО ЭКСПЛУАТАЦИИ
RU
КОМПАКТНАЯ СЕРИЯ SMART
(4)
(6)
(5)
(4)
(4)
(5)
(4)
(5)
(5)
(6)
(6)
(5)
(4)
PrE

145
www.magmaweld.com РУКОВОДСТВО ПО ЭКСПЛУАТАЦИИ
КОМПАКТНАЯ СЕРИЯ SMART
RU
PoS
brn
PoF
SoS
Crt
Pon

146
www.magmaweld.comРУКОВОДСТВО ПО ЭКСПЛУАТАЦИИ
RU
КОМПАКТНАЯ СЕРИЯ SMART
(7)
PrG:
I :
PoG:

147
www.magmaweld.com РУКОВОДСТВО ПО ЭКСПЛУАТАЦИИ
КОМПАКТНАЯ СЕРИЯ SMART
RU
PrG:
I :
PoG:

148
www.magmaweld.comРУКОВОДСТВО ПО ЭКСПЛУАТАЦИИ
RU
КОМПАКТНАЯ СЕРИЯ SMART
2
A
1
B
вид спереди разъема горелки
с дистанционным управлением
УПРАВЛЕНИЕ ФАКЕЛОМ - КОРИЧНЕВЫЙ
УПРАВЛЕНИЕ ФАКЕЛОМ - ЧЕРНЫЙ
УПРАВЛЕНИЕ ФАКЕЛОМ - КРАСНЫЙ
УПРАВЛЕНИЕ ФАКЕЛОМ - БЕЛЫЙ
УПРАВЛЕНИЕ ФАКЕЛОМ - ЗЕЛЕНЫЙ
5 A
5 A
5 A
5 A
1
1
1
2
2
2
A
A
A
B
B
B

149
www.magmaweld.com РУКОВОДСТВО ПО ЭКСПЛУАТАЦИИ
КОМПАКТНАЯ СЕРИЯ SMART
RU
Tel 0 - 25
Точечная
сварка -
Выключено
Сварочная проволока 0 - 25
Заварка кратера - Выключено
Плавный
розжиг -
Включен
Плавный
розжиг -
Выключено
Плавный
розжиг -
Включен
Плавный
розжиг -
Выключено
Растяжка дуги в конце сварки
Продувка газа в конце сварки
Продувка газа в конце
сварки
Установленное сварочное напряжение
Напряжение 0 - 25
Заварка кратера - Включено
Продувка газа перед сваркой
Установленная сварочная проволока
Продувка газа перед сваркой
Установленное сварочное напряжение
Напряжение 0 - 25
Заварка кратера - Включено
Продувка газа перед сваркой
Установленная сварочная проволока
Сварочная проволока 0 - 25
Заварка кратера - Выключено
Продувка газа перед сваркой
Точечная сварка
Продувка газа перед
сваркой
Точечная
сварка -
Включено
Растяжка дуги в конце сварки
Продувка газа в конце сварки
Растяжка дуги в конце сварки
Продувка газа в конце сварки
Растяжка дуги в конце сварки
Продувка газа в конце сварки
Заварка
кратера
Заварка
кратера
0,0 - 9,9 сек. 0,1 сек.
0,0 - 9,9 сек. 0,0 сек.
Метод / 2 / 4 2
25 - 0 - 25 0 шаг
0,6 - 20,0 мм 1,0 мм
0,0 - 9,9 сек. 0,1 сек.
0,6 - 2,4 mm 1,0 мм
MIG/MAG - MMA -
LIFT TIG
MIG / MAG
0,2 - 9,9 сек. 0,2 сек.
Steel, AlMg, FCW, AlSi, FCW-M, CuSi, CrNi, CuAl
CO₂, Ar/5-10 CO₂, Ar/15-25 CO₂, Ar/2.5 CO₂, Ar/10-15 CO₂, Argon
Синергетический / Интеллектуальный / Классический
Диапазон
значений
Параметр
заводской
настройки по
умолчанию
2-тактовый
режим
триггера
MIG
4-тактовый
режим
триггера
MIG
Продувка газа перед сваркой
Тип сварочной проволоки
Время паузы
Триггер
Растяжка дуги в конце сварки
Кратер
Толщина
Продувка газа в конце сварки
Диаметр сварочной проволоки
Метод
Время горения дуги
Режим
Тип газа
Активный / Пассивный Пассивный

150
www.magmaweld.comРУКОВОДСТВО ПО ЭКСПЛУАТАЦИИ
RU
КОМПАКТНАЯ СЕРИЯ SMART
a-
b-
c-
d-
e-
f-
a
b
d
e
f
d
cc

151
www.magmaweld.com РУКОВОДСТВО ПО ЭКСПЛУАТАЦИИ
КОМПАКТНАЯ СЕРИЯ SMART
RU
(1)
(3)
(3)
(2)
(6)
(4)
(4)
(5)
a
b
c

152
www.magmaweld.comРУКОВОДСТВО ПО ЭКСПЛУАТАЦИИ
RU
КОМПАКТНАЯ СЕРИЯ SMART
ДОСКА
A:
B:
C:
D:
E:
(3)
(1)
(2)

153
www.magmaweld.com РУКОВОДСТВО ПО ЭКСПЛУАТАЦИИ
КОМПАКТНАЯ СЕРИЯ SMART
RU
8 л/мин.
Проволока из
нелегированной
стали и с
металлическим
сердечником
Диаметр сварочной
проволоки (мм)
0.8
0.9
1.0
1.2
Сварочная
проволока с
порошковым
сердечником
Нержавеющая
сталь Алюминий
7 л/мин. 8 л/мин. 8 л/мин.
9 л/мин. 8 л/мин. 9 л/мин. 9 л/мин.
10 л/мин. 9 л/мин. 10 л/мин. 10 л/мин.
12 л/мин. 11 л/мин. 12 л/мин. 12 л/мин.
MIG/MAG.

154
www.magmaweld.comРУКОВОДСТВО ПО ЭКСПЛУАТАЦИИ
RU
КОМПАКТНАЯ СЕРИЯ SMART

155
www.magmaweld.com РУКОВОДСТВО ПО ЭКСПЛУАТАЦИИ
КОМПАКТНАЯ СЕРИЯ SMART
RU

156
www.magmaweld.comРУКОВОДСТВО ПО ЭКСПЛУАТАЦИИ
RU
КОМПАКТНАЯ СЕРИЯ SMART

157
www.magmaweld.com РУКОВОДСТВО ПО ЭКСПЛУАТАЦИИ
КОМПАКТНАЯ СЕРИЯ SMART
RU
0000 / NOP

158
www.magmaweld.comРУКОВОДСТВО ПО ЭКСПЛУАТАЦИИ
RU
КОМПАКТНАЯ СЕРИЯ SMART
E01
E02
E04
E05
E06
E03

159
www.magmaweld.com РУКОВОДСТВО ПО ЭКСПЛУАТАЦИИ
КОМПАКТНАЯ СЕРИЯ SMART
RU
NO
1
12
4
15
7
18
10
2
13
5
16
8
19
11
3
14
6
17
9
K405000230
K405000313
K405000230
A308900004
A376400016
K405000254
K405000255
A378000103
A377900106
A229900003
K309002213
K405000324
A378000050
K405000262
A421050002
K405000312
A229500001
A256006069
K405000253
A378002002
1
2
3
4
5
6
7
8
9
10
11
12
13
14 15
16 17
18
19

160
www.magmaweld.comРУКОВОДСТВО ПО ЭКСПЛУАТАЦИИ
RU
КОМПАКТНАЯ СЕРИЯ SMART
1
2
3
4
5
6
7
NO
1
4
7
2
5
8
3
6
A249000005
A240000006
A300190001
A245700003
A250001126
A300101011
A245700002
A260000010

161
www.magmaweld.com РУКОВОДСТВО ПО ЭКСПЛУАТАЦИИ
КОМПАКТНАЯ СЕРИЯ SMART
RU
R
S
T
Линейный фильтр Первичный выпрямитель Конденсаторы Модуль IGBT
эффекта Холла
Устройство
управления
Трансформатор
высокой частоты
Первичный
выпрямитель
Контрольная
линия
Выходной дроссель
Газ
Блок подачи проволоки
Шунт
Выходной фильтр
Заготовка
Сварочная горелка
Линия управления
сварочной горелкой
Соленоидный клапан
Мембранная панель
Передняя панель
Управляющий трансформатор

162
www.magmaweld.comРУКОВОДСТВО ПО ЭКСПЛУАТАЦИИ
RU
КОМПАКТНАЯ СЕРИЯ SMART
(Розетка водяного блока)
Быстрый предохранитель, стекло
Водяной насос
Вентилятор
Вентилятор

Модель
Серийный номер
Имя дилера
Город / Страна
Телефон / Электронная почта
Дата покупки
Имя MAGMA MEKATRONİK MAKİNE SANAYİ VE TİCARET A.Ş.
Адрес
Название компании
Город / Страна
Телефон / Электронная почта
Телефон / Электронная почта
Имя контакта
Organize Sanayi Bölgesi 5. Kısım MANİSA
+90 236 226 27 00 / info@magmaweld.com
Название компании
Имя техника
Дата сдачи
(дата начала гарантии)
ГАРАНТИЙНЫЙ ТАЛОН
Пожалуйста, посетите наш веб-сайт www.magmaweld.ru/условия-гарантии/wt
чтобы ознакомиться с условиями гарантии.
ИНФОРМАЦИЯ О ТОВАРЕ
ПРОИЗВОДИТЕЛЬ
ИНФОРМАЦИЯ О ПОКУПКЕ
ИНФОРМАЦИЯ О КЛИЕНТЕ
СЕРВИСНАЯ ИНФОРМАЦИЯ (если применимо)


165
www.magmaweld.com MANUAL DO UTILIZADOR
SÉRIE COMPACTA SMART
PT
CONTEÚDO
PRECAUÇÕES DE SEGURANÇA
INFORMAÇÃO TÉCNICA
Informações gerais
Componentes da máquina
Dados técnicos
Acessórios
INSTALAÇÃO
Ligações
OPERAÇÃO
Interface do utilizador
Ajuste do comprimento do arco (ArC)
Curva MIG
Funcionalidades da máquina
MANUTENÇÃO E REPARAÇÃO
Códigos de erro
ANEXO
Diagrama de blocos
Diagrama do circuito da unidade de água
166
172
172
174
176
176
177
177
178
178
178
178
179
180
182
187
188
188
189
189
190
191
192
193
194
195
196
198
199
1
1.1
1.2
1.3
1.4
1.5
2
2.1
2.2
2.3
2.3.1
2.3.2
2.3.3
2.3.4
3
3.1
3.2
3.3
3.4
3.5
3.6
3.7
3.8
3.9
3.10
4
4.1
4.2
4.3
5
5.1
5.2
5.3
Conteúdo

166
www.magmaweld.comMANUAL DO UTILIZADOR
PT
SÉRIE COMPACTA SMART
• A existência de um símbolo de segurança neste manual indica que existe perigo de ferimento e
que as instruções de segurança seguintes devem ser lidas atentamente de modo a evitar
potenciais perigos.
• O proprietário da máquina é responsável por evitar o acesso ao equipamento por parte de
segurança.
• Leia atentamente o manual do utilizador, a etiqueta na máquina e as instruções de segurança.
• Utilize a sua máquina em ambientes de trabalho adequados.
funcionamento e a durabilidade da mesma.
• Use luvas secas e resistentes e um avental de trabalho. Nunca use luvas e aventais de trabalho
local de trabalho.
• Nunca toque em peças com carga elétrica.
• Fixe o cabo de trabalho com contacto metal/metal adequado à peça de trabalho ou à mesa de
trabalho, o mais próximo da soldadura possível.
ATENÇÃO
IMPORTANTE
PERIGO
podem ser fatais
PRECAUÇÕES DE SEGURANÇA
Precauções de segurança

167
www.magmaweld.com MANUAL DO UTILIZADOR
SÉRIE COMPACTA SMART
PT
desligue a máquina.
• Mantenha os cabos secos, sem óleo e gordura, e protegidos contra metal seco e faíscas.
imediato.
contacto com objetos metálicos.
perigo de queda.
• Utilize a saída AC APENAS se necessário para o processo de soldadura.
seguintes de risco elétrico:
• em estruturas metálicas, tais como pisos, grades ou andaimes,
• em posições limitadoras, tais como sentado, ajoelhado ou deitado,
Nestas condições, utilize o seguinte equipamento pela ordem apresentada:
• Máquina de soldar MMA manual DC,
• Desligue a energia elétrica.
• Ligue para o serviço de emergência.
instruções.
• Trate as queimaduras elétricas como queimaduras térmicas, aplicando compressas
seco.
Procedimentos em
máquina e do equipamento fechados e bloqueados.
• Use calçado com biqueira de aço para efeitos da possível queda de objetos pesados sobre os pés.
causar ferimentos
caso o problema persista, interrompa o processo de soldadura/corte imediatamente.
soldadura/corte. Se necessário, instale um sistema capaz de expelir os fumos e os gases
zinco, materiais revestidos ou pintados, use máscaras que forneçam ar fresco em complemento
às precauções indicadas.
possíveis fugas de gás.
Os fumos e os gases
podem ser prejudiciais
para a sua saúde
Precauções de segurança

168
www.magmaweld.comMANUAL DO UTILIZADOR
PT
SÉRIE COMPACTA SMART
com abas para prevenir possíveis ferimentos.
As faíscas e os salpicos
podem entrar nos
olhos e ferir
• Antes de tocar nas peças, aguarde o tempo previsto para o arrefecimento da máquina.
• Se for necessário segurar em peças quentes, use as ferramentas adequadas, luvas de soldadura/
corte com isolamento térmico elevado e vestuário à prova de fogo.
podem provocar
queimaduras graves
rosto.
• Proteja destes raios outras partes expostas do seu corpo (braços, pescoço, ouvidos, etc.) com
dos olhos, evitando que as pessoas ao seu redor sofram ferimentos provocados pelos raios do
arco e pelos metais quentes.
instalações.
uma máscara antigás adequada, quando necessário.
ferir os olhos e a pele
• O ruído gerado por certos equipamentos e durante certas operações pode prejudicar a sua
capacidade auditiva.
O ruído pode
prejudicar a sua
capacidade auditiva
outras pessoas ou de qualquer metal.
proteger os seus olhos e rosto.
provocar ferimentos
Podem ocorrer incêndios ou explosões.
soldadura podem
provocar fogo e
• As faíscas e os salpicos de peças podem provocar incêndio. Por este motivo, mantenha materiais
como extintores, água e areia em locais facilmente acessíveis.
Precauções de segurança

169
www.magmaweld.com MANUAL DO UTILIZADOR
SÉRIE COMPACTA SMART
PT
Os erros ocorridos por incumprimento desta regra podem resultar em ferimento grave ou
graves.
auxiliares, no mínimo, anualmente.
e aparelhos efetuada por
originar ferimentos
corte acompanhado por outra pessoa.
• Evite, tanto quanto possível, soldar/cortar em espaços fechados.
• Adote todas as precauções necessárias ao movimentar a máquina. As áreas para onde a
pessoa responsável pelo transporte devem ser adequadas ao processo em causa.
limites de carga adequados.
• Em caso de transporte da máquina através de veículo (carro de transporte, empilhadora, etc.),
parafusos, porcas, rodas, etc.) que ligam a máquina ao veículo.
mesma (suspensores de carga, cintas, etc.) e conexões.
transporte em vigor no seu país, de modo a assegurar as condições de transporte necessárias.
de gás em separado.
• Antes de transportar o equipamento de soldar/cortar, remova todas as interligações
separadamente, eleve e transporte os mais pequenos pelos cabos e os maiores pelos olhais ou
utilizando o equipamento de transporte adequado, tal como empilhadoras.
Soldar/cortar em
transporte pode causar
acidentes
pode causar
ferimentos
fabricante.
O uso prolongado da
máquina provoca
sobreaquecimento
grupo 2, classe A, nos termos da norma TS EN 55011.
compatibilidade eletromagnética devido à interferência por radiofrequência transmitida e
emitida nesses locais.
O uso prolongado
da máquina provoca
sobreaquecimento
Precauções de segurança

170
www.magmaweld.comMANUAL DO UTILIZADOR
PT
SÉRIE COMPACTA SMART
observados os seguintes aspetos:
a)
da máquina de soldar/corte e respetivo equipamento,
b)
c) Computadores e outros equipamentos de controlo,
d)
e) Dispositivos médicos pessoais, tais como pacemakers e aparelhos auditivos,
f)
g) A imunidade de outros equipamentos circundantes. O utilizador deve assegurar a
adicionais;
h) Atendendo ao período durante o qual as operações de soldadura/corte ou outras atividades
sitivos para prevenir o efeito de interferência. Caso se considere necessário, podem também ser
entre ambas as estruturas, deve existir um bom contacto elétrico.
escrito do fabricante. Caso tais alterações sejam efetuadas, o utilizador é responsável pelas
possíveis consequências.
• Durante a soldadura/corte, é gerado um campo magnético na máquina. Tal pode fazer com
isolado quanto a todos os objetos metálicos interligados.
compatibilidade
área de trabalho
interferência
interferências eletromagnéticas durante as operações de soldadura/corte podem causar efeitos
utilizador.
• De modo a evitar possíveis danos resultantes da CEM, proceda à soldadura em local o mais
afastado possível (100 metros) de equipamentos eletrónicos sensíveis.
condições previstas no manual do utilizador.
deve ter conhecimento de que a mesma foi ligada naqueles termos; neste caso, a
responsabilidade incumbe totalmente ao utilizador.
Precauções de segurança

171
www.magmaweld.com MANUAL DO UTILIZADOR
SÉRIE COMPACTA SMART
PT
ferimentos no utilizador ou em avaria do equipamento elétrico circundante. Se necessário, é
soldadura/corte.
A corrente elétrica que passa por um condutor é passível de formar campos eletromagnéticos
(EMF) a nível local.
• O corpo e cabeça do operador devem estar o mais afastados possível da máquina de soldar/cortar
e dos cabos,
• O cabo de retorno deve estar ligado à peça de trabalho o mais próximo possível da área a soldar,
Os EMF podem também interferir com o funcionamento de implantes médicos (materiais no
interior do corpo humano), tais como pacemakers. Na presença de portadores de tais dispositivos
médicos, devem ser implementadas medidas preventivas. Por exemplo, limitações de acesso para
terceiros ou avaliações de risco individual para operadores. Devem ser realizadas avaliações de
riscos e prestado aconselhamento por especialistas médicos a portadores de dispositivos médicos.
(CEM)
• Selecione o método e a máquina de soldar/cortar para a soldura que pretende executar.
que vai soldar.
• Se necessitar de aguardar muito tempo antes de começar a soldar/cortar, desligue a máquina
depois de a ventoinha a ter arrefecido. As nossas máquinas com controlo inteligente da
máquinas usadas.
Precauções de segurança
FORMULÁRIO DE GARANTIA
Para consultar o formulário de garantia, visite a nossa página
www.magmaweld.com/warranty-form/wr .

172
www.magmaweld.comMANUAL DO UTILIZADOR
PT
SÉRIE COMPACTA SMART
INFORMAÇÃO TÉCNICA
ID 300 MK / MKW PULSE SMART, ID 400 MK / MKW PULSE SMART é uma máquina de solda inversora
MIG / MAG trifásica industrial com tecnologia Pulse, projetada para condições pesadas. Oferece fácil
1.2 Componentes da máquina
Figura 1 : ID 300 MK PULSE SMART / ID 400 MK PULSE SMART Vista frontal e traseira
1- Mostrador Digital
2-
3- Tomada de dados
4-
5-
6- Mostrador Digital
7-
8- Interruptor ON/OFF
9-
10- Entrada de gás
11- Tomada de aquecedor
12- Ventilador
13-
14- Cabo principal
15-
16- Roda
10
14
16
15
11
12
13
1 6
7
8
9
2
3
4
5
Informações técnicas

173
www.magmaweld.com MANUAL DO UTILIZADOR
SÉRIE COMPACTA SMART
PT
1- Mostrador Digital
2-
3- Tomada de dados
4-
5-
6- Mostrador Digital
7-
8- Interruptor ON/OFF
9-
10- LED de unidade de água
11- Entrada de água quente de unidade de água
12- Saída de água fria de unidade de água
13- Entrada de gás
14- Tomada de aquecedor
15- Ventilador
16-
17- Cabo principal
18-
19- Roda
Figura 2 : ID 300 MKW PULSE SMART / ID 400 MKW PULSE SMART Vista frontal e traseira
1 6
7
8
9
10
11
12
2
3
4
5
13
19
17
14
15
16
18
Informações técnicas

174
www.magmaweld.comMANUAL DO UTILIZADOR
PT
SÉRIE COMPACTA SMART
Informações técnicas

175
www.magmaweld.com MANUAL DO UTILIZADOR
SÉRIE COMPACTA SMART
PT
Fator de marcha
6 min. 6 min.6 min.4 min. 4 min. 4 min. Tempo (min.)
Informações técnicas
X
U
I
U
IP21S
U
S
I
CC / CV
Corrente contínua
Soldadura MIG/MAG
Corrente alternada trifásica de entrada
ambientes perigosos
Fator de marcha
Corrente nominal de soldadura
Potência nominal
Corrente de rede nominal

176
www.magmaweld.comMANUAL DO UTILIZADOR
PT
SÉRIE COMPACTA SMART
DADOS TÉCNICOS
Peso
Amplitude da corrente de soldadura
Dimensões (c x l x a)
UNIDADE
V
VDC
kVA
ADC
ADC
kg
mm
MK
MK
MKW
MKW
400
82
IP21S
14,7
300
1078 x 528 x 962
86
1180 x 528 x 1137
110
1078 x 528 x 962
86
1180 x 528 x 1137
110
ID 300 MK/MKW PULSE SMART
IP21S
400
82
22,1
400
ID 400 MK/MKW PULSE SMART
ACESSÓRIOS PADRÃO QUANT.
1Grampo da peça de trabalho e cabo 7905203505
7905305005
ID 300 MK/MKW
PULSE SMART
ID 400 MK/MKW
PULSE SMART
ACESSÓRIOS OPCIONAIS QUANT.
1
1
1
1
1
1
1
Mangueira de gás
Conjunto de acessórios MIG/MAG CO
Aquecedor de CO
Regulador do gás (mix)
Regulador do gás (CO)
Tocha Lava MIG 50 W refrigerada a água (3 m)
7907000002
7020009003
7020001004
7020001005
7120050003
ID 300 - 400 MK/MKW PULSE SMART
Informações técnicas
DADOS TÉCNICOS
Peso
Amplitude da corrente de soldadura
Dimensões (c x l x a)
UNIDADE
V
VDC
kVA
ADC
ADC
kg
mm
MK
MK
MKW
MKW

177
www.magmaweld.com MANUAL DO UTILIZADOR
SÉRIE COMPACTA SMART
PT
INSTALAÇÃO
contacte imediatamente o ponto de venda.
• Grampo da peça de trabalho e cabo • Manual do Utilizador
• Mangueira de gás • Fio de soldar
Em caso de entrega com danos, registo um relatório, fotografe os danos e envie à transportadora em conjunto
com uma cópia da guia de remessa. Caso o problema persista, contacte o serviço de apoio ao cliente.
• Para um melhor desempenho, mantenha a máquina 30 cm, no mínimo, afastada de outros objetos. Preste
por materiais como paredes, cortinas, placas.
corrente e rolamento.
. Nunca ligue outro dispositivo à
tomada de CO para além do aquecedor de CO!
Soldar pode ser perigoso. Devem estar previstas as condições de trabalho adequadas e as precauções
Instalação

178
www.magmaweld.comMANUAL DO UTILIZADOR
PT
SÉRIE COMPACTA SMART
• Para efeitos de segurança e para obter os melhores resultados, use reguladores e aquecedores que cumpram
utilizar é 3/8.
• Caso seja utilizado o aquecedor de CO
ao aquecedor de CO, na traseira da máquina.
, ligue o regulador do gás diretamente à garrafa de gás.
• Ligue uma extremidade da mangueira ao regulador do gás e aperte o grampo. Ligue a outra extremidade à
entrada de gás, na traseira da máquina, e aperte a porca.
1- Válvula da garrafa de gás
2- Garrafa de gás
3- Aquecedor de CO
4- Corrente
5- Cabo do aquecedor de CO
6- Regulador do gás
7- Manómetro
8- Fluxómetro
9-
10- Mangueira de gás
Figura 3 : Ligações garrafa de gás-aquecedor-regulador
1
2
5
4
3
6
7 8
9
10
Instalação

179
www.magmaweld.com MANUAL DO UTILIZADOR
SÉRIE COMPACTA SMART
PT
fechado composto por radiador, ventoinha, bomba, refrigerador e depósito.
• Ligue a mangueira de água fria (azul) à saída de água fria e a mangueira de água quente (vermelha) à entrada
melhor desempenho. Em caso de falta de refrigerador, abra a tampa do depósito de refrigerador e adicione o
refrigerador Magmaweld adequado à temperatura do ambiente de trabalho. O refrigerador deve estar entre
os valores mínimo e máximo apresentados no painel frontal da unidade.
reações químicas ou outros problemas.
água ao refrigerador Magmaweld.
• Caso pretenda utilizar uma marca diferente de refrigerador, o interior do depósito de refrigerador deve ser
totalmente esvaziado, eliminando quaisquer resíduos ou líquido.
Instalação

180
www.magmaweld.comMANUAL DO UTILIZADOR
PT
SÉRIE COMPACTA SMART
OPERAÇÃO
1 2
3 4 5 6
1-) ALIMENTAÇÃO DE FIO
2-) FLUXO DE GÁS
3-) SELEÇÃO DO MÉTODO DE SOLDADURA
• MIG/MAG
• Pulse MIG/MAG
O método de soldadura pulsada só está disponível em modelos com modo pulsado. Em modelos
sem esta funcionalidade (“W/O Pulse”), quando esta linha é alcançada, o LED não acende e o
modo pulsado não estará ativo.
De acordo com o método de soldadura selecionado, é necessário ajustar as ligações e
• MMA
No método de soldadura TIG “lift”, deve ser utilizado um aparelho adequado para ligar o
conector da tocha. O aparelho especial permite a compatibilidade com conectores europeus.
• Lift TIG
Operação

181
www.magmaweld.com MANUAL DO UTILIZADOR
SÉRIE COMPACTA SMART
PT
LED.
Opções de configuração
• Aço • AlMg
• FCW • AlSi
• CrNi • CuAl
respetivo LED.
Opções de configuração
LED.
Opções de configuração
• CO
4-) SELEÇÃO DO TIPO DE FIO
5-) SELEÇÃO DO DIÂMETRO DO FIO
6-) SELEÇÃO DO TIPO DE GÁS
Operação

182
www.magmaweld.comMANUAL DO UTILIZADOR
PT
SÉRIE COMPACTA SMART
1
3
7
8
6
2
4455
1-) ECRÃ ESQUERDO
2-) ECRÃ DIREITO
Inatividade
M. sinérgico Corrente sold.def. Corrente sold.
M. inteligente Corrente sold.def. Corrente sold.
M. clássico Corrente sold.
Carga
Inatividade
M. sinérgico
M. inteligente
M. clássico
Carga
Operação

183
www.magmaweld.com MANUAL DO UTILIZADOR
SÉRIE COMPACTA SMART
PT
Caso pretenda visualizar e regressar ao valor recomendado originalmente pela máquina, basta premir
uma vez o botão de ajuste.
O método de soldadura MIG/ MAG soldadura pulsada só está disponível em modelos com modo pulsado.
3-) SELEÇÃO DO MODO DE SOLDADURA
• Modo clássico
• Modo inteligente
• Modo sinérgico
MODO CLÁSSICO
MODO INTELIGENTE
intervalo.
MODO SINÉRGICO
MODO CLÁSSICO
MODO INTELIGENTE
dentro de um determinado intervalo.
MODO SINÉRGICO
dentro do intervalo previsto.
Operação

184
www.magmaweld.comMANUAL DO UTILIZADOR
PT
SÉRIE COMPACTA SMART
4-) BOTÃO DE AJUSTE
(4) para a esquerda ou para a direita.
automaticamente.
(6)
Exemplo:
(5), caso pretenda guardar este valor após configurar através
(4)
(4)
principal, nada será guardado.
5-) BOTÃO DE AJUSTE
(5) para a esquerda ou para a direita.
• No modo inteligente (4)
Dentro de um determinado intervalo (5)
a direita.
um determinado intervalo (5)
(6)
6-) SELEÇÃO DE FUNÇÃO
(6)
(5)
(4),
inclui as seguintes funções:
Pré-gás
Opções de configuração
PrE
Burn back
Ajuste do burn back.
Opções de configuração
especificado. Ao concluir o processo de soldadura, impede que o fio de soldar adira ao bico
de contacto.
brn
Pós-gás
Opções de configuração
Depois de concluída a soldadura durante do tempo definido, o gás entra e a soldadura
PoS
Operação

185
www.magmaweld.com MANUAL DO UTILIZADOR
SÉRIE COMPACTA SMART
PT
Tempo vazio
Opções de configuração
Arranque progressivo
Permite configurar o arranque progressivo.
Opções de configuração
Ao iniciar a soldadura, a velocidade do fio aumenta gradualmente até à velocidade
soldadura.
PoF
SoS
Depressão
Opções de configuração
é reduzida dentro de determinada linearidade e a soldadura termina.
Crt
Tempo de soldadura
Opções de configuração
Pon
7-) SELEÇÃO DE PROGRAMA
(7)
Opções de configuração
Operação
8-) SELEÇÃO DO MODO DO GATILHO
(8), alterna entre modos do gatilho.
Opções de configuração
• 2 passos
• 4 passos
• Método
Premir gatilho Manter o gatilho premido Libertar gatilho

186
www.magmaweld.comMANUAL DO UTILIZADOR
PT
SÉRIE COMPACTA SMARTOperação
MODO 4 PASSOS:
o gatilho premido até ao final da soldadura. Voltando a premir e a soltar o gatilho, concluirá o processo de
soldadura.
PrG : Período de gás inicial
I : Corrente de soldadura
PoG : Período de gás final
Iniciar a soldadura:
• Prima e mantenha premido o gatilho da tocha.
modo lento.
• A corrente de soldadura aumenta quando a peça de
trabalho é alcançada.
• Liberte o gatilho da tocha premido e a soldadura
continuará.
Concluir a soldadura:
• Liberte o gatilho da tocha premido.
• O motor de avanço do fio parará.
definido.
• O processo está concluído após o período de gás
final.
MÉTODO:
Deve ser preferido, caso pretenda sempre o mesmo cordão de soldadura e penetração. Os comprimentos
MODO 2 PASSOS:
PrG : Período de gás inicial
I : Corrente de soldadura
PoG : Período de gás final
Iniciar a soldadura:
• Prima e mantenha premido o gatilho da tocha.
modo lento.
• A corrente de soldadura aumenta quando a peça de
trabalho é alcançada.
Concluir a soldadura:
• Liberte o gatilho da tocha premido.
• O motor de avanço do fio parará.
definido.
• O processo está concluído após o período de gás
final.

187
www.magmaweld.com MANUAL DO UTILIZADOR
SÉRIE COMPACTA SMART
PT
Operação
2
A
1
B
COM. TOCHA - VERDE
COM. TOCHA - BRANCO
COM. TOCHA - VERMELHO
COM. TOCHA - PRETO
COM. TOCHA - CASTANHO
Tomada do comando à distância da tocha
Vista frontal
Modo
Modo clássico
Modo
inteligente
Modo sinérgico
0,5 m/min
5 A
5 A
0,5 V
0,5 m/min
5 A
5 A
0,5 V
0,5 V
0,5 V
0,5 V
0,5 V
1
1
1
2
2
2
A
A
A
B
B
B
Botão Posição
Com uma tocha com as propriedades adequadas e um conector, poderá também alterar a corrente de
Operação

188
www.magmaweld.comMANUAL DO UTILIZADOR
PT
SÉRIE COMPACTA SMART
Tensão de�inida
Fio de�inido
Fio de�inido
Tensão 0 - 25
Tensão 0 - 25
Fio 0 - 25
Fio 0 - 25
Depressão aberta
Pré-gás
Pré-gás
Libertação
lenta
On
Libertação
lenta
Off
Depressão fechada
Tensão de�inida
Depressão aberta
Pré-gás
Pré-gás
Depressão fechada
Libertação
lenta
On
Libertação
lenta
Off
Depressão
Depressão
Burn back
Burn back
Burn back
Burn back
Pós-gás
Pós-gás
Pós-gás
Pós-gás
Pós-gás
Pré-gás
Ponto
Modo
Pnt
On
Modo
Pnt
Off
IntervaloParâmetro
De�inição de fábrica
MIG 2 posições
Pré-gás 0,0 - 9,9 s 0,1 s
0,0 - 9,9 s 0,0 s
25 - 0 - 25 0
Espessura
Tipo de gás
Tipo de �io
0,6 - 20,0 mm 1,0 mm
Pós-gás
Burn back
Tempo de arco On
Tempo de arco Off
0,0 - 9,9 s 0,1 s
Diâmetro do �io 0,6 - 2,4 mm 1,0 mm
0,2 - 9,9 s 0,2 s
Steel, AlMg, FCW, AlSi, FCW-M, CuSi, CrNi, CuAl
MIG 4 posições
CO₂, Ar/5-10 CO₂, Ar/15-25 CO₂, Ar/2.5 C0₂, Ar/10-15 CO₂, Árgon
Método/2/4 2
Depressão
Gatilho
Método MIG/MAG - MMA -
TIG LIFT
MIG / MAG
Modo Sinérgico/inteligente/clássico
Ativo/passivo Passivo
3.4 Ajuste do comprimento do arco (ArC)
existente para a esquerda e para a direita. Na mudança feita para +7, o contato do arame se aproxima do bocal
3.5 Curva MIG
Operação

189
www.magmaweld.com MANUAL DO UTILIZADOR
SÉRIE COMPACTA SMART
PT
• Ligue a máquina através do interruptor ON/OFF.
e ver a luz principal acesa.
uma excelente estabilidade do arco. Assim que a máquina é ligada, o LED no interior do compartimento
e ranhuras em U para alumínio.
a- Motor
b- Conector europeu
c-
d-
e-
f-
Dependendo do modo, o ajuste da corrente de soldadura
Ligue os polos de acordo com o
tipo de processo de soldadura.
a
b
d
e
f
d
cc
• Antes de remover os rolos, deve desbloqueá-los. Invertendo a rotação no sentido do
(1)
(3)
(3)
(2)
(6)
(4)
(4)
(5)
Operação

190
www.magmaweld.comMANUAL DO UTILIZADOR
PT
SÉRIE COMPACTA SMART
um alicate.
ferimentos.
tenha sido adequadamente apertado, pode fazer com que a
após um certo período. Por isso, não aperte o parafuso em
no enrolamento .
SUPERFÍCIE
a
b
c
(1)
(3)
(2)
Operação

191
www.magmaweld.com MANUAL DO UTILIZADOR
SÉRIE COMPACTA SMART
PT
O excesso de aperto ou frouxidão do parafuso de ajuste da pressão ou a utilização do rolo de
A:
B:
C:
D:
E:
área de soldadura.
, Ar, mistura)
à tabela aqui disponibilizada.
mancal de impulso e feche a porta do alimentador
8 lt/min.
Aço macio
e metálico
Diâmetro (mm)
0.8
0.9
1.0
1.2
Fluxado Aço
inoxidável Alumínio
7 lt/min. 8 lt/min. 8 lt/min.
9 lt/min. 8 lt/min. 9 lt/min. 9 lt/min.
10 lt/min. 9 lt/min. 10 lt/min. 10 lt/min.
12 lt/min. 11 lt/min. 12 lt/min. 12 lt/min.
Operação

192
www.magmaweld.comMANUAL DO UTILIZADOR
PT
SÉRIE COMPACTA SMART
3.10 Funcionalidades da máquina
Construção CC/CV
• Permite soldadura MIG, MMA e TIG.
Desempenho inteligente
monitorizados e analisados.
• A máquina é reativada após 2 minutos de tempo de segurança.
Operação com geradores
Variedade de funções de utilização
Proteção de tensão
Memória
• Existem 3 memórias que podem ser guardadas.
Ventoinha inteligente
• A temperatura interna da máquina é medida em modo permanente. A velocidade da ventoinha de
ingressam na máquina. Assim, é possível uma maior durabilidade da máquina, bem como poupança
Controlo de corrente/tensão através da tocha
sem ter de se aproximar da máquina.
Proteção
• Protegida contra ausência de fase ou fase incorreta.
Arranque progressivo
Compatibilidade magnética
É possível ler alguns valores no painel LCD, na parte da frente da máquina. Outras informações (OEE do
ou comunicados na plataforma magNET. (Opcional)
Compatibilidade com robô
Operação

193
www.magmaweld.com MANUAL DO UTILIZADOR
SÉRIE COMPACTA SMART
PT
MANUTENÇÃO E REPARAÇÃO
• Nunca proceda a intervenções por si próprio. Caso o faça, a garantia do fabricante perde a validade.
durante 10 segundos pela descarga dos condensadores.
A cada 3 meses
autorizado.
cabos.
para o processo de soldadura.
comprimido muito próximo de componente eletrónicos..
A cada 6 meses
ou
Manutenção e reparação

194
www.magmaweld.comMANUAL DO UTILIZADOR
PT
SÉRIE COMPACTA SMART
As tabelas seguintes indicam erros possíveis e respetivas soluções.
• Substitua o bocal de contato
deve ser correta
correta
tungstênio esteja limpa
soldagem esteja sólida
deve ser conectado e o valor da
corrente a ser ajustada na máquina
protegidos e de que os pontos de
fazer o ajuste do gás, consulte o
serviço autorizado
problemática
apresentam problemas
é demasiado baixa
adequado
• Falha da placa eletrónica
incorreto
• O tamanho do bico de contato está
selecionado incorretamente ou
foram selecionados corretamente
processo
• Ponta de tungstênio desgastada
(em soldagem TIG)
• O alicate de aterramento da máquina
(em soldagem MIG, TIG)
• Falha da placa eletrónica
• Os valores de pólo e amperagem do
MMA)
muito ou pouco
alimentador de arame está com
defeito
funcionando corretamente
Fraca qualidade de soldadura
Corrente de soldadura instável
Falha Motivo Solução
• Contacte o serviço de assistência
autorizado
esteja conectada à eletricidade
(on/off)
• Contacte o serviço de assistência
autorizado
• Contacte o serviço de assistência
autorizado
esteja conectada à parte do grampo
de aterramento
• Contacte o serviço de assistência
autorizado
Manutenção e reparação

195
www.magmaweld.com MANUAL DO UTILIZADOR
SÉRIE COMPACTA SMART
PT
E01
E02
E03
E04
E05
E06
Código de erro Erro Causa Solução
Erro de
• Contacte o serviço de assistência
autorizado
• Contacte o serviço de assistência
autorizado
• Contacte o serviço de assistência
autorizado
• Contacte o serviço de assistência
autorizado
normal, contacte o serviço de
assistência autorizado
normal, contacte o serviço de
assistência autorizado
funcione, contacte o serviço de
assistência autorizado
• Abra os canais de ar
• Podem existir problemas em
diferentes pontos da máquina
funcionar
• Possível sobrecarga da máquina
• Podem existir problemas em
diferentes pontos da máquina
• Possível falha do sensor térmico ou
• Os canais de entrada e de saída de ar
podem estar obstruídos
pode estar extremamente quente ou
excedido
• Garanta que a máquina está numa
área em que é possível operar
adequadamente
• Aguarde um pouco até que a
máquina arrefeça. Caso a falha
desapareça, tente ligar a máquina
com valores de amperagem mais
baixos
térmica
Falha de
reduzida
Falha na leitura
do sensor
térmico
elevada
Falha Motivo Solução
• Contacte o serviço de assistência
autorizado
ser selecionados de acordo com o
método de soldadura
foram selecionados adequadamente
O valor 0000
Manutenção e reparação

196
www.magmaweld.comMANUAL DO UTILIZADOR
PT
SÉRIE COMPACTA SMART
1
12
4
15
7
18
10
2
13
5
16
8
19
11
3
14
6
17
9
CÓDIGO MATERIAL
Conector
Placa eletrónica
Bobina
Placa eletrónica
Placa eletrónica
Tomada de soldadura
Placa eletrónica
Placa eletrónica
Placa eletrónica RS Filtro
Potenciómetro
Conector
Placa eletrónica
Placa eletrónica
Placa eletrónica
K405000230
K405000313
K405000230
A308900004
A376400016
K405000254
K405000255
A378000103
A377900106
A229900003
K309002213
K405000324
A378000050
K405000262
A421050002
K405000312
A229500001
A256006069
K405000253
A378002002
1
2
3
4
5
6
7
8
9
10
11
12
13
14 15
16 17
18
19
ANEXO
Lista de peças de substituição da fonte de alimentação
Anexo
N.º DEFINIÇÃO

197
www.magmaweld.com MANUAL DO UTILIZADOR
SÉRIE COMPACTA SMART
PT
1
2
3
4
5
6
7
CÓDIGO MATERIAL
Reservatório de água
Bomba de água
Ventoinha
Radiador
1
4
7
2
5
8
3
6
A249000005
A240000006
A300190001
A245700003
A250001126
A300101011
A245700002
A260000010
Lista de peças de substituição da unidade de refrigeração a água
Anexo
N.º DEFINIÇÃO

198
www.magmaweld.comMANUAL DO UTILIZADOR
PT
SÉRIE COMPACTA SMART
5.2 Diagrama de blocos
R
S
T
Filtro de linha Reti�icador primário Capacitadores Módulo IGBT
Efeito Hall
Unidade de
controlo
Transformador de
frequência elevada
Reti�icador secundário
Linha de
controlo
Bloqueador de saída
Gás
Unidade de avanço de �io
Shunt
Filtro de saída
Peça de trabalho
Tocha de soldadura
Cabo de controlo
tocha de soldadura
Válvula solenoide
Painel de membrana
Painel frontal
Transformador de controlo
Anexo

199
www.magmaweld.com MANUAL DO UTILIZADOR
SÉRIE COMPACTA SMART
PT
5.3 Diagrama do circuito da unidade de água
VENTOINHA 308VAC
VENTOINHA 308VAC
BOMBA DE ÁGUA 380VAC
LED 5MM
(Tomada da unidade de água)
FUSÍVEL DE VIDRO DE AÇÃO RÁPIDA
Anexo


Modelo
Número de série
Nome do distribuidor
Cidade/país
Telefone/e-mail
Data de aquisição
Nome MAGMA MEKATRONİK MAKİNE SANAYİ VE TİCARET A.Ş.
Morada
Nome da empresa
Cidade/país
Telefone/e-mail
Telefone/e-mail
Nome de contacto
Organize Sanayi Bölgesi 5. Kısım MANİSA
+90 236 226 27 00 / info@magmaweld.com
Nome da empresa
Nome do técnico
Data de entrada em funcionamento
(data de início da garantia)
CARTÃO DE GARANTIA
Para consultar os termos da garantia, visite a nossa página
www.magmaweld.com/warranty-terms/wt .
INFORMAÇÃO DO PRODUTO
FABRICANTE
DADOS DA AQUISIÇÃO
DADOS DO CLIENTE
DADOS DE ASSISTÊNCIA (se aplicável)


ES
203
www.magmaweld.com GUÍA DE USUARIO
SERIE COMPACTA INTELIGENTE
NORMAS DE SEGURIDAD
INFORMACIÓN TÉCNICA
Descripciones generales
Componentes de la máquina
Etiqueta del producto
Accesorios
INSTALACIÓN
Consideraciones al recibir
Recomendaciones de instalación y funcionamiento
Conexiones de soldadura
Conexión de enchufe eléctrico
Conexión de las pinzas de tierra a la pieza de trabajo
Conexiones de gas
Unidad de refrigeración por agua
INFORMACIÓN DE USO
Interfaz de usuario
Control Remoto
Ajuste de longitud de arco (ArC)
Curva MIG
Conexión a la red eléctrica
Selección y reemplazo del rodillo alimentador de alambre
Inserción del rodillo de alambre y manejo del alambre
Características de la máquina
MANTENIMIENTO Y FALLAS
Mantenimiento
Reparación de averías
Códigos de error
ANEXOS
Listas de repuestos
Diagrama de bloques
Diagrama del circuito de la unidad de agua
204
210
210
212
214
214
215
215
216
216
216
216
217
218
220
225
226
226
227
227
228
229
230
231
232
233
234
236
237
1
1.1
1.2
1.3
1.4
1.5
2
2.1
2.2
2.3
2.3.1
2.3.2
2.3.3
2.3.4
3
3.1
3.2
3.3
3.4
3.5
3.6
3.7
3.8
3.9
3.10
4
4.1
4.2
4.3
5
5.1
5.2
5.3
ÍNDICE
Índice

204
www.magmaweld.comGUÍA DE USUARIO
SERIE COMPACTA INTELIGENTE
ES
Siga todas las normas de seguridad incluidas en el manual!
• Cuando aparezca cualquier símbolo de seguridad en este manual, debe entenderse que existe
un riesgo de lesiones y los peligros potenciales deben evitarse leyendo atentamente las
siguientes explicaciones.
• El propietario de la máquina es responsable de evitar que personas no autorizadas accedan al
equipo.
• Las personas que utilizan la máquina tienen experiencia o están completamente capacitadas en
soldadura/corte, debeN leer el manual del usuario y seguir las advertencias de seguridad antes
de comenzar el trabajo.
• Lea atentamente el manual de usuario, las etiquetas y las advertencias de seguridad de la máquina.
las etiquetas faltantes o dañadas.
• Aprenda cómo se opera la máquina y cómo hacer debidamente los controles.
• Utilice la máquina en entornos de trabajo adecuados.
• Los cambios inapropiados que se puedan realizar en su máquina afectarán negativamente la
• El fabricante no asume responsabilidad de las consecuencias de operar el dispositivo fuera de
Comprender las
advertencias de
seguridad
de seguridad
ATENCIÓN
Indica una situación potencialmente peligrosa que podría provocar lesiones o daños.
En caso de no tomar precauciones, se pueden producir lesiones o pérdidas/daños materiales.
IMPORTANTE
Indica información y advertencias de uso.
PELIGRO
Indica peligro grave. Cuando no proceda, puede provocar la muerte o lesiones graves.
máquina.
• Use guantes y delantal secos y bien aislados. Nunca use guantes y delantales mojados o dañados.
• Lleve ropa protectora ignífuga contra el riesgo de quemaduras. La ropa utilizada por el operario
debe ser protectora contra chispas, salpicaduras y radiación de arco.
informarle.
• No toque el electrodo con las manos desprotegidas. Evite que los alicates o electrodos del
electrodo entren en contacto con cualquier persona u objeto conectado a tierra.
• Nunca toque partes con acumulación de cargas eléctricas.
nunca toque el electrodo.
• No conecte más de un electrodo al portaelectrodos.
• Fije las pinzas de puesta a tierra a la pieza de trabajo oa la mesa de trabajo lo más cerca posible
para garantizar un buen contacto de metal con metal.
• No toque los portaelectrodos conectados a 2 máquinas diferentes al mismo tiempo ya que
habrá doble tensión de circuito abierto.
• Mantenga la máquina apagada cuando no esté en uso y desconecte los cables.
• Desconecte todas las conexiones de alimentación y/o enchufes o apague la máquina antes de
repararla.
Peligro de muerte por
NORMAS DE SEGURIDAD
Normas de seguridad

ES
205
www.magmaweld.com GUÍA DE USUARIO
SERIE COMPACTA INTELIGENTE
• Apague la eléctrica.
• Utilice materiales no conductores, como madera seca, para liberar a la víctima de la descarga
eléctrica de cables o piezas con corriente.
• Llame a los servicios de emergencia.
• Si la víctima no respira, realice la RCP inmediatamente después de perder el contacto con la
automático (DEA).
• Trate una quemadura eléctrica, por ej. una quemadura térmica, por medio de compresa fría.
Prevenga la infección y cubra con un paño limpio y seco.
Cosas que hacer en
caso de descarga
Es muy peligroso respirar el humo y el gas que se liberan durante la soldadura y el corte
durante mucho tiempo.
• Manténgase alejado de los objetos en movimiento.
• Mantenga todas las cubiertas, paneles, puertas, etc. de la máquina y los dispositivos cerrados y
bloqueados.
pesados.
En tal caso, aumente inmediatamente la ventilación; si el problema persiste, pare de soldar/
cortar.
• Utilice un sistema de extracción de humos adecuado en los puntos de soldadura/corte.
Si es necesario, instale un sistema que pueda expulsar los humos y gases acumulados en todo
medio ambiente.
pintados, además de las precauciones anteriores, use respiradores que proporcionen aire fresco.
• Si los cilindros de gas están agrupados en un área separado, asegure una buena ventilación de
estas áreas, mantenga las válvulas principales cerradas cuando los cilindros de gas no estén en
uso, preste atención a las fugas de gas.
• Los gases protectores como el argón son más densos que el aire y existe la posibilidad de
El humo y los gases
pueden ser perjudiciales
para la salud
pueden causar
lesiones
• Tenga cuidado al utilizar un cable de red largo.
calientes y chispas.
• Los cables pelados sin aislamiento representan un peligro mortal. Compruebe con frecuencia
todos los cables para detectar posibles daños. Si detecte un cable dañado o sin aislamiento,
repárelo o reemplácelo de inmediato.
• Si las pinzas de puesta a tierra no están conectadas a la pieza de trabajo, aíslela para evitar el
contacto con cualquier objeto metálico.
peligro de caída.
• Use la salida de CA solo cuando sea necesario para el proceso de soldadura.
• Cuando se requiera salida de CA, use la unidad de control remoto si está disponible en su
máquina.
cuando exista una de las siguientes situaciones eléctricamente peligrosas, tome
• Cuando se encuentre en pisos de metal, estructuras de rejilla o andamios,
• Cuando esté en posiciones estrechas, como sentarse, arrodillarse o acostarse,
• Cuando el riesgo de contacto con la pieza o el suelo sea alto o inevitable.
Se pueden utilizar los siguientes equipos:
• Máquina de soldadura MIG de tensión constante (CV) CC semiautomática,
• Máquina de soldadura MMA manual de CC,
• Máquina de soldar CC o CA con bajo tensión de circuito abierto (VRD), si corresponde.
Normas de seguridad

206
www.magmaweld.comGUÍA DE USUARIO
SERIE COMPACTA INTELIGENTE
ES
salpicaduras de partículas metálicas. Para evitar posibles lesiones, use gafas de seguridad
aprobadas con protectores laterales debajo de la máscara protectora.
Las chispas y las
pueden dañar sus ojos
• No toque las piezas calientes con las manos desprotegidas.
• Antes de trabajar en las piezas de la máquina deje que se enfríen.
• Cuando necesite manipular piezas calientes, utilice herramientas adecuadas, guantes de
soldadura/corte con alto aislamiento térmico y ropa ignífuga.
pueden causar
quemaduras graves
cara.
• Proteja demás partes expuestas de su cuerpo (brazos, cuello, orejas, etc.) de salpicaduras y
rayos de arco con ropa protectora adecuada.
• Rodee su área de trabajo con pantallas a prueba de llamas más altas que el nivel de los ojos
y cuelgue carteles de advertencia para que las personas a su alrededor no sufran daños por los
rayos del arco y los metales calientes.
• No se utiliza para calentar tuberías heladas. Operar con una máquina de soldar/cortar
provocará una explosión, un incendio o daños en su instalación.
Las salpicaduras y la
dañar los ojos y la piel
• El ruido generado por algunos equipos y procesos puede afectar su audición.
• Si el nivel de ruido es alto, use protectores auditivos aprobados.
El ruido puede dañar
• No suelde/corte tubos o tuberías completamente cerrados.
• Antes de soldar/cortar tubos y recipientes cerrados, ábralos, vacíelos completamente,
ventílelos y límpielos. Tenga el mayor cuidado posible cuando suelde/corte en tales lugares.
• No suelde/corte tubos o tuberías que contengan sustancias que puedan causar explosión,
incendio u otras reacciones, incluso si están vacíos.
• Se producen altas temperaturas durante el proceso de soldadura/corte. ¡Debido a esto, no se
desenrolla el alambre de soldadura.
• Cuando desenrolle manualmente el alambre de soldadura, el alambre delgado puede saltar de su
mano como un resorte y dañar a usted oa otras personas a su alrededor. Al hacer esto, protéjase
los ojos y la cara.
El alambre de
soldadura puede
causar lesiones
• Antes de comenzar el proceso de soldadura/corte, retire estos materiales del ambiente o
• En estas áreas se aplican normas particulares nacionales e internacionales.
La soldadura/corte
puede provocar
incendios y
explosiones
• Las chispas y salpicaduras pueden provocar un incendio. Mantenga materiales como tubos de
extintores, agua y arena al alcance de la mano.
una manera correcta.
• No realice operaciones de soldadura/corte en presencia de vapores de hidrocarburos clorados
liberados durante los procesos de lubricación o pintura.
• Algunas piezas soldadas/cortadas requieren ventilación particular. Se deben leer con atención
las normas de seguridad de los productos que requieran una ventilación particular. En los casos
en que se requiera, se debe usar una máscara antigás adecuada.
Normas de seguridad

ES
207
www.magmaweld.com GUÍA DE USUARIO
SERIE COMPACTA INTELIGENTE
• Los dispositivos eléctricos no deben ser reparados por personas no autorizadas. Los errores
cometidos aquí pueden provocar lesiones graves o la muerte durante el uso.
• Los elementos del circuito de gas funcionan bajo presión; los servicios por personas no
autorizadas pueden resultar con explosiones y lesiones graves de los usuarios.
• Se recomienda realizar el mantenimiento técnico de la máquina y sus periféricos al menos una
vez al año.
El mantenimiento de
por parte de personas no
lesiones
• Evite en la medida de lo posible las operaciones de soldadura/corte en lugares tan cerrados.
• Tome todas las precauciones requeridas durante el transporte de la máquina. Las áreas a
la persona que realizará el transporte deben ser adecuadas para el proceso de transporte.
• Algunas máquinas son extremadamente pesadas, por lo que al trasladarlas se debe asegurarse
de que se toman las precauciones de seguridad ambiental requeridas.
carga adecuados.
• En caso de transportar con el medio de un vehículo (carro de transporte, carretilla elevadora,
(gancho de transporte, correa, tornillo, tuerca, rueda, etc.) están intactos.
de transporte, cinturón, etc.) y las conexiones estén intactos.
• Para garantizar las condiciones de transporte necesarias, respetad las normas de la
Organización Internacional del Trabajo relativas al peso de transporte y las normas de
transporte de su país.
• Utilice siempre las asas o las agarraderas de transporte en el momento de reubicar la fuente de
alimentación. Nunca tire de sopletes, cables o mangueras. Lleve siempre los cilindros de gas por
separado.
• Antes de transportar el equipo de soldadura/corte, retire todas las interconexiones, levante y
transporte las pequeñas por sus asas, las más grandes por las agarraderas de transporte o
utilizando equipos de elevación adecuados, como carretillas elevadoras.
Soldadura/Corte en
Pequeño Volumen
No tomar las precauciones
requeridas durante el
transporte puede causar
accidentes
plataforma de gas adecuada para la botella, y a la pared con una cadena para que no vuelquen
en usos estacionarios.
pueden causar
lesiones
graves a las personas y daños materiales a otros objetos.
• Deje que la máquina se enfríe de acuerdo con los ciclos de trabajo.
• Disminuya la relación del ciclo de trabajo o corriente antes de comenzar a soldar/cortar
nuevamente.
• No bloquee las aberturas de ventilación de la máquina.
El uso excesivo provoca el
sobrecalentamiento de la
máquina
• Este dispositivo de clase A no está diseñado para usarse en áreas residenciales donde la energía
potenciales para garantizar la compatibilidad electromagnética debido a la interferencia de
radiofrecuencia transmitida y radiada.
baja tensión que se utiliza en el hogar, el instalador que realizará la conexión eléctrica
o la persona que utilizará la máquina debe tener conocimiento de la conectividad de la
máquina, en este caso es bajo la responsabilidad del usuario .ir.
La soldadura por arco
puede causar
interferencias
Normas de seguridad

208
www.magmaweld.comGUÍA DE USUARIO
SERIE COMPACTA INTELIGENTE
ES
Según IEC 60974-9 cláusula 5.2
Antes de instalar equipos de soldadura/corte, el operario y/o el usuario deben realizar una
investigación de posibles interferencias electromagnéticas en el entorno. Deben tenerse en
cuenta las siguientes situaciones:
a) Otros cables de alimentación, cables de control, cables de señal y telefónicos arriba, abajo y
junto a la máquina de soldar/cortar y sus equipos;
b) Transmisores y receptores de radio y televisión;
c) Ordenadores y otros equipos de control;
d) Equipos críticos de seguridad, por ejemplo, la protección de equipos industriales;
e) la tensións médicos de personas cercanas, por ejemplo, marcapasos y audífonos;
f) Equipos utilizados para la medición o calibración;
g) Inmunidad de otro equipo en el entorno. El usuario debe asegurarse de que otros equipos que
se utilicen en el entorno sean compatibles. Esto puede requerir medidas de protección
suplementarias,
h) Los límites del área de estudio se pueden ampliar de acuerdo con el tamaño del entorno, la
el tiempo de la operación de soldadura/corte a lo largo del día.
Además de la evaluación del área, también puede exigirse la evaluación de las instalaciones del
dispositivo para resolver el solapamiento. Cuando sea necesario, las mediciones in situ también
El suministro de equipos de soldadura por arco montados permanentemente debe ser a través de
un conducto metálico o un cable blindado equivalente.
El blindaje y la carcasa de la fuente de alimentación deben estar conectados y se debe mantener
un buen contacto eléctrico entre las dos estructuras.
• Se debe realizar el mantenimiento periódico recomendado del dispositivo. Todas las escotillas
deben estar cerradas y/o bloqueadas cuando el la tensión está en uso. No se pueden realizar
aprobación por escrito del fabricante. En caso contrario, el usuario será responsable de toda la
consecuencia que pudiera derivarse.
• Los cables de soldadura/corte deben mantenerse lo más cortos posible. Deben correr uno al lado
del otro desde el piso del área de trabajo. Los cables de soldadura/corte no deben enrollarse.
• Se forma un campo magnético en la máquina durante la soldadura/corte. Esto puede hacer que
todos estos materiales metálicos interconectados.
• En los casos en que la pieza de trabajo no esté conectada a tierra por motivos de seguridad
eléctrica o debido a su tamaño y posición (p. ej., casco de barco o fabricación de construcciones
de acero), una conexión entre la pieza de trabajo y tierra puede reducir las emisiones en algunos
casos. Debe tenerse en cuenta que conectar a tierra la pieza de trabajo puede causar lesiones a los
usuarios o el mal funcionamiento de otros equipos eléctricos en el entorno. Cuando sea necesario,
la conexión a tierra y la pieza de trabajo se pueden realizar como una conexión directa, pero en
algunos países donde la conexión directa no está permitida, la conexión se puede establecer
utilizando elementos de capacidad adecuados de acuerdo con las normas y reglamentos locales.
• El blindaje y la protección de otros dispositivos y cables en el área de trabajo pueden evitar
efectos disruptivos. Se puede considerar el blindaje de toda la zona de soldadura/corte para
Compatibilidad
Área de Estudio
de ruidoV
Las interferencias electromagnéticas que pueden ocurrir durante el proceso de soldadura/
corte pueden causar efectos no deseados en sus dispositivos electrónicos y en su red. Cualquier
efecto causado por estas interferencias durante el funcionamiento es bajo la responsabilidad
del usuario.
• En caso de alguna interferencia, para garantizar el cumplimiento; se pueden tomar medidas
adicionales, como usar cables cortos, usar cables blindados, reubicar la máquina, quitar cables
EMC.
• Realice sus operaciones de soldadura/corte lo más lejos posible (100 m) de sus dispositivos
electrónicos sensibles para evitar posibles daños EMC.
instrucciones.
Normas de seguridad

ES
209
www.magmaweld.com GUÍA DE USUARIO
SERIE COMPACTA INTELIGENTE
La corriente eléctrica que pasa a través de cualquier conductor crea campos eléctricos y magnéticos
(CEM) locales.
representa la exposición a CEM;
• Los cables de soldadura/corte deben juntarse y asegurarse con materiales de unión (cinta, bridas,
etc.) tanto como sea posible, para reducir el campo magnético.
• El cuerpo y la cabeza del operario deben mantenerse lo más alejados posible de las máquinas de
soldar/cortar y los cables;
• Los cables de soldadura/corte y eléctricos no deben enrollarse alrededor del cuerpo;
• El cuerpo no debe quedar atrapado entre los cables de soldadura/corte. Los cables de soldadura/
corte deben mantenerse alejados del cuerpo, ambos uno al lado del otro;
• El cable de retorno debe conectarse a la pieza de trabajo lo más cerca posible del área de
soldadura / corte;
• No debe apoyarse en la unidad de potencia, no debe sentirse ni trabajar muy cerca de esa;
• No se debe soldar/cortar mientras se transporta la unidad de potencia o el alimentador de
alambre.
Los CEM también pueden afectar el funcionamiento de los implantes médicos (material
implantado) como los marcapasos. Se deben tomar medidas de protección para las personas con
evaluaciones de riesgo individuales para los operarios. Un profesional médico debe realizar una
evaluación de riesgos y una recomendación para los usuarios con implantes médicos..
(CEM)
• Seleccione la corriente y/o tensión adecuado para el material y espesor que de soldadura/corte.
• Si el período de inactividad será largo, deje que el ventilador enfríe la máquina y apaguela. Las
máquinas con control inteligente de ventiladores se detendrán automáticamente.
nacional con la directiva de la Unión Europea.
• Obtenga información de su distribuidor y personas autorizadas sobre la gestión de residuos de
su máquina.
Procedimiento de
Residuos
• No exponga la máquina a la lluvia, salpicaduras de agua o vapor a presión.
FORMULARIO DE GARANTÍA
Para obtener el formulario de garantía, visite nuestro sitio web
www.magmaweld.com/warranty-form/wr.
Normas de seguridad

210
www.magmaweld.comGUÍA DE USUARIO
SERIE COMPACTA INTELIGENTE
ES
ID 300 MK / MKW PULSE SMART, ID 400 MK / MKW PULSE SMART es una soldadora industrial inverter
MIG / MAG trifásica con tecnología Pulse, diseñada para condiciones duras. Ofrece fácil movimiento con
su estructura compacta. Tiene excelentes características de soldadura con todos los alambres sólidos y
tubulares. Fuente de alimentación CC/CV; Le permite realizar métodos de soldadura MIG, TIG, MMA y corte
de carbono con una sola máquina. Gracias a su función sinérgica, la corriente y el voltaje de soldadura se
ajustan automáticamente después de determinar el tipo de alambre, el grosor y el tipo de gas. Los modos
clásico e inteligente facilitan la adaptación del usuario al modo sinérgico.
Figura 1 : ID 300 MK PULSE SMART / ID 400 MK PULSE SMART
Vista frontal y trasera
1- Pantalla digital
2- Potenciómetro
3- Toma de datos
4- Conexión antorcha
5- Conexión de polos
6- Pantalla digital
7- Potenciómetro
8- Interruptor de encendido/apagado
9- Electrodo (+) Conexión Polo
10- Entrada de gas
11- Zócalo de calefacción
12- Admirador
13- Unidad de agua Toma de energía
14- Cable de red
15- Entrada de cables
16- Rueda
10
14
16
15
11
12
13
1 6
7
8
9
2
3
4
5
Información Técnica
INFORMACIÓN TÉCNICA
1.1 Descripciones generales
1.2 Componentes de la máquina

ES
211
www.magmaweld.com GUÍA DE USUARIO
SERIE COMPACTA INTELIGENTE
1- Pantalla digital
2- Potenciómetro
3- Toma de datos
4- Conexión antorcha
5- Conexión de polos
6- Pantalla digital
7- Potenciómetro
8- Interruptor de encendido/apagado
9- Electrodo (+) Conexión Polo
10- Led Unidad Agua
11- Unidad de agua Entrada de agua caliente
12- Unidad de agua Salida de agua fría
13- Entrada de gas
14- Zócalo de calefacción
15- Admirador
16- Unidad de agua Toma de energía
17- Cable de red
18- Entrada de cables
19- Rueda
Figura 2 : ID 300 MKW PULSE SMART / ID 400 MKW PULSE SMART
Vista frontal y trasera
1 6
7
8
9
10
11
12
2
3
4
5
13
19
17
14
15
16
18
Información Técnica

212
www.magmaweld.comGUÍA DE USUARIO
SERIE COMPACTA INTELIGENTE
ES
1.3 Etiqueta del producto
Información Técnica

ES
213
www.magmaweld.com GUÍA DE USUARIO
SERIE COMPACTA INTELIGENTE Información Técnica
CC / CV
Corriente constante/tensión constante
Corriente directa
Soldadura MIG/MAG
Adecuado para trabajar en entornos peligrosos
X
U
I
U
IP21S
U
S
I
Ciclo de trabajo
Tensión de funcionamiento inactivo
Corriente de soldadura nominal
Tensión y frecuencia de red
Clase de Protección
tensión de fuente nominal
Potencia extraída de la red eléctrica
Corriente nominal extraída de la red
sin parar en los primeros 10 minutos del tiempo de 6 minutos (zona 1). No obstante, la máquina debe dejarse
inactiva durante los siguientes 4 minutos para que se enfríe (zona 2).
Ciclo de trabajo
Temperatura (ºC)
6 min. 6 min.6 min.4 min. 4 min. 4 min. Tiempo (min.)

214
www.magmaweld.comGUÍA DE USUARIO
SERIE COMPACTA INTELIGENTE
ES
400
14,7
ID 300 MK/MKW PULSE SMART
1078 x 528 x 962
86
1180 x 528 x 1137
110
IP21S
82
400
ESPECIFICACIONES TÉCNICAS
Voltaje de red (trifásico (3 Hz)
Potencia extraída de la red eléctrica
UNIDAD
V
kVA
Clase de Protección
Abra el circuito de voltaje
Peso
Corriente de soldadura Rango de ajuste
Tamaños (Largo ancho alto)
VDC
ADC
ADC
kg
mm
MK
MK
MKW
MKW
82
IP21S
300
1078 x 528 x 962
86
1180 x 528 x 1137
110
400
22,1
ID 400 MK/MKW PULSE SMART
1.5 Accesorios
ACCESORIOS ESTÁNDAR CANTIDAD
1Alicates y cable de puesta a tierra 7905203505
7905305005
ID 300 MK/MKW
PULSE SMART
ID 400 MK/MKW
PULSE SMART
ACCESORIOS OPCIONALES CANTIDAD
1
1
1
1
1
1
1
Manguera de gasolina
Regulador de gas (mezcla)
Lava MIG 50W (3 m) Antorcha MIG enfriada por agua
7907000002
7020009003
7020001004
7020001005
7120050003
ID 300 - 400 MK/MKW PULSE SMART
Información Técnica
ESPECIFICACIONES TÉCNICAS
Voltaje de red (trifásico (3 Hz)
Potencia extraída de la red eléctrica
UNIDAD
V
kVA
Corriente de soldadura Rango de ajuste ADC
ADC
Abra el circuito de voltaje
Peso
Tamaños (Largo ancho alto)
VDC
kg
mm
MK
MK
MKW
MKW
Clase de Protección

ES
215
www.magmaweld.com GUÍA DE USUARIO
SERIE COMPACTA INTELIGENTE
comuníquese con el punto de venta de inmediato.
La caja estándar debe contener;
• Alicates y cable de puesta a tierra • Manual de usuario
• Manguera de gasolina • Alambre de soldadura
con una fotocopia de la hoja de ruta. En el caso de que el problema persista, póngase en contacto con el servicio
de atención al cliente.
• La máquina debe moverse por medio de carretillas elevadoras o agarraderas. No levante la máquina con el
cilindro de gas. Coloque la fuente de alimentación en un piso duro, liso y poco inclinado donde no se caiga.
• Para un mejor rendimiento, coloque la máquina al menos a 30 cm de distancia de los objetos circundantes.
máquina a una corriente más baja o a una velocidad de ciclo más alta.
• Evite soldar al aire libre en presencia de viento y lluvia. Si es necesario soldar en tales casos, proteja el área
de soldadura y la máquina de soldar con cortinas y toldos.
el fácil acceso a los controles y conexiones de la máquina.
• Si suelda en interiores, utilice un sistema de extracción de humos adecuado. Si existe el riesgo de respirar
humos y gases de soldadura en interiores, utilice un respirador.
• Cumplase con las tasas de ciclo de operación indicadas en la etiqueta. La superación frecuente de las tasas
del ciclo de funcionamiento puede dañar la máquina, lo que puede anular la garantía.
corriente de soldadura atraviese elementos que no sean los cables de soldadura, la propia máquina, el
cilindro de gas, la cadena, el rodamiento.
La soldadura es peligrosa. Deben proporcionarse condiciones de trabajo apropiadas y deben tomarse
las medidas necesarias. Los expertos son responsables de la máquina y deben proporcionar el equipo
requerido. Las personas no encargadas deben mantenerse alejadas del área de soldadura.
se utiliza en el hogar, el instalador que realizará la conexión eléctrica o la persona que utilizará la
máquina debe tener conocimiento de la conectividad de la máquina, en este caso es bajo la
responsabilidad del usuario.
Se debe prestar atención a los símbolos de seguridad y las notas de advertencia en el dispositivo y en
el manual del usuario, y no se deben quitar las etiquetas.
Las parrillas son para la ventilación. Para garantizar un buen enfriamiento, las aberturas no deben
cubrirse y no se deben insertar objetos.
2.1 Consideraciones al recibir
INSTALACIÓN
Instalación

216
www.magmaweld.comGUÍA DE USUARIO
SERIE COMPACTA INTELIGENTE
ES
• El enchufe eléctrico en la parte posterior de la máquina es para el calentador CO.
Nunca conecte un dispositivo que no sea un calentador de CO a la toma de CO!
2.3 Conexiones de soldadura
• El enchufe no está conectado al cable de alimentación, ya que puede haber diferentes enchufes en fábricas,
obras de construcción y talleres. Un enchufe adecuado para la toma de corriente debe ser conectado por un
• Después de conectar el enchufe al cable, no lo enchufe en esta etapa.
• Abra la válvula del cilindro de gas manteniendo la cabeza y la cara alejadas de la salida de la válvula del
cilindro y manténgala abierta durante 5 segundos. De esta forma, se expulsarán posibles sedimentos y
suciedad.
posterior de la máquina.
• Conecte un extremo de la manguera del cilindro al regulador de gas y apriete la abrazadera. Conecte el otro
extremo a la entrada de gas en la parte trasera de la máquina y apriete la tuerca.
En caso de oir un sonido y/o holer a gas que indica una fuga, inspeccione sus conexiones y elimine la fuga.
2.3.3 Conexiones de gas
1- Válvula de cilindro de gas
2- Cilindro de gas
3-
4- Cadena
5-
6- Regulador de Gas
7- Manómetro
8- Caudalímetro
9- Válvula reguladora de caudal
10- Manguera de tubo
1
2
5
4
3
6
7 8
9
10
Figura 3 : Cilindro de gas - Calentador - Conexiones del regulador
Instalación

ES
217
www.magmaweld.com GUÍA DE USUARIO
SERIE COMPACTA INTELIGENTE
• La unidad de refrigeración por agua es un sistema de circuito cerrado que consta de radiador, ventilador,
depósito de refrigerante de la bomba.
• Conecte la manguera de agua fría (azul) del paquete intermedio a la salida de agua fría del sistema de
refrigeración por agua y la manguera de agua caliente (roja) a la entrada de agua caliente del sistema de
refrigeración por agua.
• Las máquinas de soldar Magmaweld vienen con refrigerante Magmaweld que se produce para brindar el
mejor rendimiento. En caso de falta de refrigerante, abra la tapa del depósito y agregue refrigerante
Magmaweld adecuado para la temperatura del entorno de trabajo. El refrigerante debe estar dentro de los
valores mínimos y máximos que se muestran en el panel frontal de la unidad.
• No se debe agregar otro refrigerante o agua. Otros aditivos líquidos pueden causar reacciones químicas o
diferentes problemas.
Si se agrega un refrigerante diferente o agua al refrigerante Magmaweld, todas las disposiciones de la
garantía quedarán anuladas.
• Si se desea utilizar una marca diferente de refrigerante, el interior del tanque de refrigerante debe estar
completamente vacío y no debe haber residuos ni líquidos en eso.
• El uso de las unidades de refrigeración por agua no es adecuado para un uso distinto de las máquinas de
funcionar con una fuente de alimentación externa.
Instalación

218
www.magmaweld.comGUÍA DE USUARIO
SERIE COMPACTA INTELIGENTE
ES
1 2
3 4 5 6
Mientras se presiona el botón, el alambre se introduce, la válvula de gas no funciona. Puede utilizar este
botón para introducir el alambre en la antorcha.
este botón después del cambio de gas.
Se realiza la selección del método de soldadura. Cada pulsación del botón cambia entre las líneas de la columna
correspondiente. Cuando se seleccione el método de soldadura, se encenderá el led correspondiente.
1-) ALAMBRE LIBRE
2-) GAS LIBRE
3-) SELECCIÓN DEL MÉTODO DE SOLDADURA
Rango de ajuste
• MIG/MAG
• Pulso MIG/MAG
El método de soldadura por pulsos solo está disponible en modelos con pulso. En los modelos
sin pulsos, cuando se alcance esta línea, el led no se encenderá y el pulso no se activará.
Debe ajustar sus conexiones y accesorios de acuerdo con el método de soldadura seleccionado.
Hay una salida separada para el método MMA delante de la máquina.
• MMA
Se debe usar un aparato adecuado para la conexión del conector de la antorcha en el método
de soldadura Lift TIG. Por medio del aparato especial, será compatible con el euroconector.
• Lift TIG
INFORMACIÓN DE USO
Información de uso

ES
219
www.magmaweld.com GUÍA DE USUARIO
SERIE COMPACTA INTELIGENTE
Se selecciona el tipo de alambre. El tipo de alambre a utilizar debe seleccionarse de una manera correcta.
Cada pulsación del botón cambia entre las líneas de la columna correspondiente. Cuando se selecciona el
tipo de alambre, se encenderá el led correspondiente.
Rango de ajuste
• Steel • AlMg
• FCW • AlSi
• CrNi • CuAl
Se selecciona el diámetro del alambre. El tipo de alambre a utilizar debe seleccionarse de una manera
correcta. Cada pulsación del botón cambia entre las líneas de la columna correspondiente. Una vez
seleccionado el diámetro del alambre, se encenderá el led correspondiente.
Rango de ajuste
Se realiza la selección del tipo de gas. El tipo de gas a utilizar debe elegirse correctamente. Cada pulsación
del botón cambia entre las líneas de la columna correspondiente. Una vez seleccionado el tipo de gas, se
encenderá el led correspondiente.
Rango de ajuste
• CO
4-) SELECCIÓN DEL TIPO DE ALAMBRE
5-) SELECCIÓN DEL DIÁMETRO DEL ALAMBRE
6-) SELECCIÓN DEL TIPO DE GAS
Información de uso

220
www.magmaweld.comGUÍA DE USUARIO
SERIE COMPACTA INTELIGENTE
ES
1
3
78
6
2
4 54 5
ven en la pantalla digital.
1-) PANTALLA DIGITAL IZQUIERDA
2-) PANTALLA DIGITAL DERECHA
Libre
Modo sinérgico Soldadura Corriente establecida Corriente de soldadura
Modo inteligente Soldadura Corriente establecida Corriente de soldadura
Modo Clásico Velocidad de cable Corriente de soldadura
En cargo
Libre
Modo sinérgico Voltaje de ajuste de soldadura Voltaje de soldadura
Modo inteligente Voltaje de ajuste de soldadura Voltaje de soldadura
Modo Clásico Voltaje de ajuste de soldadura Voltaje de soldadura
En cargo
Información de uso

ES
221
www.magmaweld.com GUÍA DE USUARIO
SERIE COMPACTA INTELIGENTE Información de uso
Se selecciona el modo de soldadura. Cada pulsación del botón cambia entre las líneas de la columna
correspondiente. Cuando se selecciona el modo de fuente, el led correspondiente se encenderá.
3-) SELECCIÓN DEL MODO DE SOLDADURA
La selección que realiza en la pestaña de método en la bolsa crea una diferenciación en las opciones del
modo de soldadura. Cuando se selecciona el método de soldadura MIG/MAG como método de soldadura, los
modos son los siguientes:
Rango de ajuste
• Modo clásico
• Modo inteligente
• Modo sinérgico
Si quiere ver el valor sugerida originalmente por la máquina y volver a ese valor, bastará con pulsar una
vez el botón de ajuste.
Se activará los modelos “Pulso”.
Cuando se selecciona el método de soldadura Pulse MIG/MAG como método de soldadura, los modos son
los siguientes:
MODO CLÁSICO
Cuando seleccionado, puede ajustar la velocidad del alambre y el voltaje de soldadura dentro de un cierto
rango de tolerancia.
La velocidad del alambre se ajusta entre 1 y 24 m/min, la tensión de soldadura entre 15 y 40 V.
MODO INTELIGENTE
Cuando seleccionado, los parámetros de soldadura como el tipo de alambre, el diámetro del alambre, el
tipo de gas deben seleccionarse correctamente. La máquina ajusta automáticamente el voltaje óptimo de
acuerdo con la corriente de soldadura seleccionada. Puede ajustar el voltaje girando el botón de ajuste en
MODO SINÉRGICO
Cuando seleccionado, los parámetros de soldadura como el tipo de alambre, el diámetro del alambre, el tipo
de gas y el grosor deben seleccionarse correctamente.
La máquina ajusta automáticamente el voltaje óptimo de acuerdo con la corriente de soldadura
seleccionada. El usuario puede navegar tanto por la corriente como por el voltaje dentro de un cierto rango
de tolerancia. La máquina recalculará automáticamente el voltaje de acuerdo con el valor actual establecido
en una cierta tolerancia.
MODO CLÁSICO
Cuando seleccionado, puede ajustar la velocidad del alambre y el voltaje de soldadura dentro de un cierto
rango de tolerancia.
La velocidad del alambre se ajusta entre 1 y 24 m/min, la tensión de soldadura entre 15 y 40 V.
MODO INTELIGENTE
Cuando seleccionado, los parámetros de soldadura como el tipo de alambre, el diámetro del alambre, el
tipo de gas deben seleccionarse correctamente. La máquina ajusta automáticamente el voltaje óptimo de
acuerdo con la corriente de soldadura seleccionada. Puede ajustar el voltaje girando el botón de ajuste en

222
www.magmaweld.comGUÍA DE USUARIO
SERIE COMPACTA INTELIGENTE
ES
Cuando se selecciona soldadura MMA y Lift TIG como método de soldadura, no hay selección en la sección
de modo.
MODO SINÉRGICO
Cuando seleccionado, los parámetros de soldadura como el tipo de alambre, el diámetro del alambre, el tipo
de gas y el grosor deben seleccionarse correctamente.
La máquina ajusta automáticamente el voltaje óptimo de acuerdo con la corriente de soldadura
seleccionada. El usuario puede navegar tanto por la corriente como por el voltaje dentro de un cierto rango
de tolerancia. La máquina recalculará automáticamente el voltaje de acuerdo con el valor actual establecido
en una cierta tolerancia.
4-) POTENCIÓMETRO DE AJUSTE
El ajuste se realiza girando el potenciómetro (4) hacia la derecha y hacia la izquierda.
• Cuando se selecciona el método de soldadura MMA, la corriente se ajusta con potenciómetro.
• Cuando se selecciona el método de soldadura Lift TIG, la corriente se ajusta con el potenciómetro.
• Cuando se selecciona el modo clásico, la velocidad del alambre se ajusta con el potenciómetro.
• Cuando se selecciona el modo inteligente, la corriente se ajusta con el potenciómetro, el voltaje se calcula
automáticamente contra la corriente ajustada.
• Cuando se selecciona el modo sinérgico, se selecciona el espesor del material a soldar con el
potenciómetro el voltaje se calcula automáticamente de acuerdo con el espesor ajustado.
• Cuando presiona el botón y cambia a la sección de funciones, debe presionar el potenciómetro una vez
y cambiar a la otra función para grabar en la función correspondiente.
La función de pregas (PrE) sea seleccionada; Si desea guardar este valor después de configurar con el
(PoS). Si no presiona el potenciómetro y pasa a la siguiente función (PoS), si regresa directamente a la página
5-) POTENCIÓMETRO DE AJUSTE
6-) SELECCIÓN DE FUNCIONES
Presionando el botón una vez se abrirán las funciones. Para volver a la página principal, simplemente presi
one el botón nuevamente. Al girar el potenciómetro hacia la derecha y hacia la izquierda, se ajusta
la función seleccionada. Cuando desee guardar la configuración seleccionada, es necesario pasar a la
siguiente función. Para guardar, basta con presionar una vez el crisol, de modo que se guarda el ajuste y se
Gas delantero
Se ajusta el tiempo de pregas.
Rango de ajuste
Antes de comenzar la soldadura por el tiempo especificado, sale gas y luego comienza la
soldadura. Proporciona la protección del grupo de soldado al comienzo de la soldadura.
PrE
El ajuste se realiza girando el potenciómetro a derecha e izquierda.
• El valor de voltaje se ajusta cuando se selecciona el modo clásico.
• Cuando se selecciona el modo inteligente, el voltaje se calcula automáticamente contra la corriente
establecida con el potenciómetro. Puede ajustar el voltaje dentro de un cierto rango de tolerancia
girando el potenciómetro hacia la izquierda y hacia la derecha..
• Cuando se selecciona el modo sinérgico, el voltaje se calcula automáticamente de acuerdo con los
parámetros determinados. Puede ajustar el voltaje dentro de un cierto rango de tolerancia girando el
potenciómetro hacia la izquierda y hacia la derecha.
• Cuando se selecciona el botón, se abrirán las funciones. Se ajustan las funciones relacionadas con el
potenciómetro.
Información de uso

ES
223
www.magmaweld.com GUÍA DE USUARIO
SERIE COMPACTA INTELIGENTE
Tiempo en reposo
Cuando se selecciona el método, se establece el tiempo sin soldadura.
Rango de ajuste
PoF
Arranque suave
Se ajusta el arranque suave.
Rango de ajuste
Al comenzar a soldar por primera vez, la velocidad del alambre aumenta gradualmente
desde la velocidad baja hasta la establecida. De esta forma se evitan golpes y salpicaduras
al inicio de la soldadura.
SoS
Cráter
Se ajuste el función de cráter.
Rango de ajuste
Es un proceso de relleno para evitar grietas que se producirán al final de la soldadura.
Cuando se activa el cráter, la corriente de soldadura se reduce con cierta linealidad al final
de la soldadura y la soldadura termina.
Crt
Tiempo de soldadura
Cuando se selecciona el método, se establece el tiempo para soldar.
Rango de ajuste
Pon
Retroquemado
Se hace el ajuste de retroquemado.
Rango de ajuste
Si el valor que se muestra en la pantalla es “+” en el retroquemado, el alambre se destacará
continuará quemándose durante el tiempo determinado. Cuando finaliza el proceso de
soldadura, evita que el alambre de soldadura se pegue a la boquilla de contacto.
brn
Gas final
Se establece el tiempo de gas final.
Rango de ajuste
Después del final de la soldadura durante el tiempo especificado, llega gas y termina la
soldadura. Proporciona la protección del baño de soldadura al final de la soldadura.
PoS
Información de uso

224
www.magmaweld.comGUÍA DE USUARIO
SERIE COMPACTA INTELIGENTE
ES
Información de uso
7-) SELECCIÓN DE PROGRAMA
8-) SELECCIÓN DEL MODO DE DISPARO
Se utiliza para grabar el trabajo realizado. Hay 3 memorias. Se encenderá el led del programa en el que
se realiza la operación.. Para guardar el programa, se debe presionar el botón una vez y cambiar al otro
está encendido, pulse una vez el botón para guardar.. Así, se apagarán todos los leds del programa.. Hay un
área que permite trabajar sin registro de programa después del programa 3. Mientras está en esta zona, el
programa no se graba y los leds de programa se apagan.
Rango de ajuste
Se utiliza para la selección del modo de disparo. Cada pulsación del botón cambia al otro modo de
activación.
Rango de ajuste
• 2 gatillos
• 4 gatillos
• Método
2 MODOS DE GATILLO : Cuando se presiona el gatillo de la antorcha, comienza la soldadura y se mantiene
presionado el gatillo hasta que finaliza la soldadura. La soldadura terminará cuando se suelte el gatillo.
PrG :
I : Corriente de soldadura
PoG : Tiempo posterior al gas
• Mantenga presionado el gatillo de la antorcha,
• El flujo de gas de protección comienza durante el
tiempo de pregas.
• Al final del período de pregas, el motor de
alimentación de alambre funciona a baja velocidad.
• La corriente de soldadura aumenta cuando véne la
pieza de trabajo.
• Suelte el gatillo de la antorcha presionado,
• Se detendrá el motor de alimentación de alambre.
• El arco se apaga después del tiempo de
retroquemado establecido.
termina.
Presione el gatillo Mantenga presionado el gatillo Suelte el gatillo

ES
225
www.magmaweld.com GUÍA DE USUARIO
SERIE COMPACTA INTELIGENTE Información de uso
2
A
1
B
CONTROLADOR DE ANTORCHA - VERDE
CONTROLADOR DE ANTORCHA - BLANCO
CONTROLADOR DE ANTORCHA - ROJO
CONTROLADOR DE ANTORCHA - NEGRO
CONTROLADOR DE ANTORCHA - MARRÓN
Vista frontal del zócalo de
la antorcha del control remoto
Modo
Modo clásico
Modo
inteligente
Modo sinérgico
Rango de ajuste: 0.5 m/min
Rango de ajuste: 5 A
Rango de ajuste: 5 A
Puede aumentar el voltaje de soldadura hasta el valor máximo de tolerancia (+10).
Rango de ajuste: 0.5 V
Puede aumentar la velocidad de su hilo hasta el valor máximo de tolerancia (+10).
Rango de ajuste: 0.5 m/min
Puede aumentar su corriente de soldadura hasta el valor máximo de tolerancia
Rango de ajuste: 5 A
Puede aumentar su corriente de soldadura hasta el valor máximo de tolerancia
Rango de ajuste: 5 A
Puede aumentar el voltaje de su soldadura hasta el valor máximo de tolerancia
Rango de ajuste: 0.5 V
Rango de ajuste: 0.5 V
Rango de ajuste: 0.5 V
Rango de ajuste: 0.5 V
Rango de ajuste: 0.5 V
1
1
1
2
2
2
A
A
A
B
B
B
Tecla Cargo
3.3 Control Remoto
Por medio de una antorcha y un conector adecuados, puede cambiar su corriente de soldadura (velocidad del
alambre) / voltaje de soldadura a través de la antorcha sin tener que ir a la máquina. Debe conectar el enchufe
de la antorcha de control remoto.
A continuación se indican las conexiones de enchufe:

226
www.magmaweld.comGUÍA DE USUARIO
SERIE COMPACTA INTELIGENTE
ES Voltaje 0 / 25
Alambre -25 / 0
Cráter abierto
Gas delantero
Gas delantero
Cráter cerrado
Alambre 0 / 25
Gas delantero
Cráter cerrado
Voltaje -25 / 0
Cráter abierto
Gas delantero
Gas �inal
Gas delantero
Spot
Punto
abierto Punto
cerrado
Cráter
Retroquemado
Gas �inal
Retroquemado
Gas �inal
Gas �inal
Retroquemado
Gas �inal
Cráter
Retroquemado
Arranque
lento abierto
Comienzo
lento Apagado
Comienzo
lento Apagado
Arranque
lento abierto
Establecer alambre
Establecer alambre
Establecer voltios
Establecer voltios
Rango de valores
Ajuste de fábrica 2- Ubicación MIG
0,0 - 9,9 seg 0,1 seg
0,0 - 9,9 seg 0,0 seg
25 - 0 - 25 0 paso
0,6 - 20,0 mm 1,0 mm
0,0 - 9,9 seg 0,1 seg
0,6 - 2,4 mm 1,0 mm
0,2 - 9,9 seg 0,2 seg
Acero, AlMg, FCW, AlSi, FCW-M, CuSi, CrNi, CuAl
4- Ubicación MIG
CO₂, Ar/5-10 CO₂, Ar/15-25 CO₂, Ar/2.5 C0₂, Ar/10-15 CO₂, Argón
Método / 2 / 4 2
MIG / MAG - MMA
LIFT TIG
MIG / MAG
Sinérgico / Inteligente / Clásico
Activo / Pasivo Pasivo
Parámetro
Gas delantero
Grosor
Tipo de gas
Tipo de alambre
Gas �inal
Retroquemado
Tiempo de soldadura
Tiempo en reposo
Diámetro del alambre
Gatillo
El método
Modo
Cráter
3.4 Ajuste de longitud de arco (ArC)
Cuando se presiona el botón de ajuste de voltaje durante 3 segundos, la función de longitud de arco estará
girando el botón existente hacia la izquierda y hacia la derecha. En el cambio realizado hacia +7, el contacto del
3.5 Curva MIG
Información de uso

ES
227
www.magmaweld.com GUÍA DE USUARIO
SERIE COMPACTA INTELIGENTE
• Coloque el rodillo de modo que los espacios dentro del rodillo del alimentador de alambre se superpongan
de alimentación de alambre estén en su lugar girándolos hacia la derecha o hacia la izquierda. Luego baje los
rodillos de presión y levante la palanca del rodillo de presión para bloquearla en el rodillo de presión.
• Cuando abre la cubierta de la sección del alimentador de alambre, puede hacer ajustes de gas libre y alambre
con el botón lateral. En la sección de alimentación de alambre, verá el sistema de alimentación estructurado
mecánicamente por la fuerza aplicada a los 4 rodillos. La velocidad de alimentación del alambre no cambia
incluso en condiciones negativas como el calentamiento del motor y el aumento de la fricción. La estabilidad
del arco es impecable. Tan pronto como la máquina esté energizada, el LED interior se activará, brindando
comodidad al cambiar los rodillos.
• Use rodillos de alimentación de alambre adecuados para el material y el diámetro del alambre de
soldadura que utilizará. Utilice rodillos de alimentación de alambre con ranura en V para acero y
acero inoxidable, ranura en V moleteada para alambre tubular y ranura en U para aluminio.
• Para reemplazar los rodillos de alimentación de alambre, tire del tornillo de ajuste de presión hacia usted y
retire las cubiertas de los rodillos superiores, luego retire los rodillos existentes.
Figura 4 : Sistema de alimentación de alambre
a- Motor
b- Euroconector
c- Tornillo de ajuste de presión
d- Rodillos de alimentación de alambre superior
e- Rodillos de alimentación de alambre inferior
f- Mecanismo de bloqueo deslizante de alambre
• Antes de que pueda quitar los rodillos , debe desbloquearlos. Para desbloquear, se debe
girar en la dirección opuesta al bloqueo, los espacios dentro del rodillo del alimentador
de alambre deben superponerse con las protuberancias en el cuerpo del mismo.
• Ambos lados de los rodillos están marcados de acuerdo con el diámetro del alambre
relacionado.
• Coloque los rodillos en la brida de modo que el valor del diámetro del alambre esté en
el lado que mira hacia usted.
a
b
d
e
f
d
cc
• Arranque la máquina con el interruptor de encendido/apagado.
• Después de oir el ruido del ventilador y ver que se enciende la luz de alimentación, apague la máquina
poniendo el interruptor de encendido/apagado en la posición de apagado.
Compruebe la tensión de red antes de
conectar la máquina a la red eléctrica.
encendido/apagado esté en la posición “0”
cuando lo conecte.
Información de uso

228
www.magmaweld.comGUÍA DE USUARIO
SERIE COMPACTA INTELIGENTE
ES
Información de uso
Figura 6 : Colocación de los rodillos
de alimentación ade alambre
Figura 5 : Extracción de los rodillos de
alimentación de alambre
(1)
(3)
(3)
(2)
(6)
(4)
(4)
(5)
• Desatornille el tornillo del sistema de transporte de alambre. Ingrese la bobina de alambre de soldadura en
el husillo del sistema de transporte de alambre y vuelva a apretar el tornillo.
• Tire de la palanca de presión del rodillo de alimentación de hilo y bájela, es decir, vacíe el rodillo de presión.
• Sin soltar el hilo, paselo por la guía de entrada hasta los rodillos, y sobre los rodillos hasta la antorcha.
• Retire el alambre de soldadura de donde está sujeta la bobina de alambre y corte el
extremo con un cortador lateral sin dejar.
Figura 7 : Inserción del rodillo de alambre
Figura 8 : Conducción del alambre al rodillo
Apretar demasiado el tornillo del sistema de transporte
de alambre impide que el alambre se alimente y puede
causar fallas de funcionamiento. Apretar poco el tornillo puede
causar que la cesta de alambre se vacíe y se enrede después de
un tiempo cuando se detiene la alimentación de alambre. Por lo
tanto, apriete el tornillo ni demasiado apretado ni demasiado
Si se pierde el extremo del cable, el alambre puede saltar como un resorte y dañarlo a usted
y a su entorno.
a
b
c
(1)
(3)
(2)

ES
229
www.magmaweld.com GUÍA DE USUARIO
SERIE COMPACTA INTELIGENTE Información de uso
alimentación de alambre incorrecto, ocurrirán los siguientes efectos.
A: Presión de alambre y tamaño de canal adecuados.
B: Como resultado de la palanca demasiado presionada, se deforma el alambre.
C:
D: La longitud del canal del rodillo es pequeña para el alambre utilizado. Hay deformaciones en el alambre.
E: La longitud del canal del rodillo es grande para el alambre utilizado. El alambre no se puede enviar a la zona
de soldadura.
8 lt/min.
Alambre de
núcleo de
metal y acero
no aleado
Diámetro del alambre
(mm)
0.8
0.9
1.0
1.2
Alambre
relleno Acero
inoxidable Aluminio
7 lt/min. 8 lt/min. 8 lt/min.
9 lt/min. 8 lt/min. 9 lt/min. 9 lt/min.
10 lt/min. 9 lt/min. 10 lt/min. 10 lt/min.
12 lt/min. 11 lt/min. 12 lt/min. 12 lt/min.
veces el diámetro del alambre.
Por ejemplo, si el diámetro del alambre es de
1,2 mm, el caudal de gas se puede ajustar como
• Puede consultar la tabla adyacente para un ajuste
gas, levante la palanca del rodillo y cierre la
cubierta del alimentador de alambre.
alambre!
MADERA
• Presione los rodillos de presión y levante la palanca de presión.
• Arranque la máquina girando el interruptor de encendido/apagado a la posición “1”.
• Presione el gatillo hasta que el hilo salga por la punta del soplete, mientras tanto observe que la bobina de hilo gire
alambre.
• Cuando el alambre salga de la punta de la antorcha, vuelva a colocar la boquilla y la punta de contacto en la
antorcha.
• Conduzca el alambre sobre una tabla para ajustar la tensión del alambre y corte el extremo del mismo.

230
www.magmaweld.comGUÍA DE USUARIO
SERIE COMPACTA INTELIGENTE
ES
3.10 Características de la máquina
Estructura CC/CV
• Permite soldadura MIG, MMA y TIG.
Rendimiento inteligente
• Supervisa y analiza continuamente los parámetros de soldadura de la máquina por medio de su control de
rendimiento inteligente.
funcionamiento.
• Esta protección se indica en el panel de la máquina mediante un led de aviso térmico.
Trabajar con generadores
técnicas.
Variedad de funciones de uso
• Proporciona una operación fácil de usar con modos MIG / MAG clásicos, inteligentes y sinérgicos.
Protección de voltaje
• Si la tensión de red es demasiado alta o baja, la máquina se protege automáticamente dando un código de
falla en la pantalla. De esta manera, no se dañan los componentes de la máquina y se garantiza que la vida
también se activan las funciones de la máquina.
Memoria
• Hay 3 memorias de trabajo que permiten el registro del trabajo realizado.
Ventilador inteligente
• La temperatura interna de la máquina se mide de una manera continua. La velocidad del ventilador de
temperatura, la fase se detiene por completo. De este modo, se reduce la cantidad de polvo que entra en
rendimiento de enfriamiento al hacer funcionar el ventilador durante la soldadura.
Control de corriente/voltaje mediante antorcha
• Por medio de conexión de control, puede cambiar el corriente/voltaje de soldadura a través de la antorcha
sin tener que ir a la máquina, con una antorcha con las características adecuadas.
Protección de fase
• Está protegido contra falta de fase o fase incorrecta.
Arranque suave
• Previene la formación de arranques golpeados y espasmódicos al aumentar gradualmente la velocidad del
alambre.
Compatibilidad con Magnet
• Gracias a la estructura elaborada para Magnet, la información de soldadura y medios se almacena en
tiempo real. Si bien algunos valores se pueden leer desde el panel LCD en la parte frontal de la máquina,
almacena y monitorea en la plataforma Magnet. (Opcional)
Compatibilidad con robots
• Proporciona facilidad de uso con su estructura compatible con robots.
Información de uso

ES
231
www.magmaweld.com GUÍA DE USUARIO
SERIE COMPACTA INTELIGENTE
• El mantenimiento y las reparaciones de la máquina deben ser realizados por personas competentes.
La compañia no asume responsabilidad de los accidentes que puedan ocurrir como consecuencia de
intervenciones de personas no autorizadas.
• Puede obtener las piezas que se utilizarán durante la reparación de nuestros servicios autorizados. El uso de
• Cualquier interposición no autorizada por el fabricante queda fuera de la garantía.
reparación.
• Antes de realizar cualquier acción en la máquina para su reparación, desconecte el enchufe de red de la
máquina y espere 10 segundos para que se descarguen los condensadores.
4.1 Mantenimiento
Cada 3 meses
• No retire las etiquetas de advertencia del dispositivo. Reemplace las etiquetas
gastadas o rotas por otras nuevas. Puede obtener las etiquetas en el servicio
autorizado.
• Revise la antorcha, las pinzas y los cables. Preste atención a las conexiones y la
durabilidad de las partes. Reemplace las piezas dañadas o defectuosas. Nunca
agregue/repare cables.
soldadura.
• Limpie y apriete las piezas de conexión como pernos y tuercas.
• Compruebe los cables de la pinza de electrodos y de la pinza de tierra.
• Abra las tapas laterales de la máquina y límpiela con aire seco a baja presión. No
aplique aire comprimido desde una distancia cercana a los componentes
electrónicos.
• Refresque con agua limpia que no sea dura periódicamente el agua del depósito de la
unidad de refrigeración por agua y protejala con anticongelante.
Cada 6 meses
o
NOTA: Los períodos mencionados son los períodos máximos que deben aplicarse si su dispositivo no
presenta ningún problema. Puede repetir los procesos mencionados anteriormente con mayor
Nunca suelde con las cubiertas de la soldadura abiertas.
los rodillos nunca deben engrasarse.
• Limpie los residuos acumulados en el mecanismo con la ayuda de aire seco en cada
cambio de hilo de soldadura.
• Los consumibles de la antorcha deben limpiarse regularmente. Si es necesario, debe
uso a largo plazo.
MANTENIMIENTO Y FALLAS
Mantenimiento y fallas

232
www.magmaweld.comGUÍA DE USUARIO
SERIE COMPACTA INTELIGENTE
ES
Las siguientes tablas contienen las posibles fallas y sus soluciones.
La maquina no funciona
• Póngase en contacto con el servicio
autorizado
• La conexión eléctrica de la máquina
es problemática
• Fusible de red defectuoso o cable de
red dañado
• Los rodillos de alimentación de
diámetro del alambre
• Demasiado o muy poco gas de
protección
• Parámetro y proceso incorrectos
• Fallo de la placa electrónica
• Falla de placa electrónica/ventilador
• Seleccione el rodillo alimentador de
alambre adecuado
Si no se puede realizar el ajuste de
gas, consulte con el servicio
autorizado
parámetros y procesos sea correcta
• Póngase en contacto con el servicio
autorizado
• Póngase en contacto con el servicio
autorizado
• Reemplace la boquilla de contacto
conectada a la parte de los alicates
de puesta a tierra
tungsteno esté limpia
• Conexiones de red incorrectas
• Tarjeta electrónica defectuosa
• Tarjeta electrónica / motor del
alimentador de alambre defectuoso
• El interruptor de encendido/apagado
no funciona correctamente
• Muy poca presión en los rodillos de
alimentación de alambre
• El tamaño de la boquilla de contacto
está mal seleccionado o dañado
• Los parámetros de soldadura no están
seleccionados correctamente
• Los alicates de conexión a tierra de la
máquina no están conectados a la
pieza de trabajo
• Extremo de tungsteno desgastado
(en soldadura TIG)
• Los valores de polo y amperaje del
electrodo incorrectos
(en soldadura MMA)
• Los rodillos de presión están bajos
• Cables y puntos de conexiones
dañados
• Antorcha dañada
(en soldadura MIG, TIG)
• Ajuste correctamente el rodillo de
presión
la velocidad del cable
conectar el electrodo y el valor de
corriente a ajustar en la máquina
• Ajuste correctamente el rodillo de
presión
resistentes y que los puntos de
conexión no estén corroídos
soldadura sea sólida
El motor del alimentador de alambre
no funciona
El motor de alimentación de alambre
funciona, pero el alambre no avanza
No suelda bien
La corriente de soldadura
no es estable y/o no está
regulada
El ventilador no funciona
Falla Causa Resolución
• Póngase en contacto con el servicio
autorizado
conectada a la electricidad
• Compruebe los fusibles de
alimentación de red, el cable de red
y el enchufe
• Compruebe que las conexiones a la
red son correctas
• Compruebe el interruptor de
encendido/apagado
Mantenimiento y fallas

ES
233
www.magmaweld.com GUÍA DE USUARIO
SERIE COMPACTA INTELIGENTE
E01
E02
E03
E04
E05
E06
Código de Error Error Causa Resolución
Error de
comunicación
• Póngase en contacto con el servicio
autorizado
• Póngase en contacto con el servicio
autorizado
• Póngase en contacto con el servicio
autorizado
• Póngase en contacto con el servicio
autorizado
• Comprobar los cables de conexión a
se proporcione la entrada de voltaje
correcta. Si la tensión de red es
normal, contactar con el servicio
autorizado
• Comprobar los cables de conexión a
se proporcione la entrada de voltaje
correcta. Si la tensión de red es
normal, contactar con el servicio
autorizado
• Compruebe visualmente si el
ventilador funciona o no. Si no
funciona, contacte con el servicio
autorizado
• Abra los conductos de aire
• Puede haber problemas en diferentes
puntos de la máquina
• Es posible que el ventilador no esté
funcionando
• Es posible que la máquina haya
consumido demasiada corriente
• Puede haber problemas en diferentes
puntos de la máquina
• Es posible que haya caído la tensión
de red
• El sensor de temperatura puede
estar roto o puede haber un
problema en su conexión eléctrica
• La tensión de red puede haber
aumentado
• La parte delantera de los canales de
entrada y salida de aire puede estar
bloqueada
• El ambiente de trabajo de la máquina
puede ser extremadamente caluroso
o sofocante
• Es posible que se haya excedido el
tiempo de actividad de su máquina
colocada en un área donde pueda
trabajar más cómodamente
• Deje que la máquina se enfríe
esperando un momento. Si la falla
desaparece, intente usarlo en valores
de amperaje más bajos
Protección
térmica
Error de
sobrecorriente
Tensión de red
baja
Error de lectura
del sensor de
temperatura
Tensión de red
alta
• Los parámetros de soldadura no
están seleccionados correctamente
• Todos los parámetros (Tipo de
cable, tipo de gas, etc.) deben
seleccionarse de acuerdo con su
método de soldadura
El valor 0000 se muestra en la pantalla
Falla Causa Resolución
Mantenimiento y fallas

234
www.magmaweld.comGUÍA DE USUARIO
SERIE COMPACTA INTELIGENTE
ES
DESCRIPCIÓN
NÚMERO
1
12
4
15
7
18
10
2
13
5
16
8
19
11
3
14
6
17
9
CÓDIGO MATERIAL
Conector
Unión de plástico
Interruptor de encendido
Placa Electrónica
Bobina de choque
Placa Electrónica
Placa Electrónica
Sistema de alimentación de alambre
Zócalo de soldadura
Conector de alimentación
Placa Electrónica
Placa Electrónica
Filtro RS de placa electrónica
Glándula de válvula de gas
Botón de potencia
Conector
Placa Electrónica
Placa Electrónica
Placa Electrónica
K405000230
K405000313
K405000230
A308900004
A376400016
K405000254
K405000255
A378000103
A377900106
A229900003
K309002213
K405000324
A378000050
K405000262
A421050002
K405000312
A229500001
A256006069
K405000253
A378002002
1
2
3
4
5
6
7
8
9
10
11
12
13
14 15
16 17
18
19
5.1 Listas de repuestos
La fuente de alimentación Lista de piezas de repuesto
ANEXOS
Anexos

ES
235
www.magmaweld.com GUÍA DE USUARIO
SERIE COMPACTA INTELIGENTE
1
2
3
4
5
6
7
CÓDIGO MATERIAL
NÚMERO
Depósito de agua
Bomba de agua
Portafusibles de vidrio
Acoplamiento Rápido Rojo
Ventilador
Fusible de vidrio rápido
Acoplamiento Rápido Azul
Radiador
1
4
7
2
5
8
3
6
A249000005
A240000006
A300190001
A245700003
A250001126
A300101011
A245700002
A260000010
DESCRIPCIÓN
Lista de piezas de repuesto de la unidad de refrigeración por agua
Anexos

236
www.magmaweld.comGUÍA DE USUARIO
SERIE COMPACTA INTELIGENTE
ES
R
S
T
Panel frontal
Filtro de entrada Recti�icador de entrada Condensadores Módulo IGBT
Efecto Hall
Unidad de
Control
Transformador de
alta frecuencia
Recti�icador de salida
Línea de
control
Bobina Choque de salida
Gas
Unidad de alimentación
de alambre
Derivación
Filtmro de
salida
Pieza de trabajo
Antorcha de soldadura
Válvula de solenoide
Transformador de control
Panel de membrana
Línea de control del
soplete de soldadura
5.2 Diagrama de bloques
Anexos

ES
237
www.magmaweld.com GUÍA DE USUARIO
SERIE COMPACTA INTELIGENTE
5.3 Diagrama del circuito de la unidad de agua
(Toma de un�dad de agua)
Fus�ble de cr�stal ráp�do
Vent�lador 380VAC
Vent�lador 380VAC
Bomba de agua 380VAC
LED de 5 mm
Anexos


Modelo
Número de serie
Título
Ciudad / País
Teléfono / E-mail
Fecha y número de factura
Título MAGMA MEKATRONİK MAKİNE SANAYİ VE TİCARET A.Ş.
Dirección
Título
Ciudad / País
Teléfono / E-mail
Teléfono / E-mail
Nombre y Apellidos del Destinatario
Organize Sanayi Bölgesi 5. Kısım MANİSA
+90 236 226 27 00 / info@magmaweld.com
Título
Nombre y Apellido del Técnico
Fecha de puesta en servicio
(Fecha de inicio de la garantía)
CERTIFICADO DE GARANTÍA
PRODUCTO
MANUFACTURERO
INFORMACIÓN DE COMPRA
INFORMACIÓN DEL CLIENTE
INFORMACIÓN DE SERVICIO (si aplica)
Para conocer las condiciones de la garantía, visite nuestro sitio web
www.magmaweld.com/warranty-terms/wt.


241
www.magmaweld.com
AR
(ArC)
MIG
1
1.1
1.2
1.3
1.4
1.5
2
2.1
2.2
2.3
2.3.1
2.3.2
2.3.3
2.3.4
3
3.1
3.2
3.3
3.4
3.5
3.6
3.7
3.8
3.9
3.10
4
4.1
4.2
4.3
5
5.1
5.2
5.3
242
247
247
249
251
251
252
252
253
253
253
253
253
255
257
262
263
263
264
264
265
266
267
268
269
270
271
273
274

242
AR
www.magmaweld.com
!
. •
• .
. •
. / • .
. •
. . •
. •
. •
. •
. •
.
. /
.
. .
.
. . •
. • .
. . •
. . •
. •
. •
. • .
. •
. •
. . . •
. •
. •
. / •
. •
. •
. . •
. . • .
. •
. •
. •
. •

243
www.magmaweld.com
AR
. •
. •
. •
. • .
. (AED) •
. •
.
.
. •
. •
. •
. • . /
. •
. / •
. .
• .
• .
. • .
. / •
. / • . .
. •
•
•
•
. •
•
•
.(VRD) •
. •
. ( )
•
• .
/ . • .

244
AR
www.magmaweld.com
. / • .
. •
.
•
/ • .
.
•
. •
. / •
. / • . /
. / •
! . / •
. •
• .
. . / •
/ • .
. •
/
. • .
. • .
. • .
• .
. •
. / •
. / •
/
. • .
. •
. •

245
www.magmaweld.com
AR
. 10 •
.
.
. •
.
. •
. / •
. •
. •
.TS EN 55011 2 •
. “” •
.
.(EMC) •
. / .
•
/ () .
( 100) / • .
. •
.IEC 61000 -3 - 12 ”
.
5.2 IEC 60974-9
. / /
/ (
(
(
(
(
. (
. . (
(
. /
.
.(IEC 60974-9 :) .
( ) • . ( )
. ( ) •
. •
. . • .
/ • .

246
AR
www.magmaweld.com
. • . .
.
. / . •
. .
. . / • . /
. . / • . .
•
.( )
.
.
. • . /
.(EMF)
( ) / • .
/ •
. / •
. / . / •
/ •
•
. / •
( )
”
. .
. .
(EMF)
. / •
. / / •
. / • .
. . •
. •
. •

247
www.magmaweld.com
AR
MIG / MAG ID 300 MK / MKW PULSE SMART ID 400 MK / MKW PULSE SMART
. .
. MMA TIG MIG CC / CV .
.
.
ID 300 MK PULSE SMART / ID 400 MK PULSE SMART :1
-1
-2
-3
-4
-5
-6
-7
/ -8
(+) -9
-10
-11
-12
-13
-14
-15
-16
10
14
16
15
11
12
13
1 6
7
8
9
2
3
4
5
11
12

248
AR
www.magmaweld.com
-1
-2
-3
-4
-5
-6
-7
/ -8
(+) -9
-10
-11
-12
-13
-14
-15
-16
-17
-18
-19
ID 300 MKW PULSE SMART / ID 400 MKW PULSE SMART :2
1 6
7
8
9
10
11
12
2
3
4
5
13
19
17
14
15
16
18

249
www.magmaweld.com
AR
13

250
AR
www.magmaweld.com
CC / CV
\
\MIG
MAG
-
X
U
I
U
IP21S
U
S
I
250 . 10 EN 60974-1
.(1 ) 10 6 / 60% 250
.(2 ) 4
( )
6 6 6 4 4 4
()

251
www.magmaweld.com
AR
1
1
1
1
1
1
1
1
CO
()
(CO )
( 3) 50 Lava
7905203505
7905305005
ID 300 MK/MKW
PULSE SMART
ID 400 MK/MKW
PULSE SMART
7907000002
7020009003
7020001004
7020001005
7120050003
ID 300 - 400 MK/MKW PULSE SMART
14
400
82
IP21S
14,7
300
1078 x 528 x 962
86
1180 x 528 x 1137
110
ID 300 MK/MKW PULSE SMART
MK
MK
MKW
MKW
( 50-60 3)
( × × )
1078 x 528 x 962
86
1180 x 528 x 1137
110
IP21S
400
82
22,1
400
ID 400 MK/MKW PULSE SMART
MK
MK
MKW
MKW
( 50-60 3)
( × × )
15
. *
*
\
\ *
\

252
AR
www.magmaweld.com
21
. .
:
• •
• •
• •
.
.
22
. . • .
. . 30 •
40 . .
. • .
. •
. • .
. . •
. •
. • .
. • .
. • !
. .
. .
.IEC 61000-3-12
.
.
. .

253
www.magmaweld.com
AR
23
231
. • . / .
. •
232
. •
.3/8 •
. 5 • .
. • .
. •
. . •
. •
. /
233
-6 -1
-7 -2
-8 -3
-9 -4
-10 -5
1
2
5
4
3
6
7 8
9
10
- - :3
. •
() () •
.
. Magmaweld Magmaweld •
. Magmaweld .
. . •
234

254
AR
www.magmaweld.com
. Magmaweld •
. Magmaweld
• .
Magma • . .

255
www.magmaweld.com
AR
1 2
3 4 5 6
31
. .
. .
. .
.
-1
-2
-3
MAG /MIG •
MAG /MIG •
Pulse Pulse ”
”
”
MMA •
Li TIG
Li TIG •

256
AR
www.magmaweld.com
v . . ”
“. .
AlMg • Steel •
AlSi • FCW •
CuSi • FCW-M •
CuAl • CrNi •
. .
. .
2.4 - 0.6 •
. .
. .
Ar/5-10 CO2 • •
Ar/2.5 CO2 • Ar/15-25 CO2 •
• Ar/10-15 CO2 •
-4
-5
-6

257
www.magmaweld.com
AR
1
3
78
6
2
4 54 5
.
/ ”
“.
“. ”
-1
-2
32

258
AR
www.magmaweld.com
. .
.
: Pulse MIG / MAG
-3
MIG / MAG .
:
•
•
•
. Li TIG MMA
.
. 15-40 / 24 - 1
.
” . -/+ .
.
.
. .
.
. 15-40 / 24 - 1
.
” . -/+ .
.
.
. .

259
www.magmaweld.com
AR
-4
-5
. (4)
. MMA •
. Li TIG •
. •
. •
. •
(6) • .
(4) (5) (PrE)
(4) .(PoS)
. (PoS)
. (5)
. •
(5) .(4) • .
. •
. (5)
. . (6) •
-6
(5) . . (6)
. .
. (4)
:
.
9.9 - 0 •
. .
PrE
25 - 25 + •
“+”
. “-”
.
brn
.
9.9 - 0 •
.
PoS

260
AR
www.magmaweld.com
.
9.9 - 0.0 •
- •
.
.
- •
.
.
.
9.9 - 0.2 •
PoF
SoS
Crt
Pon
-7
-8
. (7) . 3 .
3 .
P3 . .P3
. .
P1 - P2 - P3 •
. (8) .
2 •
4 •
•

261
www.magmaweld.com
AR
. . :2
:PrG
: I
:PoG
•
. •
. •
. •
•
. •
. •
. •
:PrG
: I
:PoG
. : 4
.
•
. •
. •
. •
. •
•
•
. •
. •
. . :
. .
. 9.9 - 0.0 : 9.9 - 0.2 :

262
AR
www.magmaweld.com
2
A
1
B
-
-
-
-
-
.(-10)
/ 0.5 :
.(-10)
5 :
.(+10)
0.5 :
.(+10)
/ 0.5 :
.(10 +)
5 :
.(10 +)
5 :
.(10 +)
0.5 :
.(10 +)
0.5 :
.(-10)
0.5 :
.(-10)
0.5 :
.(-10)
5 :
.(-10)
0.5 :
1
1
2
2
2
1
33
. / ( )
: .

263
www.magmaweld.com
AR
-25 / 0
25 / 0
-25 / 0
25 / 0
Steel, AlMg, FCW, AlSi, FCW-M, CuSi, CrNi, CuAl
CO₂, Ar/5-10 CO₂, Ar/15-25 CO₂, Ar/2.5 C0₂, Ar/10-15 CO₂, Argon
2
MIG / MAG
/ /
25 - 0 - 25
4/2 /
MIG / MAG - MMA
LIFT TIG
2.4 - 0.6
20.0 - 0.6
ArC 34
7 + .0.0 . 3
. +7 . -7 /
. -7
.
MIG 35

264
AR
www.magmaweld.com
36
:6
. •
. .”
. / •
. / •
37
. •
WD 4 .
. . . .
V . • . U V
. •
:5
-
-
-
-
-
-
. •
.
. •
. •
. “0” /
.
:7
(1)
(3)
(3)
(2)
(6)
(4)
(4)
(5)

265
www.magmaweld.com
AR
38
. . •
. •
• .
. •
:8
:9
.
.
.
.
أ
ب
ج
(1)
(3)
(2)
. •
.“1” / •
• .
. /
. •
. •

266
AR
www.magmaweld.com
.
:
. :
. :
. . :
. :
39
. •
10 ( CO Ar) •
1.2 .
. / 12 = 1.2 × 10
. • .
:10

267
www.magmaweld.com
AR
310
\
TIG MMA MIG •
. •
. •
. •
. •
. . •
. MIG / MAG •
.
• .
.
. 3 •
. . •
.
. . .
/
. / •
. •
. •
. •
( WP - OEE ) “() .
. •

268
AR
www.magmaweld.com
. • .
. . • .
3
6
. / . • .
. . •
. / . / •
. TIG . •
. .
. •
. •
. • .
• .
. • .
. • .
. •
. •
. •
. 10 •
41

269
www.magmaweld.com
AR
42
.
•
•
•
•
/ •
•
•
/ •
•
/ •
•
•
•
•
/
0000
•
•
•
•
•
. •
•
•
•
•
•
•
•
•
/ •
•
•
•
•
•
•
•
•
•
(TIG ) •
) • (MMA
•
(MIG TIG ) •

270
AR
www.magmaweld.com
43
E01
E02
E03
E04
E05
E06
•
•
•
•
•
• .
•
- •
. •
•
•
•
• .
.
• .
.
•
•
• •
( )
. •
”
“
”
“
•

271
www.magmaweld.com
AR
1
12
4
15
7
18
10
2
13
5
16
8
19
11
3
14
6
17
9
E202A-4A
E202A-FLT4
E309A-3B
E206A-CNT3P
E121A-2
Rs
E206A-1
E309A-3A
E121A-2
K405000230
K405000313
K405000230
A308900004
A376400016
K405000254
K405000255
A378000103
A377900106
A229900003
K309002213
K405000324
A378000050
K405000262
A421050002
K405000312
A229500001
A256006069
K405000253
A378002002
1
2
3
4
5
6
7
8
9
10
11
12
13
14 15
16 17
18
19
51

272
AR
www.magmaweld.com
1
2
3
4
5
6
7
1
4
7
2
5
8
3
6
A249000005
A240000006
A300190001
A245700003
A250001126
A300101011
A245700002
A260000010

273
www.magmaweld.com
AR
52

274
AR
www.magmaweld.com
53

MAGMA MEKATRONİK MAKİNE SANAYİ VE TİCARET A.Ş.
Organize Sanayi Bölgesi 5. Kısım MANİSA
+90 236 226 27 00 / info@magmaweld.com


277
www.magmaweld.com KULLANIM KILAVUZU
KOMPAKT SMART SERİSİ
TR
1
1.1
1.2
1.3
1.4
1.5
2
2.1
2.2
2.3
2.3.1
2.3.2
2.3.3
2.3.4
3
3.1
3.2
3.3
3.4
3.5
3.6
3.7
3.8
3.9
3.10
4
4.1
4.2
4.3
5
5.1
5.2
5.3
Ürün Etiketi
Teknik Özellikler
Aksesuarlar
Tel Sürme Ünitesindeki Ayarlar
Uzaktan Kontrol
Gaz Debisini Ayarlama
Makine Özellikleri
Hata Giderme
EKLER
Yedek Parça Listeleri
Blok Diyagram
278
284
284
286
288
288
289
289
290
290
290
290
291
292
294
299
300
300
301
301
302
303
304
305
306
307
308
310
311

278
www.magmaweld.comKULLANIM KILAVUZU
TR
KOMPAKT SMART SERİSİ
Güvenlik Bilgilerinin
okuyunuz.
ömrüne olumsuz etki eder.
Güvenlik Sembollerinin
Yaralanma ya da hasara neden olabilecek potansiyel tehlikeli bir durumu belirtir.
meydana gelebilir.
Öldürebilir

279
www.magmaweld.com KULLANIM KILAVUZU
KOMPAKT SMART SERİSİ
TR
Durumunda
Gerekenler
• Hareket halinde olan nesnelerden uzak durun.
Yaralanmalara
için izole edin.
• DC manuel Örtülü elektrod kaynak makinesi,

280
www.magmaweld.comKULLANIM KILAVUZU
TR
KOMPAKT SMART SERİSİ
Yaralayabilir
bekleyin.
Neden Olabilir
• Gözlerinizi ve yüzünüzü korumak için standarda uygun koruyucu maske ile ona uygun cam
Zarar Verebilir
Gürültü, Duyma
Zarar Verebilir
yüzünüzü koruyun.
Kaynak Teli
Yaralanmalara
patlamalar olabilir.
Patlamalara
Neden Olabilir

281
www.magmaweld.com KULLANIM KILAVUZU
KOMPAKT SMART SERİSİ
TR
emin olunuz.
Kaynak / Kesme
Gerekli Önlemlerin
Neden Olabilir
edin. Gaz tüplerinin devrilmemesi için tüpe uygun gaz platformu bulunan makinelerde
Yaralanmalara Sebep
Olabilir
Neden Olur
Elektromanyetik
Neden Olabilir

282
www.magmaweld.comKULLANIM KILAVUZU
TR
KOMPAKT SMART SERİSİ
a)
b)
c)
d)
e)
f)
g)
h)
Elektromanyetik
Elektronmanyetik Alan
(EMF)

283
www.magmaweld.com KULLANIM KILAVUZU
KOMPAKT SMART SERİSİ
TR
engel olun.
Koruma
GARANTİ FORMU
Garanti Formu için www.magmaweld.com.tr/garanti-formu/wr web sitemizi ziyaret ediniz.

284
www.magmaweld.comKULLANIM KILAVUZU
TR
KOMPAKT SMART SERİSİ
Ön ve Arka Görünüm
1- Dijital Ekran
2- Ayar Potu
3- Data Soketi
4-
5-
6- Dijital Ekran
7- Ayar Potu
8-
9-
10-
11-
12- Fan
13- Su Ünitesi Enerji Soketi
14-
15-
16- Tekerlek
10
14
16
15
11
12
13
1 6
7
8
9
2
3
4
5
Teknik Bilgiler

285
www.magmaweld.com KULLANIM KILAVUZU
KOMPAKT SMART SERİSİ
TR
1- Dijital Ekran
2- Ayar Potu
3- Data Soketi
4-
5-
6- Dijital Ekran
7- Ayar Potu
8-
9-
10- Su Ünitesi Ledi
11-
12-
13-
14-
15- Fan
16- Su Ünitesi Enerji Soketi
17-
18-
19- Tekerlek
Ön ve Arka Görünüm
1 6
7
8
9
10
11
12
2
3
4
5
13
19
17
14
15
16
18
Teknik Bilgiler

286
www.magmaweld.comKULLANIM KILAVUZU
TR
KOMPAKT SMART SERİSİ
1.3 Ürün Etiketi
Teknik Bilgiler

287
www.magmaweld.com KULLANIM KILAVUZU
KOMPAKT SMART SERİSİ
TR
6 dak. 6 dak.6 dak.4 dak. 4 dak. 4 dak. Zaman (dak.)
X
U
I
U
IP21
Anma Kaynak GerilimiU
S
I
CC / CV
Teknik Bilgiler

288
www.magmaweld.comKULLANIM KILAVUZU
TR
KOMPAKT SMART SERİSİ
Boyutlar (UxGxY)
V
VDC
kVA
ADC
ADC
kg
mm
MK
MK
MKW
MKW
400
82
IP21S
14,7
300
1078 x 528 x 962
86
1180 x 528 x 1137
110
Boyutlar (UxGxY)
kg
mm
MK
MK
MKW
MKW
1078 x 528 x 962
86
1180 x 528 x 1137
110
ID 300 MK/MKW PULSE SMART
IP21S
V
VDC
kVA
ADC
ADC
400
82
22,1
400
ID 400 MK/MKW PULSE SMART
1.5 Aksesuarlar
STANDART AKSESUARLAR ADET
1Topraklama Pensesi ve Kablosu 7905203505
7905305005
ID 300 MK/MKW
PULSE SMART
ID 400 MK/MKW
PULSE SMART
ADET
1
1
1
1
1
1
1
Gaz Hortumu
CO
Gaz Regülatörü (Mix)
Gaz Regülatörü (CO)
7907000002
7020009003
7020001004
7020001005
7120050003
ID 300 - 400 MK/MKW PULSE SMART
Teknik Bilgiler

289
www.magmaweld.com KULLANIM KILAVUZU
KOMPAKT SMART SERİSİ
TR
• Tüp hortumu • Garanti belgesi
meli, etiketleri sökülmemelidir.
zorunluysa, kaynak bölgesini ve kaynak makinesini perde ve tenteyle koruyun.
prizine CO
Kurulum Bilgileri

290
www.magmaweld.comKULLANIM KILAVUZU
TR
KOMPAKT SMART SERİSİ
1- 6- Gaz Regülatörü
2- Gaz Tüpü 7- Manometre
3- CO 8- Debimetre
4- Zincir 9-
5- CO10- Tüp Hortumu
1
2
5
4
3
6
7 8
9
10
Kurulum Bilgileri

291
www.magmaweld.com KULLANIM KILAVUZU
KOMPAKT SMART SERİSİ
TR
problemlere neden olabilir.
Kurulum Bilgileri

292
www.magmaweld.comKULLANIM KILAVUZU
TR
KOMPAKT SMART SERİSİ
3.1 Tel Sürme Ünitesindeki Ayarlar
1 2
3 4 5 6
kullanabilirsiniz.
1-) SERBEST TEL
2-) SERBEST GAZ
• MIG/MAG
• Pulse MIG/MAG
Pulse kaynak yöntemi sadece Pulse içeren modellerde bulunur. Pulse olmayan modellerde bu
-
• MMA
• Lift TIG

293
www.magmaweld.com KULLANIM KILAVUZU
KOMPAKT SMART SERİSİ
TR
• Steel • AlMg
• FCW • AlSi
• CrNi • CuAl
• CO² ²
² • Ar/2.5 C0²
² • Argon

294
www.magmaweld.comKULLANIM KILAVUZU
TR
KOMPAKT SMART SERİSİ
1
3
7
8
6
2
4455
Yükte
Sinerjik Mod
Klasik Mod
Yükte
Sinerjik Mod Kaynak set volt
Kaynak set volt
Kaynak set volt
Klasik Mod
rini gösterir. Tüm parametreler dijital ekran üzerinden görülmektedir.

295
www.magmaweld.com KULLANIM KILAVUZU
KOMPAKT SMART SERİSİ
TR
kendiniz ayarlayabilirsiniz.
AKILLI MOD
tipi gibi kaynak parametrelerinin
otomatik olarak ayarlar. Belirli
ayarlayabilirsiniz.
çilmesi gerekmektedir. Seçilen
kaynak parametrelerine göre
-
da kendiniz ayarlayabilirsiniz.
AKILLI MOD
tipi gibi kaynak parametrelerinin
gerekmektedir. Seçilen kaynak
makine otomatik olarak ayarlar.
seçilmesi gerekmektedir. Seçilen
kaynak parametrelerine göre
• Klasik Mod
• Sinerjik Mod

296
www.magmaweld.comKULLANIM KILAVUZU
TR
KOMPAKT SMART SERİSİ
4-) AYAR POTU
Pot (4)
• Butona (6)
Ön gaz (PrE) fonksiyonu seçili olsun; (5)(4) pota bir
(PoS)(4)
(PoS)
5-) AYAR POTU
Pot (5)
(4)
(5)
(5)
• Buton (6)
Butona (6)
Pot (5)
fonksiyona geçmek gerekir. Kaydetmek için pota (4)
Ön Gaz
PrE
Geri Yanma
brn
Son Gaz
PoS

297
www.magmaweld.com KULLANIM KILAVUZU
KOMPAKT SMART SERİSİ
TR
PoF
Soft Start
SoS
Krater
Crt
Kaynak Süresi
Pon
(7)

298
www.magmaweld.comKULLANIM KILAVUZU
TR
KOMPAKT SMART SERİSİ
(8)
• 2 Tetik
• 4 Tetik
• Metod
PrG : Ön Gaz Süresi
I
PoG : Son Gaz Süresi
PrG : Ön Gaz Süresi
I
PoG : Son Gaz Süresi
METOD :
-

299
www.magmaweld.com KULLANIM KILAVUZU
KOMPAKT SMART SERİSİ
TR
2
A
1
B
TORÇ KUMANDA - YEŞİL
TORÇ KUMANDA - BEYAZ
TORÇ KUMANDA - KIRMIZI
TORÇ KUMANDA - SİYAH
TORÇ KUMANDA - KAHVE
Uzaktan Kumandalı Torç Soketi
Önden Görünümü
1
1
0.5 m/dk
5 A
5 A
0.5 m/dk
5 A
5 A
0.5 V
0.5 V
0.5 V
0.5 V
0.5 V
0.5 V
2
2
2
A
A
A
B
B
B
1
Klasik Mod
Sinerjik Mod
Mod Görevi

300
www.magmaweld.comKULLANIM KILAVUZU
TR
KOMPAKT SMART SERİSİ
Set Volt
Set Tel
Set Tel
Voltaj 0 - 25
Voltaj 0 - 25
Tel 0 - 25
Tel 0 - 25
Krater Açık
Ön Gaz
Ön Gaz
Yavaş kalkış
Açık
Yavaş kalkış
Kapalı
Krater Kapalı
Set Volt
Krater Açık
Ön Gaz
Ön Gaz
Krater Kapalı
Yavaş kalkış
Açık
Yavaş kalkış
Kapalı
Krater
Krater
Geri Yanma
Geri Yanma
Geri Yanma
Geri Yanma
Son Gaz
Son Gaz
Son Gaz
Son Gaz
Son Gaz
Ön Gaz
Spot
Punta
Açık Punta
Kapalı
Değer Aralığı Fabrika Ayarı 2- Konumu MIG
Ön Gaz 0,0 - 9,9 sn 0,1 sn
0,0 - 9,9 sn 0,0 sn
25 - 0 - 25 0 step
Kalınlık
Gaz Tipi
Tel Tipi
0,6 - 20,0 mm 1,0 mm
Son Gaz
Geri Yanma
Kaynak Süresi
Boşluk Süresi
0,0 - 9,9 sn 0,1 sn
Tel Çapı 0,6 - 2,4 mm 1,0 mm
0,2 - 9,9 sn 0,2 sn
Steel, AlMg, FCW, AlSi, FCW-M, CuSi, CrNi, CuAl
4- Konumu MIG
CO₂, Ar/5-10 CO₂, Ar/15-25 CO₂, Ar/2.5 C0₂, Ar/10-15 CO₂, Argon
Metod / 2 / 4 2
Krater
Tetik
Yöntem MIG / MAG - MMA
LIFT TIG
MIG / MAG
Mod Sinerjik / Akıllı / Klasik
Aktif / Pasif Pasif

301
www.magmaweld.com KULLANIM KILAVUZU
KOMPAKT SMART SERİSİ
TR
•
üst makara
1- Motor
2- Euro Konnektör
3-
4-
5-
6-
a
b
d
e
f
d
cc

302
www.magmaweld.comKULLANIM KILAVUZU
TR
KOMPAKT SMART SERİSİ
-
-
makaralar üzerinden de torcun içine sürün.
yan keskiyle kesin.
zarar verebilir.
(1)
(3)
(3)
(2)
(6)
(4)
(4)
(5)
a
b
c
(3)
(1)
(2)

303
www.magmaweld.com KULLANIM KILAVUZU
KOMPAKT SMART SERİSİ
TR
TAHTA
kullanabilirsiniz.
A:
B:
C:
D:
E:
8 lt/dak.
Alaşımsız
Çelik ve Metal
Özlü Tel
Tel Çapı (mm)
0.8
0.9
1.0
1.2
Özlü Tel Paslanmaz
Çelik Alüminyum
7 lt/dak. 8 lt/dak. 8 lt/dak.
9 lt/dak. 8 lt/dak. 9 lt/dak. 9 lt/dak.
10 lt/dak. 9 lt/dak. 10 lt/dak. 10 lt/dak.
12 lt/dak. 11 lt/dak. 12 lt/dak. 12 lt/dak.

304
www.magmaweld.comKULLANIM KILAVUZU
TR
KOMPAKT SMART SERİSİ
Smart Performance
Voltaj Koruma
Smart Fan
Faz Koruma
Soft Start
Magnet ile Uyumluluk
Robot ile Uyumluluk

305
www.magmaweld.com KULLANIM KILAVUZU
KOMPAKT SMART SERİSİ
TR
3 Ayda Bir
6 Ayda Bir
veya

306
www.magmaweld.comKULLANIM KILAVUZU
TR
KOMPAKT SMART SERİSİ
4.2 Hata Giderme
• Makinenin topraklama pensesinin
olunuz
• Parametre ve proses seçiminin
emin olunuz
emin olunuz
çok az
• Kaynak parametreleri uygun
• Kaynak parametreleri uygun
• Tel tipi, gaz tipi vb. gibi tüm
parametreler kaynak yönteminize
uygun olarak seçilmelidir
Ekranda 0000 / NOP
• Koruyucu gaz çok fazla veya
çok az geliyor
ediniz
fakat tel ilerlemiyor
Neden Çözüm

307
www.magmaweld.com KULLANIM KILAVUZU
KOMPAKT SMART SERİSİ
TR
E01
E02
E03
E04
E05
E06
Hata Kodu Hata Neden Çözüm
kontrol ediniz.
servis ile irtibata geçiniz
sorun olabilir
sorun olabilir
olabilir
• Bir süre bekleyerek makinenin
Termal
Koruma
Yüksek

308
www.magmaweld.comKULLANIM KILAVUZU
TR
KOMPAKT SMART SERİSİ
EKLER
TANIM
NO
1
12
4
15
7
18
10
2
13
5
16
8
19
11
3
14
6
17
9
MALZEME KODU
Konnektör
Plastik Rakor
Tel Sürme Sistemi
Kaynak Prizi
Güç Konnektörü
Elektronik Kart Rs Filtre
Gaz Ventil Rakoru
Konnektör
K405000230
K405000313
K405000230
A308900004
A376400016
K405000254
K405000255
A378000103
A377900106
A229900003
K309002213
K405000324
A378000050
K405000262
A421050002
K405000312
A229500001
A256006069
K405000253
A378002002
1
2
3
4
5
6
7
8
9
10
11
12
13
14 15
16 17
18
19
Ekler

309
www.magmaweld.com KULLANIM KILAVUZU
KOMPAKT SMART SERİSİ
TR
1
2
3
4
5
6
7
MALZEME KODU
NO
Su Deposu
Fan
Radyatör
1
4
7
2
5
8
3
6
A249000005
A240000006
A300190001
A245700003
A250001126
A300101011
A245700002
A260000010
TANIM
Ekler

310
www.magmaweld.comKULLANIM KILAVUZU
TR
KOMPAKT SMART SERİSİ
R
S
T
Giriş Filtresi Giriş Doğrultucu Kapasitörler IGBT Modül
Hall Effect
Kontrol Ünitesi
Yüksek Frekans Trafosu Çıkış Doğrultucu
Kontrol
Hattı
Çıkış Şok Bobini
Gaz
Tel Sürme Ünitesi
Şönt
Çıkış Filtresi
İş Parçası
Kaynak Torcu
Kaynak Torç
Kontrol Hattı
Solenoid Valf
Membran Paneli
Ön Panel
Kumanda Trafosu
5.2 Blok Diyagram
Ekler

311
www.magmaweld.com KULLANIM KILAVUZU
KOMPAKT SMART SERİSİ
TR
CAM SİGORTA HIZLI
Ekler


Modeli
Seri Numarası
Ünvanı
Adresi
Telefonu / E-Postası
Fatura Tarihi ve No.
Ünvanı MAGMA MEKATRONİK MAKİNE SANAYİ VE TİCARET A.Ş.
Adresi
Ünvanı
Adresi
Telefonu / E - Postası
Telefonu / E - Postası
Teslim Alanın Adı Soyadı
Organize Sanayi Bölgesi 5. Kısım MANİSA
+90 236 226 27 00 / info@magmaweld.com
Ünvanı
Teknisyenin Adı Soyadı
Devreye Alma Tarihi
(Garanti Başlama Tarihi)
GARANTİ BELGESİ
Garanti Şartları için www.magmaweld.com.tr/garanti-sartlari/wt web sitemizi
ziyaret ediniz.
MALIN
İMALATÇI / İTHALATÇI FİRMANIN
SATICI FİRMANIN
ALICININ
KURULUMU YAPAN SERVİSİN


08.09.2020
www.magmaweld.com
DECLARATION OF CONFORMITY
UYGUNLUK DEKLARASYONU
Company / Firma
Factory / Fabrika
The Product / Ürün
Date of assessment / Değerlendirme Tarihi
European Standard / Avrupa Standartı
Magma Mekatronk Makne Sanay ve Tcaret A.Ş.
Organze Sanay Bölges 5. Kısım Yalçın Özaras Caddes No:1 45030 Mansa / TÜRKİYE
Magma Mekatronk Makne Sanay ve Tcaret A.Ş.
Organze Sanay Bölges 5. Kısım Yalçın Özaras Caddes No:1 45030 Mansa / TÜRKİYE
Approprate for professonal and ndustral usage.
ID 300MK Pulse SMART 300Amp (%40) MIG/MAG Weldng Machne
Profesyonel ve endüstryel kullanıma uygun
ID 300MK Pulse SMART 300Amp (%40) MIG/MAG Kaynak Maknes
EMC Drectve 2014/30/EU - LVD Drectve 2014/35/EU
Meet the requirements of the European Directive
/
Gereklilikler Karşılanan Avrupa Direktifleri
Magma Mekatronk Makne Industry and Trade Co. We declare that the above mentoned
products comply wth the standard. Ths declaraton wll loose ts valdty n case of
modficaton on the weldng machne wthout our wrtten authorzaton.
Magma Mekatronk Makne Sanay ve Tcaret A.Ş. olarak yukarıda geçen ürünün standartlara
uygun olduğunu beyan ederz. Yazılı znmz olmaksızın makne üzernde yapılan değşklkler
bu belgey geçersz kılacaktır.
Date of issue / Yayın Tarihi
Manisa - 12.10.2021
Barış Özgür TUĞGAN
MAGMA MEKATRONİK MAKİNE SANAYİ VE TİCARET A.Ş.
Ar-Ge Müdürü / R&D Manager
EN IEC 60974-1:2018 , EN 60974-10:2014

08.09.2020
www.magmaweld.com
DECLARATION OF CONFORMITY
UYGUNLUK DEKLARASYONU
Company / Firma
Factory / Fabrika
The Product / Ürün
Date of assessment / Değerlendirme Tarihi
European Standard / Avrupa Standartı
Magma Mekatronk Makne Sanay ve Tcaret A.Ş.
Organze Sanay Bölges 5. Kısım Yalçın Özaras Caddes No:1 45030 Mansa / TÜRKİYE
Magma Mekatronk Makne Sanay ve Tcaret A.Ş.
Organze Sanay Bölges 5. Kısım Yalçın Özaras Caddes No:1 45030 Mansa / TÜRKİYE
Approprate for professonal and ndustral usage.
ID 300MKW Pulse SMART 300Amp (%40) MIG/MAG Weldng Machne
Profesyonel ve endüstryel kullanıma uygun
ID 300MKW Pulse SMART 300Amp (%40) MIG/MAG Kaynak Maknes
EMC Drectve 2014/30/EU - LVD Drectve 2014/35/EU
Meet the requirements of the European Directive
/
Gereklilikler Karşılanan Avrupa Direktifleri
Magma Mekatronk Makne Industry and Trade Co. We declare that the above mentoned
products comply wth the standard. Ths declaraton wll loose ts valdty n case of
modficaton on the weldng machne wthout our wrtten authorzaton.
Magma Mekatronk Makne Sanay ve Tcaret A.Ş. olarak yukarıda geçen ürünün standartlara
uygun olduğunu beyan ederz. Yazılı znmz olmaksızın makne üzernde yapılan değşklkler
bu belgey geçersz kılacaktır.
Date of issue / Yayın Tarihi
Manisa - 12.10.2021
Barış Özgür TUĞGAN
MAGMA MEKATRONİK MAKİNE SANAYİ VE TİCARET A.Ş.
Ar-Ge Müdürü / R&D Manager
EN IEC 60974-1:2018 , EN 60974-10:2014

08.09.2020
www.magmaweld.com
DECLARATION OF CONFORMITY
UYGUNLUK DEKLARASYONU
Company / Firma
Factory / Fabrika
The Product / Ürün
Date of assessment / Değerlendirme Tarihi
European Standard / Avrupa Standartı
Magma Mekatronk Makne Sanay ve Tcaret A.Ş.
Organze Sanay Bölges 5. Kısım Yalçın Özaras Caddes No:1 45030 Mansa / TÜRKİYE
Magma Mekatronk Makne Sanay ve Tcaret A.Ş.
Organze Sanay Bölges 5. Kısım Yalçın Özaras Caddes No:1 45030 Mansa / TÜRKİYE
Approprate for professonal and ndustral usage.
ID 400MK Pulse SMART 400Amp (%40) MIG/MAG Weldng Machne
Profesyonel ve endüstryel kullanıma uygun
ID 400MK Pulse SMART 400Amp (%40) MIG/MAG Kaynak Maknes
EMC Drectve 2014/30/EU - LVD Drectve 2014/35/EU
Meet the requirements of the European Directive
/
Gereklilikler Karşılanan Avrupa Direktifleri
Magma Mekatronk Makne Industry and Trade Co. We declare that the above mentoned
products comply wth the standard. Ths declaraton wll loose ts valdty n case of
modficaton on the weldng machne wthout our wrtten authorzaton.
Magma Mekatronk Makne Sanay ve Tcaret A.Ş. olarak yukarıda geçen ürünün standartlara
uygun olduğunu beyan ederz. Yazılı znmz olmaksızın makne üzernde yapılan değşklkler
bu belgey geçersz kılacaktır.
Date of issue / Yayın Tarihi
Manisa - 12.10.2021
Barış Özgür TUĞGAN
MAGMA MEKATRONİK MAKİNE SANAYİ VE TİCARET A.Ş.
Ar-Ge Müdürü / R&D Manager
EN IEC 60974-1:2018 , EN 60974-10:2014

08.09.2020
www.magmaweld.com
DECLARATION OF CONFORMITY
UYGUNLUK DEKLARASYONU
Company / Firma
Factory / Fabrika
The Product / Ürün
Date of assessment / Değerlendirme Tarihi
European Standard / Avrupa Standartı
Magma Mekatronk Makne Sanay ve Tcaret A.Ş.
Organze Sanay Bölges 5. Kısım Yalçın Özaras Caddes No:1 45030 Mansa / TÜRKİYE
Magma Mekatronk Makne Sanay ve Tcaret A.Ş.
Organze Sanay Bölges 5. Kısım Yalçın Özaras Caddes No:1 45030 Mansa / TÜRKİYE
Approprate for professonal and ndustral usage.
ID 400MKW Pulse SMART 400Amp (%40) MIG/MAG Weldng Machne
Profesyonel ve endüstryel kullanıma uygun
ID 400MKW Pulse SMART 400Amp (%40) MIG/MAG Kaynak Maknes
EMC Drectve 2014/30/EU - LVD Drectve 2014/35/EU
Meet the requirements of the European Directive
/
Gereklilikler Karşılanan Avrupa Direktifleri
Magma Mekatronk Makne Industry and Trade Co. We declare that the above mentoned
products comply wth the standard. Ths declaraton wll loose ts valdty n case of
modficaton on the weldng machne wthout our wrtten authorzaton.
Magma Mekatronk Makne Sanay ve Tcaret A.Ş. olarak yukarıda geçen ürünün standartlara
uygun olduğunu beyan ederz. Yazılı znmz olmaksızın makne üzernde yapılan değşklkler
bu belgey geçersz kılacaktır.
Date of issue / Yayın Tarihi
Manisa - 12.10.2021
Barış Özgür TUĞGAN
MAGMA MEKATRONİK MAKİNE SANAYİ VE TİCARET A.Ş.
Ar-Ge Müdürü / R&D Manager
EN IEC 60974-1:2018 , EN 60974-10:2014


YETKİLİ SERVİSLER
Güncel servis listemiz için www.magmaweld.com.tr/servis-listesi
web sitemizi ziyaret ediniz.
Organize Sanayi Bölgesi, 5. Kısım 45030 MANİSA
Telefon : 444 93 53
E-Posta : [email protected]
MERKEZ SERVİS
YETKİLİ SERVİSLER

YETKİLİ SERVİSLER
Güncel servis listemiz için www.magmaweld.com.tr/servis-listesi
web sitemizi ziyaret ediniz.
Organize Sanayi Bölgesi, 5. Kısım 45030 MANİSA
Telefon : 444 93 53
E-Posta : [email protected]
MERKEZ SERVİS
YETKİLİ SERVİSLER

(+90) 444 93 53
magmaweld.com
info@magmaweld.com
T: (236) 226 27 00
F: (236) 226 27 28
01.05.2023
UM_IDMKWPS300400_032022_052023_002_324
-
 1
1
-
 2
2
-
 3
3
-
 4
4
-
 5
5
-
 6
6
-
 7
7
-
 8
8
-
 9
9
-
 10
10
-
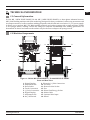 11
11
-
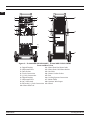 12
12
-
 13
13
-
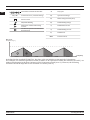 14
14
-
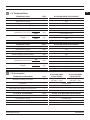 15
15
-
 16
16
-
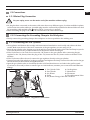 17
17
-
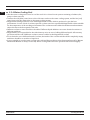 18
18
-
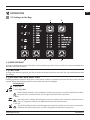 19
19
-
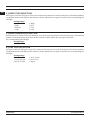 20
20
-
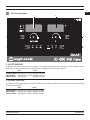 21
21
-
 22
22
-
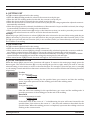 23
23
-
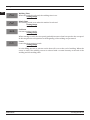 24
24
-
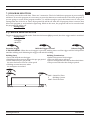 25
25
-
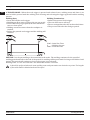 26
26
-
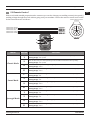 27
27
-
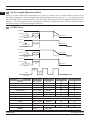 28
28
-
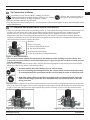 29
29
-
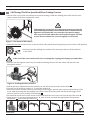 30
30
-
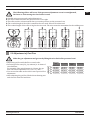 31
31
-
 32
32
-
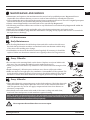 33
33
-
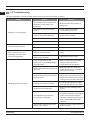 34
34
-
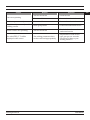 35
35
-
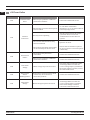 36
36
-
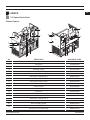 37
37
-
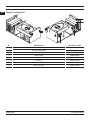 38
38
-
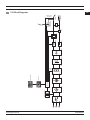 39
39
-
 40
40
-
 41
41
-
 42
42
-
 43
43
-
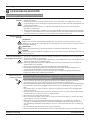 44
44
-
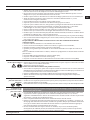 45
45
-
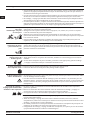 46
46
-
 47
47
-
 48
48
-
 49
49
-
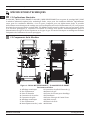 50
50
-
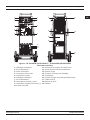 51
51
-
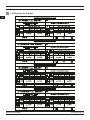 52
52
-
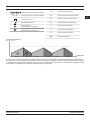 53
53
-
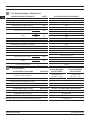 54
54
-
 55
55
-
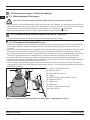 56
56
-
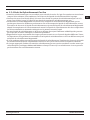 57
57
-
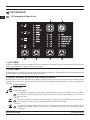 58
58
-
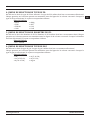 59
59
-
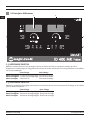 60
60
-
 61
61
-
 62
62
-
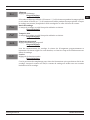 63
63
-
 64
64
-
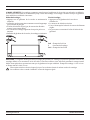 65
65
-
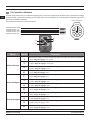 66
66
-
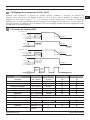 67
67
-
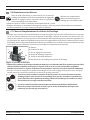 68
68
-
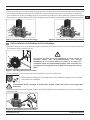 69
69
-
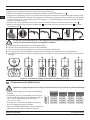 70
70
-
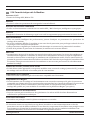 71
71
-
 72
72
-
 73
73
-
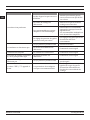 74
74
-
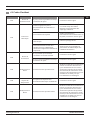 75
75
-
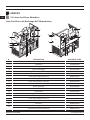 76
76
-
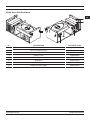 77
77
-
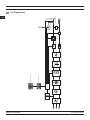 78
78
-
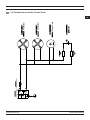 79
79
-
 80
80
-
 81
81
-
 82
82
-
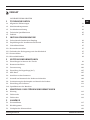 83
83
-
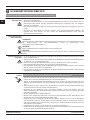 84
84
-
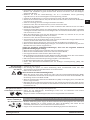 85
85
-
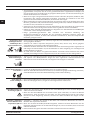 86
86
-
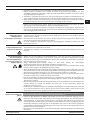 87
87
-
 88
88
-
 89
89
-
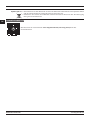 90
90
-
 91
91
-
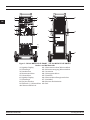 92
92
-
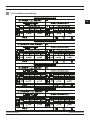 93
93
-
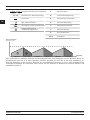 94
94
-
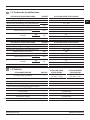 95
95
-
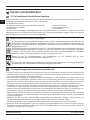 96
96
-
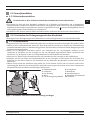 97
97
-
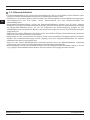 98
98
-
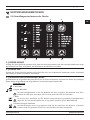 99
99
-
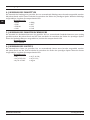 100
100
-
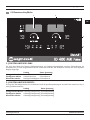 101
101
-
 102
102
-
 103
103
-
 104
104
-
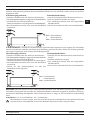 105
105
-
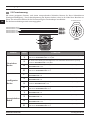 106
106
-
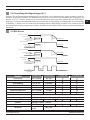 107
107
-
 108
108
-
 109
109
-
 110
110
-
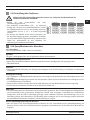 111
111
-
 112
112
-
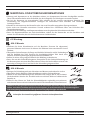 113
113
-
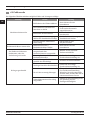 114
114
-
 115
115
-
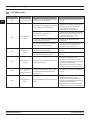 116
116
-
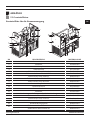 117
117
-
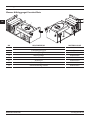 118
118
-
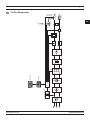 119
119
-
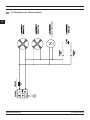 120
120
-
 121
121
-
 122
122
-
 123
123
-
 124
124
-
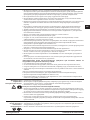 125
125
-
 126
126
-
 127
127
-
 128
128
-
 129
129
-
 130
130
-
 131
131
-
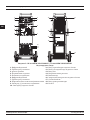 132
132
-
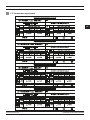 133
133
-
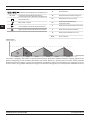 134
134
-
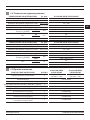 135
135
-
 136
136
-
 137
137
-
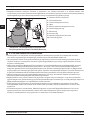 138
138
-
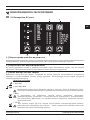 139
139
-
 140
140
-
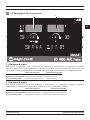 141
141
-
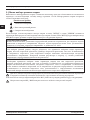 142
142
-
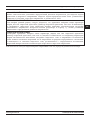 143
143
-
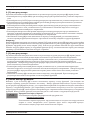 144
144
-
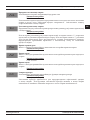 145
145
-
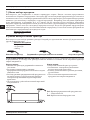 146
146
-
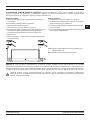 147
147
-
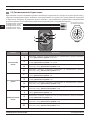 148
148
-
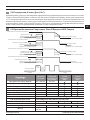 149
149
-
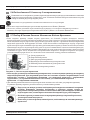 150
150
-
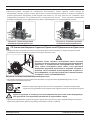 151
151
-
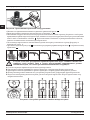 152
152
-
 153
153
-
 154
154
-
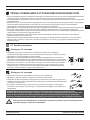 155
155
-
 156
156
-
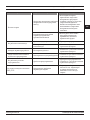 157
157
-
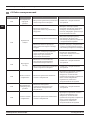 158
158
-
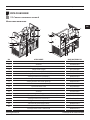 159
159
-
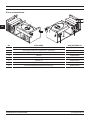 160
160
-
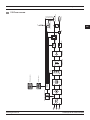 161
161
-
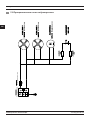 162
162
-
 163
163
-
 164
164
-
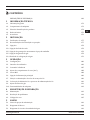 165
165
-
 166
166
-
 167
167
-
 168
168
-
 169
169
-
 170
170
-
 171
171
-
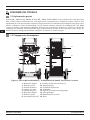 172
172
-
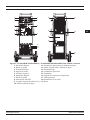 173
173
-
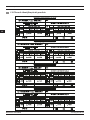 174
174
-
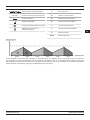 175
175
-
 176
176
-
 177
177
-
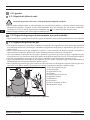 178
178
-
 179
179
-
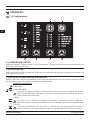 180
180
-
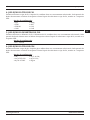 181
181
-
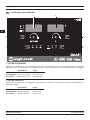 182
182
-
 183
183
-
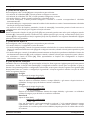 184
184
-
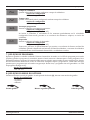 185
185
-
 186
186
-
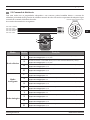 187
187
-
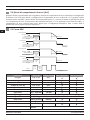 188
188
-
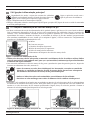 189
189
-
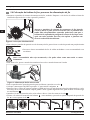 190
190
-
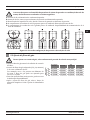 191
191
-
 192
192
-
 193
193
-
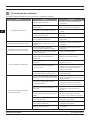 194
194
-
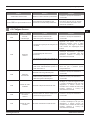 195
195
-
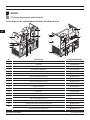 196
196
-
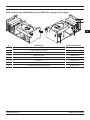 197
197
-
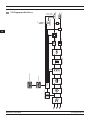 198
198
-
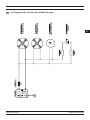 199
199
-
 200
200
-
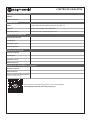 201
201
-
 202
202
-
 203
203
-
 204
204
-
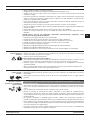 205
205
-
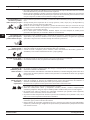 206
206
-
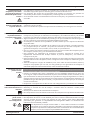 207
207
-
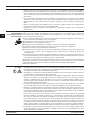 208
208
-
 209
209
-
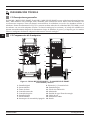 210
210
-
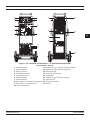 211
211
-
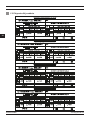 212
212
-
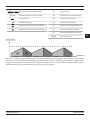 213
213
-
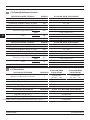 214
214
-
 215
215
-
 216
216
-
 217
217
-
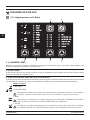 218
218
-
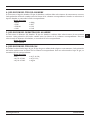 219
219
-
 220
220
-
 221
221
-
 222
222
-
 223
223
-
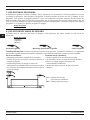 224
224
-
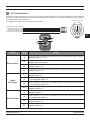 225
225
-
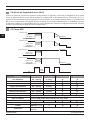 226
226
-
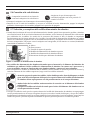 227
227
-
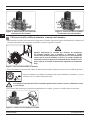 228
228
-
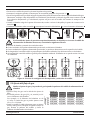 229
229
-
 230
230
-
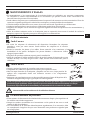 231
231
-
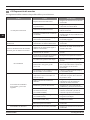 232
232
-
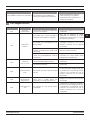 233
233
-
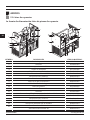 234
234
-
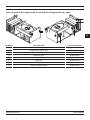 235
235
-
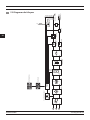 236
236
-
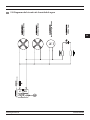 237
237
-
 238
238
-
 239
239
-
 240
240
-
 241
241
-
 242
242
-
 243
243
-
 244
244
-
 245
245
-
 246
246
-
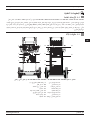 247
247
-
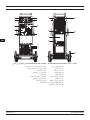 248
248
-
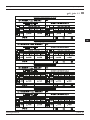 249
249
-
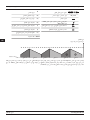 250
250
-
 251
251
-
 252
252
-
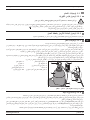 253
253
-
 254
254
-
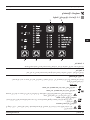 255
255
-
 256
256
-
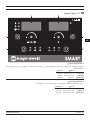 257
257
-
 258
258
-
 259
259
-
 260
260
-
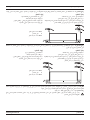 261
261
-
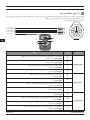 262
262
-
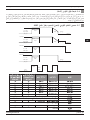 263
263
-
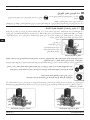 264
264
-
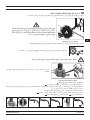 265
265
-
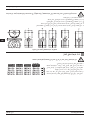 266
266
-
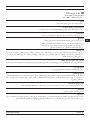 267
267
-
 268
268
-
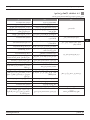 269
269
-
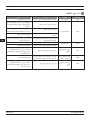 270
270
-
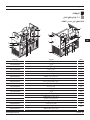 271
271
-
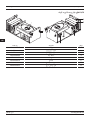 272
272
-
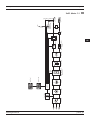 273
273
-
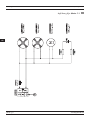 274
274
-
 275
275
-
 276
276
-
 277
277
-
 278
278
-
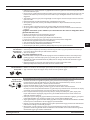 279
279
-
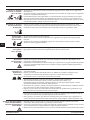 280
280
-
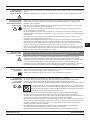 281
281
-
 282
282
-
 283
283
-
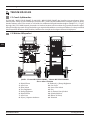 284
284
-
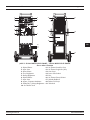 285
285
-
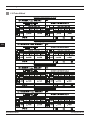 286
286
-
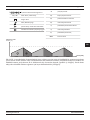 287
287
-
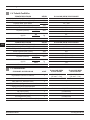 288
288
-
 289
289
-
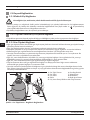 290
290
-
 291
291
-
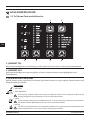 292
292
-
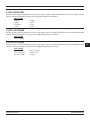 293
293
-
 294
294
-
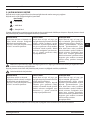 295
295
-
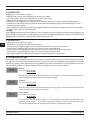 296
296
-
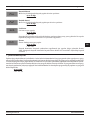 297
297
-
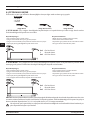 298
298
-
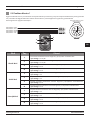 299
299
-
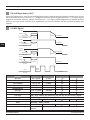 300
300
-
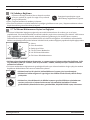 301
301
-
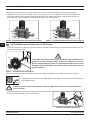 302
302
-
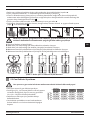 303
303
-
 304
304
-
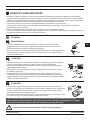 305
305
-
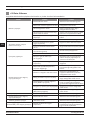 306
306
-
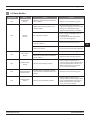 307
307
-
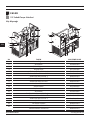 308
308
-
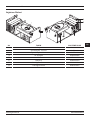 309
309
-
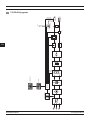 310
310
-
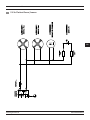 311
311
-
 312
312
-
 313
313
-
 314
314
-
 315
315
-
 316
316
-
 317
317
-
 318
318
-
 319
319
-
 320
320
-
 321
321
-
 322
322
-
 323
323
-
 324
324


Magmaweld ID 300 MK Compact Smart Series Mag Welding Machine Manual de usuario
- Categoría
- Sistema de soldadura
- Tipo
- Manual de usuario
en otros idiomas
Artículos relacionados
-
 Magmaweld ID 300 M PULSE SMART El manual del propietario
-
Magmaweld 523450W210 Compact Expert Series Manual de usuario
-
 Magmaweld ID 65 PX Plasma Cutting Mechanized El manual del propietario
-
 Magmaweld ID 350 MW ECO El manual del propietario
-
 Magmaweld ID 400 MK PULSE EXPERT El manual del propietario
-
 Magmaweld ID 400 MW PULSE EXPERT El manual del propietario
-
 Magmaweld MONOCUT 45i Plasma Cutting Mechanized El manual del propietario
-
 Magmaweld MONOCUT 45i Plasma Cutting Handheld El manual del propietario
-
 Magmaweld MONOCUT 45i Plasma Cutting Handheld El manual del propietario


Otros documentos
-
 Prest-O-Lite 200 MIG Manual de usuario
-
ESAB AristoPower 460 DC Welding Power Sources Manual de usuario
-
-
Lincoln Electric Handy MIG Manual de usuario
-
-
Lincoln Electric WIre Feed 180 11556 Manual de usuario
-
-
-
ESAB EMP 235ic Manual de usuario
-
 Herschel T-MKW Instrucciones de operación

