Kichler Lighting 9557AZ Manual de usuario
- Tipo
- Manual de usuario

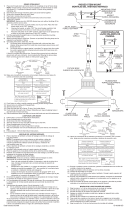
1) TURN OFF POWER.
IMPORTANT: Before you start, NEVER attempt any work without
shutting off the electricity until the work is done.
a) Go to the main fuse, or circuit breaker, box in your home. Place the
main power switch in the “OFF” position.
b) Unscrew the fuse(s), or switch “OFF” the circuit breaker switch(s),
thatcontrolthepowertothextureorroomthatyouareworkingon.
c) Placethewallswitchinthe“OFF”position.Ifthexturetobe
replaced has a switch or pull chain, place those in the “OFF”
position.
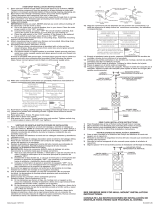
2) Assemble mounting screws into threaded holes in mounting strap.
3) Attach mounting strap to outlet box. (Screws not provided).
4) Grounding instructions: (See Illus. A or B).
A) Onxtureswheremountingstrapisprovidedwithaholeandtwo
raised dimples. Wrap ground wire from outlet box around green
ground screw, and thread into hole.
B) Onxtureswhereacupped
washer is provided. Attach ground wire from outlet box under cupped
washer and green ground screw, and thread into mounting strap.
Ifxtureisprovidedwithgroundwire.Connectxturegroundwiretooutlet
box ground wire with wire connector. (Not provided.) After following the
above steps. Never connect ground wire to black or white power supply
wires.
5) Make wire connections (connectors not provided.) Reference chart below
for correct connections and wire accordingly.
6) Pushxturetoceiling,carefullypassingmountingscrewsthroughholes.
7) Securexturetoceilingwithknurlknobs.
8) Insert recommended bulbs.
9) Raiseglassupthroughxturepassingholeinglassoversocket.
10) Threadthumbscrewsthroughholesintopofxturebody.Tightenthumbscrews
tosecureglassinxture.(DONOTovertighten.)
IMPORTANT: For xture 9557PSS316: Proper maintenance is required to
achieve maximum corrosion resistance. The surface of the stainless steel must
be kept clean. Wash with soap or a mild detergent and warm water followed by
a clean water rinse.
1) APAGAR LA ALIMENTACIÓN DE ENERGIE ELÈTRICA.
IMPORTANTE:Antesdecomenzar,NUNCAtratedetrabajarsinantes
desconectarlacorrientehastaqueeltrabajosetermine.
a) Vayaalacajaprincipaldefusibles,ointerruptorocajadecircuitosde
sucasa.Coloqueelinterruptordelacorrienteprincipalenposición
de apagado “OFF”.
b) Desatornilleel(los)fusible(s),ocoloqueelinterruptorointerruptoresdel
breakerenposicióndeapagado“OFF”,quecontrola(n)lacorriente
haciaelartefactoohabitacióndondeestátrabajando.
c) Coloqueelinterruptordeparedenposicióndeapagado“OFF”.Siel
artefacto que se va a reemplazar tiene un interruptor o cadena que
sejala,colóquelosenlaposicióndeapagado“OFF”.
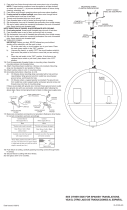
2) Montelostornillosdemontajealacajadesalida.(Lostornillosnose
proveen).
3) Acoplelaabrazaderademontajealacajadesalida.(Lostornillosnose
proveen).
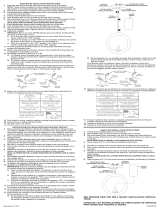
4) Instruccionesdepuestaatierra:(VealailustraciónAoB)
A) Enlosartefactosdondeseproporcionalaabrazaderademontaje
conunagujeroydosdepresioneselevadas.Envuelvaelalambrea
tierradelacajadesalidaalrededordeltornilloatierraverdey
rosqueeltornilloenelagujero.
B) Enlosartefactordondeseproporcionaunaarandelacóncava.
Pongaelalambreatierradelacajadesalidaentrelaarandela
cóncavayeltornilloatierraverdeyrosqueeltornilloenelagujero,
enlaabrazaderademontaje.
Si se proporciona el artefacto con alambre a tierra, conecte el alambre a
tierradelartefactoalalambreaatierradelacajadesalida,conel
conector de alambre (no proporcionado), después de seguir los pasos de
arriba. Nunca conecte el alambre a tierra a los alambres blanco o negro
delaalimentacióneléctrica.
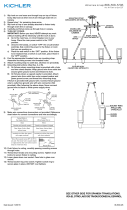
GREEN GROUND
SCREW
CUPPED
WASHER
A
B
OUTLET BOX
GROUND
FIXTURE
GROUND
DIMPLES
WIRE CONNECTOR
(NOT PROVIDED)
OUTLET BOX
GROUND
GREEN GROUND
SCREW
FIXTURE
GROUND
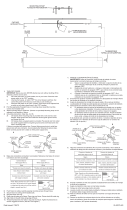
Connect Black or
Red Supply Wire to:
Connect
White Supply Wire to:
Black White
*Parallel cord (round & smooth) *Parallel cord (square & ridged)
Clear, Brown, Gold or Black
without tracer
Clear, Brown, Gold or Black
with tracer
Insulated wire (other than green)
with copper conductor
Insulated wire (other than green)
with silver conductor
*Note: When parallel wires (SPT I & SPT II)
are used. The neutral wire is square shaped
or ridged and the other wire will be round in
shape or smooth (see illus.)
Neutral Wire
KNURLKNOB
PERILLAESTRIADA
GLASS
VIDRIO
DateIssued:11/11/11
IS-9557-US
THUMBSCREW
TORNILLODE
APRIETEMANUAL
5) Hacer las conexiones de los alambres (conectores no incluidos.) Ver el
cuadromásabajoparalasconexionescorrectasyalambrardeacuerdoa
esto.
6) Empujeelartefactoenelcielorraso,pasandocuidadosamentelostornillos
demontajeenlosagujeros.
7) Sujeteelartefactocontraelcielorrasoconlasperillasestriadas.
8) Inserte la bombilla recomendada.
9) Levanteelvidrioatravésdelartefactopasandoelagujeroenelvidrio
encima del casquillo.
10) Atornille los tornillos de mariposa de apriete manual a través de los
agujeroseneltopedelcuerpodelartefactoparasujetarelvidrioenel
artefacto.
IMPORTANTE: Para artefacto 9557PSS316: Se requiere un mantenimiento
adecuadoparalograrlamayorresistenciaalacorrosión.Lasuperciede
aceroinoxidabledebemantenerselimpia.Laveconjabónoundetergente
suaveyaguatibia,seguidodeunenjuagueconagualimpia.
ARANDELA
CONCAVA
A
B
TIERRA DE LA
CAJA DE SALIDA
TORNILLO DE TIERRA,
VERDE
DEPRESIONES
TIERRA
ARTEFACTO
CONECTOR DE ALAMBRE
(NO SE PROVEE)
TIERRA DE LA
CAJA DE SALIDA
TORNILLO DE TIERRA,
VERDE
TIERRA
ARTEFACTO
Conectar el alambre de
suministro negro o rojo al
Conectar el alambre de
suministro blanco al
Negro Blanco
*Cordon paralelo (redondo y liso)
*Cordon paralelo (cuadrado y estriado)
Claro, marrón, amarillio o negro
sin hebra identificadora
Claro, marrón, amarillio o negro
con hebra identificadora
Alambre aislado (diferente del verde)
con conductor de cobre
Alambre aislado (diferente del
verde) con conductor de plata
*Nota: Cuando se utiliza alambre paralelo
(SPT I y SPT II). El alambre neutro es de forma
cuadrada o estriada y el otro alambre será de
forma redonda o lisa. (Vea la ilustracíón).
Hilo Neutral
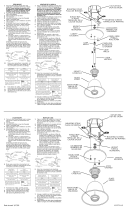
FIXTURE
ARTEFACTO
MOUNTING STRAP
ABRAZADERADEMONTAJE
-
 1
1

Kichler Lighting 9557AZ Manual de usuario
- Tipo
- Manual de usuario
en otros idiomas
- English: Kichler Lighting 9557AZ User manual
Artículos relacionados
-
 Kichler Lighting 42436AP Manual de usuario
-
 Kichler Lighting 2943NI Manual de usuario
-
 Kichler Lighting 43189AUB Manual de usuario
-
 Kichler Lighting 43765OZ Manual de usuario
-
 Kichler Lighting 42384AP Manual de usuario
-
 Kichler Lighting 42467WMZ Manual de usuario
-
 Kichler Lighting 43185AUB Manual de usuario
-
 Kichler Lighting 42275NI Manual de usuario
-
Kichler Lighting 42246NI Manual de usuario
-
 Kichler Lighting 2771NI Manual de usuario


