Electrolux TT903R5 Manual de usuario
- Categoría
- Lavaplatos
- Tipo
- Manual de usuario


CONTENTS
1. SAFETY INFORMATION...................................................................................... 3
2. SAFETY INSTRUCTIONS.....................................................................................4
3. PRODUCT DESCRIPTION................................................................................... 5
4. CONTROL PANEL...............................................................................................6
5. PROGRAMMES...................................................................................................6
6. SETTINGS........................................................................................................... 8
7. OPTIONS...........................................................................................................11
8. BEFORE FIRST USE..........................................................................................12
9. DAILY USE........................................................................................................ 13
10. HINTS AND TIPS............................................................................................. 14
11. CARE AND CLEANING....................................................................................16
12. TROUBLESHOOTING......................................................................................17
13. TECHNICAL INFORMATION............................................................................19
WE’RE THINKING OF YOU
Thank you for purchasing an Electrolux appliance. You’ve chosen a product that
brings with it decades of professional experience and innovation. Ingenious and
stylish, it has been designed with you in mind. So whenever you use it, you can be
safe in the knowledge that you’ll get great results every time.
Welcome to Electrolux.
Visit our website for:
Get usage advice, brochures, trouble shooter, service information:
www.electrolux.com
Register your product for better service:
www.registerelectrolux.com
Buy Accessories, Consumables and Original spare parts for your appliance:
www.electrolux.com/shop
CUSTOMER CARE AND SERVICE
Always use original spare parts.
When contacting our Authorised Service Centre, ensure that you have the following
data available: Model, PNC, Serial Number.
The information can be found on the rating plate.
Warning / Caution-Safety information
General information and tips
Environmental information
Subject to change without notice.
www.electrolux.com2

1. SAFETY INFORMATION
Before the installation and use of the appliance, carefully
read the supplied instructions. The manufacturer is not
responsible if an incorrect installation and use causes
injuries and damages. Always keep the instructions with
the appliance for future reference.
1.1 General Safety
• This appliance is intended to be used in household and
similar applications such as:
– farm houses; staff kitchen areas in shops, offices and
other working environments;
– by clients in hotels, motels, bed & breakfast and
other residential type environments.
• Do not change the specification of this appliance.
• The operating water pressure (minimum and maximum)
must be between 0.5 (0.05) / 8 (0.8) bar (Mpa)
•
Obey the maximum number of 15 place settings.
• If the supply cord is damaged, it must be replaced by
the manufacturer, its Authorised Service Centre or
similarly qualified persons in order to avoid a hazard.
• Put knives and cutlery with sharp points in the cutlery
basket with the points down or in a horizontal position.
• Do not keep the appliance door open without
supervision to prevent to fall on it.
• Before maintenance, deactivate the appliance and
disconnect the mains plug from the mains socket.
• Do not use water spray and steam to clean the
appliance.
• The ventilation openings in the base (if applicable) must
not be obstructed by a carpet.
• The appliance is to be connected to the water mains
using the new supplied hose-sets. Old hose sets must
not be reused.
ENGLISH
3

1.2 Children and vulnerable people safety
• This appliance can be used by children aged from 8
years and above and persons with reduced physical,
sensory or mental capabilities or lack of experience and
knowledge if they have been given supervision or
instruction concerning use of the appliance in a safe
way and understand the hazards involved.
• Do not let children play with the appliance.
• Keep all detergents away from children.
• Keep children and pets away from the appliance door
when it is open.
• Cleaning and user maintenance shall not be made by
children without supervision.
2. SAFETY INSTRUCTIONS
2.1 Installation
• Remove all the packaging.
• Do not install or use a damaged
appliance.
• Do not install or use the appliance
where the temperature is less than 0
°C.
• Obey the installation instruction
supplied with the appliance.
• Make sure that the appliance is
installed below and adjacent to safe
structures.
2.2 Electrical connection
WARNING!
Risk of fire and electrical
shock.
• The appliance must be earthed.
• Make sure that the electrical
information on the rating plate agrees
with the power supply. If not, contact
an electrician.
• Always use a correctly installed
shockproof socket.
• Do not use multi-plug adapters and
extension cables.
• Make sure not to cause damage to the
mains plug and to the mains cable.
Should the mains cable need to be
replaced, this must be carried out by
our Authorised Service Centre.
• Connect the mains plug to the mains
socket only at the end of the
installation. Make sure that there is
access to the mains plug after the
installation.
• Do not pull the mains cable to
disconnect the appliance. Always pull
the mains plug.
• This appliance complies with the E.E.C.
Directives.
• Only for UK and Ireland. The appliance
has a 13 amp mains plug. If it is
necessary to change the fuse in the
mains plug, use fuse: 13 amp ASTA
(BS 1362).
2.3 Water connection
• Make sure not to cause damage to the
water hoses.
• Before you connect the appliance to
new pipes or pipes not used for a long
time, let the water flow until it is clean.
• The first time you use the appliance,
make sure that there is no leakage.
• The water inlet hose has a safety valve
that prevents the hose to loosen. To
disconnect the hose, press the lever
(B) and turn the fastener (A) clockwise.
www.electrolux.com4

A
B
• The water inlet hose has an external
transparent sheath. If the hose is
damaged, the water in the hose
becomes dark.
• If the water inlet hose is damaged,
immediately disconnect the mains plug
from the mains socket. Contact the
Authorised Service Centre to replace
the water inlet hose.
2.4 Use
• Do not sit or stand on the open door.
• Dishwasher detergents are dangerous.
Obey the safety instructions on the
detergent packaging.
• Do not drink and play with the water in
the appliance.
• Do not remove the dishes from the
appliance until the programme is
completed. There can be detergent on
the dishes.
• The appliance can release hot steam if
you open the door while a programme
operates.
• Do not put flammable products or
items that are wet with flammable
products in, near or on the appliance.
2.5 Disposal
WARNING!
Risk of injury or suffocation.
• Disconnect the appliance from the
mains supply.
• Cut off the mains cable and discard it.
• Remove the door catch to prevent
children and pets to get closed in the
appliance.
3. PRODUCT DESCRIPTION
5
4
10
9
67
11
12
2
3
1
8
1
Top spray arm
2
Upper spray arm
3
Lower spray arm
4
Filters
ENGLISH
5

5
Rating plate
6
Salt container
7
Air vent
8
Rinse aid dispenser
9
Detergent dispenser
10
Lower basket
11
Upper basket
12
Cutlery drawer
4. CONTROL PANEL
1
2
3
4
5
6
7
8
9
1
On/off button
2
Display
3
Delay button
4
Programmi button
5
MyFavourite button
6
TimeManager button
7
Multitab button
8
Risparmio Energia button
9
Indicators
4.1 Indicators
Indicator Description
Salt indicator. It is always off while the programme operates.
Rinse aid indicator. It is always off while the programme operates.
5. PROGRAMMES
Programme Degree of soil
Type of load
Programme phases Options
P1
1)
• Normal soil
• Crockery and
cutlery
• Prewash
• Wash 50 °C
• Rinses
• Dry
• Risparmio Energia
• TimeManager
• Multitab
P2
2)
• All
• Crockery, cut-
lery, pots and
pans
• Prewash
• Wash from 45 °C to
70 °C
• Rinses
• Dry
• Risparmio Energia
• Multitab
www.electrolux.com6

Programme Degree of soil
Type of load
Programme phases Options
P3
3)
• Mixed soil
• Crockery, cut-
lery, pots and
pans
• Prewash
• Wash 50 °C and 65
°C
• Rinses
• Dry
• Risparmio Energia
• TimeManager
• Multitab
P4
4)
• Heavy soil
• Crockery, cut-
lery, pots and
pans
• Prewash
• Wash 70 °C
• Rinses
• Dry
• Risparmio Energia
• TimeManager
• Multitab
P5
5)
• Fresh soil
• Crockery and
cutlery
• Wash 60 °C
• Rinses
• Multitab
P6
6)
• All • Prewash
1)
With this programme you have the most efficient use of water and energy consumption for
crockery and cutlery with normal soil. (This is the standard programme for test institutes).
2)
The appliance senses the degree of soil and the quantity of items in the baskets . It auto-
matically adjusts the temperature and the quantity of water, the energy consumption and the
programme duration.
3)
With this programme you can wash a load with mixed soil. Very heavy soil in the lower bas-
ket and normal soil in the upper basket. The pressure and the temperature of the water in the
lower basket are higher than in the upper basket.
4)
This programme has a high temperature rinsing phase for better hygiene results. During the
rinsing phase, the temperature stays at 70 °C for at least 10 minutes.
5)
With this programme you can wash a load with fresh soil. It gives good washing results in a
short time.
6)
With this programme you can quickly rinse dishes to prevent remains of food to bond on
dishes and odours to form in the appliance. Do not use detergent with this programme.
5.1 Consumption values
Programme
1)
Water
(l)
Energy
(kWh)
Duration
(min)
P1 11 0.961 225
P2 7 - 14 0.6 - 1.4 40 - 150
P3 14 - 16 1.2 - 1.5 139 - 149
P4 12.5 - 14.5 1.4 - 1.6 154 - 164
ENGLISH
7

Programme
1)
Water
(l)
Energy
(kWh)
Duration
(min)
P5 10 0.9 30
P6 4 0.1 14
1)
The pressure and the temperature of the water, the variations of the mains supply, the op-
tions and the quantity of dishes can change the values.
5.2 Information for test institutes
For all the necessary information for test
performance, send an email to:
Write down the product number (PNC)
that is on the rating plate.
6. SETTINGS
6.1 Programme selection mode
and user mode
When the appliance is in programme
selection mode it is possible to set a
programme and to enter the user mode.
In user mode, the following settings
can be changed:
• The level of the water softener
according to the water hardness.
• The activation or the deactivation of the
acoustic signal for end of programme.
• The deactivation of the rinse aid
dispenser when you want to use the
Multitab option without rinse aid.
• The level of rinse aid according to the
required dosage.
These settings will be saved until you
change them again.
How to set the programme
selection mode
The appliance is in programme selection
mode when the display shows the
programme number P1.
When you activate the appliance, usually it
is in programme selection mode.
However, if this does not happen, you can
set the programme selection mode in the
following way:
Press and hold simultaneously and
until the appliance is in programme
selection mode.
6.2 The water softener
The water softener removes minerals from
the water supply, which would have a
detrimental effect on the washing results
and on the appliance.
The higher the content of these minerals,
the harder your water is. Water hardness
is measured in equivalent scales.
The water softener should be adjusted
according to the hardness of the water in
your area. Your local water authority can
advise you on the hardness of the water in
your area. It is important to set the right
level of the water softener to assure good
washing results.
www.electrolux.com8

Water hardness
German de-
grees (°dH)
French de-
grees (°fH)
mmol/l Clarke de-
grees
Water softener
level
47 - 50 84 - 90 8.4 - 9.0 58 - 63 10
43 - 46 76 - 83 7.6 - 8.3 53 - 57 9
37 - 42 65 - 75 6.5 - 7.5 46 - 52 8
29 - 36 51 - 64 5.1 - 6.4 36 - 45 7
23 - 28 40 - 50 4.0 - 5.0 28 - 35 6
19 - 22 33 - 39 3.3 - 3.9 23 - 27
5
1)
15 - 18 26 - 32 2.6 - 3.2 18 - 22 4
11 - 14 19 - 25 1.9 - 2.5 13 - 17 3
4 - 10 7 - 18 0.7 - 1.8 5 - 12 2
<4 <7 <0.7 < 5
1
2)
1)
Factory setting.
2)
Do not use salt at this level.
How to set the water softener
level
The appliance must be in programme
selection mode.
1. To enter the user mode, press and
hold simultaneously and until
the indicators , , and
start to flash and the display is blank.
2. Press .
• The indicators , and go
off.
• The indicator continues to
flash.
• The display shows the current
setting: e.g. = level 5.
3. Press again and again to change
the setting.
4. Press the on/off button to confirm the
setting.
6.3 The rinse aid dispenser
The rinse aid helps to dry the dishes
without streaks and stains.
The rinse aid is automatically released
during the hot rinse phase.
You can set the released quantity of rinse
aid between level 1 (minimum quantity)
and level 6 (maximum quantity). Level 0
will deactivate the rinse aid dispenser and
no rinse aid will be released.
Factory setting: level 4.
How to set the rinse aid level
The appliance must be in programme
selection mode.
1. To enter the user mode, press and
hold simultaneously and until
the indicators , , and
start to flash and the display is blank.
2. Press .
• The indicators , and go
off.
•
The indicator
continues to
flash.
• The display shows the current
setting: e.g. = level 4.
– The levels of rinse aid are from
0A to 6A.
ENGLISH
9

– Level 0 = no rinse aid is
released.
3. Press again and again to change
the setting.
4. Press the on/off button to confirm the
setting.
6.4 Use of rinse aid and multi-
tablets
The factory setting of the rinse aid
dispenser is with the dispenser activated.
This means that the rinse aid dispenser
always releases rinse aid.
It is possible to deactivate the rinse aid
dispenser, in this case the dispenser will
not release rinse aid only if the option
Multitab is activated.
If the dispenser is deactivated and you do
not select the option Multitab, the
dispenser will release rinse aid.
The use of the option Multitab with the
rinse aid dispenser deactivated may not
give satisfying drying results.
When the rinse aid dispenser is
deactivated, the rinse aid indicator is
always off when the option Multitab is
activated.
How to deactivate the rinse aid
dispenser
The appliance must be in programme
selection mode.
1. To enter the user mode, press and
hold simultaneously and until
the indicators , , and
start to flash and the display is blank.
2. Press .
• The indicators , and go
off.
• The indicator continues to
flash.
• The display shows the current
setting:
= the rinse aid
dispenser is activated (factory
setting).
3. Press to change the setting.
= the rinse aid dispenser is
deactivated.
4. Press the on/off button to confirm the
setting.
6.5 MyFavourite
With this option you can set and save the
programme that you use more frequently.
You can only save 1 programme. A new
setting cancels the previous one.
How to save the MyFavourite
programme
1. Set the programme that you want to
save
You can also set applicable options
together with the programme.
2. Press and hold until the related
indicator comes on with fixed light.
How to set the MyFavourite
programme
Press .
• The MyFavourite indicator comes
on.
• The display shows the number and
the duration of the programme.
• If options have been saved
together with the programme, the
indicators related to the options
come on.
6.6 Acoustic signals
Acoustic signals sound when a
malfunction of the appliance occurs. It is
not possible to deactivate these acoustic
signals.
There is also an acoustic signal that
sounds when the programme is
completed. By default this acoustic signal
is deactivated but it is possible to activate
it.
www.electrolux.com10

How to activate the acoustic
signal for the end of programme
The appliance must be in programme
selection mode.
1. To enter the user mode, press and
hold simultaneously and until
the indicators , , and
start to flash and the display is blank.
2. Press
• The indicators , and go
off.
• The indicator continues to
flash.
• The display shows the current
setting: = Acoustic signal off.
3. Press to change the setting.
= Acoustic signal on.
4. Press the on/off button to confirm the
setting.
7. OPTIONS
Desired options must be
activated every time before
you start a programme.
It is not possible to activate or
deactivate options while a
programme is running.
Not all options are compatible
with each other. If you have
selected non compatible
options, the appliance will
automatically deactivate one
or more of them. Only the
indicators of the options still
active will stay on.
7.1 Multitab
Activate this option when you use multi-
tablets that integrate the salt, rinse aid and
detergent functions. They can also contain
other cleaning or rinsing agents.
This option deactivates the release of salt.
The salt indicator does not come on.
This option also deactivates the release of
rinse aid but only when the rinse aid
dispenser is deactivated, (rinse aid
indicator does not come on). If the rinse
aid dispenser is activated, rinse aid is
released even with the option Multitab
activated.
With the use of this option the programme
duration is prolonged to increase the
cleaning and drying results with the use of
multi-tablets.
Multitab is not a permanent option and
must be selected at every cycle.
How to activate Multitab
Press .
The related indicator comes on.
7.2 TimeManager
This option increases the pressure and the
temperature of the water. The washing
and the drying phases are shorter.
The total programme duration decreases
by approximately 50%.
The washing results are the same as with
the normal programme duration. The
drying results can decrease.
How to activate TimeManager
Press , the related indicator comes on.
If the option is not applicable to the
programme, the related indicator does not
come on or it flashes quickly for a few
seconds and then goes off.
The display shows the updated
programme duration.
7.3 Risparmio Energia
This option decreases the temperature of
the last rinsing phase and consequently
also the energy consumption
(approximately -25%).
Dishes can still be wet once the
programme is completed.
The duration of the programme will be
shorter.
ENGLISH
11

How to activate Risparmio
Energia
Press , the related indicator comes
on.
If the option is not applicable to the
programme, the related indicator does not
come on or it flashes quickly for a few
seconds and then goes off.
The display shows the updated
programme duration.
8. BEFORE FIRST USE
1. Make sure that the current level of
the water softener agrees with the
hardness of the water supply. If
not, adjust the level of the water
softener.
2. Fill the salt container.
3. Fill the rinse aid dispenser.
4. Open the water tap.
5. Start a programme to remove any
processing residuals that can still be
inside the appliance. Do not use
detergent and do not load the
baskets.
When you start a programme, the
appliance can take up to 5 minutes to
recharge the resin in the water softener. It
seems that the appliance is not working.
The washing phase starts only after this
procedure is completed. The procedure
will be repeated periodically.
8.1 The salt container
CAUTION!
Only use salt specifically
designed for dishwashers.
The salt is used to recharge the resin in
the water softener and to assure good
washing results in the daily use.
How to fill the salt container
1. Turn the cap of the salt container
counterclockwise and remove it.
2. Put 1 litre of water in the salt container
(Only for the first time).
3. Fill the salt container with dishwasher
salt.
4. Remove the salt around the opening
of the salt container.
5. Turn the cap of the salt container
clockwise to close the salt container.
Water and salt can come out
from the salt container when
you fill it. Risk of corrosion. To
prevent it, after you fill the salt
container, start a programme.
www.electrolux.com12

8.2 How to fill the rinse aid
dispenser
A
B
C
CAUTION!
Only use rinse aid specifically
designed for dishwashers.
1. Open the lid (C).
2. Fill the dispenser (B) until the rinse aid
reaches the marking ''MAX''.
3. Remove the spilled rinse aid with an
absorbent cloth to prevent too much
foam.
4. Close the lid. Make sure that the lid
locks into position.
Fill the rinse aid dispenser
when the indicator (A)
becomes clear.
9. DAILY USE
1. Open the water tap.
2. Press the on/off button to activate the
appliance.
Make sure that the appliance is in
programme selection mode.
• If the salt indicator is on, fill the salt
container.
• If the rinse aid indicator is on, fill
the rinse aid dispenser.
3. Load the baskets.
4. Add the detergent. If you use multi-
tablets, activate the option Multitab.
5. Set and start the correct programme
for the type of load and the degree of
soil.
9.1 Using the detergent
A
B
C
CAUTION!
Only use detergent
specifically designed for
dishwashers.
1. Press the release button (A) to open
the lid (C).
2. Put the detergent, in powder or
tablets, in the compartment (B).
3. If the programme has a prewash
phase, put a small quantity of
detergent on the inner part of the
appliance door.
4. Close the lid. Make sure that the lid
locks into position.
9.2 Setting and starting a
programme
The Auto off function
This function decreases energy
consumption by deactivating automatically
the appliance when it is not operating.
The function comes into operation:
• 5 minutes after the completion of the
programme.
• After 5 minutes if the programme has
not started.
ENGLISH
13

Starting a programme
1. Keep the appliance door ajar.
2. Press the on/off button to activate the
appliance. Make sure that the
appliance is in programme selection
mode.
3. Press repeatedly
until the display
shows the number of the programme
you want to start. The display will
show the programme number for
approximately 3 seconds and then
show the programme duration.
• If you want to select the
MyFavourite programme, press
.
– The indicators of the options
related to the MyFavourite
programme come on.
The display will show the programme
number for approximately 3 seconds and
then show the programme duration.
4. Set the applicable options.
5. Close the appliance door to start the
programme.
Starting a programme with delay
start
1. Set a programme.
2. Press again and again until the
display shows the delay time you want
to set (from 1 to 24 hours).
The delay indicator comes on.
3. Close the appliance door to start the
countdown.
While a countdown is running it is possible
to increase the delay time but not to
change the selection of the programme
and options.
When the countdown is completed, the
programme starts.
Opening the door while the
appliance operates
If you open the door while a programme is
running, the appliance stops. When you
close the door, the appliance continues
from the point of interruption.
If the door is opened for more
than 30 seconds during the
drying phase, the running
programme will end.
Cancelling the delay start while
the countdown operates
When you cancel the delay start you have
to set the programme and options again.
Press and hold simultaneously and
until the appliance is in programme
selection mode.
Cancelling the programme
Press and hold simultaneously and
until the appliance is in programme
selection mode.
Make sure that there is detergent in the
detergent dispenser before you start a
new programme.
End of programme
When the programme is completed and
you open the door, the appliance is
automatically deactivated.
Close the water tap.
10. HINTS AND TIPS
10.1 General
The following hints will ensure optimal
cleaning and drying results in daily use
and also help to protect the environment.
• Remove larger residues of food from
the dishes into the waste bin.
• Do not pre-rinse dishes by hand. When
needed, use the prewash programme
(if available) or select a programme with
a prewash phase.
• Always use the whole space of the
baskets.
• When loading the appliance, make
sure that the dishes can be completely
www.electrolux.com14

reached and washed by the water
released from the spray arm nozzles.
Make sure that items do not touch or
cover each other.
• You can use dishwasher detergent,
rinse aid and salt separately or you can
use the multi-tablets (e.g. ''3in1'',
''4in1'', ''All in 1''). Follow the
instructions written on the packaging.
• Select the programme according to the
type of load and degree of soil. With
the ECO programme you have the
most efficient use of water and energy
consumption for crockery and cutlery
with normal soil.
10.2 Using salt, rinse aid and
detergent
• Only use salt, rinse aid and detergent
for dishwasher. Other products can
cause damage to the appliance.
• Multi-tablets are usually suitable in
areas with a water hardness up to 21
°dH. In areas exceeding this limit, rinse
aid and salt must be used in addition to
the multi-tablets. However, in areas
with hard and very hard water we
recommend to use solo-detergent
(powder, gel, tablets without additional
functions), rinse aid and salt separately
for optimal cleaning and drying results.
• If you use multi-tablets you can select
the Multitab option (if available). This
option increases the cleaning and
drying results with the use of multi-
tablets.
• Detergent tablets do not fully dissolve
with short programmes. To prevent
detergent residues on the tableware,
we recommend that you use the
tablets with long programmes.
• Do not use more than the correct
quantity of detergent. Refer to the
instructions on the detergent
packaging.
10.3 What to do if you want to
stop using multi-tablets
Before you start to use separately
detergent, salt and rinse aid do the
following procedure.
1. Set the highest level of the water
softener.
2. Make sure that the salt and rinse aid
containers are full.
3. Start the shortest programme with a
rinsing phase. Do not add detergent
and do not load the baskets.
4. When the programme is completed,
adjust the water softener according to
the water hardness in your area.
5. Adjust the released quantity of rinse
aid.
10.4 Loading the baskets
• Only use the appliance to wash items
that are dishwasher-safe.
• Do not put in the appliance items made
of wood, horn, aluminium, pewter and
copper.
• Do not put in the appliance items that
can absorb water (sponges, household
cloths).
• Remove larger residues of food from
the dishes into the waste bin.
• Make soft the remaining burned food
on the items.
• Put hollow items (cups, glasses and
pans) with the opening down.
• Make sure that glasses do not touch
other glasses.
• Put cutlery and small items in the
cutlery drawer.
• Put light items in the upper basket.
Make sure that the items do not move.
• Make sure that the spray arms can
move freely before you start a
programme.
10.5 Before starting a
programme
Make sure that:
• The filters are clean and correctly
installed.
• The cap of the salt container is tight.
• The spray arms are not clogged.
• There is dishwasher salt and rinse aid
(unless you use multi- tablets).
• The position of the items in the baskets
is correct.
• The programme is applicable for the
type of load and for the degree of soil.
• The correct quantity of detergent is
used.
ENGLISH
15

10.6 Unloading the baskets
1. Let the tableware cool down before
you remove it from the appliance. Hot
items can be easily damaged.
2. First remove items from the lower
basket, then from the upper basket.
At the end of the programme
water can still remain on the
sides and on the door of the
appliance.
11. CARE AND CLEANING
WARNING!
Before maintenance,
deactivate the appliance and
disconnect the mains plug
from the main socket.
Dirty filters and clogged spay
arms decrease the washing
results. Make a check
regularly and, if necessary,
clean them.
11.1 Cleaning the filters
The filter system is made of 3 parts.
C
B
A
1. Turn the filter (B) counterclockwise
and remove it.
2. Remove the filter (C) out of filter (B).
3. Remove the flat filter (A).
4. Wash the filters.
5. Make sure that there are no residues
of food or soil in or around the edge of
the sump.
6. Put back in place the flat filter (A).
Make sure that it is correctly
positioned under the 2 guides.
www.electrolux.com16

7. Reassemble the filters (B) and (C).
8. Put back the filter (B) in the flat filter
(A). Turn it clockwise until it locks.
CAUTION!
An incorrect position of the
filters can cause bad washing
results and damage to the
appliance.
11.2 Cleaning the spray arms
Do not remove the spray arms. If the holes
in the spray arms are clogged, remove
remaining parts of soil with a thin pointed
object.
11.3 External cleaning
• Clean the appliance with a moist soft
cloth.
• Only use neutral detergents.
• Do not use abrasive products, abrasive
cleaning pads or solvents.
11.4 Internal cleaning
• Carefully clean the appliance, including
the rubber gasket of the door, with a
soft moist cloth.
• If you regularly use short duration
programmes, these can leave deposits
of grease and limescale inside the
appliance. To prevent this, we
recommend to run long duration
programmes at least 2 times per
month.
12. TROUBLESHOOTING
If the appliance does not start or it stops
during operation. Before you contact an
Authorised Service Centre, check if you
can solve the problem by yourself with the
help of the information in the table.
With some problems, the display
shows an alarm code.
Problem and alarm code Possible solution
You cannot activate the ap-
pliance.
• Make sure that the mains plug is connected to the
mains socket.
• Make sure that there is no damaged fuse in the fuse
box.
ENGLISH
17

Problem and alarm code Possible solution
The programme does not
start.
• Make sure that the appliance door is closed.
• If the delay start is set, cancel the setting or wait for
the end of the countdown.
• The appliance has started the procedure to recharge
the resin inside the water softener. The duration of the
procedure is approximately 5 minutes.
The appliance does not fill
with water.
The display shows .
• Make sure that the water tap is open.
• Make sure that the pressure of the water supply is not
too low. For this information, contact your local water
authority.
• Make sure that the water tap is not clogged.
• Make sure that the filter in the inlet hose is not clog-
ged.
• Make sure that the inlet hose has no kinks or bends.
The appliance does not
drain the water.
The display shows .
• Make sure that the sink spigot is not clogged.
• Make sure that the drain hose has no kinks or bends.
The anti-flood device is on.
The display shows .
• Close the water tap and contact an Authorised Service
Centre.
Once you have checked the appliance,
deactivate and activate the appliance. If
the problem occurs again, contact an
Authorised Service Centre.
For alarm codes not described in the
table, contact an Authorised Service
Centre.
12.1 The washing and drying results are not satisfactory
Problem Possible solution
There are whitish streaks or
bluish layers on glasses and
dishes.
• The release quantity of rinse aid is too much. Adjust
the rinse aid selector to a lower position.
• The quantity of detergent is too much.
There are stains and dry wa-
ter drops on glasses and
dishes.
• The released quantity of rinse aid is not sufficient.
Adjust the rinse aid selector to a higher position.
• The quality of the rinse aid can be the cause.
The dishes are wet. • The programme does not have a drying phase or
has a drying phase with low temperature.
• The rinse aid dispenser is empty.
• The quality of the rinse aid can be the cause.
• The quality of the multi-tablets can be the cause. Try
a different brand or activate the rinse aid dispenser
and use rinse aid and multi-tablets together.
Refer to "Hints and tips" for
other possible causes.
www.electrolux.com18

13. TECHNICAL INFORMATION
Dimensions Width / height / depth (mm) 596 / 818-898 / 550
Electrical connection
1)
Voltage (V) 220 - 240
Frequency (Hz) 50
Water supply pressure bar (minimum and maximum) 0.5 - 8
MPa (minimum and maximum) 0.05 - 0.8
Water supply
Cold water or hot water
2)
max 60 °C
Capacity Place settings 15
Power consumption Left-on mode (W) 0.99
Power consumption Off-mode (W) 0.10
1)
Refer to the rating plate for other values.
2)
If the hot water comes from alternative source of energy, (e.g. solar panels, aeolian energy),
use the hot water supply to decrease energy consumption.
14. ENVIRONMENT CONCERNS
Recycle the materials with the symbol .
Put the packaging in applicable containers
to recycle it. Help protect the environment
and human health and to recycle waste of
electrical and electronic appliances. Do
not dispose appliances marked with the
symbol with the household waste.
Return the product to your local recycling
facility or contact your municipal office.
ENGLISH
19

CONTENIDO
1. INFORMACIÓN SOBRE SEGURIDAD................................................................21
2. INSTRUCCIONES DE SEGURIDAD................................................................... 22
3. DESCRIPCIÓN DEL PRODUCTO...................................................................... 24
4. PANEL DE CONTROL....................................................................................... 24
5. PROGRAMAS....................................................................................................25
6. AJUSTES...........................................................................................................27
7. OPCIONES........................................................................................................30
8. ANTES DEL PRIMER USO.................................................................................31
9. USO DIARIO......................................................................................................32
10. CONSEJOS.....................................................................................................33
11. MANTENIMIENTO Y LIMPIEZA........................................................................35
12. SOLUCIÓN DE PROBLEMAS.......................................................................... 36
13. INFORMACIÓN TÉCNICA................................................................................38
PENSAMOS EN USTED
Gracias por adquirir un aparato Electrolux. Ha escogido un producto que contiene
décadas de experiencia e innovación profesionales. Ingenioso y elegante, se ha
diseñado pensando en usted. Así pues, siempre que lo utilice, puede tener la
seguridad de que conseguirá excelentes resultados.
Bienvenido a Electrolux.
Consulte en nuestro sitio web:
Obtener consejos, folletos, soluciones a problemas e información de servicio:
www.electrolux.com
Registrar su producto para recibir un mejor servicio:
www.registerelectrolux.com
Adquirir accesorios, artículos de consumo y recambios originales para su
aparato:
www.electrolux.com/shop
ATENCIÓN Y SERVICIO AL CLIENTE
Le recomendamos que utilice recambios originales.
Al contactar con nuestro centro autorizado de servicio técnico, cerciórese de tener
la siguiente información a mano: Modelo, PNC, Número de serie.
La información se puede encontrar en la placa de características.
Advertencia / Precaución-Información sobre seguridad
Información general y consejos
Información sobre el medio ambiente
Salvo modificaciones.
www.electrolux.com20

1. INFORMACIÓN SOBRE SEGURIDAD
Antes de instalar y utilizar el aparato, lea atentamente las
instrucciones facilitadas. El fabricante no se hace
responsable de los daños y lesiones causados por una
instalación y uso incorrectos. Guarde siempre las
instrucciones junto con el aparato para futuras consultas.
1.1 Seguridad general
• Este aparato está concebido para utilizarse en
aplicaciones domésticas y similares, tales como:
– granjas; áreas de cocina para el personal en tiendas,
oficinas y otros entornos de trabajo;
– por clientes en hoteles, moteles, pensiones y otros
entornos de tipo residencial.
• No cambie las especificaciones de este aparato.
• La presión de servicio del agua (mínima y máxima) debe
estar entre 0.5 (0.05) / 8 (0.8) bares (Mpa)
•
Cumpla el número máximo de 15 cubiertos.
• Si el cable eléctrico sufre algún daño, el fabricante, su
servicio técnico autorizado o un profesional cualificado
tendrán que cambiarlo para evitar riesgos.
• Los cuchillos y otros objetos con puntas afiladas deben
colocarse en el cesto para cubiertos con las puntas
hacia abajo o en posición horizontal.
• No deje la puerta del aparato abierta sin supervisión
para evitar caídas sobre él.
• Antes de proceder con el mantenimiento, apague el
aparato y desconecte el enchufe de la red.
• No utilice pulverizadores ni vapor de agua para limpiar
el aparato.
• Vigile que ninguna alfombra obstruya las aberturas de
ventilación de la base (si existen).
• El aparato debe conectarse a la toma de agua
utilizando los nuevos juegos de tubos suministrados.
No se deben reutilizar los juegos de tubos antiguos.
ESPAÑOL
21

1.2 Seguridad de niños y personas vulnerables
• Este electrodoméstico puede ser utilizado por niños de
8 años en adelante y personas cuyas capacidades
físicas, sensoriales o mentales estén disminuidas o que
carezcan de la experiencia y conocimientos suficientes
para manejarlo, siempre que cuenten con las
instrucciones o la supervisión sobre el uso del
electrodoméstico de forma segura y comprendan los
riesgos.
• No deje que los niños jueguen con el aparato.
• Mantenga todos los detergentes fuera del alcance de
los niños.
• Mantenga a los niños y mascotas alejados del aparato
cuando la puerta se encuentre abierta.
• La limpieza y el mantenimiento no podrán realizarlas
niños sin supervisión.
2. INSTRUCCIONES DE SEGURIDAD
2.1 Instalación
• Retire todo el embalaje
• No instale ni utilice un aparato dañado.
• No instale ni utilice el aparato en
lugares con temperaturas inferiores a 0
ºC.
• Siga las instrucciones de instalación
suministradas con el aparato.
• Asegúrese de que el aparato se instala
debajo y junto a estructuras seguras.
2.2 Conexión eléctrica
ADVERTENCIA!
Riesgo de incendios y
descargas eléctricas.
• El aparato debe conectarse a tierra.
• Asegúrese de que las especificaciones
eléctricas de la placa coinciden con las
del suministro eléctrico de su hogar. En
caso contrario, póngase en contacto
con un electricista.
• Utilice siempre una toma con
aislamiento de conexión a tierra
correctamente instalada.
• No utilice adaptadores de enchufes
múltiples ni cables prolongadores.
• Asegúrese de no provocar daños en el
enchufe ni en el cable de red. El centro
de servicio autorizado es quien debe
cambiar el cable de alimentación en
caso necesario.
• Conecte el enchufe a la toma de
corriente únicamente cuando haya
terminado la instalación. Asegúrese de
tener acceso al enchufe del suministro
de red una vez instalado el aparato.
• No desconecte el aparato tirando del
cable de conexión a la red. Tire
siempre del enchufe.
• Este aparato es conforme con las
Directivas de la CEE.
• Sólo para el R.U. e Irlanda. El aparato
tiene un enchufe de 13 amp. Si es
necesario cambiar el fusible del
enchufe de alimentación, utilice un
fusible: 13 amp ASTA (BS 1362).
2.3 Conexión de agua
• Asegúrese de no provocar daños en
los tubos de agua.
www.electrolux.com22

• Antes de conectar el aparato a las
nuevas tuberías o a tuberías que no se
hayan usado durante mucho tiempo,
deje correr el agua hasta que esté
limpia.
• La primera vez que utilice el aparato,
asegúrese de que no haya fugas.
• El tubo de entrada de agua tiene una
válvula de seguridad que impide que
se afloje el tubo. Para desconectar el
tubo, presione la palanca (B) y gire el
soporte de sujeción (A) de izquierda a
derecha.
A
B
• El tubo de entrada de agua tiene un
revestimiento externo transparente. Si
se daña el tubo, el agua del tubo se
oscurece.
• Si la manguera de entrada de agua
está dañada, desconecte el aparato
inmediatamente de la toma de
corriente. Póngase en contacto con el
centro servicio técnico autorizado para
cambiar la manguera de entrada de
agua.
2.4 Uso del aparato
• No se siente ni se ponga de pie sobre
la puerta abierta.
• Los detergentes para lavavajillas son
peligrosos. Siga las instrucciones de
seguridad del envase de detergente.
• No beba agua procedente del aparato
ni juegue con ella.
• No retire la vajilla del aparato hasta que
finalice el programa. Puede quedar
detergente en los platos.
• El aparato puede liberar vapor caliente
si abre la puerta durante un programa.
• No coloque productos inflamables ni
objetos mojados con productos
inflamables dentro, cerca o encima del
aparato.
2.5 Desecho
ADVERTENCIA!
Existe riesgo de lesiones o
asfixia.
• Desconecte el aparato de la red.
• Corte el cable de conexión a la red y
deséchelo.
• Retire el pestillo de la puerta para evitar
que los niños y las mascotas queden
encerrados en el aparato.
ESPAÑOL
23

3. DESCRIPCIÓN DEL PRODUCTO
5
4
10
9
67
11
12
2
3
1
8
1
Brazo aspersor del techo
2
Brazo aspersor intermedio
3
Brazo aspersor inferior
4
Filtros
5
Placa de características
6
Depósito de sal
7
Salida de aire
8
Dosificador de abrillantador
9
Dosificador de detergente
10
Cesto inferior
11
Cesto superior
12
Cesto de cubiertos
4. PANEL DE CONTROL
1
2
3
4
5
6
7
8
9
1
Botón de encendido/apagado
2
Pantalla
3
Tecla Delay
4
Tecla Programmi
5
Tecla MyFavourite
6
Tecla TimeManager
7
Tecla Multitab
8
Tecla Risparmio Energia
9
Indicadores
www.electrolux.com24

4.1 Indicadores
Indicador Descripción
Indicador de sal. Siempre está apagado mientras el programa está en
funcionamiento.
Indicador de abrillantador. Siempre está apagado mientras el programa
está en funcionamiento.
5. PROGRAMAS
Programa Grado de sucie-
dad
Tipo de carga
Fases del programa Opciones
P1
1)
• Suciedad nor-
mal
• Vajilla y cubier-
tos
• Prelavado
• Lavado 50 °C
• Aclarado
• Secado
• Risparmio Energia
• TimeManager
• Multitab
P2
2)
• Todo
• Vajilla, cubier-
tos, cacerolas y
sartenes
• Prelavado
• Lavado entre 45 °C y
70 °C
• Aclarados
• Secado
• Risparmio Energia
• Multitab
P3
3)
• Suciedad mez-
clada
• Vajilla, cubier-
tos, cacerolas y
sartenes
• Prelavado
• Lavado 50 °C y 65 °C
• Aclarados
• Secado
• Risparmio Energia
• TimeManager
• Multitab
P4
4)
• Suciedad inten-
sa
• Vajilla, cubier-
tos, cacerolas y
sartenes
• Prelavado
• Lavado 70 °C
• Aclarados
• Secado
• Risparmio Energia
• TimeManager
• Multitab
P5
5)
• Suciedad re-
ciente
• Vajilla y cubier-
tos
• Lavado 60 °C
• Aclarados
• Multitab
ESPAÑOL
25

Programa Grado de sucie-
dad
Tipo de carga
Fases del programa Opciones
P6
6)
• Todo • Prelavado
1)
Con este programa se consigue el uso más eficaz del agua y consumo de energía para va-
jillas y cubiertos con suciedad normal. (Este es el programa estándar para institutos de prue-
bas.)
2)
El aparato detecta el tipo de suciedad y la cantidad de objetos que hay en los cestos. Ajus-
ta automáticamente la temperatura y la cantidad del agua, el consumo de energía y la dura-
ción del programa.
3)
Con este programa puede lavar una carga con suciedad variada. Suciedad muy intensa en
el cesto inferior y suciedad normal en el cesto superior. La temperatura y la presión del agua
en el cesto inferior son mayores que en el cesto superior.
4)
Este programa tiene una fase de aclarado a alta temperatura para obtener resultados más
higiénicos. Durante la fase de aclarado, la temperatura se mantiene a 70 °C durante al menos
10 minutos.
5)
Con este programa puede lavar una carga con suciedad reciente. Ofrece buenos resulta-
dos de lavado en poco tiempo.
6)
Con este programa puede aclarar la vajilla rápidamente para evitar que los restos de comi-
da se peguen a los platos y se formen olores en el aparato. No utilice detergente con este pro-
grama.
5.1 Valores de consumo
Programa
1)
Agua
(l)
Energía
(kWh)
Duración
(min)
P1 11 0.961 225
P2 7 - 14 0.6 - 1.4 40 - 150
P3 14 - 16 1.2 - 1.5 139 - 149
P4 12.5 - 14.5 1.4 - 1.6 154 - 164
P5 10 0.9 30
P6 4 0.1 14
1)
La presión y temperatura del agua, las variaciones del suministro de energía, las opciones y
la cantidad de platos pueden alterar los valores.
www.electrolux.com26

5.2 Información para los
institutos de pruebas
Para obtener toda la información
necesaria para la prueba de rendimiento,
envíe un correo electrónico a:
Anote el número de producto (PNC) que
aparece en la placa de características.
6. AJUSTES
6.1 Modo de selección de
programa y modo de usuario
Cuando el aparato está en modo de
selección de programa es posible ajustar
un programa y entrar al modo de usuario.
En el modo de usuario pueden
cambiarse los ajustes siguientes:
• El nivel del descalcificador de agua
según la dureza del agua.
• La activación o desactivación de la
señal acústica para el final del
programa.
• La desactivación del dosificador de
abrillantador cuando desee usar la
opción Multitab y el abrillantador juntos
• El nivel del abrillantador según la
dosificación necesaria.
Estos ajustes se guardan hasta que
vuelva a cambiarlos.
Cómo ajustar el modo de
selección de programa
El aparato está en modo de selección de
programa cuando la pantalla muestra el
número de programa P1.
Al encender el aparato, suele encontrarse
en modo de selección de programa. Sin
embargo, si no sucede así, puede ajustar
el modo de selección de programa de la
forma siguiente:
Mantenga pulsadas simultáneamente
y hasta que el aparato se encuentre en
el modo de selección de programa.
6.2 Descalcificador de agua
El descalcificador elimina minerales del
suministro de agua, ya que podrían
afectar o deteriorar el funcionamiento del
aparato.
Cuanto mayor sea el contenido de dichos
minerales, más dura será el agua. La
dureza del agua se mide en escalas
equivalentes.
El descalcificador de agua debe ajustarse
en función de la dureza que presente el
agua de su zona. La empresa local de
suministro de agua puede indicarle el
grado de dureza de la misma. Es muy
importante ajustar el nivel de
descalcificador para obtener un buen
resultado de lavado.
Dureza agua
Grados ale-
manes (°dH)
Grados fran-
ceses (°fH)
mmol/l Grados
Clarke
Nivel del descal-
cificador del agua
47 - 50 84 - 90 8,4 - 9,0 58 - 63 10
43 - 46 76 - 83 7,6 - 8,3 53 - 57 9
37 - 42 65 - 75 6,5 - 7,5 46 - 52 8
29 - 36 51 - 64 5,1 - 6,4 36 - 45 7
23 - 28 40 - 50 4,0 - 5,0 28 - 35 6
19 - 22 33 - 39 3,3 - 3,9 23 - 27
5
1)
ESPAÑOL
27

Grados ale-
manes (°dH)
Grados fran-
ceses (°fH)
mmol/l Grados
Clarke
Nivel del descal-
cificador del agua
15 - 18 26 - 32 2,6 - 3,2 18 - 22 4
11 - 14 19 - 25 1,9 - 2,5 13 - 17 3
4 - 10 7 - 18 0,7 - 1,8 5 - 12 2
<4 <7 <0,7 < 5
1
2)
1)
Ajuste de fábrica.
2)
No utilice sal en este nivel.
Cómo ajustar el nivel del
descalcificador de agua
El aparato debe estar en modo de
selección de programa.
1. Para acceder al modo de usuario
mantenga pulsadas simultáneamente
y hasta que los indicadores
, , y empiecen a
parpadear y la pantalla quede en
blanco.
2. Pulse .
•
Los indicadores , y se
apagan.
• El indicador continúa
parpadeando.
• La pantalla muestra el ajuste
actual: p. ej. = nivel 5.
3. Pulse repetidamente para cambiar
el ajuste.
4. Pulse la tecla de encendido/apagado
para confirmar el ajuste.
6.3 El dosificador de
abrillantador
El abrillantador ayuda a secar la vajilla sin
rayas ni franjas.
El abrillantador se añade automáticamente
durante la fase de aclarado caliente.
Para ajustar la cantidad de abrillantador
entre el nivel 1 (cantidad mínima) y el nivel
6 (cantidad máxima). El nivel 0 desactiva
el dosificador de abrillantador y no se
utiliza abrillantador.
Ajuste de fábrica: nivel 4.
Cómo ajustar el nivel de
abrillantador
El aparato debe estar en modo de
selección de programa.
1. Para acceder al modo de usuario
mantenga pulsadas simultáneamente
y hasta que los indicadores
, , y empiecen a
parpadear y la pantalla quede en
blanco.
2.
Pulse
.
• Los indicadores
, y se
apagan.
•
El indicador
continúa
parpadeando.
• La pantalla muestra el ajuste
actual: p. ej. = nivel 4.
– Los niveles de abrillantador
van de 0A a 6A.
– Nivel 0 = no se añade
abrillantador.
3. Pulse
repetidamente para cambiar
el ajuste.
4. Pulse la tecla de encendido/apagado
para confirmar el ajuste.
6.4 Uso de abrillantador y
pastillas múltiples
El ajuste de fábrica del dosificador de
abrillantador es activado. Esto significa
que el dosificador de abrillantador libera
siempre abrillantador.
Se puede desactivar el dosificador de
abrillantador; en tal caso, el dosificador no
www.electrolux.com28

liberará abrillantador sólo si la opción
Multitab está activada.
Si el dosificador está desactivado y no
selecciona la opción Multitab, el
dosificador liberará abrillantador.
El uso de la opción Multitab con el
dosificador de abrillantador desactivado
puede no ofrecer resultados de secado
satisfactorios.
Cuando el dosificador de abrillantador
está desactivado, el indicador está
siempre apagado cuando se activa la
opción Multitab.
Cómo desactivar el dosificador
de abrillantador
El aparato debe estar en modo de
selección de programa.
1. Para pasar al modo de usuario,
mantenga pulsados simultáneamente
y hasta que los indicadores
, , y empiecen a
parpadear y la pantalla esté en blanco.
2. Pulse
.
• Los indicadores , y se
apagan.
• El indicador continúa
parpadeando.
• La pantalla muestra el ajuste
actual: = el dosificador de
abrillantador está activado (ajuste
de fábrica).
3. Pulse
para cambiar el ajuste.
= el dosificador de abrillantador está
desactivado.
4. Pulse la tecla de encendido/apagado
para confirmar el ajuste.
6.5 MyFavourite
Con esta opción se puede ajustar y
guardar el programa que use con mayor
frecuencia.
Solo se puede guardar 1 programa. Un
nuevo ajuste cancela el anterior.
Cómo guardar el programa
MyFavourite
1. Ajuste el programa que desee guardar
También puede ajustar las opciones
aplicables junto con el programa.
2. Mantenga pulsada la tecla hasta
que el indicador correspondiente se
encienda de forma fija.
Cómo ajustar el programa
MyFavourite
Pulse .
• Se enciende el indicador
MyFavourite.
• La pantalla muestra el número y la
duración del programa.
• Si se han guardado opciones junto
con el programa, los indicadores
relativos a las opciones se
encienden.
6.6 Señales acústicas
Las señales acústicas suenan cuando se
produce un fallo del aparato. No es
posible desactivar estas señales
acústicas.
Al finalizar el programa también suena una
señal acústica. Por defecto, esta señal
acústica está desactivada pero es posible
activarla.
Cómo activar la señal acústica
para el final del programa
El aparato debe estar en modo de
selección de programa.
1. Para acceder al modo de usuario
mantenga pulsadas simultáneamente
y hasta que los indicadores
, , y empiecen a
parpadear y la pantalla quede en
blanco.
2. Pulse
• Los indicadores , y se
apagan.
• El indicador continúa
parpadeando.
ESPAÑOL
29

• La pantalla muestra el ajuste
actual: = Señal acústica
apagada.
3. Pulse para cambiar el ajuste.
= Señal acústica encendida.
4. Pulse la tecla de encendido/apagado
para confirmar el ajuste.
7. OPCIONES
Cada vez que inicie un
programa debe activar las
opciones que desee.
No es posible activar ni
desactivar esta opciones con
un programa en marcha.
No todas las opciones son
compatibles entre sí. Si ha
seleccionado opciones no
compatibles, el aparato
desactiva automáticamente
una o más de ellas. Solo
permanecen encendidos los
indicadores de las opciones
aún activas.
7.1 Multitab
Active esta opción cuando utilice pastillas
múltiples que integren las funciones de
sal, abrillantador y detergente. También
contienen otros agentes de limpieza o
aclarado.
Esta opción desactiva el uso de sal. El
indicador de sal no se enciende.
Esta opción también desactiva la
liberación de abrillantador pero sólo
cuando el dosificador está desactivado (el
indicador de abrillantador no se enciende).
Si el dosificador de abrillantador está
activado, el abrillantador se libera incluso
con la opción Multitab activada.
Con esta opción, la duración del
programa se prolonga para mejorar los
resultados de limpieza y secado usando
pastillas múltiples.
Multitab no es una opción permanente y
se debe seleccionar en cada ciclo.
Como activar Multitab
Pulse .
Se enciende el indicador correspondiente.
7.2 TimeManager
Esta opción aumenta la presión y la
temperatura del agua. Las fases de lavado
y de secado son más cortas.
La duración total del programa disminuye
aproximadamente un 50%.
Los resultados del lavado son los mismos
que con la duración normal del programa.
Los resultados de secado pueden
disminuir.
Como activar TimeManager
Pulse : se enciende el indicador
correspondiente.
Si la opción no es aplicable al programa,
el indicador correspondiente no se
enciende o parpadea rápidamente
durante unos segundos y después se
apaga.
La pantalla muestra la duración
actualizada del programa.
7.3 Risparmio Energia
Esta opción reduce la temperatura de la
última fase de enjuague y a la vez el
consumo de energía (aproximadamente
-25%).
Los platos pueden seguir mojados al
terminar el programa.
La duración del programa será menor.
Como activar Risparmio Energia
Pulse : se enciende el indicador
correspondiente.
Si la opción no es aplicable al programa,
el indicador correspondiente no se
enciende o parpadea rápidamente
durante unos segundos y después se
apaga.
La pantalla muestra la duración
actualizada del programa.
www.electrolux.com30

8. ANTES DEL PRIMER USO
1. Asegúrese de que el nivel actual
del descalcificador coincide con la
dureza de su suministro de agua.
Si no lo es, ajuste el nivel de
descalcificador de agua.
2. Llene el depósito de sal.
3. Llene el dosificador de abrillantador.
4. Abra la llave de paso.
5. Inicie un programa para eliminar todos
los restos de procesamiento que
pueda haber en el aparato. No utilice
detergente ni cargue los cestos.
Cuando se inicia un programa, el aparato
puede tardar hasta 5 minutos en recargar
la resina del descalcificador. Parece que el
aparato no funciona. La fase de lavado
empieza sólo después de que termine
este proceso. El proceso se repite
periódicamente.
8.1 El depósito de sal
PRECAUCIÓN!
Utilice exclusivamente sal
diseñada específicamente
para lavavajillas
La sal se utiliza para recargar la resina del
descalcificador y asegurar un buen
resultado de lavado en el uso diario.
Llenado del contenedor de sal
1. Gire la tapa del depósito de sal hacia
la izquierda y retírela.
2. Vierta 1 litro de agua en el depósito de
sal (solo la primera vez).
3. Llene el depósito con sal para
lavavajillas.
4. Elimine los restos de sal que puedan
haber quedado en la entrada del
depósito.
5. Gire la tapa del depósito de sal hacia
la derecha para cerrar el depósito de
sal.
El agua y la sal pueden
salirse del depósito de sal
cuando lo llena. Riesgo de
corrosión. Para evitarlo,
después de llenar el
depósito, inicie un programa.
8.2 Cómo llenar el dosificador
de abrillantador
A
B
C
ESPAÑOL
31

PRECAUCIÓN!
Utilice exclusivamente
abrillantador diseñado
específicamente para
lavavajillas.
1. Abra la tapa (C).
2. Llene el dosificador (B) hasta que el
abrillantador llegue a la marca "MAX".
3. Limpie las salpicaduras de
abrillantador con un paño absorbente
para evitar que se forme demasiada
espuma.
4. Cierre la tapa. Asegúrese de que la
tapa encaja en su sitio.
Llene el depósito del
abrillantador cuando el
indicador (A) aparezca
transparente.
9. USO DIARIO
1. Abra la llave de paso.
2. Pulse la tecla de encendido/apagado
para encender el aparato.
Asegúrese de que el aparato se encuentra
en modo de selección de programa.
• Si el indicador de sal está
encendido, llene el depósito.
• Si el indicador de abrillantador está
encendido, llene el dosificador de
abrillantador.
3. Cargue los cestos.
4. Añada el detergente. Si utiliza pastillas
múltiples, active la opción Multitab.
5. Ajuste e inicie el programa adecuado
para el tipo de carga y el grado de
suciedad.
9.1 Uso del detergente
A
B
C
PRECAUCIÓN!
Utilice exclusivamente
detergente diseñado
específicamente para
lavavajillas.
1. Pulse el botón de apertura (A) para
abrir la tapa (C).
2. Coloque el detergente en polvo o
pastilla en el compartimento (B).
3. Si el programa tiene una fase de
prelavado, inserte una pequeña
cantidad de detergente en la parte
interior de la puerta del aparato.
4. Cierre la tapa. Asegúrese de que la
tapa encaja en su sitio.
9.2 Ajuste e inicio de un
programa
La función Auto off
Esta función reduce el consumo de
energía desactivando automáticamente el
aparato cuando no se utiliza.
La función se activa:
• 5 minutos después de terminar el
programa.
• Después de 5 minutos si no se ha
iniciado el programa.
Inicio de un programa
1. Mantenga entreabierta la puerta del
aparato.
2. Pulse la tecla de encendido/apagado
para encender el aparato. Asegúrese
de que el aparato se encuentra en
modo de selección de programa.
3. Pulse varias veces hasta que
aparezca en pantalla el número del
programa que desea iniciar. La
pantalla muestra el número de
www.electrolux.com32

programa durante unos 3 segundos y
después la duración del programa.
• Si desea seleccionar el programa
MyFavourite, pulse la tecla .
– Los indicadores de las
opciones relacionadas con el
programa MyFavourite se
encienden.
La pantalla muestra el número de
programa durante unos 3 segundos y
después la duración del programa.
4. Ajuste las opciones aplicables.
5. Cierre la puerta del aparato para iniciar
el programa.
Inicio de un programa con inicio
diferido
1. Ajuste un programa.
2. Pulse repetidamente hasta que la
pantalla muestre el tiempo de retardo
que desee ajustar (entre 1 y 24 horas).
Se enciende el indicador de inicio diferido.
3. Cierre la puerta del aparato para iniciar
la cuenta atrás.
Mientras se realiza la cuenta atrás se
puede aumentar el tiempo de retardo,
pero no es posible cambiar la selección
del programa.
El programa se pone en marcha cuando
termina la cuenta atrás.
Apertura de la puerta mientras
está funcionando el aparato
Si abre la puerta mientras se realiza un
programa, el aparato se detiene. Cuando
cierre la puerta, el aparato continuará a
partir del punto de interrupción.
Si la puerta se abre más de
30 segundos durante la fase
de secado, el programa en
funcionamiento se termina.
Cancelación del inicio diferido
mientras está en curso la cuenta
atrás
Si cancela el inicio diferido, debe volver a
ajustar el programa y las opciones.
Mantenga pulsadas simultáneamente
y hasta que el aparato se encuentre en
el modo de selección de programa.
Cancelación de un programa
Mantenga pulsadas simultáneamente
y hasta que el aparato se encuentre en
el modo de selección de programa.
Compruebe que hay detergente en el
dosificador antes de iniciar un nuevo
programa.
Fin del programa
Cuando el programa termina y abre la
puerta, el aparato se desactiva
automáticamente.
Cierre la llave de paso.
10. CONSEJOS
10.1 General
Los consejos siguientes le aseguran un
resultado de limpieza de secado óptimo
en el uso diario y también le ayudan a
proteger el medio ambiente.
• Tire los residuos de alimentos de
mayor tamaño de los platos a la
basura.
• No enjuague los platos a mano. Si es
necesario, utilice el programa de
prelavado (en su caso) o seleccione un
programa con fase de prelavado.
• Aproveche siempre todo el espacio de
los cestos
• Al cargar el aparato, asegúrese de que
los platos quedan totalmente al
alcance de las boquillas del brazo
aspersor para lavarse con el agua que
expulsan. Asegúrese de que los
objetos no se tocan entre sí ni se
cubren unos a otros.
• Puede utilizar detergente para
lavavajillas, abrillantador y sal por
separado o pastillas múltiples (p. ej.
''3en1'', ''4en1'', ''Todo en 1''). Siga
ESPAÑOL
33

las instrucciones que aparecen en el
envoltorio.
• Seleccione el programa según el tipo
de carga y el grado de suciedad. Con
el programa ECO se consigue el uso
más eficaz del agua y consumo de
energía para vajillas y cubiertos con
suciedad normal.
10.2 Utilización de sal,
abrillantador y detergente
• Utilice únicamente sal, abrillantador y
detergente para el lavavajillas. El
aparato podría dañarse con otros
productos.
• Las pastillas múltiples suelen ser
adecuadas para áreas con dureza de
agua hasta 21 °dH. En las zonas que
superen este límite también deberá
utilizarse abrillantador además de
pastillas múltiples. Sin embargo, en
áreas con agua dura o muy dura,
recomendamos utilizar detergente solo
(en polvo, gel o pastillas sin funciones
adicionales) abrillantador y sal por
separado para conseguir un resultado
de limpieza y secado óptimo.
• Si utiliza tabletas múltiples, puede
seleccionar la opción Multitab (en su
caso). Esta opción mejora el resultado
de limpieza y secado con el uso de
pastillas múltiples.
• Las pastillas de detergente no se
disuelven completamente con
programas cortos. Para evitar restos
de detergente en la vajilla, se
recomienda usar pastillas de
detergente con los programas largos.
• No utilice más cantidad de detergente
de la recomendada. Consulte las
instrucciones del envase del
detergente.
10.3 Qué hacer si desea dejar
de usar pastillas de detergente
Antes de volver a utilizar por separado
detergente, sal y abrillantador, realice el
procedimiento siguiente.
1. Ajuste el nivel más alto del
descalcificador.
2. Asegúrese de llenar el depósito de sal
y el dosificador de abrillantador.
3. Inicie el programa más corto que
incluya una fase de aclarado. No
añada detergente ni cargue los
cestos.
4. Cuando termine el programa, ajuste el
descalcificador según la dureza del
agua de su zona.
5. Ajuste la cantidad de abrillantador.
10.4 Carga de los cestos
• Utilice el aparato exclusivamente para
lavar utensilios aptos para lavavajillas.
• No coloque en el aparato utensilios de
madera, cuerno, aluminio, peltre o
cobre.
• No coloque en el aparato objetos que
puedan absorber agua (esponjas,
paños de limpieza, etc.).
• Tire a la basura los restos de alimentos
más gruesos de los platos.
• Ablande los restos de comida
adheridos a la vajilla.
• Coloque los objetos huecos (por
ejemplo, tazas, vasos, cazuelas) boca
abajo.
• Asegúrese de que los vasos no chocan
entre sí.
• Coloque los cubiertos y los objetos
pequeños en la bandeja de cubiertos.
• Coloque los objetos ligeros en el cesto
superior. Asegúrese de que los objetos
no se mueven.
• Antes de iniciar un programa,
compruebe que los brazos aspersores
giran sin obstrucción.
10.5 Antes del inicio de un
programa
Compruebe que:
• Los filtros están limpios y bien
instalados.
• La tapa del depósito de sal está
apretada.
• Los brazos aspersores no están
obstruidos.
• Hay abrillantador y sal para lavavajillas
(a menos que utilice pastillas múltiples).
• La posición de los objetos en los
cestos es correcta.
• El programa es adecuado para el tipo
de carga y el grado de suciedad.
• Se utiliza la cantidad correcta de
detergente.
www.electrolux.com34

10.6 Descarga de los cestos
1. Deje enfriar la vajilla y cristalería antes
de retirarla del aparato Los artículos
calientes son sensibles a los golpes.
2. Vacíe primero el cesto inferior y a
continuación el superior
Al final del programa puede
haber restos de agua en los
laterales y en la puerta del
aparato.
11. MANTENIMIENTO Y LIMPIEZA
ADVERTENCIA!
Antes de proceder con el
mantenimiento, apague el
aparato y desconecte el
enchufe de la red.
Los filtros sucios y los brazos
aspersores obstruidos
reducen la calidad del lavado.
Revíselos periódicamente y,
si es necesario, límpielos.
11.1 Limpieza de los filtros
El sistema de filtro está hecho de 3
piezas.
C
B
A
1. Gire el filtro (B) hacia la izquierda y
extráigalo.
2. Extraiga el filtro (C) del filtro (B).
3. Extraiga el filtro plano (A).
4. Lave los filtros.
5. Asegúrese de que no haya restos de
comida ni suciedad alrededor del
borde del sumidero.
6. Vuelva a colocar el filtro plano (A).
Asegúrese de que esté bien colocado
bajo las 2 guías.
ESPAÑOL
35

7. Vuelva a montar los filtros (B) y (C).
8. Vuelva a colocar el filtro (B) en el filtro
plano (A). Gírelo hacia la derecha
hasta que encaje.
PRECAUCIÓN!
Una posición incorrecta de
los filtros puede dañar el
aparato y provocar
resultados de lavado no
satisfactorios.
11.2 Limpieza de los brazos
aspersores
No retire los brazos aspersores. Si los
orificios de los brazos aspersores se
taponan, retire la suciedad restante con
un objeto afilado.
11.3 Limpieza del exterior
• Limpie el aparato con un paño suave
humedecido.
• Utilice solo detergentes neutros.
• No utilice productos abrasivos,
estropajos duros ni disolventes.
11.4 Limpieza del interior
• Limpie cuidadosamente el aparato,
incluida la junta de goma de la puerta,
con un paño húmedo.
• Si normalmente utiliza programas de
corta duración, estos pueden dejar
depósitos de grasa y sarro en el interior
del aparato. Para evitarlo, se
recomienda utilizar programas de larga
duración al menos dos veces al mes.
12. SOLUCIÓN DE PROBLEMAS
Si el aparato no se pone en marcha ni se
detiene durante el funcionamiento. Antes
de ponerse en contacto con un centro de
servicio técnico, compruebe si puede
solucionar el problema por sí mismo con
ayuda de la información de la tabla.
Algunos fallos de funcionamiento se
indican en la pantalla con un código
de alarma.
www.electrolux.com36

Problema y código de
alarma
Posible solución
No se puede encender el
aparato.
• Asegúrese de que el enchufe está conectado a la
toma de corriente.
• Asegúrese de que no hay ningún fusible dañado en la
caja de fusibles.
El programa no se pone en
marcha.
• Asegúrese de que la puerta del aparato está cerrada.
• Si se ha ajustado el inicio diferido, cancele el ajuste o
espere hasta el final de la cuenta atrás.
• El aparato ha iniciado el proceso de recarga de resina
dentro del descalcificador de agua. La duración total
del proceso es de aproximadamente 5 minutos.
El aparato no carga agua.
La pantalla muestra .
• Compruebe que el grifo está abierto.
• Asegúrese de que la presión del agua no sea dema-
siado baja. Solicite información a la compañía local de
suministro de agua.
• Compruebe que el grifo no esté obstruido.
• Asegúrese de que el filtro de la manguera de entrada
no está obstruido.
• Asegúrese de que la manguera de entrada no esté
doblada ni retorcida.
El aparato no desagua.
La pantalla muestra .
• Compruebe que el desagüe no esté obstruido.
• Asegúrese de que el tubo de desagüe no esté dobla-
do ni retorcido.
El dispositivo contra inun-
dación se ha puesto en
marcha.
La pantalla muestra .
• Cierre el grifo y póngase en contacto con el Centro de
servicio técnico.
Una vez comprobado el aparato,
desactive y actívelo. Si el problema se
vuelve a producir, póngase en contacto
con un Centro de servicio técnico.
Para los códigos de alarma no descritos
en la tabla, póngase en contacto con un
Centro de servicio técnico.
12.1 Los resultados del lavado y el secado no son satisfactorios
Problema Posible solución
Hay rayas o películas azula-
das en vasos y platos.
• La dosificación del abrillantador es demasiado alta.
Ajuste el selector de abrillantador en la posición más
baja.
• La cantidad de detergente es demasiada.
Hay manchas y gotas de
agua en vajilla y cristalería
• La dosificación del abrillantador es insuficiente.
Ajuste el selector de abrillantador en una posición
más alta.
• La calidad del abrillantador podría ser la causa.
ESPAÑOL
37

Problema Posible solución
La vajilla está mojada. • El programa no tiene una fase de secado o la tiene
con una temperatura baja.
• El dosificador de abrillantador está vacío.
• La calidad del abrillantador podría ser la causa.
• La calidad de las tabletas de detergente podría ser la
causa. Pruebe con una marca diferente o active el
dosificador del abrillantador y utilice éste junto con
las tabletas de detergente.
Consulte otras posibles
causas en "Consejos".
13. INFORMACIÓN TÉCNICA
Medidas Ancho / alto / fondo (mm) 596 / 818-898 / 550
Conexión eléctrica
1)
Voltaje (V) 220 - 240
Frecuencia (Hz) 50
Presión del suministro de
agua
bares (mínimo y máximo) 0.5 - 8
MPa (mínimo y máximo) 0.05 - 0.8
Suministro de agua
Agua fría o caliente
2)
máx. 60 °C
Capacidad Cubiertos 15
Consumo de potencia Modo encendido (W) 0.99
Consumo de potencia Modo apagado (W) 0.10
1)
Consulte los demás valores en la placa de características.
2)
Si el agua caliente procede de una fuente de energía alternativa (por ejemplo, paneles so-
lares, energía eólica), utilice la toma de agua caliente para reducir el consumo de energía.
14. ASPECTOS MEDIOAMBIENTALES
Recicle los materiales con el símbolo .
Coloque el material de embalaje en los
contenedores adecuados para su
reciclaje. Ayude a proteger el medio
ambiente y la salud pública, así como a
reciclar residuos de aparatos eléctricos y
electrónicos. No deseche los aparatos
marcados con el símbolo junto con los
residuos domésticos. Lleve el producto a
su centro de reciclaje local o póngase en
contacto con su oficina municipal.
*
www.electrolux.com38

ESPAÑOL
39

www.electrolux.com/shop
117894920-A-432014
-
 1
1
-
 2
2
-
 3
3
-
 4
4
-
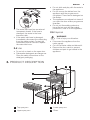 5
5
-
 6
6
-
 7
7
-
 8
8
-
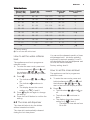 9
9
-
 10
10
-
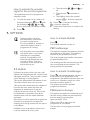 11
11
-
 12
12
-
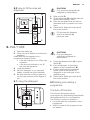 13
13
-
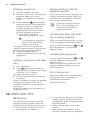 14
14
-
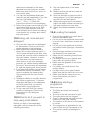 15
15
-
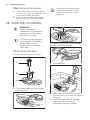 16
16
-
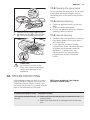 17
17
-
 18
18
-
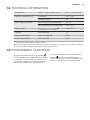 19
19
-
 20
20
-
 21
21
-
 22
22
-
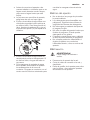 23
23
-
 24
24
-
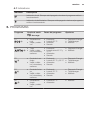 25
25
-
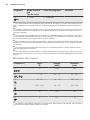 26
26
-
 27
27
-
 28
28
-
 29
29
-
 30
30
-
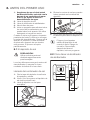 31
31
-
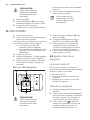 32
32
-
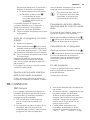 33
33
-
 34
34
-
 35
35
-
 36
36
-
 37
37
-
 38
38
-
 39
39
-
 40
40


Electrolux TT903R5 Manual de usuario
- Categoría
- Lavaplatos
- Tipo
- Manual de usuario
En otros idiomas
- English: Electrolux TT903R5 User manual
Documentos relacionados
-
Electrolux ESL4300RA Manual de usuario
-
-
-
-
-
-
-
-
-
Otros documentos
-
Aeg-Electrolux F55420W0P Manual de usuario
-
-
-
 Küppersbusch GSV4500 Manual de usuario
-
-
Zanussi ZDF14001XA Manual de usuario
-
ELECTROLUX-REX TP1003R5X Manual de usuario
-
AEG F55700VI1P Manual de usuario
-
AEG F78420VI0P Manual de usuario
-
AEG F56322M0 Manual de usuario
