LG AS401VGA1 Guía del usuario
- Categoría
- Purificadores de aire
- Tipo
- Guía del usuario
Este manual también es adecuado para

www.lg.comP/NO : MFL68181320
OWNER’S MANUAL
Model name: AS401VSA0
AIR PURIFIER
Read this owner's manual thoroughly before operating the
appliance and retain it for future reference.
ENGLISH ESPAÑOL
1,MFL68181320,영영 2016. 2. 4. 영영 11:44 Page 1

2TABLE OF CONTENTS
ENGLISH
TABLE OF CONTENTS
3
PRODUCT FEATURES
4
SAFETY INSTRUCTIONS
8
PRODUCT OVERVIEW
8Front
8Back
9 Control Panel and Display
10 Multi-Stage Filtration System
11
INSTALLATION
11 Choosing the Proper Location
11 Tips for Using the Air Purifier
12 Initial Installation of Filter
13
OPERATION
13 Air Purification
14 Turbo Function
14 PM Indicator Display
14 Air Quality Indicator Light
16 Off Timer Function
17 Lock Function
18 Filter Life Light
19
MAINTENANCE
19 Cleaning the Filters
21 Filter Maintenance Schedule
21 Cleaning the Exterior
22 Cleaning the Sensor
23 Storing the Product
24
TROUBLESHOOTING
26
SPECIFICATIONS
27
WARRANTY
1,MFL68181320,영영 2016. 2. 4. 영영 11:44 Page 2

PRODUCT FEATURES 3
ENGLISH
SMART AIR QUALITY SYSTEM
The air quality display senses and shows indoor particulate levels in real time. It can sense fine
particulate matter as small as 1.0 micron.
MULTI-STAGE FILTRATION SYSTEM
The combination of the washable pre-filter, 3M MERV 14 filter, and deodorizing filter provide
fresh indoor air by removing invisible air pollutants. Remove irritants ranging from pet hair and
pollen to tobacco smoke odors and VOCs (volatile organic compounds).
LODECIBEL QUIET OPERATION
In the sleep mode, the air purifier runs at only 23 dB and can be scheduled to shut off
automatically, making falling asleep easy.
3M MERV 14 FILTER
The 3M MERV 14 filter captures particles as small as 0.3 microns. This particulate matter can
include pollen, mold spores, and dust.
PRODUCT FEATURES
1,MFL68181320,영영 2016. 2. 4. 영영 11:44 Page 3

4SAFETY INSTRUCTIONS
ENGLISH
SAFETY INSTRUCTIONS
READ AND SAVE THESE INSTRUCTIONS
Your safety and the safety of others are very important.
We have provided many important safety messages in this manual and on the appliance. Always
read and follow all safety messages.
This is the safety alert symbol. This symbol alerts you to potential hazards that can kill or
injure you or others. All safety messages will follow the safety alert symbol and either the
word WARNING or CAUTION.
These words mean:
WARNING
If you do not follow instructions, it could result in death or serious injury.
CAUTION
If you do not follow instructions, it could result in minor or moderate injury or damage to the
product.
All safety messages will tell you what the potential hazard is, tell you how to reduce the
chance of injury, and tell you what may happen if the instructions are not followed.
IMPORTANT SAFETY INSTRUCTIONS
WARNING
To reduce the risk of explosion, fire, death, electric shock, scalding, or injury to persons
when using this appliance, follow basic precautions, including the following:
Installation
• Do not modify or extend the power cord.
• Do not plug the product into an outlet which is loose or damaged.
• Never attempt to operate this appliance if it is damaged, malfunctioning, partially
disassembled, or has missing or broken parts, including a damaged cord or plug.
• Do not use the product in locations where it will be exposed to high humidity, moisture, or oil
splatter such as in the bathroom, laundry, or near the stove.
• Connect the product to a properly rated, protected, and sized power circuit to avoid electrical
overload.
• In the event of a gas leak (propane gas, LP gas, etc.) do not operate this or any other
appliance. Open a window or door to ventilate the area immediately.
• Do not store or use gasoline or other flammable vapors and liquids in the vicinity of this or any
other appliance.
• If you detect a strange sound, a chemical or burning smell, or smoke coming from the
product, unplug it immediately and contact an LG Electronics customer information center.
!
!
!
!
1,MFL68181320,영영 2016. 2. 4. 영영 11:44 Page 4

SAFETY INSTRUCTIONS 5
ENGLISH
• Be careful not to allow the power cord to be pinched, crushed or damaged under heavy
objects.
• Do not install the product in direct sunlight, near heat sources such as furnaces or ovens, near
fireplaces or other open flames, or in wet or humid locations.
• Keep packing materials out of the reach of children. Packaging material can be dangerous for
children. There is a risk of suffocation.
• Store and install the product where it will not be exposed to temperatures below freezing or
exposed to outdoor weather conditions.
Operation
Read all instructions before using the product and save these instructions.
• Use this product only for its intended purpose.
• Do not tamper with controls.
• Do not allow children to play on or with the product. Close supervision of children is
necessary when the product is used near children.
• Repair or immediately replace all power cords that have become damaged. Do not use a cord
that shows cracks or abrasion damage along its length or at either end.
• Do not grasp the power cord or touch the appliance controls with wet hands.
• Do not modify or extend the power cord.
• If the product has been submerged, contact LG Electronics customer information center for
instructions before resuming use.
• This appliance is not intended for use by persons (including children) with reduced physical,
sensory or mental capabilities, or lack of experience and knowledge, unless they have been
given supervision or instruction concerning the use of the appliance by a person responsible
for their safety.
• If the electrical supply cord is damaged, it must only be replaced by the manufacturer or its
service agent or a similar qualified person in order to avoid a hazard.
• Never unplug the appliance by pulling on the power cord. Always grip the plug firmly and pull
straight out from the outlet.
• Do not place obstacles at the air suction port or discharge port of the product.
• Do not move the product while it is under operation.
• Do not put hands , glue or metal objects near the air suction port or discharge port of the
product.
• Do not install the product in locations with excessive industrial oil smoke or metallic dust.
Doing so may result in fire or product failure.
• Use only the handle to move the product.
• Do not repair or replace any part of the appliance. All repairs and servicing must be performed
by qualified service personnel unless specifically recommended in this owner's manual. Use
only authorized factory parts.
• Disconnect the appliance from the power supply before cleaning and attempting any user
maintenance. Turning the controls to the OFF position does not disconnect the appliance
from the power supply.
1,MFL68181320,영영 2016. 2. 4. 영영 11:44 Page 5

6SAFETY INSTRUCTIONS
ENGLISH
• Do not disassemble or repair the appliance by yourself.
• Avoid any impact to the front panel of the appliance.
California Safe Drinking Water and Toxic Enforcement Act
WARNING: This product contains chemicals known to the State of California to cause cancer and
birth defects or other reproductive harm.
Wash hands after handling.
CAUTION
To reduce the risk of injury to persons, malfunction, or damage to the product or property
when using the appliance, follow basic safety precautions, including the following:
Installation
• Avoid installing within 3 1/4 ft (1 m) of any TV or audio equipment.
• Do not use this appliance as a substitute for a ventilation fan or hood for a range.
• Unplug the appliance and wait for the fan to stop rotating before servicing or cleaning. The fan
rotates at a high speed and may cause injury.
• Do not use the product to remove toxic gas such as carbon monoxide.
• Install the product on a firm and level surface. Avoid dropping or impacts to the product.
• Provide clearance of at least 5 ft (1.5 m) from lighting appliances and at least 4 in. (10 cm)
from walls. Failure to do so may result in product discoloration or loss of cleaning
performance.
• Use only 115 V.
• This appliance is not designed for maritime use or for mobile installations such as in RVs,
trailers, or aircraft.
Operation
• This product is not intended for use in preserving animals/plants, precision equipment, art
pieces, etc. Use this appliance only for its intended purpose.
• Do not use solvents or strong detergents to clean the product. Doing so may result in fire and
product deformation.
• Unplug the product if it will remain unused for a long time.
• Do not place objects on or step on the Air Purifier.
• Insert all filters (including the pre-filter) before operating, and clean the filter regularly
following the schedule suggested in this owner's manual. Failure to do so may shorten the
effective life of the filter.
• Remove the tie from the power cord before use.
!
1,MFL68181320,영영 2016. 2. 4. 영영 11:44 Page 6

SAFETY INSTRUCTIONS 7
ENGLISH
• Allow the pre-filter to dry completely, out of direct sunlight, after washing. Do not operate
appliance with a damp filter. Do not operate appliance without pre-filter.
• Do not insert inflammables inside the product.
• Do not place the appliance where it can come into contact with the moisture from a
humidifier.
• Do not open the back panel while the product is in operation.
1,MFL68181320,영영 2016. 2. 4. 영영 11:44 Page 7

8PRODUCT OVERVIEW
ENGLISH
Dust sensor Handle
Filtration System
(Pre-Filter + 3M MERV 14 Filter
+ Deodorizing Filter)
Rear panel Gas sensor
Power cord
Display
Air outlet
Air quality indicator light
Lights to indicate the overall indoor air quality as
detected by the dust / gas sensor.
• Air Quality Levels
(contaminated) red → orange → yellow → green (clean)
❈
At start up, the air quality indicator light blinks white
for 30 seconds. After the sensor stabilizes, the
indicator displays the indoor air quality.
Back
Front
PRODUCT OVERVIEW
1,MFL68181320,영영 2016. 2. 4. 영영 11:44 Page 8

Filter Reset function Lock function
Start/Stop
button
Speed button PM indicator display Off Timer button
Filter Life light
Turbo button Indicator button
PRODUCT OVERVIEW 9
ENGLISH
Start/Stop button Starts and stops the product.
Speed button Adjusts the speed and volume of the fan.
Turbo button Cleans indoor air faster for 30 minutes.
Indicator button Toggles between PM density results for different dust particle
sizes.
Off Timer button Sets the appliance to sleep mode and automatically turns it off after
the selected amount of time.
Filter Reset function Resets operating time after replacing the filter.
Lock function Locks control panel so product won't be accidentally turned off or
settings changed by children or others.
Filter Life light Orange (Operating time: 3,600~4,000 hr)
- Time to order a replacement filter.
Red (Operating time: over 4,000 hr)
- Replace the filter.
* After replacing the filter, use the Filter Reset function to reset the
operating time.
PM density display Shows the density of dust for three different particle sizes.
Control Panel and Display
hGuide to PM (Particulate Matter)
PM10: dust particle size is equal or below 10
μ
m
(Sources include nearby fires and dust stirred up by vehicles on roads.)
PM2.5: dust particle size is equal or below 2.5
μ
m
(Sources include exhaust from motor vehicles or power plants, wood burning fires, and
some industrial processes.)
PM1.0: dust particle size is equal or below 1.0
μ
m (Sources include cigarette smoke and smog.)
1,MFL68181320,영영 2016. 2. 5. 영영 9:15 Page 9

10 PRODUCT OVERVIEW
ENGLISH
NOTE
!
• The effective life of the filters varies depending on the operational environment.
• The composition of filters can vary by model.
• Replacement filters can be purchased from a nearby LG service center or online through
LG.com.
• Use only the filters designed and approved by the manufacturer for use with this product.
Pre-Filter 3M MERV 14 Filter Deodorizing Filter
Filter name Function
Pre-Filter Filters out large particles to prolong the lifespan of the 3M MERV 14
filter.
3M MERV 14 Filter Removes fine particles such as dead ticks, pollen, cigarette smoke
(particulates), micro dust motes, and animal fur.
Deodorizing Filter Comprehensively removes odors from cigarette smoke, garbage, pets,
strong acids or bases (vinegar, bleach).
hThe life-expectancy of the filters depends on the usage environment of the air purifier.
hDo not discard the filter case. Replacement filters do not include a new case.
Multi-Stage Filtration System
1,MFL68181320,영영 2016. 2. 4. 영영 11:44 Page 10

INSTALLATION 11
ENGLISH
This product is not designed for maritime use or for mobile installations such as in RVs,
trailers, or aircraft. Failure to follow this warning can result in product failure.
• Place within reach of a power outlet.
• Make sure air inlet and outlet are free from obstacles.
• Place on a level, stable surface where air circulates freely.
• Elevate air purifier on a stable table for more efficient operation.
Tips for Using the Air Purifier
• Avoid using the air purifier while cooking strong-smelling or fried foods such as fish.
- The vaporized oil from the cooking may affect the performance and life-expectancy of the
filters and the odors may cling to the filter.
• Do not place the air purifier closer than 3 1/4 ft (1 m) to the bed.
- The fan speed in sleep mode is low, but it could cause an unwanted draft.
• Do not place the air purifier in a corner.
- Avoid surrounding the appliance with furniture and electronic equipment or crowding it into a
corner. The air purifier works best when air is free to circulate around it.
!WARNING
This appliance is not intended for use by persons (including children) with reduced physical,
sensory or mental capabilities, or lack of experience and knowledge, unless they have been
given supervision or instruction concerning use of the appliance by a person responsible for
their safety.
Children should be supervised to ensure that they do not play with the appliance.
!WARNING
This appliance has a polarized plug (one blade is wider than the other). To reduce the risk of
electric shock, this plug is intended to fit in a polarized outlet only one way. If the plug does
not fit fully in the outlet, reverse the plug. If it still does not fit, contact a qualified electrician.
Do not attempt to defeat this safety feature.
!WARNING
INSTALLATION
Choosing the Proper Location
1,MFL68181320,영영 2016. 2. 4. 영영 11:44 Page 11

12 INSTALLATION
ENGLISH
1. Pull to open the back panel.
3. Remove the filter from its packaging.
5. Align the back panel at the bottom and then
push it back into place.
2. Remove the filter from the appliance.
4. Insert the filter behind the bottom tab and
snap it into place at the top.
6. Place the air purifier on a stable, level
surface with a clear area around it for air to
circulate.
Remove
the vinyl.
Initial Installation of Filter
Remove the packaging before installing the filter.
Remove packaging from the filter before use or the product will not be able to circulate air.
!CAUTION
1,MFL68181320,영영 2016. 2. 4. 영영 11:44 Page 12

OPERATION 13
ENGLISH
Air Purification
The air purifier cleans and refreshes indoor air.
1. Press the button to turn on the air purifier.
• A chime sounds, the operation mode indicator LED lights up, and the air quality indicator light
turns on.
2. Press the Speed button to select the desired fan speed.
• Press the button repeatedly to toggle through the settings: Auto →Low →Medium →High
→Auto.
• The default mode is AUTO.
(The AUTO mode controls fan speed based on the air quality.)
• The sensor takes 30 seconds on initial startup to stabilize and prepare an air quality level
reading. After 30 seconds, the indoor air quality and PM density levels are displayed.
Indoor Air Quality Color Range
(contaminated) red →orange →yellow →green (clean)
OPERATION
…
1,MFL68181320,영영 2016. 2. 4. 영영 11:44 Page 13

14 OPERATION
ENGLISH
PM Indicator Display
1. Press the Indicator button to check the density of PM10/PM2.5/PM1.0.
• Pressing the button repeatedly toggles through to check the density of PM10 →PM2.5 →
PM1.0 in turn. The selected density displays for 10 seconds before the display reverts to the
highest measured PM level.
2. Check the dust particle size LED indicators.
• PM density is displayed based on the dust density result with the highest contamination
level.
For example, if PM10 density is 100 (normal), PM2.5 is 50 (bad), and PM1.0 is 30 (normal),
the value for PM2.5 is displayed for PM density.
Air Quality Indicator Light
Overall indoor air quality is displayed as one of four colors depending on the contamination level
of PM10, PM2.5, PM1.0, and odors.
(contaminated) red →orange →yellow →green (clean)
• The color that the air quality indicator light displays is based on the worst level among PM10,
PM2.5, PM1.0, and odor.
Turbo Function
Use this function to set the air purifier at the highest setting for 30 minutes.
1. Press the button.
2. Press the Turbo button.
• The air purifier operates at the highest setting for 30 minutes and then returns to the
previous setting.
• If the Turbo function is selected while the air purifier is in the sleep mode, the PM density
display turns off after 3 seconds, the Turbo function operates for 30 minutes, and then the
product returns to the sleep mode.
1,MFL68181320,영영 2016. 2. 4. 영영 11:44 Page 14

OPERATION 15
ENGLISH
•
In the example above, the PM1.0 density displays at 50 ug/m³ (a bad or orange level) and the dust particle
size LED indicator for PM1.0 is lit. This indicates that the PM1.0 level is higher than the PM10 or PM2.5
levels. If all the PM density levels are normal/good and the air quality indicator light is orange/red, the level
of odors is very high.
NOTE
• PM10 and PM2.5 density levels follow standards provided by the U.S. EPA (Environmental Protection
Agency).
- The overall air quality level displayed on the product may differ from the level announced by the EPA.
• The PM density level for PM1.0 is displayed in the same manner as the PM density level for PM2.5 (using
standards developed by LG Electronics).
• The displayed density of PM10 / PM2.5 could differ from the forecast of the EPA and from other
measurement devices or products.
- Indicated dust concentration values can differ from each other depending on the differences in dust
measuring methods and also from real dust concentration levels.
- The assessment of dust density was made against dust used for LG Electronics standards tests.
• The use of products which generate steam and micro particles (humidifiers, cooling devices, sprayers, etc.)
can change the micro dust density.
• Because the indoor air quality display shows the overall dust and odor level, it could differ from the density
value of PM10, PM2.5, and PM1.0
• Even in the same space, the PM10 density value could differ from other products due to air circulation.
• The displayed PM density value could change depending on the installation environment (including the
presence of sofas, beds, carpets, vacuum cleaners, humidity, smoke, bugs, oils, and other factors).
• The displayed density value of PM10/PM2.5/PM1.0 could change depending on the surrounding
environment (construction site, roadside, factory, etc.)
• The density of micro dust could be higher near exit doors, windows, and vents or anywhere where outside
air enters.
• Do not clean the sensor with anything but water. Doing so may cause product failure.
Indoor Air Quality Levels
h PM density ranges from 8 to 999 in increments of 1. PM density values follow the data
sheets provided by the sensor supplier.
Overall
air quality
Red
Orange
Yellow
Green
Status Dust density (unit
μ
g/m3)
Odor density
PM 10 PM 2.5 PM 1.0 Odor
Very Bad Equal or above
255
Equal or above
56
Equal or above
56 Strong
Weak
Bad 155~254 36~55 36~55
Normal 55~154 13~35 13~35
Good 0~54 0~12 0~12
↕
1,MFL68181320,영영 2016. 2. 4. 영영 11:44 Page 15

16 OPERATION
ENGLISH
Off Timer Function
Use this to set the air purifier in sleep mode before it turns off automatically.
1. Press the button to turn on the air purifier.
2. Press the Off Timer button to set the amount of time in sleep mode until the air purifier
automatically turns off.
• The amount of time in sleep mode can be set by pressing the Off Timer button repeatedly to
toggle through the options: 2 hours, 4 hours, 8 hours, 12 hours, disabled (reverts to normal
display).
• For example, if set for two hours the product operates for two hours in sleep mode then
automatically turns off.
Once Off Timer is set, only the Off Timer LED is lighted. All other lights on the product,
including the air quality light, are turned off. The fan is maintained at a low speed to keep noise
to a minimum. Once Off Timer is set, pressing the Off Timer button again displays the set turn
off time and wakes the display up.
3. To disable the Off Timer function, press the Off Timer button repeatedly until 12 appears in the
display. Press once more to disable the function and return the display to normal.
1,MFL68181320,영영 2016. 2. 4. 영영 11:44 Page 16

OPERATION 17
ENGLISH
Lock Function
1. Press the button.
2. Press and hold the Indicator and Off Timer buttons at the same time for 3 seconds or
until a beep sounds and the LED lights up.
• The Lock function helps protect the product from unwanted operation by children or others.
• To disable the Lock function, press and hold the Indicator and Off Timer buttons at the same
time for three seconds. A beep sounds and the LED turns off when the Lock function is
disabled.
• The Lock function cannot be set while the power cord is unplugged.
1,MFL68181320,영영 2016. 2. 4. 영영 11:44 Page 17

18 OPERATION
ENGLISH
Filter Life Light
The Filter Life light turns on based on the operating time.
The orange light turns on after 3,600 - 4,000 hours.
It is time to order a replacement filter.
The red light turns on after 4,000 hours.
It is time to replace the filter.
If the Light is Red
1.
Press the power button to turn off the product and then unplug the product
2. Open the back panel of the product and check the filter. If the filters are contaminated, clean
or replace them.
Refer to the Maintenance section of this manual for instructions on cleaning and replacing the
filters.
Resetting the Filter Life Light
Press and hold the Speed and Turbo buttons at the same time for 3 seconds or longer
(Filter Reset function).
1,MFL68181320,영영 2016. 2. 4. 영영 11:44 Page 18

MAINTENANCE 19
ENGLISH
MAINTENANCE
Cleaning the Filters
1. Turn off the power and unplug the appliance.
Then pull open the back panel.
2. Pull the filter set by the top handle to remove it from
the appliance.
• Dust may accumulate on the filter net.
• Before disassembling filter set, move the filters
to a convenient location for vacuuming.
• Place a newspaper or paper towel down to catch
any loose dust.
3. While holding the filter case over the newspaper,
press downward on the handle of the pre-filter to
separate it from the filter set.
Clean the pre-filter using a vacuum cleaner or brush.
If the filter is very dirty, rinse it under running water
after cleaning it with a vacuum cleaner.
• Allow pre-filter to dry completely, out of direct sunlight, before reinstalling.
• Do not use pre-filter while damp. Doing so may cause odor.
• Do not operate air purifier without pre-filter installed.
!CAUTION
1,MFL68181320,영영 2016. 2. 4. 영영 11:44 Page 19

20 MAINTENANCE
ENGLISH
5. Finally, disassemble the deodorizing filter
(if replacing the entire filter set).
6. After cleaning or replacing filters, assemble the filters in the
set in the reverse order from removing them. Be sure to insert
the filters behind the bottom tab and align the filter handles at
the top of the product.
7. Reassemble the back panel by aligning the bottom and then
snapping the panel up into place.
• Do not wash the 3M MERV 14 filter or the deodorizing filter with water. Replace them when
they become very dirty. Do not expose them to water during operation.
• The life-expectancy of filters may differ depending on the usage environment.
4. Next, remove the 3M MERV 14 filter (if replacing the entire filter set).
1,MFL68181320,영영 2016. 2. 4. 영영 11:44 Page 20

MAINTENANCE 21
ENGLISH
CAUTION
• Do not clean the body or display using products containing bleach or other alkalines.
• Do not clean the surface of the Air Purifier using sulfuric acid, hydrochloric acid or organic
solvents (thinners, kerosene, or others). Do not put stickers on the surface. Doing so may
damage the surface of the product.
• Do not use abrasive pads or cloths when cleaning. They may scratch the surface of the
product.
• Do not allow water inside product while cleaning the exterior. Turn off power and unplug
the power cord before cleaning. (Always check whether fan is moving.)
!
Cleaning the Exterior
Wipe the Air Purifier with a soft cloth and warm water.
The air inlet especially can accumulate dust and should be cleaned periodically.
* Contact an LG Customer Information Center for replacement filters.
Filter Maintenance Schedule
Filter types Classification Cleaning cycle Cleaning Method
Pre-Filter washable about every
month
Clean pre-filter with vacuum cleaner or
brush, followed by rinsing under running
water if very dirty.
3M MERV 14
Filter not washable,
replace
about every 12
months
* The replacement cycle for 3M MERV 14
Filter and Deodorizing Filter may vary
depending on the usage environment.
Deodorizing Filter
1,MFL68181320,영영 2016. 2. 4. 영영 11:44 Page 21

22
ENGLISH
MAINTENANCE
Cleaning the Sensor
Turn off and unplug the product.
Open the dust sensor cover.
Clean the dust sensor lens with cotton swab.
(Clean once every six months.)
CAUTION
• Use only water to clean the sensor. Failure to follow this warning can result in product
failure.
!
1,MFL68181320,영영 2016. 2. 4. 영영 11:44 Page 22

MAINTENANCE 23
ENGLISH
Storing the Product
If the product will not be used for an extended period, store it in a dry place out of direct sunlight.
1. Press the button to turn on the air purifier.
• Run the air purifier for an hour on a clear day to remove
any musty odor and mold located inside the product.
2. Press the button to turn off the air purifier and then
unplug it.
3. Remove the filters and store them tightly in a vinyl bag out
of direct sunlight.
• If the filters are stored in a humid place, they may take
on a musty or mildewy odor.
4. Clean the air purifier before storing it. Store the appliance in its vinyl cover to prevent any dust
or foreign objects from getting inside.
• Use a soft cloth when cleaning the appliance to avoid
scratching the surface.
• Store the appliance in a cool area out of direct sunlight.
5. Do not store the product where it will be exposed to high
humidity or direct sunlight.
• Doing so may result in odor, product deformation, or product malfunction.
Power plug
1,MFL68181320,영영 2016. 2. 4. 영영 11:44 Page 23

24 TROUBLESHOOTING
ENGLISH
TROUBLESHOOTING
Before Calling for Service
Problem Possible Cause Solutions
Air purifier does
not turn on
• Power cord not plugged in
• Incorrect power rating
• Plug cord securely into socket.
• Make sure outlet is rated for 115V.
Air output is weak,
product makes a
noise
• Pre-filter is clogged
• Dust accumulation on the pre-
filter
• Clean the pre-filter.
• Replace the pre-filter.
Air purification
does not work well
• Indoor air quality is very bad
• Dust has built up on the pre-
filter
• Usage area is too large
• Nearby objects are blocking air
circulation
• The product is installed in a
corner
• Ventilate the room before using the air
purifier.
• Clean or replace the pre-filter.
• Use the product in a smaller area or an
area more protected from the influx of
outside air.
• Remove nearby obstacles or move the
product to a different location.
• Move the product.
Strange odor
coming from air
outlet
• Installed in area with heavy
smoke or odors
• Odor coming from deodorizing
filter
• Very heavy smoke or odors may
degrade the performance of the filters.
Ventilate the area before using the air
purifier.
• Replace the deodorizing filter.
There is an odor,
but the Indicator
lamp does not
change.
• Gas sensor may not respond
to food odors as harmful
• Gas sensor may not respond to food
odors as harmful, but odors are
removed by the deodorizing filter.
Air quality shows
red continuously
• Air purifier may be unable to
process amount of
contamination in air
• Water or oil sprayed near air
purifier
• Try moving product to another room to
clear the indicator.
• Do not spray water or oil near the air
purifier.
Buttons do not
work • Lock function is enabled
• Press and hold Indicator and Off Timer
for 3 seconds to disable the Lock
function.
If there is a problem with the product, check the following first before calling for service.
1,MFL68181320,영영 2016. 2. 4. 영영 11:44 Page 24

TROUBLESHOOTING 25
ENGLISH
Problem Possible Cause Solutions
There has been no
change in micro
dust
concentration.
• Sensor may be dirty or blocked
by foreign material
• Air purifier may be in enclosed
area
• See instructions for cleaning sensor.
• Indoor air quality may stay the same in
an enclosed area.
The fine dust
concentration
value keeps
showing high.
• Air purifier installed in area
with constant influx of outside
air
• Levels can remain high in areas where
there is a constant influx of outside air.
Air quality light
remains
red/orange while
PM levels show
low/normal
• Air quality issue is from odor • The air quality indicator is an overall
evaluation based on odor and dust. If
an odor is strong while PM levels are
low, the light may remain on
red/orange.
The air quality
indicator differs
from the EPA
guide
• The air purifier and EPA air
quality values are measured
differently
• The EPA guide indicates an average
value during a given time period and
the air purifier's air quality indicator
measures and displays on a real-time
basis.
The filter produces
odors.
• The deodorizing filter has
become dirty
• The air purifier is being used
instead of a vent hood while
cooking
• Replace the filter. Filter life-expectancy
can vary based on usage environment.
• Filter life can be greatly reduced if the
air purifier is used while cooking
strong-smelling or oily food. Do not
use the product in place of a vent
hood. Ventilate the area during
cooking to remove strong odors and
oily splatter, then use the air purifier to
eliminate any remaining odors.
1,MFL68181320,영영 2016. 2. 4. 영영 11:44 Page 25

26 SPECIFICATIONS
ENGLISH
Depth Width
Height
The external dimensions, design and product standards may change to improve the quality of the
product.
*CADR(Clean Air Delivery Rate)
Model name AS401VSA0
Power supply 115 V~ / 60 Hz
Suggested room size 251 ft²
CADR*(ft³/min)
Tobacco Smoke 162
Dust 205
Pollen 255
Product size
(width x height x depth)
18 1/2 in. x 17 3/4 in. x 9 in.
(470 mm x 450 mm x 230 mm)
SPECIFICATIONS
1,MFL68181320,영영 2016. 2. 4. 영영 11:44 Page 26

WARRANTY 27
ENGLISH
WARRANTY (USA)
Should your LG Air Purifier fail due to a defect in materials or workmanship under normal home use, during the
warranty period set forth below, LG will at its option repair or replace the product. This limited warranty is valid
only to the original retail purchaser of the product and applies only when purchased and used within the United
States, including U.S. Territories. Proof of original retail purchase is required to obtain warranty service under
this limited warranty.
Warranty Period Scope of Warranty Remark
One (1) year from date of
original retail purchase
Any internal /
functional Parts and
Labor
LG will provide parts and labor to repair or replace
defective parts.
Ten (10) years from date of
original retail purchase
Smart
Inverter Motor
Parts Only. Customer will be responsible for any labor
or in-home service to replace defective parts.
•Replacement products and parts are warranted for the remaining portion of the original warranty period or
ninety (90) days, whichever is greater.
•Replacement products and parts may be new or remanufactured.
THIS WARRANTY IS IN LIEU OF ANY OTHER WARRANTY, EXPRESS OR IMPLIED, INCLUDING WITHOUT
LIMITATION, ANY WARRANTY OF MERCHANTABILITY OR FITNESS FOR A PARTICULAR PURPOSE. TO
THE EXTENT ANY IMPLIED WARRANTY IS REQUIRED BY LAW, IT IS LIMITED IN DURATION TO THE
EXPRESS WARRANTY PERIOD ABOVE. NEITHER THE MANUFACTURER NOR ITS U.S. DISTRIBUTOR
SHALL BE LIABLE FOR ANY INCIDENTAL, CONSEQUENTIAL, INDIRECT, SPECIAL, OR PUNITIVE
DAMAGES OF ANY NATURE, INCLUDING WITHOUT LIMITATION, LOST REVENUES OR PROFITS, OR
ANY OTHER DAMAGE WHETHER BASED IN CONTRACT, TORT, OR OTHERWISE.
Some states do not allow the exclusion or limitation of incidental or consequential damages or limitations on how
long an implied warranty lasts, so the above exclusion or limitation may not apply to you. This warranty gives you
specific legal rights and you may also have other rights that vary from state to state.
THIS LIMITED WARRANTY DOES NOT COVER:
•Service trips to deliver, pick up, or install or repair the product; instruction to the customer on operation of
the product; repair or replacement of fuses or correction of wiring or plumbing, or correction of unauthorized
repairs/installation.
•Failure of the product to perform during power failures and interrupted or inadequate electrical service.
•Damage caused by leaky or broken water pipes, frozen water pipes, restricted drain lines, inadequate or
interrupted water supply or inadequate supply of air.
•Damage resulting from operating the product in a corrosive atmosphere or contrary to the instructions outlined
in the product’s owner’s manual.
•Damage to the product caused by accidents, pests and vermin, lightning, wind, fire, floods, or acts of God.
•Damage or failure caused by unauthorized modification or alteration, or if it is used for other than the intended
purpose, or any water leakage where the unit was not properly installed.
•Damage or failure caused by incorrect electrical current, voltage, or plumbing codes, commercial or industrial
use, or use of accessories, components, or consumable cleaning products that are not approved by LG.
•Damage caused by transportation and handling, including scratches, dents, chips, and/or other damage to the
finish of your product, unless such damage results from defects in materials or workmanship and is reported
within one (1) week of delivery.
•Damage or missing items to any display, open box, discounted, or refurbished product.
•Products with original serial numbers that have been removed, altered, or cannot be readily determined. Model
and serial numbers, along with original retail sales receipts, are required for warranty validation.
•Increases in utility costs and additional utility expenses.
•Repairs when your product is used for other than normal and usual household use (e.g. commercial use, in
offices and recreational facilities) or contrary to the instructions outlined in the product’s owner’s manual.
1,MFL68181320,영영 2016. 2. 4. 영영 11:44 Page 27

28 WARRANTY
ENGLISH
The cost of repair or replacement under these excluded circumstances shall be borne by the consumer.
TO OBTAIN WARRANTY SERVICE AND ADDITIONAL INFORMATION
For additional product information, visit the LG website at http://www.lg.com
For assistance using this product or to schedule service, contact LG Electronics at 1-800-243-0000 (US).
For further assistance, write: LG Electronics, 201 James Record Road, Huntsville, Alabama 35813
•Costs associated with removal of your product from your home for repairs.
•The removal and reinstallation of the product if it is installed in an inaccessible location or is not installed in
accordance with published installation instructions, including LG’s owner’s and installation manuals.
•Damage resulting from misuse, abuse, improper installation, repair, or maintenance. Improper repair includes
use of parts not approved or specified by LG.
1,MFL68181320,영영 2016. 2. 4. 영영 11:44 Page 28

www.lg.com
MANUAL DEL USUARIO
Nombre del modelo : AS401VSA0
Purificador
de aire
Lea atentamente este manual del propietario antes de operar el
equipo y consérvelo para futuras consultas.
ESPAÑOL
2,MFL68181320,스스스 2016. 2. 4. 스스 11:45 Page 1

2TABLA DE CONTENIDO
ESPAÑOL
TABLA DE CONTENIDO
3
CARACTERÍSTICAS DEL
PRODUCTO
4
INSTRUCCIONES DE
SEGURIDAD
8
DESCRIPCIÓN GENERAL
DEL PRODUCTO
8Parte delantera
8Parte posterior
9 Panel de control y visor
10 Sistema de filtración de varias etapas
11
INSTALACIÓN
11 Selección de la ubicación correcta
11 Consejos para usar el purificador de aire
12 Instalación inicial del filtro
13
FUNCIONAMIENTO
13 Purificación de aire
14 Función Turbo
14 Visor indicador de PM
14 Luz indicadora de la calidad del aire
16 Función de apagado automático
17 Función de bloqueo
18 Luz indicadora de vida útil del filtro
19
MANTENIMIENTO
19 Limpieza de los filtros
21 Calendario de mantenimiento de los
filtros
21 Limpieza del exterior
22 Limpieza del sensor
23 Almacenamiento del producto
24
SOLUCIÓN DE
PROBLEMAS
26
ESPECIFICACIONES
27
GARANTÍA
2,MFL68181320,스스스 2016. 2. 4. 스스 11:45 Page 2

CARACTERÍSTICAS DEL PRODUCTO 3
ESPAÑOL
SISTEMA DE CALIDAD DEL AIRE INTELIGENTE
El visor de calidad del aire detecta y muestra en tiempo real los niveles de partículas en
interiores. Puede detectar partículas finas tan pequeñas como 1,0 micras.
SISTEMA DE FILTRACIÓN DE VARIAS ETAPAS
La combinación del prefiltro lavable, el filtro 3M MERV 14 y el filtro de desodorización
proporciona aire interior fresco gracias a la eliminación de contaminantes del aire invisibles.
Elimina partículas irritantes que van desde el pelo de mascotas y el polen hasta el olor a humo de
tabaco y COV.
FUNCIONAMIENTO SILENCIOSO LODECIBEL
En el modo de suspensión, el purificador de aire funciona a solo 23 dB y puede programarse para
apagarse automáticamente, lo que le permite dormirse con facilidad.
FILTRO 3M MERV 14
El filtro 3M MERV 14 capta el partículas tan pequeñas como 0,3 micrones. Entre las partículas se
incluye polen, esporas de moho, y polvo.
CARACTERÍSTICAS DEL PRODUCTO
2,MFL68181320,스스스 2016. 2. 4. 스스 11:45 Page 3

4INSTRUCCIONES DE SEGURIDAD
ESPAÑOL
INSTRUCCIONES DE SEGURIDAD
LEA TODAS LAS INSTRUCCIONES ANTES DE USARLO
Su seguridad y la de los demás son muy importantes.
Proporcionamos numerosos mensajes de seguridad importantes en este manual y en el aparato.
Lea y siga siempre todos los mensajes de seguridad.
Este es el símbolo de alerta de seguridad. Este símbolo le avisa de los peligros potenciales
que pueden causar la muerte o lesiones a usted o a otras personas. Todos los mensajes de
seguridad irán después del símbolo de alerta de seguridad y la palabra ADVERTENCIA o
PRECAUCIÓN.
Estas palabras significan:
ADVERTENCIA
Si no se siguen las instrucciones, se puede provocar la muerte o lesiones graves.
PRECAUCIÓN
Si no se siguen las instrucciones, se puede provocar lesiones leves a moderadas, o daños al
producto.
Todos los mensajes de seguridad le indicarán cuál es el peligro potencial, cómo reducir la
posibilidad de lesiones y qué puede suceder si no se siguen las instrucciones.
INSTRUCCIONES DE SEGURIDAD IMPORTANTES
ADVERTENCIA
Para reducir el riesgo de explosión, incendio, muerte, descarga eléctrica, quemaduras o
lesiones a las personas al utilizar este aparato, siga las precauciones básicas, incluidas las
siguientes:
Instalación
• No modifique ni extienda el cable de alimentación.
• No enchufe el producto a una toma de corriente que esté suelta o dañada.
• Nunca intente hacer funcionar este aparato si está dañado, funciona mal o si está
parcialmente desmontado, tiene piezas rotas o faltantes, lo que incluye un cable o enchufe
dañados.
• No utilice el producto en lugares donde pueda quedar expuesto a altos niveles de humedad o
salpicaduras de aceite, como en un baño, en el área de lavandería o cerca de la cocina.
• Conecte el producto a un circuito eléctrico con la protección, calibre y clasificación adecuados
para evitar una sobrecarga eléctrica.
• En caso de una fuga de gas (gas propano, gas licuado, etc.), no utilice este o cualquier otro
aparato. Abra una ventana o una puerta para ventilar el área inmediatamente.
• No almacene ni utilice gasolina u otros líquidos y vapores inflamables cerca de este o
cualquier otro aparato.
!
!
!
!
2,MFL68181320,스스스 2016. 2. 4. 스스 11:45 Page 4

INSTRUCCIONES DE SEGURIDAD 5
ESPAÑOL
• Si detecta un sonido extraño, un olor a productos químicos o a quemado, o humo proveniente
del producto, desconéctelo inmediatamente y póngase en contacto con un centro de
información al cliente de LG Electronics.
• Asegúrese de que el cable de alimentación no quede apretado, aplastado o se dañe debajo de
objetos pesados.
• No instale el producto bajo luz solar directa, cerca de fuentes de calor como calderas u
hornos, cerca de chimeneas u otras llamas abiertas, o en lugares húmedos o mojados.
• Mantenga los materiales de embalaje fuera del alcance de los niños. El material de embalaje
puede ser peligroso para los niños. Existe un riesgo de asfixia.
• Guarde e instale el producto en lugares donde no quede expuesto a temperaturas por debajo
del punto de congelación, ni donde quede expuesto a condiciones climáticas exteriores.
Funcionamiento
Lea todas las instrucciones antes de utilizar el producto y guarde estas instrucciones.
• Utilice este producto solo para su propósito previsto.
• No modifique los controles.
• No permita que los niños jueguen sobre o con el producto. Se debe supervisar muy bien a los
niños cuando el producto se use cerca de ellos.
• Repare o cambie inmediatamente todos los cables de alimentación que se han dañado. No
utilice un cable que muestra grietas o daño por abrasión a lo largo de su longitud o en alguno
de los extremos.
• No sujete el cable de alimentación ni toque los controles del aparato con las manos mojadas.
• No modifique ni extienda el cable de alimentación.
• Si el producto se ha sumergido, póngase en contacto con el centro de información al cliente
de LG Electronics para obtener instrucciones antes de reanudar el uso.
• Este aparato no está destinado para usarse por personas (incluidos los niños) con capacidades
físicas, sensoriales o mentales reducidas, o que no tengan experiencia ni conocimiento, a
menos que la persona responsable de su seguridad los supervise o les brinde instrucciones
sobre el uso del aparato.
• Si el cable de suministro eléctrico está dañado, debe cambiarlo únicamente el fabricante o su
agente de servicio, o una persona calificada similar a fin de evitar situaciones de peligro.
• Nunca desconecte el aparato tirando del cable de alimentación. Sujete siempre firmemente el
enchufe y tire hacia fuera de la toma de corriente.
• No ponga las manos, pegamento ni objetos metálicos cerca del puerto de succión de aire ni el
puerto de descarga del producto.
• No instale el producto en lugares donde haya exceso de humo de aceite industrial o polvo
metálico. Hacerlo podría generar un incendio o una falla del producto.
• Utilice solo la palanca para mover el producto.
• No repare ni reemplace ninguna parte del aparato. Todas las tareas de reparación y
mantenimiento las debe llevar a cabo el personal de servicio calificado, a menos que se
recomiende específicamente en este manual del propietario. Utilice solo las piezas de fábrica
autorizadas.
• Desconecte el aparato de la fuente de alimentación antes de limpiarlo e intentar alguna tarea
de mantenimiento del usuario. Apagar los controles no desconecta el aparato de la fuente de
alimentación.
2,MFL68181320,스스스 2016. 2. 4. 스스 11:45 Page 5

6INSTRUCCIONES DE SEGURIDAD
ESPAÑOL
• No desarme ni repare el producto por sí solo.
• Evite cualquier impacto en el panel frontal del aparato.
California Safe Drinking Water and Toxic Enforcement Act
(Ley de control del cumplimiento de la normativa sobre agua potable segura y productos tóxicos)
ADVERTENCIA: Este producto contiene quimicos conocidos por el Estado de California de causar
cáncer y defectos de nacimiento u otros daños reproductivos.
Lávese las manos después de
manipular.
PRECAUCIÓN
Para reducir el riesgo de lesiones a las personas, mal funcionamiento o daños al producto o
la propiedad cuando se utiliza el aparato, siga las precauciones básicas de seguridad,
incluidas las siguientes:
Instalación
• Evite la instalación a menos de 1 m (3 1/4 pies) de cualquier televisor o equipo de audio.
• No utilice este aparato como sustituto de un ventilador o una campana extractora.
• Desenchufe el aparato y espere a que el ventilador deje de girar antes de realizar el
mantenimiento o la limpieza. El ventilador gira a alta velocidad y puede causar lesiones.
• No use el producto para eliminar gases tóxicos como monóxido de carbono.
• Instale el producto en una superficie nivelada y firme. Evite dejar caer objetos en el producto
o golpearlo.
• Deje un espacio libre de al menos 1,5 m (5 pies) desde aparatos de iluminación y al menos
10 cm (4 pulg.) desde las paredes. No hacerlo puede generar decoloración del producto o
pérdida del rendimiento de la limpieza.
• Use únicamente 115 V.
• Este aparato no está diseñado para uso marítimo o para instalaciones móviles como en casas
rodantes, remolques o aeronaves.
Funcionamiento
• Este producto no está destinado para su uso en la conservación de animales y plantas,
equipos de precisión, obras de arte, etc. Utilice este aparato solo para su propósito previsto.
• No utilice disolventes ni detergentes fuertes para limpiar el producto. Hacerlo podría generar
un incendio y la deformación del producto.
• Desenchufe el producto si va a permanecer inactivo durante un largo período de tiempo.
• No coloque objetos sobre el purificador de aire ni se suba en él.
• Inserte todos los filtros (incluido el prefiltro) antes de poner en funcionamiento el aparato y
limpie el filtro periódicamente siguiendo el calendario sugerido en este manual del propietario.
No hacerlo puede acortar la vida útil del filtro.
!
2,MFL68181320,스스스 2016. 2. 4. 스스 11:45 Page 6

INSTRUCCIONES DE SEGURIDAD 7
ESPAÑOL
• Quite la amarra del cable de alimentación antes de usarlo.
• Deje que el prefiltro se seque completamente, fuera de la luz directa del sol, después de
lavarlo. No haga funcionar el aparato con un filtro húmedo. No haga funcionar el aparato sin
prefiltro.
• No inserte elementos inflamables en el producto.
• No coloque el aparato donde pueda entrar en contacto con la humedad de un humidificador.
• No abra el panel posterior del producto mientras esté en funcionamiento.
2,MFL68181320,스스스 2016. 2. 4. 스스 11:45 Page 7

8DESCRIPCIÓN GENERAL DEL PRODUCTO
ESPAÑOL
Sensor de polvo Manija
Sistema de filtración
(Prefiltro + Filtro 3M MERV 14
+ Filtro de desodorización)
Panel posterior Sensor de gas
Cable de alimentación
Visor
Salida de aire
Luz indicadora de calidad del aire
Se enciende para indicar la calidad general del aire en
interiores tal y como la detecta el sensor de
polvo / gas.
• Niveles de calidad del aire
(contaminado) rojo → naranja → amarillo → verde
(limpio)
❈
En el arranque, la luz indicadora de calidad del aire
parpadea en blanco durante 30segundos. Después
de que el sensor se estabiliza, el indicador muestra
la calidad del aire en interiores.
Parte posterior
Parte delantera
DESCRIPCIÓN GENERAL DEL PRODUCTO
2,MFL68181320,스스스 2016. 2. 4. 스스 11:45 Page 8

Función de restablecimiento de filtro Función de
bloqueo
Botón
Inicio/Detención
Botón de velocidad Visor indicador de PM
Botón del temporizador
de apagado
Luz indicadora de
vida útil del filtro
Botón Turbo Botón Indicador
DESCRIPCIÓN GENERAL DEL PRODUCTO 9
ESPAÑOL
Botón Inicio/Detención Inicia y detiene el producto.
Botón de velocidad Ajusta el volumen del ventilador.
Botón Turbo Limpia el aire en interiores más rápido durante 30 minutos.
Botón Indicador Alterna entre los resultados de densidad de PM para diferentes tamaños de
partículas de polvo.
Botón del temporizador Configura el aparato en modo de suspensión y lo apaga
de apagado automática mente después del período de tiempo seleccionado.
Función de Después de reemplazar el filtro, restablezca la luz indicadora de vida útil
restablecimiento de filtro del filtro manteniendo presionados los botones de velocidad y turbo al
mismo tiempo durante tres segundos.
Función de bloqueo Se activa o desactiva manteniendo presionados los botones del indicador y
de apagado automático al mismo tiempo durante tres segundos.
Luz indicadora de vida útil Naranja (3600 a 4000 h)
del filtro - Es necesario solicitar un filtro de repuesto.
Rojo (más de 4000 h)
- Reemplace el filtro.
* Tras el remplazo del filtro, utilice la función de restablecimiento del filtro
para restablecer la tiempo de funcionamiento.
Visor de densidad de PM Muestra la densidad del polvo para tres tamaños de partículas diferentes.
Panel de control y visor
hGuía sobre partículas (PM)
PM10: el tamaño de las partículas de polvo es igual o inferior a 10
μ
m (Entre las fuentes se
incluyen incendios cercanos y el polvo que levantan los vehículos en los caminos).
PM2.5: el tamaño de las partículas de polvo es igual o inferior a 2,5
μ
m (Entre las fuentes se
incluyen los gases de escape de los vehículos de motor o las plantas de energía, la
quema de madera y algunos procesos industriales).
PM1.0: el tamaño de las partículas de polvo es igual o inferior a 1,0
μ
m (Entre las fuentes se
incluyen el humo de cigarrillo y el smog).
2,MFL68181320,스스스 2016. 2. 4. 스스 11:45 Page 9

10 DESCRIPCIÓN GENERAL DEL PRODUCTO
ESPAÑOL
NOTA
!
• La vida útil de los filtros varía según el entorno de funcionamiento.
• La composición de los filtros puede variar según el modelo.
• Los filtros de repuesto pueden adquirirse en un centro de servicio de LG cercano o en línea
a través de LG.com.
• Utilice únicamente los filtros diseñados y aprobados por el fabricante con este producto.
Prefiltro Filtro 3M MERV 14 Filtro de desodorización
Nombre del filtro Función
Prefiltro Filtra partículas grandes para prolongar la vida útil del filtro 3M MERV 14.
Filtro 3M MERV 14 Elimina las particulas finas como garrapatas muertas, polen, humo de
cigarrillo (particulas), microparticulas de polvo, motas y pelos de animal.
Filtro de desodorización Elimina ampliamente los olores del humo de cigarrillo, basura,
mascotas, ácidos o bases fuertes (vinagre, lejía).
hLa esperanza de vida de los filtros depende del entorno de uso del purificador de aire.
hNo deseche la caja del filtro. Los filtros de reemplazo no incluyen una nueva caja.
Sistema de filtración de varias etapas
2,MFL68181320,스스스 2016. 2. 5. 스스 1:38 Page 10

INSTALACIÓN 11
ESPAÑOL
Este producto no está diseñado para uso marítimo o para instalaciones móviles como en
casas rodantes, remolques o aeronaves. Hacerlo podría generar una falla del producto.
• Coloque el aparato al alcance de una toma de corriente.
• Asegúrese de que no haya obstáculos en la admisión y salida de aire.
• Coloque el aparato sobre una superficie nivelada y estable donde el aire circule libremente.
• Elevar purificador de aire sobre una mesa estable para el funcionamiento más eficiente.
Consejos para usar el purificador de aire
• Evite utilizar el purificador de aire mientras cocina alimentos con olor fuerte o fritos, como
pescado.
- El aceite vaporizado de la cocina podría afectar el rendimiento y la vida útil de los filtros y
puede que los olores se impregnen en el filtro.
• No coloque el purificador de aire a menos de 1 m (3 1/4 pies) de la cama.
- La velocidad del ventilador en el modo de suspensión es baja, pero podría causar una corriente
desagradable.
• No coloque el purificador de aire en una esquina.
- Evite rodear el aparato con muebles y equipos electrónicos o amontonarlo en una esquina. El
purificador de aire funciona mejor cuando el aire puede circular libremente a su alrededor.
!ADVERTENCIA
Este aparato no está destinado para su uso por personas (incluidos niños) con capacidades
físicas, sensoriales o mentales reducidas, o que no tengan la experiencia ni el conocimiento
necesarios, a menos que la persona responsable de su seguridad los supervise o les brinde
instrucciones sobre el uso del aparato. Se debe supervisar a los niños para que no jueguen
con el aparato.
!ADVERTENCIA
Este aparato cuenta con un enchufe polarizado (una paleta es más ancha que la otra). Para
evitar el riesgo de descarga eléctrica, el enchufe se ha diseñado para uso en una toma
polarizada con una sola posición. Si el enchufe no encaja completamente en la toma, dé
vuelta el enchufe. Si aún así no entra, póngase en contacto con un electricista calificado. No
intente anular este elemento de seguridad.
!ADVERTENCIA
INSTALACIÓN
Selección de la ubicación correcta
2,MFL68181320,스스스 2016. 2. 4. 스스 11:45 Page 11

12 INSTALACIÓN
ESPAÑOL
1. Tire para abrir el panel posterior.
3. Quite el filtro de su embalaje.
5. Alinee el panel posterior en la parte inferior
y luego vuelva a colocarlo en su sitio.
2. Quite el filtro del aparato.
4. Inserte el filtro detrás de la pestaña inferior
y encájelo en su lugar en la parte superior.
6. Coloque el purificador de aire sobre una
superficie estable y nivelada, con una zona
despejada alrededor de este para que el
aire circule.
Retire el
vinilo.
Instalación inicial del filtro
Retire el embalaje antes de instalar el filtro.
Retire el embalaje del filtro antes de usarlo, o el producto no podrá hacer circular el aire.
!PRECAUCIÓN
2,MFL68181320,스스스 2016. 2. 4. 스스 11:45 Page 12

FUNCIONAMIENTO 13
ESPAÑOL
Purificación de aire
El purificador de aire limpia y refresca el aire en interiores.
1. Pulse el botón para encender el purificador de aire.
• Suena un zumbador y se encienden el indicador LED de modo de funcionamiento y la luz
indicadora de calidad del aire.
2. Pulse el botón Velocidad para seleccionar la velocidad que desee del ventilador.
• Pulse el botón varias veces para alternar entre los ajustes: Auto →Low →Medium →High →
Auto (Automático →Bajo →Medio →Alto →Automático).
• El modo predeterminado es AUTO (Automático).
(El modo AUTO controla la velocidad del ventilador según la calidad del aire).
• El sensor tarda 30 segundos en estabilizarse y preparar una lectura del nivel de calidad del aire
durante el arranque inicial. Después de 30 segundos, se muestra la calidad del aire en interiores
y los niveles de densidad de PM.
Gama de colores de la calidad del aire en interiores
(contaminado) rojo →naranja →amarillo →verde (limpio)
FUNCIONAMIENTO
…
2,MFL68181320,스스스 2016. 2. 4. 스스 11:45 Page 13

14 FUNCIONAMIENTO
ESPAÑOL
Visor indicador de PM
1. Presione el botón Indicador para comprobar la densidad de las partículas
PM10/PM2.5/PM1.0.
• Si presiona el botón varias veces, se comprueba de forma alternada la densidad de las
partículas PM10 →PM2,5 →PM1,0. Si se presiona el botón indicador durante el
funcionamiento, aparece en el visor la densidad de las partículas PM10/PM2,5/PM1,0
durante 10 segundos.
2. Compruebe los indicadores LED de tamaño de las partículas de polvo.
• Se muestra la densidad de PM según el resultado de densidad del polvo con el nivel de
contaminación más alto.
Por ejemplo, si la densidad de PM10 es 100 (normal), la de PM2,5 es 50 (mala) y la de PM1,0
es 30 (normal), se muestra el valor de PM2,5 para la densidad de PM.
Luz indicadora de la calidad del aire
La calidad general del aire en interiores se muestra como uno de los cuatro colores en función
del nivel de contaminación de PM10, PM2.5, PM1.0 y los olores.
(contaminado) rojo →naranja →amarillo →verde (limpio)
• El color que muestra la luz indicadora de calidad del aire se basa en el peor nivel entre PM10,
PM2,5; PM1,0 y el olor.
Función Turbo
Utilice esta función para establecer el purificador de aire en el ajuste más alto durante 30 minutos.
1. Presione el botón .
2. Presione el botón Turbo.
• El purificador de aire funciona en el ajuste más alto durante 30 minutos y después vuelve a la
configuración anterior.
• Si se selecciona la función Turbo mientras el purificador de aire está en el modo de
suspensión, el visor de densidad de PM se apaga durante 3 segundos, la función Turbo
funciona durante 30 minutos y después el producto vuelve al modo de suspensión.
2,MFL68181320,스스스 2016. 2. 4. 스스 11:45 Page 14

FUNCIONAMIENTO 15
ESPAÑOL
•
En el ejemplo anterior, la densidad de PM1.0 se muestra en 50 ug/m³ (mala o de nivel naranja) y se enciende el
indicador LED para el tamaño de las partículas de polvo de PM1.0. Esto indica que el nivel de PM1.0 es más alto
que los niveles de PM10 o PM2.5 . Si todos los niveles de densidad de PM son normales/buenos y la luz
indicadora de calidad del aire se enciende de color naranja/rojo, el nivel de los olores es muy alto.
NOTA
• Los niveles de densidad de PM10 y PM2,5 siguen las normas establecidas por la Agencia de Protección
Ambiental (EPA, Environmental Protection Agency) de Estados Unidos.
- El nivel de calidad general del aire que se muestra en el producto puede ser diferente del nivel anunciado
por la EPA.
• El nivel de densidad de PM para PM1,0 se muestra de la misma manera que el nivel de densidad de PM
para PM2,5 (usando las normas desarrolladas por LG Electronics).
• La densidad mostrada de las partículas PM10 y PM2,5 podría diferir de la previsión de la EPA y de otros
dispositivos o productos de medición.
- Los valores de concentración de polvo indicados pueden diferir entre sí en función de las diferencias de
los métodos de medición de polvo y también de los niveles reales de concentración de polvo.
- La evaluación de densidad de polvo se hizo en función del polvo que se usó para las pruebas de las
normas de LG Electronics.
• El uso de productos que generen vapor y micropartículas (humidificadores, dispositivos de refrigeración,
aerosoles, etc.) puede cambiar la densidad de las micropartículas de polvo.
• Dado que el visor de calidad del aire en interiores muestra el nivel de polvo y olores general, puede ser
diferente del valor de densidad de PM10, PM2,5 y PM1,0.
• Incluso en el mismo espacio, el valor de densidad PM10 podría diferir de otros productos debido a la
circulación de aire.
• El valor de densidad de PM que se muestra puede cambiar según el entorno de instalación (influyen la
presencia de camas, sofás, alfombras, aspiradoras, humedad, humo, insectos, aceites y otros factores).
• El valor de densidad de PM10/PM2,5/PM1,0 que se muestra puede variar según el entorno circundante
(sitio de construcción, borde de un camino, una planta, etc.).
• La densidad de las micropartículas de polvo puede ser mayor cerca de puertas de salida, ventanas y
ventilaciones, o en cualquier parte donde ingrese aire desde el exterior.
• Solo use agua para limpiar el sensor. Puede provocar la falla del producto.
Niveles de calidad del aire en interiores
h La densidad de PM varía de 8 a 999 en incrementos de 1. Los valores de la densidad de PM
siguen las hojas de datos que proporcionada el proveedor del sensor.
Calidad general
del aire
Rojo
Naranja
Amarillo
Verde
Rojo Densidad de polvo (unidad
μ
g/m3)
Densidad de olor
PM 10 PM 2.5 PM 1.0 Olor
Muy malo Igual o superior a
255
Igual o superior a
56
Igual o superior a
56 Fuerte
Débil
Malo 155~254 36~55 36~55
Normal 55~154 13~35 13~35
Bueno 0~54 0~12 0~12
↕
2,MFL68181320,스스스 2016. 2. 4. 스스 11:45 Page 15

16 FUNCIONAMIENTO
ESPAÑOL
Función de apagado automático
Utilice esta opción para configurar el purificador de aire en el modo de suspensión antes de que
se apague automáticamente.
1. Pulse el botón para encender el purificador de aire.
2. Pulse el botón Temporizador de apagado para establecer la cantidad de tiempo del modo
de suspensión hasta que se apague automáticamente el purificador de aire.
• cantidad de tiempo del modo de suspensión se puede configurar pulsando el botón de
apagado automático varias veces para alternar entre las opciones: 2 hours, 4 hours, 8 hours,
12 hours, Disable (2 horas, 4 horas, 8 horas, 12 horas, Desactivar).
• Por ejemplo, si se establece durante dos horas, el producto funciona durante dos horas en
modo de suspensión y después se apaga automáticamente.
Una vez que se ajusta el apagado automático, solo se enciende el LED de apagado automático.
Todas las demás luces del producto, incluida la luz de calidad del aire, se apagan. El ventilador
se mantiene a una velocidad baja para mantener el ruido al mínimo. Una vez que se ajusta el
apagado automático, si pulsa nuevamente el botón de apagado automático, aparecerá la hora
de apagado establecida y el visor se activará.
3. Para desactivar la función de apagado automático, pulse el botón de apagado automático varias
veces para alternar entre las opciones del modo de suspensión hasta que seleccione Disable
(Desactivar).
2,MFL68181320,스스스 2016. 2. 4. 스스 11:45 Page 16

FUNCIONAMIENTO 17
ESPAÑOL
Función de bloqueo
1. Presione el botón .
2. Mantenga pulsado los botones del indicador y de apagado automático al mismo tiempo
durante 3 segundos o hasta que suene un pitido.
• Puede impedir que los niños u otras personas realicen una operación indeseada del producto.
• Para desactivar la función de bloqueo, mantenga presionados los botones del indicador y de
apagado automático al mismo tiempo durante tres segundos.
• No se puede establecer la función de bloqueo mientras el cable de alimentación está
desconectado.
2,MFL68181320,스스스 2016. 2. 4. 스스 11:45 Page 17

18 FUNCIONAMIENTO
ESPAÑOL
Luz indicadora de vida útil del filtro
La luz indicadora de vida útil del filtro activa en función del tiempo de funcionamiento.
La luz naranja se enciende después de 3.600 ~ 4.000 horas.
Es hora de pedir un filtro de repuesto.
La luz roja se enciende después de 4.000 horas.
Es el momento de cambiar el filtro.
Si la luz es roja
1. Pulse el boton de encendido para apagar el producto y luego desconectelo.
2. Abra el panel posterior del producto y revise el filtro. Si los filtros estan contaminados,
limpielos o reemplacelos.
Consulte la sección Mantenimiento de este manual para obtener instrucciones sobre la
limpieza y el reemplazo de los filtros.
Restablecimiento de la luz indicadora de vida útil del filtro
Mantenga presionados los botones de velocidad y turbo al mismo tiempo durante 3
segundos o más (función de restablecimiento del filtro).
2,MFL68181320,스스스 2016. 2. 4. 스스 11:45 Page 18

MANTENIMIENTO 19
ESPAÑOL
MANTENIMIENTO
Limpieza de los filtros
1. Desconecte la energía y desenchufe el aparato. Luego,
tire para abrir el panel posterior.
2. Tire del conjunto del filtro por el asa superior para
sacarlo del aparato.
• Puede haber acumulación de polvo en la red del filtro.
• Antes de desmontar el conjunto de filtros, mueva
los filtros donde sea más fácil realizar la limpieza.
• Coloque una toalla de papel o una hoja de periódico
debajo para atrapar el polvo suelto.
3. Mientras sujeta la caja del filtro sobre la hoja de periódico,
presione hacia abajo el asa del prefiltro para separarlo
del conjunto del filtro.
Limpie el prefiltro con una aspiradora o un cepillo.
Si el filtro está muy sucio, enjuáguelo bajo agua corriente
después de limpiarlo con una aspiradora.
• Deje que el prefiltro se seque completamente, fuera de la luz directa del sol, antes de
volver a instalarlo.
• No utilice el prefiltro mientras esté húmedo. De lo contrario, se pueden generar olores.
• No haga funcionar el purificador de aire sin el prefiltro instalado.
!PRECAUCIÓN
2,MFL68181320,스스스 2016. 2. 4. 스스 11:45 Page 19

20 MANTENIMIENTO
ESPAÑOL
5. Finalmente, desmonte el filtro de desodorización
(si reemplaza todo el conjunto del filtro).
6. Después de limpiar o reemplazar los filtros, móntelos en el
conjunto siguiendo el orden inverso al de extracción.
Asegúrese de alinear las asas del filtro en la parte superior del
producto.
7. Alinee la parte inferior del panel posterior primero y luego
encaje el panel en su lugar.
• No lave el filtro 3M MERV 14 ni el filtro de desodorización con agua y reemplácelos cuando
estén muy sucios. No los exponga al agua durante el funcionamiento.
• La vida útil de los filtros puede variar dependiendo del entorno de uso.
4. A continuación, extraiga el filtro 3M MERV 14 (si reemplaza todo el conjunto del filtro).
2,MFL68181320,스스스 2016. 2. 4. 스스 11:45 Page 20

MANTENIMIENTO 21
ESPAÑOL
PRECAUCIÓN
• No limpie el cuerpo ni el visor con productos cuyos componentes sean lejía u otras
sustancias alcalinas.
• No limpie la superficie del purificador de aire con ácido sulfúrico, ácido clorhídrico o
disolventes orgánicos (diluyentes, queroseno u otros). No coloque autoadhesivos sobre la
superficie. Hacerlo puede dañar la superficie del producto.
• No utilice almohadillas abrasivas ni paños al limpiar. Puede rayar la superficie del producto.
• Al limpiar el producto, no deje que le entre agua. Apague la alimentación y desenchufe el
cable de alimentación antes de la limpieza. (Compruebe siempre si el ventilador está en
movimiento).
!
Limpieza del exterior
Limpie el purificador de aire con un paño suave y agua tibia.
La entrada de aire, en particular, puede acumular polvo y debe limpiarse periódicamente.
* Póngase en contacto con un centro de información al cliente de LG para obtener filtros de
reemplazo.
Calendario de mantenimiento de los filtros
Tipos de filtros Clasificación Ciclo de
limpieza Método de limpieza
Prefiltro lavable aproximadamente
cada mes
Limpie el prefiltro con una aspiradora o un
cepillo, luego enjuáguelo bajo agua
corriente si está muy sucio.
Filtro 3M
MERV 14 no lavable,
reemplazar
aproximadamente
cada 12 meses
* El ciclo de reemplazo del filtro
3M MERV 14 y del filtro de
desodorización puede variar según el
entorno de uso.
Filtro de
desodorización
2,MFL68181320,스스스 2016. 2. 4. 스스 11:45 Page 21

22
ESPAÑOL
MANTENIMIENTO
Limpieza del sensor
Abra la tapa del sensor de polvo.
Limpie la lente del sensor de polvo con un hisopo de algodón.
(Limpie una vez cada seis meses).
PRECAUCIÓN
• Utilice solo agua para limpiar el sensor. Si no se sigue esta advertencia, se pueden
provocar fallas en el producto.
!
2,MFL68181320,스스스 2016. 2. 4. 스스 11:45 Page 22

MANTENIMIENTO 23
ESPAÑOL
Almacenamiento del producto
Si el producto no va a utilizar durante un período prolongado, guárdelo en un lugar seco fuera de
la luz directa del sol.
1. Pulse el botón para encender el purificador de aire.
• Encienda el purificador de aire durante una hora en un día
claro para eliminar toda la humedad y el moho dentro del
producto.
2. Presione el botón para apagar el purificador de aire y luego
desenchúfelo.
3. Quite los filtros y guárdelos herméticamente en una bolsa de
vinilo fuera de la luz directa del sol.
• Si los filtros se guardan en un lugar húmedo,
puede que adquieran un olor a rancio o mohoso.
4. Limpie el purificador de aire antes de guardarlo. Guarde el aparato en su cubierta de vinilo para
evitar la entrada de partículas de polvo u objetos extraños en el interior.
• Utilice un paño suave para limpiar el aparato y así evitar
que se raye la superficie.
• Guarde el aparato en un lugar fresco fuera de la luz
directa del sol.
5. No guarde el producto en lugares donde pueda quedar expuesto a alta humedad o luz directa
del sol.
• Si lo hace, se pueden generar olores, deformación del producto o mal funcionamiento del
producto.
Enchufe
2,MFL68181320,스스스 2016. 2. 4. 스스 11:45 Page 23

24 SOLUCIÓN DE PROBLEMAS
ESPAÑOL
SOLUCIÓN DE PROBLEMAS
Antes de llamar al centro de servicio
Problema Causa posible Soluciones
El purificador de
aire no se
enciende
• El cable de alimentación no
está enchufado
• La potencia nominal es
incorrecta
• Enchufe el cable firmemente en la
toma de corriente.
• Asegúrese de que la toma tiene una
clasificación de 115 V.
La salida de aire es
débil, el producto
genera ruidos
• El prefiltro está obstruido
• Hay acumulación de polvo en
el prefiltro
• Limpie el prefiltro.
• Reemplace el prefiltro.
La purificación de
aire no funciona
bien
• La calidad del aire en interiores
es muy mala
• Hay acumulación de polvo en
el prefiltro
• El área de uso es demasiado
grande
• Hay objetos cercanos que
bloquean la circulación de aire
• El producto está instalado en
una esquina
• Ventile la habitación antes de usar el
purificador de aire.
• Limpie o reemplace el prefiltro.
• Utilice el producto en un área más
pequeña o un área más protegida
contra la entrada de aire exterior.
• Quite los obstáculos cercanos o
mueva el producto a una ubicación
diferente.
• Mueva el producto.
Se emite un olor
extraño por la
salida de aire
• Se ha instalado en un área con
humo u olores pesados
• Olor procedente del filtro de
desodorización
• El humo u olores pesados pueden
degradar el rendimiento de los filtros.
Ventile el área antes de usar el
purificador de aire.
• Reemplace el filtro de desodorización.
Hay un olor, pero
la luz indicadora no
cambia
• El sensor de gas podría no
responder a los olores de
alimentos como sustancias
perjudiciales
• El sensor de gas podría no responder a
los olores de alimentos como
sustancias perjudiciales, pero el filtro
de desodorización elimina los olores.
La calidad del aire
se muestra en rojo
continuamente
• Es posible que el purificador de
aire no pueda procesar la
cantidad de contaminación en
el aire
• Se ha rociado agua o aceite
cerca del purificador de aire
• Trate de mover el producto a otra
habitación para borrar el indicador.
• No rocíe agua ni aceite cerca del
purificador de aire.
Los botones no
funcionan
• La función de bloqueo está
activada • Mantenga pulsado los botones del
indicador y apagado automático
durante 3 segundos para desactivar la
función de bloqueo.
Si se produce un problema con el producto, compruebe lo siguiente antes de llamar al centro de
servicio.
2,MFL68181320,스스스 2016. 2. 4. 스스 11:45 Page 24

SOLUCIÓN DE PROBLEMAS 25
ESPAÑOL
Problema Causa posible Soluciones
No ha habido
ningún cambio en
la concentración
de micropartículas
de polvo
• El sensor puede estar sucio o
bloqueado por materiales
extraños
• El purificador de aire puede
estar en un área cerrada
• Consulte las instrucciones de limpieza
del sensor.
• La calidad del aire en interiores puede
seguir siendo la misma en un área
cerrada.
El valor de
concentración de
polvo fino sigue
apareciendo alto
• El purificador de aire está
instalado en un área con flujo
entrante constante de aire
exterior
• Los niveles pueden permanecer
elevados en áreas donde existe un
flujo entrante constante de aire
exterior.
La luz de calidad
del aire sigue
siendo roja/naranja
mientras los
niveles de PM
muestran un nivel
bajo/normal
• El problema de calidad del aire
se debe al olor • El indicador de calidad del aire es una
evaluación global basada en el olor y el
polvo. Si un olor es fuerte, mientras
que los niveles de PM son bajos, la luz
puede permanecer en rojo/naranja.
El indicador de
calidad del aire
difiere de la guía
de la EPA
• El purificador de aire y los
valores de calidad del aire de la
EPA se miden de manera
diferente
• La guía de la EPA indica un valor
promedio durante un período de
tiempo dado y el indicador de calidad
del aire del purificador de aire realiza la
medición y la muestra en tiempo real.
El filtro produce
olores
• El filtro de desodorización se
ha ensuciado
• El purificador de aire se está
usando en lugar de una
campana extractora mientras
cocina
• Reemplace el filtro. La vida útil del
filtro puede variar según el entorno de
uso.
• La vida útil del filtro puede reducirse
considerablemente si el purificador de
aire se utiliza mientras se cocinan
alimentos con olores fuertes o
grasosos. No utilice el producto en
lugar de una campana extractora.
Ventile el área mientras cocina para
eliminar olores fuertes y salpicaduras
de aceite, luego use el purificador de
aire para eliminar cualquier olor
restante.
2,MFL68181320,스스스 2016. 2. 4. 스스 11:45 Page 25

26 ESPECIFICACIONES
ESPAÑOL
Profundidad Ancho
Altura
Las dimensiones externas, el diseño y los estándares del producto pueden cambiar para mejorar
la calidad del mismo.
*CADR (Tasa de emisión de aire limpio)
Nombre del modelo AS401VSA0
Alimentación eléctrica 115 V~ / 60 Hz
Tamaño de la habitación
sugerido 251 ft²
CADR*(ft³/min)
Humo de tabaco 162
Polvo 205
Polen 255
Tamaño del producto
(ancho x altura x profundidad)
18 1/2 in. x 17 3/4 in. x 9 in.
(470 mm x 450 mm x 230 mm)
ESPECIFICACIONES
2,MFL68181320,스스스 2016. 2. 4. 스스 11:45 Page 26

GARANTÍA 27
ESPAÑOL
GARANT
Í
A
Período de la garantía Alcance de la garantía Observación
Un (1) año desde la fecha de
compra minorista original
Diez (10) años desde la fecha de
compra minorista original
Cualquier pieza
y fabricación
interna/operativa
LG proporcionará piezas y mano de obra para reparar o
reemplazar las piezas defectuosas.
Motor Inverter
inteligente
Solo piezas. El cliente será responsable de cualquier trabajo
o reparación doméstica para reemplazar las piezas
defectuosas.
ESTA GARANTÍA LIMITADA NO CUBRE:
Si el purificador de aire LG falla debido a un defecto en los materiales o la mano de obra en condiciones normales de uso
doméstico, durante el período de garantía que se establece a continuación, LG, a su opción, reparará o reemplazará el
producto. Esta garantía limitada es válida únicamente para el comprador minorista original del producto y se aplica solo se
adquiere y utiliza dentro de los Estados Unidos, incluidos los territorios de Estados Unidos. Se requiere prueba de la compra
minorista original para obtener el servicio de garantía en virtud de la presente garantía limitada.
• Los productos y las piezas de repuesto contarán con la garantía durante el tiempo restante del período de garantía original
o durante noventa (90) días, lo que sea mayor.
• Los productos y las piezas de reemplazo pueden ser nuevos o reacondicionados.
• Viajes de servicio para entregar, recoger, instalar o reparar el producto; la instrucción al cliente sobre el funcionamiento del
producto; la reparación o el reemplazo de fusibles o la corrección de cableado o tuberías, ni la corrección de las
reparaciones/instalaciones no autorizadas.
• Que el producto no funcione durante fallas eléctricas o durante un servicio eléctrico interrumpido o inadecuado.
• Los daños causados por tuberías de agua con fugas o rotas, tuberías de agua congeladas, tuberías de drenaje
restringidas, suministro de agua inadecuado o interrumpido, o un suministro de aire inadecuado.
• Los daños provocados por el funcionamiento del producto en un ambiente corrosivo o contrario a las instrucciones
descritas en el manual del propietario del producto.
• Los daños al producto causados por accidentes, plagas y parásitos, rayos, viento, incendios, inundaciones o eventos de la
naturaleza.
• Los daños o fallas causados por la modificación o alteración no autorizada, o si se utiliza para otros fines que los previstos,
o cualquier fuga de agua cuando la unidad no se ha instalado correctamente.
• Los daños o fallas causados por corriente eléctrica o voltaje incorrectos, o códigos de plomería, uso comercial o industrial,
o el uso de accesorios, componentes o productos de limpieza genéricos que no sean aprobados por LG.
• Los daños causados por el transporte y la manipulación, incluidos los rayones, abolladuras, picaduras u otros daños en el
acabado del producto, a menos que dichos daños se provoquen a partir de defectos de materiales o mano de obra, y se
haya informado en el plazo de una (1) semana desde la entrega.
• Daños o la falta de elementos en productos en exhibición, con caja abierta, con descuento o restaurados.
• Los productos con números de serie originales que se han eliminado, alterado o no se pueden determinar fácilmente. Los
números de modelo y de serie, junto con los comprobantes de venta minorista originales, son necesarios para validar la
garantía.
• Los aumentos en los costos y gastos adicionales.
• Las reparaciones cuando el producto se utiliza de manera distinta al uso doméstico normal y habitual (p. ej., uso comercial,
en oficinas e instalaciones recreativas) o contrario a las instrucciones descritas en el manual del propietario del producto.
Algunos estados no permiten la exclusión o limitación de daños incidentales o resultantes, o las limitaciones en la duración
de una garantía implícita, por lo que la exclusión o limitación anterior podría no aplicarse en su caso. Esta garantía le otorga
derechos legales específicos y también podría tener otros derechos que varían entre los estados.
ESTA GARANTÍA SUSTITUYE A CUALQUIER OTRA GARANTÍA, EXPRESA O IMPLÍCITA, INCLUIDA, SIN
LIMITACIÓN, CUALQUIER GARANTÍA DE COMERCIABILIDAD O IDONEIDAD PARA UN PROPÓSITO PARTICULAR.
EN LA MEDIDA QUE LA LEGISLACIÓN REQUIERA ALGUNA GARANTÍA IMPLÍCITA, ESTA SE LIMITARÁ A LA
DURACIÓN DEL PERÍODO DE GARANTÍA EXPRESADO ANTERIORMENTE. NI EL FABRICANTE NI SU DISTRIBUI-
DOR EN ESTADOS UNIDOS SERÁN RESPONSABLES POR DAÑOS INCIDENTALES, RESULTANTES, ESPECIALES,
INDIRECTOS O PUNITIVOS DE CUALQUIER NATURALEZA, INCLUIDA, SIN LIMITACIÓN, LA PÉRDIDA DE
INGRESOS O BENEFICIOS, O CUALQUIER OTRO DAÑO QUE SE BASE EN CONTRATO, AGRAVIO U OTRO.
2,MFL68181320,스스스 2016. 2. 4. 스스 11:45 Page 27

28 GARANTÍA
ESPAÑOL
• Los costos asociados con el retiro del producto desde su hogar para reparaciones.
• El retiro y la reinstalación del producto si se instaló en una ubicación inaccesible o no está instalado de acuerdo con las
instrucciones de instalación publicadas, incluidos los manuales de instalación y del propietario de LG.
• Los daños generados por el uso indebido, abuso e instalación, reparación o mantenimiento incorrectos. La reparación
inadecuada incluye el uso de piezas no aprobadas o especificadas por LG.
El costo de la reparación o el reemplazo bajo estas circunstancias excluidas correrán a cargo del cliente.
PARA OBTENER SERVICIO DE GARANTÍA E INFORMACIÓN ADICIONAL
Para obtener más información sobre el producto, visite el sitio web de LG en http://www.lg.com
Para obtener asistencia en el uso de este producto o para programar el servicio, póngase en contacto con LG Electronics en
el teléfono 1-800-243-0000 (EE. UU.).
Para obtener más ayuda, escriba a: LG Electronics, 201 James Record Road, Huntsville, Alabama 35813
2,MFL68181320,스스스 2016. 2. 4. 스스 11:45 Page 28

29
ESPAÑOL
2,MFL68181320,스스스 2016. 2. 4. 스스 11:45 Page 29

30
ESPAÑOL
2,MFL68181320,스스스 2016. 2. 4. 스스 11:45 Page 30

31
ESPAÑOL
2,MFL68181320,스스스 2016. 2. 4. 스스 11:45 Page 31

1,MFL68181320,영영 2016. 2. 4. 영영 11:44 Page 100
-
 1
1
-
 2
2
-
 3
3
-
 4
4
-
 5
5
-
 6
6
-
 7
7
-
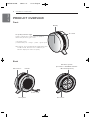 8
8
-
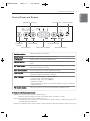 9
9
-
 10
10
-
 11
11
-
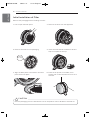 12
12
-
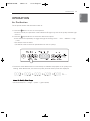 13
13
-
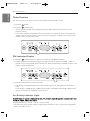 14
14
-
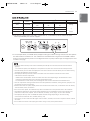 15
15
-
 16
16
-
 17
17
-
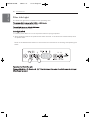 18
18
-
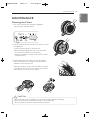 19
19
-
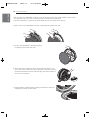 20
20
-
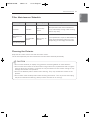 21
21
-
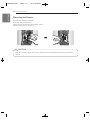 22
22
-
 23
23
-
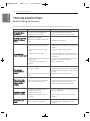 24
24
-
 25
25
-
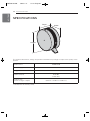 26
26
-
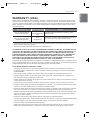 27
27
-
 28
28
-
 29
29
-
 30
30
-
 31
31
-
 32
32
-
 33
33
-
 34
34
-
 35
35
-
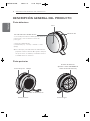 36
36
-
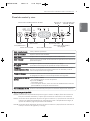 37
37
-
 38
38
-
 39
39
-
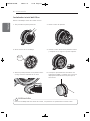 40
40
-
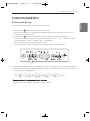 41
41
-
 42
42
-
 43
43
-
 44
44
-
 45
45
-
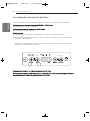 46
46
-
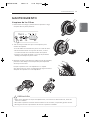 47
47
-
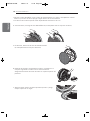 48
48
-
 49
49
-
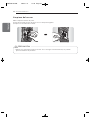 50
50
-
 51
51
-
 52
52
-
 53
53
-
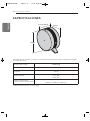 54
54
-
 55
55
-
 56
56
-
 57
57
-
 58
58
-
 59
59
-
 60
60


LG AS401VGA1 Guía del usuario
- Categoría
- Purificadores de aire
- Tipo
- Guía del usuario
- Este manual también es adecuado para
En otros idiomas
- English: LG AS401VGA1 User guide