
WA02
SISTEMA PER IL CONTROLLO DELLA CASA - WAVE
32
32
°C
10:55
10:55
MANUALE D’INSTALLAZIONE

2
I dati e le informazioni indicate in questo manuale sono da ritenersi suscettibili di modifica in qualsiasi momento e senza obbligo di preavviso da parte di CAME cancelli automatici s.p.a.
IT
INDICE
1. Legenda simboli...........................................................3
2. Destinazione d’uso e limiti d’impiego.........................3
2.1 De stina zio ne d’uso.............................................. 3
2.2 Limiti d’impiego..................................................3
3. Riferimenti normativi..................................................4
4. Descri zion e..................................................................4
4.1 Sistema per il controllo 12V d.c...........................4
4.2 Dati tecnici..........................................................4
4.3 Descrizione generale...........................................5
5. Installazione................................................................6
5.1 Verifiche preliminari............................................6
5.2 Attrezzi e materiali..............................................6
5.3 Dimensioni, interassi e fori di fissaggio.............7
5.4 Introduzione alla logica di funzionamento..........8
5.5 Collegamento cavi..............................................9
5.6 Montaggio a parete............................................10
6. Progr ammazione.......................................................11
6.1 Descrizione comandi e display..........................11
6.2 Navigazione menù.............................................12
6.3 Struttura Menu - Principale...............................13
6.3.1 Menu-Impostazioni-Lingua.......................14
6.3.2 Menu -Impostazioni-Temperatura............15
6.3.3 Menu -Impostazioni-Salva schermo.........15
6.4 Menu-Modifica utente.......................................16
6.5 Menu-Nuovo utente...........................................18
6.6 Menu-Elimina utente.........................................19
6.7 Menu-TX Radio..................................................20
6.8 Menu-Timer.......................................................21
6.9 Menu-Sveglia....................................................22
6.10 Menu-Termostato.............................................23
6.11 Menu-Orologio.................................................24
6.12 Menu-Funzione tasti.........................................24
6.13 Menu-Password...............................................25
6.14 Menu-Num. Periferica......................................28
6.15 Menu-Ingressi..................................................28
6.16 Menu-Uscite.....................................................29
7.Manutenzione........................................................30
8.Dismissione e Smaltimento.....................................30
9.Di chi ar a zio ne de l fa bbr ic ant e....................................31

3
IT
I dati e le informazioni indicate in questo manuale sono da ritenersi suscettibili di modifica in qualsiasi momento e senza obbligo di preavviso da parte di CAME cancelli automatici s.p.a.
Sistema di controllo per home automation, con interfaccia a scheda elettronica digitale WI08.
Questo simbolo indica parti da leggere con attenzione
Questo simbolo indica parti riguardanti la sicurezza
Questo simbolo indica cosa comunicare all’utente
2.1 Destinazione d’uso
2.2 Limiti d’impiego
Posizionare l’apparecchio in zone protette da urti accidentali.
2 Destinazione d’uso e Limiti d’impiego
1 Legenda simboli
“IMPORTANTI ISTRUZIONI DI SICUREZZA PER L’INSTALLAZIONE”
“ATTENZIONE: L’INSTALLAZIONE NON CORRETTA PUÓ CAUSARE GRAVI DANNI, SEGUIRE TUTTE LE ISTRUZIONI DI INSTALLAZIONE”
“IL PRESENTE MANUALE É DESTINATO ESCLUSIVAMENTE A INSTALLATORI PROFESSIONALI O A PERSONE COMPETENTI”

4
I dati e le informazioni indicate in questo manuale sono da ritenersi suscettibili di modifica in qualsiasi momento e senza obbligo di preavviso da parte di CAME cancelli automatici s.p.a.
IT
Il prodotto in oggetto è conforme alle seguenti normative: EN 60730-1, EN 60950-1.
3 Riferimenti normativi
Alimentazione: 12V DC
Assobimento massimo: 100mA (12V DC) (1.2W)
Assorbimento a riposo: 85mA (12V DC) (1.02W)
Grado di protezione: IP40
Variazione temperatura: ± 1°C
Materiale: Supporto ABS /PC/ PA6 - Placca PMMA
Frequenza Radio: 433,92 MHz
Portata radio stimata: 30m (interni all’edifi cio)
Temperatura di esercizio:
#
#
Sistema di controllo per home automation con alimentazione 12V DC
Came progetta e produce interamente in Italia.
Integrabile su tutte le scatole porta frutto ad incasso.
4.2 Dati tecnici
4.1 Sistema per il controllo 12V DC
4 Descrizione
vedi dichiarazione di conformità

5
IT
I dati e le informazioni indicate in questo manuale sono da ritenersi suscettibili di modifica in qualsiasi momento e senza obbligo di preavviso da parte di CAME cancelli automatici s.p.a.
#/- 6$#
!"'.$
32
32
°C
10:55
10:55
4.3 Descrizione generale
1
2
4
3
6
5
1- Sensore per il rilevamento temperatura
2- Pulsantiera di comando
3- Display
4- Placca di copertura fori
5- Morsettiera di alimentazione
6- Morsettiera per il collegamento a WI08

6
I dati e le informazioni indicate in questo manuale sono da ritenersi suscettibili di modifica in qualsiasi momento e senza obbligo di preavviso da parte di CAME cancelli automatici s.p.a.
IT
Prima di procedere all’installazione dell’automazione è necessario:
• Verificare che il punto di fissaggio sia protetto da urti e che sia resistente. Il fissaggio deve essere fatto con viti,
tasselli, ecc. idonei al tipo di superficie;
• Predisporre adeguate tubazioni e canaline per il passaggio dei cavi elettrici garantendone la protezione contro il
danneggiamento meccanico;
5 .1 Verifiche preliminari
5.2 Attrezzi e materiali
Assicurarsi di avere tutti gli strumenti e il materiale necessario per effettuare l’installazione nella massima sicu-
rezza e secondole normative vigenti. In figura alcuni esempi di attrezzatura per l’installatore.
5 Installazione

7
IT
I dati e le informazioni indicate in questo manuale sono da ritenersi suscettibili di modifica in qualsiasi momento e senza obbligo di preavviso da parte di CAME cancelli automatici s.p.a.
5.3 Dimensioni, Interassi e fori di fissaggio
117
80
46.5
9.5 37
75.5
50
83.5
38

8
I dati e le informazioni indicate in questo manuale sono da ritenersi suscettibili di modifica in qualsiasi momento e senza obbligo di preavviso da parte di CAME cancelli automatici s.p.a.
IT
5.4 Introduzione alla logica di funzionamento del prodotto
Transponder
Relè remoti (WI08)
Radio
RS 485
IN OUT
Tasti
Termostato
Timer
IN
Wave permette di associare un comando “IN” del tipo: transponder, tasti, termostato e timer, a un’istruzione in
uscita “OUT” che può essere un codice radio o un contatto relè o il collegamento a un altro dispositivo (solo con
WI08).
Per esempio: si possono comandare le luci del giardino sia con il timer sia con pulsante o transponder.

9
IT
I dati e le informazioni indicate in questo manuale sono da ritenersi suscettibili di modifica in qualsiasi momento e senza obbligo di preavviso da parte di CAME cancelli automatici s.p.a.
#/- 6$#
!"'.$
5.5 Collegamento cavi
WA02
LN
AB
GND
NC NO CNC NO CNC NO CNC NO CNC NO CNC NO CNC NO CNC NO C
AB
GND
+ 12V DC- + 12V DC-
Scheda WI08
Alimentazione
230VAC

10
I dati e le informazioni indicate in questo manuale sono da ritenersi suscettibili di modifica in qualsiasi momento e senza obbligo di preavviso da parte di CAME cancelli automatici s.p.a.
IT
5.6 Montaggio a parete
1 2
3

11
IT
I dati e le informazioni indicate in questo manuale sono da ritenersi suscettibili di modifica in qualsiasi momento e senza obbligo di preavviso da parte di CAME cancelli automatici s.p.a.
32
32
°C
10:55
10:55
01
01
1
2
3
4
5
6
7
8
Il tasto ENTER
32 C
10:55
01
1
serve per :
- entrare nei menu
- confermare e memorizzare il valore impostato
Il tasto ESC
32 C
10:55
01
1
serve per :
- uscire dai menu
- annulla le modifi che
- tornare indietro nei menu editabili
I tasti
32 C
10:55
01
1
32 C
10:55
01
1
servono per :
- spostarsi da una voce di menu a un’altra
- incrementare o decrementare un valore
6 Programmazione
6.1 Descrizione comandi e display
MENU
MENU
Impostazioni
Impostazioni
Modifica Utente
Modifica Utente
Nuovo Utente
Nuovo Utente
Elimina Utente
Elimina Utente
Indicatore di stato (in-
dica il menu dentro il
quale si sta navigando)
}Voce selezionata
Voci menu: selezionabili con
i tasti freccia
Termostato impostato
Timer impostato
Sveglia impostata
Relè attivo
1
2
3
4
5
6
7
8
01
01
Relè non attivo
N° periferica

12
I dati e le informazioni indicate in questo manuale sono da ritenersi suscettibili di modifica in qualsiasi momento e senza obbligo di preavviso da parte di CAME cancelli automatici s.p.a.
IT
32
32
°C
10:55
10:55
6.2 Navigazione Menu
Per entrare nel
menu principale,
tenere premuto il
tasto ENTER
MENU
MENU
Impostazioni
Impostazioni
Modifica Utente
Modifica Utente
Nuovo Utente
Nuovo Utente
Elimina Utente
Elimina Utente
Per scegliere la voce desiderata,
spostarsi con le FRECCE
MENU
MENU
Impostazioni
Impostazioni
Modifica Utente
Modifica Utente
Nuovo Utente
Elimina Utente
Elimina Utente
CONFERMI (SI)
CONFERMI (SI)
Nuovo Utente
Nuovo Utente
?
MENU
MENU
Impostazioni
Impostazioni
Modifica Utente
Modifica Utente
Nuovo Utente
Elimina Utente
Elimina Utente
CONFERMI (NO)
CONFERMI (NO)
Nuovo Utente
Nuovo Utente
?
Per entrare nel sot-
to menu, premere
il tasto ENTER
Per selezionare, spostarsi
con le FRECCE
Premendo il tasto Esc
si torna sempre al
menu precedente
CONFERMI (SI)
CONFERMI (SI)
Nuovo Utente
Nuovo Utente
?Premere ENTER per
confermare

13
IT
I dati e le informazioni indicate in questo manuale sono da ritenersi suscettibili di modifica in qualsiasi momento e senza obbligo di preavviso da parte di CAME cancelli automatici s.p.a.
6.3 Struttura Menu - Principale
Impostazioni
Impostazioni
Modifica utente
Modifica utente
Nuovo utente
Nuovo utente
Elimina utente
Elimina utente
TX Radio
TX Radio
Timer
Timer
Sveglia
Sveglia
Termostato
Termostato
Orologio
Orologio
Funz. Tasti
Funz. Tasti
Password
Password
Tenendo premuto il tasto ENTER per alcuni secondi si
entra nel menu principale (primo livello)
Per spostarsi da una voce di menu a un’altra muoversi con
le FRECCE
Premere ENTER per confermare (si accede al secondo
livello)
Premendo il tasto Esc si
torna sempre al menu
precedente
Num. Periferica
Num. Periferica
Ingressi
Ingressi
Uscite
Uscite

14
I dati e le informazioni indicate in questo manuale sono da ritenersi suscettibili di modifica in qualsiasi momento e senza obbligo di preavviso da parte di CAME cancelli automatici s.p.a.
IT
6.3.1 Menu - Impostazioni - Lingua
ENGLISH
ENGLISH
FRANCAIS
FRANCAIS
DEUTSCH
DEUTSCH
ESPANOL
ESPANOL
TemperaturaTemperatura
Salva SchermoSalva Schermo
Impostazioni
Impostazioni
ITALIANO
ITALIANO
32 C
10:55
01
1
Lingua
Lingua
32 C
10:55
01
1
Modifica utente
Modifica utente
Nuovo utente
Nuovo utente
32 C
10:55
01
1
Selezionare la lingua prescelta e confermare premendo ENTER

15
IT
I dati e le informazioni indicate in questo manuale sono da ritenersi suscettibili di modifica in qualsiasi momento e senza obbligo di preavviso da parte di CAME cancelli automatici s.p.a.
6.3.2 Menu - Impostazioni - Temperatura
6.3.3 Menu - Impostazioni - Screensaver
Selezionare l’unita di misura della temperatura e confermare premendo ENTER
Temperatura
Temperatura
Salva SchermoSalva Schermo
Celsius
Celsius
LinguaLingua
Fahrenheit
Fahrenheit
Impostazioni
Impostazioni
32 C
10:55
01
1
Modifica utente
Modifica utente
Nuovo utente
Nuovo utente
32 C
10:55
01
1
32 C
10:55
01
1
Selezionare lo screensaver e confermare premendo ENTER
TemperaturaTemperatura
Salva Schermo
Salva Schermo
Impostazioni
Impostazioni
Ora
Ora
32 C
10:55
01
1
LinguaLingua
32 C
10:55
01
1
Data
Data
Logo CAME
Logo CAME
32 C
10:55
01
1
Modifica utente
Modifica utente
Nuovo utente
Nuovo utente

16
I dati e le informazioni indicate in questo manuale sono da ritenersi suscettibili di modifica in qualsiasi momento e senza obbligo di preavviso da parte di CAME cancelli automatici s.p.a.
IT
SELEZ. UTENTE
SELEZ. UTENTE
Nuovo n..
Nuovo n..
Nuovo002
Nuovo002
Nuovo001
Nuovo001
6.4 Menu - Modifica utente
Modifica Utente
Modifica Utente
USCITA
USCITA
NOME
NOME
CODICE
CODICE
Modifi ca Utente: Permette di modifi care le caratteristiche del singolo utente (codice, nome, uscita associata)
ImpostazioniImpostazioni
Modifica utente
Modifica utente
Nuovo utente
Nuovo utente
32 C
10:55
01
1
32 C
10:55
01
1
Selezionare l’utente da
modifi care spostandosi con le
frecce. Confermare premendo
ENTER
Nuovo001
Nuovo001
32 C
10:55
01
1
32 C
10:55
01
1
Nel menu di modifi ca
del singolo utente, si
possono
selezionare il para-
metri da cambiare
spostandosi con le
FRECCE. Una volta
selezionato quello da
modifi care confermare
premendo ENTER

17
IT
I dati e le informazioni indicate in questo manuale sono da ritenersi suscettibili di modifica in qualsiasi momento e senza obbligo di preavviso da parte di CAME cancelli automatici s.p.a.
CODICE
CODICE
Modifica Utente
Modifica Utente
nuovo001
nuovo001
NUOVO CODICE
NUOVO CODICE
NOME
NOME
Modifica Utente
Modifica Utente
nuovo001
nuovo001
nuovo001
n
Premere ENTER
32 C
10:55
01
1
per :
- Passare alla successiva lettera da modifi care
- confermare le modifi che (tenendolo premuto)
Premere il tasto ESC
32 C
10:55
01
1
per :
- ritornare alla lettera precedente
- ritornare al livello precedente, senza salvare le mo-
difi che (tenendolo premuto)
Premere i tasti freccia
32 C
10:55
01
1
32 C
10:55
01
1
per :
- cambiare lettera
Selezionando la voce NOME
si entra nell’area di
modifi ca del nome utente.
6.4 Menu - Modifica utente
32 C
10:55
01
1
32 C
10:55
01
1
è possibile memorizzare un codice transponder
e associarlo all’utente selezionato, avvicinando
la tessera al Wave per far riconoscere il codice
entro 10 s

18
I dati e le informazioni indicate in questo manuale sono da ritenersi suscettibili di modifica in qualsiasi momento e senza obbligo di preavviso da parte di CAME cancelli automatici s.p.a.
IT
USCITA
USCITA
nuovo001
nuovo001
USCITA
USCITA
USCITA 1
USCITA 1
Modifica Utente
Modifica Utente
Per selezionare l’uscita da
associare spostarsi con i
tasti freccia e confermare
premendo Enter
6.4 Menu - Modifica utente
Con USCITA si associano dei comandi all’utente. Posono essere suddivisi in due gruppi: il primo è defi nito
uscita relè 1÷ 8 e sono dei contatti fi sici (NO,
NC fi no ad un massimo di otto); il secondo è
un’uscita radio (se ne possono inserire fi no a
quattro diverse)
6.5 Menu - Nuovo utente
CONFERMI (NO)
CONFERMI (NO)
Nuovo Utente
Nuovo Utente
?
Per creare un nuovo utente
spostarsi con i tasti freccia sul
SI e confermare premendo Enter.
Il menu modifi ca utente si attiva
automaticamente. Per impostare
i dati si veda cap. 6.4
Modifica utente
Modifica utente
Nuovo utente
Nuovo utente
32 C
10:55
01
1
Elimina Utente
Elimina Utente
32 C
10:55
01
1
32 C
10:55
01
1

19
IT
I dati e le informazioni indicate in questo manuale sono da ritenersi suscettibili di modifica in qualsiasi momento e senza obbligo di preavviso da parte di CAME cancelli automatici s.p.a.
6.6 Menu - Elimina Utente
CONFERMI (NO)
CONFERMI (NO)
Elimina Utente
Elimina Utente
Nuovo002
Nuovo002
?
Elimina Utente: Si elimina un utente già inserito
SELEZ. UTENTE
SELEZ. UTENTE
Nuovo n..
Nuovo n..
Nuovo002
Nuovo002
Nuovo001
Nuovo001
ImpostazioniImpostazioni
Modifica utente
Modifica utente
Nuovo utente
Nuovo utente
32 C
10:55
01
1
32 C
10:55
01
1
Elimina Utente
Elimina Utente
32 C
10:55
01
1
TX RadioTX Radio
Per confermare l’operazione spostarsi sul SI con i tasti freccia e confermare premendo Enter.

20
I dati e le informazioni indicate in questo manuale sono da ritenersi suscettibili di modifica in qualsiasi momento e senza obbligo di preavviso da parte di CAME cancelli automatici s.p.a.
IT
6.7 Menu - TX Radio
TX Radio
TX Radio
CANALE RADIO:1
CANALE RADIO:1
ATTESA
ATTESA
Per selezionare il canale radio
da memorizzare spostarsi
con i tasti freccia e confer-
mare premendo Enter
TX Radio
TX Radio
1
CANALE RADIO
CANALE RADIO
Elimina Utente
Elimina Utente
TX Radio
TX Radio
32 C
10:55
01
1
TimerTimer
32 C
10:55
01
1
Dal menu TX RADIO è possibile associare un codice di un trasmettitore CAME a un’uscita, così da poterlo
“ripetere” e controllare gli automatismi direttamente con tastiera o con transponder da WAVE.
Inviare il codice radio mediante
trasmettitore entro 10 secondi
(come indicato in fi gura). L’avve-
nuta memorizzazione è confermata
dalla visualizzazione del codice sul
display. Utilizzare trasmettitori serie:
Top 433.92MHz
o
Tam 433.92MHz

21
IT
I dati e le informazioni indicate in questo manuale sono da ritenersi suscettibili di modifica in qualsiasi momento e senza obbligo di preavviso da parte di CAME cancelli automatici s.p.a.
6.8 Menu - Timer
ELIMINA
ELIMINA
NUOVO
NUOVO
Timer
Timer
MODIFICA
MODIFICA
Per creare un nuovo interval-
lo spostarsi con i tasti freccia
su NUOVO e confermare
premendo Enter ...
ORA
ORA
08
08
Timer
Timer
ATTIVAZIONE
ATTIVAZIONE
... una volta creato, verrà
richiesta l’ora, i minuti, poi il
giorno di attivazione, e quale
comando si vuole associare
dare (uscita locale, o una delle
uscite radio)...
Con TIMER si possono associare comandi a un intervallo di tempo prefi ssato.
... successivamente impostare il giorno
di disattivazione. Verranno richieste le
stesse informazioni, così da creare un
intervallo preciso di tempo.
TX RadioTX Radio
32 C
10:55
01
1
Timer
Timer
32 C
10:55
01
1
SvegliaSveglia
Oltre alla creazione di un nuovo
“TIMER” si possono
MODIFICARE
o
ELIMINARE
quelli già esistenti.
Timer
Timer
ELIMINA
ELIMINA
NUOVO
NUOVO
MODIFICA
MODIFICA
ORA
ORA
08
08
Timer
Timer
DISATTIVAZIONE
DISATTIVAZIONE
32
32
°C
10:55
10:55
Una volta imposta-
to il Timer, compa-
rirà questo simbolo
sul display.

22
I dati e le informazioni indicate in questo manuale sono da ritenersi suscettibili di modifica in qualsiasi momento e senza obbligo di preavviso da parte di CAME cancelli automatici s.p.a.
IT
6.9 Menu - Sveglia
Sveglia
Sveglia
1
SELEZIONA
SELEZIONA
Selezionare quale delle due
sveglie si vuole impostare.
Verranno richiesti l’ora, i
minuti, e il tipo di suone-
ria. Confermare premendo
Enter .
32 C
10:55
01
1
TimerTimer
32 C
10:55
01
1
Sveglia
Sveglia
TermostatoTermostato
ORA
ORA
08
08
Timer
Timer
DISATTIVAZIONE
DISATTIVAZIONE
32
32
°C
10:55
10:55
Una volta impostata
la sveglia/e, compa-
rirà questo
simbolo sul display.
Con SVEGLIA si possono impostare due avvisi acustici

23
IT
I dati e le informazioni indicate in questo manuale sono da ritenersi suscettibili di modifica in qualsiasi momento e senza obbligo di preavviso da parte di CAME cancelli automatici s.p.a.
6.10 Menu - Termostato
Termostato
Termostato
20
20
o
o
C
ATTIVAZIONE
ATTIVAZIONE
32 C
10:55
01
1
OrologioOrologio
32 C
10:55
01
1
SvegliaSveglia
Termostato
Termostato
ORA
ORA
08
08
Timer
Timer
DISATTIVAZIONE
DISATTIVAZIONE
32
32
°C
10:55
10:55
Una volta impostato
il termostato, com-
parirà questo
simbolo sul display.
Con Termostato si può impostare un intervallo di temperatura, nel quale Wave attiva un contatto.
Per creare un nuovo intervallo
spostarsi con i tasti FRECCIA
sulla soglia (temperatura) di
attivazione prescelta, confer-
mare premendo ENTER. Ripe-
tere l’operazione per la scelta
della soglia di disattivazione;
confermare il funzionamento
spostandosi con i tasti
FRECCIA su ABILITATO e
premere ENTER.
per disabilitare il funzionamen-
to spostarsi con le FRECCE
su DISABILITATO e premere
ENTER.

24
I dati e le informazioni indicate in questo manuale sono da ritenersi suscettibili di modifica in qualsiasi momento e senza obbligo di preavviso da parte di CAME cancelli automatici s.p.a.
IT
6.11 Menu - Orologio
Orologio
Orologio
21
21
ORA
ORA
Verrà chiesto l’inserimento di ora,
minuti, secondi, anno, mese e gior-
no. Per inserirli procedere come per
le impostazioni precedenti.
(con i tasti freccia per la modifi ca
del valore e con Enter per la
conferma).
32 C
10:55
01
1
Orologio
Orologio
32 C
10:55
01
1
Funz. Tasti
Funz. Tasti
TermostatoTermostato
Con Orologio si setta l’orario e la data corrente di Wave.
Funz. Tasti
Funz. Tasti
USCITA RELE’
USCITA RELE’
TASTO
TASTO
32 C
10:55
01
1
OrologioOrologio
32 C
10:55
01
1
Funz. Tasti
Funz. Tasti
Password
Password
6.12 Menu - Funzione tasti
Con Funzione tasti si può associare ai due pulsanti una determinata funzione selezionabile tra: uscita
relè o uno dei 4 codici radio.
Per associare un comando a uno
dei due tasti spostarsi con le
frecce sulla funzione prescelta,
confermare premendo enter.

25
IT
I dati e le informazioni indicate in questo manuale sono da ritenersi suscettibili di modifica in qualsiasi momento e senza obbligo di preavviso da parte di CAME cancelli automatici s.p.a.
6.13 Menu - Password
32 C
10:55
01
1
Funz. Tasti
Funz. Tasti
32 C
10:55
01
1
Password
Password
Con Password si limita l’accesso alle funzioni di Wave
Password
Password
MODIFICA
MODIFICA
DISABILITATO
DISABILITATO
32 C
10:55
01
1
ABILITATO
ABILITATO
32 C
10:55
01
1
32 C
10:55
01
1
MODIFICA PASSW.
MODIFICA PASSW.
CODICE 2
CODICE 2
CODICE 1
CODICE 1
TRASP 1
TRASP 1
TRASP 2
TRASP 2
32 C
10:55
01
1
CODICE
ODICE
1
1
ELIMINA PASSW.
ELIMINA PASSW.
NUOVA PASSWORD
NUOVA PASSWORD
32 C
10:55
01
1
Vedi pag. 26
fi g. A
32 C
10:55
01
1
Vedi pag. 26
fi g. B
La funzione Abilita o Disabilita permette di
rendere operativa la Password.
Con codice si in-
tende un numero
di 4 cifre, invece
con transp. si
utilizza una tes-
sera transponder
per effettuare
l’accesso.
Nuova password permette di creare
un nuovo codice. Elimina password
permette di cancellare un codice già
esistente
32 C
10:55
01
1
Vedi pag. 27

26
I dati e le informazioni indicate in questo manuale sono da ritenersi suscettibili di modifica in qualsiasi momento e senza obbligo di preavviso da parte di CAME cancelli automatici s.p.a.
IT
6.13 Menu - Password
32 C
10:55
01
1
CONFERMI (NO)
CONFERMI (NO)
ELIMINA PASSW.
ELIMINA PASSW.
?
32 C
10:55
01
1
NUOVA PASSWORD
NUOVA PASSWORD
DIGITARE CODICE
DIGITARE CODICE
1234
1234
5678
5678
90<>
90<>
1
1000
1
DIGITARE CODICE
DIGITARE CODICE
1234
1234
5678
5678
90<>
90<>
1
1000
1
Per confermare l’operazione spostarsi con i tasti FRECCIA sul
SI confermare premendo ENTER.
Per scegliere un valore spostarsi con i tasti FRECCIA, selezio-
narlo e confermare premendo ENTER. Ripetere l’operazione
fi no all’inserimento del codice a 4 cifre desiderato.
Quando verrà richiesta la password all’accesso al menu di WAVE
procedere come sopradescritto per inserire il codice.
fi g. A
fi g. B

27
IT
I dati e le informazioni indicate in questo manuale sono da ritenersi suscettibili di modifica in qualsiasi momento e senza obbligo di preavviso da parte di CAME cancelli automatici s.p.a.
6.13 Menu - Password
32 C
10:55
01
1
TRASP. 1
TRASP. 1
ELIMINA PASSW.
ELIMINA PASSW.
NUOVA PASSWORD
NUOVA PASSWORD
CONFERMI (NO)
CONFERMI (NO)
ELIMINA PASSW.
ELIMINA PASSW.
?
Per confermare l’operazione
spostarsi con le
FRECCE su SI e confermare
premendo ENTER
32 C
10:55
01
1
32 C
10:55
01
1
32 C
10:55
01
1
TRASP 1
TRASP 1
NUOVO CODICE
NUOVO CODICE
Selezionando NUOVA PAS-
SWORD apparirà una barra che
indica il tempo per l’inserimento
del codice. Passare la tessera
vicino al Wave per permettere il
riconoscimento del codice.
Quando verrà richiesta la pas-
sword all’accesso del menu
principale passare la tessera (con
funzione) “Password“ su WAVE.

28
I dati e le informazioni indicate in questo manuale sono da ritenersi suscettibili di modifica in qualsiasi momento e senza obbligo di preavviso da parte di CAME cancelli automatici s.p.a.
IT
6.14 Menu - Num. Periferica
32 C
10:55
01
1
Password
Password
32 C
10:55
01
1
Num. Periferica
Num. Periferica
Con Num. Periferica si associa un identifi cativo nel caso di più Wave collegati.
Num.Periferica
Num.Periferica
01
01
SELEZIONA
SELEZIONA
Per assegnare un numero alla
periferica spostarsi con le frecce
sull numero prescelto, e confer-
mare premendo ENTER.
N.B. In un sistema a più di un Wave è
necessario che tutti abbiano un numero di
periferica diverso ,e che almeno uno (master)
sia associato al numero “1”.
32 C
10:55
01
1
Num. Periferica
Num. Periferica
32 C
10:55
01
1
Ingressi
Ingressi
6.15 Menu - Ingressi
Con Ingressi si può associare ad un comando (ingresso) un relè (uscita).
SELEZ.INGRESSO
SELEZ.INGRESSO
USCITA 1
USCITA 1
1
1
DISABILITATO
DISABILITATO
USCITA 2USCITA 2
32 C
10:55
01
1
Ingressi
Ingressi
USCITA 1
USCITA 1
1
Per assegnare un nomero do perife-
rica all’uscita spostarsi con le frecce
sul numero prescelto, e confermare
premendo ENTER.

29
IT
I dati e le informazioni indicate in questo manuale sono da ritenersi suscettibili di modifica in qualsiasi momento e senza obbligo di preavviso da parte di CAME cancelli automatici s.p.a.
6.16 Menu - Uscite
Con Uscite si seleziona il metodo e il tempo di intervento di un relè di WA08.
32 C
10:55
01
1
IngressiIngressi
32 C
10:55
01
1
Uscite
Uscite
SELEZ.USCITA
SELEZ.USCITA
4 TEMP. 1 s
4 TEMP. 1 s
3 Flip - Flop
3 Flip - Flop
1 TEMP. 10:50
1 TEMP. 10:50
2 TEMP. 1 s
2 TEMP. 1 s
Per selezionare un’uscita da
impostare, spostarsi con le
frecce sulla funzione prescelta,
confermare premendo i tasti
ENTER...
Uscite
Uscite
TEMP. 1 s
TEMP. 1 s
1
Per selezionare il metodo e il
tempo d’intervento spostarsi
con i tasti freccia e confer-
mare premendo Enter.
Si puo impostare un’intervallo di tempo
d’intervento che va da 1 s a 21:10 h op-
pure si puo impostare un funzionamento
bistabile con la voce FLIP-FLOP.

30
I dati e le informazioni indicate in questo manuale sono da ritenersi suscettibili di modifica in qualsiasi momento e senza obbligo di preavviso da parte di CAME cancelli automatici s.p.a.
IT
7 Manutenzione
I nostri prodotti sono realizzati con materiali diversi. La maggior parte di essi (alluminio, plastica, ferro, cavi
elettrici) è assimilabile ai rifi uti solidi e urbani. Possono essere riciclati attraverso la raccolta e lo smaltimento differen-
ziato nei centri autorizzati.
Altri componenti (schede elettroniche, batterie dei trasmettitori etc.) possono invece contenere sostanze inquinanti.
Vanno quindi rimossi e consegnati a ditte autorizzate al recupero e allo smaltimento degli stessi.
Wave non ha bisogno di manutenzioni periodiche. Per la pulizia si raccomanda di usare un panno umido e di evitare
agenti chimici o materiali abrasivi, che potrebbero rovinare le superfi ci del prodotto.
Per qualsiasi problema rivolgersi all’assistenza.
8 Dismissione e Smaltimento

31
IT
I dati e le informazioni indicate in questo manuale sono da ritenersi suscettibili di modifica in qualsiasi momento e senza obbligo di preavviso da parte di CAME cancelli automatici s.p.a.
9 Dichiarazione del fabbricante
DICHIARAZIONE CE DI CONFORMITÀ
Ai sensi della Direttiva Bassa Tensione 2006/95/CE
CAME Cancelli Automatici S.p.A.
via Martiri della Libertà, 15
31030 Dosson di Casier - Treviso - ITALY
tel (+39) 0422 4940 - fax (+39) 0422 4941
internet: www.came.it - e-mail: [email protected]
Dichiara sotto la propria responsabilità, che i seguenti prodotti per
l’automazione di cancelli e porte da garage, così denominati:
WA02
… sono conformi ai requisiti essenziali ed alle disposizioni pertinenti,
stabilite dalle seguenti Direttive e alle parti applicabili delle Normative di
riferimento in seguito elencate.
--- DIRETTIVE ---
2006/95/CE DIRETTIVA BASSA TENSIONE
2014/30/UE DIRETTIVA COMPATIBILITÀ ELETTROMAGNETICA
--- NORMATIVE ---
AMMINISTRATORE DELEGATO
Sig. Gianni Michielan
Codice di riferimento per richiedere una copia conforme all’originale: DDC L IT W001
EN 300 330-1/-2
EN 301 489-1/-3
EN 60730
EN 60950

CAME cancelli automatici s.p.a.
VIA MARTIRI DELLA LIBERTÀ 15
31030 DOSSON DI CASIER - TV - ITALY
www.came.it
Per assistenza e informazioni tecniche
.5-%2/6%2$%
Cod. 119RU28 ver 0.1 05/07 © CAME cancelli automatici s.p.a.

WA02
32
32
°C
10:55
10:55
AUTOMATED HOME CONTROL SYSTEM
INSTALLATION MANUAL

2
The data and information shown in this manual may be changed by CAME cancelli automatici s.p.a. at any time without prior warning
EN
INDICE
1. Legend of symbols.......................................................3
2. Intended use and restrictions.......................................3
2.1 Int ende d use........................................................ 3
2.2 Usage restrictions...............................................3
3. Regulator y framework.................................................4
4. Description..................................................................4
4.1 12V DC Control system.......................................4
4.2 Technical Data....................................................4
4.3 General Description............................................5
5. Installation..................................................................6
5.1 Preliminary checks.............................................6
5.2 Tools and materials.............................................6
5.3 Dimensions, centre distance and securing holes.7
5.4 Introduction to the functioning logic...................8
5.5 Connecting cables...............................................9
5.6 Wall mounting...................................................10
6. Programming............................................................11
6.1 Description of commands and the display.11
6.2 Browsing the menu............................................12
6.3 Menu Structure - Main.......................................13
6.3.1 Menu-Settings-Language.........................14
6.3.2 Menu -Settings-Temperature...................15
6.3.3 Menu -Settings-Screensaver....................15
6.4 Menu-Modify user.............................................16
6.5 Menu-New user..................................................18
6.6 Menu-Remove user............................................19
6.7 Menu-TX Radio..................................................20
6.8 Menu-Timer.......................................................21
6.9 Menu-Alarm clock.............................................22
6.10 Menu-Thermostat............................................23
6.11 Menu-Clock......................................................24
6.12 Menu-Key functions.........................................24
6.13 Menu-Password...............................................25
6.14 Menu-Rem address..........................................28
6.15 Menu-Inputs.....................................................28
6.16 Menu-Outputs..................................................29
7.Maintenance.........................................................30
8.Phasing out and Disposal.....................................30
9.Manufacturer’s statement.......................................31

3
EN
The data and information shown in this manual may be changed by CAME cancelli automatici s.p.a. at any time without prior warning
Automated home control system – will interface with the WI08 digital, electronic card.
This symbol tells you to read the section with particular care.
This symbol tells you that the sections concern safety issues.
This symbol tells you what to say to the end-users.
2.1 Intended use
2.2 Restrictions
Secure the apparatus in areas free from accidental impacts.
2 Intended use and restrictions
1 Legend of symbols
“IMPORTANT INSTALLATION, SAFETY INSTRUCTIONS”
“CAUTION: IMPROPER INSTALLATION MAY CAUSE SERIOUS DAMAGE, FOLLOW ALL INSTALLATION INSTRUCTIONS CAREFULLY”
“THIS MANUAL IS ONLY FOR PROFESSIONAL OR QUALIFIED INSTALLERS”

4
The data and information shown in this manual may be changed by CAME cancelli automatici s.p.a. at any time without prior warning
EN
This product complies with the following standards: EN 60730-1, EN 60950-1.
3 Reference Standards
Power supply: 12V DC
Max Power: 100mA (12V DC) (1.2W)
Power draw when idle: 85mA (12V DC) (1.02W)
Protection rating: IP40
Temperature variance: ± 1°C
Material: ABS Support /PC/ - PA6 – PMMA Plate
Radio Frequency: 433.92 MHz
Estimated radio range: 30m (inside building)
Operating temperature:
#
#
Home automation control system powered by 12V DC
CAME projects and produces entirely in Italy.
It fi ts all embedded door wall boxes.
4.2 Technical features
4.1 12V DC control system
4 Description
see declaration of compliance

5
EN
The data and information shown in this manual may be changed by CAME cancelli automatici s.p.a. at any time without prior warning
#/- 6$#
!"'.$
32
32
°C
10:55
10:55
4.3 General description
1
2
4
3
6
5
1- Temperature gauge sensor
2- Command keypad
3- Display
4- Hole cover-plate
5- Power terminals
6- Terminals for connecting the WI08

6
The data and information shown in this manual may be changed by CAME cancelli automatici s.p.a. at any time without prior warning
EN
Before installing, do the following:
• Make sure that the sport where the device will be secured is protected from impacts. Secure the device using
suitable screws, plugs, and so on for the type of surface;
• Make sure you have suitable tubing and conduits for the electrical cables to pass through and be protected against
mechanical damage;
5 .1 Preliminary checks
5.2 Tools and materials
Make sure you have all the tools and materials you will need for the installation at hand to work in total safety and
compliance with the current standards and regulations. The following figure illustrates the minimum equipment
needed by the installer.
5 Installation

7
EN
The data and information shown in this manual may be changed by CAME cancelli automatici s.p.a. at any time without prior warning
5.3 Dimensions, centre distances and securing holes
117
80
46.5
9.5 37
75.5
50
83.5
38

8
The data and information shown in this manual may be changed by CAME cancelli automatici s.p.a. at any time without prior warning
EN
5.4 Introduction to the functioning logic
Transponder
RS 485
Radio
Relay (WI08)
IN OUT
Keys
Thermostat
Timer
IN
Wave allows you to associate an “IN” command such as:
Transponder, keys, thermostat and timer to an “OUT” instruction such as a radio code or to the connection of
another device (only for the WI08).
For example: you may control the garden lights with either the timer or keys and transponder.

9
EN
The data and information shown in this manual may be changed by CAME cancelli automatici s.p.a. at any time without prior warning
#/- 6$#
!"'.$
5.5 Connecting cables
WA02
LN
AB
GND
NC NO CNC NO CNC NO CNC NO CNC NO CNC NO CNC NO CNC NO C
AB
GND
+ 12V DC- + 12V DC-
WI08 card
230 V. a.c.
power source

10
The data and information shown in this manual may be changed by CAME cancelli automatici s.p.a. at any time without prior warning
EN
5.6 Wall mounting
1 2
3

11
EN
The data and information shown in this manual may be changed by CAME cancelli automatici s.p.a. at any time without prior warning
32
32
°C
10:55
10:55
01
01
1
2
3
4
5
6
7
8
6 Programming
6.1 Description of commands and display
MENU
MENU
Setup
Setup
Edit User
Edit User
New User
New User
Delete User
Delete User
Status indicator (shows
which menu you are
browsing)
}Selected item
Menu items: can be selected
using arrow keys
Set Thermostat
Set Timer
Set Alarm clock
Reray on
1
2
3
4
5
6
7
8
01
01
Relay 0ff
Rem Address
The ENTER key
32 C
10:55
01
1
is for :
- Accessing the menu
- Confi rming and memorising the set value
The ESC key
32 C
10:55
01
1
is for :
- Exiting the menu
- Cancelling changes
- Go back in the editable menus
The key
32 C
10:55
01
1
32 C
10:55
01
1
are for:
- Shift from one menu item to another
- Increase and decrease a value

12
The data and information shown in this manual may be changed by CAME cancelli automatici s.p.a. at any time without prior warning
EN
32
32
°C
10:55
10:55
6.2 Browsing Menu
To enter the main
menu, keep the
ENTER key pressed
MENU
MENU
Setup
Setup
Edit User
Edit User
New User
New User
Delete User
Delete User
To chose the selected item, shift
using the ARROWS
MENU
MENU
Impostazioni
Impostazioni
Modifica Utente
Modifica Utente
Nuovo Utente
Elimina Utente
Elimina Utente
CONFERMI (SI)
CONFERMI (SI)
Nuovo Utente
Nuovo Utente
?
MENU
MENU
Impostazioni
Impostazioni
Modifica Utente
Modifica Utente
Nuovo Utente
Elimina Utente
Elimina Utente
CONFERMI (NO)
CONFERMI (NO)
Nuovo Utente
Nuovo Utente
?
To enter the sub-
menu, press the
ENTER key
To select, shift using the
ARROWS
Pressing the Esc key
takes you to the pre-
vious menu
CONFERMI (SI)
CONFERMI (SI)
Nuovo Utente
Nuovo Utente
?Press ENTER to con-
fi r m

13
EN
The data and information shown in this manual may be changed by CAME cancelli automatici s.p.a. at any time without prior warning
Rem. Address
Rem. Address
Inputs
Inputs
Outputs
Outputs
6.3 Structure - Main Menu
Setup
Setup
Edit User
Edit User
New User
New User
Delete User
Delete User
TX Radio
TX Radio
Timer
Timer
Alarm
Alarm
Thermostat
Thermostat
Clock
Clock
Key Function
Key Function
Password
Password
Pressing the Enter key for a few seconds takes you into
the main menu (main level)
To shift from one item to another use the ARROWS
Press Enter to confi rm (this takes you to the second level)
Pressing Esc takes
you back to the
previous menu

14
The data and information shown in this manual may be changed by CAME cancelli automatici s.p.a. at any time without prior warning
EN
6.3.1 Menu – Settings – Language
ENGLISH
ENGLISH
FRENCH
FRENCH
GERMAN
GERMAN
SPANISH
SPANISH
TemperatureTemperature
Screen SaverScreen Saver
Setup
Setup
ITALIAN
ITALIAN
32 C
10:55
01
1
Language
Language
32 C
10:55
01
1
Edit User
Edit User
New User
New User
32 C
10:55
01
1
Choose the selected language and confi rm by pressing ENTER

15
EN
The data and information shown in this manual may be changed by CAME cancelli automatici s.p.a. at any time without prior warning
6.3.2 Menu – Settings – Temperature
6.3.3 Menu – Settings – Screensaver
Select the unit of measure for the temperature and confi rm by pressing ENTER
Temperature
Temperature
Screen SaverScreen Saver
Celsius
Celsius
LanguageLanguage
Fahrenheit
Fahrenheit
Setup
Setup
32 C
10:55
01
1
Edit User
Edit User
New User
New User
32 C
10:55
01
1
32 C
10:55
01
1
Select the screensaver and conform by pressing ENTER
TemperatureTemperature
Screen Saver
Screen Saver
Setup
Setup
Hour
Hour
32 C
10:55
01
1
LanguageLanguage
32 C
10:55
01
1
Date
Date
Logo CAME
Logo CAME
32 C
10:55
01
1
Edit User
Edit User
New User
New User

16
The data and information shown in this manual may be changed by CAME cancelli automatici s.p.a. at any time without prior warning
EN
SELECT USER
SELECT USER
New n..
New n..
New002
New002
New001
New001
6.4 Menu – Change user
Edit User
Edit User
OUTPUT
OUTPUT
NAME
NAME
CODE
CODE
Change user: Allows you to change the details of a single user (code, name, kind of exit)
SetupSetup
Edit User
Edit User
New User
New User
32 C
10:55
01
1
32 C
10:55
01
1
Select the use to change by
using the arrows. Confi rm by
pressing ENTER
New001
New001
32 C
10:55
01
1
32 C
10:55
01
1
In the single user
change menu, you
may choose the
parameters to change
using the arrows.
Once you have chosen
which to change
confi rm by pressing
Enter

17
EN
The data and information shown in this manual may be changed by CAME cancelli automatici s.p.a. at any time without prior warning
CODE
CODE
Modifica Utente
Modifica Utente
nuovo001
nuovo001
NUOVO CODICE
NUOVO CODICE
NAME
NAME
Modifica Utente
Modifica Utente
nuovo001
nuovo001
nuovo001
n
Press ENTER
32 C
10:55
01
1
to :
- To go to the next letter that needs changing
- Confi rm the changes (keeping it pressed)
Press ESC
32 C
10:55
01
1
to :
- Go back to the previous letter
- Go back to the previous level, without saving any
changes (keeping it pressed)
Keep the arrow keys pressed
32 C
10:55
01
1
32 C
10:55
01
1
to:
- Change letter
Selecting the NAME item
takes you into the user
change area.
6.4 Change user - Menu
32 C
10:55
01
1
32 C
10:55
01
1
You may memorise a transponder code and
associate it to a chosen user, by approaching
the card to the Wave device which enables code
recognition within 10 s

18
The data and information shown in this manual may be changed by CAME cancelli automatici s.p.a. at any time without prior warning
EN
OUTPUT
OUTPUT
new001
new001
OUTPUT
OUTPUT
RELAY 1
RELAY 1
Edit User
Edit User
To select the output to
associate shift using the
arrow keys and confi rm by
pressing Enter
6.4 Change user - Menu
EXIT associates a command to a user. It can be of two types: the fi rst is defi ned as local exit and is a physical
socket (NO, NC); the second is a radio socket
(up to four different ones can be inserted).
6.5 New user - Menu
CONFERMI (NO)
CONFERMI (NO)
Nuovo Utente
Nuovo Utente
?
New user : to create a new user
shift using the arrow keys to YES
and confi rm by pressing Enter.
The change menu is activated
automatically. To set the date
see chapter 6.4.
Edit User
Edit User
New User
New User
32 C
10:55
01
1
Delete User
Delete User
32 C
10:55
01
1
32 C
10:55
01
1

19
EN
The data and information shown in this manual may be changed by CAME cancelli automatici s.p.a. at any time without prior warning
6.6 Eliminate User - Menu
CONFERMI (NO)
CONFERMI (NO)
Elimina Utente
Elimina Utente
Nuovo002
Nuovo002
?
Eliminate User: Eliminates a present user.
SELECT USER
SELECT USER
New n..
New n..
New002
New002
New001
New001
SetupSetup
Edit User
Edit User
New User
New User
32 C
10:55
01
1
32 C
10:55
01
1
Delete User
Delete User
32 C
10:55
01
1
TX RadioTX Radio
To confi rm the operation shift to YES using the arrow keys and confi rm using Enter.

20
The data and information shown in this manual may be changed by CAME cancelli automatici s.p.a. at any time without prior warning
EN
6.7 Radio TX - Menu
TX Radio
TX Radio
CANALE RADIO:1
CANALE RADIO:1
ATTESA
ATTESA
To select the radio channel
to be memorised shift using
the arrow and confi rm by
pressing Enter
TX Radio
TX Radio
1
CANALE RADIO
CANALE RADIO
Delete User
Delete User
TX Radio
TX Radio
32 C
10:55
01
1
TimerTimer
32 C
10:55
01
1
From the RADIO TX menu you can associate a CAME transmitter code to an output, so as to “repeat” it and
control the automated devices directly through the keyboard or transponder from WAVE.
Send the radio code by transmitter
within 10 seconds (as shown in
fi gure). Memorisation is confi rmed
when code is shown on display.
Use transmitters of the
following series: Top
433.92MHz or Tam
433.92MHz

21
EN
The data and information shown in this manual may be changed by CAME cancelli automatici s.p.a. at any time without prior warning
6.8 Menu - Timer
ELIMINA
ELIMINA
NUOVO
NUOVO
Timer
Timer
MODIFICA
MODIFICA
To create a new time interval
shift using the arrow key
onto NEW and confi rm by
pressing Enter…
ORA
ORA
08
08
Timer
Timer
ATTIVAZIONE
ATTIVAZIONE
…once created, you will be
asked the time and minutes
and the day of activation, and
which command you wish to
associate (local output, or one
of the radio outputs)…
The TIMER lets you associate commands to pre-set time intervals.
…then set the deactivation day. You will
be asked the same information, to create
a precise time interval.
TX RadioTX Radio
32 C
10:55
01
1
Timer
Timer
32 C
10:55
01
1
AlarmAlarm
Besides creating a new “TIMER”
you may also
CHANGE
or
ELIMINATE
those already existing.
Timer
Timer
REMOVE
REMOVE
NEW
NEW
EDIT
EDIT
ORA
ORA
08
08
Timer
Timer
DISATTIVAZIONE
DISATTIVAZIONE
32
32
°C
10:55
10:55
Once the timer is
set, the display will
show this symbol.

22
The data and information shown in this manual may be changed by CAME cancelli automatici s.p.a. at any time without prior warning
EN
6.9 Alarm clock - Menu
Sveglia
Sveglia
1
SELEZIONA
SELEZIONA
Select which of the two
alarm clocks you wish to
set. You will be asked the
time, minutes, and type of
sound. Confi rm by pressing
Enter .
32 C
10:55
01
1
TimerTimer
32 C
10:55
01
1
Alarm
Alarm
ThermostatThermostat
ORA
ORA
08
08
Timer
Timer
DISATTIVAZIONE
DISATTIVAZIONE
32
32
°C
10:55
10:55
Once the alarm
clock/s is/are set,
this symbol will
appear on the
display.
ALARM CLOCK allows you to set two sound warnings.

23
EN
The data and information shown in this manual may be changed by CAME cancelli automatici s.p.a. at any time without prior warning
6.10 Thermostat - Menu
Termostato
Termostato
20
20
o
o
C
ATTIVAZIONE
ATTIVAZIONE
32 C
10:55
01
1
ClockClock
32 C
10:55
01
1
AlarmAlarm
Thermostat
Thermostat
ORA
ORA
08
08
Timer
Timer
DISATTIVAZIONE
DISATTIVAZIONE
32
32
°C
10:55
10:55
Once the thermostat
is set, this symbol
will appear on the
display.
The Thermostat allows you to set a temperature interval, within which Wave will activate a socket..
To create a new interval shift
using the ARROW onto the cho-
sen temperature threshold and
confi rm by pressing ENTER.
Repeat the process to chose the
deactivation threshold, confi rm
functioning by shifting using
the ARROW onto ACTIVATED
and press ENTER.
To deactivate functioning
shift using the ARROWS
onto DEACTIVATED and press
ENTER.

24
The data and information shown in this manual may be changed by CAME cancelli automatici s.p.a. at any time without prior warning
EN
6.11 Clock – Menu
Orologio
Orologio
21
21
ORA
ORA
You will be asked to enter the hour,
minutes, seconds, year, month
and day. To insert them proceed
as in the previous steps (using the
arrow keys to make changes to
the values and by pressing Enter
to confi rm).
32 C
10:55
01
1
Clock
Clock
32 C
10:55
01
1
Key FunctionKey Function
ThermostatThermostat
With the Clock you can set the current time and date on Wave.
Funz. Tasti
Funz. Tasti
USCITA RELE’
USCITA RELE’
TASTO
TASTO
32 C
10:55
01
1
ClockClock
32 C
10:55
01
1
Key Function
Key Function
Password
Password
6.12 Key Functions – Menu
Key Functions allows you to associate, to the two keys, one of the following functions: relay output or
one of the 4 radio codes.
To associate a command to one
of the two key shift using the
arrows onto the chose function,
and confi rm by keeping the
arrow key pressed.

25
EN
The data and information shown in this manual may be changed by CAME cancelli automatici s.p.a. at any time without prior warning
6.13 Password - Menu
32 C
10:55
01
1
Key FunctionKey Function
32 C
10:55
01
1
Password
Password
The Password allows you to limit access to Wave’s functions
Password
Password
EDIT
EDIT
DISABLED
DISABLED
32 C
10:55
01
1
ENABLED
ENABLED
32 C
10:55
01
1
32 C
10:55
01
1
EDIT PASSWRD
EDIT PASSWRD
CODE 2
CODE 2
CODE 1
CODE 1
PSW TRASP 1
PSW TRASP 1
PSW TRASP 2
PSW TRASP 2
32 C
10:55
01
1
CODE
ODE
1
1
DEL.PASSWRD
DEL.PASSWRD
NEW PASSWRD
NEW PASSWRD
32 C
10:55
01
1
See page 26
fi g. A
32 C
10:55
01
1
See page 26
fi g. B
The Activate or Deactivate function lets you
make the Password operational.
Code means a
4-digit number,
while transp.
Uses a tran-
sponder card to
access.
New password allows you to create a
new code. Eliminate password allows
to cancel an existing password.
32 C
10:55
01
1
See page 27

26
The data and information shown in this manual may be changed by CAME cancelli automatici s.p.a. at any time without prior warning
EN
6.13 Password - Menu
32 C
10:55
01
1
CONFERMI (NO)
CONFERMI (NO)
ELIMINA PASSW.
ELIMINA PASSW.
?
32 C
10:55
01
1
NUOVA PASSWORD
NUOVA PASSWORD
DIGITARE CODICE
DIGITARE CODICE
1234
1234
5678
5678
90<>
90<>
1
1000
1
To confi rm the step shift using the ARROW keys onto YES and
confi rm by pressing ENTER.
To chose a value shift using the ARROW key, select and confi rm
by pressing ENTER. Repeat the step until you have inserted
the 4-digit code that you have chosen. When the password
is requested upon accessing the WAVE menu, proceed as
described above to insert the code.
fi g. A
fi g. B
TYPE CODE
TYPE CODE
1000
1
1234
1234
5678
5678
90<>
90<>
1

27
EN
The data and information shown in this manual may be changed by CAME cancelli automatici s.p.a. at any time without prior warning
6.13 Password - Menu
32 C
10:55
01
1
PSW TRASP 1
PSW TRASP 1
DEL.PASSWRD
DEL.PASSWRD
NEW PASSWRD
NEW PASSWRD
CONFERMI (NO)
CONFERMI (NO)
ELIMINA PASSW.
ELIMINA PASSW.
?
To confi rm the operation
shift using the ARROWS
to YES and confirm by
pressing ENTER
32 C
10:55
01
1
32 C
10:55
01
1
32 C
10:55
01
1
TRASP 1
TRASP 1
NUOVO CODICE
NUOVO CODICE
Selecting NEW PASSWORD will
bring up a bar showing the time
allowed for inserting the code.
Approach the card to the Wave
device to allow recognition of
the code. When the main menu
access password is requested ap-
proach the “Password” function
card near WAVE.

28
The data and information shown in this manual may be changed by CAME cancelli automatici s.p.a. at any time without prior warning
EN
6.14 Menu - Rem.Address
32 C
10:55
01
1
Password
Password
32 C
10:55
01
1
Rem. Adress
Rem. Adress
Use “Rem.Address” to associate an identifi cation in case of more than one device.
Rem address
Rem address
01
01
SELECT
SELECT
To associate a number identifi ca-
tion to the device shift using the
arrow keys on the number and
press Enter to confi rm.
N.B.In a more than one Wave system every
Rem.Address must be different and at least
one must be the number “1” (master).
32 C
10:55
01
1
Rem. Adress
Rem. Adress
32 C
10:55
01
1
Inputs
Inputs
6.15 Menu - Inputs
“Inputs” allows you to associate a command (input) to a remote relay (output).
SEL.Inputs
SEL.Inputs
OUTPUT 1
OUTPUT 1
1
1
DISABLE
DISABLE
OUTPUT 2OUTPUT 2
32 C
10:55
01
1
Inputs
Inputs
OUTPUT 1
OUTPUT 1
1
To associate an input to a an output
shift using the arrow keys on the
output number and press Enter
to confi rm.

29
EN
The data and information shown in this manual may be changed by CAME cancelli automatici s.p.a. at any time without prior warning
6.16 Menu - Outputs
“Outputs” allows you to select the working time and mode of one remote WI08 relay.
32 C
10:55
01
1
InputsInputs
32 C
10:55
01
1
OUTPUTS
OUTPUTS
SELEZ.OUTPUT
SELEZ.OUTPUT
4 TEMP. 1 s
4 TEMP. 1 s
3 Flip - Flop
3 Flip - Flop
1 TEMP. 10:50
1 TEMP. 10:50
2 TEMP. 1 s
2 TEMP. 1 s
To select an output to setup,
shift using the arrow keys on
the output number and press
Enter to confi rm.
OUTPUT
OUTPUT
TIMED. 1 s
TIMED. 1 s
1
To select the working time
and mode shift using the
arrow keys and press Enter
to confi rm.
Choose the working time from 1s up to
21:10h for a monostable mode or “FLIP-
FLOP” for a bistable mode.

30
The data and information shown in this manual may be changed by CAME cancelli automatici s.p.a. at any time without prior warning
EN
7 Maintenance
Our products are made of different materials. The majority of these (aluminium, plastic, iron, and electric
cables) are considered solid urban waste. As such they can be recycled by certifi ed centres after proper collection.
Other component (such as electronic cards, batteries and transmitters) constitute environmental hazards. They must
thus be turned in to specialised fi rms for their processing and disposal.
Wave does not require any periodic maintenance. To clean we suggest using a moist cloth and not any chemical agents
or abrasive materials that may ruin the product’s surface.
For any problems contact after-sales assistance.
8 Phasing out and Disposal

31
EN
The data and information shown in this manual may be changed by CAME cancelli automatici s.p.a. at any time without prior warni ng
9 Manufacturer’s statement
CE CONFORMITY DECLARATION
Pursuant to Low Voltage Directive 2006/95/CE
CAME Cancelli Automatici S.p.A.
via Martiri della Libertà, 15
31030 Dosson di Casier - Treviso - ITALY
tel (+39) 0422 4940 - fax (+39) 0422 4941
internet: www.came.it - e-mail: [email protected]
Declares under its own responsibility that the equipments for automatic
garage doors and gates listed below:
WA02
… comply with the National Law related to the following European
Directives and to the applicable parts of the following Standards.
--- DIRECTIVES ---
2006/95/CE LOW VOLTAGE DIRECTIVE
2014/30/UE ELECTROMAGNETIC COMPATIBILITY DIRECTIVE
--- STANDARDS ---
Reference code to request a true copy of the original: DDC L EN W001
MANAGING DIRECTOR
Mr. Gianni Michielan
EN 300 330-1/-2
EN 301 489-1/-3
EN 60730
EN 60950

Cod. 119RU28 ver 0.1 05/07 © CAME cancelli automatici s.p.a.
CAME UNITED KINGDOM LTD
UNIT 3, ORCHARD BUSINESS PARK
TOWN STREET, SANDIACRE
NOTTINGHAM - NG10 5BP - U.K.
Tel - 0044 115 9210430
Fax - 0044 115 9210431

WA02
SYSTÈME POUR LE CONTRÔLE DE LA MAISON
32
32
°C
10:55
10:55
MANUEL D’INSTALLATION
WA02

2
Les données et les indications fournies dans ce manuel peuvent subir des modifications à tout moment sans avis préalable de la part de CAME Cancelli s.p.a.
FR
SOMMAIRE
1. Légende des symboles.............................................3
2. Application et mode d’emploi.....................................3
2.1 A pplic at ion.......................................................... 3
2.2 Mode d’emploi.....................................................3
3. Normes de référence...................................................4
4. Description.................................................................4
4.1 Système pour le contrôle 230V a.c......................4
4.2 Informations techniques.....................................4
4.3 Description générale...........................................5
5. Installation..................................................................6
5.1 Contrôles préliminaires............................................6
5.2 Outils et matériel.................................................6
5.3 Dimensions, entretoises et trous de fixage.........7
5.4 Introduction à la méthode de fonctionnement....8
5.5 Connexion câbles................................................9
5.6 Montage mural..................................................10
6. Programmation.........................................................11
6.1 Description commandes et afficheur.................11
6.2 Navigation menu................................................12
6.3 Structure Menu - Principal...............................13
6.3.1 Menu-Configurations-Langue...................14
6.3.2 Menu-Configurations-Température..........15
6.3.3 Menu-Configurations-Économiseur d’écran..15
6.4 Menu-Modification usager................................16
6.5 Menu-Nouvel usager.........................................18
6.6 Menu-Élimination usager..................................19
6.7 Menu-TX Radio..................................................20
6.8 Menu-Timer.......................................................21
6.9 Menu-Réveil......................................................22
6.10 Menu-Thermostat............................................23
6.11 Menu-Montre...................................................24
6.12 Menu-Fonction touches...................................24
6.13 Menu-Mot de passe..........................................25
6.14 Menu – Num. Périphérique..............................28
6.15 Menu - Entrées..................................................28
6.16 Menu - Sorties..................................................29
7.Entretien........................................................30
8.Démolition et élimination.........................................30
9.Déclaration du fabricant..........................................31

3
FR
Les données et les indications fournies dans ce manuel peuvent subir des modifications à tout moment sans avis préalable de la part de CAME Cancelli s.p.a.
Système de contrôle pour automatisme domestique, avec fonction en mode autonome et possibilité d’interface
avec carte électronique numérique WI08.
Ce symbole signale les parties à lire attentivement
Ce symbole signale les parties concernant la sécurité
Ce symbole signale les indications à communiquer à l’usager
2.1 Usage prévu
2.2 Mode d’emploi
Placez l’appareil dans un endroit à l’abri des chocs imprévus
2 Application et mode d’emploi
1 Légende des symboles
“CONSIGNES DE SÉCURITÉ IMPORTANTES POUR LE MONTAGE”
“ATTENTION: UN MONTAGE INCORRECT PEUT PROVOQUER DE GRAVES DOMMAGES, SUIVRE TOUTES LES INSTRUCTIONS DE MONTAGE”
“CE MANUEL EST DESTINÉ EXCLUSIVEMENT AUX INSTALLATEURS PROFESSIONNELS OU AU PERSONNEL AUTORISÉ”

4
Les données et les indications fournies dans ce manuel peuvent subir des modifications à tout moment sans avis préalable de la part de CAME Cancelli s.p.a.
FR
Le produit en objet est conforme aux normes suivantes : EN 60730-1, EN 60950-1.
3 Normes de référence
Alimentation: 12V DC
Absorpton max : 100mA (12V DC) (1.2W)
Absorption au repos: 85mA (12V DC) (1.02W)
Degré de protection: IP40
Variation de température: ± 1°C
Matériel: Support ABS /PC/ PA6 - Plaque PMMA
Fréquence Radio: 433,92 MHz
Portée radio estimée: 30 m (à l’intérieur du bâtiment)
Température de fonctionnement:
#
#
Système de contrôle pour automatisme domestique avec alimentation 12V DC.
Les produits CAME sont entièrement conçus et fabriqués en Italie.
Il est universel et peut être incorporé dans tous les boitiers de prises de dérivation
4.2 Informations techniques
4.1 Système pour le contrôle 230V a.c.
4 Description
voir declaration de conformite

5
FR
Les données et les indications fournies dans ce manuel peuvent subir des modifications à tout moment sans avis préalable de la part de CAME Cancelli s.p.a.
#/- 6$#
!"'.$
32
32
°C
10:55
10:55
4.3 Description générale
1
2
4
3
6
5
1- Capteur pour relèvement température
2- Clavier de commande
3- Affi cheur
4- Plaque de couverture des trous
5- Bornier d’alimentation
6- Bornier pour connexion en WI08

6
Les données et les indications fournies dans ce manuel peuvent subir des modifications à tout moment sans avis préalable de la part de CAME Cancelli s.p.a.
FR
Avant de procéder au montage de l’automatisme, il est nécessaire de:
• Vérifier que l’emplacement du fixage est solide et à l’abri des chocs imprévus. Le fixage doit être exécuté avec
des éléments (vis, chevilles, etc.) appropriés aux caractéristiques de l’emplacement du fixage ;
• Prévoir des conduits et des caniveaux appropriés pour le passage des câbles électriques afi n de les protéger contre
tout dommage mécanique
5 .1 Contrôles préliminaires
5.2 Outils et matériel
Assurez-vous d’avoir les outils et le matériel nécessaire pour effectuer le montage de l’automatisme en toute sé-
curité et conformément aux normes en vigueur. Sur la planche, quelques exemples de matériel pour l’installateur.
5 Installation

7
FR
Les données et les indications fournies dans ce manuel peuvent subir des modifications à tout moment sans avis préalable de la part de CAME Cancelli s.p.a.
5.3 Dimensions, entretoises et trous de fixage
117
80
46.5
9.5 37
75.5
50
83.5
38

8
Les données et les indications fournies dans ce manuel peuvent subir des modifications à tout moment sans avis préalable de la part de CAME Cancelli s.p.a.
FR
5.4 Introduction à la méthode de fonctionnement du produit
Transpondeur
Relais (WI08)
Radio
RS 485
IN OUT
Touches
Thermostat
Timer
IN
Wave permet d’associer une commande “IN” du type : transpondeur, touches, thermostat et timer, à une in-
struction en sortie « OUT » qui peut être un code radio ou un contact relais ou la connexion à un autre dispositif
(seulement avec WI08).
Par exemple : vous pouvez commander l’éclairage du jardin aussi bien avec le timer qu’avec la touche ou le
transpondeur.

9
FR
Les données et les indications fournies dans ce manuel peuvent subir des modifications à tout moment sans avis préalable de la part de CAME Cancelli s.p.a.
#/- 6$#
!"'.$
5.5 Connexion câbles
WA02
LN
AB
GND
NC NO CNC NO CNC NO CNC NO CNC NO CNC NO CNC NO CNC NO C
AB
GND
+ 12V DC- + 12V DC-
Carte WI08
Alimentation
230VAC

10
Les données et les indications fournies dans ce manuel peuvent subir des modifications à tout moment sans avis préalable de la part de CAME Cancelli s.p.a.
FR
5.6 Montage mural
1 2
3

11
FR
Les données et les indications fournies dans ce manuel peuvent subir des modifications à tout moment sans avis préalable de la part de CAME Cancelli s.p.a.
MENU
MENU
Saisissez
Saisissez
Changez Util.
Changez Util.
Nouveaux Util.
Nouveaux Util.
Supprimez Util.
Supprimez Util.
32
32
°C
10:55
10:55
01
01
1
2
3
4
5
6
7
8
La touche ENTER
32 C
10:55
sert pour :
- entrer dans les menus
- confi rmer et mettre en mémoire la valeur confi gurée
La touche ESC
32 C
10:55
sert pour :
- sortir des menus
- annuler les modifi cations
- revenir en arrière dans les menus affi chés
Les touches
32 C
10:55
32 C
10:55
servent pour :
- se déplacer d’un élément du menu à un autre
- augmenter ou diminuer une valeur
6 Programmation
6.1 Description commandes et afficheur Indicateur de position (il
indique le menu dans lequel
on est en train de surfer)
}Élément sélectionné
Éléments menu: ils peuvent
être sélectionnés en utilisant les
fl èches
Thermostat confi guré
Timer confi guré
Réveil confi guré
Relè actif
1
2
3
4
5
6
7
8
01
01
Relè non actif
N° périphérique

12
Les données et les indications fournies dans ce manuel peuvent subir des modifications à tout moment sans avis préalable de la part de CAME Cancelli s.p.a.
FR
32
32
°C
10:55
10:55
6.2 Navigation Menu
Pour entrer dans le
menu principal, ap-
puyez sans relâcher
sur la touche
ENTER
MENU
MENU
Saisissez
Saisissez
Changez Util.
Changez Util.
Nouveaux Util.
Nouveaux Util.
Supprimez Util.
Supprimez Util.
Pour choisir l’élément désiré,
utilisez les FLÈCHES
MENU
MENU
Saisissez
Saisissez
Changez Util.
Changez Util.
Nouveaux Util.
Supprimez Util.
Supprimez Util.
CONFIRMEZ (OUI)
CONFIRMEZ (OUI)
Nouveaux Util.
Nouveaux Util.
?
MENU
MENU
Saisissez
Saisissez
Changez Util.
Changez Util.
Nouveaux Util.
Supprimez Util.
Supprimez Util.
CONFIRMEZ (NON)
CONFIRMEZ (NON)
Nouveaux Util.
Nouveaux Util.
?
Pour entrer dans le
sous-menu,
appuyez sur la
touche ENTER
Pour sélectionner, utilisez
les FLÈCHES
En appuyant sur la
touche Esc, vous
revenez toujours au
menu précédent.
CONFIRMEZ (OUI)
CONFIRMEZ (OUI)
Nouveaux Util.
Nouveaux Util.
?Appuyez sur ENTER
pour confi rmer

13
FR
Les données et les indications fournies dans ce manuel peuvent subir des modifications à tout moment sans avis préalable de la part de CAME Cancelli s.p.a.
6.3 Structure Menu – Principal
Saisissez
Saisissez
Changez Util.
Changez Util.
Nouveaux Util.
Nouveaux Util.
Supprimez Util.
Supprimez Util.
TX Radio
TX Radio
Timer
Timer
Alarme
Alarme
Thermostat
Thermostat
Horloge
Horloge
Fonct. Touches
Fonct. Touches
Passe
Passe
En appuyant sans relâcher sur la touche ENTER pendant
quelques secondes, vous entrez dans le menu principal
(premier niveau)
Pour vous déplacer d’un élément à l’autre du menu utilisez
les FLÈCHES
Appuyez sur ENTER pour confi rmer (vous entrez dans le
deuxième niveau)
En appuyant sur la
touche Esc, vous revenez
toujours au menu
précédent
Nom. Peripherique
Nom. Peripherique
Entrees
Entrees
Sorties
Sorties

14
Les données et les indications fournies dans ce manuel peuvent subir des modifications à tout moment sans avis préalable de la part de CAME Cancelli s.p.a.
FR
6.3.1 Menu – Configuration – Langue
ENGLISH
ENGLISH
FRANCOIS
FRANCOIS
ALEMAIGNE
ALEMAIGNE
ESPAGNOLE
ESPAGNOLE
NEDERLANDS
NEDERLANDS
TemperatureTemperature
Screen SaverScreen Saver
Saisissez
Saisissez
ITALIANO
ITALIANO
32 C
10:55
Langue
Langue
32 C
10:55
Changez Util.Changez Util.
Nouveaux Util.
Nouveaux Util.
32 C
10:55
Sélectionnez la langue choisie et confi rmez en appuyant sur ENTER

15
FR
Les données et les indications fournies dans ce manuel peuvent subir des modifications à tout moment sans avis préalable de la part de CAME Cancelli s.p.a.
6.3.2 Menu – Configuration - Température
6.3.3 Menu – Configuration – Économiseur d’écran
Sélectionnez l’unité de mesure de la température et confi rmez en appuyant sur ENTER
Temperature
Temperature
Screen SaverScreen Saver
Celsius
Celsius
LangueLangue
Fahrenheit
Fahrenheit
Saisissez
Saisissez
32 C
10:55
Modifica utente
Modifica utente
Nuovo utente
Nuovo utente
32 C
10:55
32 C
10:55
Sélectionnez l’économiseur d’écran et confi rmez en appuyant sur ENTER
TemperatureTemperature
Screen Saver
Screen Saver
Saisissez
Saisissez
Heure
Heure
32 C
10:55
LangueLangue
32 C
10:55
Date
Date
Logo CAME
Logo CAME
32 C
10:55
Changez Util.Changez Util.
Nouveaux Util.
Nouveaux Util.

16
Les données et les indications fournies dans ce manuel peuvent subir des modifications à tout moment sans avis préalable de la part de CAME Cancelli s.p.a.
FR
SELECT. UTILIS.
SELECT. UTILIS.
nouveaux n..
nouveaux n..
nouveaux 002
nouveaux 002
nouveaux 001
nouveaux 001
6.4 Menu – Modification usager
Changez Util.
Changez Util.
SORTIE
SORTIE
NOM
NOM
CODE
CODE
Modifi cation usager: Il permet de modifi er les caractéristiques d’un seul usager (code, nom, sortie associée)
SaisissezSaisissez
Changez Util.
Changez Util.
Nouveaux Util.
Nouveaux Util.
32 C
10:55
32 C
10:55
Sélectionnez l’usager objet
de la modifi cation en utilisant
les FLÈCHES. Confi rmez en
appuyant sur ENTER
nouveaux 001
nouveaux 001
32 C
10:55
32 C
10:55
Dans le menu de
modifi cation d’un
seul usager, vous
pouvez sélectionner
les paramètres à
changer en utilisant
les FLÈCHES. Après
avoir sélectionné le
paramètre à modifi er
confi rmez en appuyant
sur ENTER

17
FR
Les données et les indications fournies dans ce manuel peuvent subir des modifications à tout moment sans avis préalable de la part de CAME Cancelli s.p.a.
CODE
CODE
Changez Util.
Changez Util.
nouveaux 001
nouveaux 001
NOUVEAU CODE
NOUVEAU CODE
NOM
NOM
Changez Util.
Changez Util.
nouveaux 001
nouveaux 001
nouveaux001
n
Appuyez sur ENTER
32 C
10:55
pour :
- passer à la lettre suivante que vous voulez modifi er
-confi rmer les modifi cations (sans relâcher la touche)
Appuyez sur la touche ESC
32 C
10:55
pour :
- revenir à la lettre précédente
- revenir au niveau précédent, sans sauvegarder les
modifi cations (sans relâcher la touche)
Appuyez sur les fl èches
32 C
10:55
32 C
10:55
pour :
- Changer de lettre
En sélectionnant l’élément
NOM, vous entrez dans
l’espace de modifi cation du
nom usager
6.4 Menu – Modification usager
32 C
10:55
32 C
10:55
Modification usager : Il est possible de mettre
en mémoire un code transpondeur et de
l’associer à l’usager sélectionné, pour cela il
faut approcher la carte du Wave afin qu’il reconnaisse le code dans les
10 secondes

18
Les données et les indications fournies dans ce manuel peuvent subir des modifications à tout moment sans avis préalable de la part de CAME Cancelli s.p.a.
FR
nouveaux 001
nouveaux 001
SORTIE
SORTIE
LOCAL RELAY
LOCAL RELAY
Changez Util.
Changez Util.
SORTIE
SORTIE
Pour sélectionner la sor-
tie à associer, utilisez les
FLÈCHES et confi rmez en
appuyant sur ENTER
6.4 Menu – Modification usager
Avec SORTIE, vous associez une commande à l’usager. Il existe deux types de commande : la première
est appelée sortie locale et c’est un contact
physique (NO, NC), la deuxième est une sortie
radio (vous pouvez en introduire jusqu’à quatre
différentes)
6.5 Menu - Nouvel usager
CONFERMI (NO)
CONFERMI (NO)
Nuovo Utente
Nuovo Utente
?
Nouvel usager : pour créer un
nouvel usager déplacez-vous
sur OUI avec les fl èches puis
confi rmez en appuyant sur Enter.
Le menu modifi cation usager
est actif automatiquement. Pour
confi gurer les données voir le
chapitre 6.4.
Changez Util.Changez Util.
Nouveaux Util.
Nouveaux Util.
32 C
10:55
01
1
Supprimez Util.Supprimez Util.
32 C
10:55
01
1
32 C
10:55
01
1

19
FR
Les données et les indications fournies dans ce manuel peuvent subir des modifications à tout moment sans avis préalable de la part de CAME Cancelli s.p.a.
6.6 Menu – Élimination usager
CONFIRMEZ (NON)
CONFIRMEZ (NON)
CONFIRMEZ
CONFIRMEZ
nouveaux 002
nouveaux 002
?
Élimination usager: Vous éliminez un usager déjà inséré.
SELECT. UTILIS.
SELECT. UTILIS.
nouveaux n..
nouveaux n..
nouveaux 002
nouveaux 002
nouveaux 001
nouveaux 001
SaisissezSaisissez
Changez Util.Changez Util.
Nouveaux Util.
Nouveaux Util.
32 C
10:55
32 C
10:55
CONFIRMEZ
CONFIRMEZ
32 C
10:55
TX RadioTX Radio
Pour confi rmer l’opération déplacez-vous sur OUI à l’aide des FLÈCHES et confi rmez en appuyant sur ENTER.

20
Les données et les indications fournies dans ce manuel peuvent subir des modifications à tout moment sans avis préalable de la part de CAME Cancelli s.p.a.
FR
6.7 Menu - TX Radio
TX Radio
TX Radio
CANAL RADIO:1
CANAL RADIO:1
EN ATTENTE
EN ATTENTE
Pour sélectionner le canal
radio à mettre en mémoire
utilisez les FLÈCHES et
confi rmez en appuyant sur
ENTER
TX Radio
TX Radio
1
CANAL RADIO
CANAL RADIO
Supprimez Util.Supprimez Util.
TX Radio
TX Radio
32 C
10:55
TimerTimer
32 C
10:55
Du Menu TX Radio, il est possible d’associer un code d’un émetteur CAME à une sortie, afi n de pouvoir le
«répéter» et contrôler les automatismes directement du clavier ou avec le transpondeur de Wave.
Envoyez le code radio par l’émetteur
dans les 10 secondes (comme indi-
qué sur le dessin). Le code apparaît
sur l’affi cheur pour confi rmer que la
mise en mémoire a été effectuée. Utilisez les émetteurs des séries:
Top 433.92MHz
o
Tam 433.92MHz

21
FR
Les données et les indications fournies dans ce manuel peuvent subir des modifications à tout moment sans avis préalable de la part de CAME Cancelli s.p.a.
6.8 Menu - Timer
SUPPRIMEZ
SUPPRIMEZ
NOVEAUX
NOVEAUX
Timer
Timer
CHANGEZ
CHANGEZ
Pour créer un nouvel inter-
valle déplacez-vous avec
les fl èches sur NOUVEAU et
confi rmez en appuyant sur
ENTER ...
HEURE
HEURE
08
08
Timer
Timer
ACTIVATION
ACTIVATION
… lorsque l’intervalle est créé,
indiquez l’heure, les minutes,
puis le jour de mise en activité,
ainsi que les commandes à
associer (sortie locale ou une
des sorties radio)…
Avec TIMER vous pouvez associer les commandes à un intervalle de temps prédéfi ni.
… ensuite confi gurez le jour de mise au
repos. Pour créer un intervalle de temps
précis vous devrez fournir les mêmes
renseignements.
TX RadioTX Radio
32 C
10:55
Timer
Timer
32 C
10:55
Alarme
Alarme
Outre à la création d’un nou-
veau “TIMER” il est possible de
MODIFIER
ou
d’ÉLIMINER
ùceux qui sont déjà présents.
Timer
Timer
SUPPRIMEZ
SUPPRIMEZ
NOVEAUX
NOVEAUX
CHANGEZ
CHANGEZ
ORA
ORA
08
08
Timer
Timer
DISATTIVAZIONE
DISATTIVAZIONE
32
32
°C
10:55
10:55
Ce symbole appa-
raît sur l’affi cheur
pour confi rmer
que le Timer est
confi guré.

22
Les données et les indications fournies dans ce manuel peuvent subir des modifications à tout moment sans avis préalable de la part de CAME Cancelli s.p.a.
FR
6.9 Menu - Réveil
Alarme
Alarme
1
SELECTION
SELECTION
Sélectionnez lequel des
deux réveils vous voulez
confi gurer. Indiquez l’heure,
les minutes et le type de son-
nerie. Confi rmez en appuyant
sur ENTER.
32 C
10:55
TimerTimer
32 C
10:55
Alarme
Alarme
ThermostatThermostat
ORA
ORA
08
08
Timer
Timer
DISATTIVAZIONE
DISATTIVAZIONE
32
32
°C
10:55
10:55
Ce symbole apparaît
sur l’affi cheur pour
confi rmer que la
confi guration réveil/s
a été effectuée.
Avec RÉVEIL vous pouvez confi gurer deux avertissements acoustiques.

23
FR
Les données et les indications fournies dans ce manuel peuvent subir des modifications à tout moment sans avis préalable de la part de CAME Cancelli s.p.a.
6.10 Menu – Thermostat
Termostato
Termostato
20
20
o
o
C
ATTIVAZIONE
ATTIVAZIONE
32 C
10:55
HorlogeHorloge
32 C
10:55
AlarmeAlarme
Thermostat
Thermostat
ORA
ORA
08
08
Timer
Timer
DISATTIVAZIONE
DISATTIVAZIONE
32
32
°C
10:55
10:55
Ce symbole apparaît
sur l’affi cheur pour
confi rmer que le
thermostat a été
confi guré.
Avec Thermostat, vous pouvez confi gurer un intervalle de température pendant lequel Wave met en activité un
contact.
Pour créer un nouvel intervalle
déplacez-vous à l’aide des
FLÈCHES sur le seuil de mise
en activité choisi, confi rmez en
appuyant sur ENTER. Répétez
l’opération pour déterminer le
seuil de mise au repos ; confi r-
mez le fonctionnement en vous
déplaçant avec les FLÈCHES
sur MISE EN SERVICE et
appuyez sur ENTER.
pour désactiver le fonctionne-
ment déplacez-vous avec les
FLÈCHES sur DÉSACTIVÉ et
appuyez sur ENTER.

24
Les données et les indications fournies dans ce manuel peuvent subir des modifications à tout moment sans avis préalable de la part de CAME Cancelli s.p.a.
FR
6.11 Menu - Montre
Horloge
Horloge
21
21
HEURE
HEURE
Indiquez l’heure, les minutes, les
secondes, l’année, le mois et le jour.
Pour les insérer agissez comme
pour les opérations précédentes
(en utilisant les FLÈCHES pour la
modifi cation de la valeur et avec
ENTER pour la confi rmation).
32 C
10:55
Horloge
Horloge
32 C
10:55
Fonct. Touches
Fonct. Touches
ThermostatThermostat
Avec Montre vous confi gurez l’heure et la date courante de Wave.
Fonct. Touches
Fonct. Touches
RELAY OUT
RELAY OUT
KEY
KEY
32 C
10:55
HorlogeHorloge
32 C
10:55
Fonct. Touches
Fonct. Touches
Passe
Passe
6.12 Menu – Fonction touches
Avec Fonction touches, vous pouvez associer aux deux boutons une fonction déterminée que vous
pouvez sélectionner parmi : sortie relais ou un des 4 codes radio.
Pour associer une commande à
un des deux boutons déplacez-
vous avec les FLÈCHES sur la
fonction choisie ; confi rmez en
appuyant sur les ENTER.

25
FR
Les données et les indications fournies dans ce manuel peuvent subir des modifications à tout moment sans avis préalable de la part de CAME Cancelli s.p.a.
6.13 Menu – Mot de passe
32 C
10:55
Fonct. Touches
Fonct. Touches
32 C
10:55
Passe
Passe
Avec Mot de passe, vous limitez l’accès aux fonctions de Wave.
Passe
Passe
CHANGEZ
CHANGEZ
DESACTIVE
DESACTIVE
32 C
10:55
AUTORISE
AUTORISE
32 C
10:55
32 C
10:55
CHANG.PASSE
CHANG.PASSE
CODE 2
CODE 2
CODE 1
CODE 1
TRASP 1
TRASP 1
TRASP 2
TRASP 2
32 C
10:55
CODICE
ODICE
1
1
SUPPR.PASSE
SUPPR.PASSE
NOUV.PASSE
NOUV.PASSE
32 C
10:55
Voir page 26,
dessin A.
32 C
10:55
Voir page 26,
dessin B.
La fonction Mise en service ou Désactivé
permet au mot de passe d’être opérationnel.
Avec code signifi e
que vous utilisez
un numéro de 4
chiffres tandis
qu’avec transp.
vous utilisez une
carte transpondeur
pour effectuer
l’accès
Nouveau Mot de Passe : il vous permet
de créer un nouveau code.
Élimination mot de passe : il vous per-
met d’effacer un code déjà présent.
32 C
10:55
Voir page. 27

26
Les données et les indications fournies dans ce manuel peuvent subir des modifications à tout moment sans avis préalable de la part de CAME Cancelli s.p.a.
FR
6.13 Menu – Mot de passe
32 C
10:55
CONFERMI (NON)
CONFERMI (NON)
SUPPR.PASSE
SUPPR.PASSE
?
32 C
10:55
NOUV.PASSE
NOUV.PASSE
TAPEZ CODE
TAPEZ CODE
1234
1234
5678
5678
90<>
90<>
1
1000
1
Pour confi rmer l’opération déplacez-vous avec les FLÈCHES
sur OUI et confi rmez en appuyant ENTER.
Pour choisir une valeur, utilisez les FLÈCHEs, sélectionnez-la et
confi rmez en appuyant sur ENTER. Répétez l’opération jusqu’à
ce que le code à 4 chiffres désiré soit inséré. Lorsque le mot de
passe d’accès au menu de Wave vous sera demandé, insérez
le code en suivant les indications ci-dessus.
fi g. A
fi g. B
TAPEZ CODE
TAPEZ CODE
1234
1234
5678
5678
90<>
90<>
1
1000
1

27
FR
Les données et les indications fournies dans ce manuel peuvent subir des modifications à tout moment sans avis préalable de la part de CAME Cancelli s.p.a.
6.13 Menu - Password
32 C
10:55
01
1
TRASP. 1
TRASP. 1
ELIMINA PASSW.
ELIMINA PASSW.
NUOVA PASSWORD
NUOVA PASSWORD
CONFERMI (NO)
CONFERMI (NO)
ELIMINA PASSW.
ELIMINA PASSW.
?
Pour confi rmer l’opération
déplacez-vous avec les
fl èches sur OUI et confi r-
mez en appuyant sur Enter
32 C
10:55
01
1
32 C
10:55
01
1
32 C
10:55
01
1
TRASP 1
TRASP 1
NUOVO CODICE
NUOVO CODICE
En sélectionnant NOUVEAU MOT DE
PASSE vous verrez apparaître une
barre qui indique le temps nécessaire
pour insérer le code. Passez la carte
près du Wave pour lui permettre de
reconnaître le code. Lorsque le mot
de passe d’accès au menu principal
vous sera demandé, passez la carte
(avec fonction) « Mot de passe »
sur WAVE.

28
Les données et les indications fournies dans ce manuel peuvent subir des modifications à tout moment sans avis préalable de la part de CAME Cancelli s.p.a.
FR
6.14 Menu – Num. Périphérique
32 C
10:55
01
1
Passe
Passe
32 C
10:55
01
1
Num.Peripherique
Num.Peripherique
Avec Num. Périphérique il est possible d’associer un identifi cateur lorsque plusieurs systèmes Wave sont connectés.
Num.Peripheriqu
Num.Peripheriqu
e
01
01
selectionner
selectionner
Pour attribuer un numéro au
périphérique, à l’aide des fl èches
placez-vous sur le numéro choisi
et confi rmez en appuyant sur
ENTER.
N.B.: Lorsque le système a plus d’un système
Wave il faut que le numéro de périphérique soit
différent pour chacun et qu’au moins l’un d’entre
eux (master) soit associé au numéro “1”.
32 C
10:55
01
1
Num.PeripheriqueNum.Peripherique
32 C
10:55
01
1
Entrees
Entrees
6.15 Menu - Entrées
Avec Entrées il est possible d’associer à une commande (entrée) un relais (sortie).
SELEC.Entrees
SELEC.Entrees
SORTIE 1
SORTIE 1
1 Hors service
1 Hors service
SORTIE 2SORTIE 2
32 C
10:55
01
1
Entrees
Entrees
SORTIE 1
SORTIE 1
1
Pour attribuer un numéro de périphéri-
que à la sortie, à l’aide des fl èches
placez-vous sur le numéro choisi,
confi rmez en appuyant sur ENTER.

29
FR
Les données et les indications fournies dans ce manuel peuvent subir des modifications à tout moment sans avis préalable de la part de CAME Cancelli s.p.a.
6.16 Menu - Sorties
Avec Sorties il est possible de sélectionner la méthode et la durée du temps d’intervention d’un relais de WA08.
32 C
10:55
01
1
Entrees
Entrees
32 C
10:55
01
1
Sorties
Sorties
SELEZ. Sorties
SELEZ. Sorties
4 TEMP. 1 s
4 TEMP. 1 s
3 Flip - Flop
3 Flip - Flop
1 TEMP. 10:50
1 TEMP. 10:50
2 TEMP. 1 s
2 TEMP. 1 s
Pour sélectionner une sortie à
confi gurer, à l’aide des fl èches
placez-vous sur la fonction
choisie. Confi rmez en appuyant
sur la touche ENTER
Sorties
Sorties
TEMP. 1 s
TEMP. 1 s
1
Pour sélectionner la méthode et
la durée du temps d’intervention
utilisez les fl èches et confi rmez en
appuyant sur Enter.
Il est possible de confi gurer un intervalle
de temps d’intervention sur une plage de
1s à 21:10 h ou bien un fonctionnement
bistable avec la fonction FLIP-FLOP.

30
Les données et les indications fournies dans ce manuel peuvent subir des modifications à tout moment sans avis préalable de la part de CAME Cancelli s.p.a.
FR
7 Entretien
Nos produits sont constitués de différents types de matériaux. La plupart d’entre eux (aluminium, plastique,
fer, câbles électriques) sont assimilables aux déchets solides urbains. Ils peuvent donc être recyclés en les triant et en
les apportant dans un des centres spécialisés pour le ramassage des déchets.
Les autres composants (cartes électroniques, batteries des émetteurs etc.) peuvent par contre contenir des substan-
ces polluantes.
Wave n’a pas besoin d’entretien périodique. Pour le nettoyage, il suffi t d’utiliser un chiffon humide et d’éviter les produits
chimiques et abrasifs qui pourraient endommager la superfi cie du produit. Pour tout autre problème adressez-vous au
service après-vente.
8 Démolition et Élimination

31
FR
Les données et les indications fournies dans ce manuel peuvent subir des modifications à tout moment sans avis préalable de la part de CAME Cancelli s.p.a.
9 Déclaration du fabricant
DÉCLARATION CE DE CONFORMITÈ
Aux termes de la Directive Basse Tension 2006/95/CE
CAME Cancelli Automatici S.p.A.
via Martiri della Libertà, 15
31030 Dosson di Casier - Treviso - ITALY
tel (+39) 0422 4940 - fax (+39) 0422 4941
internet: www.came.it - e-mail: [email protected]
Déclare sous sa responsabilité, que les produits suivants pour
l’automation de portails et portes de garage, ainsi dénommés:
WA02
... sont conformes aux conditions nécessaires et aux dispositions
appropriées, fi xées par les Directives suivantes et aux articles applicables
des Règlementations de référence indiqués ci-après.
--- DIRECTIVES ---
2006/95/CE DIRECTIVE BASSE TENSION
2014/30/UE DIRECTIVE COMPATIBILITÉ ELECTROMAGNÉTIQUE
--- RÈGLEMENTATIONS ---
Code de référence pour demander une copie conforme à l’original: DDC L FR W001
ADMINISTRATEUR DÉLÉGUÉ
Monsieur Gianni Michielan
EN 300 330-1/-2
EN 301 489-1/-3
EN 60730
EN 60950

CAME FRANCE S.A.
7 RUE DES HARAS
92737 NANTERRE CEDEX
PARIS - FRANCE
Tel 0033 1 46.13.05.05
Fax 0033 1 46.13.05.00
Cod. 119RU28 v 0.1 05/07 © CAME cancelli automatici s.p.a.

WA02
KONTROLLSYSTEM FÜR IHR HEIM
32
32
°C
10:55
10:55
INSTALLATIONSANLEITUNG
WA02

2
DE
Alle Angaben in diesem Handbuch können jederzeit ohne Vorankündigung seitens der CAME automatische Antriebe S.p.A. geändert werden.
INDEX
1. Zeichenerklärung.......................................................3
2. Verwendungszweck und Verwendungsbegren zung...3
2.1 Ver wen dungs zw eck ............................................3
2. 2 Ver wen dung sbe gre nzu ng.................................... 3
3. Be zug snor men .............................................................4
4. Be sch reib ung...............................................................4
4.1 Kontrollsystem 230V a.c.....................................4
4.2 Technische Daten................................................4
4.3 Descrizione generale...........................................5
5. Ins ta lla tio n...................................................................6
5.1 Vorherige Überprüfungen...................................6
5.2 Werkzeug und Materialien..................................6
5.3 Größe, Achsabstand und Befestigungslöcher.....7
5.4 Einführung in die Funktionslogik.........................8
5.5 Kabelverbindungen.............................................9
5.6 Anbringung an der Wand....................................10
6. Programmierung.......................................................11
6.1 Beschreibung der Befehle und des Displays......11
6.2 Menü..................................................................12
6.3 Menüaufbau - Hauptmenü.................................13
6.3.1 Menü-Einstellungen-Sprache......................14
6.3.2 Menü -Einstellungen-Temperatur................15
6.3.3 Menü -Einstellungen-Screensaver.............15
6.4 Menü-Ändere Nutzer..........................................16
6.5 Menü-Neuer Nutzer............................................18
6.6 Menü-Lösche Nutzer..........................................19
6.7 Menü-TX Radio..................................................20
6.8 Menü-Timer.......................................................21
6.9 Menü-Wecker....................................................22
6.10 Menü-Thermostat.............................................23
6.11 Menü-Uhr..........................................................24
6.12 Menü-Tasterfunktionen....................................24
6.13 Menü-Passwort................................................25
6.14 Menü – Peripheriegerätnr..................................28
6.15 Menü - Eingänge................................................28
6.16 Menü – Ausgänge.............................................29
7.Wartung........................................................30
8.Abbau und Entsorgung.............................................30
9.Herstellererklärung...........................................31

3
DE
Alle Angaben in diesem Handbuch können jederzeit ohne Vorankündigung seitens der CAME automatische Antriebe S.p.A. geändert werden.
Kontrollsystem zur Home Automation mit stand alone Funktion und der Möglichkeit einer Schnittstelle mit
digitaler Elektrokarte WI08.
Dieses Zeichen steht vor den Teilen des Handbuchs, die aufmerksam zu lesen sind.
Dieses Zeichen steht vor den Teilen des Handbuchs, welche die Sicherheit betreffen.
Dieses Zeichen steht vor den Anmerkungen für den Benutzer.
2.1 Gebrauchsbestimmung
2.2 Verwendungsbegrenzung
Das Gerät stoßsicher aufstellen.
2 Verwendungszweck und Verwendungsbegrenzung
1 Zeichenerklärung
“WICHTIGE SICHERHEITSHINWEISE FÜR DIE INSTALLATION”
“ACHTUNG: EINE UNSACHGEMÄSSE INSTALLATION KANN SCHWERE SCHÄDEN VERURSACHEN – DAHER MÜSSEN ABSOLUT ALLE
INSTALLATIONSANWEISUNGEN BEFOLGT WERDEN”
“DAS VORLIEGENDE HANDBUCH IST AUSSCHLIESSLICH FÜR FACHINSTALLATEURE ODER ANDERE SACHKUNDIGE PERSONEN BESTIMMT”

4
DE
Alle Angaben in diesem Handbuch können jederzeit ohne Vorankündigung seitens der CAME automatische Antriebe S.p.A. geändert werden.
Für das besagte Produkt wurden die nachstehenden Bezugsnormen berücksichtigt: EN 60730-1, EN 60950-1.
3 Bezugsnormen
Anschluss: 12V DC
Max Aufnahme: 100mA (12V DC) (1.2W)
Leistung: 85mA (12V DC) (1.02W)
Schutzart: IP40
Temperaturveränderung: ± 1°C
Material: Halterung ABS/PC/PA6 – Abdeckung PMMA
Funkfrequenz: 433,92 MHz
Reichweite des Funkgeräts: 30m (im Innern des Gebäudes)
Temperaturbereich:
#
#
Kontrollsystem zur Home Automation mit 12V DC Speisung
CAME entwickelt und produziert ausschließlich in Italien.
Das System integriert sich perfekt in alle versenkbare Schaltergehäuse.
4.2 Technische Daten
4.1 Kontrollsystem 12V DC
4 Beschreibung
siehe Konformitatserklarung

5
DE
Alle Angaben in diesem Handbuch können jederzeit ohne Vorankündigung seitens der CAME automatische Antriebe S.p.A. geändert werden.
#/- 6$#
!"'.$
32
32
°C
10:55
10:55
4.3 Allgemeine Beschreibung
1
2
4
3
6
5
1- Temperaturfühler
2- Befehlstaster
3- Display
4- Abdeckung der Löcher
5- Klemmleiste für Stromanschluss
6- Klemmleiste für Anschluss an WI08

6
DE
Alle Angaben in diesem Handbuch können jederzeit ohne Vorankündigung seitens der CAME automatische Antriebe S.p.A. geändert werden.
Vor der Installation sind folgende Kontrollen vorzunehmen:
• Überprüfen, dass das Gerät stoßsicher und fest aufgestellt wird. Das Gerät muss mit für die Oberfläche geei-
gneten Schrauben, Dübeln usw. angebracht werden.;
• Geeignete Kabelkanäle und -schläuche vorsehen, um die elektrischen Kabel vor Schäden zu schützen;
5 .1 Vorherige Überprüfungen
5.2 Arbeitsgeräte und Material
Sich davon überzeugen, dass alle Werkzeuge und das notwendige Material zur Durchführung der Installation
gemäß den geltenden Sicherheitsvorschriften vorhanden sind. In der nachstehenden Abbildung wird die Minde-
stausrüstung für den Installateur dargestellt.
5 Installation

7
DE
Alle Angaben in diesem Handbuch können jederzeit ohne Vorankündigung seitens der CAME automatische Antriebe S.p.A. geändert werden.
5.3 Größe, Achsabstand und Befestigungslöcher
117
80
46.5
9.5 37
75.5
50
83.5
38

8
DE
Alle Angaben in diesem Handbuch können jederzeit ohne Vorankündigung seitens der CAME automatische Antriebe S.p.A. geändert werden.
5.4 Einführung in die Funktionslogik
Transponder
Relais (WI08)
Funkgerät
RS 485
IN OUT
Taster
Thermostat
Timer
IN
Wave ermöglicht die Verknüpfung eines Befehls „IN“ des Typs: Transponder, Taster, Thermostat und Timer mit
einer Angabe „OUT“, wie z.B. einem Funkkode, ein Relaisschalter bzw. der Anschluss an ein anderes Gerät (nur
mit WI08).
Zum Beispiel: kann man die Gartenbeleuchtung sowohl mit dem Timer als auch per Taster oder Transponder
kontrollieren.

9
DE
Alle Angaben in diesem Handbuch können jederzeit ohne Vorankündigung seitens der CAME automatische Antriebe S.p.A. geändert werden.
#/- 6$#
!"'.$
5.5 Kabelverbindungen
WA02
LN
AB
GND
NC NO CNC NO CNC NO CNC NO CNC NO CNC NO CNC NO CNC NO C
AB
GND
+ 12V DC- + 12V DC-
Karte WI08
Anschluss
230VAC

10
DE
Alle Angaben in diesem Handbuch können jederzeit ohne Vorankündigung seitens der CAME automatische Antriebe S.p.A. geändert werden.
5.6 Wandbefestigung
1 2
3

11
DE
Alle Angaben in diesem Handbuch können jederzeit ohne Vorankündigung seitens der CAME automatische Antriebe S.p.A. geändert werden.
MENU
MENU
Einrichten
Einrichten
Nutzer Andern
Nutzer Andern
Neue Nutzer
Neue Nutzer
Losche Nutzer
Losche Nutzer
32
32
°C
10:55
10:55
01
01
1
2
3
4
5
6
7
8
Mit dem Taster
32 C
10:55
ENTER :
- Steigt man in die Menüs ein
- Werden eingegebene Werte bestätigt und gespeichert
Mit dem Taster
32 C
10:55
ESC :
- Steigt man aus den Menüs aus
- Werden Änderungen annulliert
- Kehrt man um einen Schritt in den Menüs zurück
Mit den Tastern
32 C
10:55
32 C
10:55
:
- Kann man das Menü hinauf- oder hinunterfahren
- Einen Wert erhöhen bzw. verringern
6 Programmierung
6.1 Beschreibung der Befehle und des Displays Statusanzeiger (zeigt das
Menü in dem man sich
gerade befi ndet an)
} Gewählter Punkt
Menüpunkte: durch Pfeiltaster
auswählbar
Thermostat eingestellt
Timer eingestellt
Wecker eingestellt
Relè aktives
1
2
3
4
5
6
7
8
01
01
Nicht aktives Relè
N° peripher

12
DE
Alle Angaben in diesem Handbuch können jederzeit ohne Vorankündigung seitens der CAME automatische Antriebe S.p.A. geändert werden.
32
32
°C
10:55
10:55
6.2 Surfen im Menü
Um in das Haupt-
menü einzusteigen,
den Taster ENTER
drücken
MENU
MENU
Einrichten
Einrichten
Nutzer Andern
Nutzer Andern
Neue Nutzer
Neue Nutzer
Losche Nutzer
Losche Nutzer
Um den gewünschten Punkt
auszuwählen, die PFEILTASTER
betätigen
MENU
MENU
Einrichten
Einrichten
Nutzer Andern
Nutzer Andern
Neue Nutzer
Losche Nutzer
Losche Nutzer
Bestatigen (JA)
Bestatigen (JA)
Neue Nutzer
Neue Nutzer
?
MENU
MENU
Einrichten
Einrichten
Nutzer Andern
Nutzer Andern
Neue Nutzer
Losche Nutzer
Losche Nutzer
Bestatigen(NEIN)
Bestatigen(NEIN)
Neue Nutzer
Neue Nutzer
?
Um in die Unter-
menüs einzustei-
gen, den Taster
ENTER drücken
Um auszuwählen, die
PFEILTASTER betätigen
Durch Druck auf Esc
geht es zurück zum
vorherigen Menü
Bestatigen (JA)
Bestatigen (JA)
Neue Nutzer
Neue Nutzer
?Durch Druck auf EN-
TER bestätigen

13
DE
Alle Angaben in diesem Handbuch können jederzeit ohne Vorankündigung seitens der CAME automatische Antriebe S.p.A. geändert werden.
6.3 Menüstruktur – Hauptmenü
Einrichten
Einrichten
Nutzer Andern
Nutzer Andern
Neue Nutzer
Neue Nutzer
Losche Nutzer
Losche Nutzer
TX Funksender
TX Funksender
Timer
Timer
Alarm
Alarm
Thermostat
Thermostat
Uhr
Uhr
Tastenfunktion
Tastenfunktion
Passwort
Passwort
Durch einige Sek. anhaltenden Druck auf ENTER steigt
man in das Hauptmenü ein (1. Niveau)
Um sich von einem Menüpunkt zum anderen zu bewegen,
die PFEILTASTER betätigen.
Durch Druck auf ENTER bestätigen (Einstieg Niveau 2)
Durch Druck auf Esc
geht es immer zum
vorherigen Menü zurück
Peripheriegeratnr
Peripheriegeratnr
Eingange
Eingange
Ausgange
Ausgange

14
DE
Alle Angaben in diesem Handbuch können jederzeit ohne Vorankündigung seitens der CAME automatische Antriebe S.p.A. geändert werden.
6.3.1 Menü - Einstellungen - Sprache
ENGLISH
ENGLISH
FRANZOSISCH
FRANZOSISCH
DEUTSCH
DEUTSCH
SPANISCH
SPANISCH
NEDERLANDS
NEDERLANDS
TemperaturTemperatur
Screen SaverScreen Saver
Einrichten
Einrichten
ITALIENISCH
ITALIENISCH
32 C
10:55
Sprache
Sprache
32 C
10:55
Nutzer Andern
Nutzer Andern
Neue Nutzer
Neue Nutzer
32 C
10:55
Die gewünschte Sprache auswählen und durch Druck auf ENTER bestätigen.

15
DE
Alle Angaben in diesem Handbuch können jederzeit ohne Vorankündigung seitens der CAME automatische Antriebe S.p.A. geändert werden.
6.3.2 Menü - Einstellungen - Temperatur
6.3.3 Menü - Einstellungen - Screensaver
Die Temperatureinheit auswählen und durch Druck auf ENTER bestätigen
Temperatur
Temperatur
Screen SaverScreen Saver
Celsius
Celsius
SpracheSprache
Fahrenheit
Fahrenheit
Einrichten
Einrichten
32 C
10:55
utzer Andernutzer Andern
Neue Nutzer
Neue Nutzer
32 C
10:55
32 C
10:55
Screensaver auswählen und durch Druck auf ENTER bestätigen
TemperaturTemperatur
Screen Saver
Screen Saver
Einrichten
Einrichten
Uhrzeit
Uhrzeit
32 C
10:55
SpracheSprache
32 C
10:55
Datum
Datum
Logo CAME
Logo CAME
32 C
10:55
Nutzer Andern
Nutzer Andern
Neue Nutzer
Neue Nutzer

16
DE
Alle Angaben in diesem Handbuch können jederzeit ohne Vorankündigung seitens der CAME automatische Antriebe S.p.A. geändert werden.
WAHLEN NUTZER
WAHLEN NUTZER
Neue n..
Neue n..
Neue002
Neue002
Neue001
Neue001
6.4 Menü – Ändere Nutzer
Neue Nutzer
Neue Nutzer
AUSGABE
AUSGABE
NAME
NAME
KODENUMMER
KODENUMMER
Ändere Nutzer: Ermöglicht die Änderung der Charakteristiken des jeweiligen Nutzers (Kode, Name, mit ihm verbunde-
ner Ausgang).
Einrichten
Einrichten
Nutzer Andern
Nutzer Andern
Neue Nutzer
Neue Nutzer
32 C
10:55
32 C
10:55
Den abzuändernden Nutzer mit
Hilfe der Pfeiltaster auswäh-
len. Durch Druck auf ENTER
bestätigen.
Neue001
Neue001
32 C
10:55
32 C
10:55
Im Menü zur Ände-
rung der einzelnen
Nutzer kann man mit
Hilfe der PFEILTASTER
die zu verändernden
Parameter auswählen.
Nach Auswahl des zu
ändernden Parame-
ters durch Druck auf
ENTER bestätigen

17
DE
Alle Angaben in diesem Handbuch können jederzeit ohne Vorankündigung seitens der CAME automatische Antriebe S.p.A. geändert werden.
KODENUMMER
KODENUMMER
Nutzer Andern
Nutzer Andern
neue001
neue001
NEUER KODE
NEUER KODE
NAME
NAME
Nutzer andern
Nutzer andern
neue001
neue001
neue 001
n
ENTER drücken
32 C
10:55
um :
- Den nächsten zu verändernden Punkt auszuwählen
- Die Änderungen zu bestätigen (lang drücken)
ESC drücken
32 C
10:55
um :
- Zum vorherigen Punkt zurückzukehren
- Zum vorherigen Niveau zurückzukehren ohne die
Änderungen abzuspeichern (lang drücken)
Pfeiltaster drücken
32 C
10:55
32 C
10:55
um :
- Einen anderen Punkt auszuwählen
Durch Auswahl des Punktes
NAME steigt man in das Menü
Ändere Nutzer ein.
6.4 Menü - Ändere Nutzer
32 C
10:55
32 C
10:55
Es ist möglich, einen Transponderkode zu spei-
chern und diesen durch Annäherung der Karte
an Wave zur Erkennung des Kodes innerhalb
von 10 Sek. dem ausgewählten Nutzer zuzuordnen.

18
DE
Alle Angaben in diesem Handbuch können jederzeit ohne Vorankündigung seitens der CAME automatische Antriebe S.p.A. geändert werden.
Bestatigen (NEIN)
Bestatigen (NEIN)
Neue Nutzer
Neue Nutzer
?
neue001
neue001
AUSGABE
AUSGABE
LOCAL RELAY
LOCAL RELAY
Neue Nutzer
Neue Nutzer
AUSGABE
AUSGABE
Den zuzuordnenden Ausgang
mit Hilfe der Pfeiltaster
auswählen und durch Druck
auf Enter bestätigen
6.4 Menu - Modifica utente
Mit AUSGANG wird ein Befehl einem Nutzer zugeordnet. Es können zweierlei Befehle sein: der lokale Ausgang
ist ein physischer Kontakt (NO, NC); oder ein
Funkausgang (es können bis zu vier verschie-
dene eingegeben werden.
6.5 Menü - Neuer Nutzer
Neuer Nutzer: Um einen neuen
Nutzer einzuspeichern mit Hilfe
der Pfeiltaster JA auswählen
und durch Druck auf ENTER
bestätigen. Das Menü Ändere
Nutzer wird automatisch ak-
tiviert. Zur Eingabe der Daten
siehe Kap. 6.4
Nutzer Andern
Nutzer Andern
Neue Nutzer
Neue Nutzer
32 C
10:55
01
1
Losche Nutzer
Losche Nutzer
32 C
10:55
01
1
32 C
10:55
01
1

19
DE
Alle Angaben in diesem Handbuch können jederzeit ohne Vorankündigung seitens der CAME automatische Antriebe S.p.A. geändert werden.
6.6 Menü - Lösche Nutzer
Bestatigen (NEIN)
Bestatigen (NEIN)
Losche Nutzer
Losche Nutzer
Neue002
Neue002
?
Lösche Nutzer: Ein bereits eingespeicherter Nutzer wird gelöscht.
WAHLEN NUTZER
WAHLEN NUTZER
Neue n..
Neue n..
Neue002
Neue002
Neue001
Neue001
Einrichten
Einrichten
Nutzer Andern
Nutzer Andern
Neue Nutzer
Neue Nutzer
32 C
10:55
32 C
10:55
Losche Nutzer
Losche Nutzer
32 C
10:55
TX FunksenderTX Funksender
Zur Bestätigung mit Hilfe der Pfeiltaster JA auswählen und durch Druck auf Enter bestätigen.

20
DE
Alle Angaben in diesem Handbuch können jederzeit ohne Vorankündigung seitens der CAME automatische Antriebe S.p.A. geändert werden.
6.7 Menü - TX Radio
TX Funksender
TX Funksender
FUNKFELD:1
FUNKFELD:1
WARTE
WARTE
Zu speichernden Funkkanal
mit Hilfe der Pfeiltaster
auswählen und durch Druck
auf Enter bestätigen
TX Funksender
TX Funksender
1
FUNKFELD
FUNKFELD
Losche Nutzer
Losche Nutzer
TX Funksender
TX Funksender
32 C
10:55
TimerTimer
32 C
10:55
Mit dem Menü TX RADIO kann man den Kode eines Funksenders von CAME einem Ausgang zuordnen, um diesen
„wiederholen“ zu können und die Antriebe direkt über Taster oder Transponder über WAVE zu kontrollieren.
Funkkode mit Hilfe eines Senders
innerhalb von 10 Sek. senden (siehe
Zeichnung). Die erfolgte Speiche-
rung wird durch Erscheinen des
Kodes auf dem Display bestätigt. Verwenden Sie bitte Funksen-
der der Serien:
Top 433.92MHz
oder
Tam 433,92MHz

21
DE
Alle Angaben in diesem Handbuch können jederzeit ohne Vorankündigung seitens der CAME automatische Antriebe S.p.A. geändert werden.
6.8 Menü - Timer
LOSCHE
LOSCHE
NEUE
NEUE
Timer
Timer
ANDERN
ANDERN
Um einen neuen Zeitintervall
einzugeben mit Hilfe der
Pfeiltaster NEU auswählen
und durch Druck auf Enter
bestätigen....
UHRZEIT
UHRZEIT
08
08
Timer
Timer
AKTIVIERUNG
AKTIVIERUNG
... nach erfolgter Eingabe
Stunde, Minuten, Tag der
Aktivierung und zugeordneten
Befehl (lokaler Ausgang bzw.
einer der Funkausgänge)
angeben...
Mit dem Menü TIMER können Befehle einem bestimmten Zeitintervall bzw. einer Tageszeit zugeordnet werden.
... anschließend den Tag der Deaktivie-
rung angeben. Der genaue Zeitintervall
wird durch Angabe derselben Informa-
tionen, wie oben, eingegeben.
TX FunksenderTX Funksender
32 C
10:55
Timer
Timer
32 C
10:55
AlarmAlarm
Neben der Eingabe eines neuen
„TIMERS“ kann man die schon
bestehenden
ÄNDERN
bzw
LÖSCHEN
Timer
Timer
LOSCHE
LOSCHE
NEUE
NEUE
ANDERN
ANDERN
ORA
ORA
08
08
Timer
Timer
DISATTIVAZIONE
DISATTIVAZIONE
32
32
°C
10:55
10:55
Nach Einstel-
lung des Timers
erscheint dieses
Symbol auf dem
Display.

22
DE
Alle Angaben in diesem Handbuch können jederzeit ohne Vorankündigung seitens der CAME automatische Antriebe S.p.A. geändert werden.
6.9 Menü - Wecker
Alarm
Alarm
1
WAHLEN
WAHLEN
Einen der beiden Wecker
auswählen. Stunde, Minuten
und Läutsignal angeben.
Durch Druck auf Enter be-
stätigen.
32 C
10:55
TimerTimer
32 C
10:55
Alarm
Alarm
ThermostatThermostat
ORA
ORA
08
08
Timer
Timer
DISATTIVAZIONE
DISATTIVAZIONE
32
32
°C
10:55
10:55
Nach Einstellung
des/der Wecker(s)
erscheint dieses
Symbol auf dem
Display.
Mit dem Menü WECKER können zwei akustische Signale eingestellt werden.

23
DE
Alle Angaben in diesem Handbuch können jederzeit ohne Vorankündigung seitens der CAME automatische Antriebe S.p.A. geändert werden.
6.10 Menü - Thermostat
Thermostat
Thermostat
20
20
o
o
C
AKTIVIERUNG
AKTIVIERUNG
32 C
10:55
UhrUhr
32 C
10:55
AlarmAlarm
Thermostat
Thermostat
ORA
ORA
08
08
Timer
Timer
DISATTIVAZIONE
DISATTIVAZIONE
32
32
°C
10:55
10:55
Nach Einstellung
des Thermostats
erscheint dieses
Symbol auf dem
Display.
Mit dem Menü Thermostat kann ein Temperaturbereich eingestellt werden innerhalb desselben Wave einen Schalter
aktiviert.
Um einen neuen Temperatur-
bereich einzustellen mit Hilfe
der PFEILTASTER die Aktivie-
rungstemperatur auswählen
und durch Druck auf ENTER
bestätigen. Die Operation zur
Auswahl der Deaktivierung-
stemperatur wiederholen; die
Funktion durch Auswahl der
Funktion BEREIT und Druck
auf ENTER bestätigen.
Um die Funktion zu löschen
mit Hilfe der PFEILTASTER
GESPERRT auswählen und
durch Druck auf ENTER be-
stätigen.

24
DE
Alle Angaben in diesem Handbuch können jederzeit ohne Vorankündigung seitens der CAME automatische Antriebe S.p.A. geändert werden.
6.11 Menü - Uhr
Uhr
Uhr
21
21
UHRZEIT
UHRZEIT
Stunde, Minuten, Sekunden, Jahr,
Monat und Tag eingeben. Eingabe
auf dieselbe Art der vorherigen Ein-
stellungen (mit Hilfe der Pfeiltaster
wird der Wert geändert und durch
Druck auf Enter bestätigt).
32 C
10:55
Uhr
Uhr
32 C
10:55
TastenfunktionTastenfunktion
ThermostatThermostat
Mit dem Menü Uhr wird die Uhrzeit und das Datum von Wave eingestellt.
Tastenfunktion
Tastenfunktion
RELAY OUT
RELAY OUT
KEY
KEY
32 C
10:55
UhrUhr
32 C
10:55
Tastenfunktion
Tastenfunktion
Passwort
Passwort
6.12 Menü - Tasterfunktionen
Mit dem Menü Tasterfunktionen können den beiden Tastern bestimmte Funktionen zugeordnet wer-
den: Relaisausgang bzw. einer der 4 Funkkodes.
Um einen Befehl einem der bei-
den Taster zuzuordnen, mit Hilfe
der Pfeiltaster die gewünschte
Funktion auswählen und durch
Druck auf die Enter bestätigen.

25
DE
Alle Angaben in diesem Handbuch können jederzeit ohne Vorankündigung seitens der CAME automatische Antriebe S.p.A. geändert werden.
6.13 Menü - Passwort
32 C
10:55
TastenfunktionTastenfunktion
32 C
10:55
Mit dem Menü Passwort wird der Zugang zu den Funktionen von Wave begrenzt.
Passwort
Passwort
ANDERN
ANDERN
UNZULASSIGE
UNZULASSIGE
32 C
10:55
ZUGELASSEN
ZUGELASSEN
32 C
10:55
32 C
10:55
ANDERN PASSW.
ANDERN PASSW.
KODENUM.2
KODENUM.2
KODENUM.1
KODENUM.1
TRASP 1
TRASP 1
TRASP 2
TRASP 2
32 C
10:55
KODENUM.1
KODENUM.1
LOSCHE PASSW.
LOSCHE PASSW.
NEUE PASSW.
NEUE PASSW.
32 C
10:55
Siehe S. 26
Fig. A
32 C
10:55
Siehe S. 26
Fig. B
Die Funktionen bereit bzw. gesperrt ermögli-
chen die Aktivierung des Passwortes.
Unter Kode
versteht sich eine
Zahl mit 4 Ziffern
– während man
bei Transp. eine
Transponderkarte
verwendet, um
den Zugang zu
ermöglichen.
Neues Passwort ermöglicht die
Schaffung eines neuen Kodes. Lösche
Passwort ermöglicht das Löschen eines
schon bestehenden Kodes.
32 C
10:55
Siehe S. 27

26
DE
Alle Angaben in diesem Handbuch können jederzeit ohne Vorankündigung seitens der CAME automatische Antriebe S.p.A. geändert werden.
6.13 Menü - Passwort
32 C
10:55
Bestatigen(NEIN)
Bestatigen(NEIN)
LOSCHE PASSW.
LOSCHE PASSW.
?
32 C
10:55
NEUE PASSW.
NEUE PASSW.
CODE EING.
CODE EING.
1234
1234
5678
5678
90<>
90<>
1
1000
1
Um die Operation zu bestätigen, mit Hilfe der PFEILTASTER JA
auswählen und durch Druck auf ENTER bestätigen.
Einen Wert mit Hilfe der PFEILTASTER auswählen und durch
Druck auf ENTER bestätigen. Dies bis zur Eingabe des gewün-
schten vierziffrigen Kodes wiederholen. Wenn für den Zugriff
auf das Menü von WAVE ein Passwort angefordert wird, den
Kode, wie oben beschrieben, eingeben.
fi g. A
fi g. B
CODE EING.
CODE EING.
1234
1234
5678
5678
90<>
90<>
1
1000
1

27
DE
Alle Angaben in diesem Handbuch können jederzeit ohne Vorankündigung seitens der CAME automatische Antriebe S.p.A. geändert werden.
6.13 Menü - Passwort
32 C
10:55
TRASP. 1
TRASP. 1
LOSCHE PASSW.
LOSCHE PASSW.
NEUE PASSW.
NEUE PASSW.
Bestatigen(NEIN)
Bestatigen(NEIN)
LOSCHE PASSW.
LOSCHE PASSW.
?
Um die Operation zu bestäti-
gen, mit Hilfe der PFEILTA-
STER JA auswählen und
durch Druck auf ENTER
bestätigen.
32 C
10:55
32 C
10:55
32 C
10:55
TRASP 1
TRASP 1
NEUER KODE
NEUER KODE
Bei Auswahl von NEUES PAS-
SWORT erscheint eine Leiste,
die die Zeit für die Eingabe des
Kodes angibt. Zur Kodeiden-
tifi zierung die Karte an Wave
annähern. Wenn für den Zugriff
auf das Hauptmenü ein Passwort
angefordert wird, die Karte (mit
Funktion) Passwort an WAVE
annähern.

28
DE
Alle Angaben in diesem Handbuch können jederzeit ohne Vorankündigung seitens der CAME automatische Antriebe S.p.A. geändert werden.
6.14 Menü – Peripheriegerätnr.
32 C
10:55
01
1
Passwort
Passwort
32 C
10:55
01
1
Peripheriegeratnr
Peripheriegeratnr
Mit der Funktion Peripheriegerätnr. kann man im Fall mehrerer angeschlossener Wave eine Identifi zierungsnummer
Peripheriegeratnr
Peripheriegeratnr
01
01
einzustellenden
einzustellenden
Um dem Peripheriegerät eine
Nummer zuzuordnen, die Pfeile
betätigen, bis die gewünschte
Nummer ausgewählt wurde und
ENTER drücken.
N.B.: In einem System mit mehreren Wave muss
jedem Gerät eine andere Peripheriegerätnr. zu-
geordnet werden, dabei muss mindestens einem
Gerät (Master) die Nr. 1 zugeordnet werden.
32 C
10:55
01
1
PeripheriegeratnrPeripheriegeratnr
32 C
10:55
01
1
Eingange
Eingange
6.15 Menü - Eingänge
Mit der Funktion Eingänge kann man einem Befehl (Eingang) ein Relais (Ausgang) zuordnen.
EINGANG AUSWAHLEN
EINGANG AUSWAHLEN
AUSGANG 1
AUSGANG 1
1
1
BLOCKIERT
BLOCKIERT
AUSGANG 2AUSGANG 2
32 C
10:55
01
1
Eingange
Eingange
AUSGANG 1
AUSGANG 1
1
Um dem Ausgang eine Peripheriegerät-
nummer zuzuordnen, die Pfeile betätigen,
bis die gewünschte Nummer ausgewählt
wurde und ENTER drücken.

29
DE
Alle Angaben in diesem Handbuch können jederzeit ohne Vorankündigung seitens der CAME automatische Antriebe S.p.A. geändert werden.
6.16 Menü – Ausgänge
Mit der Funktion Ausgänge kann man die Betriebsweise und Betriebsdauer eines Relais WA08 auswählen
32 C
10:55
01
1
EingangeEingange
32 C
10:55
01
1
Ausgange
Ausgange
AUSGANG AUSWAHLEN
AUSGANG AUSWAHLEN
4 TEMP. 1 s
4 TEMP. 1 s
3 Flip - Flop
3 Flip - Flop
1 TEMP. 10:50
1 TEMP. 10:50
2 TEMP. 1 s
2 TEMP. 1 s
Um den einzustellenden Au-
sgang auszuwählen, die Pfeile
betätigen, bis die gewünschte
Funktion ausgewählt wurde und
ENTER drücken.
Ausgange
Ausgange
TEMP. 1 s
TEMP. 1 s
1
Um die Betriebsweise und
Betriebsdauer auszuwählen,
die Pfeile betätigen und
ENTER drücken.
Es ist möglich, eine Betriebszeitspanne
von 1 Sek. bis 21:10 St. bzw. eine bistabile
Betriebsweise mit der Funktion FLIP-FLOP
einzugeben.

30
DE
Alle Angaben in diesem Handbuch können jederzeit ohne Vorankündigung seitens der CAME automatische Antriebe S.p.A. geändert werden.
7 Wartung
Unsere Produkte bestehen aus verschiedenen Materialien. Der größte Teil davon (Aluminium, Plastik, Eisen
Stromkabel) kann mit dem Hausmüll entsorgt und durch getrennte Sammlung in zugelassenen Fachbetrieben recycelt
werden.
Andere Bestandteile (elektronische Steckkarten, Batterien der Funkgeräte usw.) können Schadstoffe enthalten. Sie
müssen dementsprechend entfernt und in zugelassenen Fachbetrieben entsorgt werden.
Wave benötigt keine regelmäßige Wartung. Für die Reinigung bitte ein feuchtes Tuch verwenden und chemische Lösun-
gen bzw. Schleifmittel, die die Oberfl äche des Produktes beschädigen könnten, vermeiden.
Sollten irgendwelche Probleme auftreten, wenden Sie sich an den Kundendienst.
8 Abbau und Entsorgung

31
DE
Alle Angaben in diesem Handbuch können jederzeit ohne Vorankündigung seitens der CAME automatische Antriebe S.p.A. geändert wer den.
9 Herstellererklärung
CE KONFORMITÄTSERKLÄRUNG
Gemãß der Nierspannungsrichtlinie 2006/95/CE
CAME Cancelli Automatici S.p.A.
via Martiri della Libertà, 15
31030 Dosson di Casier - Treviso - ITALY
tel (+39) 0422 4940 - fax (+39) 0422 4941
internet: www.came.it - e-mail: [email protected]
Bestätigt unter eigener Verantwortung, dass folgende automatische
Antriebe für Tore und Garagentore:
WA02
… den grundlegenden Anforderungen und entsprechenden Bestimmungen
der folgenden Richtlinien und der anzuwendenden Teilbestimmungen der
im folgenden aufgeführten Gesetzesvorschriften entsprechen.
--- RICHTLINIEN ---
2006/95/CE NIEDERSPANNUNGSRICHTLINIE
2014/30/UE RICHTLINIE ÜBER E VLEKTROMAGNETISCHE ERTRÄGLICHKEIT
--- NORMEN ---
Code zur Anforderung einer dem Original entsprechenden Kopie: DDC L DE W001
DER GESCHÄFTSFÜHRER
Herr Gianni Michielan
EN 300 330-1/-2
EN 301 489-1/-3
EN 60730
EN 60950

CAME GmbH
KORNWESTHEIMER STR. 37
70825 KORNTAL - MÜNCHINGEN
BEI STUTTGART - DEUTSCHLAND
Tel - 0049 71 5037830
Fax - 0049 71 50378383
--------------
CAME GmbH
AKAZIENSTR. 9
16356 SEEFELD BEI BERLIN
DEUTSCHLAND
Tel - 0049 33 3988390
Fax - 0049 33 39885508
Cod. 119RU28 v 0.1 05/07 © CAME cancelli automatici s.p.a.

WA02
SISTEMA PARA EL CONTROL DE LA VIVIENDA
32
32
°C
10:55
10:55
MANUAL DE INSTALACIÓN
WA02

2
ES
Los datos y las informaciones contenidas en este manual deben considerarse susceptibles de modificación en cualquier momento y sin obligación de
aviso previo por parte de la firma CAME cancelli automatici s.p.a.
ÍNDICE
1. Leyenda símbolos.......................................................3
2. Uso previsto y límites de utilización.............................3
2.1 Uso prev isto........................................................ 3
2.2 Límites de utilización..........................................3
3. Referencias normativas..............................................4
4. Descripción.................................................................4
4.1 Sistema para el control 12V d.c .........................4
4.2 Datos técnicos....................................................4
4.3 Descripción general............................................5
5. Instalación..................................................................6
5.1 Verificaciones preliminares................................6
5.2 Equipos y materiales...........................................6
5.3 Medidas, interejes y agujeros de fijación.............7
5.4 Introducción a la lógica de funcionamiento.........8
5.5 Conexión cables..................................................9
5.6 Montaje de pared...............................................10
6. Programación...........................................................11
6.1 Descripción mandos y display...........................11
6.2 Navegación menú..............................................12
6.3 Estructura Menú - Principal...............................13
6.3.1 Menú-Programaciones-Idioma.........................14
6.3.2 Menú -Programaciones-Temperatura........15
6.3.3 Menú -Programaciones-Screensaver.........15
6.4 Menú-Modificación usuario...............................16
6.5 Menú-Nuevo usuario..........................................18
6.6 Menú-Elimina usuario........................................19
6.7 Menú-TX Radio..................................................20
6.8 Menú-Timer (Temporizador).............................21
6.9 Menú-Despertador............................................22
6.10 Menú-Termostato.............................................23
6.11 Menú-Reloj.......................................................24
6.12 Menú-Función teclas........................................24
6.13 Menú-Contraseña............................................25
6.14 Menú - Núm. Periférica.....................................28
6.15 Menú - Entradas................................................28
6.16 Menú - Salidas.................................................29
7.Mantenimento........................................................30
8.Demolición y Eliminación.....................................30
9.Declaración del fabbricante....................................31

3
ES
Los datos y las informaciones contenidas en este manual deben considerarse susceptibles de modificación en cualquier momento y sin obligación de
aviso previo por parte de la firma CAME cancelli automatici s.p.a.
Sistema de control para home automation, con función stand alone y con posibilidad de interfaz con tarjeta
electrónica digital WI08.
Este símbolo indica las partes que deben leerse detenidamente.
Este símbolo indica las partes que se refieren a la seguridad.
Este símbolo indica las informaciones destinadas al usuario final.
2.1 Uso previsto
2.2 Condiciones de utilización
Ubicar el aparato en zonas protegidas de eventuales golpes accidentales.
2 Uso previsto y condiciones de utilización
1 Leyenda de los símbolos
“INSTRUCCIONES IMPORTANTES DE SEGURIDAD PARA LA INSTALACIÓN”
“ATENCIÓN: LA INSTALACIÓN INCORRECTA PODRÍA PROVOCAR GRAVES DAÑOS, SIGA LAS INSTRUCCIONES DE INSTALACIÓN”
“ESTE MANUAL ESTÁ DESTINADO ÚNICAMENTE A INSTALADORES PROFESIONALES O A PERSONAS COMPETENTES”

4
ES
Los datos y las informaciones contenidas en este manual deben considerarse susceptibles de modificación en cualquier momento y sin obligación de
aviso previo por parte de la firma CAME cancelli automatici s.p.a.
Para el producto en cuestión se han tomado como referencia las siguientes normativas: EN 60730-1, EN 60950-1.
3 Normativas de referencia
Alimentación: 12V DC
Absorción max: 100mA (12V DC) (1.2W)
Absorción en estado de reposo: 85mA (12V DC) (1.02W)
Grado de proteción: IP40
Variación temperatura: ± 1°C
Material: Soporte ABS /PC/ PA6 - Placa PMMA
Frecuencia Radio: 433,92 MHz
Capacidad radio estimada: 30m (internos al edifi cio)
Temperatura de ejercicio:
#
#
Sistema de control para home automation con alimentación 12V DC
CAME proyecta y produce íntegramente en Italia sus productos.
Se integra en todas las cajas porta borne de conexión mediante encastre.
4.2 Datos técnicos
4.1 Sistema para control 12V DC
4 Descripción
vease declaracion de conformidad

5
ES
Los datos y las informaciones contenidas en este manual deben considerarse susceptibles de modificación en cualquier momento y sin obligación de
aviso previo por parte de la firma CAME cancelli automatici s.p.a.
#/- 6$#
!"'.$
32
32
°C
10:55
10:55
4.3 Descripción general
1
2
4
3
6
5
1- Sensor para la detección temperatura
2- Botonera de mando
3- Display
4- Placa de cobertura agujeros
5- Caja de bornes de alimentación
6- Caja de bornes para la conexión a WI08

6
ES
Los datos y las informaciones contenidas en este manual deben considerarse susceptibles de modificación en cualquier momento y sin obligación de
aviso previo por parte de la firma CAME cancelli automatici s.p.a.
Antes de instalar la automatización es necesario:
• Verificar que el punto de fijación esté protegido de los golpes y que sea resistente. La fijación debe efectuarse
mediante tornillos, tacos, etc idóneos para el tipo di superficie;
• Colocar tubos y canaletas adecuados para el pasaje de los cables eléctricos garantizando de esta manera la protec-
ción contra los eventuales daños mecánicos;
5 .1 Controles preliminares
5.2 Herramientas y materiales
Tenga a disposición todas las herramientas y el material necesario para efectuar la instalación de manera segura,
respetando las normativas vigentes. En la figura se indican algunos ejemplos de las herramientas que necesita el
instalador.
5 Instalación

7
ES
Los datos y las informaciones contenidas en este manual deben considerarse susceptibles de modificación en cualquier momento y sin obligación de
aviso previo por parte de la firma CAME cancelli automatici s.p.a.
5.3 Medidas, interejes y agujeros de fijación
117
80
46.5
9.5 37
75.5
50
83.5
38

8
ES
Los datos y las informaciones contenidas en este manual deben considerarse susceptibles de modificación en cualquier momento y sin obligación de
aviso previo por parte de la firma CAME cancelli automatici s.p.a.
5.4 Introducción a la lógica de funcionamiento del producto
Transponder
Relè (WI08)
Radio
RS 485
IN OUT
Teclas
Termostato
Timer (Temporizador)
IN
Wave permite asociar un mando “IN” del tipo: transponder, teclas, termostato y timer (temporizador) a una in-
strucción en salida “OUT” que puede ser un código radio o un contacto relé o la conexión a otro dispositivo (sólo
con WI08).
Por ejemplo: se pueden mandar las luces del jardín tanto con timer (temporizador) como con pulsador o tran-
sponder.

9
ES
Los datos y las informaciones contenidas en este manual deben considerarse susceptibles de modificación en cualquier momento y sin obligación de
aviso previo por parte de la firma CAME cancelli automatici s.p.a.
#/- 6$#
!"'.$
5.5 Conexión cables
WA02
LN
AB
GND
NC NO CNC NO CNC NO CNC NO CNC NO CNC NO CNC NO CNC NO C
AB
GND
+ 12V DC- + 12V DC-
Tarjeta WI08
Alimentación
230VAC

10
ES
Los datos y las informaciones contenidas en este manual deben considerarse susceptibles de modificación en cualquier momento y sin obligación de
aviso previo por parte de la firma CAME cancelli automatici s.p.a.
5.6 Montaje de pared
1 2
3

11
ES
Los datos y las informaciones contenidas en este manual deben considerarse susceptibles de modificación en cualquier momento y sin obligación de
aviso previo por parte de la firma CAME cancelli automatici s.p.a.
32
32
°C
10:55
10:55
01
01
1
2
3
4
5
6
7
8
La tecla ENTER
32 C
10:55
sirve para :
- entrar en el menú
- confi rmar y memorizar el valor establecido
La tecla ESC
32 C
10:55
sirve para :
- salir de los menú
- anula las modifi caciones
- volver hacia atrás en el menú editables
Las teclas
32 C
10:55
32 C
10:55
sirven para :
- desplazarse de una función a otra en el menú
- incrementar o disminuir un valor
6 Programación
6.1 Descripción mandos y display
MENU
MENU
Programar
Programar
Modifi. Usuario
Modifi. Usuario
Nuevo Usuario
Nuevo Usuario
Eliminar
Eliminar
Usuario
Usuario
Indicador de estado
(indica el menú dentro del
cual se está navegando)
}Función seleccionada
Funciones menú: se seleccionan
con las teclas fl echa
Termostato establecido
Timer (Temporizador) Establecido
Despertador programado
Relè activado
1
2
3
4
5
6
7
8
01
01
Relè desactivado
N° periférica

12
ES
Los datos y las informaciones contenidas en este manual deben considerarse susceptibles de modificación en cualquier momento y sin obligación de
aviso previo por parte de la firma CAME cancelli automatici s.p.a.
32
32
°C
10:55
10:55
6.2 Navegación Menú
Para entrar en el
menú principal, te-
ner apretada la
tecla ENTER
MENU
MENU
Programar
Programar
Modifi. Usuario
Modifi. Usuario
Nuevo Usuario
Nuevo Usuario
Eliminar
Eliminar
Usuario
Usuario
Para elegir la opción deseada,
desplazarse con las FLECHAS
MENU
MENU
Programar
Programar
Modifi. Usuario
Modifi. Usuario
Nuevo Usuario
EliminarUsuario
EliminarUsuario
CONFIRMAR (SI)
CONFIRMAR (SI)
Nuevo Usuario
Nuevo Usuario
?
MENU
MENU
Programar
Programar
Modifi. Usuario
Modifi. Usuario
Nuevo Usuario
EliminarUsuario
EliminarUsuario
CONFIRMAR (NO)
CONFIRMAR (NO)
Nuevo Usuario
Nuevo Usuario
?
Para entrar en el
submenú, apretar
la tecla ENTER
Para seleccionar, despla-
zarse con las FLECHAS
Apretando la tecla Esc
se vuelve siempre al
menú precedente
CONFIRMAR (SI)
CONFIRMAR (SI)
Nuevo Usuario
Nuevo Usuario
?Apretar ENTER para
confi rmar

13
ES
Los datos y las informaciones contenidas en este manual deben considerarse susceptibles de modificación en cualquier momento y sin obligación de
aviso previo por parte de la firma CAME cancelli automatici s.p.a.
6.3 Estructuara Menú - Principal
Programar
Programar
Modifi. Usuario
Modifi. Usuario
Nuevo Usuario
Nuevo Usuario
Eliminar Usuario
Eliminar Usuario
TX Radio
TX Radio
Timer
Timer
Alarma
Alarma
Termostato
Termostato
Reloj
Reloj
Funcion Teclas
Funcion Teclas
Contrasena
Contrasena
Teniendo apretada la tecla ENTER por algunos segundos
se entra en el menú principal (primer nivel)
Para desplazarse de una opción del menú a otra, moverse
con las FLECHAS
Apretar ENTER para confi rmar (se accede al segundo nivel)
Apretando la tecla Esc
se vuelve siempre al
menú precedente
Num. Periferica
Num. Periferica
Entradas
Entradas
Salidas
Salidas

14
ES
Los datos y las informaciones contenidas en este manual deben considerarse susceptibles de modificación en cualquier momento y sin obligación de
aviso previo por parte de la firma CAME cancelli automatici s.p.a.
6.3.1 Menú - Programaciones - Idioma
INGLES
INGLES
FRANCES
FRANCES
ALEMAN
ALEMAN
ESPANOL
ESPANOL
NEDERLANDS
NEDERLANDS
TemperaturaTemperatura
Screen saverScreen saver
Programar
Programar
ITALIANO
ITALIANO
32 C
10:55
Idioma
Idioma
32 C
10:55
Modifi. Usuario
Modifi. Usuario
Nuevo Usuario
Nuevo Usuario
32 C
10:55
Seleccionar el idioma preelegido y confi rmar apretando ENTER

15
ES
Los datos y las informaciones contenidas en este manual deben considerarse susceptibles de modificación en cualquier momento y sin obligación de
aviso previo por parte de la firma CAME cancelli automatici s.p.a.
6.3.2 Menú - Programaciones - Temperatura
6.3.3 Menú - Programaciones - Screensaver
Seleccionar la unidad de medida de la temperatura y confi rmar apretando ENTER
Temperatura
Temperatura
Screen saverScreen saver
Celsius
Celsius
IdiomaIdioma
Fahrenheit
Fahrenheit
Programar
Programar
32 C
10:55
Modifi. Usuario
Modifi. Usuario
Nuevo Usuario
Nuevo Usuario
32 C
10:55
32 C
10:55
Seleccionar el screensaver y confi rmar apretando ENTER
TemperaturaTemperatura
Screen saver
Screen saver
Programar
Programar
Hora
Hora
32 C
10:55
IdiomaIdioma
32 C
10:55
Fecha
Fecha
Logo CAME
Logo CAME
32 C
10:55
Modifi. Usuario
Modifi. Usuario
Nuevo Usuario
Nuevo Usuario

16
ES
Los datos y las informaciones contenidas en este manual deben considerarse susceptibles de modificación en cualquier momento y sin obligación de
aviso previo por parte de la firma CAME cancelli automatici s.p.a.
SELEC. USUARIOS
SELEC. USUARIOS
Nuevo n..
Nuevo n..
Nuevo002
Nuevo002
Nuevo001
Nuevo001
6.4 Menú - Modificación usuario
Modifi. Usuario
Modifi. Usuario
SALIDAS
SALIDAS
NOMBRE
NOMBRE
CODIGO
CODIGO
Modifi cación Usuario: Permite modifi car las características de cada usuario (código, nombre, salida asociada)
ProgramarProgramar
Modifi. Usuario
Modifi. Usuario
Nuevo Usuario
Nuevo Usuario
32 C
10:55
32 C
10:55
Seleccionar el usuario a mo-
difi car desplazándose con las
fl echas. Confi rmar apretando
ENTER
Nuovo001
Nuovo001
32 C
10:55
32 C
10:55
En el menú de
modifi cación de cada
usuario, se pueden
seleccionar los
parámetros a cambiar
desplazándose con
las FLECHAS. Una vez
seleccionado aquel a
modifi car, confi rmar
apretando ENTER

17
ES
Los datos y las informaciones contenidas en este manual deben considerarse susceptibles de modificación en cualquier momento y sin obligación de
aviso previo por parte de la firma CAME cancelli automatici s.p.a.
CODIGO
CODIGO
Modifi. Usuario
Modifi. Usuario
nuevo001
nuevo001
NUEVO CODIGO
NUEVO CODIGO
NOMBRE
NOMBRE
Modifi. Usuario
Modifi. Usuario
nuevo001
nuevo001
nuevo001
n
Apretar ENTER
32 C
10:55
para :
- pasar a la letra sucesiva a modifi car
- confi rmar las modifi caciones (teniéndolo apretado)
Apretar la tecla ESC
32 C
10:55
para :
- volver a la letra precedente
- retornar al nivel precedente, sin guardar las modifi -
caciones (teniéndolo apretado)
Apretar las teclas Flechas
32 C
10:55
32 C
10:55
para :
- cambiar letra
Seleccionando la opción
NOMBRE se entra en el área
de modifi cación del nombre
usuario.
6.4 Menú - Modificación usuario
32 C
10:55
32 C
10:55
Es posible memorizar un código transponder y
asociarlo al usuario seleccionado, acercando la
tarjeta al Wave para hacer reconocer el código
dentro de 10 s

18
ES
Los datos y las informaciones contenidas en este manual deben considerarse susceptibles de modificación en cualquier momento y sin obligación de
aviso previo por parte de la firma CAME cancelli automatici s.p.a.
SALIDAS
SALIDAS
nuevo001
nuevo001
SALIDAS
SALIDAS
LOCAL RELAY
LOCAL RELAY
Modifi. Usuario
Modifi. Usuario
Para seleccionar la salida a
asociar desplazarse con las
teclas Flecha y confi rmar
apretando Enter
6.4 Men ú - Modificación usuario
Con SALIDA se asocia un mando al usuario. Puede ser de dos tipos: el primero se defi ne salida local y es un
contacto físico (NA, nc); el segundo es una
salida radio (se pueden conectar hasta cuatro
diferentes)
6.5 Menú - Nuevo usuario
CONFIRMAR (NO)
CONFIRMAR (NO)
Nuevo Usuario
Nuevo Usuario
?
Para crear un nuevo usuario
desplazarse con las teclas fl echa
sobre SI y confi rmar apretando
Enter. El menú modificación
usuario se activa automática-
mente. Para programar los datos
véase cap. 6.4
Modifi. Usuario
Modifi. Usuario
Nuevo Usuario
Nuevo Usuario
32 C
10:55
Eliminar Usuario
Eliminar Usuario
32 C
10:55
32 C
10:55

19
ES
Los datos y las informaciones contenidas en este manual deben considerarse susceptibles de modificación en cualquier momento y sin obligación de
aviso previo por parte de la firma CAME cancelli automatici s.p.a.
6.6 Menú - Eliminación Usuario
CONFIRMAR (NO)
CONFIRMAR (NO)
Eliminar Usuario
Eliminar Usuario
Nuevo002
Nuevo002
?
Eliminación Usuario: Se elimina un usuario ya introducido
SELEC. USUARIOS
SELEC. USUARIOS
Nuevo n..
Nuevo n..
Nuevo002
Nuevo002
Nuevo001
Nuevo001
ProgramarProgramar
Modifi. Usuario
Modifi. Usuario
Nuevo usuario
Nuevo usuario
32 C
10:55
32 C
10:55
Eliminar Usuario
Eliminar Usuario
32 C
10:55
TX RadioTX Radio
Para confi rmar las operaciones desplazarse sobre SI con las teclas fl echa y confi rmar apretando Enter.

20
ES
Los datos y las informaciones contenidas en este manual deben considerarse susceptibles de modificación en cualquier momento y sin obligación de
aviso previo por parte de la firma CAME cancelli automatici s.p.a.
6.7 Menú - TX Radio
TX Radio
TX Radio
CANAL RADIO:1
CANAL RADIO:1
ESPERE
ESPERE
Para seleccionar el canal
radio a memorizar despla-
zarse con las teclas fl echa y
confi rmar apretando Enter
TX Radio
TX Radio
1
CANAL RADIO
CANAL RADIO
Eliminar Usuario
Eliminar Usuario
TX Radio
TX Radio
32 C
10:55
TimerTimer
32 C
10:55
Del menú TX RADIO es posible asociar un código de un emisor CAME a una salida, de esta manera es posible
“repetir” y controlar las automatizaciones directamente con el teclado o con transponder de WAVE.
Enviar el código radio mediante
emisor dentro de 10 segundos
(como se indica en la fi gura). La vi-
sualización del código en el display
confi rma que se ha verifi cado la
memorización. Utilizar emisores serie:
Top 433.92MHz
o
Tam 433.92MHz

21
ES
Los datos y las informaciones contenidas en este manual deben considerarse susceptibles de modificación en cualquier momento y sin obligación de
aviso previo por parte de la firma CAME cancelli automatici s.p.a.
6.8 Menú - Timer (Temporizador)
ELIMINAR
ELIMINAR
NUEVO
NUEVO
Timer
Timer
MODIFIC.
MODIFIC.
Para crear un nuevo intervalo
desplazarse con las teclas
fl echa en NUEVO y confi rmar
apretando Enter ...
HORA
HORA
08
08
Timer
Timer
ACTIVACION
ACTIVACION
... una vez creado, se requerirá
la hora, los minutos, después
el día de activación y qué
mando se desea asociar (sa-
lida local o una de las salidas
radio)...
Con TIMER (TEMPORIZADOR) se pueden asociar mandos en un intervalo de tempo preestablecido.
... sucesivamente programar el día de
desactivación. Se requerirán las mismas
informaciones en manera de crear un
intervalo preciso de tiempo.
TX RadioTX Radio
32 C
10:55
Timer
Timer
32 C
10:55
AlarmaAlarma
Además de la creación de un
nuevo “TIMER” se pueden
MODIFICAR
o
ELIMINAR
aquellos ya existentes.
Timer
Timer
ELIMINAR
ELIMINAR
NUEVO
NUEVO
MODIFIC.
MODIFIC.
ORA
ORA
08
08
Timer
Timer
DISATTIVAZIONE
DISATTIVAZIONE
32
32
°C
10:55
10:55
Una vez esta-
blecido el Timer
(Temporizador)
aparecerá este sím-
bolo en el display.

22
ES
Los datos y las informaciones contenidas en este manual deben considerarse susceptibles de modificación en cualquier momento y sin obligación de
aviso previo por parte de la firma CAME cancelli automatici s.p.a.
6.9 Menú - Despertador
Alarma
Alarma
1
SELEC.
SELEC.
Seleccionar cual de los dos
despertadores se desea
programar.
Se requerirán hora, minutos
y tipo de timbre. Confi rmar
apretando Enter .
32 C
10:55
TimerTimer
32 C
10:55
Alarma
Alarma
TermostatoTermostato
ORA
ORA
08
08
Timer
Timer
DISATTIVAZIONE
DISATTIVAZIONE
32
32
°C
10:55
10:55
Una vez progra-
mado el desperta-
dor/res aparecerá
este símbolo en el
display.
Con DESPERTADOR se pueden programar dos alarmas acústicas.

23
ES
Los datos y las informaciones contenidas en este manual deben considerarse susceptibles de modificación en cualquier momento y sin obligación de
aviso previo por parte de la firma CAME cancelli automatici s.p.a.
6.10 Menú - Termostato
Termostato
Termostato
20
20
o
o
C
ACTIVACION
ACTIVACION
32 C
10:55
RelojReloj
32 C
10:55
AlarmaAlarma
Termostato
Termostato
ORA
ORA
08
08
Timer
Timer
DISATTIVAZIONE
DISATTIVAZIONE
32
32
°C
10:55
10:55
Una vez programa-
do el termostato,
aparecerá este sím-
bolo en el display.
Con Termostato se puede programar un intervalo de temperatura dentro del cual Wave activa un contacto.
Para crear un nuevo intervalo
desplazarse con las teclas
FLECHA en el nivel (tempera-
tura) de activación preelegido,
confi rmar apretando ENTER.
Repetir la operación para la
elección del nivel de
desactivación; confirmar el
funcionamiento desplazándose
con las teclas FLECHA en HABI-
LITADO y apretar ENTER.
para deshabilitar el funciona-
miento desplazarse con las
FLECHAS en DESHABILITADO
y apretar ENTER.

24
ES
Los datos y las informaciones contenidas en este manual deben considerarse susceptibles de modificación en cualquier momento y sin obligación de
aviso previo por parte de la firma CAME cancelli automatici s.p.a.
6.11 Menú - Rloj
Reloj
Reloj
21
21
HORA
HORA
Se requerirá la introducción de
hora, minutos, segundos, año, mes
y día. Para introducirlos proceder
como para las programaciones
precedentes (con las teclas fl echa
para la modifi cación del valor y con
Enter para la confi rmación).
32 C
10:55
Reloj
Reloj
32 C
10:55
Funcion Teclas
Funcion Teclas
TermostatoTermostato
Con Orologio se confi gura el horario y la fecha actual de Wave.
Funcion Teclas
Funcion Teclas
RELAY OUT
RELAY OUT
KEY
KEY
32 C
10:55
RelojReloj
32 C
10:55
Funcion Teclas
Funcion Teclas
ContrasenaContrasena
6.12 Menú - Función teclas
Con Función teclas se puede asociar a los dos pulsadores una determinada función seleccionable
entre: salida relé o uno de los 4 códigos radio.
Para asociar un mando a una
de las dos teclas, desplazarse
con las fl echas en la función
preelegida; confi rmar apretando
las teclas Enter.

25
ES
Los datos y las informaciones contenidas en este manual deben considerarse susceptibles de modificación en cualquier momento y sin obligación de
aviso previo por parte de la firma CAME cancelli automatici s.p.a.
6.13 Menú - Contraseña
32 C
10:55
Funcion Teclas
Funcion Teclas
32 C
10:55
Contrasena
Contrasena
Con Contraseña se limita el acceso a las funciones de Wave
Contrasena
Contrasena
MODIFIC.
MODIFIC.
DESHAB.DO
DESHAB.DO
32 C
10:55
HABILITADO
HABILITADO
32 C
10:55
32 C
10:55
MOD. CONTRAS.
MOD. CONTRAS.
CODIGO 2
CODIGO 2
CODIGO 1
CODIGO 1
TRASP 1
TRASP 1
TRASP 2
TRASP 2
32 C
10:55
CODIGO
ODIGO
1
1
ELIM. CONTRAS.
ELIM. CONTRAS.
NUEVA CONTRAS.
NUEVA CONTRAS.
32 C
10:55
Véase pág. 26
fi g. A
32 C
10:55
Véase pág. 26
fi g. B
La función Habilita o Deshabilita hace
operativa la Contraseña.
Por código se
entiende un
número de 4
cifras, en cambio
por transp. se
utiliza una tarjeta
transponder
para efectuar el
acceso.
Nueva contraseña permite crear un
nuevo código. Elimina contraseña per-
mite cancelar un código ya existente.
32 C
10:55
Véase pag. 27

26
ES
Los datos y las informaciones contenidas en este manual deben considerarse susceptibles de modificación en cualquier momento y sin obligación de
aviso previo por parte de la firma CAME cancelli automatici s.p.a.
6.13 Menú - Contraseña
32 C
10:55
CONFIRMAR (NO)
CONFIRMAR (NO)
ELIM. CONTRAS.
ELIM. CONTRAS.
?
32 C
10:55
TECL. CODIGO
TECL. CODIGO
1000
1
NUEVA CONTRAS.
NUEVA CONTRAS.
1234
1234
5678
5678
90<>
90<>
1
Para confi rmar la operación desplazarse con las teclas FLECHA
en SI y confi rmar apretando ENTER.
Para elegir un valor desplazarse con las teclas FLECHA, selec-
cionarlo y confi rmar apretando ENTER. Repetir la operación
hasta la introducción del código de 4 cifras deseado.
Cuando se requerirá la contraseña en el acceso al menú de WAVE
proceder como se describe arriba para introducir el código.
fi g. A
fi g. B
TECL. CODIGO
TECL. CODIGO
1000
1
1234
1234
5678
5678
90<>
90<>
1

27
ES
Los datos y las informaciones contenidas en este manual deben considerarse susceptibles de modificación en cualquier momento y sin obligación de
aviso previo por parte de la firma CAME cancelli automatici s.p.a.
6.13 Menú - Contraseña
32 C
10:55
TRASP. 1
TRASP. 1
ELIMI. CONTRAS.
ELIMI. CONTRAS.
NUEVA CONTRAS.
NUEVA CONTRAS.
CONFIRMAR (NO)
CONFIRMAR (NO)
ELIM. CONTRAS.
ELIM. CONTRAS.
?
Para confi rmar la operación
desplazarse con las
FLECHAS en SI y confi rmar
apretando ENTER
32 C
10:55
32 C
10:55
32 C
10:55
TRASP 1
TRASP 1
NUEVO CODIGO
NUEVO CODIGO
Seleccionando NUEVA CONTRA-
SEÑA aparecerá una barra que
indica el tiempo para la introduc-
ción del código. Pasar la tarjeta
cerca del Wave para permitir el
reconocimiento del código.
Cuando se requerirá la contraseña
del acceso del menú principal
pasar la tarjeta (con función)
“Contraseña “en WAVE.

28
ES
Los datos y las informaciones contenidas en este manual deben considerarse susceptibles de modificación en cualquier momento y sin obligación de
aviso previo por parte de la firma CAME cancelli automatici s.p.a.
6.14 Menú - Núm. Periférica
32 C
10:55
01
1
ContrasenaContrasena
32 C
10:55
01
1
Num. Periferica
Num. Periferica
Con Núm. Periférica es posible asociar un identifi cador en el caso de varios Wave conectados
Num.Periferica
Num.Periferica
01
01
SELEZIONA
SELEZIONA
Para asignar un número a la
periférica, desplazarse con las
fl echas hacia el número pree-
legido y confi rmar apretando
ENTER.
NOTA: En un sistema con más de un Wave es
necesario que cada uno de éstos tenga un nú-
mero de periférica diferente y que por lo menos
un (maestro) esté asociado al número “1”.
32 C
10:55
01
1
Num. Periferica
Num. Periferica
32 C
10:55
01
1
Entradas
Entradas
6.15 Menú - Entradas
SELEC ENTRADA
SELEC ENTRADA
SALIDA 1
SALIDA 1
1
1
DESHABILITADO
DESHABILITADO
SALIDA 2SALIDA 2
32 C
10:55
01
1
Entradas
Entradas
SALIDA 1
SALIDA 1
1
Para asignar un número de periféri-
ca a la salida, desplazarse con las
fl echas hacia el número preelegido y
confi rmar apretando ENTER.

29
ES
Los datos y las informaciones contenidas en este manual deben considerarse susceptibles de modificación en cualquier momento y sin obligación de
aviso previo por parte de la firma CAME cancelli automatici s.p.a.
6.16 Menú - Salidas
Con Salidas es posible seleccionar el método y el tiempo de intervención de un relé de WA08.
32 C
10:55
01
1
Entradas
Entradas
32 C
10:55
01
1
SALIDAS
SALIDAS
SELEZ.SALIDA
SELEZ.SALIDA
4 TEMP. 1 s
4 TEMP. 1 s
3 Flip - Flop
3 Flip - Flop
1 TEMP. 10:50
1 TEMP. 10:50
2 TEMP. 1 s
2 TEMP. 1 s
Para seleccionar una salida a
programar, desplazarse con las
fl echas hacia la función pree-
legida. Confi rmar apretando la
tecla ENTER...
SALIDAS
SALIDAS
TEMP. 1 s
TEMP. 1 s
1
Para seleccionar el método y
el tiempo de intervención de-
splazarse con la teclas fl echas y
confi rmar apretando Enter
Es posible programar un intervalo de
tiempo de intervención que oscila entre
1s a 21:10 h o bien un funcionamiento
biestable con la función FLIP-FLOP

30
ES
Los datos y las informaciones contenidas en este manual deben considerarse susceptibles de modificación en cualquier momento y sin obligación de
aviso previo por parte de la firma CAME cancelli automatici s.p.a.
7 Mantenimiento
Nuestros productos han sido realizados con materiales diferentes. La mayor parte de éstos (aluminio, plástico,
hierro, cables eléctricos) son asimilables a los residuos sólidos y urbanos. Pueden reciclarse mediante la recolección y
la eliminación diferenciada en los centros autorizados.
Otros componentes tales como tarjetas electrónicas, baterías de los emisores, etc, podrían contener en cambio,
sustancias contaminantes. Por lo tanto se deben extraer y entregar a empresas autorizadas para su recuperación y
eliminación.
Wave no necesita operaciones de mantenimiento periódicas. Para la limpieza se recomienda utilizar un paño ligeramente
húmedo evitando agentes químicos o materiales abrasivos porqué podrían arruinar las superfi cies de producto.
Por cualquier tipo de problema contactar a la asistencia.
8 Demolición y Eliminación

31
ES
Los datos y las informaciones contenidas en este manual deben considerarse susceptibles de modificación en cualquier momento y sin obligación de
aviso previo por parte de la firma CAME cancelli automatici s.p.a.
9 Declaración del fabricante
DECLARACIÓN CE DE CONFORMIDAD
De conformidad con la Directiva Baja Tensión 2006/95/CE
CAME Cancelli Automatici S.p.A.
via Martiri della Libertà, 15
31030 Dosson di Casier - Treviso - ITALY
tel (+39) 0422 4940 - fax (+39) 0422 4941
internet: www.came.it - e-mail: [email protected]
Declara bajo su exclusiva responsabilidad, que los siguientes productos para
la automatización de cancelas y puertas para garajes, denominados del
siguiente modo:
WA02
… son de conformidad con los requisitos esenciales y las disposiciones
pertinentes, establecidos por las siguientes Directivas y con las partes
aplicables de las Normativas de referencia que se indican a continuación.
--- DIRECTIVAS ---
2006/95/CE DIRECTIVA BAJA TENSIÓN
2014/30/UE DIRECTIVA COMPATIBILIDAD ELECTROMAGNÉTICA
--- NORMATIVAS ---
Código de referencia para solicitar una copia de conformidad con la copia original: DDC L ES W001
ADMINISTRADOR DELEGADO
Sr. Gianni Michielan
EN 300 330-1/-2
EN 301 489-1/-3
EN 60730
EN 60950

CAME AUTOMATISMOS S.A.
C/JUAN DE MARIANA, 17
28045 MADRID - ESPAÑA
Tel - 0034 91 5285009
Fax - 0034 91 4685442
--------------
CAME AUTOMATISMOS CATALUNYA S.A.
POL. IND. MOLÌ DELS FRARES - CARRER A, 23
08620 SANT VICENÇ DELS HORTS
BARCELONA - ESPAÑA
Tel - 0034 93 65 67 694
Fax - 0034 93 67 24 505
Cod. 119RU28 v 0.1 05/07 © CAME cancelli automatici s.p.a.
-
 1
1
-
 2
2
-
 3
3
-
 4
4
-
 5
5
-
 6
6
-
 7
7
-
 8
8
-
 9
9
-
 10
10
-
 11
11
-
 12
12
-
 13
13
-
 14
14
-
 15
15
-
 16
16
-
 17
17
-
 18
18
-
 19
19
-
 20
20
-
 21
21
-
 22
22
-
 23
23
-
 24
24
-
 25
25
-
 26
26
-
 27
27
-
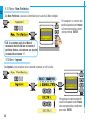 28
28
-
 29
29
-
 30
30
-
 31
31
-
 32
32
-
 33
33
-
 34
34
-
 35
35
-
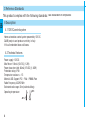 36
36
-
 37
37
-
 38
38
-
 39
39
-
 40
40
-
 41
41
-
 42
42
-
 43
43
-
 44
44
-
 45
45
-
 46
46
-
 47
47
-
 48
48
-
 49
49
-
 50
50
-
 51
51
-
 52
52
-
 53
53
-
 54
54
-
 55
55
-
 56
56
-
 57
57
-
 58
58
-
 59
59
-
 60
60
-
 61
61
-
 62
62
-
 63
63
-
 64
64
-
 65
65
-
 66
66
-
 67
67
-
 68
68
-
 69
69
-
 70
70
-
 71
71
-
 72
72
-
 73
73
-
 74
74
-
 75
75
-
 76
76
-
 77
77
-
 78
78
-
 79
79
-
 80
80
-
 81
81
-
 82
82
-
 83
83
-
 84
84
-
 85
85
-
 86
86
-
 87
87
-
 88
88
-
 89
89
-
 90
90
-
 91
91
-
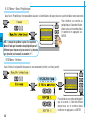 92
92
-
 93
93
-
 94
94
-
 95
95
-
 96
96
-
 97
97
-
 98
98
-
 99
99
-
 100
100
-
 101
101
-
 102
102
-
 103
103
-
 104
104
-
 105
105
-
 106
106
-
 107
107
-
 108
108
-
 109
109
-
 110
110
-
 111
111
-
 112
112
-
 113
113
-
 114
114
-
 115
115
-
 116
116
-
 117
117
-
 118
118
-
 119
119
-
 120
120
-
 121
121
-
 122
122
-
 123
123
-
 124
124
-
 125
125
-
 126
126
-
 127
127
-
 128
128
-
 129
129
-
 130
130
-
 131
131
-
 132
132
-
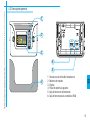 133
133
-
 134
134
-
 135
135
-
 136
136
-
 137
137
-
 138
138
-
 139
139
-
 140
140
-
 141
141
-
 142
142
-
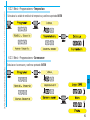 143
143
-
 144
144
-
 145
145
-
 146
146
-
 147
147
-
 148
148
-
 149
149
-
 150
150
-
 151
151
-
 152
152
-
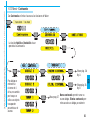 153
153
-
 154
154
-
 155
155
-
 156
156
-
 157
157
-
 158
158
-
 159
159
-
 160
160


En otros idiomas
- italiano: CAME WA02 Guida d'installazione
- Deutsch: CAME WA02 Installationsanleitung