Optelec ClearView GO Manual de usuario
- Categoría
- Encimeras
- Tipo
- Manual de usuario


Optelec ClearView GO
3
Contents
Configuration ....................................................................................................... 10
1. Introduction ..................................................................................................... 12
1.1. About this manual .......................................................................................... 12
1.2. Instructions before use .................................................................................. 12
1.3. What’s in the box ........................................................................................... 12
2. Getting started ................................................................................................ 13
2.1. Opening the ClearView GO ........................................................................... 13
2.2. Closing the ClearView GO ............................................................................. 14
2.3. Camera positions ........................................................................................... 15
3. Buttons ............................................................................................................. 16
4. Hot keys & features ........................................................................................ 18
4.1. Line & Mask ................................................................................................... 18
4.2. Battery status ................................................................................................. 19
4.3. HDMI OUT mode ........................................................................................... 19
4.4. Scroll the frozen image .................................................................................. 20
4.5. Power saving mode ....................................................................................... 20
4.6. Color mode selection ..................................................................................... 20
4.7. Self-view & Distance-view mode ................................................................... 21
5. Menu ................................................................................................................ 22
5.1. Navigating the Menu ...................................................................................... 22
5.2. Menu options ................................................................................................. 22
Color Mode .................................................................................................... 22
Zoom ratio ...................................................................................................... 23
LED brightness .............................................................................................. 23
Reset .............................................................................................................. 23
5.3 More Settings .................................................................................................. 24
Language ....................................................................................................... 24
Capture Scroll Speed .................................................................................... 24
Key Lock Mode .............................................................................................. 24
Personal & Public .......................................................................................... 24
Power Saving Mode ...................................................................................... 24
Technical Specifications .................................................................................... 25
ClearView GO 15” ................................................................................................. 25
ClearView GO 17” ................................................................................................. 26
Safety, Care & Regulatory Notices.................................................................... 27

Optelec ClearView GO
4
Inhoud
Configuratie ......................................................................................................... 32
1. Introductie ........................................................................................................ 34
1.1. Over deze handleiding ................................................................................... 34
1.2. Instructies voor gebruik .................................................................................. 34
1.3. Wat zit er in de doos ...................................................................................... 34
2. Aan de slag ...................................................................................................... 35
2.1. De ClearView GO openen ............................................................................. 35
2.2. De ClearView GO sluiten ............................................................................... 36
2.3. Camera posities ............................................................................................. 37
3. Knoppen ........................................................................................................... 38
4. Sneltoetsen en functies ................................................................................. 40
4.1. Lijn & Afdekken .............................................................................................. 40
4.2. Batterij status ................................................................................................. 41
4.3. HDMI UIT modus ........................................................................................... 41
4.4. Scrollen door de bevroren afbeelding ............................................................ 41
4.5. Energiebesparende modus ............................................................................ 42
4.6. Selectie kleurmodus....................................................................................... 42
4.7. Spiegelmodus & afstandsmodus ................................................................... 43
5. Menu ................................................................................................................ 44
5.1. Menu navigatie ............................................................................................... 44
5.2. Menu opties.................................................................................................... 44
Kleurmodus .................................................................................................... 44
Vergrotingsfactor ........................................................................................... 45
LED helderheid .............................................................................................. 45
Reset .............................................................................................................. 45
5.3. Meer instellingen ............................................................................................ 46
Taal ................................................................................................................ 46
Scrollsnelheid ................................................................................................ 46
Knopvergrendeling ........................................................................................ 46
Persoonlijk & Openbaar ................................................................................. 46
Energiebesparende modus ........................................................................... 46
Technische specificities..................................................................................... 47
ClearView GO 15” ................................................................................................. 47
ClearView GO 17” ................................................................................................. 48
Veiligheid en regelgeving................................................................................... 49

Optelec ClearView GO
5
Table des matières
Configuration ....................................................................................................... 54
1. Introduction ..................................................................................................... 56
1.1. À propos de ce manuel .................................................................................. 56
1.2. Instructions avant de débuter ........................................................................ 56
1.3. Contenu de la boîte........................................................................................ 56
2. Pour débuter .................................................................................................... 57
2.1. Ouvrir le ClearView GO ................................................................................. 57
2.2. Fermer le ClearView GO ............................................................................... 58
2.3. Positions de caméra ...................................................................................... 59
3. Boutons ............................................................................................................ 60
4. Principales Touches et Fonctions ................................................................ 62
4.1. Ligne et Masque ............................................................................................ 62
4.2. État de la batterie ........................................................................................... 63
4.3. Mode Sortie HDMI ......................................................................................... 63
4.4. Faites défiler l'image figée ............................................................................. 63
4.5. Mode Économie de batterie ........................................................................... 64
4.6. Sélection du Mode Couleurs .......................................................................... 64
4.7. Modes Auto-visualisation et Distance ............................................................ 65
5. Menu ................................................................................................................ 66
5.1. Navigation dans le menu ............................................................................... 66
5.2. Options de menu ............................................................................................ 66
Mode couleur ................................................................................................. 66
Rapport de zoom ........................................................................................... 67
Luminosité LED ............................................................................................. 67
Réinitialiser .................................................................................................... 67
5.3. Plus de paramètres ........................................................................................ 68
Langue ........................................................................................................... 68
Vitesse de défilement des captures d’images ............................................... 68
Mode de verrouillage des touches ................................................................ 68
Personnel et public ........................................................................................ 68
Mode économie d'énergie ............................................................................. 68
Spécifications techniques ................................................................................. 69
ClearView GO 15” ................................................................................................. 69
ClearView GO 17” ................................................................................................. 70
Avis de sécurité et de réglementation .............................................................. 71

Optelec ClearView GO
6
Indice
Configurazione .................................................................................................... 76
1. Introduzione..................................................................................................... 78
1.1. Informazioni su questo manuale .................................................................... 78
1.2. Istruzioni prima dell’uso ................................................................................. 78
1.3. Contenuto della confezione ........................................................................... 78
2. Iniziamo ............................................................................................................ 79
2.1. Aprire ClearView GO ..................................................................................... 79
2.2. Chiudere ClearView GO ................................................................................ 80
2.3. Posizioni della telecamera ............................................................................. 81
3. Pulsanti ............................................................................................................ 82
4. Tasti rapidi e funzioni ..................................................................................... 84
4.1. Righe e maschere .......................................................................................... 84
4.2. Stato della batteria ......................................................................................... 85
4.3. Modalità di uscita HDMI ................................................................................. 85
4.4. Esplorare l’immagine acquisita ...................................................................... 86
4.5. Modalità risparmio energetico........................................................................ 86
4.6. Selezione delle modalità di colore ................................................................. 87
4.7. Modalità Visualizzazione Ritratto e da lontano .............................................. 87
5. Menu ................................................................................................................ 88
5.1. Spostarsi nel menu ........................................................................................ 88
5.2. Opzioni del menu ........................................................................................... 88
Modalità colori ................................................................................................ 88
Intervallo ingrandimenti ................................................................................. 89
Luminosità LED ............................................................................................. 89
Ripristina ........................................................................................................ 89
5.3 Altre impostazioni ............................................................................................ 90
Lingua ............................................................................................................ 90
Velocità scorrimento acquisizione ................................................................. 90
Modalità Blocco Tasti .................................................................................... 90
Personale e pubblica ..................................................................................... 90
Modalità risparmio energetico ....................................................................... 90
Specifiche tecniche ............................................................................................ 91
ClearView GO 15” ................................................................................................. 91
ClearView GO 17” ................................................................................................. 92
Note per la sicurezza e la cura del prodotto .................................................... 93

Optelec ClearView GO
7
Índice
Configuración ...................................................................................................... 98
1. Introducción .................................................................................................. 100
1.1. Acerca de este manual ............................................................................... 100
1.2. Antes de utilizar el dispositivo...................................................................... 100
1.3. Contenido de la caja .................................................................................... 100
2. Cómo empezar a trabajar ............................................................................. 101
2.1. Abrir ClearView GO ..................................................................................... 101
2.2. Cerrar ClearView GO ................................................................................... 102
2.3. Posiciones de la cámara .............................................................................. 103
3. Botones .......................................................................................................... 104
4. Teclas rápidas y funciones .......................................................................... 106
4.1. Línea guía y Máscara .................................................................................. 106
4.2. Estado de la batería ..................................................................................... 107
4.3. Modo HDMI OUT ......................................................................................... 107
4.4. Desplazar la imagen congelada .................................................................. 107
4.5. Modo Ahorro de batería ............................................................................... 108
4.6. Selección de modo de color ........................................................................ 108
4.7. Los modos Autovisualización y Visualización a distancia ........................... 109
5. El Menú .......................................................................................................... 110
5.1. Navegación por el menú .............................................................................. 110
5.2. Opciones del Menú ...................................................................................... 110
Modo de color .............................................................................................. 110
Rango de ampliación ................................................................................... 111
Brillo del LED ............................................................................................... 111
Restablecer .................................................................................................. 111
5.3. Más opciones ............................................................................................... 112
Idioma .......................................................................................................... 112
Velocidad de desplazamiento de la captura ............................................... 112
Modo Bloqueo de Teclas ............................................................................. 112
Personal y Público ....................................................................................... 112
Modo Ahorro de batería ............................................................................... 112
Especificaciones técnicas ............................................................................... 113
ClearView GO 15” ............................................................................................... 113
ClearView GO 17” ............................................................................................... 114
Advertencias de seguridad y normativa ........................................................ 115

Optelec ClearView GO
8
Inhalt
Konfiguration ..................................................................................................... 120
1. Einführung ..................................................................................................... 122
1.1. Über diese Anleitung.................................................................................... 122
1.2. Vor dem ersten Gebrauch ........................................................................... 122
1.3. Was ist in der Verpackung ........................................................................... 123
2. Erste Schritte ................................................................................................. 124
2.1. Öffnen des ClearView GO ........................................................................... 124
2.2. Schließen des ClearView GO ...................................................................... 125
2.3. Kamerapositionen ........................................................................................ 126
3. Bedienungstasten ......................................................................................... 127
4. Kurztasten & Erweiterungen ........................................................................ 129
4.1. Linien & Abdeckungen ................................................................................. 129
4.2. Akkuanzeige................................................................................................. 130
4.3. HDMI OUT ................................................................................................... 130
4.4. Eingefrorenes Bild verschieben .................................................................. 131
4.5. Stromsparmodus .......................................................................................... 131
4.6. Lesefarbenauswahl ...................................................................................... 132
4.7. Selbstansicht & Tafelansicht ........................................................................ 132
5. Menü .............................................................................................................. 133
5.1. Menü Navigation .......................................................................................... 133
5.2. Menüpunkte ................................................................................................. 133
Lesefarben ................................................................................................... 133
Vergrößerungsbereich ................................................................................. 134
Beleuchtung Helligkeit ................................................................................. 134
Zurücksetzen ............................................................................................... 134
5.3. Weitere Einstellungen .................................................................................. 135
Sprache........................................................................................................ 135
Geschwindigkeit Bild verschieben ............................................................... 135
Tastensperre ................................................................................................ 135
Persönlich und Allgemein ............................................................................ 135
Energiesparmodus Stromspareinstellungen ............................................... 135
Technische Informationen ............................................................................... 136
ClearView GO 15 ................................................................................................ 136
ClearView GO 17 ................................................................................................ 137
Sicherheits- & Regulatorische Hinweise ........................................................ 138
Gewährleistungsbedingungen ........................................................................ 145
Contact ............................................................................................................. 147

Optelec ClearView GO
English 9
ClearView GO
User manual
Optelec
P.O. Box 399
2993 LT Barendrecht
The Netherlands
Telephone: +31 (0)88 6783 444
Fax +31 (0)88 6783 400
E-mail: info@optelec.nl
Website: www.optelec.com

Optelec ClearView GO
10 English
Configuration

Optelec ClearView GO
English 11
1. Power on/off
2. Image optimizer wheel (adjusts brightness and contrast)
3. Snapshot button
4. Zoom wheel
5. Color Mode button
6. Natural Color button
7. Super Function Key
8. LCD screen
9. Camera
10. Close up lens (open this lens for distance view)
11. DC jack (insert the power adapter here to charge the battery)
12. HDMI output
13. Camera Positioning wheel
14. LED lights
Note: With the camera ⑨, be careful not to allow foreign material to adhere to
the camera lens. If any foreign material is on the lens, wipe it off with the
provided microfiber cloth.

Optelec ClearView GO
12 English
1. Introduction
Congratulations on choosing the ClearView GO. ClearView GO offers the same
reading comfort, ease of use, and functionality as a desktop video magnifier, but
in a compact and foldable design. It is the ideal solution for people who need
magnification at different locations. With ClearView GO, you can comfortably
read text and view objects, at home, office, classroom, or on the go. Its foldable
design makes it extremely easy to take the ClearView GO with you or to store it
when you do not need it.
1.1. About this manual
This manual will help you to become familiar with the ClearView GO features and
operation. Please read this manual thoroughly before using your ClearView GO.
If you have any questions or suggestions concerning the use of this product,
please contact your Optelec distributor or Optelec’s headquarters by consulting
the contact information page located at the end of this manual. We greatly
appreciate your feedback. We hope you enjoy working with your ClearView GO.
1.2. Instructions before use
The battery must be fully charged prior to the initial use. Connect the supplied
power adapter to the DC input jack to charge the battery. While charging, a red
light is illuminated. When fully charged, the light is green.
Remove the LCD protection film before using the unit. Be careful not to allow
foreign material to adhere to the camera lens. If any foreign material is on the
lens, wipe it off with the provided microfiber cloth.
1.3. What’s in the box
The ClearView GO packaging contains the following items. If any of these items
are missing from your package, please contact your distributor.
1. ClearView GO portable magnifier
2. Power adapter
3. Carrying pouch (15” model only)
4. User manual
5. Microfiber cloth for cleaning the display

Optelec ClearView GO
English 13
2. Getting started
2.1. Opening the ClearView GO
1. Place the folded ClearView GO on a stable surface such as a table.
2. Press on the base plate with one hand, while the other hand lifts the top of the
body frame.
3. Lift the arm until it locks in place.
4. Put both hands on the left and right sides of the LCD monitor.
5. Pull the LCD monitor towards you.
6. Push the LCD monitor up using both hands and adjust it to a suitable position.

Optelec ClearView GO
14 English
2.2. Closing the ClearView GO
1. Put both hands on the left and right sides of the LCD monitor.
2. To close the ClearView GO, lower the LCD monitor using both hands.
3. Push the LCD monitor toward the main body frame.
4. Place both hands on top of the body frame.
5. Lower the top of the body frame until it is closed.

Optelec ClearView GO
English 15
2.3. Camera positions
You can switch between modes by rotating/adjusting the Camera Positioning
wheel.
1. Reading mode
2. Distance-view mode (open the close-up lens for distance viewing)
3. Self-view mode (mirror mode)

Optelec ClearView GO
16 English
3. Buttons
1. Power On/Off button
To power the device on/off, press the button for two seconds.
2. Image optimizer wheel
Provides different functions:
• When in Natural color mode, turn the knob to adjust the brightness of the
display (five levels).
• When in a high contrast color mode, turn the knob to adjust the image
contrast. Press it to return to the default setting.
• To toggle auto focus on/off, press and hold the button for two seconds.
3. Snapshot button
Briefly press the Snapshot button ③ to freeze the image.
• You can zoom in/out on the frozen image and adjust color and screen
brightness.
• When the image is magnified, you can pan around the image using the
Super Function Key ⑦.
Press the Snapshot button again to return to live mode.
4. Zoom wheel
To adjust the magnification, turn the knob. The level of magnification depends
on the size of ClearView GO that you own.
• ClearView GO 15”:
Magnification: 1.4x to 20x, 2.0x to 32x (default), or 3.5x to 60x.
Additional magnification in captured image: 5.5x.

Optelec ClearView GO
English 17
• ClearView GO 17”:
Magnification: 1.4x to 25x, 2.3x to 35x (default), or 3.5x to 70x.
Additional magnification in captured image: 5.5x.
Different magnification levels can be set in the Menu. Press and hold the
Zoom wheel to access the Menu and select Zoom Ratio to adjust. For more
information on how to do this, refer to the “Zoom ratio” section in chapter 5.2.
5. Color mode button
The image on the screen can be viewed in eight color modes: the natural color
mode and seven high contrast colors:
• Natural color mode
• White text on black background
• Black text on white background
• Yellow text on black background
• Black text on yellow background
• Green text on black background
• Blue text on yellow background
• Yellow text on blue background
Up to 35 color modes can be set using the menu.
6. Natural Color button
Press the Natural Color button ⑥ to view pictures or documents in natural
color.
Press and hold the Natural Color button ⑥ to use the Find function when
magnified. The Find function allows you to quickly zoom out and see the entire
image. Releasing the button returns the camera to the original magnification
level.
7. Super Function Key
Used for panning/scrolling the frozen image when magnified. Refer to
chapter 4.4.
Used to select and apply the line/mask function. Refer to chapter 4.1.

Optelec ClearView GO
18 English
4. Hot keys & features
4.1. Line & Mask
Press and hold the Super Function Key ⑦ to activate or deactivate Line & Mask.
When Line & Mask is active, the direction key and wheel of the Super Function
Key ⑦ work as follows.
• Left and right ◀ ▶ : Choose the function.
1. Horizontal line
2. Vertical line
3. Horizontal mask
4. Vertical mask
• Up and down ▲▼ : Increase or decrease the thickness of a line and the
distance between masks.

Optelec ClearView GO
English 19
• Turning the wheel moves the position of the line or mask.
1) Counterclockwise 2) Clockwise
4.2. Battery status
The status of the remaining battery power is not continuously displayed. The
battery charging icon is displayed when the power adapter is connected.
To check the status of the remaining battery, press the Snapshot button ③ for
three seconds or more.
4.3. HDMI OUT mode
When the HDMI output cable is connected, the LCD display is blank and the
image is displayed on an external monitor. Switch between the LCD display and
an external monitor by pressing the Super Function Key ⑦.

Optelec ClearView GO
20 English
4.4. Scroll the frozen image
Adjust the zoom level as desired to frame the entire area you would like to read.
Then, press the Snapshot button ③ to freeze the image.
When you press the Zoom wheel ④ while in the frozen image, a horizontal line
marker appears. You can move this line by rotating the Super Function Key ⑦.
You can zoom in/out on the frozen image with the Zoom wheel ④. When the
image is magnified, you can pan around the frozen image using the up/down and
left/right direction keys around the Super Function Key ⑦. When you pan to the
end of a frozen image, you can advance to the next paragraph or line by
releasing the left or right direction key and pressing it again.
At any time while panning the image, your current reading position is displayed
by pressing and holding the Natural Color button ⑥. The location of the
magnified area is shown within the entire field of view.
4.5. Power saving mode
If you leave the unit turned on and unused for 10 minutes, the LCD screen turns
off to conserve battery power. If the unit is left for three additional minutes, the
power is automatically switched off. For more information about how to adjust
these times, refer to the “Power saving mode” section in chapter 5.3.
4.6. Color mode selection
Press and hold the Color Mode button ⑤ and rotate the Zoom wheel ④ to cycle
through the available color modes. For more information about how to select
colors, refer to the “Color Mode” section in chapter 5.2.
• Color Mode button ⑤ + Zoom wheel ④, Right: Next color mode
• Color Mode button ⑤ + Zoom wheel ④, Left: Previous color mode
• Press the Color Mode button repeatedly to cycle through the available color
modes.

Optelec ClearView GO
English 21
4.7. Self-view & Distance-view mode
You can change the viewing mode by moving the camera with the Camera
Positioning wheel ⑬.
Self-view mode (Mirror mode)
Use when the direction of the camera is pointing towards you.
• The camera switches automatically into self-view mode.
• The magnification range is minimized.
• The camera switches automatically to natural color mode.
Distance-view mode
Use this mode to view a distant object, such as a whiteboard. Open the close-up
lens when using this mode.
• The camera switches automatically into distance-view mode.
• The magnification ratio is minimized.
• The camera switches automatically to natural color mode.

Optelec ClearView GO
22 English
5. Menu
You use the Menu to customize the product. This section describes how to
navigate the Menu and select options to change the look and feel of your
ClearView GO.
5.1. Navigating the Menu
Press and hold the center of the Zoom wheel ④ to enter and exit the Menu.
Once in the Menu, you can change or save settings by using the Zoom wheel ④
or Super Function Key ⑦.
• Move around the menu by turning the Zoom wheel ④ or the Super Function
Key ⑦.
• Select an option by pressing the center of the Zoom wheel ④ or Super
Function Key ⑦.
• To return to the previous screen, press and hold the center of the Zoom wheel
④ or Super Function Key ⑦.
5.2. Menu options
The following menu options are available: Color Mode, Zoom Ratio, LED
Brightness, More Settings, and Reset.
Within the More Settings menu, the following options are available: Language,
Capture Scroll Speed, Key Lock Mode, Personal & Public, and Power
Saving Mode.
Color Mode
Using the Color Mode option, you can add or remove your preferred high
contrast color combinations. The default is a selection of seven high contrast
color modes.
• Default: Seven high contrast color modes selected.
• Extend: All 35 color modes selected.

Optelec ClearView GO
English 23
Select your preferred color modes using the Zoom Wheel ④ or the Super
Function Key ⑦. Enable and disable a color mode by pressing the Zoom Wheel
④. A color mode is enabled when circled in red. A color mode is disabled when
circled in gray. Press save to apply the changes you made.
Zoom ratio
For ClearView GO 15”, the default magnification range is 2.0x to 32x. You can
set the magnification range to:
1.4x to 20x
2.0x to 32x
3.5x to 60x
For ClearView GO 17”, the default magnification range is 2.3x to 35x. You can
set the magnification range to:
1.4x to 25x
2.3x to 35x
3.5x to 70x
LED brightness
With this option, you can adjust the LED brightness through 11 different levels,
including turning the lights completely off.
Reset
This menu resets all settings back to default values.

Optelec ClearView GO
24 English
5.3 More Settings
If you select More Settings, you can adjust the following functions: Language,
Capture Scroll Speed, Key Lock Mode, Personal & Public, and Power
Saving Mode.
To save your updated settings, select Save & Exit or press and hold the Image
Optimizer wheel ②.
Language
This menu enables you to select your preferred language.
Capture Scroll Speed
When this option is selected, you can adjust the capture scroll/panning speed.
Or, use the Image Optimizer wheel ②. You can test the scroll speed in real-time
using the Super Function Key ⑦. Make sure that you are zoomed in to be able
to test the scroll speed.
Key Lock Mode
If you select Yes, only three buttons are available: Zoom wheel ④, Color Mode
button ⑤, and Natural Color button ⑥. If you select No, all buttons are
available.
Personal & Public
With Personal mode, all current customized user settings are remembered after
the device is rebooted. With Public mode, all settings are returned to their
factory default values after the device is rebooted. Public mode is recommended
when a device is used by several people, such as in a library.
Power Saving Mode
To conserve battery life, you can adjust the length of time before the LCD
automatically turns off after a period of non-use. You can also adjust the time
when all power is turned off. The defaults settings are:
• Auto LCD OFF time is 10 minutes.
• Auto Power OFF time is three minutes.

Optelec ClearView GO
English 25
Technical Specifications
ClearView GO 15”
LCD screen size
15.6 inches (396mm), 16:9 wide screen
LCD resolution
1920 x 1080 (full HD)
LCD rotation angle
180 degrees
Camera specifications
1920 x 1080, 60 fps
Auto focus
Dimensions
Folded: approx. 15.1 x 16 x 2.5 inches or
approx. 384 x 405 x 64 mm
In use: approx. 15.1 x 15.75 x 22.7 inches or
approx. 384 x 400 x 577 mm
(max. height)
Light weight
10.65 lbs / 4.8 kg
Color modes
Default 8, including natural color (extended 35)
Magnification range
Live image mode: 1.4x to 20x, 2.0x to 32x
(default), or 3.5x to 60x.
Additional magnification in captured image: 5.5x
Camera mode
Reading, Distance-view, Self-view
Battery capacity
16.8V, 5200mAh
Battery weight
0.90 lbs / 400 g
Power consumption
14~20W (in operation)
Battery life
5 hours
Input power rating for
Adapter
100-240V, 50-60Hz, 1.7A
Output power rating for
unit
DC +19V-3.42A
Connectivity
HDMI OUT

Optelec ClearView GO
26 English
ClearView GO 17”
LCD screen size
17.3 inches (439mm), 16:9 wide screen
LCD resolution
1920 x 1080 (Full HD)
LCD rotation angle
180 degrees
Camera specifications
1920 x 1080, 60 fps
Auto focus
Dimensions
Folded: approx. 16.2 x 17 x 2.5 inches or
approx. 411 x 432 x 64 mm
In use: approx. 16.2 x 17.5 x 25.7 inches
(max. height)
approx. 411 x 445 x 653 mm
(max. height)
Light weight
12.05 lbs / 5.465 kg
Color modes
Default 8, including natural color (extended 35)
Magnification range
Live image mode: 1.4x to 25x, 2.3x to 35x
(default), or 3.5x to 70x.
Additional magnification in captured image: 5.5x
Camera mode
Reading, Distance-view, Self-view
Battery capacity
16.8V, 5200mAh
Battery weight
0.90 lbs / 400 g
Power consumption
14~20W (in operation)
Battery life
5 hours
Input power rating for
Adapter
100-240V, 50-60Hz, 1.7A
Output power rating for
unit
DC +19V-3.42A
Connectivity
HDMI OUT

Optelec ClearView GO
English 27
Safety, Care & Regulatory Notices
• Negligent use or misuse of the product may cause a fire, personal injury or
serious damage.
• Do not use damaged power plug or unsuitable outlet to prevent electric shock
or fire.
• Do not touch power plug with wet hands to prevent electric shock.
• Misuse of the product may result in personal injury or damage to the unit.
• Use only the adapter supplied with the product. Other adapters may damage
the unit.
• Do not use this unit in moist environments like a bathroom or shower room.
• Do not place heavy objects on the unit.
• Do not attempt to disassemble, remodel, or repair the unit. It may damage the
unit and will void the warranty.
• After six (6) months usage, the lifespan of the battery may be shortened.
• Keep the product out of direct sunlight and extreme temperatures.
• The display may not work properly.
• The recommended operating temperature is between 0 ~ 35 ℃ (32 ~ 95 ℉)
Precautions for use
• Follow all warnings, cautions, and instructions marked on the product.
• Use ClearView GO on a stable, level surface such as a solid desk or table,
according to its intended design specifications.
• Avoid placing ClearView GO on an unstable table, cart, or stand. It may fall,
causing serious damage to the device or bodily injury.
• Use ClearView GO indoors only—it should NOT be exposed to extreme or
rapid changes in temperature or humidity. Do not place ClearView GO near a
radiator, heater, or areas exposed to long hours of direct sunlight. These
conditions may cause damage to the device’s electronics or optics.
• At least once per week, clean ClearView GO with a soft dry cloth or an
electrostatic dusting cloth. DO NOT use liquid cleaners on plastic surfaces. No
additional methods of sterilization or cleaning are recommended or required.
• Do not use ClearView GO near flammable materials or liquids.

Optelec ClearView GO
28 English
Safety and care
To ensure your safety and obtain the most benefit from ClearView GO, review
these safety precautions carefully.
ClearView GO enlarges and enhances text and objects in order to improve the
quality of life for people who are visually impaired. The extent to which this
product can improve the ability to see images depends on a person’s individual
condition and level of visual impairment.
ClearView GO is not designed to restore vision, correct eye conditions, or halt
degenerative vision loss. An eye care professional can determine the usefulness
and suitability of ClearView GO for a patient’s individual condition.
Caring for ClearView GO
To care for your ClearView GO, follow these recommendations:
• When ClearView GO is not in use and not connected to external power,
always turn the power off by pressing the Power button for two seconds.
• Ensure that your ClearView GO is completely off before cleaning it.
• Clean ClearView GO with a soft dry cloth or an electrostatic dusting cloth.
DO NOT use liquid cleaners on its plastic surfaces.
• To prolong the life of ClearView GO, remove the battery from the device if it
will not be in use for one week or more.
• The protective glass covering the camera can be cleaned as needed with the
lens cloth provided within the packaging of ClearView GO. DO NOT use liquid
cleaners on the plastic surfaces. No additional methods of sterilization or
cleaning are recommended or required.
Transporting ClearView GO
Carry the device by firmly grasping the ClearView GO main body when it is in the
folded position.
Warning: Do not carry ClearView GO by the camera head since this may result
in damage to your device.
The ClearView GO 15” comes with a convenient carrying case for transport. To
prevent the device from being accidentally dropped and damaged, always return
the ClearView GO to the carrying case when not in use. Disconnect and secure
all cables before moving the device.

Optelec ClearView GO
English 29
FCC Compliance Notice
This device complies with Part 15 of the FCC Rules. Operation is subject to the
following two conditions: (1) This device may not cause harmful interference, and
(2) this device must accept any interference received, including interference that
may cause undesired operation. This equipment has been tested and found to
comply with the limits for a Class B digital device, pursuant to Part 15 of the FCC
Rules. These limits are designed to provide reasonable protection against
harmful interference in a residential installation. This equipment generates, uses,
and can radiate radio frequency energy and, if not installed and used in
accordance with the instructions, may cause harmful interference to radio
communications. However, there is no guarantee that interference will not occur
in some instances. If this equipment does cause harmful interference to radio or
television reception, which can be determined by turning the equipment off and
on, you are encouraged to try to correct the interference by one or more of the
following measures:
• Reorient or relocate the receiving antenna.
• Increase the separation between the equipment and receiver.
• Connect the equipment to a wall outlet on a circuit different from that to which
the receiver is connected.
• Consult the dealer or an experienced radio/TV technician for help.
Unauthorized changes or modifications to this system can void your authority to
operate this equipment.
Industry Canada (IC) Notice
This Class B digital apparatus complies with Canadian ICES-003.
This unit is an EMC-registered device.
This device bears the CE and FCC, KC approval mark

Optelec ClearView GO
30 English
Additional mechanical safety precautions
Your ClearView GO has moving parts. Do not attempt to forcibly reposition or
adjust the parts. It may cause damage to the device.
Note: Use caution when moving parts or when transporting the ClearView GO to
avoid possible injury to hands and fingers.
Susceptibility to interference
There may be temporary degradation of the image when ClearView GO is
subjected to a strong radio frequency field, electrostatic discharge, or transient
electrical noise. An electrostatic discharge (caused by static electricity) may
cause the screen to go blank. If this happens, follow these steps:
1. Disconnect the DC adapter power supply from the electrical outlet.
2. Wait 30 seconds.
3. Connect the DC adapter power supply again.
Additional electrical safety precautions
Read these safety precautions before using ClearView GO:
• Using any power supply other than the one provided by Optelec for ClearView
GO will void the warranty.
• If using DC power, the ClearView GO device should be near a wall outlet that
is easily accessible.
• Do not use ClearView GO in, near, or around water. ClearView GO is not
designed to offer protection against contact with any liquids.
• Use only the power supply provided with your ClearView GO. Using
unauthorized power supplies may cause serious damage to ClearView GO’s
electronic components.
• Always place the power cord away from traffic areas to avoid damage to the
power supply.
• Prevent the risk of electrical shock by NOT attempting to disassemble the
device. Refer all service to an authorized repair facility.
• Ensure that you make all proper cable connections.

Optelec ClearView GO
Nederlands 31
ClearView GO
Gebruikershandleiding
Optelec
Postbus 399
2993 LT Barendrecht
Nederland
Telefoon: +31 (0)88 6783 444
Fax +31 (0)88 6783 400
E-mail: info@optelec.nl
Website: www.optelec.com

Optelec ClearView GO
32 Nederlands
Configuratie

Optelec ClearView GO
Nederlands 33
1. Aan-/ Uit knop
2. Beeldoptimalisatiewiel (aanpassen van helderheid en contrast)
3. Snapshot knop
4. Zoomwiel
5. Kleur modus knop
6. Natuurlijke kleur knop
7. Super Functietoets
8. LCD scherm
9. Camera
10. Close-up lens (open deze lens voor afstandsweergave)
11. DC aansluiting (sluit de voedingsadapter hier aan om de batterij op te
laden)
12. HDMI uitgang
13. Camerapositioneringswiel
14. LED verlichting
Let op: zorg er bij de camera ⑨ voor dat er geen vreemd materiaal aan de
cameralens kleeft. Als er vreemd materiaal op de lens zit, veeg dit dan af met de
meegeleverde microvezeldoek.

Optelec ClearView GO
34 Nederlands
1. Introductie
Gefeliciteerd met het kiezen van de ClearView GO. ClearView GO biedt
hetzelfde leescomfort, gebruiksgemak en dezelfde functionaliteit als een
tafelmodel beeldscherm loep maar in een compact en opvouwbaar ontwerp. Het
is de ideale oplossing voor mensen die vergroting op verschillende locaties nodig
hebben. Met ClearView GO kunt u comfortabel tekst lezen en objecten bekijken,
thuis, op kantoor, in de klas of onderweg. Het opvouwbare ontwerp maakt het
uiterst eenvoudig om de ClearView GO mee te nemen of op te slaan wanneer u
deze niet nodig hebt.
1.1. Over deze handleiding
Deze handleiding helpt u vertrouwd te raken met de functies en bediening van de
ClearView GO. Lees deze handleiding aandachtig door voordat u uw ClearView
GO gebruikt. Als u vragen of suggesties hebt over het gebruik van dit product,
neem dan contact op met uw Optelec distributeur of het hoofdkantoor van
Optelec door de contactinformatiepagina aan het einde van deze handleiding te
raadplegen. We stellen uw feedback zeer op prijs. We hopen dat u veel plezier
beleeft aan het werken met uw ClearView GO.
1.2. Instructies voor gebruik
De batterij moet volledig zijn opgeladen vóór het eerste gebruik. Sluit de
meegeleverde voedingsadapter aan op de DC-ingang om de batterij op te laden.
Tijdens het opladen brandt een rood lampje. Zodra er volledig is opgeladen, is
het lampje groen.
Verwijder de LCD-beschermfolie voordat u het apparaat gebruikt. Zorg ervoor dat
er geen vreemd materiaal aan de cameralens blijft kleven. Als er vreemd
materiaal op de lens zit, veeg dit dan af met de meegeleverde microvezeldoek.
1.3. Wat zit er in de doos
De ClearView GO-verpakking bevat het volgende. Neem contact op met uw
distributeur als een van deze items in uw pakket ontbreekt.
1. ClearView GO draagbare vergroter
2. Voedingsadapter
3. Draagtas (enkel 15” model)
4. Gebruikershandleiding
5. Microvezeldoek voor het reinigen van het beeldscherm

Optelec ClearView GO
Nederlands 35
2. Aan de slag
2.1. De ClearView GO openen
1. Plaats de gevouwen ClearView GO op een stabiel oppervlak zoals een tafel.
2. Druk met één hand op de bodemplaat, terwijl de andere hand de bovenkant
van het apparaat optilt.
3. Til de arm op totdat deze vastklikt.
4. Plaats de handen aan de linker- en rechterkant van het LCD-scherm.
5. Trek het LCD-scherm naar u toe.
6. Duw het LCD-scherm met beide handen omhoog en stel het in op een
geschikte positie.
1.
2.
3.
4.
5.
6.

Optelec ClearView GO
36 Nederlands
2.2. De ClearView GO sluiten
1. Plaats de handen aan de linker- en rechterkant van het LCD-scherm.
2. Druk het LCD-scherm met beide handen omlaag om de ClearView GO te
sluiten.
3. Duw het LCD-scherm in de richting van het apparaat.
4. Plaats beide handen bovenop het apparaat.
5. Laat de bovenkant van het apparaat zakken totdat deze gesloten is.
1.
2.
3.
4.
5.

Optelec ClearView GO
Nederlands 37
2.3. Camera posities
U kunt tussen modi schakelen door aan het camerapositioneringswiel te draaien.
1. Lees modus
2. Afstandsweergavemodus (open de close-up lens voor afstandsweergave)
3. Spiegelmodus
1.
2.
3.

Optelec ClearView GO
38 Nederlands
3. Knoppen
1. Aan/Uit knop
Druk deze knop 2 seconden in om het apparaat aan- of uit te schakelen.
2. Beeld optimalisatiewiel
Biedt verschillende functies:
• Draai de knop in de natuurlijke kleurenmodus om de helderheid van het
scherm aan te passen (vijf niveaus).
• Draai de knop in een hoog contrast modus om het contrast van het
beeld aan te passen. Druk de knop in om terug te keren naar de
standaard instellingen.
• Druk de knop in en houd deze twee seconden ingedrukt om auto focus
in- of uit te schakelen.
3. Snapshot knop
Druk kort op de Snapshot knop ③ om het beeld te bevriezen.
• U kunt vervolgens op het stilstaande beeld in- en uitzoomen en de kleur
en helderheid van het scherm aanpassen.
• Wanneer het beeld vergroot is, kunt u door het beeld heen schuiven
(pannen) door de Super Functietoets ⑦ te gebruiken.
Druk nogmaals op de knop om terug te keren naar de livemodus.
4. Zoomwiel
Draai aan de knop om de vergroting aan te passen. Het vergrotingsbereik
hangt af van welke ClearView GO u bezit.
• ClearView GO 15”:
Vergroting: 1.4x tot 20x, 2.0x tot 32x (standaard),
of 3.5x tot 60x.
Toegevoegde vergroting in een snapshot: 5.5x.
1. 2. 3. 4. 5. 6. 7.

Optelec ClearView GO
Nederlands 39
• ClearView GO 17”:
Vergroting: 1.4x tot 25x, 2.3x tot 35x (standaard),
of 3.5x tot 70x.
Toegevoegde vergroting in een snapshot: 5.5x.
Verschillende vergrotingsfactoren kunnen in het Menu worden ingesteld.
Druk het zoomwiel in en houd deze ingedrukt om toegang te krijgen tot het
menu en selecteer het aan te passen vergrotingsbereik. Zie het onderdeel
vergrotingsbereik in hoofdstuk 5.2. voor meer informatie over hoe dit te
doen.
5. Kleur modus knop
Het beeld op het scherm kan worden bekeken in acht kleurmodi, de
natuurlijke kleur modus en zeven hoog contrast kleuren:
• Natuurlijke kleur modus
• Witte tekst op zwarte achtergrond
• Zwarte tekst op witte achtergrond
• Gele tekst op zwarte achtergrond
• Zwarte tekst op gele achtergrond
• Groene tekst op zwarte achtergrond
• Blauwe tekst op gele achtergrond
• Gele tekst op blauwe achtergrond
Via het menu kunnen maximaal 35 kleurmodi worden ingesteld.
6. Natuurlijke kleur knop
Druk op de natuurlijke kleur knop ⑥ om foto's of documenten in natuurlijke
kleur te bekijken.
Druk de natuurlijke kleur knop ⑥ in en houd deze ingedrukt om de Zoek
functie te gebruiken tijdens het vergroten. De Zoek functie stelt u in staat
snel uit te zoomen en het gehele beeld te zien. Loslaten van de knop keert
terug naar de originele vergrotingsfactor.
7. Super functietoets
Gebruik deze knop om in de vergroting the schuiven(pannen) en scrollen
over het stilstaande beeld. Zie hoofdstuk 4.4.
Deze knop wordt ook gebruikt voor de lijn/afdekfuncties. Zie hoofdstuk 4.1.

Optelec ClearView GO
40 Nederlands
4. Sneltoetsen en functies
4.1. Lijn & Afdekken
Houd de Super Functietoets ⑦ ingedrukt om Lijn en afdekken te activeren of te
deactiveren.
Wanneer Lijn en afdekken geactiveerd is, werkt de navigatietoets/wiel van de
Super Functietoets ⑦ als volgt.
• Links en rechts ◀ ▶ : Kies de functie.
5. Horizontale lijn
6. Verticale lijn
7. Horizontaal afdekken
8. Verticaal afdekken
• Omhoog en omlaag ▲ ▼: de dikte van een lijn en de afstand tussen het
afgedekte gebied vergroten of verkleinen.

Optelec ClearView GO
Nederlands 41
• Draai het wiel om de positie van de lijn of de afdekking te verplaatsen.
1) Tegen de klok in 2) Met de klok mee
4.2. Batterij status
De status van het resterende batterijvermogen wordt niet continu weergegeven.
Het pictogram voor het opladen van de batterij wordt weergegeven wanneer de
voedingsadapter is aangesloten.
Druk de snapshot knop ③ minimaal drie seconden in om de status van het
resterende batterijvermogen te controleren.
4.3. HDMI UIT modus
Bij het aansluiten van de HDMI-uitvoerkabel blijft het LCD-scherm leeg en wordt
informatie weergegeven op een externe monitor.
U kunt schakelen tussen het LCD-scherm en een externe monitor door op de
Super Functietoets ⑦ te drukken.
4.4. Scrollen door de bevroren afbeelding
Pas naar behoefte de vergrotingsfactor aan om het gehele gebied dat u wilt
lezen te omvatten. Druk dan de snapshot knop ③ in om het beeld te bevriezen.
Wanneer u het Zoomwiel ④ indrukt terwijl u in het stilstaande beeld bent,
verschijnt een horizontale lijnmarkering. U kunt deze lijn verplaatsen door de
Super Functietoets ⑦ te draaien.

Optelec ClearView GO
42 Nederlands
U kunt op het stilstaande beeld in- en uitzoomen met het Zoomwiel ④. Wanneer
het beeld vergroot is, kunt u over het stilstaande beeld schuiven door gebruik te
maken van de omhoog/omlaag en links/rechts navigatietoetsen rondom de Super
Functietoets ⑦. Als u schuift naar het eind van een stilstaand beeld, kunt u
verder gaan met de volgende alinea of lijn door de linker of rechter navigatietoets
los te laten en weer in te drukken.
Terwijl u over het beeld schuift kan uw huidige leespositie worden weergegeven
door de Natuurlijke kleur knop ⑥ in te drukken. De locatie van het vergroot
gebied wordt getoond binnen een volledig weergegeven beeld.
4.5. Energiebesparende modus
Wanneer u het apparaat 10 minuten ongebruikt aan laat staan zal het LCD
scherm worden uitgezet om het batterijvermogen te sparen. Als het apparaat nog
drie minuten extra ongebruikt blijft, wordt het automatisch uitgeschakeld. Zie de
“Energiebesparende modus” sectie in hoofdstuk 5.3. voor meer informatie over
het aanpassen van deze tijden.
4.6. Selectie kleurmodus
Houd de kleurmodusknop ⑤ ingedrukt en draai aan het zoomwiel ④ om door
de beschikbare kleurmodi te bladeren. Zie de “Kleurmodus” sectie in hoofdstuk
5.2. voor meer informatie over hoe kleuren te selecteren.
• Kleurmodusknop ⑤ + zoomwiel ④, rechts: volgende kleur modus
• Kleurmodusknop ⑤ + zoomwiel ④, links: vorige kleur modus
• Druk de knop Kleurmodus herhaaldelijk in om te schakelen tussen de
beschikbare kleuren modi.

Optelec ClearView GO
Nederlands 43
4.7. Spiegelmodus & afstandsmodus
U kunt de weergave modus veranderen door de camera te verplaatsen met het
camerapositioneringswiel ⑬.
Spiegelmodus
Gebruik wanneer de camera naar u toe gericht is.
• De camera schakelt automatisch over naar de spiegelmodus.
• Het vergrotingsbereik is geminimaliseerd.
• De camera schakelt automatisch over naar de natuurlijke kleur modus.
Afstandsmodus
Gebruik deze modus om een object op afstand te bekijken, zoals een
schoolbord. Open de close-up lens wanneer deze modus gebruikt wordt.
• De camera schakelt automatisch over naar de Afstandsweergave modus.
• De vergrotingsfactor is geminimaliseerd.
• De camera schakelt automatisch over naar de natuurlijke kleur modus.

Optelec ClearView GO
44 Nederlands
5. Menu
U gebruikt het menu om het product aan te passen. Deze sectie beschrijft hoe te
navigeren door het menu en opties te selecteren om het uiterlijk en gevoel van
uw ClearView GO aan te passen.
5.1. Menu navigatie
Houd het midden van het Zoomwiel ④ ingedrukt om het menu te openen en te
sluiten. In het menu kunt u instellingen wijzigen of opslaan met behulp van het
Zoomwiel ④ en de Super Functietoets ⑦.
• Navigeer door het menu door het Zoomwiel ④ of de Super Functietoets ⑦ te
draaien.
• Selecteer een optie door het midden van het Zoomwiel ④ of de Super
Functietoets ⑦ in te drukken.
• Houd het midden van het zoomwiel ④ of de Super Functietoets ⑦ ingedrukt
om terug te keren naar het vorige scherm.
5.2. Menu opties
De volgende menuopties zijn beschikbaar: Kleurmodus, Vergrotingsbereik,
LED helderheid, Meer Instellingen, en Reset.
Binnen het Meer Instellingen menu zijn de volgende opties beschikbaar: Taal,
Scrollsnelheid vastleggen, Knopvergrendeling, Persoonlijk & Openbaar, en
Energiebesparende modus.
Kleurmodus
Door gebruik te maken van de kleurmodus optie, kunt u uw voorkeurs
hoogcontrast kleur combinaties toevoegen of verwijderen. De standaard is een
selectie van zeven hoog contrast kleurmodi.
• Standaard: 7 kleurmodi geselecteerd
• Uitgebreid: alle 35 kleurmodi geselecteerd
Selecteer uw voorkeurs kleurmodi door gebruikt te maken van het Zoomwiel ④
of de Super Functietoets ⑦. Schakel een kleurmodus in of uit door het Zoomwiel
④ in te drukken. Een kleurmodus is ingeschakeld zodra deze rood omcirkeld is.
Een kleurmodus is uitgeschakeld zodra deze grijs omcirkeld is. Druk Opslaan
om de veranderingen toe te passen die u heeft gemaakt.

Optelec ClearView GO
Nederlands 45
Vergrotingsfactor
Voor ClearView GO 15”, is het standaard vergrotingsbereik 2.0x tot 32x. U kunt
het vergrotingsbereik instellen op:
• 1.4x tot 20x
• 2.0x tot 32x
• 3.5x tot 60x
Voor ClearView GO 17”, is het standaard vergrotingsbereik 2.3x tot 35x. U kunt
het vergrotingsbereik instellen op:
• 1.4x to 25x
• 2.3x to 35x
• 3.5x to 70x
LED helderheid
Met deze optie kunt u de LED helderheid aanpassen in 11 verschillende niveaus,
inclusief de verlichting volledig uitschakelen.
Reset
Dit menu zet alle instellingen terug naar standaard waarden.

Optelec ClearView GO
46 Nederlands
5.3. Meer instellingen
Als u Meer instellingen selecteert, kunt u de volgende functies aanpassen:
Taal, Scrollsnelheid vastleggen, Knopvergrendeling, Persoonlijk &
Openbaar, en Energiebesparende modus.
Selecteer Opslaan & Afsluiten of druk het Beeldoptimalisatiewiel ② in en houd
deze ingedrukt om uw aangepaste instellingen op te slaan.
Taal
Met dit menu kunt u uw voorkeurstaal selecteren.
Scrollsnelheid
Wanneer deze optie geselecteerd is kunt u de snelheid van het
schuiven(pannen) en scrollen vastleggen. Of, gebruik het Beeldoptimalisatiewiel
②. U kunt de scrollsnelheid ter plekke testen met de Super Functietoets ⑦. Zorg
dat u ingezoomd bent om de scroll snelheid te testen.
Knopvergrendeling
Als u Ja selecteert, zijn slechts drie toetsen beschikbaar: Zoomwiel ④,
Kleurmodus knop ⑤, Natuurlijke kleur knop ⑥.
Als u Nee, selecteert, zijn alle knoppen beschikbaar.
Persoonlijk & Openbaar
In de Persoonlijke modus worden alle aangepaste gebruikersinstellingen
onthouden nadat het apparaat is herstart.
In de Openbare modus worden alle instellingen teruggezet naar de standaard
waarden nadat het apparaat is herstart. De Openbare modus wordt aangeraden
wanneer een apparaat wordt gebruikt door meerdere personen, zoals in een
bibliotheek.
Energiebesparende modus
Om de levensduur van de batterij te verlengen, kunt u de tijdslengte aanpassen
waarna de LCD automatisch uitschakelt als het apparaat niet gebruikt wordt. U
kunt ook de tijd aanpassen waarna het apparaat volledig uitschakelt. De
standaard instellingen zijn:
• Automatische LCD uitschakel tijd is 10 minuten.
• Automatische uitschakel tijd is drie minuten.

Optelec ClearView GO
Nederlands 47
Technische specificities
ClearView GO 15”
LCD Scherm Formaat
15.6 inches (396mm)
16: 9 wide screen
LCD Resolutie
1920 x 1080 (Full HD)
LCD rotatiehoek
180 graden
Camera Specificaties
1920 x 1080, 60 fps
Auto focus
Afmetingen
Ong. 384 x 405 x 64 mm (gevouwen)
Ong. 384 x 400 x 577 mm (in gebruik)
Licht gewicht
4.8 kg
Kleur modus
Standaard 8, inclusief natuurlijke kleur
(Uitgebreid 35)
Vergrotingsbereik
Live camerabeeld: 1.4x tot 20x, 2.0x tot
32x (standaard), of 3.5x tot 60x.
Extra vergroting in snapshot: 5.5x
Camera modus
Leesmodus, afstandsmodus,
spiegelmodus
Batterij capaciteit
16.8V, 5200mAh
Batterij gewicht
400 g
Energie verbruik
14~20W (tijdens gebruik)
Batterij levensduur
5 uur
Input power rating - Adapter
100-240V, 50-60Hz, 1.7A
Output power rating - Unit
DC +19V-3.42A
Connectiviteit
HDMI UIT

Optelec ClearView GO
48 Nederlands
ClearView GO 17”
LCD Scherm Formaat
17.3 inches (439mm)
16: 9 wide screen
LCD Resolutie
1920 x 1080 (Full HD)
LCD rotatiehoek
180 graden
Camera Specificaties
1920 x 1080, 60 fps
Auto focus
Afmetingen
Ong. 411 x 432 x 64 mm (gevouwen)
Ong. 411 x 445 x 653 mm (in gebruik)
Licht gewicht
5.465 kg
Kleur modus
Standaard 8, inclusief natuurlijke kleur
(Uitgebreid 35)
Vergrotingsbereik
Live camerabeeld: 1.4x tot 25x, 2.3x tot
35x (standaard), of 3.5x tot 70x.
Extra vergroting in snapshot: 5.5x
Camera modus
Leesmodus, afstandsmodus,
spiegelmodus
Batterij capaciteit
16.8V, 5200mAh
Batterij gewicht
400 g
Energie verbruik
14~20W (tijdens gebruik)
Batterij levensduur
5 uur
Input power rating - Adapter
100-240V, 50-60Hz, 1.7A
Output power rating - Unit
DC +19V-3.42A
Connectiviteit
HDMI UIT

Optelec ClearView GO
Nederlands 49
Veiligheid en regelgeving
• Onachtzaam gebruik of misbruik van het product kan brand, persoonlijk letsel
of ernstige schade veroorzaken.
• Gebruik geen beschadigde stekker of ongeschikt stopcontact om elektrische
schokken of brand te voorkomen.
• Raak de stekker niet aan met natte handen om elektrische schokken te
voorkomen.
• Misbruik van het product kan leiden tot persoonlijk letsel of schade aan het
apparaat.
• Gebruik alleen de adapter die bij het product is meegeleverd. Andere adapters
kunnen het apparaat beschadigen.
• Gebruik dit apparaat niet in vochtige omgevingen zoals een badkamer of
doucheruimte.
• Plaats geen zware voorwerpen op het apparaat.
• Probeer het apparaat niet uit elkaar te halen, om te bouwen of te repareren.
Dit kan het apparaat beschadigen en maakt de garantie ongeldig.
• Na zes (6) maanden gebruik kan de gebruiksduur van de batterij zijn verkort.
• Houd het product uit direct zonlicht en extreme temperaturen.
• Het display werkt mogelijk niet correct.
• De aanbevolen temperatuur ligt tussen 0 ~ 35 ℃ (32 ~ 95 ℉)
Voorzorgsmaatregelen voor gebruik
• Volg alle waarschuwingen, voorzorgsmaatregelen en instructies die op het
product zijn aangegeven
• Gebruik ClearView GO op een stabiel, horizontaal oppervlak, zoals een stevig
bureau of tafel, volgens de beoogde ontwerpspecificaties.
• Plaats ClearView GO niet op een onstabiele tafel, verschuifbare kar of
standaard. Deze kan vallen, wat ernstige schade aan het apparaat of
lichamelijk letsel kan veroorzaken.
• Gebruik ClearView GO alleen binnenshuis - het apparaat mag NIET worden
blootgesteld aan extreme of snelle veranderingen in temperatuur of
vochtigheid. Plaats ClearView GO niet in de buurt van een radiator,
verwarming of gebieden die zijn blootgesteld aan lange uren direct zonlicht.
Deze omstandigheden kunnen de elektronica of optica van het apparaat
beschadigen.
• Reinig ClearView GO minimaal één keer per week met een zachte, droge
doek of een elektrostatische stofdoek. Gebruik GEEN vloeibare
reinigingsmiddelen op de plastic oppervlakken. Er worden geen aanvullende
sterilisatie- of reinigingsmethoden aanbevolen of vereist.

Optelec ClearView GO
50 Nederlands
• Gebruik ClearView GO niet in de buurt van brandbare materialen of
vloeistoffen.
Veiligheid en zorg
Bekijk deze veiligheidsmaatregelen zorgvuldig om uw veiligheid te garanderen
en het meeste voordeel uit ClearView GO te halen.
ClearView GO vergroot en verbetert tekst en objecten om de kwaliteit van leven
van mensen met een visuele beperking te verbeteren. De mate waarin dit
product het vermogen om afbeeldingen te zien kan verbeteren, hangt af van
iemands individuele toestand en mate van visuele beperking.
ClearView GO is niet ontworpen om het gezichtsvermogen te herstellen,
oogaandoeningen te corrigeren of degeneratief verlies van gezichtsvermogen te
stoppen. Een oogzorgspecialist kan het nut en de geschiktheid van ClearView
GO bepalen voor de individuele toestand van een patiënt.
Zorgen voor ClearView GO
Volg deze aanbevelingen om voor uw ClearView GO te zorgen:
• Als ClearView GO niet in gebruik is en niet is aangesloten op externe voeding,
zet u de stroom altijd uit door de aan / uit knop twee seconden ingedrukt te
houden.
• Zorg ervoor dat uw ClearView GO volledig is uitgeschakeld voordat u hem
schoonmaakt.
• Reinig ClearView GO met een zachte, droge doek of een elektrostatische
stofdoek. Gebruik GEEN vloeibare reinigingsmiddelen op de plastic
oppervlakken.
• Om de levensduur van ClearView GO te verlengen, verwijdert u de batterij uit
het apparaat als deze een week of langer niet wordt gebruikt.
• Het beschermende glas dat de camera bedekt, kan indien nodig worden
schoongemaakt met het lensdoekje dat in de verpakking van ClearView GO
zit. Gebruik GEEN vloeibare reinigingsmiddelen op de plastic oppervlakken.
Er worden geen aanvullende sterilisatie- of reinigingsmethoden aanbevolen of
vereist.
ClearView GO vervoeren
Draag het apparaat wanneer het is opgevouwen door het ClearView GO-
hoofdgedeelte stevig vast te pakken.
Waarschuwing: draag ClearView GO niet bij de camerakop, aangezien dit kan
leiden tot schade aan uw apparaat.
De ClearView GO 15” wordt geleverd met een handige draagtas voor transport.
Om te voorkomen dat het apparaat per ongeluk valt en beschadigd raakt, plaatst
u de ClearView GO altijd in de draagtas wanneer deze niet in gebruik is. Koppel
alle kabels los en berg ze op voordat u het apparaat verplaatst.

Optelec ClearView GO
Nederlands 51
FCC-conformiteitsverklaring
Dit apparaat voldoet aan Deel 15 van de FCC-regels. Het gebruik is
onderworpen aan de volgende twee voorwaarden: (1) dit apparaat mag geen
schadelijke interferentie veroorzaken, en (2) dit apparaat moet alle ontvangen
interferentie accepteren, inclusief interferentie die een ongewenste werking kan
veroorzaken. Deze apparatuur is getest en in overeenstemming bevonden met
de limieten voor een digitaal apparaat van Klasse B, conform Deel 15 van de
FCC-regels. Deze limieten zijn ontworpen om een redelijke bescherming te
bieden tegen schadelijke interferentie bij installatie in een woonomgeving. Deze
apparatuur genereert en gebruikt radiofrequentie-energie en kan deze uitstralen
en kan, indien niet geïnstalleerd en gebruikt volgens de instructies, schadelijke
storing aan radiocommunicatie veroorzaken. Er kan echter niet worden
gegarandeerd dat er in sommige gevallen geen interferentie zal optreden. Als
deze apparatuur schadelijke storing veroorzaakt aan radio- of televisieontvangst,
wat kan worden vastgesteld door de apparatuur uit en weer in te schakelen,
wordt u aangemoedigd om te proberen de storing te corrigeren door een of meer
van de volgende maatregelen:
• Heroriënteer of verplaats de ontvangende antenne.
• Vergroot de afstand tussen de apparatuur en de ontvanger.
• Sluit de apparatuur aan op een stopcontact op een ander circuit dan dat
waarop de ontvanger is aangesloten.
• Raadpleeg de dealer of een ervaren radio- / tv-technicus voor hulp.
Ongeautoriseerde veranderingen of modificaties aan dit systeem kunnen uw
bevoegdheid om dit apparaat te bedienen ongeldig maken.
Dit apparaat is een EMC-geregistreerd apparaat.
Dit apparaat draagt het CE- en FCC-keurmerk

Optelec ClearView GO
52 Nederlands
Aanvullende mechanische veiligheidsmaatregelen
Je ClearView GO heeft bewegende delen. Probeer de onderdelen niet
geforceerd te verplaatsen of aan te passen. Dit kan schade aan het apparaat
veroorzaken.
Opmerking: wees voorzichtig bij het verplaatsen van onderdelen of bij het
vervoeren van de ClearView GO om mogelijk letsel aan handen en vingers te
voorkomen.
Gevoeligheid voor interferentie
Het beeld kan tijdelijk verslechteren wanneer ClearView GO wordt blootgesteld
aan een sterk radiofrequentieveld, elektrostatische ontlading of voorbijgaande
elektrische ruis. Door een elektrostatische ontlading (veroorzaakt door statische
elektriciteit) kan het scherm zwart worden. Als dit gebeurt, volg dan deze
stappen:
1. Koppel de voeding van de gelijkstroomadapter los van het stopcontact.
2. Wacht 30 seconden.
3. Sluit de voeding van de DC-adapter opnieuw aan.
Aanvullende elektrische veiligheidsmaatregelen
Lees deze veiligheidsmaatregelen voordat u ClearView GO gebruikt:
• Bij gebruik van een andere voeding dan die van Optelec voor ClearView GO
vervalt de garantie.
• Als u gelijkstroom gebruikt, moet het ClearView GO-apparaat zich in de buurt
van een gemakkelijk toegankelijk stopcontact bevinden.
• Gebruik ClearView GO niet in, bij of rond water. ClearView GO is niet
ontworpen om bescherming te bieden tegen contact met vloeistoffen van
welke aard dan ook.
• Gebruik alleen de voeding die bij uw ClearView GO is geleverd. Het gebruik
van niet-geautoriseerde voedingen kan ernstige schade toebrengen aan de
elektronische componenten van ClearView GO.
• Plaats het netsnoer altijd uit de buurt van looproutes om schade aan de
voeding te voorkomen.
• Voorkom het risico op elektrische schokken door NIET te proberen het
apparaat te demonteren. Laat alle service over aan een geautoriseerde
reparatie-instelling.
• Zorg ervoor dat u alle juiste kabelaansluitingen maakt.

Optelec ClearView GO
Français 53
ClearView GO
Manuel d’utilisation
Optelec
Boîte postale 399
2993 LT Barendrecht
Pays-Bas
Téléphone: +31 (0)88 6783 444
Télécopieur +31 (0)88 6783 400
Courriel: info@optelec.nl
Site internet: www.optelec.com

Optelec ClearView GO
54 Français
Configuration

Optelec ClearView GO
Français 55
1. Bouton d’alimentation Marche/Arrêt
2. Roulette d’optimisation de l’image (Ajustement de la luminosité et le
contraste)
3. Bouton Capture instantanée
4. Roulette du Zoom
5. Bouton Mode Couleurs
6. Bouton Couleur Naturelle
7. Touche Super Fonction
8. Écran LCD
9. Caméra
10. Objectif gros-plan (ouvrez cet objectif pour une vue à distance)
11. Prise DC (insérez l'adaptateur secteur ici pour charger la batterie)
12. Sortie HDMI
13. Roulette de positionnement de la caméra
14. Lumières DEL
Remarque: avec la caméra ⑨, évitez que des corps étrangers se logent sur
l’objectif. Si cela se produit, utilisez le linge de microfibre fourni pour essuyer la
lentille.

Optelec ClearView GO
56 Français
1. Introduction
Nous vous félicitons pour l’acquisition de votre nouveau ClearView GO.
ClearView GO offre le même confort de lecture, la même facilité d’utilisation et
les mêmes fonctionnalités qu’un télé-agrandisseur de bureau dans un design
pliable et compact. Il est donc la solution idéale pour ceux qui nécessitent du
télé-agrandissement à des endroits variés. ClearView GO vous permet de lire et
de visualiser des objets à la maison, au bureau, dans la salle de classe ou
ailleurs. Son design pliable le rend extrêmement facile à transporter ou à
entreposer lorsque vous n’en avez pas besoin.
1.1. À propos de ce manuel
Ce manuel vous aidera à vous familiariser avec l’utilisation et les fonctions du
ClearView GO. Lisez-le attentivement avant la première utilisation. Si vous avez
des questions ou des suggestions concernant l’utilisation de ce produit, veuillez
contacter votre distributeur Optelec ou le siège social d’Optelec à l’aide de
l’information de contact fournie à la fin de ce manuel. Vos commentaires sont
appréciés. Nous espérons que vous apprécierez travailler avec votre ClearView
GO.
1.2. Instructions avant de débuter
La batterie doit être pleinement chargée avant la première utilisation. Veuillez
connecter l’adaptateur d’alimentation fourni à l’entrée DC pour charger la
batterie. Pendant la charge, un voyant rouge est allumé. Lorsqu'il est
complètement chargé, le voyant est vert.
Enlevez le film de protection de l’écran LCD avant d’utiliser l’appareil. Évitez
qu’un corps étranger n’adhère à la lentille de la caméra. Essuyez les corps
étrangers de la lentille avec le linge fourni.
1.3. Contenu de la boîte
L’emballage du ClearView GO contient les éléments suivants. Si un ou des
éléments sont manquants, veuillez contacter votre distributeur.
1. Agrandisseur portatif
2. Adaptateur d’alimentation
3. Pochette de transport (modèle 15 pouces uniquement)
4. Manuel d’utilisation
5. Linge en microfibre pour nettoyer l’écran

Optelec ClearView GO
Français 57
2. Pour débuter
2.1. Ouvrir le ClearView GO
1. Placez le ClearView GO fermé sur une surface plane et stable.
2. Maintenez la base de l’appareil d’une main tout en soulevant la partie
supérieure de l’appareil de l’autre main.
3. Soulevez le bras jusqu’à ce qu’il s’enclenche dans la bonne position.
4. Tenez des deux mains les côtés gauche et droit du moniteur LCD.
5. Tirez le moniteur LCD vers vous.
6. Poussez le moniteur vers le haut avec les deux mains et ajustez-le à la
position souhaitée.
1.
2.
3.
4.
5.
6.

Optelec ClearView GO
58 Français
2.2. Fermer le ClearView GO
1. Tenez des deux mains les côtés gauche et droit du moniteur LCD.
2. Pour fermer ClearView GO, abaissez l'écran LCD à deux mains.
3. Poussez le moniteur vers la partie centrale de l’appareil.
4. Placez les deux mains sur le dessus de la partie supérieure de l’appareil.
5. Descendez le dessus de l’appareil jusqu’à ce qu’il soit fermé.
1.
2.
3.
4.
5.

Optelec ClearView GO
Français 59
2.3. Positions de caméra
Vous pouvez basculer entre les modes en pivoter/ ajuster avec la Roulette de
positionnement de la caméra.
1. Mode Lecture
2. Mode Distance (ouvrez l'objectif en plan éloigné pour une visualisation à
distance)
3. Mode Auto-visualisation (mode miroir)
1.
2.
3.

Optelec ClearView GO
60 Français
3. Boutons
1. Bouton Marche/Arrêt
Pour allumer / éteindre l'appareil, appuyez sur ce bouton pendant deux
secondes.
2. Roulette d’optimisation de l’image
Fonctions différentes selon le réglage.
• En mode couleur naturelle, tournez le bouton pour régler la luminosité
de l'affichage (cinq niveaux).
• En mode couleur à contraste élevé, tournez le bouton pour régler le
contraste de l'image. Appuyez dessus pour revenir au réglage par
défaut.
• Pour activer / désactiver la mise au point automatique, appuyez sur le
bouton et maintenez-le enfoncé pendant deux secondes.
3. Bouton Capture instantanée
Appuyez brièvement sur le bouton Capture instantanée ③ pour figer
l'image.
• Vous pouvez alors faire un zoom avant ou arrière sur l’image gelée et
ajuster la couleur ou la luminosité.
• Lorsque l'image est agrandie, vous pouvez faire un panoramique autour
de l'image à l'aide de la touche Super Fonction ⑦.
Appuyez sur le bouton à nouveau pour retourner au mode en direct.
4. Roulette du Zoom
Tournez la roulette pour ajuster le grossissement. Le niveau
d'agrandissement dépend de la taille de ClearView GO que vous
possédez.
• ClearView GO 15”:
Grossissement: 1,4x à 20x, 2,0x à 32x (par défaut) ou 3,5x à 60x.
Agrandissement supplémentaire dans l'image capturée: 5,5x.
1. 2. 3. 4. 5. 6. 7.

Optelec ClearView GO
Français 61
• ClearView GO 17”:
Grossissement: 1,4x à 25x, 2,3x à 35x (par défaut) ou 3,5x à 70x.
Agrandissement supplémentaire dans l'image capturée: 5,5x.
Différents niveaux d'agrandissement peuvent être définis dans le menu.
Appuyez sur la roulette du zoom et maintenez-la enfoncée pour accéder au
menu et sélectionnez le niveau du zoom pour le régler. Pour plus
d'informations sur la façon de procéder, reportez-vous à la section
«Rapport de zoom» du chapitre 5.2.
5. Bouton Mode Couleur
L’image affichée peut être visualisée en huit modes de couleurs, le mode
couleur naturelle et sept couleurs à contraste élevé:
• Mode Couleur naturelle
• Texte blanc sur fond noir
• Texte noir sur fond blanc
• Texte jaune sur fond noir
• Texte noir sur fond jaune
• Texte vert sur fond noir
• Texte bleu sur fond jaune
• Texte jaune sur fond bleu
Jusqu’à 35 modes couleurs peuvent être programmés dans le menu.
6. Bouton Couleur naturelle
Appuyez sur le bouton pour voir les images ou documents dans leurs
couleurs réelles.
Maintenez enfoncé le bouton Couleur naturelle ⑥ pour utiliser la fonction
Rechercher une fois agrandi. La fonction Rechercher vous permet de faire
un zoom arrière rapide et de voir l'image entière. Relâcher le bouton
ramène la caméra au niveau d'agrandissement d'origine.
7. Touche Super Fonction
Utilisé pour le panoramique / défilement de l'image figée lorsqu'elle est
agrandie. Reportez-vous au chapitre 4.4.
Utilisé pour sélectionner et appliquer la fonction ligne / masque. Se référer
au chapitre 4.1.

Optelec ClearView GO
62 Français
4. Principales Touches et Fonctions
4.1. Ligne et Masque
Maintenez la touche Super Fonction ⑦ pour activer ou désactiver Ligne &
Masque.
Lorsque Ligne & Masque est activé, la touche de direction et la roulette de la
touche Super Fonction ⑦ fonctionnent de la manière suivante.
• Gauche & Droite ◀ ▶ : Choisir la fonction.
1. Ligne horizontale
2. Ligne verticale
3. Masque horizontal
4. Masque vertical
• Haut & Bas ▲▼ : Augmenter ou réduire l’épaisseur d’une ligne ou la distance
entre les masques.

Optelec ClearView GO
Français 63
• Tourner la roulette déplace la position de la ligne ou du masque.
1) Sens antihoraire 2) Sens horaire
4.2. État de la batterie
L’état de la charge restante à la batterie n’est pas normalement affiché. L’icône
de chargement de la batterie s’affiche lorsque l’adaptateur d’alimentation est
connecté.
Pour vérifier l'état de la batterie restante, appuyez sur le bouton de capture
d'image ③ pendant trois secondes ou plus.
4.3. Mode Sortie HDMI
Lors du raccordement du câble de sortie HDMI, l’écran LCD est vide et les
informations sont affichées sur un moniteur externe.
Vous pouvez basculer entre l’écran LCD et un moniteur externe en appuyant sur
la touche Super Fonction ⑦.
4.4. Faites défiler l'image figée
Ajustez le niveau de zoom comme vous le souhaitez pour cadrer toute la zone
que vous souhaitez lire. Appuyez ensuite sur le bouton Capture d'image ③ pour
figer l'image.
Lorsque vous appuyez sur la roulette du zoom ④ dans l'image figée, un
marqueur de ligne horizontale apparaît. Vous pouvez déplacer cette ligne en
tournant la touche Super Fonction ⑦.

Optelec ClearView GO
64 Français
Vous pouvez faire un zoom avant ou arrière sur l’image gelée avec la roulette du
zoom ④. Lorsque l'image est agrandie, vous pouvez faire un panoramique
autour de l'image figée à l'aide des touches de direction haut / bas et gauche /
droite autour de la touche Super Fonction ⑦. Lorsque vous effectuez un
panoramique jusqu'à la fin d'une image figée, vous pouvez passer au
paragraphe ou à la ligne suivante en relâchant la touche de direction gauche ou
droite et en appuyant à nouveau dessus.
À tout moment pendant le panoramique de l'image, votre position de lecture
actuelle est affichée en appuyant sur le bouton Couleur naturelle et en le
maintenant enfoncé. L'emplacement de la zone agrandie est affiché dans tout le
champ de visionnement.
4.5. Mode Économie de batterie
Si vous laissez l'appareil allumé et inutilisé pendant 10 minutes, l'écran LCD
s'éteint pour économiser la batterie. Si l'appareil est laissé pendant trois minutes
supplémentaires, l'alimentation est automatiquement coupée. Pour plus
d'informations sur la façon de régler le temps, reportez-vous à la section «Mode
d'économie d'énergie» du chapitre 5.3.
4.6. Sélection du Mode Couleurs
Maintenez appuyé le Bouton Mode couleurs ⑤ et tournez la Roulette du Zoom
④ pour vous délacer parmi les choix de Modes Couleurs disponibles. Pour plus
d'informations sur la sélection des couleurs, reportez-vous à la section «Mode
couleur» du chapitre 5.2.
Bouton Mode Couleurs ⑤ + Roulette du Zoom ④, Droite: Mode
couleur suivant
Bouton Mode Couleurs ⑤ + Roulette du Zoom ④, Gauche: Mode
Couleurs précédent
Appuyez plusieurs fois sur le bouton Mode couleur pour parcourir les modes
couleur disponibles.

Optelec ClearView GO
Français 65
4.7. Modes Auto-visualisation et Distance
Vous pouvez changer le mode de visualisation en déplaçant la caméra avec la
roulette de positionnement de la caméra ⑬.
Mode Auto-visualisation (Mode miroir)
Utilisez cette option lorsque la direction de la caméra est dirigée vers vous.
• La caméra se mettra automatiquement en Mode Auto-visualisation.
• La plage de grossissement sera diminuée.
• La caméra se mettra automatiquement en Mode Couleur naturelle.
Mode Distance
Utilisez ce mode pour afficher un objet distant, tel qu'un tableau blanc. Ouvrez
l'objectif de plan éloigné lorsque vous utilisez ce mode.
• La caméra passera automatiquement en Mode Distance.
• La plage de grossissement sera diminuée.
• La caméra passera automatiquement au Mode Couleur naturelle.

Optelec ClearView GO
66 Français
5. Menu
Vous pouvez utiliser le menu pour personnaliser le produit. Cette section décrit
comment naviguer dans les menus et sélectionner les options pour changer
l'apparence de votre ClearView GO.
5.1. Navigation dans le menu
Appuyez et maintenez enfoncer le centre de la roulette du zoom ④ pour entrer
et quitter le menu. Une fois dans le menu, vous pouvez modifier ou enregistrer
les paramètres à l'aide de la roulette du zoom ④ ou de la touche Super Fonction
⑦.
• Déplacez-vous dans le menu en tournant la roulette du zoom ④ ou la touche
Super Fonction ⑦.
• Sélectionnez une option en appuyant au centre de la roulette du zoom ④ ou
de la touche Super Fonction ⑦.
• Pour revenir à l'écran précédent, maintenez le centre de la roulette du Zoom
④ ou de la touche de Super Fonction ⑦ enfoncée.
5.2. Options de menu
Les options de menu suivantes sont disponibles: Mode couleur, Rapport de
zoom, Luminosité LED, Plus de paramètres et Réinitialiser.
Dans le menu Plus de paramètres, les options suivantes sont disponibles:
Langue, Vitesse de défilement des captures d’images, Mode de verrouillage
des touches, Personnel et public et Mode d'économie d'énergie.
Mode couleur
En utilisant l'option Mode couleur, vous pouvez ajouter ou supprimer vos
combinaisons de couleurs à contraste élevé préférées. La valeur par défaut est
une sélection de sept modes de couleur à contraste élevé.
• Par défaut: sept modes de couleur à contraste élevé sélectionnés
• Additionnel: les 35 modes de couleur sélectionnés
Sélectionnez vos modes de couleur préférés à l'aide de la roulette du zoom ④
ou de la touche Super Fonction ⑦. Activez et désactivez un mode couleur en
appuyant sur la roulette du zoom ④. Un mode couleur est activé lorsqu'il est
entouré de rouge. Un mode couleur est désactivé lorsqu'il est entouré de gris.

Optelec ClearView GO
Français 67
Appuyez sur enregistrer pour appliquer les modifications que vous avez
apportées.
Rapport de zoom
Pour ClearView GO 15”, la plage d'agrandissement par défaut est de 2,0x à 32x.
Vous pouvez définir la plage d'agrandissement sur:
• 1,4x à 20x
• 2,0x à 32x
• 3,5x à 60x
Pour ClearView GO 17”, la plage d'agrandissement par défaut est de 2,3x à 35x.
Vous pouvez définir la plage d'agrandissement sur:
• 1,4x à 25x
• 2,3x à 35x
• 3,5x à 70x
Luminosité LED
Avec cette option, vous pouvez régler la luminosité des LED sur 11 niveaux
différents, notamment en éteignant complètement les lumières.
Réinitialiser
Ce menu réinitialise tous les paramètres aux valeurs par défaut.

Optelec ClearView GO
68 Français
5.3. Plus de paramètres
Si vous sélectionnez Plus de paramètres, vous pouvez régler les fonctions
suivantes : Langue, Vitesse de défilement des captures d’images, Mode de
verrouillage des touches, Personnel et public et Mode d'économie
d'énergie.
Pour enregistrer vos paramètres mis à jour, sélectionnez Enregistrer et quitter
ou maintenez enfoncée la molette Image Optimizer ②.
Langue
Ce menu vous permet de sélectionner votre langue préférée.
Vitesse de défilement des captures d’images
Lorsque cette option est sélectionnée, vous pouvez régler la vitesse de
défilement / panoramique de capture. Ou utilisez la molette Image Optimizer ②.
Vous pouvez tester la vitesse de défilement en temps réel à l'aide de la touche
Super Fonction ⑦. Assurez-vous d'avoir zoomé pour pouvoir tester la vitesse de
défilement.
Mode de verrouillage des touches
Si vous sélectionnez Oui, seules 3 touches sont disponibles : la roulette du
Zoom ④, la touche de mode couleur ⑤ et la touche de couleur naturelle ⑥. Si
vous sélectionnez Non, tous les boutons sont disponibles.
Personnel et public
Avec le mode Personnel, tous les paramètres utilisateur personnalisés actuels
sont mémorisés après le redémarrage de l'appareil.
Avec le mode Public, tous les paramètres reviennent à leurs valeurs d'usine par
défaut après le redémarrage de l'appareil. Le mode public est recommandé
lorsqu'un périphérique est utilisé par plusieurs personnes, comme dans une
bibliothèque.
Mode économie d'énergie
Pour économiser la batterie, vous pouvez régler la durée avant que l'écran LCD
s'éteigne automatiquement après une période de non-utilisation. Vous pouvez
également régler l'heure à laquelle l'alimentation est coupée. Les paramètres par
défaut sont:
• Le temps d'extinction automatique de l'écran LCD est de 10 minutes.
• Le temps de mise hors tension automatique est de trois minutes.

Optelec ClearView GO
Français 69
Spécifications techniques
ClearView GO 15”
Écran LCD -Dimensions
15.6 pouces (396mm), 16 : 9 écran large
Résolution
1920 x 1080 (Plein HD)
Angle de rotation
180 degrés
Spécifications de la caméra
1920 x 1080, 60 images/seconde
Mise au point automatique
Dimensions
Ferme: 384 x 405 x 64 mm
15.1 x 16 x 2.5 po
Ouvert: 384 x 400 x 577 (max) mm
15.1 x 15.75 x 22.7 (max) po
Poids
4.8 kg / 10.65 lb.
Modes de couleurs
Par défaut 8, comprenant la couleur
naturelle (Mode additionnel 35)
Plage de grossissement
Sélectionnable : 1,4x à 20x, 2,0x à 32x
(défaut), ou 3,5x à 60x.
Agrandissement supplémentaire dans
l'image capturée: 5,5x
Modes de caméra
Mode Lecture, Mode Distance, Mode Auto-
visualisation
Batterie – Capacité
16.8V, 5200mAh
Poids de la batterie
400 g / 0.90 lb.
Durée de la batterie
5 heures
Consommation
14~20W (en opération)
Puissance d’entrée – Adaptateur
100-240V, 50-60Hz, 1.7A
Puissance de sortie – Unité
DC +19V-3.42A
Connectivité
Sortie HDMI

Optelec ClearView GO
70 Français
ClearView GO 17”
Écran LCD -Dimensions
17.3 pouces (439mm), 16 : 9 écran large
Résolution
1920 x 1080 (Plein HD)
Angle de rotation
180 degrés
Spécifications de la caméra
1920 x 1080, 60 images/seconde
Mise au point automatique
Dimensions
Ferme: 411 x 432 x 64 mm
16.2 x 17 x 2.5 po
Ouvert: 411 x 445 x 653 (max) mm
16.2 x 17.5 x 25.7 (max) po
Poids
5.465 kg / 12.05 lb.
Modes de couleurs
Par défaut 8, comprenant la couleur
naturelle (Mode additionnel 35)
Plage de grossissement
Sélectionnable : 1,4x à 25x, 2,3x à 35x
(défaut), ou 3,5x à 70x.
Agrandissement supplémentaire dans
l'image capturée: 5,5x
Modes de caméra
Mode Lecture, Mode Distance, Mode Auto-
visualisation
Batterie – Capacité
16.8V, 5200mAh
Poids de la batterie
400 g / 0.90 lb.
Durée de la batterie
5 heures
Consommation
14~20W (en opération)
Puissance d’entrée – Adaptateur
100-240V, 50-60Hz, 1.7A
Puissance de sortie – Unité
DC +19V-3.42A
Connectivité
Sortie HDMI

Optelec ClearView GO
Français 71
Avis de sécurité et de réglementation
• Une utilisation négligente du produit peut causer un incendie, des blessures
ou de sérieux dommages.
• Afin d’éviter un incendie ou un choc électrique, ne pas utiliser une prise ou
fiche électrique endommagée ou inappropriée.
• Afin d’éviter un choc électrique, ne pas toucher la prise ou fiche électrique
avec une main mouillée.
• Une mauvaise utilisation du produit peut causer des blessures corporelles ou
endommager l’appareil.
• Utiliser uniquement l’adaptateur fourni avec ce produit. L’utilisation d’un autre
adaptateur peut endommager l’appareil.
• Ne pas utiliser cet appareil dans un environnement humide, par exemple dans
une salle de bain.
• Ne pas placer d’objet lourd sur l’appareil.
• Ne pas tenter de désassembler, modifier ou réparer l’unité. Cela peut
endommager l’appareil et annulera la garantie.
• Il est possible que la durée de vie de la batterie diminue après six (6) mois
d’utilisation.
• Garder l’appareil hors de la lumière solaire directe et des températures
extrêmes.
• L’affichage peut ne pas s’afficher correctement.
• Il est recommandé d’opérer l’appareil dans une température se situant entre 0
~ 35 ℃ (32 ~ 95 ℉).
Précautions d'emploi
• Suivez tous les avertissements, mises en garde et instructions indiqués sur le
produit.
• Utilisez ClearView GO sur une surface stable et de niveau telle qu'un bureau
ou une table solide, conformément aux spécifications de conception prévues.
• Évitez de placer ClearView GO sur une table, un chariot ou un support
instable. Il pourrait tomber, causant de graves dommages à l'appareil ou des
blessures corporelles.
• Utilisez ClearView GO uniquement à l'intérieur - il ne doit PAS être exposé à
des changements extrêmes ou rapides de température ou d'humidité. Ne
placez pas ClearView GO près d'un radiateur ou de zones exposées à de
longues heures de soleil direct. Ces conditions peuvent endommager
l'électronique ou l'optique de l'appareil.
• Au moins une fois par semaine, nettoyez ClearView GO avec un chiffon doux
et sec ou un chiffon à poussière électrostatique. NE PAS utiliser de nettoyants

Optelec ClearView GO
72 Français
liquides sur ses surfaces en plastique. Aucune méthode supplémentaire de
stérilisation ou de nettoyage n'est recommandée ou requise.
• N'utilisez pas ClearView GO à proximité de matériaux ou de liquides
inflammables.
Sécurité et entretien
Pour garantir votre sécurité et tirer le meilleur parti de ClearView GO, lisez
attentivement ces précautions de sécurité.
ClearView GO agrandit et améliore le texte et les objets afin d'améliorer la qualité
de vie des personnes malvoyantes. La mesure dans laquelle ce produit peut
améliorer la capacité de voir des images dépend de l'état individuel d'une
personne et de son niveau de déficience visuelle.
ClearView GO n'est pas conçu pour restaurer la vision, corriger les problèmes
oculaires ou arrêter la perte de vision dégénérative. Un professionnel des soins
oculaires peut déterminer l’utilité et la pertinence de ClearView GO pour l’état
individuel d’un patient.
Prendre soin de ClearView GO
Pour prendre soin de votre ClearView GO, suivez ces recommandations:
• Lorsque ClearView GO n'est pas utilisé et n'est pas connecté à une
alimentation externe, coupez toujours l'alimentation en appuyant sur le bouton
d'alimentation pendant deux secondes.
• Assurez-vous que votre ClearView GO est complètement éteint avant de le
nettoyer.
• Nettoyez ClearView GO avec un chiffon doux et sec ou un chiffon à
épousseter électrostatique. NE PAS utiliser de nettoyants liquides sur ses
surfaces en plastique.
• Pour prolonger la durée de vie de ClearView GO, retirez la batterie de
l'appareil s'il ne sera pas utilisé pendant une semaine ou plus.
• La vitre de protection recouvrant la caméra peut être nettoyée au besoin avec
le chiffon d'objectif fourni dans l'emballage de ClearView GO. NE PAS utiliser
de nettoyants liquides sur les surfaces en plastique. Aucune méthode
supplémentaire de stérilisation ou de nettoyage n'est recommandée ou
requise.
Transport de ClearView GO
Transportez l'appareil en saisissant fermement le corps principal du ClearView
GO lorsqu'il est en position repliée.
Avertissement: ne transportez pas ClearView GO par la tête de la caméra car
cela pourrait endommager votre appareil.

Optelec ClearView GO
Français 73
Le ClearView GO 15 ”est livré avec un étui de transport pratique pour le
transport. Pour éviter que l'appareil ne tombe accidentellement et ne soit
endommagé, remettez toujours le ClearView GO dans son étui de transport
lorsqu'il n'est pas utilisé. Débranchez et fixez tous les câbles avant de déplacer
l'appareil.
Précautions de sécurité mécaniques supplémentaires
Votre ClearView GO comporte des pièces mobiles. N'essayez pas de
repositionner ou d'ajuster de force les pièces. Cela pourrait endommager
l'appareil.
Remarque: Soyez prudent lorsque vous déplacez des pièces ou lorsque vous
transportez le ClearView GO pour éviter de vous blesser aux mains et aux
doigts.
Sensibilité aux interférences
Il peut y avoir une dégradation temporaire de l'image lorsque ClearView GO est
soumis à un fort champ de radiofréquences, une décharge électrostatique ou un
bruit électrique transitoire. Une décharge électrostatique (causée par de
l'électricité statique) peut provoquer un écran vide. Si cela se produit, procédez
comme suit:
• Débranchez l'adaptateur secteur de la prise électrique murale.
• Attendez 30 secondes.
• Rebranchez l'alimentation de l'adaptateur CC.
Précautions de sécurité électrique supplémentaires
Lisez ces précautions de sécurité avant d'utiliser ClearView GO:
• L'utilisation d'une alimentation autre que celle fournie par Optelec pour
ClearView GO annulera la garantie.
• Si vous utilisez une alimentation CC, le périphérique ClearView GO doit être à
proximité d'une prise murale facilement accessible.
• N'utilisez pas ClearView GO dans, près ou autour de l'eau. ClearView GO
n'est pas conçu pour offrir une protection contre le contact avec des liquides
de toute nature.
• Utilisez uniquement l'alimentation fournie avec votre ClearView GO.
L'utilisation de blocs d'alimentation non autorisés peut endommager
gravement les composants électroniques de ClearView GO.
• Eloignez toujours le cordon d'alimentation des zones de circulation pour éviter
d'endommager le bloc d'alimentation.

Optelec ClearView GO
74 Français
• Évitez tout risque de choc électrique en n'essayant PAS de démonter
l'appareil. Confiez tous les services à un centre de réparation agréé.
• Assurez-vous que vous effectuez toutes les connexions de câbles
appropriées.
Avis de conformité FCC
Cet appareil est conforme à la partie 15 des règles de la FCC. Son
fonctionnement est soumis aux deux conditions suivantes: (1) Cet appareil ne
doit pas provoquer d'interférences nuisibles et (2) cet appareil doit accepter toute
interférence reçue, y compris les interférences susceptibles de provoquer un
fonctionnement indésirable. Cet équipement a été testé et déclaré conforme aux
limites d'un appareil numérique de classe B, conformément à la partie 15 des
règles de la FCC. Ces limites sont conçues pour fournir une protection
raisonnable contre les interférences nuisibles dans une installation résidentielle.
Cet équipement génère, utilise et peut émettre de l'énergie radiofréquence et, s'il
n'est pas installé et utilisé conformément aux instructions, peut provoquer des
interférences nuisibles aux communications radio. Cependant, il n'y a aucune
garantie qu'aucune interférence ne se produira dans certains cas. Si cet
équipement provoque des interférences nuisibles à la réception radio ou
télévision, ce qui peut être déterminé en éteignant puis en rallumant
l'équipement, nous vous encourageons à essayer de corriger les interférences
par une ou plusieurs des mesures suivantes:
• Réorientez ou déplacez l'antenne de réception.
• Augmentez la distance entre l'équipement et le récepteur.
• Connectez l'équipement à une prise murale sur un circuit différent de celui
auquel le récepteur est connecté.
• Consultez le revendeur ou un technicien radio / TV expérimenté pour obtenir
de l'aide.
Les changements ou modifications non autorisés à ce système peuvent annuler
votre droit d'utiliser cet équipement.
Industry Canada (IC) Notice
Cet appareil numérique de la classe B est conforme à la norme NMB-003 du
Canada.
Cet appareil est enregistré CEM.
Cet appareil porte les sceaux d’approbation du CE et de la FCC, marque d’approbation KC.

Optelec ClearView GO
Italiano 75
ClearView GO
Manuale utente
Optelec
P.O. Box 399
2993 LT Barendrecht
The Netherlands
Telephone: +31 (0)88 6783 444
Fax +31 (0)88 6783 400
E-mail: info@optelec.nl
Website: www.optelec.com

Optelec ClearView GO
76 Italiano
Configurazione

Optelec ClearView GO
Italiano 77
1. Accensione/spegnimento
2. Manopola di ottimizzazione dell’immagine (regola luminosità e contrasto)
3. Pulsante di acquisizione dell’immagine
4. Manopola per l’ingrandimento
5. Pulsante Modalità Colori
6. Pulsante Colori reali
7. Tasto funzione Super
8. Schermo LCD
9. Telecamera
10. Lente per vicino (aprite lo sportellino per la visualizzazione da lontano)
11. Jack DC (inserire l’alimentatore qui per ricaricare la batteria)
12. Uscita HDMI
13. Manopola di posizionamento della telecamera
14. Luci a LED
Nota: Con la telecamera ⑨, cercate di evitare il deposito di materiale sulla lente.
Se c’è dello sporco, pulite la lente con il panno in microfibra in dotazione.

Optelec ClearView GO
78 Italiano
1. Introduzione
Complimenti per aver scelto di acquistare ClearView GO. ClearView GO offre la
stessa facilità d’uso e le funzionalità di un normale ingranditore da tavolo, ma in
un design compatto e ripiegabile. È la soluzione ideale per le persone che
necessitano di un ingrandimento in posti diversi. Con ClearView GO, è possibile
leggere testi e visualizzare oggetti comodamente, a casa, in ufficio, in classe o in
viaggio. Il suo design ripiegabile rende ClearView GO facilmente trasportabile.
1.1. Informazioni su questo manuale
Questo manuale aiuterà a prendere dimestichezza con le funzioni di ClearView
GO. Leggetelo attentamente prima di usare il prodotto. Se avete domande o
suggerimenti su come usare ClearView GO, contattate il vostro distributore
Optelec consultando la pagina sulle informazioni di contatto alla fine di questo
manuale.
1.2. Istruzioni prima dell’uso
La batteria deve essere caricata completamente prima di usare il dispositivo per
la prima volta. Collegate l’alimentatore in dotazione al jack in entrata per caricare
la batteria. Durante la ricarica, si accenderà una luce rossa. Una volta completata
la ricarica, la luce sarà verde.
Rimuovete la pellicola di protezione sullo schermo prima di usare l’unità. Verificate
che non ci sia nulla sulla lente della telecamera. Eventualmente, pulitela con il
panno in microfibra in dotazione.
1.3. Contenuto della confezione
La confezione di ClearView GO contiene i seguenti elementi. Se dovesse mancare
qualcosa, contattate il vostro distributore.
1. Videoingranditore portatile ClearView GO
2. Alimentatore
3. Borsa di trasporto (solo modello da 15”)
4. Manuale utente
5. Panno in microfibra

Optelec ClearView GO
Italiano 79
2. Iniziamo
2.1. Aprire ClearView GO
1. Posizionate il ClearView GO ripiegato su una superficie stabile.
2. Premete sul piatto della base con una mano, mentre usate l’altra mano per
sollevare la parte superiore della struttura del dispositivo.
3. Sollevate il braccio fino a quando non resta bloccato.
4. Posizionate entrambe le mani sui lati sinistro e destro del monitor LCD.
5. Tirate il monitor LCD verso di voi.
6. Tirate su il monitor LCD usando entrambe le mani e regolatelo per trovare la
posizione adatta.

Optelec ClearView GO
80 Italiano
2.2. Chiudere ClearView GO
1. Posizionate entrambe le mani sui lati sinistro e destro del monitor LCD.
2. Per chiudere ClearView GO, abbassate il monitor LCD con entrambe le mani.
3. Spingete il monitor LCD verso la struttura principale.
4. Posizionate entrambe le mani sulla parte superiore della struttura.
5. Abbassate la parte superiore della struttura fino a chiuderla.

Optelec ClearView GO
Italiano 81
2.3. Posizioni della telecamera
È possibile passare tra le varie modalità ruotando/regolando la manopola di
posizionamento della telecamera.
1. Modalità di lettura
2. Modalità visualizzazione da lontano (aprire lo sportellino della lente)
3. Modalità ritratto (modalità “a specchio”)

Optelec ClearView GO
82 Italiano
3. Pulsanti
1. Pulsante di accensione/spegnimento
Per accendere/spegnere il dispositivo, premete il pulsante per due secondi.
2. Manopola di ottimizzazione dell’immagine
Dà diverse funzioni:
• Quando si è in Modalità Colori Reali, ruotate la manopola per regolare la
luminosità dello schermo (cinque livelli).
• Quando si è in Modalità Colori a Contrasto Elevato, ruotate la manopola per
regolare il contrasto. Premetela per tornare all’impostazione predefinita.
• Per attivare/disattivare l’autofocus, premete e tenete premuto il pulsante per
due secondi.
3. Pulsante Acquisizione Immagine
Premete il pulsante di acquisizione immagine ③ per “catturare” l’immagine a
schermo.
• È possibile aumentare/diminuire l’ingrandimento dell’immagine acquisita e
regolarne colori e luminosità a schermo.
• Quando l’immagine è ingrandita, è possibile esplorare l’immagine tramite il
tasto funzione Super ⑦.
Premete ancora il tasto di acquisizione per tornare alla modalità “dal vivo”.
4. Manopola dell’ingrandimento
Per regolare l’ingrandimento, ruotate la manopola. Il livello di ingrandimento
dipende dalla dimensione dello schermo del ClearView GO in vostro possesso.
• ClearView GO 15”:
Ingrandimento: da 1.4x a 20x, da 2.0x a 32x (predefinito), o da 3.5x a 60x.
Ulteriore ingrandimento per l’immagine acquisita: 5.5x.

Optelec ClearView GO
Italiano 83
• ClearView GO 17”:
Ingrandimento: da 1.4x a 25x, da 2.3x a 35x (predefinito), o da 3.5x a 70x.
Ulteriore ingrandimento per l’immagine acquisita: 5.5x.
I vari livelli di ingrandimento possono essere impostati nel menu. Premete e
tenete premuta la manopola dell’ingrandimento per accedere al menu e
selezionate Intervallo ingrandimenti. Per maggiori informazioni su come fare
questa operazione, consultate la sezione “Intervallo ingrandimenti” nel capitolo
5.2.
5. Pulsante Modalità Colori
L’immagine a schermo può essere visualizzata in otto modalità colore differenti:
la modalità a colori reali e sette combinazioni di colore a contrasto elevato:
• Modalità a colori reali
• Testo bianco su sfondo nero
• Testo nero su sfondo bianco
• Testo giallo su sfondo nero
• Testo nero su sfondo giallo
• Testo verde su sfondo nero
• Testo blu su sfondo giallo
• Testo giallo su sfondo blu
Tramite il menu possono essere impostate fino 35 modalità colore.
6. Pulsante Colori reali
Premete il pulsante Colori reali ⑥ per visualizzare immagini o documenti a
colori reali.
Premete e tenete premuto il pulsante Colori reali ⑥ per usare la funzione di
ricerca con l’ingrandimento. La funzione di ricerca consente di disattivare
rapidamente l’ingrandimento per vedere tutta l’immagine. Rilasciando il
pulsante riporterete la telecamera al suo livello di ingrandimento originario.
7. Tasto Funzione Super
Viene usato per far scorrere l’immagine acquisita quando quest’ultima è
ingrandita, fate riferimento al capitolo 4.4.
Viene usato anche per selezionare ed applicare la funzione di righe/maschere.
Fate riferimento al capitolo 4.1.

Optelec ClearView GO
84 Italiano
4. Tasti rapidi e funzioni
4.1. Righe e maschere
Premete e tenete premuto il tasto funzione Super ⑦ per attivare o disattivare
Righe e Maschere. Quando Righe e Maschere è attiva, il tasto di direzione e la
manopola del tasto funzione Super agiscono ⑦ nel modo seguente.
• Sinistra e destra ◀ ▶ : Scegliete la funzione.
1. Riga orizzontale
2. Riga verticale
3. Maschera orizzontale
4. Maschera verticale
• Su e Giù ▲▼ : aumenta o diminuisce lo spessore di una riga e la distanza tra
le maschere.

Optelec ClearView GO
Italiano 85
• Ruotando la manopola sposterete la posizione della riga o della maschera.
1) In senso antiorario 2) In senso orario
4.2. Stato della batteria
Lo stato della percentuale di batteria rimasta non viene continuamente
visualizzato. L’icona di caricamento della batteria sarà mostrato quando è
collegato l’alimentatore.
Per controllare lo stato della percentuale di batteria rimasta, premete il pulsante di
acquisizione ③ per tre o più secondi.
4.3. Modalità di uscita HDMI
Quando viene collegato un cavo HDMI, lo schermo LCD rimarrà spento e
l’immagine sarà mostrata sul monitor esterno. È possibile alternare tra schermo
LCD e monitor esterno premendo il tasto funzione Super ⑦.

Optelec ClearView GO
86 Italiano
4.4. Esplorare l’immagine acquisita
Regolate l’ingrandimento al livello desiderato per inquadrare tutta la zona da
leggere. Dopodichè, premete il pulsante Acquisisci ③ per catturare l’immagine.
Quando premete la manopola dell’ingrandimento ④ mentre è visibile l’immagine
acquisita, apparirà una riga orizzontale. È possibile spostare questa riga ruotando
il tasto funzione Super ⑦.
È possibile ingrandire/diminuie le dimensioni dell’immagine tramite la manopola
dell’ingrandimento ④. Quando l’immagine è ingrandita, è possibile esplorarla
tramite i tasti direzionali su/giù e sinistra/destra, intorno al tasto funzione Super ⑦.
Quando vi spostate alla fine dell’immagine, potrete avanzare al paragrafo o alla
riga successivi rilasciando il tasto direzionale sinistro o destro e premendoli di
nuovo.
In qualsiasi momento, durante l’esplorazione dell’immagine, la posizione di lettura
corrente sarà visualizzata premendo e tenendo premuto il pulsante Colori reali ⑥.
La posizione dell’area ingrandita verrà mostrata all’interno di tutto il campo di
visualizzazione.
4.5. Modalità risparmio energetico
Se lasciate l’unità accesa e inutilizzata per 10 minuti, lo schermo LCD verrà spento
per preservare l’autonomia della batteria. Se l’unità non viene usata per altri tre
minuti, il dispositivo si spegnerà automaticamente. Per maggiori informazioni su
come regolare questi tempi, consultate la sezione “Modalità risparmio energetico”
al capitolo 5.3.

Optelec ClearView GO
Italiano 87
4.6. Selezione delle modalità di colore
Premete e tenete premuto il pulsante Modalità Colori ⑤ e ruotate la manopola
dell’ingrandimento ④ per vedere le modalità di colore disponibili. Per maggiori
informazioni su come selezionare i colori, consultate la sezione “Modalità Colori”
al capitolo 5.2.
• Pulsante Modalità Colori ⑤ + Manopola dell’ingrandimento ④, a destra:
Modalità colore successiva
• Pulsante Modalità Colori ⑤ + Manopola dell’ingrandimento ④, a sinistra:
Modalità colore precedente
• Premete il pulsante Modalità Colori ripetutamente per passare tra le varie
modalità di colore disponibili.
4.7. Modalità Visualizzazione Ritratto e da lontano
È possibile cambiare la modalità di visualizzazione spostando la telecamera con
la manopola di posizionamento della telecamera ⑬.
Modalità ritratto (Modalità “a specchio”)
Usate questa modalità quando la telecamera è rivolta verso di voi.
• La telecamera passerà automaticamente in modalità ritratto.
• L’intervallo di ingrandimento sarà ridotto al minimo.
• La telecamera passerà automaticamente alla modalità a colori reali.
Modalità visualizzazione da lontano
Usate questa modalità per visualizzare un oggetto distante, come una lavagna, ad
esempio. Quando usate questa modalità, aprite lo sportellino della lente.
• La telecamera passerà automaticamente in modalità visualizzazione da
lontano.
• L’intervallo di ingrandimento sarà ridotto al minimo.
• La telecamera passerà automaticamente alla modalità a colori reali.

Optelec ClearView GO
88 Italiano
5. Menu
Usate il menu per personalizzare il prodotto. Questa sezione descrive come
spostarsi nel menu e quali opzioni selezionare per cambiare l’aspetto di ClearView
GO.
5.1. Spostarsi nel menu
Premete e tenete premuto il centro della manopola dell’ingrandimento ④ per
accedere ed uscire dal menu.
Una volta nel menu, è possibile cambiare o salvare le impostazioni usando la
manopola dell’ingrandimento ④ o il tasto funzione Super ⑦.
• Spostatevi nel menu ruotando la manopola dell’ingrandimento ④ o il tasto
funzione Super ⑦.
• Selezionate un’opzione premendo il centro della manopola dell’ingrandimento
④ o il tasto funzione Super ⑦.
• Per tornare alla schermata precedente, premete e tenete premuto il centro della
manopola dell’ingrandimento ④ o del tasto funzione Super ⑦.
5.2. Opzioni del menu
Sono disponibili le opzioni seguenti: Modalità colori, Intervallo ingrandimenti,
Luminosità LED, Altre impostazioni, e Ripristina.
Nel menu Altre impostazioni, sono disponibili le opzioni seguenti: Lingua,
Velocità scorrimento acquisizione, Modalità Blocco Tasti, Personale e
pubblica e Modalità risparmio energetico.
Modalità colori
Usando l’opzione Modalità Colori, è possibile aggiungere o rimuovere le
combinazioni di colore a contrasto elevato preferite. L’impostazione predefinita
consiste in una selezione di sette modalità a contrasto elevato.
• Predefinito: Selezionate sette modalità colore a contrasto elevato.
• Esteso: Selezionate tutte e 35 le modalità colore.

Optelec ClearView GO
Italiano 89
Selezionate le modalità colore preferite tramite la manopola dell’ingrandimento ④
o il tasto funzione Super ⑦. Abilitate o disabilitate una modalità colore premendo
la manopola dell’ingrandimento ④. La modalità colore è abilitata quando è
cerchiata in rosso. La modalità colore è disabilitata quando è cerchiata in grigio.
Premete salva per applicare le modifiche fatte.
Intervallo ingrandimenti
Per ClearView GO 15”, l’intervallo predefinito per l’ingrandimento va da 2.0x a 32x.
È possibile impostare l’intervallo con questi valori:
Da 1.4x a 20x
Da 2.0x a 32x
Da 3.5x a 60x
Per ClearView GO 17”, l’intervallo predefinito per l’ingrandimento va da 2.3x a 35x.
È possibile impostare l’intervallo con questi valori:
Da 1.4x a 25x
Da 2.3x a 35x
Da 3.5x a 70x
Luminosità LED
Con questa opzione, è possibile regolare la luminosità dei LED con 11 livelli
differenti, inclusa l’opzione per disattivare completamente le luci.
Ripristina
Questo menu ripristina tutte le impostazioni ai valori predefiniti.

Optelec ClearView GO
90 Italiano
5.3 Altre impostazioni
Selezionando Altre impostazioni, sarà possibile regolare le funzioni seguenti:
Lingua, Velocità scorrimento acquisizione, Modalità Blocco Tasti, Personale
e pubblica, e Modalità risparmio energetico.
Per salvare le impostazioni aggiornate, selezionate Salva e esci o premete e
tenete premuto la manopola di ottimizzazione dell’immagine ②.
Lingua
Questo menu vi consente di selezionare la lingua preferita.
Velocità scorrimento acquisizione
Quando viene selezionata questa opzione, sarà possibile regolare la velocità di
scorrimento quando ci si muove nell’l’immagine “catturata”. In alternativa, usate la
manopola di ottimizzazione dell’immagine ②. Potete provare la velocità di
scorrimento in tempo reale usando il tasto funzione Super ⑦. Assicuratevi che sia
attivato l’ingrandimento per poter provare la velocità di scorrimento.
Modalità Blocco Tasti
Se selezionate Sì, saranno disponibili solo tre pulsanti: Manopola
dell’ingrandimento ④, Pulsante Modalità Colori ⑤, e Pulsante Colori Reali ⑥. Se
selezionate No, saranno disponibili tutti i pulsanti.
Personale e pubblica
In modalità Personale, tutte le impostazioni utente correnti personalizzate
saranno valide anche quando il dispositivo verrà riavviato. In modalità Pubblica,
tutte le impostazioni saranno ripristinate ai valori predefiniti quando il dispositivo
sarà riavviato. La modalità Pubblica è consigliata quando il dispositivo viene usato
da diverse persone, come in libreria.
Modalità risparmio energetico
Pe preservare l’autonomia della batteria è possibile regolare dopo quanto tempo
si spegnerà lo schermo LCD nei periodi di inattività. È anche possibile regolare
dopo quanto tempo si spegnerà il dispositivo. Le impostazioni predefinite sono:
• Tempo di spegnimento automatico LCD: 10 minuti.
• Tempo di spegnimento automatico: tre minuti.

Optelec ClearView GO
Italiano 91
Specifiche tecniche
ClearView GO 15”
Dimensioni schermo
15.6 pollici (396mm), 16:9 wide screen
Risoluzione LCD
1920 x 1080 (full HD)
Angolo di rotazione LCD
180 gradi
Specifiche telecamera
1920 x 1080, 60 fps
Autofocus
Dimensioni
Ripiegato: circa. 384 x 405 x 64 mm
In uso: circa 384 x 400 x 577 mm
(massima altezza)
Peso
4.8 kg
Modalità colore
Predefiniti 8, inclusi i colori reali (estesi 35)
Intervalli ingrandimento
Modalità immagine dal vivo: da 1.4x a 20x, da
2.0x a 32x (predefinito), o da 3.5x a 60x.
Ingrandimento ulteriore per l’immagine acquisita:
5.5x
Modalità telecamera
Vicino, Lontano, Modalità Ritratto
Capacità batteria
16.8V, 5200mAh
Peso batteria
400 g
Consumo
14~20W (in uso)
Autonomia batteria
5 ore
Intervallo alimentazione
in entrata per
l’alimentatore
100-240V, 50-60Hz, 1.7A
Intervallo alimentazione
in uscita per l’unità
DC +19V-3.42A
Connessioni
HDMI OUT

Optelec ClearView GO
92 Italiano
ClearView GO 17”
Dimensioni schermo
17.3 pollici (439mm), 16:9 wide screen
Risoluzione LCD
1920 x 1080 (Full HD)
Angolo di rotazione LCD
180 gradi
Specifiche telecamera
1920 x 1080, 60 fps
Auto focus
Dimensioni
Ripiegato: circa. 411 x 432 x 64 mm
In uso: circa. 411 x 445 x 653 mm
(massima altezza)
Peso
5.465 kg
Modalità colore
Predefiniti 8, inclusi i colori reali (estesi 35)
Intervalli ingrandimento
Modalità immagine dal vivo: da 1.4x a 25x, da
2.3x a 35x (predefinito), o da 3.5x a 70x.
Ingrandimento ulteriore per l’immagine acquisita:
5.5x
Modalità telecamera
Vicino, Lontano, Modalità Ritratto
Capacità batteria
16.8V, 5200mAh
Peso batteria
400 g
Consumo
14~20W (in uso)
Autonomia batteria
5 ore
Intervallo alimentazione
in entrata per
l’alimentatore
100-240V, 50-60Hz, 1.7A
Intervallo alimentazione
in uscita per l’unità
DC +19V-3.42A
Connessioni
HDMI OUT

Optelec ClearView GO
Italiano 93
Note per la sicurezza e la cura del prodotto
• Usi impropri del prodotto possono causare incendi, infortuni o danni seri.
• Non usate una presa di corrente danneggiata o una presa non appropriata per
evitare scosse elettriche o incendi.
• Non toccate la presa con mani umide o bagnate per evitare scosse elettriche.
• Un uso inappropriato del prodotto può provocare infortuni o danni all’unità.
• Usate solo l’alimentatore in dotazione con il prodotto. Altri alimentatori
potrebbero danneggiare l’unità.
• Non usate questa unità in ambienti umidi.
• Non posizionate oggetti pesanti sull’unità.
• Non provate a disassemblare, rimodellare o riparare l’unità. Potrebbe
danneggiarla ed annullarne la garanzia.
• Dopo sei (6) mesi d’utilizzo, la durata della batteria potrebbe ridursi.
• Tenete il prodotto lontano dalla luce diretta del sole e dalle alte temperature.
• Lo schermo potrebbe non funzionare correttamente.
• La temperatura operativa consigliata è tra 0 e 35 ℃ (32 ~ 95 ℉)
Precauzioni d’uso
• Seguite tutti gli avvisi, le attenzioni e le istruzioni indicate sul prodotto.
• Usate ClearView GO su una superficie piatta e stabile, come una scrivania o
un tavolo.
• Evitate di posizionare ClearView GO su una superficie non stabile, perché
potrebbe fare cadere il prodotto causando danni sia a voi che al prodotto
stesso.
• Usate ClearView GO solo in ambienti chiusi — il dispositivo non dovrebbe
essere esposto a cambiamenti climatici. Non posizionate ClearView GO vicino
a radiatori, caloriferi, o aree esposte per ore alla luce diretta del sole. Queste
condizioni potrebbero danneggiare l’elettronica o le ottiche del dispositivo.
• Una volta alla settimana, pulite ClearView GO con un panno morbido e
asciutto. NON usate liquidi o solventi sulle superfici in plastica. Non è
necessario nessun ulteriore metodo di sterilizzazione o di pulizia.
• Non usate ClearView GO vicino a materiale infiammabile.

Optelec ClearView GO
94 Italiano
Sicurezza e cura
Per la vostra sicurezza e per ottimizzare la vostra esperienza d’uso con
ClearView GO, attenetevi a queste indicazioni.
ClearView GO ingrandisce e migliora la visualizzazione di testi ed oggetti. La
capacità con cui il prodotto può migliorare la possibilità di vedere le immagini
dipendono dalle condizioni della singola persona e dal suo livello di ipovisione.
ClearView GO non è stato progettato per ridare la vista, per correggere delle
condizioni visive o per fermare la perdita della vista. Professionisti nella cura
della vista possono determinare l’utilità di ClearView GO per le condizioni del
singolo paziente.
Manutenzione di ClearView GO
Per la manutenzione di ClearView GO, seguite queste raccomandazioni:
• Quando ClearView GO non è in uso e non è collegato alla corrente, spegnete
sempre l’alimentatore premendo il pulsante di alimentazione per due secondi.
• Assicuratevi che ClearView GO sia completamente spento prima di pulirlo.
• Pulite ClearView GO con un panno asciutto morbido. NON usate liquidi o
solventi sulle superfici in plastica.
• Per ottimizzare la durata del prodotto, rimuovete la batteria dal dispositivo se
non viene usato da più di una settimana.
• Il vetro di protezione della telecamera può essere pulito con il panno in
dotazione con ClearView GO. NON usate liquidi o solventi sulle superfici in
plastica. Non è necessario nessun ulteriore metodo per pulire l’apparecchio.
Trasportare ClearView GO
Tenete il dispositivo afferrando il corpo principale di ClearView GO, una volta che
quest’ultimo è stato chiuso.
Attenzione: non prendete ClearView GO dalla testa della telecamera poiché
potreste danneggiare il dispositivo.
ClearView GO 15” ha in dotazione una borsa di trasporto. Per evitare che il
dispositivo cada accidentalmente, rimettete ClearView GO nella sua borsa
quando non lo usate. Scollegate tutti i cavi prima di spostare il dispositivo.

Optelec ClearView GO
Italiano 95
Avviso di conformità FCC
Questa apparecchiatura è stata collaudata ed è risultata conforme ai limiti per i
dispositivi digitali di Classe B, ai sensi della Parte 15 delle norme FCC. Questi
limiti sono indicati per fornire una ragionevole protezione contro interferenze
dannose nelle installazioni residenziali. Questa apparecchiatura genera, utilizza
e può irradiare energia a radiofrequenza e, se non installata e utilizzata secondo
le istruzioni, può causare interferenze dannose alle comunicazioni radio. Tuttavia
non vi è alcuna garanzia che tali interferenze non si verifichino in una particolare
installazione. Se questo apparecchio causasse interferenze dannose per la
ricezione radio o televisiva, che possono essere determinate accendendo e
spegnendo il dispositivo, si consiglia all’utente di provare a correggere
l’interferenza adottando una o più delle seguenti misure:
• Riorientare o riposizionare l’antenna ricevente.
• Aumentare la distanza tra l’apparecchio e il ricevitore
• Collegare l’apparecchiatura ad una presa su un circuito diverso da quello a cui
è collegato il ricevitore.
• Consultare il rivenditore o un tecnico radio/TV.
Cambiamenti o modifiche al sistema non autorizzate possono invalidare l’uso
dell’apparecchio da parte dell’utente.
Questa unità è un dispositivo registrato
EMC.
Questo è un dispositivo approvato CE, FCC, KC

Optelec ClearView GO
96 Italiano
Ulteriori precauzioni per la sicurezza
ClearView GO ha parti in movimento. Non provate a forzare il riposizionamento
di alcune parti. Potreste danneggiare il dispositivo.
Nota: fate attenzione quando spostate delle parti o quando trasportate ClearView
GO per evitare di farvi male alle mani o alle dita.
Suscettibilità alle interferenze
Potrebbe verificarsi una temporanea degradazione dell’immagine quando
ClearView GO si trova sotto ad un forte campo di frequenze radio, scariche
elettrostatiche, o disturbi elettrici transitori. Una scarica elettrostatica (causata da
elettricità statica) può far oscurare lo schermo. Se succedesse, fate quanto
segue:
1. Scollegate l’alimentatore dalla presa di corrente.
2. Aspettate 30 secondi.
3. Collegate l’alimentatore alla corrente.
Ulteriori precauzioni per la sicurezza
Leggete attentamente queste precauzioni prima di usare ClearView GO:
• Se usate un alimentatore diverso da quello in dotazione da Optelec per
ClearView GO annullerete la garanzia.
• Se usate l’alimentatore, ClearView GO dovrà essere vicino ad una presa di
corrente facilmente accessibile.
• Non usate ClearView GO in un’area dove c’è acqua. ClearView GO non è
stato progettato per essere protetto dal contatto con liquidi di qualsiasi tipo.
• Usate solo l’alimentatore fornito con ClearView GO. Se usate un alimentatore
non autorizzato potreste danneggiare i componenti di ClearView GO.
• Posizionate sempre il cavo della corrente lontano da aree trafficate.
• Evitate il rischio di shock elettrici nel tentativo di disassemblare il dispositivo.
Fate riferimento ad un centro di riparazione riconosciuto.
• Assicuratevi di fare i collegamenti corretti con i cavi.

Optelec ClearView GO
Español 97
ClearView GO
Manual de usuario
Optelec
P.O. Box 399
2993 LT Barendrecht
The Netherlands
Teléfono: +31 (0)88 6783 444
Fax +31 (0)88 6783 400
Correo electrónico: info@optelec.nl
Sitio Web: www.optelec.com

Optelec ClearView GO
98 Español
Configuración

Optelec ClearView GO
Español 99
1. Botón de Encendido/Apagado
2. Rueda de optimización de imagen (Ajustar brillo y contraste)
3. Botón de Captura
4. Rueda de Ampliación
5. Botón de Modo de color
6. Botón de Color natural
7. Tecla de Super función
8. Pantalla LCD
9. Cámara
10. Lente de cerca (abrir para visualización a distancia)
11. Conector de alimentación (inserte aquí el cable del alimentador para cargar
la batería)
12. Salida HDMI
13. Rueda de ajuste de posición de la cámara
14. Señales luminosas del LED
Nota: Por lo que respecta a la cámara ⑨, evite que se adhiera a la lente de la
cámara cualquier material extraño. Si esto ocurriera, deberá limpiar la lente con
la bayeta microfibra que se proporciona con el equipo.

Optelec ClearView GO
100 Español
1. Introducción
Gracias por adquirir ClearView GO. ClearView GO ofrece la misma
funcionalidad, facilidad de uso y comodidad para la lectura que un ampliador de
sobremesa pero en un diseño compacto y plegable. Se trata de un dispositivo
ideal para las personas que necesitan ampliación en distintos lugares y
situaciones. ClearView GO le permitirá leer texto y visualizar objetos en casa,
en la escuela, en la oficina o donde quiera que vaya. Gracias a su diseño
plegable, podrá llevarlo consigo o guardarlo fácilmente cuando no lo necesite.
1.1. Acerca de este manual
Este manual le ayudará a familiarizarse con las funciones y el manejo de
ClearView GO. Léalo atentamente antes de utilizar el dispositivo.
Si tiene preguntas o sugerencias acerca del uso de este producto, póngase en
contacto con su proveedor o con las oficinas centrales de Optelec haciendo uso
de la información que encontrará en la última página de este manual.
Apreciamos sus comentarios. Esperamos que disfrute de su ClearView GO.
1.2. Antes de utilizar el dispositivo
Deberá cargar completamente la batería antes de utilizar ClearView GO por
primera vez. Conecte el alimentador al dispositivo para cargarlo. Cuando el
dispositivo está en carga, aparece una luz roja. Cuando la carga está completa,
la luz será de color verde.
Despegue el plástico protector de la pantalla LCD antes de empezar a trabajar
con el dispositivo. Evite que se adhiera a la lente de la cámara cualquier material
extraño. Si esto ocurriera, deberá limpiar la lente con la gamuza microfibra que
se proporciona con el equipo.
1.3. Contenido de la caja
El embalaje de ClearView GO contiene los siguientes elementos. Si su caja no
contuviera alguno de estos elementos, póngase en contacto con su distribuidor.
1. Ampliador portátil
2. Alimentador
3. Funda de transporte (solo en el modelo de 15”)
4. Manual de usuario
5. Bayeta microfibra para la limpieza de la lente

Optelec ClearView GO
Español 101
2. Cómo empezar a trabajar
2.1. Abrir ClearView GO
1. Coloque ClearView GO plegado en una superficie estable tal como una mesa.
2. Presione la base con una mano y, con la otra, eleve la parte superior del
marco exterior del equipo.
3. Eleve el brazo hasta que encaje.
4. Coloque las manos en los laterales izquierdo y derecho del monitor LCD.
5. Tire del monitor LCD hacia usted.
6. Tire del monitor hacia arriba con ambas manos hasta ajustarlo a la posición
más adecuada para usted.
1.
2.
3.
4.
5.
6.

Optelec ClearView GO
102 Español
2.2. Cerrar ClearView GO
1. Coloque las manos en los laterales izquierdo y derecho del monitor LCD.
2. Para cerrar ClearView GO, baje el monitor LCD con ambas manos.
3. Empuje el monitor LCD hacia el marco exterior del equipo.
4. Coloque ambas manos en la parte superior del marco exterior.
5. Bájelo hasta que se cierre.
1.
2.
3.
4.
5.

Optelec ClearView GO
Español 103
2.3. Posiciones de la cámara
Puede conmutar entre los distintos modos ajustando/girando la rueda de
posición de la cámara.
1. Modo Lectura
2. Modo Visualización a distancia (abra la lente de cerca para ver a distancia)
3. Modo Autovisualización (modo Espejo)
1.
2.
3.

Optelec ClearView GO
104 Español
3. Botones
1. Botón de Encendido/Apagado
Para encender/apagar el dispositivo, pulse este botón durante dos
segundos.
2. Rueda de optimización de imagen
Realiza distintas funciones:
• En el modo Color Natural, gire el mando para ajustar el brillo de la
pantalla (cinco niveles).
• En los modos de color de alto contraste, gire el mando para ajustar el
contraste de la imagen. Púlselo para volver a la configuración
predeterminada.
• Para activar o desactivar el enfoque automático, mantenga el botón
pulsado durante dos segundos.
3. Botón de Captura
Pulse brevemente el botón de Captura ③ para congelar la imagen.
• Podrá aumentar o disminuir la ampliación de la imagen congelada, así
como ajustar el color y el brillo de la pantalla.
• Cuando la imagen está ampliada, podrá desplazar la imagen con la
Tecla de Super Función ⑦.
• Vuelva a pulsar el botón para volver al modo a tiempo real.
4. Rueda de Ampliación
Gire el mando para ajustar la ampliación. El nivel de ampliación depende
del tamaño del ClearView GO con el que trabaje.
1. 2. 3. 4. 5. 6. 7.

Optelec ClearView GO
Español 105
• ClearView GO 15”:
Ampliación: 1,4x a 20x, 2,0x a 32x (predeterminado), o 3,5x a 60x.
Ampliación adicional en imagen capturada: 5,5x.
• ClearView GO 17”:
Ampliación: 1,4x a 25x, 2,3x a 35x (predeterminado), o 3,5x a 70x.
Ampliación adicional en imagen capturada: 5,5x.
En el menú pueden fijarse distintos niveles de ampliación. Mantenga
pulsada la Rueda de ampliación para acceder al Menú y seleccione Rango
de ampliación para ajustarla. Para obtener más información acerca de
cómo hacer esto, consulte la sección "Rango de ampliación" en el capítulo
5.2.
5. Botón de Modo de color
La imagen en pantalla puede visualizarse en ocho modos de color, el modo
color natural y siete modos de alto contraste:
• Modo Color natural
• Texto blanco sobre fondo negro
• Texto negro sobre fondo blanco
• Texto amarillo sobre fondo negro
• Texto negro sobre fondo amarillo
• Texto verde sobre fondo negro
• Texto azul sobre fondo amarillo
• Texto amarillo sobre fondo azul
Desde el menú, puede definir hasta 35 modos de color.
6. Botón de Color Natural
Pulse el botón Color Natural ⑥ para ver documentos o imágenes en su
color natural.
Mantenga pulsado el botón Color Natural ⑥ para utilizar la función de
Búsqueda cuando la imagen está ampliada. La función de Búsqueda
permite alejar la imagen rápidamente para verla completa. Suelte el botón
para devolver la cámara al modo de ampliación anterior.
7. Tecla de Super función
• Se utiliza para desplazar la imagen congelada cuando está ampliada.
Consulte el capítulo 4.4.
• Se utiliza para seleccionar y aplicar la función de máscara/línea guía.
Consulte el capítulo 4.1.

Optelec ClearView GO
106 Español
4. Teclas rápidas y funciones
4.1. Línea guía y Máscara
Mantenga pulsada la tecla de Super Función ⑦ para activar o desactivar la línea
guía y la Máscara.
Cuando la Línea guía y la Máscara están activas, la Tecla de dirección y la
Rueda de la Tecla Super Función ⑦ funcionan de la forma siguiente.
• Izquierda y Derecha ◀ ▶ : Seleccione la función.
1) Línea horizontal
2) Línea vertical
3) Máscara horizontal
4) Máscara vertical
• Arriba y Abajo ▲▼ : Aumentar y disminuir el grosor de la línea y la distancia
entre las máscaras.

Optelec ClearView GO
Español 107
• Al girar la rueda, se desplazará la posición de la línea guía o la máscara.
1) En contra de las agujas del reloj 2) A favor de las agujas del
reloj
4.2. Estado de la batería
Normalmente no se muestra el porcentaje restante de carga de la batería.
Cuando el alimentador está conectado, se muestra el icono de batería en carga.
Para comprobar el estado de carga de la batería, pulse el botón de Capturar
imagen ③ durante tres segundos o más.
4.3. Modo HDMI OUT
Cuando se conecta el cable de salida HDMI, la pantalla LCD aparece en blanco
y la información se muestra en un monitor externo.
Puede conmutar entre la pantalla LCD y el monitor externo pulsando la Tecla de
Super Función ⑦.
4.4. Desplazar la imagen congelada
Ajuste el nivel de ampliación como desee para enmarcar toda el área que desea
leer. A continuación, pulse el botón de Capturar imagen ③ para congelar la
imagen.
Cuando se pulsa la Rueda de ampliación ④ en la imagen congelada, aparece
un marcador en forma de línea horizontal. puede desplazar esta línea girando la
Tecla de Super Función ⑦.
Podrá aumentar o disminuir la ampliación de la imagen congelada con la Rueda
de ampliación ④. Cuando la imagen está ampliada, puede desplazarse por la

Optelec ClearView GO
108 Español
imagen congelada con las teclas de dirección arriba/abajo e izquierda/derecha
que rodean a la Tecla de Super Función ⑦. Cuando se desplace al final de la
imagen congelada, puede avanzar al párrafo o línea siguientes soltando la tecla
de dirección izquierda o derecha y volviendo a pulsarla.
Mientras se desplaza por la imagen, podrá ver en cualquier momento la posición
actual de lectura manteniendo pulsado el botón de Color natural ⑥. El área
ampliada se mostrará en todo el campo de visión.
4.5. Modo Ahorro de batería
Si deja el dispositivo encendido y sin usar durante 10 minutos, la pantalla LCD
se apagará para ahorrar batería. Si el dispositivo continúa sin actividad durante
tres minutos más, se apagará automáticamente. para más información acerca
de cómo ajustar estos límites de tiempo, consulte la sección "Modo ahorro de
batería", en el capítulo 5.3.
4.6. Selección de modo de color
Para conmutar entre los distintos modos de color disponibles, mantenga pulsado
el botón de Modo de color ⑤ y gire la Rueda de ampliación ④. Para más
información acerca de la selección de colores, consulte la sección “Modo de
color” en el capítulo 5.2.
• Botón Modo de color ⑤ + Rueda de ampliación ④, Derecha: Siguiente modo
de color
• Botón Modo de color ⑤ + Rueda de ampliación ④, Izquierda: Modo de color
anterior
• Pulse el botón Modo de color repetidas veces para conmutar entre los
distintos modos de color disponibles.

Optelec ClearView GO
Español 109
4.7. Los modos Autovisualización y Visualización a
distancia
Puede cambiar el modo de visualización desplazando la cámara con la Rueda
de posición de la cámara.
Modo Autovisualización (modo Espejo)
Utilice este modo cuando la cámara apunte hacia usted.
• La cámara conmuta automáticamente al modo Espejo.
• Se minimiza el rango de ampliación.
• La cámara conmuta automáticamente al modo Color natural.
Modo Visualización a distancia
Este modo se utiliza para visualizar un objeto lejano, tal como una pizarra.
Cuando trabaje con este modo, abra la lente de cerca.
• La cámara conmuta automáticamente al modo Visualización a distancia.
• Se minimiza el ratio de ampliación.
• La cámara conmuta automáticamente al modo Color natural.

Optelec ClearView GO
110 Español
5. El Menú
El Menú permite configurar el dispositivo. En esta sección se explica cómo
navegar por el menú y seleccionar opciones para cambiar la configuración de
ClearView GO.
5.1. Navegación por el menú
Para entrar y salir del Menú, mantenga pulsado el centro de la Rueda de
ampliación ④. En el Menú, podrá modificar y guardar opciones de configuración
con la Rueda de ampliación ④ o la Tecla de Super Función ⑦.
• Desplácese por el menú girando la Rueda de ampliación ④ o la Tecla de
Super Función ⑦.
• Para seleccionar una opción, pulse el centro de la Rueda de ampliación ④ o
la Tecla de Super Función ⑦.
• Para volver a la pantalla anterior, mantenga pulsado el centro de la Rueda de
Ampliación ④ o de la Tecla de Super Función ⑦.
5.2. Opciones del Menú
El menú cuenta con las siguientes opciones: Modo de Color, Rango de
ampliación, Brillo del LED, Más opciones y Restablecer.
En el menú Más opciones están disponibles las opciones siguientes: Idioma,
Velocidad de desplazamiento de captura, Modo Bloqueo de teclas,
Personal y público y Modo Ahorro de energía.
Modo de color
Esta opción le permite agregar o eliminar sus combinaciones decolores de alto
contraste preferidas. De forma predeterminada se ofrece una selección de siete
modos de color de alto contraste.
• Predeterminados: Siete modos de color de alto contraste seleccionados
• Todos : Se seleccionan los 35 modos de color
Seleccione sus modos de color preferidos con la Rueda de ampliación ④ o la
Tecla de Super Función ⑦. para activar o desactivar un modo de color, pulse la
Rueda de ampliación ④. Los modos de color activados están marcados con un
círculo rojo. Los modos de color desactivados están marcados con un círculo
gris. Pulse guardar para aplicar los cambios efectuados.

Optelec ClearView GO
Español 111
Rango de ampliación
En ClearView GO 15”, el rango de ampliación predeterminado es 2,0x a 32x. El
rango de ampliación puede configurarse a:
• 1,4x a 20x
• 2,0x a 32x
• 3,5x a 60x
En ClearView GO 17”, el rango de ampliación predeterminado es 2,3x a 35x. El
rango de ampliación puede configurarse a:
• 1,4x to 25x
• 2,3x to 35x
• 3,5x to 70x
Brillo del LED
El brillo del LED puede ajustarse a 11 niveles distintos; uno de ellos permite
desactivar las luces por completo.
Restablecer
Restablece toda la configuración a los valores predeterminados.

Optelec ClearView GO
112 Español
5.3. Más opciones
En el menú Más opciones están disponibles las opciones siguientes: Idioma,
Velocidad de desplazamiento de captura, Modo Bloqueo de teclas,
Personal y público y Modo Ahorro de energía. Para guardar las nuevas
opciones de configuración, seleccione Guardar y salir o mantenga pulsada la
Rueda de optimización de la imagen ②.
Idioma
Este menú permite seleccionar el idioma preferido.
Velocidad de desplazamiento de la captura
Esta opción permite ajustar la velocidad de desplazamiento de la captura.
También puede utilizar la Rueda de optimización de la imagen ②. Podrá probar
la velocidad de desplazamiento en tiempo real con la Tecla de Super Función
⑦. Para poder probar la velocidad de desplazamiento, deberá aumentar la
ampliación.
Modo Bloqueo de Teclas
Si selecciona Sí, quedarán disponibles únicamente las 3 teclas siguientes: la
Rueda de Ampliación ④, el botón Modo de Color ⑤, y el botón Color Natural
⑥. Si selecciona No, todos los botones estarán disponibles.
Personal y Público
En el modo Personal , el dispositivo recordará todas las opciones de
configuración del usuario cuando se lo reinicie.
En el modo Público , las opciones de configuraciones vuelven a los valores de
fábrica cuando se reinicia el dispositivo. El modo Público se recomienda cuando
varias personas utilizan un mismo dispositivo, por ejemplo, en una biblioteca.
Modo Ahorro de batería
Para ahorrar batería, puede ajustar el límite de tiempo tras el cual la pantalla
LCD se apaga automáticamente tras un período de inactividad. También podrá
ajustar el tiempo tras el cual el dispositivo se apagará por completo. Las
opciones predeterminadas son:
• Apagado de la pantalla LCD, 10 minutos.
• Apagado del dispositivo, 3 minutos.

Optelec ClearView GO
Español 113
Especificaciones técnicas
ClearView GO 15”
Tamaño de la pantalla
LCD
15,6 pulgadas (396 mm),
pantalla panorámica 16 : 9
Resolución LCD
1920 x 1080 (HD)
Ángulo de rotación LCD
180 grados
Cámara Especificaciones
1920 x 1080, 60 fps, Enfoque automático
Dimensiones
384 x 405 x 64 mm (cerrado)
15,1 x 16 x 2,5 pulgadas (cerrado)
384 x 400 x 577(max) mm (abierto)
15,1 x 15,75 x 22,7(max) pulgadas (abierto)
Peso
4,8 kg / 10,65 lbs.
Modos de color
8 predeterminados, includo modo color natural
(ampliables hasta 35)
Rango de ampliación
1,4x a 20x, 2,0x a 32x (predeterminado), o 3,5x a
60x.
Ampliación adicional en imagen capturada: 5,5x.
Modo Cámara
Lectura, Visualización a distancia, Espejo
Capacidad de batería
16,8V, 5200mAh
Peso de la batería
400 g (0,90 lbs)
Consumo de energía
14~20W (en funcionamiento)
Potencia de entrada del
alimentador
100-240V, 50-60Hz, 1.7A
Potencia de salida del
equipo
DC +19V-3.42A
Duración de la batería
5 horas
Conectividad
HDMI OUT

Optelec ClearView GO
114 Español
ClearView GO 17”
Tamaño de la pantalla
LCD
17,3 pulgadas (439 mm),
pantalla panorámica 16 : 9
Resolución LCD
1920 x 1080 (HD)
Ángulo de rotación LCD
180 grados
Cámara
Especificaciones
1920 x 1080, 60 fps
Enfoque automático
Dimensiones
411 x 432 x 64 mm (cerrado)
16,2 x 17 x 2,5 pulgadas (cerrado)
411 x 445 x 653 (max) mm (abierto)
16,2 x 17,5 x 25,7 (max) pulgadas (abierto)
Peso
5,465 kg / 12,05 lbs.
Modos de color
8 predeterminados, includo modo color natural
(ampliables hasta 35)
Rango de ampliación
1,4x a 25x, 2,3x a 35x (predeterminado), o 3,5x a
70x.
Ampliación adicional en imagen capturada: 5,5x.
Modo Cámara
Lectura, Visualización a distancia, Espejo
Capacidad de batería
16,8V, 5200mAh
Peso de la batería
400 g (0,90 lbs)
Consumo de energía
14~20W (en funcionamiento)
Potencia de entrada del
alimentador
100-240V, 50-60Hz, 1.7A
Potencia de salida del
equipo
DC +19V-3.42A
Duración de la batería
5 horas
Conectividad
HDMI OUT

Optelec ClearView GO
Español 115
Advertencias de seguridad y normativa
• El uso indebido del producto puede provocar incendios, lesiones personales o
graves daños.
• Para evitar descargas eléctricas e incendios, no utilice enchufes dañados ni
tomas de corriente inadecuadas.
• para evitar descargas eléctricas, no toque los enchufes con las manos
mojadas.
• El uso indebido del equipo puede dañarlo o producir lesiones personales.
• Utilice únicamente el alimentador que se suministra con el producto. Otros
alimentadores pueden dañar el equipo.
• NO utilice el equipo en lugares húmedos tales como un baño.
• No coloque objetos pesados encima del equipo.
• No trate de desmontar, modificar ni reparar el equipo. Ello puede dañarlo e
invalida la garantía.
• La capacidad de la batería puede disminuir tras seis meses de uso.
• Mantenga el equipo alejado de temperaturas extremas y luz solar directa.
• la pantalla podría no funcionar correctamente.
• La temperatura recomendada para un buen funcionamiento es de 0 ~ 35 ℃
(32 ~ 95 ℉)
Este equipo es un dispositivo registrado EMC.
Este dispositivo lleva los indicadores de aprobación
de la CE y la FCC, KC

Optelec ClearView GO
116 Español
Precauciones de uso
• Siga todas las advertencias e instrucciones marcadas en el producto.
• Utilice ClearView GO en una superficie plana y estable tal como una mesa
sólida, como se indica en las especificaciones de su diseño..
• Evite colocar ClearView GO en una mesa inestable o móvil. Si el dispositivo
cae al suelo, podría dañarse o producir lesiones personales.
• Utilice ClearView GO solo en interiores — NO debe exponer el dispositivo a
cambios bruscos ni extremos de humedad y temperatura. No deje ClearView
GO cerca de un radiador, calefactor o en zonas en las que esté expuesto a la
acción directa de la luz solar durante horas. directa . Ello podría dañar la
electrónica o las lentes del equipo.
• Al menos una vez a la semana, limpie ClearView GO con un paño suave y
seco o con una gamuza electroestática. NO limpie las superficies de plástico
con ningún líquido. No se requieren ni recomiendan otros métodos de
esterilización ni limpieza.
• No utilice ClearView GO cerca de materiales ni líquidos inflamables.
Mantenimiento y seguridad
Para sacar el máximo partido de ClearView GO y no correr riesgos, revise con
atención las siguientes normas de seguridad.
ClearView GO amplía los objetos y mejora el texto para ofrecer más calidad de
vida a los deficientes visuales. Este dispositivo mejorará la capacidad para
visualizar imágenes en función del nivel de visión de cada usuario.
ClearView GO no está diseñado para restaurar la visión, corregir problemas
oculares ni detener la pérdida degenerativa de visión. Un profesional podrá
determinar la utilidad y adecuación de ClearView GO para cada paciente.

Optelec ClearView GO
Español 117
Mantenimiento de ClearView GO
Para mantener ClearView GO en buen estado, siga estas recomendaciones:
• Siempre que no esté utilizando ClearView GO y este no esté conectado a la
corriente, deberá apagarlo pulsando el botón de Encendido durante dos
segundos.
• Asegúrese de que ClearView GO está completamente apagado antes de
limpiarlo.
• Limpie ClearView GO con un paño suave y seco o una gamuza
electroestática. NO limpie las superficies de plástico con ningún líquido.
• para prolongar la vida útil de ClearView GO, extraiga la batería del dispositivo
si no va a usarlo durante un período de tiempo superior a una semana.
• El cristal protector que cubre la cámara puede limpiarse cuando sea
necesario con la gamuza que se suministra con ClearView GO. NO limpie las
superficies de plástico con ningún líquido. No se requieren ni recomiendan
otros métodos de esterilización ni limpieza
Transportar ClearView GO
Cuando esté plegado, transpórtelo sujetando con firmeza el dispositivo principal.
Advertencia: No sostenga ClearView GO por la cabeza de la cámara, ello
podría dañar el dispositivo.
ClearView GO 15” incluye funda de transporte. Para evitar caídas y daños,
guarde siempre ClearView GO en su funda cuando no esté utilizándolo.
Desconecte todos los cables antes de mover el dispositivo.
Otras precauciones mecánicas de seguridad
ClearView GO contiene piezas móviles. No intente forzarlas al ajustarlas. Ello
puede dañar el dispositivo.
Nota: Transporte ClearView GO y desplace las piezas con cuidado para no
lesionarse dedos o manos.

Optelec ClearView GO
118 Español
Posibilidad de interferencia
puede observarse una degradación temporal de la imagen si se somete a
ClearView GO a una campo de frecuencia de radio fuerte, a descarga
electroestática a ruido eléctrico transitorio. La pantalla puede quedarse en
blanco como consecuencia de una descarga electroestática. Si ocurre esto, siga
estos pasos:
1. Desconecte el alimentador de la red eléctrica.
2. Espere 30 segundos.
3. Vuelva a conectar el alimentador.
Otras precauciones eléctricas de seguridad
Lea estas precauciones de seguridad antes de utilizar ClearView GO.
• El uso de otro alimentador con ClearView GO que no sea el proporcionado
por Optelec invalidará la garantía.
• Si trabaja con batería, ClearView GO deberá estar cerca de un un enchufe al
que pueda accederse fácilmente.
• No use ClearView GO en el agua o cerca de ella. ClearView GO no está
diseñado para proteger frente al contacto con líquidos de ningún tipo.
• Utilice únicamente el alimentador de corriente proporcionado con ClearView
GO. El uso de alimentadores no autorizados puede dañar gravemente los
componentes electrónicos de ClearView GO.
• Mantenga siempre el cable de alimentación alejado de zonas con mucho
movimiento para evitar daños en el alimentador.
• Para evitar riesgos de descarga eléctrica NO intente desmontar el dispositivo.
para servicios de reparación, acuda a un organismo autorizado.
• Conecte los cables de forma adecuada.

Optelec ClearView GO
Deutsch 119
ClearView GO
Bedienungsanleitung
Optelec
P.O. Box 399
2993 LT Barendrecht
The Netherlands
Telephone: +31 (0)88 6783 444. Fax +31 (0)88 6783 400
E-mail: info@optelec.nl
Website: www.optelec.com

Optelec ClearView GO
120 Deutsch
Konfiguration

Optelec ClearView GO
Deutsch 121
1. Ein/Ausschalttaste
2. Bildqualitätssregler (ändert Helligkeit und Kontrast)
3. Schnappschusstaste
4. Vergrößerungsregler
5. Lesefarbentaste
6. Echtfarbentaste
7. Superfunktionstaste
8. TFT-Bildschirm
9. Kamera
10. Nahlinse (aufgeklappt für Distanzansicht)
11. DC-Buchse (Stecken Sie hier das Netzgerätkabel ein, um den Akku
aufzuladen)
12. HDMI Ausgang
13. Kamerapositionierungsrad
14. LED-Beleuchtung
Kamera ⑨: Achten Sie darauf, dass keine Fremdkörper am Kameraobjektiv
haften. Wenn sich Fremdkörper auf der Linse befinden, wischen Sie sie mit dem
mitgelieferten Mikrofasertuch ab.

Optelec ClearView GO
122 Deutsch
1. Einführung
Herzlichen Glückwunsch zur Wahl des ClearView GO. Der ClearView GO bietet
den gleichen Lesekomfort, dieselbe Benutzerfreundlichkeit und Funktionalität wie
ein Bildschirmlesegerät, jedoch in einem kompakten und faltbaren Design. Er ist
die ideale Lösung für Menschen, die an verschiedenen Orten ein
Bildschirmlesegerät benötigen. Mit dem ClearView GO können Sie Text und
Objekte bequem lesen. Zu Hause, im Büro, im Klassenzimmer oder unterwegs.
Durch das zusammenklappbare Design können Sie den ClearView GO ganz
einfach mitnehmen oder, wenn Sie ihn nicht benötigen, platzsparend
aufbewahren.
1.1. Über diese Anleitung
Dieses Handbuch hilft Ihnen, sich mit den Funktionen und der Bedienung des
ClearView GO vertraut zu machen. Bitte lesen Sie dieses Handbuch sorgfältig
durch, bevor Sie Ihren ClearView GO verwenden. Wenn Sie Fragen oder
Anregungen zur Verwendung dieses Produkts haben, wenden Sie sich bitte an
Ihre Optelec-Vertretung oder an die Optelec-Zentrale. Die Kontaktinformationen
finden Sie am Ende dieses Handbuchs. Wir freuen uns sehr über Ihr Feedback.
Wir wünschen Ihnen viel Freude mit Ihrem ClearView GO.
1.2. Vor dem ersten Gebrauch
Der Akku muss vor dem ersten Gebrauch vollständig aufgeladen sein. Schließen
Sie das mitgelieferte Netzteil an die DC-Eingangsbuchse an, um den Akku
aufzuladen. Während des Ladevorgangs leuchtet die Betriebs-LED neben dem
Netzgeräteanschluss an der Rückseite rot, nach Ende der Ladung grün.
Entfernen Sie die TFT-Schutzfolie, bevor Sie das Gerät verwenden. Achten Sie
darauf, dass keine Fremdkörper am Kameraobjektiv haften. Wenn sich
Fremdkörper auf der Linse befinden, wischen Sie sie mit dem mitgelieferten
Mikrofasertuch ab.

Optelec ClearView GO
Deutsch 123
1.3. Was ist in der Verpackung
Die ClearView GO-Verpackung enthält Folgendes:
1. Bildschirmlesegerät ClearView GO
2. Netzgerät
3. Transporttasche (nur bei dem ClearView GO mit 39,6cm (15.6 Zoll)
Bildschirm)
4. Bedienungsanleitung
5. Mikrofasertuch zur Reinigung des Displays
Sollte eines dieser Elemente in Ihrem Paket fehlen, wenden Sie sich bitte an
Ihren Händler.

Optelec ClearView GO
124 Deutsch
2. Erste Schritte
2.1. Öffnen des ClearView GO
1. Legen Sie den zusammengeklappten ClearView GO auf eine stabile
Oberfläche, beispielsweise einen Tisch.
2. Drücken Sie mit einer Hand auf die Grundplatte, während Sie mit der
anderen Hand die Oberseite des Stativrahmens anheben.
3. Heben Sie den Stativrahmen bis zum Anschlag an.
4. Fassen Sie die linke und rechte Seite des TFT-Bildschirms.
5. Ziehen Sie den TFT-Bildschirm zu sich heran.
6. Schieben Sie den TFT-Bildschirm mit beiden Händen nach oben und
stellen Sie ihn auf eine geeignete Position ein.
1.
2.
3.
4.
5.
6.

Optelec ClearView GO
Deutsch 125
2.2. Schließen des ClearView GO
1. Fassen Sie die linke und rechte Seite des TFT-Bildschirms.
2. Zum Zusammenklappen des ClearView GO drücken Sie den Bildschirm mit
beiden Händen hinunter.
3. Schieben Sie den TFT-Bildschirm in Richtung Stativrahmen.
4. Legen Sie beide Hände auf Sie die Oberseite des Stativrahmens.
5. Senken Sie die Oberseite des Stativrahmens ab, bis der ClearView GO
zusammengeklappt ist.
1.
2.
3.
4.
5.

Optelec ClearView GO
126 Deutsch
2.3. Kamerapositionen
Sie können die Kamerastellung ändern, indem Sie an dem
Kamerapositionierungsrad drehen.
1. Lesemodus: Drehen Sie die Kamera mit Hilfe dieses Drehrads so, dass
sie auf die Lesevorlage gerichtet ist.
2. Distanz, Fern bzw. Tafelkameramodus: Drehen Sie die Kamera mit Hilfe
dieses Drehrads so, dass sie auf ein Objekt oder die Tafel gerichtet ist.
Klappen Sie die Nahlinse dafür nach unten.
3. Selbstansichtmodus (Spiegelmodus): Drehen Sie die Kamera mit Hilfe
dieses Drehrads so, dass sie auf Sie selbst gerichtet ist.
1.
2.
3.

Optelec ClearView GO
Deutsch 127
3. Bedienungstasten
1. Ein/Aus Taste
Drücken Sie zum Ein/Ausschalten die Taste zwei Sekunden lang.
2. Bildqualitätsregler
Bietet verschiedene Funktionen.
1) Echtfarbenmodus: Drehen Sie den Knopf, um die Helligkeit der
Anzeige anzupassen (5 Schritte).
2) Lesefarbenmodus: Drehen Sie den Knopf, um die Einstellungen für
die Optimierung der Bildqualität anzupassen. Drücken Sie die Taste,
um zum Standard zurückzukehren.
3) Autofokus Ein/Aus: Drücken Sie diese Taste für 2 Sekunden.
3. Schnappschusstaste
Drücken Sie kurz die Schnappschusstaste und das Bild auf dem
Bildschirm wird eingefroren.
• Sie können das Standbild vergrößern / verkleinern sowie die Farbe
und die Bildschirmhelligkeit verändern.
• Wenn das Bild nochmals vergrößert wird, können Sie die vergrößerte
Darstellung mit der Superfunktionstaste ⑦ in alle Richtungen
verschieben.
Drücken Sie die Schnappschusstaste erneut um wieder das Livebild zu
erhalten.
4. Vergrößerungsregler
Drehen Sie den Regler um die Vergrößerung einzustellen. Die absolute
Vergrößerung ist abhängig von der Größe des Bildschirmes
(modellabhängig). Bei jedem Gerät gibt es 3 voreinstellbare
Vergrößerungsbereiche, die Sie über das Menü einstellen können.
• ClearView GO 15:
1.4-20fach, 2.0-32fach oder 3.5-60fach
1. 2. 3. 4. 5. 6. 7.

Optelec ClearView GO
128 Deutsch
Maximale zusätzliche digitale Vergrößerung im Schnappschuss-
Modus: Bild x 5,5.
• ClearView GO 17:
1.4-25fach, 2.3-35fach oder 3.5-70fach .
Maximale zusätzliche digitale Vergrößerung im Schnappschuss-
Modus: Bild x 5,5.
Halten Sie den Vergrößerungsregler länger gedrückt, um in das Menü zu
gelangen und wählen Sie Vergrößerungsbereich aus. Weitere
Informationen dazu finden Sie im Abschnitt „Vergrößerungsbereich“ in
Kapitel 5.2.
5. Lesefarbentaste
Das Bild kann in Echtfarben und sieben vorauswählbaren Lesefarben
angezeigt werden:
Echtfarbenmodus
Weißer Text auf schwarzem Hintergrund
Schwarzer Text auf weißem Hintergrund
Gelber Text auf schwarzem Hintergrund
Schwarzer Text auf gelbem Hintergrund
Grüner Text auf schwarzem Hintergrund
Blauer Text auf gelbem Hintergrund
Gelber Text auf blauem Hintergrund
Über das Menü können bis zu 35 Lesefarben eingestellt werden.
6. Echtfarbentasten
Drücken Sie die Echtfarbentaste, um Bilder oder Dokumente in natürlicher
Farbe anzuzeigen.
Drücken und halten Sie die Echtfarbentaste zum Verkleinern und Anzeigen
des Suchfelds auf dem Bildschirm. So erhalten Sie eine bessere Übersicht
um Objekte unter der Kamera schneller finden zu können. Nehmen Sie den
Finger von der Taste, um zur vorherigen Vergrößerungsstufe zu zoomen.
7. Superfunktionstaste
Verschieben des Standbildes im Schnappschussmodus. Weitere
Informationen dazu finden Sie in Kapitel 4.4.
Auswählen / Verwenden der Linien- / Abdeckfunktionen im Lesemodus.
Weitere Informationen dazu finden Sie in Kapitel 4.1.

Optelec ClearView GO
Deutsch 129
4. Kurztasten & Erweiterungen
4.1. Linien & Abdeckungen
Im Lesemodus drücken und halten Sie die Superfunktionstaste ⑦, um die Linien
und Abdeckungen zu aktivieren. Wenn die Linien und Abdeckungen aktiviert
sind, arbeiten die Bedienelemente der Superfunktionstaste ⑦ wie nachfolgend
erklärt.
• Links & Rechts ◀ ▶ : Wählen Sie die Funktion.
1. Horizontale Linie
2. Vertikale Linie
3. Horizontale Abdeckung
4. Vertikale Abdeckung
• Auf & Ab ▲▼ : Erhöhen oder verringern Sie die Dicke der Linie oder den
Abstand zwischen den Abdeckungen.

Optelec ClearView GO
130 Deutsch
Drehrad : Verändern Sie die Position der Linie oder Abdeckung.
1) Linksherum 2) Rechtsherum
4.2. Akkuanzeige
Der Status der verbleibenden Akkuleistung wird normalerweise nicht angezeigt.
Das Symbol zum Laden des Akkus wird angezeigt, wenn das Netzteil
angeschlossen ist.
Sie können den Status der verbleibenden Akkuladung ein- oder ausschalten,
indem Sie die Schnappschusstaste ③ für 3 Sekunden oder länger drücken.
4.3. HDMI OUT
Beim Anschließen eines externen Bildschirms an den HDMI-Ausgang bleibt der
eigene Bildschirm leer und das Bild wird auf dem externen Bildschirm angezeigt.
Sie können zwischen dem eigenen Bildschirm und einem externen Bildschirm
umschalten, indem Sie die Superfunktionstaste ⑦ drücken.

Optelec ClearView GO
Deutsch 131
4.4. Eingefrorenes Bild verschieben
Verstellen Sie die Vergrößerung bis Sie den gesamten Bereich, den Sie lesen
möchten, auf dem Bildschirm sehen. Drücken Sie dann die Schnappschusstaste
③, um das Bild einzufrieren.
Drücken Sie den Vergrößerungsregler ④ während der Darstellung eines
eingefrorenen Bildes, so wird eine horizontale Linie angezeigt. Diese kann durch
Drehen der Superfunktionstaste ⑦ verschoben werden.
Vergrößern Sie das eingefrorene Bild noch einmal mit dem Vergrößerungsregler
④, können Sie das vergrößerte, eingefrorene Bild zusätzlich mit den Links-,
Rechts-, Auf- und Abfunktionen der Superfunktionstaste ⑦ in alle Richtungen
verschieben. Wenn Sie von links nach rechts oder rechts nach links zum Ende
des Bildschirms kommen, drücken Sie erneut die Superfunktionstaste ⑦ in die
Richtung, in der Sie weiterschieben möchten, um automatisch zum nächsten
Absatz oder zur nächsten Zeile zu gelangen.Wenn Sie die Mitte der
Superfunktionstaste ⑦ drücken, gelangen Sie automatisch zum nächsten
Absatz oder zur nächsten Zeile.
Wenn das vergrößerte Bild verschoben ist, kann Ihre aktuelle Leseposition
jederzeit durch Drücken und Halten der Echtfarbentaste ⑥ angezeigt werden.
Die Position des vergrößerten Bereichs wird auf dem Bildschirm durch ein
umrandetes Rechteck dargestellt.
4.5. Stromsparmodus
Wenn Sie das Gerät für 10 Minuten eingeschaltet und unbenutzt lassen,
wechselt es automatisch in den Energiesparmodus. Wenn das Gerät nach dem
Aufrufen des Energiesparmodus 3 Minuten lang stehen gelassen wird, wird es
automatisch ausgeschaltet.
Weitere Informationen dazu finden Sie im Abschnitt „Stromspareinstellungen“ in
Kapitel 5.3.

Optelec ClearView GO
132 Deutsch
4.6. Lesefarbenauswahl
Drücken und Halten Sie die Lesefarbentaste ⑤ und drehen Sie den
Vergrößerungsregler, um zwischen den verfügbaren Lesefarben zu wechseln.
Weitere Informationen zur Auswahl der Lesefarben finden Sie im Kapitel
„Lesefarben“ in Kapitel 5.2.
• Lesefarbentaste ⑤ + Vergrößerungsregler ④, Rechts: Nächste Lesefarbe
• Lesefarbentaste ⑤ + Vergrößerungsregler ④, Links: Vorherige Lesefarbe
• Drücken Sie wiederholt die Taste Lesefarben ⑤, um durch die verfügbaren
Lesefarben zu blättern.
4.7. Selbstansicht & Tafelansicht
Sie können die Kamerastellung ändern, indem Sie die Kamera mit dem
Kamerapositionierungsrad ⑬ verdrehen.
Selbstansicht (Spiegelansicht)
Die Selbstansicht ist eingestellt, wenn die Kamera auf den Benutzer gerichtet ist.
Achten Sie bitte darauf dass bei der Drehung der Kamera auf die Selbstansicht
nicht der hochgestellte Bildschirm die Ansicht versperrt.
• Die Kamera wechselt automatisch in den Selbstansichtsmodus.
• Der Vergrößerungsbereich wird minimiert.
• Die Kamera wechselt automatisch in den Echtfarbenmodus.
Distanz bzw. Tafelkameraansicht
Die Distanzansicht ist eingestellt, wenn die Kamera in die Ferne (z.B. zur Tafel)
gerichtet ist. Zusätzlich klappen Sie noch die Nahlinse vor der Kamera weg.
• Die Kamera wechselt automatisch in den Distanzmodus.
• Das Vergrößerungsverhältnis wird minimiert.
• Die Kamera wechselt automatisch in den Echtfarbenmodus.

Optelec ClearView GO
Deutsch 133
5. Menü
Sie verwenden das Menü, um Ihren ClearViewGO anzupassen. In diesem
Kapitel wird beschrieben, wie Sie im Menü navigieren und Optionen auswählen,
um Funktionen Ihres ClearView GO zu verändern.
5.1. Menü Navigation
Halten Sie die Mitte des Vergrößerungsreglers ④ gedrückt, um das Menü
aufzurufen oder zu verlassen. Im Menü können Sie Einstellungen mit dem
Vergrößerungsregler ④ oder der Superfunktionstaste ⑦ ändern oder
abspeichern.
• Bewegen Sie sich im Menü, indem Sie den Vergrößerungsregler ④ oder die
Superfunktionstaste ⑦ drehen.
• Wählen Sie eine Option durch Drücken der Mitte des Vergrößerungsreglers ④
oder der Superfunktionstaste ⑦.
• Um zur vorherigen Menüanzeige zurückzukehren drücken und halten Sie bitte
den Vergrößerungsregler ④ oder die Superfunktionstaste ⑦.
5.2. Menüpunkte
Die folgenden Menüpunkte stehen zur Verfügung: Lesefarben,
Vergrößerungsbereich, Beleuchtung Helligkeit, Weitere Einstellungen und
Zurücksetzen.
Im Menü Weitere Einstellungen stehen folgende Optionen zur Verfügung:
Sprache, Geschwindigkeit Bild verschieben, Tastensperre, Persönlich und
Allgemein, und Stromspareinstellungen.
Lesefarben
Mit der Option Lesefarben können Sie Ihre bevorzugten kontrastreichen
Farbkombinationen hinzufügen oder entfernen. Die Standardeinstellung ist eine
Auswahl von sieben kontrastreichen Farbkombinationen.
• Standard: Sieben kontrastreiche Farbkombinationen ausgewählt
• Erweitert: Alle 35 Lesefarben ausgewählt

Optelec ClearView GO
134 Deutsch
Wählen Sie Ihre bevorzugten Farbkombinationen mit dem Vergrößerungsregler
④ oder der Superfunktionstaste ⑦. Aktivieren und deaktivieren Sie eine
Farbkombination durch Drücken des Vergrößerungsreglers ④. Eine
Farbkombination ist aktiviert, wenn sie rot eingerahmt ist. Eine Farbkombination
ist deaktiviert, wenn sie grau eingerahmt ist. Wählen Sie Speichern und drücken
den Vergrößerungsreglers ④, um die Auswahl zu übernehmen.
Vergrößerungsbereich
Für den ClearView GO 15 beträgt der Standardvergrößerungsbereich 2-32fach.
Sie können den Vergrößerungsbereich auf folgende Bereiche einstellen:
• 1,4-20fach
• 2-32fach oder
• 3.5–60fach.
Für den ClearView GO 17 beträgt der Standardvergrößerungsbereich 2.3-
35fach. Sie können den Vergrößerungsbereich auf folgende Bereiche einstellen:
• 1,4-25fach
• 2.3-35fach oder
• 3.5–70fach.
Beleuchtung Helligkeit
Mit dieser Option können Sie die LED-Helligkeit in 11 verschiedenen Stufen
einstellen, einschließlich des vollständigen Ausschaltens der LED-Beleuchtung.
Zurücksetzen
In diesem Menüpunkt können Sie alle Einstellungen auf die Standardwerte
zurücksetzen.

Optelec ClearView GO
Deutsch 135
5.3. Weitere Einstellungen
Im Menü Weitere Einstellungen stehen folgende Optionen zur Verfügung:
Sprache, Geschwindigkeit Bild verschieben, Tastensperre, Persönlich und
Allgemein, und Stromspareinstellungen.
Um Ihre aktualisierten Einstellungen zu speichern, wählen Sie Speichern und
Verlassen oder halten Sie den Bildqualitätssregler ② gedrückt.
Sprache
In diesem Menü können Sie Ihre bevorzugte Landessprache auswählen.
Geschwindigkeit Bild verschieben
Wenn diese Option ausgewählt ist, können Sie die Bildlaufschiebe-
geschwindigkeit anpassen. Verwenden Sie dazu den Bildqualitätssregler ②. Sie
können die Bildlaufgeschwindigkeit in Echtzeit mit der Superfunktionstaste ⑦
testen. Stellen Sie sicher, dass das Bild noch einmal vergrößert wurde, um die
Bildlaufgeschwindigkeit zu testen.
Tastensperre
Wenn Sie Ja auswählen, sind nur 3 Tasten benutzbar: Vergrößerungsregler ④,
Lesefarbentaste ⑤ und Echtfarbentaste ⑥.
Wählen Sie Nein und alle Tasten sind wieder freigegeben.
Persönlich und Allgemein
Im Persönlich-Modus werden alle aktuellen benutzerdefinierten
Benutzereinstellungen für jeden Neustart des Geräts übernommen.
Im Allgemein-Modus werden alle Einstellungen nach dem Neustart des Geräts
auf die werkseitigen Standardwerte zurückgesetzt. Der Allgemein-Modus wird
empfohlen, wenn ein Gerät von mehreren Personen, z. B. in einer Bibliothek,
verwendet wird.
Energiesparmodus Stromspareinstellungen
Um die Batterielaufzeit zu verlängern können Sie die Zeit einstellen, bevor sich
der Bildschirm und danach das Gerät ohne Benutzung automatisch ausschaltet.
Hinweis: Nur wenn Sie eine Zeit für den Bildschirm wählen kann das Gerät auch
nach der zusätzlich gewählten Zeit ganz ausschalten. Die Standardeinstellungen:
• Bildschirm automatisch ausschalten: 10 Minuten.
• Gerät automatisch ausschalten: weitere 3 Minuten.

Optelec ClearView GO
136 Deutsch
Technische Informationen
ClearView GO 15”
Bildschirmdiagonale
39,6cm (15.6 Zoll), 16:9 Breitbild
Bildschirmauflösung
1920 x 1080 (Full HD)
Seitenblickwinkel
180 Grad (Bildschirm)
Kamera
1920 x 1080, 60 Hz
Fokus
Autofokus
Abmessungen
384 x 405 x 64 mm (Transport)
384 x 400 x 577(max) mm (Betrieb)
Gewicht
4.8 kg
Darstellungsmodi
Standard 8 Farbkombinationen, einschließlich
Echtfarbe Foto Modus (erweitert 35)
Vergrößerung
Selbst wählbar: 1.4-20fach, 2-32fach (standard)
oder 3.5–60fach.
Zusätzliche digitale Vergrößerung im
Schnappschuss-Modus: Bild x 5.5.
Kameramodi
Lesemodus, Tafelbildmodus, Selbstansichtmodus
Akkukapazität
16.8V, 5200mAh
Akkugewicht
400 g
Leistungsverbrauch
14~20W (im Betrieb)
Akkulaufzeit
Bis 5 Stunden
Netz-Ladegerät
Eingang 100-240V, 50-60Hz, 1.7A
Ausgang DC +19V-3.42A
Anschlüsse
HDMI Ausgang

Optelec ClearView GO
Deutsch 137
ClearView GO 17”
Bildschirmdiagonale
43,9cm (17.3Zoll), 16:9 Breitbild
Bildschirmauflösung
1920 x 1080 (Full HD)
Seitenblickwinkel
180 Grad (Bildschirm)
Kamera
1920 x 1080, 60 Hz
Fokus
Autofokus
Abmessungen
411 x 432 x 64 mm (Transport)
411 x 445 x 653max) mm (Betrieb)
Gewicht
5.465 kg
Darstellungsmodi
Standard 8 Farbkombinationen, einschließlich
Echtfarbe Foto Modus (erweitert 35)
Vergrößerung
Selbst wählbar: 1.4-25fach, 2.3-35fach (standard)
oder 3.5–70fach.
Zusätzliche digitale Vergrößerung im
Schnappschuss-Modus: Bild x 5.5.
Kameramodi
Lesemodus, Tafelbildmodus, Selbstansichtmodus
Akkukapazität
16.8V, 5200mAh
Akkugewicht
400 g
Leistungsverbrauch
14~20W (im Betrieb)
Akkulaufzeit
Bis 5 Stunden
Netz-Ladegerät
Eingang: 100-240V, 50-60Hz, 1.7A
Ausgang: DC +19V-3.42A
Anschlüsse
HDMI Ausgang

Optelec ClearView GO
138 Deutsch
Sicherheits & Regulatorische Hinweise
• Nachlässiger Gebrauch oder Missbrauch des Produkts kann zu Feuer,
Verletzungen oder schweren Schäden führen.
• Verwenden Sie keinen beschädigten Netzstecker oder eine ungeeignete
Steckdose, um einen elektrischen Schlag oder Feuer zu vermeiden.
• Berühren Sie den Netzstecker nicht mit nassen Händen, um einen
elektrischen Schlag zu vermeiden.
• Ein Missbrauch des Produkts kann zu Verletzungen oder zur Beschädigung
des Geräts führen.
• Verwenden Sie nur den mit dem Produkt gelieferten Adapter. Andere Adapter
können das Gerät beschädigen.
• Verwenden Sie dieses Gerät nicht in feuchten Umgebungen wie Badezimmer
oder Duschräumen.
• Legen Sie keine schweren Gegenstände auf das Gerät.
• Versuchen Sie nicht, das Gerät zu zerlegen, umzubauen oder zu reparieren.
Dadurch kann das Gerät beschädigt werden und die Gewährleistung erlischt.
• Nach sechs (6) Monaten kann die Lebensdauer des Akkus verkürzt sein.
• Setzen Sie das Produkt keinem direkten Sonnenlicht und extremen
Temperaturen aus.
• Die Anzeige funktioniert möglicherweise nicht richtig.
•
Die empfohlene Betriebstemperatur liegt zwischen 0 und 35
C
Verwendungszweck: Der ClearView GO ist für Menschen mit einer
Sehbehinderung konzipiert.
Warnung: Wichtige diagnostische Entscheidungen sollten nicht aufgrund von
Bildern dieses Geräts basieren.
Wartungs oder Instandhaltungsarbeiten: Keine Wartungs- oder
Instandhaltungsarbeiten erforderlich.
Risiken und Nebenwirkungen: Keine bekannt.

Optelec ClearView GO
Deutsch 139
Vorsichtsmaßnahmen für den Gebrauch
• Befolgen Sie alle auf dem Produkt angegebenen Warnungen,
Vorsichtsmaßnahmen und Anweisungen.
• Verwenden Sie den ClearView GO auf einer stabilen, ebenen Oberfläche wie
einem stabilen Schreibtisch oder Tisch.
• Stellen Sie ClearView GO nicht auf einen instabilen Tisch, Wagen oder
Ständer. Er kann herunterfallen und schwer beschädigt werden oder Ihnen
Verletzungen zufügen.
• Verwenden Sie den ClearView GO nur in Innenräumen - er sollte NICHT
extremen oder schnellen Änderungen von Temperatur oder Luftfeuchtigkeit
ausgesetzt werden. Stellen Sie en ClearView GO nicht in der Nähe eines
Heizkörpers, einer Heizung oder in Bereichen auf, die lange Zeit direkter
Sonneneinstrahlung ausgesetzt sind. Diese Bedingungen können die
Elektronik, Mechanik oder Optik des Gerätes beschädigen.
• Es sind keine zusätzlichen Sterilisations- oder Reinigungsmethoden
empfohlen oder erforderlich.
• Verwenden Sie ClearView GO nicht in der Nähe von brennbaren Materialien
oder Flüssigkeiten.

Optelec ClearView GO
140 Deutsch
Sicherheit und Pflege
Lesen Sie diese Sicherheitsvorkehrungen sorgfältig durch, um Ihre Sicherheit zu
gewährleisten und den größtmöglichen Nutzen mit dem ClearView GO zu
erzielen.
ClearView GO vergrößert und verbessert Texte und Objekte, um die
Lebensqualität von Menschen mit einer Sehbehinderung zu verbessern.
Inwieweit dieses Produkt die Fähigkeit verbessern kann, Bilder zu sehen, hängt
vom individuellen Zustand und dem Grad der Sehbehinderung der
sehbehinderten Person ab.
Der ClearView GO wurde nicht entwickelt, um das Sehvermögen
wiederherzustellen, Augenerkrankungen zu korrigieren oder den degenerativen
Sehverlust zu stoppen. Ein Augenarzt kann den Nutzen und die Eignung von
dem ClearView GO für den individuellen Zustand eines Patienten bestimmen.
Die Pflege von dem ClearView GO
Befolgen Sie diese Empfehlungen, um Ihr ClearView GO zu pflegen:
• Wenn der ClearView GO nicht verwendet wird oder nicht an eine externe
Stromversorgung angeschlossen ist, schalten Sie die Stromversorgung immer
aus, indem Sie die Ein- / Aus-Taste zwei Sekunden lang drücken.
• Stellen Sie sicher, dass Ihr ClearView GO vollständig ausgeschaltet ist, bevor
Sie ihn reinigen.
• Reinigen Sie den ClearView GO mindestens einmal pro Woche mit einem
weichen, trockenen Tuch oder einem elektrostatischen Staubtuch. Verwenden
Sie KEINE flüssigen Reinigungsmittel auf den Kunststoffoberflächen.
• Das Schutzglas, das die Kamera abdeckt, kann bei Bedarf mit dem in der
Verpackung beiliegenden Objektivtuch gereinigt werden.

Optelec ClearView GO
Deutsch 141
Den ClearView GO transportieren
Tragen Sie das Gerät im zusammengeklappten Zustand!
Warnung: Tragen Sie den ClearView GO nicht am Kamerakopf, da dies zu einer
Beschädigung des Geräts führen kann.
Der ClearView GO wird mit einer praktischen Tragetasche für den Transport
geliefert. Wenn Sie den ClearView GO nicht mehr benutzen, legen Sie Ihn immer
wieder in die Tragetasche um zu verhindern, dass das Gerät versehentlich
herunterfällt und beschädigt wird. Trennen und sichern Sie alle Kabel, bevor Sie
den ClearView GO bewegen.
Zusätzliche mechanische Sicherheitsvorkehrungen
Ihr ClearView GO verfügt über bewegliche Teile. Versuchen Sie nicht, die Teile
gewaltsam neu zu positionieren oder einzustellen. Dies kann das Gerät
beschädigen.
Hinweis: Gehen Sie beim Bewegen von Teilen oder beim Transport des
ClearView GO vorsichtig vor, um mögliche Verletzungen von Händen und
Fingern zu vermeiden.

Optelec ClearView GO
142 Deutsch
FCC-Konformitätserklärung
Dieses Gerät entspricht Teil 15 der FCC-Bestimmungen. Der Betrieb unterliegt
den folgenden zwei Bedingungen: (1) Dieses Gerät darf keine störende
Emissionen verursachen, und (2) dieses Gerät muss immun gegen alle
empfangenen Störungen sein, einschließlich Störungen, die einen
unerwünschten Betrieb verursachen können. Dieses Gerät wurde getestet und
entspricht den Grenzwerten für digitale Geräte der Klasse B gemäß Teil 15 der
FCC-Bestimmungen. Diese Grenzwerte sollen einen angemessenen Schutz
gegen schädliche Störungen in einer Wohnanlage bieten. Dieses Gerät erzeugt
und verwendet Hochfrequenzenergie und strahlt diese möglicherweise aus.
Wenn es nicht gemäß den Anweisungen installiert und verwendet wird, kann es
zu Funkstörungen kommen. Es gibt jedoch keine Garantie dafür, dass in einigen
Fällen keine Interferenzen auftreten. Wenn dieses Gerät den Radio- oder
Fernsehempfang schädigt, das durch Aus- und Einschalten des Geräts
festgestellt werden kann, sollten Sie versuchen, die Störung durch eine oder
mehrere der folgenden Maßnahmen zu beheben:
• Richten Sie die Empfangsantenne Ihres empfangenden Gerätes (Radiogerät,
Fernsehgerät oder ähnl.) neu aus oder stellen Sie sie neu auf.
• Erhöhen Sie den Abstand zwischen Gerät und Empfänger.
• Schließen Sie das Gerät an eine Wandsteckdose an, die sich von dem
Stromkreis unterscheidet, an den der Empfänger angeschlossen ist.
• Wenden Sie sich an den Händler oder einen erfahrenen Radio- /
Fernsehtechniker.
Durch nicht autorisierte Änderungen oder Modifikationen an diesem System kann
Ihre Berechtigung zum Betrieb dieses Gerätes ungültig werden.
Dieses Gerät entspricht den gesetzlichen Anforderungen.
Dieses Gerät führt das CE und FCC, KC Label.

Optelec ClearView GO
Deutsch 143
Störanfälligkeit
Es kann zu einer vorübergehenden Verschlechterung des Bildes kommen, wenn
der ClearView GO einem starken Hochfrequenzfeld, einer elektrostatischen
Entladung oder einem vorübergehenden elektrischen Rauschen ausgesetzt ist.
Eine elektrostatische Entladung (verursacht durch statische Elektrizität) kann
dazu führen, dass der Bildschirm keinen Bildinhalt hat. Führen Sie in diesem Fall
die folgenden Schritte aus:
1. Trennen Sie die Stromversorgung des Netzgerätes von der Steckdose.
2. Warten Sie 30 Sekunden.
3. Schließen Sie das Netzgerät wieder an.
Sicherheitsvorkehrungen
Lesen Sie diese Sicherheitsvorkehrungen, bevor Sie den ClearView GO
verwenden:
• Wenn Sie ein anderes Netzgerät als das von Optelec für den ClearView GO
bereitgestellte verwenden, erlischt die Garantie.
• Bei Benutzung des Netzgerätes sollte sich der ClearView GO in der Nähe
einer leicht zugänglichen Steckdose befinden.
• Verwenden Sie den ClearView GO nicht in oder in der Nähe von Wasser. Der
ClearView GO bietet keinen Schutz gegen den Kontakt mit Flüssigkeiten
jeglicher Art.
• Verwenden Sie nur das mit Ihrem ClearView GO gelieferte Netzgerät. Die
Verwendung nicht autorisierter Netzgeräte kann die elektronischen
Komponenten des ClearView GO ernsthaft beschädigen.
• Verlegen Sie das Netzkabel nicht in der Nähe von Verkehrsbereichen, um
Schäden an der Stromversorgung zu vermeiden.
• Verhindern Sie die Gefahr eines Stromschlags, indem Sie NICHT versuchen,
das Gerät zu öffnen. Wenden Sie sich an eine autorisierte Reparaturwerkstatt.
• Stellen Sie sicher, dass Sie alle Kabel und Leitungen richtig verbinden.

Optelec ClearView GO
144 Deutsch
WEEE Richtlinie
Die WEEE-Richtlinie (Waste Electrical and Electronic Equipment; deutsch:
(Elektro- und Elektronikgeräte-Abfall) ist die EG-Richtlinie 2012/19/EU
(WEEE2) zur Reduktion der zunehmenden Menge an Elektronikschrott aus
nicht mehr benutzten Elektro- und Elektronikgeräten. Die EU-Richtlinie ist
am 15. Februar 2014 in Kraft getreten.
Oberstes Ziel dieser Richtlinie ist das Vermeiden, Verringern sowie
umweltverträgliche Entsorgen der zunehmenden Mengen an Elektro- und
Elektronikschrott.
Das WEEE Zeichen auf dem Produkt oder der Verpackung gibt an, dass
dieses Produkt nicht mit dem üblichen Haushaltsmüll entsorgt werden darf.
Sie sind dafür verantwortlich, Ihren Elektroabfall über eine speziell dafür
geeignete Sammelstelle für Wiederverwertung zu entsorgen. Getrennte
Sammlung und sachgerechte Behandlung in einer Verwertungsanlage hilft
uns, die Rohstoffe zu erhalten. Außerdem hilft die richtige Wiederverwertung
durch das WEEE System, die menschliche Gesundheit sicherzustellen. Für
mehr Informationen über das Wiederverwertungssystem für elektronische und
elektrische Geräte über Sammelstellen wenden Sie sich bitte an Ihre Stadt
oder Gemeindeverwaltung, den Haushalt-Abfallbeseitigungs-Dienst oder Ihren
Händler, von dem Sie das Gerät kauften.
Beachten Sie bitte, dass in der Bundesrepublik Deutschland die
Elektrogeräteentsorgung durch das Elektro- und Elektronikgerätegesetz –
ElektroG2 – geregelt ist.
RoHS Übereinstimmung
Dieses Produkt stimmt mit der Direktive 2011/65/EU des Europäischen
Parlaments und dem Europäischen Rat vom 03. Januar 2013 über die
Reduzierung gefährlicher Substanzen in elektrischen und elektronischen
Geräten (RoHS II) überein.

Optelec ClearView GO
Deutsch 145
Gewährleistungsbedingungen
Optelec garantiert, dass der ClearView GO ab dem Lieferdatum keine Material-
oder Verarbeitungsfehler aufweist.
Die Gewährleistung ist nicht übertragbar und gilt nicht für Gruppen, Mehrfach-
Anwender oder Agenturen. Der ClearView GO wurde für Endkunden bzw.
Einzelpersonen zur Verwendung zu Hause oder unterwegs konzipiert. Optelec
behält sich das Recht vor, den ClearView GO zu reparieren oder durch ein
ähnliches oder besseres Produkt zu ersetzen.
Eine Haftung von Seiten von Optelec oder seinen Vertretern für indirekte oder
direkte mittelbare Schäden ist in jedem Fall ausgeschlossen. Die dem
ursprünglichen Benutzer zustehenden Rechtsmittel beschränken sich auf den
Austausch des ClearView GO. Diese Gewährleistung ist nur unter der
Voraussetzung gültig, dass das Gerät in dem Land gewartet wurde, in dem es
gekauft wurde, und dass alle Versiegelungen unversehrt sind. Bitte wenden Sie
sich an Ihren Händler im Falle von zusätzlichen Gewährleistungsansprüchen
oder Wartungsmaßnahmen während oder nach der Laufzeit der Gewährleistung.
Optelec übernimmt keine Haftung für die Verwendung dieses Gerätes, wenn es
auf eine andere, zu den Beschreibungen in diesem Handbuch abweichende Art
und Weise verwendet wurde. Benutzen Sie den ClearView GO nicht wie in
diesem Handbuch beschrieben, so erlischt die Gewährleistung.

Optelec ClearView GO
146

Optelec ClearView GO
147
Contact
Optelec Europe
Pesetastraat 5a
2991 XT Barendrecht,
The Netherlands
T: +31 (0)88 6783 444
www.optelec.com
Optelec US
17757 US Highway 19 North,
Suite 560,
Clearwater, FL 33764
U.S.A.
T: +1 (800) 444-4443
www.optelec.com
Optelec NV
Baron Ruzettelaan 29
8310 Bruges
Belgium
T: +32 (0)50 35 7555
www.optelec.be
Optelec Canada
1812, Boulevard Marie-Victorin
Longueuil, QC J4G 1Y9
Canada
T: +1 (0)450 677-1171
www.optelec.ca
Optelec GmbH
Fritzlarer Strasse 25
34613 Schwalmstadt
Germany
T: +49 (0)6691 96170
www.optelec.de
Optelec Nederland BV
Pesetastraat 5a
2991 XT Barendrecht,
The Netherlands
T: +31 (0)88 6783 555
www.optelec.nl
Optelec UK
Unit C, Plot 5,
Merlin Way Quarry Hill Ind. Estate,
Ilkeston,
Derbyshire, DE7 4RA
United Kingdom
T: +44 (1923) 23 13 13
www.optelec.co.uk

441028-001
Rev. B
V3.1, December 2020
Copyright 2020 Optelec, the Netherlands
All rights reserved
-
 1
1
-
 2
2
-
 3
3
-
 4
4
-
 5
5
-
 6
6
-
 7
7
-
 8
8
-
 9
9
-
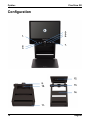 10
10
-
 11
11
-
 12
12
-
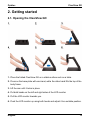 13
13
-
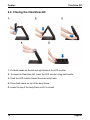 14
14
-
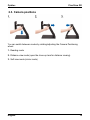 15
15
-
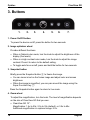 16
16
-
 17
17
-
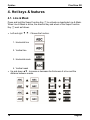 18
18
-
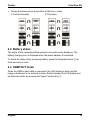 19
19
-
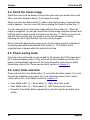 20
20
-
 21
21
-
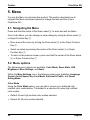 22
22
-
 23
23
-
 24
24
-
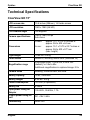 25
25
-
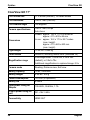 26
26
-
 27
27
-
 28
28
-
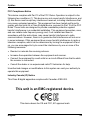 29
29
-
 30
30
-
 31
31
-
 32
32
-
 33
33
-
 34
34
-
 35
35
-
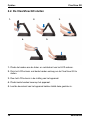 36
36
-
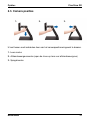 37
37
-
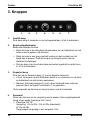 38
38
-
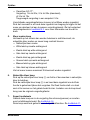 39
39
-
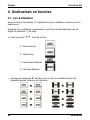 40
40
-
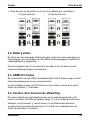 41
41
-
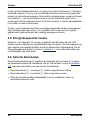 42
42
-
 43
43
-
 44
44
-
 45
45
-
 46
46
-
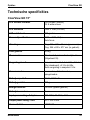 47
47
-
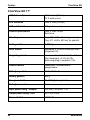 48
48
-
 49
49
-
 50
50
-
 51
51
-
 52
52
-
 53
53
-
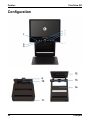 54
54
-
 55
55
-
 56
56
-
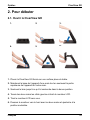 57
57
-
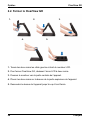 58
58
-
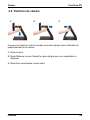 59
59
-
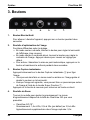 60
60
-
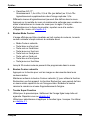 61
61
-
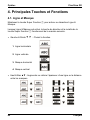 62
62
-
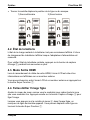 63
63
-
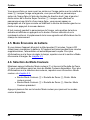 64
64
-
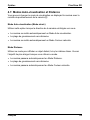 65
65
-
 66
66
-
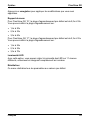 67
67
-
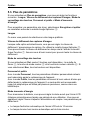 68
68
-
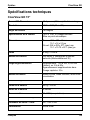 69
69
-
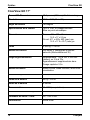 70
70
-
 71
71
-
 72
72
-
 73
73
-
 74
74
-
 75
75
-
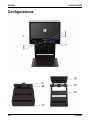 76
76
-
 77
77
-
 78
78
-
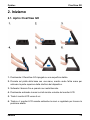 79
79
-
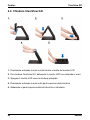 80
80
-
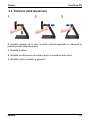 81
81
-
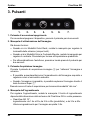 82
82
-
 83
83
-
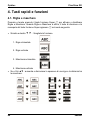 84
84
-
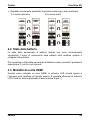 85
85
-
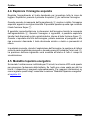 86
86
-
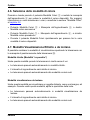 87
87
-
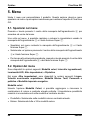 88
88
-
 89
89
-
 90
90
-
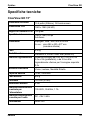 91
91
-
 92
92
-
 93
93
-
 94
94
-
 95
95
-
 96
96
-
 97
97
-
 98
98
-
 99
99
-
 100
100
-
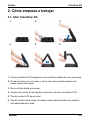 101
101
-
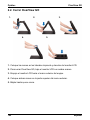 102
102
-
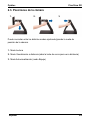 103
103
-
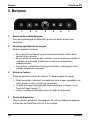 104
104
-
 105
105
-
 106
106
-
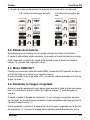 107
107
-
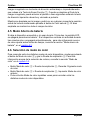 108
108
-
 109
109
-
 110
110
-
 111
111
-
 112
112
-
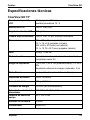 113
113
-
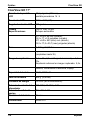 114
114
-
 115
115
-
 116
116
-
 117
117
-
 118
118
-
 119
119
-
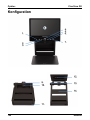 120
120
-
 121
121
-
 122
122
-
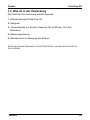 123
123
-
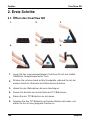 124
124
-
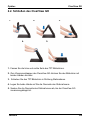 125
125
-
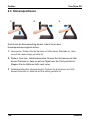 126
126
-
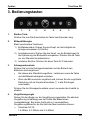 127
127
-
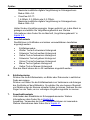 128
128
-
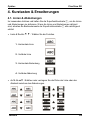 129
129
-
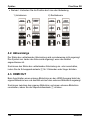 130
130
-
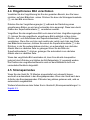 131
131
-
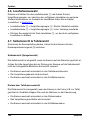 132
132
-
 133
133
-
 134
134
-
 135
135
-
 136
136
-
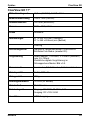 137
137
-
 138
138
-
 139
139
-
 140
140
-
 141
141
-
 142
142
-
 143
143
-
 144
144
-
 145
145
-
 146
146
-
 147
147
-
 148
148


Optelec ClearView GO Manual de usuario
- Categoría
- Encimeras
- Tipo
- Manual de usuario
En otros idiomas
- français: Optelec ClearView GO Manuel utilisateur
- italiano: Optelec ClearView GO Manuale utente
- English: Optelec ClearView GO User manual
- Deutsch: Optelec ClearView GO Benutzerhandbuch
- Nederlands: Optelec ClearView GO Handleiding