Aroma ACU-140S Manual de usuario
- Categoría
- Accesorios para hacer café
- Tipo
- Manual de usuario

SSttaaiinnlleessss SStteeeell
CCooffffeeee UUrrnn
Instruction Manual
Model # ACU-140S
www.AromaCo.com
CCaaffeetteerraa ddee aacceerroo
iinnooxxiiddaabbllee
Manual de instrucciones
Model # ACU-140S
www.AromaCo.com

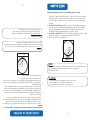
Congratulations on your purchase of the Stainless Steel Coffee Urn!
Ideal for a wide variety of social gatherings, the Stainless Steel Coffee Urn will
quickly brew up to 40 cups of delicious coffee or tea. Double-wall construction
keeps the urn’s exterior cool to the touch, while the coffee within the stainless
steel inner chamber stays hot and fresh.
Serving is simple with the drip-free spigot and the removable drip tray catches
any potential spills.
For more kitchen solution ideas, please visit us online at
wwwwww..AArroommaaCCoo..ccoomm
.
Pl
ease read all the instructions before first use.
Published By:
Aroma Housewares Co.
6469 Flanders Drive
San Diego, CA 92121
U.S.A.
1-800-276-6286
www.aromaco.com
© 2008 Aroma Housewares Company All rights reserved.
Felicitaciones por su compra de su cafetera de acero inoxidable.
Esta cafetera de acero inoxidable es ideal para diversas reuniones sociales y
prepara rápidamente hasta cuarenta tazas de café o té deliciosos. La
construcción de doble capa mantiene el exterior de la cafetera frío al tacto,
mientras que el café que está dentro del depósito interior de acero inoxidable se
mantiene caliente y delicioso.
Es sencillo servir el café con la espita que no gotea y la bandeja para goteo
removible que atrapa cualquier derrame potencial.
Para obtener más ideas para la cocina, visítenos en internet en
wwwwww..AArroommaaCCoo..ccoomm
.
Le
a todas las instrucciones antes de usar el producto por primera vez.
Publicado Por:
Aroma Housewares Co.
6469 Flanders Drive
San Diego, CA 92121
U.S.A.
1-800-276-6286
www.aromaco.com
© 2008 Aroma Housewares Company. Todos los derechos reservados.

MEDIDAS IMPORTANTES
DE SEGURIDAD
SSAAVVEE TTHHEESSEE IINNSSTTRRUUCCTTIIOONNSS
IIMMPPOORRTTAANNTT SSAAFFEEGGUUAARRDDSS
1
Basic safety precautions should always be followed when using electrical
appliances, including the following:
1. Important: Read all instructions before use.
2. Do not touch hot surfaces. Use handles or knobs.
3. Do not remove the lid when the coffee urn is brewing. Scalding may occur if
the lid is removed during the brewing cycle.
4. Never turn on the coffee urn when there is no water in the urn as it may burn
the product and cause permanent damage.
5. When filling with water, never exceed the maximum water line of the coffee
urn.
6. To protect against fire, electrical shock and injury to persons, do not immerse
cord, plug or the product in water or any liquid.
7. This appliance is not intended to be used by children. Close supervision is
necessary when the coffee urn is in use near children.
8. Unplug the coffee urn from outlet when not in use and before cleaning.
9. Allow the coffee urn to cool completely before putting on or removing any
parts and before cleaning.
10. Do not operate this appliance when the power cord or plug is damaged, if it
malfunctions, or is dropped or has been damaged in any manner. Contact
Aroma customer service for examination, repair or electrical/mechanical
adjustment.
11. Do not use outdoors.
12. Do not let cord hang over the edge of table and counter.
13. Do not let cord touch hot surfaces.
14. Do not place the coffee urn on or near a gas or electrical burner, or in a
heated oven.
15. Do not move or attempt to move the coffee urn while in use or when coffee is
hot.
16. Do not use this appliance for other than its intended use.
17. The use of accessory attachments not recommended or supplied by the
appliance manufacturer may result in fire, electric shock or injury to persons.
GUARDE ESTAS INSTRUCCIONES
1
Cuando se usen aparatos electricos, siempre deberán observarse las precau
ciones básicas de seguridad, incluyendo las siguientes:
1. Importante: Lea todas las instrucciones antes de utilizar el aparato.
2. No toque las superficies calientes. Use las asas o perillas.
3. No abra la tapa cuando la cafetera esté en el proceso de preparación del café.
Se pueden sufrir quemaduras si se quita la tapa durante el ciclo de preparación.
4. Nunca encienda la cafetera cuando no haya agua en la jarra porque puede
quemar el aparato y causarle daños permanentes.
5. Cuando está llenando con agua, nunca exceda la línea máxima de agua de la
cafetera.
6. Para evitar incendios, descargas eléctricas y daños personales, no sumerja el
cable, enchufe o el aparato en agua o ningún líquido.
7. Este aparato no está diseñado para ser utilizado por niños. La supervisión con
stante es indispensable cuando la cafetera se esté usando cerca de ellos.
8. Desenchufe la cafetera del tomacorriente cuando no esté en uso y antes de
limpiarla.
9. Deje que la cafetera se enfríe completamente antes de colocarle o quitarle
cualquier pieza y antes de limpiarla.
10. No opere este aparato si el cable o el enchufe eléctricos están dañados, si no
opera correctamente, si se ha caído o si ha sufrido cualquier tipo de daño.
Comuníquese con el servicio de atención al cliente de Aroma para solicitar una
revisión, reparación o ajuste eléctrico o mecánico.
11. No la utilice al aire libre.
12. No permita que el cable cuelgue por el borde de la mesa o encimera.
13. No permita que el cable toque superficies calientes.
14. No coloque la cafetera cerca de una resistencia de gas o eléctrica caliente, ni
en un horno caliente.
15. No mueva o intente mover la cafetera mientras esté en uso o si el café está
caliente.
16. No use el aparato para otro propósito que no sea su función específica.
17. El uso de accesorios no recomendados o proporcionados por el fabricante del
aparato puede causar incendios, descargas eléctricas o lesiones a las personas.

1. A short power-supply cord is provided to reduce the risks resulting from
becoming entangled in or tripping over a longer cord.
2. Longer extension cords are available and may be used if care is exercised in
their use.
3. If a longer extension cord is used:
a. The marked electrical rating of the extension cord should be at least as
great as the electrical rating of the appliance.
b. The longer cord should be arranged so that it will not drape over the
countertop or tabletop where it can be pulled by children or tripped over
unintentionally.
2
This appliance has a polarized plug (one blade is wider than the other); follow
the instructions below:
To reduce the risk of electric shock, this plug is intended to fit into a polarized
outlet only one way. If the plug does not fit fully into the outlet, reverse the plug.
If it still does not fit, contact a qualified electrician. Do not attempt to modify
the plug in any way.
If the supply cord is damaged, it must be replaced by the manufacturer, its
service agent or a similarly qualified person in order to avoid a hazard.
This appliance is for household use only.
SHORT CORD INSTRUCTIONS
POLARIZED PLUG
KEEP AWAY
FROM CHILDREN!
DO NOT DRAPE CORD!
1. Se proporciona un cable eléctrico corto con el propósito de reducir el
riesgo de tropezarse o enredarse con un cable más largo.
2. Hay cables de extensión más largos disponibles y deben ser usados con
sumo cuidado.
3. Si se usa un cable de extensión más largo:
a. La clasificación eléctrica marcada en el cable de extensión debe ser
por lo menos igual que la clasificación eléctrica del aparato.
b. El cable más largo debe ser colocado de manera que no cuelguepor
el borde del mostrador o mesa en donde pudiera ser jalado por un
niño o alguien pudiera tropezarse con el cable sin querer.
2
Si este aparato tiene ploya polarizada:
Para reducir el riesgo de descarga eléctrica, este ploya intencionalmente solo
debe de enchufar un lado en enchufes de luz de ploya polarisada. Si la clavija
no entra completamente, da vuelta a la clavija. Si aun la clavija no puede
entrar, llame a un electricista calificada. No intente de modificar la clavija, es
muy peligroso.
Si esté estropeado el cordón eléctrico, hay que ser reemplazado por el fabri-
cante o su agencia de servicio u otra persona calificada para hacer que se
evita cualquier peligro.
ESTE APARATO ES PARA USO DOMÉSTICO.
¡MANTENGALO
LEJOS DE LOS
NINOS!
¡NO DEJE QUE EL CABLE
CUELGUE!
INSTRUCCIONES DE CABLE CORTO
PLOYA POLARIZADA

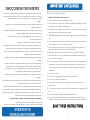
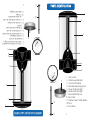
PPAARRTTSS IIDDEENNTTIIFFIICCAATTIIOONN
1. Lock-on Lid
2. Water Level Indicator
3. Cool-Touch Exterior
4. Non-Drip Dispensing Spout
5. Power Indicator Light
6. Ready Indicator Light
7. Removable Drip Tray
8. Stem Well
9. Stainless Steel Coffee Basket
10.Stem
11.Stem Base
3
1
2
3
4
5
6
7
9
10
11
8
IDENTIFICACION DE LAS PARTES
1. Tapa con cierre de seguridad
2. Indicador del nivel de agua
3. Exterior frío al tacto
4. Surtidor antigoteo
5. Luz indicadora de Encendido
6. Luz Indicadora de Listo
7. Bandeja removible para
goteo
8. Cavidad del vástago
9. Canasta de filtrado de café
de acero inoxidable
10. Vástago
11.Base del vástago
3
1
2
3
4
5
6
7
9
10
11
8

1. Place the urn upright on a dry, sturdy and
heat-resistant surface.
2. Fill the urn with cold water in accordance with the
amount of coffee needed. See the “Coffee/Tea
Measuring Chart” on page 6 for reference.
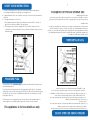
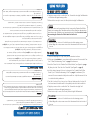
3. Insert the ‘Stem’ into the ‘Stainless Steel Coffee Basket’
(see Figure A), then place the ‘Stem’ into the ‘Stem
Well’ (see Figure B).
4. Spread the desired amount of ground coffee evenly
into the ‘Stainless Steel Coffee Basket’ (see
“Coffee/Tea Measuring Chart” on page 6 for
reference). Use a standard U.S. measuring cup (250ml)
for measuring coffee. The amount recommended in
the “Coffee/Tea Measuring Chart” will produce mild
coffee. Adjust the amount of coffee to match individual preference.
5. Twist the ‘Lock-on Lid’ in place on top of the urn. Make sure the ‘Lock-on Lid’
has been turned clockwise until it is completely locked into the handle slots.
CONTINUED ON NEXT PAGE
4
1. Read all the instructions and important safeguards.
2. Remove all packaging materials; make sure all your items are received in
good condition.
3. Wash the inner urn and all accessories with warm, soapy water using a sponge
or dishcloth.
4. Rinse thoroughly to remove soapy residue.
5. Wipe body clean with a damp cloth.
Ø Do not use abrasive cleaners or scouring pads.
Ø Do not immerse the appliance, cord or plug in water at any time.
UUSSIINNGG YYOOUURR UURRNN
BBeeffoorree FFiirrsstt UUssee::
TTOO MMAAKKEE CCOOFFFFEEEE::
Figure A
Figure B
NOTE:
For best results, use coarsely ground coffee. Avoid using extremely fine grounds.
1. Coloque la cafetera verticalmente en una superficie
seca, firme y resistente al calor.
2. Llene la jarra con agua fría según la cantidad de
café que desee preparar. Consulte la “tabla para
medir el café y el té” en la página 6 como referencia.
3. Coloque el “vástago” en la “canasta de filtrado de
café de acero inoxidable” (consulte la Figura A),
luego coloque el “vástago” en la “cavidad del
vástago” (consulte la Figura B).
4. Distribuya uniformemente la cantidad recomendada
de café molido en la “canasta para el café de acero
inoxidable” (consulte la “tabla para medir el café y el
té” en la página 6 como referencia). Use una taza
estándar (según el sistema de medidas
estadounidense, unos 250 ml) para medir el café. La cantidad recomendada
en la “tabla para medir el café y el té” producirá café no muy fuerte. Ajuste la
cantidad de café al gusto individual.
5. Gire la “tapa con cierre de seguridad” en su lugar sobre la cafetera.
Asegúrese de que la “tapa con cierre de seguridad” se haya girado en la
dirección de las manecillas del reloj hasta que esté completamente cerrada
en las ranuras de las asas.
CONTINUO EN LA PÁGINA SIGUIENTE
4
1. Lea todas las instrucciones y las precauciones importantes.
2. Retire todos los materiales de embalaje; asegúrese de que todos los artículos
recibidos estén en buenas condiciones.
3. Lave el depósito interior y todos los accesorios con agua tibia y jabón usando
una esponja o paño limpio.
4. Enjuague a fondo para eliminar todo resto de jabón.
5. Limpie la parte exterior con un paño húmedo.
Ø No use limpiadores abrasivos ni estropajos.
Ø No sumerja la cafetera, el cable ni el enchufe en agua.
PPAARRAA PPRREEPPAARRAARR CCAAFFÉÉ::
Figura A
Figura B
NOTA:
Para obtener mejores resultados, use café molido que no sea demasiado fino. Evite el
uso de un molido extremadamente fino.
COMO USAR LA CAFETERA
Antes de usarla por primera vez:

CAUTION:
• Never open the ‘Lock-on Lid’ while the urn is in the brewing process.
• When filling with water, never exceed the ‘Maximum Water Line’ inside of
the urn.
TTOO MMAAKKEE CCOOFFFFEEEE ((CCOONNTT..))::
UUSSIINNGG YYOOUURR UURRNN
6. Plug the power cord into a wall outlet. The ‘Power Indicator Light’ will illuminate
and the urn will begin brewing coffee.
7. When coffee is ready to serve, the ‘Ready Indicator Light’ will illuminate.
NOTE:
If the urn is to be in use for several hours, it is best to remove the ‘Stainless Steel Coffee
Basket’ prior to serving coffee. This will prevent the oil of the coffee from dripping down,
which may create a bitter flavor over an extended period of time. Use extreme caution
when removing the ‘Stainless Steel Coffee Basket’ as it will be hot.
TTOO MMAAKKEE TTEEAA::
1. Place the urn upright on a dry, sturdy and heat-resistant surface.
2. Fill the urn with cold water in accordance with the amount of tea needed. See
the “Coffee/Tea Measuring Chart” on page 6 for reference.
3. Insert the ‘Stem’ into the ‘Stainless Steel Coffee Basket’ (see Figure A on page
4), then place the ‘Stem’ into the ‘Stem Well’ (see Figure B on page 4).
4. Add the desired amount of tea or tea bags into the ‘Stainless Steel Coffee
Basket’ (see “Coffee/Tea Measuring Chart” on page 6 for reference). The
amount of tea recommended will produce mild tea. Adjust the amount of tea
to match individual preference.
5. Twist the ‘Lock-on Lid’ in place on top of the urn. Make sure the ‘Lock-on Lid’
has been turned clockwise until it is completely locked into the handle slots.
6. Plug the power cord into a wall outlet. The ‘Power Indicator Light’ will
illuminate and the urn will begin brewing tea.
7. When tea is ready to serve, the ‘Ready Indicator Light’ will illuminate.
CAUTION:
• Never open the ‘Lock-on Lid’ while the urn is in the brewing process.
• When filling with water, never exceed the ‘Maximum Water Line’ inside of
the urn.
5
PRECAUCIÓN:
• Nunca abra la “tapa con cierre de seguridad” mientras la cafetera esté en proceso de
preparar el café.
• Cuando la está llenando con agua, nunca exceda la “línea máxima de agua”dentro
de la cafetera.
PPAARRAA PPRREEPPAARRAARR CCAAFFÉÉ ((CCOONNTT..))::
6. Conecte el enchufe a un tomacorriente de pared. Se encenderá la “luz indicadora de
Encendido” y la cafetera comenzará a preparar el café.
7. Cuando el café esté listo para servir, la “luz indicadora de Listo” se encenderá.
NOTA:
Si se va a utilizar la cafetera durante varias horas, es mejor quitar la “canasta de filtradode café de
acero inoxidable” antes de servir el café. Esto evitará que el aceite del café gotee en el café
preparado y que produzca un sabor amargo en un lapso de tiempo extendido. Proceda con
extrema precaución cuando retire la “canasta de filtrado de café de acero inoxidable” porque
estará caliente.
PPAARRAA PPRREEPPAARRAARR TTÉÉ::
1. Coloque la cafetera verticalmente en una superficie seca, firme y resistente al calor.
2. Llene la jarra con agua fría según la cantidad de té que desee preparar.
Consulte la “tabla para medir el café y el té” en la página 6 como referencia.
3. Coloque el “vástago” en la “canasta de filtrado de café de acero inoxidable”
(consulte la Figura A en la página 4), luego coloque el “vástago” adentro del
“cavidad del vástago” (consulte la Figura B en la página 4).
4. Agregue la cantidad deseada de té o de bolsitas de té en la “canasta de filtrado de
café de acero inoxidable” (Consulte la “tabla para medir el café y el té” en la página 6
como referencia). La cantidad de té recomendada producirá un té no muy fuerte.
Ajuste la cantidad de té al gusto individual.
5. Gire la “tapa con cierre de seguridad” en su lugar sobre la cafetera. Asegúrese de que
la “tapa con cierre de seguridad” se haya girado en la dirección de las manecillas del
reloj hasta que esté completamente cerrada en las ranuras de las asas.
6. Conecte el enchufe a un tomacorriente de pared. Se encenderá la “luz indicadora de
Encendido” y la cafetera comenzará a preparar el té.
7. Cuando el té esté listo para servir, la “luz indicadora de Listo” se encenderá.
5
PRECAUCIÓN:
• Nunca abra la “tapa con cierre de seguridad” mientras la cafetera esté en proceso de
preparar el café.
• Cuando la está llenando con agua, nunca exceda la “línea máxima de agua” dentro de la
cafetera.
COMO USAR LA CAFETERA

6
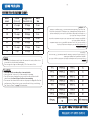
UUSSIINNGG YYOOUURR UURRNN
Water
Level
Coffee
(Ground)
Bagged Tea
(Standard Size)
Loose
Tea
40 2½ cups 37 Bags 3¾ oz.
36 2 cups 33 Bags 3⅓ oz.
30 1¾ cups 30 Bags 3 oz.
24 1½ cups 23 Bags 2¼ oz.
22 1½ cups 20 Bags 2 oz.
18 1¼ cups 17 Bags 1¾ oz.
14 1 cup 10 Bags 1 oz.
CCOOFFFFEEEE//TTEEAA MMEEAASSUURRIINNGG CCHHAARRTT::
CAUTION:
• Do not operate the urn when there is no water inside.
• Never open the ‘Lock-on Lid’ of the urn while it is brewing.
• Turn off the urn and unplug the power cord from the electrical outlet
when there is less than 2 cups of coffee or tea remaining.
• The urn must be cleaned after each use. Improper cleaning will affect the
performance of the product or may cause the unit to stop percolating.
See “How to Clean” on page 7 for instructions.
NOTE:
• This chart is for reference only. Adjust the amount of water, coffee or tea
as needed to suit individual preferences.
• The average tea bag contains roughly 1/10 of an ounce of tea.
6
Nivel de agua Café (molido)
Té
empaquetado
Té flojo
40 2½ tazas 37 bolsos 3¾ oz.
36 2 tazas 33 bolsos 3⅓ oz.
30 1¾ tazas 30 bolsos 3 oz.
24 1½ tazas 23 bolsos 2¼ oz.
22 1½ tazas 20 bolsos 2 oz.
18 1¼ tazas 17 bolsos 1¾ oz.
14 1 tazas 10 bolsos 1 oz.
TTAABBLLAA DDEE MMEEDDIIDDAASS PPAARRAA CCAAFFÉÉ YY TTÉÉ::
PRECAUCIÓN:
• No enchufe ni encienda la cafetera cuando está vacía.
• Nunca abra la “tapa con cierre de seguridad” de la cafetera mientras
está preparando café o té.
• Apague la cafetera y desconecte el cable del tomacorriente si quedan
menos de 2 tazas de café o té.
• La cafetera se debe limpiar después de cada uso. Una limpieza inade
cuada afectará el rendimiento de la cafetera y podría hacer que deje
de colar café. Consulte las instrucciones de “Cómo limpiar la cafetera”
en la página 7.
NOTA:
• Esta tabla es solo para referencia. Ajuste la cantidad de agua, café o té
según lo necesario para el gusto individual.
• La bolsita de té promedio contiene aproximadamente 1/10 de una onza
(3 g) de té.
COMO USAR LA CAFETERA

HHOOWW TTOO CCLLEEAANN
7
Always unplug and allow unit to cool completely before cleaning.
1. Clean the ‘Stainless Steel Coffee Basket,’ ‘Stem’ and ‘Lock-on Lid’ in warm,
soapy water with a soft dishcloth; rinse and dry. Use a soft, damp cloth to
scour any stains or residue left on the ‘Lock-on Lid’ by using non-abrasive
cleaner.
2. To clean the inside of the urn: Fill the urn at least ⅓ full with hot water and
add one drop of liquid dishwashing detergent. Wash with a soft dishcloth
and rinse thoroughly with warm, soapy water. Run warm, soapy water
through the ‘Non-Drip Dispensing Spout’ to clean it as well.
3. To clean the ‘Stem Well’: Clean the ‘Stem Well’ thoroughly to remove coffee
residue. See Figure C below for the location of the ‘Stem Well.’
4. Wipe body dry with a soft dishcloth.
The ‘Stem Well’ must be cleaned after each use. If it is not cleaned properly
and thoroughly, the urn may malfunction due to the buildup of
coffee/tea residue.
NOTE:
CAUTION:
• Do not immerse the appliance in water or any liquid.
• Do not clean urn or accessories in dishwasher.
• Do not use abrasive cleaners or scouring pads.
Figure C
Stem
Well
7
Siempre desenchufe la unidad y espere que se enfríe por completo antes de
limpiarla.
1. Lave la “canasta de filtrado de café de acero inoxidable”, el “vástago” y la
“tapa con cierre de seguridad” con agua tibia jabonosa con un paño
suave; enjuáguela y séquela. Use un paño suave y húmedo para limpiar las
manchas o residuos de la “tapa con cierre de seguridad” usando un
limpiador no abrasivo.
2. Para limpiar el interior de la cafetera, llénela al menos hasta un tercio con
agua caliente y agregue una gota de detergente líquido para platos. Lave
la cafetera con un paño suave y enjuáguela completamente con agua
tibia jabonosa. Pase agua tibia jabonosa por el “surtidor antigoteo” para
limpiarla también.
3. Para limpiar la “cavidad del vástago”, límpiela completamente para quitar
los residuos de café. Refiérase a la Figura C a continuación para conocer la
ubicación de la “cavidad del vástago”.
4. Limpie el exterior con un paño suave.
La “cavidad del vástago” se debe limpiar después de cada uso. Si no es
limpiado completa y correctamente, la cafetera puede dejar de funcionar
debido a la acumulación de residuos de café o té.
NOTA:
PRECAUCIÓN:
• No sumerja la cafetera en agua ni en ningún otro líquido.
• No lave la cafetera ni sus accesorios en un lavavajillas.
• No use limpiadores abrasivos ni estropajos.
Figura C
Cavidad
del vástago
COMO LIMPIAR LA CAFETERA

PPRREEPPAARRAACCIIÓÓNN PPAARRAA OOBBTTEENNEERR EELL MMEEJJOORR
SSAABBOORR
• Para obtener los mejores resultados, utilice café recién molido.
• Nunca utilice de nuevo el poso del café porque los resultados serán
dramáticamente inferiores.
• Almacene el café molido en un lugar fresco, seco y alejado del calor o los
rayos solares. No lo almacene en un refrigerador o congelador porque el café
absorberá los olores y propiedades de los alimentos que lo rodean. La mejor
manera de almacenarlo es usando un recipiente hermético que no sea
transparente.
• Para asegurar mejor sabor y resultados, espere hasta que la cafetera haya
terminado su ciclo de preparación antes de servir la primera taza.
• El café está compuesto principalmente de agua, por lo que debe tratar de
usar la mejor calidad de agua disponible. Para obtener el mejor sabor posible,
use agua filtrada o embotellada.
• Para asegurar el sabor más fresco posible, mantenga la cafetera limpia en
todo momento. Asegúrese de limpiar la cafetera después de cada uso y
enjuague la cafetera y la canasta para café antes de usarla.
• Si el agua es particularmente dura donde usted vive, pase una solución fuerte
de vinagre por la cafetera después de cada uso para limpiar los depósitos de
minerales. Enjuague la cafetera completamente para asegurarse de que
toda la solución de vinagre se haya eliminado antes del siguiente uso.
8
BBRREEWWIINNGG FFOORR BBEESSTT FFLLAAVVOORR
• For best results, use fresh ground coffee.
• Never reuse coffee grounds, the results will suffer dramatically.
• Store coffee grounds in a cool, dry place away from heat or sunlight. Do not
store in a refrigerator or freezer, as coffee will absorb the odors and attributes
of other foods around it. It is best stored in an airtight container that is not
clear.
• To ensure the best taste and results, wait until the urn has finished brewing
before pouring the first cup.
• Coffee is mostly water, so be sure to use the best water available. For best
taste results, use filtered or bottled water.
• To ensure the freshest taste possible, keep the urn clean at all times. Be sure to
clean after every use and rinse the urn and coffee basket out before use.
• If the water in your area is particularly hard, run a strong solution of vinegar
through the urn to clean out any mineral deposits after each use. Rinse
thoroughly to ensure that all vinegar solution is removed prior to the next use.
8

LLIIMMIITTEEDD WWAARRRRAANNTTYY
Aroma Housewares Company warrants this product free from defects in
material and workmanship for one year from provable date of purchase
in the continental United States.
Within this warranty period, Aroma Housewares Company will repair or
replace, at its option, defective parts at no charge, provided the
product is returned, freight prepaid with proof of purchase and U.S.
$13.00 for shipping and handling charges payable to Aroma Housewares
Company. Before returning an item, please call the toll-free number
below for a return authorization number. Allow 2-4 weeks for return
shipping.
This warranty does not cover improper installation, misuse, abuse or
neglect on the part of the owner. Warranty is also invalid in any case
that the product is taken apart or serviced by an unauthorized service
station.
This warranty gives you specific legal rights, which may vary from state to
state, and does not cover areas outside the United States.
AROMA HOUSEWARES COMPANY
6469 Flanders Drive
San Diego, California 92121
1-800-276-6286
M-F, 8:30 AM - 5:00 PM, Pacific Time
Website: www.aromaco.com
9
GARANTÍA LIMITADA
Aroma Housewares Company garantiza que este producto no
tenga defectos en sus materiales y fabricación durante un período
de un año a partir de la fecha comprobada de compra dentro de
la parte continental de los Estados Unidos.
Dentro de este período de garantía, Aroma Housewares Company
reparará o reemplazará, a su opción, las partes defectuosas sin
ningún costo, siempre y cuando el producto sea devuelto, con el
flete prepagado, con comprobación de compra y $13.00 dólares
para cargos de envío y manejo a favor de Aroma Housewares
Company. Antes de devolver un producto, sírvase llamar al número
telefónico gratuito que está más abajo para obtener un número de
autorización de devolución. Espere entre 2-4 semanas para recibir el
aparato nuevamente.
Esta garantía no cubre la instalación incorrecta, el uso indebido,
maltrato o negligencia por parte del usuario. La garantía también
es inválida en caso de que el aparato sea desarmado o se le dé
mantenimiento en un centro de servicio no autorizado.
Esta garantía le da derechos legales específicos los cuales podrán
variar de un estado a otro y no cubre áreas fuera de los Estados
Unidos.
AROMA HOUSEWARES COMPANY
6469 Flanders Drive
San Diego, California 92121
1-800-276-6286
L-V, 8:30 AM - 5:00 PM, Tiempo del Pacífico
Sitio Web: www.aromaco.com
9
Transcripción de documentos
www.AromaCo.com Model # ACU-140S Cafetera de acero inoxidable Manual de instrucciones Instruction Manual Stainless Steel Coffee Urn www.AromaCo.com Model # ACU-140S Felicitaciones por su compra de su cafetera de acero inoxidable. Esta cafetera de acero inoxidable es ideal para diversas reuniones sociales y prepara rápidamente hasta cuarenta tazas de café o té deliciosos. La construcción de doble capa mantiene el exterior de la cafetera frío al tacto, mientras que el café que está dentro del depósito interior de acero inoxidable se mantiene caliente y delicioso. Es sencillo servir el café con la espita que no gotea y la bandeja para goteo removible que atrapa cualquier derrame potencial. Para obtener más ideas para la cocina, visítenos en internet en www.AromaCo.com. Lea todas las instrucciones antes de usar el producto por primera vez. © 2008 Aroma Housewares Company All rights reserved. Aroma Housewares Co. 6469 Flanders Drive San Diego, CA 92121 U.S.A. 1-800-276-6286 www.aromaco.com Published By: Publicado Por: Aroma Housewares Co. 6469 Flanders Drive San Diego, CA 92121 U.S.A. 1-800-276-6286 www.aromaco.com Please read all the instructions before first use. For more kitchen solution ideas, please visit us online at www.AromaCo.com. © 2008 Aroma Housewares Company. Todos los derechos reservados. Serving is simple with the drip-free spigot and the removable drip tray catches any potential spills. Ideal for a wide variety of social gatherings, the Stainless Steel Coffee Urn will quickly brew up to 40 cups of delicious coffee or tea. Double-wall construction keeps the urn’s exterior cool to the touch, while the coffee within the stainless steel inner chamber stays hot and fresh. Congratulations on your purchase of the Stainless Steel Coffee Urn! 1 SAVE THESE INSTRUCTIONS appliance manufacturer may result in fire, electric shock or injury to persons. 17. The use of accessory attachments not recommended or supplied by the 16. Do not use this appliance for other than its intended use. hot. 15. Do not move or attempt to move the coffee urn while in use or when coffee is heated oven. 14. Do not place the coffee urn on or near a gas or electrical burner, or in a 13. Do not let cord touch hot surfaces. 12. Do not let cord hang over the edge of table and counter. 11. Do not use outdoors. adjustment. Aroma customer service for examination, repair or electrical/mechanical malfunctions, or is dropped or has been damaged in any manner. Contact 10. Do not operate this appliance when the power cord or plug is damaged, if it parts and before cleaning. 9. Allow the coffee urn to cool completely before putting on or removing any 8. Unplug the coffee urn from outlet when not in use and before cleaning. necessary when the coffee urn is in use near children. 7. This appliance is not intended to be used by children. Close supervision is cord, plug or the product in water or any liquid. MEDIDAS IMPORTANTES DE SEGURIDAD Cuando se usen aparatos electricos, siempre deberán observarse las precau ciones básicas de seguridad, incluyendo las siguientes: 1. Importante: Lea todas las instrucciones antes de utilizar el aparato. 2. No toque las superficies calientes. Use las asas o perillas. 3. No abra la tapa cuando la cafetera esté en el proceso de preparación del café. Se pueden sufrir quemaduras si se quita la tapa durante el ciclo de preparación. 4. Nunca encienda la cafetera cuando no haya agua en la jarra porque puede quemar el aparato y causarle daños permanentes. 5. Cuando está llenando con agua, nunca exceda la línea máxima de agua de la cafetera. 6. Para evitar incendios, descargas eléctricas y daños personales, no sumerja el cable, enchufe o el aparato en agua o ningún líquido. 7. Este aparato no está diseñado para ser utilizado por niños. La supervisión con stante es indispensable cuando la cafetera se esté usando cerca de ellos. 8. Desenchufe la cafetera del tomacorriente cuando no esté en uso y antes de limpiarla. 9. Deje que la cafetera se enfríe completamente antes de colocarle o quitarle cualquier pieza y antes de limpiarla. 10. No opere este aparato si el cable o el enchufe eléctricos están dañados, si no opera correctamente, si se ha caído o si ha sufrido cualquier tipo de daño. Comuníquese con el servicio de atención al cliente de Aroma para solicitar una revisión, reparación o ajuste eléctrico o mecánico. 13. No permita que el cable toque superficies calientes. 5. When filling with water, never exceed the maximum water line of the coffee 11. No la utilice al aire libre. 6. To protect against fire, electrical shock and injury to persons, do not immerse urn. the product and cause permanent damage. 4. Never turn on the coffee urn when there is no water in the urn as it may burn the lid is removed during the brewing cycle. 3. Do not remove the lid when the coffee urn is brewing. Scalding may occur if 2. Do not touch hot surfaces. Use handles or knobs. 1. Important: Read all instructions before use. Basic safety precautions should always be followed when using electrical appliances, including the following: IMPORTANT SAFEGUARDS 12. No permita que el cable cuelgue por el borde de la mesa o encimera. 14. No coloque la cafetera cerca de una resistencia de gas o eléctrica caliente, ni en un horno caliente. 15. No mueva o intente mover la cafetera mientras esté en uso o si el café está caliente. 16. No use el aparato para otro propósito que no sea su función específica. 17. El uso de accesorios no recomendados o proporcionados por el fabricante del aparato puede causar incendios, descargas eléctricas o lesiones a las personas. GUARDE ESTAS INSTRUCCIONES 1 INSTRUCCIONES DE CABLE CORTO 1. Se proporciona un cable eléctrico corto con el propósito de reducir el riesgo de tropezarse o enredarse con un cable más largo. 2. Hay cables de extensión más largos disponibles y deben ser usados con sumo cuidado. 3. Si se usa un cable de extensión más largo: a. La clasificación eléctrica marcada en el cable de extensión debe ser por lo menos igual que la clasificación eléctrica del aparato. b. El cable más largo debe ser colocado de manera que no cuelguepor el borde del mostrador o mesa en donde pudiera ser jalado por un niño o alguien pudiera tropezarse con el cable sin querer. ¡NO DEJE QUE EL CABLE CUELGUE! 2 This appliance is for household use only. If the supply cord is damaged, it must be replaced by the manufacturer, its service agent or a similarly qualified person in order to avoid a hazard. To reduce the risk of electric shock, this plug is intended to fit into a polarized outlet only one way. If the plug does not fit fully into the outlet, reverse the plug. If it still does not fit, contact a qualified electrician. Do not attempt to modify the plug in any way. This appliance has a polarized plug (one blade is wider than the other); follow the instructions below: POLARIZED PLUG KEEP AWAY FROM CHILDREN! ¡MANTENGALO LEJOS DE LOS NINOS! PLOYA POLARIZADA Si este aparato tiene ploya polarizada: Para reducir el riesgo de descarga eléctrica, este ploya intencionalmente solo debe de enchufar un lado en enchufes de luz de ploya polarisada. Si la clavija no entra completamente, da vuelta a la clavija. Si aun la clavija no puede entrar, llame a un electricista calificada. No intente de modificar la clavija, es muy peligroso. Si esté estropeado el cordón eléctrico, hay que ser reemplazado por el fabricante o su agencia de servicio u otra persona calificada para hacer que se evita cualquier peligro. ESTE APARATO ES PARA USO DOMÉSTICO. 2 DO NOT DRAPE CORD! 1. A short power-supply cord is provided to reduce the risks resulting from becoming entangled in or tripping over a longer cord. 2. Longer extension cords are available and may be used if care is exercised in their use. 3. If a longer extension cord is used: a. The marked electrical rating of the extension cord should be at least as great as the electrical rating of the appliance. b. The longer cord should be arranged so that it will not drape over the countertop or tabletop where it can be pulled by children or tripped over unintentionally. SHORT CORD INSTRUCTIONS 11 IDENTIFICACION DE LAS PARTES 10 2 1 3 9 8 3 1. Lock-on Lid 2. Water Level Indicator 3. Cool-Touch Exterior 4. Non-Drip Dispensing Spout 5. Power Indicator Light 6. Ready Indicator Light 7. Removable Drip Tray 8. Stem Well 9. Stainless Steel Coffee Basket 10. Stem 11. Stem Base 7 4 5 6 5 6 4 8 9 3 2 1 10 PARTS IDENTIFICATION 11 7 1. Tapa con cierre de seguridad 2. Indicador del nivel de agua 3. Exterior frío al tacto 4. Surtidor antigoteo 5. Luz indicadora de Encendido 6. Luz Indicadora de Listo 7. Bandeja removible para goteo 8. Cavidad del vástago 9. Canasta de filtrado de café de acero inoxidable 10. Vástago 11. Base del vástago 3 COMO USAR LA CAFETERA Antes de usarla por primera vez: 1. Lea todas las instrucciones y las precauciones importantes. 2. Retire todos los materiales de embalaje; asegúrese de que todos los artículos recibidos estén en buenas condiciones. 3. Lave el depósito interior y todos los accesorios con agua tibia y jabón usando una esponja o paño limpio. Enjuague a fondo para eliminar todo resto de jabón. Limpie la parte exterior con un paño húmedo. No use limpiadores abrasivos ni estropajos. No sumerja la cafetera, el cable ni el enchufe en agua. 4. 5. Ø Ø PARA PREPARAR CAFÉ: 1. Coloque la cafetera verticalmente en una superficie NOTE: Figure B seca, firme y resistente al calor. 2. Llene la jarra con agua fría según la cantidad de café que desee preparar. Consulte la “tabla para medir el café y el té” en la página 6 como referencia. 3. Coloque el “vástago” en la “canasta de filtrado de “Coffee/Tea Measuring Chart” on page 6 for Figura A café de acero inoxidable” (consulte la Figura A), luego coloque el “vástago” en la “cavidad del (see Figure A), then place the ‘Stem’ into the ‘Stem Figure A vástago” (consulte la Figura B). 4. Distribuya uniformemente la cantidad recomendada de café molido en la “canasta para el café de acero inoxidable” (consulte la “tabla para medir el café y el té” en la página 6 como referencia). Use una taza estándar (según el sistema de medidas Figura B estadounidense, unos 250 ml) para medir el café. La cantidad recomendada en la “tabla para medir el café y el té” producirá café no muy fuerte. Ajuste la cantidad de café al gusto individual. NOTA: Para obtener mejores resultados, use café molido que no sea demasiado fino. Evite el uso de un molido extremadamente fino. 5. Gire la “tapa con cierre de seguridad” en su lugar sobre la cafetera. Asegúrese de que la “tapa con cierre de seguridad” se haya girado en la dirección de las manecillas del reloj hasta que esté completamente cerrada or dishcloth. good condition. en las ranuras de las asas. CONTINUO EN LA PÁGINA SIGUIENTE 4 CONTINUED ON NEXT PAGE has been turned clockwise until it is completely locked into the handle slots. 5. Twist the ‘Lock-on Lid’ in place on top of the urn. Make sure the ‘Lock-on Lid’ For best results, use coarsely ground coffee. Avoid using extremely fine grounds. coffee. Adjust the amount of coffee to match individual preference. the “Coffee/Tea Measuring Chart” will produce mild for measuring coffee. The amount recommended in reference). Use a standard U.S. measuring cup (250ml) into the ‘Stainless Steel Coffee Basket’ (see 4. Spread the desired amount of ground coffee evenly Well’ (see Figure B). 3. Insert the ‘Stem’ into the ‘Stainless Steel Coffee Basket’ Measuring Chart” on page 6 for reference. amount of coffee needed. See the “Coffee/Tea 2. Fill the urn with cold water in accordance with the heat-resistant surface. 1. Place the urn upright on a dry, sturdy and TO MAKE COFFEE: 5. Wipe body clean with a damp cloth. Ø Do not use abrasive cleaners or scouring pads. Ø Do not immerse the appliance, cord or plug in water at any time. 4. Rinse thoroughly to remove soapy residue. 3. Wash the inner urn and all accessories with warm, soapy water using a sponge 2. Remove all packaging materials; make sure all your items are received in 1. Read all the instructions and important safeguards. Before First Use: USING YOUR URN 4 5 the urn. • When filling with water, never exceed the ‘Maximum Water Line’ inside of • Never open the ‘Lock-on Lid’ while the urn is in the brewing process. CAUTION: 7. When tea is ready to serve, the ‘Ready Indicator Light’ will illuminate. illuminate and the urn will begin brewing tea. 6. Plug the power cord into a wall outlet. The ‘Power Indicator Light’ will has been turned clockwise until it is completely locked into the handle slots. 5. Twist the ‘Lock-on Lid’ in place on top of the urn. Make sure the ‘Lock-on Lid’ to match individual preference. amount of tea recommended will produce mild tea. Adjust the amount of tea Basket’ (see “Coffee/Tea Measuring Chart” on page 6 for reference). The 4. Add the desired amount of tea or tea bags into the ‘Stainless Steel Coffee 4), then place the ‘Stem’ into the ‘Stem Well’ (see Figure B on page 4). 3. Insert the ‘Stem’ into the ‘Stainless Steel Coffee Basket’ (see Figure A on page the “Coffee/Tea Measuring Chart” on page 6 for reference. 2. Fill the urn with cold water in accordance with the amount of tea needed. See 1. Place the urn upright on a dry, sturdy and heat-resistant surface. TO MAKE TEA: • Never open the ‘Lock-on Lid’ while the urn is in the brewing process. • When filling with water, never exceed the ‘Maximum Water Line’ inside of the urn. CAUTION: If the urn is to be in use for several hours, it is best to remove the ‘Stainless Steel Coffee Basket’ prior to serving coffee. This will prevent the oil of the coffee from dripping down, which may create a bitter flavor over an extended period of time. Use extreme caution when removing the ‘Stainless Steel Coffee Basket’ as it will be hot. NOTE: 7. When coffee is ready to serve, the ‘Ready Indicator Light’ will illuminate. and the urn will begin brewing coffee. 6. Plug the power cord into a wall outlet. The ‘Power Indicator Light’ will illuminate TO MAKE COFFEE (CONT.): USING YOUR URN COMO USAR LA CAFETERA PARA PREPARAR CAFÉ (CONT.): 6. Conecte el enchufe a un tomacorriente de pared. Se encenderá la “luz indicadora de Encendido” y la cafetera comenzará a preparar el café. 7. Cuando el café esté listo para servir, la “luz indicadora de Listo” se encenderá. NOTA: Si se va a utilizar la cafetera durante varias horas, es mejor quitar la “canasta de filtradode café de acero inoxidable” antes de servir el café. Esto evitará que el aceite del café gotee en el café preparado y que produzca un sabor amargo en un lapso de tiempo extendido. Proceda con extrema precaución cuando retire la “canasta de filtrado de café de acero inoxidable” porque estará caliente. PRECAUCIÓN: • Nunca abra la “tapa con cierre de seguridad” mientras la cafetera esté en proceso de preparar el café. • Cuando la está llenando con agua, nunca exceda la “línea máxima de agua”dentro de la cafetera. PARA PREPARAR TÉ: 1. Coloque la cafetera verticalmente en una superficie seca, firme y resistente al calor. 2. Llene la jarra con agua fría según la cantidad de té que desee preparar. Consulte la “tabla para medir el café y el té” en la página 6 como referencia. 3. Coloque el “vástago” en la “canasta de filtrado de café de acero inoxidable” (consulte la Figura A en la página 4), luego coloque el “vástago” adentro del “cavidad del vástago” (consulte la Figura B en la página 4). 4. Agregue la cantidad deseada de té o de bolsitas de té en la “canasta de filtrado de café de acero inoxidable” (Consulte la “tabla para medir el café y el té” en la página 6 como referencia). La cantidad de té recomendada producirá un té no muy fuerte. Ajuste la cantidad de té al gusto individual. 5. Gire la “tapa con cierre de seguridad” en su lugar sobre la cafetera. Asegúrese de que la “tapa con cierre de seguridad” se haya girado en la dirección de las manecillas del reloj hasta que esté completamente cerrada en las ranuras de las asas. 6. Conecte el enchufe a un tomacorriente de pared. Se encenderá la “luz indicadora de Encendido” y la cafetera comenzará a preparar el té. 7. Cuando el té esté listo para servir, la “luz indicadora de Listo” se encenderá. PRECAUCIÓN: • Nunca abra la “tapa con cierre de seguridad” mientras la cafetera esté en proceso de preparar el café. • Cuando la está llenando con agua, nunca exceda la “línea máxima de agua” dentro de la cafetera. 5 TABLA DE MEDIDAS PARA CAFÉ Y TÉ: Nivel de agua Café (molido) 40 36 30 24 22 18 14 NOTA: 2½ tazas 2 tazas 1¾ tazas 1½ tazas 1½ tazas 1¼ tazas 1 tazas Té empaquetado 37 bolsos 33 bolsos 30 bolsos 23 bolsos 20 bolsos 17 bolsos 10 bolsos Té flojo 3¾ oz. 3⅓ oz. 3 oz. 2¼ oz. 2 oz. 1¾ oz. 1 oz. 1¾ oz. 2 oz. • Esta tabla es solo para referencia. Ajuste la cantidad de agua, café o té según lo necesario para el gusto individual. • La bolsita de té promedio contiene aproximadamente 1/10 de una onza (3 g) de té. 17 Bags 20 Bags 3⅓ oz. PRECAUCIÓN: 1 oz. 2¼ oz. 33 Bags • • 10 Bags 23 Bags 2 cups • 1½ cups 1½ cups 3 oz. 36 2½ cups • 22 24 30 Bags Bagged Tea (Standard Size) No enchufe ni encienda la cafetera cuando está vacía. Nunca abra la “tapa con cierre de seguridad” de la cafetera mientras está preparando café o té. Apague la cafetera y desconecte el cable del tomacorriente si quedan menos de 2 tazas de café o té. La cafetera se debe limpiar después de cada uso. Una limpieza inade cuada afectará el rendimiento de la cafetera y podría hacer que deje de colar café. Consulte las instrucciones de “Cómo limpiar la cafetera” en la página 7. CAUTION: NOTE: 1 cup 1¼ cups 1¾ cups 3¾ oz. Coffee (Ground) 40 COMO USAR LA CAFETERA 6 • Do not operate the urn when there is no water inside. • Never open the ‘Lock-on Lid’ of the urn while it is brewing. • Turn off the urn and unplug the power cord from the electrical outlet when there is less than 2 cups of coffee or tea remaining. • The urn must be cleaned after each use. Improper cleaning will affect the performance of the product or may cause the unit to stop percolating. See “How to Clean” on page 7 for instructions. • This chart is for reference only. Adjust the amount of water, coffee or tea as needed to suit individual preferences. • The average tea bag contains roughly 1/10 of an ounce of tea. 14 18 30 37 Bags Water Level COFFEE/TEA MEASURING CHART: Loose Tea USING YOUR URN 6 7 • Do not immerse the appliance in water or any liquid. • Do not clean urn or accessories in dishwasher. • Do not use abrasive cleaners or scouring pads. CAUTION: The ‘Stem Well’ must be cleaned after each use. If it is not cleaned properly and thoroughly, the urn may malfunction due to the buildup of coffee/tea residue. NOTE: Figure C COMO LIMPIAR LA CAFETERA Siempre desenchufe la unidad y espere que se enfríe por completo antes de limpiarla. 1. Lave la “canasta de filtrado de café de acero inoxidable”, el “vástago” y la “tapa con cierre de seguridad” con agua tibia jabonosa con un paño suave; enjuáguela y séquela. Use un paño suave y húmedo para limpiar las manchas o residuos de la “tapa con cierre de seguridad” usando un limpiador no abrasivo. 2. Para limpiar el interior de la cafetera, llénela al menos hasta un tercio con agua caliente y agregue una gota de detergente líquido para platos. Lave la cafetera con un paño suave y enjuáguela completamente con agua tibia jabonosa. Pase agua tibia jabonosa por el “surtidor antigoteo” para limpiarla también. 3. Para limpiar la “cavidad del vástago”, límpiela completamente para quitar los residuos de café. Refiérase a la Figura C a continuación para conocer la ubicación de la “cavidad del vástago”. 4. Limpie el exterior con un paño suave. Cavidad del vástago NOTA: Stem Well Figura C La “cavidad del vástago” se debe limpiar después de cada uso. Si no es limpiado completa y correctamente, la cafetera puede dejar de funcionar debido a la acumulación de residuos de café o té. 1. Clean the ‘Stainless Steel Coffee Basket,’ ‘Stem’ and ‘Lock-on Lid’ in warm, soapy water with a soft dishcloth; rinse and dry. Use a soft, damp cloth to scour any stains or residue left on the ‘Lock-on Lid’ by using non-abrasive cleaner. 2. To clean the inside of the urn: Fill the urn at least ⅓ full with hot water and add one drop of liquid dishwashing detergent. Wash with a soft dishcloth and rinse thoroughly with warm, soapy water. Run warm, soapy water through the ‘Non-Drip Dispensing Spout’ to clean it as well. 3. To clean the ‘Stem Well’: Clean the ‘Stem Well’ thoroughly to remove coffee residue. See Figure C below for the location of the ‘Stem Well.’ 4. Wipe body dry with a soft dishcloth. PRECAUCIÓN: • No sumerja la cafetera en agua ni en ningún otro líquido. • No lave la cafetera ni sus accesorios en un lavavajillas. • No use limpiadores abrasivos ni estropajos. Always unplug and allow unit to cool completely before cleaning. 7 HOW TO CLEAN PREPARACIÓN PARA OBTENER EL MEJOR SABOR 8 • Para obtener los mejores resultados, utilice café recién molido. • Nunca utilice de nuevo el poso del café porque los resultados serán dramáticamente inferiores. • Almacene el café molido en un lugar fresco, seco y alejado del calor o los rayos solares. No lo almacene en un refrigerador o congelador porque el café absorberá los olores y propiedades de los alimentos que lo rodean. La mejor manera de almacenarlo es usando un recipiente hermético que no sea transparente. • Para asegurar mejor sabor y resultados, espere hasta que la cafetera haya terminado su ciclo de preparación antes de servir la primera taza. • El café está compuesto principalmente de agua, por lo que debe tratar de usar la mejor calidad de agua disponible. Para obtener el mejor sabor posible, use agua filtrada o embotellada. • Para asegurar el sabor más fresco posible, mantenga la cafetera limpia en todo momento. Asegúrese de limpiar la cafetera después de cada uso y enjuague la cafetera y la canasta para café antes de usarla. • Si el agua es particularmente dura donde usted vive, pase una solución fuerte de vinagre por la cafetera después de cada uso para limpiar los depósitos de minerales. Enjuague la cafetera completamente para asegurarse de que toda la solución de vinagre se haya eliminado antes del siguiente uso. • If the water in your area is particularly hard, run a strong solution of vinegar through the urn to clean out any mineral deposits after each use. Rinse thoroughly to ensure that all vinegar solution is removed prior to the next use. • To ensure the freshest taste possible, keep the urn clean at all times. Be sure to clean after every use and rinse the urn and coffee basket out before use. • Coffee is mostly water, so be sure to use the best water available. For best taste results, use filtered or bottled water. • To ensure the best taste and results, wait until the urn has finished brewing before pouring the first cup. • Store coffee grounds in a cool, dry place away from heat or sunlight. Do not store in a refrigerator or freezer, as coffee will absorb the odors and attributes of other foods around it. It is best stored in an airtight container that is not clear. • Never reuse coffee grounds, the results will suffer dramatically. 8 • For best results, use fresh ground coffee. BREWING FOR BEST FLAVOR 9 GARANTÍA LIMITADA Aroma Housewares Company garantiza que este producto no tenga defectos en sus materiales y fabricación durante un período de un año a partir de la fecha comprobada de compra dentro de la parte continental de los Estados Unidos. AROMA HOUSEWARES COMPANY 6469 Flanders Drive San Diego, California 92121 1-800-276-6286 M-F, 8:30 AM - 5:00 PM, Pacific Time Website: www.aromaco.com This warranty gives you specific legal rights, which may vary from state to state, and does not cover areas outside the United States. This warranty does not cover improper installation, misuse, abuse or neglect on the part of the owner. Warranty is also invalid in any case that the product is taken apart or serviced by an unauthorized service station. Within this warranty period, Aroma Housewares Company will repair or replace, at its option, defective parts at no charge, provided the product is returned, freight prepaid with proof of purchase and U.S. $13.00 for shipping and handling charges payable to Aroma Housewares Company. Before returning an item, please call the toll-free number below for a return authorization number. Allow 2-4 weeks for return shipping. Dentro de este período de garantía, Aroma Housewares Company reparará o reemplazará, a su opción, las partes defectuosas sin ningún costo, siempre y cuando el producto sea devuelto, con el flete prepagado, con comprobación de compra y $13.00 dólares para cargos de envío y manejo a favor de Aroma Housewares Company. Antes de devolver un producto, sírvase llamar al número telefónico gratuito que está más abajo para obtener un número de autorización de devolución. Espere entre 2-4 semanas para recibir el aparato nuevamente. Esta garantía no cubre la instalación incorrecta, el uso indebido, maltrato o negligencia por parte del usuario. La garantía también es inválida en caso de que el aparato sea desarmado o se le dé mantenimiento en un centro de servicio no autorizado. Esta garantía le da derechos legales específicos los cuales podrán variar de un estado a otro y no cubre áreas fuera de los Estados Unidos. AROMA HOUSEWARES COMPANY 6469 Flanders Drive San Diego, California 92121 1-800-276-6286 L-V, 8:30 AM - 5:00 PM, Tiempo del Pacífico Sitio Web: www.aromaco.com Aroma Housewares Company warrants this product free from defects in material and workmanship for one year from provable date of purchase in the continental United States. LIMITED WARRANTY 9-
 1
1
-
 2
2
-
 3
3
-
 4
4
-
 5
5
-
 6
6
-
 7
7
-
 8
8
-
 9
9
-
 10
10
-
 11
11


Aroma ACU-140S Manual de usuario
- Categoría
- Accesorios para hacer café
- Tipo
- Manual de usuario
En otros idiomas
- English: Aroma ACU-140S User manual