
1www.Ferguson.com/PROFLO
0523 5376783
ENGLISH
Care Instructions:
non-abrasive wax. Any cleaners should be rinsed
off immediately. Do not use abrasive cleaners on
the
FRANÇAIS
Directives d’Entretien:
ESPAÑOL
Instrucciones de Cuidado:
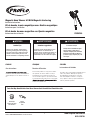
You May Need/Articles Dont Vous Pouvez Avoir Besoin/Usted Puede Necesitar
Sealant Tape
Ruban d'étanchéité
Cinta Selladora
PFHSK200
Magnetic Hand Shower Kit With Magnetic Anchoring
Installation Instructions
Kit de douche à main magnétique avec fixation magnétique
Instructions pour l’installation
Kit de ducha de mano magnética con fijación magnética
Instrucciones de instalación
WARNING
Caution-Tips:
AVERTISSEMENT ADVERTENCIA
Precaución-consejos:
Siempre corte el suministro de agua
antes de retirar el grifo actual o
remplazar cualquier pieza del mismo.
Abra la llave del grifo para liberar la
presión de agua y asegurar que ya no
corre agua.
Always turn off water supply before
removing existing faucet or replacing
any part of the faucet. Open the faucet
handle to relieve water pressure and
ensure that water is completely shut off.
Toujours couper l'alimentation en eau
avant d'enlever ou de démonter le
robinet. Ouvrir le robinet pour libérer la
pression d'eau et pour s'assurer que
l'alimentation en eau a bien été coupée.
Attention-suggestions:
Votre nouveau produits est conçu pour fonctionner
sans problème, des années durant. Le nettoyer
périodiquement avec un chiffon doux pour qu’il
conserve la même apparence qu’à l’état neuf. Éviter
les nettoyants abrasifs, la laine d’acier et les produits
rendront votre garantie nulle.
Su producto nuevo está diseñado para brindar años de
servicio sin problemas. Mantenga su apariencia
nueva limpiándolo periódicamente con un paño
suave. Evite limpiadores abrasivos, estropajo de
acero y químicos cáusticos porque deslustrarán el
acabado y anularán la garantía.
Wrench
Clé ajustable
Llave
©2023 FERGUSON ENTERPRISES, LLC 0523 5376783
Tools

2
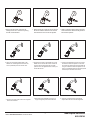
1. Remove the old shower head from the
existing shower arm. Unscrew it by turning
the ball counterclockwise.
1. Retirez l'ancienne pomme de douche du bras
de douche existant. Dévissez-la en tournant
la boule dans le sens inverse des aiguilles.
1. Quita el cabezal de ducha anterior del brazo
de ducha existente.
Desenróscala girando la
bola hacia la izquierda.
2. Apply the new thread sealant tape to the
shower arm. Hand-tighten the shower arm
mount (clockwise) onto the shower arm.
2. Appliquez du ruban d' étanchéité pour joints
filetes neuf sur le bras de douche. Serrez la
monture de bras de douche (B) à la main
(dans le sens des aiguilles d'une montre) sur
le bras de douche.
2. Coloca cinta selladora nueva en las roscas
del brazo de la ducha.Aprieta con la mano
el montaje (en sentido de las manecillas del
reloj) en el brazo de la ducha.Aprieta con la
mano el montaje del brazo de la ducha (hacia
la derecha) en el brazo de la ducha.
3. Connect one end of the hose to the magnetic
shower arm bracket.
3. Raccorder une extrémité du tuyau à un
support magnétique de bras de douche.
3. Conecte un extremo de la manguera al
soporte del brazo de la ducha magnética.
©2023 FERGUSON ENTERPRISES, LLC 0523 5376783 www.Ferguson.com/PROFLO
0523 5376783

3
4. Attach the other end of the handshower
hose to the handshower.
4. Attachez l'autre extrémité du flexible à la
douche téléphone.
4. Fija el otro extremo de la manguera de la
ducha manual a la ducha manual.
5. Turn on the water supply, check for leaks
and tighten as needed.
5. Ouvrez l'eau, vérifiez qu'il n'y a pas de
fuite et serrez au besoin.
5. Abre el suministro del agua, comprueba
que no haya fugas y aprieta según sea
necesario.
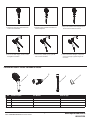
No. Item Description Part Number Material Type
1 Magnetic Hand Shower NA Plastic
2Shower arm mount NA Plastic
3Hose NA Metal
4Tape NA Ceramic
1234
CONTENIDO DEL PAQUETE /
CONTENU
/ CONTENIDO DEL PAQUETE
©2023 FERGUSON ENTERPRISES, LLC 0523 5376783 www.Ferguson.com/PROFLO
0523 5376783
-
 1
1
-
 2
2
-
 3
3


ProFlo PFHSK200CP Guía de instalación
- Tipo
- Guía de instalación
- Este manual también es adecuado para
en otros idiomas
- français: ProFlo PFHSK200CP Guide d'installation
- English: ProFlo PFHSK200CP Installation guide

