
Item #1002255558
#1002255544
#1002255538
#1002255543
Model #TSPE0513-WH
#TSPE0513-BI
#TSPE0513-BO
#TSPE0513-BK
THANK YOU
THANK YOUTHANK YOU
THANK YOU
We appreciate the trust and condence you have placed in Glacier Bay through the purchase of this toilet seat. We strive to
continually create quality products designed to enhance your home. Visit us online to see our full line of products available for your home
improvement needs. Thank you for choosing Glacier Bay!
USE AND CARE GUIDE
PLASTIC TOILET SEAT (ELONGATED)
HOMEDEPOT.COM/GLACIERBAY
Questions, problems, missing parts? Before returning to the store,
call Home Decorators Collection Customer Service
8 a.m. - 7 p.m., EST, Monday-Friday, 9 a.m. - 6 p.m., EST, Saturday
1-855-HD-GLACIER

2
Table of Contents
Table of Contents .............................................................2
Warranty..............................................................
.........
..2
Pre-Installation......................................................
..........
3
Tools Required............
.................................................
.
..3
Hardware Included..............................
...........
..
......
.......
..3
Package Contents........................
...............
..
.........
.......
..3
Warranty
This product comes with a one (1) year warranty. For more information, please contact the Customer Service Team at 1-855-HD-GLACIER or
visit www.HomeDepot.com/GlacierBay.
Installation ............................................................
..........
4
Care and Cleaning............................................................4
Safety Information
WARNING: Do not stand on the toilet seat.

3
HOMEDEPOT.COM/GLACIERBAY
Please contact 1-855-HD-GLACIER for further assistance.
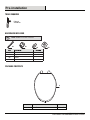
Pre-Installation
HARDWARE INCLUDED
PACKAGE CONTENTS
Part
Description
Quantity
A Toilet seat 1
NOTE: Hardware not shown to actual size.
Flathead
screwdriver
TOOLS REQUIRED
Part Description Quantity
A
A
Bolt
BB Snap lock
Washer CC
AA BB
CC
DD
Lock nut DD
2
2
2
2
A

4
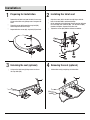
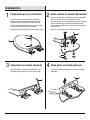
Installation
Installation
Remove the old toilet seat from the toilet, if necessary.
Lift up on the toilet seat (A) hinge covers to expose the
holes.
Thread the screw (AA) through the snap lock (BB),
then through the hole in the hinge.
Repeat with other screw (AA), snap lock (BB) and hole.
1
Preparing for Installation
2
Installing the toilet seat
3
Unlocking the seat (optional)
4
Removing the seat (optional)
A
AA
BB
Lift the toilet seat (A) straight up, off of the toilet.
Lift up on the toilet seat (A) hinge covers to release
the snap locks (BB).
CC
DD
Align the screws (AA) in the toilet seat (A) hinges with the
holes in the toilet bowl, and thread through.
On the underside of the toilet bowl, thread a washer (CC) onto
the screw (AA), then a lock nut (DD). Turn the lock nut (DD)
clockwise to tighten. Repeat on the other side.
Tighten the screws (AA) with the athead screwdriver.
AA
A
A
A

Care and Cleaning
Re-tighten nuts after seat has been in use for several weeks.
Do not use abrasive cleaners or corrosive chemicals for daily cleaning.
Clean with soft damp cloth using mild detergent.
5
HOMEDEPOT.COM/GLACIERBAY
Please contact 1-855-HD-GLACIER for further assistance.

Retain this manual for future use.
HOMEDEPOT.COM/GLACIERBAY
Questions, problems, missing parts? Before returning to the store,
call Home Decorators Collection Customer Service
8 a.m. - 7 p.m., EST, Monday-Friday, 9 a.m. - 6 p.m., EST, Saturday
1-855-HD-GLACIER

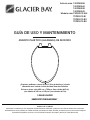
Modelo núm.
TSPE0513-WH
TSPE0513-BI
TSPE0513-BO
TSPE0513-BK
ASIENTO PLÁSTICO (
ALARGADA
) DE INODORO
GUÍA DE USO Y MANTENIMIENTO
1-855-HD-GLACIER
HOMEDEPOT.COM/GLACIERBAY
¿Preguntas, problemas o piezas faltantes? Antes de devolver a la tienda,
comunícate con el servicio al cliente de Home Decorators Collection
De lunes a viernes, entre 8:00 a.m. y 7:00 p.m. (hora estándar del Este),
y los sábados de 9:00 a.m. a 6:00 p.m. (hora estándar del Este)
GRACIAS POR TU COMPRA
Apreciamos la conanza que has depositado en Home Decorators Collection al comprar este asiento de inodoro. Nos esforzamos
continuamente en crear productos de calidad diseñados para mejorar tu hogar. Visítanos por Internet para ver nuestra línea completa
de productos disponibles con vistas a las necesidades de mejora de tu hogar. ¡Gracias por elegir Glacier Bay!
Artículo núm.
1002255558
1002255544
1002255538
1002255543

2
Tabla de contenido
Garantía
Información de seguridad
ADVERTENCIA: No te pares sobre el asiento de inodoro.
Tabla de contenido ...........................................................2
Garantía......................................................
..................
..2
Preinstalación....................................
..........
..........
..........
3
Herramientas necesarias.............................................
..
..3
Herrajes incluidos..................................................
.......
..3
Contenido del paquete...............................
.........
....
.......
..3
Esta producto viene con una garantía limitada de un (1) años. Para más información, póngase en contacto con el Equipo de Servico al Cliente
llamando al 1-855-HD-GLACIER o visite www.HomeDepot.com/GlacierBay.
Instalación............................................................
..........
4
Mantenimiento y limpieza....................................
............
4

3
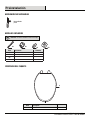
Preinstalación
HERRAJES INCLUIDOS
CONTENIDO DEL PAQUETE
Cantidad
A Asiento de inodoro 1
Destornillador
plano
HERRAMIENTAS NECESARIAS
Descripción Cantidad
A
A
BB Cierre a presión
CC
AA BB
CC
DD
Contratuerca DD
2
2
2
2
NOTA: .
No se muestra el tamaño real de los herrajes.
Pieza
Tornillo
Arandela
Descripción
Pieza
HOMEDEPOT.COM/GLACIERBAY
Para obtener asistencia, llama al 1-855-HD-GLACIER.
A

4
Installation
Instalación
De ser necesario, retira el viejo asiento del inodoro.
Hala hacia arriba las cubiertas de bisagra del asiento
del inodoro (A) para dejar los oricios al descubierto.
Enrosca el tornillo (AA) a través del cierre a presión (BB)
y enseguida a través del oricio de la bisagra.
Repite con otro tornillo (AA), cierre a presión (BB) y oricio.
1
Preparación para la instalación
2
Cómo instalar el asiento del inodoro
3
Cómo liberar el asiento (opcional)
4
Cómo quitar el asiento (opcional)
A
AA
BB
Levanta el asiento del inodoro (A) hacia arriba separándolo
del inodoro.
Hala hacia arriba las cubiertas de bisagra del asiento
del inodoro (A) para liberar los cierres a presión (BB).
CC
DD
Alinea los tornillos (AA) en las bisagras del asiento del inodoro
(A) con los oricios de la taza del inodoro, y enrosca.
En la parte inferior de la taza del inodoro enrosca una arandela
(CC) en el tornillo (AA) y enseguida una contratuerca (DD).
Gira la contratuerca (DD) hacia la derecha para ajustar. Repite
en el otro lado.
Aprieta los tornillos (AA) con el destornillador plano.
AA
A
A
A

5
Apretar nuevamente las tuercas luego que el asiento haya estado en uso durante varias semanas.
No usar productos abrasivos o productos químicos corrosivos para la limpieza.
Limpiar con un trapo suave y húmedo usando detergente suave.
Mantenimiento y Limpieza
HOMEDEPOT.COM/GLACIERBAY
Para obtener asistencia, llama al 1-855-HD-GLACIER.

1-855-HD-GLACIER
HOMEDEPOT.COM/GLACIERBAY
¿Preguntas, problemas o piezas faltantes? Antes de devolver a la tienda,
comunícate con el servicio al cliente de Home Decorators Collection
De lunes a viernes, entre 8:00 a.m. y 7:00 p.m. (hora estándar del Este),
y los sábados de 9:00 a.m. a 6:00 p.m. (hora estándar del Este)
Conserva este manual para referencia futura.
-
 1
1
-
 2
2
-
 3
3
-
 4
4
-
 5
5
-
 6
6
-
 7
7
-
 8
8
-
 9
9
-
 10
10
-
 11
11
-
 12
12


Glacier Bay TSPE0513-BO Guía de instalación
- Tipo
- Guía de instalación
- Este manual también es adecuado para
en otros idiomas
Artículos relacionados
-
Glacier Bay TSPR1509-BO Guía de instalación
-
-
-
Glacier Bay N2420E-SF Guía de instalación
-
-
-