
49-5000429 Rev. 2 01-20 GEA
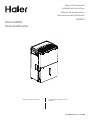
Owner’s Manual and
Installation Instruction
Manual del propietario y
instrucciones de instalación
QPHR50
Design may vary by model number. El diseño puede variar según el número
de modelo
Dehumidifier
Deshumidificador

2 49-5000429 Rev. 2
ENGLISH

49-5000429 Rev. 2 3
ENGLISH
TABLE OF CONTENTS
SAFTEY INFORMATION ...........................................................................................4
CONTROL PANEL .................................................................................................5
INSTALLATION INSTRUCTIONS ...................................................................................6
USING THE DEHUMIDIFIER ...................................................................................... 7
CARE AND CLEANING .......................................................................................... 10
TROUBLESHOOTING ............................................................................................11
LIMITED WARRANTY ............................................................................................12
RECORD KEEPING
Thank you for purchasing this Haier product. This user
manual will help you get the best performance from your new
dehumidifier.
Para referencia futura, registre el modelo y el número de serie
ubicados en el deshumidificador y la fecha de compra.
Staple your proof of purchase to this manual to aid in
obtaining warranty service if needed.
____________________________________________________
Model number
____________________________________________________
Serial number
____________________________________________________
Date of purchase
HAIER WEBSITE
Have a question or need assistance with your appliance? Try the Haier Website 24 hours a day, any day of the year!
You can also shop for more great Haier products and take advantage of all our on-line support services designed for
your convenience. In the US: Haierappliances.com

4 49-5000429 Rev. 2
ENGLISH
READ AND SAVE THESE INSTRUCTIONS
IMPORTANT SAFETY INFORMATION
READ ALL INSTRUCTIONS BEFORE USING THE APPLIANCE
WARNING
For your safety, the information in this manual must be followed to minimize the risk of fire, electric
shock or personal injury.
•
Use this appliance only for its intended purpose as
described in this Owner’s Manual.
•
This dehumidifier must be properly installed and grounded
as described in this manual before it is used.
•
Never operate this dehumidifier in an area that is likely to
accumulate standing water. If this condition develops, for
your safety disconnect the power supply before stepping
into the water.
•
Never unplug your dehumidifier by pulling on the power
cord. Always grip plug firmly and pull straight out from the
receptacle.
•
Replace immediately all electric service cords that have
become frayed or otherwise damaged. A damaged power
supply cord must be replaced with a new power supply cord
obtained from the manufacturer and not repaired. Do not
use a cord that shows cracks or abrasion damage along its
length or at either the plug or connector end.
•
If the receptacle does not match the plug, the receptacle
must be changed out by a qualified electrician
•
If the SUPPLY CORD is damaged, it must be replaced by the
manufacturer, its service agent or similarly qualified person
in order to avoid a hazard.
•
The appliance shall be installed in accordance with national
wiring regulations.
•
Turn the dehumidifier OFF and unplug it before cleaning.
•
Haier does not support any servicing of the dehumidifier.
We strongly recommend that you do not attempt to
service the dehumidifier yourself.
•
For your safety, do not store or use combustible materials,
gasoline or other flammable vapors or liquids in the vicinity
of this or any other appliance.
•
All dehumidifiers contain refrigerants, which under federal
law must be removed prior to product disposal. If you are
getting rid of an old product with refrigerants, check with
the company handling disposal about what to do.
•
Do not use outdoors.
•
This dehumidifier is intended for indoor residential
applications only. This dehumidifier should not be used for
commercial or industrial applications.
•
These R410A Dehumidifier Systems require contractors
and technicians to use tools, equipment and safety
standards approved for use with this refrigerant. DO NOT
use equipment certified for R22 refrigerant only.
•
This appliance can be used by persons with reduced physical,
sensory or mental capabilities or lack of experience and
knowledge if they have been given supervision or instruction
concerning use of the appliance in a safe way and understand
the hazards involved.
WARNING
USE OF EXTENSION CORDS
RISK OF FIRE. Could cause serious injury or death.
•
DO NOT use an extension cord with this Dehumidifier.
•
DO NOT use surge protectors or multi-outlet adaptors
with this Dehumidifier.
HOW TO CONNECT ELECTRICITY
Do not, under any circumstances, cut or remove the third
(ground) prong from the power cord. For personal safety, this
appliance must be properly grounded.
DO NOT use an adapter plug with this appliance.
The power cord of this appliance is equipped with a 3-prong
(grounding) plug which mates with a standard 3-prong
(grounding) wall outlet to minimize the possibility of electric
shock hazard from this appliance.
Have the wall outlet and circuit checked by a qualified
electrician to make sure the outlet is properly grounded.
Where a 2-prong wall outlet is encountered, it is your
personal responsibility and obligation to have it replaced with
a properly grounded 3-prong wall outlet.
The dehumidifier should always be plugged into its own
individual electrical outlet, which has a voltage rating
matching the rating plate.
This provides the best performance and also prevents
overloading house wiring circuits, which could cause a fire
hazard from overheated wires.
RECYCLING INFORMATION
For appliance recycling information please visit www.geappliances.com/recycling.
SAFETY INFORMATION

49-5000429 Rev. 2 5
ENGLISH
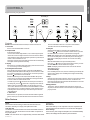
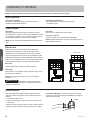
CONTROLS
Other Features
Controls
NOTE: When the bucket is full or removed, the controls cannot be set.
1. Power Pad
Press to turn the dehumidifier on and off.
"ÏäñÜóèèçÙäç
Controls the fan speed.
Press to select either High, Medium, Low, or Smart Dry fan speed.
Set the fan control to High for maximum moisture removal. When
the humidity has been reduced and quiet operation is preferred, set
the fan control to Medium or Low.
Smart Dry compares the set humidity level with the actual humidity
and adjusts the fan speed automatically.
3. Display
Shows the set % humidity level while setting, then shows the actual
(+/– 5% accuracy) room % humidity level.
$Ñøðìçì÷üÜè÷Ìòñ÷õòïÙäçö
Ýëèëøðìçì÷üïèùèïæäñåèöè÷úì÷ëìñäõäñêèòé#%]ÛѤÛèïä÷ìùè
Ñøðìçì÷ü¥÷ò( ]ÛѤÛèïä÷ìùèÑøðìçì÷ü¥ìñ%]ìñæõèðèñ÷öòõä÷×Ü
for continuous operation. To set the unit for continuous operation,
press the
pad until the screen reads NS.
NOTE: If NS (Nonstop) is selected, the dehumidifier will operate
continuously at its maximum dehumidification settings if attached
to a hose to drain or until the bucket is full.
For drier air, press the
pad and set to a lower percent value (%).
For damper air, press the pad and set to a higher percent value (%).
When you first use the dehumidifier, set the humidity control to
45% or 50%. Allow at least 24 hours for the dehumidifier to achieve
the humidity level. If you still have damper air than desired, set the
humidity level to a lower setting or select Nonstop for maximum
dehumidification.
5. Filter Timer
After 250 hours of operation, the Clean the Filter indicator light will
glow to remind you to clean the filter. Remove the filter and clean it.
Press and hold filter button for 3 seconds to reset the filter
reminder. See the Care and Cleaning section.
6. Delay Off
While the dehumidifier is operating press the Delay button.
Press the
/ buttons to select the number of hours you want
the dehumidifier to continue to operate before turning Off.
NOTE: After displaying the time, the Display will revert to showing
the current humidity after 5 seconds have passed. Pressing the
Delay button will display the number of hours left on the delay.
Delay On
While the dehumidifier is off press the Delay button.
Press the
/ buttons to select the number of hours you want
the dehumidifier to remain off before turning On.
NOTE: The display will show the number of hours left until the
dehumidifier turns on.
To cancel the Delay:
Press the Delay button once, the hours remaining on the Delay will
appear on the display. Press the Delay button again and the Delay
will be cancelled.
7. Pump
Activates the internal pump function. Press for 3 seconds to activate
the internal pump for automatic removal of condensate. The
internal pump indicator light will remain illuminated after 3 seconds.
Press to deactivate the pump.
8. Empty Indicator
The “Empty” indicator will blink when the bucket is ready to be
emptied, or when the bucket is removed and/or not replaced in the
proper position.
Alarm
If the bucket is full or missing, an alarm will sound for about 10
seconds to remind you to empty and replace the bucket.
Auto Shut Off
The Water Level Control Switch shuts off the dehumidifier when the
bucket is full, or when the bucket is removed and/or not replaced in
the proper position.
NOTE: Fan will continue to run approximately 3 minutes after bucket
is removed.
Auto Defrost
When frost builds up on the evaporator coils, the compressor will
cycle off and the fan will continue to run until the frost disappears.
Power Outage
In the case of a power outage or interruption, the unit will automatically
restart, in the settings last used, after the power is restored.
Appearance may vary by model.
Humidity %

6 49-5000429 Rev. 2
ENGLISH
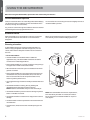
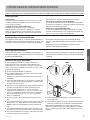
Choosing a Location
How the Dehumidifier Operates
Moist, humid air is drawn over a cold refrigerated dehumidifying
coil. Moisture in the air condenses on this coil and drains into a
bucket (or through a hose and drain).
Dry, clean air is drawn through the condenser where it is heated
and discharged out the top grille into the room.
It is normal for the surrounding air to become slightly warmer as
the dehumidifier operates.
Automatic Defrost
When frost builds up on the evaporator coils, the compressor
will cycle off and the fan will continue to run until the frost
disappears.
When the coil is defrosted, the compressor or fan will
automatically restart and dehumidifying will resume.
When first using the dehumidifier, operate the unit continuously for 24 hours.
A dehumidifier operating in a basement will have little or no
effect in drying an adjacent enclosed storage area, such as a
closet, unless there is adequate circulation of air in and out of
the area.
•
Do not use outdoors.
•
This dehumidifier is intended for indoor residential
applications only. This dehumidifier should not be used for
commercial or industrial applications.
•
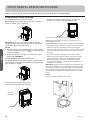
Place the dehumidifier on a smooth, level floor strong enough
to support the unit with a full bucket of water.
•
Allow at least 18 inches of air space on all sides of the unit for
good air circulation.
•
Place the dehumidifier in an area where the temperature will
not fall below 41°F (5°C) or above 90°F (32°C). The coils can
become covered with frost at temperatures below 41°F,
which may reduce performance.
•
The suggested range of relative humidity is between 40% and
50%
•
Use the dehumidifier in cooking, laundry, bathing and
dishwashing areas that have excessive moisture.
NOTE: Place the dehumidifier away from the clothes dryer.
•
Use the dehumidifier to prevent moisture damage anywhere
books or valuables are stored.
•
Use the dehumidifier in a basement to help prevent moisture
damage.
•
The dehumidifier must be operated in an enclosed area to be
most effective.
•
Close all doors, windows and other outside openings to the
room.
NOTE: The dehumidifier has rollers to aid placement,
but it should only be rolled on smooth, flat surfaces.
Do not attempt to roll the dehumidifier on carpet or
over objects.
41 °F
(5 °C)
41 °F
(5 °C)
Above
Below
Correct Wrong
at least 18 inches
at least 18 inches
USING THE DEHUMIDIFIER

49-5000429 Rev. 2 7
ENGLISH
USING THE DEHUMIDIFIER
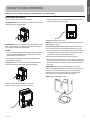
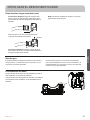
Removing Collected Water
There are 3 ways to remove collected water:
Use the bucket. When the bucket is removed, the unit will shut
off. Empty and replace the bucket.
IMPORTANT: Do not use the hose if using the bucket to collect
water. When the hose is connected, water will flow through it
onto the floor instead of into the bucket.
NOTES:
•
Do not remove the bucket while the dehumidifier is operating
or if it has just stopped operating. This might cause some
water to drip from the drain pan.
•
The bucket must be in place and securely seated for the
dehumidifier to operate.
Use a hose. Water can be automatically emptied into a floor
drain by attaching a garden water hose (not included).
1. Remove the bucket from the front of the unit.
2. Open the drain cover on the side of the unit.
3. Thread a garden hose (not supplied) onto the nozzle, cut to
length, and lead it to the floor drain.
4. Replace the bucket in the unit.
NOTE: The bucket must be in place and securely seated for the
dehumidifier to operate.
Use the internal pump. Water can be automatically emptied
into a remote location by attaching the included pump hose.
1. Attach the pump hose to the hose connector by pushing the
tube fitting into the connector until it fits into place (should
not be able to remove the hose when pulled).
2. Position the hose discharge to the desired location.
3. Make sure the pump is activated. To activate the pump, press
and hold the Pump button for 3 seconds. The Pump indicator
light will flash then remain illuminated once the 3 seconds are
complete.
IMPORTANT: Make sure the condensate hose is properly
connected and is not kinked, bent or cracked as this may cause
water to flow onto the floor. The bucket must also be fully
seated for the pump to work properly. Do not operate the
machine if the room temperature is 41°F or below.
NOTE: Maximum lift height is 16ft.
Always make sure the water bucket is locked into place on the dehumidifier.

8 49-5000429 Rev. 2
ENGLISH
USING THE DEHUMIDIFIER
Removing Collected Water (Continued)
Water Level
The dehumidifier will turn off automatically when the bucket is
full, or when the bucket is removed or not replaced in the proper
position.
The bucket must be replaced in the proper position for the
dehumidifier to work. The light will be on and the dehumidifier
will not run if the bucket is not in the proper position.
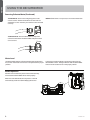
Bucket Operation
DO NOT remove the foam piece in the bucket assembly.
If removed the Dehumidifier will not work properly.
When the coil is defrosted, the compressor or fan will
automatically restart and dehumidifying will resume.
To Install Hose: Push in hose and gently pull to make
sure it is secure. Should not be able to be removed. You
should hear a “click” that lets you know the hose is inserted
correctly.
To Release Hose: Press the blue button on top of the
connector attached to the dehumidifier and pull the hose
out to remove.
NOTE: DO NOT kink or crimp hose, as it can block water flow.
Insert
Press
Pull

49-5000429 Rev. 2 9
ENGLISH
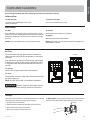
Air Filter
The air filter behind the rear grille should be checked and
cleaned at least every 250 hours of operation or more often if
necessary.
After 250 hours of operation, the Filter indicator light will glow
to remind you to clean the filter. Remove the filter and clean
it. Replace the filter and press and hold the filter button for 3
seconds.
To remove:
Remove the rear grille and the filter will be attached.
To clean:
Clean the filter with warm, soapy water. Rinse and let the filter
dry before replacing it.
NOTE: DO NOT put the filter in an automatic dishwasher.
CAUTION
DO NOT operate the dehumidifier without a
filter because dirt and lint will clog it and reduce performance.
Grille and Case
To clean the case:
Use water and a mild detergent. Do not use
bleach or abrasives.
To clean the rear grille:
Use a vacuum attachment or brush.
Water Bucket
To clean:
Every few weeks, clean the bucket to prevent growth of mold,
mildew and bacteria. Partially fill the bucket with clean water and
add a little mild detergent. Swish it around in the bucket, empty
and rinse.
NOTE: Do not use a dishwasher to clean the water bucket.
To remove:
Remove the bucket and pour out any water.
To replace:
Slide the bucket into the dehumidifier.
NOTE: The bucket must be in place and securely seated for the
dehumidifier to operate.
Turn off the dehumidifier and remove the plug from the wall outlet before cleaning.
CARE AND CLEANING
Air filter
Storage
If the unit is to be stored for an extended period of time, take the
following actions before putting away the machine.
1. Empty the bucket of all water.
2. Clean the water bucket and bucket filter per instructions.
3. Allow water bucket to dry and reinstall.
4. Remove pump hose and store with unit.
To Release Hose: Press the blue button on top of the connector
attached to the dehumidifier and pull the hose out to remove.
Press
Pull

10 49-5000429 Rev. 2
ENGLISH
NOTES

49-5000429 Rev. 2 11
ENGLISH
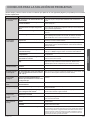
Save time and money! Review the charts on the following pages first and you may not need to call for service.
Problem Possible Cause What To Do
Dehumidifier does
not start
The dehumidifier is unplugged. Makes sure the dehumidifier’s plug is pushed completely into the
outlet.
The fuse is blown/circuit breaker is
tripped.
Check the house fuse/circuit breaker box and replace the fuse or reset
the breaker.
Dehumidifier has reached its set
humidity level or bucket is full.
The dehumidifier automatically turns off when either condition occurs.
Change to a lower setting or empty the bucket and replace properly.
Bucket is not in the proper position. The bucket must be in place and securely seated for the dehumidifier
to operate.
Power Failure. There is a protective time delay (up to 3 minutes) to prevent tripping
of the compressor overload. For this reason, the unit may not start
normal dehumidification for 3 minutes after turning back on.
Dehumidifier does
not dry the air as it
should
Did not allow enough time to
remove the moisture.
When first installed, allow at least 24 hours to maintain the desired
dryness.
Airflow is restricted.
Make sure there are no curtains, blinds or furniture blocking the top or
back of the dehumidifier. See the Choosing a Location section.
Dirty Filter See the Care and Cleaning section.
The Humidity Control may not be
set low enough.
For drier air, press the – pad and set to a lower percent value (%) or at
NS (Nonstop) for maximum dehumidification.
Doors and windows may not be
closed tightly.
Check that all doors, windows and other openings are securely closed.
Clothes dryer may be blowing
moisure-laden air into the room.
Install the dehumidifier away from the dyer. The dryer should be
vented to the outside.
Room temperature is too low. Moisture removal is best at higher room temperatures. Lower room
temperatures will reduce the moisture removal rate. Models are
designed to be operated at temperatures above 41°F (5°C).
Dehumidifier runs
too much
Area to be dehumidified is too large.
The capacity of your dehumidifier may not be adequate.
Doors and windows are open. Close all doors and windows to the outside.
Frost appears on the
coils
Dehumidifier has been turned on
recently, or room temperature is
below 41°F (5°C)
This is normal. Frost will usually disappear within 60 minutes. See the
Automatic Defrost section
Control cannot be
set
The compressor will turn off and the
fan will automatically continue to
run for approximately 3 minutes at a
fixed setting.
This is normal. Wait approximately 3 minutes and set the fan as
desired.
Fan noise Air is moving through the
dehumidifier.
This is normal.
Water on floor Hose connection may be loose. Check the hose connection. See the Removing Collected Water
section.
Intended to use the bucket to collect
water, but a hose was attached.
Disconnect the hose if using a bucket to collect water. See the
Removing Collected Water section.
Bucket Full LED light
flashing and alarm
sounds while drain
hose is connected.
Drain hose not tight on fitting. Check drain hose connection.
Drain hose is kinked. Ensure the drain hose is pointed straight down to the floor and is not
kinked in anyway.
Bucket fills up when
using drain pump
Unit not in pump mode Ensure pump is turned on and pump light is illuminated
Pump Hose not installed Ensure pump hose is properly installed on back of unit
Water level sensor issue This may be caused by very humid conditions or error with float
sensor. Check unit for a P1 error code on display. If this is present -
turn off the unit, unplug unit for a few seconds, plug back in and turn
on the unit to reset sensor. If this error continues to occur refer to
warranty section for exchange options.
TROUBLESHOOTING

12 49-5000429 Rev. 2
ENGLISH
•
Customer instruction. This owner’s manual provides
information regarding operating instructions and
user controls.
•
Improper installation. If you have an installation problem,
or if the product is of improper capacity, contact your
dealer or installer. You are responsible for providing
adequate electrical connecting facilities.
•
Failure of the product resulting from modifications to the
product or due to unreasonable use including failure to
provide reasonable and necessary maintenance.
•
Replacement of house fuses or resetting of circuit
breakers.
•
Failure due to corrosion.
•
Damage to the product caused by improper power
supply voltage, accident, fire, floods or acts of God.
•
Incidental or consequential damage caused by possible
defects with this product.
•
Damage caused after delivery.
What Haier Will Not Cover:
This limited warranty is extended to the original purchaser and any succeeding owner for products purchased for home
use within the USA.
Some states do not allow the exclusion or limitation of incidental or consequential damages. This limited warranty gives
you specific legal rights, and you may also have other rights which vary from state to state. To know what your legal
rights are, consult your local or state consumer affairs office or your state’s Attorney General.
Exclusion of implied warranties: Except where prohibited or restricted by law, there are no warranties, whether express,
oral or statutory which extend beyond the description on the face hereof, including specifically the implied warranties of
merchantability or fitness for a particular purpose.
Warrantor: GE Appliances, a Haier company
Louisville, KY 40225
EXCLUSION OF IMPLIED WARRANTIES—Your sole and exclusive remedy is product repair as provided in this Limited
Warranty. Any implied warranties, including the implied warranties of merchantability or fitness for a particular
purpose, are limited to one year or the shortest period allowed by law.
For The Period Of: Haier Will Replace:
One Year
From the date of the original
purchase
Replacement unit for any product which fails due to a defect in materials or
workmanship. The replacement unit is warranted for the remainder of your product’s
original one-year warranty period. The replacement unit may either be a new unit or a
refurbished unit.
•
Properly pack your unit. We recommend using
the original carton and packing materials.
•
Return the product to the retail location where
it was purchased.
•
Include in the package a copy of the sales receipt or other
evidence of date of original purchase. Also print your name
and address and a description of the defect.
In Order to Make a Warranty Claim During the First 90 Days from the Date of Original Purchase:
•
Locate your original sales receipt and make a note
of your model and serial number.
•
Call Haier at 800.432.2737 to initiate the product
replacement process.
•
You will be asked to provide your name, address,
date of purchase, model and serial number.
•
Haier will arrange for a carton to be sent to your home to
recover the product.
•
You must return the product (postage pre-paid by Haier)
to GE Applaince’s recovery center before a replacement
unit will be provided. Please include a description of the
defect.
•
You should receive your replacement product within
7 to 10 business days after your unit is received.
In Order to Make a Warranty Claim During the Remainder of the One-Year Warranty:
Staple your receipt here. Proof of the original purchase
date is needed to obtain service under the warranty.
LIMITED WARRANTY
Printed in China

49-5000429 Rev. 2 13
ESPAÑOL
ÍNDICE
SEGURIDAD DEL ACONDICIONADOR DE AIRE ......................................................................... 15
PANEL DE CONTROL .................................................................................................. 16
INSTRUCCIONES DE INSTALACIÓN ................................................................................... 17
CÓMO USAR EL DESHUMEDIFICADOR ................................................................................ 18
CUIDADO Y LIMPIEZA ................................................................................................. 21
SOLUCIÓN DE PROBLEMAS ............................................................................................22
GARANTÍA LIMITADA ..................................................................................................23
SITIO WEB DE HAIER
¿Desea realizar una consulta o necesita ayuda con su electrodoméstico? ¡Intente a través del Sitio Web de Haier las 24 horas del día,
cualquier día del año! Usted también puede comprar más electrodomésticos maravillosos de Haier y aprovechar todos nuestros servicios
de soporte a través de Internet, diseñados para su conveniencia. En EE.UU.: Haierappliances.com
INFORMACIÓN A TENER EN CUENTA
Le agradecemos la compra de este producto de marca Haier. Este
manual del usuario lo ayudará a obtener el mejor rendimiento de su
nuevo deshumidificador.
Para referencia futura, registre el modelo y número de serie ubicados
en el frente, detrás del cajón de almacenamiento de la cocina, y la
fecha de compra.
Engrape la prueba de compra a este manual para asistirle cuando
necesite obtener servicio bajo la garantía.
__________________________________________________________
Número de modelo
__________________________________________________________
Número de serie
__________________________________________________________
Fecha de compra

14 49-5000429 Rev. 2
ESPAÑOL

49-5000429 Rev. 2 15
ESPAÑOL
INFORMACIÓN IMPORTANTE DE SEGURIDAD
LEA TODAS LAS INSTRUCCIONES ANTES DE USAR ESTE ELECTRODOMÉSTICO
LEA Y GUARDE ESTAS INSTRUCCIONES
ADVERTENCIA
Por su seguridad, se debe seguir la información en este manual para minimizar el riesgo de
incendios, descargas eléctricas o lesiones personales.
Ŷ8VHHVWHHOHFWURGRPpVWLFRVRODPHQWHSDUDHOSURSyVLWR
GHWHUPLQDGRVHJ~QVHGHVFULEHHQHVWH0DQXDOGHO
SURSLHWDULR
Ŷ(VWHGHVKXPHGLILFDGRUGHEHLQVWDODUVHFRUUHFWDPHQWH\
FRQHFWDGRDWLHUUDGHDFXHUGRFRQODVLQVWUXFFLRQHVGHHVWH
PDQXDODQWHVGHVXXVR
Ŷ1XQFDRSHUHHVWHGHVKXPHGLILFDGRUHQXQiUHDHQODTXH
HVSRVLEOHTXHVHDFXPXOHDJXD'HHQFRQWUDUVHHQHVWDV
FRQGLFLRQHVSRUVXVHJXULGDGGHVFRQHFWHHOVXPLQLVWURGH
FRUULHQWHHOpFWULFDDQWHVGHSLVDUVREUH
HODJXD
Ŷ1XQFDGHVHQFKXIHVXGHVKXPHGLILFDGRUWLUDQGRGHOFDEOH
HOpFWULFR6LHPSUHDJDUUHILUPHPHQWHHOHQFKXIH\WLUHGHpO
GLUHFWDPHQWHKDFLDDIXHUD
Ŷ5HHPSODFHLQPHGLDWDPHQWHWRGRVORVFDEOHVHOpFWULFRVTXH
VHKD\DQSHODGRRTXHVHKD\DQGDxDGRGHDOJXQDRWUD
PDQHUD8QFDEOHGHFRUULHQWHGDxDGRQRGHEHUHSDUDUVH
VLQRTXHGHEHVHUVXVWLWXLGRSRUXQRQXHYRTXHVHDGTXLHUD
GHOIDEULFDQWH1RXVHXQFDEOHHOpFWULFRTXHPXHVWUH
HYLGHQFLDVGHGHWHULRURRGDxRVGHDEUDVLyQHQVXVXSHUILFLH
HQDOJXQRGHVXVH[WUHPRV
Ŷ6LHOUHFHSWiFXORQRFRLQFLGHFRQHOHQFKXIHXQHOHFWULFLVWD
FDOLILFDGRGHEHUHHPSOD]DUHOUHFHSWiFXOR
Ŷ6LHO&$%/('($/,0(17$&,21HVWiGDxDGRGHEHUiVHU
UHHPSOD]DGRSRUHOIDEULFDQWHVXDJHQWHGHVHUYLFLRVRXQD
SHUVRQDFRQFDOLILFDFLyQVLPLODUDILQGHHYLWDUULHVJRV
Ŷ(OHOHFWURGRPpVWLFRGHEHUiVHULQVWDODGRGHDFXHUGRFRQODV
UHJXODFLRQHVGHFDEOHDGRQDFLRQDOHV
Ŷ$SDJXHHOFRQWURO\GHVHQFKXIHVXGHVKXPHGLILFDGRUDQWHV
GHKDFHUFXDOTXLHUUHSDUDFLyQROLPSLDU
Ŷ*($SSOLDQFHVQRHVWiQRDSR\DTXHVHOHSURSRUFLRQH
QLQJ~QVHUYLFLRDOGHVKXPHGLILFDGRU9HKHPHQWHPHQWH
UHFRPHQGDPRVTXHXVWHGQRLQWHQWHSURSRUFLRQDUVHUYLFLRDO
GHVKXPHGLILFDGRUXVWHGPLVPR
Ŷ3RUVXVHJXULGDGQRDOPDFHQHQLXVHPDWHULDOHV
FRPEXVWLEOHVJDVROLQDXRWURVYDSRUHVROtTXLGRVLQIODPDEOHV
HQODSUR[LPLGDGGHpVWHRDOJ~QRWURHOHFWURGRPpVWLFR
Ŷ1RXVHHOGHVKXPHGLILFDGRUHQH[WHULRUHV
Ŷ(VWHGHVKXPHGLILFDGRUHVWiGLVHxDGRH[FOXVLYDPHQWHSDUD
DSOLFDFLRQHVUHVLGHQFLDOHVGHLQWHULRU1RGHEHXVDUVHSDUD
DSOLFDFLRQHVFRPHUFLDOHVQLLQGXVWULDOHV
Ŷ(VWRV6LVWHPDV'HVKXPHGLILFDGRUHV5$UHTXLHUHQTXH
ORVFRQWUDWLVWDV\WpFQLFRVXWLOLFHQKHUUDPLHQWDVHTXLSDPLHQWR
\QRUPDVGHVHJXULGDGDSUREDGDVSDUDVXXVRFRQHVWH
UHIULJHUDQWH12XWLOLFHHTXLSDPLHQWRFHUWLILFDGRVyORSDUD
UHIULJHUDQWH5
Ŷ(VWHHOHFWURGRPpVWLFRSXHGHVHUXVDGRSRUSHUVRQDVFRQ
FDSDFLGDGHVItVLFDVVHQVRULDOHVRPHQWDOHVUHGXFLGDVR
FRQIDOWDGHH[SHULHQFLD\FRQRFLPLHQWRVLOHVIXHGDGD
VXSHUYLVLyQRLQVWUXFFLyQUHODFLRQDGDFRQHOXVRGHHVWH
HOHFWURGRPpVWLFRGHXQDIRUPDVHJXUD\HQWLHQGHQORV
ULHVJRVLQYROXFUDGRV
ADVERTENCIA
USO DE PROLONGADORES
RIESGO DE INCENDIO. Podría ocasionar lesiones graves o la muerte.
Ŷ12XVHSURORQJDGRUHVFRQHVWH'HVKXPLGLILFDGRU
Ŷ12XVHSURWHFWRUHVFRQWUDSLFRVGHFRUULHQWHQLDGDSWDGRUHV
SDUDP~OWLSOHVWRPDFRUULHQWHVFRQHVWH'HVKXPLGLILFDGRU
COMO CONECTAR LA ELECTRICIDAD
%DMRQLQJXQDFLUFXQVWDQFLDFRUWHRUHPXHYDODWHUFHUDS~D
WLHUUDGHOFDEOHHOpFWULFR(QSRVGHODVHJXULGDGSHUVRQDO
HVWHHOHFWURGRPpVWLFRGHEHVLHPSUHFRQHFWDUVHDWLHUUD
1286(XQHQFKXIHDGDSWDGRUFRQHVWHDSDUDWR
(OFDEOHHOpFWULFRGHHVWHHOHFWURGRPpVWLFRHVWiHTXLSDGR
FRQXQHQFKXIHGHWUHVS~DVWLHUUDTXHFRPELQDFRQXQ
WRPDFRUULHQWHHVWiQGDUGHWUHVWRPDVGHSDUHGSDUDPLQLPL]DU
ODSRVLELOLGDGGHXQDGHVFDUJDHOpFWULFD
3LGDDXQWpFQLFRTXHLQVSHFFLRQHHOWRPDFRUULHQWH\HOFLUFXLWR
SDUDFHUFLRUDUVHGHTXHHOWRPDFRUULHQWHHVWiFRQHFWDGRDWLHUUD
GHODPDQHUDDSURSLDGD
'RQGHH[LVWDXQWRPDFRUULHQWHGHGRVWRPDVHVVX
UHVSRQVDELOLGDG\REOLJDFLyQSHUVRQDOKDFHUTXHGLFKR
WRPDFRUULHQWHVHDUHHPSOD]DGRSRUXQRGHWUHVWRPDVFRQ
FRQH[LyQDWLHUUD
(OGHVKXPHGLILFDGRUGHEHUtDVLHPSUHHVWDUFRQHFWDGR
DXQWRPDFRUULHQWHLQGLYLGXDOFRQVXFLUFXLWRGHYROWDMH
FRUUHVSRQGLHQWH
(VWRSURSRUFLRQDHOPD\RUUHQGLPLHQWR\DGHPiVHYLWDTXHORV
FLUFXLWRVGHOUHVWRGHODFDVDVHVREUHFDUJXHQORFXDOSRGUtD
FDXVDULQFHQGLRVSRUHOVREUHFDOHQWDPLHQWRGHOFDEOHDGR
INFORMACIÓN SOBRE CÓMO RECICLAR
Para acceder a información sobre como reciclar sus electrodomésticos, ingrese a www.geappliances.com/recycling.
SEGURIDAD DEL ACONDICIONADOR DE AIRE

16 49-5000429 Rev. 2
ESPAÑOL
CONTROLES
/DDSDULHQFLDSXHGHYDULDUGHDFXHUGRDOPRGHOR
Controles
NOTA: &XDQGRHOUHFLSLHQWHHVWiOOHQRRHVUHWLUDGRORVFRQWUROHV
QRSXHGHQVHUDMXVWDGRV
1. Power Pad
3UHVLRQHSDUDHQFHQGHURDSDJDUHOGHVKXPHGLILFDGRU
2. Boton de velocidad del ventilador (Fan Speed)
&RQWURODODYHORFLGDGGHFLUFXODFLyQGHODLUH
3UHVLRQHSDUDVHOHFFLRQDUODYHORFLGDGGHOYHQWLODGRUHQDOWD
+LJKPHGLR0HGLXPREDMR/RZ
&RORTXHHOFRQWUROGHOYHQWLODGRUDDOWD+LJKYHORFLGDGSDUD
ORJUDUUHPRYHUODPD\RUFDQWLGDG
GHKXPHGDG&XDQGRODKXPHGDGKD\DVLGRUHGXFLGD\XVWHG
SUHILHUDXQDRSHUDFLyQPiVWUDQTXLODFRORTXHHOFRQWUROGHO
YHQWLODGRUDPHGLR0HGLXPREDMR/RZYHORFLGDG
3. Pantalla
0XHVWUDHOGHOQLYHOGHKXPHGDGSURJUDPDGRGXUDQWHOD
FRQILJXUDFLyQOXHJRPXHVWUDHOGHOQLYHOGHKXPHGDGUHDOGH
ODKDELWDFLyQFRQXQDSUHFLVLyQGH±
4.
Botones para el Control de humedad
(Humidity Set Control)
/DKXPHGDGVHSXHGHFRQWURODUDQLYHOHVGHHQWUH+5
KXPHGDGUHODWLYD±+5KXPHGDGUHODWLYDHQLQFUHPHQWRV
GHORFRQ16SDUDXQIXQFLRQDPLHQWRFRQWLQXR3DUD
FRQILJXUDUODXQLGDGHQRSHUDFLyQFRQWLQXDSUHVLRQHODIOHFKD
KDFLDDEDMRKDVWDTXHVHREVHUYH16HQODSDQWDOOD
NOTA: 6LVHVHOHFFLRQD161RQVWRSHOGHVKXPHGLILFDGRU
IXQFLRQDUiHQIRUPDFRQWLQXDHQODFRQILJXUDFLyQPi[LPDGH
GHVKXPHGLILFDFLyQKDVWDTXHVHOOHQHHOWDQTXH
6LGHVHDDLUHPiVVHFRSUHVLRQHHOERWyQ–\VHOHFFLRQHXQ
YDORUSRUFHQWXDOPiVEDMR
6LGHVHDDLUHPiVK~PHGRSUHVLRQHHOERWyQ+\VHOHFFLRQH
XQYDORUSRUFHQWXDOPiVDOWR
&XDQGRXVHSRUSULPHUDYH]HOGHVKXPHGLILFDGRUFRORTXH
HOFRQWUROGHOGHVKXPHGLILFDGRUDy3HUPLWD
TXHWUDQVFXUUDQSRUORPHQRVKRUDVSDUDTXHHO
GHVKXPHGLILFDGRUDOFDQFHHOQLYHOGHKXPHGDG6LHO
DLUHD~QHVWiPiVK~PHGRGHORGHVHDGRDMXVWHHOQLYHO
GHKXPHGDGDXQQLYHOPHQRURVHOHFFLRQHHOERWyQGH
IXQFLRQDPLHQWRFRQWLQXR1RQVWRSSDUDREWHQHUXQDPi[LPD
GHVKXPLGLILFDFLyQ
5. Temporizador del filtro (Filter Timer)
'HVSXpVGHKRUDVGHRSHUDFLyQVHHQFHQGHUiODOX]
LQGLFDGRUDGH&OHDQWKH)LOWHU/LPSLH]DGHILOWURSDUD
UHFRUGDUOHTXHGHEHOLPSLDUHOILOWUR4XLWHHOILOWUR\OtPSLHOR
0DQWHQJDSUHVLRQDGRHOERWyQGHOILOWURGXUDQWHVHJXQGRV
SDUDUHVWDEOHFHUHOUHFRUGDWRULRGHOILOWUR
6. Retraso Desactivado
0LHQWUDVHOGHVKXPLGLILFDGRUVHHQFXHQWUDHQIXQFLRQDPLHQWR
SUHVLRQHHOERWyQ'HOD\5HWUDVR
3UHVLRQHORVERWRQHV8S$UURZ)OHFKD+DFLD$UULED'RZQ$UURZ
)OHFKD+DFLD$EDMRSDUDVHOHFFLRQDUODFDQWLGDGGHKRUDVTXH
GHVHDTXHHOGHVKXPLGLILFDGRUFRQWLQ~HIXQFLRQDQGRDQWHVGH
DSDJDUHOPLVPR
NOTA:/XHJRGHH[KLELUHOWLHPSRODSDQWDOODSDVDUiDPRVWUDUHO
QLYHOGHKXPHGDGDFWXDOXQDYH]TXHKD\DQSDVDGRVHJXQGRV
3UHVLRQDUHOERWyQ'HOD\5HWUDVRH[KLELUiODFDQWLGDGGHKRUDV
UHVWDQWHVGHOUHWUDVR
Retraso Activado
0LHQWUDVHOGHVKXPLGLILFDGRUVHHQFXHQWUDDSDJDGRSUHVLRQHHO
ERWyQ'HOD\5HWUDVR
3UHVLRQHORVERWRQHV8S$UURZ)OHFKD+DFLD$UULED'RZQ$UURZ
)OHFKD+DFLD$EDMRSDUDVHOHFFLRQDUODFDQWLGDGGHKRUDVTXH
GHVHDTXHHOGHVKXPLGLILFDGRUSHUPDQH]FDDSDJDGRDQWHVGH
HQFHQGHUHOPLVPR
NOTA:/DSDQWDOODPRVWUDUiODFDQWLGDGGHKRUDVUHVWDQWHVKDVWD
TXHVHHQFLHQGDHOGHVKXPLGLILFDGRU
Para cancelar el Retraso:
$OSUHVLRQDUHOERWyQ'HOD\5HWUDVRXQDYH]DSDUHFHUiOD
FDQWLGDGGHKRUDVUHVWDQWHVGHO5HWUDVRHQODSDQWDOOD3UHVLRQHHO
ERWyQ'HOD\5HWUDVRQXHYDPHQWH\HOPLVPRVHUiFDQFHODGR
3UHVLRQDUHOERWyQ3RZHU(QFHQGLGRWDPELpQFDQFHODUiODIXQFLyQ
'HOD\5HWUDVR
7. Bomba
$FWLYDODIXQFLyQGHODERPEDLQWHUQD3UHVLRQHGXUDQWH
VHJXQGRVSDUDDFWLYDUODERPEDLQWHUQDSDUDHOUHWLURDXWRPiWLFR
GHOFRQGHQVDGR/DOX]LQGLFDGRUD3XPS2Q%RPED(QFHQGLGD
WLWLODUi\OXHJRSHUPDQHFHUiLOXPLQDGDXQDYH]FRPSOHWDGRVORV
VHJXQGRV3UHVLRQHSDUDGHVDFWLYDUODERPED
8. Indicador de Vaciado
(OLQGLFDGRUGH³9DFLDGR´SDUSDGHDUiFXDQGRHOFXERHVWpOLVWR
SDUDVHUYDFLDGRRFXDQGRHOFXERVHDUHWLUDGR\RQRVHD
UHHPSOD]DGRHQODSRVLFLyQFRUUHFWD
Humidity %

49-5000429 Rev. 2 17
ESPAÑOL
41 °F
(5 °C)
41 °F
(5 °C)
Above
Below
Correct Wrong
at least 18 inches
at least 18 inches
Selección del lugar adecuado
Cómo funciona el deshumedificador
/DKXPHGDGHQHODLUHSDVDSRUXQVHUSHQWLQGHVKXPHGLILFDGRU/D
KXPHGDGHQHODLUHVHFRQGHQVDHQHVWHVHUSHQWLQ\VHGUHQDKDFLD
HOWDQTXHRDWUDYpVGHODPDQJXHUD\OXHJRWUDYpVGHOGUHQDMH
(ODLUHOLPSLR\VHFRSDVDOXHJRSRUHOFRQGHQVDGRUGRQGHHV
FDOHQWDGR\GHVHFKDGRGHUHJUHVRDOPHGLRDPELHQWHDWUDYpVGHOD
SDUULOOD
(VQRUPDOTXHHODLUHHQORVDOUHGHGRUHVVHFDOLHQWHXQSRFR
FRQIRUPHHOGHVKXPHGLILFDGRUIXQFLRQD
Descongelado automático
&XDQGRVHDFXPXOHHVFDUFKDHQORVVHUSHQWLQHVHYDSRUDGRUHVHO
FRPSUHVRUVHDSDJDUi\HOYHQWLODGRUFRQWLQXDUiIXQFLRQDQGRKDVWD
TXHODHVFDUFKDGHVDSDUH]FD
&XDQGRHOHYDSRUDGRUVHGHVFRQJHOHHOFRPSUHVRURHOYHQWLODGRU
VHHQFHQGHUiDXWRPiWLFDPHQWH\HOSURFHVRGHGHVKXPHGLILFDFLyQ
FRQWLQXDUi
Cuando se disponga a usar el deshumedificador por primera vez, permita que la unidad opere de manera continua por 24 horas.
(OGHVKXPHGLILFDGRUXELFDGRHQXQVyWDQRWHQGUiSRFRR
QLQJ~QHIHFWRHQVHFDUHODLUHGHQWURDUHDVDGMDFHQWHVGH
DOPDFHQDPLHQWRFRPRXQDUPDULRSRUHMHPSORDOPHQRVTXH
H[LVWDXQDFLUFXODFLyQDGHFXDGDGHDLUHKDFLDHQLQWHULRU\KDFLD
HOH[WHULRUGHGLFKDiUHD
Ŷ1RXVHHOGHVKXPHGLILFDGRUHQH[WHULRUHV
Ŷ(VWHGHVKXPHGLILFDGRUHVWiGLVHxDGRH[FOXVLYDPHQWHSDUD
DSOLFDFLRQHVUHVLGHQFLDOHV
GHLQWHULRU1RGHEHXVDUVHSDUDDSOLFDFLRQHVFRPHUFLDOHVQL
LQGXVWULDOHV
Ŷ&RORTXHHOGHVKXPHGLILFDGRUHQXQSLVRILUPH\QLYHODGRTXH
VHDORVXILFLHQWHPHQWHIXHUWHSDUDVRSRUWDUODXQLGDGFXDQGR
ODFXEHWDHVWpOOHQDGHDJXD
Ŷ'HMHSRUORPHQRVSXOJDGDVGHHVSDFLROLEUHDOUHGHGRUGH
ODXQLGDGSDUDTXHH[LVWDXQDEXHQDFLUFXODFLyQGHDLUH
Ŷ&RORTXHHOGHVKXPHGLILFDGRUHQXQiUHDHQODTXHOD
WHPSHUDWXUDQRVHDLQIHULRUD)&QLVXSHULRUD)
&/RVVHUSHQWLQHVSXHGHQHVFDUFKDUVHHQDPELHQWHV
FRQWHPSHUDWXUDVLQIHULRUHVD)&ORFXDOSXHGH
UHGXFLUVXUHQGLPLHQWR
Ŷ(OUDQJRVXJHULGRRODKXPHGDGUHODWLYDHVWiHQWUH\
Ŷ8VHHOGHVKXPHGLILFDGRUHQiUHDVFRPRODFRFLQDFXDUWRVGH
ODYDGREDxRV\HQiUHDVGRQGHH[LVWDKXPHGDGH[FHVLYD
NOTA:&RORTXHHOGHVKXPHGLILFDGRUOHMRVODVHFDGRUDGH
URSD
Ŷ8VHHOGHVKXPHGLILFDGRUSDUDHYLWDUGDxRVFDXVDGRVSRUOD
KXPHGDGHQOXJDUHVGRQGHJXDUGHOLEURVRDUWtFXORVGHYDORU
Ŷ8VHHOGHVKXPHGLILFDGRUHQHOVyWDQRSDUDD\XGDUDSUHYHQLU
ORVGDxRVFDXVDGRVSRUODKXPHGDG
Ŷ
(OGHVKXPHGLILFDGRUGHEHXVDUVHHQiUHDVFHUUDGDVSDUD
PD\RUHIHFWLYLGDG
Ŷ&LHUUHWRGDVODVSXHUWDVYHQWDQDV\RWUDVDEHUWXUDVKDFLDHO
H[WHULRUGHODKDELWDFLyQHQGRQGHHVWpHOGHVKXPHGLILFDGRU
NOTA: (OGHVKXPHGLILFDGRUWLHQHUXHGDVSDUDD\XGDUOHD
FRORFDUORHQGLVWLQWRVOXJDUHVSHURGHEHURGDUVHHQVXSHUILFLHV
ILUPHV\SODQWDV1RLQWHQWHURGDUORVREUHREMHWRVRVREUHXQD
DOIRPEUD
CÓMO USAR EL DESHUMEDIFICADOR
Otras funciones
Alarma (Alarm)
6LHOWDQTXHVHHQFXHQWUDOOHQRRQRHVWiHQVXOXJDUVRQDUi
XQDDODUPDGXUDQWHVHJXQGRVSDUDUHFRUGDUOHGHYDFLDU\
YROYHUDFRORFDUHOWDQTXH
Apagado automático (AUTO SHUT OFF)
(O,QWHUUXSWRUGHFRQWUROGHQLYHOGHDJXDDSDJDHO
GHVKXPHGLILFDGRUFXDQGRHOWDQTXHHVWpOOHQRRFXDQGRHO
WDQTXHQRHVWpSUHVHQWHRQRHVWpFRORFDGRHQXQDSRVLFLyQ
DSURSLDGDNOTA: (OYHQWLODGRUVHJXLUiIXQFLRQDQGRGXUDQWH
DSUR[LPDGDPHQWHPLQXWRVGHVSXpVGHTXLWDUHOWDQTXH
Descongelado automático (AUTO DEFROST)
&XDQGRVHDFXPXOHHVFDUFKDHQORVVHUSHQWLQHVHYDSRUDGRUHV
HOFRPSUHVRUVHDSDJDUi\HOYHQWLODGRUFRQWLQXDUiIXQFLRQDQGR
KDVWDTXHODHVFDUFKDGHVDSDUH]FD
Pérdida de energía (POWER OUTAGE)
(QFDVRGHODSpUGLGDGHODHQHUJtDRLQWHUUXSFLyQODXQLGDG
UHLQLFLDUiDXWRPiWLFDPHQWHHQODVFRQILJXUDFLRQHVXVDGDVSRU
~OWLPDYH]XQDYH]ODHQHUJtDVHDUHVWDEOHFLGD
SI
NO
3RUGHEDMR
GH)
&
3RU
HQFLPD
GH)
&
SXOJDGDVPtQ
SXOJDGDVPtQ

49-5000429 Rev. 2
ESPAÑOL
Cómo desechar el agua acumulada
+D\IRUPDVGHGHVHFKDUHODJXDDFXPXODGD
Use el tanque. &XDQGRXVWHGVDTXHHOWDQTXHGHVXOXJDUOD
XQLGDGVHDSDJDUi9DFtH\UHLQVWDOHOR
IMPORTANTE:1RXVHHOPDQJXHUDVLXVDHOWDQTXHSDUD
UHFRJHUDJXD6LHOPDQJXHUDHVWiFRQHFWDGDHODJXDFDHUiDO
SLVRHQOXJDUGHFDHUGHQWURGHOWDQTXH
NOTAS:
Ŷ1RUHWLUHHOEDOGHFRQHOGHVKXPHGLILFDGRUHQIXQFLRQDPLHQWR
RVLUHFLpQVHDSDJy(VWRSXHGHKDFHUTXHHODJXDJRWHHGHO
UHFLSLHQWHGHGUHQDMH
Ŷ(OWDQTXHGHEHHVWDUHQVXOXJDU\ELHQVXMHWRSDUDTXHHO
GHVKXPHGLILFDGRUIXQFLRQH
Use una manguera. (ODJXDSXHGHGHVHFKDUVH
DXWRPiWLFDPHQWHKDFLDXQGUHQDMHHQHOSLVRVLXVWHGFRQHFWDHO
WXERGHGUHQDMHFRQERTXLOODGHODXQLGDGDXQDPDQJXHUDSDUD
DJXDGHMDUGtQQRLQFOXLGD
6DTXHHOWDQTXHGHOIUHQWHGHODXQLGDG
$EUDODWDSDGHGUHQDMHVREUHHOODGRGH
(QURVTXHXQDPDQJXHUDSDUDMDUGtQQRSURYLVWDHQOD
ERTXLOODFXWWROHQJWK\GLUtMDODDOGUHQDMHGHSLVR
9XHOYDDFRORFDUHOWDQTXHHQODXQLGDG
NOTA:(OWDQTXHGHEHHVWDUHQVXOXJDU\ELHQVXMHWRSDUDTXHHO
GHVKXPHGLILFDGRUIXQFLRQH
Use la bomba interna. (ODJXDSXHGHVHUYDFLDGDGHIRUPDDXWRPiWLFD
HQXQDXELFDFLyQUHPRWDDGKLULHQGRODPDQJXHUDLQFOXLGDGHODERPED
$GKLHUDODPDQJXHUDGHODERPEDDOFRQHFWRUGHODPDQJXHUD
SUHVLRQDQGRHODFFHVRULRGHODWXEHUtDHQHOFRQHFWRUKDVWDTXHTXHGH
FRORFDGDFRUUHFWDPHQWHXVWHGQRGHEHUtDSRGHUUHWLUDUODPDQJXHUD
DOHPSXMDU
3RVLFLRQHODGHVFDUJDGHODPDQJXHUDHQODXELFDFLyQGHVHDGD
$VHJ~UHVHGHTXHODERPEDHVWpDFWLYDGD3DUDDFWLYDUODERPED
PDQWHQJDSUHVLRQDGRHOERWyQ3XPS2Q2II%RPED$FWLYDGD
'HVDFWLYDGDGXUDQWHVHJXQGRV/DOX]LQGLFDGRUD3XPS2Q
%RPED(QFHQGLGDWLWLODUi\OXHJRSHUPDQHFHUiLOXPLQDGDXQDYH]
FRPSOHWDGRVORVVHJXQGRV
IMPORTANTE:$VHJ~UHVHGHTXHODPDQJXHUDSDUDFRQGHQVDGRHVWp
FRUUHFWDPHQWHFRQHFWDGD\TXHQRHVWpUHWRUFLGDLQFOLQDGDQLILVXUDGD
\DTXHHVWRSXHGHKDFHUTXHFDLJDDJXDDOSLVR(OFXERWDPELpQGHEH
HVWDUFRPSOHWDPHQWHDSR\DGRSDUDTXHODERPEDIXQFLRQHGHIRUPD
FRUUHFWD1RXWLOLFHODPiTXLQDVLODWHPSHUDWXUDDPELHQWHHVGH)R
LQIHULRU
NOTAS:
Ŷ/DDOWXUDPi[LPDGHHOHYDFLyQHVGHSLHV
Siempre cerciórese de que la tanque de agua esté asegurada en su lugar dentro del deshumedificador.
0DQLMD
5HFLSLHQWH
0DQJXHUD
GH'HVDJH
CÓMO USAR EL DESHUMEDIFICADOR

49-5000429 Rev. 2
ESPAÑOL
Nivel de agua
(OGHVKXPHGLILFDGRUVHDSDJDUiDXWRPiWLFDPHQWHFXDQGRHO
WDQTXHVHOOHQHRFXDQGRHOWDQTXHVHDUHPRYLGRRQRVHD
FRORFDGRHQODSRVLFLyQDSURSLDGD
(OWDQTXHGHEHFRORFDUVHHQODSRVLFLyQDSURSLDGDSDUD
TXHHOGHVKXPHGLILFDGRUIXQFLRQH/DOX]VHHQFHQGHUi\HO
GHVKXPHGLILFDGRUQRIXQFLRQDUiDQRVHUTXHHOWDQTXHHVWp
FRORFDGRHQODSRVLFLyQDSURSLDGD
Funcionamiento del Balde
12UHWLUHODSLH]DGHHVSXPDHQODMXQWDGHOEDOGH6LVHUHWLUDHO
'HVKXPLGLILFDGRUQRIXQFLRQDUiFRUUHFWDPHQWH
&XDQGRODERELQDHVWpGHVFRQJHODGDHOFRPSUHVRURHOYHQWLODGRU
VHUHLQLFLDUiQGHIRUPDDXWRPiWLFD\ODGHVKXPLGLILFDFLyQVHUi
UHLQLFLDGD
Para Instalar la Manguera: (PSXMHODPDQJXHUDKDFLD
DGHQWUR\GHIRUPDVXDYHHPSXMHODPLVPDKDFLDXVWHG
SDUDFRQWURODUTXHHVWpELHQDVHJXUDGD1RGHEHSRGHUVHU
HOLPLQDGR
'HEHHVFXFKDUXQ³FOLF´TXHOHSHUPLWHVDEHUTXHOD
PDQJXHUDHVWiLQVHUWDGDFRUUHFWDPHQWH
Para Liberar la Manguera:3UHVLRQHHOERWyQD]XOHQOD
SDUWHVXSHULRUGHOFRQHFWRUFRQHFWDGRDOGHVKXPLGLILFDGRU\
H[WUDLJDODPDQJXHUDSDUDH[WUDHUOD
NOTE: 12UHWXHU]DQLSHOOL]TXHODPDQJXHUD\DTXHHVWR
SXHGHEORTXHDUHOIOXMRGHDJXD
Cómo desechar el agua acumulada (cont.)
CÓMO USAR EL DESHUMEDIFICADOR
LQVHUWDU
SUHQVD
+DODU

49-5000429 Rev. 2
ESPAÑOL
Filtro de aire
(OILOWURGHDLUHTXHVHHQFXHQWUDGHWUiVGHODUHMLOODWUDVHUD
VHGHEHUiUHYLVDU\OLPSLDUSRUORPHQRVFDGDKRUDVGH
IXQFLRQDPLHQWRRFRQXQDIUHFXHQFLDPD\RUVLIXHUDQHFHVDULR
/XHJRGHKRUDVGHIXQFLRQDPLHQWRODOX]LQGLFDGRUDGH)LOWUR
EULOODUiSDUDUHFRUGDUOHTXHVHGHEHOLPSLDUHOILOWUR5HWLUHHOILOWUR\
OLPSLHHOPLVPR5HHPSODFHHOILOWUR\SUHVLRQHODWHFOD)LOWHU7LPHU
7HPSRUL]DGRUGHO)LOWURSDUDUHLQLFLDUHOUHFRUGDWRULRGHOILOWUR
Para retirar:
5HWLUHODUHMLOODWUDVHUD\HOILOWURVHHQFRQWUDUiDGKHULGR
Para limpiar:
/LPSLHHOILOWURFRQDJXDFDOLHQWH\MDEyQ(QMXDJXH\GHMHVHFDUHO
ILOWURDQWHVGHVXUHHPSOD]R
NOTA: 1RHQMXDJXHQLFRORTXHHOILOWURHQXQODYDYDMLOODV
DXWRPiWLFR
PRECAUCIÓN
1223(5(HOGHVKXPHGLILFDGRUVLQ
HOILOWURGHELGRDTXHODVXFLHGDG\ODVSHOXVDVORREVWUXLUiQ\
UHGXFLUiQVXUHQGLPLHQWR
Rejilla y gabinete
Para limpiar el gabinete:
8VHDJXD\XQGHWHUJHQWHGHEDMDFRQFHQWUDFLyQ1RXVH
EODQTXHDGRUQLOLPSLDGRUHVDEUDVLYRV
Para limpiar la rejilla trasera:
8VHXQDDVSLUDGRUDFRQDFFHVRULRGHFHSLOORVXDYH
RXQFHSLOORGHPDQR
Tanque de agua
Para limpiar:
'HVSXpVGHDOJXQDVVHPDQDVOLPSLHHOWDQTXHSDUDHYLWDUOD
IRUPDFLyQGHPRKRPLOGL~\EDFWHULDV/OHQHSDUFLDOPHQWHHOWDQTXH
FRQDJXDOLPSLD\DJUHJXHXQSRFRGHGHWHUJHQWHVXDYH$JLWHHO
FRQWHQLGRGHQWURGHOWDQTXHOXHJRYDFtHOR\HQMXiJXHOR
NOTA: 1RXVHXQDPiTXLQDODYDYDMLOODVSDUDOLPSLDUHOWDQTXHGH
DJXD
Para retirar:
5HWLUHHOWDQTXH\GHVHFKHWRGRUHVWRGHDJXD
Para volver a colocar:
&RORTXHHOWDQTXHHQHOGHVKXPHGLILFDGRUGHVOL]iQGROR
NOTA: (OWDQTXHGHEHHVWDUHQVXOXJDU\ELHQVXMHWRSDUDTXHHO
GHVKXPHGLILFDGRUIXQFLRQH
Apague el deshumedificador y desconecte el enchufe del tomacorriente en la pared antes de limpiarlo.
)LOWURGHDLUH
Almacenamiento
6LODXQLGDGHVWDUiDOPDFHQDGDGXUDQWHXQSHUtRGRGHWLHPSR
SURORQJDGRUHDOLFHODVVLJXLHQWHVDFFLRQHVDQWHVGHJXDUGDUOD
PiTXLQD
9DFtHWRGDHODJXDGHOFXER
/LPSLHHOFXERGHDJXD\HOILOWURGHOFXERGHDFXHUGRFRQODV
LQVWUXFFLRQHV
'HMHTXHHOFXERGHDJXDVHVHTXH\YXHOYDDLQVWDODUHOPLVPR
5HWLUHODPDQJXHUDGHDJXD\JXDUGHODPLVPDFRQODXQLGDG
Para Liberar la Manguera: 3UHVLRQHHOERWyQD]XOHQODSDUWH
VXSHULRUGHOFRQHFWRUFRQHFWDGRDOGHVKXPLGLILFDGRU\H[WUDLJDOD
PDQJXHUDSDUDH[WUDHUOD
CUIDADO Y LIMPIEZA
SUHQVD
+DODU

49-5000429 Rev. 2
ESPAÑOL
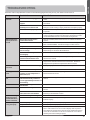
£$KRUUHWLHPSR\GLQHUR3ULPHURUHYLVHORVFXDGURVTXHDSDUHFHQHQODVVLJXLHQWHVSiJLQDV\HVSRVLEOHTXHQRQHFHVLWH
VROLFLWDUUHSDUDFLRQHV
Problema Causas posibles Qué hacer
El deshumedificador
no enciende
El cable eléctrico del deshumedificador está
desenchufado.
&HUFLyUHVHGHTXHODFODYLMDGHOGHVKXPHGLILFDGRUHVWpFRQHFWDGDHQOD
SDUHG
El fusible está quemado o el disyuntor del
circuito está abierto.
5HYLVHODFDMDGHOGLV\XQWRUGHOFLUFXLWRyHOIXVLEOHFDPELHHOIXVLEOHRYXHOYD
DFWLYDUHOGLV\XQWRU
El deshumedificador ha alcanzado su nivel
preseleccionado o el tanque de agua está
lleno.
(OGHVKXPHGLILFDGRUVHDSDJDDXWRPiWLFDPHQWHFXDQGRRFXUUHDOJXQDGHODV
GRVFRQGLFLRQHV&DPELHDXQDFRQILJXUDFLyQPiVEDMDRYDFtHHOWDQTXHGH
DJXD\UHLQVWDOHDSURSLDGDPHQWH
El tanque no está en su lugar. (OWDQTXHGHEHHVWDUHQVXOXJDU\ELHQVXMHWRSDUDTXHHOGHVKXPHGLILFDGRU
IXQFLRQH
Corte de energía. +D\XQDGHPRUDSURWHFWRUDGHKDVWDPLQXWRVSDUDSUHYHQLUODLQWHUUXSFLyQ
GHODVREUHFDUJDGHOFRPSUHVRU3RUHVDUD]yQODXQLGDGQRUHLQLFLDUiOD
GHVKXPHGLILFDFLyQDORVPLQXWRVGHKDEHUVLGRHQFHQGLGDGHQXHYR
Deshumedificador
no seca el aire
como debiera
No ha pasado suficiente tiempo para que
seque el aire.
&XDQGRVHLQVWDODSRUSULPHUDYH]GHMHTXHSDVHQKRUDVSDUDTXHVH
PDQWHQJDHOQLYHOGHKXPHGDGGHVHDGD
Hay escasa circulación de aire. &HUFLyUHVHGHTXHQRKD\DFRUWLQDVSHUVLDQDVRPXHEOHVTXHEORTXHHQOD
SDUWHSRVWHULRUyDOIUHQWHGHOGHVKXPHGLILFDGRU9HDODVHFFLyQ6HOHFFLRQH
GHOOXJDUDGHFXDGR
Filtro sucio 9HDODVHFFLyQGH&XLGDGR\OLPSLH]D
El Control de humedad no está ajustado lo
suficientemente bajo.
3DUDDLUHPiVVHFRSUHVLRQHHOERWyQ\VHOHFFLRQHXQYDORUSRUFHQWXDOPiV
EDMRRHQNS1RQVWRSSDUDREWHQHUXQDPi[LPDGHVKXPLGLILFDFLyQ
Las puertas y ventanas no están cerradas
completamente.
5HYLVHTXHWRGDVODVSXHUWDVYHQWDQDV\RWUDVDEHUWXUDVHVWiQFHUUDGDV
FRPSOHWDPHQWH
El secador de ropa podría estar generando
aire húmedo en el recinto.
,QVWDOHHOGHVKXPHGLILFDGRUOHMRVGHODVHFDGRUDGHURSD(OVHFDGRUGHEH
GHVHFKDUHODLUHKDFLDHOH[WHULRU
La temperatura del recinto está demasiado
baja.
/DGHVKXPHGLILFDFLyQHVPHMRUDWHPSHUDWXUDVDPELHQWHDOWDV7HPSHUDWXUDV
EDMDVFDXVDQEDMRUHQGLPLHQWRGHGHVKXPHGLILFDFLyQ0RGHORVHVWiQ
GLVHxDGDSDUDIXQFLRQDUDWHPSHUDWXUDVSRUHQFLPDGH)&
El deshumedificador
trabaja demasiado
El volumen de aire a deshumedificar es
excesivo.
/DFDSDFLGDGGHVXGHVKXPHGLILFDGRUQRHVWiQDGHFXDGD
Las puertas y ventanas están abiertas. &LHUUHWRGDVODVSXHUWDV\YHQWDQDVTXHGHQDOH[WHULRU
Se forma escarcha
en el serpentín
El deshumedificador ha sido encendido hace
poco o la temperatura del recinto es inferior
a 41 °F (5 °C).
(VWRHVQRUPDO/DHVFDUFKDQRUPDOPHQWHGHVDSDUHFHUiHQPLQXWRV9HD
ODVHFFLyQGH'HVFRQJHODGRDXWRPiWLFR$XWRPDWLFGHIURVW
Los controles
no se pueden
configurar
El compresor se apaga, y el ventilador
sigue funcionando automáticamente
durante aproximadamente 3 minutos a una
configuración fija.
(VWRHVQRUPDO(VSHUHDSUR[LPDGDPHQWHPLQXWRV\FRORTXHHOYHQWLODGRU
ORGHVHH
El ventilador hace
ruido
El aire se mueve a través del
deshumedificador.
(VWRHVQRUPDO
Hay agua en el piso La conexione a la manguera está floja. ,QVSHFFLRQHODFRQH[LRQHDODPDQJXHUD&RQVXOWHODVHFFLyQ&yPRGHVHFKDU
HODJXDDFXPXODGD
Intenta usar el tanque para recoger agua,
pero el manguera está colocada.
'HVFRQHFWHHOPDQJXHUDVLXVDHOWDQTXHSDUDUHFRJHUDJXD&RQVXOWHOD
VHFFLyQ&yPRGHVHFKDUHODJXDDFXPXODGD
La luz LED de
Tanque Lleno
destella y suena la
alarma
La manguera de drenaje no está bien
ajustada en el accesorio
9HULILTXHODFRQH[LyQGHODPDQJXHUDGHGUHQDMH
La manguera de drenaje está torcida 9HULILTXHTXHODPDQJXHUDGHGUHQDMHDSXQWHHQIRUPDUHFWDKDFLDHOSLVR\
TXHQRVHHQFXHQWUHWRUFLGD
El cubo se llena al
usar la bomba de
drenaje
La unidad no se encuentra en el modo con
bomba
Asegúrese de que la bomba se encuentre encendida y que la luz de la bomba
esté iluminada.
La manguera de la bomba no se encuentra
instalada
Asegúrese de que la manguera de la bomba esté correctamente instalada en
la parte trasera de la unidad.
Problema en el sensor de nivel de agua Esto podrá ser ocasionado por condiciones muy húmedas o errores del
sensor flotante. Controle el código de error P1 en la pantalla de la unidad. Si
este error está presente – apague la unidad, desenchufe la misma durante
algunos segundos, vuelva a enchufarla y encienda la unidad para reiniciar
el sensor. Si este error continúa produciéndose, consulte la sección de la
garantía para acceder a opciones de cambio.
CONSEJOS PARA LA SOLUCIÓN DE PROBLEMAS

49-5000429 Rev. 2
ESPAÑOL
Ŷ,QVWUXFFLRQHVDOFOLHQWH(O0DQXDOGHOSURSLHWDULR
proporciona información acerca de las instrucciones de
operación y de los controles del usuario.
Ŷ,QVWDODFLyQRHQWUHJDLQDSURSLDGDRPDQWHQLPLHQWR
impropio. Si usted tiene un problema durante la instalación,
o si su producto no tiene la capacidad que usted necesita,
póngase en contacto con nuestro distribuidor. Usted es
responsable de proporcionar las instalaciones eléctricas y
de plomerianecesarias.
Ŷ)DOORGHOSURGXFWRUHVXOWDQWHGHPRGLILFDFLRQHVDOSURGXFWR
o debido a uso irrazonable incluyendo no proporcionar
mantenimiento razonable y necesario.
Ŷ5HHPSOD]RGHIXVLEOHVGHODFDVDRUHDMXVWHGHOVLVWHPDGH
circuitos.
Ŷ)DOORGHELGRDODFRUURVLyQ
Ŷ'DxRDOSURGXFWRFDXVDGRSRUYROWDMHLQDSURSLDGRKDFLDHO
equipo, accidentes, incendios, inundaciones o actos
de la naturaleza de fuerza mayor.
Ŷ'DxRVLQFLGHQWDOHVRFRQVHFXHQFLDOHVFDXVDGRVSRU
defectos posibles con este producto.
Ŷ&DXVDUGDxRVGHVSXpVGHODHQWUHJD
Lo quxe no está cubierto:
(VWDJDUDQWtDOLPLWDGDVHH[WLHQGHDOFRPSUDGRURULJLQDO\FXDOTXLHUFRPSUDGRUSRVWHULRUGHSURGXFWRVFRPSUDGRVSDUDXVR
UHVLGHQFLDOGHQWURGH(VWDGRV8QLGRV
$OJXQRVHVWDGRVQRSHUPLWHQODH[FOXVLyQRODVOLPLWDFLRQHVGHGDxRVLQFLGHQWDOHVRFRQVHFXHQFLDOHV(VWDJDUDQWtDOLPLWDGD
GDGHUHFKRVOHJDOHVHVSHFtILFRV\XVWHGSRGUtDWHQHURWURVGHUHFKRVTXHYDULDUiQGHHVWDGRDHVWDGR3DUDVDEHUFXiOHVVRQ
VXVGHUHFKRVOHJDOHVFRQVXOWHDODRILFLQDGHDVXQWRVGHOFRQVXPLGRUORFDORODRILFLQDGHO$WWRUQH\*HQHUDOHQVXORFDOLGDG
([FOXVLyQGHJDUDQWtDVLPSOLFDGDV([FHSWRGRQGHHVWiSURKLELGRRUHVWULQJLGRSRUODOH\QRKD\JDUDQWtDVH[SUHVDVRUDOHV
RHVWDWXWDULDVTXHH[WLHQGDQPiVDOOiGHODGHVFULSFLyQHVSHFtILFDLQFOX\HQGRHVSHFtILFDPHQWHODVJDUDQWtDVLPSOLFDGDVGH
PHUFDQWLELOLGDGRSURSLHGDGSDUDXQSURSyVLWRSDUWLFXODU
Garante: GE Appliances, a Haier company
Louisville, KY 40225
EXCLUSIÓN DE GARANTÍAS IMPLÍCITAS—Su único y exclusivo derecho es el reemplazo del producto, tal y
como se indica en esta Garantía limitada. Cualquier garantía implícita, incluyendo las garantías implícitas de
FRPHUFLDELOLGDGRDGHFXDFLyQSDUDXQILQGHWHUPLQDGRHVWiQOLPLWDGDVDXQDxRRHOSHUtRGRGHWLHPSRPiV
breve permitido por la ley.
Por el período de: Nosotros reemplazaremos:
8QDxR
$SDUWLUGHODIHFKDGHOD
FRPSUDRULJLQDO
Unidad de reemplazo SDUDFXDOTXLHUSURGXFWRTXHIDOOHGHELGRDGHIHFWRVHQORVPDWHULDOHVRHQ
HOSURFHVRGHIDEULFDFLyQ/DXQLGDGGHUHHPSOD]RHVWiJDUDQWL]DGDSDUDHOUHVWRGHOSHUtRGRGH
XQDxRGHJDUDQWtDRULJLQDOGHOSURGXFWR La unidad de reemplazo puede ser una nueva o una
reparada.
Ŷ Empaque su unidad apropiadamente. Recomendamos usar el
cartón original y los materiales de empaquetado.
Ŷ
Regrese el producto al local de ventas donde usted
lo compró.
Ŷ
Incluya en el paquete una copia del recibo de venta
u otra evidencia de la fecha original de la compra.
Además imprima su nombre y dirección y una descripción del
defecto.
Si desea realizar una queja durante los primeros 90 días de la garantía desde la fecha original de compra:
Ŷ8ELTXHDVXUHFHSWRURULJLQDOGHYHQWDV\KDJDXQDQRWD
indicando su modelo y número de serie.
Ŷ/ODPHD*($SSOLDQFHVDODILQGHLQLFLDUHO
proceso de reemplazo del producto.
Ŷ6HOHSHGLUiTXHGpVXQRPEUHGRPLFLOLRIHFKDGH
adquisición, modelo y número de serie.
Ŷ
GE hará arreglos para que se envíe una caja a su hogar
a fin de que pueda recuperar el producto.
Ŷ
Deberá entregar el producto (con los gastos de correo
previamente cubiertos por GE) al centro de recuperación de
GE para que se pueda entregar una unidad de reemplazo.
Incluya una descripción del defecto.
Ŷ
Deberá recibir el producto de reemplazo entre los 7 y 10 días
hábiles luego de que hayamos recibido su unidad.
6LGHVHDKDFHUXQDTXHMDGXUDQWHHODxRGHJDUDQWtDUHVWDQWH
$EURFKHVXUHFLERDTXt3DUDDFFHGHUDOVHUYLFLRWpFQLFRGHDFXHUGRFRQ
ODJDUDQWtDGHEHUiFRQWDUFRQODSUXHEDGHODIHFKDRULJLQDOGHFRPSUD
GARANTÍA LIMITADA

49-5000429 Rev. 2
ESPAÑOL
,PSUHVRHQ&KLQD
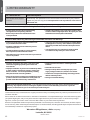
IMPORTANT
Do Not Return This Product To The Store
If you have a problem with this product, please call 1-877-337-3639 for the name and telephone number of the
nearest authorized service center.
DATED PROOF OF PURCHASE REQUIRED FOR WARRANTY SERVICE
IMPORTANTE
No regrese este producto a la tienda
Si tiene un problema con este producto, por favor comuníquese al 1-877-337-3639 para solicitar el
nombre y número telefónico del centro de servicio al cliente autorizado más cercano.
NECESITA UNA PRUEBA DE COMPRA FECHADA, NÚMERO DE MODELO
Y DE SERIE PARA EL SERVICIO DE LA GARANTÍA
-
 1
1
-
 2
2
-
 3
3
-
 4
4
-
 5
5
-
 6
6
-
 7
7
-
 8
8
-
 9
9
-
 10
10
-
 11
11
-
 12
12
-
 13
13
-
 14
14
-
 15
15
-
 16
16
-
 17
17
-
 18
18
-
 19
19
-
 20
20
-
 21
21
-
 22
22
-
 23
23


Haier QPHR50LZ Guía de instalación
- Categoría
- Deshumidificadores
- Tipo
- Guía de instalación
en otros idiomas
- English: Haier QPHR50LZ Installation guide
Otros documentos
-
LG UD551GKG3 El manual del propietario
-
GE APEL50LZ El manual del propietario
-
-
-
-
GE ADEW45LY El manual del propietario
-
GE ADEL20LY Manual de usuario
-
-
-