SMC 7204BRB El manual del propietario
- Categoría
- Enrutadores
- Tipo
- El manual del propietario

SMC7204BRB
4-port ADSL Router with
built-in ADSL Modem (Annex B)
Model Number: SMC7204BRB
Quick Installation Guide
Guide d’installation rapide
Guía de inicio rápido
Beknopte installatiehandleiding
Manual de instalação rápida
4-port ADSL Router with built-in ADSL Modem
Routeur ADSL 4 ports avec modem ADSL intégré
Router ADSL de 4 puertos con módem ADSL integrado
4-poorts ADSL-router met ingebouwde ADSL-modem
Router ADSL de 4 Portas com Modem ADSL Integrado

English
2
Contents
1
•One ADSL Barricade
TM
.
•One Power adapter.
•One RJ-45 Ethernet cable.
•One RJ-11 Standard phone/DSL line cable.
•One Installation utility and Documentation CD.
• Quick Installation Guide.
Note: ADSL splitters/microfilters are included with some models.
Package Contents
English 2 - 21
Deutsch 22 - 41
Français 42 - 61
Español 62 - 81
Nederlands 82 - 101
Português 102 - 121
Compliances & Information 122 - 130
Contents

Front Panel
English
4
Hardware Description
English
3
System Requirements
In order to use the ADSL Barricade
TM
, you must have
the following:
• ADSL service up and running on your telephone line,
with at least one public Internet address for your LAN.
•One or more computers, each containing an Ethernet
10/100 Base-T network interface card (NIC).
• An Ethernet hub/switch, if you are connecting the device
to more than one computer on an Ethernet network.
• For system configuration using the supplied web-based
program: a web browser such as Internet Explorer V5.0
or later, or Netscape V6.1 or later.
LED Label
Color Status
Green Steady
Green Blink
Yellow Steady
Yellow Blink
OFF
Power
Green
Power On
N/A
N/A
N/A
Power Off
Link
Green
ADSL line
is trained.
Training
N/A
N/A
No
Connection
TX/RX
Green
DSL Transmitting/
Receiving
TX/RX
N/A
N/A
No TX/RX
Ethernet
1 2 3 4
Green / 100 Mbps
Yellow / 10 Mbps
Link
Transmitting/
Receiving
Link
Transmitting/
Receiving
No Connection

5
English
6
English
This Quick Installation Guide provides basic instructions for
connecting the ADSL Barricade
TM
to a computer or LAN and to the
Internet.
• Section 1 describes how to set up the hardware.
• Section 2 describes how to configure Internet properties on
your computer(s).
• Section 3 shows you how to configure ISP settings using
Auto Setup utility.
This Guide assumes that you have already established an ADSL
service with your Internet service provider (ISP). These
instructions provide a basic configuration that should be
compatible with your home or small office network setup.
5
Rear Panel
Description
12V, 1.2A
If depressed for 1-2 seconds: reset.
If depressed for 5 seconds or more:
reset to factory default.
RJ-11 phone connector
Four 10/100M RJ-45 connectors
Rear Panel
Connector
Power Supply
Reset and Restore
Factory Defaults
Button
DSL Port
Ethernet Port

English
8
English
7
Connecting the Hardware
1
Warning: Before you begin, turn the power off for all devices.
These include your computer(s), your LAN hub/switch
(if applicable), and the ADSL Barricade
TM
.
Step 1. Connect the ADSL cable
Connect one end of the provided phone cable (RJ-11) to the port
labeled DSL on the Rear Panel of the device. Connect the other
end to your ADSL Microfilter/Splitter*.
*Note: ADSL splitters/microfilters are included with some models.
Step 2. Connect the Ethernet cable
If you are connecting a LAN to the ADSL Barricade
TM
, attach one
end of a provided Ethernet cable to hub/switch port and the other
to the Ethernet port on the ADSL Barricade
TM
. If you are using the
ADSL Barricade
TM
with a single computer and no hub, you must use
an Ethernet cable to attach the PC directly to the device.
Step 3. Attach the power connector
Connect the AC power adapter to the Power connector on the back
of the device and plug in the adapter to a wall outlet or power
strip.
Step 4. Power up your systems
Turn on and boot up your computer(s) and any LAN device such
as hubs or switches.

English
9
10
English
3. In the [LAN or High-Speed Internet] window, right-click on
the icon corresponding to your network interface card (NIC)
and select [Properties]. (Often, this icon is labeled [Local
Area Connection].) The [Local Area Connection] dialog box
displays a list of currently installed network items.
4. Ensure that the check box to the left of the item labeled
[Internet Protocol TCP/IP] is checked, and click [Properties].
5. In the [Internet Protocol (TCP/IP) Properties] dialog box,
click the radio button labeled [Obtain an IP address
automatically]. Also click the radio button labeled [Obtain
DNS server address automatically].
6. Click [OK] twice to confirm your changes, and close
the [Control Panel].
This section provides instructions for configuring the Internet
settings on your computers to work with the ADSL Barricade
TM
.
Before you begin
By default, the ADSL Barricade
TM
automatically assigns all required
Internet settings to your PCs. You need only to configure the PCs
to accept the information when it is assigned. Follow the
instructions that correspond to the operating system installed
on your PC.
Windows® XP
1. In the Windows task bar, click the [Start] button,
and then click [Control Panel].
2. Double-click the [Network Connections] icon.
Configuring
Your Computers
2

English
12
English
11
Windows 2000
First, check for the IP protocol and, if necessary, install it.
1. In the Windows task bar, click the [Start] button,
point to [Settings], and then click [Control Panel].
2. Double-click the [Network and Dial-up Connections] icon.
3. In the [Network and Dial-up Connections] window, right-click
the [Local Area Connection] icon, and then select
[Properties]. The [Local Area Connection Properties] dialog
box displays a list of currently installed network components.
If the list includes [Internet Protocol (TCP/IP)], then the
protocol has already been enabled. Skip to Step 10.
4. If [Internet Protocol (TCP/IP)] does not appear as
an installed component, click [Install…].
5. In the [Select Network Component Type] dialog box,
select [Protocol], and then click [Add…].
6. Select [Internet Protocol (TCP/IP)] in the [Network Protocols]
list, and then click [OK]. You may be prompted to install files
from your Windows 2000 installation CD or other media.
Follow the instructions to install the files.
7. If prompted, click [OK] to restart your computer with the new
settings. Next, configure the PCs to accept IP information
assigned by the ADSL Barricade
TM
.
8. In the [Control Panel], double-click the [Network and Dial-up
Connections] icon.

English
13
English
14
9. In the [Network and Dial-up Connections] window, right-click
the [Local Area Connection] icon, and then select
[Properties].
10. In the [Local Area Connection Properties] dialog box, select
[Internet Protocol (TCP/IP)], and then click [Properties].
11. In the [Internet Protocol (TCP/IP) Properties] dialog box,
click the radio button labeled [Obtain an IP address
automatically]. Also click the radio button labeled [Obtain
DNS server address automatically].
12. Click [OK] twice to confirm and save your changes, and then
close the [Control Panel].
Windows 98/Me/SE
1. In the Windows task bar, click the [Start] button,
point to [Settings], and then click [Control Panel].
2. Double-click the [Network and Dial-up Connections] icon.
3. In the [Network and Dial-up Connections] window, right-click
the [Network] icon, and then select [Properties]. The [Network
Properties] dialog box displays a list of currently installed
network components. If the list includes [Internet Protocol
(TCP/IP)], then the protocol has already been enabled. Skip to
Step 11.

English
16
English
16
15
9. In the [Control Panel], double-click the [Network and Dial-up
Connections] icon.
10. In the [Network and Dial-up Connections] window, right-click
the [Network] icon, and then select [Properties].
11. In the [Network Properties] dialog box, select [TCP/IP],
and then click [Properties].
12. In the [TCP/IP Settings] dialog box, click the radio button
labeled [Server assigned IP address]. Also click the radio
button labeled [Server assigned name server address].
13. Click [OK] twice to confirm and save your changes,
and then close the Control Panel.
Note: For Windows 95 and NT, please see the installation
instructions in the User Guide contained on the CD Rom.
4. If [Internet Protocol (TCP/IP)] does not appear as
an installed component, click [Add…].
5. In the [Select Network Component Type] dialog box,
select [Protocol], and then click [Add…].
6. Select [Microsoft] in the [Manufacturers] box.
7. Select [Internet Protocol (TCP/IP)] in the [Network Protocols]
list, and then click [OK]. You may be prompted to install files
from your Windows Me installation CD or other media. Follow
the instructions to install the files.
8. If prompted, click [OK] to restart your computer with the new
settings. Next, configure the PCs to accept IP information
assigned by the ADSL Barricade
TM
.

English
18
English
17
This section provides instructions on how to use the Auto Setup
utility for configuration of the ADSL Barricade
TM
for your ISP.
1. Insert the Installation utility and Documentation CD into
your CD drive.
2. Browse to the location of your CD drive and run AutoSetup.exe.
This will start the Auto Setup utility, which provides an easy
way to configure the ADSL Barricade
TM
for your ISP.
3. Click [Yes, I agree] to accept terms of license agreement
and continue with the setup.
Configuring
the ADSL Barricade
TM
3
4. Select your country from the drop down list, then click [Next]
to continue. If your country is not listed, click [Custom] and
skip to section Custom.
5. Select your ISP/Network provider from the drop down list, then
click [Next] to continue. If your ISP/Network Provider is not
listed, click [Custom] and skip to section Custom.
6. Enter the Username and password supplied by your ISP, then
click [Next] to continue.
Note: You will only be required to enter a username and password if
your ISP uses protocol PPPoA or PPPoE. If your ISP uses
RFC1483 Bridging no further input is required, simply click
[Next] to continue.
If your ISP uses RFC1483 Routed after clicking [Next] you
will be required to enter the IP address, Netmask, Gateway
address, Primary and Secondary DNS address supplied by
your ISP. Click [Next].

English
19
English
20
7. Finally click [Finish]. The AutoSetup utility will now configure
the ADSL Barricade
TM
with the settings you have entered. This
may take a few moments. When the setup is complete you will
see the following message:
Your ADSL Barricade
TM
is now setup. Go to section Troubleshooting
of the User Guide if you cannot make a connection to the
Internet.
Custom
If your Country or ISP is not listed, you will be required to
manually enter your ISP settings. This is done using the option
[Custom]. For custom installation you will also need to know
the following settings supplied by your ISP:
What Protocol? (PPPoA, PPPoE, RFC1483 Bridging
or RFC1483 Routed).
What Encapsulation? (VC-Mux or LLC).
What are the VPI/VCI circuit numbers? E.g. 0/38.

Deutsch
22
English
21
1. Select/enter the values corresponding to the above settings
supplied by your ISP.
2. Go back to Step 6.
• Ein ADSL Barricade
TM
.
•Ein Netzteil.
•Ein RJ-45-Ethernet-Kabel.
• Ein standardmäßiges RJ-11-Telefon/DSL-Leitungskabel.
• Eine CD mit Installationshilfsprogramm und Dokumentation.
• Eine Installationskurzanleitung.
Hinweis: Bei einigen Modellen werden ADSL-Splitter/-Mikrofilter
geliefert.
Bei bestimmten Modellen wird ein RJ-11-zu-RJ45-Kabel
mitgeliefert, das eine Verbindung mit einem ISDN-Splitter
ur Herstellung von U-R2-Kompatibilität ermöglicht.
Lieferumfang

Deutsch
23
Deutsch
24
Vorderseite
HardwarebeschreibungSystemanforderungen
Um den ADSL Barricade
TM
verwenden zu können, müssen Sie über
Folgendes verfügen:
• Der ADSL-Dienst muss auf Ihrer Telefonleitung funktionieren,
und es muss mindestens eine öffentliche Internet-Adresse für
Ihr LAN verfügbar sein.
• Mindestens ein Computer mit je einer Ethernet-
10/100-Base-T-Netzwerkkarte.
• Ein Ethernet-Hub/Switch, wenn Sie das Gerät mit mehreren
Computern in einem Ethernet-Netzwerk verbinden.
• Für die Systemkonfiguration über das mitgelieferte web-
basierende Programm wird ein Web-Browser wie der Internet
Explorer ab V5.0 oder der Netscape ab V6.1 benötigt.
LED-
Beschriftung
Farbstatus
Leuchtet grün
Blinkt grün
Leuchtet gelb
Blinkt gelb
AUS
Netzspannung
Grün
Eingeschaltet
-
-
-
Ausgeschaltet
Link
Grün
ADSL-Leitung
wird verwendet
Herstellung der
Verbindung
-
-
Keine
Verbindung
TX/RX
Grün
DSL-Senden/
-Empfang
TX/RX
-
-
Kein TX/RX
Ethernet
1 2 3 4
Grün / 100 Mbit/s
Gelb / 10 Mbit/s
Verbindung
Senden/Empfang
Verbindung
Senden/Empfang
Keine Verbindung

Deutsch
25
Deutsch
26
In dieser Broschüre finden Sie Hinweise für das Anschließen des
ADSL Barricade
TM
an einen Computer oder ein LAN und zur
Verbindung des Geräts mit dem Internet.
• In Abschnitt 1 wird das Einrichten der Hardware beschrieben.
• In Abschnitt 2 wird das Konfigurieren der Internet-
Eigenschaften für Ihre(n) Computer beschrieben.
• In Abschnitt 3 lernen Sie, wie die ISP-Einstellungen mit dem
Programm AutoSetup konfigurieren.
Es wird vorausgesetzt, dass Sie bereits über Ihren Internet Service
Provider (ISP) Zugriff auf den ADSL-Service haben. Anhand dieser
Anweisungen kann eine Basiskonfiguration erstellt werden, die mit
Ihrem Heim- oder Kleinunternehmensnetzwerk kompatibel ist.
Rückseite
Beschreibung
12 V, 1,2 A
Wenn 1-2 Sekunden lang gedrückt:
Zurücksetzen.
Wenn mindestens 5 Sekunden lang
gedrückt: Wiederherstellen der werkseitigen
Standardeinstellungen.
RJ-11-Telefonanschluss
Vier RJ-45-Anschlüsse (10/100 Mbit/s)
Anschluss auf der
Rückseite
Stromversorgung
Taste zum
Zurücksetzen des
Geräts und
Wiederherstellen der
werkseitigen
Standardeinstellungen
DSL-Port
Ethernet-Port

Deutsch
27
Deutsch
28
Anschließen der Hardware
1
Achtung: Schalten Sie vor Beginn alle Geräte aus. Dies betrifft
Ihre(n) Computer, Ihren LAN-Hub/-Switch (falls
vorhanden) und den ADSL Barricade
TM
.
Schritt 1. Anschließen des ADSL-Kabels
Verbinden Sie ein Ende des mitgelieferten Telefonkabels (RJ-11)
mit dem Anschluss auf der Rückseite des Geräts, der die
Beschriftung DSL trägt. Verbinden Sie das andere Ende mit Ihrem
ADSL-Mikrofilter/-Splitter*.
*Hinweis: Bei einigen Modellen werden ADSL-Splitter/-Mikrofilter
geliefert.
Bei bestimmten Modellen wird ein RJ-11-zu-RJ45-Kabel
mitgeliefert, das eine Verbindung mit einem ISDN-
Splitter ur Herstellung von U-R2-Kompatibilität
ermöglicht.
Schritt 2. Anschließen des Ethernet-Kabels
Um ein LAN mit dem ADSL Barricade
TM
zu verbinden, schließen Sie
ein Ende eines mitgelieferten Ethernet-Kabels an den Hub/Switch-
Port und das andere an den Ethernet-Port am ADSL Barricade
TM
an.
Wenn Sie den ADSL Barricade
TM
mit einem Einzel-Computer und
ohne Hub verwenden, müssen Sie den PC über das Ethernet-Kabel
direkt an das Gerät anschließen.
Schritt 3. Anschließen des Netzteils
Verbinden Sie das Wechselstrom-Netzteil mit dem Stromanschluss
an der Rückseite des Geräts und stecken Sie die andere Seite des
Netzteils in eine Wandsteckdose oder Steckerleiste ein.
Schritt 4. Starten des Systems
Schalten Sie den/die Computer ein und starten Sie ihn/sie. Starten
Sie auch andere LAN-Geräte wie Hubs oder Switches.

Deutsch
29
Deutsch
30
3. Klicken Sie im Fenster [LAN or High-Speed Internet] (LAN
oder Hochgeschwindigkeits-Internet) mit der rechten
Maustaste auf das Symbol, das Ihrer Netzwerkkarte entspricht,
und wählen Sie [Properties] (Eigenschaften). (Dieses Symbol
trägt oft die Bezeichnung [Local Area Connection] (LAN-
Verbindung). Das Dialogfeld [Local Area Connection] (LAN-
Verbindung) zeigt eine Liste der derzeit installierten
Netzwerkobjekte an.
4. Sorgen Sie dafür, dass das Kontrollkästchen links neben dem
Objekt [Internet Protocol TCP/IP] (Internetprotocol TCP/IP]
aktiviert ist, und klicken Sie auf [Properties] (Eigenschaften).
5. Klicken Sie im Dialogfeld [Internet Protocol (TCP/IP)
Properties] (Eigenschaften von Internetprotokoll (TCP/IP)) auf
die Optionsschaltfläche [Obtain an IP address automatically]
(IP-Adresse automatisch beziehen). Klicken Sie ebenfalls auf
die Optionsschaltfläche [Obtain DNS server address
automatically] (Adresse des DNS-Servers automatisch
beziehen).
6. Klicken Sie zwei Mal auf [OK], um Ihre Änderungen zu
bestätigen und die Systemsteuerung zu schließen.
In diesem Abschnitt finden Sie Anweisungen zum Konfigurieren
der Internet-Einstellungen des Computers für die Arbeit mit dem
ADSL Barricade
TM
.
Vorbereitende Arbeiten
Standardmäßig weist der ADSL Barricade
TM
Ihren PCs automatisch
alle erforderlichen Internet-Einstellungen zu. Sie brauchen die PCs
nur noch so zu konfigurieren, dass sie die zugewiesenen Werte
übernehmen. Befolgen Sie die Anweisungen für das auf Ihren PC
installierte Betriebssystem.
Windows® XP
1. Klicken Sie in der Windows-Task-Leiste auf die Schaltfläche
[Start] und klicken Sie dann auf [Control Panel]
(Systemsteuerung).
2. Doppelklicken Sie auf das Symbol [Network Connections]
(Netzwerkverbindungen).
Konfigurieren
des Computers
2

Deutsch
31
Deutsch
32
Windows 2000
Prüfen Sie zunächst, ob das IP-Protokoll vorhanden ist, und
installieren Sie es ggf.
1. Klicken Sie in der Windows-Task-Leiste auf die Schaltfläche
[Start], wählen Sie [Settings] (Einstellungen) und klicken Sie
dann auf [Control Panel] (Systemsteuerung).
2. Doppelklicken Sie auf [Network and Dial-up Connections]
(Netzwerk- und DFÜ-Verbindungen).
3. Klicken Sie im Fenster [Network and Dial-up Connections]
(Netzwerk- und DFÜ-Verbindungen) mit der rechten Maustaste
auf das Symbol [Local Area Connection] (LAN-Verbindung) und
wählen Sie dann [Properties] (Eigenschaften). Das Dialogfeld
[Local Area Connection] (Eigenschaften von LAN-Verbindung)
zeigt eine Liste der derzeit installierten Netzwerkkomponenten
an. Wenn in der Liste der Eintrag [Internet Protocol (TCP/IP)]
(Internetprotokoll (TCP/IP)) enthalten ist, ist das Protokoll
bereits aktiviert. Fahren Sie in diesem Fall mit Schritt 10 fort.
4. Wenn [Internet Protocol (TCP/IP)] (Internetprotokoll
(TCP/IP)) nicht als installierte Komponente erscheint, klicken
Sie auf [Install…] (Installieren).
5. Wählen Sie im Dialogfeld [Select Network Component Type]
(Typ der Netzwerkkomponente auswählen) die Option
[Protocol] (Protokoll) und klicken Sie dann auf [Add…]
(Hinzufügen).
6. Wählen Sie [Internet Protocol (TCP/IP)] (Internetprotokoll
(TCP/IP) in der Liste [Network Protocols] (Netzwerkprotokoll]
und klicken Sie dann auf [OK]. Möglicherweise werden Sie
aufgefordert, Dateien von Ihrer Windows 2000-Installations-
CD oder anderen Speichermedien zu installieren. Befolgen Sie
die Anweisungen zum Installieren der Dateien.
7. Wenn Sie dazu aufgefordert werden, klicken Sie auf [OK], um
den Computer mit den neuen Einstellungen zu starten.
Anschließend müssen Sie die PCs so konfigurieren, dass sie
vom ADSL Barricade
TM
zugewiesene IP-Adressen übernehmen.
8. Doppelklicken Sie in der Systemsteuerung auf das Symbol
[Network and Dial-up Connections] (Netzwerk- und DFÜ-
Verbindungen).

Deutsch
33
Deutsch
34
9. Klicken Sie im Fenster [Network and Dial-up Connections]
(Netzwerk- und DFÜ-Verbindungen) mit der rechten Maustaste
auf das Symbol [Local Area Connection] (LAN-Verbindung) und
wählen Sie dann [Properties] (Eigenschaften).
10. Wählen Sie im Dialogfeld [Local Area Connection Properties]
(Eigenschaften von LAN-Verbindung) die Option [Internet
Protocol (TCP/IP)] (Internetprotokoll (TCP/IP)) und klicken
Sie dann auf [Properties] (Eigenschaften).
11. Klicken Sie im Dialogfeld [Internet Protocol (TCP/IP)
Properties] (Eigenschaften von Internetprotokoll (TCP/IP)) auf
die Optionsschaltfläche [Obtain an IP address automatically]
(IP-Adresse automatisch beziehen). Klicken Sie ebenfalls auf
die Optionsschaltfläche [Obtain DNS server address
automatically] (DNS-Serveradresse automatisch beziehen).
12. Klicken Sie zwei Mal auf [OK], um Ihre Änderungen zu
bestätigen und die Systemsteuerung zu schließen.
Windows 98/Me/SE
1. Klicken Sie in der Windows-Task-Leiste auf die Schaltfläche
[Start], wählen Sie [Settings] (Einstellungen) und klicken Sie
dann auf [Control Panel] (Systemsteuerung).
2. Doppelklicken Sie auf [Network and Dial-up Connections]
(Netzwerk- und DFÜ-Verbindungen).
3. Klicken Sie im Fenster [Network and Dial-up Connections]
(Netzwerk- und DFÜ-Verbindungen) mit der rechten Maustaste
auf das Symbol [Network] (Netzwerk) und wählen Sie dann
[Properties] (Eigenschaften). Das Dialogfeld [Network
Properties] (Netzwerkeigenschaften) zeigt eine Liste der
derzeit installierten Netzwerkkomponenten an. Wenn in der
Liste der Eintrag [Internet Protocol (TCP/IP)]
(Internetprotokoll (TCP/IP)) enthalten ist, ist das Protokoll
bereits aktiviert. Fahren Sie in diesem Fall mit Schritt 11 fort.

Deutsch
35
Deutsch
36
9. Doppelklicken Sie in der Systemsteuerung auf das Symbol
[Network and Dial-up Connections] (Netzwerk- und DFÜ-
Verbindungen).
10. Klicken Sie im Fenster [Network and Dial-up Connections]
(Netzwerk- und DFÜ-Verbindungen) mit der rechten Maustaste
auf das Symbol [Network] (Netzwerk) und wählen Sie dann
[Properties] (Eigenschaften).
11. Wählen Sie im Dialogfeld [Network Properties]
(Netzwerkeigenschaften) die Option [TCP/IP] und klicken Sie
dann auf [Properties] (Eigenschaften).
12. Klicken Sie im Dialogfeld [TCP/IP Settings] (Eigenschaften von
TCP/IP) auf die Optionsschaltfläche [Server assigned IP
address) (Vom Server zugewiesene IP-Adresse). Klicken Sie
ebenfalls auf die Optionsschaltfläche [Server assigned name
server address] (Vom Server automatisch zugewiesene Namens-
Server-Adresse).
13. Klicken Sie zwei Mal auf [OK], um Ihre Änderungen zu
bestätigen und die Systemsteuerung zu schließen.
Hinweis: Beachten Sie für Windows 95 und NT die
Installationshinweise im Handbuch auf der CD-ROM.
4. Wenn [Internet Protocol (TCP/IP)] (Internetprotokoll
(TCP/IP)) nicht als installierte Komponente erscheint, klicken
Sie auf [Add…] (Hinzufügen).
5. Wählen Sie im Dialogfeld [Select Network Component Type]
(Typ der Netzwerkkomponente auswählen) die Option
[Protocol] (Protokoll) und klicken Sie dann auf [Add…]
(Hinzufügen).
6. Wählen Sie [Microsoft] in der Herstellerliste aus.
7. Wählen Sie [Internet Protocol (TCP/IP)] (Internetprotokoll
(TCP/IP) in der Liste [Network Protocols] (Netzwerkprotokoll]
und klicken Sie dann auf [OK]. Möglicherweise werden Sie
aufgefordert, Dateien von Ihrer Windows-Installations-CD oder
anderen Speichermedien zu installieren. Befolgen Sie die
Anweisungen zum Installieren der Dateien.
8. Wenn Sie dazu aufgefordert werden, klicken Sie auf [OK],
um den Computer mit den neuen Einstellungen zu starten.
Anschließend müssen Sie die PCs so konfigurieren, dass sie
vom ADSL Barricade
TM
zugewiesene IP-Adressen übernehmen.

Deutsch
37
Deutsch
38
In diesem Abschnitt finden Sie Hinweise darüber, wie Sie mit der
Funktion zur automatischen Einrichtung den ADSL Barricade
TM
für
Ihren ISP konfigurieren können.
1. Legen Sie die mitgelieferte CD mit Installationsprogramm und
Dokumentation in Ihr CD-ROM-Laufwerk ein.
2. Suchen Sie Ihr CD-Laufwerk im Explorer und starten Sie
AutoSetup.exe. Hierdurch wird das Hilfsprogramm zur
automatischen Einrichtung gestartet, mit dem der ADSL
Barricade
TM
sehr leicht für Ihren ISP konfiguriert werden kann.
3. Klicken Sie auf [Yes, I agree] (Ja, ich stimme zu), um den
Bedingungen der Lizenzvereinbarung zuzustimmen und mit der
Einrichtung fortzufahren.
Konfigurieren
des ADSL Barricade
TM
3
4. Wählen Sie Ihr Land in der Dropdown-Liste und klicken Sie dann
auf [Next] (Weiter), um fortzufahren. Wenn Ihr Land nicht
aufgeführt ist, klicken Sie auf [Custom] (Benutzerdefiniert) und
fahren Sie mit dem Abschnitt Benutzerdefinierte ISP-Angaben
fort.
5. Wählen Sie Ihren ISP/Netzwerkanbieter in der Dropdown-Liste
und klicken Sie dann auf [Next] (Weiter), um fortzufahren. Wenn
Ihr ISP/Netzwerkanbieter nicht aufgeführt ist, klicken Sie auf
[Custom] (Benutzerdefiniert) und fahren Sie mit dem Abschnitt
Benutzerdefinierte ISP-Angaben fort.
6. Geben Sie die von Ihrem ISP gelieferten Angaben für
Benutzernamen und Kennwort ein und klicken Sie dann auf
[Next] (Weiter), um fortzufahren.
Hinweis: Sie müssen nur einen Benutzernamen und ein Kennwort
eingeben, wenn Ihr ISP das Protokoll PPPoA oder PPPoE
verwendet. Wenn Ihr ISP RFC1483 Bridging verwendet,
sind keine weiteren Angaben erforderlich. Klicken Sie nur
auf [Next] (Weiter), um fortzufahren.
Wenn Ihr ISP RFC1483 Routed verwendet, müssen Sie nach
dem Klicken auf [Next] (Weiter) die Werte eingeben, die
Sie von Ihrem ISP für IP-Adresse, Netzmaske, Gateway-
Adresse sowie primäre und sekundäre DNS-Adresse erhalten
haben. Klicken Sie auf [Next] (Weiter).

Deutsch
39
Deutsch
40
7. Klicken Sie dann auf [Finish] (Fertig stellen) Das
Hilfsprogramm AutoSetup konfiguriert nun den ADSL
Barricade
TM
mit den angegebenen Werten. Dies dauert einige
Sekunden. Wenn die Einrichtung beendet ist, erscheint
folgende Meldung:
Das ADSL-Modem ist jetzt eingerichtet. Fahren Sie mit dem
Abschnitt zur Fehlerbehebung im Benutzerhandbuch fort, wenn
Sie keine Verbindung zum Internet herstellen können.
Benutzerdefinierte ISP-Angaben
Wenn Ihr Land oder ISP nicht aufgeführt ist, müssen Sie die ISP-
Einstellungen manuell eingeben. Dies erfolgt über die Option
[Custom] (Benutzerdefiniert). Für benutzerdefinierte Installationen
müssen Sie auch folgende Einstellungen kennen, die Sie von Ihrem
ISP erhalten:
Welches Protokoll wird verwendet? (PPPoA, PPPoE, RFC1483
Bridging oder RFC1483 Routed).
Welche Verkapselung (Encapsulation)? (VC-Mux oder LLC).
Was sind die VPI/VCI-Nummern? Beispiel: 0/38.

Deutsch
41
Français
42
• Routeur Barricade
TM
ADSL.
•Un cordon d’alimentation.
•Un câble Ethernet RJ-45.
•Un câble téléphonique/DSL RJ-11 standard.
• CD-ROM avec l’utilitaire d’installation et la documentation.
• Guide d’installation rapide.
Remarque : Des diviseurs/microfiltres ADSL sont fournis avec
certains modèles.
Contenu de l’emballage
1. Wählen Sie die Werte gemäß den Angaben Ihres ISP für die
oben genannten Werte aus.
2. Fahren Sie mit Schritt 6 fort.

Français
44
Français
43
Panneau avant
Description du matérielConfiguration requise
Pour pouvoir utiliser le routeur Barricade
TM
ADSL, vous devez
disposer des éléments suivants :
•Un service ADSL opérationnel sur votre ligne téléphonique,
avec au moins une adresse Internet publique pour votre réseau
local.
•Un ou plusieurs ordinateurs contenant chacun une carte
d’interface réseau Ethernet 10/100 Base-T.
•Un concentrateur/commutateur Ethernet, si vous connectez
l’appareil à plusieurs ordinateurs d’un réseau Ethernet.
•Pour une configuration système à l’aide du programme Web
fourni : un navigateur Web tel qu’Internet Explorer V5.0
ou ultérieur, ou bien Netscape V6.1 ou ultérieur.
Témoins
lumineux
Couleur
Vert
allumé
Vert
clignotant
Jaune
allumé
Jaune
clignotant
Éteint
Power
(Alimentation)
Vert
Sous tension
Sans objet
Sans objet
Sans objet
Hors tension
Link
(Liaison)
Vert
La ligne ADSL
est formée
Apprentissage
Sans objet
Sans objet
Pas de
connexion
TX/RX (Émission/
réception)
Vert
Émission/
réception DSL
TX/RX (Émission/
réception)
Sans objet
Sans objet
Pas d’émission/
réception
Ethernet
1 2 3 4
Vert / 100 Mbps
Jaune / 10 Mbps
Link (Liaison)
Émission /
réception
Link (Liaison)
Émission /
réception
Pas de connexion

Français
46
Français
45
Ce Guide d’installation rapide fournit des instructions de base pour
la connexion du routeur Barricade
TM
ADSL à un ordinateur ou un
réseau local et à Internet.
• La section 1 décrit comment configurer le matériel.
• La section 2 décrit comment configurer les propriétés Internet
sur votre ou vos ordinateurs.
• La section 3 montre comment configurer les paramètres du FAI
au moyen de
l’utilitaire Auto Setup.
Ce Guide suppose que vous avez déjà mis en place un service ADSL
avec votre Fournisseur d’Accès Internet (FAI). Ces instructions vous
aideront à effectuer une configuration de base qui devrait être
compatible avec la configuration de votre réseau domestique ou
avec le réseau de votre PME.
Panneau arrière
Description
12 V, 1,2 A
Enfoncé pendant 1 à 2 secondes :
réinitialisation.
Enfoncé pendant au moins 5 secondes :
restauration des valeurs par défaut.
Connecteur téléphonique RJ-11
Quatre connecteurs RJ-45 10/100M
Connecteur du
panneau arrière
Alimentation
Bouton de
réinitialisation et
de restauration des
valeurs par défaut
Port DSL
Port Ethernet

Français
48
Français
47
Connexion du matériel
1
Avertissement : Avant de commencer, mettez tous les appareils
hors tension. Cela inclut vos ordinateurs, votre
concentrateur/commutateur sur le réseau local
(s’il y a lieu), et le routeur Barricade
TM
ADSL.
Étape 1. Branchez le câble ADSL
Connectez l’une des extrémités du câble téléphonique (RJ-11)
fourni au port DSL sur le panneau arrière de l’appareil. Connectez
l’autre extrémité à votre microfiltre/diviseur ADSL*.
*Remarque : Des diviseurs/microfiltres ADSL sont fournis avec
certains modèles.
Étape 2. Branchez le câble Ethernet
Si vous connectez un réseau local au routeur Barricade
TM
ADSL,
branchez une extrémité du câble Ethernet fourni au port du
concentrateur/commutateur et l’autre au port Ethernet du routeur
Barricade
TM
ADSL. Si vous utilisez le routeur Barricade
TM
ADSL avec
un seul ordinateur et sans concentrateur, vous devez utiliser un
câble Ethernet pour connecter le PC directement à l’appareil.
Étape 3. Raccordez le cordon d’alimentation
Raccordez une extrémité du cordon d’alimentation au connecteur
d’alimentation situé à l’arrière de l’appareil et l’autre extrémité à
une prise murale ou une ligne d’alimentation.
Étape 4. Allumez vos systèmes
Allumez et démarrez votre ou vos ordinateurs ainsi que tout
périphérique de réseau local tel que concentrateur ou
commutateur.

Français
49
Français
50
3. Dans la fenêtre [LAN or High-Speed Internet] (Réseau local ou
Internet à grande vitesse), cliquez avec le bouton droit sur
l’icône correspondant à votre carte d’interface réseau et
sélectionnez [Properties] (Propriétés). (Cette icône est
souvent libellée [Local Area Connection] (Connexion au réseau
local).) La boîte de dialogue [Local Area Connection]
(Connexion au réseau local) affiche la liste des éléments
réseau installés.
4. Vérifiez que la case à cocher située à gauche de l’élément
[Internet Protocol TCP/IP] (Protocole Internet TCP/IP) est
activée, et cliquez sur [Properties] (Propriétés).
5. Dans la boîte de dialogue [Internet Protocol (TCP/IP)
Properties] (Propriétés TCP/IP), cliquez sur la case d’option
[Obtain an IP address automatically] (Obtenir une adresse IP
automatiquement). Cliquez également sur la case d’option
[Obtain DNS server address automatically] (Obtenir les
adresses des serveurs DNS automatiquement).
6. Cliquez deux fois sur [OK] pour confirmer vos modifications et
fermez le Panneau de configuration.
Cette section contient les instructions qui vous permettront de
configurer les paramètres Internet sur vos ordinateurs pour
pouvoir utiliser le routeur Barricade
TM
ADSL.
Avant de commencer
Par défaut, le routeur Barricade
TM
ADSL affecte automatiquement
tous les paramètres Internet nécessaires à vos PC. Il vous suffit
de configurer les PC pour qu’ils acceptent les informations
affectées. Suivez les instructions correspondant au système
d’exploitation installé sur votre PC.
Windows® XP
1. Dans la barre des tâches Windows, cliquez sur [Start]
(Démarrer), puis cliquez sur [Control Panel]
(Panneau de configuration).
2. Double-cliquez sur l’icône [Network Connections]
(Connexions réseau).
Configuration
de vos ordinateurs
2

Français
51
Français
52
Windows 2000
Commencez par vérifier la présence du protocole IP et, si
nécessaire, installez-le.
1. Dans la barre des tâches Windows, cliquez sur le bouton
[Start] (Démarrer), pointez sur [Settings] (Paramètres), puis
cliquez sur [Control Panel] (Panneau de configuration).
2. Double-cliquez sur l’icône [Network and Dial-Up Connections]
(Connexions réseau et accès à distance).
3. Dans la fenêtre [Network and Dial-up Connections]
(Connexions réseau et accès à distance), cliquez avec le
bouton droit de la souris sur l’icône [Local Area Connection]
(Connexion au réseau local), puis sélectionnez [Properties]
(Propriétés). La boîte de dialogue [Local Area Connection
Properties] (Propriétés de Connexion au réseau local) affiche
la liste des éléments réseau installés. Si cette liste contient
l’élément [Internet Protocol (TCP/IP)] (Protocole Internet
TCP/IP), cela signifie que le protocole a déjà été activé.
Passez à l’Étape 10.
4. Si l’élément [Internet Protocol (TCP/IP)] (Protocole Internet
TCP/IP) n’apparaît pas comme composant installé, cliquez sur
[Install…] (Installer).
5. Dans la boîte de dialogue [Select Network Component Type]
(Sélection du type de composant réseau), sélectionnez
[Protocol] (Protocole), puis cliquez sur [Add…] (Ajouter).
6. Sélectionnez [Internet Protocol (TCP/IP)] (Protocole Internet
TCP/IP) dans la liste [Network Protocols] (Protocoles réseau),
puis cliquez sur [OK]. Il est possible que vous soyez invité à
installer les fichiers à partir de votre CD-ROM d’installation de
Windows 2000 ou d’un autre support. Suivez les instructions
pour installer les fichiers.
7. Si un message vous le demande, cliquez sur [OK] pour
redémarrer votre ordinateur avec les nouveaux paramètres.
Configurez ensuite les PC pour accepter les informations
relatives aux adressesIP affectées par le routeur Barricade
TM
ADSL.
8. Dans le Panneau de configuration, double-cliquez sur l’icône
[Network and Dial-up Connections] (Connexions réseau et
accès à distance).

Français
54
Français
53
9. Dans la fenêtre [Network and Dial-up Connections]
(Connexions réseau et accès à distance), cliquez avec le
bouton droit de la souris sur l’icône [Local Area Connection]
(Connexion au réseau local), puis sélectionnez [Properties]
(Propriétés).
10. Dans la boîte de dialogue [Local Area Connection Properties]
(Propriétés de Connexion au réseau local), sélectionnez
[Internet Protocol (TCP/IP)] (Protocole Internet TCP/IP) et
cliquez sur [Properties] (Propriétés).
11. Dans la boîte de dialogue [Internet Protocol (TCP/IP)
Properties] (Propriétés TCP/IP), cliquez sur la case d’option
[Obtain an IP address automatically] (Obtenir une adresse IP
automatiquement). Cliquez également sur la case d’option
[Obtain DNS server address automatically] (Obtenir les
adresses des serveurs DNS automatiquement).
12. Cliquez deux fois sur [OK] pour confirmer et enregistrer vos
modifications, puis fermez le Panneau de configuration.
Windows 98/Me/SE
1. Dans la barre des tâches Windows, cliquez sur le bouton
[Start] (Démarrer), pointez sur [Settings] (Paramètres), puis
cliquez sur [Control Panel] (Panneau de configuration).
2. Double-cliquez sur l’icône [Network and Dial-Up Connections]
(Connexions réseau et accès à distance).
3. Dans la fenêtre [Network and Dial-up Connections]
(Connexions réseau et accès à distance), cliquez avec le
bouton droit de la souris sur l’icône [Network] (Réseau), puis
sélectionnez [Properties] (Propriétés). La boîte de dialogue
[Network Properties] (Propriétés du réseau) affiche la liste des
composants réseau installés. Si cette liste contient l’élément
[Internet Protocol (TCP/IP)] (Protocole Internet (TCP/IP), cela
signifie que le protocole a déjà été activé. Passez à l’Étape 11.

Français
56
Français
55
9. Dans le Panneau de configuration, double-cliquez sur l’icône
[Network and Dial-up Connections] (Connexions réseau et
accès à distance).
10. Dans la fenêtre [Network and Dial-up Connections]
(Connexions réseau et accès à distance), cliquez avec le
bouton droit de la souris sur l’icône [Network] (Réseau), puis
sélectionnez [Properties] (Propriétés).
11. Dans la boîte de dialogue [Network Properties] (Propriétés du
réseau), sélectionnez [TCP/IP] et cliquez sur [Properties]
(Propriétés).
12. Dans la boîte de dialogue [TCP/IP Settings] (Paramètres
TCP/IP), cliquez sur la case d’option [Server assigned IP
address] (AdresseIP affectée par le serveur). Cliquez
également sur la case d’option [Server assigned name server
address] (Adresse du serveur DNS affectée par le serveur).
13. Cliquez deux fois sur [OK] pour confirmer et enregistrer vos
modifications, puis fermez le Panneau de configuration.
Remarque : Pour Windows 95 et NT, consultez les instructions
d’installation dans le Manuel fourni sur le CD-ROM.
4. Si l’élément [Internet Protocol (TCP/IP)] (Protocole Internet
TCP/IP) n’apparaît pas comme composant installé, cliquez sur
[Add…] (Ajouter).
5. Dans la boîte de dialogue [Select Network Component Type]
(Sélection du type de composant réseau), sélectionnez
[Protocol] (Protocole), puis cliquez sur [Add…] (Ajouter).
6. Sélectionnez [Microsoft] dans la liste [Manufacturers]
(Constructeurs).
7. Sélectionnez [Internet Protocol (TCP/IP)] (Protocole Internet
TCP/IP) dans la liste [Network Protocols] (Protocoles réseau),
puis cliquez sur [OK]. Il est possible que vous soyez invité à
installer les fichiers à partir de votre CD-ROM d’installation de
Windows Me ou d’un autre support. Suivez les instructions
pour installer les fichiers.
8. Si un message vous le demande, cliquez sur [OK] pour
redémarrer votre ordinateur avec les nouveaux paramètres.
Configurez ensuite les PC pour accepter les informations
relatives aux adresses IP affectées par le routeur Barricade
TM
ADSL.

Français
58
Français
57
Cette section contient des instructions qui vous permettront
d’utiliser l’utilitaire Auto Setup pour configurer automatiquement
le routeur Barricade
TM
ADSL pour votre FAI.
1. Insérez le CD-ROM contenant l’utilitaire d’installation et la
documentation dans votre lecteur de CD-ROM.
2. Naviguez jusqu’à l’emplacement de votre lecteur de CD-ROM et
exécutez le programme AutoSetup.exe. L’utilitaire Auto Setup
s’exécute. Il offre un moyen simple pour configurer le routeur
Barricade
TM
ADSL pour votre FAI.
3. Cliquez sur [Yes, I agree] (Oui, j’accepte) pour accepter les
termes du contrat de licence et continuer la configuration.
Configuration du routeur
Barricade
TM
ADSL
3
4. Sélectionnez votre pays dans la liste déroulante, puis cliquez sur
[Next] (Suivant) pour continuer. Si votre pays n’apparaît pas,
cliquez sur [Custom] (Personnalisé) puis passez à la section
Custom.
5. Sélectionnez votre FAI/fournisseur réseau dans la liste
déroulante, puis cliquez sur [Next] pour continuer. Si votre
FAI/fournisseur réseau n’apparaît pas, cliquez sur [Custom] puis
passez à la section Custom.
6. Entrez le nom d’utilisateur et le mot de passe fournis par votre
FAI, puis cliquez sur [Next] pour continuer.
Remarque : Vous n’aurez besoin d’entrer un nom d’utilisateur et un
mot de passe que si votre FAI utilise le protocole
PPPoA ou PPPoE. Si votre FAI utilise RFC1483 Bridging,
aucune autre saisie n’est nécessaire, il vous suffit de
cliquer sur [Next] pour continuer.
Si votre FAI utilise RFC1483 Routed, après avoir cliqué
sur [Next] vous devrez entrer l’adresse IP, le masque de
réseau, l’adresse de passerelle et les adresses DNS
primaire et secondaire fournis par votre FAI.
Cliquez sur [Next].

Français
60
Français
59
7. Enfin, cliquez sur [Finish] (Terminer). L’utilitaire Auto Setup
va maintenant configurer le routeur Barricade
TM
ADSL avec les
paramètres que vous avez saisis. Cette opération peut durer
quelques minutes. Lorsque la configuration est terminée, le
message suivant s’affiche :
Votre router Barricade
TM
ADSL est maintenant configuré. Reportez-
vous à la section Dépannage du Manuel d’utilisation si vous ne
parvenez pas à établir de connexion à Internet.
Personnalisé
Si votre pays ou votre FAI ne figure pas dans la liste, vous devrez
entrer manuellement vos paramètres de FAI. Cette opération
s’effectue en utilisant l’option [Custom] (Personnalisé). Pour une
installation personnalisée, vous aurez également besoin de
connaître les paramètres suivants fournis par votre FAI :
Protocole? (PPPoA, PPPoE, RFC1483 Bridging
ou RFC1483 Routed).
Encapsulation ? (VC-Mux ou LLC).
Numéros de circuits VPI/VCI ? Par exemple 0/38.

Español
62
Français
61
1. Sélectionnez/entrez les valeurs correspondant aux paramètres
ci-dessus fournis par votre FAI.
2. Revenez à l’Étape 6.
•Un ADSL Barricade
TM
.
•Un adaptador de corriente.
•Un cable Ethernet RJ-45.
•Un cable RJ-11 para la línea DSL o la línea telefónica estándar.
•Un CD con la utilidad de instalación y la documentación.
•Manual de instalación rápida.
Nota: Algunos modelos incluyen divisores o microfiltros ADSL.
Contenido del paquete

Español
64
Español
63
Panel frontal
Descripción del hardwareRequisitos del sistema
Para utilizar el ADSL Barricade
TM
, debe disponer
de los siguientes elementos:
•Línea telefónica con servicio ADSL en funcionamiento y con al
menos una dirección pública de Internet para su LAN.
•Uno o más ordenadores, cada uno con una tarjeta de interfaz
de red (NIC) Ethernet 10/100 Base-T.
•Un switch o hub Ethernet, si va a conectar el dispositivo
a más de un ordenador de una red Ethernet.
•Para configurar el sistema utilizando el programa basado en
web que se suministra, necesitará: un navegador de Internet
como Internet Explorer V5.0 o posterior, o Netscape V6.1 o
posterior.
Etiqueta
LED
Color
Verde fijo
Verde
intermitente
Amarillo fijo
Amarillo
intermitente
Apagado
Power
(Alimentación)
Verde
Encendido
N/D
N/D
N/D
Apagado
Link
(Enlace)
Verde
Línea ADSL
preparada
Preparación
N/D
N/D
Sin
conexión
TX/RX
Verde
DSL transmitiendo
o recibiendo
TX/RX
N/D
N/D
Sin TX/RX
Ethernet
1 2 3 4
Verde / 100 Mbps
Amarillo / 10 Mbps
Enlace
Transmitiendo o
recibiendo
Enlace
Transmitiendo o
recibiendo
Sin Conexión

Español
66
Español
65
Este Manual de instalación rápida contiene las instrucciones
básicas para conectar el ADSL Barricade
TM
a un ordenador o a una
LAN, y a Internet.
• La sección 1 describe cómo configurar el hardware.
• La sección 2 describe cómo configurar las propiedades de
Internet de su ordenador.
• La sección 3 describe como configurar los parámetros del ISP
mediante la utilidad de configuración automática.
Este manual presupone que ya tiene contratado un servicio ADSL
con su proveedor de servicios de Internet (ISP) Estas instrucciones
proporcionan una configuración básica que debería ser compatible
con la configuración de red de su casa o de una oficina pequeña.
Panel trasero
Descripción
12 V; 1,2 A
Si se pulsa durante 1 ó 2 segundos: se
reinicia.
Si se pulsa durante 5 segundos o más:
se restauran los valores de fábrica.
Conector telefónico RJ-11
Cuatro conectores RJ-45 de 10/100 Mbps
Conector
del panel trasero
Fuente de alimentación
Botón para restablecer
y restaurar los ajustes
predeterminados en
fábrica.
Puerto DSL
Puerto Ethernet

Español
68
Español
67
Conexión del hardware
1
Advertencia: Antes de empezar, desconecte la corriente de todos
los dispositivos. Desconecte el ordenador u
ordenadores, el hub o switch de la LAN
(si procede) y el ADSL Barricade
TM
.
Paso 1. Conectar el cable ADSL
Conecte un extremo del cable telefónico proporcionado (RJ-11) al
puerto DSL del panel trasero del dispositivo. Conecte el otro
extremo al microfiltro o divisor ADSL*.
*Nota: Algunos modelos incluyen divisores o microfiltros ADSL.
Paso 2. Conectar el cable Ethernet
Si va a conectar una LAN al ADSL Barricade
TM
, conecte un extremo
del cable Ethernet proporcionado a un puerto del hub o switch y
el otro extremo al puerto Ethernet del ADSL Barricade
TM
. Si va a
utilizar el ADSL Barricade
TM
con un único ordenador sin hub, debe
usar un cable Ethernet para conectar el ordenador al dispositivo
directamente.
Paso 3. Enchufar el cable de alimentación de corriente
Conecte el adaptador de CA a la toma de alimentación de la parte
trasera del dispositivo y enchufe el adaptador a una toma de pared
o a una regleta de enchufes.
Paso 4. Encender los sistemas
Encienda y arranque el ordenador u ordenadores y cualquier
dispositivo de la LAN como hubs o switches.

Español
69
Español
70
3. En la ventana [LAN or High-Speed Internet] (LAN o Internet
de alta velocidad), haga clic con el botón derecho del ratón
en el icono correspondiente a su tarjeta de interfaz de red
(NIC) y seleccione [Properties] (Propiedades). (Este icono
suele denominarse [Local Area Connection] (Conexión de área
local)). El cuadro de diálogo [Local Area Connection]
(Conexión de área local) muestra una lista de los elementos
de red instalados.
4. Compruebe que la casilla de verificación a la izquierda del
elemento [Internet Protocol TCP/IP] (Protocolo Internet
TCP/IP) está marcada y pulse [Properties] (Propiedades).
5. En el cuadro de diálogo [Internet Protocol (TCP/IP)
Properties] (Propiedades del Protocolo Internet (TCP/IP)),
seleccione la opción [Obtain an IP address automatically]
(Obtener dirección IP automáticamente). Seleccione también
la opción [Obtain DNS server address automatically] (Obtener
la dirección del servidor DNS automáticamente].
6. Pulse [OK] (Aceptar) dos veces para confirmar los cambios y
cerrar el [Control Panel] (Panel de control).
Esta sección proporciona instrucciones para configurar los ajustes
de Internet del ordenador y poder trabajar con el ADSL
Barricade
TM
.
Antes de empezar
De forma predeterminada, el ADSL Barricade
TM
asigna
automáticamente a los ordenadores todos los ajustes de Internet
necesarios. Sólo tiene que configurar los ordenadores para aceptar
la información una vez asignada. Siga las instrucciones
correspondientes al sistema operativo instalado en el ordenador.
Windows® XP
1. En la barra de tareas de Windows, pulse el botón [Start]
(Inicio) y luego [Control Panel] (Panel de control).
2. Haga doble clic en el icono [Network Connections]
(Conexiones de red).
Configuración
de los ordenadores
2

Español
71
Español
72
Windows 2000
En primer lugar, hay que comprobar la existencia del protocolo IP
e instalarlo, en caso de ser necesario.
1. En la barra de tareas de Windows, pulse el botón [Start]
(Inicio), vaya a [Settings] (Configuración) y luego pulse
[Control Panel] (Panel de control).
2. Haga doble clic en el icono [Network and Dial-up
Connections] (Conexiones de red y de acceso telefónico).
3. En la ventana [Network and Dial-up Connections] (Conexiones
de red y de acceso telefónico), haga clic con el botón derecho
del ratón en el icono [Local Area Connection] (Conexión de
área local) y seleccione [Properties] (Propiedades). El cuadro
de diálogo [Local Area Connection] (Conexión de área local)
muestra una lista de los componentes de red instalados. Si la
lista incluye [Internet Protocol (TCP/IP)] (Protocolo Internet
(TCP/IP)), significa que el protocolo ya está activado. Vaya al
paso 10.
4. Si [Internet Protocol (TCP/IP)] (Protocolo Internet (TCP/IP))
no aparece como componente instalado, haga clic en
[Install…] (Instalar).
5. En el cuadro de diálogo [Select Network Component Type]
(Seleccionar tipo de componente de red), seleccione
[Protocol] (Protocolo) y luego seleccione [Add…] (Agregar).
6. Seleccione [Internet Protocol (TCP/IP)] (Protocolo Internet
(TCP/IP)) en la lista de [Network Protocols] (Protocolos de
red) y pulse [OK] (Aceptar). Es posible que el sistema le pida
que instale los archivos desde el CD de instalación de
Windows 2000 o desde otro medio. Siga las instrucciones para
instalar los archivos.
7. Si el sistema se lo pide, pulse [OK] (Aceptar) para reiniciar el
ordenador con la nueva configuración. Después, configure los
ordenadores para que acepten la información de IP asignada
por el ADSL Barricade
TM
.
8. En [Control Panel] (Panel de control), haga doble clic en el
icono [Network and Dial-up Connections] (Conexiones de red y
acceso telefónico).

Español
73
Español
74
9. En la ventana [Network and Dial-up Connections] (Conexiones
de red y de acceso telefónico), haga clic con el botón derecho
del ratón en el icono [Local Area Connection] (Conexión de
área local) y seleccione [Properties] (Propiedades).
10. En el cuadro [Properties] (Propiedades) de [Local Area
Connection] (Conexión de área local), seleccione [Internet
Protocol (TCP/IP)] (Protocolo Internet (TCP/IP)) y luego haga
clic en [Properties] (Propiedades).
11. En el cuadro de diálogo [Internet Protocol (TCP/IP)
Properties] (Propiedades del Protocolo Internet (TCP/IP)),
seleccione la opción [Obtain an IP address automatically]
(Obtener dirección IP automáticamente). Seleccione también
la opción [Obtain DNS server address automatically] (Obtener
la dirección del servidor DNS automáticamente].
12. Pulse [OK] (Aceptar) dos veces para confirmar los cambios y
cerrar el [Control Panel] (Panel de control).
Windows 98, Me, SE
1. En la barra de tareas de Windows, pulse el botón [Start]
(Inicio), vaya a [Settings] (Configuración) y luego pulse
[Control Panel] (Panel de control).
2. Haga doble clic en el icono [Network and Dial-up Connections]
(Red).
3. En la ventana [Network and Dial-up Connections] (Red), pulse
el icono [Network] (Red) con el botón derecho y seleccione
[Properties] (Propiedades). El cuadro de diálogo [Network
Properties] (Propiedades de red) muestra una lista de los
componentes de red instalados. Si la lista incluye [Internet
Protocol (TCP/IP)] (TCP/IP), significa que el protocolo ya está
activado. Vaya al paso 11.

Español
75
Español
76
9. En [Control Panel] (Panel de control), haga doble clic en el
icono [Network and Dial-up Connections] (Conexiones de red y
acceso telefónico).
10. En la ventana [Network and Dial-up Connections] (Conexiones
de red y de acceso telefónico), pulse el icono [Network] (Red)
con el botón derecho y seleccione [Properties] (Propiedades).
11. En el cuadro de diálogo [Network Properties] (Propiedades de
red), seleccione [TCP/IP] (TCP/IP) y luego pulse [Properties]
(Propiedades).
12. En el cuadro de diálogo [TCP/IP Settings] (Configuración
TCP/IP), seleccione la opción [Server assigned IP address]
(Dirección IP asignada por el servidor). Seleccione también la
opción [Server assigned name server addresses] (Direcciones
del servidor de nombres asignadas por el servidor).
13. Pulse [OK] (Aceptar) dos veces para confirmar los cambios y
cerrar el [Control Panel] (Panel de control).
Nota: Para Windows 95 y NT, consulte las instrucciones de
instalación en el manual que contiene el CD-ROM.
4. Si [Internet Protocol (TCP/IP)] (TCP/IP) no aparece como
componente instalado, haga clic en [Add…] (Agregar).
5. En el cuadro de diálogo [Select Network Component Type]
(Seleccionar tipo de componente de red), seleccione
[Protocol] (Protocolo) y luego seleccione [Add…] (Agregar).
6. Seleccione [Microsoft] en la lista de [Manufacturers]
(Fabricantes).
7. Seleccione [Internet Protocol (TCP/IP)] (TCP/IP) en la lista de
[Network Protocols] (Protocolos de red) y pulse [OK]
(Aceptar). Es posible que el sistema le pida que instale los
archivos desde el CD de instalación de Windows Me o desde
otro medio. Siga las instrucciones para instalar los archivos.
8. Si el sistema se lo pide, pulse [OK] (Aceptar) para reiniciar el
ordenador con la nueva configuración. Después, configure los
ordenadores para que acepten la información de IP asignada
por el ADSL Barricade
TM
.

Español
77
Español
78
Esta sección proporciona instrucciones sobre cómo emplear
la utilidad de configuración automática del ADSL Barricade
TM
para su ISP.
1. Introduzca el CD con la documentación y la utilidad de
instalación en la unidad de CD.
2. Busque en el CD el programa AutoSetup.exe y ejecútelo.
Se iniciará la utilidad de configuración automática, que le
permitirá configurar fácilmente su ADSL Barricade
TM
según su
ISP.
3. Pulse [Yes, I agree] (Sí, acepto) para aceptar los términos del
contrato de licencia y continuar con la instalación.
Configuración
del ADSL Barricade
TM
3
4. Seleccione su país en la lista despegable y luego pulse [Next]
(Siguiente) para continuar. Si su país no aparece en la lista,
pulse [Custom] (Personalizado) y vaya a la sección
Personalización.
5. Seleccione su proveedor ISP o de red en la lista despegable y
luego pulse [Next] (Siguiente) para continuar. Si su proveedor
ISP o de red no aparece en la lista, pulse [Custom]
(Personalizado) y vaya a la sección Personalización.
6. Introduzca el nombre de usuario y la contraseña proporcionados
por su ISP y pulse [Next] (Siguiente) para continuar.
Nota: Sólo deberá introducir un nombre de usuario y una contraseña
si su ISP utiliza el protocolo PPPoA o PPPoE. Si su ISP utiliza
RFC1483 Bridging no deberá introducir ningún dato más,
simplemente pulse [Next] (Siguiente) para continuar.
Si su ISP utiliza RFC1483 Routed, tras pulsar [Next]
(Siguiente), deberá introducir la dirección IP, la máscara de
red, la dirección de la puerta de enlace, y las direcciones DNS
primaria y secundaria proporcionadas por su ISP. Pulse [Next]
(Siguiente).

Español
79
Español
80
7. Pulse [Finish] (Finalizar) para terminar. La utilidad de
configuración automática configurará el ADSL Barricade
TM
con
la configuración introducida. Puede que tarde unos minutos.
Una vez completada la configuración, aparecerá el siguiente
mensaje:
Su ADSL Barricade
TM
ya está configurado. Vaya a la sección
Resolución de problemas de la Guía del usuario si no puede
conectarse a Internet.
Personalización
Si su país o ISP no aparece en la lista, deberá introducir
manualmente la configuración de su ISP. Esto se hace mediante la
opción [Custom] (Personalizado). Para la instalación
personalizada, también necesitará los siguientes datos de
configuración proporcionados por su ISP:
¿Qué protocolo utiliza? (PPPoA, PPPoE, RFC1483
Bridging o RFC1483 Routed).
¿Qué encapsulado? (VC-Mux o LLC).
¿Cuáles son los números de circuito VPI/VCI? P. ej., 0/38.

Nederlands
82
• Eén ADSL Barricade
TM
• Eén voedingsadapter
• Eén RJ-45 Ethernet-kabel
• Eén RJ-11 standaard telefoon/DSL-kabel
• Een cd met installatieprogramma en documentatie
• Quick Installation Guide
Opmerking: Bij sommige modellen worden ADSL-splitters/
microfilters meegeleverd.
Inhoud van de verpakking
Español
81
1. Seleccione o introduzca los valores correspondientes de los
ajustes mencionados proporcionados por su ISP.
2. Vuelva al paso 6.

Nederlands
84
Nederlands
83
Voorpaneel
Beschrijving van de hardware
Systeemvereisten
Teneinde de ADSL Barricade
TM
te kunnen gebruiken, moet u over
het volgende beschikken:
•Werkende ADSL-service op uw telefoonlijn,
met minimaal één openbaar internetadres voor uw LAN.
• Eén of meer computers met elk een Ethernet
10/100 Base-T netwerkinterfacekaart (NIC).
• Een Ethernet-hub/switch, als u het apparaat aansluit
op meer dan één computer op een Ethernet-netwerk.
•Voor systeemconfiguratie met behulp van het meegeleverde
webprogramma: een webbrowser zoals Internet Explorer V5.0
of hoger, of Netscape V6.1 of hoger.
Opschrift
LED
Kleurstatus
Groen
brandend
Groen
knipperend
Geel brandend
Geel
knipperend
UIT
Aan/uit
Groen
Systeem
ingeschakeld
N.v.t.
N.v.t.
N.v.t.
Systeem
uitgeschakeld
Link
Groen
ADSL-lijn
is getraind.
Training
N.v.t.
N.v.t.
Geen
verbinding
TX/RX
Groen
DSL
verzendt/
ontvangt
TX/RX
N.v.t.
N.v.t.
Geen TX/RX
Ethernet
1 2 3 4
Groen / 100 Mbps
Geel / 10 Mbps
Link
Bezig met
verzenden/
ontvangen
Link
Bezig met
verzenden/
ontvangen
Geen verbinding

Nederlands
86
Nederlands
85
Deze Quick Installation Guide biedt basisinstructies voor het
aansluiten van de ADSL Barricade
TM
op een computer of LAN en op
internet.
• In sectie 1 wordt beschreven hoe u de hardware moet
instellen.
• In sectie 2 wordt beschreven hoe u interneteigenschappen
kunt configureren op uw computer(s).
• In sectie 3 wordt aangegeven hoe u ISP-instellingen moet
configureren met het hulpprogramma Auto Setup.
In deze handleiding wordt ervan uitgegaan dat u al over een ADSL-
service van uw internetprovider (ISP) beschikt. In deze instructies
wordt de basisconfiguratie beschreven die overeen zou moeten
komen met de setup van uw thuisnetwerk of uw kleine
kantoornetwerk.
Achterpaneel
Beschrijving
12V, 1,2A
Indien gedurende 1-2 seconden ingedrukt:
reset.
Indien gedurende 5 seconden of langer
ingedrukt: herstel van fabrieksinstellingen.
RJ-11-telefoonconnector
Vier 10/100M RJ-45-connectoren
Connector op
achterpaneel
Voeding
Knop voor Reset
en herstellen van
fabrieksinstellingen
DSL-poort
Ethernet-poort

Nederlands
88
Nederlands
87
De hardware aansluiten
1
Waarschuwing: Schakel, voordat u begint, de stroom uit op alle
apparaten. Dit geldt voor uw computer(s), uw
LAN-hub/switch (indien van toepassing) en de
ADSL Barricade
TM
.
Stap 1. De ADSL-kabel aansluiten
Sluit het ene uiteinde van de meegeleverde telefoonkabel (RJ-11)
aan op de poort met het opschrift DSL op het achterpaneel van
het apparaat. Sluit het andere uiteinde aan op uw ADSL-
microfilter/splitter*.
*Opmerking: Bij sommige modellen worden ADSL-splitters/
microfilters meegeleverd.
Stap 2. De Ethernet-kabel aansluiten
Bij aansluiting van een LAN op de ADSL Barricade
TM
, sluit u het
ene uiteinde van een meegeleverde Ethernet-kabel aan op een
poort van de hub/switch en het andere uiteinde op de Ethernet-
poort op de ADSL Barricade
TM
. Als u de ADSL Barricade
TM
gebruikt
met één enkele computer en geen hub, moet u een Ethernet-kabel
gebruiken om de pc rechtstreeks op het apparaat aan te sluiten.
Stap 3. De voedingsconnector aansluiten
Sluit de wisselstroomadapter aan op de voedingsconnector aan de
achterkant van het apparaat en sluit de adapter aan op een
stopcontact of stekkerdoos.
Stap 4. Uw systemen inschakelen
Zet uw computer(s) en eventuele LAN-apparaten zoals hubs of
switches aan en start ze op.

Nederlands
90
Nederlands
89
3. Klik in het venster [LAN or High-Speed Internet] (LAN- of
snelle Internet-verbinding), met de rechtermuisknop op het
pictogram voor uw netwerkinterfacekaart (NIC) en selecteer
[Properties] (Eigenschappen). (Vaak heeft dit pictogram de
titel [Local Area Connection] (LAN-verbinding).) In het
dialoogvenster [Local Area Connection] (LAN-verbinding)
wordt een lijst weergegeven van geïnstalleerde
netwerkonderdelen.
4. Controleer of het selectievakje links van het item met de titel
[Internet Protocol TCP/IP] (Internet-protocol (TCP/IP)) is
ingeschakeld en klik op [Properties] (Eigenschappen).
5. Klik in het dialoogvenster [Internet Protocol (TCP/IP)
Properties] (Eigenschappen voor Internet Protocol (TCP/IP))
op het keuzerondje [Obtain an IP address automatically]
(Automatisch een IP-adres laten toewijzen). Klik tevens op
het keuzerondje op [Obtain DNS server address automatically]
(Automatisch een DNS-serveradres laten toewijzen).
6. Klik tweemaal op [OK] om uw wijzigingen te bevestigen en
sluit het [Control Panel] (Configuratiescherm).
Deze sectie bevat instructies voor het configureren van de
internetinstellingen op uw computer zodat deze werken met de
ADSL Barricade
TM
.
Voordat u begint
De ADSL Barricade
TM
wijst standaard automatisch alle vereiste
internetinstellingen toe aan uw pc’s. U hoeft alleen de pc’s
zodanig te configureren dat deze de toegewezen informatie
accepteren. Volg de instructies voor het besturingssysteem dat is
geïnstalleerd op uw pc.
Windows® XP
1. Klik achtereenvolgens op [Start] en [Control Panel]
(Configuratiescherm) op de taakbalk van Windows.
2. Dubbelklik op het pictogram [Network Connections]
(Netwerkverbindingen).
Uw computers
configureren
2

Nederlands
92
Nederlands
91
Windows 2000
Controleer eerst of het IP-protocol beschikbaar is en installeer dit,
indien nodig.
1. Klik op [Start], wijs [Settings] (Instellingen) aan en klik op
[Control Panel] (Configuratiescherm) op de taakbalk van
Windows.
2. Dubbelklik op het pictogram [Network and Dial-up
Connections] (Netwerk- en inbelverbindingen).
3. Klik in het venster [Network and Dial-up Connections]
(Netwerk- en inbelverbindingen) met de rechtermuisknop op
het pictogram [Local Area Connection] (LAN-verbinding) en
selecteer [Properties] (Eigenschappen). In het dialoogvenster
[Local Area Connection Properties] (Eigenschappen voor LAN-
verbinding) wordt een lijst weergegeven van geïnstalleerde
netwerkonderdelen. Als de lijst [Internet Protocol (TCP/IP)]
(Internet Protocol (TCP/IP)) bevat, is het protocol al
ingeschakeld. Ga verder naar stap 10.
4. Als [Internet Protocol (TCP/IP)] (Internet-protocol (TCP/IP))
niet wordt weergegeven als geïnstalleerd onderdeel, klikt u op
[Install…] (Installeren).
5. Selecteer [Protocol] in het dialoogvenster [Select Network
Component Type] (Type netwerkonderdeel selecteren) en klik
vervolgens op [Add…] (Toevoegen).
6. Selecteer [Internet Protocol (TCP/IP)] (Internet-protocol
(TCP/IP)) in de lijst [Network Protocols] (Netwerkprotocollen)
en klik vervolgens op [OK]. Mogelijk wordt u gevraagd
bestanden te installeren van uw installatie-cd voor Windows
2000 of van andere media. Volg de instructies om de
bestanden te installeren.
7. Klik, als u hierom wordt gevraagd, op [OK] om de computer
opnieuw op te starten met de nieuwe instellingen. Configureer
vervolgens de pc’s om IP-informatie te accepteren die wordt
toegewezen door de ADSL Barricade
TM
.
8. Dubbelklik op het pictogram [Network and Dial-up
Connections] (Netwerk- en inbelverbindingen) op het [Control
Panel] (Configuratiescherm).

Nederlands
94
Nederlands
93
9. Klik in het venster [Network and Dial-up Connections]
(Netwerk- en inbelverbindingen) met de rechtermuisknop op
het pictogram [Local Area Connection] (LAN-verbinding) en
selecteer [Properties] (Eigenschappen).
10. Selecteer [Internet Protocol (TCP/IP)] (Internet-protocol
(TCP/IP)) in het dialoogvenster [Local Area Connection
Properties] (Eigenschappen voor lokale netwerkverbinding)
en klik vervolgens op [Properties] (Eigenschappen).
11. Klik in het dialoogvenster [Internet Protocol (TCP/IP)
Properties] (Eigenschappen voor Internet Protocol (TCP/IP))
op het keuzerondje [Obtain an IP address automatically]
(Automatisch een IP-adres laten toewijzen). Klik tevens op
het keuzerondje op [Obtain DNS server address automatically]
(Automatisch een DNS-serveradres laten toewijzen).
12. Klik tweemaal op [OK] om uw wijzigingen te bevestigen en op
te slaan, en sluit vervolgens het [Control Panel]
(Configuratiescherm).
Windows 98, Me, SE
1. Klik op [Start], wijs [Settings] (Instellingen) aan en klik op
[Control Panel] (Configuratiescherm) op de taakbalk van
Windows.
2. Dubbelklik op het pictogram [Network and Dial-up
Connections] (Netwerk- en inbelverbindingen).
3. Klik in het venster [Network and Dial-up Connections]
(Netwerk- en inbelverbindingen) met de rechtermuisknop op
het pictogram [Network] (Netwerk) en selecteer vervolgens
[Properties] (Eigenschappen). In het dialoogvenster [Network
Properties] (Netwerkgegevens) wordt een lijst weergegeven van
geïnstalleerde netwerkonderdelen. Als de lijst [Internet
Protocol (TCP/IP)] (Internet Protocol (TCP/IP)) bevat, is het
protocol al ingeschakeld. Ga verder naar stap 11.

Nederlands
96
Nederlands
95
9. Dubbelklik op het pictogram [Network and Dial-up
Connections] (Netwerk- en inbelverbindingen) op het [Control
Panel] (Configuratiescherm).
10. Klik in het venster [Network and Dial-up Connections]
(Netwerk- en inbelverbindingen) met de rechtermuisknop op
het pictogram [Network] (Netwerk) en selecteer vervolgens
[Properties] (Eigenschappen).
11. Selecteer [TCP/IP] in het dialoogvenster [Network Properties]
(Netwerkgegevens) en klik vervolgens op [Properties]
(Eigenschappen).
12. Klik in het dialoogvenster [TCP/IP Settings] (TCP/IP-
instellingen) op het keuzerondje [Server assigned IP address]
(Door server toegewezen IP-adres). Klik tevens op het
keuzerondje [Server assigned name server address] (Door
server toegewezen adressen van naamservers).
13. Klik op tweemaal op [OK] om uw wijzigingen te bevestigen en
op te slaan, en sluit vervolgens het [Control Panel]
(Configuratiescherm).
Opmerking: Zie voor Windows 95 en NT de installatie-instructies
in de Gebruikershandleiding op de cd-rom.
4. Als [Internet Protocol (TCP/IP)] (Internet-protocol (TCP/IP))
niet wordt weergegeven als geïnstalleerd onderdeel, klikt u op
[Add…] (Toevoegen).
5. Selecteer [Protocol] in het dialoogvenster [Select Network
Component Type] (Type netwerkonderdeel selecteren) en klik
vervolgens op [Add…] (Toevoegen).
6. Selecteer [Microsoft] uit de lijst [Manufacturers]
(Fabrikanten).
7. Selecteer [Internet Protocol (TCP/IP)] (Internet-protocol
(TCP/IP)) in de lijst [Network Protocols] (Netwerkprotocollen)
en klik vervolgens op [OK]. Mogelijk wordt u gevraagd
bestanden te installeren van uw installatie-cd voor Windows
Me of van andere media. Volg de instructies om de bestanden
te installeren.
8. Klik, als u hierom wordt gevraagd, op [OK] om de computer
opnieuw op te starten met de nieuwe instellingen. Configureer
vervolgens de pc’s om IP-informatie te accepteren die wordt
toegewezen door de ADSL Barricade
TM
.

Nederlands
98
Nederlands
97
Deze sectie bevat instructies voor het gebruik van het
hulpprogramma Auto Setup voor configuratie van de ADSL
Barricade
TM
voor uw internetprovider.
1. Plaats de cd-rom met het installatieprogramma en de
documentatie in uw cd-rom-station.
2. Ga naar de locatie van uw cd-rom-station en voer
AutoSetup.exe uit. Het hulpprogramma Auto Setup, waarmee u
op eenvoudige wijze de ADSL Barricade
TM
kunt configureren voor
uw ISP, wordt nu gestart.
3. Klik op [Yes, I agree] (Ja, ik ga akkoord) om de voorwaarden
van de licentieovereenkomst te accepteren en door te gaan
met de setup.
De ADSL Barricade
TM
configureren
3
4. Selecteer uw land uit de keuzelijst en klik vervolgens op [Next]
(Volgende) om door te gaan. Als uw land niet in de lijst
voorkomt, klikt u op [Custom] (Aangepast) en gaat u naar de
sectie Custom (Aangepast).
5. Selecteer uw internet-/netwerkprovider uit de keuzelijst en klik
vervolgens op [Next] (Volgende) om door te gaan. Als uw
internet-/netwerkprovider niet in de lijst voorkomt, klikt u op
[Custom] (Aangepast) en gaat u naar de sectie Custom
(Aangepast).
6. Selecteer de gebruikersnaam en het wachtwoord die u hebt
ontvangen van uw internetprovider en klik vervolgens op [Next]
(Volgende) om door te gaan.
Opmerking: U hoeft alleen een gebruikersnaam en wachtwoord in te
voeren als uw internetproviders het protocol PPPoA of
PPPoE gebruikt. Als uw internetprovider RFC1483
Bridging gebruikt, is geen verdere invoer vereist en
kunt u volstaan met op [Next] (Volgende) te klikken om
door te gaan.
Als uw internetprovider gebruikmaakt van RFC1483
Routed, moet u, nadat u op [Next] (Volgende) hebt
geklikt, het IP-adres, het subnetmasker, het gateway-
adres, het primaire en het secundaire DNS-adres
invoeren dat u hebt ontvangen van uw internetprovider.
Klik op [Next] (Volgende).

Nederlands
99
Nederlands
100
7. Klik tenslotte op [Finish] (Voltooien). Het hulpprogramma
AutoSetup configureert nu de ADSL Barricade
TM
met de
instellingen die u hebt ingevoerd. Dit kan enkele seconden in
beslag nemen. Nadat de setup is voltooid, wordt het volgende
bericht weergegeven:
Uw ADSL Barricade
TM
is nu ingesteld. Ga naar de sectie Problemen
oplossen van de Gebruikershandleiding als u geen verbinding met
internet kunt maken.
Aangepast
Als uw land of internetprovider niet voorkomen in de lijst, moet u
de instellingen voor de internetprovider handmatig invoeren. Dit
doet u met de optie [Custom] (Aangepast). Voor een aangepaste
installatie moet u tevens de volgende instellingen weten die door
uw internetprovider zijn verstrekt:
Welk protocol? (PPPoA, PPPoE, RFC1483 Bridging of RFC1483
Routed). Welke encapsulation? (VC-Mux of LLC). Wat zijn de
VPI/VCI-circuitnummers? Bijvoorbeeld 0/38.

Português
102
Nederlands
101
•Um ADSL Barricade
TM
.
•Um adaptador de corrente.
•Um cabo Ethernet RJ-45.
•Um cabo de linha DSL/telefone standard RJ-11.
•Um CD com o utilitário de instalação e a documentação.
•Manual de Instalação Rápida.
Nota: Alguns modelos incluem micro-filtros/separadores ADSL.
Conteúdo da Embalagem
1. Selecteer de waarden die overeenkomen met de bovenstaande
instellingen die zijn verstrekt door uw internetprovider of voer
deze waarden in.
2. Ga terug naar stap 6.

Português
104
Português
103
Painel Frontal
Descrição do HardwareRequisitos do Sistema
Para utilizar o ADSL Barricade
TM
, deverá possuir o seguinte:
• Serviço ADSL activado e em funcionamento na sua linha
telefónica, no mínimo com um endereço público de Internet
para a sua LAN.
•Um ou mais computadores, cada um deles com uma placa de
interface de rede (NIC) Ethernet 10/100 Base-T.
•Um hub/switch Ethernet, se pretender ligar o dispositivo
a mais do que um computador numa rede Ethernet.
•Para uma configuração do sistema utilizando o programa de
Internet fornecido: Um programa de navegação, como o
Internet Explorer V5.0 ou posterior, ou o Netscape V6.1 ou
posterior.
Identificação
do LED
Estado da cor
Verde fixo
Verde
intermitente
Amarelo fixo
Amarelo
intermitente
Desligado
Alimentação
Verde
Alimentação
ligada
N/D
N/D
N/D
Alimentação
desligada
Ligação
Verde
Linha ADSL
programada
Em
programação
N/D
N/D
Nenhuma
ligação
TX/RX
Verde
DSL a transmitir/
receber
TX/RX
N/D
N/D
Sem TX/RX
Ethernet
1 2 3 4
Verde / 100 Mbps
Amarelo / 10 Mbps
Ligação
A transmitir/receber
Ligação
A transmitir/receber
Nenhuma ligação

Português
106
Português
105
Este Manual de Instalação Rápida inclui instruções básicas sobre
como ligar o ADSL Barricade
TM
a um computador ou LAN e à
Internet.
• A secção 1 explica como instalar o hardware.
• A secção 2 explica como configurar as opções de Internet
no(s) computador(es).
• A secção 3 explica como configurar as definições ISP
utilizando o utilitário Auto Setup.
Neste manual, parte-se do princípio de que o utilizador já
subscreveu o serviço ADSL junto do seu fornecedor de serviços de
Internet (ISP). Estas instruções permitem-lhe efectuar uma
configuração básica, que deverá ser compatível com a instalação
de rede na sua casa ou escritório.
Painel Traseiro
Descrição
12 V, 1,2 A
Se for premido durante 1-2 segundos:
reinicialização.
Se for premido por 5 segundos ou mais:
reposição das definições de origem.
Conector de telefone RJ-11
Quatro conectores 10/100 M RJ-45
Conector do Painel
Traseiro
Fonte de alimentação
Botão de reinicialização
e reposição das
definições de origem
Porta DSL
Porta Ethernet

Português
108
Português
107
Ligar o Hardware
1
Aviso: Antes de começar, desligue a alimentação de todos os
dispositivos. Entre estes dispositivos encontram-se o(s)
computador(es), o hub/switch de LAN (se aplicável)
e o ADSL Barricade
TM
.
Passo 1. Ligar o cabo ADSL
Ligue uma extremidade do cabo de telefone fornecido (RJ-11) à
porta com a identificação DSL, no painel traseiro do dispositivo.
Ligue a outra extremidade ao micro-filtro/separador ADSL*.
*Nota: Alguns modelos incluem micro-filtros/separadores ADSL.
Passo 2. Ligar o cabo Ethernet
Se pretender ligar uma LAN ao ADSL Barricade
TM
, conecte uma
extremidade do cabo Ethernet fornecido à porta de hub/switch e a
outra extremidade à porta Ethernet situada no ADSL Barricade
TM
.
Se pretender utilizar o ADSL Barricade
TM
com um único computador
e sem hub, terá de utilizar um cabo Ethernet para ligar o PC
directamente ao dispositivo.
Passo 3. Ligar o conector de alimentação
Ligue o adaptador de corrente CA ao conector de corrente
eléctrica, situado na parte traseira do dispositivo, e ligue o
adaptador a uma tomada de corrente ou a uma tomada múltipla
linear.
Passo 4. Ligar os sistemas
Ligue e reinicialize o(s) computador(es) e qualquer dispositivo de
LAN, como hubs ou switches.

Português
110
Português
109
3. Na janela [LAN or High-Speed Internet] (LAN ou Internet de
alta velocidade), faça clique, com o botão direito do rato, no
ícone correspondente à sua placa de interface de rede (NIC) e
seleccione [Properties] (Propriedades). (É frequente este ícone
designar-se por [Local Area Connection] (Ligação de área
local)). A caixa de diálogo [Local Area Connection] (Ligação
de área local) apresenta uma lista dos itens de rede
actualmente instalados.
4. Certifique-se de que a opção à esquerda do item [Internet
Protocol TCP/IP] (Protocolo Internet TCP/IP) está activa e
faça clique em [Properties] (Propriedades).
5. Na caixa de diálogo [Internet Protocol (TCP/IP) Properties]
(Propriedades do protocolo Internet (TCP/IP)), faça clique no
botão de opção [Obtain an IP address automatically] (Obter
um endereço de IP automaticamente). Além disso, faça clique
no botão de opção [Obtain DNS server address automatically]
(Obter endereço do servidor DNS automaticamente).
6. Faça clique em [OK] duas vezes, para confirmar as alterações,
e feche o [Control Panel] (Painel de controlo).
Esta secção explica como configurar as definições de Internet dos
seus computadores, para funcionarem com o ADSL Barricade
TM
.
Antes de começar
Como valor assumido, o ADSL Barricade
TM
atribui automaticamente
todas as definições de Internet necessárias aos seus PCs. Assim,
só terá de configurar os PCs para aceitarem as informações,
quando estas forem atribuídas. Siga as instruções correspondentes
ao sistema operativo instalado no seu PC.
Windows® XP
1. Na barra de tarefas do Windows, faça clique no botão [Start]
(Iniciar) e, em seguida, em [Control Panel] (Painel de
controlo).
2. Faça duplo clique no ícone [Network Connections]
(Ligações de rede).
Configurar
os Computadores
2

Português
112
Português
111
Windows 2000
Em primeiro lugar, verifique o protocolo IP e, se necessário,
instale-o.
1. Na barra de tarefas do Windows, faça clique no botão [Start]
(Iniciar), marque [Settings] (Definições) e, em seguida, faça
clique em [Control Panel] (Painel de controlo).
2. Faça duplo clique no ícone [Network and Dial-up Connections]
(Ligações de acesso telefónico e de rede).
3. Na janela [Network and Dial-up Connections] (Ligações de
acesso telefónico e de rede), faça clique com o botão direito
do rato no ícone [Local Area Connection] (Ligação de área
local) e, em seguida, seleccione [Properties] (Propriedades).
A caixa de diálogo [Local Area Connection Properties]
(Propriedades de ligação de rede local) apresenta uma lista
dos componentes de rede actualmente instalados. Se a lista
incluir [Internet Protocol (TCP/IP)] (Protocolo de Internet
(TCP/IP)), o protocolo já foi activado. Avance para o Passo
10.
4. Se [Internet Protocol (TCP/IP)] (Protocolo de Internet
(TCP/IP)) não aparecer como um componente instalado, faça
clique em [Install...] (Instalar).
5. Na caixa de diálogo [Select Network Component Type]
(Seleccionar tipo de componente de rede), seleccione
[Protocol] (Protocolo) e, em seguida, faça clique em [Add…]
(Adicionar).
6. Seleccione [Internet Protocol (TCP/IP)] (Protocolo de Internet
(TCP/IP)) na lista [Network Protocols] (Protocolos de rede) e
faça clique em [OK]. Poderá ser apresentado o pedido para
instalar ficheiros do CD de instalação do Windows 2000 ou de
outro suporte de dados. Para instalar os ficheiros, siga as
instruções apresentadas.
7. Se for apresentado o pedido, faça clique em [OK] para
reinicializar o computador com as novas definições. Em
seguida, configure os PCs para aceitar as informações IP
atribuídas pelo ADSL Barricade
TM
.
8. No [Control Panel] (Painel de controlo), faça duplo clique no
ícone [Network and Dial-up Connections] (Ligações de acesso
telefónico e de rede).

Português
114
Português
113
9. Na janela [Network and Dial-up Connections] (Ligações de
acesso telefónico e de rede), faça clique com o botão direito
do rato no ícone [Local Area Connection] (Ligação de área
local) e, em seguida, seleccione [Properties] (Propriedades).
10. Na caixa de diálogo [Local Area Connection Properties]
(Propriedades de ligação de rede local), seleccione [Internet
Protocol (TCP/IP)] (Protocolo de Internet (TCP/IP)) e faça
clique em [Properties] (Propriedades).
11. Na caixa de diálogo [Internet Protocol (TCP/IP) Properties]
(Propriedades do protocolo Internet (TCP/IP)), faça clique no
botão de opção [Obtain an IP address automatically] (Obter
um endereço de IP automaticamente). Além disso, faça clique
no botão de opção [Obtain DNS server address automatically]
(Obter endereço do servidor DNS automaticamente).
12. Faça clique em [OK] duas vezes, para confirmar e guardar as
alterações, e feche o [Control Panel] (Painel de controlo).
Windows 98/Me/SE
1. Na barra de tarefas do Windows, faça clique no botão [Start]
(Iniciar), marque [Settings] (Definições) e, em seguida, faça
clique em [Control Panel] (Painel de controlo).
2. Faça duplo clique no ícone [Network and Dial-up Connections]
(Ligações de acesso telefónico e de rede).
3. Na janela [Network and Dial-up Connections] (Ligações de
acesso telefónico e de rede), faça clique com o botão direito
do rato no ícone [Network] (Rede) e, em seguida, seleccione
[Properties] (Propriedades). A caixa de diálogo [Network
Properties] (Propriedades de rede) apresenta uma lista dos
componentes de rede actualmente instalados. Se a lista incluir
[Internet Protocol (TCP/IP)] (Protocolo de Internet (TCP/IP)),
o protocolo já foi activado. Avance para o Passo 11.

Português
115
Português
116
9. No [Control Panel] (Painel de controlo), faça duplo clique no
ícone [Network and Dial-up Connections] (Ligações de acesso
telefónico e de rede).
10. Na janela [Network and Dial-up Connections] (Ligações de
acesso telefónico e de rede), faça clique com o botão direito
do rato no ícone [Network] (Rede) e, em seguida, seleccione
[Properties] (Propriedades).
11. Na caixa de diálogo [Network Properties] (Propriedades de
rede), seleccione [TCP/IP] e faça clique em [Properties]
(Propriedades).
12. Na caixa de diálogo [TCP/IP Settings] (Definições de TCP/IP),
faça clique no botão de opção [Server assigned IP address]
(Endereço de IP atribuído pelo servidor). Além disso, faça
clique no botão de opção [Server assigned name server
address] (Endereços de servidor de nomes atribuídos pelo
servidor).
13. Faça clique em [OK] duas vezes, para confirmar e guardar as
alterações, e feche o [Control Panel] (Painel de controlo).
Nota: No caso do Windows 95 e NT, consulte as instruções de
instalação do manual incluído no CD ROM.
4. Se [Internet Protocol (TCP/IP)] (Protocolo de Internet
(TCP/IP)) não aparecer como um componente instalado,
faça clique em [Add...] (Adicionar).
5. Na caixa de diálogo [Select Network Component Type]
(Seleccionar tipo de componente de rede), seleccione
[Protocol] (Protocolo) e, em seguida, faça clique em
[Add…] (Adicionar).
6. Seleccione [Microsoft] na caixa [Manufacturers] (Fabricantes).
7. Seleccione [Internet Protocol (TCP/IP)] (Protocolo de Internet
(TCP/IP)) na lista [Network Protocols] (Protocolos de rede) e
faça clique em [OK]. Poderá ser apresentado o pedido para
instalar ficheiros do CD de instalação do Windows Me ou de
outro suporte de dados. Para instalar os ficheiros, siga as
instruções apresentadas.
8. Se for apresentado o pedido, faça clique em [OK] para
reinicializar o computador com as novas definições. Em
seguida, configure os PCs para aceitar as informações IP
atribuídas pelo ADSL Barricade
TM
.

Português
118
Português
117
Esta secção explica como usar o utilitário Auto Setup (Instalação
Automática) para configurar o ADSL Barricade
TM
para o seu ISP.
1. Introduza o CD com o utilitário de instalação e a
documentação na unidade de CR ROM.
2. Localize a sua unidade de CD ROM e execute o ficheiro
AutoSetup.exe. Será iniciado o utilitário Auto Setup, que
permite configurar facilmente o ADSL Barricade
TM
para o seu
ISP.
3. Faça clique em [Yes, I agree] (Sim, concordo), para aceitar os
termos do acordo de licenciamento e prosseguir com a
instalação.
Configurar
o ADSL Barricade
TM
3
4. Seleccione o seu país na lista pendente e faça clique em [Next]
(Seguinte) para continuar. Se o seu país não se encontrar na
lista, faça clique em [Custom] (Personalizar) e avance para a
secção Personalizar.
5. Seleccione o seu ISP/Operador de rede na lista pendente e faça
clique em [Next] (Seguinte) para continuar. Se o seu
ISP/Operador de rede não se encontrar na lista, faça clique em
[Custom] (Personalizar) e avance para a secção Personalizar.
6. Introduza o nome de utilizador e a palavra-passe fornecidos
pelo seu ISP e, em seguida, faça clique em [Next] (Seguinte)
para continuar.
Nota: Só terá de introduzir um nome de utilizador e uma palavra-
passe se o seu ISP utilizar o protocolo PPPoA ou PPPoE. Se o
ISP utilizar RFC1483 Bridging, não são necessários mais
dados, basta fazer clique em [Next] (Seguinte) para continuar.
Se o ISP utilizar RFC1483 Routed, depois de fazer clique em
[Next] (Seguinte) terá de introduzir o endereço IP, a máscara
de rede, o endereço da porta de ligação e o endereço DNS
principal e secundário fornecidos pelo ISP. Faça clique em
[Next] (Seguinte).

Português
120
Português
119
7. Por fim, faça clique em [Finish] (Concluir). O utilitário
AutoSetup irá configurar o ADSL Barricade
TM
com as definições
especificadas. Este processo pode demorar alguns segundos.
Uma vez concluída a instalação, será apresentada a seguinte
mensagem:
O seu ADSL Barricade
TM
já está instalado. Se não conseguir
estabelecer ligação com a Internet, consulte a secção Detecção e
Resolução de Problemas, no Manual do Utilizador.
Personalizar
Se o seu país ou ISP não for apresentado na lista, deverá
introduzir manualmente as sua definições de ISP. Para tal, deverá
utilizar a opção [Custom] (Personalizar). Para proceder à
instalação personalizada, também deverá conhecer as seguintes
definições, fornecidas pelo seu ISP:
Qual é o protocolo? (PPPoA, PPPoE, RFC1483 Bridging
ou RFC1483 Routed).
Qual é o encapsulamento? (VC-Mux ou LLC).
Quais são os números do circuito VPI/VCI? Por ex. 0/38.

Português
121
122
FCC - Class B
This equipment has been tested and found to comply with the
limits for a Class B digital device, pursuant to Part 15 of the FCC
Rules. These limits are designed to provide reasonable protection
against harmful interference in a residential installation. This
equipment generates, uses and can radiate radio frequency energy
and, if not installed and used in accordance with instructions,
may cause harmful interference to radio communications.
However, there is no guarantee that the interference will not
occur in a particular installation. If this equipment does cause
harmful interference to radio or television reception, which can be
determined by turning the equipment off and on, the user is
encouraged to try to correct the interference by one or more of
the following measures:
• Reorient the receiving antenna.
• Increase the separation between the equipment and receiver.
• Connect the equipment into an outlet on a circuit different from
that to which the receiver is connected.
• Consult the dealer or an experienced radio/TV technician
for help.
Note: In order to maintain compliance with the limits for a Class
B digital device, you are required to use a quality interface
cable when connecting to this device. Changes or
modifications not expressly approved by our company could
void the user’s authority to operate this equipment.
Compliances
Compliances
1. Seleccione/Introduza os valores correspondentes às definições
anteriores, fornecidos pelo seu ISP.
2. Regresse ao Passo 6.

Compliances
123
Compliances
124
FCC - Part 68
This equipment complies with Part 68 of the FCC rules. This
equipment comes with a label attached to it that contains, among
other information, the FCC registration number and ringer
equivalence number (REN) for this equipment. If requested, this
information must be provided to the telephone company.
This equipment uses the following USOC jacks: RJ-11C.
The REN is used to determine the quantity of devices that may be
connected to the telephone line. Excessive RENs on the telephone
line may result in the devices not ringing in response to an
incoming call. In most, but not all areas, the sum of the RENs
should not exceed five (5.0.) To be certain of the number of
devices that may be connected to the line, as determined by
the total RENs, contact the telephone company to determine
the maximum REN for the calling area.
If this equipment causes harm to the telephone network, the
telephone company will notify you in advance that temporary
discontinuance of service may be required. If advance notice
not practical, the telephone company will notify the customer
as soon as possible. Also, you will be advised of your right to
file a complaint with the FCC if you believe it is necessary. The
telephone company may make changes in its facilities, equipment,
operations, or procedures that will provide advance notice in order
for you to make the necessary modifications in order to maintain
uninterrupted service.
If trouble is experienced with this equipment, please contact our
company at the numbers shown on back of this manual for repair
and warranty information. If the trouble is causing harm to the
telephone network, the telephone company may request you to
remove the equipment from the network until the problem is
resolved. No repairs may be done by the customer.
This equipment cannot be used on telephone company-provided
coin service. Connection to Party Line Service is subject to state
tariffs.
When programming and/or making test calls to emergency
numbers:
• Remain on the line and briefly explain to the dispatcher
the reason for the call.
• Perform such activities in off-peak hours such as early
morning or late evenings.
The Telephone Consumer Protection Act of 1991 makes it unlawful
for any person to use a computer or other electronic device to
send any message via a telephone facsimile machine unless such
message clearly contains, in a margin at the top or bottom of
each transmitted page or on the first page of the transmission
the date and time it is sent and an identification of the business,
other entity, or individual sending the message and the telephone
number of the sending machine or such business, other entity, or
individual.
In order to program this information into your facsimile, refer to
your communications software user manual.

Compliances
125
Compliances
126
EC Conformance Declaration - Class B
This information technology equipment complies with the
requirements of the Council Directive 89/336/EEC on the
Approximation of the laws of the Member States relating to
Electromagnetic Compatibility and 73/23/EEC for electrical
equipment used within certain voltage limits and the Amendment
Directive 93/68/EEC. For the evaluation of the compliance with
these Directives, the following standards were applied.
RFI Emission:
• Limit class B according to EN 55022:1998
• Limit class B for harmonic current emission according
to EN 61000-3-2/1995
• Limitation of voltage fluctuation and flicker in low-voltage
supply system according to EN 61000-3-3/1995
Immunity:
• Product family standard according to EN 55024:1998
• Electrostatic Discharge according to EN 61000-4-2:1995
(Contact Discharge: ±4 kV, Air Discharge: ±8 kV)
• Radio-frequency electromagnetic field according
to EN 61000-4-3:1996 (80 - 1000 MHz with 1 kHz AM
80% Modulation: 3 V/m)
• Electrical fast transient/burst according to EN 61000-4-4:1995
(AC/DC power supply: ±1 kV, Data/Signal lines: ±0.5 kV)
• Surge immunity test according to EN 61000-4-5:1995
(AC/DC Line to Line: ±1 kV, AC/DC Line to Earth: ±2 kV)
• Immunity to conducted disturbances, Induced by radio-
frequency fields:
EN 61000-4-6:1996 (0.15 - 80 MHz with 1 kHz AM 80%
Modulation: 3 V/m)
• Power frequency magnetic field immunity test according
to EN 61000-4-8:1993 (1 A/m at frequency 50 Hz)
• Voltage dips, short interruptions and voltage variations
immunity test according to EN 61000-4-11:1994
(>95% Reduction @10 ms, 30% Reduction @500 ms,
>95% Reduction @5000 ms)
LVD:
• EN 60950 (A1/1992; A2/1993; A3/1993; A4/1995; A11/1997)

128
Compliances
Safety Compliance
Wichtige Sicherheitshinweise (Germany)
1. Bitte lesen Sie diese Hinweise sorgfältig durch.
2. Heben Sie diese Anleitung für den späteren Gebrauch auf.
3. Vor jedem Reinigen ist das Gerät vom Stromnetz zu trennen.
Verwenden Sie keine Flüssigoder Aerosolreiniger. Am besten
eignet sich ein angefeuchtetes Tuch zur Reinigung.
4. Die Netzanschlu ßsteckdose soll nahe dem Gerät angebracht und
leicht zugänglich sein.
5. Das Gerät ist vor Feuchtigkeit zu schützen.
6. Bei der Aufstellung des Gerätes ist auf sicheren Stand zu
achten. Ein Kippen oder Fallen könnte Beschädigungen
hervorrufen.
7. Die Belüftungsöffnungen dienen der Luftzirkulation, die das
Gerät vor Überhitzung schützt. Sorgen Sie dafür, daß diese
Öffnungen nicht abgedeckt werden.
8. Beachten Sie beim Anschluß an das Stromnetz die nschlußwerte.
9. Verlegen Sie die Netzanschlußleitung so, daß niemand darüber
fallen kann. Es sollte auch nichts auf der Leitung abgestellt
werden.
10. Alle Hinweise und Warnungen, die sich am Gerät befinden, sind
zu beachten.
11. Wird das Gerät über einen längeren Zeitraum nicht benutzt,
sollten Sie es vom Stromnetz trennen. Somit wird im Falle
einer Überspannung eine Beschädigung vermieden.
12. Durch die Lüftungsöffnungen dürfen niemals Gegenstände oder
Flüssigkeiten in das Gerät gelangen. Dies könnte einen Brand
bzw. elektrischen Schlag auslöse
127
Compliances
13. Öffnen sie niemals das Gerät. Das Gerät darf aus Gründen der
elektrischen Sicherheit nur von authorisiertem Servicepersonal
geöffnet werden.
14. Wenn folgende Situationen auftreten ist das Gerät vom
Stromnetz zu trennen und von einer qualifizierten Servicestelle
zu überprüfen:
a. Netzkabel oder Netzstecker sind beschädigt.
b. Flüssigkeit ist in das Gerät eingedrungen.
c. Das Gerät war Feuchtigkeit ausgesetzt.
d. Wenn das Gerät nicht der Bedienungsanleitung entsprechend
funktioniert oder Sie mit Hilfe dieser Anleitung keine
Verbesserung erzielen.
e. Das Gerät ist gefallen und/oder das Gehäuse ist beschädigt.
f. Wenn das Gerät deutliche Anzeichen eines Defektes aufweist.
15. Stellen Sie sicher, daß die Stromversorgung dieses Gerätes nach
der EN 60950 geprüft ist. Ausgangswerte der Stromversorgung
sollten die Werte von AC 7,5-8V, 50-60Hz nicht über oder
unterschreiten sowie den minimalen Strom von 1A nicht
unterschreiten.
Der arbeitsplatzbezogene Schalldruckpegel nach DIN 45 635 Teil
1000 beträgt 70dB(A) oder weniger.

130
129
Information
Full Installation Manual
Full installation manuals are provided on the Installation CD-Rom.
Manuals in other languages than those included on the CD-Rom
are provided on www.smc-europe.com (section support).
Firmware and Drivers
For latest driver, technical information and bug-fixes please visit
www.smc-europe.com for EMEA and www.smc.com for North
America.
Limited Lifetime Warranty Statement
For detailed information on SMC’s limited lifetime warranty
please check the English full manual on this CD-Rom or visit
www.smc-europe.com (section support, product registration).
Contact SMC
Contact details are available on www.smc-europe.com for EMEA
and www.smc.com for North America.
Statement of Conditions
In line with our continued efforts to improve internal design,
operational function, and/or reliability, SMC reserves the right
to make changes to the product(s) described in this document
without notice. SMC does not assume any liability that may occur
due to the use or application of the product(s) described herein.
In order to obtain the most accurate knowledge of installation,
bug-fixes and other product related information we advise to visit
the relevant product support page at www.smc-europe.com for
EMEA and www.smc.com for North America before you start
installing the equipment. All information is subject to change
without notice.
Information
Information
Limitation of Liability
In no event, whether based in contract or tort (including
negligence), shall SMC be liable for incidental, consequential,
indirect, special or punitive damages of any kind, or for loss of
revenue, loss of business or other financial loss arising out of
or in connection with the sale, installation, maintenance, use,
performance, failure or interruption of its products, even if SMC
or its authorized reseller has been adviced of the possiblity of
such damages.
Copyright
Information furnished by SMC Networks, Inc. (SMC) is believed
to be accurate and reliable. However, no responsibility is assumed
by SMC for its use, nor for any infringements of patents or other
rights of third parties which may result from its use. No license
is granted by implication or otherwise under any patent or patent
rights of SMC. SMC reserves the right to change specifications at
any time without notice.
Trademarks
SMC is a registered trademark and Barricade is a trademark
of SMC Networks, Inc. Other product and company names are
trademarks or registered trademarks of their respective holders.
Transcripción de documentos
4-port ADSL Router with built-in ADSL Modem (Annex B) 4-port ADSL Router with built-in ADSL Modem Routeur ADSL 4 ports avec modem ADSL intégré Router ADSL de 4 puertos con módem ADSL integrado 4-poorts ADSL-router met ingebouwde ADSL-modem Router ADSL de 4 Portas com Modem ADSL Integrado Quick Installation Guide Guide d’installation rapide Guía de inicio rápido Beknopte installatiehandleiding Manual de instalação rápida Model Number: SMC7204BRB SMC7204BRB 1 Package Contents English 2 - 21 Deutsch 22 - 41 Français 42 - 61 Español 62 - 81 Nederlands 82 - 101 Português 102 - 121 Compliances & Information 122 - 130 • • • • • • One ADSL BarricadeTM. One Power adapter. One RJ-45 Ethernet cable. One RJ-11 Standard phone/DSL line cable. One Installation utility and Documentation CD. Quick Installation Guide. Note: ADSL splitters/microfilters are included with some models. English Contents Contents 2 System Requirements In order to use the ADSL BarricadeTM, you must have the following: Front Panel • LED Label Power Link TX/RX Color Status Green Green Green ADSL service up and running on your telephone line, with at least one public Internet address for your LAN. One or more computers, each containing an Ethernet 10/100 Base-T network interface card (NIC). • An Ethernet hub/switch, if you are connecting the device to more than one computer on an Ethernet network. • For system configuration using the supplied web-based program: a web browser such as Internet Explorer V5.0 or later, or Netscape V6.1 or later. Ethernet 1 2 3 4 Green / 100 Mbps Yellow / 10 Mbps Green Steady Power On ADSL line DSL Transmitting/ Link is trained. Receiving Training TX/RX Transmitting/ Receiving Yellow Steady N/A N/A N/A Link Yellow Blink N/A N/A N/A Transmitting/ Receiving OFF No TX/RX Power Off No Connection Green Blink N/A English English • 3 Hardware Description No Connection 4 5 Rear Panel Connector Description Power Supply 12V, 1.2A Reset and Restore Factory Defaults Button If depressed for 1-2 seconds: reset. If depressed for 5 seconds or more: reset to factory default. DSL Port RJ-11 phone connector Ethernet Port Four 10/100M RJ-45 connectors This Quick Installation Guide provides basic instructions for connecting the ADSL BarricadeTM to a computer or LAN and to the Internet. • • • Section 1 describes how to set up the hardware. Section 2 describes how to configure Internet properties on your computer(s). Section 3 shows you how to configure ISP settings using Auto Setup utility. This Guide assumes that you have already established an ADSL service with your Internet service provider (ISP). These instructions provide a basic configuration that should be compatible with your home or small office network setup. English English Rear Panel 6 1 Connecting the Hardware Warning: Before you begin, turn the power off for all devices. These include your computer(s), your LAN hub/switch (if applicable), and the ADSL BarricadeTM. Step 1. Connect the ADSL cable Connect one end of the provided phone cable (RJ-11) to the port labeled DSL on the Rear Panel of the device. Connect the other end to your ADSL Microfilter/Splitter*. Step 3. Attach the power connector Connect the AC power adapter to the Power connector on the back of the device and plug in the adapter to a wall outlet or power strip. Step 4. Power up your systems Turn on and boot up your computer(s) and any LAN device such as hubs or switches. English English *Note: ADSL splitters/microfilters are included with some models. Step 2. Connect the Ethernet cable If you are connecting a LAN to the ADSL BarricadeTM, attach one end of a provided Ethernet cable to hub/switch port and the other to the Ethernet port on the ADSL BarricadeTM. If you are using the ADSL BarricadeTM with a single computer and no hub, you must use an Ethernet cable to attach the PC directly to the device. 7 8 2 Configuring Your Computers This section provides instructions for configuring the Internet settings on your computers to work with the ADSL BarricadeTM. Before you begin By default, the ADSL BarricadeTM automatically assigns all required Internet settings to your PCs. You need only to configure the PCs to accept the information when it is assigned. Follow the instructions that correspond to the operating system installed on your PC. English 1. In the Windows task bar, click the [Start] button, and then click [Control Panel]. 4. Ensure that the check box to the left of the item labeled [Internet Protocol TCP/IP] is checked, and click [Properties]. 5. In the [Internet Protocol (TCP/IP) Properties] dialog box, click the radio button labeled [Obtain an IP address automatically]. Also click the radio button labeled [Obtain DNS server address automatically]. English Windows® XP 3. In the [LAN or High-Speed Internet] window, right-click on the icon corresponding to your network interface card (NIC) and select [Properties]. (Often, this icon is labeled [Local Area Connection].) The [Local Area Connection] dialog box displays a list of currently installed network items. 6. Click [OK] twice to confirm your changes, and close the [Control Panel]. 2. Double-click the [Network Connections] icon. 9 10 Windows 2000 First, check for the IP protocol and, if necessary, install it. 1. In the Windows task bar, click the [Start] button, point to [Settings], and then click [Control Panel]. 5. In the [Select Network Component Type] dialog box, select [Protocol], and then click [Add…]. 2. Double-click the [Network and Dial-up Connections] icon. 6. Select [Internet Protocol (TCP/IP)] in the [Network Protocols] list, and then click [OK]. You may be prompted to install files from your Windows 2000 installation CD or other media. Follow the instructions to install the files. 7. If prompted, click [OK] to restart your computer with the new settings. Next, configure the PCs to accept IP information assigned by the ADSL BarricadeTM. English 3. In the [Network and Dial-up Connections] window, right-click the [Local Area Connection] icon, and then select [Properties]. The [Local Area Connection Properties] dialog box displays a list of currently installed network components. If the list includes [Internet Protocol (TCP/IP)], then the protocol has already been enabled. Skip to Step 10. English 4. If [Internet Protocol (TCP/IP)] does not appear as an installed component, click [Install…]. 8. In the [Control Panel], double-click the [Network and Dial-up Connections] icon. 11 12 9. In the [Network and Dial-up Connections] window, right-click the [Local Area Connection] icon, and then select [Properties]. 10. In the [Local Area Connection Properties] dialog box, select [Internet Protocol (TCP/IP)], and then click [Properties]. 12. Click [OK] twice to confirm and save your changes, and then close the [Control Panel]. 13 1. In the Windows task bar, click the [Start] button, point to [Settings], and then click [Control Panel]. 2. Double-click the [Network and Dial-up Connections] icon. 3. In the [Network and Dial-up Connections] window, right-click the [Network] icon, and then select [Properties]. The [Network Properties] dialog box displays a list of currently installed network components. If the list includes [Internet Protocol (TCP/IP)], then the protocol has already been enabled. Skip to Step 11. English English 11. In the [Internet Protocol (TCP/IP) Properties] dialog box, click the radio button labeled [Obtain an IP address automatically]. Also click the radio button labeled [Obtain DNS server address automatically]. Windows 98/Me/SE 14 4. If [Internet Protocol (TCP/IP)] does not appear as an installed component, click [Add…]. 9. In the [Control Panel], double-click the [Network and Dial-up Connections] icon. 5. In the [Select Network Component Type] dialog box, select [Protocol], and then click [Add…]. 10. In the [Network and Dial-up Connections] window, right-click the [Network] icon, and then select [Properties]. 6. Select [Microsoft] in the [Manufacturers] box. 11. In the [Network Properties] dialog box, select [TCP/IP], and then click [Properties]. English 8. If prompted, click [OK] to restart your computer with the new settings. Next, configure the PCs to accept IP information assigned by the ADSL BarricadeTM. 12. In the [TCP/IP Settings] dialog box, click the radio button labeled [Server assigned IP address]. Also click the radio button labeled [Server assigned name server address]. English 7. Select [Internet Protocol (TCP/IP)] in the [Network Protocols] list, and then click [OK]. You may be prompted to install files from your Windows Me installation CD or other media. Follow the instructions to install the files. 13. Click [OK] twice to confirm and save your changes, and then close the Control Panel. Note: For Windows 95 and NT, please see the installation instructions in the User Guide contained on the CD Rom. 15 16 3 Configuring the ADSL BarricadeTM This section provides instructions on how to use the Auto Setup utility for configuration of the ADSL BarricadeTM for your ISP. 1. Insert the Installation utility and Documentation CD into your CD drive. 2. Browse to the location of your CD drive and run AutoSetup.exe. This will start the Auto Setup utility, which provides an easy way to configure the ADSL BarricadeTM for your ISP. 4. Select your country from the drop down list, then click [Next] to continue. If your country is not listed, click [Custom] and skip to section Custom. 5. Select your ISP/Network provider from the drop down list, then click [Next] to continue. If your ISP/Network Provider is not listed, click [Custom] and skip to section Custom. 6. Enter the Username and password supplied by your ISP, then click [Next] to continue. English If your ISP uses RFC1483 Routed after clicking [Next] you will be required to enter the IP address, Netmask, Gateway address, Primary and Secondary DNS address supplied by your ISP. Click [Next]. 3. Click [Yes, I agree] to accept terms of license agreement and continue with the setup. 17 18 English Note: You will only be required to enter a username and password if your ISP uses protocol PPPoA or PPPoE. If your ISP uses RFC1483 Bridging no further input is required, simply click [Next] to continue. 7. Finally click [Finish]. The AutoSetup utility will now configure the ADSL BarricadeTM with the settings you have entered. This may take a few moments. When the setup is complete you will see the following message: Custom If your Country or ISP is not listed, you will be required to manually enter your ISP settings. This is done using the option [Custom]. For custom installation you will also need to know the following settings supplied by your ISP: English English What Protocol? (PPPoA, PPPoE, RFC1483 Bridging or RFC1483 Routed). What Encapsulation? (VC-Mux or LLC). What are the VPI/VCI circuit numbers? E.g. 0/38. Your ADSL BarricadeTM is now setup. Go to section Troubleshooting of the User Guide if you cannot make a connection to the Internet. 19 20 Lieferumfang 1. Select/enter the values corresponding to the above settings supplied by your ISP. • • • • • • Ein ADSL BarricadeTM. Ein Netzteil. Ein RJ-45-Ethernet-Kabel. Ein standardmäßiges RJ-11-Telefon/DSL-Leitungskabel. Eine CD mit Installationshilfsprogramm und Dokumentation. Eine Installationskurzanleitung. 2. Go back to Step 6. 21 Deutsch English Hinweis: Bei einigen Modellen werden ADSL-Splitter/-Mikrofilter geliefert. Bei bestimmten Modellen wird ein RJ-11-zu-RJ45-Kabel mitgeliefert, das eine Verbindung mit einem ISDN-Splitter ur Herstellung von U-R2-Kompatibilität ermöglicht. 22 Systemanforderungen Um den ADSL BarricadeTM verwenden zu können, müssen Sie über Folgendes verfügen: Vorderseite • Der ADSL-Dienst muss auf Ihrer Telefonleitung funktionieren, und es muss mindestens eine öffentliche Internet-Adresse für Ihr LAN verfügbar sein. LEDBeschriftung Netzspannung Link TX/RX Farbstatus Grün Grün Grün Mindestens ein Computer mit je einer Ethernet10/100-Base-T-Netzwerkkarte. Leuchtet grün Eingeschaltet ADSL-Leitung wird verwendet DSL-Senden/ Verbindung -Empfang • • Ein Ethernet-Hub/Switch, wenn Sie das Gerät mit mehreren Computern in einem Ethernet-Netzwerk verbinden. Für die Systemkonfiguration über das mitgelieferte webbasierende Programm wird ein Web-Browser wie der Internet Explorer ab V5.0 oder der Netscape ab V6.1 benötigt. Ethernet 1 2 3 4 Grün / 100 Mbit/s Gelb / 10 Mbit/s Blinkt grün - Leuchtet gelb - - - Verbindung Blinkt gelb - - - Senden/Empfang Keine Verbindung Kein TX/RX Keine Verbindung AUS Ausgeschaltet Herstellung der TX/RX Verbindung Senden/Empfang Deutsch Deutsch • 23 Hardwarebeschreibung 24 25 In dieser Broschüre finden Sie Hinweise für das Anschließen des ADSL BarricadeTM an einen Computer oder ein LAN und zur Verbindung des Geräts mit dem Internet. Anschluss auf der Rückseite Beschreibung Stromversorgung 12 V, 1,2 A Taste zum Zurücksetzen des Geräts und Wiederherstellen der werkseitigen Standardeinstellungen Wenn 1-2 Sekunden lang gedrückt: Zurücksetzen. Wenn mindestens 5 Sekunden lang gedrückt: Wiederherstellen der werkseitigen Standardeinstellungen. DSL-Port RJ-11-Telefonanschluss Ethernet-Port Vier RJ-45-Anschlüsse (10/100 Mbit/s) • • • In Abschnitt 1 wird das Einrichten der Hardware beschrieben. In Abschnitt 2 wird das Konfigurieren der InternetEigenschaften für Ihre(n) Computer beschrieben. In Abschnitt 3 lernen Sie, wie die ISP-Einstellungen mit dem Programm AutoSetup konfigurieren. Es wird vorausgesetzt, dass Sie bereits über Ihren Internet Service Provider (ISP) Zugriff auf den ADSL-Service haben. Anhand dieser Anweisungen kann eine Basiskonfiguration erstellt werden, die mit Ihrem Heim- oder Kleinunternehmensnetzwerk kompatibel ist. Deutsch Deutsch Rückseite 26 1 Anschließen der Hardware Achtung: Schalten Sie vor Beginn alle Geräte aus. Dies betrifft Ihre(n) Computer, Ihren LAN-Hub/-Switch (falls vorhanden) und den ADSL BarricadeTM. Schritt 1. Anschließen des ADSL-Kabels Verbinden Sie ein Ende des mitgelieferten Telefonkabels (RJ-11) mit dem Anschluss auf der Rückseite des Geräts, der die Beschriftung DSL trägt. Verbinden Sie das andere Ende mit Ihrem ADSL-Mikrofilter/-Splitter*. Schritt 3. Anschließen des Netzteils Verbinden Sie das Wechselstrom-Netzteil mit dem Stromanschluss an der Rückseite des Geräts und stecken Sie die andere Seite des Netzteils in eine Wandsteckdose oder Steckerleiste ein. Schritt 4. Starten des Systems Schalten Sie den/die Computer ein und starten Sie ihn/sie. Starten Sie auch andere LAN-Geräte wie Hubs oder Switches. Deutsch Deutsch *Hinweis: Bei einigen Modellen werden ADSL-Splitter/-Mikrofilter geliefert. Bei bestimmten Modellen wird ein RJ-11-zu-RJ45-Kabel mitgeliefert, das eine Verbindung mit einem ISDNSplitter ur Herstellung von U-R2-Kompatibilität ermöglicht. Schritt 2. Anschließen des Ethernet-Kabels Um ein LAN mit dem ADSL BarricadeTM zu verbinden, schließen Sie ein Ende eines mitgelieferten Ethernet-Kabels an den Hub/SwitchPort und das andere an den Ethernet-Port am ADSL BarricadeTM an. Wenn Sie den ADSL BarricadeTM mit einem Einzel-Computer und ohne Hub verwenden, müssen Sie den PC über das Ethernet-Kabel direkt an das Gerät anschließen. 27 28 2 Konfigurieren des Computers In diesem Abschnitt finden Sie Anweisungen zum Konfigurieren der Internet-Einstellungen des Computers für die Arbeit mit dem ADSL BarricadeTM. Windows® XP 1. Klicken Sie in der Windows-Task-Leiste auf die Schaltfläche [Start] und klicken Sie dann auf [Control Panel] (Systemsteuerung). 2. Doppelklicken Sie auf das Symbol [Network Connections] (Netzwerkverbindungen). 4. Sorgen Sie dafür, dass das Kontrollkästchen links neben dem Objekt [Internet Protocol TCP/IP] (Internetprotocol TCP/IP] aktiviert ist, und klicken Sie auf [Properties] (Eigenschaften). Deutsch Deutsch Vorbereitende Arbeiten Standardmäßig weist der ADSL BarricadeTM Ihren PCs automatisch alle erforderlichen Internet-Einstellungen zu. Sie brauchen die PCs nur noch so zu konfigurieren, dass sie die zugewiesenen Werte übernehmen. Befolgen Sie die Anweisungen für das auf Ihren PC installierte Betriebssystem. 3. Klicken Sie im Fenster [LAN or High-Speed Internet] (LAN oder Hochgeschwindigkeits-Internet) mit der rechten Maustaste auf das Symbol, das Ihrer Netzwerkkarte entspricht, und wählen Sie [Properties] (Eigenschaften). (Dieses Symbol trägt oft die Bezeichnung [Local Area Connection] (LANVerbindung). Das Dialogfeld [Local Area Connection] (LANVerbindung) zeigt eine Liste der derzeit installierten Netzwerkobjekte an. 5. Klicken Sie im Dialogfeld [Internet Protocol (TCP/IP) Properties] (Eigenschaften von Internetprotokoll (TCP/IP)) auf die Optionsschaltfläche [Obtain an IP address automatically] (IP-Adresse automatisch beziehen). Klicken Sie ebenfalls auf die Optionsschaltfläche [Obtain DNS server address automatically] (Adresse des DNS-Servers automatisch beziehen). 6. Klicken Sie zwei Mal auf [OK], um Ihre Änderungen zu bestätigen und die Systemsteuerung zu schließen. 29 30 Windows 2000 Prüfen Sie zunächst, ob das IP-Protokoll vorhanden ist, und installieren Sie es ggf. 1. Klicken Sie in der Windows-Task-Leiste auf die Schaltfläche [Start], wählen Sie [Settings] (Einstellungen) und klicken Sie dann auf [Control Panel] (Systemsteuerung). 2. Doppelklicken Sie auf [Network and Dial-up Connections] (Netzwerk- und DFÜ-Verbindungen). Deutsch 5. Wählen Sie im Dialogfeld [Select Network Component Type] (Typ der Netzwerkkomponente auswählen) die Option [Protocol] (Protokoll) und klicken Sie dann auf [Add…] (Hinzufügen). 6. Wählen Sie [Internet Protocol (TCP/IP)] (Internetprotokoll (TCP/IP) in der Liste [Network Protocols] (Netzwerkprotokoll] und klicken Sie dann auf [OK]. Möglicherweise werden Sie aufgefordert, Dateien von Ihrer Windows 2000-InstallationsCD oder anderen Speichermedien zu installieren. Befolgen Sie die Anweisungen zum Installieren der Dateien. Deutsch 3. Klicken Sie im Fenster [Network and Dial-up Connections] (Netzwerk- und DFÜ-Verbindungen) mit der rechten Maustaste auf das Symbol [Local Area Connection] (LAN-Verbindung) und wählen Sie dann [Properties] (Eigenschaften). Das Dialogfeld [Local Area Connection] (Eigenschaften von LAN-Verbindung) zeigt eine Liste der derzeit installierten Netzwerkkomponenten an. Wenn in der Liste der Eintrag [Internet Protocol (TCP/IP)] (Internetprotokoll (TCP/IP)) enthalten ist, ist das Protokoll bereits aktiviert. Fahren Sie in diesem Fall mit Schritt 10 fort. 4. Wenn [Internet Protocol (TCP/IP)] (Internetprotokoll (TCP/IP)) nicht als installierte Komponente erscheint, klicken Sie auf [Install…] (Installieren). 7. Wenn Sie dazu aufgefordert werden, klicken Sie auf [OK], um den Computer mit den neuen Einstellungen zu starten. Anschließend müssen Sie die PCs so konfigurieren, dass sie vom ADSL BarricadeTM zugewiesene IP-Adressen übernehmen. 8. Doppelklicken Sie in der Systemsteuerung auf das Symbol [Network and Dial-up Connections] (Netzwerk- und DFÜVerbindungen). 31 32 1. Klicken Sie in der Windows-Task-Leiste auf die Schaltfläche [Start], wählen Sie [Settings] (Einstellungen) und klicken Sie dann auf [Control Panel] (Systemsteuerung). 10. Wählen Sie im Dialogfeld [Local Area Connection Properties] (Eigenschaften von LAN-Verbindung) die Option [Internet Protocol (TCP/IP)] (Internetprotokoll (TCP/IP)) und klicken Sie dann auf [Properties] (Eigenschaften). 2. Doppelklicken Sie auf [Network and Dial-up Connections] (Netzwerk- und DFÜ-Verbindungen). 11. Klicken Sie im Dialogfeld [Internet Protocol (TCP/IP) Properties] (Eigenschaften von Internetprotokoll (TCP/IP)) auf die Optionsschaltfläche [Obtain an IP address automatically] (IP-Adresse automatisch beziehen). Klicken Sie ebenfalls auf die Optionsschaltfläche [Obtain DNS server address automatically] (DNS-Serveradresse automatisch beziehen). 3. Klicken Sie im Fenster [Network and Dial-up Connections] (Netzwerk- und DFÜ-Verbindungen) mit der rechten Maustaste auf das Symbol [Network] (Netzwerk) und wählen Sie dann [Properties] (Eigenschaften). Das Dialogfeld [Network Properties] (Netzwerkeigenschaften) zeigt eine Liste der derzeit installierten Netzwerkkomponenten an. Wenn in der Liste der Eintrag [Internet Protocol (TCP/IP)] (Internetprotokoll (TCP/IP)) enthalten ist, ist das Protokoll bereits aktiviert. Fahren Sie in diesem Fall mit Schritt 11 fort. 12. Klicken Sie zwei Mal auf [OK], um Ihre Änderungen zu bestätigen und die Systemsteuerung zu schließen. 33 Windows 98/Me/SE Deutsch Deutsch 9. Klicken Sie im Fenster [Network and Dial-up Connections] (Netzwerk- und DFÜ-Verbindungen) mit der rechten Maustaste auf das Symbol [Local Area Connection] (LAN-Verbindung) und wählen Sie dann [Properties] (Eigenschaften). 34 4. Wenn [Internet Protocol (TCP/IP)] (Internetprotokoll (TCP/IP)) nicht als installierte Komponente erscheint, klicken Sie auf [Add…] (Hinzufügen). 9. Doppelklicken Sie in der Systemsteuerung auf das Symbol [Network and Dial-up Connections] (Netzwerk- und DFÜVerbindungen). 5. Wählen Sie im Dialogfeld [Select Network Component Type] (Typ der Netzwerkkomponente auswählen) die Option [Protocol] (Protokoll) und klicken Sie dann auf [Add…] (Hinzufügen). 10. Klicken Sie im Fenster [Network and Dial-up Connections] (Netzwerk- und DFÜ-Verbindungen) mit der rechten Maustaste auf das Symbol [Network] (Netzwerk) und wählen Sie dann [Properties] (Eigenschaften). 6. Wählen Sie [Microsoft] in der Herstellerliste aus. 11. Wählen Sie im Dialogfeld [Network Properties] (Netzwerkeigenschaften) die Option [TCP/IP] und klicken Sie dann auf [Properties] (Eigenschaften). Deutsch 8. Wenn Sie dazu aufgefordert werden, klicken Sie auf [OK], um den Computer mit den neuen Einstellungen zu starten. Anschließend müssen Sie die PCs so konfigurieren, dass sie vom ADSL BarricadeTM zugewiesene IP-Adressen übernehmen. Deutsch 7. Wählen Sie [Internet Protocol (TCP/IP)] (Internetprotokoll (TCP/IP) in der Liste [Network Protocols] (Netzwerkprotokoll] und klicken Sie dann auf [OK]. Möglicherweise werden Sie aufgefordert, Dateien von Ihrer Windows-Installations-CD oder anderen Speichermedien zu installieren. Befolgen Sie die Anweisungen zum Installieren der Dateien. 12. Klicken Sie im Dialogfeld [TCP/IP Settings] (Eigenschaften von TCP/IP) auf die Optionsschaltfläche [Server assigned IP address) (Vom Server zugewiesene IP-Adresse). Klicken Sie ebenfalls auf die Optionsschaltfläche [Server assigned name server address] (Vom Server automatisch zugewiesene NamensServer-Adresse). 13. Klicken Sie zwei Mal auf [OK], um Ihre Änderungen zu bestätigen und die Systemsteuerung zu schließen. Hinweis: Beachten Sie für Windows 95 und NT die Installationshinweise im Handbuch auf der CD-ROM. 35 36 3 Konfigurieren des ADSL BarricadeTM In diesem Abschnitt finden Sie Hinweise darüber, wie Sie mit der Funktion zur automatischen Einrichtung den ADSL BarricadeTM für Ihren ISP konfigurieren können. 1. Legen Sie die mitgelieferte CD mit Installationsprogramm und Dokumentation in Ihr CD-ROM-Laufwerk ein. Deutsch 2. Suchen Sie Ihr CD-Laufwerk im Explorer und starten Sie AutoSetup.exe. Hierdurch wird das Hilfsprogramm zur automatischen Einrichtung gestartet, mit dem der ADSL BarricadeTM sehr leicht für Ihren ISP konfiguriert werden kann. 4. Wählen Sie Ihr Land in der Dropdown-Liste und klicken Sie dann auf [Next] (Weiter), um fortzufahren. Wenn Ihr Land nicht aufgeführt ist, klicken Sie auf [Custom] (Benutzerdefiniert) und fahren Sie mit dem Abschnitt Benutzerdefinierte ISP-Angaben fort. 5. Wählen Sie Ihren ISP/Netzwerkanbieter in der Dropdown-Liste und klicken Sie dann auf [Next] (Weiter), um fortzufahren. Wenn Ihr ISP/Netzwerkanbieter nicht aufgeführt ist, klicken Sie auf [Custom] (Benutzerdefiniert) und fahren Sie mit dem Abschnitt Benutzerdefinierte ISP-Angaben fort. Deutsch 6. Geben Sie die von Ihrem ISP gelieferten Angaben für Benutzernamen und Kennwort ein und klicken Sie dann auf [Next] (Weiter), um fortzufahren. Hinweis: Sie müssen nur einen Benutzernamen und ein Kennwort eingeben, wenn Ihr ISP das Protokoll PPPoA oder PPPoE verwendet. Wenn Ihr ISP RFC1483 Bridging verwendet, sind keine weiteren Angaben erforderlich. Klicken Sie nur auf [Next] (Weiter), um fortzufahren. 3. Klicken Sie auf [Yes, I agree] (Ja, ich stimme zu), um den Bedingungen der Lizenzvereinbarung zuzustimmen und mit der Einrichtung fortzufahren. 37 Wenn Ihr ISP RFC1483 Routed verwendet, müssen Sie nach dem Klicken auf [Next] (Weiter) die Werte eingeben, die Sie von Ihrem ISP für IP-Adresse, Netzmaske, GatewayAdresse sowie primäre und sekundäre DNS-Adresse erhalten haben. Klicken Sie auf [Next] (Weiter). 38 7. Klicken Sie dann auf [Finish] (Fertig stellen) Das Hilfsprogramm AutoSetup konfiguriert nun den ADSL BarricadeTM mit den angegebenen Werten. Dies dauert einige Sekunden. Wenn die Einrichtung beendet ist, erscheint folgende Meldung: Benutzerdefinierte ISP-Angaben Wenn Ihr Land oder ISP nicht aufgeführt ist, müssen Sie die ISPEinstellungen manuell eingeben. Dies erfolgt über die Option [Custom] (Benutzerdefiniert). Für benutzerdefinierte Installationen müssen Sie auch folgende Einstellungen kennen, die Sie von Ihrem ISP erhalten: Deutsch Deutsch Welches Protokoll wird verwendet? (PPPoA, PPPoE, RFC1483 Bridging oder RFC1483 Routed). Welche Verkapselung (Encapsulation)? (VC-Mux oder LLC). Was sind die VPI/VCI-Nummern? Beispiel: 0/38. Das ADSL-Modem ist jetzt eingerichtet. Fahren Sie mit dem Abschnitt zur Fehlerbehebung im Benutzerhandbuch fort, wenn Sie keine Verbindung zum Internet herstellen können. 39 40 Contenu de l’emballage 1. Wählen Sie die Werte gemäß den Angaben Ihres ISP für die oben genannten Werte aus. • • • • • • Routeur BarricadeTM ADSL. Un cordon d’alimentation. Un câble Ethernet RJ-45. Un câble téléphonique/DSL RJ-11 standard. CD-ROM avec l’utilitaire d’installation et la documentation. Guide d’installation rapide. Français Deutsch Remarque : Des diviseurs/microfiltres ADSL sont fournis avec certains modèles. 2. Fahren Sie mit Schritt 6 fort. 41 42 Configuration requise Pour pouvoir utiliser le routeur BarricadeTM ADSL, vous devez disposer des éléments suivants : Panneau avant • Un service ADSL opérationnel sur votre ligne téléphonique, avec au moins une adresse Internet publique pour votre réseau local. Témoins Power Link lumineux (Alimentation) (Liaison) TX/RX (Émission/ Ethernet 1 2 3 4 réception) Couleur Vert Vert Vert Vert / 100 Mbps Jaune / 10 Mbps Un ou plusieurs ordinateurs contenant chacun une carte d’interface réseau Ethernet 10/100 Base-T. Vert allumé Sous tension La ligne ADSL est formée Émission/ réception DSL Link (Liaison) • • Un concentrateur/commutateur Ethernet, si vous connectez l’appareil à plusieurs ordinateurs d’un réseau Ethernet. Pour une configuration système à l’aide du programme Web fourni : un navigateur Web tel qu’Internet Explorer V5.0 ou ultérieur, ou bien Netscape V6.1 ou ultérieur. Vert Sans objet clignotant Apprentissage TX/RX (Émission/ réception) Émission / réception Jaune allumé Sans objet Sans objet Sans objet Link (Liaison) Jaune Sans objet clignotant Sans objet Sans objet Émission / réception Éteint Pas de connexion Pas d’émission/ réception Pas de connexion Hors tension Français Français • 43 Description du matériel 44 45 Ce Guide d’installation rapide fournit des instructions de base pour la connexion du routeur BarricadeTM ADSL à un ordinateur ou un réseau local et à Internet. Connecteur du panneau arrière Description Alimentation 12 V, 1,2 A Bouton de réinitialisation et de restauration des valeurs par défaut Enfoncé pendant 1 à 2 secondes : réinitialisation. Enfoncé pendant au moins 5 secondes : restauration des valeurs par défaut. Port DSL Connecteur téléphonique RJ-11 Port Ethernet Quatre connecteurs RJ-45 10/100M • • • La section 1 décrit comment configurer le matériel. La section 2 décrit comment configurer les propriétés Internet sur votre ou vos ordinateurs. La section 3 montre comment configurer les paramètres du FAI au moyen de l’utilitaire Auto Setup. Ce Guide suppose que vous avez déjà mis en place un service ADSL avec votre Fournisseur d’Accès Internet (FAI). Ces instructions vous aideront à effectuer une configuration de base qui devrait être compatible avec la configuration de votre réseau domestique ou avec le réseau de votre PME. Français Français Panneau arrière 46 1 Connexion du matériel Avertissement : Avant de commencer, mettez tous les appareils hors tension. Cela inclut vos ordinateurs, votre concentrateur/commutateur sur le réseau local (s’il y a lieu), et le routeur BarricadeTM ADSL. Étape 3. Raccordez le cordon d’alimentation Raccordez une extrémité du cordon d’alimentation au connecteur d’alimentation situé à l’arrière de l’appareil et l’autre extrémité à une prise murale ou une ligne d’alimentation. Étape 1. Branchez le câble ADSL Connectez l’une des extrémités du câble téléphonique (RJ-11) fourni au port DSL sur le panneau arrière de l’appareil. Connectez l’autre extrémité à votre microfiltre/diviseur ADSL*. Étape 4. Allumez vos systèmes Allumez et démarrez votre ou vos ordinateurs ainsi que tout périphérique de réseau local tel que concentrateur ou commutateur. Français Français *Remarque : Des diviseurs/microfiltres ADSL sont fournis avec certains modèles. Étape 2. Branchez le câble Ethernet Si vous connectez un réseau local au routeur BarricadeTM ADSL, branchez une extrémité du câble Ethernet fourni au port du concentrateur/commutateur et l’autre au port Ethernet du routeur BarricadeTM ADSL. Si vous utilisez le routeur BarricadeTM ADSL avec un seul ordinateur et sans concentrateur, vous devez utiliser un câble Ethernet pour connecter le PC directement à l’appareil. 47 48 2 Configuration de vos ordinateurs Cette section contient les instructions qui vous permettront de configurer les paramètres Internet sur vos ordinateurs pour pouvoir utiliser le routeur BarricadeTM ADSL. Windows® XP 1. Dans la barre des tâches Windows, cliquez sur [Start] (Démarrer), puis cliquez sur [Control Panel] (Panneau de configuration). 2. Double-cliquez sur l’icône [Network Connections] (Connexions réseau). 4. Vérifiez que la case à cocher située à gauche de l’élément [Internet Protocol TCP/IP] (Protocole Internet TCP/IP) est activée, et cliquez sur [Properties] (Propriétés). Français Français Avant de commencer Par défaut, le routeur BarricadeTM ADSL affecte automatiquement tous les paramètres Internet nécessaires à vos PC. Il vous suffit de configurer les PC pour qu’ils acceptent les informations affectées. Suivez les instructions correspondant au système d’exploitation installé sur votre PC. 3. Dans la fenêtre [LAN or High-Speed Internet] (Réseau local ou Internet à grande vitesse), cliquez avec le bouton droit sur l’icône correspondant à votre carte d’interface réseau et sélectionnez [Properties] (Propriétés). (Cette icône est souvent libellée [Local Area Connection] (Connexion au réseau local).) La boîte de dialogue [Local Area Connection] (Connexion au réseau local) affiche la liste des éléments réseau installés. 5. Dans la boîte de dialogue [Internet Protocol (TCP/IP) Properties] (Propriétés TCP/IP), cliquez sur la case d’option [Obtain an IP address automatically] (Obtenir une adresse IP automatiquement). Cliquez également sur la case d’option [Obtain DNS server address automatically] (Obtenir les adresses des serveurs DNS automatiquement). 6. Cliquez deux fois sur [OK] pour confirmer vos modifications et fermez le Panneau de configuration. 49 50 Windows 2000 Commencez par vérifier la présence du protocole IP et, si nécessaire, installez-le. 5. Dans la boîte de dialogue [Select Network Component Type] (Sélection du type de composant réseau), sélectionnez [Protocol] (Protocole), puis cliquez sur [Add…] (Ajouter). 2. Double-cliquez sur l’icône [Network and Dial-Up Connections] (Connexions réseau et accès à distance). 6. Sélectionnez [Internet Protocol (TCP/IP)] (Protocole Internet TCP/IP) dans la liste [Network Protocols] (Protocoles réseau), puis cliquez sur [OK]. Il est possible que vous soyez invité à installer les fichiers à partir de votre CD-ROM d’installation de Windows 2000 ou d’un autre support. Suivez les instructions pour installer les fichiers. Français 1. Dans la barre des tâches Windows, cliquez sur le bouton [Start] (Démarrer), pointez sur [Settings] (Paramètres), puis cliquez sur [Control Panel] (Panneau de configuration). 3. Dans la fenêtre [Network and Dial-up Connections] (Connexions réseau et accès à distance), cliquez avec le bouton droit de la souris sur l’icône [Local Area Connection] (Connexion au réseau local), puis sélectionnez [Properties] (Propriétés). La boîte de dialogue [Local Area Connection Properties] (Propriétés de Connexion au réseau local) affiche la liste des éléments réseau installés. Si cette liste contient l’élément [Internet Protocol (TCP/IP)] (Protocole Internet TCP/IP), cela signifie que le protocole a déjà été activé. Passez à l’Étape 10. Français 4. Si l’élément [Internet Protocol (TCP/IP)] (Protocole Internet TCP/IP) n’apparaît pas comme composant installé, cliquez sur [Install…] (Installer). 7. Si un message vous le demande, cliquez sur [OK] pour redémarrer votre ordinateur avec les nouveaux paramètres. Configurez ensuite les PC pour accepter les informations relatives aux adressesIP affectées par le routeur BarricadeTM ADSL. 8. Dans le Panneau de configuration, double-cliquez sur l’icône [Network and Dial-up Connections] (Connexions réseau et accès à distance). 51 52 9. Dans la fenêtre [Network and Dial-up Connections] (Connexions réseau et accès à distance), cliquez avec le bouton droit de la souris sur l’icône [Local Area Connection] (Connexion au réseau local), puis sélectionnez [Properties] (Propriétés). Windows 98/Me/SE 10. Dans la boîte de dialogue [Local Area Connection Properties] (Propriétés de Connexion au réseau local), sélectionnez [Internet Protocol (TCP/IP)] (Protocole Internet TCP/IP) et cliquez sur [Properties] (Propriétés). 2. Double-cliquez sur l’icône [Network and Dial-Up Connections] (Connexions réseau et accès à distance). Français 3. Dans la fenêtre [Network and Dial-up Connections] (Connexions réseau et accès à distance), cliquez avec le bouton droit de la souris sur l’icône [Network] (Réseau), puis sélectionnez [Properties] (Propriétés). La boîte de dialogue [Network Properties] (Propriétés du réseau) affiche la liste des composants réseau installés. Si cette liste contient l’élément [Internet Protocol (TCP/IP)] (Protocole Internet (TCP/IP), cela signifie que le protocole a déjà été activé. Passez à l’Étape 11. Français 11. Dans la boîte de dialogue [Internet Protocol (TCP/IP) Properties] (Propriétés TCP/IP), cliquez sur la case d’option [Obtain an IP address automatically] (Obtenir une adresse IP automatiquement). Cliquez également sur la case d’option [Obtain DNS server address automatically] (Obtenir les adresses des serveurs DNS automatiquement). 1. Dans la barre des tâches Windows, cliquez sur le bouton [Start] (Démarrer), pointez sur [Settings] (Paramètres), puis cliquez sur [Control Panel] (Panneau de configuration). 12. Cliquez deux fois sur [OK] pour confirmer et enregistrer vos modifications, puis fermez le Panneau de configuration. 53 54 4. Si l’élément [Internet Protocol (TCP/IP)] (Protocole Internet TCP/IP) n’apparaît pas comme composant installé, cliquez sur [Add…] (Ajouter). 9. Dans le Panneau de configuration, double-cliquez sur l’icône [Network and Dial-up Connections] (Connexions réseau et accès à distance). 5. Dans la boîte de dialogue [Select Network Component Type] (Sélection du type de composant réseau), sélectionnez [Protocol] (Protocole), puis cliquez sur [Add…] (Ajouter). 10. Dans la fenêtre [Network and Dial-up Connections] (Connexions réseau et accès à distance), cliquez avec le bouton droit de la souris sur l’icône [Network] (Réseau), puis sélectionnez [Properties] (Propriétés). 6. Sélectionnez [Microsoft] dans la liste [Manufacturers] (Constructeurs). Français 8. Si un message vous le demande, cliquez sur [OK] pour redémarrer votre ordinateur avec les nouveaux paramètres. Configurez ensuite les PC pour accepter les informations relatives aux adresses IP affectées par le routeur BarricadeTM ADSL. Français 7. Sélectionnez [Internet Protocol (TCP/IP)] (Protocole Internet TCP/IP) dans la liste [Network Protocols] (Protocoles réseau), puis cliquez sur [OK]. Il est possible que vous soyez invité à installer les fichiers à partir de votre CD-ROM d’installation de Windows Me ou d’un autre support. Suivez les instructions pour installer les fichiers. 11. Dans la boîte de dialogue [Network Properties] (Propriétés du réseau), sélectionnez [TCP/IP] et cliquez sur [Properties] (Propriétés). 12. Dans la boîte de dialogue [TCP/IP Settings] (Paramètres TCP/IP), cliquez sur la case d’option [Server assigned IP address] (AdresseIP affectée par le serveur). Cliquez également sur la case d’option [Server assigned name server address] (Adresse du serveur DNS affectée par le serveur). 13. Cliquez deux fois sur [OK] pour confirmer et enregistrer vos modifications, puis fermez le Panneau de configuration. Remarque : Pour Windows 95 et NT, consultez les instructions d’installation dans le Manuel fourni sur le CD-ROM. 55 56 3 Configuration du routeur BarricadeTM ADSL Cette section contient des instructions qui vous permettront d’utiliser l’utilitaire Auto Setup pour configurer automatiquement le routeur BarricadeTM ADSL pour votre FAI. 1. Insérez le CD-ROM contenant l’utilitaire d’installation et la documentation dans votre lecteur de CD-ROM. 5. Sélectionnez votre FAI/fournisseur réseau dans la liste déroulante, puis cliquez sur [Next] pour continuer. Si votre FAI/fournisseur réseau n’apparaît pas, cliquez sur [Custom] puis passez à la section Custom. 6. Entrez le nom d’utilisateur et le mot de passe fournis par votre FAI, puis cliquez sur [Next] pour continuer. Remarque : Vous n’aurez besoin d’entrer un nom d’utilisateur et un mot de passe que si votre FAI utilise le protocole PPPoA ou PPPoE. Si votre FAI utilise RFC1483 Bridging, aucune autre saisie n’est nécessaire, il vous suffit de cliquer sur [Next] pour continuer. Si votre FAI utilise RFC1483 Routed, après avoir cliqué sur [Next] vous devrez entrer l’adresse IP, le masque de réseau, l’adresse de passerelle et les adresses DNS primaire et secondaire fournis par votre FAI. Cliquez sur [Next]. 3. Cliquez sur [Yes, I agree] (Oui, j’accepte) pour accepter les termes du contrat de licence et continuer la configuration. 57 58 Français Français 2. Naviguez jusqu’à l’emplacement de votre lecteur de CD-ROM et exécutez le programme AutoSetup.exe. L’utilitaire Auto Setup s’exécute. Il offre un moyen simple pour configurer le routeur BarricadeTM ADSL pour votre FAI. 4. Sélectionnez votre pays dans la liste déroulante, puis cliquez sur [Next] (Suivant) pour continuer. Si votre pays n’apparaît pas, cliquez sur [Custom] (Personnalisé) puis passez à la section Custom. 7. Enfin, cliquez sur [Finish] (Terminer). L’utilitaire Auto Setup va maintenant configurer le routeur BarricadeTM ADSL avec les paramètres que vous avez saisis. Cette opération peut durer quelques minutes. Lorsque la configuration est terminée, le message suivant s’affiche : Personnalisé Si votre pays ou votre FAI ne figure pas dans la liste, vous devrez entrer manuellement vos paramètres de FAI. Cette opération s’effectue en utilisant l’option [Custom] (Personnalisé). Pour une installation personnalisée, vous aurez également besoin de connaître les paramètres suivants fournis par votre FAI : Français Français Protocole? (PPPoA, PPPoE, RFC1483 Bridging ou RFC1483 Routed). Encapsulation ? (VC-Mux ou LLC). Numéros de circuits VPI/VCI ? Par exemple 0/38. Votre router BarricadeTM ADSL est maintenant configuré. Reportezvous à la section Dépannage du Manuel d’utilisation si vous ne parvenez pas à établir de connexion à Internet. 59 60 Contenido del paquete 1. Sélectionnez/entrez les valeurs correspondant aux paramètres ci-dessus fournis par votre FAI. • • • • • • Un ADSL BarricadeTM. Un adaptador de corriente. Un cable Ethernet RJ-45. Un cable RJ-11 para la línea DSL o la línea telefónica estándar. Un CD con la utilidad de instalación y la documentación. Manual de instalación rápida. Español Français Nota: Algunos modelos incluyen divisores o microfiltros ADSL. 2. Revenez à l’Étape 6. 61 62 Requisitos del sistema Panel frontal • Etiqueta LED Power Link (Alimentación) (Enlace) TX/RX Ethernet 1 2 3 4 Color Verde Verde Verde Verde / 100 Mbps Amarillo / 10 Mbps Uno o más ordenadores, cada uno con una tarjeta de interfaz de red (NIC) Ethernet 10/100 Base-T. Verde fijo Encendido Línea ADSL preparada DSL transmitiendo Enlace o recibiendo • Un switch o hub Ethernet, si va a conectar el dispositivo a más de un ordenador de una red Ethernet. Verde N/D intermitente Preparación TX/RX Transmitiendo o recibiendo Amarillo fijo N/D N/D N/D Enlace • Para configurar el sistema utilizando el programa basado en web que se suministra, necesitará: un navegador de Internet como Internet Explorer V5.0 o posterior, o Netscape V6.1 o posterior. Amarillo N/D intermitente N/D N/D Transmitiendo o recibiendo Apagado Sin conexión Sin TX/RX Sin Conexión Español Línea telefónica con servicio ADSL en funcionamiento y con al menos una dirección pública de Internet para su LAN. Apagado Español Para utilizar el ADSL BarricadeTM, debe disponer de los siguientes elementos: • 63 Descripción del hardware 64 Panel trasero Conector del panel trasero Este Manual de instalación rápida contiene las instrucciones básicas para conectar el ADSL BarricadeTM a un ordenador o a una LAN, y a Internet. Descripción 65 Botón para restablecer y restaurar los ajustes predeterminados en fábrica. Si se pulsa durante 1 ó 2 segundos: se reinicia. Si se pulsa durante 5 segundos o más: se restauran los valores de fábrica. Puerto DSL Conector telefónico RJ-11 Puerto Ethernet Cuatro conectores RJ-45 de 10/100 Mbps • • • La sección 1 describe cómo configurar el hardware. La sección 2 describe cómo configurar las propiedades de Internet de su ordenador. La sección 3 describe como configurar los parámetros del ISP mediante la utilidad de configuración automática. Este manual presupone que ya tiene contratado un servicio ADSL con su proveedor de servicios de Internet (ISP) Estas instrucciones proporcionan una configuración básica que debería ser compatible con la configuración de red de su casa o de una oficina pequeña. Español Español Fuente de alimentación 12 V; 1,2 A 66 1 Conexión del hardware Advertencia: Antes de empezar, desconecte la corriente de todos los dispositivos. Desconecte el ordenador u ordenadores, el hub o switch de la LAN (si procede) y el ADSL BarricadeTM. Paso 3. Enchufar el cable de alimentación de corriente Conecte el adaptador de CA a la toma de alimentación de la parte trasera del dispositivo y enchufe el adaptador a una toma de pared o a una regleta de enchufes. Paso 1. Conectar el cable ADSL Conecte un extremo del cable telefónico proporcionado (RJ-11) al puerto DSL del panel trasero del dispositivo. Conecte el otro extremo al microfiltro o divisor ADSL*. Paso 4. Encender los sistemas Encienda y arranque el ordenador u ordenadores y cualquier dispositivo de la LAN como hubs o switches. Español Español *Nota: Algunos modelos incluyen divisores o microfiltros ADSL. Paso 2. Conectar el cable Ethernet Si va a conectar una LAN al ADSL BarricadeTM, conecte un extremo del cable Ethernet proporcionado a un puerto del hub o switch y el otro extremo al puerto Ethernet del ADSL BarricadeTM. Si va a utilizar el ADSL BarricadeTM con un único ordenador sin hub, debe usar un cable Ethernet para conectar el ordenador al dispositivo directamente. 67 68 2 Configuración de los ordenadores Esta sección proporciona instrucciones para configurar los ajustes de Internet del ordenador y poder trabajar con el ADSL BarricadeTM. Windows® XP 1. En la barra de tareas de Windows, pulse el botón [Start] (Inicio) y luego [Control Panel] (Panel de control). 2. Haga doble clic en el icono [Network Connections] (Conexiones de red). 4. Compruebe que la casilla de verificación a la izquierda del elemento [Internet Protocol TCP/IP] (Protocolo Internet TCP/IP) está marcada y pulse [Properties] (Propiedades). Español Español Antes de empezar De forma predeterminada, el ADSL BarricadeTM asigna automáticamente a los ordenadores todos los ajustes de Internet necesarios. Sólo tiene que configurar los ordenadores para aceptar la información una vez asignada. Siga las instrucciones correspondientes al sistema operativo instalado en el ordenador. 3. En la ventana [LAN or High-Speed Internet] (LAN o Internet de alta velocidad), haga clic con el botón derecho del ratón en el icono correspondiente a su tarjeta de interfaz de red (NIC) y seleccione [Properties] (Propiedades). (Este icono suele denominarse [Local Area Connection] (Conexión de área local)). El cuadro de diálogo [Local Area Connection] (Conexión de área local) muestra una lista de los elementos de red instalados. 5. En el cuadro de diálogo [Internet Protocol (TCP/IP) Properties] (Propiedades del Protocolo Internet (TCP/IP)), seleccione la opción [Obtain an IP address automatically] (Obtener dirección IP automáticamente). Seleccione también la opción [Obtain DNS server address automatically] (Obtener la dirección del servidor DNS automáticamente]. 6. Pulse [OK] (Aceptar) dos veces para confirmar los cambios y cerrar el [Control Panel] (Panel de control). 69 70 Windows 2000 En primer lugar, hay que comprobar la existencia del protocolo IP e instalarlo, en caso de ser necesario. 5. En el cuadro de diálogo [Select Network Component Type] (Seleccionar tipo de componente de red), seleccione [Protocol] (Protocolo) y luego seleccione [Add…] (Agregar). 2. Haga doble clic en el icono [Network and Dial-up Connections] (Conexiones de red y de acceso telefónico). 6. Seleccione [Internet Protocol (TCP/IP)] (Protocolo Internet (TCP/IP)) en la lista de [Network Protocols] (Protocolos de red) y pulse [OK] (Aceptar). Es posible que el sistema le pida que instale los archivos desde el CD de instalación de Windows 2000 o desde otro medio. Siga las instrucciones para instalar los archivos. Español 1. En la barra de tareas de Windows, pulse el botón [Start] (Inicio), vaya a [Settings] (Configuración) y luego pulse [Control Panel] (Panel de control). 3. En la ventana [Network and Dial-up Connections] (Conexiones de red y de acceso telefónico), haga clic con el botón derecho del ratón en el icono [Local Area Connection] (Conexión de área local) y seleccione [Properties] (Propiedades). El cuadro de diálogo [Local Area Connection] (Conexión de área local) muestra una lista de los componentes de red instalados. Si la lista incluye [Internet Protocol (TCP/IP)] (Protocolo Internet (TCP/IP)), significa que el protocolo ya está activado. Vaya al paso 10. Español 4. Si [Internet Protocol (TCP/IP)] (Protocolo Internet (TCP/IP)) no aparece como componente instalado, haga clic en [Install…] (Instalar). 7. Si el sistema se lo pide, pulse [OK] (Aceptar) para reiniciar el ordenador con la nueva configuración. Después, configure los ordenadores para que acepten la información de IP asignada por el ADSL BarricadeTM. 8. En [Control Panel] (Panel de control), haga doble clic en el icono [Network and Dial-up Connections] (Conexiones de red y acceso telefónico). 71 72 9. En la ventana [Network and Dial-up Connections] (Conexiones de red y de acceso telefónico), haga clic con el botón derecho del ratón en el icono [Local Area Connection] (Conexión de área local) y seleccione [Properties] (Propiedades). 10. En el cuadro [Properties] (Propiedades) de [Local Area Connection] (Conexión de área local), seleccione [Internet Protocol (TCP/IP)] (Protocolo Internet (TCP/IP)) y luego haga clic en [Properties] (Propiedades). Español 1. En la barra de tareas de Windows, pulse el botón [Start] (Inicio), vaya a [Settings] (Configuración) y luego pulse [Control Panel] (Panel de control). 2. Haga doble clic en el icono [Network and Dial-up Connections] (Red). 3. En la ventana [Network and Dial-up Connections] (Red), pulse el icono [Network] (Red) con el botón derecho y seleccione [Properties] (Propiedades). El cuadro de diálogo [Network Properties] (Propiedades de red) muestra una lista de los componentes de red instalados. Si la lista incluye [Internet Protocol (TCP/IP)] (TCP/IP), significa que el protocolo ya está activado. Vaya al paso 11. Español 11. En el cuadro de diálogo [Internet Protocol (TCP/IP) Properties] (Propiedades del Protocolo Internet (TCP/IP)), seleccione la opción [Obtain an IP address automatically] (Obtener dirección IP automáticamente). Seleccione también la opción [Obtain DNS server address automatically] (Obtener la dirección del servidor DNS automáticamente]. Windows 98, Me, SE 12. Pulse [OK] (Aceptar) dos veces para confirmar los cambios y cerrar el [Control Panel] (Panel de control). 73 74 4. Si [Internet Protocol (TCP/IP)] (TCP/IP) no aparece como componente instalado, haga clic en [Add…] (Agregar). 5. En el cuadro de diálogo [Select Network Component Type] (Seleccionar tipo de componente de red), seleccione [Protocol] (Protocolo) y luego seleccione [Add…] (Agregar). 6. Seleccione [Microsoft] en la lista de [Manufacturers] (Fabricantes). Español 8. Si el sistema se lo pide, pulse [OK] (Aceptar) para reiniciar el ordenador con la nueva configuración. Después, configure los ordenadores para que acepten la información de IP asignada por el ADSL BarricadeTM. 10. En la ventana [Network and Dial-up Connections] (Conexiones de red y de acceso telefónico), pulse el icono [Network] (Red) con el botón derecho y seleccione [Properties] (Propiedades). 11. En el cuadro de diálogo [Network Properties] (Propiedades de red), seleccione [TCP/IP] (TCP/IP) y luego pulse [Properties] (Propiedades). Español 7. Seleccione [Internet Protocol (TCP/IP)] (TCP/IP) en la lista de [Network Protocols] (Protocolos de red) y pulse [OK] (Aceptar). Es posible que el sistema le pida que instale los archivos desde el CD de instalación de Windows Me o desde otro medio. Siga las instrucciones para instalar los archivos. 9. En [Control Panel] (Panel de control), haga doble clic en el icono [Network and Dial-up Connections] (Conexiones de red y acceso telefónico). 12. En el cuadro de diálogo [TCP/IP Settings] (Configuración TCP/IP), seleccione la opción [Server assigned IP address] (Dirección IP asignada por el servidor). Seleccione también la opción [Server assigned name server addresses] (Direcciones del servidor de nombres asignadas por el servidor). 13. Pulse [OK] (Aceptar) dos veces para confirmar los cambios y cerrar el [Control Panel] (Panel de control). Nota: Para Windows 95 y NT, consulte las instrucciones de instalación en el manual que contiene el CD-ROM. 75 76 3 Configuración del ADSL BarricadeTM Esta sección proporciona instrucciones sobre cómo emplear la utilidad de configuración automática del ADSL BarricadeTM para su ISP. 1. Introduzca el CD con la documentación y la utilidad de instalación en la unidad de CD. 5. Seleccione su proveedor ISP o de red en la lista despegable y luego pulse [Next] (Siguiente) para continuar. Si su proveedor ISP o de red no aparece en la lista, pulse [Custom] (Personalizado) y vaya a la sección Personalización. 6. Introduzca el nombre de usuario y la contraseña proporcionados por su ISP y pulse [Next] (Siguiente) para continuar. Nota: Sólo deberá introducir un nombre de usuario y una contraseña si su ISP utiliza el protocolo PPPoA o PPPoE. Si su ISP utiliza RFC1483 Bridging no deberá introducir ningún dato más, simplemente pulse [Next] (Siguiente) para continuar. Si su ISP utiliza RFC1483 Routed, tras pulsar [Next] (Siguiente), deberá introducir la dirección IP, la máscara de red, la dirección de la puerta de enlace, y las direcciones DNS primaria y secundaria proporcionadas por su ISP. Pulse [Next] (Siguiente). 3. Pulse [Yes, I agree] (Sí, acepto) para aceptar los términos del contrato de licencia y continuar con la instalación. 77 78 Español Español 2. Busque en el CD el programa AutoSetup.exe y ejecútelo. Se iniciará la utilidad de configuración automática, que le permitirá configurar fácilmente su ADSL BarricadeTM según su ISP. 4. Seleccione su país en la lista despegable y luego pulse [Next] (Siguiente) para continuar. Si su país no aparece en la lista, pulse [Custom] (Personalizado) y vaya a la sección Personalización. 7. Pulse [Finish] (Finalizar) para terminar. La utilidad de configuración automática configurará el ADSL BarricadeTM con la configuración introducida. Puede que tarde unos minutos. Una vez completada la configuración, aparecerá el siguiente mensaje: Personalización Si su país o ISP no aparece en la lista, deberá introducir manualmente la configuración de su ISP. Esto se hace mediante la opción [Custom] (Personalizado). Para la instalación personalizada, también necesitará los siguientes datos de configuración proporcionados por su ISP: Español Español ¿Qué protocolo utiliza? (PPPoA, PPPoE, RFC1483 Bridging o RFC1483 Routed). ¿Qué encapsulado? (VC-Mux o LLC). ¿Cuáles son los números de circuito VPI/VCI? P. ej., 0/38. Su ADSL BarricadeTM ya está configurado. Vaya a la sección Resolución de problemas de la Guía del usuario si no puede conectarse a Internet. 79 80 Inhoud van de verpakking 1. Seleccione o introduzca los valores correspondientes de los ajustes mencionados proporcionados por su ISP. • • • • • • Eén ADSL BarricadeTM Eén voedingsadapter Eén RJ-45 Ethernet-kabel Eén RJ-11 standaard telefoon/DSL-kabel Een cd met installatieprogramma en documentatie Quick Installation Guide Español Nederlands Opmerking: Bij sommige modellen worden ADSL-splitters/ microfilters meegeleverd. 2. Vuelva al paso 6. 81 82 Systeemvereisten Teneinde de ADSL BarricadeTM te kunnen gebruiken, moet u over het volgende beschikken: Voorpaneel • Opschrift LED Aan/uit Link TX/RX Ethernet 1 2 3 4 Kleurstatus Groen Groen Groen Groen / 100 Mbps Geel / 10 Mbps Groen brandend DSL ADSL-lijn Systeem ingeschakeld is getraind. verzendt/ ontvangt Groen knipperend N.v.t. Werkende ADSL-service op uw telefoonlijn, met minimaal één openbaar internetadres voor uw LAN. Eén of meer computers met elk een Ethernet 10/100 Base-T netwerkinterfacekaart (NIC). • Een Ethernet-hub/switch, als u het apparaat aansluit op meer dan één computer op een Ethernet-netwerk. • Voor systeemconfiguratie met behulp van het meegeleverde webprogramma: een webbrowser zoals Internet Explorer V5.0 of hoger, of Netscape V6.1 of hoger. Link Training TX/RX Bezig met verzenden/ ontvangen Geel brandend N.v.t. N.v.t. N.v.t. Link Geel knipperend N.v.t. N.v.t. N.v.t. Bezig met verzenden/ ontvangen UIT Geen Systeem uitgeschakeld verbinding Nederlands Nederlands • 83 Beschrijving van de hardware Geen TX/RX Geen verbinding 84 Achterpaneel Deze Quick Installation Guide biedt basisinstructies voor het aansluiten van de ADSL BarricadeTM op een computer of LAN en op internet. Beschrijving Voeding 12V, 1,2A Knop voor Reset en herstellen van fabrieksinstellingen Indien gedurende 1-2 seconden ingedrukt: reset. Indien gedurende 5 seconden of langer ingedrukt: herstel van fabrieksinstellingen. DSL-poort RJ-11-telefoonconnector Ethernet-poort Vier 10/100M RJ-45-connectoren Nederlands • 85 • • In sectie 1 wordt beschreven hoe u de hardware moet instellen. In sectie 2 wordt beschreven hoe u interneteigenschappen kunt configureren op uw computer(s). In sectie 3 wordt aangegeven hoe u ISP-instellingen moet configureren met het hulpprogramma Auto Setup. In deze handleiding wordt ervan uitgegaan dat u al over een ADSLservice van uw internetprovider (ISP) beschikt. In deze instructies wordt de basisconfiguratie beschreven die overeen zou moeten komen met de setup van uw thuisnetwerk of uw kleine kantoornetwerk. Nederlands Connector op achterpaneel 86 Nederlands 1 De hardware aansluiten Waarschuwing: Schakel, voordat u begint, de stroom uit op alle apparaten. Dit geldt voor uw computer(s), uw LAN-hub/switch (indien van toepassing) en de ADSL BarricadeTM. Stap 3. De voedingsconnector aansluiten Sluit de wisselstroomadapter aan op de voedingsconnector aan de achterkant van het apparaat en sluit de adapter aan op een stopcontact of stekkerdoos. Stap 1. De ADSL-kabel aansluiten Sluit het ene uiteinde van de meegeleverde telefoonkabel (RJ-11) aan op de poort met het opschrift DSL op het achterpaneel van het apparaat. Sluit het andere uiteinde aan op uw ADSLmicrofilter/splitter*. Stap 4. Uw systemen inschakelen Zet uw computer(s) en eventuele LAN-apparaten zoals hubs of switches aan en start ze op. Nederlands *Opmerking: Bij sommige modellen worden ADSL-splitters/ microfilters meegeleverd. Stap 2. De Ethernet-kabel aansluiten Bij aansluiting van een LAN op de ADSL BarricadeTM, sluit u het ene uiteinde van een meegeleverde Ethernet-kabel aan op een poort van de hub/switch en het andere uiteinde op de Ethernetpoort op de ADSL BarricadeTM. Als u de ADSL BarricadeTM gebruikt met één enkele computer en geen hub, moet u een Ethernet-kabel gebruiken om de pc rechtstreeks op het apparaat aan te sluiten. 87 88 2 Uw computers configureren Deze sectie bevat instructies voor het configureren van de internetinstellingen op uw computer zodat deze werken met de ADSL BarricadeTM. Windows® XP 1. Klik achtereenvolgens op [Start] en [Control Panel] (Configuratiescherm) op de taakbalk van Windows. 2. Dubbelklik op het pictogram [Network Connections] (Netwerkverbindingen). 4. Controleer of het selectievakje links van het item met de titel [Internet Protocol TCP/IP] (Internet-protocol (TCP/IP)) is ingeschakeld en klik op [Properties] (Eigenschappen). Nederlands Nederlands Voordat u begint De ADSL BarricadeTM wijst standaard automatisch alle vereiste internetinstellingen toe aan uw pc’s. U hoeft alleen de pc’s zodanig te configureren dat deze de toegewezen informatie accepteren. Volg de instructies voor het besturingssysteem dat is geïnstalleerd op uw pc. 3. Klik in het venster [LAN or High-Speed Internet] (LAN- of snelle Internet-verbinding), met de rechtermuisknop op het pictogram voor uw netwerkinterfacekaart (NIC) en selecteer [Properties] (Eigenschappen). (Vaak heeft dit pictogram de titel [Local Area Connection] (LAN-verbinding).) In het dialoogvenster [Local Area Connection] (LAN-verbinding) wordt een lijst weergegeven van geïnstalleerde netwerkonderdelen. 5. Klik in het dialoogvenster [Internet Protocol (TCP/IP) Properties] (Eigenschappen voor Internet Protocol (TCP/IP)) op het keuzerondje [Obtain an IP address automatically] (Automatisch een IP-adres laten toewijzen). Klik tevens op het keuzerondje op [Obtain DNS server address automatically] (Automatisch een DNS-serveradres laten toewijzen). 6. Klik tweemaal op [OK] om uw wijzigingen te bevestigen en sluit het [Control Panel] (Configuratiescherm). 89 90 Windows 2000 1. Klik op [Start], wijs [Settings] (Instellingen) aan en klik op [Control Panel] (Configuratiescherm) op de taakbalk van Windows. 5. Selecteer [Protocol] in het dialoogvenster [Select Network Component Type] (Type netwerkonderdeel selecteren) en klik vervolgens op [Add…] (Toevoegen). 2. Dubbelklik op het pictogram [Network and Dial-up Connections] (Netwerk- en inbelverbindingen). 6. Selecteer [Internet Protocol (TCP/IP)] (Internet-protocol (TCP/IP)) in de lijst [Network Protocols] (Netwerkprotocollen) en klik vervolgens op [OK]. Mogelijk wordt u gevraagd bestanden te installeren van uw installatie-cd voor Windows 2000 of van andere media. Volg de instructies om de bestanden te installeren. 3. Klik in het venster [Network and Dial-up Connections] (Netwerk- en inbelverbindingen) met de rechtermuisknop op het pictogram [Local Area Connection] (LAN-verbinding) en selecteer [Properties] (Eigenschappen). In het dialoogvenster [Local Area Connection Properties] (Eigenschappen voor LANverbinding) wordt een lijst weergegeven van geïnstalleerde netwerkonderdelen. Als de lijst [Internet Protocol (TCP/IP)] (Internet Protocol (TCP/IP)) bevat, is het protocol al ingeschakeld. Ga verder naar stap 10. Nederlands Nederlands Controleer eerst of het IP-protocol beschikbaar is en installeer dit, indien nodig. 4. Als [Internet Protocol (TCP/IP)] (Internet-protocol (TCP/IP)) niet wordt weergegeven als geïnstalleerd onderdeel, klikt u op [Install…] (Installeren). 7. Klik, als u hierom wordt gevraagd, op [OK] om de computer opnieuw op te starten met de nieuwe instellingen. Configureer vervolgens de pc’s om IP-informatie te accepteren die wordt toegewezen door de ADSL BarricadeTM. 8. Dubbelklik op het pictogram [Network and Dial-up Connections] (Netwerk- en inbelverbindingen) op het [Control Panel] (Configuratiescherm). 91 92 Windows 98, Me, SE 1. Klik op [Start], wijs [Settings] (Instellingen) aan en klik op [Control Panel] (Configuratiescherm) op de taakbalk van Windows. 10. Selecteer [Internet Protocol (TCP/IP)] (Internet-protocol (TCP/IP)) in het dialoogvenster [Local Area Connection Properties] (Eigenschappen voor lokale netwerkverbinding) en klik vervolgens op [Properties] (Eigenschappen). 2. Dubbelklik op het pictogram [Network and Dial-up Connections] (Netwerk- en inbelverbindingen). 11. Klik in het dialoogvenster [Internet Protocol (TCP/IP) Properties] (Eigenschappen voor Internet Protocol (TCP/IP)) op het keuzerondje [Obtain an IP address automatically] (Automatisch een IP-adres laten toewijzen). Klik tevens op het keuzerondje op [Obtain DNS server address automatically] (Automatisch een DNS-serveradres laten toewijzen). 3. Klik in het venster [Network and Dial-up Connections] (Netwerk- en inbelverbindingen) met de rechtermuisknop op het pictogram [Network] (Netwerk) en selecteer vervolgens [Properties] (Eigenschappen). In het dialoogvenster [Network Properties] (Netwerkgegevens) wordt een lijst weergegeven van geïnstalleerde netwerkonderdelen. Als de lijst [Internet Protocol (TCP/IP)] (Internet Protocol (TCP/IP)) bevat, is het protocol al ingeschakeld. Ga verder naar stap 11. Nederlands Nederlands 9. Klik in het venster [Network and Dial-up Connections] (Netwerk- en inbelverbindingen) met de rechtermuisknop op het pictogram [Local Area Connection] (LAN-verbinding) en selecteer [Properties] (Eigenschappen). 12. Klik tweemaal op [OK] om uw wijzigingen te bevestigen en op te slaan, en sluit vervolgens het [Control Panel] (Configuratiescherm). 93 94 4. Als [Internet Protocol (TCP/IP)] (Internet-protocol (TCP/IP)) niet wordt weergegeven als geïnstalleerd onderdeel, klikt u op [Add…] (Toevoegen). 9. Dubbelklik op het pictogram [Network and Dial-up Connections] (Netwerk- en inbelverbindingen) op het [Control Panel] (Configuratiescherm). 5. Selecteer [Protocol] in het dialoogvenster [Select Network Component Type] (Type netwerkonderdeel selecteren) en klik vervolgens op [Add…] (Toevoegen). 10. Klik in het venster [Network and Dial-up Connections] (Netwerk- en inbelverbindingen) met de rechtermuisknop op het pictogram [Network] (Netwerk) en selecteer vervolgens [Properties] (Eigenschappen). 6. Selecteer [Microsoft] uit de lijst [Manufacturers] (Fabrikanten). Nederlands 8. Klik, als u hierom wordt gevraagd, op [OK] om de computer opnieuw op te starten met de nieuwe instellingen. Configureer vervolgens de pc’s om IP-informatie te accepteren die wordt toegewezen door de ADSL BarricadeTM. Nederlands 7. Selecteer [Internet Protocol (TCP/IP)] (Internet-protocol (TCP/IP)) in de lijst [Network Protocols] (Netwerkprotocollen) en klik vervolgens op [OK]. Mogelijk wordt u gevraagd bestanden te installeren van uw installatie-cd voor Windows Me of van andere media. Volg de instructies om de bestanden te installeren. 11. Selecteer [TCP/IP] in het dialoogvenster [Network Properties] (Netwerkgegevens) en klik vervolgens op [Properties] (Eigenschappen). 12. Klik in het dialoogvenster [TCP/IP Settings] (TCP/IPinstellingen) op het keuzerondje [Server assigned IP address] (Door server toegewezen IP-adres). Klik tevens op het keuzerondje [Server assigned name server address] (Door server toegewezen adressen van naamservers). 13. Klik op tweemaal op [OK] om uw wijzigingen te bevestigen en op te slaan, en sluit vervolgens het [Control Panel] (Configuratiescherm). Opmerking: Zie voor Windows 95 en NT de installatie-instructies in de Gebruikershandleiding op de cd-rom. 95 96 3 De ADSL BarricadeTM configureren Deze sectie bevat instructies voor het gebruik van het hulpprogramma Auto Setup voor configuratie van de ADSL BarricadeTM voor uw internetprovider. 1. Plaats de cd-rom met het installatieprogramma en de documentatie in uw cd-rom-station. 5. Selecteer uw internet-/netwerkprovider uit de keuzelijst en klik vervolgens op [Next] (Volgende) om door te gaan. Als uw internet-/netwerkprovider niet in de lijst voorkomt, klikt u op [Custom] (Aangepast) en gaat u naar de sectie Custom (Aangepast). 6. Selecteer de gebruikersnaam en het wachtwoord die u hebt ontvangen van uw internetprovider en klik vervolgens op [Next] (Volgende) om door te gaan. Opmerking: U hoeft alleen een gebruikersnaam en wachtwoord in te voeren als uw internetproviders het protocol PPPoA of PPPoE gebruikt. Als uw internetprovider RFC1483 Bridging gebruikt, is geen verdere invoer vereist en kunt u volstaan met op [Next] (Volgende) te klikken om door te gaan. 3. Klik op [Yes, I agree] (Ja, ik ga akkoord) om de voorwaarden van de licentieovereenkomst te accepteren en door te gaan met de setup. 97 Als uw internetprovider gebruikmaakt van RFC1483 Routed, moet u, nadat u op [Next] (Volgende) hebt geklikt, het IP-adres, het subnetmasker, het gatewayadres, het primaire en het secundaire DNS-adres invoeren dat u hebt ontvangen van uw internetprovider. Klik op [Next] (Volgende). 98 Nederlands Nederlands 2. Ga naar de locatie van uw cd-rom-station en voer AutoSetup.exe uit. Het hulpprogramma Auto Setup, waarmee u op eenvoudige wijze de ADSL BarricadeTM kunt configureren voor uw ISP, wordt nu gestart. 4. Selecteer uw land uit de keuzelijst en klik vervolgens op [Next] (Volgende) om door te gaan. Als uw land niet in de lijst voorkomt, klikt u op [Custom] (Aangepast) en gaat u naar de sectie Custom (Aangepast). 7. Klik tenslotte op [Finish] (Voltooien). Het hulpprogramma AutoSetup configureert nu de ADSL BarricadeTM met de instellingen die u hebt ingevoerd. Dit kan enkele seconden in beslag nemen. Nadat de setup is voltooid, wordt het volgende bericht weergegeven: Aangepast Als uw land of internetprovider niet voorkomen in de lijst, moet u de instellingen voor de internetprovider handmatig invoeren. Dit doet u met de optie [Custom] (Aangepast). Voor een aangepaste installatie moet u tevens de volgende instellingen weten die door uw internetprovider zijn verstrekt: Nederlands Nederlands Welk protocol? (PPPoA, PPPoE, RFC1483 Bridging of RFC1483 Routed). Welke encapsulation? (VC-Mux of LLC). Wat zijn de VPI/VCI-circuitnummers? Bijvoorbeeld 0/38. Uw ADSL BarricadeTM is nu ingesteld. Ga naar de sectie Problemen oplossen van de Gebruikershandleiding als u geen verbinding met internet kunt maken. 99 100 Conteúdo da Embalagem 1. Selecteer de waarden die overeenkomen met de bovenstaande instellingen die zijn verstrekt door uw internetprovider of voer deze waarden in. • • • • • • Um ADSL BarricadeTM. Um adaptador de corrente. Um cabo Ethernet RJ-45. Um cabo de linha DSL/telefone standard RJ-11. Um CD com o utilitário de instalação e a documentação. Manual de Instalação Rápida. Português Nederlands Nota: Alguns modelos incluem micro-filtros/separadores ADSL. 2. Ga terug naar stap 6. 101 102 Requisitos do Sistema Para utilizar o ADSL BarricadeTM, deverá possuir o seguinte: • Painel Frontal Identificação Alimentação Ligação do LED TX/RX Estado da cor Verde Verde Verde Um ou mais computadores, cada um deles com uma placa de interface de rede (NIC) Ethernet 10/100 Base-T. Verde fixo Alimentação ligada Linha ADSL programada DSL a transmitir/ Ligação receber • Um hub/switch Ethernet, se pretender ligar o dispositivo a mais do que um computador numa rede Ethernet. Verde intermitente N/D Em programação TX/RX A transmitir/receber Amarelo fixo N/D N/D N/D Ligação • Para uma configuração do sistema utilizando o programa de Internet fornecido: Um programa de navegação, como o Internet Explorer V5.0 ou posterior, ou o Netscape V6.1 ou posterior. Amarelo intermitente N/D N/D N/D A transmitir/receber Desligado Alimentação desligada Nenhuma ligação Sem TX/RX Nenhuma ligação • 103 Ethernet 1 2 3 4 Verde / 100 Mbps Amarelo / 10 Mbps 104 Português Português Serviço ADSL activado e em funcionamento na sua linha telefónica, no mínimo com um endereço público de Internet para a sua LAN. Descrição do Hardware 105 Este Manual de Instalação Rápida inclui instruções básicas sobre como ligar o ADSL BarricadeTM a um computador ou LAN e à Internet. Conector do Painel Traseiro Descrição Fonte de alimentação 12 V, 1,2 A Botão de reinicialização e reposição das definições de origem Se for premido durante 1-2 segundos: reinicialização. Se for premido por 5 segundos ou mais: reposição das definições de origem. Porta DSL Conector de telefone RJ-11 Porta Ethernet Quatro conectores 10/100 M RJ-45 • • • A secção 1 explica como instalar o hardware. A secção 2 explica como configurar as opções de Internet no(s) computador(es). A secção 3 explica como configurar as definições ISP utilizando o utilitário Auto Setup. Neste manual, parte-se do princípio de que o utilizador já subscreveu o serviço ADSL junto do seu fornecedor de serviços de Internet (ISP). Estas instruções permitem-lhe efectuar uma configuração básica, que deverá ser compatível com a instalação de rede na sua casa ou escritório. Português Português Painel Traseiro 106 1 Ligar o Hardware Aviso: Antes de começar, desligue a alimentação de todos os dispositivos. Entre estes dispositivos encontram-se o(s) computador(es), o hub/switch de LAN (se aplicável) e o ADSL BarricadeTM. Passo 1. Ligar o cabo ADSL Ligue uma extremidade do cabo de telefone fornecido (RJ-11) à porta com a identificação DSL, no painel traseiro do dispositivo. Ligue a outra extremidade ao micro-filtro/separador ADSL*. Passo 3. Ligar o conector de alimentação Ligue o adaptador de corrente CA ao conector de corrente eléctrica, situado na parte traseira do dispositivo, e ligue o adaptador a uma tomada de corrente ou a uma tomada múltipla linear. Passo 4. Ligar os sistemas Ligue e reinicialize o(s) computador(es) e qualquer dispositivo de LAN, como hubs ou switches. Português Português *Nota: Alguns modelos incluem micro-filtros/separadores ADSL. Passo 2. Ligar o cabo Ethernet Se pretender ligar uma LAN ao ADSL BarricadeTM, conecte uma extremidade do cabo Ethernet fornecido à porta de hub/switch e a outra extremidade à porta Ethernet situada no ADSL BarricadeTM. Se pretender utilizar o ADSL BarricadeTM com um único computador e sem hub, terá de utilizar um cabo Ethernet para ligar o PC directamente ao dispositivo. 107 108 2 Configurar os Computadores Esta secção explica como configurar as definições de Internet dos seus computadores, para funcionarem com o ADSL BarricadeTM. 4. Certifique-se de que a opção à esquerda do item [Internet Protocol TCP/IP] (Protocolo Internet TCP/IP) está activa e faça clique em [Properties] (Propriedades). Windows® XP 1. Na barra de tarefas do Windows, faça clique no botão [Start] (Iniciar) e, em seguida, em [Control Panel] (Painel de controlo). 2. Faça duplo clique no ícone [Network Connections] (Ligações de rede). Português Português Antes de começar Como valor assumido, o ADSL BarricadeTM atribui automaticamente todas as definições de Internet necessárias aos seus PCs. Assim, só terá de configurar os PCs para aceitarem as informações, quando estas forem atribuídas. Siga as instruções correspondentes ao sistema operativo instalado no seu PC. 3. Na janela [LAN or High-Speed Internet] (LAN ou Internet de alta velocidade), faça clique, com o botão direito do rato, no ícone correspondente à sua placa de interface de rede (NIC) e seleccione [Properties] (Propriedades). (É frequente este ícone designar-se por [Local Area Connection] (Ligação de área local)). A caixa de diálogo [Local Area Connection] (Ligação de área local) apresenta uma lista dos itens de rede actualmente instalados. 5. Na caixa de diálogo [Internet Protocol (TCP/IP) Properties] (Propriedades do protocolo Internet (TCP/IP)), faça clique no botão de opção [Obtain an IP address automatically] (Obter um endereço de IP automaticamente). Além disso, faça clique no botão de opção [Obtain DNS server address automatically] (Obter endereço do servidor DNS automaticamente). 6. Faça clique em [OK] duas vezes, para confirmar as alterações, e feche o [Control Panel] (Painel de controlo). 109 110 Windows 2000 Em primeiro lugar, verifique o protocolo IP e, se necessário, instale-o. 1. Na barra de tarefas do Windows, faça clique no botão [Start] (Iniciar), marque [Settings] (Definições) e, em seguida, faça clique em [Control Panel] (Painel de controlo). 3. Na janela [Network and Dial-up Connections] (Ligações de acesso telefónico e de rede), faça clique com o botão direito do rato no ícone [Local Area Connection] (Ligação de área local) e, em seguida, seleccione [Properties] (Propriedades). A caixa de diálogo [Local Area Connection Properties] (Propriedades de ligação de rede local) apresenta uma lista dos componentes de rede actualmente instalados. Se a lista incluir [Internet Protocol (TCP/IP)] (Protocolo de Internet (TCP/IP)), o protocolo já foi activado. Avance para o Passo 10. 5. Na caixa de diálogo [Select Network Component Type] (Seleccionar tipo de componente de rede), seleccione [Protocol] (Protocolo) e, em seguida, faça clique em [Add…] (Adicionar). 6. Seleccione [Internet Protocol (TCP/IP)] (Protocolo de Internet (TCP/IP)) na lista [Network Protocols] (Protocolos de rede) e faça clique em [OK]. Poderá ser apresentado o pedido para instalar ficheiros do CD de instalação do Windows 2000 ou de outro suporte de dados. Para instalar os ficheiros, siga as instruções apresentadas. 7. Se for apresentado o pedido, faça clique em [OK] para reinicializar o computador com as novas definições. Em seguida, configure os PCs para aceitar as informações IP atribuídas pelo ADSL BarricadeTM. 8. No [Control Panel] (Painel de controlo), faça duplo clique no ícone [Network and Dial-up Connections] (Ligações de acesso telefónico e de rede). 111 112 Português Português 2. Faça duplo clique no ícone [Network and Dial-up Connections] (Ligações de acesso telefónico e de rede). 4. Se [Internet Protocol (TCP/IP)] (Protocolo de Internet (TCP/IP)) não aparecer como um componente instalado, faça clique em [Install...] (Instalar). Windows 98/Me/SE 1. Na barra de tarefas do Windows, faça clique no botão [Start] (Iniciar), marque [Settings] (Definições) e, em seguida, faça clique em [Control Panel] (Painel de controlo). 10. Na caixa de diálogo [Local Area Connection Properties] (Propriedades de ligação de rede local), seleccione [Internet Protocol (TCP/IP)] (Protocolo de Internet (TCP/IP)) e faça clique em [Properties] (Propriedades). 2. Faça duplo clique no ícone [Network and Dial-up Connections] (Ligações de acesso telefónico e de rede). 11. Na caixa de diálogo [Internet Protocol (TCP/IP) Properties] (Propriedades do protocolo Internet (TCP/IP)), faça clique no botão de opção [Obtain an IP address automatically] (Obter um endereço de IP automaticamente). Além disso, faça clique no botão de opção [Obtain DNS server address automatically] (Obter endereço do servidor DNS automaticamente). 3. Na janela [Network and Dial-up Connections] (Ligações de acesso telefónico e de rede), faça clique com o botão direito do rato no ícone [Network] (Rede) e, em seguida, seleccione [Properties] (Propriedades). A caixa de diálogo [Network Properties] (Propriedades de rede) apresenta uma lista dos componentes de rede actualmente instalados. Se a lista incluir [Internet Protocol (TCP/IP)] (Protocolo de Internet (TCP/IP)), o protocolo já foi activado. Avance para o Passo 11. 12. Faça clique em [OK] duas vezes, para confirmar e guardar as alterações, e feche o [Control Panel] (Painel de controlo). 113 114 Português Português 9. Na janela [Network and Dial-up Connections] (Ligações de acesso telefónico e de rede), faça clique com o botão direito do rato no ícone [Local Area Connection] (Ligação de área local) e, em seguida, seleccione [Properties] (Propriedades). Português 9. No [Control Panel] (Painel de controlo), faça duplo clique no ícone [Network and Dial-up Connections] (Ligações de acesso telefónico e de rede). 5. Na caixa de diálogo [Select Network Component Type] (Seleccionar tipo de componente de rede), seleccione [Protocol] (Protocolo) e, em seguida, faça clique em [Add…] (Adicionar). 10. Na janela [Network and Dial-up Connections] (Ligações de acesso telefónico e de rede), faça clique com o botão direito do rato no ícone [Network] (Rede) e, em seguida, seleccione [Properties] (Propriedades). 6. Seleccione [Microsoft] na caixa [Manufacturers] (Fabricantes). 11. Na caixa de diálogo [Network Properties] (Propriedades de rede), seleccione [TCP/IP] e faça clique em [Properties] (Propriedades). 7. Seleccione [Internet Protocol (TCP/IP)] (Protocolo de Internet (TCP/IP)) na lista [Network Protocols] (Protocolos de rede) e faça clique em [OK]. Poderá ser apresentado o pedido para instalar ficheiros do CD de instalação do Windows Me ou de outro suporte de dados. Para instalar os ficheiros, siga as instruções apresentadas. 8. Se for apresentado o pedido, faça clique em [OK] para reinicializar o computador com as novas definições. Em seguida, configure os PCs para aceitar as informações IP atribuídas pelo ADSL BarricadeTM. Português 4. Se [Internet Protocol (TCP/IP)] (Protocolo de Internet (TCP/IP)) não aparecer como um componente instalado, faça clique em [Add...] (Adicionar). 12. Na caixa de diálogo [TCP/IP Settings] (Definições de TCP/IP), faça clique no botão de opção [Server assigned IP address] (Endereço de IP atribuído pelo servidor). Além disso, faça clique no botão de opção [Server assigned name server address] (Endereços de servidor de nomes atribuídos pelo servidor). 13. Faça clique em [OK] duas vezes, para confirmar e guardar as alterações, e feche o [Control Panel] (Painel de controlo). Nota: No caso do Windows 95 e NT, consulte as instruções de instalação do manual incluído no CD ROM. 115 116 3 Configurar o ADSL BarricadeTM Esta secção explica como usar o utilitário Auto Setup (Instalação Automática) para configurar o ADSL BarricadeTM para o seu ISP. 1. Introduza o CD com o utilitário de instalação e a documentação na unidade de CR ROM. 2. Localize a sua unidade de CD ROM e execute o ficheiro AutoSetup.exe. Será iniciado o utilitário Auto Setup, que permite configurar facilmente o ADSL BarricadeTM para o seu ISP. 4. Seleccione o seu país na lista pendente e faça clique em [Next] (Seguinte) para continuar. Se o seu país não se encontrar na lista, faça clique em [Custom] (Personalizar) e avance para a secção Personalizar. 5. Seleccione o seu ISP/Operador de rede na lista pendente e faça clique em [Next] (Seguinte) para continuar. Se o seu ISP/Operador de rede não se encontrar na lista, faça clique em [Custom] (Personalizar) e avance para a secção Personalizar. Português Nota: Só terá de introduzir um nome de utilizador e uma palavrapasse se o seu ISP utilizar o protocolo PPPoA ou PPPoE. Se o ISP utilizar RFC1483 Bridging, não são necessários mais dados, basta fazer clique em [Next] (Seguinte) para continuar. 3. Faça clique em [Yes, I agree] (Sim, concordo), para aceitar os termos do acordo de licenciamento e prosseguir com a instalação. 117 Se o ISP utilizar RFC1483 Routed, depois de fazer clique em [Next] (Seguinte) terá de introduzir o endereço IP, a máscara de rede, o endereço da porta de ligação e o endereço DNS principal e secundário fornecidos pelo ISP. Faça clique em [Next] (Seguinte). 118 Português 6. Introduza o nome de utilizador e a palavra-passe fornecidos pelo seu ISP e, em seguida, faça clique em [Next] (Seguinte) para continuar. 7. Por fim, faça clique em [Finish] (Concluir). O utilitário AutoSetup irá configurar o ADSL BarricadeTM com as definições especificadas. Este processo pode demorar alguns segundos. Uma vez concluída a instalação, será apresentada a seguinte mensagem: Personalizar Se o seu país ou ISP não for apresentado na lista, deverá introduzir manualmente as sua definições de ISP. Para tal, deverá utilizar a opção [Custom] (Personalizar). Para proceder à instalação personalizada, também deverá conhecer as seguintes definições, fornecidas pelo seu ISP: Português Português Qual é o protocolo? (PPPoA, PPPoE, RFC1483 Bridging ou RFC1483 Routed). Qual é o encapsulamento? (VC-Mux ou LLC). Quais são os números do circuito VPI/VCI? Por ex. 0/38. O seu ADSL BarricadeTM já está instalado. Se não conseguir estabelecer ligação com a Internet, consulte a secção Detecção e Resolução de Problemas, no Manual do Utilizador. 119 120 Compliances 2. Regresse ao Passo 6. FCC - Class B This equipment has been tested and found to comply with the limits for a Class B digital device, pursuant to Part 15 of the FCC Rules. These limits are designed to provide reasonable protection against harmful interference in a residential installation. This equipment generates, uses and can radiate radio frequency energy and, if not installed and used in accordance with instructions, may cause harmful interference to radio communications. However, there is no guarantee that the interference will not occur in a particular installation. If this equipment does cause harmful interference to radio or television reception, which can be determined by turning the equipment off and on, the user is encouraged to try to correct the interference by one or more of the following measures: • Reorient the receiving antenna. • Increase the separation between the equipment and receiver. • Connect the equipment into an outlet on a circuit different from that to which the receiver is connected. • Consult the dealer or an experienced radio/TV technician for help. Note: In order to maintain compliance with the limits for a Class B digital device, you are required to use a quality interface cable when connecting to this device. Changes or modifications not expressly approved by our company could void the user’s authority to operate this equipment. 121 122 Compliances Português 1. Seleccione/Introduza os valores correspondentes às definições anteriores, fornecidos pelo seu ISP. If trouble is experienced with this equipment, please contact our company at the numbers shown on back of this manual for repair and warranty information. If the trouble is causing harm to the telephone network, the telephone company may request you to remove the equipment from the network until the problem is resolved. No repairs may be done by the customer. This equipment uses the following USOC jacks: RJ-11C. This equipment cannot be used on telephone company-provided coin service. Connection to Party Line Service is subject to state tariffs. The REN is used to determine the quantity of devices that may be connected to the telephone line. Excessive RENs on the telephone line may result in the devices not ringing in response to an incoming call. In most, but not all areas, the sum of the RENs should not exceed five (5.0.) To be certain of the number of devices that may be connected to the line, as determined by the total RENs, contact the telephone company to determine the maximum REN for the calling area. If this equipment causes harm to the telephone network, the telephone company will notify you in advance that temporary discontinuance of service may be required. If advance notice not practical, the telephone company will notify the customer as soon as possible. Also, you will be advised of your right to file a complaint with the FCC if you believe it is necessary. The telephone company may make changes in its facilities, equipment, operations, or procedures that will provide advance notice in order for you to make the necessary modifications in order to maintain uninterrupted service. Compliances Compliances FCC - Part 68 This equipment complies with Part 68 of the FCC rules. This equipment comes with a label attached to it that contains, among other information, the FCC registration number and ringer equivalence number (REN) for this equipment. If requested, this information must be provided to the telephone company. When programming and/or making test calls to emergency numbers: • Remain on the line and briefly explain to the dispatcher the reason for the call. • Perform such activities in off-peak hours such as early morning or late evenings. The Telephone Consumer Protection Act of 1991 makes it unlawful for any person to use a computer or other electronic device to send any message via a telephone facsimile machine unless such message clearly contains, in a margin at the top or bottom of each transmitted page or on the first page of the transmission the date and time it is sent and an identification of the business, other entity, or individual sending the message and the telephone number of the sending machine or such business, other entity, or individual. In order to program this information into your facsimile, refer to your communications software user manual. 123 124 RFI Emission: • Limit class B according to EN 55022:1998 • Limit class B for harmonic current emission according to EN 61000-3-2/1995 • Limitation of voltage fluctuation and flicker in low-voltage supply system according to EN 61000-3-3/1995 • Immunity to conducted disturbances, Induced by radiofrequency fields: EN 61000-4-6:1996 (0.15 - 80 MHz with 1 kHz AM 80% Modulation: 3 V/m) • Power frequency magnetic field immunity test according to EN 61000-4-8:1993 (1 A/m at frequency 50 Hz) • Voltage dips, short interruptions and voltage variations immunity test according to EN 61000-4-11:1994 (>95% Reduction @10 ms, 30% Reduction @500 ms, >95% Reduction @5000 ms) LVD: • EN 60950 (A1/1992; A2/1993; A3/1993; A4/1995; A11/1997) Compliances Compliances EC Conformance Declaration - Class B This information technology equipment complies with the requirements of the Council Directive 89/336/EEC on the Approximation of the laws of the Member States relating to Electromagnetic Compatibility and 73/23/EEC for electrical equipment used within certain voltage limits and the Amendment Directive 93/68/EEC. For the evaluation of the compliance with these Directives, the following standards were applied. Immunity: • Product family standard according to EN 55024:1998 • Electrostatic Discharge according to EN 61000-4-2:1995 (Contact Discharge: ±4 kV, Air Discharge: ±8 kV) • Radio-frequency electromagnetic field according to EN 61000-4-3:1996 (80 - 1000 MHz with 1 kHz AM 80% Modulation: 3 V/m) • Electrical fast transient/burst according to EN 61000-4-4:1995 (AC/DC power supply: ±1 kV, Data/Signal lines: ±0.5 kV) • Surge immunity test according to EN 61000-4-5:1995 (AC/DC Line to Line: ±1 kV, AC/DC Line to Earth: ±2 kV) 125 126 1. Bitte lesen Sie diese Hinweise sorgfältig durch. 2. Heben Sie diese Anleitung für den späteren Gebrauch auf. 3. Vor jedem Reinigen ist das Gerät vom Stromnetz zu trennen. Verwenden Sie keine Flüssigoder Aerosolreiniger. Am besten eignet sich ein angefeuchtetes Tuch zur Reinigung. 4. Die Netzanschlu ßsteckdose soll nahe dem Gerät angebracht und leicht zugänglich sein. 5. Das Gerät ist vor Feuchtigkeit zu schützen. 6. Bei der Aufstellung des Gerätes ist auf sicheren Stand zu achten. Ein Kippen oder Fallen könnte Beschädigungen hervorrufen. 7. Die Belüftungsöffnungen dienen der Luftzirkulation, die das Gerät vor Überhitzung schützt. Sorgen Sie dafür, daß diese Öffnungen nicht abgedeckt werden. 8. Beachten Sie beim Anschluß an das Stromnetz die nschlußwerte. 9. Verlegen Sie die Netzanschlußleitung so, daß niemand darüber fallen kann. Es sollte auch nichts auf der Leitung abgestellt werden. 10. Alle Hinweise und Warnungen, die sich am Gerät befinden, sind zu beachten. 11. Wird das Gerät über einen längeren Zeitraum nicht benutzt, sollten Sie es vom Stromnetz trennen. Somit wird im Falle einer Überspannung eine Beschädigung vermieden. 12. Durch die Lüftungsöffnungen dürfen niemals Gegenstände oder Flüssigkeiten in das Gerät gelangen. Dies könnte einen Brand bzw. elektrischen Schlag auslöse 127 13. Öffnen sie niemals das Gerät. Das Gerät darf aus Gründen der elektrischen Sicherheit nur von authorisiertem Servicepersonal geöffnet werden. 14. Wenn folgende Situationen auftreten ist das Gerät vom Stromnetz zu trennen und von einer qualifizierten Servicestelle zu überprüfen: a. Netzkabel oder Netzstecker sind beschädigt. b. Flüssigkeit ist in das Gerät eingedrungen. c. Das Gerät war Feuchtigkeit ausgesetzt. d. Wenn das Gerät nicht der Bedienungsanleitung entsprechend funktioniert oder Sie mit Hilfe dieser Anleitung keine Verbesserung erzielen. e. Das Gerät ist gefallen und/oder das Gehäuse ist beschädigt. f. Wenn das Gerät deutliche Anzeichen eines Defektes aufweist. 15. Stellen Sie sicher, daß die Stromversorgung dieses Gerätes nach der EN 60950 geprüft ist. Ausgangswerte der Stromversorgung sollten die Werte von AC 7,5-8V, 50-60Hz nicht über oder unterschreiten sowie den minimalen Strom von 1A nicht unterschreiten. Der arbeitsplatzbezogene Schalldruckpegel nach DIN 45 635 Teil 1000 beträgt 70dB(A) oder weniger. 128 Compliances Compliances Safety Compliance Wichtige Sicherheitshinweise (Germany) Information Full Installation Manual Full installation manuals are provided on the Installation CD-Rom. Manuals in other languages than those included on the CD-Rom are provided on www.smc-europe.com (section support). Limited Lifetime Warranty Statement For detailed information on SMC’s limited lifetime warranty please check the English full manual on this CD-Rom or visit www.smc-europe.com (section support, product registration). Contact SMC Contact details are available on www.smc-europe.com for EMEA and www.smc.com for North America. Statement of Conditions In line with our continued efforts to improve internal design, operational function, and/or reliability, SMC reserves the right to make changes to the product(s) described in this document without notice. SMC does not assume any liability that may occur due to the use or application of the product(s) described herein. In order to obtain the most accurate knowledge of installation, bug-fixes and other product related information we advise to visit the relevant product support page at www.smc-europe.com for EMEA and www.smc.com for North America before you start installing the equipment. All information is subject to change without notice. 129 Copyright Information furnished by SMC Networks, Inc. (SMC) is believed to be accurate and reliable. However, no responsibility is assumed by SMC for its use, nor for any infringements of patents or other rights of third parties which may result from its use. No license is granted by implication or otherwise under any patent or patent rights of SMC. SMC reserves the right to change specifications at any time without notice. Information Information Firmware and Drivers For latest driver, technical information and bug-fixes please visit www.smc-europe.com for EMEA and www.smc.com for North America. Limitation of Liability In no event, whether based in contract or tort (including negligence), shall SMC be liable for incidental, consequential, indirect, special or punitive damages of any kind, or for loss of revenue, loss of business or other financial loss arising out of or in connection with the sale, installation, maintenance, use, performance, failure or interruption of its products, even if SMC or its authorized reseller has been adviced of the possiblity of such damages. Trademarks SMC is a registered trademark and Barricade is a trademark of SMC Networks, Inc. Other product and company names are trademarks or registered trademarks of their respective holders. 130-
 1
1
-
 2
2
-
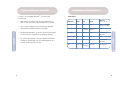 3
3
-
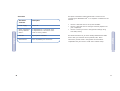 4
4
-
 5
5
-
 6
6
-
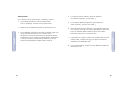 7
7
-
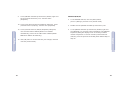 8
8
-
 9
9
-
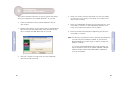 10
10
-
 11
11
-
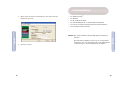 12
12
-
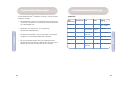 13
13
-
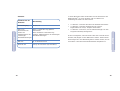 14
14
-
 15
15
-
 16
16
-
 17
17
-
 18
18
-
 19
19
-
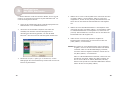 20
20
-
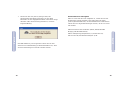 21
21
-
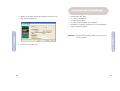 22
22
-
 23
23
-
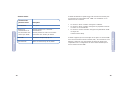 24
24
-
 25
25
-
 26
26
-
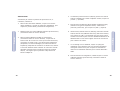 27
27
-
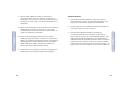 28
28
-
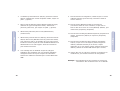 29
29
-
 30
30
-
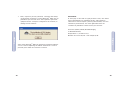 31
31
-
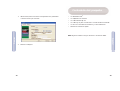 32
32
-
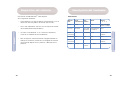 33
33
-
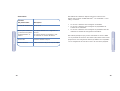 34
34
-
 35
35
-
 36
36
-
 37
37
-
 38
38
-
 39
39
-
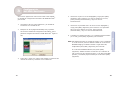 40
40
-
 41
41
-
 42
42
-
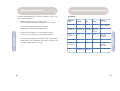 43
43
-
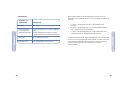 44
44
-
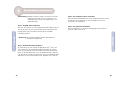 45
45
-
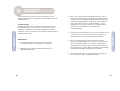 46
46
-
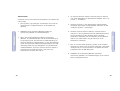 47
47
-
 48
48
-
 49
49
-
 50
50
-
 51
51
-
 52
52
-
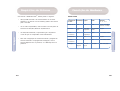 53
53
-
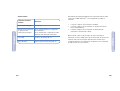 54
54
-
 55
55
-
 56
56
-
 57
57
-
 58
58
-
 59
59
-
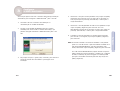 60
60
-
 61
61
-
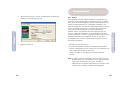 62
62
-
 63
63
-
 64
64
-
 65
65
-
 66
66


SMC 7204BRB El manual del propietario
- Categoría
- Enrutadores
- Tipo
- El manual del propietario
en otros idiomas
- français: SMC 7204BRB Le manuel du propriétaire
- English: SMC 7204BRB Owner's manual
- Deutsch: SMC 7204BRB Bedienungsanleitung
- Nederlands: SMC 7204BRB de handleiding
- português: SMC 7204BRB Manual do proprietário
Artículos relacionados
Otros documentos
-
Asus ET2013IUTI Manual de usuario
-
D-Link DSL-380T Quick Instruction Manual
-
-
SMC Networks SMC2804WBR Manual de usuario
-
Linksys BEFDSR41W El manual del propietario
-
Asus RT-AC66U WEU7417 Manual de usuario
-
-
-
Asus RT-N56U WEU7823 El manual del propietario
-