
EN|ES|FR|DE|PT
TOP LOADING
SOLO PESO
CONTRÔLE POIDS
GERWICHTSKONTROLLE
BALANÇA APENAS PESO
BW
USER’S MANUAL | MANUAL DE USUARIO | MANUEL D’USAGER
BEDIENUNGSANLEITUNG | MANUAL DO UTILIZADOR
trade mark propiety of | marca propiedad de | est une marque de | Warenzeichen Proprietät von
marca de propriedade de :
Pol. Empordà Internacional C/ Molló, 3
17469 VILAMALLA - (Girona) SPAIN
T. (34) 972 527 212
El fabricante se reserva el derecho de modificar sin previo aviso las características de sus productos para introducir mejoras técnicas o cumplir con nuevas regulaciones oficiales / The
manufacturer reserves the right to modify the specifications of its products in order to make technical improvements or comply with new regulations / Le constructeur se réserve le droit de
modifier les caractéristiques de ses produits en vue d’y apporter des améliorations techniques ou de respecter de nouvelles réglamentations / O fabricante reserva-se o direito de modificar as
especificações de seus produtos para realizar melhorias técnicas ou cumprir novas regulamentações / Der Hersteller behält sich das Recht vor, die Spezifikationen seiner Produkte zu ändern,
um technische Verbesserungen vorzunehmen oder neue Vorschriften einzuhalten.
V.1.6
23/06/2022

2
ENGLISH 4
1. INTRODUCTION 4
2. SPECIFICATIONS 4
3. INSTALLATION 5
3.1 GENERAL INSTALLATION 5
3.2 INSTALLATION OF BW SERIES 5
4. KEY DESCRIPTIONS 6
5. ÉCRAN 7
6. OPERATION 7
6.1. ZEROING THE DISPLAY 7
6.2 TARING 7
6.3 WEIGHING A SAMPLE 8
6.4 PERCENT WEIGHING 8
6.5 PARTS COUNTING 8
6.6 CHECK WEIGHING 9
6.7 ACCUMULATED TOTAL 9
6.8 MANUAL ACCUMULATION 10
6.9 AUTOMATIC ACCUMULATION 10
7. BATTERY OPERATION 10
8. RS-232 OUTPUT 11
9. SETTINGS 11
10. CALIBRATION 12
10.1. CALIBRATION LINEAR 12
10.2. NORMAL CALIBRATION 13
11. ERROR CODES 13
ESPAÑOL 14
1. INTRODUCCIÓN 14
2. ESPECIFICACIONES 14
3. INSTALACIÓN 15
3.1. INSTALACIÓN GENERAL 15
3.2. INSTALACIÓN DE LA SERIE BW 15
4. DESCRIPCIÓN DEL TECLADO 16
5. PANTALLA 17
6. OPERATIVA 17
6.1 PANTALLA A CERO 17
6.2 TARA 17
6.3 PESO DE UNA MUESTRA 18
6.4 PESO PERCENTUAL 18
6.5. MODO CUENTAPIEZAS 18
6.6. COMPROBACIÓN DE PESADO 19
6.7. ACUMULACIÓN DE TOTALES 19
6.8 ACUMULACIÓN MANUAL 20
6.9 ACUMULACIÓN AUTOMÁTICA 20
7. FUNCIONAMIENTO CON BATERÍA 21
8. INTERFAZ RS.232 22
9. PARÁMETROS 22
10. CALIBRACIÓN 23
10.1. CALIBRACIÓN LINEAR 23
10.2. CALIBRACIÓN NORMAL 24
11. CÓDIGOS DE ERROR 24
INDEX-BW

3
FRANÇAIS 25
1. INTRODUCTION 25
2. SPÉCIFICATIONS 25
3. INSTALLATION 26
3.1. INSTALLATION GÉNÉRALE 26
3.2. INSTALLATION DE LA SÉRIE 26
4. DESCRIPTION DU CLAVIER 27
5. ÉCRAN 28
6. OPÉRATION 28
6.1 REMISE A ZÉRO 28
6.2 TARE 28
6.3 POIDS D’UN ÉCHANTILLON 29
6.4 POIDS EN POURCENTAGE 29
6.5 MODE COMPTAGE 29
6.6 VÉRIFICATION DE PESAGE 30
6.7 ACCUMULATION DE TOTAUX 31
6.8 ACCUMULATION MANUELLE 31
6.9 ACCUMULATION AUTOMATIQUE 31
7. FONCTIONNEMENT AVEC BATTERIE 32
8. INTERFACE RS.232 33
9. PARAMÈTRES 33
10. CALIBRATION 34
10.1. CALIBRATION LINÉAIRE 34
10.2 CALIBRATION NORMAL 35
11. CODES D’ERREUR 35
DEUTSCH 36
1. EINLEITUNG 36
2. SPEZIFIKATIONEN 36
3. INSTALLATION 37
3.1. ALLGEMEINE INSTALLATION 37
3.2. INSTALLATION DER BW-SERIE 37
4. TASTATUR BESCHREIBUNGEN 38
5. ANZEIGEN 39
6. BETRIEB 39
6.1 NULLSETZEN DER ANZEIGE 39
6.2 TARIEREN 39
6.3 WIEGEN EINER PROBE 40
6.4 PROZENT WIEGEN 40
6.5 TEILEZÄHLUNG 40
6.6 KONTROLLWIEGEN 40
6.7 KUMULIERTE SUMME 41
6.8 MANUELLE AKKUMULIERUNG 42
6.9 AUTOMATISCHE AKKUMULIERUNG 42
7. BATTERIEBETRIEB 43
8. RS-232 AUSGANG 43
9. EINSTELLUNGEN 44
10. KALIBRIERUNG 45
10.1 KALIBRIERUNG LINEAR 45
10.2 NORMALE KALIBRIERUNG 46
11. FEHLERCODES 46
PORTUGUÊS 47
1. INTRODUÇÃO 47
2. ESPECIFICAÇÕES 47
3. INSTALAÇÃO 48
3.1 INSTALAÇÃO GERAL 48
3.2 INSTALAÇÃO DA SÉRIE BW 48
4. DESCRIÇÃO DO TECLADO 49
5. ÉCRA 50
6. OPERATIVA 50
6.1 ECRÃ A ZERO 50
6.2 TARA 50
6.3 PESO DE UMA AMOSTRA 51
6.4 PESO PERCENTUAL 51
6.5 MODO CONTADOR DE PEÇAS 51
6.6 COMPROVAÇÃO DA PESAGEM 52
6.7 ACUMULAÇÃO DE TOTAIS 53
6.8 ACUMULAÇÃO MANUAL 53
6.9 ACUMULAÇÃO MANUAL 53
7. FUNCIONAMENTO COM BATERIA 54
8. INTERFACE RS.232 55
9. PARÂMETROS 55
10. CALIBRAÇÃO 56
10.1.CALIBRAÇÃO LINEAR 56
10.2 CALIBRAÇÃO NORMAL 57
11. CÓDIGOS DE ERRO 57

ENENUSER’S MANUAL BW
4
ENGLISH
1. INTRODUCTION
Note: : These scales are not suitable for the uses listed in para graph 2a of the article 1 of Directive 90/384/EC.
The electronic scales series BW of provides a precise, fast and versatile scales with functions of counting and percentage weight.
The series consists of 4 models, with capacities up to 30 kg.
All of them incorporate stainless steel plate on a base unit of ABS.
All keyboards are compounds of keys for easy touch and display screens are liquid crystal displays (LCD) of great size and easy to
read. The LCDs feature backlight.
All the units incorporate auto zero, auto tare, and a accumulation function that allows to store the count and retrieved as cumulative
total.
2. SPECIFICATIONS
SERIES BW
Nº MODEL # BW3 BW6 BW15 BW30
Range 3 Kg 6 Kg 15 Kg 30 Kg
Stair 0,1 g 0,2 g 0,5 g 1,0 g
Resolution 1/30.000 1/30.000 1/30.000 1/30.000
Tare maximum 3 Kg 6 Kg 10 Kg 30 Kg
Minimum weight 2,0 g 4,0 g 10,0 g 20,0 g
Repeatability 0,1 g 0,2 g 0,5 g 1,0 g
Linearity ± 0,2 g 0,4 g 1,0 g 2,0 g
Units of measure kg / g / lb / oz

5
ENENUSER’S MANUAL BW
COMMON SPECIFICATIONS
Interface Exit RS.232 optional
Settling Time Usually 2 seconds
Temperature of operation 0 ºC until 40 ºC / 32 ºF until 104 ºF
Supply of current (external) 115 / 230 V ac, 50/60 Hz, 10 watts
Calibration External automatic
Screen Digital screen LCD of 6 digits
Materials of manufacture Plastic ABS, dish of stainless steel
Size of the dish 225 x 300 mm
General dimensions (width x bottom x high) 320 x 340 x 125 mm
Applications Scales for general ends
Functions Weight, counting, percent weighing, check weighing
Other components and specifications Internal battery rechargeable (70 h. Of length approx.)
3. INSTALLATION
3.1 GENERAL INSTALLATION
The scales should be sited in a location that will not degrade the accuracy.
Avoid extremes of temperature. Do not place in direct sunlight or near air conditioning vents.
Avoid unsuitable tables. The tables or floor must be rigid and not vibrate. Do not place near vibrating machinery.
Avoid uns table power sources. Do not use near large users of electricity such as welding equipment or large motors.
Avoid high humidity that might cause condensation. Avoid direct contact with water.
Do not spray or immerse the scales in water.
Avoid air movement such as from fans or opening doors. Do not place near open windows.
Keep the scales clean.
Do not stack material on the scales when they are not in use.
3.2 INSTALLATION OF BW SERIES
The BW Series comes with a stainless steel platform packed separa tely. Place the platform in the locating holes on the top cover. Do
not press with excessive force as this could damage the load cell inside.
Level the scale by adjusting the four feet. The scale should be adjusted such that the bubble in the spirit level is in the centre of the level
and the scale is supported by all four feet, If the scale rocks readjust the feet.
Attach the mains cable to the connector on the bottom of the scale. The power switch is located on the base near the front of the scale.
!Perform a weight calibration as instructed in chapters 10 (setup) and 11 (calibration)

ENENUSER’S MANUAL BW
6
4. KEY DESCRIPTIONS
KEY DESCRIPTION
PRIMARY FUNCTIONS SECUNDARY FUNTIONS
Enter the zero point for all of the following
weigh.
The display shows zero.
Fixed the parameters or other functions.
Tare the balance. Saves the current load in
memory as a tare value, subtracts the value of
tare weight of the load and displays the results.
This is the net weight. By entering the values
using the password memorized this value as a
tare value.this value like a value tare.
To increase the active digit when it enter
a value for parameters or other functions.
It establishes the limits to check the load. It
allows the operation of the low or high limits or
both. To move the activated digit rightwards , to
establish the values of setting or other functions.
It enters the function of weight percentage. It
allows the weight, the unit of load and account. To move the digit of activated leftwards,
to establish the values of parameter or other
functions.
To select the function of the scale. If the scale
is weighing, will select the parts to explain. If it
does not find in way of heavy will go back to the
position of heavy of user.
(C) To act like button of help to select values for
the parameters or other functions.
To print the results to PC or printer using the op-
tional RS- 232 interface. Also it adds the value
of accumulation if the function of accumulation
is not automatic.
(ESC) To go back to the normal operation when
the scales is on settings menu.
MODE This button will select Kg, Lb or oz.

7
ENENUSER’S MANUAL BW
5. ÉCRAN
The LCD display will show a value and a unit to the right of the digits. In addition there are labels for TARE, GROSS weight, ZERO
and for Low battery
HI
LO
GROSS
TARE
ZERO
888888
g/pcs
oz
tk
g
lb
OK
Stability Symbol
Checkweighing Symbols Weighing Units
Parts Counting Units
Low Battery
Symbol
6. OPERATION
6.1. ZEROING THE DISPLAY
You can press the key at any time to set the zero point from which all other weighing and count ing is measured, within 4% of
power up zero. This will usually only be necessary when the platform is empty. When the zero point is obtained the display will show
the indicator for zero.
The scale has an automatic rezeroing function to account for minor drifting or accumulation of material on the platform. However you
may need to press the key to rezero the scale if small amounts of weight are shown when the platform is empty.
6.2 TARING
Zero the scale by pressing the key if necessa ry. The zero indicator will be on.
Place a container on the platform, a value for its weight will be displayed.
Press the key to tare the scale. The weight that was displayed is stored as the tare value and that value is subtracted from the
display, leaving zero on the display.
The “TARE” indicator will be on. As product is added only the weight of the product will be shown.
When the container is removed a negative value will be shown. If the scale was tared just before removing the container this value is
the gross weight of the container plus all product that was removed. The zero indicator will also be on because the platform is back to
the same condition it was when the key was last pressed.

ENENUSER’S MANUAL BW
8
6.3 WEIGHING A SAMPLE
To determine the weight of a sample first tare the empty container then place the sample in the container.
The display will show the weight and the units of weight currently in use.
6.4 PERCENT WEIGHING
The scale will allow a sample weight to be shown as 100%. Then any other weight placed on the scale will be displayed as a percentage
of the original sample. For example is 350g is placed on the scale and the key is pressed the display will show .
Removing the 350g weight and putting a 300g weight on the scale the display will show 85.71 % as 300g is 85.71% of
Note: the scale may jump by large numbers unexpectedly if small weights are used to set the 100% level. For example if only 23.5g is
on a scale with 0.5g increments and the scale is set to 100 %, the display will show 100.00%, however a small change of weight will
cause the display to jump to 102.13% as one scale division (0.5g) increase to 24.0g will be equivalent to a 2.13% increase.
Removing the 350g weight and putting a 300g weight on the scale the display will show 85.71 % as 300g is 85.71% of
Pressing the key will return the scale to weighing.
6.5 PARTS COUNTING
When the scale is showing weight, pressing the key will start the parts counting function.
Before beginning, tare the weight of any container that will be used, leaving the empty container on the scale. Place the number of
samples on the scale.
The number should match the options for parts counting, 10, 20, 50, 100 or 200 pieces.
Press the key to begin. The scale will show “ SP 10” asking for a sample size of 10 parts.
Change the sample size by pressing the key. the display will cycle through the options: 10,20, 50, 100, 200 and back to 10.
Press the key when the number matches th e number of parts used for the sample. As more weight is added the display will
show the number of parts (pcs).
Press the key to display unit weight (g/pcs) pcs), Total weight (kg) or the count (pcs).
Press the key to return to normal weighing.

9
ENENUSER’S MANUAL BW
6.6 CHECK WEIGHING
Check-weighing is a procedure to cause an alarm to sound when the weight on the scale meets or exceeds values stored in memory.
The memory holds values for a high limit and a low limit. Either limit can be used or both can be used.
Press the key. The display will show the current High Limit with the left most digit flashing and the HI symbol on to the left of
the display.
To change the value shown use the and the to select the digit to change. Then use the key to increment the
flashing digit.
When the desired value is shown press the key to accept the value. If you want to reset the value to zero press the key
to clear the value.
After pressing the key the display will then s how the Low Limit, the LO symbol will be on to the left side of the display.
Enter the low limit in the same way the high limit was entered.
After pressing the key the scale will return to weighing with the Check weighing function enabled.
When a weight is placed on the scale the arrows will show if the weight is above or below the limits and the beeper will sound as
described below.
BOTH LIMITS SET
The display will show OK and the beeper will sound when the weight is between the limits.
LOW LIMIT SET,
HIGH LIMIT is set to zero
The display will show OK and the beeper will sound when the weight is less than the Low Limit. Above the Low Limit the display will
show HIGH and the beeper will be off.
HIGH LIMIT SET,
LOW LIMIT is set to zer zero
The display will show LOW and the beeper will be on when the weight is less than the High Limit. Above the High Limit the display will
show
OK and the beeper will be off.
BOTH LIMITS SET. LOW IS SET GREATER THAN HIGH
The beeper will sound and the display will show LOW if the weight is less that the LOW limit, and HIGH if the weight is greater than the
Low Limit.
NOTE: The weight must be greater than 20 scale divisions for the check weighing to operate.
To disable the Check-Weighing function enter zero into both limits by pressing the key when the current limits are shown then
pressing the key to store the zero values.
6.7 ACCUMULATED TOTAL
The scale can be set to accumulate automatically when a weight is added to he scale or manually by pressing the key. See the
PARAMETERS Section for details of selecting the method. The accumulation function is only available when weighing. It is disabled
during percent weighing or parts counting.

ENENUSER’S MANUAL BW
10
6.8 MANUAL ACCUMULATION
When the scale is set to manual accumulation the weight displayed will be stored in memory when the key is pressed and the
weight is stable.
The display will show “ACC 1” and then the total in memory for 2 seconds before returning to normal. If the optional RS-232 interface
is installed the weight will be output to a printer or PC.
Remove the weight, allowing the scale to return to zero and put a second weight on. Press , the display will show “ACC 2” and
then show the new total. Continue until all weights have been added.
To view the totals in memory press the key when the scale is at zero. The display will show the total number of items “ACC
xx” and the total weight before returning to zero. The totals will also be printed via the RS-232 interface.
To erase the memory press to view the totals and then press the FUNC/C key to clear the memory.
6.9 AUTOMATIC ACCUMULATION
When the scale has been set to Automatic Accumulation the value is stored in memory automatically.
Add a weight to the scale, the beeper will sound when the scale is stable to signify the value is accepted. Remove the weight.
The display will show “ACC 1” and the totals in memory when the scale returns to zero. Adding a second weight will repeat the process.
While the weight is on the scale it is permissible to press the key to store the value immediately. In this case the scale will not
store the value when the weight is removed.
The totals can be viewed as above.
In all cases the scale must return to zero or a negative number before another sample can be added to the memory.
More product can then be added and pressed again. This can continue for up to 99 entries, or until the capacity weight display
is exceeded.
7. BATTERY OPERATION
The scales can be operated from the battery if desired. The battery life is approximately 100 hours.
When the battery needs charging the arrow above the low battery symbol under the weight
display will turn on. The battery should be charged as soon as the arrow above the symbol is
on. The scale will still operate for about 10 hours (without backlight) after which it will auto-
matically switch off to protect the battery.
To charge the battery simply plug into the mains power. The scale does not need to be turned
on.
The battery should be charged for 12 hours for full capacity.
Just under the quantity display is an LED to indicate the status of battery charging. When the
scale is plugged into the mains power the internal battery will be charged. If the LED is green
the battery has a full charge. If it is Red the battery is nearly discharged and yellow indicates
the battery is being charged.
As the battery is used it may fail to hold a full charge. If the battery life becomes unacceptable then contact your distributor.

11
ENENUSER’S MANUAL BW
8. RS-232 OUTPUT
The BW Series of scales can be ordered with an optional RS-232 output.
Specifications:
RS-232 output of weighing data
• ASCII code
• 4800 Baud
• 8 data bits
• No parity
Connector: Connected:
Type 9 pin d-subminiature socket BW PC
Pin 2 Input 2 3
Pin 3 Output 3 2
Pin 5 Signal Ground 5 5
Data Format for normal weighing operations, parts counting or recalling of totals from memory will all be different.
Normal Output
GS 1.234 GS for Gross weight, NT for net weight and a unit of
No.. 1 This number increments every time a new value is stored in memory
Total 1.234 Kg The total value stored in memory
<lf> Includes 2 line feeds .
<lf>
When percent weighing, the output is the weight will be show in percent only
GS 100.00% GS for Gross weight, NT for net weight and a unit of weight.
<lf> Incluy Il inclut 2 pieds de ligne.
<lf> Includes 2 line feeds .
9. SETTINGS
The scale has 6 parameters that can be set by the user. These allow the user to set the scale for:
• Show the weight in increases of weight to minimise the damage that can cause vibrations, wind or other environmental conditions.
• Control the backlight of the screen. It can’t be necessary turn off this light for maximize the duration of the battery.
• Select the automatic accumulation, manual or install the RS-232 interface to print the weight continuously.
• Program when it has to make accumulation and when it has to print.
• Program the value of auto zero.
• Select another unit of weight in addition to the standardProgrammer la valeur d’auto zéro.
For acces to the parameters you must press the buttons and at the same time
If“M” is verified, press on the countdown
The screen will show “XX Inc”. The first value that show is the value of error of increase of the Scales. To select an increase of different
value, press the button and afterwards press the button .
For example, with a weight of 15kg on the scales the standard increase is of 0.5, the value can be changed of 1,0g to 2,0g.

ENENUSER’S MANUAL BW
12
The next parameter is the backlight control. The standard consists in that the backlight work automatically, turning off when the scales
does not use. The backlight can be set with “EL ON”, “EL AU” (Automatic) or “EL Off”. The maximum duration of the battery achieves
when the backlight turns off.
Press the button to change the value, afterwards press the button he automatic accumulation is the following step.
With ‘’ Au On “the memory will accumulate the weight automatically, “ Au Off “will allow the manual accumulation and with”P COnt”the
RS-232 interface will send the weight continuously and the function of accumulation will be disabled
Press the button to change the value, afterwards press the button .
With ‘’ ACC ON “when you press will make the accumulation,
With “ ACC OF “only will print, without accumulation.
Press the button to change the programming, afterwards press the button .
The value of auto zero is the next. You can select between 0, 5 d, 1 d, 2d and 4 d. Press the button to change the programming,
afterwards press the button .
The unit of weight will show to continuation.
The scales are calibrated and weight in kilograms, however will show him the weight in grams, you pounds if you selects this function
Press the button to change the value, afterwards press the button when the scales was programmed to weigh with
other units of weight, the function of accumulation will continue saving the weight in kilograms.
10. CALIBRATION
10.1. CALIBRATION LINEAR
To start with the calibration, turn off the scales and go back to light it. Press and together during the initial account,
from 9 to 0 in the screen
The screen will show “unLOAD”. Unlocal all the weight of the pan and press to go back to the point zero.
The screen will show to continuation the first calibration. Put the weight on the platform and press when the scales was stable.
The scale must to be stable to accept weight. The indicator of stability will light to show that the value is stable. After completing all
the calibration of weight, press to complete the calibration. The scales will begin to explain backwards to zero after selecting
the last weight.
CALIBRATION OF WEIGHTS
SERIE BW
MODEL BW3 BW6 BW15 BW30
Weight 1 ZERO ZERO ZERO ZERO
Weight 2 1kg 2kg 5kg 10kg
Weight 3 3kg 6kg 15kg 30kg

13
ENENUSER’S MANUAL BW
10.2. NORMAL CALIBRATION
To start with the calibration turn off the scales and go back to light it. Press and at the same time during the initial
account from 9 to 0.
Press the calibration button if they are verified and then and . Press before countdown
The screen will show “UNLOAD”. Unload the weight of the scales and afterwards press to go back to the point zero.
Afterwards it use , the buttons and to calibrate the weight. Press to be sure , the display will show
“LOAD”. Place the weight on the pan when the indicator is turned on , press zero to ensure.
After returning to the self-check, the balance BW is ready to be used.
11. ERROR CODES
During the initial checking or during another operation, is possible that the scales show a message of error. The meaning of the mes-
sages of error are described.
If a message of error appears in screen, repeat the operation that has produced the apparition of this message, going back to light the
scales, calibration or other functions. If the message of error persists contact to your provider for more details.
CODE OF ERROR DESCRIPTION POSSIBLES CAUSES
Err4
Initial Zero is greater of the allowed (4%
of maximum capacity) when it lights
the scales or when the button
powered is.
Weight on the scales when it lights the
scales. Excessive weight on the tray when
it installs the function zero.
Wrong calibration of the
Err5 Error of keyboard. Wrong operation of the scales.
Err6 The account To/D is not correct when it
lights the scales.
The platform is not installed. The cell of
load is damaged. Failures in the electro-
nics.
For viewing the account A/D press the button and at the same time while the scales is making the initial lighting when
checking. Pressing ZERO/ENTER to go back to the normal function.

ESESMANUAL DE USUÁRIO BW
14
ESPAÑOL
1. INTRODUCCIÓN
NOTA: Estas balanzas no son aptas para los usos indicados en el apartado 2a del artículo 1º de la Directiva 90/384/CE.
La serie BW de balanzas electrónicas proporciona una serie precisa, rápida y versátil de balanzas de pesaje para todo uso con funciones
de cuentapiezas y peso porcentual.
La serie consta de 4 modelos, con capacidades de hasta 3.000g.
Todas ellas incorporan platos de acero inoxidable sobre una unidad base de ABS.
Todos los teclados están compuestos de teclas de fácil pulsación y las pantallas de visualización son displays de cristal líquido (LCD) de
gran tamaño y fáciles de leer. Los LCDs incorporan retroiluminación.
Todas la unidades incorporan puesta a cero automática, tara automática, y una función de acumulación que permite que el recuento sea
almacenado y recuperado como total acumulado.
2. ESPECIFICACIONES
SERIE BW
Nº MODELO # BW3 BW6 BW15 BW30
Alcance 3 Kg 6 Kg 15 Kg 30 Kg
Escalón 0,1 g 0,2 g 0,5 g 1,0 g
Resolución 1/30.000 1/30.000 1/30.000 1/30.000
Tara máxima 3 Kg 6 Kg 10 Kg 30 Kg
Peso mínimo 2,0 g 4,0 g 10,0 g 20,0 g
Repetibilidad 0,1 g 0,2 g 0,5 g 1,0 g
Linealidad ± 0,2 g 0,4 g 1,0 g 2,0 g
Unidades de medida kg / g / lb / oz

ESESMANUAL DE USUÁRIO BW
15
ESPECIFICACIONES COMUNES
Interfaz Salida RS.232 opcional
Tiempo de estabilización Habitualmente 2 segundos.
Temperatura de funcionamiento 0 ºC hasta 40 ºC / 32 ºF hasta 104 ºF
Suministro de corriente (externo) 115 / 230 V ac, 50/60 Hz, 10 watts
Calibración Externa automática
Pantalla Pantalla digital LCD de 6 dígitos
Materiales de fabricación Plástico ABS, plato de acero inoxidable
Tamaño del plato 225 x 300 mm
Dimensiones generales (ancho x fondo x alto) 320 x 340 x 125 mm
Aplicaciones Balanza para fines generales
Funciones Peso, cuentapiezas, peso porcentual, peso de comprobación.
Otros componentes y especificaciones Batería interna recargable (70 h. de duración aprox.)
3. INSTALACIÓN
3.1. INSTALACIÓN GENERAL
La balanza debe ser colocada sobre una superficie firme y bien nivelada.
Evite temperaturas extremas. No coloque la balanza directamente bajo la luz del sol ni cerca de conductos de salida de aire acondicionado.
Evite las mesas inestables. Las mesas o el suelo deben ser rígidos y no vibrar. No coloque la balanza cerca de maquinaria que vibre.
Evite las tomas de corriente inestables. No utilice la balanza cerca de equipos con mucho consumo eléctrico como equipamiento de sol-
dadura o grandes motores.
Evite movimientos de aire como los procedentes de ventiladores y la apertura de puertas. No coloque la balanza cerca de ventanas abiertas.
Mantenga la balanza limpia. Mantenga la balanza seca.
Esta balanza no ha sido diseñada como una balanza a prueba de agua (IP44) por lo que debe evitar niveles altos de humedad que podrían
causar condensación. Evite el contacto directo con el agua. No pulverice agua sobre las balanzas ni las sumerja. Si la balanza entra en
contacto con el agua, los datos de lectura pueden ser inestables, o la balanza puede no funcionar correctamente, en ese caso, apague el
suministro eléctrico inmediatamente.
No apile material sobre la balanza cuando no está en uso.
3.2. INSTALACIÓN DE LA SERIE BW
La serie BW incorpora un plato de acero inoxidable que viene empaquetado por separado. Coloque el plato en los agujeros de ajuste sobre
la cubierta superior. No apriete con excesiva fuerza ya que esto podría dañar la célula de carga interna.
Nivele la balanza ajustando las cuatro patas. Se debería ajustar la balanza de tal forma que la burbuja del nivel quede en el centro del círculo
y la balanza se apoye sobre las cuatro patas. Si la balanza se tambalea, vuelva a ajustar las patas.
Coloque el cable adaptador en el conector situado en el lateral de la balanza. Por favor utilice el suministro eléctrico según las especifica-
ciones.
Accione el interruptor, que está situado junto al conector del adaptador de corriente para encender o apagar la balanza.
!Efectúe una calibración de peso tal como se describe en los apartados
10 (Configuración) y 11 (Calibración).

ESESMANUAL DE USUÁRIO BW
16
4. DESCRIPCIÓN DEL TECLADO
TECLA DESCRIPCIÓN
FUNCIÓN PRIMARIA FUNCIÓN SECUNDARIA
Introduzca el punto cero para todos los siguien-
tes pesados.
La pantalla mostrará cero.
Fija los parámetros u otras funciones.
Tara la balanza. Guarda el pesado actual en la
memoria como un valor de Tara, resta el valor
tara del de pesado
y muestra los resultados. Este es el peso neto.
Entrando los valores utilizando la contraseña
memorizará este valor como un valor tara.
Para incrementar el dígito activo cuando
introduzca un valor para parámetros o otras
funciones.
Establece los límites para comprobar el pesado.
Permite el funcionamiento de los límites bajos o
altos o ambos.
Para mover el dígito de activado hacia la
derecha , para establecer los valores de paráme-
tro u otras funciones.
Introduce la función de porcentaje de peso.
Permite el peso, la unidad de pesado y cuenta. Para mover el dígito de activado hacia la
izquierda, para establecer los valores de pará-
metro o otras funciones.
Se utiliza para seleccionar la función de la balan-
za. Si la balanza está pesando seleccionará las
partes para contar. Si no se encuentra en modo
de pesado volverá a la posición de pesado de
usuario.
(C) Para actuar como botón de ayuda para
seleccionar valores para los parámetros u otras
funciones.
Para imprimir los resultados a PC o impresora
utilizando el opcional RS- 232 interface. Tam-
bién añade el valor de acumulación de memoria
si la función de acumulación no es automática.
(ESC) Para volver a la operación normal cuando
la balanza está en el parámetro de modo de
funcionamiento.
MODE Este botón seleccionará Kg, Lb o oz para la
unidad de pesado.

ESESMANUAL DE USUÁRIO BW
17
5. PANTALLA
La pantalla LCD mostrará el valor y la unidad en la derecha de los dígitos. También añade los valores de TARA, PESO BRUTO, CERO, es-
tabilidad y batería baja.
HI
LO
GROSS
TARE
ZERO
888888
g/pcs
oz
tk
g
lb
OK
Símbolo de estabilidad
Símbolos de comprobación de pesado Unidades de pesado
Piezas
Símbolo de
batería baja
6. OPERATIVA
6.1 PANTALLA A CERO
Puede presionar el botón de en cualquier momento para introducir el punto cero des del cual los números de pesado y contado
son mesurados, desde el 4% de funcionamiento hasta cero. Esto será necesario cuando la plataforma esté vacía. Cuando se obtiene el
punto cero la pantalla mostrará el indicador de cero
La balanza tiene la función de re-cero automática para considerar mínimas desviaciones o acumulación del material sobre la plataforma.
Sin embargo, usted puede necesitar presionar el botón para obtener la función re-cero si pequeñas cantidades de peso son
mostradas cuando la plataforma está vacía.
6.2 TARA
Sitúe la balanza a cero, presionando el botón si es necesario. El indicador de cero se encontrará encendido.
Sitúe un contenedor sobre la plataforma, aparecerá el valor de pesado.
Presionar el botón para la función tara. El pesado que mostrará se guardará como el valor tara y el valor se sustraerá de la pantalla
dejando cero. El indicador “TARA” estará encendido. Cuando se añada el producto sólo aparecerá el peso del producto. La balanza será
tarada por segunda vez si otro tipo de producto se añade al primero. También esta vez sólo aparecerá en pantalla el peso añadido después
de tarar la balanza.
Cuando el container sea retirado se mostrará un valor negativo. Si la balanza ha sido tarada justo antes de remover el container este valor es
le peso bruto del contenedor más todo el producto que se ha retirado. El indicador de cero también estará encendido porque la plataforma
vuelve a la misma condición que tenía cuando el botón de fue presionado por última vez.

ESESMANUAL DE USUÁRIO BW
18
6.3 PESO DE UNA MUESTRA
Para determinar el peso del contenedor tara primero el contenedor vacío e introducir el contenido en el container. La pantalla mostrará el
pesado y las unidades de pesado de uso corriente.
6.4 PESO PERCENTUAL
La balanza permitirá una prueba de pesado al 100%. Después cualquier otro peso situado sobre la balanza será mostrado como un por-
centaje de la prueba original. Por ejemplo si 350g son situados sobre la balanza y el botón es presionado, la pantalla mostrará
100,00%
Retirando los 350g de pesado y añadiendo uno de 300g en la balanza, la pantalla mostrará 85,71% como 300 g es 85,71% de 350g.
Nota: la balanza puede saltar a grandes números inesperadamente si pequeños pesos son utilizados al nivel de 100%. Por ejemplo si sólo
23,5g están sobre la balanza con incrementos de 0,5g y la balanza está al 100%, la pantalla mostrará 100,00%, sin embargo un pequeño
cambio de peso haría que la pantalla saltase a 102,3% ya que la balanza de división (0.5g) incrementada a 240g equivaldría a un incre-
mento del 2,13%.
Retirando el peso de 350g y añadiendo uno de 300g la pantalla mostrará 85,7% como 300 es 85,71 de 350g.
Presionando el botón la balanza volverá a su pesado habitual.
6.5. MODO CUENTAPIEZAS
Cuando la balanza está mostrando peso, presione el botón para empezar las partes de la función de contar.
Antes de empezar, tare el peso de cualquier contenedor a utilizar, dejando el contenedor vacío sobre la balanza. Sitúe el número de unidades
de muestra sobre la balanza. El número debe coincidir con las opciones para la cuenta de piezas: 10, 20, 50, 100 y 200.
Pressione a tecla para empezar. La balanza mostrará “SP 10” por una muestra de 10 piezas. Cambie el tamaño de la muestra
presionando . La pantalla variará entre las opciones 10, 20, 50, 100 y 200 y volverá a 10.
Presionar el botón cuando el número coincida con el número de cantidades utilizadas para la prueba . Cuando más peso sea aña-
dido la pantalla mostrará el número de piezas. /Pcs)
Presione el botón para visualizar unidades de peso (kg) o la cuenta de piezas (pcs). para volver al peso normal.
6.6. COMPROBACIÓN DE PESADO
La comprobación de pesado es un procedimiento para accionar el sonido de alarma cuando el peso sobre la balanza sea igual o superior
a aquellos guardados en la memoria. La memoria guarda valores para un valor alto y bajo. Cualquiera de los límites puede ser utilizado, o
ambos.
Presione el botón . La pantalla mostrará el valor alto actual en la izquierda de la pantalla y con el símbolo HI.
Para cambiar el valor mostrado utilice y para seleccionar el dígito de cambio. Después utilice el botón para
incrementar el flash en el dígito. Cuando se muestre el valor deseado, presione el botón para aceptar el valor.
Si usted quiere volver al valor cero presione

ESESMANUAL DE USUÁRIO BW
19
Después de presionar la pantalla mostrará el límite inferior, el símbolo LO aparecerá en la parte izquierda de la pantalla.
Introduzca el límite inferior de la misma forma que se introducio el límite superior.
Después de presionar el botón la balanza volverá a pesar con la función de comprobación de pesado activada.
Cuando un peso se sitúe sobre la balanza las flechas mostrarán si el peso está por encima o por debajo de los límites y la bocina sonará
tal y como se describe a continuación.
AMBOS LÍMITES ACCIONADOS
La pantalla mostrará OK y un sonido de aviso sonará cuando el peso se encuentre cerca de los límites.
LÍMITE INFERIOR ACCIONADO
LÍMITE SUPERIOR se encuentra a cero.
La pantalla mostrará OK y un sonido de aviso sonará cuando el peso sea inferior al límite mínimo. Por encima de éste la pantalla mostrará
HIGH y el sonido de aviso desaparecerá.
LÍMITE SUPERIOR ACIONADO
LÍMITE INFERIOR se encuentra a cero.
La pantalla mostrará LOW y el sonido de aviso aparecerá cuando el peso sea inferior al límite máximo. Por encima de éste la pantalla mos-
trará OK y el sonido de aviso se apagará.
LOS DOS LÍMITES ACCIONADOS. EL INFERIOR ES MAYOR QUE EL SUPERIOR
El sonido de aviso sonará y en la pantalla, aparecerá LOW si el peso es inferior al límite mínimo, y
HIGH si el peso es superior al límite máximo.
NOTA: El peso debe ser mayor que 20 divisiones de balanza para que el pesado opere.
Para eliminar la función de comprobación de Pesado introducir cero en ambos límites presionando el botón de cuando los límites
actuales aparezcan.
Después presionar para almacenar los valores cero.
6.7. ACUMULACIÓN DE TOTALES
La balanza puede acumular automáticamente cuando un peso es añadido a la balanza o manualmente presionando .
Mirar la Sección de PARÁMETROS para ver detalles sobre el método de selección. La función acumuladora sólo está disponible cuando se
pesa. Desaparece durante el porcentaje de pesado o contando unidades.
6.8 ACUMULACIÓN MANUAL
Cuando la balanza está en posición de acumulación manual el peso mostrado se almacenará en la memoria cuando presione el botón
y el peso esté estable.
La pantalla mostrará “ACC 1” y después el total en memoria durante 2 segundos, antes de volver a normal. Si la interface opcional RS-232
se instala, el peso será reproducido a una impresora o PC.
Retirar el peso, permitiendo a la balanza volver a cero y colocar la segunda unidad .

ESESMANUAL DE USUÁRIO BW
20
Presionar la pantalla mostrará “ACC 2” y después mostrará el nuevo total de peso. Continuar hasta que se añadan todos los pesos.
Para ver los totales archivados en la memoria, presione cuando la balanza esté en cero. La pantalla mostrará el número total de
elementos “ACC XX” y el total de peso antes de volver a cero . Los totales también se imprimirán via RS-232 interface.
Para borrar la memoria presionar para ver los totales y después para limpiar la memoria.
6.9 ACUMULACIÓN AUTOMÁTICA
Cuando la balanza está en posición de Acumulación Automática el valor se almacena en la memoria automáticamente.
Añada el peso a la balanza, el sonido de aviso sonará cuando la balanza esté estable significando que el valor es aceptado. Retirar el peso.
La pantalla mostrará “ACC 1” y los totales de la memoria cuando la balanza vuelva a cero. Cuando se añada un segundo peso, el proceso
se repetirá.
Mientras el peso está sobre la balanza se puede presionar , para almacenar el valor inmediatamente. En este caso la balanza no
almacenará el valor cuando el peso sea retirado.
Los totales se pueden ver tal y como se menciona anteriormente.
En todos los casos las balanzas deben volver a cero o un número negativo antes que otro peso se añada a la memoria.
Entonces se pueden añadir más productos y presionar otra vez. Esto puede continuar hasta un total de 99 veces, o hasta que la
capacidad de peso sea excedida.

ESESMANUAL DE USUÁRIO BW
21
7. FUNCIONAMIENTO CON BATERÍA
Este tipo de balanzas incorporan una batería recargable (batería de ácido de plomo 6V74Ah). Las balanzas pueden funcionar con baterías
si se desea. La duración de la batería es de aproximadamente 100 horas.
Nota: las baterías nuevas están parcialmente cargadas. Antes de poder utilizar su balanza, debe instalar y cargar la batería siguiendo las
siguientes instrucciones.
Algunas baterías tienen un mejor rendimiento después de varios ciclos completos de carga/descarga. El rendimiento de las baterías depen-
de de numerosos factores, incluida la configuración de la retroiluminación y la operativa.
No utilice nunca un cargador o una batería que estén dañados.
No haga un cortocircuito en la batería. Se puede producir un cortocircuito accidental cuando
un objeto metálico (moneda, clip o bolígrafo) causa una conexión directa de los polos + y – de
la batería (tiras metálicas de la batería), por ejemplo cuando lleva una batería de repuesto en el
bolsillo.
Hacer un corto-circuito de los polos puede dañar la batería o el objeto que se conecta.
No tire las baterías al fuego.
Tire las baterías siguiendo la reglamentación local (por ejemplo, reciclaje).
No tire las baterías como basura doméstica.
Evite cargar la batería en condiciones de falta de aire.
Cuando la batería necesita recarga, se encenderá la flecha situada sobre el símbolo de batería baja bajo el display de peso. Se debe re-
cargar la batería tan pronto como aparezca la flecha sobre el símbolo. La balanza aún funcionará unas 10 horas tras lo cual se apagará
automáticamente para proteger la batería.
Para cargar la batería sólo tiene que enchufarla a la red eléctrica. No es necesario encender la balanza. La recarga debería durar 12 horas
para llenar la batería a plena capacidad.
Inmediatamente debajo del display de cantidad hay un LED que indica el estado de la carga de la batería.
Cuando la balanza está enchufada a la red eléctrica, la batería interna se cargará. Si el LED es verde la batería tiene carga completa. Si es
rojo, la batería está prácticamente descargada, y el amarillo indica que la batería está en proceso de recarga.
A fin de maximizar el rendimiento de su batería:
Use siempre baterías y adaptador de CA originales. La garantía de la balanza no cubre los daños causados como consecuencia del uso de
otras baterías y/o cargadores.
La tensión de salida del adaptador CA es de 9V, pero el rango de tensión normal oscilará entre los 11V y los 15V.
Las baterías nuevas o aquellas baterías que hayan sido almacenadas durante largos periodos de tiempo pueden requerir un mayor tiempo
de carga.
Mantenga la batería a temperatura ambiente o una temperatura próxima cuando efectúe la carga. No exponga las baterías a temperaturas
inferiores a -10°C o superiores a 45°C.
En el transcurso de periodos de tiempo largo, las baterías van perdiendo progresivamente capacidad de carga y requieren tiempos de
recarga más largos.
Esto es normal. Si usted carga la batería regularmente y observa que disminuye el periodo de funcionamiento o que aumenta el periodo de
carga, probablemente es momento de adquirir una nueva batería.

ESESMANUAL DE USUÁRIO BW
22
8. INTERFAZ RS.232
Las balanzas de la serie PC-50 incorporan como opción un interfaz RS-232.
Especificaciones:
• Puerto de salida RS-232 de datos de pesada
• Código ASCII
• 4800 baudios
• 8 bits de datos
• Sin paridad
Connector: Conexionado:
Type 9 pin d-subminiature socket BW PC
Pin 2 Input 2 3
Pin 3 Output 3 2
Pin 5 Signal Ground 5 5
El formato de datos para pesado normal, cuentapiezas y totales de memória son todos diferentes. Vea los ejemplos siguientes.
Output normal
GS 1.234 GS para peso bruto, NT para peso neto y unidad de peso.
No.. 1 Este número incrementa cada vez que se almacena un nuevo valor en la memoria.
Total 1.234 Kg Valor total almacenado en memoria.
<lf> Incluye 2 pies de línea.
<lf>
En peso porcentual, la salida es solo el peso porcentual mostrado.
GS 100.00% GS para peso bruto, NT para peso neto y una unidad de peso.
<lf> Incluye 2 pies de línea.
<lf>
9. PARÁMETROS
La balanza tiene 6 parámetros que pueden ser establecidos por el usuario. Éstos permiten al usuario preparar la balanza para:
Mostrar el peso en incrementos de peso para minimizar el daño que puedan ocasionarvibraciones, viento u otras condiciones medioam-
bientales.
Controlar la luz trasera de la pantalla. Puede ser necesario apagar esta luz para maximizar laduración de la batería.
Introducir la acumulación al automático, manual o instalar el RS-232 interface para imprimir elpeso continuamente.
Programar cuando debe realizar acumulación y cuando debe imprimir.
Programar el valor de auto cero
Seleccionar otra unidad de peso además de la estándar.
Para instalar los parámetros debe presionar los botones y a la vez.
En caso de ser “M” verificada hay que pulsar en la cuentra atras
La pantalla mostrará “Inc XX”. El primer valor que muestre es el valor de error de incremento de la balanza. Para seleccionar un incremento

ESESMANUAL DE USUÁRIO BW
23
de valor diferente, presione el botón para cambiar el valor, después presione el botón .
Por ejemplo, con un peso de 15kg sobre la balanza el incremento estándar es de 0,5, el valor puede ser cambiado de 1,0g a 2,0g.
El próximo parámetro es el de control de la luz trasera. El estándar consiste en que la luz trasera funcione automáticamente, apagándose
cuando la balanza no se utiliza. La luz trasera puede ser instalada con “EL On”, “EL AU” (Automática) o “EL Off”. La máxima duración de
la batería se consigue cuando la luz trasera se apaga.
Presione el botón para cambiar el valor, después presione el botón
La acumulación automática es el siguiente paso. Con “Au On” la memoria acumulará el peso automáticamente, “Au Off” permitirá la acu-
mulación manual y con “P COnt” la interface RS-232 enviará el peso continuamente y la función de acumulación será desactivada.
Presione el botón para cambiar el valor, después presione el botón
Con “ACC ON” cuando usted oprima se realizará la acumulación, con “ACC OF” sólo imprimirá, sin acumulación.
Presione el botón para cambiar la programación, después presione el botón
El valor de auto cero es el próximo. Usted puede seleccionar entre 0,5d, 1d, 2d y 4d.
Presione el botón para cambiar la programación, después presione el botón .
La unidad de peso se mostrará a continuación. Las balanzas están calibradas y pesan en kilogramos, sin embargo le mostrarán el peso en
gramos, unzas o libras si usted selecciona esta función.
Presione el botón para cambiar el valor, después presione el botón .
Cuando la balanza sea programada para pesar con otras unidades de peso, la función de acumulación continuará guardando el peso en
kilogramos.
10. CALIBRACIÓN
10.1. CALIBRACIÓN LINEAR
Para empezar la calibración, apagar la balanza y volverla a encender. Presionar y juntos durante la cuenta inicial, desde
9 a 0 en la pantalla.
Pulsar el pulsador de calibracion en caso de que esten verificadas y a continuacion y .
Pulsar antes de la cuenta atras
La pantalla mostrará “unLOAD”. Retire todo el peso de la bandeja y presione para volver al punto cero.
La pantalla mostrará a continuación la primera calibración. Poner el peso sobre la plataforma y presionar cuando la balanza esté
estable.
La balanza debe estar estable para aceptar un peso. El indicador de estabilidad se encenderá para mostrar que el valor es estable.
Después de completar toda la calibración de peso, presionar para completar la calibración. La balanza empezará a contar atrás
hacia cero después de seleccionar la última pesada.

ESESMANUAL DE USUÁRIO BW
24
Calibración de pesos
SERIE BW
MODELO BW3 BW6 BW15 BW30
Peso 1 ZERO ZERO ZERO ZERO
Peso 2 1kg 2kg 5kg 10kg
Peso 3 3kg 6kg 15kg 30kg
10.2. CALIBRACIÓN NORMAL
Para empezar la calibración apagar la balanza y volverla a encender. Presionar y a la vez durante la cuenta inicial desde 9
a 0.
Pulsar el pulsador de calibracion en caso de que esten verificadas y a continuacion y
Pulsar antes de la cuenta atras
La pantalla mostrará “UNLOAD”. Retire el peso de la balanza y después presione para volver al punto cero.
Después utilice , los botones y para calibrar el peso. Presionar para asegurarse, la pantalla mostrará
“LOAD”. Sitúe el peso sobre la bandeja cuando el indicador esté encendido, presionar para asegurar.
Después de volver a la autocomprobación, la balanza BW está a punto para ser utilizada.
11. CÓDIGOS DE ERROR
Durante la prueba inicial de encendido o durante otra operación, es posible que la balanza muestre un mensaje de error. El significado de
los mensajes de error se describe a continuación.
Si un mensaje de error aparece en pantalla, repita la operación que ha producido la aparición de este mensaje, volviendo a encender la
balanza, calibración u otras funciones, Si el mensaje de error persiste contacte a su proveedor para más detalles.
CÓDIGO DE ERROR DESCRIPCIÓN CAUSAS POSIBLES
Err4
Inicial Zero es mayor de lo permitido (4%
de capacidad máxima) cuando se en-
ciende la balanza o bien cuando el botón
es accionado.
Peso sobre la balanza cuando se enciende
la balanza.
Peso excesivo sobre la bandeja cuando se
instala la función cero.
Calibración incorrecta de la balanza. Célu-
la de carga dañada.
Err5 Error de teclado. Operación incorrecta de la balanza.
Err6 La cuenta A/D no es correcta cuando se
enciende la balanza.
La plataforma no está instalada. La célula
de carga está dañada. Fallos en la electró-
nica.
Para visionar la cuenta A/D presionar el botón y el a la vez mientras la balanza está realizando la comprobación inicial al
encenderse. Presionar ZERO/ENTER para volver a la función normal.

FRFRMANUEL D’USAGER BW
25
FRANÇAIS
1. INTRODUCTION
Note: Ces balances ne sont pas aptes pour des utilisations indiquées sur la section 2a de l’article 1º de la directive 90/384/CE.
La série de balances électroniques BW est une gamme précise et rapide de balances de pesage pour toute utilisation avec fonctions comp-
tage et de poids en pourcentage.
La série est composée de 4 modèles, avec des capacités jusqu’à 3.000g. Toutes elles incorporent des plateaux en acier inoxydable sur
une base en ABS.
Tous les claviers sont composés de touches ergonomique et les écrans sont en cristaux liquides (LCD) de grand format et faciles à lire.
Les écrans LCD retro-eclaire.
Toutes les unités ont un zéro automatique, et une tare automatique, et une fonction accumulation ce qui permet a la fonction comptage d
être enregistre et récupéré comme total accumulé.
2. SPÉCIFICATIONS
SÉRIE BW
Nº MODELO # BW3 BW6 BW15 BW30
Portée 3 Kg 6 Kg 15 Kg 30 Kg
Échelon 0,1 g 0,2 g 0,5 g 1,0 g
Résolution 1/30.000 1/30.000 1/30.000 1/30.000
Tare max 3 Kg 6 Kg 10 Kg 30 Kg
Poids min 2,0 g 4,0 g 10,0 g 20,0 g
Répétitivité 0,1 g 0,2 g 0,5 g 1,0 g
Linéarité ± 0,2 g 0,4 g 1,0 g 2,0 g
Unités de mesure kg / g / lb / oz

FRFRMANUEL D’USAGER BW
26
SPÉCIFICATIONS COMMUNES
Interface Sortie RS.232 - optionnel
Temps de stabilisation Habituellement 2 secondes
Température de fonctionnement De 0 ºC jusqu'à 40 ºC / de 32 ºF jusqu'à 104 ºF
Fourniture de courant (externe) 115 / 230 V ac, 50/60 Hz, 10 watts
Calibration Externe automatique
Écran Écran numérique LCD de 6 chiffres
Matériels de fabrication Plastique ABS, plateau en acier inoxydable
Dimensions du plateau 225 x 300 mm
Dimensions générales (large x fond x grand) 320 x 340 x 125 mm
Applications Balance pour fins générales
Fonctions Poids, comptage, poids en pourcentage, poids de vérification.
D’autres composants et spécifications Batterie interne rechargeable, 70 h.d utilisation.
3. INSTALLATION
3.1. INSTALLATION GÉNÉRALE
La balance doit être placée sur une surface ferme et bien nivelée.
Éviter les températures extrêmes. Ne pas placer la balance directement sous la lumière du soleil ni tout près de conduits de sortie d’air
conditionné.
Éviter les tables instables. Les tables ou le sol doivent être rigides et ne pas vibrer.. Ne pas placer la balance tout près de machinerie qui
vibre.
Éviter les prises de courant instables. N’utilise pas la balance tout près d’équipement avec beaucoup de consommation électrique comme
équipement de soudure ou grands moteurs.
Éviter des mouvements d’air comme les ventilateurs et l’ouverture de portes. Ne placer pas la balance tout près de fenêtres ouvertes.
Maintenir la balance propre. Maintenir la balance sèche.
Cette balance n’a pas un indice de protection élevé (IP44) éviter l humidité ce qui pourraient causer une condensation. Éviter le contact
direct avec l’eau. Ne pulvérisez pas d’eau sur les balances ne les immergez pas dans l eau. Si la balance prend contact avec l’eau, les
données de lecture peuvent être instables, ou la balance peut ne pas fonctionner correctement, dans ce cas, éteigner immédiatement la
source électrique.
N’empiler pas de matériel sur la balance quand elle n’est pas en utilisation.
3.2. INSTALLATION DE LA SÉRIE
La série BW a un plateau d’acier inoxydable empaqueté séparément dans son emballage. Placer le plateau sur les trous d’ajustement sur
la partie supérieure. Ne pas forcer lors du posotionement puisque ceci pourrait endommager le capteur.
Niveler la balance en ajustant les quatre pieds. Adapter la balance de telle sorte que la bulle du niveau reste sur le centre du cercle et la
balance s’appuie sur les quatre pieds. Si la balance chancelle, recommencer à ajuster des pieds.
Placer le câble adaptateur sur le connecteur situé au latéral de la balance. Utiliser la fourniture électrique selon les spécifications.
Actionner l’interrupteur, qui est situé près du connecteur de l’adaptateur de courant pour allumer ou éteindre la balance.
!Effectuer une calibration de poids comme indique aux chapitres 10 (configuration) et 11 (calibration)

FRFRMANUEL D’USAGER BW
27
4. DESCRIPTION DU CLAVIER
TOUCHE DESCRIPTION
FONCTION PRIMAIRE FONCTION SECONDAIRE
Introduire le point zéro pour tous les suivants
poids.
L’écran montrera zéro.
Cette touche fixe les paramètres ou d’autres
fonctions.
Cette touche tare la balance. Elle garde le poids
actuel sur la mémoire comme une valeur de
Tare, elle soustrait la valeur tare du pesage et
elle montre les résultats. Celui est le poids net.
En entrant les valeurs utilisant le mot de passe
mémoriser cette valeur comme une valeur tare.
S’utilise pour augmenter le chiffre actif
quand on introduira une valeur pour paramètres
ou d’autres fonctions.
Etablit les limites pour vérifier le poids. Permet le
fonctionnement des limites basses ou hautes ou
basses et hautes.
Pour changer les chiffres d’activation vers
la gauche, pour établir les valeurs de paramètre
ou d’autres fonctions.
Introduit la fonction de pourcentage de poids.
Permet le poids, l’unité de pesage et comptage. Pour changer les chiffres d’activation
vers la gauche, pour établir les valeurs de para-
mètre ou d’autres fonctions.
On utilise cette touche pour sélectionner la
fonction de la balance. Si la balance est en
fonctionnement elle sélectionnera les parties
pour compter. Si elle ne se trouve pas en mode
de pesage elle reviendra à la position de pesage
d’usager.
(C) S’utilise comme bouton d’aide pour sélec-
tionner valeurs pour les paramètres ou d’autres
fonctions.
Pour imprimer des résultats au PC ou impriman-
te en utilisant l’option RS232 . ajoute la valeur
d’accumulation de la mémoire si la fonction
d’accumulation n’est pas automatique.
(ESC) Pour revenir à l’opération normale quand
la balance est sur le mode de fonctionnement.
MODE Ce bouton sélectionnera kg, lb ou oz pour l’unité
de poids.

FRFRMANUEL D’USAGER BW
28
5. ÉCRAN
L’écran LCD montrera la valeur et l’unité à la droite des chiffres. Ainsi que les valeurs de Tare, Poids brut, Zéro, stabilité et batterie baisse.
HI
LO
GROSS
TARE
ZERO
888888
g/pcs
oz
tk
g
lb
OK
Symbole de stabilité
Symboles de vérification de poids Unités de pesage
Pièces
Symbole de
batterie baisse
6. OPÉRATION
6.1 REMISE A ZÉRO
Il peut presser le bouton à tout moment pour introduire le point zéro donnez dont les numéros de de lourd et compté sont mesurés,
depuis 4% de fonctionnement jusqu’à zéro. Ceci sera nécessaire quand la plate-forme sera vide. L’indicateur a zéro apparaîtra.
La balance a la fonction de le mise à zéro automatique pour considérer des déviations minis ou l’accumulation du matériel sur la plate-
forme. Toutefois, pousser le bouton pour obtenir la fonction du zéro, s’il y a des petites variations de poids quand la plate-forme
sera vide.
6.2 TARE
Mettre la balance au zéro, en poussant la touche s’il est nécessaire. L’indicateur a zéro apparaîtra.
Situer un container sur la plate-forme, la valeur de pesage s’affiche.
Pousser la touche pour la fonction tare. La balance gardera comme valeur la tare et la valeur sera soustrait à la valeur de l écran
tout en laissant lezéro. L’indicateur “TARE” est allumé. Quand on ajoutera le produit seulement apparaîtra le poids du produit. La balance
sera tarée par seconde fois si un autre type de produit est pesée. Aussi cette fois apparaîtra seulement à l’écran le poids ajouté après
avoir taré la balance
Quand le container est retiré une valeur négative s affiche. Si la balance a été tare juste avant de déplacer le container cette valeur est le
poids brut du container, plus tout le produit qu’on a retiré.
L’indicateur de zéro sera aussi allumé parce que la plate-forme reviens sur la même configuration qu elle avait quand le bouton du
était activé.

FRFRMANUEL D’USAGER BW
29
6.3 POIDS D’UN ÉCHANTILLON
Pour déterminer le poids du container on doit tare d’abord le container vide et introduire le contenu dans le container. L’écran montrera le
pesage et les unités de pesage d’utilisation courante.
6.4 POIDS EN POURCENTAGE
La balance permettra un échantillon de pesage au 100%. Ensuite quelconque autre poids situé sur la balance sera montré comme un pour-
centage de l’échantillon original. Par exemple si 350 kg sont situés sur la balance et bouton est pressé, l’écran montrera 100,00%
en retirant les 350 gr de pesage et en ajoutant un de 300 gr sur la balance, l’écran montrera 85.71% comme 300g est 85.71 de 350 gr.
Note: la balance peut basculer sur une autre fonction si les poids sont utilisés au niveau du 100%. Par exemple si seulement 23,5g sont sur
la balance avec des développements de 0,5g et la balance est au 100%, l’écran montrera 100,00%, un petit changement de poids ferait que
le display saute à 102.3% puisque la balance de division (0.5g) augmentée à 240g il équivaudrait à un développement du 2,13%. Retirant
le poids de 350g et ajoutant un de 300g l’écran montrera 85,7% comme 300 est le 85,71 de 350g.
Pressant le bouton la balance reviendra à son pesage habituel.
6.5 MODE COMPTAGE
Quand la balance montre le poids, presser la touche pour commencer les parties de la fonction comptage.
Avant de commencer, tarer le poids à utiliser, laisser le container vide sur la balance. Situer le numéro d’unités d’échantillon sur la balance.
Le numéro doit coïncider avec les options pour le compte des pièces : 10, 20, 50, 100 et 200.
Presser la touche pour commencer. La balance montrera “SP10” pour un échantillon de 10 pièces. Changer le grandeur de
l’échantillon poussant . L’écran variera parmi des fonctions 10, 20, 50, 100 et 200 et reviendra a 10.
Presser la touche quand le nombre le nombre coïncide avec le nombre de quantités utilisées pour l’échantillon. Quand davantage
de poids sera ajouté l’écran montrerait le nombre de pièces (pcs). Presser la touche pour visualiser des unités de poids (kg) ou le
compte de pièces (pcs).
Presser la touche pour retourner au poids normal.

FRFRMANUEL D’USAGER BW
30
6.6 VÉRIFICATION DE PESAGE
La vérification de pesage est un procédé pour actionner le son d’alarme quand le poids sur la balance soit égal ou supérieur à ceux gar-
dés sur la mémoire. La mémoire garde les valeurs pour une valeure haute et basse. Chacune des limites peut être utilisé séparément ou
ensemble.
Presser le bouton . L’écran montrerait la valeur halte actuelle à gauche de l’écran et avec le symbole HI.
Pour changer la valeur montrée utiliser et pour choisir le digit de changement. Utiliser ensuite la touche pour
augmenter flash le digit. Quand on montrera la valeur souhaitée presser la touche pour accepter la valeur. Si vous voulez retourner
à la valeur zéro presser .
Après avoir presser l’écran montrera la limite inférieure, le symbole LO apparaîtra à la partie gauche de l’écran.
Introduisez la limite inférieure la même manière qui a été introduite la limite supérieure.
Après avoir pressé la touche la balance pèsera à nouveau avec la fonction de vérification de pesage active.
Quand un poids se situera sur la balance les flèches montreront si le poids est superficiellement ou sous les limites et l alarme se déclen-
chera.
LES DEUS LIMITES ACTIONNÉS
L’écran montrera OK et un son d’avis sonnera quand le poids se trouve tout près des limites.
LIMITE INFÉRIEUR ACTIONNÉ
LIMITE SUPÉRIEUR se trouve au zéro.
L’écran montrera OK et un son d’avis sonnera quand le poids était inférieur à la limite minime. Par- dessus celui l’écran montrera HIGH et
le son d’avis disparaîtra.
LIMITE SUPÉRIEUR ACTIONNÉ
LIMITE INFÉRIEUR se trouve au zéro.
L’écran montrera LOW et le son d’avis apparaîtra quand le poids était inférieur à la limite maximale. Par- dessus celui l’écran montrera OK
et le son d’avis disparaîtra.
LES DEUX LIMITES ACTIONNÉES. L’INFÉRIEUR EST MAJEUR QUE LE SUPÉRIEUR
Le son d’avis sonnera et sur l’écran apparaîtra LOW si le poids est inférieur à la limite minime, et HIGH si le poids est supérieur à la limite
maximale.
NOTE: Le poids doit être majeur que 20 divisions de balance pour que le pesage opère.
Pour éliminer la fonction de vérification de pesage d’introduire zéro dans les deux limites poussant le bouton de quand les limites
actuelles apparaîtront. Presser ensuite pour stocker les valeurs zéro.

FRFRMANUEL D’USAGER BW
31
6.7 ACCUMULATION DE TOTAUX
La balance peut automatiquement accumuler quand un poids sera ajouté à la balance ou manuellement en poussant . Surveiller
la section de paramètres pour voir des détails sur la méthode de sélection. La fonction accumulatrice est seulement disponible quand on
pèse. Elle disparaît pendant le pourcentage ou en comptant des unités
6.8 ACCUMULATION MANUELLE
Quand la balance sera en position d’accumulation manuelle le poids montré sera stocké sur la mémoire quand on pressera la touche
et le poids soit stable.
L’écran montrera “ACC 1” et après le total en mémoire pendant 2 secondes, avant de revenir à normal. Si l’interface optionnelle RS.232
s’installe, le poids sera reproduit à une imprimante ou à PC.
Rétirer le poids, permettant à la balance de revenir au zéro et placer la deuxième unité. Presser , et l’écran montrera “ACC 2” et après
montrera les nouveaux totaux des poids. Continuer jusqu’à ce qu’on ajoute tous les poids. Pour voir les totaux archivés sur la mémoire
presser quand la balance sera au zéro. L’écran montrera le nombre total d’éléments “ACC XX” et le total de poids avant de retourner
à zéro. Les totaux seront aussi imprimés via RS232 interface.
Pour effacer la mémoire pousser pour voir les totaux et ensuite pour nettoyer la mémoire.
6.9 ACCUMULATION AUTOMATIQUE
Quand la balance est en position d’Accumulation Automatique la valeur ser emmagasiné automatiquement sur la mémoire.
Ajouter le poids à la balance, le son d’avis sonnera quand la balance reste stable signifiant que la valeur est acceptée. Retirer le poids.
L’écran montrera “ACC 1” et les totaux de la mémoire quand la balance reviendra au zéro. Quand on ajoute un deuxième poids, le procès
se répétera.
Pendant que le poids est sur la balance on peut presser , pour emmagasiner immédiatement la valeur. Dans ce cas quand la balance
n’emmagasinera pas la valeur quand le poids soit retiré.
On peut voire les totaux comme il est indiqué antérieurement.
Dans tous les cas les balances doivent revenir à zéro ou un numéro négatif avant qu’un autre poids s’ajoute à la mémoire.
Alors on peut ajouter plus de produits en presser une autre fois. Ceci peut continuer jusqu’à un total de 99 fois ou jusqu’à ce que
la capacité de poids soit excédée.

FRFRMANUEL D’USAGER BW
32
7. FONCTIONNEMENT AVEC BATTERIE
Ce type de balances a une batterie rechargeable (batterie d’acide de plomb 6V74Ah). Les balances peuvent fonctionner avec des batteries
si on le désire. La durée de la batterie est à peu près de 100 heures.
Note: les batteries nouvelles sont partiellement chargées. Avant de pouvoir utiliser la balance, installer et charger la batterie suivant les
suivantes instructions.
Quelques batteries ont une meilleure résistance après différents cycles complets de charge/dé-
charge. La résistance des batteries dépend de nombreux facteurs, incluse la configuration du
rétro éclairage.
N’utiliser jamais un chargeur ou une batterie qui soient endommagés. On peut produire un court-
circuit accidentel quand un objet métallique (monnaie, clip ou stylo) cause une connexion directe
des pôles + et - de la batterie (bandes métalliques de la batterie), par exemple quand on porte
une batterie de provision dans la poche.
Faire un court-circuit des pôles peut endommager la batterie ou l’objet qu’il se connecte.
Ne jeter pas les batteries au feu. Jeter les batteries suivant la réglementation locale (par exemple,
recyclage).
Ne jeter pas les batteries comme ordures domestique. Éviter de charger la batterie en conditions
de manque d’air.
Quand la batterie a besoin de recharge, la flèche située sur le symbole de batterie petite sous l’écran de poids, s’allumera. On doit recharger
la batterie aussitôt il apparaisse la flèche sur le symbole. La balance fonctionnera encore quelques 10 heures derrière le qu’il s’éteindra
automatiquement pour protéger la batterie.
Pour charger la batterie on doit seulement la brancher au réseau électrique. Il n’est pas nécessaire allumer la balance.
La recharge devrait durer 12 heures pour remplir la batterie à la pleine capacité.
Immédiatement sous l’écran de quantité il y a un Led qu’il indique l’état de la charge de la batterie.
Quand la balance est branchée au réseau électrique, la batterie interne se chargera. Si le Led est vert la batterie a charge complète. S’il est
rouge, la batterie est pratiquement déchargée, et le jaune indique que la batterie est en procès de recharge.
Afin de maximaliser la durée de vie de la batterie: Utiliser toujours batteries et adaptateur de CA originaux. La garantie de la balance ne
couvre pas les dommages causés à cause de l’utilisation de d’autres batteries et/ou chargeurs.
La tension de sortie de l’adaptateur CA est de 9V, mais le rang de tension normale oscillera entre 11V heures et 15V heures.
Les batteries nouvelles ou ces batteries qui aient été emmagasinées pendant longues périodes de temps peuvent requérir un majeur temps
de chargement.
Maintenir la batterie à la température environne ou une température prochaine quand effectue la charge. N’exposer pas les batteries aux
températures inférieures à -10°C ou supérieurs à 45°C.
Dans le cours de périodes de temps long, les batteries perdrent progressivement capacité de chargement et elles requièrent temps de
recharge plus longs.
Ceci est normal. Si vous charge régulièrement la batterie et on observe qu’il diminue la période de fonctionnement où qu’il augmente la
période de chargement, probablement c’est moment d’acquérir une nouvelle batterie.

FRFRMANUEL D’USAGER BW
33
8. INTERFACE RS.232
Les balances de la serie BW incorporent comme option une interface RS-232. Spécifications:
• Port de sortie RS-232 de données de pesage
• Code ASCII
• 4800 baudies
• 8 bits de données
• Sans parité
Connecteur: Connecté:
Type 9 pin d-subminiature socket BW PC
Pin 2 Input 2 3
Pin 3 Output 3 2
Pin 5 Signal Ground 5 5
Le format des données pour pesage normal, compte des pièces et totaux de mémoire, ils sont tous différent. Voir les examples suivants.
Output normal
GS 1.234 GS pour poids brut, NT pour poids net et unité de poids.
No.. 1 Ce numéro augmente chaque fois qu'on emmagasine une nouvelle valeur sur la mémoire.
Total 1.234 Kg Valeur totale emmagasinée en mémoire.
<lf> Il inclut 2 pieds de ligne..
<lf>
Em peso percentual, a saída é só o peso percentual mostrado.
GS 100.00% GS pour poids brut, NT pour poids net et une unité de poids.
<lf> Incluy Il inclut 2 pieds de ligne.
<lf>
9. PARAMÈTRES
La balance a six paramètres qui peuvent être établis par l’usager. Ce paramètres permettent à l’usager de prépare la balance pour:
Montrer le poids en développements de poids pour minimiser les dommages qu’ils peuvent occasionner des vibrations, du vent ou d’autres
conditions environnementales.
Contrôler la lumière postérieure de l’écran. Il peut être nécessaire d’éteindre cetter lumière pour Maximaliser la durée de la batterie.
Introduire l’accumulation au bouton automatique, manuel ou installer le RS-232 interface pour Imprimer le poids continuellement.
Programmer quand il doit réaliser accumulation et quand il doit imprimer.
Programmer la valeur d’auto zéro.
Sélectionner une autre unité de poids en plus du standard.
Pour installer les paramètres on doit presser les boutons et au même temps.
SI “M” est vérifié, appuyer sur le compte à rebours.
L’écran montrerait “Inc XX”. La première valeur qu’il montre est la valeur d’erreur de développement de la balance. Pour sélectionner une

FRFRMANUEL D’USAGER BW
34
valeur de développement différent, presser la touche pour changer la valeur et ensuite presser la touche .
Par exemple avec un poids de 15 kg sur la balance le développement standard est de 0.5, la valeur peut être changé de 1.0 g à 2.0 g
Le prochain paramètre est le contrôle de la lumière postérieure. Le standard consiste que la lumière postérieure fonctionne automatique-
ment, s’éteignant quand la balance ne s’utilise pas. La lumière postérieure peut être installée avec “L’On”, “L’AU” (Automatique) ou “L’Off.”
On obtient la maximale durée de la batterie obtient quand la lumière s’éteint
Pousser la touche pour changer le valeur, après pousser la touche .
L’accumulation automatique est le suivant pas. Avec “Au On” la mémoire accumulera automatiquement le poids, “Au Off” permettra
l’accumulation manuelle et avec “P COnt” l’interface RS-232 enverra le poids constantement et la fonction d’accumulation sera désactivée.
Pousser la touche pour changer le valeur, après pousser la touche .
“ACC ON” quand on le pousse se réalisera l’accumulation, avec “ACC OF” seulement imprimera, sans accumulation.
Pousser la touche pour changer la programmation, après la touche .
La valeur d’auto zéro est le prochain. On peut choisir entre 0.5d, 1d, 2d et 4d. Pousser la touche pour changer la programmation,
après la touche .
L’unité de poids se montrera ensuite. Les balances sont calibrées et elles pèsent en kilogrammes, mais elle montrera le poids en grammes,
hunzas ou livres si on sélectionne cette fonction.
Pousser la touche pour changer le valeur, après pousser la touche .
Quand la balance soit programmée pour peser avec d’autres unités de poids, la fonction d’accumulation continuera à garder le poids en
kilogrammes. Kil par défaut “on”, pour obtenir la sortie RS232 définir à “of”.
10. CALIBRATION
10.1. CALIBRATION LINÉAIRE
Pour commencer la calibration, éteindre la balance et la rallumer. Presser et joints pendant l’addition initiale, de 9 jusqu’à
0 sur l’écran.
L’écran montrera “unLOAD”. Retirer tout le poids du plateau et pousser pour retourner au point zéro.
L’écran montrera ensuite le 1ª calibration. Mettre le poids sur la plate-forme et pousser quand la balance sera stable.
La balance doit être stable pour accepter un poids. L’indicateur de stabilité s’allumera pour montrer que la valeur est stable.
Après avoir complété toute la calibration de poids, pousser pour compléter la calibration. La balance commencera à compter de-
rrière vers zéro après avoir sélectionné le dernier poids.

FRFRMANUEL D’USAGER BW
35
Calibraction de poids
SERIE BW
MODELO BW3 BW6 BW15 BW30
Peso 1 ZERO ZERO ZERO ZERO
Peso 2 1kg 2kg 5kg 10kg
Peso 3 3kg 6kg 15kg 30kg
10.2 CALIBRATION NORMAL
Pour commencer la calibration, éteindre la balance et la rallumer. Presser et joints pendant l’addition initiale, de 9 jusqu’à
0 sur l’écran.
Appuyez sur le bouton d’étalonnage s’ils sont vérifiés, puis et . Appuyez avant le compte à rebours
L’écran montrera “unLOAD”. Retirer tout le poids du plateau et pousser pour retourner au point zéro.
Ensuite utiliser , des touches et pour la calibration du poids. Pousser pour s’assurer, l’écran montrera
“LOUD.” Situer le poids sur le plateau quand l’indicateur sera allumé, pousser pour assurer.
Après retourner à l’auto vérification, on peut déjà utiliser la balance BW.
11. CODES D’ERREUR
Pendant la preuve initiale d’allumage ou pendant une autre opération, il est possible que la balance montre un message d’erreur. Le sens
des messages d’erreur se décrit ensuite.
Si un vous d’erreur apparaît à l’écran, répéter l’opération qu’a produit l’apparition de ce message, recommençant à allumer la balance,
calibration ou d’autres fonctions, Si le message d’erreur persiste contacter son fournisseur pour plus de détails.
CODE D’ERREUR DESCRIPTION POSSIBLES CAUSES
Err4
Initial Zero est supérieur du permis (4%
de capacité maximale) quand la balance
s’allume ou bien quand la touche
Est actionnée..
Poids sur la balance quand la balance
s’allume. Poids excessif sur le plateau
quand on installe la fonction zéro.
Calibration incorrecte de la balance. Cap-
teur de chargement endommagé
Err5 Erreur de clavier. Opération incorrecte de la balance.
Err6 L’addition A/D n’est pas correcte quand
elle s’allume la balance.
La plate-forme n’est pas installée. Le
capteur de chargement est endommagé.
Sentences de l’électronique.
Pour visionner l’addition A/D pousser la touche et le à fois pendant que la balance réalise la vérification initiale au s’allumer.
Pousser ZERO/ENTER pour retourner à la fonction normale.

DEDEBEDIENUNGSANLEITUNG BW
3636
DEUTSCH
1. EINLEITUNG
HINWEIS: Diese Waagen sind nicht für die in Absatz 2a des Artikels 1 der Richtlinie 90/384/EG aufgeführten Anwendungen
geeignet.
Die elektronischen Waagen der BW Serie bieten eine präzise, schnelle und vielseitige Waage mit Zähl- und Prozentwertfunktionen.
Die Serie besteht aus 4 Modellen mit Kapazitäten bis zu 30 kg.
Alle sind mit einer Edelstahlplatte auf einer Basiseinheit aus ABS ausgestattet.
Alle Tastaturen sind Tasten für eine einfache Bedienung und die Bildschirme sind Flüssigkristallanzeigen (LCD) von großer Größe und
gut lesbar. Die LCDs verfügen über eine Hintergrundbeleuchtung.
Alle Einheiten verfügen über einen automatischen Nullpunkt, eine automatische Tarierung und eine Akkumulierfunktion, die es ermögli-
cht, die Zählung zu speichern und als kumulative Summe abzurufen.
2. SPEZIFIKATIONEN
SERIE BW
Nº MODELL # BW3 BW6 BW15 BW30
Kapazität 3 Kg 6 Kg 15 Kg 30 Kg
Zählschritt 0,1 g 0,2 g 0,5 g 1,0 g
Auflösung 1/30.000 1/30.000 1/30.000 1/30.000
Tara-Maximum 3 Kg 6 Kg 10 Kg 30 Kg
Minimales Gewicht 2,0 g 4,0 g 10,0 g 20,0 g
Wiederholbarkeit 0,1 g 0,2 g 0,5 g 1,0 g
Linearität ± 0,2 g 0,4 g 1,0 g 2,0 g
Maßeinheiten kg / g / lb / oz

DEDEBEDIENUNGSANLEITUNG BW
3737
ALLGEMEINE SPEZIFIKATIONEN
Schnittstelle Ausgang RS.232 optional
Einschwingzeit Normalerweise 2 Sekunden.
Betriebstemperatur 0 ºC bis 40 ºC / 32 ºF bis 104 ºF
Stromversorgung (extern) 115 / 230 V Wechselstrom, 50/60 Hz, 10 Watt
Kalibrierung Extern automatisch
Bildschirm Digitalbildschirm LCD mit 6 Ziffern
Herstellungsmaterialien Kunststoff ABS, Schale aus Edelstahl
Größe der Schale 225 x 300 mm
Allgemeine Abmessungen (Breite x 320 x 340 x 125 mm
Anwendungen Waage für allgemeine Zwecke
Funktionen Gewicht, Zählen, prozentuales Wiegen, Kontrollwägung.
Andere Komponenten und Interner Akku wiederaufladbar (70 h. Länge ca.)
3. INSTALLATION
3.1. ALLGEMEINE INSTALLATION
Die Waagen sollten an einem Ort aufgestellt werden, der die Genauigkeit nicht beeinträchtigt.
Vermeiden Sie extreme Temperaturen. Nicht in direktem Sonnenlicht oder in der Nähe von Lüftungsöffnungen der Klimaanlage aufste-
llen.
Vermeiden Sie ungeeignete Tische. Die Tische oder der Boden müssen starr und vibrationsfrei sein. Nicht in der Nähe von vibrierenden
Maschinen aufstellen.
Vermeiden Sie instabile Stromquellen. Verwenden Sie das Gerät nicht in der Nähe von großen Stromverbrauchern wie Schweißgeräten
oder großen Motoren.
Vermeiden Sie hohe Luftfeuchtigkeit, die zu Kondensation führen kann. Vermeiden Sie den direkten Kontakt mit Wasser. Sprühen oder
tauchen Sie die Waage nicht in Wasser.
Vermeiden Sie Luftbewegungen, z.B. durch Ventilatoren oder das Öffnen von Türen. Nicht in der Nähe von offenen Fenstern platzieren.
Halten Sie die Waage sauber.
Stapeln Sie kein Material auf die Waage, wenn sie nicht benutzt wird.
3.2. INSTALLATION DER BW-SERIE
Die BW Serie wird mit einer Edelstahlplattform geliefert, die separat verpackt ist. Platzieren Sie die Plattform in den Ortungslöchern auf
der oberen Abdeckung. Drücken Sie nicht mit übermäßiger Kraft, da dies die Wägezelle im Inneren beschädigen könnte.
Richten Sie die Waage aus, indem Sie die vier Füße einstellen. Die Waage sollte so eingestellt werden, dass sich die Blase in der Was-
serwaage in der Mitte befindet und die Waage von allen vier Füßen getragen wird. Wenn die Waage kippelt, stellen Sie die Füße nach.
Schließen Sie das Netzkabel in den Stecker an der Unterseite der Waage an. Der Netzschalter befindet sich an der Basis in der Nähe der
Vorderseite der Waage.
!Führen Sie eine Gewichtskalibrierung durch, wie in den Kapiteln 10 (Setup) und 11 (Kalibrierung)
beschrieben.

DEDEBEDIENUNGSANLEITUNG BW
3838
4. TASTATUR BESCHREIBUNGEN
TASTE BESCHREIBUNG
PRIMÄRE FUNKTIONEN SEKUNDÄRE FUNKTIONEN
Geben Sie den Nullpunkt für alle folgenden
Wägungen ein.
Auf der Anzeige erscheint Null.
Die Parameter oder andere Funktionen wurden
korrigiert
Waage tarieren. Speichert die aktuelle Last im
Speicher als
Tara-Wert, subtrahiert den Wert des Tara-Gewi-
chts der Last und zeigt die Ergebnisse an. Dies
ist das Nettogewicht. Dieser Wert entspricht
einem Tara-Wert.
Erhöht die aktive Ziffer, wenn ein Wert für
Parameter oder andere Funktionen eingegeben
wird.
Es legt die Grenzen für die Kontrolle der Last
fest. Es ermöglicht den Betrieb mit dem unteren
oder oberen Grenzwert oder beides
Um die aktivierte Stelle nach rechts zu
bewegen , um die Werte der Einstellung
oder anderer Funktionen festzulegen.
Gibt die Funktion des Gewichtsprozentsatzes
ein. Es erlaubt das Gewicht, die Ladeeinheit und
Bericht.
Um die Ziffer der aktivierten Funktion
nach links zu verschieben, um die Werte des
Parameters oder anderer Funktionen festzulegen.
Zur Auswahl der Stückzählfunktion. Wenn
Wenn Gewicht auf der Waage ist, warden dia
zu zählenden Stücke ausgewählt. Wenn kein
Gewicht auf der Waage ist, wird diese Funktion
nicht aktiviert.
(C) Als Hilfetaste, zum Zurückstellen des editier-
baren Wertes auf 0.
Zum Ausdrucken der Ergebnisse auf PC oder
Drucker über die optionale RS-232-Schnittstelle.
Es fügt auch den Wert der Akkumulation hinzu,
wenn die Funktion der Akkumulation nicht auto-
matisch ist.
(ESC) Um zum Normalbetrieb zurückzukehren,
wenn sich die Waage im Einstellungsmenü
befindet.
MODE Mit dieser Taste wird Kg, Pfund oder Unzen
ausgewählt.

DEDEBEDIENUNGSANLEITUNG BW
3939
5. ANZEIGEN
Auf der LCD-Anzeige wird rechts neben den Ziffern ein Wert und eine Einheit angezeigt.
Zusätzlich gibt es Symbole für TARA, BRUTTO-Gewicht, NULL und für schwache Batterie
HI
LO
GROSS
TARE
ZERO
888888
g/pcs
oz
tk
g
lb
OK
Stabilitätssymb
Kontrollwaageneinheiten Wiegeeinheiten
Teilezähleinheiten
Symbol schwache
Batterie
6. BETRIEB
6.1 NULLSETZEN DER ANZEIGE
Sie können die Taste jederzeit drücken, um den Nullpunkt, ab dem alle anderen Wägungen und Zählungen gemessen werden,
innerhalb von 4% des Einschaltzustandes einzustellen. Dies ist in der Regel nur notwendig, wenn die Plattform leer ist. Wenn der Null-
punkt erreicht ist, zeigt die Anzeige den Indikator für Null an.
Die Waage verfügt über eine automatische Nullstellung, um eine geringe Schwankung oder Ansammlung von Material auf der Plattform
zu berücksichtigen. Möglicherweise müssen Sie jedoch die Taste drücken, um die Waage wieder auf Null zu stellen, wenn bei
leerer Plattform kleine Gewichtsmengen angezeigt werden.
6.2 TARIEREN
Nullstellung der Waage durch Drücken der , falls erforderlich. Die Nullanzeige leuchtet.
Stellen Sie einen Behälter auf die Plattform, es wird ein Wert für sein Gewicht angezeigt.
Drücken Sie die , um die Waage zu tarieren. Das angezeigte Gewicht wird als Tara-Wert gespeichert und von der Anzeige
subtrahiert, wobei Null auf der Anzeige bleibt. Die Anzeige “TARE” (TARA) leuchtet. Wenn das Produkt hinzugefügt wird, wird nur das
Gewicht des Produkts angezeigt.
Wenn der Behälter entnommen wird, wird ein negativer Wert angezeigt. Wurde die Waage kurz vor dem Entnehmen des Behälters
tariert, ist dieser Wert das Bruttogewicht des Behälters plus aller entnommenen Produkte. Die Nullanzeige leuchtet auch, weil sich die
Plattform wieder im gleichen Zustand befindet wie beim letzten Drücken der Taste .

DEDEBEDIENUNGSANLEITUNG BW
4040
6.3 WIEGEN EINER PROBE
Um das Gewicht einer Probe zu bestimmen, tarieren Sie zuerst den leeren Behälter und legen Sie die Probe dann in den Behälter.
Auf der Anzeige erscheinen das Gewicht und die aktuell verwendeten Gewichtseinheiten.
6.4 PROZENT WIEGEN
Die Waage ermöglicht die Anzeige eines Probengewichts, das zu 100% angezeigt wird. Dann wird jedes andere Gewicht, das auf die
Waage gelegt wird, als Prozentsatz der ursprünglichen Probe angezeigt. Wenn beispielsweise 350g auf die Waage gelegt und die Taste
% gedrückt wird, zeigt die Anzeige an.
Wenn Sie das 350g-Gewicht entfernen und ein 300g-Gewicht auf die Waage legen, zeigt das Display 85,71% an, während 300g 85,71%
von 350g sind.
Hinweis: Die Waage kann bei großen Zahlen unerwartet springen, wenn kleine Gewichte verwendet werden, um den 100%-Wert ein-
zustellen. Wenn beispielsweise nur 23,5 g auf einer Waage mit 0,5 g Schritten liegen und die Waage auf 100% eingestellt ist, zeigt die
Anzeige 100,00 % an, jedoch führt eine kleine Gewichtsveränderung dazu, dass die Anzeige auf 102,13 % springt, da eine Waagenun-
terteilung (0,5 g) auf 24,0 g einer Erhöhung um 2,13 % entspricht. Wenn Sie das 350g-Gewicht entfernen und ein 300g-Gewicht auf
die Waage legen, zeigt das Display 85,71% an, während 300g 85,71% von 350g sind.
Durch Drücken der kehrt die Waage zum Wiegen zurück.
6.5 TEILEZÄHLUNG
Wenn die Waage Gewicht anzeigt, wird durch Drücken der Taste die Teilezählfunktion gestartet.
Tarieren Sie vor Beginn das Gewicht des verwendeten Behälters und lassen Sie den leeren Behälter auf der Waage stehen. Legen Sie
die Anzahl der Proben auf die Waage. Die Anzahl sollte mit den Optionen für die Teilezählung 10, 20, 50, 100 oder 200 Stück übere-
instimmen.
Drücken Sie die , um zu beginnen. Auf der Waage erscheint „SP 10“ und es wird eine Probengröße von 10 Teilen verlangt.
Ändern Sie die Probengröße, indem Sie die .Taste drücken. die Anzeige wird durch die Optionen blättern: 10, 20, 50, 100, 200
und zurück zu 10.
Drücken Sie die Taste , wenn die Nummer mit der Anzahl der für die Probe verwendeten Teile übereinstimmt. Wenn mehr Gewi-
cht hinzugefügt wird, zeigt die Anzeige die Anzahl der Teile (Stück) an.
Drücken Sie die , um das Stückgewicht (g/Stck.), das Gesamtgewicht (kg) oder die Anzahl (Stck.) anzuzeigen. Drücken Sie die
FUNC-Taste, um zum normalen Wiegen zurückzukehren.
6.6 KONTROLLWIEGEN
Das Kontrollwiegen ist ein Verfahren, bei dem ein Alarm ausgelöst wird, wenn das Gewicht auf der Waage die im Speicher gespeicher-
ten Werte erreicht oder überschreitet. Der Speicher speichert Werte für einen oberen und einen unteren Grenzwert. Es kann entweder
nur ein Limit (Grenze) oder beide verwendet werden.
Drücken Sie die Taste . Auf der Anzeige erscheint der aktuelle obere Grenzwert, wobei die linke Ziffer blinkt und das HI-Symbol
links neben der Anzeige erscheint....

DEDEBEDIENUNGSANLEITUNG BW
4141
Um den angezeigten Wert zu ändern, verwenden Sie die Taste und , um die zu ändernde Ziffer auszuwählen, und
verwenden Sie dann die Taste taste, um die blinkende Ziffer zu erhöhen. Wenn der gewünschte Wert angezeigt wird, drücken
Sie die Taste , um den Wert zu übernehmen. Wenn Sie den Wert auf Null zurücksetzen möchten, drücken Sie die Taste
, um den Wert zu löschen.
Nach Drücken der Taste zeigt die Anzeige dann den unteren Grenzwert an, das LO-Symbol erscheint auf der linken Seite der
Anzeige.
Geben Sie den unteren Grenzwert wie bei der Eingabe des oberen Grenzwerts ein.
Nach Drücken der Taste kehrt die Waage bei aktivierter Funktion Kontrollwiegen zum Wiegen zurück.
Wenn ein Gewicht auf die Waage gelegt wird, zeigen die Pfeile an, ob das Gewicht über oder unter den Grenzwerten liegt, und der
Piepser ertönt wie unten beschrieben.
BEIDE GRENZWERTE EINGESTELLT
Auf der Anzeige erscheint OK und der Piepser ertönt, wenn das Gewicht zwischen den Grenzwerten liegt.
NIEDRIGER GRENZWERT EINGESTELLT,
HOHER GRENWERT wird auf Null gesetzt
(Nur außerhalb des gesetzlichen Messwesen)
Auf der Anzeige erscheint OK und der Piepser ertönt, wenn das Gewicht unter dem unteren Grenzwert liegt. Oberhalb des unteren
Grenzwertes erscheint auf der Anzeige HOCH und der Piepser ist ausgeschaltet.
HOHER GRENZWERT EINGESTELLT,
UNTERER GRENZWERT wird auf Null gesetzt
Auf der Anzeige erscheint LOW und der Piepser ist an, wenn das Gewicht unter dem oberen Grenzwert liegt. Oberhalb des oberen
Grenzwerts zeigt die Anzeige OK an und der Piepser ist ausgeschaltet.
BEIDE GRENZWERTE EINGESTELLT. UNTERER GRENZWERT IST GRÖßER ALS DER OBERE GRENZWERT EINGESTELLT
(Nur außerhalb des gesetzlichen Messwesen).
Der Piepser ertönt und auf der Anzeige erscheint LOW, wenn das Gewicht kleiner als ist, und HIGH, wenn das Gewicht größer der untere
Grenzwert ist.
HINWEIS: Das Gewicht muss größer als 20 Divisionen sein, damit die Kontrollwägung funktioniert.
Um die Funktion Kontrollwiegen zu deaktivieren, geben Sie in beide Grenzen Null ein, indem Sie die Taste drücken, wenn die
aktuellen Grenzen angezeigt werden, und dann die Taste drücken, um die Nullwerte zu speichern.
6.7 KUMULIERTE SUMME
Die Waage kann so eingestellt werden, dass sie automatisch akkumuliert, wenn ein Gewicht zur Waage hinzugefügt wird oder manuell
durch Drücken der Taste .
Siehe Abschnitt PARAMETER für Details zur Auswahl der Methode. Die Akkumulierfunktion ist nur beim Wiegen verfügbar. Sie wird
während des prozentualen Wiegens oder der Teilezählung deaktiviert.

DEDEBEDIENUNGSANLEITUNG BW
4242
6.8 MANUELLE AKKUMULIERUNG
Wenn die Waage auf manuelle Akkumulierung eingestellt ist, wird das angezeigte Gewicht gespeichert, wenn die Taste ge-
drückt wird und das Gewicht stabil ist.
Auf der Anzeige erscheint “ACC 1“ und dann die Summe für 2 Sekunden im Speicher, bevor zur Normalität übergegangen wird. Wenn
die optionale RS-232-Schnittstelle installiert ist, wird das Gewicht auf einem Drucker oder PC ausgegeben.
Entfernen Sie das Gewicht, damit die Waage auf Null zurückkehrt und legen Sie ein zweites Gewicht auf. Drücken Sie , auf der
Anzeige erscheint “ACC 2“ und dann die neue Summe.
Fahren Sie fort, bis alle Gewichte addiert wurden.
Um die Summen im Speicher anzuzeigen, drücken Sie die Taste , wenn die Waage auf Null steht. Auf der Anzeige erscheint die
Gesamtzahl der Elemente “ACC xx“ und das Gesamtgewicht, bevor auf Null zurückgekehrt wird. Die Summen werden auch über die
RS-232-Schnittstelle ausgegeben.
Um den Speicher zu löschen, drücken Sie , um die Summen anzuzeigen, und drücken
Sie dann die Taste , um den Speicher zu löschen.
6.9 AUTOMATISCHE AKKUMULIERUNG
Wenn die Waage auf Automatische Akkumulierung eingestellt ist, wird der Wert automatisch gespeichert.
Fügen Sie der Waage ein Gewicht hinzu, der Piepser ertönt, wenn die Waage stabil ist, um zu signalisieren, dass der Wert akzeptiert
wird. Entfernen Sie das Gewicht.
Auf der Anzeige erscheint „ACC 1“und die Summen im Speicher, wenn die Waage auf Null zurückkehrt. Das Hinzufügen eines zweiten
Gewichts wird den Vorgang wiederholen.
Während das Gewicht auf der Waage liegt, ist es zulässig, die Taste zu drücken, um den Wert sofort zu speichern. In diesem
Fall speichert die Waage den Wert nicht, wenn das Gewicht entfernt wird.
Die Summen können wie oben beschrieben betrachtet werden.
In allen Fällen muss die Waage auf Null oder eine negative Zahl zurückgesetzt werden, bevor eine weitere Probe in den Speicher aufge-
nommen werden kann.
Es kann dann mehr Produkt hinzugefügt und erneut gedrückt werden. Dies kann für bis zu 99 Einträge oder bis zur Überschre-
itung der Kapazitätsanzeige fortgesetzt werden.

DEDEBEDIENUNGSANLEITUNG BW
4343
7. BATTERIEBETRIEB
Die Waagen können auf Wunsch mit der Batterie betrieben werden. Die Batterielaufzeit beträgt ca. 100 Stunden.
Wenn die Batterie aufgeladen werden muss, schaltet das Symbol für schwache Batterie ein.
Die Batterie sollte geladen werden, sobald Symbol leuchtet. Die Waage arbeitet noch ca. 10
Stunden (ohne Hintergrundbeleuchtung) und schaltet sich dann zum Schutz der Batterie au-
tomatisch aus.
Um die Batterie aufzuladen, stecken Sie sie einfach in das Stromnetz. Die Waage muss nicht
eingeschaltet werden.
Die Batterie sollte für die volle Kapazität 12 Stunden lang aufgeladen werden.
Direkt unter der Mengenanzeige befindet sich eine LED, die den Ladezustand der Batterie
anzeigt. Wenn die Waage an das Stromnetz angeschlossen ist, wird die interne Batterie gela-
den. Wenn die LED grün leuchtet, ist die Batterie vollständig geladen. Wenn sie rot ist, ist die
Batterie fast entladen und gelb zeigt an, dass die Batterie geladen wird.
Da die Batterie verwendet wird, kann es vorkommen, dass sie nicht vollständig geladen ist. Wenn die Batterielaufzeit nicht mehr akzep-
tabel ist, wenden Sie sich an Ihren Händler.
8. RS-232 AUSGANG
Die Waagen der BW-Serie können optional mit einem RS-232-Ausgang bestellt werden.
Spezifikationen:
• RS-232-Ausgabe der Wiegedaten
• ASCII-Code
• 4800 Baud
• 8 Datenbits
• Keine Parität
Anschluss: Angeschlossen
9-polige D-Subminiatur-Buchse BW PC
Pin 2 Input 2 3
Pin 3 Output 3 2
Pin 5 Signalmasse 5 5
Wiegeausgang prüfen(9-polige D-Subminiatur-Buchse)
• Pin 1 VB
• Pin 4 vcc (5V)(Ausgang)
• Pin 5 com (gnd) öffentlich
• Pin 6 ok (Ausgang)
• Pin 7 niedrig (Ausgang)
• Pin 8 hoch (Ausgang)
• Pin 9 Piepton (Ausgang)
Das Datenformat für normale Wiegungen, das Zählen von Teilen oder das Abrufen von Summen aus dem Speicher ist unterschiedlich.
Es folgen Beispiele:

DEDEBEDIENUNGSANLEITUNG BW
4444
Normale Ausgabe
GS 1.234 GS für Bruttogewicht, NT für Nettogewicht und eine Gewichtseinheit
No.. 1 Diese Zahl erhöht sich bei jedem neuen Wert im Speicher gespeichert
Summe 1.234 Kg Der im Speicher gespeicherte Gesamtwert
<lf> Beinhaltet 2 Zeilenvorschübe
<lf>
Bei prozentualer Wägung wird das Gewicht nur in Prozent angezeigt.
GS 100.00% GS für Bruttogewicht, NT für Nettogewicht und eine Gewichtseinheit
<lf> Beinhaltet 2 Zeilenvorschübe
<lf>
9. EINSTELLUNGEN
Die Waage verfügt über 6 Parameter, die vom Benutzer eingestellt werden können. Diese ermöglichen es dem Benutzer, die Waage
einzustellen für:
• Das Gewicht in Gewichtszunahmen anzeigen, um Schäden zu minimieren, die Vibrationen, Wind oder andere Umgebungsbedin-
gungen verursachen können.
• Hintergrundbeleuchtung des Bildschirms steuern. Es kann erforderlich sein, dieses Licht auszuschalten, um die Batteriedauer zu
maximieren.
• Wählen Sie die automatische Akkumulation, manuell oder installieren Sie die RS-232-Schnittstelle, um das Gewicht kontinuierlich
zu drucken.
• Programmieren, wann eine Akkumulation durchgeführt und wann gedruckt werden muss.
• Programmieren Sie den Wert von Auto-Null.
• Wählen Sie neben der Standardeinheit eine andere Gewichtseinheit.
Für den Zugriff auf die Parameter müssen Sie die Tasten und gleichzeitig nach dem Einshalten der Waage drücken.
Wenn Sie mit “M” verifiziert sind, müssen Sie den Countdown drücken.
Auf dem Bildschirm erscheint “XX Inc“. Der erste angezeigte Wert ist der Wert der Divisionen der Waage. Um eine Erhöhung mit unters-
chiedlichem Wert zu wählen, drücken Sie die Taste und anschließend die Taste .
Bei einem Gewicht von 15 kg auf der Waage beträgt die Standarderhöhung beispielsweise 0,5, der Wert kann von 1,0g auf 2,0g geän-
dert werden.
Der nächste Parameter ist die Hintergrundbeleuchtungssteuerung. Der Standard besteht darin, dass die Hintergrundbeleuchtung au-
tomatisch arbeitet und sich abschaltet, wenn die Waage nicht benutzt wird. Die Hintergrundbeleuchtung kann mit “EL ON“, „EL AU“
(Automatisch) oder “EL Off“ eingestellt werden. Die maximale Lebensdauer der Batterie wird erreicht, wenn die Hintergrundbeleuchtung
ausgeschaltet wird.
Drücken Sie die Taste , um den Wert zu ändern, danach die Taste , die automatische Akkumulation ist der nächste
Schritt. Mit “Au On“ akkumuliert der Speicher das Gewicht automatisch, “Au Off“ ermöglicht die manuelle Akkumulation und mit
“P COnt“ sendet die RS-232-Schnittstelle das Gewicht kontinuierlich und die Funktion der Akkumulation wird deaktiviert.
Drücken Sie die Taste , um den Wert zu ändern, drücken Sie dann die Taste . Wenn Sie “ACC ON“ drücken, wird die
Akkumulation durchgeführt, mit “ACC OF“ wird nur gedruckt, ohne Akkumulation.

DEDEBEDIENUNGSANLEITUNG BW
4545
Drücken Sie die Taste , um die Programmierung zu ändern und drücken Sie anschließend die Taste .
Der Wert von Auto-Null ist der nächste. Sie können zwischen 0, 5 d, 1 d, 2d und 4 d wählen. Drücken Sie die Taste , um die
Programmierung zu ändern und drücken Sie anschließend die Taste .
Die Gewichtseinheit wird danach angezeigt. Die Waagen sind kalibriert und wiegen in Kilogramm, zeigen aber auch das Gewicht in
Gramm und Pfund, wenn Sie diese Funktion wählen.
Drücken Sie die Taste , um den Wert zu ändern, drücken Sie anschließend die Taste , wenn die Waage für das Wiegen
mit anderen Gewichtseinheiten programmiert wurde, die Funktion der Akkumulation speichert das Gewicht in Kilogramm weiter.
Kil standardmäßig “on”, um die Ausgabe RS232 zu erhalten, setzen Sie auf “of”.
Por ejemplo, con un peso de 15kg sobre la balanza el incremento estándar es de 0,5, el valor puede ser cambiado de 1,0g a 2,0g.
El próximo parámetro es el de control de la luz trasera. El estándar consiste en que la luz trasera funcione automáticamente, apagán-
dose cuando la balanza no se utiliza. La luz trasera puede ser instalada con “EL On”, “EL AU” (Automática) o “EL Off”. La máxima
duración de la batería se consigue cuando la luz trasera se apaga.
Presione el botón para cambiar el valor, después presione el botón .
10. KALIBRIERUNG
10.1 KALIBRIERUNG LINEAR
Schalten Sie die Waage aus und schalten Sie sie wieder ein, um mit der Kalibrierung zu beginnen. Drücken Sie und
zusammen während der ersten Rechnung, von 9 bis 0 auf dem Bildschirm.
Auf dem Bildschirm erscheint “unLOAD“ (ENTLADEN). Entfernen Sie das gesamte Gewicht der Schale und drücken Sie auf ,
um zum Nullpunkt zurückzukehren.
Der Bildschirm wird angezeigt, um die erste Kalibrierung fortzusetzen. Legen Sie das Gewicht auf die Plattform und drücken Sie
, wenn die Waage stabil war. Die Waage muss stabil sein, um Gewicht aufnehmen zu können. Die Anzeige für die Stabilität leuchtet auf,
um anzuzeigen, dass der Wert stabil ist. Nachdem Sie alle Gewichtskalibrierungen abgeschlossen haben, drücken Sie , um die
Kalibrierung abzuschließen.
Die Waage beginnt, sich nach Auswahl des letzten Gewichts rückwärts auf Null zu zählen.
KALIBRIERGEWICHTE
SERIE BW
MODELL BW3 BW6 BW15 BW30
Gewicht 1 ZERO ZERO ZERO ZERO
Gewicht 2 1kg 2kg 5kg 10kg
Gewicht 3 3kg 6kg 15kg 30kg

DEDEBEDIENUNGSANLEITUNG BW
4646
10.2 NORMALE KALIBRIERUNG
Schalten Sie die Waage aus und schalten Sie sie wieder an, um mit der Kalibrierung zu beginnen. Drücken Sie .und
gleichzeitig während des ersten Zählung von 9 bis 0.
Drücken Sie die Kalibrierungstaste, wenn sie verifiziert sind, und dann .und . Drücken Sie vor dem Countdown
Auf dem Bildschirm erscheint “UNLOAD“ (ENTLADEN). Entlasten Sie das Gewicht der Waage und drücken Sie anschließend ,
um zum Nullpunkt zurückzukehren.
Danach wird verwendet, die Tasten und zum Kalibrieren des Gewichts. Drücken Sie , um sicherzus-
tellen, dass auf der Anzeige
“LOAD“ (LADEN) erscheint. Legen Sie das Gewicht auf die Schale, wenn die Anzeige eingeschaltet ist und drücken Sie , um
sicherzustellen.
Nach der Rückkehr zum Selbsttest ist die Waage BW einsatzbereit.
11. FEHLERCODES
Bei der Erstkontrolle oder bei einem anderen Vorgang ist es möglich, dass die Waage eine Fehlermeldung anzeigt. Die Bedeutung der
Fehlermeldungen wird beschrieben.
Wenn eine Fehlermeldung auf dem Bildschirm erscheint, wiederholen Sie den Vorgang, der die Erscheinung dieser Meldung hervorgeru-
fen hat, und schalten Sie die Waage, die Kalibrierung oder andere Funktionen wieder ein. Wenn die Fehlermeldung weiterhin besteht,
wenden Sie sich an Ihren Provider, um weitere Informationen zu erhalten.
FEHLERCODE BESCHREIBUNG MÖGLICHE
Err4
Der anfängliche Nullpunkt ist größer als
der zulässige Wert (4% der maximalen
Kapazität), wenn die Waage aufleuchtet
oder die Taste gedrückt wird.
Gewicht auf der Waage, wenn die Waage
beleuchtet ist.
Übergewicht auf dem Tablett, wenn es die
Funktion Null installiert.
Err5 Tastaturfehler. Falsche Bedienung der Waagen.
Err6 Das Konto To/D ist nicht korrekt, wenn es
auf der Waage leuchtet.
Die Plattform ist nicht installiert. Die
Ladezelle ist beschädigt. Ausfälle in der
Elektronik.
Um das Konto A/D anzuzeigen, drücken Sie gleichzeitig die Taste und die Taste , während die Waage beim Überprüfen
die anfängliche Beleuchtung ausführt. Drücken Sie ZERO/ENTER, um zur normalen Funktion zurückzukehren.

PTPTMANUAL DE USUÁRIO BW
47
PORTUGUÊS
1. INTRODUÇÃO
NOTA: Estas balanças não estão aptas para as utilizações indicadas na secção 2ª do artigo 1º da Diretiva 90/384/CE.
A série BW de balanças eletrónicas proporciona uma série precisa, rápida e versátil de balanças de pesagem para todas as utilizações
com funções de contador de peças e peso percentual.
A série consta de 4 modelos, com capacidades de até 3.000g.
Todas elas incorporam pratos de aço inoxidável sobre uma unidade base de ABS.
Todos os teclados estão compostos por teclas de pressão fácil e os ecrãs de visualização são visores de vidro líquido (LCD) de grande
dimensões e fáceis de ler. Os LCDs incorporam retroiluminação.
Todas as unidades incorporam colocação automática a zero, tara automática e uma função de acumulação que permite que a contagem
seja armazenada e recuperada como total acumulado.
2. ESPECIFICAÇÕES
SÉRIE BW
Nº MODELO # BW3 BW6 BW15 BW30
Alcance 3 Kg 6 Kg 15 Kg 30 Kg
Escalão 0,1 g 0,2 g 0,5 g 1,0 g
Resolução 1/30.000 1/30.000 1/30.000 1/30.000
Tara máxima 3 Kg 6 Kg 10 Kg 30 Kg
Peso mínimo 2,0 g 4,0 g 10,0 g 20,0 g
Repetibilidade 0,1 g 0,2 g 0,5 g 1,0 g
Linearidade ± 0,2 g 0,4 g 1,0 g 2,0 g
Unidades de medida kg / g / lb / oz

PTPTMANUAL DE USUÁRIO BW
48
ESPECIFICAÇÕES COMUNS
Interface Saída RS.232 opcional
Tempo de estabilização Normalmente 2 segundos.
Temperatura de funcionamento 0 ºC bis 40 ºC / 32 ºF bis 104 ºF
Abastecimento de corrente (externo) 115 / 230 V Wechselstrom, 50/60 Hz, 10 Watt
Calibração Externa automática
Ecrã Ecrã digital LCD de 6 dígitos
Materiais de fabrico Plástico ABS, prato de aço inoxidável
Tamanho do prato 225 x 300 mm
Dimensões gerais (largura x fundo x altura) 320 x 340 x 125 mm
Aplicações Balança para fins gerais
Funções Peso, contador de peças, peso percentual, peso de comprovação
Outros componentes e especificações Bateria interna recarregável (70 h. de duração aprox.)
3. INSTALAÇÃO
3.1 INSTALAÇÃO GERAL
A balança deve ser colocada sobre uma superfície firme e bem nivelada.
Evite temperaturas extremas. Não coloque a balança diretamente exposta à luz do sol nem perto de condutas de saída de ar condicio-
nado.
Evite mesas instáveis. As mesas ou pavimento devem ser rígidos e não vibrar. Não coloque a balança perto de máquinas que vibrem.
Evite as tomadas de corrente instáveis. Não utilize a balanças perto de equipamentos com muito consumo elétrico, tais como equipa-
mento de soldadura ou grandes motores.
Evite movimentos de ar como os provenientes de ventiladores e abertura de portas. Não coloque a balança perto de janelas abertas.
Mantenhas a balança limpa.
Mantenha a balança seca.
Esta balança não foi desenhada como uma balança à prova de água (IP44) pelo que se devem evitar níveis altos de humidade que pos-
sam provocar condensação. Evite o contacto direto com a água. Não pulverize água sobre as balanças nem as submerja. Se a balança
entrar em contacto com a água, os dados de leitura podem ser instáveis ou a balança pode não funcionar corretamente, em cujo caso,
se deverá apagar imediatamente o abastecimento elétrico.
Não empilhe material sobre a balança quando não estiver a ser usada.
3.2 INSTALAÇÃO DA SÉRIE BW
A série BW incorpora um prato de aço inoxidável que vem empacotado separadamente. Coloque o prato nos orifícios de ajuste sobre a
cobertura superior. Não aperte com demasiada força pois poderia danificar a célula de carregamento interno.
Nivele a balança ajustando as quatro patas. Será necessário ajustar a balança de maneira a que a borbulha do nível fique no centro do
círculo e a balança se apoie sobre as quatro patas. Se a balança se continuar a mover-se , volte a ajustar as patas.
Coloque o cabo adaptador no conector situado na parte lateral da balança. Por favor, utilize o abastecimento elétrico de acordo com as
especificações.
Acione o interruptor, que está situado perto do conector do adaptador de corrente para ligar ou desligar a balança.
Schließen Sie das Netzkabel in den Stecker an der Unterseite der Waage an. Der Netzschalter befindet sich an der Basis in der Nähe der
Vorderseite der Waage.
!Efetue uma calibração de peso, tal como descrito nas secções 10 (Configuração) e 11 (Calibração).

PTPTMANUAL DE USUÁRIO BW
49
4. DESCRIÇÃO DO TECLADO
TECLA DESCRIÇÃO
FUNÇÃO PRIMÁRIA FUNÇÃO SECUNDÁRIA
Introduza o ponto zero para todas as seguin-
tes pesagens.
O ecrã mostrará zero.
Fixa os parâmetros ou outras funções.
Tara a balança. Salva a pesagem atual na
memória como um valor de Tara, subtraindo
o valor tara da pesagem
além de mostrar os resultados. Este é o
peso líquido. Inserindo os valores com a
utilização da senha memorizará este valor
como um valor tara.
Para aumentar o dígito ativo quan-
do introduzir um valor para parâmetros ou
outras funções.
Estabelece os limites para comprovar a pe-
sagem. Permite o funcionamento dos limites
baixos ou altos ou de ambos.
Para mover o dígito de ativação para
a direita , para estabelecer os valores de
parâmetro ou outras funções.
Introduz a função de percentagem de peso.
Permite o peso, a unidade de pesagem e
conta.
Para mover o dígito de ativação para
a esquerda, para estabelecer os valores de
parâmetro ou outras funções.
Utiliza-se para selecionar a função da ba-
lança. Se a balança estiver a pesar selecio-
nará as partes para contar. Se não estiver
em modo de pesagem voltará à posição de
pesagem de usuário.
(C) Para acionar como botão de ajuda para
selecionar valores para os parâmetros ou
outras funções.
Para imprimir os resultados através de PC
ou impressora utilizando o opcional RS- 232
interface. Também acrescenta o valor de
acumulação de memória se a função de
acumulação não for automática.
(ESC) Para regressar à operação normal
quando a balança estiver no parâmetro de
modo de funcionamento.
MODE Este botão selecionará Kg, Lb ou oz para a
unidade de pesagem.

PTPTMANUAL DE USUÁRIO BW
50
5. ÉCRA
O ecrã LCD mostrará o valor e a unidade à direita dos dígitos. Também acrescenta os valores de TARA, PESO BRUTO, ZERO, estabilidade
e bateria baixa.
Símbolo de
bateria
baixa
Peça
s
HI
LO
GROSS
T
ARE
ZERO
888888
g/pcs
oz
%
tkglb
Símbolos de comprovação de
pesagem
Unidades de
pesagem
OK
Símbolo de estabilidade
6. OPERATIVA
6.1 ECRÃ A ZERO
Pode pressionar o botão de em qualquer momento para introduzir o ponto zero a partir do qual
os números de pesagem e contagem são medidos, desde 4% de funcionamento a zero. Isto será necessário quando a plataforma estiver
vazia. Quando se obtiver o ponto zero o ecrã mostrará o indicador de zero.
A balança tem a função automática de re-zero para considerar desvios mínimos ou acumulação do material sobre a plataforma. No
entanto, poderá ser necessário premir o botão para obter a função re-zero se forem mostradas pequenas quantidades de
peso quando a plataforma estiver vazia.
6.2 TARA
Situe a balança a zero, pressionando o botão se for necessário. O indicador de zero estará ligado.
Situe um contentor sobre a plataforma e aparecerá o valor de pesagem.
Pressionar o botão para a função tara. A pesagem que será mostrada será guardada como o valor tara e o valor será subtraído
do ecrã deixando zero. O indicador “TARA” estará ligado. Quando se acrescentar o produto apenas aparecerá o peso do produto. A
balança será tarada pela segunda vez se for acrescentado outro tipo de produto ao primeiro. Desta vez só aparecerá no ecrã o peso
acrescentado depois de a balança ter sido tarada.
Quando o recipiente for retirado será mostrado um valor negativo. Se a balança tiver sido tarada justo antes de remover o recipiente, este
valor é o peso bruto do recipiente mais todo o produto retirado. O indicador de zero também estará ligado porque a plataforma volta ao
mesmo estado em que estava quando o botão de foi pressionado por última vez.

PTPTMANUAL DE USUÁRIO BW
51
6.3 PESO DE UMA AMOSTRA
Para determinar o peso do contentor tara, primeiro deve ter o contentor vazio e introduzir o conteúdo no recipiente. O ecrã mostrará a
pesagem e as unidades de pesagem de utilização corrente.
6.4 PESO PERCENTUAL
A balança permitirá um teste de pesagem a 100%. Depois qualquer outro peso situado sobre a balança será mostrado como uma per-
centagem do teste original. Por exemplo se situarem 350g sobre a balança e o botão for premido, o ecrã mostrará 100,00%
Retirando os 350g de pesagem e acrescentando um de 300g na balança, o ecrã mostrará 85,71% como 300 g é 85,71% de 350g.
Nota: a balança pode saltar para grandes números inesperadamente se forem utilizados pequenos pesos no nível 100%. Por exemplo se
apenas estiverem 23,5g sobre a balança com incrementos de 0,5g e a balança estiver a 100%, o ecrã mostrará 100,00%, no entanto,
uma pequena alteração de peso faria com que o ecrã saltasse para 102,3%, na medida em que a balança de divisão (0.5g) incrementada
para 240g iria equivaler a um aumento de 2,13%.
Retirando o peso de 350g e acrescentando um de 300g, o ecrã mostrará 85,7% como 300 é 85,71 de 350g.
Pressionando o botão a balança voltará à pesagem habitual.
6.5 MODO CONTADOR DE PEÇAS
Quando a balança estiver a mostrar o peso, prima o botão para começar as partes da função de contar.
Antes de começar, tare o peso de qualquer contentor a utilizar, deixando o contentor vazio sobre a balança. Situe o número de unidades
de mostra sobre a balança. O número deve coincidir com as opções para a contagem de peças: 10, 20, 50, 100 e 200.
Pressione a tecla para começar. A balança mostrará “SP 10” por uma amostra de 10 peças. Mude o tamanho da amostra
pressionando . O ecrã variará entre as opções 10, 20, 50, 100 e 200 e voltará a 10.
Pressionar o botão quando o número coincidir com o número de quantidades utilizadas para o teste. O ecrã irá mostrando o
número de peças à medida que for
aumentando o número de peças. /Pcs)
Pressionar o botão para visualizar unidades de peso (kg) ou a contagem de peças (pcs)
Pressionar o botão func para voltar ao peso normal.

PTPTMANUAL DE USUÁRIO BW
52
6.6 COMPROVAÇÃO DA PESAGEM
A comprovação de pesagem é um procedimento para acionar o som do alarme quando o peso sobre a balança for igual ou superior
aos salvados na memória. A memória salva valores para um valor alto e baixo. Pode ser utilizado qualquer um dos limites ou ambos.
Pressione o botão . O ecrã mostrará o valor alto atual à esquerda do ecrã e com o símbolo HI.
Para mudar o valor mostrado utilize e para selecionar o dígito de mudança.
Depois utilize o botão Tare para aumentar o flash no dígito. Quando aparecer o valor desejado, pressione o botão Zero para
aceitar o valor. Se desejar regressar ao valor zero pressione Func. Depois de pressionar Zero o ecrã mostrará o limite inferior, o
símbolo LO aparecerá na parte esquerda do ecrã.
Introduza o seu limite inferior da mesma maneira em que se introduziu o limite superior.
Depois de premir o botão a balança voltará a pesar com a função de comprovação de pesagem ativada.
Quando se situar um peso em cima da balança, as flechas vão mostrar se o peso está acima ou abaixo dos limites e a buzina soará
tal como descrito a seguir.
AMBOS OS LIMITES ACIONADOS
O ecrã mostrará OK e um som de aviso soará quando o peso estiver perto dos limites.
LIMITE INFERIOR ACIONADO
LIMITE SUPERIOR está em zero.
O ecrã mostrará OK e um som de aviso soará quando o peso for inferior ao limite mínimo. Acima do mesmo, o ecrã mostrará HIGH
e o som de aviso desaparecerá.
LIMITE SUPERIOR ACIONADO
LIMITE INFERIOR está em zero.
o ecrã mostrará LOW e o som de aviso aparecerá quando o peso for inferior ao limite máximo. Acima do mesmo, o ecrã mostrará
OK e o som de aviso pára de soar.
OS DOIS LÍMITES ACIONADOS. O INFERIOR É MAIOR QUE O SUPERIOR
O som de aviso soará e no ecrã aparecerá LOW se o peso for inferior ao limite mínimo, e
HIGH se o peso for superior ao limite máximo.
NOTA: O peso deve ser superior a 20 divisões da balança para que a pesagem opere.
Para eliminar a função de comprovação de Pesagem introduzir zero em ambos os limites premindo o botão de quando os
limites atuais apareçam.
Depois premir para armazenar os valores zero.

PTPTMANUAL DE USUÁRIO BW
53
6.7 ACUMULAÇÃO DE TOTAIS
A balança pode acumular automaticamente quando um peso for acrescentado à balança ou premindo
manualmente . Ver a Secção de PARÂMETROS para ver detalhes sobre o método de seleção.
A funçãoacumuladora só está disponível quando se pesa. Desaparece durante a percentagem de pesagem ou contando unidades.
6.8 ACUMULAÇÃO MANUAL
Quando a balança estiver em posição de acumulação manual, o peso mostrado será armazenado na memória quando se premir o botão
e o peso estiver estável.
O ecrã mostrará “ACC 1” e depois o total na memória durante 2 segundos, antes de voltar ao normal. Se a interface opcional RS-232
for instalada, o peso será reproduzido a uma impressora ou PC.
Retirar o peso, permitindo à balança regressar a zero e colocar a segunda unidade. Premir , o ecrã mostrará “ACC 2” e depois
mostrará o novo total de peso.
Continuar até que se acrescentem todos os pesos. Para ver os totais arquivados na memória, prima quando a balança estiver
em zero.
O ecrã mostrará o número total de elementos “ACC XX” e o total de peso antes de regressar a zero . Os totais também serão impressos
via RS-232 interface.
Para apagar a memória premir para ver os totais e depois para limpar a memória.
6.9 ACUMULAÇÃO MANUAL
Quando a balança estiver na posição de Acumulação Automática, o valor armazena-se na memória automaticamente.
Acrescente o peso à balança, o som de aviso soará quando a balança estiver estável, o que significa que o valor foi aceite. Retirar o
peso.
O ecrã mostrará “ACC 1” e os totais da memória quando a balança regressar a zero. Quando se acrescentar um segundo peso, o pro-
cesso repete-se.
Enquanto o peso estiver sobre a balança, pode-se premir , para armazenar o valor imediatamente. Neste caso, a balança não
irá armazenar o valor quando o peso for retirado.
Os totais podem ser vistos tal como mencionado anteriormente.
As balanças devem sempre regressar a zero ou a um número negativo antes de acrescentar outro peso à memória.
A partir desse momento, já se poderá adicionar mais produtos e premir outra vez. Isto pode continuar até um número total de
99 vezes ou até a capacidade de peso ser excedida.

PTPTMANUAL DE USUÁRIO BW
54
7. FUNCIONAMENTO COM BATERIA
Este tipo de balanças incorporam uma bateria recarregável (bateria de ácido de chumbo 6V74Ah). As balanças podem funcionar com
baterias se se desejar. A duração da bateria é de aproximadamente 100 horas.
Nota: as baterias novas estão parcialmente carregadas. Antes de poder utilizar a sua balança, deve instalar e carregar a bateria
seguindo as seguintes instruções.
Algumas baterias têm melhor rendimento depois de vários ciclos completos de carga/descarga. O rendimento das baterias depende de
numerosos fatores, incluindo a configuração da retroiluminação e a operativa.
Nunca utilize um carregador ou uma bateria que estejam danificados.
Não provoque um curto-circuito na bateria. Se existir a possibilidade de ocorrer um curto-
circuito acidental quando um objeto metálico (moeda, clipe ou caneta) provocar uma cone-
xão direta dos polos + e – da bateria (tiras metálicas da bateria), por exemplo quando levar
uma bateria sobressalente no bolso.
Provocar um curto-circuito dos polos pode danificar a bateria ou o objeto que se conecta.
Não deite as baterias no fogo.
As baterias seguindo a regulamentação local (por exemplo, reciclagem).
Não deite as baterias como lixo doméstico.
Evite carregar a bateria em condições de falta de ar.
Quando a bateria precisar de ser recarregada, irá acender a flecha situada sobre o símbolo da bateria baixa debaixo do visor do peso.
Será necessário recarregar a bateria assim que aparecer a flecha sobre o símbolo. A balança ainda irá funcionar durante cerca de 10
horas, após este período apagará automaticamente para proteger a bateria.
Para carregar a bateria basta ligá-la à rede elétrica. Não é necessário acender a balança. O recarregamento deveria durar 12 horas para
encher a bateria a plena capacidade.
Imediatamente debaixo do visor de quantidade há um LED que indica o estado da carga da bateria.
A bateria interna carrega quando a balança estiver ligada à rede elétrica. Se o LED estiver com cor verde a bateria tem a carga completa.
Se estiver vermelho, a bateria está praticamente descarregada e o amarelo indica que a bateria está em processo de recarregamento.
A fim de maximizar o rendimento da sua bateria:
Use sempre baterias e adaptador de CA originais. A garantia da balança não cobre os danos provocados como consequência da utili-
zação de outras baterias e/ou carregadores.
A tensão de saída do adaptador CA é de 9V, mas a faixa de tensão normal oscilará entre 11V e 15V.
As baterias novas ou as baterias que foram armazenadas durante longos períodos de tempo podem requerer mais tempo de carga.
Mantenha a bateria a temperatura ambiente ou uma temperatura próxima quando estiver a efetuar o carregamento. Não exponha as
baterias a temperaturas inferiores a -10°C ou superiores a 45°C.
Durante o transcurso de longos períodos de tempo, as baterias vão perdendo progressivamente capacidade de carregamento, reque-
rendo tempos cada vez mais longos de recarregamento.
Isto é normal. Se tiver de carregar a bateria regularmente e observar que o período de funcionamento está a diminuir ou que o período
de carregamento está a aumentar, provavelmente é momento de adquirir uma bateria nova.

PTPTMANUAL DE USUÁRIO BW
55
8. INTERFACE RS.232
As balanças da série PC-50 incorporam como opção uma interface RS-232. Especificações:
• Porto de saída RS-232 de dados de pesagem
• Código ASCII
• 4800 taxas de baud
• 8 bits de dados
• Sem paridade
Conector: Conectado
Type 9 pin d-subminiature socket BW PC
Pin 2 Input 2 3
Pin 3 Output 3 2
Pin 5 Signal Ground 5 5
O formato de dados para pesagem normal, contador de peças e totais de memória são todos diferentes. Veja os exemplos a seguir.
Output normal
GS 1.234 GS para peso bruto, NT para peso liquido e unidade de peso.
No.. 1 Este número aumenta cada vez que se armazenar um valor novo na memória.
Total 1.234 Kg Valor total armazenado na
emória.
<Lf> Inclui 2 rodapés de página.
Em peso percentual, a saída é só o peso percentual mostrado.
GS 100.00% Valor total armazenado na
<lf> Inclui dois rodapés.
<lf>
9. PARÂMETROS
A balança tem 6 parâmetros que podem ser estabelecidos pelo usuário. Estes parâmeros permitem ao usuário preparar a balança para:
• Mostrar o peso em incrementos de peso para minimizar o dano que podem provocar vibrações, vento ou outras condições meio
ambientais.
• Controlar a luz traseira do ecrã. Pode ser necessário apagar esta luz para maximizar a duração da bateria.
• Introduzir a acumulação ao automático, manual ou instalar o RS-232 interface para imprimir o peso continuamente.
• Programar quando deve realizar acumulação e quando deve imprimir.
• Programar o valor de zero automático
• Selecionar outra unidade de peso além do padrão.
Para instalar os parâmetros deve premir os botões e ao mesmo tempo.
No caso de ser “M” verificado, você deve pressionar a contagem regressiva.
O ecrã mostrará “Inc XX”. O primeiro valor mostrado é o valor de erro de aumento da balança. Para selecionar um aumento de valor
diferente, prima o Botão para mudar o valor e depois prima o botão .
Por exemplo, com um peso de 15kg em cima da balança o aumento padrão é de 0,5, o valor pode ser mudado de 1,0g para 2,0g.

PTPTMANUAL DE USUÁRIO BW
56
O próximo parâmetro é o de controle da luz traseira. O padrão consiste em que a luz traseira funcione automaticamente, apagando
quando a balança não é utilizada. A luz traseira pode ser instalada com “O On”, “O AU” (Automática) ou “O Off”. A duração máxima da
bateria consegue-se quando a luz traseira se apaga.
Prima o botão para mudar o valor, depois prima o botão .
A acumulação automática é o seguinte passo. Com “Au On” a memória acumulará o peso automaticamente, “Au Off” permitirá a
acumulação manual e com “P COnt” a interface RS-232 enviará o peso continuamente e a função de acumulação será desativada.
Prima o botão para mudar o valor, depois prima o botão .
Com “ACC ON” quando for premido será realizada a acumulação, com “ACC OF” apenas imprimirá, sem acumulação.
Prima o botão para mudar a programação, depois prima o botão .
O valor de zero automático é o próximo. Você pode selecionar entre 0,5d, 1d, 2d e 4d.
Prima o botão para mudar a programação, depois prima o botão .
Quando a balança for programada para pesar com outras unidades de peso, a função de acumulação continuará a salvar o peso em
quilogramas.
10. CALIBRAÇÃO
10.1.CALIBRAÇÃO LINEAR
Para começar a calibração, apagar a balança e voltar a acender. Premir e juntos durante a conta inicial, desde 9 a
0 no ecrã.
O ecrã mostrará “unLOAD”. Retire todo o peso da bandeja e prima para voltar ao ponto zero.
O ecrã mostrará a seguir a primeira calibração. Pôr o peso sobre a plataforma e premir quando a balança estiver estável. A
balança deve estar estável para aceitar um peso. O indicador de estabilidade acenderá para mostrar que o valor é estável.
Depois de completar toda a calibração de peso, premir para completar a calibração. A balança começará a contar atrás para
zero depois de selecionar a última pesagem.
Calibração de pesos
SÉRIE BW
MODELO BW3 BW6 BW15 BW30
Peso 1 ZERO ZERO ZERO ZERO
Peso 2 1kg 2kg 5kg 10kg
Peso 3 3kg 6kg 15kg 30kg

PTPTMANUAL DE USUÁRIO BW
57
10.2 CALIBRAÇÃO NORMAL
Para começar a calibração apagar a balança e voltar a ligá-la. Premir e ao mesmo tempo durante a contagem inicial
de 9 a 0.
Pressione o botão de calibração se eles forem verificados e, em seguida, e . Pressione antes da contagem regressiva
O ecrã mostrará “UNLOAD”. Retire o peso da balança e depois prima para regressar ao ponto zero.
Depois utilize , os botões e para calibrar o peso.
Premir Para assegurar-se, o ecrã mostrará “LOAD”. Situe o peso sobre bandeja quando o indicador estiver aceso, premir
para assegurar. Depois de regressar à comprovação automática, a balança BW está pronta para ser utilizada.
11. CÓDIGOS DE ERRO
Durante o teste inicial de ligação ou durante outra operação, é possível que a balança mostre uma mensagem de erro. O significado das
mensagens de erro descreve-se a seguir.
Se aparecer uma mensagem de erro no ecrã, repita a operação que provocou a aparição desta mensagem, voltando a acender a ba-
lança, calibração ou outras funções, Se a mensagem de erro persiste contacte o seu fornecedor para mais detalhes.
CÓDIGO DE ERRO DESCRIÇÃO CAUSAS POSSÍVEIS
Err4
O Inicial Zero é maior do que o permitido
(4% de capacidade máxima) quando
a balança a cender ou quando o botão
for acionado.
Peso sobre a balança quando a mesma
acende.
Peso excessivo sobre a bandeja quando
se instala a função zero.
Calibração incorreta da balança. Célula
de carregamento
danificada.
Err5 Erro de teclado. Operação incorreta da balança.
Err6 A conta A/D não é correta
quando se acende a balança.
A plataforma não está instalada. A célula
de carregamento está danificada. Falhas
na eletrónica.
Para visualizar a conta A/D premir o botão e ao mesmo tempo enquanto a balança estiver a realizar a
comprovação inicial quando for ligada. Premir ZERO/ENTER para regressar à função normal.


trade mark propiety of | marca propiedad de | est une marque de | Warenzeichen Proprietät von
marca de propriedade de :
Pol. Empordà Internacional C/ Molló, 3
17469 VILAMALLA - (Girona) SPAIN
T. (34) 972 527 212
-
 1
1
-
 2
2
-
 3
3
-
 4
4
-
 5
5
-
 6
6
-
 7
7
-
 8
8
-
 9
9
-
 10
10
-
 11
11
-
 12
12
-
 13
13
-
 14
14
-
 15
15
-
 16
16
-
 17
17
-
 18
18
-
 19
19
-
 20
20
-
 21
21
-
 22
22
-
 23
23
-
 24
24
-
 25
25
-
 26
26
-
 27
27
-
 28
28
-
 29
29
-
 30
30
-
 31
31
-
 32
32
-
 33
33
-
 34
34
-
 35
35
-
 36
36
-
 37
37
-
 38
38
-
 39
39
-
 40
40
-
 41
41
-
 42
42
-
 43
43
-
 44
44
-
 45
45
-
 46
46
-
 47
47
-
 48
48
-
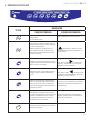 49
49
-
 50
50
-
 51
51
-
 52
52
-
 53
53
-
 54
54
-
 55
55
-
 56
56
-
 57
57
-
 58
58
-
 59
59
-
 60
60


en otros idiomas
- français: Baxtran BW Manuel utilisateur
- English: Baxtran BW User manual
- Deutsch: Baxtran BW Benutzerhandbuch
- português: Baxtran BW Manual do usuário