Unbranded BFP-218-V5.0 Instrucciones de operación
- Tipo
- Instrucciones de operación

Replacement Bluetooth® Speaker Kit
Installation Instructions
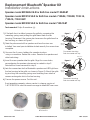
1) If the bath fan is installed, remove the grille by squeezing the
mounting springs and pulling the grille down from the fan
housing. Disconnect the connectors to remove the grille from the
fan housing, as shown in Figure 1.
2) Note the placement of the speaker and how the wires are
installed. You want your installation to look exactly the same when
complete.
3) Unscrew the 4 screws holding the speaker in place
using a screwdriver. Retain the screws. Remove the speaker and
attached wiring.
4) Insert the new speaker into the grille. Align the screw holes,
remembering the previous placement as noted in step 2.
Reinstall the screws removed in step 3.
5) Join the connectors for the Bluetooth® speaker and LED light from
the fan housing to the grille, as shown in Figure 2. Attach the grille
by pinching the mounting springs and inserting them into the
narrow rectangular slots in the fan housing.
6) Turn on the power source. Test the unit.
If not operating properly, please contact customer service at
1-877-319-3757 or send an email message to [email protected].
Speaker model BFP-069L-V5.0 for Bath Fan model 7130-03-BT
Speaker model BFP-218-V5.0 for Bath Fan models 7130-04, 7130-08, 7130-14,
7130-15, 7130-18-BT
Speaker model BFP-230-V5.0 for Bath Fan model 7130-13-BT
Tools needed: Philips Screwdriver (+)
Homewerks.com © 2021 Homewerks Worldwide, LLC REV.: 8/4/21
BFP-069L-V5.0 BFP-218-V5.0 BFP-230-V5.0
Disconnect the wiring
Bath fan models will vary
Figure 1
Reconnect the wiring
Bath fan models will vary
Figure 2
Housing
slots
Grille
Connectors
Mounting
springs
Housing
slots
Grille
Connectors
Mounting
springs

Kit de Altavoz Bluetooth® de Repuesto
Instrucciones de Instalación
1) Si el ventilador está instalado, retire la rejilla apretando los resortes
de montaje y tirando de la rejilla hacia abajo de la caja del
ventilador. Desconecte los conectores para quitar la rejilla de la
caja del ventilador, como se muestra en la Figura 1.
2) Tenga en cuenta la posición del altavoz y cómo están instalados
los cables. Desea que su instalación se vea exactamente igual
cuando se complete.
3) Usando un destornillador, desatornille los 4 tornillos que sujetan el
altavoz en su lugar. Conserve los tornillos. Retire el altavoz y el
cableado adjunto.
4) Inserte el nuevo altavoz en la rejilla. Alinee los oricios de los
tornillos, recordando la ubicación anterior como se indicó en el
paso 2. Vuelva a instalar los tornillos que quitó en el paso 3.
5) Una los conectores para el altavoz Bluetooth® y la luz LED de la
caja del ventilador a la rejilla, como se muestra en la Figura 2.
Sujete la rejilla presionando los resortes de montaje e insértelos en
las ranuras rectangulares estrechas en la caja del ventilador.
6) Apague la fuente de alimentación. Pruebe la unidad.
Si no funciona correctamente, comuníquese con el servicio de
atención al cliente al 1-877-319-3757 o envíe un mensaje de
correo electrónico a [email protected].
Altavoz modelo BFP-069L-V5.0 para ventilador de baño modelo 7130-03-BT
Altavoz modelo BFP-218-V5.0 para ventilador de baño modelo 7130-04,
7130-08, 7130-14, 7130-15, 7130-18-BT
Altavoz modelo BFP-230-V5.0 para ventilador de baño modelo 7130-13-BT
Herramientas necesarias: Destornillador de estrella (+)
Homewerks.com © 2021 Homewerks Worldwide, LLC REV.: 8/ 4/21
BFP-069L-V5.0 BFP-218-V5.0 BFP-230-V5.0
Desconectar el cableado
los modelos de
ventiladores variarán
Figura 1
Volver a conectar el cableado
los modelos de
ventiladores variarán
Figura 2
Ranuras
de la caja
Rejilla
Conectores
Resortes
de montaje
Ranuras
de la caja
Rejilla
Conectores
Resortes
de montaje
-
 1
1
-
 2
2

