La página se está cargando...

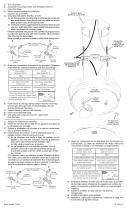
NOTE DIRECTION OF SWIVEL IN ACCORDANCE WITH CEILING.
1) Lower shade down over socket cluster.
2) Passwirefromxturethroughstemandscrewstemtotopofcoupling.
IMPORTANT: At least one 6” stem must be used.
NOTE: Threadlockingcompoundmustbeappliedtoallstemthreadsasnotedwith
symbol (3)topreventaccidentalrotationofxtureduringcleaning,relamping,etc.
3) Passxturewirethroughremainingstemsandscrewstemstogether.
4) Screwlaststemtothreadedpipeonswiveloncanopy.
5) TURN OFF POWER.
IMPORTANT:Beforeyoustart,NEVERattemptanyworkwithoutshuttingoffthe
electricity until the work is done.
a) Gotothemainfuse,orcircuitbreaker,boxinyourhome.Placethemainpower
switchinthe“OFF”position.
b) Unscrewthefuse(s),orswitch“OFF”thecircuitbreakerswitch(s),thatcontrol
thepowertothextureorroomthatyouareworkingon.
c) Placethewallswitchinthe“OFF”position.Ifthexturetobereplacedhasa
switchorpullchain,placethoseinthe“OFF”position.
6) Findtheappropriatethreadedholesonmountingstrap.Assemblemountingscrews
into threaded holes.
7) Attachmountingstraptooutletbox.(Screwsnotprovided).Mountingstrapcanbe
adjustedtosuitpositionofxture.
8) Groundinginstructions:(SeeIllus.AorB).
A) Onxtureswheremountingstrapisprovidedwithaholeandtworaised
dimples.Wrapgroundwirefromoutletboxaroundgreengroundscrew,and
thread into hole.
B) Onxtureswhereacuppedwasherisprovided.Attachgroundwirefromoutlet
boxundercuppedwasherandgreengroundscrew,andthreadintomounting
strap.
Ifxtureisprovidedwithgroundwire.Connectxturegroundwiretooutletbox
groundwirewithwireconnector.(Notprovided.)Afterfollowingtheabovesteps.
Neverconnectgroundwiretoblackorwhitepowersupplywires.
9) Makewireconnections(connectorsnotprovided.)Referencechartbelorforcorrect
connectionsandwireaccordingly.
10)Pushxturetoceiling,carefullypassingmountingscrewsthroughholesincanopy.
11)Securexturetoceilingwithknurlknobs.
12)Raiseglassuptoxture.Passholeinglassoversocket.
13) Threadsocketringontosocket.(DONOTovertighten.)
NOTE LA DIRECCIÓN DE LA UNIÓN GIRATORIA DE ACUERDO CON EL
CIELO RASO.
1) Pongalapantallaabajo,encimadeldelracimodecasquillos.
2) Paseelalambredelartefactoatravésdelvástagoyatornilleelvástagoaltopedel
artefacto.IMPORTANTE: Porlomenosunvástagode6”sedebeusar.
NOTA:Elcompuestopararoscaestancasedebeaplicaratodaslasroscasdel
vástagocomosenotóconelsímbolo(3)paraimpedirlarotaciónaccidentaldel
artefactodurantelalimpieza,instalacióndeunabombillanueva,etc.
3) Paseelalambredelartefactoatravésdelosvástagosrestantesyatornillelos
vástagosjuntos.
4) Atornilleelúltimovástagoaltuboroscadoenlaunióngiratoriadelcapuchón.
5) APAGUELAALIMENTACIÓNELÉCTRICA.
IMPORTANTE: Antesdecomenzar,NUNCAtratedetrabajarsinantesdesconectar
lacorrientehastaqueeltrabajosetermine.
a) Vayaalacajaprincipaldefusibles,ointerruptorocajadecircuitosdesucasa.
Coloqueelinterruptordelacorrienteprincipalenposicióndeapagado“OFF”.
b) Desatornilleel(los)fusible(s),ocoloqueelinterruptorointerruptoresdel
breakerenposicióndeapagado“OFF”,quecontrola(n)lacorrientehaciael
artefactoohabitacióndondeestátrabajando.
c) Coloqueelinterruptordeparedenposicióndeapagado“OFF”.Sielartefacto
quesevaareemplazartieneuninterruptorocadenaquesejala,colóquelosen
laposicióndeapagado“OFF”.
6) Encontrarlosagujerosroscadoscorrectosenlaabrazaderademontaje.Instalarlos
tornillosdemontajeenlosagujerosroscados.
7) Unirlaabrazaderademontajealacajadeconexiones.(Noseproveentornillos).La
abrazaderademontajepuedeajustarseparaacomodarlaposicióndelartefacto.
8) InstruccionesdeconexiónatierrasolamenteparalosEstadosUnidos.
(VealailustracionAoB).
A) Enlaslámparasquetieneneleje,demontajeconunagujeroydoshoyuelos
realzados.Enrollarelalambreatierradelacajatomacorrientealrededordel
tornilloverdeypasarloporelaquiero.
B) Enlaslámparasconunaarandelaacopada.Fijarelalambreatierradelacaja
tomacorrientedelajodelaarandelaacoadaytornilloverde,ypaserporeleje
de montaje.
Silalámparavieneconalambreatierra.Conecterelalambreatierradelalámpara
al alambre a tierra de la caja tomacorriente con un conector de alambres (no
incluido)espuésdeseguirlospasosanteriores.Nuncaconectarelalambraatierraa
losalambreseléctrosnegrooblanco.
9) Hagalesconexionesdelosalambres(noseproveenlosconnectores.)Latablade
referenciadeabajoindicalasconexionescorrectasylosalambrescorrespondientes.
10)Empujeelartefactohaciaeltecho,pasandocuidadosamentelostornillosdemontaje
atravésdelosoriciosenelescudete.
11) Asegureelartefactoaltechoconlasperillasestriadas.
12)Levanteelvidriohastaelartefactopasandoelagujeroenelvidrio
encimadelcasquillo.
13) Rosqueelanillodelcasquilloenelcasquillo.(NOaprieteexcesivamente.)
GREEN GROUND
SCREW
CUPPED
WASHER
A
B
OUTLET BOX
GROUND
FIXTURE
GROUND
DIMPLES
WIRE CONNECTOR
(NOT PROVIDED)
OUTLET BOX
GROUND
GREEN GROUND
SCREW
FIXTURE
GROUND
Connect Black or
Red Supply Wire to:
Connect
White Supply Wire to:
Black White
*Parallel cord (round & smooth) *Parallel cord (square & ridged)
Clear, Brown, Gold or Black
without tracer
Clear, Brown, Gold or Black
with tracer
Insulated wire (other than green)
with copper conductor
Insulated wire (other than green)
with silver conductor
*Note: When parallel wires (SPT I & SPT II)
are used. The neutral wire is square shaped
or ridged and the other wire will be round in
shape or smooth (see illus.)
Neutral Wire
ARANDELA
CONCAVA
A
B
TIERRA DE LA
CAJA DE SALIDA
TORNILLO DE TIERRA,
VERDE
DEPRESIONES
TIERRA
ARTEFACTO
CONECTOR DE ALAMBRE
(NO SE PROVEE)
TIERRA DE LA
CAJA DE SALIDA
TORNILLO DE TIERRA,
VERDE
TIERRA
ARTEFACTO
Conectar el alambre de
suministro negro o rojo al
Conectar el alambre de
suministro blanco al
Negro Blanco
*Cordon paralelo (redondo y liso)
*Cordon paralelo (cuadrado y estriado)
Claro, marrón, amarillio o negro
sin hebra identificadora
Claro, marrón, amarillio o negro
con hebra identificadora
Alambre aislado (diferente del verde)
con conductor de cobre
Alambre aislado (diferente del
verde) con conductor de plata
*Nota: Cuando se utiliza alambre paralelo
(SPT I y SPT II). El alambre neutro es de forma
cuadrada o estriada y el otro alambre será de
forma redonda o lisa. (Vea la ilustracíón).
Hilo Neutral
DateIssued:9/2/11 IS-2693-US
MOUNTINGSTRAP
ABRAZADERA
DEMONTAJE
CANOPY
CAPUCHÓN
STEM
VÁSTAGO
3
4
KNURL KNOB
PERILLAESTRIADA
3
SWIVEL
UNIÓNGIRATORIA
4
3
GLASS
VIDRIO
SOCKETRING
ANILLODELCASQUILLO
1/1

