iLuv Aud Shower Guía de inicio rápido
- Categoría
- Bocinas portables
- Tipo
- Guía de inicio rápido

Pour augmenter le volume, appuyez brièvement
sur plusieurs fois, jusqu’à ce que vous ayez
atteint le niveau sonore désiré.
Pour baisser le volume, appuyez sur plusieurs fois,
jusqu’à ce que vous ayez atteint le niveau sonore désiré.
Maintenez appuyé pendant 3 secondes
jusqu’à ce que le voyant d’alimentation devienne
bleu. L’appareil émettra un bip sonore une fois
l’alimentation branchée.
iLuv Aud Shower
Beep
iLuv Aud Shower
iLuv Aud Shower
Beep
1
QSG
(Apple device shown as an example)
(Dispositif Apple montré en exemple)
(Dispositivo Apple mostrado como ejemplo)
1
(iPad)
(iPhone/iPod)
2
3
6
7
8
NOTE: This equipment has been tested and found to comply with the limits for a Class B digital
device, pursuant to Part 15 of the FCC Rules. These limits are designed to provide reasonable
protection against harmful interference in a residential installation. This equipment generates, uses
and can radiate radio frequency energy and, if not installed and used in accordance with the
instructions, may cause harmful interference to radio communications. However, there is no
guarantee that interference will not occur in a particular installation. If this equipment does cause
harmful interference to radio or television reception, which can be determined by turning the
equipment o and on, the user is encouraged to try to correct the interference by one or
more of the following measures:
Reorient or relocate the receiving antenna.
Connect the equipment into an outlet on a circuit dierent from that to which the receiver is connected.
Consult the dealer or an experienced radio/TV technician for help.
Increase the separation between the equipment and receiver.
COMPLIES WITH FCC PART 15 RULES / COMPLIES WITH 21 CFR 1040.10 / COMPLIES WITH RSS-210
OF INDUSTRY CANADA
WARNING: Changes or modications to this unit not expressly approved by the party responsible for
compliance could void the user’s authority to operate the equipment.
This Class B digital apparatus complies without apply CAN ICES-3 (B)/NMB-3(B) / Cet appareil numérique
de la classe B est conforme à la norme CAN ICES-3 (B)/NMB-3(B).
The device complies with Part 15 of the FCC Rules. Operation is subject to the following two
conditions: (1) this device may not cause harmful interference, and (2) this device must accept
any interference received, including interference that may cause undesired operation.
苹果设备示出为例
4
2
2
5
Incoming
Call
1. Once your phone is connected to Bluetooth, speaker will ring when there
is incoming call.
Une fois votre téléphone connecté à Bluetooth, le haut-parleur sonnera en cas d’appel entrant.
Una vez haya conectado el teléfono al Bluetooth, el auricular sonará cuando haya una llamada entrante.
Wanneer je telefoon met Bluetooth is verbonden, gaat, als er iemand belt, je telefoon op de speaker over.
2. Press to answer and begin talking.
You should be able to hear call through the
speaker. To end call press call button again.
Music will resume automatically once call ends.
1
1
1. To raise volume, briey click
repeatedly until you have reached
desired level.
2. To lower volume, briey click
repeatedly until you have reached
desired level.
2
1. To forward track, press and hold
(the one pointing to the call button)
Pour passer à la piste suivante, maintenez appuyé
(la touche qui indique la direction de la touche d’appel)
Para avanzar la pista, presione y sostenga
(la que señala al botón de llamar)
Vooruitspoelen: houd ingedrukt (wijst naar de
belknop).
要在轨道中向前,按住 (指向呼叫按钮)
要重播轨道中,按住 (指向充电站的按钮)
充电时,LED指示灯会亮红光。一旦充电完成,LED指示灯将熄灭
使用回形针或任何尖锐工具按下位于充电USB接口旁边的小孔内的重置按钮来重置单位。
* 配对时,指示灯会闪烁蓝色。配对成后,
LED会以较慢的速度闪烁,警告声音会消失
往坚硬平整的表面按压住吸杯的橡胶端。
将吸入锁朝着安装盖快速向下滑到底,直到听到卡锁声
一旦你的手机连接到蓝牙,扬声器在来电时会响。
按下 回答并开始通话。
你应该能够通过扬声器听到通话。
要结束通话,再次按下呼叫按钮。
一旦通话结束,音乐将自动恢复。
把安装孔放置到安装钩上,以安装连接扬声器头,然后扭转直到固定。
若要从墙上取下安装,先拧掉喇叭头,吸锁往上搬。如果安装仍连接,
把吸嘴安装的取下垂片往上搬。
要提高音量,重复短击 ,直到达到期望的音量
要降低音量,重复短击 ,直到达到期望的音量。
按下 即可暂停播放。再按 即可恢复播放。
Pour relire la piste, maintenez appuyé
(la touche qui indique la station de charge)
Para reproducir la pista otra vez, presione y sostenga
(la que mira a la estación de carga)
Nummer opnieuw afspelen: houd ingedrukt
(wijst naar het oplaadstation).
Appuyez simplement sur pour mettre la lecture
sur pause. Appuyez à nouveau sur pour relancer la
lecture de la piste
2. To replay track, press and hold
(the one pointing to the charging station)
Use paper clip or any sharp tool to press the reset button located inside
the hole next to charging USB jack to reset the unit.
Utilisez un trombone ou un autre outil pointu pour appuyer sur le bouton de réinitialisation situé dans
le trou à côté du connecteur de charge USB pour réinitialiser l’unité.
Use un clip para papeles o cualquier herramienta alada para apretar el botón reiniciar, que se
encuentra dentro del oricio junto al enchufe de carga del USB para reiniciar la unidad.
Gebruik een paperclip of iets vergelijkbaars om de resetknop in te drukken. Deze is te vinden in het
gaatje naast de usb-aansluiting voor opladen.
3. Simply press to pause playing.
Press once again to resume track
Water Resistant Bluetooth® Speaker with Hands-free Talking
Haut-parleur Bluetooth® résistant à l'eau avec conversation mains-libres
Aud
™
Shower
2. Flick down the suction lock all the way
toward the mount cover until
you hear click
3. Connect speaker head onto mount by placing mount hole
on mount hook and twisting until it feels secure.
Connectez la tête haut-parleur sur la monture en plaçant le trou de la monture sur le crochet
et en tournant jusqu’à ce que la jonction soit sécurisée
Conecte el auricular del altavoz al soporte colocando el oricio del soporte en el gancho del
soporte y gírelo hasta que parezca seguro
Verbind de kop van de speaker aan de houder door het houdergat op de houderhaak te
plaatsen. Draai totdat het stevig aanvoelt
To remove mount from wall, twist o speaker head and ick up
the suction lock.
If mount is still connected lift, suction mount removal tab.
Pour retirer la monture du mur, tournez la tête haut-parleur et relevez le verrouillage
de la ventouse. Si la monture est encore connectée, soulevez la languette de retrait
de la ventouse de la monture.
Para quitar el soporte de la pared, desenrosque el auricular del altavoz y tire hacia arriba
el bloqueo de succión. Si el soporte está todavía conectado, levante la lengüeta para
quitar el soporte de succión.
Houder van de muur verwijderen: draai de speakerkop van de houder en schakel de
zuignapvergrendeling uit (naar boven). Als de houder nog vastzit: trek het lipje voor
verwijderen van de zuignaphouder op.
1. Push and hold rubber end of suction
cup against hard and at surface
Maintenez appuyée l’extrémité en caoutchouc
de la ventouse contre une surface dure et plate
Empuje y sostenga el extremo de goma de la vent osa
de succión contra una supercie dura y plana
Druk het rubberen uiteinde van de zuignap stevig
tegen een hard en een oppervlak
Abaissez le blocage de la ventouse vers la monture
du boîtier jusqu’à ce que vous entendiez un déclic
Baje hasta el fondo el bloqueo de succión hacia la
tapa del soporte hasta que oiga un clic
Schakel de vergrendeling voor de zuignap in de
richting van de houder totdat je een klik hoort
1
2
3
1
2
RESET
DC 5V
RESET
2
100%
When charging, LED light will glow red. Once charged, LED will turn o
Pendant la charge, la LED s’allumera en rouge. Une fois l’appareil chargé, la LED s’éteindra
Cuando se cargue, la luz LED brillará en color rojo. Una vez cargado, la LED se apagará.
Tijdens het opladen brandt het ledlampje rood. Het ledlampje gaat uit wanneer opladen voltooid is.
* When pairing, LED will ash blue.
Once paired, LED will ash at slower pace
and alert sound will go o
* La LED clignotera en bleu lors du couplage. Une fois couplée,
la LED clignotera plus lentement et le son d’alerte se déclenchera.
* Cuando acople, la LED destellará en azul. Una vez acoplado,
la LED irá a un ritmo más lento y se apagará el sonido de aviso.
* Tijdens pairing knippert het ledlampje blauw. Als pairing klaar is,
knippert het ledlampje langzamer en hoor je een audiosignaal
1
DC 5V
To force the unit to pairing mode,
press and hold button for 3s.
Press and hold for 3 seconds until
power light turns blue. Device will beep
once power is on
3
Presione y sostenga durante 3 segundos hasta
que la luz de la corriente se ponga azul. El dispositivo
hará un sonido bip cuando la corriente esté encendida.
Houd gedurende 3 seconden ingedrukt totdat
het stroomlampje blauw brandt. Het apparaat geeft
een piepje zodra het aan is
Pour forcer l’unité à entrer en mode couplage,
maintenez appuyée la touche
pendant 3 secondes.
Para forzar la unidad al modo acoplamiento.
presione y sostenga el botón durante 3 s.
De eenheid dwingen in pairingmodus te gaan:
houd gedurende 3 sec. ingedrukt
Para pausar la reproducción, simplemente presione .
Vuelva a presionar para continuar la reproducción
Druk gewoon op om het afspelen te pauzeren.
Druk opnieuw op om afspelen te vervolgen.
按住 3秒钟,直到电源指示灯变为蓝色。
装置会在电源开启时发出哔哔声
强制单位进入配对模式,按住 按钮3秒。
Appuyez sur pour répondre et commencer à parler.
Vous devriez pouvoir entendre l’appel par le
haut-parleur. Appuyez de nouveau sur le bouton d’appel
pour mettre un terme à celui-ci. La musique sera
automatiquement relancée une fois l’appel terminé.
Presione para responder y empezar a hablar.
Debería poder oír la llama a través del auricular.
Para terminar la llamada presione otra vez el botón de
llamada. La música continuará de nuevo de forma
automática cuando acabe la llamada.
Druk op om het gesprek te beginnen.
Het gesprek is via de speaker te horen. Het gesprek
wordt beëindigd door opnieuw op de belknop te
drukken. Na het gesprek gaat de muziek automatisch
verder.
Para subir el volumen, haga clic breve y repetidamente
en hasta que logre el nivel deseado.
Het volume verhogen: druk kort herhaaldelijk
op totdat het gewenste volume is bereikt.
Para bajar el volumen haga clic breve y repetidamente
en hasta que alcance el nivel deseado.
Het volume verlagen: druk kort herhaaldelijk
op totdat het gewenste volume is bereikt.
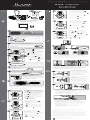
Transcripción de documentos
Water Resistant Bluetooth® Speaker with Hands-free Talking Haut-parleur Bluetooth® résistant à l'eau avec conversation mains-libres Aud™ Shower 1 1. To forward track, press and hold (the one pointing to the call button) Pour passer à la piste suivante, maintenez appuyé (la touche qui indique la direction de la touche d’appel) Para avanzar la pista, presione y sostenga (la que señala al botón de llamar) QSG Vooruitspoelen: houd belknop). ingedrukt (wijst naar de 要在轨道中向前,按住 (指向呼叫按钮) 2 (Apple device shown as an example) (Dispositif Apple montré en exemple) (Dispositivo Apple mostrado como ejemplo) 2. To replay track, press and hold (the one pointing to the charging station) (苹果设备示出为例) Pour relire la piste, maintenez appuyé (la touche qui indique la station de charge) Para reproducir la pista otra vez, presione y sostenga (la que mira a la estación de carga) Nummer opnieuw afspelen: houd (wijst naar het oplaadstation). (iPad) (iPhone/iPod) 要重播轨道中,按住 1 3 3. Simply press Press ingedrukt (指向充电站的按钮) to pause playing. once again to resume track Appuyez simplement sur pour mettre la lecture sur pause. Appuyez à nouveau sur pour relancer la lecture de la piste Para pausar la reproducción, simplemente presione . Vuelva a presionar para continuar la reproducción 2 Druk gewoon op Druk opnieuw op 按下 om het afspelen te pauzeren. om afspelen te vervolgen. 即可暂停播放。再按 即可恢复播放。 3 2 DC 5V RESET 1 4 Press and hold for 3 seconds until power light turns blue. Device will beep once power is on Maintenez appuyé pendant 3 secondes jusqu’à ce que le voyant d’alimentation devienne bleu. L’appareil émettra un bip sonore une fois l’alimentation branchée. Beep 100% Presione y sostenga durante 3 segundos hasta que la luz de la corriente se ponga azul. El dispositivo hará un sonido bip cuando la corriente esté encendida. Houd gedurende 3 seconden ingedrukt totdat het stroomlampje blauw brandt. Het apparaat geeft een piepje zodra het aan is 按住 3秒钟,直到电源指示灯变为蓝色。 装置会在电源开启时发出哔哔声 When charging, LED light will glow red. Once charged, LED will turn off 5 To force the unit to pairing mode, press and hold button for 3s. Pour forcer l’unité à entrer en mode couplage, maintenez appuyée la touche pendant 3 secondes. Para forzar la unidad al modo acoplamiento. presione y sostenga el botón durante 3 s. Pendant la charge, la LED s’allumera en rouge. Une fois l’appareil chargé, la LED s’éteindra Cuando se cargue, la luz LED brillará en color rojo. Una vez cargado, la LED se apagará. Tijdens het opladen brandt het ledlampje rood. Het ledlampje gaat uit wanneer opladen voltooid is. 充电时,LED指示灯会亮红光。一旦充电完成,LED指示灯将熄灭 De eenheid dwingen in pairingmodus te gaan: houd gedurende 3 sec. ingedrukt 按钮3秒。 RESET 强制单位进入配对模式,按住 DC 5V 6 iLuv Aud Shower Use paper clip or any sharp tool to press the reset button located inside the hole next to charging USB jack to reset the unit. 7 Utilisez un trombone ou un autre outil pointu pour appuyer sur le bouton de réinitialisation situé dans le trou à côté du connecteur de charge USB pour réinitialiser l’unité. Use un clip para papeles o cualquier herramienta afilada para apretar el botón reiniciar, que se encuentra dentro del orificio junto al enchufe de carga del USB para reiniciar la unidad. Gebruik een paperclip of iets vergelijkbaars om de resetknop in te drukken. Deze is te vinden in het gaatje naast de usb-aansluiting voor opladen. iLuv Aud Shower 使用回形针或任何尖锐工具按下位于充电USB接口旁边的小孔内的重置按钮来重置单位。 1 8 1. Push and hold rubber end of suction cup against hard and flat surface Maintenez appuyée l’extrémité en caoutchouc de la ventouse contre une surface dure et plate iLuv Aud Shower Beep Empuje y sostenga el extremo de goma de la vent osa de succión contra una superficie dura y plana Druk het rubberen uiteinde van de zuignap stevig tegen een hard en effen oppervlak * When pairing, LED will flash blue. Once paired, LED will flash at slower pace and alert sound will go off 往坚硬平整的表面按压住吸杯的橡胶端。 * La LED clignotera en bleu lors du couplage. Une fois couplée, la LED clignotera plus lentement et le son d’alerte se déclenchera. * Cuando acople, la LED destellará en azul. Una vez acoplado, la LED irá a un ritmo más lento y se apagará el sonido de aviso. 2 2. Flick down the suction lock all the way toward the mount cover until you hear click * Tijdens pairing knippert het ledlampje blauw. Als pairing klaar is, knippert het ledlampje langzamer en hoor je een audiosignaal * 配对时,指示灯会闪烁蓝色。配对成后, LED会以较慢的速度闪烁,警告声音会消失 Abaissez le blocage de la ventouse vers la monture du boîtier jusqu’à ce que vous entendiez un déclic Baje hasta el fondo el bloqueo de succión hacia la tapa del soporte hasta que oiga un clic 1 Schakel de vergrendeling voor de zuignap in de richting van de houder totdat je een klik hoort 将吸入锁朝着安装盖快速向下滑到底,直到听到卡锁声 Incoming Call 3 1. Once your phone is connected to Bluetooth, speaker will ring when there is incoming call. 1 2 Une fois votre téléphone connecté à Bluetooth, le haut-parleur sonnera en cas d’appel entrant. Una vez haya conectado el teléfono al Bluetooth, el auricular sonará cuando haya una llamada entrante. Wanneer je telefoon met Bluetooth is verbonden, gaat, als er iemand belt, je telefoon op de speaker over. 一旦你的手机连接到蓝牙,扬声器在来电时会响。 2 2. Press to answer and begin talking. You should be able to hear call through the speaker. To end call press call button again. Music will resume automatically once call ends. Appuyez sur pour répondre et commencer à parler. Vous devriez pouvoir entendre l’appel par le haut-parleur. Appuyez de nouveau sur le bouton d’appel pour mettre un terme à celui-ci. La musique sera automatiquement relancée une fois l’appel terminé. Presione para responder y empezar a hablar. Debería poder oír la llama a través del auricular. Para terminar la llamada presione otra vez el botón de llamada. La música continuará de nuevo de forma automática cuando acabe la llamada. 3. Connect speaker head onto mount by placing mount hole on mount hook and twisting until it feels secure. Connectez la tête haut-parleur sur la monture en plaçant le trou de la monture sur le crochet et en tournant jusqu’à ce que la jonction soit sécurisée Conecte el auricular del altavoz al soporte colocando el orificio del soporte en el gancho del soporte y gírelo hasta que parezca seguro Verbind de kop van de speaker aan de houder door het houdergat op de houderhaak te plaatsen. Draai totdat het stevig aanvoelt 把安装孔放置到安装钩上,以安装连接扬声器头,然后扭转直到固定。 Druk op om het gesprek te beginnen. Het gesprek is via de speaker te horen. Het gesprek wordt beëindigd door opnieuw op de belknop te drukken. Na het gesprek gaat de muziek automatisch verder. 按下 回答并开始通话。 你应该能够通过扬声器听到通话。 要结束通话,再次按下呼叫按钮。 一旦通话结束,音乐将自动恢复。 1 1. To raise volume, briefly click repeatedly until you have reached desired level. Pour augmenter le volume, appuyez brièvement sur plusieurs fois, jusqu’à ce que vous ayez atteint le niveau sonore désiré. Para subir el volumen, haga clic breve y repetidamente en hasta que logre el nivel deseado. To remove mount from wall, twist off speaker head and flick up the suction lock. If mount is still connected lift, suction mount removal tab. Pour retirer la monture du mur, tournez la tête haut-parleur et relevez le verrouillage de la ventouse. Si la monture est encore connectée, soulevez la languette de retrait de la ventouse de la monture. Para quitar el soporte de la pared, desenrosque el auricular del altavoz y tire hacia arriba el bloqueo de succión. Si el soporte está todavía conectado, levante la lengüeta para quitar el soporte de succión. Houder van de muur verwijderen: draai de speakerkop van de houder en schakel de zuignapvergrendeling uit (naar boven). Als de houder nog vastzit: trek het lipje voor verwijderen van de zuignaphouder op. 若要从墙上取下安装,先拧掉喇叭头,吸锁往上搬。如果安装仍连接, Het volume verhogen: druk kort herhaaldelijk op totdat het gewenste volume is bereikt. 要提高音量,重复短击 2 把吸嘴安装的取下垂片往上搬。 ,直到达到期望的音量 WARNING: Changes or modifications to this unit not expressly approved by the party responsible for compliance could void the user’s authority to operate the equipment. 2. To lower volume, briefly click repeatedly until you have reached desired level. Pour baisser le volume, appuyez sur plusieurs fois, jusqu’à ce que vous ayez atteint le niveau sonore désiré. Para bajar el volumen haga clic breve y repetidamente en hasta que alcance el nivel deseado. Het volume verlagen: druk kort herhaaldelijk op totdat het gewenste volume is bereikt. 要降低音量,重复短击 COMPLIES WITH FCC PART 15 RULES / COMPLIES WITH 21 CFR 1040.10 / COMPLIES WITH RSS-210 OF INDUSTRY CANADA This Class B digital apparatus complies without apply CAN ICES-3 (B)/NMB-3(B) / Cet appareil numérique de la classe B est conforme à la norme CAN ICES-3 (B)/NMB-3(B). The device complies with Part 15 of the FCC Rules. Operation is subject to the following two conditions: (1) this device may not cause harmful interference, and (2) this device must accept any interference received, including interference that may cause undesired operation. NOTE: This equipment has been tested and found to comply with the limits for a Class B digital device, pursuant to Part 15 of the FCC Rules. These limits are designed to provide reasonable protection against harmful interference in a residential installation. This equipment generates, uses and can radiate radio frequency energy and, if not installed and used in accordance with the instructions, may cause harmful interference to radio communications. However, there is no guarantee that interference will not occur in a particular installation. If this equipment does cause harmful interference to radio or television reception, which can be determined by turning the equipment off and on, the user is encouraged to try to correct the interference by one or more of the following measures: ,直到达到期望的音量。 Reorient or relocate the receiving antenna. Increase the separation between the equipment and receiver. Connect the equipment into an outlet on a circuit different from that to which the receiver is connected. Consult the dealer or an experienced radio/TV technician for help.-
 1
1

iLuv Aud Shower Guía de inicio rápido
- Categoría
- Bocinas portables
- Tipo
- Guía de inicio rápido
en otros idiomas
- français: iLuv Aud Shower Guide de démarrage rapide
- English: iLuv Aud Shower Quick start guide
- Nederlands: iLuv Aud Shower Snelstartgids
