Aspes ACH5600EDC El manual del propietario
- Categoría
- Enfriadores de bebidas
- Tipo
- El manual del propietario
Este manual también es adecuado para

MANUAL DE INSTRUCCIONES ES
USER MANUAL GB
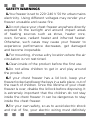
CHEST FREEZER
CONGELADOR HORIZONTAL
ACH6200EDC

2
Dear Customer,
Thank you for choosing products. Our goal is to ensure you to
use this product manufactured in compliance with the sense of total
quality, at our modern plant, in a meticulous working ambient and
without harming the nature, in a most efficient way.
In order for the chest freezer you have purchased sustain its first day
features for a long time and serve you in the most efficient manner, we
recommend that you read the user manual carefully before using your
chest freezer and keep the manual in perpetuity.
NOTE:
This User Manual has been prepared for a multitude of the models.
Some features indicated in the Manual may not be available in your
product. Such features are marked with an * Have the mounting and
introduction of your product performed by an authorised service
agent.
Our product is intended for household use only. They are not suitable
for commercial use.
"READ THE INSTRUCTIONS BEFORE INSTALLING OR OPERATING THE
APPLIANCE."
This product has been manufactured at the modern plants respectful
to the environment without harming the nature.
"Complies with the WEEE Directive"

3
CONTENTS
PART 1
Safety Warnings ................................................................. 4
PART 2
Overview and Technical Specifications ............................... 8
Technical Table ................................................................... 10
PART 3
Mounting Your Chest Freezer ........................................... 12
PART 4
Using Your Chest Freezer ................................................. 13
Packaging the Food ......................................................... 16
Placing the Food .............................................................. 17
PART 5
Cleaning, Maintenance and Transportation of Your Chest
Freezer ............................................................................ 19
Things to Do on Vacations ............................................... 22
PART 6
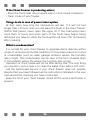
Things to Do Before Calling the Authorised Service .......... 23
PART 7
Compliance With WEEE Regulation And Disposing of the
Waste Product and Package Info ...................................... 25

4
SAFETY WARNINGS
1.You freezer is set to 220-240 V 50 Hz urban mains
electricity. Using different voltages may render your
freezer unusable and cause fire.
2.Do not place your chest freezer anywhere directly
exposed to the sunlight and around impact areas
of heating sources such as stove, heater core,
oven, furnace, radiant heater and infra-red heater.
Otherwise, such cases may cause your freezer to
experience performance decreases, get damaged
and become inoperable.
3.For mounting, choose a dry location where the air
circulation is not restricted.
4.Clean inside of the product before the first use.
5.Do not allow children to get in and play around
the product.
6.If your chest freezer has a lid lock, keep your
freezer locked and keep the keys in a safe place, out of
the reach of children. Once the lifetime of your chest
freezer is over, disable the lid lock before disposing. It
is extremely important that the children do not stay
inside the chest freezer. It can be dangerous to stay
inside the chest freezer.
7.For your own safety, so as to avoid electric shock
and risk of fire, your electric wiring must definitely

5
have a fuse system that is of a residual current
device. We are not responsible for any malfunction
or damages that may occur if the product is used on
an electric network which has not been grounded.
8.Do not put explosive and flammable materials
inside the chest freezer.
9.Do not use any other items to scrape frost than
the frost-scraper apparatus provided with your
product. Otherwise, by using sharp, pointed or metal-
like object, you may damage the inner wall of the
freezer. Besides, misuse of the product may result in
gas leakage.
10.After you place your freezer on the dedicated
area, keep it at least for 2 hours without moving
before starting to use.
11.You freezer has been designed for indoor use. Do
not use it outdoors.
12.Installation, placement, maintenance and cleaning
of the freezer must be performed as indicated in the
manual. You warranty will be void if your freezer gets
damaged owing to the faulty use of the manual.
13.Since a strike of sharp, pointed object or the
touch of an extremely hot material to vitreous part
of the glass-lidded products may break the glasses,
please pay great attention on this issue. (Glass lid

6
option varies depending on the model.)
14.Place your appliance on a flat floor that is not
sloping so as to prevent it from sliding and falling
down.
15.To take the necessary measurements for the foods
inside of the product in case of any malfunction is
totally under initiative of the consumer. Our company
shall not be held responsible for the spoilage of the
foods stemming from any malfunction or misuse.
16.Do not use the freezer with an extension cord or
multi socket.
17.Never use pressurised water for cleaning.
Pressurised water may cause damages in the live
parts.
18.Keep the package materials of the appliance out
of the reach of children. The package materials (nylon,
styrofoam, etc.) may be a hazard risk for children.
19.The device must not be used by the physically,
visually, aurally, mentally disabled and by children
and persons who lack knowledge without being
supervised by the ones who are responsible for their
safety.
20.Open the lid of the freezer only when necessary.
When it is not, make sure the lid is closed properly.

7
21.Unplug the product in case of any power
interruption. Plug it after 20 minutes when you are
sure that the electricity network has returned to
normal.
22.Do not put any pets or wild animals inside the
product and do not allow them to enter. These
creatures may damage the electrical system of the
product and cause fire.
23.Instead of filling your freezer at full capacity, to
load the foods part by part and add more foods after
the recent ones are frozen is a more healthy method.
On the full capacity loadings made all at once, cooling
operation of your freezer may not be adequate as
sufficient cool air flow cannot be provided.
24.Do not contact the foods you have recently put
inside the freezer with the ones that are frozen.

8
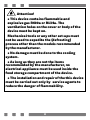
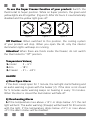
Attention!
• This device contains flammable and
explosive gas R600a or R134a. The
ventilation holes on the cover or body of the
device must be kept on.
Mechanical tools or any other set-ups must
not be used to expedite the (defrosting)
process other than the models recommended
by the manufacturer.
• No damage must be done to the cooling
system.
• As long as they are not the items
recommended by the manufacturer, no
electrical appliance must be used inside the
food storage compartment of the device.
• The installation and repair of the this device
must be carried out only by service agents to
reduce the danger of flammability.

9
PART 2
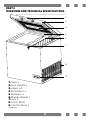
OVERVIEW AND TECHNICAL SPECIFICATIONS
1. Glass *
2.Door Handle *
3.Upper Lid
4.Illumination *
5.Separator *
6.Storage Basket *
7.Lock *
8.Comp. Blind
9. Control Panel *
Optional *
2
7
8
3
5
6
1
4
9

10
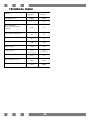
Model
Refrigerant Gas
Energy Class
Annual energy
consumption (kWh/
annum)
Total Gross Volume (l)
Total Net Volume (l)
Height (mm)
Width (mm)
Depth (mm)
Net Weight (kg)
Power Input (V/Hz)
Total Power (W)
TECHNICAL TABLE
ACH1459
R600a
C
610
469
459
840
1492
765
(with handle)
57,5
220-240V/
50Hz
170w
ACH1561
R600a
C
745
572
561
840
1775
765
(with handle)
65
220-240V/
50Hz
200w

11

PART 3
MOUNTING YOUR CHEST FREEZER AND FIRST START-UP
1.Remove the plastic transportation stiffener elements which have
been placed between the upper lid and the body.
2.It is compulsory to have an air circulation at the backside so as to
get a satisfying efficiency from the freezer. You should leave at least
20cm space at the sides of your chest freezer.
3.After mounting the freezer, expect at least for 2 hours without
moving before starting to use it. Then plug your device.
Line voltage and frequency must correspond to the values
written on the label located on the backside of the product. If
the line voltage is too lower or higher than the indicated
values, supply the desired voltage by assuredly using a voltage
regulator. You may consult a qualified electrician in regard to this
issue. The fuse of the wall-socket where your device is plugged must
be 16A maximum.
12

PART 4
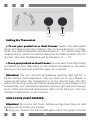
Setting the Thermostat
•To use your product as coolerSwitch the thermostat to Cooler
position (Figure 1). On the first switch (1 beep) is heard, in "Cooler"
mode, the interior temperature will be between 3 ~ 6°C and the green
light is lit.
• To use your product as chest freezer:You can switch the
thermostat to the position between Eco mode and Freezer depending
on the ambient temperature, the place where you use and according
to frequently the upper lid is opened. (Figure 2)
13

•To use the Super Freezer function of your product: Switch the
thermostat to Super position. While on Super position, the green and
yellow lights are lit together. (Figure 3) After 26 hours it is automatically
disabled and the yellow light goes off.
Figure 1 Figure 2 Figure 3
Off Position: When switched to this position, the cooling system
of your product will stop. When you open the lid, only the interior
illumination lights will keep on running.
Attention! When there are foods inside the freezer, do not switch
the thermostat to "Off" position.
Temperature Values;
1. Cooler 3 ~ 6°C
2. Eco - 18°C
3. Freezer - 21 ~ -24°C
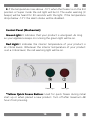
ALARM
a) Door Open Alarm
If the door is kept open for 1 minute, the red light starts flashing and
an audio warning is given with the buzzer (2). If the door is not closed
for 5 minutes audio warning keeps on buzzing in every 10 minutes.
When the door is closed the illumination will fade off.
b) Overheating Alarm
1.If the temperature rises above +12°C or drops below -5°C the red
light will be lit. The audio warning (3 beeps) will be heard for 30 seconds
with the light. If the temperature drops below +10°C or rises above
+0°C the alarm status will be disabled.
14

2. If the temperature rises above -10°C when the freezer is on the 3rd
position or Super mode the red light will be lit. The audio warning (3
beeps) will be heard for 30 seconds with the light. If the temperature
drops below -12°C the alarm status will be disabled.
Control Panel (Mechanical)
Green Light: It indicates that your product is energised. As long
as your appliance keeps on running the green light will be on.
Red Light:It indicates the interior temperature of your product is
at critical levels. Whenever the interior temperature of your product
is at a critical level, the red warning light will be on.
Green Light Red Light
*Yellow Quick Freeze Button: Used for quick freeze during initial
start up or when placed a new product. Turn off after maximum 48
hours from pressing.
15

Yellow
Light
Green
Light
Setting the Thermostat
• To use your product as a chest freezer: Switch the thermostat
arrow to Fridge position by rotating in the clockwise direction. In Fridge
mode, the inner temperature will be between 3 ~ 6°C. And to keep the
meat products, switch the thermostat arrow to Chiller position. On this
position, the inner temperature will be between +1 ~ -1°C.
• To use your product as chest freezer:You can switch the thermostat
to Freezer position depending on the ambient temperature, the place
where you use and how often the upper lid is opened.
Attention! The red coloured temperature warning light will be lit
till the desired cold temperature that you have set on your freezer is
achieved and when the temperature is at the desired level, the light
will go off. As long as the set interior temperature in your freezer is not
achieved the red coloured temperature warning light will continuously
be on. If the red coloured temperature light is lit for 24 hours, this may
indicate a malfunction in your product.
USING YOUR CHEST FREEZER
Attention! Do not put hot foods, bottles as they may blow out and
sparkling drinks inside your freezer.
1. Plug your freezer into a grounded wall-socket. The green coloured
16

power network warning light and red coloured temperature warning on
the control panel light will be lit.
2. Set the thermostat knob to any position you wish.
3. When the light goes off you can load your foods to the freezer.
4. The red warning light will again be lit when the upper lid of your
freezer is kept open for a long time or when you add new bunch of
foods inside.
5. Set the knob to quick freezing position and switch the freezer on at
least 24 hours before loading the fresh foods. Do not open the upper
lid for 24 hours.
Attention! Do not open the upper lid not to cause heat loss in case
of any long-term power interruptions.
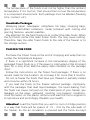
PACKAGING THE FOOD
1. Place the foods in the package.
2. Evacuate the air inside by pressing down.
3. Shut the package tightly.
4. Check if there is any leakage around the package.
5. Write the content and date information down the package.
Remember to operate your chest freezer at least for twenty four (24)
hours unloaded and on quick freezing position before loading the foods.
Switch the thermostat arrow to SUPER position on A++ products and
to MAX position on A+ products. Make the loading after 24 hours.
Your A++ refrigerator will return to its normal operation period after
a certain while. And on A+ refrigerator, switch the thermostat arrow
to FREEZER position after 24 hours. In this way your refrigerator will
return to its normal operation period. Pack your foods up in a way
that no leakage will emerge before placing inside your chest freezer.
Otherwise the foods will lose their taste and become dry. Pack your
foods with suitable packing materials such as aluminium foil, locker
bag, plastic container and etc.
Pack the foods by separating them in portions according to your daily
or meal-based needs.
17

The temperature of the foods must not be higher than the ambient
temperature. If it is too hot, then ensure them to lose the temperature
in a convenient environment. Each package must be labelled (freezing
time, content, etc.).
Unsuitable Packages
Wrapping paper, newspaper, cellophane, bin bags, shopping bags,
glass or metal-lidded containers, metal container with cutting and
piercing features, wooden palettes.
Pay attention for the fresh foods not to contact the older foods. When
the hot foods contact the older frozen foods, this may cause melting.
Therefore, take the older frozen foods to the side of the freezer or to
the storage section.
PLACING THE FOOD
Purchase the frozen foods at the end of shopping and wrap them to
sustain the temperature degrees.
If there is a significant increase in the temperature degree of the
packaged frozen foods (e.g. if the power is interrupted or the lid is kept
open for a long time) take the expiry date indicated on the package
short.
Follow the instructions on the frozen food packages. If there is no
remark made for the duration, do not keep it for more than 3 months.
Do not re-freeze the foods that have just thawed or partially melted
and consume within 24 hours.
If you load the foods to the freezer without package, improperly,
with the packages that lead liquid leakages, the liquid leaking from
the foods can cause corrosion on the metal parts of your freezer, gas
leakages on the pipes, yellowing, cracking, non-hygienic conditions,
smell formation on the plastic sections and lead the micro-organisms
to reproduce and accordingly threaten your health.
Attention! Load the foods that you wish to cool on Fridge position
in a way that there will be spaces of 1.5 - 2cm by the side walls of
the freezer. So the air circulation is ensured and the foods are kept
18

homogeneously. If the foods contact the side walls of the freezer, then
cases like frosting, tarnishing, etc. may occur.
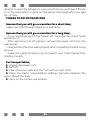
Freezing the cooked foods
• You can put the home-cooked of fried foods inside your chest
freezer. However please do not put the foods that are not fully frozen
such as egg, potato and macaroni inside the chest freezer. Add them
to your frozen foods later.
• Some certain foods to be put inside the freezer should slightly be
cooked and spiced if suitable.
• Place the foods that are eaten cold such as cake and milk puddings
after they are cooked.
• You can also put the foods without cooking them after you prepare
and separately pack them.
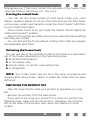
Defrosting the Frozen Foods
You can use one of the methods to defrost the foods you have taken
out of the freezer depending on the type and purpose.
1. At ambient temperature
2. In microwave oven
3. Hot air space / In electric oven without fan
4. In refrigerator
NOTE: Your frozen foods may not be in the same consistency and
integrity after being frozen. Never re-freeze the foods that you have
defrosted.
SWITCHING THE PRODUCT OFF
• Take the frozen foods inside your product to anywhere you may
like.
• Remove the product from the wall-socket.
• If you will not be using your product for a long time, perform the
following steps; clean and dry the product. Otherwise, the humidity
left on the walls of the product may cause frost deposit on inner
surface.
19

WARNING: If the product will be stored in a closed environment
after switching off, do not cover it with plastic covers. Since plastic
does not take the air, this may cause your product to smell and sweat.
As a result of sweating there is a possibility of corrosion. In the cases
where you do not store your product with its lid kept open, there may
be smell formation inside.
20

PART
CLEANING, MAINTENANCE AND TRANSPORTATION OF YOUR
CHEST FREEZER
DEFROST PROCESS
There may be frost deposit on the inner surface of your product in
time due to the fact that the lid is opened and closed. If you do not
frequently open the lid of the product and store the foods in closed
packages, ice and frost deposit will form slowly. Such ice and frost
decrease the efficiency of your product. When the ice thickness is over
2-3 mm, you must immediately carry out defrosting process.
Switch the chest freezer to super cooling (* option) position at least
around 24 hours before starting defrosting process. In that way, your
foods will be protected during the defrosting and cleaning processes
(max. 1 hour).Take the foods inside the freezer to suitable cool area.
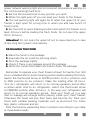
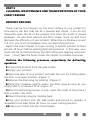
Perform the following processes respectively for defrosting
operation.
1.Unplug the product from the wall-socket.
2.Empty your product.
3.Open the door of your product and wait the ices for melting when
the door is on open position. (Figure 1)
5.Remove the drain plug by rotating. (Figure 2)
6.Place the container exactly under the drain plug as long as you
empty after it is full each time. (Figure 3)
7.After the defrosting process is over, clean the inside of the product
with a cotton, dry cloth.
8.Mount the drain plug by rotating back.
9.Plug your product into the wall-socket and ensure to operate it
unloaded for at least three (3) hours on super cooling position.
10.Place your foods into the chest freezer.
21

Figure 1 Figure 2 Figure 3
WARNING! Do not use any of the materials and metals that are
not recommended by the manufacturer during defrosting. You may
damage the refrigerant components. Do not use any other item to
scrape frost than the frost-scraper apparatus provided with your
product. Otherwise, if you use sharp, pointed or metal-like object,
you may damage the inner wall of the freezer. Besides, misuse of the
product may result in gas leakage. Never use water or any other liquid to
remove the frost in your freezer and never clean it with steam cleaners.
It may damage your freezer or cause electric shocks. Never use any of
the heating sources (such as electrical heater, heater, etc.) to expedite
the defrosting process on your freezer. Such heaters may damage the
plastic sections of the freezer. Take a good care while placing frozen,
boned foods or hard covered materials which are suitable for use into
the product so that these elements do not damage the interior.
MAINTENANCE AND CLEANING
• Perform maintenance and cleaning at least once a year to get a
good efficiency from your chest freezer.
• Before cleaning, remove the power cord of the freezer from the
wall-socket.
• Make sure that your wear protective gloves during the maintenance
and cleaning. This will protect you against injuries.
• Never use domestic cleaning products and abrasive, scratching
materials as cleaning agents. Never use pressurised or flowing water
for washing.
• Never wash inner and outer surfaces of your product. It may damage
your freezer or cause electric shocks.
22

MAINTENANCE
This product does not require periodical maintenance.
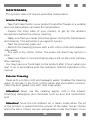
Interior Cleaning
• Take the frozen foods in your product to another freezer or a suitable
and cool place where can keep the temperature.
• Expect the inner sides of your product to get by the ambient
temperature before the interior cleaning.
• Make sure that your wear protective gloves during the maintenance
and cleaning. This will protect you against injuries.
• Take the accessory parts out.
• Perform the cleaning process with a soft cotton cloth and lukewarm
soap water.
• Dry with a dry cotton clothe. The areas not dried may tarnish in
time.
• Make sure that no moist and damp area is left on the inner surfaces
after cleaning.
You may load your foods back to the product after 3 hours when you
start it up in accordance with the operation method indicated in this
manual.
Exterior Cleaning
Clean with a cotton cloth and lukewarm water. Disallow the cleaning
water to intrude in the front control panel and illumination sections.
Clean the door gasket only with clear soap water.
Attention! Never use the cleaning agents sold in the market,
scratching detergents and chemicals such as acid and hydrochloric
acid.
Attention! Since the hot ambient air is taken inside when the lid
of the product is opened and the volume of the taken hot air shrinks
when the lids is closed, vacuum will generate inside the freezer. If you
23

attempt to open the lid again in a very brief time you will have difficulty
in it. The issue which is quite normal will be eliminated after you wait
for 10 mins.
THINGS TO DO ON VACATIONS
Assume that you will go on vacation for a short time;
Leave your chest freezer keeping on operating.
Assume that you will go on vacation for a long time;
• If you would like switch the freezer off, consume the stored foods
and empty it.
• After switching it to off position, remove the power cord from the
wall-socket.
• Clean and dry the inner walls properly after completing the defrosting
process.
• Leave the upper lid open so as to prevent your chest freezer from
smelling mouldy.
For transportation;
1. Unplug the power cord.
2. Defrost.
3. Clean the inner walls and the floor with a moist cloth.
4. Place the plastic transportation stiffener elements between the
upper lid and the body.
5. Carry on the normal use position.
24

PART 6
THINGS TO DO BEFORE CALLING THE AUTHORISED SERVICE
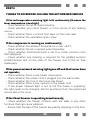
If the red temperature warning light is lit continuously (it means the
inner temperature is too high.);
• Check whether the lid is closed properly,
• Check whether your chest freezer is in the vicinity of any heating
source,
• Check whether there is a thick frost layer on the inner wall,
• Check whether the ventilation grid is clear.
If the compressor is running on continuously;
• Check whether the ambient temperature is over +43°C,
• Check whether the lid is opened quite frequently,
• Check whether thermostat knob is set to a cooler position more
than adequate,
• Check whether any cleaning is required for the gridded sections
located behind and on the sides of the freezer due to the air flow
inadequacy.
If the power network warning light goes off and the freezer does
not operate;
• Check whether there is any power interruption,
• Check whether the power cord is plugged into the wall socket,
• Check whether the fuse in the house has blown,
• Check whether there is any rupture on the power cord.
• If the power network light is not lit but the freeze is operating;
the light needs to be changed. Ask for assistance from the authorised
service about the issue.
If the Chest Freezer is operating tumultuously;
• Check whether the freezer contacts with the walls or any other
furniture that can cause vibration.
• Ensure that the legs of the freezer are exactly stepping on the floor.
25

If the Chest Freezer is producing odour;
• Store the foods that may produce odour in the closed containers.
• Clean inside of your freezer.
Things to do in case of power interruption
At first, learn how long the interruption will last. If it will not last
longer than 12 hours, then you can leave the foods in the chest freezer.
Within that period, never open the upper lid. If the interruption lasts
more than 12 hours and some parts of the foods have begun being
defrosted you have to utilise the foods within 24 hours (for re-freezing
after cooking).
What is condensation?
It is normal for your chest freezer to generate damp deposits within
scope of some environmental conditions if it has been placed on humid
or unventilated (such as cellar, garage) ambient (where the humidity
rate is high). The condensation can be seen in the form of water drips
in the ambient where the where the humidity rate is high.
Operation of chest freeze will not be affected by that. The only thing
you should in such a case is to clean the water drips with a soft cloth.
Call the Authorised Service if your chest freezer does not operate
despite that you have followed up the instructions indicated in the user
manual and the checking you have conducted.
Keep the lid of your chest freezer closed till the service technician is
present.
26

Part 7
COMPLIANCE WITH WEEE REGULATION AND DISPOSING OF
THE WASTE PRODUCT
1.This product does not contain harmful and forbidden
materials described in the "Regulation on the Control of the
Waste Electrical and Electronic Equipment" issued by T.R.
Ministry of Environment and Urbanization. Complies with
the WEEE Directive.
2. This product has been manufactured with high quality
parts and materials which are reusable and suitable for recycling.
Therefore, do not dispose the product with normal domestic waste at
the end of its service life. Take it to a collection point for the recycling
of electrical and electronic equipment. Check with the local authority
in your area for these points. Help protect the environment and
natural resources by recycling used products. For children's safety,
cut the power cable and render the locking mechanism inoperative so
that it will be non-functional before disposing of the product.
PACKAGE INFORMATION
Packaging materials of the product are manufactured from recyclable
materials in accordance with our National Environment Regulations. Do
not dispose of the packaging materials together with the domestic or
other wastes. Take them to the packaging material collection points
designated by the local authorities.
Follow up the instructions indicated in the user manual.
If your chest freezer does not operate normally despite the
checking you have conducted.
Call the Authorised Service.
27


1
Estimado Cliente,
Gracias por escoger los productos . Nuestro objetivo es que usted use este
producto con la máxima calidad, en nuestra moderna planta, en un ambiente de
trabajo meticulosos y sin perjudicar a la naturaleza, de la manera más eficiente.
Para que el congelador horizontal que ha adquirido mantenga las prestaciones del
primer día durante un largo período de tiempo y le preste servicio de la manera más
eficiente, le recomendamos leer el manual de instrucciones atentamente antes de
usar el producto y guardar el manual para siempre.
NOTA:
Este manual de instrucciones ha sido elaborado para una variedad de modelos.
Algunas de las funciones especificadas en el manual pueden no estar disponibles en
su electrodoméstico. Tales funciones llevan la marca *. El montaje y la introducción del
electrodoméstico deben llevarse a cabo de la mano de un servicio técnico autorizado.
El aparato está pensado exclusivamente para su uso doméstico. No es para uso
comercial.
«LEA LAS INSTRUCCIONES ANTES DE INSTALAR O UTILIZAR ESTE
ELECTRODOMÉSTICO.»
Este producto ha sido fabricado en una planta ecológica y moderna, de manera
respetuosa con el medio ambiente y sin dañar la naturaleza.
«Cumple con la Directiva RAEE»

2
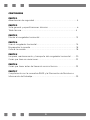
CONTENIDOS
PARTE 1
Advertencias de seguridad .................................................................... 4
PARTE 2
Vista general y especificaciones técnicas .............................................. 8
Tabla técnica ....................................................................................... 9
PARTE 3
Montar el congelador horizontal ..........................................................13
PARTE 4
Usar el congelador horizontal ..............................................................14
Empaquetar la comida ........................................................................18
Colocar la comida ...............................................................................18
PARTE 5
Limpieza, mantenimiento y transporte del congelador horizontal ........20
Cosas que hace en vacaciones ............................................................22
PARTE 6
Cosas que hacer antes de llamar al servicio técnico ............................ 23
PARTE 7
Cumplimiento con la normativa RAEE y la Eliminación de Residuos e
Información de Embalaje .....................................................................25

3
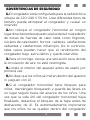
ADVERTENCIAS DE SEGURIDAD
1.El congelador está configurado para la red eléctrica
urbana de 220-240 V 50 Hz. Usar diferentes tipos de
tensión puede estropear el congelador y causar un
incendio.
2.No coloque el congelador horizontal en ningún
lugar directamente expuesto a la luz del sol ni alrededor
de zonas de fuentes de calor tales como fogones,
núcleos de calentador, hornos, calderas, calefactores
radiantes y calefactores infrarrojos. De lo contrario,
tales casos pueden hacer que el rendimiento del
congelador baje, sufra daños y quede inservible.
3.Para el montaje, escoja una ubicación seca donde
la circulación de aire no esté restringida.
4.Limpie el interior del aparato antes de usarlo por
primera vez.
5.No deje que los niños se metan dentro del aparato
ni jueguen con él.
6.Si el congelador horizontal tiene bloqueo para
niños, manténgalo bloqueado y guarde las llaves en
un lugar seguro fuera del alcance de los niños. Una
vez que la vida útil del congelador horizontal haya
finalizado, desactive el bloqueo de la tapa antes de
deshacerse de él. Es extremadamente importante
que los niños no se queden dentro del congelador

4
horizontal. Quedarse dentro de él puede ser peligroso.
7.Para su propia seguridad, así como para evitar
descargas eléctricas y un riesgo de incendio, el
cableado del aparato debe tener un sistema de
fusibles que pertenezca a un dispositivo actual
residual. No nos hacemos responsable de cualquier
mal funcionamiento o daños que el aparato pueda
presentar si éste se usa en una res eléctrica sin toma
de tierra.
8.No ponga materiales explosivos o inflamables
dentro del congelador horizontal.
9.No use ningún otro elemento para raspar escarcha
que no sea el incluido con el aparato. De lo contrario,
si una un objeto puntiagudo o metálico, podría dañar
la pared interna del congelador. Además, el mal uso
del aparato podría causar escapes de gas.
10.Después de colocar el congelador en la zona
destinada para tal, déjelo al menos 2 horas antes de
empezar a usarlo.
11.El congelador ha sido diseñado para su uso en
interiores. No lo use en exteriores.
12.La instalación, la colocación, el mantenimiento y
la limpieza del congelador deben llevarse a cabo tal
como está indicado en el manual. La garantía quedará
anulada si el congelador sufre daños a causa de un

5
uso incorrecto del manual.
13.Dado que un golpe de un objeto afilado
o puntiagudo o el contacto de un material
extremadamente caliente con la parte vítrea de los
productos con tapa de cristal puede romper el cristal,
por favor, preste especial atención a este asunto. (La
opción de tapa de cristal varía según el modelo.)
14.Coloque el aparato en un suelo plano no inclinado
para evitar que se deslice o caiga.
15.Es obligación del usuario llevar a cabo las
medidas necesarias para los alimentos de dentro del
congelador si el aparato no funciona correctamente.
Nuestra compañía no se hará responsable de la
descomposición de los alimentos de dentro del
congelador debido a un mal funcionamiento o a un
mal uso.
16.No use el congelador con un cable extensible o
un multi enchufe.
17.Nunca use agua a presión para la limpieza. El
agua a presión podría dañar las partes conductoras.
18.Mantenga los materiales de embalaje del aparato
fuera del alcance de los niños. Los materiales de
embalaje (nylon, poliestireno excluido, etc.) pueden
constituir un peligro para los niños.
19.Las personas con discapacidades físicas, visuales,

6
auditivas o mentales y los niños y las personas con
falta de conocimiento no deben usar el aparato
sin supervisión por parte de aquellas personas
responsable de su seguridad.
20.Abra la tapa del congelador solamente cuando
sea necesario. Cuando no lo sea, asegúrese de cerrar
la tapa correctamente.
21.Desenchufe el aparato en caso que se produzca
una interrupción en el suministro eléctrico. Enchúfelo
después de 20 minutos cuando esté seguro de que la
red eléctrica haya vuelto a la normalidad.
22.No ponga mascotas o animales salvajes dentro
del congelador ni permita que entren. Estas criaturas
podrían dañar el sistema eléctrico del aparato y causar
un incendio.
23.Colocar alimentos parte por parte y añadir más
alimentos después de que los más recientes se
hayan congelado es un método más sano que llenar
el congelador totalmente. Si llena el congelador
totalmente a la vez, puede que la refrigeración no sea
adecuada, dado que el aparato no podría proporcionar
un flujo de aire frío suficiente.
24.No deje que los alimentos que ha puesto
recientemente en el congelador toquen con los que
estén congelados.

7
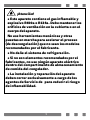
¡Atención!
• Este aparato contiene el gas inflamable y
explosivo R600a o R134a. Debe mantener los
orificios de ventilación en la cubierta o en el
cuerpo del aparato.
No use herramientas mecánicas y otras
puestas en marcha para acelerar el proceso
(de descongelación) que no sean los modelos
recomendados por el fabricante.
• No dañe el sistema de refrigeración.
• Si no son elementos recomendados por el
fabricantes, no use ningún aparato eléctrico
dentro del compartimento de almacenamiento
de comida del congelador.
• La instalación y reparación del aparato
deben correr exclusivamente a cargo de los
agentes de Servicio de para reducir el riesgo
de inflamabilidad.

8
PARTE 2
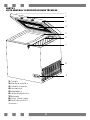
VISTA GENERAL Y ESPECIFICACIONES TÉCNICAS
1. Cristal*
2.Asa de la puerta *
3.Cubierta superior
4.Iluminación*
5.Separador *
6.Cesta de depósito *
7.Bloqueo*
8.Comp. Zona ciega
9.Panel de control *
Opcional *
2
7
8
3
5
6
1
4
9

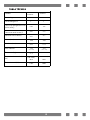
TABLA TÉCNICA
Modelo ACH1459
Gas refrigerante R600a
Clase energética C
Consumo energético anual
(kWh/añoÇ) 610
Consumo total bruto (l) 469
Volumen total neto (l) 459
Altura (mm) 840
Anchura (mm) 1492
Profundidad 765
(Con asa)
Peso neto (kg) 57,5
Potencia de entrada (V/
Hz) 220-240V/
50Hz
Potencia total (W) 170w
ACH1561
R600a
C
745
572
561
840
1775
765
(Con asa)
65
220-240V/
50Hz
200w
9


PARTE 3
MONTAR EL CONGELADOR HORIZONTAL Y PRIMER USO
1.Retire los elementos del endurecedor de transporte que estén colocados entre la
tapa superior y el cuerpo.
2.Es obligatorio que haya circulación de aire en la parte posterior para que el
rendimiento del congelador sea el adecuado. Debe dejar al menos 20 cm de espacio
a los lados del congelador horizontal.
3.Después de montar el congelador, déjelo al menos 2 horas antes de empezar a
usarlo. Luego, enchufe el aparato.
La tensión de red y la frecuencia deben corresponderse a los valores
escritos en la parte trasera del aparato. Si la tensión de red es demasiado
baja o alta respecto a los valores indicados, facilite la tensión deseada con
un regulador de tensión. Puede consultar con un electricista cualificado sobre este
asunto. El fusible de la toma de pared donde está enchufado el aparato debe de
ser de 16 A como máximo.
11

PARTE 4
USAR EL CONGELADOR HORIZONTAL
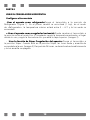
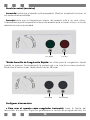
Configurar el termostato
•Usar el aparato como refrigeradorPonga el termostato a la posición de
Refrigerador (Figura 1). En el primer cambio se escuchará (1 bip), en el modo
de «Refrigerador», la temperatura interior estará entre 3 ~ 6°C y la luz verde se
encenderá.
• Usar el aparato como congelador horizontal:Puede cambiar el termostato a
la posición entre el modo Eco y Congelador según la temperatura ambiente, el lugar
donde lo use y según la frecuencia con que abra la tapa superior. (Imagen 2)
•Usar la función de Súper Congelación del aparato: Ponga el termostato a
la posición Súper. Cuando esté en la posición Súper, las luces verde y amarilla de
encenderán a la vez. (Imagen 3) Después de 26 horas, se desactivará automáticamente
y la luz amarilla se apagará.
12

Imagen 1 Imagen 2 Imagen 3
Posición de apagado:Cuando cambie a esta posición, el sistema de refrigeración
el aparato se detendrá. Cuando abra la tapa, tan sólo las luces del interior seguirán
funcionando.
¡Atención! Cuando haya alimentos dentro del congelador, no cambie el termostato
a la posición de «Apagado».
Valores de temperatura.
1. Refrigerador 3 ~ 6°C
2. Eco -18°C
3. Congelador -21 ~ -24°C
ALARMA
a) Alarma indicadora de puerta abierta
Si la puerta permanece abierta durante 1 minuto, la luz roja empezará a parpadear
y el timbre emitirá una señal audible (2). Si la puerta no se cierra en 5 minutos,
la señal auditiva seguirá sonando cada 10 minutos. Cuando la puerta se cierre la
iluminación se apagará.
b) Alarma de sobrecalentamiento
1.Si la temperatura sube por encima de los +12°C o desciende por debajo de los
-5°C la luz roja se encenderá. La alarma auditiva (3 bips) se escuchará durante 30
segundos con la luz. Si la temperatura desciende por debajo de los +10°C o sube por
por encima de los +0°C, el estado de la alarma se desactivará.
2. Si la temperatura sube por encima de los -10°C cuando el congelador esté en la
tercera posición o el modo Súper, la luz roja se encenderá. La alarma auditiva (3 bips)
se escuchará durante 30 segundos con la luz. Si la temperatura desciende por debajo
de los -12°C, el estado de la alarma se desactivará.
13

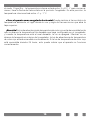
Panel de control (mecánico)
Luz verde: Indica que el aparato está energizado. Mientras el aparato funcione, la
luz verde estará encendida.
Luz roja:Indica que la temperatura interior del aparato está a un nivel crítico.
Cuandoquiera que la temperatura interior del aparato esté a niveles críticos, la luz de
advertencia roja se encenderá.
Luz roja
Luz verde
*Botón Amarillo de Congelación Rápida: Se utiliza para la congelación rápida
cuando se pone en funcionamiento la primera vez o se inserta un nuevo producto.
Desactivar el botón a más tardar dentro de las 48 horas.
Amarilloroja
Luz verde
Configurar el termostato
•Para usar el aparato como congelador horizontal: Lleve la flecha del
termostato a la posición Frigorífico girándola en el sentido del as agujas del reloj. En
14

el modo Frigorífico , la temperatura interna estará entre 3 y 6°C. Y para conservar
carnes, lleve la flecha del termostato en la posición Congelador. En esta posición, la
temperatura interna estará entre +1 y -1 °C.
• Usar el aparato como congelador horizontal:Puede cambiar el termostato a la
temperatura ambiente, el lugar donde lo use y según la frecuencia con que abra la
tapa superior.
¡Atención! La luz de advertencia de temperatura de color rojo estará encendida hasta
que se alcance la temperatura fría deseada que haya configurado en el congelador
y cuando la temperatura esté al nivel deseado, la luz se apagará. Mientras no se
alcance la temperatura interior del congelador, la luz de advertencia de temperatura
de color rojo estará encendida continuamente. Si la luz de temperatura de color rojo
está encendida durante 24 horas, esto puede indicar que el aparato no funciona
correctamente.
15

USAR EL CONGELADOR HORIZONTAL
¡Atención! No ponga alimentos calientes en botellas, pues podrían explotar dentro
del congelador y provocar chispas.
1. Enchufe el congelador en un enchufe con conexión a tierra. La luz verde de
advertencia de red de potencia y la luz roja de advertencia de temperatura en la luz
del panel de control estará encendida.
2. Ponga el mando del termostato en cualquier posición que desee.
3. Cuando la luz se apague, podrá poner alimentos en el congelador.
4. La luz de advertencia roja se encenderá de nuevo cuando la cubierta superior del
congelador permanezca abierta durante un largo período de tiempo o cuando ponga
más alimentos dentro.
5. Ponga el mando en la posición de congelado rápido y encienda el congelador al
menos 24 horas antes de poner los alimentos frescos. No abra la tapa durante 24
horas.
¡Atención! No abra la tapa superior para no causar una pérdida de calor en caso
de apagones de luz prolongados.
EMPAQUETAR LA COMIDA
1. Coloque los alimentos en el envoltorio.
2. Elimine el aire del interior pulsando hacia abajo.
3. Cierre el envase bien.
4. Compruebe que no haya ningún escape alrededor del envoltorio.
5. Escriba el contenido y la fecha en el envoltorio.
Antes de poner alimentos, recuerde utilizar el congelador horizontal al menos
durante veinticuatro (24) horas sin alimentos en su interior y en la posición de
congelado rápido. Ponga la flecha del termostato en la posición SUPER en los aparatos
A++ y a la posición MAX en los aparatos A+. Realice la carga una vez transcurridas 24
horas. Su refrigerador A++ regresará a su modo de funcionamiento normal al cabo de
unos momentos. En un refrigerador A+, ponga la flecha del termostato en la posición
CONGELADOR al cabo de 24 horas. De esta manera, su refrigerador regresará a
su modo de funcionamiento normal. Envuelva los alimentos de manera que no se
produzca ningún goteo antes de colocarlo dentro del congelador horizontal. De lo
contrario, los alimentos perderán su sabor y se secarán. Envuelva los alimentos con
materiales para envolver adecuados, tales como papel de aluminio, bolsas herméticas,
fiambreras de plástico, etc.
Envuelva los alimentos separándolos en porciones según sus necesidades
alimenticias diarias.
La temperatura de los alimentos no debe ser superior a la temperatura ambiente. Si
están demasiado calientes, déjelos enfriar en un entorno adecuado. Cada envoltorio
16

debe llevar una etiqueta (hora de congelación, contenido, etc.).
Envoltorios no aptos
Papel para envolver, papel de periódico, celofán, bolsas de basura, bolsas de
supermercado, envases de cristal o con tapa metálica, envases metálicos con
elementos cortantes y/o punzantes, paletas de madera.
Procure que los alimentos frescos no entren en contacto con los alimentos que
lleven más tiempo. Cuando los alimentos calientes estén en contacto con los alimentos
congelados que lleven más tiempo, esto podría causar que se derritieran. Por lo
tanto, ponga los alimentos congelados que lleven más tiempo al lado del congelador
o a la sección de almacenamiento.
COLOCAR LA COMIDA
Compre los alimentos congelados antes de finalizar la compra y envuélvalos para
sostener los grados de temperatura.
Si hay un aumento significativo de la temperatura de los alimentos congelados
envueltos (p. ej. si hay un apagón de luz o la tapa se mantiene abierta durante mucho
tiempo), reduzca la fecha de caducidad indicada en el envoltorio.
Siga las instrucciones en los envoltorios de los alimentos congelados. Si no hay
ninguna observación acerca de la duración, no conserve los alimentos congelados
durante más de 3 meses.
No vuelva a congelar los alimentos que se hayan descongelado o que se haya
derretido parcialmente y consúmalos en un plazo de 24 horas.
Si pone alimentos en el congelador sin envoltorio, de manera incorrecta, con
envoltorios que goteen, el líquido que gotee de los alimentos puede corroer las partes
metálicas del congelador, escapes de gas en los tubos, amarillamiento, agrietamientos,
condiciones no higiénicas, formación de olores en las zonas de plástico y hacer que
los microorganismos se reproduzcan y por lo tanto poner en riesgo su salud.
¡Atención! Ponga los alimentos que desee enfriar en la posición Refrigerador de
manera que haya espacios de 1,5 - 2 cm en los laterales del congelador. De esta
manera, asegurará la circulación de aire y los alimentos se conservarán uniformemente.
Si los alimentos tocan con las paredes del congelador, entonces puede producirse
escarcha, empañamiento, etc.
Congelar alimentos cocinados
• Puede colocar los alimentos cocinados y fritos de manera casera dentro del
congelador horizontal. Sin embargo, por favor, no coloque alimentos que no se
congelen totalmente, tales como huevos, patatas y macarrones dentro del congelador
horizontal. Añádalos a los alimentos congelados más adelante.
• Debería cocinar y condimentar levemente ciertos tipos de alimentos que vaya a
colocar dentro del congelador si es posible.
17

• Coloque los alimentos que se coman fríos tales como pasteles y pudins de leche
después de prepararlos.
• También puede colocar los alimentos sin cocinarlos después de prepararlos y
envolverlos por separado.
Descongelar alimentos congelados
Puede usar uno de los métodos para descongelar los alimentos que haya sacado
del congelador según el tipo de éste y la finalidad.
1. A temperatura ambiente
2. En microondas
3. Espacio de aire caliente / En horno eléctrico sin ventilador
4. En frigorífico
NOTA: Puede que los alimentos congelados no tengan la misma consistencia e
integridad después de haber sido congelados. Nunca vuelva a congelar los alimentos
que haya descongelado.
APAGAR EL APARATO
• Ponga los alimentos congelados de dentro del congelador donde quiera.
• Desenchufe el aparato de la toma de pared.
• Si no va a usar el congelador horizontal durante mucho tiempo, lleve a cabo
los pasos siguientes; limpie y seque el aparato. De lo contrario, la humedad que
quede en las paredes del aparato puede provocar que se formen acumulaciones de
escarcha en la superficie interior.
ADVERTENCIA: Si va a guardar el aparato en un ambiente cerrado después de
desenchufarlo, no lo cubra con cubiertas de plástico. Ya que el plástico no coge
el aire, esto puede causar que el aparato huela mal y transpire. Esta transpiración
puede provocar corrosión. En caso de que no guarde el aparato con la cubierta
abierta, puede que se forme olor en el interior.
18

PARTE
LIMPIEZA, MANTENIMIENTO Y TRANSPORTE DEL CONGELADOR HORIZONTAL
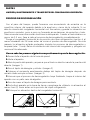
PROCESO DE DESCONGELACIÓN
Con el paso del tiempo, puede formarse una acumulación de escarcha en la
superficie interior del aparato debido a la apertura y cierre de la cubierta. Si no
abre la cubierta del congelador horizontal con frecuencia y guarda los alimentos en
envoltorios cerrados, poco a poco se formarán acumulaciones de escarcha y hielo.
Tales acumulaciones disminuirán la eficiencia del aparato. Cuando el hielo alcance un
grosor de 2-3 mm, lleve a cabo el proceso de descongelación inmediatamente.
Ponga el congelador horizontal en la posición de súper refrigeración (opción *) al
menos alrededor de 24 horas antes de iniciar el proceso de descongelado. De esta
manera, los alimentos estarán protegidos durante los procesos de descongelación y
limpieza (máx. 1 hora). Retire los alimentos del interior del congelador y póngalos en
una zona fría adecuada.
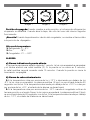
Lleve a cabo los procesos siguientes respectivamente para la descongelación.
1.Desenchufe el aparato de la toma de pared.
2.Vacíe el aparato.
3.Abra la puerta del aparato y espere a que el hielo se derrita cuando la puerta esté
abierta. (Imagen 1)
5.Gire el tapón de desagüe y retírelo. (Imagen 2)
6.Coloque el recipiente exactamente debajo del tapón de desagüe después de
vaciarlo cada vez que se llene. (Imagen 3)
7.Una vez que el proceso de descongelación haya finalizado, limpie el interior del
aparato con un paño seco de algodón.
8.Gire de nuevo el tapón de desagüe para montarlo.
9.Enchufe el aparato en la toma de tierra y asegúrese de utilizarlo sin alimentos al
menos tres (3) horas antes en la posición de súper refrigeración.
10.Coloque los alimentos dentro del congelador horizontal.
Imagen 1 Imagen 2 Imagen 3
19

ADVERTENCIA No use ninguno de los materiales y metales que no estén
recomendados por el fabricante durante la descongelación. Podría dañar los
componentes refrigerantes. No use ningún otro elemento para raspar escarcha que
no sea el incluido con el aparato. De lo contrario, si usa un objeto puntiagudo o
metálico, podría dañar la pared interior del congelador. Además, el mal uso del aparato
podría causar escapes de gas. Nunca use agua o cualquier otro líquido para retirar la
escarcha de dentro del congelador y nunca lo limpie con limpiadores a vapor. Puede
dañar el aparato o causar descargas eléctricas. Nunca use ninguna de las fuentes
calefactoras (tales como calefactores eléctricos, calefactores, etc.) para acelerar el
proceso en el congelador. Tales calefactores podrían dañar las zonas de plástico del
congelador. Tenga mucho cuidado cuando coloque alimentos congelados, alimentos
con hueso o materiales con tapa dura que sean aptos para usar dentro del aparato
para que estos elementos no dañen el interior.
MANTENIMIENTO Y LIMPIEZA
• Lleve a cabo el mantenimiento y la limpieza al menos una vez al año para obtener
una buena eficiencia del congelador horizontal.
• Antes de limpiarlo, retire el cable de alimentación del congelador de la toma de
pared.
• Asegúrese de llevar guantes de protección durante el mantenimiento y la limpieza.
Esto le protegerá de posibles lesiones.
• Nunca use productos de limpieza domésticos y materiales abrasivos y raspantes
tales como agentes de limpieza. Nunca use agua a presión para el lavado.
• Nunca lave las superficies interiores y exteriores del aparato. Puede dañar el
aparato o causar descargas eléctricas.
MANTENIMIENTO
El aparato no requiere de un mantenimiento periódico.
Limpieza del interior
• Retire los alimentos congelados del congelador y póngalos en otro congelador u
otro sitio frío apto donde se pueda mantener la temperatura.
• Los lados interiores del producto alcanzarán la temperatura ambiente antes de
limpiar el interior.
• Asegúrese de llevar guantes de protección durante el mantenimiento y la limpieza.
Esto le protegerá de posibles lesiones.
• Retire las piezas accesorias.
Lleve a cabo el proceso de limpieza con un paño de algodón suave y agua jabonosa
tibia.
• Séquelo con un paño de algodón seco. Puede que las zonas que no estén secas
20

se empañen con el tiempo.
• Asegúrese de que no quede ninguna zona húmeda en las superficies interiores
después de la limpieza.
Puede colocar los alimentos de nuevo en el congelador después de 3 horas de
haberlo encendido de acuerdo con el método de funcionamiento indicado en este
manual.
Limpieza del exterior
Límpielo con un paño de algodón y agua tibia. Retire el agua de limpieza para
inmiscuirse en el panel de control frontal y las secciones de iluminación. Limpie la
junta de la puerta únicamente con agua jabonosa clara.
¡Atención! Nunca use agentes de limpieza que se venden en el mercado,
detergentes agresivos tales como ácido y ácido hidroclórico.
¡Atención! Dado que el aire del ambiente caliente se va hacia el interior cuando
se abre la cubierta del aparato y el volumen del aire caliente absorbido disminuye
cuando las cubiertas se cierran, se generará vacío dentro del congelador. Si intenta
abrir la cubierta de nuevo en muy poco tiempo, le será difícil. Esto es normal y
desaparecerá en 10 minutos.
COSAS QUE HACER EN VACACIONES
En el caso de que se vaya de vacaciones durante un corto período de tiempo;
Deje el congelador horizontal encendido en funcionamiento.
En el caso de que se vaya de vacaciones durante un largo período de tiempo;
• Si desea apagar el congelador, consuma los alimentos guardados en él y vacíelo.
• Después de apagarlo, retire el cable de alimentación de la toma de pared.
• Limpie y seque las paredes interiores correctamente después de finalizar el
proceso de descongelación.
• Deje la cubierta superior abierta para evitar que el aparato huela a moho.
Para el transporte:
1. Desenchufe el cable de alimentación.
2. Descongelar.
3. Limpie las paredes interiores y el suelo con un paño húmedo.
4. Coloque los elementos del rigidizador de transporte entre la cubierta superior y
el cuerpo.
5. Transporte el aparato en la posición normal de uso.
21

PARTE 6
COSAS QUE HACER ANTES DE LLAMAR AL SERVICIO TÉCNICO
Si la luz roja de advertencia de temperatura está continuamente
encendida (significa que la temperatura interior es demasiado alta.);
• Asegúrese de cerrar la tapa correctamente.
• Compruebe si el congelador horizontal está cerca de una fuente de calor.
• Compruebe si hay una capa gruesa de escarcha en la pared interior.
• Compruebe si la rejilla de ventilación está despejada.
Si el compresor funciona continuamente:
• Compruebe si la temperatura ambiente está por encima de los +43°C.
• Compruebe si la tapa se abre con frecuencia.
• Compruebe si el mando del termostato está en una posición de refrigerador más
que adecuada.
• Compruebe si hace falta limpiar las zonas con rejillas ubicadas detrás y a los lados
del congelador debido a un flujo de aire inadecuado.
Si la luz de advertencia de la red de alimentación se apaga y el congelador no
funciona,
• Compruebe si no hay ningún apagón eléctrico.
• Compruebe si el cable de alimentación está enchufado en la toma de pared.
• Compruebe si el fusible de su casa se ha fundido.
• Compruebe si hay alguna rotura en el cable de alimentación.
• Si la luz de la red de alimentación no está encendida pero la congelación está en
proceso, deberá remplazarla. Pida ayuda acerca de este asunto al servicio técnico
autorizado.
Si el congelador horizontal funciona tumultuosamente:
• Compruebe si el congelador está en contacto con las paredes o cualquier otro
mueble que cause vibraciones.
• Asegúrese de que las patas toquen debidamente al suelo.
Si el congelador horizontal produce olor:
• Guarde los alimentos que puedan producir olores en recipientes cerrados.
• Limpie el interior del congelador.
Cosas a hacer en caso de apagón eléctrico
Primero, averigüe cuánto tiempo durará el apagón. Si no va a durar más de 12
horas, entonces puede dejar los alimentos dentro del congelador horizontal. Dentro
de este período, nunca abra la cubierta superior. Si el apagón va a durar más de
22

12 horas y algunos alimentos han empezado a descongelarse, deberá consumir los
alimentos en un plazo de 24 horas (para volver a congelarlos después de cocinarlos).
¿Qué es la condensación?
Es normal que el congelador horizontal genere acumulaciones de humedad en el
marco de algunas condiciones medioambientales si se ha colocado en un ambiente
húmedo o no ventilado (tales como bodegas, garajes, donde el grado de humedad es
alto). La condensación puede apreciarse en forma de gotas de agua en el ambiente
donde el grado de humedad sea alto.
El funcionamiento del congelador horizontal no se verá afectado por ello. Lo único
que debería hacer en tal caso es limpiar las gotas de agua con un paño suave.
Llame al servicio técnico autorizado si el congelador horizontal no funciona a pesar
de haber seguido las instrucciones indicadas en el manual de instrucciones y las
comprobaciones.
Mantenga la cubierta del congelador horizontal cerrada hasta que venga el técnico.
23

Parte 7
CUMPLIMIENTO CON LA NORMATIVA RAEE Y LA ELIMINACIÓN DE
RESIDUOS
1.Este producto no contiene materiales dañinos ni prohibidos
descritos en la «Regulación del Control de Residuos de Equipos
Eléctricos y Electrónicos» publicada por T.R. Ministerio de Medio
Ambiente y Urbanismo. Cumple con la Directiva RAEE.
2.Este aparato ha sido fabricado con piezas y materiales de alta
calidad que pueden reutilizarse y pueden reciclarse. Por lo tanto,
no se deshaga del aparato junto con el resto de residuos domésticos
al final de su vida útil. Llévelo a un punto de recogido para el reciclaje de equipos
eléctricos y electrónicos. Compruebe con sus autoridades locales de su zona cuáles
son estos puntos. Ayude a proteger el medio ambiente y los recursos naturales
reciclando productos usados. Para la seguridad de los niños, corte el cable de
alimentación y deje el mecanismo de bloque inoperativo para que no funcione antes
de deshacerse del aparato.
INFORMACIÓN DE EMBALAJE
El material de embalaje del aparato ha sido fabricado con materiales reciclables de
acuerdo con las Normativas Nacionales sobre Medio Ambiente. No elimine el material
de embalaje junto con los residuos domésticos o de otro tipo. Llévelos a los puntos
de recogida de material de embalaje asignados por las autoridades locales.
Siga las instrucciones indicadas en el manual de instrucciones.
Si el congelador horizontal no funciona a pesar de haber llevado a cabo las
comprobaciones.
Llame al servicio técnico autorizado.
24
www.aspes.es
[email protected]; 902 99 69 01 / 944 04 14 08

H10-20-320-203
REV1
-
 1
1
-
 2
2
-
 3
3
-
 4
4
-
 5
5
-
 6
6
-
 7
7
-
 8
8
-
 9
9
-
 10
10
-
 11
11
-
 12
12
-
 13
13
-
 14
14
-
 15
15
-
 16
16
-
 17
17
-
 18
18
-
 19
19
-
 20
20
-
 21
21
-
 22
22
-
 23
23
-
 24
24
-
 25
25
-
 26
26
-
 27
27
-
 28
28
-
 29
29
-
 30
30
-
 31
31
-
 32
32
-
 33
33
-
 34
34
-
 35
35
-
 36
36
-
 37
37
-
 38
38
-
 39
39
-
 40
40
-
 41
41
-
 42
42
-
 43
43
-
 44
44
-
 45
45
-
 46
46
-
 47
47
-
 48
48
-
 49
49
-
 50
50
-
 51
51
-
 52
52
-
 53
53


Aspes ACH5600EDC El manual del propietario
- Categoría
- Enfriadores de bebidas
- Tipo
- El manual del propietario
- Este manual también es adecuado para
En otros idiomas
- English: Aspes ACH5600EDC Owner's manual