LG WFSL1432ET El manual del propietario
- Categoría
- Lavadoras
- Tipo
- El manual del propietario

WFSL1432ET


afety Information
S
4
Introduction
Read carefully and thoroughly through this booklet as it contains important safety information
that will protect the user from unexpected dangers and prevent potential damages to the product.
This booklet is divided into 2 parts : Warning and Caution.
: This is a warning sign specifying user’s applications which might
be dangerous.
: This is a sign specifying ‘Strictly Forbidden’ applications.
WARNING
: Failure to comply with the instructions under this
sign may result in major physical injuries or death.
CAUTION
: Failure to comply with the instructions under this
sign may result in minor physical injuries or
damages to the product.
WARNING
• Under certain conditions hydrogen gas may be produced in a water heater that has not been
used for two weeks or more. Hydrogen gas can be explosive under these circumstances.
If the HOT water has not been used for two weeks or more, prevent the possibility of
damage or injury by turning on all Hot water faucets and allowing them to run for several
minutes. Do this before using any electrical appliance which is connected to the HOT
water system. This simple procedure will allow any built-up hydrogen gas to escape. Since
the gas is flammable, do not smoke or use an open flame or appliance during this process.
• The base opening must not be obstructed by carpeting when the washing machine is installed on a
carpeted floor.
• Install or store where it will not be exposed to temperatures below freezing or exposed to the weather.
If the product is exposed to such conditions, electric shock, fire, break down or
deformation may occur.
• Properly ground washer to conform with all governing codes and ordinances. Follow details in
Installation Instructions.
If not grounded properly, break down and leakage of electricity may occur, which may
cause electric shock.
• Must be positioned so that the plug is accessible.
If the plug is placed between the wall and the machine, it may get damaged, possibly
causing fire or electric shock.
• Make sure the plug is completely pushed into the outlet.
Failure to do so may cause electric shock and fire due to overheating.
WATER
HEATER
SAFETY
CAUTION
PROPER
INSTALLATION

afety Information
S
5
Introduction
WARNING
• Keep the area underneath and around your appliances free of combustible
materials such as lint, paper, rags, chemical, etc.
Operating with such materials around the machine may trigger
explosion or fire.
• Close supervision is necessary if this appliance is used by or near children.
Do not allow children to play on, with, or inside this or any other appliance.
There is potential danger that children might drown in the tub.
Do not touch the power plug with a wet hand.
It will cause electric shock
Do not put your hand, foot or anything under the washing machine
while the washing machine is in operation.
There is a rotating mechanism under the machine, so you could be injured.
• Make sure that drainage is working properly.
If water is not drained properly, your floor may get flooded. Flooded floors
may induce electricity leakage, further resulting in electric shock or fire.
• If, during spinning, opening the lid does not stop the tub within about 15 seconds,
immediately discontinue operating the machine.
Call for repair. A machine that spins with its door open may cause injuries.
Never reach into washer while it is moving.
Wait until the machine has completely stopped before opening the lid.
Even slow rotation can cause injury.
Never attempt to operate this appliance if it is damaged, malfunctioning, partially
disassembled, or has missing or broken parts, including a damaged cord or plug.
Operating with a damaged plug may cause electric shock.
Do not use water hotter than 50°C.
Use of excessively hot water may cause damage to fabrics or cause
leakage of water.
• Use this appliance only for its intended purpose as described in this Owner’s Manual.
• The laundry process can reduce the flame retardancy of fabrics. To avoid such a result,
carefully follow the garment manufacturer’s wash and care instructions.
• To minimize the possibility of electric shock, unplug this appliance from the power
supply or disconnect the washer at the household distribution panel by removing the
fuse or switching off the cirduit breaker before attempting any maintenance or cleaning.
YOUR
LAUNDRY
AREA
CAUTION
WHEN USING
THE WASHER
NOTE : Pressing Power button to turn off does NOT
disconnect the appliance from the power supply.
• This appliance is not intended for use by persons (including children) with reduced physical,
sensory or mental capabilities, or lack of experience and knowledge, unless they have been given
supervision or instruction concerning use of the appliance by person responsible for their safety,
Children should be supervised to ensure that they do not play with the appliance

6
Introduction
afety Information
S
WARNING
Do not use a plug socket and wiring equipment for more than their rated capacity.
Exceeding the limit may lead to electric shock, fire , break down, and/or
deformation of parts.
Do not mix chlorine bleach with ammonia or acids such as vinegar and/or rust remover.
Mixing different chemicals can produce toxic gases which may cause death.
Do not wash or dry articles that have been cleaned in, washed in, soaked in, or spotted
with combustible or explosive substances (such as wax, oil, paint, gasoline, dry-
cleaning solvents, kerosene, etc). Do not add these substances to the wash water.
Do not use or place these substances around your washer or dryer during operation.
It may ignite or explode.
• Turn off water faucets to relieve pressure on hoses and valves and to minimize leakage
if a break or rupture should occur. Check the condition of the fill hoses; they may need
replacement after 5years.
• When the air temperature is high and the water temperature is low, condensation may
occur and thus wet the floor.
• Wipe off dirt or dust on the contacts of the power plug.
Using unclean power plug may cause fire.
• Before discarding a washer, or removing it from service, remove the washer lid to
prevent children from hiding inside.
Children may be trapped and suffocated if the lid is left intact.
Do not attempt to repair or replace any part of this appliance unless specifically
recommended in this Owner’s Manual, or in published user-repair instructions
that you understand and have the skills to carry out.
Operating the machine with improperly replaced parts may be a
cause for fire or electric shock.
Do not tamper with controls.
It may lead to electric shock, fire , break down, deformation.
Do not yank the power cord in an attempt to disconnect the power plug.
Securely hold the power plug to unplug the machine.
Failure to observe these instructions may cause electric shock or fire
due to short-circuit .
When you are cleaning the washing machine, do not apply water directly to any
part of the washing machine.
It will cause short circuit and electric shock.
WHEN USING
THE WASHER
CAUTION
WHEN NOT
IN USE


unction Information
F
8
Introduction
Our machine provides various washing methods which suits various conditions
and types of laundry.
FUZZY(Normal) Wash
JEANS Wash
WOOL Wash
QUICK WASH
SOAK Wash
DELAY START Wash
OPTION WASH
Use this Program for everyday washing e.g. sheets, towels, T-shirts.
(refer to page 16)
EXTRA CLEANING
Use this program to get better rising performance.
(refer to page 16)
FAVORITE Wash
This setting allows you to store your FAVORITE wash conditions in the normal cycle memory. (refer to page 19)
SILENT Wash
Use this program to wash quietly at night. (refer to page 20)
Use this Program for heavily soiled durable garments e.g. overalls, jeans.
Thick and heavy clothes or those which are excessively dirty like jeans or working uniforms can be washed. (refer to page 16)
Wool clothes (lingerie, wool, etc.) which may be easily damaged can be washed. (refer to page 16)
The fibers of machine washable woolens have been specifically modified to prevent felting when they are machine washed.
Most handknitted garments are not made of machine washable wool and we recommend that you hand wash them
• Before washing your woolens check the care label for the washing instructions.
• When washing woolens use a mild Detergent recommended for washing wool.
• Hand washed woolens may be spun in a washing machine to reduce the time they take to dry.
• To dry woolens lay down them flat on a towel and pat into shape. Dry woolens out of direct sunlight.
(The heat and tumble action of a dryer may cause shrinkage or felting of woolen garments.)
Some wool underlays and sheepskin products can be washed in a washing machine but may cause pump blockages.
(Ensure that the whole article is suitable for machine washing and not just the backing material.)
You may wish to handwash these articles and place them in the machine to spin dry.
QUICK WASH can be selected to wash lightly soiled clothes of less than 2.0 kg in a short time. (refer to page 16)
SOAK Wash can be selected to wash heavily soiled laundry by soaking in water for some time to remove dirt and
grime. (refer to page 18)
DELAY START Wash is used to delay the finishing time of the operation.
The number of hours to be delayed can be set by the user accordingly. (refer to page 24)
When the user needs only SPIN, RINSE/SPIN, RINSE, WASH/RINSE, WASH, WASH/RINSE/SPIN,
SOAK/WASH/RINSE/SPIN. (refer to page 23)
TUB CLEAN
Use this program to clean the inside of washing machine especially Inner tub & Outer tub . (refer to page 21)
Washing according to the condition of laundry
Other washing method
Different types of laundry washing

reparation Before Washing
P
9
Before Starting to Wash
• Check all pockets to make sure that they are empty. Things such as nails, hairclips, matches,
pens, coins, and keys can damage both your washer and your clothes.
• Mend any torn garments or loose buttons. Tears or holes may become larger during washing.
• Remove belts, underwires, etc. to prevent damage to the machine or your clothes.
• Pretreat any dirt and stains.
• Make sure the clothes are washable in water.
• Check the washing instructions.
• Remove tissue in pockets.
To get the best results, different fabrics need to be washed in different ways.
• SOIL (Heavy, Normal, Light)
Separate clothes according to the type and amount of soil.
• COLOR (Whites, Lights, Darks) Separate white fabrics from colored fabrics.
• LINT (Lint producers, Collectors) Separate lint producers and lint collectors.
Lint Producers Terry cloth, Chenille, Towels, Nappies, Diapers
Lint Collectors Synthetics, Corduroy, Permanent Press, Socks
WIRE
Sorting
Check before Loading
* Look for a care label on your clothes. This will tell you about the fabric content of your garment
and how it should be washed.
Sort clothes into loads that can be washed with the same wash cycle, Water Temperature and spin speed.
Care Labels
Use nylon nets for long, DELICATE items. For laundry with long strings or long length , a net will prevent
tangling during washing.
Fasten zippers, hook, and strings to make sure that these items don't snag on other clothes.
Nylon net is not supplied by LG.
Clothes like downs and woollens are light weight, large and float easily. Use a nylon net and
wash them in a small amount of water. If the laundry floats during the wash cycle, it may
become damaged. Use dissolved Detergent to prevent the Detergent from clumping.
Light and Large-sized clothing
Long laundry items
Do not wash fabrics containing flammable materials (waxes, cleaning fluids, etc.).
Load Size
The WATER LEVEL should just cover the clothes. Adjust the load size
accordingly. Loosely load clothes no higher than the top row of holes in the
washer tub. To add items after washer has started, press Start button and
submerge additional items. Close the lid and press Start button again to restart.
Loading
• Pretreat shirt collars and cuffs with a pre-wash product or liquid Detergent when placing them in the washer.
Before washing treat special stains with bar soaps, liquid Detergent or a paste of water and granular Detergent.
• Use a pretreat soil and stain remover.
Treat stains AS SOON AS POSSIBLE. The longer they are left the harder they are to remove.
(For more detail refer to page13)
Pretreatment on stains or heavy soil
Fire Hazard
Never place items in the washer that are
dampened with gasoline or other flammable
fluids.
No washer can completely remove oil.
Do not dry anything that has ever had any type
of oil on it (including cooking oils).
Doing so can result in death, explosion, or fire.
WARNING

liquid Detergent General Detergent
DETERGENT
Water
Level
Water
(L)
MAX
Capa
(kg)
Capacity Recommend
7.6 - 8.4
8.5
4.6 - 5.1
5.2 - 6.1
6.2 - 7.5
1.4 - 2.5
2.6 - 3.3
3.4 - 4.5
No recommend
Lower-1.3
98 L
100 L
80 L
86 L
92 L
58 L
65 L
72 L
46 L
51 L
** The information this table must be followed in
all the washing programs


pecial Guide for Stain Removal
S
13
Before Starting to Wash
• Remove stains promptly.
• Determine the kind of stain, then follow the recommended treatment in the stain
removal chart below.
• To pretreat stains, use a prewash product, liquid Detergent, or a paste made from
granular Detergent and water.
• Use COLD water on unknown stains because HOT water can set stains.
• Check care label instructions for treatments to avoid on specific fabrics.
• Check for colorfastness by testing stain remover on an inside seam.
• Rinse and wash items after stain removal.
For successful stain removal:
Follow fabric care label
instructions
■
Do not use or mix liquid chlorine bleach with other household chemicals such as toilet cleaners, rust removers, acid or
products containing ammonia. These mixtures can produce dangerous fumes which can cause serious injury or death.
■
To reduce the risk of fire or serious injury to persons or property, comply with the basic warnings listed below:
• Read and comply with all instructions on stain removal products.
• Keep stain removal products in their original labeled containers and out of children’s reach.
• Thoroughly wash any utensil used.
• Do not combine stain removal products, especially ammonia and chlorine bleach. Dangerous fumes may result.
• Never wash items which have been previously cleaned in, washed in, soaked in or spotted with gasoline, dry cleaning solvents
or other flammable or explosive substances because they give off vapors that could ignite or explode.
• Never use highly flammable solvents, such as gasoline, inside the home. Vapors can explode on contact with flames or sparks.
WARNING
Stain Removal
STAIN
Adhesive tape, chewing gum,
rubber cement
Baby formula, dairy products, egg
Beverages (coffee, tea, soda, juice,
alcoholic beverages)
Blood
Candle wax, crayon
Chocolate
Collar or cuff soil, cosmetics
Dye transfer on white fabric
Grass
Grease, oil, tar (butter, fats, salad
dressing, cooking oils, car grease,
motor oils)
Ink
Mildew, scorch
Mud
Mustard, tomato
Nail polish
Paint, varnish
Rust, brown or yellow
discoloration
Shoe polish
Apply ice. Scrape off excess. Place stain face down on paper towels. Saturate with prewash stain remover or
nonflammable dry cleaning fluid.
Use product containing enzymes to pretreat or soak stains.
Pretreat stain. Wash using COLD water and bleach safe for fabric.
Rinse with COLD water. Rub with bar soap. Or pretreat or soak with product containing enzymes. Wash using
bleach safe for fabric.
Scrape off surface wax. Place stain face down between paper towels. Press with warm iron until wax is absorbed.
Replace paper towels frequently. Treat remaining stain with prewash stain remover or nonflammable dry cleaning
fluid. Hand wash to remove solvent. Wash using bleach safe for fabric.
Pretreat or soak in WARM water using product containing enzymes. Wash using bleach safe for fabric.
Pretreat with prewash stain remover or rub with bar soap.
Use packaged color remover. Wash using bleach safe for fabric.
Pretreat or soak in WARM water using product containing enzymes. Wash using bleach safe for fabric.
Scrape residue from fabric. Pretreat. Wash using hottest water safe for fabric. For heavy stains and tar, apply
nonflammable dry cleaning fluid to back of stain. Replace towels under stain frequently. Rinse throughly. Wash
using hottest water safe for fabric.
Some inks may be impossible to remove. Washing may set some inks. Use prewash stain remover, denatured
alcohol or nonflammable dry cleaning fluid.
Wash with chlorine bleach if safe for fabric. Or, soak in oxygen bleach and HOT water before washing. Badly
mildewed fabrics may be permanently damaged.
Brush off dry mud. Pretreat or soak with product containing enzymes.
Pretreat with prewash stain remover. Wash using bleach safe for fabric.
May be impossible to remove. Place stain face down on paper towels. Apply nail polish remover to back of stain.
Repeat, replacing paper towels frequently. Do not use on acetate fabrics.
WATER BASED : Rinse fabric in cool water while stain is wet. Wash. Once paint is dry, it cannot be removed,
OIL BASED AND VARNISH : Use solvent recommended on can label. Rinse throughly before washing.
For spots, use rust remover safe for fabric. For discoloration of an entire load, use phosphate Detergent and
nonchlorine bleach. Do not use chlorine bleach because it may intensify discoloration.
LIQUID : Pretreat with a paste of granular Detergent and water. PASTE : Scrape residue from fabric. Pretreat with
prewash stain remover or nonflammable dry cleaning fluid. Rub Detergent into dampened area, Wash using bleach
safe for fabric.
TREATMENT


16
Wa
shing
P
rogram s
W
ashing Programs
Washing
Programs
Add
the
laundry
Add
the Detergent
(Normal Wash)
Used for normal loads, this
mode automatically selects the
most appropriate conditions
and completes the sequence
in one operation. The built-in
sensor detects the size of the
load and the ideal wash
power and wash, rinse and
spin times are set accordingly.
Use this mode when washing
lightly soiled clothes for a short
time. The highly recommended
laundry amount is under 2.0kg.
Use this program to increase
rising performance.
This would include underwear
and baby clothes.
If someone has sensitive skin or
skin trouble,use this program.
POWER
AUTO OFF
1
1
2
5
4
3
2
•
Select the
QUICK
WASH
program on
the Control
panel.
•
Add the appropriate
quantity of Detergent as
indicated by the WATER
LEVEL next to
WATER DETERGENT.
Or follow the Detergent
manufacturer’s
instructions
•
Add the appropriate
quantity of Detergent a
s
indicated by the
WATER LEVEL next to
WATER DETERGENT.
Or follow the Detergent
manufacturer’s
instructions
Use Jean program when
washing Jeans of different sizes
1
5
3
2
•
Select the
JEANS
program on
the Control
panel.
• Spread
the jean
evenly in
the tub
1
5
3
2
• Select the
WOOL
program on
the Control
panel.
Use this program for washing
delicate fabrics such as lingerie
and woolens. (wash only “water
washable” clothes)
Before washing your woolens
check the care label for the
washing instructions.
(wash only water washable
clothes)
• Use neutral
Detergent
appropriate for the
laundry.
• When washing
woolens use a mild
Detergent
recommend- ed fo
r
washing wool.
1
5
3
2
• Select the
EXTRA
CLEANING
program on
the
Control
panel.

17
Washing Programs
Close the lid Finish Caution & Note
STSTARART
PAUSEUSE
POWER
• The pulsator rotates for
8 seconds to detect the
laundry load.
• Then the WATER LEVEL
and the amount of
Detergent to be used
will be shown and
water will be supplied.
• Water will be
supplied for 2
minutes after the
start of the wash to
supplement the
water the laundry
has absorbed.
• When the wash
program ends, the
buzzer will ring
for 10 seconds
before the Power
goes off
automatically.
• If water is already in the tub, or putting
wet laundry into the tub before starting
will increase the WATER LEVEL.
• With lightweight bulky loads, WATER
LEVEL can be set low.
• Changes to Water Temperature
(HOT/COLD) and wash level are
possible during operation.
(refer to page 14)
3
5
6
7
6
7
6
4
4
7
6
4
• When setting the WATER LEVEL
manually, do not set to Medium to
prevent damage to laundry.
• Washing with HOT water may damage
the laundry (Water is set to cold
automatically). Ensure that the load is
under 2kg.
• In order to avoid damage to laundry,
the spin cycle may appear slow.
This also avoids wrinkles and clothing
may still contain some water. This is
normal.
• When static pressure of water is more
than 2kg/cm
2
, the QUICK WASH course
will be within 19min.
7
6
4


AVORITE Wash
F
19
Washing Programs
Pressing the FAVORITE button allows you to store your FAVORITE wash conditions in the
normal cycle memory and then recall it for use at a later time.
START
PAUSE
POWERWER
AUTO OFF
• Press the TEMP. button to select wash Water
Temperature.
• Press the WATER button to select
WATER.
• Press the WASH button, the RINSE button & the SPIN
button to select wash time, rinse time & spin time
respectively you want to store.
Press the POWER (AUTO OFF) button to turn power on.
Select the FAVORITE program.
Select your FAVORITE wash conditions.
Press the START/PAUSE button to store & start your FAVORITE wash cycle.
Power turns off automatically after wash.
START
PAUSEUSE
POWER
1
2
3
4
NOTE
To recall your FAVORITE cycle.
1. Press POWER on.
2. Select the FAVORITE cycle by pressing the PROGRAM.
3. Press the START/PAUSE button. Then the wash cycle starts.
START
PAU SE
POWER

ILENT Wash
S
20
Washing Programs
Use this program to wash quietly in SILENT especially during late night and dawn.
START
PAU SE
POWERWER
AUTO OFF
Press the POWER (AUTO OFF) button to turn power on.
Press the PROGRAM button to select SILENT program.
Press the START/PAUSE button.
Add the laundry into the washing tub.
Add the Detergent and close the lid.
START
PAUSE
POWER
STSTARART
PAUSEUSE
POWER
1
3
4
5
2
NOTE
• SILENT program takes longer washing time than FUZZY(Normal) program.
• To reduce noise in spinning, spin rpm is lower than normal spinning rpm. So the laundry has
more moisture than normal.

UB CLEAN
T
21
Additional Function Program
START
PAUSEUSE
POWER
If scrud is allowed to build-up in the machine it can result in stains on your clothes or unpleasant smell in
your washer.
Scrud is the way build-up that can occur within any washer when the fabric softener comes into contact
with Detergent, and according to particular degree of dirtiness or quality of water to be use, in these
case, use this program to clean inner tub and outer tub.
START
PAU SE
POWERWER
AUTO OFF
Press the POWER (AUTO OFF) button to turn power on.
Press the PROGRAM button to select the TUB CLEAN program.
After 10 minutes of water supplement. Add the oxygenated bleach (about 300m ).
Press the START/PAUSE button.
Close the lid.
START
PAUSE
POWER
1
3
4
5
2
NOTE
• Before using this program remove lint inside lint filter.
• When using this program, do not place any laundry inside tub.
• This program takes about 3 hours to be completed.
• After using this program, remove dirt inside filter.
• After finishing this program, open the lid of wash to remove irritant odor.
• Do not pour bleach into the tub directly. It might cause damage the tub.
• Do not leave diluted oxygenated bleach inside tub for long time.
It rusts the tub must drain the remained diluted oxygenated water out.
• Use this program once for every month.
• Do not use this program repeatedly.
Ex-Large WATER is set automatically.
• When the lid is open the machine will not operate, and an
alarm signal will remind you to close the lid.
• Left time is displayed.
• Do not use Detergent box.
• Do not place any laundry inside tub.

IR DRY
A
22
Additional Function Program
AIR DRY for your laundary.
START
PAU SE
PO
WER
WER
AUTO OFF
Press the POWER (AUTO OFF) button to turn power on.
Press the AIR DRY button to select the desired timing.
Press the START/PAUSE button.
Closed the lid.
STSTARART
PAUSEUSE
POWER
1
3
4
2
NOTE
■ Select "Air Dry" 30min ➔ TUB DRY
-Use this mode to keep inner tub from getting moldy caused by remaining moisture.
- Do not place any laundry inside tub.
- Use this mode once a week.
Caution) For better performance, put drain hose down to the floor so that water inside will be
completely drained out.
■ Select “Air Dry” above 1 hour
- Use this mode to reduce the drying time by minimizing remaining moisture on the laundry.
- In general, this is very effective on synthetic items(100% polyester).
- Do place laundry which is evenly distributed(Under 2kg).
- For normal clothes : Select 1 hour
- For synthetic items(100% polyester): Select 2 hours or 3 hours(on some models)

ption Washing
O
23
Additional Function Program
When you only need the Wash, Wash/Rinse or Rinse cycles, these can be set manually.
Add the laundry into the washing tub.
Press the START/PAUSE button.
Press the WATER button, to control the water level according to the amount
of laundry. If you do not choose anything, it is set the middle water level
automatically.
Add the detergent and close the lid.
START
PAUSEUSE
POWER
3
4
5
6
2
Press the POWER (AUTO OFF) button to turn power on.
START
PAUSE
POWERWER
AUTO OFF
• When a Wash, Wash/Rinse or Rinse only option is selected, after the wash is completed the water will not
be drained off. If you wish to drain the water, press SPIN button and wait until the water in the tub has drained
completely. Then press the START/PAUSE button.
• If you do not specify the water level, then Medium will be automatically selected.
• If only Rinse is selected, the process will start from Water Supply.
NOTE
Press the
RINSE
button to
select the desired times of
rinse.
Only Rinse
Press the
SPIN
button to
select the desired times of
spin.
Only Spin
START
PAU SE
POWER
1
Press the
WASH
button to
select the desired timing.
START
PAUSE
POWER
Only Wash
Press the
RINSE
button to
select the desired times of
rinse.
Press the
SPIN
button to
select the desired times of
spin.
Only Rinse,Spin
When you want to only
drain, wait until the water
in the washing tub drains
completely.
Only Drain
Press the
WAS H
button to
select the desired timing.
Press the
RINSE
button to
select the desired times of
rinse.
You can use this option
for preventing wrinkles of
laundry
Only Wash,Rinse
START
PAU SE
POWER
START
PAUSE
POWER
START
PAUSE
POWER
START
PAUSE
POWER
START
PAU SE
POWER

ELAY START (RESERVATION) Wash
D
24
Additional Function Program
POWER
AUTO OFF
DELAY START (RESERVATION) Wash is used to delay the finishing time of the operation.
The hours to be delayed can be set by the user accordingly.
The time on the display is the finishing time , not the start time.
• When you press the START/PAUSE button the light will
blink.
• Select the program for laundry on the Control panel.
This program will not work in WOOL and TUB CLEAN
Program.
Press the POWER (AUTO OFF) button to turn power on.
Press the PROGRAM button to select the washing program.
Add the laundry and press the START/PAUSE button.
STSTART
PAUSE
USE
POWER
• The appropriate quantity of Detergent marked next to the
WATER of WATER•DETERGENT.
• When the lid is open the machine will not operate, and an
alarm signal will remind you to close the lid
Add the Detergent.
• Water will be supplied for 2 minutes after the start of the
wash to supplement the water the laundry has absorbed.
Close the lid.
• The washing will be finished according to the delayed time.
Finish
START
PAU SE
POWER
1
2
4
5
6
3
• The light will ‘DELAY’ turn on and
‘TIME LEFT’ will be marked.
• Press the button repeatedly to set the desired finishing time.
For example, To finish washing in 9 hours from now, by
make the number 9:00 pressing the DELAY START
(RESERVATION ) button repeatedly.
Press the DELAY START (RESERVATION) button.
(RES.=DELAY)
• Finishing time can be delayed from 3~48 hours. Delaying from3~12 hours can be done in 1 hour time intervals
and from 12~48 hours in 2 hour time intervals.
• If the lid is open, the machine will not work, and an alarm signal will alarm to remind you to close the lid.
• To select washing time, rinsing times, spinning time, water level, hot/cold or wash power manually, press the
DELAY START (RESERVATION) button and select the desired option. Then press the START/PAUSE button.
• When the laundry cannot be taken out immediately after the wash program ends, it is better to omit the spinning
program . (The laundry will be wrinkled if left for a long time after spinning.)
NOTE


onnecting Water Supply Hose
C
27
Installation
Before connecting the Water Supply Hose to the water tap, check the hose type and then
choose the correct instruction here under.
Note that the Water Supply Hose supplied may vary from country to country, Make sure to
connect the blue inlet hose to the COLD water tap, and the orange inlet hose to the HOT
water tap.
Connecting Water Supply Hose to water tap
Connector
Connector
Water
Supply Hose
screw
Untighten the screw
Untighten the screw of the connector so that the
tap can be placed in the middle.
Fixing the connector to the tap
Push the upper connector up till the rubber
packing is in tight contact with the tap. Then
tighten the 4 screws.
Attach the water supply hose securely to the
connector
Push the water supply hose vertically upwards so
that the rubber seal within the hose can adhere
completely to the tap.
Check the connection of water supply hose and the connector
After connecting the hose, open the tap to check
for any water leakage.
If the water leaks, close the tap and start again
from step 1
Fixing the connector to the water supply hose
Attach the water supply hose to the connector and
then tighten it by screwing it to the right.
Normal Type
(Normal tap without thread & screw type inlet hose.)
1
2
3
4
5
Rubber packing
NOTE
The washing machine is to be connected to the water mains using new hose-sets and old hose-sets should
not be reused.

28
Installation
Rubber packing
Rubber packing
Fixed sticker
screw
Guide plate
Connector
Connector
Fixed sticker
Middle
Connector
Middle
Connector
Water Supply Hose
Pressing rod
Pressing handle
Connector
Middle
connector
Fixed Sticker
Pressing Handle
Pressing Rod
Water Supply Hose
Separate Middle connector from Water Supply Hose
Separate Middle connector from the Water
Supply Hose by pulling the Pressing Rod and the
Pressing Handle that is attached to the Water
Supply Hose.
Loosen the fixed nuts to connect the connector to the tap
Untighten the screw of the connector so that the
tap can be placed in the middle.
Fixing Connectors to the Tap
Push the upper connector up till the rubber
packing is in tight contact with the tap. Then
tighten the 4 screws.
Fixing Upper Connector and Middle Connector
Remove the fixed sticker in between the Upper
and Middle Connectors. Tighten the connectors
by holding one connector and twist middle
connector to the right.
Connecting Middle Connector and Water Supply Hose
Press down the pressing rod of the Water Supply
Hose which was separated from middle connector
(refer to Step1) and then join it to the middle
connector.
Normal Type
If the tap diameter is too large or is square,
untighten the 4 screws and remove the guide
plate. Then follow step1.
In case tap is too large.
NOTE
Check for water leakage
After connecting the hose, open the tap to check
for any water leakage.
If the connection leaks, close the tap and start
again from step 1.
If you skip step 1, water leakage may occur.
(Normal tap without thread & one touch type inlet hose.)
1
2
3
4
5
6
C
onnecting Water Supply Hose

29
Installation
Attach the water supply hose to the tap.
Push the water supply hose up so that the rubber
packing within the hose can adhere completely to
the tap.
Connect the water supply hose to the tap.
Connect the water supply hose to the tap and then
tighten it by screwing it to the right.
Check water leakage.
After connecting the hose, open the tap to check
for any water leakage.
• Connect the water supply hose to inlet valve of
the washing machine, and then lock it by turning
the hose connecting part.
• Check to see if there is a rubber seal inside the
connector.
Screw Type
Water Supply Hose
Rubber Packing
Hose connector
Rubber seal
Water
tap
Connecting Water Supply Hose to the machine
1
2
3

onnecting Drain Hose
C
30
Installation
Hose
Guide
0.9~1.2m
Drain Hose
Within 50mm
Put the other end of the drain hose over the standpipe or
wash tub.
2
Before connecting Drain Hose, check your Drain Hose model and choose the correct
instructions.
Fit the end of the drain hose to the outlet of the
drain pump and tighten the clamp.
Pump Model
To prevent siphoning, the drain hose should not extend more than 50 mm from the end of the hose guide.
The discharge height should be approximately 0.9 ~ 1.2 m from the floor.
NOTE
Before connecting
Ensure that the hose clip is set as indicated here.
Connect the Elbow Hose
Push the elbow hose toward the body of the
washing machine.
Non-Pump Model
Place the Drain Hose
To change the direction of the hose, pull out the
elbow hose and change the direction.
Repeat Step 2.
Clip
1
1
2
3

rounding Method
G
31
Care and Maintenance
Earth wire should be connected.
If the earth wire is not connected, there is possible a danger of electric shock caused by
the current leakage .
Grounding Method with Ground insert space Terminal
Other Grounding Method
If the AC current outlet has a ground terminal, then
separate grounding is not required. Note that AC power
outlet configurations may differ from country to country
Connect the ground Wire to the socket provided
exclusively for Grounding.
If grounding methods described above are not
possible, a separate circuit breaker should be
employed and installed by a qualified electrician
Ground
Terminal
Outlet with ground terminal.
Ground Wire
Ground Copper Plate
Ground
Wire
Short-circuit
breaker
• To prevent a possible explosion, do not connect ground to a gas pipe
• Do not connect ground to telephone wires or lightning rods. This may be dangerous during electrical
storms
• Connecting ground to plastic has no effect
• Ground wires should be connected when an extension cord is used.
Using Ground Wire
Using a Short Circuit Breaker
Connect the Ground Wire to a Ground Copper
Plate and bury it more than 75cm in the ground.
Burying Copper Plate
Caution
75cm
Caution
CAUTION concerning the Power Cord
Most appliances recommend they be placed upon a dedicated circuit; that is, a single outlet circuit which powers
only that appliance and has no additional outlets or branch circuits. Check the specification page of this owner's
manual to be certain. Do not overload wall outlets. Overloaded wall outlets, loose or damaged wall outlets,
extension cords, frayed power cords, or damaged or cracked wire insulation are dangerous. Any of these
conditions could result in electric shock or fire. Periodically examine the cord of your appliance, and if its
appearance indicates damage or deterioration, unplug it, discontinue use of the appliance, and have the cord
replaced with an exact replacement part by an authorized servicer. Protect the power cord from physical or
mechanical abuse, such as being twisted, kinked, pinched, closed in a door, or walked upon. Pay particular
attention to plugs, wall outlets, and the point where the cord exits the appliance.

leaning and Maintenance
C
32
Care and Maintenance
When water supply into the tub is not clean or the filter is clogged with particles (such as sand), clean the
filter in the inlet valve occasionally.
(The figure of power cord and water tap may vary according to the country)
To Clean the Filter in the Inlet Valve
Cold water washing
To Clean the Lint Filter
Close the tap before turning off the power.
Select both HOT/COLD and then press the
[START/PAUSE] button to remove water
from the machine completely.
• If you always use COLD water, we recommend that a WARM or HOT wash be used at a regular
intervals e.g. every 5th wash should be at least a WARM one.
When you have finished
• Turn off taps to prevent the chance of flooding should a hose burst.
• Always unplug the power cord after use.
After removing the water supply
hose pull out the filter.
Then use a brush to clean the filter.
Turn off the power before
pulling out the cord.
Replace the filter after cleaning it.
1 2
3 4
NOTE
• If the lint filter is torn or damaged, purchase a new one from LG service center.
NOTE
• Before cleaning the filter, the impurities in the water supply hose should be removed.
NOTE
• Check if water leaks after reassembling. (The Rubber ring is in the cap)
To Clean the Pump casing (for pump model)
Place a towel on the
floor under the drain
pump cap. Excess
water may flow out.
Remove any foreign
objects and fluff inside
pump casing and from the
filter.
Replace the cap. Insert the filter along
the guide ribs inside the pump casing.
Filter must face the guide ribs inside
pump casing and securely turn the cap
clockwise.
1 2 3 4
Turn the cap
counter-
clockwise and
pull it out.
Filter
Cap
Guide rib
Filter
1
2
3
4 5 6

leaning and Maintenance
C
33
Care and Maintenance
Wash Inner-tub
Leave the lid open after washing to allow moisture to evaporate. If you want to clean
the inner-tub use a clean soft cloth dampened with liquid Detergent, then rinse. (Do
not use harsh or gritty cleaners.)
Inlet Hoses
Hoses connecting washer to faucet should be replaced every 5 years.
Exterior Immediately wipe off any spills. Wipe with damp cloth. Try not to hit surface with
sharp objects.
Long Vacations Be sure water supply is shut off at faucets. Drain all water from hoses if weather will
be below freezing.
When there is a fear of freezing
If frozen
• Remove the water supply hose, and immerse it in HOT water at approx.. 40˚C.
• Pour approx.. 2 liters of HOT water at approx.. 40˚C, into the bowl and let it stand for 10 minutes.
• Connect the water supply hose to the water tap and confirm that the washing machine performs the
supply and drainage of water.
• Close the water taps and remove the Water Supply Hose.
• Remove the water which remains in the water supply.
• Lower the drain hose and drain the water in the bowl and the drain hose by spinning.
Cleaning the Inside of your Washer
If you use fabric softener or do regular COLD water washing, it is very important that you occasionally clean the
inside of your washer.
• Fill your washer with HOT water.
• Add about two cups of a powdered Detergent that contains phosphate.
• Let it operate for several minutes.
• Stop the washer, open the lid and leave it to soak overnight.
• After soaking, drain the washer and run it through a normal cycle.
Or use TUB CLEAN PROGRAM periodically.
We do not recommend that you wash clothes during this procedure.
Products that might damage your washing machine
• Concentrated bleaches and diaper sanitizer will cause damage to the paintwork and components of your washer.
• Hydrocarbon solvents i.e. petrol, paint thinners and lacquer thinners, etc. can dissolve plastic and blister paint
(Be careful when washing garments stained with these solvents as they are flammable DO NOT put them in
washer or dryer.)
• Some pretreatment sprays or liquids can damage your washer’s control panel.
• Use of dyes in your washer may cause staining of the plastic components. The dye will not damage the machine
but we suggest you thoroughly clean your washer afterwards. We do not recommend the use of dye strippers in
your washer.
• Do not use your washer lid as a work surface.

34
Care and Maintenance
se of Handle Locker
U
NOTE
If you operate door like the below picture that, you can hurt so use after check locker was fixing or not.
Lock
Unlock
>eldnah gnixifnu fo etatS<>eldnah gnixif fo etatS<
You can use handle hold function if you like to use.
Handle hold function is operated by holder under the handle.
• Slide holder to left/right side until you listen to "Click" sound to holding handle.
• Do opposite to loose the Handle handing .

ommon washing problems
C
35
Troubleshooting
Many washing problems involve poor soil & stain removal, residues of lint and scum, and
fabric damage. For satisfactory washing results, follow these instructions.
WASH PROBLEM
Possible Causes
Problems
Solutions & Preventive Measures
• Use correct amount of Detergent for load size, amount of
soil and water Hardness.
• Use WARM or HOT water for normal soil.
Different Water Temperature may be required according to
soil type. (refer to page 10)
• Reduce load size.
• Wash with JEAN or SOAK & JEAN wash cycle for heavy
soiled laundry.
• Separate heavily soiled items from lightly soiled ones.
• Pretreat stain and heavy soil according to directions shown
on page 9.
• Rub the stain with bar soap. Wash.
• Do not overfill fabric softener dispenser and do not pour
liquid fabric softener directly onto fabric.
See page 12 for more instructions.
• Keep the recommendations against Scrud(waxy buildup).
(refer to scrud page12.)
• Use correct amount of Detergent for load size, amount of soil
and water Hardness.
• To restore discolored load of whites, use rust remover safe
for fabric.
• Install nonprecipitating water softener or an iron filter in
your water supply system for an ongoing problem.
• Before washing, run water for a few minutes to clear lines.
• Wash lint givers eg towels, flannelette sheets, separately
from lint collectors eg synthetic fabrics and remove tissues in
pockets before wash. See page 9 for sorting and caring
before loading.
• Do not overload the washer
• Do not overload the washer.
• Some Detergents need to be pre-dissolved, check the Detergent
instructions. Try pre-dissolving the Detergent.
• Increase Water Temperature using HOT water safe for fabric.
• Use proper amount of Detergent.
• Never pour chlorine bleach directly on fabric.
See page 11 for adding liquid bleach.
• Fasten zippers, hooks, and buckles.
• Remove objects in pockets. See page 9 for caring before
loading.
• Do not overload the washer.
Poor soil
removal
• Not enough Detergent
• Wash Water Temperature
too low.
• Overloading the washer
• Incorrect wash cycle
• Incorrect sorting
• Do not pretreat stain
• Undiluted fabric softener
dispensed directly onto
fabric
• A buildup caused by the
interaction of fabric softener
and Detergent can flake off
and mark clothes
• Not enough Detergent
• Iron or manganese in
water supply, water pipes,
or water heater
• Incorrect sorting
• Tissues left in pocket
• Overloading the washer
• Overloading the washer
• Undissolved Detergent
• Use too much Detergent
• Incorrect use of chlorine
bleach.
• Unfastened zippers,
hooks, buckles
• Ribs, tears and broken
threads
• Overloading the washer
• Degradation of fabric
Blue Stains
Holes, tears,
or snags
Black or gray
marks on
clothes
Yellow or
brown rust
stains
Lint
Residue or
Detergent

roubleshooting
T
36
Troubleshooting
Before calling for service, check the problem against the list bellows.
Symptom Error Message
Check up
• Is the water tap shut off?
• Is the water supply cut off ?
• Is the tap or water supply hose frozen ?
• Is the water pressure low or is the filter of the inlet
valve clogged with impurities?
• Is the Hot hose connected to cold?
• Is the Cold hose connected to hot?
Drainage Failure
Water Supply
Failure
• Is the drain hose positioned correctly?
• Is the drain hose bent or placed too high?
• Is the internal part of the hose or drain pump
(only pump model) clogged with impurities?
• Check if electric power has gone off.
Spin Failure
• Is the laundry evenly balanced?
• Is the washing machine placed on a flat surface?
• Is the lid closed?
Door(Lid) Open
Internal sensing
failure
Power failure
• Please call your nearest LG Electronics service center
for help.

37

150 W
Model
Voltage and frequency
Power Input
Rate Output
Water tab pressure
RPM of Motor
Product Capacity
Dimension
Water consumption
Wash Capacity
WFSL1332ET
120 V ~ 60 Hz
560 W
30 - 800 kPa (0,3 kgf / cm
2
- 8 kgf / cm
2
)
135 RPM
45 kg
611(W)
x
635(D)
x
992(H) mm
145
l
13 kg
150 W
WFSL1432ET
120 V ~ 60 Hz
480 W
30 - 800 kPa (0,3 kgf / cm
2
- 8 kgf / cm
2
)
135 RPM
45 kg
611(W)
x
635(D)
x
992(H) mm
145
l
14 kg

M
emo

120 V ~ 60 Hz
560 W
45 kg
611(Anchura) x 635(Profundidad) x 992(Altura) mm
13 kg
WFSL1332ET
120 V ~ 60 Hz
480 W
45 kg
611(Anchura) x 635(Profundidad) x 992(Altura) mm
14 kg
WFSL1432ET

P
roblemas Comunes de Lavadora
36
Detección de fallas

roblemas Comunes de Lavadora
P
35
Detección de fallas
La mayor parte de los problemas de lavado trae los resultados tales como la
eliminación no suficiente de suciedad, manchas, residuos de pelusas y
espumas y el daño a la lavandería. Para un resultado satisfactorio del lavado,
siga las instrucciones siguientes :
PROBLEMAS DEL LAVADO
Causas Posibles
Problemas
Solución y Medidas Preventivas
• Use la cantidad correcta de detergente de acuerdo con la canti-
dad de lavandería, intensidad de suciedad y la dureza del
agua.
• Use el agua calurosa o caliente para la suciedad normal.
La temperatura diferente de agua será requerida de acuerdo
con el tipo de suciedad. (Véase la página 10)
• Reduzca la cantidad de lavandería.
• Lave usando el cíclo de Vaqueros o Mojada(Remojo)
y Vaqueros para la lavandería de suciedad pesada.
• Separe los artículos muy sucios desde los poco sucios.
• Pre-trate las manchas y suciedad pesada de acuerdo con las
instrucciones mostradas en la página 9.
• Frote las manchas con el jabón. Lave.
• No llene excesivamente el distribuidor del suavizante de teji-
do y no vierta directamente el suavizante de tejido líquido al
tejido.
Véase la página 12 para más instrucciones.
• Guarde las recomendaciones contra Scrud (construcción de
cera). (Vease la página 12)
• Use la cantidad correcta de detergente para la cantidad corre-
spondiente de lavandería, intensidad de suciedad y la dureza
del agua.
• Para recuperar el color de l
os artículos blancos, use el elimi-
nador de manchas seguro para el tejido.
• Instale el suavizanante de tejido no precipitado o el filtro de
hierro dentro de su sistema de suministro del agua para
resolver el problema.
• Antes de lavar, suministre el agua por unos minutos para
limpiar las líneas.
• Lave los productores de pelusas como toallas, flanela de
algodón separadamente de los colecionistas de pelusas como
tejidos sintéticos y saque el tisú desde los bolsillos antes de
empezar el lavado. Véase la página 9 para la clasificación de
la lavandería antes de empezar el lavado.
• No ponga demasiado lavandería.
• No ponga demasiado lavandería.
• Algunos detergentes se necesitan ser pre-disueltos, por lo
tanto, chequee las instrucciones de detergente. Intente a pre-
disolver el detergente.
• Alce la temperatura de agua usando el agua caliente segura
para el tejido.
• Use la cantidad apropiada de detergente.
• Nunca vierta el blanqueador de cloro directamente al tejido.
Véase la página 11 para añadir el blanqueador líquido.
• Cierre la cremallera, la cor
chete y la hebilla.
• Saque los objetos de bolsillos. Véase la página 9 para tener
cuidado antes de poner la lavandería.
• No ponga demasiado lavandería.
Eliminación
insuficiente
de suciedad
• Detergente no-suficiente
• Temperatura del agua
demasiado baja
• Demasiado lavandería
• Cíclo incorrecto
• Clasificación incorrecta
• No pre-tratar las manchas
• El suavizante de tejido no
diluido distribuye directa-
mente al tejido
• Una construcción de cera causa-
da por la interacción del
suavizante de tejido y el deter-
gente puede ser quedada y mar-
cada a la lavandería
• Detergente no-suficiente
• El hierro o el manganeso
dentro del agua sumin-
istrada, pipas del agua o
calentador del agua
• Clasificación incorrecta
• Tisú quedado en el bolsillo
• Demasiado lavandería
• Demasiado lavandería
• Detergente no-disuelto
• Uso del detergente excesi-
vo
• Uso incorrecto del blan-
queador de cloro
• Cremallera, corchete y hebilla
no cerradas perfectamente
• Costillas, rasgones e hilos
rotos
• Demasiado lavandería
• Degradación de tejidos
Manchas
Azules
Agujeros, ras-
gones
Marcas
Negras o
Grises sobre
la lavandería
Manchas
Amarillas o
de Marrón
Pelusas
Residuo o
detergente

so del Seguro en la Tapa
U
34
Cuidado y Mantenimiento
Usted puede usar la funci n de bloqueo manual si lo desea.
El bloqueo de mano es activado por un seguro deslizante bajo la tapa.
• Deslizar a la izquierda/derecha hasta que escuche un “click”.
• Hacer lo opuesto para desbloquearlo.
Nota
Para evitar daños, asegúrese de enganchar correctamente el seguro.
Bloquear
Desbloquear
<Tapa bloqueada> <Tapa desbloqueada>


impieza y Mantenimiento
L
32
Cuidado y Mantenimiento
Lavado con agua fría
• Si usted usa siempre agua fría, le recomendamos usar agua tibia o caliente a intervalos regulares.
Ejm. Cada 5 lavados a lo menos 1 deberá ser con agua tibia
• Cerrar las llaves para prevenir posibles inundaciones si se abre la manguera inesperadamente.
• Siempre desenchúfela desde el toma corriente cuando no la use.
Cuando usted finalizo el lavado
Cuando el suministro de agua al tambor no es limpio o el filtro se obstruye con part culas (arena,
piedrecillas...), limpie el filtro de la v lvula de entrada ocasionalmente. La forma del cable el trico y de
la llave de agua puede variar de acuerdo al pa s
Limpie la bomba casing (cuando el drenado sea malo)
• Cuando el filtro para pelusas se encuentre gastado, etc., póngase en contacto con un Centro de Servicio
Técnico Autorizado de LG para obtener uno nuevo.
Coloque una toalla en el piso
bajo el casco de la bomba de
agua, ya que podria escurrir
exceso de agua.
Saque cualquier objeto
extrano o pelusas que
haya dentro de la bomba
y sobre el filtro.
Vuelva a colocar la tapa. Inserte el filtro a lo
largo de las canaletas guia dentro de la cubierta
de la bomba. El filtro debe mirar hacia las
canaletas guia dentro de la cubierta de la
bomba. Luego gire fuertemente la tapa de la
bomba en el sentido de las manecillas del reloj.
Gire la tapa de la
bomba en el sen-
tido del reloj, y
tire hacia afuera.
Filter
Filter
Cap
Tapa
Filtro
Filtro
Canaletas guia

Debe conectarse un cable a tierra.
Si el cable a tierra no est conectado, hay un peligro de golpe el ctrico causado
por la fuga de corriente de la lavadora.
Precauciones de los Cordones de Enchufes
En la mayoría de los electrodomésticos se recomienda que sean puestos en un circuito que sea dedicado sólo para ellos;
esto significa, un solo circuito de salida el cual sólo le da energía a eseelectrodoméstico y no tiene salidas adicionales o
sucursal de circuitos (otras sucursales de circuitos). Chequear la página de las especificaciones en este manual de usuario
para estar seguro.
No se debe sobre cargar la pared de las salidas de energía. Sobrecargar la pared de salida de energía es peligroso, también
lo es tener la pared de salida de energía suelta o dañada, cordones de extensión, cordones deshilachados, o el aislamiento
de cordones dañados o rajados. Cualquiera de estas condiciones pueden resultar en un corto circuito o un incendio.
Periódicamente examine los cordones de sus electrodomésticos, y si parece que están dañados o deteriorados,
desconéctelos, deje de usar el electrodoméstico, y reemplace el cordón con otro cordón de la mismas características de un
servidor autorizado.
Proteger el enchufe y cordones de maltratos físicos o mecánicos, tales como ser doblados, retorcidos, peñiscados,
dañados con la puerta al cerrarla, o caminar por encima de los mismos. Prestarle una atención particular a los enchufes,
en las paredes de salida de energía, y el punto de donde el cordón sale del electrodoméstico.
Precaución
M
todo de puesta a tierra
31
Cuidado y Mantenimiento

onexi n de la manguera de drenaje
C
30
Instalaci n
Antes de conectar la manguera de drenaje, revise modelo de manguera de drenaje
y escoja la instrucci n correcta de las siguientes.
0,9 - 1,2 m
-
Dentro de 50 mm


onexi n de la manguera de suministro de agua
C
28
Instalaci n
Empaquetadura
de goma
Empaquetadura
de goma
Etiqueta adhesiva
Tornillo
Placa guía
Conector
Etiqueta adhesiva
Conector
del medio
Conector
del medio
Manguera de
suministro de agua
Vástago de presión
Manilla de presión
Conector
Conector
del medio
Etiqueta adhesiva
Manilla de presión
Tornillo
Vástago de presión
Manguera de
suministro de agua
Separe el conector del medio de la manguera de
suministro de agua
Afloje las tuercas para conectar el conector a la llave
Fije los conectores a la llave
Fije el conector superior y el conector del medio
Conecte el conector del medio y la manguera de
suministro de agua
Otros tipos no normales
En caso de que la llave sea grande
Nota
Revise p rdidas de agua
Conector

Antes de conectar la manguera de suministro de agua a la llave, revise el tipo de
manguera y escoja la instrucci n correcta. Las mangueras de suministro de agua
pueden variar de acuerdo al pa s.
Conexión de la manguera de suministro de agua a la llave
Atención
La lavadora debe ser conectada a las llaves del agua usando el paquete de mangueras nuevo, y los antiguos no
deben re-utilizarse.
C
onexi n de la manguera de suministro de agua
27
Instalaci n

(2 pcs)


avado con Reserva (Inicio diferido)
L
24
Opciones de funci n adicionales
El lavado con reserva se usa para retardar el tiempo de finalizaci n de la operaci n.
Las horas a ser diferido pueden fijarse por el usuario seg n desee.
El tiempo mostrado en el indicador es el tiempo de finalizaci n, no el de inicio.
• Cuando presione el botón INICIO/PAUSA la luz destellará y se
mostrará el tiempo.
• Seleccione el programa para el lavado en el panel de control.
Este programa no funcionará en los Programas
LANA y LIMPIEZA TAMBOR.
• Se encenderá la lámpara ‘RESERVA’ y será marcado ‘Tiempo Restante’
• Presione repetidamente el botón para fijar el tiempo de terminación deseado. Por ejemplo, para
terminar el lavado en 9 horas desde ahora, coloque el número 9 presionando repetidamente el
botón RESERVA.
Presione el bot n ENCENDIDO(AUTO OFF) para encender la lavadora.
Presione el bot n PROGRAMA para seleccionar el programa de lavado.
Agregue la ropa y presione el bot n INICIO/PAUSA.
Presione el bot n de RESERVA (Retardado).
• La cantidad apropiada de detergente marcada junto al NIVEL
DE AGUA de AGUA-DETERGENTE.
• Mientras la tara esté abierta, la máquina no trabajará y una
señal dará la alarma para recordarle que cierre la tapa.
Agregue detergente.
• El agua será suministrada por 2 min después del inicio del lavado
para suplir el agua que absorbe la ropa.
Cierre la tapa.
• Cuando termina el programa de lavado, el zumbador sonará por
10 s antes de que la energía eléctrica se apague automáticamente.
Finalizaci n.
• El tiempo de finalización puede ser demorado desde 3 - 48 horas. El retardo entre 3 -12 horas puede hacerse en intervalos
de tiempo de 1 hora y para 12 hasta 48 horas, en intervalos de tiempo de 2 horas. Si se abre la tapa, la máquina no trabajará
y una señal darál la alarma para recordarle que cierre la tapa.
• Para seleccionar el tiempo de lavado, cantidad de enjuagues, tiempo de centrifugado, nivel de agua, caliente/fría o potencia
de agua, presione el botón RESERVA y seleccione la opción deseada. Luego presione el botón INICIO/PAUSA.
• Cuando la carga de ropa no pueda ser sacada inmediatamente después de que el programa de lavado finalice, es mejor
omitir el programa de centrifugado. (La ropa se arrugará si se deja mucho tiempo en la lavadora después del centrifugado.)
Nota

Cuando sólo necesite Lavado, Lavado/Enjuague o ciclos de Enjuague, éstos pueden ser
determinados manualmente.
Presione el bot n ENCENDIDO(AUTO OFF) para apagar.
Agregue la ropa a lavarse en la tina de lavado.
Presione el bot n
INICIO/PAUSA.
Presione el bot n
NIVEL DE AGUA para controlar el nivel de
agua conforme a la cantidad de ropa a lavarse. Si no elige nada,
se determina autom ticamente el nivel medio de agua.
Agregue el detergente y cierre la tapa.
• Después de haber completado el lavado y cuando las únicas opciones seleccionadas son
Lavado, Lavado/Enjuague o Enjuague, el agua no se drenará. Si desea hacerlo, presione
ROTAR(y espere hasta que el agua en la tina se desagite completamente. Luego presione el
botón INICIO/PAUSA.
• Si no especifica el nivel de agua, se seleccionará automáticamente Medio.
• Si se selecciona solamente Enjuague, el proceso comenzará por la provisión de agua.
Nota
NIVEL DE AGUA
Presione el botón ENJUAGUE
para seleccionar los tiempos
deseados de enjuague.
Sólo Enjuague
Presione el botón CEN-
TRIFUGADO
para
seleccionar los tiempos
deseados de centrifuga-
do.
Sólo Centrifugado
Presione el botón LAVADO
para seleccionar el tiempo
deseado.
Sólo Lavado
Presione el botón ENJUAGUE
para seleccionar los tiempos
deseados de enjuague.
Presione el botón CENTRIFU-
GADO para seleccionar los
tiempos deseados de centrifuga-
do.
Sólo Enjuague, Centrifugado
Cuando desea sólo quitar agua,
espere hasta que el agua en la
tina de lavado se drene
completamente.
Sólo Desagotar
Presione el botón
LAVADO
para seleccionar el tiempo
deseado.
Presione el botón
ENJUAGUE
para seleccionar el tiempo
deseado de enjuague.
Puede usar esta opción para
evitar arrugas en la ropa
Sólo Lavado, Enjuague
O
pci n de Lavado
23
Opciones de funci n adicionales

IR DRY
A
22
Opciones de funci n adicionales
Presione el bot n ENCENDIDO(AUTO OFF) para encender la lavadora.
Seleccione el bot n
AIR DRY.
Presione el bot n de INICIO/PAUSA.
Cierre la tapa.
Nota
Seleccionar Air Dry (Secado por Aire) 30 min ‘ TUB DRY (Secado por Tina)
- Utilize este sistema para prevenir desarrollo de la suciedad causado por la humedad existentes del
tambor despues del lavado
- No coloque ropa en la tina durante este ciclo.
- Use esta modalidad una vez por semana.
Precaución) Para major resultado, poner de manguera de drenaje hacia abajo para que desague com-
pletamente.
Seleccionar Air Dry (Secado por Aire) 1 hora
- Utilize este sistema para reducir tiempo de secado minimizado la humedad en la ropa.
Esta es muy eficaz para ropas sintéticas(100% poliéster)- Coloque las prendas por lavar bien dis-
tribuidas (abajo de 2 kg)
- Para lavado normal: Seleccione 1 hora
- Para ropas sintéticas(100% poliéster): Seleccione 2 horas o 3 horas(depende de los modelos)

Si se produce sarro en el tambor, podría manchar su ropa o producir un desagradable aroma en su
lavadora.
El sarro se puede producir dentro de cualquier lavadora cuando el suavizante de fábrica entra en
contacto con el detergente , y de acuerdo con el grado particular de suciedad o calidad del agua a
usarse; en ese caso, use este programa para limpiar el interior y exterior del tambor.
Presione el bot n ENCENDIDO(AUTO OFF) para encender la lavadora.
Presione el bot n PROGRAMA para seleccionar el programa
de
LIMPIEZA TAMBOR.
Si va a usar blanqueador (300 ml) agr guelo 10 min despu s de la
alimentaci n de agua.
Presione el bot n INICIO/PAUSA.
Cierre la tapa.
Nota
• Antes de usar este programa, se deben sacar las pelusas o hilachas dentro del filtro.
• Al usar este programa, no coloque ninguna prenda dentro del tambor.
• Este programa demora alrededor de 3 horas.
• Después de usar este programa, saque la suciedad del interior del filtro.
• Después de finalizar este programar, abra la tapa de la lavadora para sacar cualquier olor irritante.
• No coloque blanqueador dentro del tambor directamente, ya que podría dañarlo.
• No deje blanqueador diluido en el interior del tambor por un tiempo prolongado, ya que puede producir oxi-
dación en el tambor. Se debe drenar el blanqueador remanente.
• Use este programa una vez al mes.
• No use este programa repetidamente.
El NIVEL DE AGUA Extra se fija automáticamente.
• Cuando la tapa está abierta, la lavadora no funcionará, y la
señal de alarma le recordará que se debe cerrar la tapa.
• El tiempo remanente aparece en el indicador.
• No use detergente en caja.
• No coloque ninguna prenda dentro del tambor.
L
impieza Tambor
21
Opciones de funci n adicionales

ilencioso
S
20
Programas de Lavado
Use este programa para lavar en Silencio, especialmente durante la noche.
Presione el bot n ENCENDIDO(AUTO OFF) para encender la lavadora.
Presione el bot n de PROGRAMA para seleccionar programa silencioso.
Presione el bot n de INICIO/PAUSA.
Agreque la ropa en el tambor.
Agregue el detergente y cierre la tapa.
Nota
• El programa Silencio toma mayor tiempo de lavado que el programa FUZZY(Normal).
• Para reducir el ruido del centrifugado, las revoluciones de la tina son más bajas que en el proceso de
centrifugado normal. Por lo tanto, la ropa queda más húmeda que en el programa normal.

Presionar el botón Favorito le permite almacenar las condiciones de lavado favoritas en la
memoria de ciclo normal y luego re-llamarlo para usarlo en una oportunidad posterior.
• Presione el botón TEMP. DE AGUA para seleccionar la temperatura
del agua de lavado.
• Presione el botón NIVEL DE AGUA para seleccionar el nivel de
agua.
• Presione el botón LAVADO, el ENJUAGUE y CENTRIFUGADO
para seleccionar los tiempos de lavado, de enjuague y de rotación
respectivamente que desea almacenar.
Presione el bot n ENCENDIDO(AUTO OFF) para encender la lavadora.
Seleccione sus condiciones de lavado preferidas.
Presione el bot n INICIO/PAUSA para almacenar e iniciar su ciclo de lavado
FAVORITO. La lavadora se apagar autom ticamente despu s que haya final-
izado el Lavado.
Nota
Para re-llamar su PROGRAMA FAVORITO.
1. Presione botón de ENCENDIDO(AUTO OFF).
2. Seleccione el ciclo FAVORITO presionando el botón PROGRAMA.
3. Presione el botón INICIO/PAUSA. Luego el ciclo de lavado se inicia.
Seleccione el programa FAVORITO.
L
avado de Favorito
19
Programas de Lavado


17
Programas de Lavado
Cierre la tapa. Finalización Precaución & Nota
•
El pulsador gira por 8 s
para detectar la carga de
lavado.
•
Luego se mostrará el
nivel de agua y la canti
• El agua se suminis-
trará por
2 min después del
inicio del lavado
para suplir el agua
que ha absorbido la
ropa.
•
Cuando termina el
programa de lava-
do, el zumbador
suena por 10 s antes
de que la energía
eléctrica se apague
automáticamente.
• Controlar el NIVEL DE AGUA cuando el
agua permanece en el tambor o poniendo
la ropa mojada antes de anunciar el lavado
aumentará el NIVEL DE AGUA.
• En caso de ropa voluminosa y liviana,el
nivel de agua puede ser bajo.
• Son posibles alteraciones de agua
caliente/fr
í
a y de nivel de agua durante la
operación.
(refiérase a la página 14)
• Cuando la presión estática del agua es
más que 2kg/cm
2
el ciclo QUICK WASH
estará dentro de 19 min
3
5
6
7
7
7
6
6
6
4
4
4
•
Cuando fije el NIVEL DE AGUA manualmente,
no seleccione el nivel de agua bajo Medio
porque puede dañar la ropa.Cuando se lava con
agua caliente,la ropa se quede dañar (El agua
suministrada será siempre fijada en Fría).
Asegúrese de que la carga de ropa sea menor de
2 kg
•
Para evitar un daño de la ropa,se fija un cen-
trifugado libre de arrugas.Por lo tanto,el cen-
trifugado puede ser débil y las ropas pueden
contener algo de agua,pero eso es normal.El
lavado con remojo no puede ser seleccionado
para el programa de lavado de lana.
•
Si se selecciona el lavado de Lanas, se fijará
automáticamente el Suave.
7
6
4

.


• Elimine las manchas puntualmente.
• Determine el tipo de manchas, y luego siga el tratado recomendado en el cuadro abajo
de instrucciones para eliminar las manchas.
• Para pre-tratar las manchas, use el producto de pre-lavado, detergente líquido, o una
pasta hecha por el detergente granulado y el agua.
• Use el agua fría para eliminar las manchas desconocidas porque el agua caliente
puede fijar sólidamente las manchas.
• Chequee las instrucciones de etiqueta al tratar las manchas para evitar el daño al tejido específico.
• Chequee el descoloramiento haciendo un test del eliminador de manchas a la costura interior.
• Enjuague y lave los artículos después de eliminar las manchas.
Para la eliminación exitosa de manchas
Advertencia
Cinta de adhesión, chicle, cemento
de goma
Fórmula de bebé, productos lecheros, huevo
Bebida (café, té, sopa, jugo, bebida
alcohólica)
Sangre
Cera de cándela, lápiz de color
Chocolate
Suciedad en collar o en puño,
cosméticos
Teñido al tejido blanco
Hierba
Tinta
Moho, chamusquina
Barro
Mostaza, tomate
Esmalte de uñas
Pintura, barniz
Orín, decoloración del castaño o
amarillo
Betún
Aplique el hielo. Frote los excedentes. Mantega el lado manchado abajo de una toalla de papel. Sature con el elimi-
nador de manchas pre-lavado o el producto inflamable de limpieza en seco.
Use el producto que contiene enzimas pare pre-tratar o remojar las manchas.
Pre-trate las manchas. Lave con el uso del agua fría y el blanqueador seguro para el tejido.
Enjuague con el agua fría. Frote con el jabón. O pre-trate o remoje con los productos que contienen enzimas. Lave
con el uso de blanqueador seguro para el tejido.
Frote la cera de superficie. Mantega el lado manchado abajo del toalla de papel. Reemplace con mucha frecuencia las toallas de
papel. Trate las manchas quedadas con el eliminador de manchas de pre-lavado o el producto inflamable de limpieza en seco. Lave
con la mano para quitar el solvente. Lave con el uso de blanqueador seguro para el tejido
.
Pre-trate o remoje dentro del agua calurosa con el uso de productos que contienen enzimas. Lave con el uso de blanqueador seguro para el tejido.
Pre-trate con el eliminador de manchas de pre-lavado o frote con el jabón.
Use el eliminador de color en paquete. Lave con el uso de blanqueador seguro para el tejido.
Pre-trate o remoje dentro del agua calurosa con el uso de productos que contienen enzimas. Lave con el uso de blanqueador seguro para el tejido.
Quite el residuo desde el tejido. Pre-trate. Lave con el uso del agua más caliente segura para el tejido. Para las manchas y el
alquitrán, aplique el producto de limpieza en seco no-inflamable al lado revés de las manchas. Reemplace con frecuencia las toalla
de abajo.Enjuague enteramente. Lave con el uso del caliente más caliente segura para el tejido.
Algunas tintas pueden ser imposible a eliminar. El lavado puede fijar de vez en cuando las manchas de tintas. Use el
eliminador de manchas de pre-lavado, alcohól transformado o el producto de limpieza en seco no-inflamable.
Lave con el blanqueador de cloro si éste sea seguro al tejido. O, vierta el blanqueador el oxígeno y el agua caliente
antes del lavado. El tejido mal suavizado puede ser dañado permanentemente.
Quite el barro seco. Pretrate o vierta con el producto que contiene enzimas.
Pre-trate con el eliminador de manchas de pre-lavado. Use con el blanqueador seguro para el tehido.
Puede ser imposible quitar. Mantega el lado manchado abajo del toalla de papel. Aplique el esmalte de uñas al lado
revés de manchas. Repite, reemplace con frecuencia las toallas de papel. No se use sobre los tejidos de acetato.
BASADO DEL AGUA : Enjuague el tejido en el agua fría mientras que esté mojada la mancha. Lave. Una vez esté
seca la pintada, ésto no puede ser quitado. BASADO DEL ACEITE Y BARNIZ : Use el solvente recomendado en
la etiqueta. Enjuague enteramente antes del lavado.
Para las manchas, use el eliminador de manchas seguro para el tejido. Para la decoloración de la lavandería entera, use el detergente de fos-
fato y el blanqueador de no-cloro. No se use el blanqueador de cloro porque esto puede intensificar la decoloración.
LÍQUIDO : Pre-trate con una pasta de detergente granulado y el agua. PASTA : Frote el residuo desde el tejido.
Pre-trate con el eliminador de manchas de pre-lavado o el producto de limpieza en seco no-inflamable. Frote el
detergente dentro del area húmeda, lave con el uso del blanqueador seguro para el tejido.
No use o mezcle el blanqueador líquido de cloro con otros químicos del uso doméstico tales como el líquido de limpieza
del baño, eliminador de orín, ácido o los productos que contienen el amonio. Este tipo de mezcla puede producir el
humo peligroso el cual puede causar una lesión seria o la muerte.
Para reducir el riesgo del incendio o las lesiones serias a las personas o a la propiedad, cumpla las advertencias básicas
alistadas abajo :
• Lea y cumpla todas las instrucciones escritas en los productos de eliminar las manchas.
• Guarde los productos para eliminar las manchas dentro del contenedor original con la etiqueta y fuera del alcance de los niños.
• Solamente para el uso de lavado o de utensilios.
• No combine los productos para eliminar las manchas, en especial con el amonio y el blanqueador de cloro. Puede provocar el
humo peligroso.
• Nunca lave los artículos que se han previamente limpiado, lavado, remojado o manchado por gasolina, solventes de limpieza en
seco o otras substancias inflamables o explosivas porque ellos emiten vapores que pueden ser encendidos o explotados.
• Nunca use solventes inflamables como gasolina dentro de casa. Los vapores pueden provocar una explosión teniendo contacto con
las llamas o chispas.
Grasas, aceite, alquitrán
(mantequilla, grasas, aliño de ensalada, aceite
para la cocción, gasolina de coche, gasolina de
motocicleta)
G
u a Espec fica para Quitar las Manchas
13
Antes de comenzar el lavado

Si usted quiere usar el suavizante de tejido, le recomendamos que :
Atención
No mezcle con detergente o blanqueador.
Nunca vierta directamente el suavizante de tejido a la lavandería. Eso podrá provocar las manchas a la
lavandería.
No pare el lavado durante el primer centrifugado para la distribución a tiempo.
El lavado de opción no está diseñado para ser usado con el distribuidor de suavizante de tejido.
Scrud (Cera construida)
Uso de suavizante
En caso de ser necesario, agregue la cantidad recomendada de suavizante
dentro de su dispensador.
Use solamente suavizante líquido para telas.
• No exceda el límite máximo de llenado.
Sobrepasar el límite de llenado puede ocasionar que se derrame con antici-
pación el suavizante, lo que puede ocasionar manchas en la ropa.
NOTA: No vacíe directamente el suavizante a la ropa ya que puede ocasion-
ar manchas.
Scrud es un nombre dado por la cera construida la cual puede presentarse en cualquier lavado cuando el
suavizante de tejido tiene contacto con el detergente. Esta construcción no es causada por un fallo de la
máquina.
Si el scrud está se puede presentar dentro de su aparato, esto puede resultar en manchas o un olor
desagradable a su ropa.
• El uso frugal de un suavizante de tejido.
• Cuando está lleno el distribuidor, no lo salpique ni lo derrame.
• Limpie el distribuidor lo más pronto pisible después de terminar el cíclo.
• Limpie regularmente su lavadora.
(Refiérase a la página 21 u 32)
• El lavado con agua fría las probabilidades de construcción de cera. Le recomendamos un lavado regular con
agua caliente.
Atención
Nunca vierta el blanqueador líquido no-diluido directamente a la ropa o al tambor de lavado.
Depositando blanqueador
• Separe la ropa sucia para ser blanqueada.
• Mida el blanqueador en polvo cuidadosamente, siguiendo las instrucciones de la caja.
• Antes de comenzar a lavar, ponga la medida de blanqueador dentro del dispensador de blanqueador.
Uso del blanqueador
Uso del blanqueador
Verifique las etiquetas de advertencia del fabricante para instrucciones especiales.
• Use blanqueador oxigenado.
• El blanqueador en polvo debe ser mezclado con agua y luego vertido en el tambor.
• Para mayores detalles refiérase a las instrucciones de uso del producto.


Detergente regular
Detergente líquido
DETERGENTE
Nivel
de
Agua
Agua
(L)
CARGA
MÁXIMA
46 L
No se recomienda
lavar con este
nivel agua
51 L
HASTA-1,3
1,4 - 2,5
2,6 - 3,3
3,4 - 4,5
4,6 - 5,1
5,2 - 6,1
6,2 - 7,5
7,6 - 8,4
8,5
58 L
65 L
72 L
80 L
86 L
92 L
98 L
100 L
CARGAS RECOMENDADAS
**Esta tabla es aplicable para todos los ciclos
de lavado de su equipo
(kg)

• Revise todos los bolsillos para asegurarse que estén vacíos. Los artículos como clavos, horquillas, fósforos, plumas, monedas
y llaves pueden provocar un daño a su lavadora y a su lavandería.
• Repare cualquiera ropa rasgada y los botones perdidos. Las rasgaduras o los agujeros pueden ser agrandados durante el lavado.
• Quite los cinturones, adornos metálicos, etc. para prevenir el daño a la máquina o a sus ropas.
• Pre-lave la suciedad y las manchas.
• Asegúrese si la ropa se lava en agua o en seco.
• Revise las instrucciones para el lavado.
• Saque de los bolsillos los pañuelos de papel.
Para obtener el mejor resultado, la ropa de diferentes materiales debe de ser lavada en programas distintos.
• Suciedad (Pesada, Normal, Ligera) : Separe las ropas de acuerd
o con el tipo y la intensidad de suciedad.
• Color (Blancos, Claros, Obscuros) : Separe los tejidos blancos de los tejidos de color.
• Pelusas (Productores de Pelusas, Coleccionistas de Pelusas) : Separe los productores de pelusas de los coleccionistas de pelusas.
Productores de Pelusas : Tejido Terry, Chenille, Toallas, Pañales
Coleccionistas de Pelusas : Tejidos Sintéticos, Pana, Presión Permanente, Medias
Alambre
Clasificación
Revise antes de cargar
* Busque la etiqueta de la ropa. Ésta le avisará del contenido de tejido de su vestido y en qué manera debe ser lavado.
Clasifique la lavandería que pueda ser lavada en el mismo cíclo de lavado, misma temperatura de agua y misma velocidad
de centrifugado.
Etiqueta
Use la red de nilón para los artículos grandes y delicados. Para ropa grande o con tejidos amplios el uso de
una la red evitará el enredo durante el lavado. Cierre la cremallera y abroche el corchete y la cuerda para ase-
gurarse de que estos artículos no hagan rasgones a otras ropas.
La red de nilón no será suministrada por LG.
La ropa de pluma y de lana es ligera y voluminosa y fácil de lavar, Use la red de nilón y lávelos en poca
cantidad del agua. Si lava este tipo de ropa con ciclo completo de lavado, ésta se dañara irrremediablemte.
Use un detergente fácil de disolver para evitar el agrupamiento del detergente.
Ropa ligera y de tamaño grande
Ropa grande
No lave tejidos que contienen materiales inflamables (cera, producto de limpieza, etc.)
Cantidad de lavandería
El nivel de agua debe llegar hasta un nivel para cubrir la ropa. Ajuste apropiadamente
la cantidad de de ropa a cargar.
Coloque la ropa de tal manera que ésta no rebase el límite indicado en la tina. Si
requiere depositar más ropa una vez iniciado el funcionamiento de la máquina, pre-
sione el botón Inicio (Start) y póngala dentro del agua. Cierre la tapa y pulse de nuevo
el botón Inicio pare reiniciar.
Colocación de la ropa
• Prelave los cuellos y puños de las camisas con el uso de un producto para pre-lavado o un detergente en líquido antes de poner la
lavandería dentro de la máquina. Antes de iniciar el lavado, trate algunas manchas especiales usando un jabón de pastilla, el deter-
gente en líquido y detergente en gránulo.
• Use el eliminador de suciedad y manchas del tipo pre-lavado. Lave las manchas LO MÁS PRONTO POSIBLE. Cuanto más tiempo
se quedan las manchas, tanto más difícil será quitarlas.
(Para linformación más detallada, véase la página 13.)
Pre-lavado de la suciedad y las manchas
Riesgo de Incendio
Nunca ponga dentro de la lavadera los
artículos que están mojados por gasolina o
otros productos inflamables.
La lavadora no puede limpiar perfectamente
la gasolina.
No seque cualquier cosa que ha tenido
cualquier tipo de aceite en ella (incluyendo
el aceide comestible).
Si no observa la advertencia, puede tener el
resultado de muerte, explosión o incendio.
Advertencia
P
reparaci ón antes de Empezar el Lavado
9
Antes de comenzar el lavado


nformaci n de Seguridad
I
6
Introducci n
Advertencia
Por favor no conecte más aparatos eléctricos en la toma de corriente donde tiene
conectada su lavadora.
Exceder el límite puede causar una descarga eléctrica, fuego, averías, y/o
deformaciones de las partes.
No mezcle cloro blanqueador con amoniaco o ácidos tales como vinagre para limpiar.
La mezcla de diferentes químicos puede producir un gas tóxico el cual le puede
causar la muerte.
No lave o seque en su lavadora artículos que han sido limpiados o que contienen solventes o
substancias explosivas, (tales como aceite, pintura, gasolina, desengrasantes, parafina etc) los
cuales pueden arder o explotar. No agregue estas substancias al agua de lavado. No use o
guarde estas substancias cerca de la lavadora o durante la operación de secado.
Este puede prenderse o explotar.
• Cierre la llave de agua para aliviar la presión sobre la manguera y las válvulas, y asi
minimizar el goteo si ocurriera una ruptura. Revisar la condición de las mangueras,
es necesario reemplazarlas luego de 5 años de uso.
• Cuando la temperatura del aire es alta y la temperatura del agua es baja, una con-
densación puede ocurrir y mojar los pisos.
• Limpiar la suciedad o polvo en los contactos del enchufe.
El usar un enchufe que no está limpio puede causar un incendio.
• Antes de desechar una lavadora, quite la tapa para prevenir que los niños queden
atrapados en su interior.
Los niños se pueden quedar atrapados y ahogarse si la tapa es dejada abierta.
No intente repararla o reemplazar alguna parte de este artefacto, a menos que
el manual de instrucciones lo especifique.
Lea cuidadosamente y siga estas instrucciones de seguridad.
Operar la máquina con repuestos que no son los apropiados puede
causar un incendio o descarga eléctrica.
No desarme los controles.
Puede llevar a una descarga eléctrica, fuego, avería, deformación.
No jalar el cordón de electricidad en un intento de desconectar el
enchufe. Agarre firmemente el enchufe para desenchufar la máquina.
El no observar estas instrucciones puede causar una descarga
eléctrica o incendio debido a un corto circuito.
Cuando este limpiando la lavadora, no aplique agua directamente
a ninguna parte de la máquina.
Esto causará un corto circuito y una descarga eléctrica.
CUANDO USE LA
LAVADORA
Precaución
CUANDO NO ESTE
EN USO

Advertencia
• Mantener el área limpia y alrededor de su electrodoméstico, y libre de combustible o materiales tales como papeles,
pelusillas de ropa, químicos, etc.
El operar con ese tipo de materiales alrededor de la máquina puede ocasionar una explosión o incendio.
• Es necesario supervisar al máximo, si el artefacto es usado por menores o si ellos están cerca. No permita que los
niños jueguen con o en el interior de su lavadora.
Existe un peligro potencial que los niños se puedan ahogar en la tina.
No tocar el enchufe con la mano mojada.
Esto causará un descarga eléctrica.
No debe de poner su mano, pie o cualquier cosa debajo la máquina lavadora mientras la máquina esta
operando.
Existe un mecanismo de rotación debajo de la máquina, por eso Usted puede resultar lesionado.
• Asegurarse que el drenaje esta trabajando correctamente.
Si el agua no está drenando apropiadamente, tu piso puede inundarse.
Los pisos inundados pueden causar fuga de electricidad y en consecuencia una
descarga eléctrica o incendio.
• Si al abrir la tapa la lavadora no se detiene durante los primeros 15 segundos de la
función de centrifugado, proceda a desconectar su aparato.
Llamar a su agente de servicio. Una máquina que gira con su puerta abierta
puede causar lesiones.
Nunca introduzca las manos en la lavadora mientras este funcionando. Para
abrir la tapa espere hasta que la máquina esté completamente detenida.
Hasta la rotación lenta puede causar lesiones.
Nunca intente operar este artefacto si está dañado o funcionado mal, partic-
ularmente si tiene partes quebradas, incluyendo el cordón dañdo.
Operar con un enchufe dañado puede causar una descarga eléctrica.
No usar agua que este más caliente que 50 grados centígrados.
El uso excesivo de agua caliente puede causar daños a los tejidos
de la ropa o causar fuga de agua.
• Use este artefacto solo para los fines descritos en el manual de usuario.
• El proceso de lavado de la ropa puede reducir el brillo de las telas deteriorándolas.
Para evitar este resultado, siga cuidadosamente las instrucciones de lavado y cuida-
dos dadas por el fabricante de la prenda.
• Para minimizar la posibilidad de choque eléctrico , desenchufe este artefacto desde la
toma de corriente o desconecte el panel distribuidor de la casa, para cortar
momentáneamente el circuito eléctrico cuando proceda a limpiarla.
AREADE LAVADO
Precaución
CUANDO USE LA
LAVADORA
NOTA :
Apáguela presionando el botón Power, No la
desconecte del suministro de energía.
I
nformaci
ó
n de Seguridad
5
Introducci
ó
n
• Este electrodoméstico no esta diseñado para ser utilizado por personas (incluyendo niños)
con discapacidad mental o sensorial, ó con falta de experiencia y conocimiento sobre este
producto, a menos que sean supervisadas e instruidas por una persona responsable de su seguridad.
Los niños deben de ser supervisados para asegurar que no jueguen con este aparato.

nformaci ón de Seguridad
I
4
Introducci ón
Leer detallada y completamente este manual que contiene información importante acerca de la
seguridad, que protegerá al usuario de peligros inesperados y prevendrá daños potenciales al
producto.
Este manual está divido en dos partes: Advertencia y Precaución.
: Esta es una señal de advertencia especificando las aplicaciones
del usuario que pueden ser peligrosas.
: Esta es una señal especificando aplicaciones "Estrictamente
Prohibidas".
Advertencia
: El no llevar a cabo las instrucciones que han
sido dadas puede resultar en graves lesiones
físicas o muerte.
Precaución
: El no llevar a cabo las instrucciones que han
sido dadas puede resultar en lesiones físicas
o daños al producto.
Advertencia
• Bajo ciertas condiciones puede producirse gas hidrogeno en el calentador de agua
que no ha sido usado por 2 meses o más. El gas hidrogeno puede ser explosivo bajo
estas circunstancias. Si el agua caliente no ha sido usada por 2 meses o más, hay que
prevenir la fuga o daño abriendo completamente la llave de agua caliente y ensegui-
da dejarla correr por unos minutos. Hacer esto antes de usar un artefacto eléctrico en
el cual está conectado el sistema de agua caliente. Este simple procedimiento permi-
tirá alguna fuga de gas hidrogeno. Como el gas es inflamable, no fume o encienda la
llama de un artefacto durante este proceso.
• Cuando la lavadora este instalada sobre un piso alfombrado, la abertura de la base no
debe estar obstruida por la alfombra.
• Instalar o guardar donde no este expuesta a temperaturas bajo congelamiento o expues-
ta a la interperie.
Si es que el producto es expuesto a estas condiciones pueden suceder descar-
gas eléctricas (corto circuito), incendio, averías o deformaciones.
• Para una apropiada instalación a tierra de la lavadora conforme con todas las normas,
siga los detalles de las instrucciones de instalación.
Si no esta apropiadamente instalado, averías y fugas de electricidad pueden
ocurrir, lo cual puede causar una descarga eléctrica.
• La apertura de la base no debe quedar obstruida por la alfombra cuando la lavadora
esté instalada en un piso alfombrado.
Podría haber una avería y descarga eléctrica por una fuga de energía si no se ejecuta.
• Asegurarse que el enchufe está completamente introducido en el toma corriente.
El no llevar a cabo estas instrucciones puede causar un descarga eléctrica
o incendio debido a un sobrecalentamiento.
SEGURIDAD DEL
CALENTADOR DE
AGUA
Precaución
INSTALACION
APROPIADA


aracterísticas del Producto
C
Control de lógica FUZZY
Un sensor de carga y un microprocesador en el controlador detectan la carga
de lavado y fijan las condiciones óptimas de lavado, tales como nivel de
agua, tiempo de lavado, etc.
La tecnología más avanzada en sistema de control electrónico proporciona el
mejor rendimiento de lavado.
Lavado Turbo Drum (opcional)
Cuando giran las aspas “Punch +3”, el tambor gira en la
dirección opuesta. Esto produce una corriente de agua
en ambos sentidos que mejora el rendimiento de lavado
restregando enérgicamente la ropa.
La lavadora no funcionará con la tapa abierta. Si se abre la tapa durante el lava-
do, el enjuague o el , la operación se detendrá por seguridad.
3 Pasos de Lavado
3 pasos de lavado producen mayor eficiencia con bajo enredo.
Frotación
Desplazamiento y
desenredo
Frotación
Desplazamiento
ATENCIÓN
Asegúrese de quitar la unidad de la base de cartón, de otra
manera la máquina no podrá funcionar apropiadamente.

WFSL1432ET
-
 1
1
-
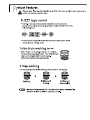 2
2
-
 3
3
-
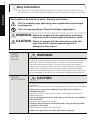 4
4
-
 5
5
-
 6
6
-
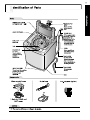 7
7
-
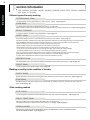 8
8
-
 9
9
-
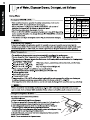 10
10
-
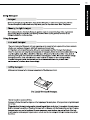 11
11
-
 12
12
-
 13
13
-
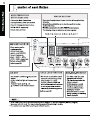 14
14
-
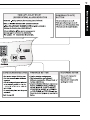 15
15
-
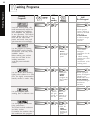 16
16
-
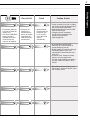 17
17
-
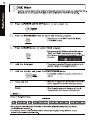 18
18
-
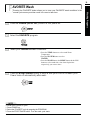 19
19
-
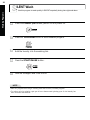 20
20
-
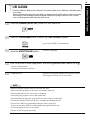 21
21
-
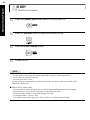 22
22
-
 23
23
-
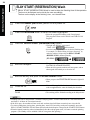 24
24
-
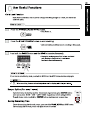 25
25
-
 26
26
-
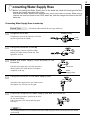 27
27
-
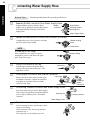 28
28
-
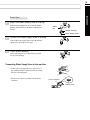 29
29
-
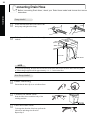 30
30
-
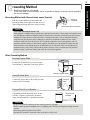 31
31
-
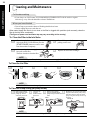 32
32
-
 33
33
-
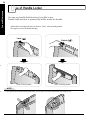 34
34
-
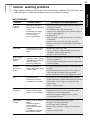 35
35
-
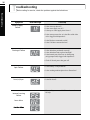 36
36
-
 37
37
-
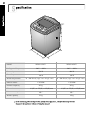 38
38
-
 39
39
-
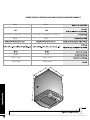 40
40
-
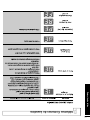 41
41
-
 42
42
-
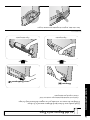 43
43
-
 44
44
-
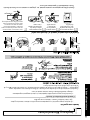 45
45
-
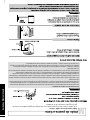 46
46
-
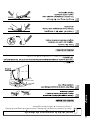 47
47
-
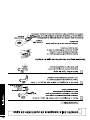 48
48
-
 49
49
-
 50
50
-
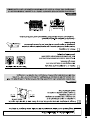 51
51
-
 52
52
-
 53
53
-
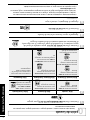 54
54
-
 55
55
-
 56
56
-
 57
57
-
 58
58
-
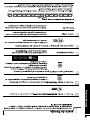 59
59
-
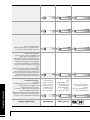 60
60
-
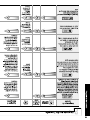 61
61
-
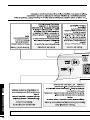 62
62
-
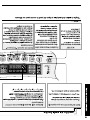 63
63
-
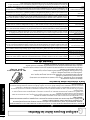 64
64
-
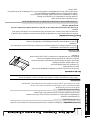 65
65
-
 66
66
-
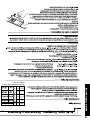 67
67
-
 68
68
-
 69
69
-
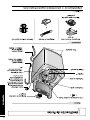 70
70
-
 71
71
-
 72
72
-
 73
73
-
 74
74
-
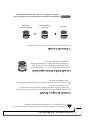 75
75
-
 76
76


LG WFSL1432ET El manual del propietario
- Categoría
- Lavadoras
- Tipo
- El manual del propietario
En otros idiomas
- English: LG WFSL1432ET Owner's manual