
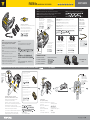
Tighten the bolts.
(Do not tighten completely.)
Serrer les vis.
(Ne pas serrer complètement.)
Apretar tornillos.
( No apretar completamente)
Stringere le viti.
( non stringere completamente)
Dokręć śruby.
(Nie dokręcaj zupełnie)
ยቼႮཊགྷ
ဋ႖ዻୁႮၦხൠཊགྷ
ᗆღᓲකĄ
)ኛ̻ԆБᗆღ*
Ziehen Sie die Schrauben leicht an.
FIXER 8e
HANDLEBAR BAG FIXER FOR EBIKES USER'S GUIDE
ENTFERNEN
enlever
Desmontar
Rimuovere
Wyjmij
INSTALLATION / BEFESTIGUNG / INSTALLATION / INSTALACIÓN / INSTALLAZIONE / MONTAŻ / / /
щ྅Վូᄲځ
໕ᆳዻૺ
For ø28,6 mm size handlebar
Für ø28,6 mm Lenker
Para manillares de 28,6 mm
Pour cintre de diamètre 28,6 mm
Solo per manubri con ø 28,6 mm
Dla kierownic ø28,6 mm
ø28.6 mm
ຫၦღጆ౹
ዋϡ ø28.6 mm ֘͘ԯ
For ø25.4 mm size handlebar
Für ø25,4 mm Lenker
Para manillares de 25,4mm
Pour cintre de diamètre 25,4mm
Solo per manubri con ø 25,4mm
Dla kierownic ø25,4 mm
ø25.4 mm
ຫၦღጆ౹
ዋϡ ø25.4 mm ֘͘ԯ
GB DE FR ES IT PL JP KR
CHT
CABLE DE SÉCURITÉ
CAVO DI SICUREZZA
LINKA ZABEZPIECZAJĄCA
CABLE DE SEGURIDAD
ྦ႖ᇛၦ๓
ؠΐૻቢ
SICHERHEITSKABEL
SECURITY CABLE
Remove
ொੵ
Tool Required : 5 mm Allen key
Benötigtes Werkzeug: 5 mm Innensechskant-Schlüssel
Outils nécessaires: Clé Allen de 5 mm
Herramienta requerida: Llave Allen de 5 mm
Attrezzo necessario: brugola da 5 mm
Zalecane narzędzia : imbusy 5 mm
ֹϡ̍ : 5 mm ̰̱֎Գ͘
8
NOTE:
Please remove the display unit from your eBike
before installing Fixer 8e on your handlebar.
HINWEIS:
Bitte entfernen Sie das Display am Lenker ihres
eBikes bevor Sie die Fixer 8e Halterung montieren.
NOTE:
Retirer l'unité d'affichage de votre eBike avant
d'installer le Fixer 8e sur le guidon.
NOTE : Per prima cosa ricordatevi di togliere il
display della vostra eBike dall'unità, prima di
installare il Fixer 8e sul manubrio .
UWAGA:
Proszę zdjąć wyświetlacz z Twojego eBike'a
przed montażem Fixera 8e na kierownicy.
ڦຍĈ
щ྅Fixer 8eؠळҌ֘͘ԯ݈ĂኛАொੵeBike˯
۞ពϯᏈ၌-ГҖщ྅Ą
NOTA:
Por favor desmonte el monitor de su eBike antes
de instalar Fixer 8e en el manillar.
Install Rubber Sizing Pads on handlebar.
( Not needed if handlebar diameter is 31.8mm.)
Installieren Sie die Distanzgummis am Lenker
(nicht nötig bei ø 31,8 mm Lenkern).
Installer les cousinets en caoutchouc sur le guidon.
(Pas nécessaire pour les diamètre de guidon de 31,8mm)
Instalar adaptadores de goma en el manillar.
(no son necesarios si el diámetro del manillar es 31,8mm)
Installate i morsetti in gomma sul manubrio.
( non necessari se il diametro del manubrio è di 31,8 mm.)
щ྅ါͯٺ֘͘ԯ˯Ą
ø31.8 mm ֘͘ԯ̙ᅮщ྅*
Zainstaluj gumowe podkładki na kierownicy ( Nie-
potrzebne, jeśli kierownica ma średnicę 31,8mm.)
Pancerz linki
Cable Housing
ᇛၦ๓ዻဨჷ
హგ
Involucro cavo
Cable
Gaine
Kabelhülle
For ø28,6 mm size handlebar
Für ø28,6 mm Lenker
Para manillares de 28,6 mm
Pour cintre de diamètre 28,6 mm
Solo per manubri con ø 28,6 mm
Dla kierownic ø28,6 mm
ø28.6 mm
ຫၦღጆ౹
ዋϡ ø28.6 mm ֘͘ԯ
For ø25.4 mm size handlebar
Für ø25,4 mm Lenker
Para manillares de 25,4mm
Pour cintre de diamètre 25,4mm
Solo per manubri con ø 25,4mm
Dla kierownic ø25,4 mm
ø25.4 mm
ຫၦღጆ౹
ዋϡ ø25.4 mm ֘͘ԯ
DISTANZGUMMI (nicht nötig bei ø 31,8 mm Lenkern)
RUBBER SIZING PAD ( Not needed if handlebar diameter is 31.8mm.)
COUSSINET D'ADAPTATION EN CAOUTCHOUC
(Pas nécessaire pour guidon de diamètre 31,8mm.)
PROTECCIONES DE GOMA (no es necesario si el diámetro del manillar es de 31,8mm)
GOMMINI IN GOMMA (Non necessari se il il diametro del manubrio è di 31,8mm)
GUMOWE PODKŁADKI ( Niepotrzebny, jeśli kierownica ma średnicę 31,8mm.)
ါͯ ø31.8 mm ֘͘ԯ̙ᅮщ྅*
FIXER 8e (passend für ø 25,4 mm, ø 28,6 mm und ø 31,8 mm Lenker)
FIXER 8e ( Fits ø25.4, ø28.6 and ø31.8 mm handlebars. )
FIXER 8e (compatible pour guidon avec diamètre de 25,4mm, 28,6mm et 31,8mm)
FIXER 8e (válido para manillares de 25,4 a 28,6 y 31,8mm)
FIXER 8e (compatibile con manubri da ø25,4, ø28,6 e ø31,8 mm) FIXER 8e ؠळ(ዋϡ ø25.4, ø28.6 ᄃ ø31.8 mm ֘͘ԯ)
FIXER 8e ( Pasuje do kierownic ø25,4, ø28,6 i ø31,8 mm . )
FIXER 8e
M5 x 10 mm Schrauben
Boulon M5 x 10mm
Tornillo M5 x 10mm
Vite M5 x 10 mm
Śruby M5 x 10 mm
M5 x 10 mm ᓲක
M5 x 10 mm Bolt
LINKA ZABEZPIECZAJĄCA
ྦ႖ᇛၦ๓
ؠΐૻቢ
SECURITY CABLE
CABLE DE SÉCURITÉ
CAVO DI SICUREZZA
CABLE DE SEGURIDAD
SICHERHEITSKABEL
Release Button
Entriegelungsknopf
Bouton de déverrouillage
Botón soltar
Tasto a rilascio
Przycisk zwalniający
עੵต
Topeak Handlebar Bag
Series
COMPATIBLE ACCESSORIES
KOMPATIBLES ZUBEHÖR
ACCESOIRES COMPATIBLES
ACCESORIOS COMPATIBLES
ACCESSORI COMPATIBILI
KOMPATYBILNE AKCESORIA
ΞᏴ੨થݡ
M5 x 25 mm Bolts
M5 x 25 mm Schrauben
Boulon M5 x 25 mm
Tornillo M5 x 25 mm
Vite M5 x 25 mm
M5 x 25 mm ᓲක
Śruby M5 x 25 mm
M5 x 25 mm

Loosen the bolt. (Do not loosen completely.)
Lösen Sie die Schraube (nicht vollständig lösen).
Dévisser la vis. (Ne pas dévisser complètement)
aflojar tornillo (no aflojar completamente)
Stringere la vite. (Non stringere completamente)
ᗫฟᓲකĄ)ኛ̻ԆБᗫฟ*
Poluzuj lekko śrubę.
Pull cable and tighten anchor bolt firmly.
Tirer le câble et serrer fermement la vis de fixation.
Tirar del cable y apretar firmemente el tornillo.
Tirare il cavo e stringere le viti in modo fermo.
Pociągnij linkę i mocno dokręć śrubę.
ᇛၦ๓ၕఙૺඓྼᇑยቼୁႮၦཊགྷ
ؠΐૻቢٛҝ֭˯ღᓲකؠĄ
Spannen Sie das Sicherheitskabel und schrauben
Sie die Befestigungsschraube fest.
Recommended
5˚ from horizontal
Empfehlung
5° von der
Horizontalen
Recommandation
5° par rapport à
l'horizontale
Recomendación
5º en horizontal
Raccomandato
5 gradi rispetto alla
posizione orizzontale
Zalecane
5˚ od poziomu
ၿੜ
༘ዀ
5˚
ືጎ
ޙᛉщ྅֎ޘ
ᗓͪπࢬ 5˚
Pancerz linki
ᇛၦ๓ዻဨჷ
హგ
PARA CAVO
Cable
Gaine
KABELHÜLLE
Colocar cable encima del cable de
seguridad para proteger la potencia.
Cortar el exceso de cable.
aggiungere il para cavo sul cavo di
sicurezza per proteggere l'attacco
manubrio da sfregamenti. Tagliare il
para cavo in eccesso.
Załóż pancerz na linkę
zabezpieczającą w celu ochrony
mostka. Przytnij nadmiar pancerza.
Glisser le câble de sécurité dans une
gaine pour protéger la potence.
Couper l'excédent de gaine.
ྦ႖ᇛၦ๓ᇛၦ๓ዻဨჷၕ୶ဲ
ப࿌༺ቋၡືၕ෮ხዻཊགྷ
ஆၔᇛၦ๓ዻဨჷၔຫၦღ൬
ၹೡஏཊགྷ
дؠΐૻቢ˯ᆧΐహგĂͽ᜕ܲከ
გ֨ͤ᎐ຫĂ࣒֭ગкዶ۞హგĄ
Installieren Sie zum Schutz des Vorbaus
die Kabelhülle über dem Sicherheitskabel.
Kürzen Sie die Kabelhülle bei Bedarf.
Add cable housing over the security
cable to protect from marring the stem.
Trim excess cable housing.
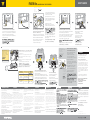
WARRANTY
2-year Warranty: All electronic and
mechanical components against
manufacturer defects only.
Warranty Claim Requirements
To obtain warranty service, you must
have your original sales receipt. Items
returned without a sales receipt will
assume that the warranty begins on
the date of manufacture. All warranties
will be void if the product is damaged
due to user crash, abuse, system
alteration, modification, or used in any
way not intended as described in this
manual.
* The specifications and design are
subject to change without notice.
Please contact your Topeak dealer
with any questions.
For USA customer service call:
1-800-250-3068
www.topeak.com
GEWÄHRLEISTUNG
2 Jahre Gewährleistung auf alle verbauten Teile, jedoch
nur gegen Herstellermängel.
Gewährleistungsanspruch
Sie benötigen Ihren Originalkaufbeleg um den
Gewährleistungs-Service zu erhalten. Bei Artikel die ohne
Kaufbeleg eingesendet werden, wird davon ausgegangen,
dass die Gewährleistung mit dem Herstellungsdatum
beginnt. Alle Gewährleistungsansprüche werden ungültig,
wenn der Artikel auf Grund eines Unfalls beschädigt oder
zweckentfremdet wurde, Systemänderungen oder
andere Veränderungen vorgenommen wurden oder der
Artikel anderweitig verwendet wurde als in diesem
Handbuch beschrieben.
* Änderungen in Design und Eigenschaft bedürfen keiner
vorherigen Ankündigung.
Topeak Produkte sind ausschließlich im
Fahrradfachhandel erhältlich.
Bitte nehmen Sie Kontakt mit Ihrem nächsten Topeak
Händler auf, um offene Fragen zu klären. Für Kunden in
Deutschland, Tel. 0261-899998-28 / Homepage:
www.topeak.com
Garantie de 2 ans : toutes parties mécaniques
contre tout défaut de fabrication.
Réclamation de la garantie
Pour bénéficier de notre service de garantie,
vous devez être en possession de la facture
d'achat originale. Si le produit nous est retourné
sans cette facture d'achat, nous considérons la
date de fabrication comme début de la garantie.
Toute garantie sera considérée comme nulle si
le produit à été endommagé suite à une chute,
à un abus, une surcharge, à un quelconque
changement ou modification ou à une
utilisation autre que celle décrite dans ce
manuel.
* Les spécifications et l'apparence peuvent
être sujettes à certaines modifications.
Contactez votre revendeur Topeak si vous
avez la moindre question. For USA customer
service cal l : 1-800-250-3068 /
www.topeak.com
GARANTÍA
Disponen de 2 años de garantía : Todos los
componentes mecánicos con algún defecto
de fabricación.
Requerimientos para Reclamación de la
Garantía
Para obtener la garantía debe disponer del
justificante de compra, sin el recibo de
compra se considerará como fecha de inicio
de la garantía la fecha de fabricación. No se
considerarán cubiertos por la garantía los
artículos dañados por golpes, abuso o
alteraciones del sistema, modificaciones, o
utilización de otra manera o para otros usos a
los descritos en este manual.
Por favor, contacte con su distribuidor
Topeak para cualquier pregunta.
www.servixtt.com, www.topeak.com
GARANZIA
2 Anni di garanzia : solo per difetti di produzione
alle parti meccaniche.
Condizioni di garanzia
Per usufruire della garanzia è necessario essere
in possesso dello scontrino originale di acquisto.
In caso il prodotto ci venga restituito senza lo
scontrino la garanzia decorrerà dalla data di
fabbricazione. La garanzia decade qualora il
prodotto venga danneggiato da uso improprio,
sovraccarico, modifiche o utilizzato in maniera
diversa da quella descritta nelle presenti
Istruzioni d’uso.
* Le caratteristiche del prodotto possono
essere cambiate senza preavviso.
I prodotti Topeak sono in vendita nei negozi
specializzati per ciclisti.
Per ogni richiesta o chiarimento rivolgetevi al
rivenditore Topeak più vicino.
Sito web: www.topeak.com
GWARANCJA
2 lata gwarancji: Na wady fabryczne
wszystkich części mechanicznych.
Warunki korzystania z gwarancji
Aby uzyskać serwis gwarancyjny, należy
posiadać oryginalny dowód zakupu. Gdy
produkt reklamowany jest bez paragonu
zakładamy, że gwarancja rozpoczyna sie od
daty produkcji. Wszystkie gwarancje sa
nieważne jeśli produkt został uszkodzony na
skutek wypadku, nadużycia, zmiany, mody
kacji lub wykorzystywany w jakikolwiek
sposób niezgodny z opisanym w niniejszej
instrukcji.
* Specykacja i projekt mogą ulec zmianie bez
powiadomienia.
W przypadku jakichkolwiek pytań skontaktuj
się ze sprzedawcą lub importerem Topeak.
ܲࢋՐ
Ϧኛܲഇࢨ̚۞ڇચĂืᑭࣧᔉ෴ॡ̝
൴ைĂࡶڱ೩ֻĂܲഇࢨҋᄦౄ
͟ഇฟؕზĄࡶЯֹϡ۰̙ຕၢᗼăֹϡ
̙༊ăҋҖԼ྅ăՀԼրٕϏਕᄲځ
३˯۞ϒቁፆү͞ёĂώயݡ̙జЕˢܲ
ቑಛĄ
+ώ̳ΦܲயݡఢॾតՀ̝ᝋӀĄ
Topeakயݡ࠹ᙯ۞ྤੈĂኛࠀྙTopeak
༊гᝋ۞གྷዚથĄ
შӬĈwww.topeak.com
யݡܲ
M-TC3012-ML 11/15
Copyright © Topeak, Inc. 2015
GARANTIE
5˚
CABLE
HOUSING
Trim excess cable.
Couper l'excédent de câble.
Cortar el exceso de cable.
Tagliare il cavo in eccesso.
Przytnij nadmiar linki.
ᇛၦ๓୵ၕၹೡஏཊགྷ
࣒ગкዶ۞ؠΐૻቢĄ
Kürzen Sie das überstehende
Sicherheitskabel.
Stellen Sie den korrekten Winkel ein und ziehen Sie die
Schrauben fest an.
Resserrer les vis lorsque l'angle souhaité est obtenu.
Po ustawieniu kąta ponownie dokręć śruby.
Volver a apretar los tornillos cuando se consiga el
ángulo deseado.
Stringere le viti sino a che viene raggiunta la giusta
angolazione.
ဴዻ௴ੜചႮႜፎยቼဋ႖ዻႮၦཊགྷ
༊አፋזϒቁ۞֎ޘޢĂᗆღᓲකͽؠ֎ޘĄ
Re-tighten the bolts once correct angle is reached.
USER'S GUIDE
FIXER 8e
HANDLEBAR BAG FIXER FOR EBIKES
2 Nm
Recommended Torque
Empfohlener Drehmoment
couple recommandé
Apriete recomendado
Chiave torica consigliata
ޙᛉԮ˧ࣃ
Logo z przodu
Pull
Back
Release
Button
Entriegelungsknopf
Bouton de déverrouillage
Botón soltar
Tasto a rilascio
Przycisk zwalniający
עੵต
Zurück ziehen
Tirer en arrière
Tirar hacia atrás
Tirare Indietro
Pociągnij
Шޢٛ
Remove Handlebar Bag.
Entfernen der Lenkertasche.
Retirer HandleBar Bag.
Desmontar la bolsa.
Rimuovere la borsa dal manubrio
Zdejmij Handlebar Bag.
ொੵ֘͘ԯఠĄ
Pull back release button of FIXER 8e
and lift handlebar bag to detach.
Ziehen Sie den Entriegelungsknopf
zurück und heben Sie die
Lenkertasche aus dem Halter.
Tirer en arrière le bouton de
verrouillage du Fixer 8e et soulever le
bagage pour le détacher.
Tirar hacia atrás el botón soltar del
Fixer 8e y levantar la bolsa de manillar
para el desmontaje.
Tirare all'indietro il tasto a rilascio
del FIXER 8e e fate scorrere la
borsa per staccarla dal manubrio
Pociągnij przycisk zwalniając
FIXER’a 8e i zdejmij torbę.
Аؠळ۞עੵตـޢٛĂГ֘
͘ԯఠـ˯ொੵ̶ᗓĄ
Install Topeak Handlebar Bag on Fixer 8e.
Montieren Sie die Topeak Lenkertasche auf
dem Fixer 8e Halter.
Installer Topeak HandleBar Bag sur Fixer 8e.
Instalar la bolsa de manillar Topeak en el Fixer 8e.
Installare la borsa al manubrio sul Fixer 8e.
Zamontuj Topeak Handlebar Bag na Fixer 8e.
щ྅Topeak֘͘ԯఠҌؠळ˯Ą
-
 1
1
-
 2
2


Topeak TC3012 El manual del propietario
- Tipo
- El manual del propietario
- Este manual también es adecuado para
En otros idiomas
- français: Topeak TC3012 Le manuel du propriétaire
- italiano: Topeak TC3012 Manuale del proprietario
- English: Topeak TC3012 Owner's manual
- Deutsch: Topeak TC3012 Bedienungsanleitung
- polski: Topeak TC3012 Instrukcja obsługi