
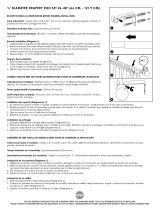
Placing Rod and Drapes on Brackets
(diagram 2.)
1. Remove 1 finial from rod section by turning
counter clock wise.
2. Slip draper over rod until end of rod is visible.
3. Place rod in bracket cradles as shown.
4. Screw both finials back on the rod.
Be sure to read all instructions
before starting installation.
Estimated Assembly Time:
30 minutes
Tools Needed (not included)
. Drill with 3/16” drill bit
. Phillips screwdriver
. Level (recommended)
Care Instructions:
Clean with soft cloth only.
No abrasive cleaning agents.
Tools needed for installation.
(Not Included)
Pencil
Level
(Recommended)
Phillips
Screw Driver
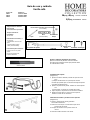
Bracket installation.
(diagram 1.)
1. Using bracket as a guide, adjust to desired
height and mark location on wall for mounting
screws. (Wall anchors may not be necessary
for all applications.)
2. Remove bracket from wall. Drill pilot hole using
3/16” drill bit and insert wall anchors.
3. Attach bracket to wall using screws provided.
4. Repeat steps 1 to 3 for additional brackets.
Use level if necessary.
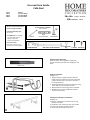
Parts Included
2 Wall Brackets
Rod with 1 Finials attached
4 Screws 4 Anchors
Item # Model #
96181 FSI 1151 E WLNT
96198 FSI 1182 E WEPS
96206 FSI 1163 E NICK
28in-48in 71.12cm - 121.92 cm
5/8in diameter 1.58 cm
2
nd
finial in the
bag
Use and Care Guide
Café Rod
Plastic Covering
Remove Plastic Rod Cover
Remove plastic covering before installation.
Do not use sharp tools that can damage the rod
finish

Colocación de varillas y cortinas en los soportes
(diagrama 2).
1. Quite 1 remate de la varilla girándolo
en sentido antihorario.
2. Deslice la cortina por la varilla hasta que vea el
extremo de la varilla.
3. Coloque la varilla en los soportes como se
ilustra.
4. Atornille ambos remates a la varilla.
Asegúrese de leer todas las
instrucciones
antes de instalar el producto.
Tiempo estimado de
ensamblaje:
30 minutos
Herramientas necesarias (no
se incluyen)
. Taladradora con broca de
3/16”
. Destornillador Phillips
. Nivel (recomendado)
Instrucciones para el cuidado:
Limpiar solo con un paño
suave.
Nunca usar agentes de
limpieza abrasivos.
Herramientas necesarias para la instalación.
(no incluidas)
Lápiz
Nivel
(recomendado)
Destornillador
Phillips
Instalación del soporte.
(diagrama 1).
1. Ajuste a la altura deseada, usando el soporte como
guía
y marque la ubicación en la pared para colocar
tornillos (Es posible que no necesite anclajes de pared
en todas las aplicaciones).
2. Quite el soporte de la pared. Taladre un orificio piloto
con
la broca 3/16” e inserte los anclajes de pared.
3. Fije el soporte a la pared con los tornillos incluidos.
4. Repita los pasos del 1 al 3 para el otro soporte.
Utilice un nivel de ser necesario.
Piezas incluidas
2 soportes de pared
Varilla con 1 remate
colocado
4 tornillos
4 anclajes
Artículo N.° Modelo N.°
96181 FSI1151 E WLNT
96198 FSI1182 E WEPS
96206 FSI1163 E NICK
28pulg.-48pulg. 71.12 cm - 121.92 cm
5/8pulg. de diámetro 1.58 cm
2.
o
remate en la
bolsa
Guía de uso y cuidado
Varilla café
Cubierta de plástico
Quitar la cubierta de plástico de la varilla
Quite la cubierta de plástico antes de instalar.
No utilice herramientas filosas que puedan dañar
el acabado de la varilla
-
 1
1
-
 2
2


Home Decorators Collection FSI�1182 F WEPS Guía de instalación
- Tipo
- Guía de instalación
- Este manual también es adecuado para
Artículos relacionados
Otros documentos
-
The Haven Collection 003-72144BC Instrucciones de operación
-
Decopolitan 27865-B Guía de instalación
-
STYLE FSI 1457E Manual de usuario
-
Style Selections 5276612 Manual de usuario
-
-
Montevilla 29991-48VS Guía de instalación
-
-
Decopolitan 30409-SL36 Guía de instalación
-
 Montevilla 30072-26AS Guía de instalación
-
Decopolitan 27877-36BW Guía de instalación
