Insignia NS-IMC44S3 Guía del usuario
- Categoría
- Fabricantes de cubitos de hielo
- Tipo
- Guía del usuario

Before using your new product, please read these instructions to prevent any damage.
Antes de usar su producto nuevo, lea este instructivo para prevenir cualquier daño.
USER GUIDE
GUÍA DEL USUARIO
44-lb. Clear Ice Maker
Máquina de hielo
transparente de 44 lb.
NS-IMC44S3
ENGLISH . . . . . . . . . . . . . 3
ESPAÑOL. . . . . . . . . . . . . 19

www.insigniaproducts.com
2
Contents
ENGLISH
Introduction . . . . . . . . . . . . . . . . . . . . . . . . . . . . . . . . . . . . . . . . . . . . . . . . . . . . . . . . . . . . 3
Important Safety Instructions . . . . . . . . . . . . . . . . . . . . . . . . . . . . . . . . . . . . . . . . . . . . 3
Features . . . . . . . . . . . . . . . . . . . . . . . . . . . . . . . . . . . . . . . . . . . . . . . . . . . . . . . . . . . . . . . .5
Setting up your ice maker . . . . . . . . . . . . . . . . . . . . . . . . . . . . . . . . . . . . . . . . . . . . . . . 7
Using your ice maker . . . . . . . . . . . . . . . . . . . . . . . . . . . . . . . . . . . . . . . . . . . . . . . . . . . . 8
Cleaning and maintaining your ice maker . . . . . . . . . . . . . . . . . . . . . . . . . . . . . . .10
Troubleshooting . . . . . . . . . . . . . . . . . . . . . . . . . . . . . . . . . . . . . . . . . . . . . . . . . . . . . . .13
Specifications . . . . . . . . . . . . . . . . . . . . . . . . . . . . . . . . . . . . . . . . . . . . . . . . . . . . . . . . . .16
ONE-YEAR LIMITED WARRANTY . . . . . . . . . . . . . . . . . . . . . . . . . . . . . . . . . . . . . . . . .17
ESPAÑOL
Introducción . . . . . . . . . . . . . . . . . . . . . . . . . . . . . . . . . . . . . . . . . . . . . . . . . . . . . . . . . . .19
Instrucciones importantes de seguridad . . . . . . . . . . . . . . . . . . . . . . . . . . . . . . . .19
Características. . . . . . . . . . . . . . . . . . . . . . . . . . . . . . . . . . . . . . . . . . . . . . . . . . . . . . . . . .22
Cómo configurar la máquina de hielo . . . . . . . . . . . . . . . . . . . . . . . . . . . . . . . . . . .24
Utilización de su máquina de hacer hielo . . . . . . . . . . . . . . . . . . . . . . . . . . . . . . . .25
Limpieza y mantenimiento de la máquina de hielo . . . . . . . . . . . . . . . . . . . . . .28
Localización y corrección de fallas. . . . . . . . . . . . . . . . . . . . . . . . . . . . . . . . . . . . . . .31
Especificaciones. . . . . . . . . . . . . . . . . . . . . . . . . . . . . . . . . . . . . . . . . . . . . . . . . . . . . . . .33
GARANTÍA LIMITADA DE UN AÑO . . . . . . . . . . . . . . . . . . . . . . . . . . . . . . . . . . . . . . .34

3
44-lb. Clear Ice Maker
www.insigniaproducts.com
ENGLISH
Introduction
Congratulations on your purchase of a high-quality Insignia product. Your
NS-IMC44S3 represents the state of the art in ice maker design and is designed for
reliable and trouble-free performance.
Important Safety Instructions
WARNING
Read these instructions.
• Keep these instructions.
•Heed all warnings.
• Follow all instructions.
• Do not operate your ice maker with a damaged cord.
• Your ice maker requires a standard 110-120 Volt, 60Hz electrical outlet with a
three-prong ground.
• Connect to a properly polarized outlet only. No other appliance should be
plugged into the same outlet.
• Make sure that the plug is fully inserted into the outlet.
• Do not run the power cord over carpeting or other heat insulators. Do not
cover the cord. Keep the cord away from traffic areas, and do not submerge in
water.
• We do not recommend the use of an extension cord because it may overheat
and become a risk of fire. If you must use an extension cord, use No.14 AWG
minimum size and rated no less than 1875 watts.
• Unplug your ice maker before cleaning or making any repairs or servicing.
• Exercise caution and use reasonable supervision when your ice maker is used
near children.
• Do not use your ice maker outdoors.
• Place your ice maker away from direct sunlight and make sure that there is at
least 6 inches (15 cm) of space between the back and sides of your ice maker
and surrounding walls.
• Do not use any other liquid besides water to make ice cubes.
CAUTION
RISK OF ELECTRIC SHOCK
DO NOT OPEN
This symbol indicates that dangerous voltage
constituting a risk of electric shock is present
within your ice maker.
This symbol indicates that there are important
operating and maintenance instructions in the
literature accompanying your ice maker.

4www.insigniaproducts.com
• Do not clean your ice maker with flammable fluids. The fumes can create a fire
hazard or explosion.
• Do not tip over.
• If your ice maker is brought in from outside storage in winter, wait a few hours
for it to warm up to room temperature before plugging it in.
• To avoid a hazard due to instability of your ice maker, it must be placed on an
even or flat surface.
WARNING
Electric Shock Hazard
Failure to follow these instructions can result in electric shock, fire, or
death.
DANGER: Risk of fire or explosion. Flammable refrigerant used.
• Ensure that servicing is done by factory authorized service
personnel to minimize product damage or safety issues.
• Consult repair manual or owner's guide before attempting to
service this product. All safety precautions must be followed.
• Follow handling instructions carefully.
1WARNING–Do not operate this, or any other appliance with a damaged cord.
Make sure that the plug is fully inserted into the receptacle.
2WARNING–Keep ventilation openings in the appliance enclosure clear of
obstruction.
3WARNING–Do not touch the interior of the ice maker compartment with wet
hands. This could result in frost bite.
4WARNING–Do not use mechanical devices or other means to accelerate the
defrosting process, other than those recommended by the manufacturer.
5WARNING–Do not damage the refrigerant circuit when handling, moving, or
using your ice maker.
6WARNING–Do not use electrical appliances inside the storage compartment
of the cooler, unless they are of the type recommended by the manufacturer.
7Unplug your ice maker before carrying out user maintenance on it.
8Please dispose of your ice maker according to local regulations as the cooler
contains flammable gas and refrigerant.
9This ice maker should be installed in accordance with the safety standard for
Refrigeration Systems, ASHRAE15. Your ice maker shall not be installed in
corridors or hallways of public buildings.
10 This ice maker is intended to be used in household and similar environments,
such as:
• Staff kitchen areas in shops, offices, and other working environments
• Farm houses and by clients in hotels, motels, and other residential
environments
• Bed and breakfasts
• Catering and similar non-retail applications

5
44-lb. Clear Ice Maker
www.insigniaproducts.com
Features
• Produces up to 44 lbs. (19.9 kg) of ice per day, letting you stock up for your
next get together
• Clear ice keeps your beverage cold longer and creates less fizz than white or
bullet ice
• Fast-working system produces your first ice in about 14 minutes
• 2.6 lbs. (1.2 kg) storage capacity gives you plenty of ice for any occasion
• Reduces water waste by letting you add water manually
• Stainless steel surface is easy to keep clean and looks great in any kitchen
• Digital controls make using your ice maker simple and easy
• Included scoop makes it easy to pour ice into individual glasses
• Auto cleaning mode keeps your ice maker in good working condition
Package contents
• 44 lb. Clear Ice Maker
•Ice scoop
• Ice basket (pre-installed)
• User Guide
Product overview
Note: Ice clarity may vary, depending on several factors.
Water reservoir
lid
Vent
Cover
Water separator
piper
Evaporator
Ice basket
Control panel
Ice scoop
Water drain cap
(on bottom)
Water reservoir

6www.insigniaproducts.com
Control panel and display
#ICONBUTTON/DISPLAYDESCRIPTION
1TIMER button Press to set the timer. Press and hold for five seconds to
begin the automatic cleaning cycle or to turn off the
blinking self-clean indicator.
2LCD display screen Lights to show indicators, timer settings and countdown,
and ambient temperature.
3Ambient temperature
and ice maker
countdown
M - indicates timer/ice maker countdown
F or C - indicates ambient temperature in Fahrenheit or
Celsius.
4Ice making symbol When this symbol blinks, your ice maker is emptying the
ice tray. When the symbol rotates, your ice maker is
making ice.
5Self-clean indicator • Lights when the automatic self-clean program is
activated.
• Blinks when it’s time to run the automatic cleaning
cycle.
6Power on indicator Lights when your ice maker is turned on.
7+/ice maker timer/ice
thickness increase When your ice maker is making ice, press to make thicker
ice. When setting the timer, press to increase the time.
Press and hold for more than five seconds to switch the
temperature display between °F and °C.
8ON/OFF button Press to turn your ice maker on or off.
Press and hold for more than five seconds to stop the ice
making process and have the ice tray eject the ice cubes.
9Time setting indicator M - indicates how many minutes increase or decrease.
H - indicates how long until your ice maker turns on or off.
10 Ice full warning Lights to indicate that the ice basket is full.
11 Low water warning Lights to indicate that your ice maker needs water.
M
H
C
F
C
F
M
H

7
44-lb. Clear Ice Maker
www.insigniaproducts.com
Setting up your ice maker
Before using your ice maker
• Remove the exterior and interior packing.
• Remove all tape and take out the accessories from the unit. If any parts are
missing, contact customer service.
• Clean your ice maker (see Cleaning and maintaining your ice maker on page
10), then run two or three cycles of ice and dispose of them to remove any
plastic odor or residue from the manufacturing and shipping process.
Finding a suitable location
• Your ice maker is designed to be free standing only, and should not be
recessed or built-in.
• Place your ice maker on a counter top that is strong enough to support it
when it is fully loaded.
• Allow six inches (15 cm) of space between the back and sides of your ice
maker and any surrounding walls to allow for proper air ventilation.
• Place your ice maker away from direct sunlight and sources of heat, such as a
stove, heater, or radiator. Direct sunlight may affect the acrylic coating and
heat sources may increase electrical consumption. Extremely cold
temperatures may also prevent your ice maker from performing properly.
Providing a proper power supply
This appliance requires a standard 110-120 Volt, 60 Hz electrical outlet with good
grounding means.
12 Error code indicator E - Indicates an ice making problem or a refrigerant leak.
E1 - Indicates that the ambient temperature sensor is bad.
E2 - Indicates that the water temperature sensor is bad.
13 -/ice maker timer/ice
thickness decrease When your ice maker is making ice, press to make thinner
ice. When setting the timer, press to decrease the time.
Press and hold for more than five seconds to switch the
temperature display between °F and °C.
WARNINGS: Before plugging in your ice maker, wait four hours for the refrigerant fluid to
settle.
WARNINGS: Improper use of the grounded plug can result in the risk of electrical
shock. If the power cord is damaged please call our customer service.
#ICONBUTTON/DISPLAYDESCRIPTION

8www.insigniaproducts.com
This unit should be properly grounded for your safety. The power cord of this
appliance is equipped with a grounding plug which mates with standard
grounding wall outlets to minimize the possibility of electric shock.
Using your ice maker
Making ice
1Open the water reservoir lid and fill the reservoir with drinking water. Keep the
water level below the maximum FULL level.
Notes:
• Your ice maker should always be plugged into its own individual electrical outlet
which has a voltage rating that matches the rating plate.
• Never unplug your ice maker by pulling on the power cord. Always grip the plug
firmly and pull straight out from the outlet.
• Do not, under any circumstances, damage the grounding prong of the plug. Any
questions concerning power and/or grounding should be directed toward a certified
electrician.
CAUTIONS:
• Fill the reservoir with drinking water only.
• Change water in the water reservoir every 24 hours to make sure that it is fresh. If the
unit isn’t to be used for an extended period, drain the water and dry the water
reservoir.
• Do not pour water into the internal water tank under the ice basket, as this will
negatively affect the performance of your ice maker.
Tips:
To improve ice clarity:
• Try using distilled or purified water in your ice maker
• Make sure that you are running the ice maker auto clean cycle frequently
Note: When there is no more water in the top water reservoir, the water tank symbol
lights.
3-prong receptacle
Receptacle box cover3-prong plug
Grounding lead
Grounding adapter Receptacle box cover
Screw
Receptacle
Using a 3-prong plug and outlet Using a grounding adapter
FULL
Water reservoir lid

9
44-lb. Clear Ice Maker
www.insigniaproducts.com
2Close the water reservoir lid.
3Plug in your ice maker. The power indicator on the display begins to blink
and the ambient temperature (in degrees Fahrenheit) is shown.
4Press the (ON/OFF) button to turn on your ice maker. The symbol stops
blinking (stays on), the ice making symbol begins rotating, and the
ambient temperature turns off.
• After several minutes, the countdown is shown on the display, indicating the
time (in minutes) until the ice making process is complete.
• Water flows from the top water reservoir to the bottom water tank and the
water tank symbol turns on.
5When the ice making symbol blinks, the cycle is over.
6To make additional ice cubes, leave your ice maker on and refill the top water
reservoir. When the water float in the bottom tank detects a full tank, the
water tank symbol turns off and the next ice making cycle begins.
OR
Press the (ON/OFF) button to turn your ice maker off.
Changing the thickness of the ice cubes
• Press the + or - buttons prior to the ice making cycle to increase or decrease
the ice making time in one minute increments. More time for thicker ice cubes,
and less time for thinner.
Notes:
• The ice making cycle lasts between 13 and 25 minutes, depending on the ambient
temperature.
• The first time you make ice, depending on the initial water temperature, ice-making
time will be a little longer. In a very hot room, ice-making time may vary, but will not
exceed 35 minutes.
• To stop the ice making process at any time, press and hold the (ON/OFF) button for
more than five seconds to cause the ice tray to eject the ice cubes.
• If the low water icon is on, add water then press the (ON/OFF) button to restart
the ice maker.

10 www.insigniaproducts.com
Removing ice
1Your ice maker stops making ice when the ice basket is full. When this
happens, the full indicator appears on the display.
2Open your ice maker lid and remove the ice basket.
3Empty the ice basket and replace it into your ice maker.
4Your ice maker resumes making ice.
Using the timer to turn on your ice maker and start making ice
You can use the timer to turn your ice maker on.
1With your ice maker off, press the (TIMER) button. The display shows “1”
(indicating one hour) and a blinking “H”.
2Press the + button to add additional time to the setting, or the - button to
subtract time from the setting. After five seconds, the time setting stays on
and the timer is set.
The time on the display begins to count down from the time you set and your
ice maker turns on and starts making ice when the time gets to “0”.
Using the timer to turn off your ice maker
You can use the timer to turn off your ice maker.
1With your ice maker on, press the (TIMER) button. The display shows “1”
(indicating one hour) and a blinking “H”.
2Press the + button to add additional time to the setting, or the - button to
subtract time from the setting. After five seconds, the time setting stays on
and the timer is set.
The time on the display begins to count down from the time you set and your
ice maker turns off when the time gets to “0”.
Cleaning and maintaining your ice maker
Clean your ice maker at least every week by running the cleaning cycle. Every
three days is recommended.
If you don’t plan to use your ice maker for an extended period of time, drain the
water from the water reservoir.
Draining the water from your ice maker
1Make sure that your ice maker is plugged in.
2Move your ice maker to the edge of the countertop, then place a large bowl
under it or make sure the edge is above the sink.
Note: If it has been a while since you last made ice, we suggest that you drain the water
from below the ice basket.
Note: Make sure that the water reservoir has water in it.
CAUTION:
• To prevent damage to the finish, do not use gasoline, benzine, thinner, or other similar
solvents, or abrasive cleaners to clean the exterior.
• Do not use bleach or vinegar to clean the internal components of your ice maker.

11
44-lb. Clear Ice Maker
www.insigniaproducts.com
3Pull the drain plug from the bottom of your ice maker and let the water drain
from the tank.
4Replace the drain plug into the bottom of your ice maker. Your ice maker is
ready to use.
Running the automatic self-cleaning program
Run the automatic self-cleaning program before using your ice maker for the first
time. After that, we suggest running a cleaning cycle at least every week. When
the running time on the compressor reaches 40 hours (approximately every three
to seven days), the automatic self-clean icon blinks to remind you to clean your
ice maker. Run the automatic self-clean program to turn off the blinking icon.
1Fill the water reservoir with about .5 gal. (2 L) of water.
2Plug in your ice maker, but do not press the power (ON/OFF) button.
Drain plug
Drain plug

12 www.insigniaproducts.com
3With your ice maker still powered off, press and hold (for over five seconds) the
(TIMER) button. The (clean) indicator turns on and the time counts
down from 20 minutes. When the self-cleaning cycle is done, the indicator
light turns off.
4Drain the water from the tank (see Draining the water from your ice maker on
page 10.)
Cleaning the parts
1Unplug your ice maker.
2Open your ice maker and remove the ice basket.
3Clean the inside with a damp, warm cloth and lemon water, or use a sponge
brush.
4Use clean water to rinse out the inside of your ice maker, then drain the water
by removing the plug from the water drain on the bottom.
5Dry the inside of your ice maker with a soft cloth.
6Replace the ice basket.
7Clean the outside of your ice maker with a soft cloth using mild, diluted
detergent in warm water.
Deep cleaning your ice maker
After using your ice maker for a long period of time (three months using relatively
soft water or one month using harder water), we also suggest deep cleaning your
ice maker to keep it running efficiently and the ice tasting good. Special attention
should be given to the water separator pipe.
1Turn off and unplug your ice maker, then completely drain the water reservoir
(see Draining the water from your ice maker on page 10).
Note: To stop the self-cleaning cycle at any point, press the (ON/OFF) button.
Notes:
• Because the water in the water reservoir is controlled by a valve, you must plug in your
ice maker (but don’t turn it on), then remove the water drain plug on the bottom and
wait for several minutes for the water to drain completely.
• If you find that there is an ice cube left in the evaporator that cannot be easily
removed, you can turn on your ice maker to let the unit enter the ice making process,
then press and hold the (ON/OFF) button for more than five seconds to cause the
ice tray to eject the ice cubes.

13
44-lb. Clear Ice Maker
www.insigniaproducts.com
2Gain access to the water separator pipe by lifting the left and right sides of the
pipe from its recess, do not pull the pipe out of the silicone tube on the right.
3Clean each hole in the water separator pipe with a paper clip or toothpick.
4Reattach the left and right sides of the water pipe by inserting it into the
recess from which it was removed. Make sure that the holes are facing down.
5Clean the water tank and water reservoir with lemon water, using a soft cloth.
6Drain the water tank and water reservoir, then rinse with clean water and drain
again (see Draining the water from your ice maker on page 10).
Troubleshooting
CAUTION: Do not try to repair your ice maker yourself. Doing so invalidates the warranty.
Notes:
• Make sure that the water tank, water filter, and water separator pipe are not blocked.
• Water temperature affects the speed at which ice is made. The lower the temperature,
the faster ice cubes are made.
• The cooler the ambient temperature, the faster ice cubes are made.
• Always use good quality water (clean and relatively soft) in your ice maker. If you use
hard or dirty water, your ice maker will still work, but the pump may be noisy.
• If you turn your ice maker off then turn it back on, the compressor takes three minutes
to restart.
PROBLEM POSSIBLE CAUSE POSSIBLE SOLUTION
The (add
water) indicator
lights
No water in the reservoir. Turn off your ice maker and add water to the
water reservoir, then press the (ON/OFF)
button to turn on your ice maker and begin
making ice.
The (add
water) indicator
lights with water
in the reservoir
The water inlet valve is
not working. Have your ice maker serviced by a qualified
technician.
The ice has a bad
taste or there is
an odor
Various • Make a few loads of ice after unpacking and
discard the ice
• Clean your ice maker with lemon water
• Use filtered water
Water separator pipe

14 www.insigniaproducts.com
The (ice full)
indicator lights
Too much ice in the ice
basket. Remove some ice from the ice basket.
The ice making
cycle is normal,
but no ice is
made
The room temperature or
water temperature may
be too high.
The room temperature should be no higher than
86° F (30° C). The water temperature should be no
higher than 77° F (25° C) and no lower than 50° F
(10° C).
The refrigerant liquid may
have leaked. Contact a qualified service technician for repair.
A pipe in the cooling
system may be blocked. Contact a qualified service technician for repair.
The ice making cycle is
too short. Press the + button to lengthen the ice making
cycle.
The ice cubes
stick together The ice cycle is too long
for the room
temperature.
Stop your ice maker, and restart it when the ice
blocks melt. Press the - button to shorten the ice
making cycle.
My ice maker
makes ice too
slowly
The hot air outlet is
blocked. Check the hot air outlet and remove any
blockage.
The water temperature in
the water reservoir is too
high.
The water temperature should be no higher than
77° F (25° C) and no lower than 50° F (10° C).
The refrigeration system
is malfunctioning. Have your ice maker serviced by a qualified
technician.
There is no water
in the water
separator pipe
The holes in the separator
pipe are blocked. Use a thin wire or paper clip to clean the holes in
the water separator pipe
The ice cubes are
too thick and
can’t drop into
the ice basket
The ice making cycle is
too long. Press the - button to shorten the ice making cycle.
The ice cubes are
too thin
The ambient temperature
is too high. Move your ice maker to a cooler place. The
temperature should be no higher than 86° F
(30° C). The water temperature should be no
higher than 77° F (25° C) and no lower than 50° F
(10° C).
There is a refrigerant
system leak or blockage. Have your ice maker serviced by a qualified
technician.
My ice maker is
leaking water The drain plug is loose or
missing. Replace the drain plug into the drain line.
A pipe joint in your ice
maker may be loose. Have your ice maker serviced by a qualified
technician.
The seal has reached the
end of its service life. Have your ice maker serviced by a qualified
technician.
“E1” appears on
the display
The ambient temperature
sensor is not working. Have your ice maker serviced by a qualified
technician.
“E2” appears on
the display
The water temperature
sensor is not working. Have your ice maker serviced by a qualified
technician.
PROBLEM POSSIBLE CAUSE POSSIBLE SOLUTION

15
44-lb. Clear Ice Maker
www.insigniaproducts.com
My ice maker is
noisy Your ice maker makes
noise during the freezing
cycle and when it is
dumping ice.
This is normal.
My ice maker
will not stop Ice full indicator board is
broken. Have your ice maker serviced by a qualified
technician.
PROBLEM POSSIBLE CAUSE POSSIBLE SOLUTION

16 www.insigniaproducts.com
Specifications
Dimensions (HxWxD) 14.6 x 9.9 x 14.2 in. (37.1 x 25.2 x 36 cm)
Weight 22 lbs. (10 kg)
Power requirements 115V~ 60Hz
Current Ice making - 2.2A
Ice harvest - 2.5A
Noise level <44 dB
Operating temperature 50~100.4° F (10~38° C)
Cube shape and size Square

17
44-lb. Clear Ice Maker
www.insigniaproducts.com
ONE-YEAR LIMITED WARRANTY
Definitions:
The Distributor* of Insignia branded products warrants to you, the original purchaser of this
new Insignia-branded product (“Product”), that the Product shall be free of defects in the
original manufacturer of the material or workmanship for a period of one (1) year from the
date of your purchase of the Product (“Warranty Period”).
For this warranty to apply, your Product must be purchased in the United States or Canada
from a Best Buy branded retail store or online at www.bestbuy.com or www.bestbuy.ca and
is packaged with this warranty statement.
How long does the coverage last?
The Warranty Period lasts for 1 year (365 days) from the date you purchased the Product.
Your purchase date is printed on the receipt you received with the Product.
What does this warranty cover?
During the Warranty Period, if the original manufacture of the material or workmanship of
the Product is determined to be defective by an authorized Insignia repair center or store
personnel, Insignia will (at its sole option): (1) repair the Product with new or rebuilt parts; or
(2) replace the Product at no charge with new or rebuilt comparable products or parts.
Products and parts replaced under this warranty become the property of Insignia and are
not returned to you. If service of Products or parts are required after the Warranty Period
expires, you must pay all labor and parts charges. This warranty lasts as long as you own your
Insignia Product during the Warranty Period. Warranty coverage terminates if you sell or
otherwise transfer the Product.
How to obtain warranty service?
If you purchased the Product at a Best Buy retail store location or from a Best Buy online
website (www.bestbuy.com or www.bestbuy.ca), please take your original receipt and the
Product to any Best Buy store. Make sure that you place the Product in its original packaging
or packaging that provides the same amount of protection as the original packaging.
To obtain warranty service, in the United States and Canada call 1-877-467-4289. Call agents
may diagnose and correct the issue over the phone.
Where is the warranty valid?
This warranty is valid only in the United States and Canada at Best Buy branded retail stores
or websites to the original purchaser of the product in the country where the original
purchase was made.
What does the warranty not cover?
This warranty does not cover:
• Food, beverage, and or medicine loss/spoilage.
• Customer instruction/education
•Installation
•Set up adjustments
• Cosmetic damage
• Damage due to weather, lightning, and other acts of God, such as power surges
• Accidental damage
•Misuse
•Abuse
•Negligence
• Commercial purposes/use, including but not limited to use in a place of business or in
communal areas of a multiple dwelling condominium or apartment complex, or
otherwise used in a place of other than a private home.
• Modification of any part of the Product, including the antenna
• Display panel damaged by static (non-moving) images applied for lengthy periods
(burn-in).

18 www.insigniaproducts.com
• Damage due to incorrect operation or maintenance
• Connection to an incorrect voltage or power supply
• Attempted repair by any person not authorized by Insignia to service the Product
• Products sold “as is” or “with all faults”
• Consumables, including but not limited to batteries (i.e. AA, AAA, C etc.)
• Products where the factory applied serial number has been altered or removed
• Loss or Theft of this product or any part of the product
• Display panels containing up to three (3) pixel failures (dots that are dark or incorrectly
illuminated) grouped in an area smaller than one tenth (1/10) of the display size or up to
five (5) pixel failures throughout the display. (Pixel based displays may contain a limited
number of pixels that may not function normally.)
• Failures or Damage caused by any contact including but not limited to liquids, gels or
pastes.
REPAIR REPLACEMENT AS PROVIDED UNDER THIS WARRANTY IS YOUR EXCLUSIVE REMEDY
FOR BREACH OF WARRANTY. INSIGNIA SHALL NOT BE LIABLE FOR ANY INCIDENTAL OR
CONSEQUENTIAL DAMAGES FOR THE BREACH OF ANY EXPRESS OR IMPLIED WARRANTY ON
THIS PRODUCT, INCLUDING, BUT NOT LIMITED TO, LOST DATA, LOSS OF USE OF YOUR
PRODUCT, LOST BUSINESS OR LOST PROFITS. INSIGNIA PRODUCTS MAKES NO OTHER
EXPRESS WARRANTIES WITH RESPECT TO THE PRODUCT, ALL EXPRESS AND IMPLIED
WARRANTIES FOR THE PRODUCT, INCLUDING BUT NOT LIMITED TO ANY IMPLIED
WARRANTIES OF AND CONDITIONS OF MERCHANTABILITY AND FITNESS FOR A PARTICULAR
PURPOSE, ARE LIMITED IN DURATION TO THE WARRANTY PERIOD SET FORTH ABOVE AND
NO WARRANTIES, WHETHER EXPRESS OR IMPLIED, WILL APPLY AFTER THE WARRANTY
PERIOD. SOME STATES, PROVINCES AND JURISDICTIONS DO NOT ALLOW LIMITATIONS ON
HOW LONG AN IMPLIED WARRANTY LASTS, SO THE ABOVE LIMITATION MAY NOT APPLY TO
YOU. THIS WARRANTY GIVES YOU SPECIFIC LEGAL RIGHTS, AND YOU MAY ALSO HAVE OTHER
RIGHTS, WHICH VARY FROM STATE TO STATE OR PROVINCE TO PROVINCE.
Contact Insignia:
1-877-467-4289
www.insigniaproducts.com
INSIGNIA is a trademark of Best Buy and its affiliated companies.
*Distributed by Best Buy Purchasing, LLC
7601 Penn Ave South, Richfield, MN 55423 U.S.A
©2022 Best Buy. All rights reserved.

19
Máquina de hielo transparente de 44 lb.
www.insigniaproducts.com
ESPAÑOL
Introducción
Felicitaciones por comprar un producto de alta calidad de Insignia. Su
NS-IMC44S3 representa el más moderno diseño de máquina de hielo y está
diseñado para brindar un rendimiento confiable y sin problemas.
Instrucciones importantes de
seguridad
ADVERTENCIA
Lea estas instrucciones.
• Conserve estas instrucciones.
• Preste atención a todas las advertencias.
• Siga todas las instrucciones.
• No utilice su máquina para hacer hielo con un cable dañado.
• Su máquina de hielo requiere un tomacorriente eléctrico estándar de 110 a
120 V y 60 Hz con una conexión a tierra de tres patas.
• Conecte solamente a un tomacorriente correctamente polarizado. Ningún
otro aparato deberá ser conectado a la misma toma.
• Asegúrese de que el enchufe esté correctamente insertado en la toma.
• No pase el cable de alimentación sobre una alfombra u otro aislante de calor.
No cubra el cable. Mantenga el cable lejos de áreas de tráfico y no lo sumerja
en agua.
• No se recomienda el uso de un cable de extensión, ya que puede
sobrecalentarse y ser un riesgo de incendio. Si debe usar un cable de
extensión, utilice el tamaño N° 14 AWG como mínimo y no menos de 1875
vatios.
• Desconecte su máquina de hielo antes de limpiar o hacer cualquier reparación
o servicio.
• Tenga precaución y use una supervisión razonable cuando su máquina de
hielo se use cerca de los niños.
CUIDADO
RIESGO DE CHOQUE ELÉCTRICO
NO ABRIR
Este símbolo indica que un voltaje peligroso
que puede constituir un riesgo de choque
eléctrico está presente dentro de su máquina
de hacer hielo.
Este símbolo indica que hay instrucciones
importantes de operación y mantenimiento en
la literatura que acompaña a su máquina de
hacer hielo.

20 www.insigniaproducts.com
• No utilice su máquina de hielo al aire libre.
• Coloque la máquina de hielo lejos de la luz solar directa y asegúrese de que
haya al menos 15 cm (6 pulg.) de espacio entre la parte posterior y los lados de
la máquina de hielo y las paredes circundantes.
• No use ningún otro líquido que no sea el agua para hacer cubos de hielo.
• No limpie su máquina de hielo con líquidos inflamables. Los vapores pueden
crear un riesgo de incendio o explosión.
• No volcarla.
• Si su máquina para hacer hielo se trae del exterior en invierno, espere unas
horas para que se caliente a temperatura ambiente antes de enchufarla.
• Para evitar un peligro debido a la inestabilidad de su máquina de hielo, debe
colocarse en una superficie nivelada o plana.
ADVERTENCIA
Peligro de descarga eléctrica
El incumplimiento de estas instrucciones podría resultar en choque
eléctrico, incendio o muerte.
PELIGRO: Riesgo de incendio o explosión. Se utiliza refrigerante
inflamable.
• Asegúrese de que el mantenimiento sea realizado por el
personal de servicio autorizado por la fábrica, para minimizar los
daños al producto o los problemas de seguridad.
• Consulte el manual de reparaciones o la guía del usuario antes
de intentar reparar este producto. Se deben seguir todas las
precauciones de seguridad.
• Siga las instrucciones de manejo cuidadosamente.
1ADVERTENCIA: No utilice este u otro electrodoméstico con un cable dañado.
Asegúrese de que el enchufe esté correctamente insertado en la toma.
2ADVERTENCIA: Mantenga las aberturas de ventilación de la carcasa del
aparato libres de obstrucciones.
3ADVERTENCIA: No toque el interior del compartimiento de la maquina de
hielo con las manos mojadas. Esto podría dar lugar a la congelación.
4ADVERTENCIA: No utilice dispositivos mecánicos u otros medios para
acelerar el proceso de descongelación, que no sean los recomendados por el
fabricante.
5ADVERTENCIA: No dañe la tubería del refrigerante al manipular, mover o al
usar la maquina de hielo.
6ADVERTENCIA: No utilice aparatos eléctricos en el interior del
compartimento del enfriador, a menos que sean del tipo recomendados por el
fabricante.
7Desenchufe su máquina de hacer hielo antes de llevar a cabo el
mantenimiento de usuario en la misma.
8Deseche la maquina de hielo de acuerdo con las normativas locales ya que el
mismo contiene gas inflamable y refrigerante.
9Esta máquina de hielo debe instalarse de acuerdo con la norma de seguridad
para sistemas de refrigeración, ASHRAE15. Su máquina de hielo no se instalará
en los pasillos o corredores de los edificios públicos.

21
Máquina de hielo transparente de 44 lb.
www.insigniaproducts.com
10 Esta máquina de hacer hielo está diseñada para ser utilizada en los hogares y
ambientes similares, tales como:
• Las zonas de cocina de personal en tiendas, oficinas y otros entornos
laborales
• Casas de campo y por clientes en hoteles, moteles y otros entornos
residenciales
• Casa de huéspedes
• Abastecimientos y aplicaciones similares no comerciales

22 www.insigniaproducts.com
Características
• Produce hasta 19.9 kg (44 lb.) de hielo por día, lo que le permite abastecerse
para su próxima encuentro
• El hielo transparente mantiene su bebida fría durante más tiempo y crea
menos efervescencia que el hielo blanco o en forma de bala
• El sistema de operación rápido produce su primer hielo en unos 14 minutos
• La capacidad de almacenamiento de 1.2 kg (2.6 lb.) ofrece suficiente hielo para
cualquier ocasión.
• Reduce el desperdicio de agua al permitirle añadir agua manualmente
• La superficie de acero inoxidable es fácil de mantener limpia y luce muy bien
en cualquier cocina
• Los controles digitales hacen que el uso de esta máquina de hielo sea simple y
fácil
• La cuchara incluida facilita el vertido de hielo en vasos individuales
• El modo de limpieza automática mantiene la máquina de hielo en buen
estado de funcionamiento
Contenido del paquete
• Máquina de hielo transparente de 44 lb.
• Pala para hielo
• Recipiente para hielo (Instalado previamente)
• Guía del usuario
Información general del producto
Nota: La claridad del hielo puede variar, dependiendo de varios factores.
Tapa del depósito
de agua
Ventilador
Cubierta
Tubo separador
de agua
Evaporador
Recipiente para hielo
Panel de
control
Pala para hielo
Tapa de drenaje de
agua (en la parte
inferior)
Depósito de agua

23
Máquina de hielo transparente de 44 lb.
www.insigniaproducts.com
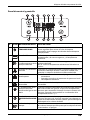
Panel de control y pantalla
N.° ICON BOTÓN/PANTALLA DESCRIPCIÓN
1Botón de
TEMPORIZADOR Presiónelo para ajustar el temporizador. Presione durante
cinco segundos para iniciar el ciclo de limpieza
automática o para apagar el indicador de autolimpieza
que parpadea.
2Pantalla LCD Se ilumina para mostrar los indicadores, los ajustes del
temporizador y la cuenta regresiva, y la temperatura
ambiente.
3Temperatura ambiente
y cuenta regresiva de la
máquina de hielo
M - indica el temporizador/cuenta regresiva de la
máquina de hielo
F o C - indica la temperatura ambiente en Fahrenheit o
Celsius.
4Símbolo de fabricación
de hielo Cuando este símbolo parpadea, la máquina de hielo está
vaciando la bandeja de hielo. Cuando el símbolo esta
girando, su máquina de hielo está fabricando hielo.
5Indicador de
autolimpieza • Se ilumina cuando se activa el programa de limpieza
automática.
• Parpadea cuando es el momento de ejecutar el ciclo
de limpieza automática.
6Indicador de
encendido Se ilumina cuando la máquina de hielo se encuentra
encendida.
7+/ temporizador de la
máquina de hielo/
aumento del grosor del
hielo
Cuando la máquina de hielo esté haciendo hielo, presione
para hacer hielo más grueso. Al ajustar el temporizador,
presione para aumentar el tiempo. Presione durante más
de cinco segundos para cambiar la visualización de la
temperatura entre °F y °C.
8 Botón de
ENCENDIDO/APAGAD
O
Presione para encender o apagar su máquina de hielo.
Presione durante más de cinco segundos para detener el
proceso de fabricación de hielo y hacer que la bandeja de
hielo expulse los cubitos de hielo.
9Indicador de ajuste de
tiempo M - indica cuántos minutos aumentan o disminuyen.
H - indica el tiempo que falta para que la máquina de hielo
se encienda o se apague.
M
H
C
F
C
F
M
H

24 www.insigniaproducts.com
Cómo configurar la máquina de hielo
Antes de usar su máquina de hielo
• Retire el embalaje exterior e interior.
• Retire toda la cinta adhesiva y saque los accesorios de la unidad. Si faltan
algunas piezas, póngase en contacto con el servicio al cliente.
• Limpie su máquina de hielo (Refiérase a Cleaning and maintaining your ice
maker en la página 10), luego realice dos o tres ciclos de hielo y deséchelos
para eliminar cualquier olor o residuo de plástico del proceso de fabricación y
envío.
Encontrar una ubicación conveniente
• Su máquina de hielo ha sido diseñada para ser instalada libremente, y no debe
ser empotrada.
• Coloque su máquina de hielo sobre un mostrador que sea lo suficientemente
fuerte como para aguantarla cuando esté completamente cargada.
• Deje un espacio de 15 cm (6 pulg.) entre la parte posterior y los lados de su
máquina de hielo y las paredes circundantes para permitir la ventilación
adecuada de aire.
• Coloque su máquina de hacer hielo lejos de la luz solar directa y de fuentes de
calor, como una estufa, calentador o radiador. La luz solar directa puede
afectar a la capa de acrílico y las fuentes de calor pueden aumentar el
consumo eléctrico. Las temperaturas extremadamente frías también pueden
impedir que su máquina de hacer hielo funcione correctamente.
Proveer una fuente de alimentación adecuada
10 Advertencia de hielo
completo
Se ilumina para indicar que la cesta de hielo está llena.
11 Aviso de bajo nivel de
agua Se ilumina para indicar que la máquina de hielo necesita
agua.
12 Indicador de código de
error E - Indica un problema de fabricación de hielo o una fuga
de refrigerante.
E1 - Indica que el sensor de temperatura ambiente está
mal.
E2 - Indica que el sensor de temperatura del agua está
mal.
13 -/temporizador de la
máquina de
hielo/disminución del
grosor del hielo
Cuando la máquina de hielo esté haciendo hielo, presione
para hacer hielo más fino. Al ajustar el temporizador,
presione para disminuir el tiempo. Presione durante más
de cinco segundos para cambiar la visualización de la
temperatura entre °F y °C.
ADVERTENCIAS: Antes de enchufar su máquina de hielo, espere cuatro horas hasta que
el líquido refrigerante se asiente.
ADVERTENCIAS: El uso inadecuado del enchufe con toma a tierra puede
ocasionar el riesgo de una descarga eléctrica. Si el cable de alimentación está
dañado, llame a nuestro servicio de atención al cliente.
N.° ICON BOTÓN/PANTALLA DESCRIPCIÓN

25
Máquina de hielo transparente de 44 lb.
www.insigniaproducts.com
Este aparato requiere un tomacorriente estándar de 110-120 V, 60 Hz con buena
conexión a tierra.
Esta unidad debe estar correctamente conectado a tierra para su seguridad. El
cable de alimentación de este electrodoméstico está equipado con un enchufe de
conexión a tierra que se conecta a un tomacorriente con conexión a tierra para
minimizar la posibilidad de una descarga eléctrica.
Utilización de su máquina de hacer hielo
Fabricación de hielo
Notas:
• Su máquina de hielo siempre debe estar conectada en su propio tomacorriente
individual teniendo una tensión nominal que coincida con la placa de clasificación.
• Nunca desenchufe su máquina de hielo tirando del cable de alimentación. Siempre
agarre firmemente el enchufe y tírelo de forma recta hacia afuera del tomacorriente.
• No dañe en ningún caso la clavija de conexión a tierra del enchufe. Cualquier
pregunta relacionada con la alimentación y/o la conexión a tierra debe consulte un
electricista certificado.
PRECAUCIONES:
• Llene el depósito de agua de agua sólo con agua potable.
• Cambie el agua del depósito cada 24 horas para asegurarse de que esté fresca. Si la
unidad no se va a utilizar durante un período prolongado, drene el agua y seque el
depósito de agua.
• No vierta agua en el depósito interno de agua situado bajo la cesta de hielo, ya que
esto afectará negativamente al rendimiento de su máquina de hielo.
Consejos:
Para mejorar la claridad del hielo:
• Pruebe a utilizar agua destilada o purificada en su máquina de hielo
• Asegúrese de ejecutar el ciclo de limpieza automática de la máquina de hielo con
frecuencia
Nota: Cuando no hay más agua en el depósito superior de agua, se enciende el símbolo
del depósito de agua .
Receptáculo de 3 clavijas
Cubierta de la caja del
receptáculo
Enchufe de 3
clavijas
Cable a tierra
Adaptador de
conexión a tierra
Cubierta de la caja del
receptáculo
Tornillo
Receptáculo
Utilización de un enchufe de 3
clavijas y del tomacorriente
Uso de un adaptador
de conexión a tierra

26 www.insigniaproducts.com
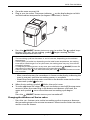
1Abra la tapa del depósito de agua y llene el depósito con agua potable.
Mantenga el nivel de agua por debajo del nivel máximo FULL.
2Cierre la tapa del depósito de agua.
3Enchufe su máquina de hielo. El indicador de encendido de la pantalla
comienza a parpadear y se muestra la temperatura ambiente (en grados
Fahrenheit).
4Presione el botón (ON/OFF) (Encendido/Apagado) para encender su
máquina de hacer hielo. El símbolo deja de parpadear (permanece
encendido), el símbolo de fabricación de hielo comienza a girar y la
temperatura ambiente se apaga.
• Transcurridos varios minutos, se muestra en la pantalla la cuenta regresiva
que indica el tiempo (en minutos) que falta para que finalice el proceso de
fabricación de hielo.
Notas:
• El ciclo de fabricación de hielo dura entre 13 y 25 minutos, dependiendo de la
temperatura ambiente.
• La primera vez que haga hielo, dependiendo de la temperatura inicial del agua, el
tiempo de fabricación de hielo será un poco más largo. En una habitación muy
caliente, el tiempo de fabricación de hielo puede variar, pero no superará los 35
minutos.
• Para detener el proceso de fabricación de hielo en cualquier momento, presione el
botón (ON/OFF) durante más de cinco segundos para que la bandeja de hielo
expulse los cubitos.
• Si el icono del nivel de agua está encendido, añada agua y luego presione el botón
(ON/OFF) para reiniciar la máquina de hielo.
FULL
Tapa del depósito de agua

27
Máquina de hielo transparente de 44 lb.
www.insigniaproducts.com
• El agua fluye desde el depósito de agua superior hasta el depósito de agua
inferior y el símbolo del depósito de agua se enciende.
5Cuando el símbolo de fabricación de hielo parpadea, el ciclo ha terminado.
6Para hacer más cubitos de hielo, deje la máquina de hielo encendida y rellene
el depósito superior de agua. Cuando el flotador de agua del depósito inferior
detecta un depósito lleno, el símbolo de depósito de agua se apaga y
comienza el siguiente ciclo de fabricación de hielo.
O
Presione el botón (ENCENDIDO/APAGADO) para apagar su maquina de
hielo.
Par cambiar el grosor de los cubitos de hielo
• Presione los botones + o - antes del ciclo de fabricación de hielo para
aumentar o disminuir el tiempo de fabricación de hielo en incrementos de un
minuto. Más tiempo para los cubos de hielo más gruesos y menos tiempo para
los más finos.
Para retirar el hielo
1La máquina de hielo deja de producir hielo cuando la cesta de hielo está llena.
Cuando esto ocurre, el indicador de lleno aparece en la pantalla.
2Abra la tapa de su máquina de hielo y retire la cesta de hielo.
3Vacíe la cesta de hielo y vuelva a colocarla en su máquina de hielo.
4La máquina de hielo vuelve a fabricar hielo.
Uso del temporizador para encender la máquina de hielo y empezar a
hacer hielo
Puedes utilizar el temporizador para encender su máquina de hielo.
1Con la máquina de hielo apagada, presione el botón (TEMPORIZADOR). La
pantalla muestra “1” (indicando una hora) y una “H” parpadeante.
2Presione el botón + para añadir tiempo adicional al ajuste, o el botón - para
restar tiempo al ajuste. Después de cinco segundos, el ajuste de tiempo se
mantiene y el temporizador se ajusta.
El tiempo que aparece en la pantalla comienza la cuenta reciba desde la hora
que se ha establecido y la maquina de hielo se enciende y comienza a fabricar
hielo cuando el tiempo llega a “0”.
Uso del temporizador para apagar la máquina de hielo
Puede utilizar el temporizador para apagar su máquina de hielo.
1Con la máquina de hielo encendida, presione el botón (TEMPORIZADOR).
La pantalla muestra “1” (indicando una hora) y una “H” parpadeante.
2Presione el botón + para añadir tiempo adicional al ajuste, o el botón - para
restar tiempo al ajuste. Después de cinco segundos, el ajuste de tiempo se
mantiene y el temporizador se ajusta.
Nota: Si ha pasado un tiempo desde la última vez que hizo hielo, le sugerimos que drene
el agua de debajo de la cesta de hielo.
Nota: Asegúrese de que el depósito de agua contenga agua.

28 www.insigniaproducts.com
El tiempo que aparece en la pantalla comienza la cuenta regresiva desde la
hora que usted fijó y su máquina de hielo se apaga cuando el tiempo llega a
“0”.
Limpieza y mantenimiento de la máquina de hielo
Limpie su máquina de hielo al menos cada semana ejecutando el ciclo de
limpieza. Se recomienda cada tres días.
Si no tiene previsto utilizar la máquina de hielo durante un periodo de tiempo
prolongado, vacíe el agua del depósito.
Para drenar del agua de la máquina de hielo
1Asegúrese de que su máquina de hielo esté enchufada.
2Mueva su máquina de hielo al borde del mostrador, luego coloque un
recipiente grande debajo de ella o asegúrese de que el borde esté por encima
del fregadero.
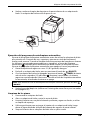
3Tire del tapón de drenaje de la parte inferior de su máquina de hielo y deje
que el agua se drene del deposito.
CUIDADO:
• Para evitar daños en el acabado, no utilice gasolina, bencina, diluyente u otros
disolventes similares, ni limpiadores abrasivos para limpiar el exterior.
• No use lejía o vinagre para limpiar los componentes internos de su máquina de hielo.
Tapón de
drenaje

29
Máquina de hielo transparente de 44 lb.
www.insigniaproducts.com
4Vuelva a colocar el tapón de drenaje en la parte inferior de su máquina de
hielo. Su máquina de hielo está lista para su uso.
Ejecución del programa de autolimpieza automática
Ejecute el programa de limpieza automática antes de utilizar la máquina de hielo
por primera vez. Después de eso, sugerimos ejecutar un ciclo de limpieza al
menos cada semana. Cuando el tiempo de funcionamiento del compresor alcanza
las 40 horas (aproximadamente cada tres o siete días), el icono de limpieza
automática parpadea para recordarle que debe limpiar su máquina de hielo.
Ejecute el programa de limpieza automática para apagar el icono parpadeante.
1Llene el depósito de agua con unos 2 l. (0.5 galones) de agua.
2Enchufe su máquina de hielo, pero no presione el botón de (ON/OFF).
3Con la máquina de hielo aún apagada, presione el botón (TIMER) (durante
más de cinco segundos). El indicador (limpieza) se enciende y la cuenta
regresiva comienza desde 20 minutos. Cuando el ciclo de limpieza automática
ha terminado, el indicador luminoso se apaga.
4Vacíe el agua del depósito (refiérase a Draining the water from your ice maker
en la página 10.)
Limpieza de las piezas
1Desconecte la máquina de hielo.
2Abra su máquina de hielo y retire la cesta de hielo.
3Limpie el interior con un paño húmedo y caliente y agua con limón, o utilice
un cepillo de esponja.
4Utilice agua limpia para enjuagar el interior de su máquina de hielo, luego
drene el agua retirando el tapón del drenaje de agua en la parte inferior.
5Seque el interior de su máquina de hielo con un paño suave.
Nota: Para detener el ciclo de autolimpieza en cualquier momento, presione el botón
(ON/OFF).
Tapón de
drenaje

30 www.insigniaproducts.com
6Vuelva a colocar la cesta de hielo.
7Limpie el exterior de su máquina de hielo con un paño suave utilizando un
detergente suave diluido en agua tibia.
Limpieza detallada de la máquina de hielo
Después de utilizar la máquina de hielo durante un largo periodo de tiempo (tres
meses con agua relativamente blanda o un mes con agua más dura), también
sugerimos que se realice una limpieza a fondo de la máquina de hielo para que
siga funcionando de forma eficiente y el hielo tenga un buen sabor. Se debe
prestar especial atención a la tubería del separador de agua.
1Apague y desenchufe su máquina de hielo, luego drene completamente el
depósito de agua (refiérase a Draining the water from your ice maker en la
página 10).
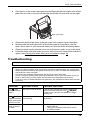
2Acceda a la tubería del separador de agua levantando los lados izquierdo y
derecho de la tubería de su recinto, no saque la tubería del tubo de silicón de
la derecha.
3Limpie cada orificio de la tubería del separador de agua con un clip para papel
o un palillo.
4Vuelva a colocar los lados izquierdo y derecho del tubo de agua
introduciéndolo en el reciento del que fue retirado. Asegúrese de que los
agujeros estén orientados hacia abajo.
5Limpie el tanque y el depósito de agua con agua de limón, utilizando un paño
suave.
6Vacíe el tanque y el depósito de agua, luego enjuáguelo con agua limpia y
vuélvalo a vaciar (refiérase Draining the water from your ice maker en la
página 10).
Notas:
• Debido a que el agua del depósito de agua está controlada por una válvula, debe
enchufar su máquina de hielo (pero no encenderla), luego quitar el tapón de drenaje
de agua en la parte inferior y esperar varios minutos para que el agua se drene
completamente.
• Si encuentra que queda un cubo de hielo en el evaporador que no puede ser retirado
fácilmente, puede encender su maquina de hielo para dejar que la unidad entre en el
proceso de fabricación de hielo, y luego presione el botón (ON/OFF) durante más
de cinco segundos para hacer que la bandeja de hielo expulse los cubos de hielo.
Tubo separador
de agua

31
Máquina de hielo transparente de 44 lb.
www.insigniaproducts.com
Localización y corrección de fallas
CUIDADO: No intente reparar su máquina de hielo usted mismo. Al hacer esto invalida la
garantía.
Notas:
• Asegúrese de que el depósito de agua, el filtro de agua y el tubo separador de agua no
estén bloqueados.
• La temperatura del agua afecta a la velocidad a la que se produce el hielo. Cuanto más
baja sea la temperatura, más rápido se harán los cubitos de hielo.
• Cuanto más fría sea la temperatura ambiente, más rápido se harán los cubitos de hielo.
• Utilice siempre agua de buena calidad (limpia y relativamente blanda) en su máquina
de hielo. Si utiliza agua dura o sucia, su máquina de hielo seguirá funcionando, pero la
bomba puede ser ruidosa.
• Si apaga la máquina de hielo y la vuelve a encender, el compresor tarda tres minutos
en volver a funcionar.
PROBLEMA CAUSA PROBABLE SOLUCIÓN PROBABLE
El indicador
(Añadir agua) se
ilumina
No hay agua en el
depósito. Apague su máquina de hielo y añada agua al
depósito de agua, luego presione el botón
(ON/OFF) para encender su máquina de hielo y
comenzar a hacer hielo.
El indicador
(añadir agua) se
ilumina con
agua en el
depósito
La válvula de entrada de
agua no funciona. Haga que su máquina de hielo sea revisada por un
técnico calificado.
El hielo tiene un
mal sabor o hay
un olor
Varios • Haga unas cuantas cargas de hielo después
de desembalar y deseche el hielo
• Limpie su máquina de hielo con agua de
limón
• Utilice agua filtrada
El indicador
(lleno de hielo)
se ilumina
Demasiado hielo en la
cesta de hielo. Saque un poco de hielo de la cesta de hielo.
El ciclo de
fabricación de
hielo es normal,
pero no se
produce hielo
La temperatura ambiente
o la temperatura del agua
podría ser demasiado
alta.
La temperatura ambiente no debe ser superior a
30 ºC (86 °F). La temperatura del agua no debe ser
superior a 25 °C (77 °F) ni inferior a 10 °C (50 °F).
El líquido refrigerante
puede haberse salido. Póngase en contacto con un técnico de servicio
calificado para la reparación.
Una tubería en el sistema
de enfriamiento puede
estar bloqueada.
Póngase en contacto con un técnico de servicio
calificado para la reparación.
El ciclo de fabricación de
hielo es demasiado corto. Presione el botón + para alargar el ciclo de
fabricación de hielo.
Los cubos de
hielo se pegan
entre si
El ciclo de fabricación de
hielo es demasiado largo
para la temperatura de la
habitación.
Detenga su máquina de hielo y reiníciela cuando
los bloques de hielo se derritan. Presione el botón
- para acortar el ciclo de fabricación de hielo.

32 www.insigniaproducts.com
Mi máquina de
hielo hace el
hielo muy
lentamente
La salida de aire caliente
está bloqueada. Compruebe la salida de aire caliente y elimine
cualquier obstrucción.
La temperatura del agua
en el depósito de agua es
demasiado alta.
La temperatura del agua no debe ser superior a
25 °C (77 °F) ni inferior a 10 °C (50 °F).
El sistema de
refrigeración funciona
mal.
Haga que su máquina de hielo sea revisada por un
técnico calificado.
No hay agua en
la tubería del
separador de
agua
Los agujeros del tubo
separador están
bloqueados.
Utilice un alambre fino o un clip para papel para
limpiar los agujeros del tubo separador de agua
Los cubos de
hielo son
demasiado
gruesos y no
pueden caer en
la cesta de hielo
El ciclo de fabricación de
hielo es demasiado largo. Presione el botón - para acortar el ciclo de
fabricación de hielo.
Los cubos de
hielo son
demasiado finos
La temperatura ambiente
es demasiado alta. Mueva su máquina de hielo a un lugar más fresco.
La temperatura no debe ser superior a 30 °°C
(86 °F).
La temperatura del agua no debe ser superior a
25 °C (77 °F) ni inferior a 10 °C (50 °F).
Hay una fuga u
obstrucción en el sistema
de refrigeración.
Haga que su máquina de hielo sea revisada por un
técnico calificado.
Mi máquina de
hielo tiene una
fuga de agua
El tapón de drenaje está
suelto o falta. Vuelva a colocar el tapón de drenaje en la línea de
drenaje.
Es posible que una junta
de la tubería de la
máquina de hielo esté
floja.
Haga que su máquina de hielo sea revisada por un
técnico calificado.
La junta ha llegado al final
de su vida útil. Haga que su máquina de hielo sea revisada por un
técnico calificado.
“E1” se muestra
en la pantalla
El sensor de temperatura
ambiente no funciona. Haga que su máquina de hielo sea revisada por un
técnico calificado.
“E2” se muestra
en la pantalla
El sensor de temperatura
del agua no funciona. Haga que su máquina de hielo sea revisada por un
técnico calificado.
Mi máquina de
hielo es ruidosa. Su máquina de hielo hace
ruido durante el ciclo de
congelación y cuando
está descargando el hielo.
Esto es normal.
Mi máquina de
hielo no se
detiene.
El panel indicador de
hielo completo está roto. Haga que su máquina de hielo sea revisada por un
técnico calificado.
PROBLEMA CAUSA PROBABLE SOLUCIÓN PROBABLE

33
Máquina de hielo transparente de 44 lb.
www.insigniaproducts.com
Especificaciones
Dimensiones (alto x ancho
x prof.) 37.1 x 25.2 x 36 cm (14.6 x 9.9 x 14.2 pulg.)
Peso 10 kg (22 lb.)
Requisitos de potencia 115V~ 60Hz
Intensidad Fabricación de hielo - 2.2A
Recolección del hielo - 2.5A
Nivel de ruido <44 dB
Temperatura en operación 10 a 38 °C (50 a 100.4 °F)
Forma y tamaño del cubo Cuadrado

34 www.insigniaproducts.com
GARANTÍA LIMITADA DE UN AÑO
Descripción:
El distribuidor* de los productos de la marca Insignia le garantiza a usted, el comprador
original de este producto nuevo de la marca Insignia (“Producto”), que éste se encontrará
libre de defectos de material o de mano de obra en su fabricación original por un período de
un (1) año a partir de la fecha de compra del Producto (“Período de garantía”).
Para que esta garantía se aplique, su Producto tiene que haberse comprado en los Estados
Unidos o en Canadá con un detallista de la marca Best Buy o en línea en los sitios
www.bestbuy.com o www.bestbuy.ca y empacado con esta declaración de garantía.
¿Cuánto dura la garantía?
El Período de garantía dura por 1 año (365 días) a partir de la fecha en que compró el
Producto. La fecha de compra se encuentra impresa en el recibo que recibió con el Producto.
¿Qué es lo que cubre esta garantía?
Durante el Período de garantía, si un centro de reparación autorizado de Insignia concluye
que la fabricación original del material o la mano de obra del Producto se encuentran
defectuosos Insignia (cómo su opción exclusiva): (1) reparará el Producto con repuestos
nuevos o reconstruidos; o (2) reemplazará el Producto sin costo alguno por un producto
nuevo o reconstruido con características similares. Los Productos y repuestos reemplazados
bajo esta garantía se volverán propiedad de Insignia y no se le regresarán a usted. Si se
requiere la reparación de Productos o partes después de que se vence el Período de
garantía, usted deberá pagar todos los costos de mano de obra y de repuestos. Esta garantía
estará vigente tanto como usted sea el dueño de su producto Insignia durante el período de
garantía. La cobertura de la garantía se anula si usted vende o transfiere el Producto.
¿Cómo se obtiene el servicio de garantía?
Si se compró el Producto en una tienda de Best Buy, o en un sitio Web de Best Buy
(www.bestbuy.com o www.bestbuy.ca), lleve su recibo original y el Producto a cualquier
tienda de Best Buy. Asegúrese de volver a colocar el producto en su empaque original o en
un empaque que provea la misma protección que el original.
Para obtener servicio de garantía, llame al 1-877-467-4289 en los Estados Unidos y Canadá.
Los agentes de soporte técnico diagnosticarán y corregirán el problema por teléfono.
¿Dónde es válida la garantía?
Esta garantía sólo es válida en los Estados Unidos y Canadá en las tiendas de Best Buy o en
sus sitios Web para el comprador original del producto en el país donde se realizó la compra.
¿Qué es lo que no cubre la garantía?
Esta garantía no cubre:
• Pérdida/Deterioro de alimentos, bebidas y o medicamentos.
• Capacitación o instrucción del cliente
•Instalación
• Ajustes de configuración
• Daños cosméticos
• Daños debidos al clima, relámpagos, causas de fuerza mayor, tales como sobretensiones
• Danos accidentales
• Uso inapropiado
•Abuso
•Negligencia
• Uso o propósito comercial, incluyendo pero no limitado al uso en centros comerciales o
lugares comunes de un condominio de varios pisos o un edificio de departamentos, o
cualquier uso en un lugar que no sea una casa privada.
• Modificación de alguna parte del Producto, incluyendo la antena
• Un panel de pantalla dañado por la persistencia de imágenes estáticas (sin
movimiento), mostradas por períodos de tiempo extendido (efecto “burn-in”).

35
Máquina de hielo transparente de 44 lb.
www.insigniaproducts.com
• Daño debido al uso o mantenimiento inapropiado
• Conexión a una fuente de voltaje o de alimentación incorrecta
• Intento de reparación por cualquier persona que no sea autorizada por Insignia para
reparar el Producto
• Productos vendidos “tal cual” (en el estado en que se encuentran) o “con todas sus
fallas”
• Consumibles, incluyendo pero no limitado a pilas (tipo AA, AAA, C etc.)
• Productos en los cuales el número de serie asignado en la fábrica ha sido alterado o
removido
• Pérdida o robo de este producto o cualquier parte de sus componentes
• Las pantallas con hasta tres (3) pixels defectuosos (puntos oscuros o incorrectamente
iluminados) agrupados en una superficie más pequeña que la décima parte (1/10) del
tamaño de la pantalla ni hasta cinco (5) pixels defectuosos en toda la superficie de la
pantalla. (Las pantallas basadas en píxeles pueden contener un número limitado de
píxeles que pueden no funcionar normalmente).
• Los defectos o daños causados cómo resultado de cualquier contacto, sin limitarse a
líquidos, geles o pastas.
EL REEMPLAZO O LA REPARACIÓN ESTIPULADOS BAJO ESTA GARANTÍA SON SU RECURSO
EXCLUSIVO POR CUALQUIER VIOLACIÓN DE LA GARANTÍA. INSIGNIA NO SERÁ RESPONSABLE
POR DAÑOS INCIDENTALES O CONSECUENTES DEBIDO AL INCUMPLIMIENTO DE CUALQUIER
GARANTÍA EXPRESA O IMPLÍCITA RELACIONADA CON ESTE PRODUCTO, INCLUYENDO PERO
SIN LIMITARSE A LA PÉRDIDA DE INFORMACIÓN, LA PÉRDIDA DE NEGOCIOS O DE
GANANCIAS. INSIGNIA PRODUCTS NO HACE NINGUNA OTRA GARANTÍA EXPRESA E
IMPLÍCITA RELACIONADA A ESTE PRODUCTO, INCLUYENDO PERO SIN LIMITARSE A,
CUALQUIER GARANTÍA IMPLÍCITA Y CONDICIONES DE COMERCIALIZACIÓN Y IDONEIDAD
PARA UN USO PARTICULAR, ESTÁN LIMITADAS EN DURACIÓN AL PERÍODO DE GARANTÍA
DECLARADO ANTERIORMENTE Y NINGUNA GARANTÍA YA SEA EXPRESA O IMPLÍCITA SE
APLICARÁ DESPUÉS DEL PERÍODO DE GARANTÍA. ALGUNOS ESTADOS, PROVINCIAS Y
JURISDICCIONES NO PERMITEN RESTRICCIONES EN CUANTO A LA DURACIÓN DE UNA
GARANTÍA IMPLÍCITA, ASÍ QUE LA RESTRICCIÓN ANTERIOR PUEDE NO APLICARSE EN SU
CASO. ESTA GARANTÍA LE DA DERECHOS LEGALES ESPECÍFICOS, Y USTED PUEDE POSEER
OTROS DERECHOS QUE VARÍAN DE ESTADO A ESTADO, O DE PROVINCIA A PROVINCIA.
Comuníquese con Insignia:
1-877-467-4289
www.insigniaproducts.com
INSIGNIA es una marca comercial de Best Buy y sus compañías asociadas.
* Distribuido por Best Buy Purchasing, LLC
7601 Penn Avenue South, Richfield, MN 55423 E.U.A.
©2022 Best Buy. Todos los derechos reservados.

www.insigniaproducts.com
1-877-467-4289 (U.S. and Canada/EE.UU. y Canadá)
INSIGNIA is a trademark of Best Buy and its affiliated companies.
Distributed by Best Buy Purchasing, LLC
7601 Penn Ave South, Richfield, MN 55423 U.S.A.
©2022 Best Buy. All rights reserved.
INSIGNIA es una marca comercial de Best Buy y sus compañías asociadas.
Distribuido por Best Buy Purchasing, LLC
7601 Penn Ave South, Richfield, MN 55423 U.S.A.
© 2022 Best Buy. Todos los derechos reservados.
V1 ENGLISH/
ESPAÑOL
22-0059
-
 1
1
-
 2
2
-
 3
3
-
 4
4
-
 5
5
-
 6
6
-
 7
7
-
 8
8
-
 9
9
-
 10
10
-
 11
11
-
 12
12
-
 13
13
-
 14
14
-
 15
15
-
 16
16
-
 17
17
-
 18
18
-
 19
19
-
 20
20
-
 21
21
-
 22
22
-
 23
23
-
 24
24
-
 25
25
-
 26
26
-
 27
27
-
 28
28
-
 29
29
-
 30
30
-
 31
31
-
 32
32
-
 33
33
-
 34
34
-
 35
35
-
 36
36


Insignia NS-IMC44S3 Guía del usuario
- Categoría
- Fabricantes de cubitos de hielo
- Tipo
- Guía del usuario
En otros idiomas
- English: Insignia NS-IMC44S3 User guide