GE Monogram ZET9550SHSS DL d1d28d7f47f074cfe4435c6e7a60
- Categoría
- Medir, probar
- Tipo
- DL d1d28d7f47f074cfe4435c6e7a60

OWNER’S
MANUAL
30" Single Direct Air Convection
Built-In Electric Wall Oven
30" Double Direct Air
Convection Built-In
Electric Wall Oven
Para consultar una version en español de este manual de
instrucciones, visite nuestro sitio de internet Monogram.com.
Monogram.com

2 49-80824
Contents
Wall Oven
Contents
Consumer Information ................3
Safety Information ....................4
Using The Oven
Single Wall Oven Controls ..............7
Double Wall Oven Controls ..............8
Special Features ......................9
Sabbath ............................11
Oven Racks .........................12
Aluminum Foil and Oven Liners .........13
Cooking Modes ......................14
Probe ..............................15
Cookware ..........................16
Cooking Guide .......................17
Care and Cleaning
Oven ..............................18
Probe ..............................19
Oven Racks .........................20
Oven Doors .........................21
Oven Light ..........................22
Troubleshooting Tips ................23
Warranty ...........................26
Accessories ........................27
Consumer Support ..................28

49-80824 3
Consumer Information
Wall Oven
If you
received a
damaged
wall oven
Immediately contact the dealer (or builder) that
sold you the wall oven.
Save time
& money
Before you request service, check the
Troubleshooting Tips in the back of this
manual.
It lists causes of minor operating problems that
you can correct yourself.
If you
need
service
To obtain service, see the Consumer
Services page in the back of this manual.
We’re proud of our service and want you to be
pleased. If for some reason you are not happy
with the service you receive, here are steps to
follow for further help.
FIRST, contact the people who serviced your
appliance. Explain why you are not pleased.
In most cases, this will solve the problem.
NEXT, if you are still not pleased, write all the
details—including your phone number—to:
Manager, Customer Relations
Monogram
Appliance Park
Louisville, KY 40225
Before
using your
wall oven
Read this manual carefully. It is intended
to help you operate and maintain your new
wall oven properly.
Keep it handy for answers to your questions.
If you don’t understand something or need
more help, there is a list of toll-free consumer
service numbers included in the back section
of this manual.
OR
Visit our website at: Monogram.com
Write
down the
model
& serial
numbers
You can find them on a label on the side trim
or on the front of the (lower) oven behind the
oven door.
Before sending in the Product Registration
card, please write these numbers here:
Model Number
Serial Number
Use these numbers in any correspondence or
service calls concerning your wall oven.

4 49-80824
IMPORTANT SAFETY INFORMATION
READ ALL INSTRUCTIONS BEFORE USING THE APPLIANCE
READ AND SAVE THESE INSTRUCTIONS
WARNING
Read all safety instructions before using the product. Failure to follow these instructions may result
in fire, electrical shock, serious injury or death.
WARNING
GENERAL SAFETY INSTRUCTIONS
Ŷ 8VHWKLVDSSOLDQFHRQO\IRULWVLQWHQGHGSXUSRVHDV
described in this Owner’s Manual.
Ŷ %HVXUH\RXUDSSOLDQFHLVSURSHUO\LQVWDOOHGDQG
grounded by a qualified installer in accordance with
the provided installation instructions.
Ŷ 'RQRWDWWHPSWWRUHSDLURUUHSODFHDQ\SDUWRI\RXU
oven unless it is specifically recommended in this
manual. All other servicing should be performed by a
qualified technician.
Ŷ %HIRUHSHUIRUPLQJDQ\VHUYLFHGLVFRQQHFWWKH
power supply at the household distribution panel by
removing the fuse or switching off the circuit breaker.
Ŷ 'RQRWOHDYHFKLOGUHQDORQH²FKLOGUHQVKRXOGQRW
be left alone or unattended in an area where an
appliance is in use. They should never be allowed to
climb, sit or stand on any part of the appliance.
Ŷ
CAUTION
Do not store items of interest to
children in cabinets above an oven - children climbing
on the oven to reach items could be seriously injured.
Ŷ 8VHRQO\GU\SRWKROGHUV²PRLVWRUGDPSSRWKROGHUV
on hot surfaces may result in burns from steam. Do
not let pot holders touch hot heating elements. Do not
use a towel or other bulky cloth in place of pot holders.
Ŷ 1HYHUXVH\RXUDSSOLDQFHIRUZDUPLQJRUKHDWLQJWKH
room.
Ŷ 'RQRWWRXFKWKHKHDWLQJHOHPHQWVRUWKHLQWHULRU
surface of the oven. These surfaces may be hot enough
to burn even though they are dark in color. During and
after use, do not touch, or let clothing or other flammable
materials contact any interior area of the oven; allow
sufficient time for cooling first. Other surfaces of the
appliance may become hot enough to cause burns.
Potentially hot surfaces include the oven vent opening,
surfaces near the opening and crevices around the oven
door.
Ŷ 'RQRWKHDWXQRSHQHGIRRGFRQWDLQHUV3UHVVXUH
could build up and the container could burst, causing
an injury.
Ŷ 'RQRWXVHDQ\W\SHRIIRLORUOLQHUWRFRYHUWKHRYHQ
bottom or anywhere in the oven, except as described
in this manual. Oven liners can trap heat or melt,
resulting in damage to the product and risk of shock,
smoke or fire.
Ŷ $YRLGVFUDWFKLQJRULPSDFWLQJJODVVGRRUVRUFRQWURO
panels. Doing so may lead to glass breakage. Do not
cook on a product with broken glass. Shock, fire or
cuts may occur.
Ŷ &RRNPHDWDQGSRXOWU\WKRURXJKO\²PHDWWRDWOHDVW
an internal temperature of 160°F and poultry to at
least an internal temperature of 180°F. Cooking
to these temperatures usually protects against
foodborne illness.
WARNING
KEEP FLAMMABLE MATERIALS AWAY FROM THE OVEN
Failure to do so may result in fire or personal injury.
Ŷ 'RQRWVWRUHRUXVHIODPPDEOHPDWHULDOVLQRUQHDU
an oven, including paper, plastic, pot holders, linens,
wall coverings, curtains, drapes and gasoline or other
flammable vapors and liquids.
Ŷ 1HYHUZHDUORRVHILWWLQJRUKDQJLQJJDUPHQWVZKLOH
using the appliance. These garments may ignite if
they contact hot surfaces, causing severe burns.
Ŷ 'RQRWOHWFRRNLQJJUHDVHRURWKHUIODPPDEOH
materials accumulate in or near the oven. Grease in
the oven or near the oven may ignite.

49-80824 5
IMPORTANT SAFETY INFORMATION
READ ALL INSTRUCTIONS BEFORE USING THE APPLIANCE
READ AND SAVE THESE INSTRUCTIONS
WARNING
IN THE EVENT OF A FIRE, TAKE THE FOLLOWING
STEPS TO PREVENT INJURY AND FIRE SPREADING
Ŷ 'RQRWXVHZDWHURQJUHDVHILUHV1HYHUSLFNXSD
flaming pan.
Ŷ ,IWKHUHLVDILUHLQWKHRYHQGXULQJEDNLQJVPRWKHUWKH
fire by closing the oven door and turning the oven off
or by using a multi-purpose dry chemical or foam-type
fire extinguisher.
Ŷ ,IWKHUHLVDILUHLQWKHRYHQGXULQJVHOIFOHDQWXUQWKH
oven off and wait for the fire to go out. Do not force
the door open. Introduction of fresh air at self-clean
temperatures may lead to a burst of flame from the
oven.
WARNING
OVEN SAFETY INSTRUCTIONS
Ŷ 6WDQGDZD\IURPWKHRYHQZKHQRSHQLQJWKHRYHQ
door. Hot air or steam which escapes can cause
burns to hands, face and/or eyes.
Ŷ .HHSWKHRYHQYHQWXQREVWUXFWHG
Ŷ .HHSWKHRYHQIUHHIURPJUHDVHEXLOGXS*UHDVHLQ
the oven may ignite.
Ŷ 3ODFHRYHQUDFNVLQGHVLUHGORFDWLRQZKLOHRYHQLV
cool. If rack must be moved while oven is hot, do not
let pot holder contact hot heating element in oven.
Ŷ :KHQXVLQJFRRNLQJRUURDVWLQJEDJVLQWKHRYHQ
follow the manufacturer’s directions.
Ŷ 3XOOLQJRXWWKHVWDQGDUGUDFNVWRWKHLUVWRSORFNV
or the extension rack to its fully open position is a
convenience in lifting heavy foods. It is also a precaution
against burns from touching hot surfaces of the door or
oven walls.
Ŷ 'RQRWOHDYHLWHPVVXFKDVSDSHUFRRNLQJXWHQVLOVRU
food in the oven when not in use. Items stored in an
oven can ignite.
Ŷ 1HYHUSODFHFRRNLQJXWHQVLOVSL]]DRUEDNLQJVWRQHV
or any type of foil or liner on the oven floor. These
items can trap heat or melt, resulting in damage to the
product and risk of shock, smoke or fire.
WARNING
SELF-CLEANING OVEN SAFETY INSTRUCTIONS
The self-cleaning feature operates the oven at temperatures high enough to burn away food soils in the oven. Follow
these instructions for safe operation.
Ŷ 'RQRWWRXFKRYHQVXUIDFHVGXULQJVHOIFOHDQ
operation. Keep children away from the oven during
self-cleaning. Failure to follow these instructions may
cause burns.
Ŷ %HIRUHVHOIFOHDQLQJWKHRYHQUHPRYHVKLQ\VLOYHU
colored oven racks (on some models), the probe, any
aluminum foil, and any broiler pan, grid, and other
cookware. Only porcelain coated oven racks may be
left in the oven.
Ŷ %HIRUHRSHUDWLQJWKHVHOIFOHDQF\FOHZLSHJUHDVHDQG
food soils from the oven. Excessive amount of grease
may ignite, leading to smoke damage to your home.
Ŷ ,IWKHVHOIFOHDQLQJPRGHPDOIXQFWLRQVWXUQWKHRYHQ
off and disconnect the power supply. Have it serviced by
a qualified technician.
Ŷ 'RQRWFOHDQWKHGRRUJDVNHW7KHGRRUJDVNHWLV
essential for a good seal. Care should be taken not to
rub, damage or move the gasket.
Ŷ 'RQRWXVHRYHQFOHDQHUV1RFRPPHUFLDORYHQ
cleaner or oven liner protective coating of any kind
should be used in or around any part of the oven.

6 49-80824
The remote enable equipment installed on this oven has
been tested and found to comply with the limits for a Class
B digital device, pursuant to part 15 of the FCC Rules.
These limits are designed to:
(a) provide reasonable protection against harmful
interference in a residential installation. This equipment
generates, uses and can radiate radio frequency energy
and, if not installed and used in accordance with the
instructions, may cause harmful interference to radio
communications. However, there is no guarantee that
interference will not occur in a particular installation. If this
equipment does cause harmful interference to radio or
television reception, which can be determined by turning
the equipment off and on, the user is encouraged to try
to correct the interference by one or more of the following
measures:
Ŷ5HRULHQWRUUHORFDWHWKHUHFHLYLQJDQWHQQD
Ŷ,QFUHDVHWKHVHSDUDWLRQEHWZHHQWKHHTXLSPHQWDQG
receiver.
Ŷ&RQQHFWWKHHTXLSPHQWLQWRDQRXWOHWRQDFLUFXLW
different from that to which the receiver is connected.
Ŷ&RQVXOWWKHGHDOHURUDQH[SHULHQFHGUDGLR79WHFKQLFLDQ
for help.
(b) accept any interference received, including interference
that may cause undesired operation of the device.
Note that any changes or modifications to the wireless
communication device installed on this oven that are not
expressly approved by the manufacturer could void the
user's authority to operate the equipment.
How to Remove Protective Shipping Film and Packaging Tape
Carefully grasp a corner of the protective shipping film with
your fingers and slowly peel it from the appliance surface.
Do not use any sharp items to remove the film. Remove all
of the film before using the appliance for the first time.
To assure no damage is done to the finish of the product,
the safest way to remove the adhesive from packaging
tape on new appliances is an application of a household
liquid dishwashing detergent. Apply with a soft cloth and
allow to soak.
NOTE: The adhesive must be removed from all parts. It
cannot be removed if it is baked on.
IMPORTANT SAFETY INFORMATION
READ ALL INSTRUCTIONS BEFORE USING THE APPLIANCE
READ AND SAVE THESE INSTRUCTIONS
STATE OF CALIFORNIA PROPOSITION 65 WARNINGS
WARNING
This product contains one or more chemicals known to the State of California to cause cancer, and
birth defects or other reproductive harm.
Self-clean electric ovens: Self clean ovens can cause low level exposure to some of the Proposition 65 substances,
LQFOXGLQJFDUERQPRQR[LGHGXULQJWKHFOHDQLQJF\FOH([SRVXUHWRWKHVHVXEVWDQFHVFDQEHPLQLPL]HGE\RSHQLQJD
window or using a ventilation fan or hood.

49-80824 7
Using the Oven
Wall Oven
Single Wall Oven Controls
1. Convection Cooking Modes: Convection cooking
modes use increased air circulation to improve performance. The
type of benefit depends on the mode. Your oven has the following
convection cooking modes: Bake, Bake Multi Rack, Roast, Broil Hi,
Broil Lo, and Broil Crisp. See the Cooking Modes section for more
information.
2. Traditional Cooking Modes: Your oven has the
following traditional cooking modes: Bake, Broil Hi, Broil Lo, Proof
and Warm. See the Cooking Modes section for more information.
3. Clean: Your oven has two cleaning modes: Self Clean and
Steam Clean. See the Cleaning the Oven section for important
information about using these modes.
4. Start: Must be pressed to start any cooking, cleaning, or timed
function.
5. Cancel/Off: Cancels ALL oven operations except the clock
and timer.
6. Cook Time: Counts down cooking time and turns off the
oven when the cooking time is complete. Press the Cook Time
pad, use the number pads to program a cooking time in hours
and minutes, then press Start. This can only be used with
Traditional Bake, Convection Bake, Convection Bake Multi, and
Convection Roast.
7. Clock: Sets the oven clock time. Press the Clock pad and the
number pads to program the clock. Make sure to select AM or PM.
Press Start to save the time.
8. Timer: Works as a countdown timer. Press the Timer pad and the
number pads to program the time in hours and minutes. Press
the Start pad. The oven will continue to operate when the timer
countdown is complete. To turn the timer off press the Timer pad.
9. Delay Time: Delays when the oven will turn on. Use this to
set a time when you want the oven to start. Press the Delay Time
pad and use the number pads to program the time of day for the
oven to turn on. Press the desired cooking mode and temperature
then press Start. A cook time may also be programmed if desired.
This can only be used with Traditional Bake, Convection Bake,
Convection Bake Multi Rack, Convection Roast and Self-Clean.
NOTE: When using the delay time feature, foods that spoil easily—
such as milk, eggs, fish, stuffings, poultry and pork—should not be
allowed to sit for more than 1 hour before or after cooking. Room
temperature promotes the growth of harmful bacteria. Be sure that
the oven light is off because heat from the bulb will speed harmful
bacteria growth.
10. Probe: Monitors internal food temperature and turns the oven
off when the food reaches the programmed temperature. Insert
the probe, program the cooking mode, and program the probe
temperature. See the Cooking Modes section for more information.
The probe can only be used with Traditional Bake, Convection
Bake, and Convection Roast.
11. Oven Light(s): Turns the oven light(s) on or off.
12. Remote Enable (on some models):
CONNECTING YOUR OVEN
Off - Oven is not connected. Open the app then press and hold
Remote Enable pad for 5 seconds to begin the connecting process.
Slow flash - Oven is in discovery mode and looking for a network.
Rapid flash - An error occurred during the connecting process.
Solid - Oven is connected to the network and can be remotely
controlled by a connected mobile device when in operation, but it
cannot be started remotely.
REMOTE STARTING YOUR OVEN
REMOTE
To be able to start the oven remotely, press the Remote Enable pad
and the REMOTE icon will turn on in the display. The oven can now
be remotely started with a connected device. Opening an oven door
or turning off the oven will turn off the REMOTE icon. The REMOTE
icon must be lit to start the oven remotely. The REMOTE icon is not
required to change the oven settings or to turn the oven off.
After using the oven, remember to verify that the REMOTE icon is
lit if you wish to start the oven remotely in the future.
13. Lock Controls: Locks out the control so that pressing the
pads does not activate the controls. Press and hold the Lock
Controls pad for three seconds to lock or unlock the control.
Cancel/Off is always active, even when the control is locked.
2346 785
11 10
1312
19

8 49-80824
Using the Oven
Wall Oven
Double Wall Oven Controls
378694
10 11
14 1213
251
1. Upper Oven and Lower Oven: Designates which oven
to use. Press the Upper Oven or Lower Oven pad to select an
oven, then press the desired cooking mode pad. The oven control
will default to the upper oven.
2. Convection Cooking Modes: Convection cooking
modes use increased air circulation to improve performance. The
type of benefit depends on the mode. Your oven has the following
convection cooking modes: Bake, Bake Multi Rack, Roast, Broil Hi,
Broil Lo, and Broil Crisp. See the Cooking Modes section for more
information.
3. Traditional Cooking Modes: Your oven has the
following traditional cooking modes: Bake, Broil Hi, Broil Lo, Proof
and Warm. See the Cooking Modes section for more information.
4. Clean: Your oven has two cleaning modes: Self Clean and
Steam Clean. See the Cleaning the Oven section for important
information about using these modes.
5. Start: Must be pressed to start any cooking, cleaning, or timed
function.
6. Cancel/Off: Cancels ALL oven operations except the clock and
timer.
7. Cook Time: Counts down cooking time and turns off the oven
when the cooking time is complete. Press the Cook Time pad, use
the number pads to program a cooking time in hours and minutes,
then press Start. This can only be used with Traditional Bake,
Convection Bake, Convection Bake Multi, and Convection Roast.
8. Clock: Sets the oven clock time. Press the Clock pad and the
number pads to program the clock. Make sure to select AM or PM.
Press Start to save the time.
9. Timer: Works as a countdown timer. Press the Timer pad and the
number pads to program the time in hours and minutes. Press
the Start pad. The oven will continue to operate when the timer
countdown is complete. To turn the timer off press the Timer pad.
10. Delay Time: Delays when the oven will turn on. Use this to
set a time when you want the oven to start. Press the Delay Time
pad and use the number pads to program the time of day for the
oven to turn on. Press the desired cooking mode and temperature
then press Start. A cook time may also be programmed if desired.
This can only be used with Traditional Bake, Convection Bake,
Convection Bake Multi Rack, Convection Roast and Self-Clean
NOTE: When using the delay time feature, foods that spoil easily—
such as milk, eggs, fish, stuffings, poultry and pork—should not be
allowed to sit for more than 1 hour before or after cooking. Room
temperature promotes the growth of harmful bacteria. Be sure that
the oven light is off because heat from the bulb will speed harmful
bacteria growth.
11. Probe: Monitors internal food temperature and turns the oven off
when the food reaches the programmed temperature. Select upper
or lower, insert the probe, program the cooking mode, and program
the probe temperature. See the Cooking Modes section for more
information. The probe can only be used with Traditional Bake,
Convection Bake, and Convection Roast.
12. Oven Light(s): Turns the oven light(s) on or off.
13. Remote Enable (on some models):
CONNECTING YOUR OVEN
Off - Oven is not connected. Open the app then press and hold
Remote Enable pad for 5 seconds to begin the connecting
process.
Slow flash - Oven is in discovery mode and looking for a network.
Rapid flash - An error occurred during the connecting process.
Solid - Both ovens are connected to the network and can be
remotely controlled by a connected mobile device when in
operation, but cannot be started remotely
REMOTE STARTING YOUR OVEN
REMOTE
To be able to start the oven remotely, press the Remote Enable
pad and the REMOTE icon will turn on in the display. Either oven
can now be remotely started with a connected device. Opening
any oven door or turning off either oven will turn off the REMOTE
icon. The REMOTE icon must be lit to start the oven remotely. The
REMOTE icon is not required to change the oven settings or to turn
either oven off.
After using the oven, remember to verify that the REMOTE icon is
lit if you wish to start an oven remotely in the future.
14. Lock Controls: Locks out the control so that pressing the
pads does not activate the controls. Press and hold the Lock
Controls pad for three seconds to lock or unlock the control.
Cancel/Off is always active, even when the control is locked.

49-80824 9
Special
Features
There are numerous special features that are controlled using the number key pad.
Ŷ Degree - Fahrenheit or Celsius temperature
display
Ŷ End tone - Cycle End Tone
Ŷ Sound - Tone Volume
Ŷ Setting - Clock Setting
Ŷ Auto Recipe - Auto Recipe Conversion
(for Convection Baking)
Ŷ 12hr shutoff - 12 Hour Shutoff
Ŷ Sabbath - Sabbath mode
Ŷ Temp Offset - Adjust the oven temperature
(Double ovens have upper and lower
options)
Ŷ Light Bar - Turns the light indicator on or off
Ŷ Default - Reset control to factory settings
To change the Special Features settings follows these guidelines.
Press and hold the Traditional Bake
and Traditional Broil pads for 3 seconds
simultaneously.
When you enter the special features mode:
Ŷ The numbers 2 and 8 act as up and down
to scroll thru the features and their settings.
Ŷ The numbers 4 and 6 act as right and left
to change back and forth from scrolling
thru the features to changing the feature
settings.
Ŷ The number 5 acts as an enter pad.
Press and hold the Traditional Bake
and Traditional Broil pads for 3 seconds
simultaneously to exit the special feature mode.
Example: Adjusting the Oven Temperature
1. Press and hold the Traditional Bake
and Traditional Broil pads for 3 seconds
simultaneously to enter special features
mode.
2. Press the number 2 pad until the display
reads “UPPEr tE-P oFFSEt” (double wall
ovens will have a selection for both the
upper and lower ovens).
3. Press the number 6 pad to change the
special feature setting.
4. Press the number 2 or 8 pads to either
increase or decrease the temperature in
one degree Fahrenheit increments up to +
35º F or down to -35º F.
5. Press the number 5 pad to save your
desired change.
6. Press the number 4 pad to return to the
other features.
7. Press and hold the Traditional Bake
and Traditional Broil pads for 3 seconds
simultaneously to exit the special feature
mode.
Using the Oven
Wall Oven
123
456
78
0
9
Cook
Time
Set
Clock
AM/PM
13
Enter
=
7
0
9
Cook
Time
Set
Clock
AM/PM

10 49-80824
Special
Features
(Cont.)
Fahrenheit or Celsius (dEGrEE)
Your oven control is set to use Fahrenheit
temperature units but can be changed to use
Celsius temperature units if preferred.
Cycle End Tone (End tonE)
This is the tone that signals the end of a timer.
You can change it to be one tone (bEEP) or a
continuous repeating tone (Con bEEP).
Tone Volume (SoUnd)
This feature allows the oven tone volume to be
adjusted between Hi, std (default), Lo and oFF.
Clock Setting (SEttinG)
This feature specifies how the time of day
will be displayed. Options are for a standard
12-hour clock with AM and PM selections (12
Hr), 24-hour military time display (24 Hr), or for
no display (oFF).
Auto Recipe Conversion
(AUto rECiPE)
When using Convection Bake or Convection
Bake Multi cooking modes, Auto Recipe
conversion will automatically reduce the
programmed cooking temperature. Note that
this option does not convert convection baking
times, only temperatures.
12-hour Shutoff (12 Hr SHUtoFF)
When this feature is turned on, the oven will
automatically turn off after 12 continuous
hours of use.
Adjust the Oven Temperature
(UPPEr tE-P oFFSEt) (Upper and
Lower on some models)
This feature allows the oven temperature to
be adjusted up to 35ºF hotter or down to 35ºF
cooler. Use this feature if you believe your
oven temperature is too hot or too cold and
wish to change it. For double oven models
the upper and lower ovens are adjusted
separately (UPPEr tE-P OFFSET and
Lo-Er tE-P oFFSEt). This adjustment affects
Traditional Bake, Convection Bake, and
Convection Bake Multi Rack modes.
Light Bar (LiGHt bAr)
This feature uses a light bar between the
door and the control panel for easy visual
indication of preheat and cook time status. This
feature can be turned on or off in the special
features of your oven. This feature works with
Convection Bake, Convection Bake Multi,
Convection Broil, Convection Roast, Traditional
Bake, Traditional Broil, Warm, Proof, Self
Clean, Cook Time and Timer. On a double
wall oven the notification lighting indicates
the status of the upper oven only. Below is a
description of the different light conditions.
OFF - No oven or timer
function is running or the
feature has been turned
off in special features.
PULSING BAR - The
oven is pre-heating. The
light bar will pulse until the
oven set temperature has
been reached.
PROGRESS BAR - Will
slowly progress to a fully
lit bar as the timer counts
down.
NOTE: If the Cook Time button is used, the
light bar and the oven will turn off when the time
UHDFKHV]HUR,ITimer button is used the light
EDUZLOOUHPDLQVROLGZKHQWLPHUHDFKHV]HUR
SOLID BAR - The oven
is at the set temperature
and/or function or your
kitchen timer is complete.
NOTE: The progress bar for timed functions
takes priority over the solid or pulsating functions
if both are being used at the same time.
Default (dEFAULt)
This feature resets all of the special features
to the default settings originally on the oven.
Using the Oven
Wall Oven

49-80824 11
Sabbath
(SAbbAtH)
Sabbath mode disables the oven lights (the oven light will not turn on when the door is opened
and the notification light bar will be disabled), all sounds (the control will not beep when a pad
is pressed), Convection modes, Broil modes, Warm, Proof, and all time functions. Sabbath
mode can only be used with Traditional Bake. This feature conforms to the Star-K Jewish
Sabbath requirements.
NOTE: If a power outage occurs during when the oven is in Sabbath Mode, the unit will return
to Sabbath Mode when power is restored.
Enter the Sabbath Mode
Press the Traditional Bake and Traditional
Broil pads at the same time and hold for three
seconds. Use the number 2 or 8 pad to scroll
thru the special features options to “SAbbAtH”
and then press the number 6 pad to allow the
number 2 or 8 pad to change the Sabbath
feature setting from “oFF to “on”.
Press the number 5 pad to enter the selection.
Press and hold the Traditional Bake and
Traditional Broil pads for 3 seconds to exit
special features mode. The ] icon will appear in
the display to signify that the unit is in Sabbath
Mode. The clock will not be displayed.
Note that if you have a double wall oven, when
you place the control into Sabbath mode, both
ovens are now in Sabbath mode and available
for cooking.
Start a Sabbath Bake
Press Traditional Bake. The control will default
the temperature to 350F but you can use the
number pads to enter a temperature between
170ºF and 550ºF and press Start. No sound
will be given when the keys are pressed. At
a random time between 30 seconds and 1
minute, the ][ icon will appear in the display
indicating the oven is running.
For double wall ovens, both ovens can be
used while in Sabbath mode. Press the Upper
Oven or Lower Oven pad prior to pressing
Traditional Bake. By default, the upper oven
is selected if the Upper Oven or Lower Oven
pad is not pressed first. If using both ovens,
please wait until one oven indicates it is
running before starting the second oven.
Adjust the Temperature During a
Sabbath Bake
Press Traditional Bake, use the number pads
to enter a new temperature between 170ºF
and 550ºF, and press Start. No sound will be
given when the keys are pressed. Since no
feedback is given during temperature change,
an oven thermometer can be used to confirm
temperature changes.
For double wall ovens press the Upper
Oven or Lower Oven pad prior to pressing
Traditional Bake. By default, the upper oven
is selected if the Upper Oven or Lower
Oven pad is not pressed first. If using both
ovens, please wait until one oven indicates
it is running before starting or turning off the
second oven.
Timed Bake During Sabbath
If you wish to use the Cook Time feature to
bake in the oven and then have the oven
automatically turn off, do not enter Sabbath
mode. You will need to change the Cycle End
Tone from a continuous beep to a single beep,
turn the Tone Volume off, and turn the oven
light on using the control panel or remove the
light bulb. Then you can program the oven for
the desired cook time in bake.
Exit the Sabbath Mode
To end a bake cycle, press Cancel/Off. The ]
[ icon will change to the ] icon, indicating that
the oven has turned off.
Press the Traditional Bake and Traditional
Broil pads at the same time and hold for three
seconds. Use the number 2 or 8 pad to scroll
thru the special features options to “SAbbAtH”
and then press the number 6 pad to allow the
number 2 or 8 pad to change the Sabbath
feature setting from “on to “oFF”.
Press the number 5 pad to enter the selection.
Press and hold the Traditional Bake and
Traditional Broil pads for 3 seconds to exit
special features mode. The clock will be
displayed again indicating the oven is out of
Sabbath Mode.
Using the Oven
Wall Oven

12 49-80824
Oven Racks
Your oven has six rack positions. Recommended
rack positions for various types of foods are
provided in the Cooking Guide. Adjusting rack
position is one way to impact cooking results. For
example, if you would prefer darker tops on cakes,
muffins, or cookies, try moving food one rack
position higher. If you find foods are too brown on
top try moving them down next time.
When baking with multiple pans and on multiple
racks, ensure there is at least 1½" between pans
to allow sufficient space for air to flow.
Oven Racks
Your oven may have extension racks and/or
traditional flat racks.
To avoid possible burns, place the racks in the
desired position before you turn the oven on.
Extension Racks
Extension racks have an install feature that
locks into the rack supports (guides) on both
sides. Once the install feature is locked into
place, always pull the rack out, by its upper
front rail, to its full extension stop position,
when placing or removing cookware.
If extension racks are difficult to extend,
lubricate the racks with the graphite lubricant
provided with your oven. Remove the rack from
the oven, remove debris in the slide tracks with
a paper towel, shake the graphite lubricant and
place 4 small drops on the two bottom tracks of
the left and right sides. Open and close the rack
several times to distribute the lubricant.
To order additional graphite lubricant, see the
Accessories and Consumer Support sections
at the end of this manual.
To Remove An Extension Rack:
1. Make sure the rack is pushed all the way
into the oven.
2. Grasp the rack by both its upper front rail
and its lower handles on two sides and lift
straight up to unlock the rack from the rack
supports.
3. Firmly holding onto both the upper front rail
and lower handles on both sides, pull the
rack forward. Grasp the rack on both sides
if necessary. Then remove it from the oven.
Using the Oven
Wall Oven
The oven
has 6 rack
positions
Upper Front Rail
Handle
Handle
Upper Front Rail
Handle
Handle
Upper Front Rail
Lift to
unlock from
the rack
support
Install Feature

49-80824 13
Oven Racks
(Cont.)
Extension Racks (Cont.)
To Replace An Extension Rack:
1. Place the rear portion of the rack onto
the rack supports (guides) as shown in
the picture.
2. Hold the upper front rail and lower
handles and push the rack all the way in
until the install feature locks into the front
rack support.
If extension racks are difficult to replace or
remove, wipe the oven rack supports with
cooking oil. Do not wipe oil on the rack slides.
Traditional Flat Racks
The racks have stops so that when placed
correctly on the supports they will stop before
coming completely out and will not tilt. When
placing and removing cookware, pull the rack
out until it stops.
To Remove a Rack
Pull it toward you, tilt the front end up and pull
it out.
To Replace a Rack
Tilt the front of the rack up, hook the rear
locating posts under the rack supports, push
the rack back (past the stoppers) and lower it
into position. Push the rack all the way in.
If flat racks are difficult to slide and/or remove,
place some cooking oil on a soft cloth or paper
towel and rub onto the sides of the rack and
each rack support.
CAUTION
Use caution when removing a rack from lowest position as door may be hot.
Using the Oven
Wall Oven
Aluminum
Foil and
Oven
Liners
CAUTION
Do not use any type of foil or oven liner to cover the oven bottom. These
items can trap heat or melt, resulting in damage to the product and risk of shock, smoke
or fire. Damage from improper use of these items is not covered by the product warranty.
Foil may be used to catch spills by placing a sheet on a lower rack, several inches below the
food. Do not use more foil than necessary and never entirely cover an oven rack with aluminum
foil. Keep foil at least 1-1/2” from oven walls to prevent poor heat circulation.
Front
Rack Lock
Hold the upper front rail and
lower handles and push the rack
all the way in until the install
feature locks on the front support
Flat Rack
Stopper
Rack
Support
Locating Post

14 49-80824
Cooking
Modes
Your new oven has a variety of cooking modes to help you get the best results. These modes
are described below. Refer to the Cooking Guide section for recommendations for specific
foods. Remember, your new oven may perform differently than the oven it is replacing.
Baking and Roasting Modes
Select a mode for baking and roasting based
on the type and quantity of food you are
preparing. When preparing baked goods such
as cakes, cookies, and pastries always preheat
the oven first. Follow recipe recommendations
for food placement. If no guidelines are
provided, center food in the oven.
Traditional Bake
The traditional bake mode is intended for
single rack cooking. This mode uses heat
primarily from the lower element but also from
the upper element to cook food. To use this
mode press the Bake pad under Traditional,
enter a temperature, and then press Start.
Preheating is generally recommended when
using this mode.
Convection Bake with Direct Air
The Convection Bake mode is intended for
single rack cooking. This mode uses heat from
the lower element and also the upper and rear
elements, along with air movement directly
down from the top of the oven to enhance
evenness. Your oven is equipped with Auto
Recipe Conversion, so it is not necessary
to convert the temperature when using this
mode. To use this mode press the Bake pad
under Convection, enter a temperature, and
then press Start. Preheating is generally
recommended when using this mode.
Convection Bake Multi Rack
The Convection Bake Multi Rack mode is
intended for baking on multiple racks at the
same time. This mode uses heat primarily
from the rear element but also heat from the
upper and lower elements, along with air
movement from the convection fan to enhance
cooking evenness. Your oven is equipped with
Auto Recipe Conversion, so it is not necessary
to convert the temperature when using this
mode. Baking time might be slightly longer for
multiple racks than what would be expected
for a single rack. To use this mode press the
Bake Multi Rack pad under Convection,
enter a temperature, and then press Start.
Always preheat when using this mode.
Convection Roast with Direct Air
The Convection Roast mode is intended for
roasting whole cuts of meat on a single rack.
This mode uses heat from the lower, upper,
and rear elements along with air movement
directly down from the top of the oven to
improve browning and reduce cooking time.
It is not necessary to convert temperature.
Check food earlier than the recipe suggested
time when using this mode, or use the probe.
To use this mode press the Roast pad under
Convection, enter a temperature, and then
press Start. It is not necessary to preheat
when using this mode.
Broiling Modes
Always broil with the door closed. The broil
element in this oven is very powerful. Monitor
food closely while broiling. Use caution when
broiling on upper rack positions as placing
food closer to the broil element increases
smoking, spattering, and the possibility of fats
igniting. Broiling on rack position 6 is not
recommended.
Try broiling foods that you would normally grill.
Adjust rack positions to adjust the intensity
of the heat to the food. Place foods closer
to the broil element when a seared surface
and rare interior is desired. Thicker foods and
foods that need to be cooked through should
be broiled on a rack position farther from
the broiler or by using Traditional Broil Lo or
Convection Broil Lo. For best performance,
center food below the broil heating element.
Traditional Broil Hi
The Traditional Broil Hi mode uses intense
heat from the upper element to sear foods.
Use Broil Hi for thinner cuts of meat and/or
foods you prefer less done on the interior. To
use this mode press the Broil pad once under
Traditional and then press Start. It is not
necessary to preheat when using this mode.
Using the Oven
Wall Oven

49-80824 15
Cooking
Modes
(Cont.)
Traditional Broil Lo
The Traditional Broil Lo mode uses less
intense heat from the upper element to cook
food thoroughly while also producing surface
browning. Use Broil Lo for thicker cuts of meat
and/or foods that you would like cooked all the
way through. To use this mode press the Broil
pad twice under Traditional and then press
Start. It is not necessary to preheat when
using this mode.
Convection Broil Hi with Direct Air
The Convection Broil Hi mode uses intense
heat from the upper element along with air
movement directly down from the top of the
oven for improved searing and browning. To
use this mode press the Broil pad once under
Convection and then press Start. For best
results preheat 5 minutes when using this mode.
Convection Broil Lo with Direct Air
The Convection Broil Lo mode uses less
intense heat from the upper element along
with air movement directly down from the top
of the oven. To use this mode press the Broil
pad twice under Convection and then press
Start. For best results preheat 5 minutes when
using this mode.
Convection Broil Crisp with
Direct Air
The Convection Broil Crisp mode is intended
as a finishing mode at the end of a cooking
cycle to add surface browning to a dish
such as a casserole or a roast. To use this
mode press the Broil pad three times under
Convection and then press Start. Monitor
food closely to prevent over browning.
Proof
Proof mode is designed for rising (fermenting
and proofing) bread doughs. Press the Proof
pad and then press Start. Cover dough well to
prevent drying out. Bread will rise more rapidly
than at room temperature.
Warm
Warm mode is designed to keep hot foods
hot for up to 3 hours. To use this mode, press
the Warm pad then press Start. Cover foods
that need to remain moist and do not cover
foods that should be crisp. Preheating is not
required. Do not use warm to heat cold food
other than crisping crackers, chips or dry
cereal. It is also recommended that food not
be kept warm for more than 2 hours.
Using the Oven
Wall Oven
Probe
Proper Probe Placement
After preparing the meat and placing it on the cooking pan follow these instructions for proper
probe placement.
Ŷ ,QVHUWWKHSUREHLQWRWKHIRRGVRWKDW
the tip of the probe will rest in the center
of the thickest part of the food. For best
performance the probe should be fully
inserted into the food. If the probe is not
located properly, it may not accurately
measure the temperature of the coolest
portion of the food. Some foods, particularly
small items, are not well suited for cooking
ZLWKWKHSUREHGXHWRWKHLUVKDSHRUVL]H
Ŷ 7KHSUREHVKRXOGQRWWRXFKERQHIDWRU
gristle.
Ŷ )RUZKROHSRXOWU\LQVHUWWKHSUREHLQWRWKH
thickest part of the breast.
Ŷ )RUERQHOHVVURDVWVLQVHUWWKHSUREHLQWR
the center of the roast.
WARNING
Consuming undercooked food can result in foodborne illness. Use probe
according to the following instructions to ensure all portions of the food reach minimum safe
cooking temperatures. Recommendations for minimum safe food temperatures can be found at
www.foodsafety.gov or www.IsItDoneYet.gov.
Internal food temperature is frequently used as an indicator of doneness, especially for roasts
and poultry. The Probe mode monitors the internal food temperature and turns the oven off
when the internal food temperature reaches the programmed temperature.
Always check the temperature at multiple locations in the food with a food thermometer
after cooking to ensure that all portions of the food have reached the minimum safe internal
temperature for that food.

16 49-80824
Probe
(Cont.)
Proper Probe Placement (Cont.)
Ŷ )RUERQHLQKDPRUODPELQVHUWWKHSUREH
into the center of the lowest large muscle
or joint.
Ŷ )RUFDVVHUROHVRUGLVKHVVXFKDVPHDWORDI
insert the probe into the center of the dish.
Ŷ )RUILVKLQVHUWWKHSUREHIURPMXVWDERYH
the gill into the meatiest area, parallel to
the backbone.
Probe Usage
To use the probe without preheating:
1. Insert the probe into the food (see Proper
Probe Placement).
2. Place the food in the oven and connect the
probe into the probe outlet in the oven.
3. Program the desired probe and cooking
mode settings by pressing the Probe
pad and entering the desired internal
food temperature, then pressing the cook
mode pad (Traditional Bake, Convection
Bake, or Convection Roast) and entering
the desired cooking temperature. The
maximum internal food temperature that
you can set is 200°F.
To use the probe with preheating:
1. Press the desired cook mode (Traditional
Bake, Convection Bake, or Convection
Roast) pad and enter the desired cooking
temperature.
2. Insert the probe into the food (see Proper
Probe Placement).
3. Once the oven is preheated, place the food
in the oven and connect the probe to the
probe outlet, making sure it is fully inserted.
Use caution, the oven walls and probe
outlet are hot.
4. Program the probe temperature by
pressing the Probe pad and entering the
desired internal food temperature. The
maximum internal food temperature that
you can set is 200° F.
Probe Care Guidelines
NOTE: some double oven models have a
probe in the upper oven only.
Ŷ 8VHRISUREHVRWKHUWKDQWKHRQHSURYLGHG
with this product may result in damage to
the probe.
Ŷ 8VHWKHKDQGOHVRIWKHSUREHDQGSOXJ
when inserting and removing them from the
meat and outlet
Ŷ 7RDYRLGGDPDJLQJ\RXUSUREHGRQRWXVH
tongs to pull on the cable when removing it.
Ŷ 7RDYRLGEUHDNLQJWKHSUREHPDNHVXUH
food is completely defrosted before
inserting the probe.
Ŷ 7RSUHYHQWSRVVLEOHEXUQVGRQRWXQSOXJ
the probe from the outlet until the oven has
cooled.
Ŷ 1HYHUOHDYHWKHSUREHLQVLGHWKHRYHQ
during a self or steam clean cycle.
Ŷ 'RQRWVWRUHWKHSUREHLQWKHRYHQ
Cookware Guidelines
7KHPDWHULDOILQLVKDQGVL]HRIFRRNZDUH
affect baking performance.
Dark, coated and dull pans absorb heat more
readily than light, shiny pans. Pans that absorb
heat more readily can result in a browner,
crisper, and thicker crust. If using dark and
coated cookware check food earlier than
minimum cook time. If undesirable results are
obtained with this type of cookware consider
reducing oven temperature by 25º F next time.
Shiny pans can produce more evenly cooked
baked goods such as cakes and cookies.
Glass and ceramic pans heat slowly but retain
heat well. These types of pans work well for
dishes such as pies and custards.
Air insulated pans heat slowly and can reduce
bottom browning.
Keep cookware clean to promote even heating.
Using the Oven
Wall Oven
Cookware

49-80824 17
Cooking Guide
Using the Oven
Wall Oven
FOOD TYPE
RECOMMENDED
MODE(S)
RECOMMENDED
RACK POSITION(S) ADDITIONAL SUGGESTIONS
Baked Goods
Layer cakes, sheet cakes,
bundt cakes, muffins, quick
breads on a Single Rack
Convection Bake
Traditional Bake
3 Use shiny cookware.
Layer cakes* on Multiple
Racks
Convection Bake Multi Rack
Traditional Bake
2 and 4
Extension rack in higher position if used. Ensure adequate airflow
(see illustration below).
Chiffon cakes (angel food)
Convection Bake
Traditional Bake
1 Use shiny cookware.
Cookies, biscuits, scones on
a Single Rack
Convection Bake 3 Use shiny cookware.
Cookies, biscuits, scones on
Multiple Racks
Convection Bake
Multi Rack
2 and 4
1, 3 and 5
Extension rack position 4 for 2 racks, and position 3 for 3 racks.
Ensure adequate airflow.
Beef & Pork
Hamburgers Traditional Broil Hi 5
Use extension rack; for patties spaced equally on broil pan grid
to get a well seared exterior and a rare interior cook the first side
approximately 3 minutes and cook the second side approximately
4 minutes. Move food down for more doneness/less searing. For
best performance, center food below the broil heating element.
Steaks & Chops
Convection Broil Hi
Traditional Broil Hi
5
Use a broil pan; Preheat 5 minutes if using Convection Broil Mode.
Move food down for more doneness/less searing. Watch food
closely when broiling. For best performance, center food below the
broil heating element.
Roasts Convection Roast 2 or 3
Use a low sided pan such as a broil pan. Preheating is not
necessary. Use probe feature.
Poultry
Whole chicken Convection Roast 2 or 3 Use a low sided pan such as a broil pan. Use probe feature.
Bone-in chicken breasts,
legs, thighs
Broil Hi 1
If breaded or coated in sauce avoid Broil Hi modes. Broil skin side
down first. Watch food closely when broiling. For best performance
when broiling, center food below the broil heating element.
Broil Lo
Convection Bake
Traditional Bake
3
Boneless chicken breasts
Convection Broil Lo
Convection Bake
Traditional Bake
3
Preheat 5 minutes if using Convection Broil. Move food down for
more doneness/less searing and up for greater searing/browning
when broiling. For best performance when broiling, center food
below the broil heating element.
Whole turkey Convection Roast 1 or 2 Use a low sided pan such as a broil pan. Use the probe feature.
Turkey Breast Convection Roast 2 or 3 Use a low sided pan such as a broil pan. Use the probe feature.
Fish
Convection Broil Lo
Broil Lo
5 (1/2 thick or less)
4 (>1/2 inch)
Preheat 5 minutes when Convection Broiling. Watch food closely
when broiling. For best performance, center food below the broil
heating element.
Casseroles
Convection Bake
Traditional Bake
3
Use Convection Broil Crisp mode during last 2-5 minutes of baking
to melt/brown cheese or crisp surface.
Frozen Convenience Foods
3L]]DIUHQFKIULHVWDWRUWRWV
FKLFNHQQXJJHWVDSSHWL]HUV
on a Single Rack
Convection Bake
Traditional Bake
3
Use Convection Broil Crisp mode during last 2-5 minutes of
cooking to crisp the exterior.
3L]]DIUHQFKIULHVWDWRUWRWV
FKLFNHQQXJJHWVDSSHWL]HUV
on Multiple Racks
Convection Bake
Multi Rack
2 and 4
If using Crisp mode, place both pans on top rack if space allows,
otherwise Crisp one at a time on top rack position.
*When baking four cake layers at a time, use racks 2 and 4. Place
the pans as shown so that one pan is not directly above another.
Cook food thoroughly to help protect against food borne illness.
Minimum safe food temperature recommendations for food safety
can be found at www.IsItDoneYet.gov. Make sure to use a food
thermometer to take food temperatures.

18 49-80824
Oven
Be sure electrical power is off and all surfaces are cool before cleaning any part of the oven
Control Panel
It’s a good idea to wipe the control panel after
each use. Clean with mild soap and water or
vinegar and water, rinse with clean water and
polish dry with a soft cloth.
Do not use abrasive cleansers, strong liquid
cleansers, plastic scouring pads or oven
cleaners on the control panel—they will
damage the finish.
Oven Exterior
Do not use oven cleaners, abrasive cleansers,
strong liquid cleansers, steel wool, plastic
scouring pads, or cleaning powders on the
interior or exterior of the oven. Clean with a
mild soap and water or vinegar and water
solution. Rinse with clean water and dry with
a soft cloth. When cleaning surfaces, make
sure that they are at room temperature and
not in direct sunlight.
If stain on the door vent trim is persistent,
use a mild abrasive cleaner and a sponge-
scrubber for best results.
Spillage of marinades, fruit juices, tomato
sauces and basting liquids containing acids
may cause discoloration and should be wiped
up immediately. Let hot surfaces cool, then
clean and rinse.
Stainless Steel Surfaces
Do not use a steel wool pad; it will scratch the
surface.
To clean the stainless steel surface, use warm
sudsy water or a stainless steel cleaner or
polish. Always wipe the surface in the direction
of the grain. Follow the cleaner instructions for
cleaning the stainless steel surface.
To inquire about purchasing cleaning products
including stainless steel appliance cleaner or
polish, see the Accessories and Consumer
Support sections at the end of this manual.
Oven Interior
The interior of your new oven can be cleaned
manually or by using the Steam Clean or Self
Clean modes.
Spillage of marinades, fruit juices, tomato
sauces and basting liquids containing acids
may cause discoloration and should be wiped
up immediately. Let hot surfaces cool, then
clean and rinse.
Manual Cleaning
Do not use oven cleaners, abrasive cleaners,
strong liquid cleansers, steel wool, scouring
pads, or cleaning powders on the interior of
the oven. Clean with a mild soap and water or
vinegar and water solution. Rinse with clean
water and dry with a soft cloth. When cleaning
surfaces, make sure that they are at room
temperature.
Steam Clean Mode
Steam clean is intended to clean small spills
using water and a lower cleaning temperature
than Self-Clean.
To use the Steam Clean feature, wipe grease
and soils from the oven. Pour one cup of
water into the bottom of the oven. Close the
door. Press the Steam Clean pad and then
press Start. The oven door will lock. You
can not open the door during the 30 minute
steam clean as this will decrease the steam
clean performance. At the end of the steam
clean cycle the door will unlock. Wipe out any
excess water and any remaining soil.
Care and Cleaning
Wall Oven

49-80824 19
Care and Cleaning
Wall Oven
Oven
(Cont.)
Oven Interior (Cont.)
Self Clean Mode
Read Self-Cleaning Oven Safety Instructions
at the beginning of this manual before using
Self Clean Mode.
IMPORTANT: The health of some birds is
extremely sensitive to the fumes given off
during the self-cleaning cycle of any range.
Move birds to another well-ventilated room.
Self clean uses very high temperatures to
clean the oven interior. The oven door will
lock when using this feature. Before operating
the self clean cycle, wipe up grease and soils
from the oven. Remove all items from the
oven other than enameled (dark color) racks.
Shiny or silver racks, the meat probe, and any
cookware or other items should all be removed
from the oven before initiating a self clean
cycle. Close the door. Press the Self Clean
pad and a default self-clean time is displayed.
The clean time can be changed to any time
between 3:00 and 5:00 hours by using the
number pads to enter a different time and
pressing Start. For heavily soiled ovens, the
maximum 5 hour clean time is recommended.
If you wish to use the default time, press the
Start pad immediately after pressing the Self
Clean pad. The oven will turn off automatically
when the self clean cycle is complete. The
door will stay locked until the oven has cooled
down. After the oven has cooled down wipe
any ash out of the oven.
On double oven models, you can set a clean
cycle in both ovens at the same time. The last
oven set will automatically delay its start until
the end of the first oven’s clean cycle.
Probe
The temperature probe may be cleaned with
soap and water or a soap-filled scouring pad.
Cool the temperature probe before cleaning.
Scour stubborn spots with a soap-filled
scouring pad, rinse and dry.
To order additional temperature probes, see
the Accessories and Consumer Support
sections at the end of this manual.
Ŷ Do not immerse the temperature probe in
water.
Ŷ Do not store the temperature probe in the
oven.
Ŷ Do not leave the temperature probe inside
the oven during a self or steam clean cycle.

20 49-80824
Care and Cleaning
Wall Oven
Oven Racks
The racks that were provided with your oven
(dark enameled racks, not shiny) may remain
in the oven during the self-cleaning cycle
without being damaged.
To manually clean racks, use warm, soapy
water. Make sure not to wash the rack slides
on an extension rack.
If racks become more difficult to remove from
the oven, put some vegetable oil on a soft
cloth or paper towel and rub onto the oven
rack supports. Do not wipe the oil on an
extension rack slide.
Periodically, after several self-clean cycles,
the extension rack slides may need to be
lubricated using the graphite lubricant shipped
with your wall oven. To order additional
graphite lubricant, see the Accessories and
Consumer Support sections at the end of this
manual.
1. Remove extension rack from the oven. See
the Extension Oven Racks section.
2. Fully extend the rack on a table or
countertop. Newspaper may be placed
underneath the rack for easy clean up.
3. If there is debris in the slide tracks, wipe
it away using a paper towel. NOTE: Any
graphite lubricant wiped away must be
replaced.
4. Shake the graphite lubricant before opening
it. Starting with left slide mechanism of the
rack, place four (4) small drops of lubricant
on the two (2) bottom tracks of the slide
close to the bearing carriers.
5. Repeat for the right slide mechanism of the
rack.
6. Open and close the rack several times to
distribute the lubricant.
7. Replace the cap on the lubricant and shake
it again. Turn the rack over and repeat
steps 3, 4, 5 and 6.
8. Close the rack, turn rack right-side-up and
place in the oven. See the Extension Oven
Racks section.
9. Repeat above steps for each rack.
NOTE: Do not spray with cooking spray or
other lubricant sprays.

49-80824 21
Removal position
Hinge lock
Slot
Pull hinge locks down to unlock
Oven Doors
Care and Cleaning
Wall Oven
Lift-Off Oven Door
The door is very heavy. Be careful when removing and lifting the door.
Do not lift the door by the handle.
To remove the door:
1. Fully open the door.
2. Pull the hinge locks down toward the door
frame, to the unlocked position. A tool,
such as a small flat-blade screwdriver, may
be required.
3. Firmly grasp both sides of the door at the
top.
4. Close door to the door removal position.
The door should be open approximately 3"
with no obstruction above the door.
5. Lift door up and out until both hinge arms
are clear of the slots.
To replace the door:
1. Firmly grasp both sides of the door at the
top.
2. Starting on the left side, with the door at the
same angle as the removal position, seat
the indentation of the hinge arm into the
bottom edge of the hinge slot. The notch in
the hinge arm must be fully seated into the
bottom of the slot. Repeat for right side.
3. Fully open the door. If the door will not
fully open, the indentation is not seated
correctly in the bottom edge of the slot.
4. Push the hinge locks up against the front
frame of the oven cavity, to the locked
position.
5. Close the oven door.
Push hinge locks up to lock
Hinge
lock
Hinge
arm
Indentation
Bottom
edge of slot
Hinge arm

22 49-80824
Care and Cleaning
Wall Oven
Oven Light
Oven Light Replacement
1. Disconnect power at the main fuse or
circuit breaker panel.
2. Remove oven racks.
3. Slide a flat blade screwdriver between the
housing and the glass light cover.
4. Support the glass light cover with two
fingers to prevent the cover from falling to
the bottom of the oven. Be careful not to
chip the oven coating.
5. Gently twist the screwdriver blade to
loosen the glass light cover.
6. Remove the glass light cover.
7. Remove the bulb by firmly grasping and
sliding the bulb straight out until the two
prongs have cleared the ceramic holder.
8. Do not touch the glass of the new
replacement bulb with your fingers. It will
cause the bulb to fail when it lights. Grasp
the replacement bulb with a clean towel or
facial tissue with the prongs facing down.
Align the two prongs in the ceramic holder,
pressing gently until the bulb is securely in
the ceramic socket.
9. Slide the protective lens into the holder and
push until the clips snap into the housing.
10. Reconnect power.
WARNING
SHOCK OR BURN HAZARD: Before replacing oven light bulb, disconnect the
electrical power to the oven at the main fuse or circuit breaker panel. Failure to
do so may result in electric shock or burn.
CAUTION
BURN HAZARD: The glass cover and bulb should be removed when cool.
Touching hot glass with bare hands or a damp cloth can cause burns.

49-80824 23
Before you
call for service
Save time and money! Review the charts on the following pages first and you may not need to
call for service.
Troubleshooting Tips
Wall Oven
Problem Possible Cause What To Do
My new oven
doesn't cook
like my old one.
Is something
wrong with the
temperature
settings?
Your new oven has a different cooking
system from your old oven and
therefore may cook differently than your
old oven.
For the first few uses, follow your recipe
times and temperatures carefully. If you still
think your new oven is too hot or too cold,
you can adjust the temperature yourself to
meet your specific cooking preference. See
the Special Features Section to adjust the
oven temperature. NOTE: This adjustment
affects Traditional Bake, Convection Bake
and Convection Bake Multi temperatures; it
will not affect Convection Roast, Traditional
Broil, Convection Broil or Clean.
Food does not
bake properly
Oven controls improperly set. See the Cooking Modes section.
Rack position is incorrect or rack is not
level.
See the Cooking Modes section and
Cooking Guide.
Incorrect cookware or cookware of
LPSURSHUVL]HEHLQJXVHG
See the Cookware section.
Oven temperature needs adjustment. See the Special Features section.
Ingredient substitution Substituting ingredients can change the
recipe outcome.
Food does not
broil properly
Oven controls improperly set. Make sure you select the appropriate broil
mode. NOTE: Convection crisp is not for
broiling foods.
Improper rack position being used. See the Cooking Guide for rack location
suggestions.
Food being cooked in a hot pan. Make sure cookware is cool
Cookware not suited for broiling. Use a pan specifically designed for broiling
Aluminum foil used on the broiling pan
and grid has not been fitted properly
and slit as recommended.
If using aluminum foil conform to pan slits.
In some areas the power (voltage) may
be low.
Preheat the broil element for 10 minutes.
Oven
temperature too
hot or too cold
Oven temperature needs adjustment. See the Special Features section.
Oven does not
work or appears
not to work
A fuse in your home may be blown or
the circuit breaker tripped.
Replace the fuse or reset the circuit
breaker.
Oven controls improperly set. See the Using the Oven section.
Oven is in Sabbath Mode. Verify that the oven is not in Sabbath
Mode. See the Special Features section.
“Crackling”
or “popping”
sound
This is the sound of the metal heating
and cooling during both the cooking
and cleaning functions.
This is normal.

24 49-80824
Before you
call for service
Troubleshooting Tips
Wall Oven
Problem Possible Cause What To Do
Why is my
range making a
"clicking" noise
when using my
oven?
Your range has been designed to
maintain a tighter control over your
oven's temperature. You may hear your
oven's heating elements "click" on and
off more frequently than in older ovens
to achieve better results during baking,
broiling, convection, and self-clean
cycles.
This is normal.
Clock and timer
do not work
A fuse in your home may be blown or
the circuit breaker tripped.
Replace the fuse or reset the circuit
breaker.
Oven light does
not work
Light bulb is broken or defective. Call for service.
Pad operating light is broken. Call for service.
Oven will not
self-clean
The temperature is too high to set a
self-clean operation.
Allow the oven to cool and reset the
controls.
Oven controls improperly set. See the Cleaning the Oven section.
Excessive
smoking during
clean cycle
Excessive soil or grease. Press the Cancel/Off pad. Open the
windows to rid the room of smoke. Wait
until the LOCKED light goes off. Wipe up
the excess soil and reset the clean cycle.
Excessive
smoking during
broiling
Food too close to burner element. Lower the rack position of the food.
Oven door will
not open after a
clean cycle
Oven too hot. Allow the oven to cool below locking
temperature.
Oven not clean
after a clean
cycle
Oven controls improperly set. See the Cleaning the Oven section.
Oven was heavily soiled. Clean up heavy spillovers before starting
the clean cycle. Heavily soiled ovens may
need to self-clean again or for a longer
period of time.
"DOOR
"
flashes in the
display
The self-clean cycle has been selected
but the door is not closed.
Close the oven door. Wait for oven door to
finish locking.
"DOOR
" will flash while the oven
door is locking to start self-clean and
steam clean.
This is normal.
"DOOR " light
is on when you
want to cook
The oven door is locked because the
temperature inside the oven has not
dropped below the locking temperature.
Press the Cancel/Off pad. Allow the oven
to cool.
“F— and a
number or
letter” flash in
the display
You have a function error code. Press the Cancel/Off pad. Allow the oven
to cool for one hour. Put the oven back into
operation.
If the function code repeats. Disconnect all power to the oven for at
least 30 seconds and then reconnect
power. If the function error code repeats,
call for service.

49-80824 25
Before you
call for service
Troubleshooting Tips
Wall Oven
Problem Possible Cause What To Do
Display goes
blank
A fuse in your home may be blown or
the circuit breaker tripped.
Replace the fuse or reset the circuit
breaker.
The clock is turned off. See the Special Features section.
Oven is in Sabbath Mode. Verify that the oven is not in Sabbath
Mode. See the Special Features section.
Power outage,
clock flashes
Power outage or surge Reset the clock. If the oven was in use,
you must reset it by pressing the Cancel/
Off pad, setting the clock and resetting any
cooking function.
“Burning” or
“oily” odor
emitting from
the vent
This is normal in a new oven and will
disappear in time.
To speed the process, set a self-clean
cycle for a minimum of 3 hours. See the
Cleaning the Oven section.
Strong odor An odor from the insulation around the
inside of the oven is normal for the first
few times the oven is used.
This is temporary and will go away after
several uses or a self-clean cycle.
Fan noise
A cooling fan may automatically turn on.
This is normal. The cooling fan will turn on
to cool internal parts. It may run for up to
1-1/2 hours after the oven is turned off.
My oven door
glass appears
to be "tinted"
or have a
"rainbow" color.
Is this defective?
No. The inner oven glass is coated with
a heat barrier to reflect the heat back
into the oven to prevent heat loss and
keep the outer door cool while baking.
This is normal. Under certain light or
angles, you may see this tint or rainbow
color.
Sometimes
the oven takes
longer to preheat
to the same
temperature
Cookware or food in oven The cookware or food in the oven will
cause the oven to take longer to preheat.
Remove items to reduce preheat time.
Number of racks in oven Adding more racks to the oven will cause
the oven to take longer to preheat.
Remove some racks.
Different cooking modes The different cooking modes use different
preheat methods to heat the oven for the
specific cooking mode. Some modes will
take longer than others (i.e. convection
bake multi).
Oven will not
work remotely
Router issues, no wireless signal, etc. For assistance with oven wireless network
connectivity, please call 800.444.1845.
Oven is not connected.

26 49-80824
This warranty is extended to the original purchaser and any succeeding owner for products purchased for
KRPHXVHZLWKLQWKH86$,IWKHSURGXFWLVORFDWHGLQDQDUHDZKHUHVHUYLFHE\DQ$XWKRUL]HG6HUYLFHULVQRW
DYDLODEOH\RXPD\EHUHVSRQVLEOHIRUDWULSFKDUJHRU\RXPD\EHUHTXLUHGWREULQJWKHSURGXFWWRDQ$XWKRUL]HG
Service location. In Alaska, the warranty excludes the cost of shipping or service calls to your home. Some
states do not allow the exclusion or limitation of incidental or consequential damages. This warranty gives you
specific legal rights, and you may also have other rights which vary from state to state. To know what your legal
rights are, consult your local or state consumer affairs office or your state’s Attorney General.
Warranty
Wall Oven
EXCLUSION OF IMPLIED WARRANTIES
Your sole and exclusive remedy is product repair as provided in this Limited Warranty. Any implied
warranties, including the implied warranties of merchantability or fitness for a particular purpose, are
limited to one year or the shortest period allowed by law.
WHAT IS
COVERED
From the Date
of the Original
Purchase
LIMITED TWO-YEAR WARRANTY
For two years from date of original purchase, we will provide, free of charge, parts and service labor in your
home to repair or replace any part of the oven that fails because of a manufacturing defect.
$OOZDUUDQW\VHUYLFHLVSURYLGHGE\RXU)DFWRU\6HUYLFH&HQWHUVRUDQDXWKRUL]HG&XVWRPHU&DUH
®
technician.
To schedule service online, visit us at Monogram.com or call Monogram Preferred Service (800.444.1845).
Please have your serial number and your model number available when calling for service.
Servicing your appliance may require the use of the onboard data port for diagnostics. This gives the factory
service technician the ability to quickly diagnose any issues with your appliance and helps Monogram
improve its products by providing Monogram with information on your appliance. If you do not want your
appliance data to be sent to Monogram, please advise your technician not to submit the data to Monogram at
the time of service.
Extended Warranties: Purchase a Monogram extended warranty and learn about special discounts that
are available while your warranty is still in effect. Visit Monogram.com or call 800.444.1845 to learn more
on how to purchase.
Warrantor: GE Appliances, a Haier company
WHAT IS NOT
COVERED
Ŷ6HUYLFHWULSVWR\RXUKRPHWRWHDFK\RXKRZWR
use the product.
Ŷ,PSURSHULQVWDOODWLRQGHOLYHU\RUPDLQWHQDQFH
Ŷ)DLOXUHRIWKHSURGXFWLILWLVDEXVHGPLVXVHG
modified or used for other than the intended
purpose or used commercially.
Ŷ5HSODFHPHQWRIKRXVHIXVHVRUUHVHWWLQJRI
circuit breakers.
Ŷ'DPDJHWRWKHSURGXFWFDXVHGE\DFFLGHQW
fire, floods or acts of God.
Ŷ,QFLGHQWDORUFRQVHTXHQWLDOGDPDJHFDXVHGE\
possible defects with this appliance.
Ŷ'DPDJHFDXVHGDIWHUGHOLYHU\
Ŷ3URGXFWQRWDFFHVVLEOHWRSURYLGHUHTXLUHG
service.
Ŷ6HUYLFHWRUHSDLURUUHSODFHOLJKWEXOEVH[FHSW
for LED lamps.
YOUR MONOGRAM WALL OVEN WARRANTY
Staple your receipt here. Proof of the original purchase date is needed to
obtain service under the warranty.

49-80824 27
Accessories
XL Broiler Pan (17 ” x 1 ¼” x 19 1/4“)
Parts
Oven racks
Oven elements
Light bulbs
Probe
Cleaning Supplies
CitruShine™ Stainless Steel Wipes
CeramaBryte Stainless Steel Appliance Cleaner
Graphite Lubricant
Accessories
Looking For Something More?
Monogram offers a variety of accessories
to improve your cooking and maintenance
experiences!
Refer to the Consumer Support page for
phone numbers and website information.
The following products and more are available:
Accessories
Wall Oven

28 49-80824
With the purchase of your new Monogram appliance, receive the
assurance that if you ever need information or assistance from
Monogram, we will be there. All you have to do is call!
Register Your
Appliance
Register your new appliance on-line at your convenience! Timely product registration will allow for
enhanced communication and prompt service under the terms of your warranty, should the need
arise. You may also mail in the pre-printed registration card included in the packing material.
In the US: Monogram.com
Schedule Service
Expert Monogram repair service is only one step away from your door. Get on-line and schedule
your service at your convenience any day of the year.
In the US: Monogram.com
or call 800.444.1845 during normal business hours.
Extended
Warranties
Remote
Connectivity
Parts and
Accessories
Purchase a Monogram extended warranty and learn about special discounts that are available while
your warranty is still in effect.
In the US: Monogram.com
or call 800.444.1845 during normal business hours.
For assistance with wireless network connectivity (for models with remote enable),
visit our website at monogram.com or call 800.444.1845 in the US.
Individuals qualified to service their own appliances can have parts or accessories sent directly to
their homes (VISA, MasterCard and Discover cards are accepted). Order on-line today 24 hours
every day.
In the US: Monogram.com or by phone at 800.444.1845 during normal business hours.
Instructions contained in this manual cover procedures to be performed by any user. Other
servicing generally should be referred to qualified service personnel. Caution must be
exercised, since improper servicing may cause unsafe operation.
Consumer Support
Wall Oven
49-80824
12-17 GEA
Printed in the United States

MANUAL DEL
PROPIETARIO
Horno de Pared Eléctrico Simple
Incorporado con Convección de
Aire Directa de 30”
Horno de Pared Eléctrico Doble
Incorporado con Convección
Directa de Aire de 30”
Monogram.com

2 49-80824
Contenidos
Horno de Pared
Contenidos
Información al Consumidor ................3
Información de Seguridad .................4
Uso del Horno
Controles del Horno Simple de Pared .........7
Controles del Horno Doble de Pared ..........8
Funciones especiales ......................9
Modo Sabático ..........................11
Estantes del Horno .......................12
Papel de Aluminio y Cobertores del Horno .....13
Modos de Cocción. . . . . . . . . . . . . . . . . . . . . . . . 14
Sonda .................................15
Utensilios ...............................16
Guía de Cocción .........................17
Cuidado y Limpieza
Horno ..................................18
Sonda .................................19
Estantes del Horno .......................20
Puertas de Horno ........................21
Luz del Horno ...........................22
Consejos para la Solución de Problemas ...23
Garantía ...............................26
Accesorios .............................27
Soporte para el Consumidor ..............28

49-80824 3
Información al Consumidor
Horno de Pared
Si recibió
un horno
de pared
dañado
De forma inmediata, comuníquese con el
comerciante (o fabricante) que le vendió
el horno de pared.
Ahorre
tiempo y
dinero
Antes de solicitar el servicio técnico, consulte
la sección de Consejos para Solucionar
Problemas en el reverso de este manual.
En el mismo figuran causas de problemas menores
de funcionamiento que usted puede corregir.
Si necesita
solicitar el
servicio
técnico
Para acceder al servicio técnico, consulte la
página de Servicios al Consumidor en la parte
trasera de este manual.
Estamos orgullosos de nuestro servicio técnico
y deseamos que esté complacido. Si por alguna
razón no se siente a gusto con el servicio técnico
que recibe, aquí figuran los pasos que deberá
seguir para solicitar ayuda adicional.
PRIMERO, comuníquese con las personas que le
brindaron el servicio técnico sobre su electrodoméstico.
Explique por qué no se siente a gusto. En la mayoría
de los casos, esto resolverá el problema.
LUEGO, si aún no se siente a gusto, escriba todos
los detalles, incluyendo su número telefónico, a:
Manager, Customer Relations
Monogram
Appliance Park
Louisville, KY 40225
Antes de
Usar su
horno de
pared
Lea este manual cuidadosamente. La finalidad del
mismo es ayudarle a realizar un uso y mantenimiento
correctos de su nuevo horno de pared.
Téngalo a mano para encontrar respuestas a
sus preguntas.
Si usted no entiende algo o necesita más ayuda, en
la sección trasera de este manual figura un listado
de números gratuitos de servicio al consumidor.
O
Visite nuestro sitio web en: Monogram.com
Escriba los
números
de modelo
y serie
Los podrá encontrar en una etiqueta en el borde
lateral o en el frente del horno (inferior) detrás de la
puerta del horno.
Antes de enviar esta tarjeta de Registro del
Producto, escriba estos números aquí:
Número de Modelo
Número de Serie
Use estos números en cualquier correspondencia
o llamadas al servicio técnico relacionadas con su
horno de pared.

4 49-80824
LEA Y GUARDE ESTAS INSTRUCCIONES
ADVERTENCIA
Lea todas las instrucciones antes de usar el producto. Si no se siguen estas instrucciones se podrán
producir incendios, descargas eléctricas, lesiones graves o la muerte.
ADVERTENCIA
INSTRUCCIONES GENERALES DE SEGURIDAD
Ŷ 8VHHVWHHOHFWURGRPpVWLFRVyORSDUDVXSURSyVLWRRULJLQDO
como se describe en el Manual del Propietario.
Ŷ6ROLFLWHTXHXQLQVWDODGRUFDOLILFDGRLQVWDOHVXHOHFWURGRPpVWLFR
y que esté adecuadamente conectado a tierra, de acuerdo con
las instrucciones de instalación provistas.
Ŷ1RLQWHQWHUHSDUDURUHHPSOD]DUQLQJXQDSDUWHGHOKRUQRD
menos que se recomiende específicamente en este manual.
Cualquier otra reparación deberá ser realizada por un
técnico calificado.
Ŷ$QWHVGHUHDOL]DUFXDOTXLHUVHUYLFLRWpFQLFRGHVFRQHFWHHO
suministro de corriente desde el panel de distribución del
hogar, retirando el fusible o desconectando el disyuntor.
Ŷ1RGHMHDORVQLxRVVRORV±QRVHGHEHUiGHMDUDORVQLxRV
solos o fuera de su radio de atención en el área donde el
electrodoméstico se encuentre en uso. Nunca se les deberá
permitir trepar, sentarse o pararse sobre ninguna parte del
electrodoméstico.
Ŷ
PRECAUCIÓN
No coloque artículos de interés
SDUDORVQLxRVVREUHORVJDELQHWHVTXHHVWiQVREUHXQ
KRUQR±VLORVQLxRVVHWUHSDQVREUHHOKRUQRSDUDOOHJDUD
estos artículos podrían sufrir lesiones graves.
Ŷ 8VHVyORPDQJRVGHROODVVHFDV±ORVPDQJRVK~PHGRV
sobre superficies calientes pueden producir quemaduras
GHELGRDOYDSRU1RGHMHTXHORVPDQJRVGHODVROODVWRTXHQ
los elementos que están calientes. No use una toalla u otra
tela voluminosa para reemplazar el mango de las cacerolas.
Ŷ1XQFDXVHHOHOHFWURGRPpVWLFRSDUDFDOHQWDURFDOHIDFFLRQDU
la habitación.
Ŷ1RWRTXHHOHOHPHQWRFDOHQWDGRUQLODVXSHUILFLHLQWHULRU
del horno. Es posible que estas superficies estén demasiado
calientes como para quemar, aunque su color sea oscuro.
Durante y después del uso, no toque ni permita que telas u
otros materiales inflamables toquen cualquier área interior
del horno; espere a que haya pasado un tiempo suficiente
para que se enfríen. Otras superficies del electrodoméstico se
podrán calentar lo suficiente como para ocasionar lesiones.
Las superficies potencialmente calientes incluyen la abertura
de la ventilación del horno, superficies cercanas a la abertura
y grietas alrededor de la puerta del horno.
Ŷ1RFDOLHQWHHQYDVHVGHFRPLGDTXHQRKD\DQVLGRDELHUWRV
Se podría acumular presión y el envase podría explotar,
ocasionando una lesión.
Ŷ1RXVHQLQJ~QWLSRGHDOXPLQLRRFREHUWRUSDUDFXEULUHO
fondo del horno o cualquier parte del horno, excepto como
se describe en este manual. Los cobertores de horno pueden
DWUDSDUHOFDORURGHUUHWLUVHRFDVLRQDQGRGDxRVVREUHHO
producto y el riesgo de descargas, humo o incendios.
Ŷ(YLWHODVUDOODGXUDVRLPSDFWRVVREUHODVSXHUWDVGHYLGULRR
los paneles de control. Hacer esto podrá producir la rotura
de vidrios. No cocine un producto con un vidrio roto. Es
posible que se produzcan descargas, incendios o cortes.
Ŷ&RFLQHFDUQHV\FDUQHVGHDYHHQIRUPDFRPSOHWD±ODFDUQH
por lo menos a una temperatura interna de 160º F y la carne
de ave por lo menos a una temperatura interna de 180º
F. Normalmente la cocción a estas temperaturas es una
protección contra las enfermedades transmitidas por
la comida.
ADVERTENCIA
MANTENGA LOS MATERIALES INFLAMABLES ALEJADOS DE LA COCINA
Si esto no se cumple, se podrán sufrir lesiones personales graves o incendios.
Ŷ 1RJXDUGHQLXVHPDWHULDOHVLQIODPDEOHVHQRFHUFDGHXQ
horno, incluyendo papel, plástico, mangos de ollas, trapos,
FREHUWRUHVGHSDUHGFRUWLQDVSDxRV\JDVROLQDXRWURV
vapores y líquidos inflamables.
Ŷ 1XQFDXVHSUHQGDVKROJDGDVRTXHFXHOJXHQPLHQWUDVXVD
el electrodoméstico. Estas prendas se podrán incendiar si
entran en contacto con superficies calientes, ocasionando
quemaduras graves.
Ŷ 1RSHUPLWDTXHODJUDVDGHODFRFFLyQXRWURVPDWHULDOHV
inflamables se acumulen en o cerca del horno. La grasa
que está en o cerca del horno se podrá incendiar.
INFORMACIÓN IMPORTANTE DE SEGURIDAD
LEA TODAS LAS INSTRUCCIONES ANTES DE USAR

49-80824 5
LEA Y GUARDE ESTAS INSTRUCCIONES
ADVERTENCIA
EN CASO DE INCENDIO, SIGA LOS SIGUIENTES PASOS PARA
EVITAR LESIONES O LA PROPAGACIÓN DEL FUEGO
Ŷ 1RXVHDJXDVREUHHOIXHJRGHODJUDVD1XQFDWRPHXQD
olla que se esté incendiando.
Ŷ 6LKD\XQLQFHQGLRHQHOKRUQRGXUDQWHHOKRUQHDGRDKRJXH
el fuego cerrando la puerta del horno y apagando el mismo
o usando un químico seco multipropósito o un extintor de
incendio con espuma.
Ŷ (QFDVRGHTXHKD\DIXHJRHQHOKRUQRGXUDQWHHOFLFORGH
limpieza automática, apague el horno y espere a que el fuego
se extinga. No fuerce la puerta para abrirla. La entrada de aire
fresco sobre las temperaturas de la limpieza automática podrá
conducir a la producción de llamas en el horno.
ADVERTENCIA
INSTRUCCIONES DE SEGURIDAD DEL HORNO
Ŷ 0DQWpQJDVHDOHMDGRGHOKRUQRDODEULUODSXHUWDGHO
mismo. El aire caliente o el vapor que sale puede causar
TXHPDGXUDVHQODVPDQRVURVWUR\XRMRV
Ŷ 0DQWHQJDGHVREVWUXLGDODYHQWLODFLyQGHOKRUQR
Ŷ 0DQWHQJDHOKRUQROLEUHGHDFXPXODFLyQGHJUDVD/DJUDVD
del horno se puede incendiar.
Ŷ &RORTXHORVHVWDQWHVGHOKRUQRHQODXELFDFLyQGHVHDGD
mientras éste se encuentra frío. Si es necesario mover el
estante mientras el horno está caliente, evite que el mango de
la olla tenga contacto con el elemento calentador en el horno.
Ŷ $OXVDUODVEROVDVSDUDFRFLQDURGRUDUHQHOKRUQRVLJDODV
instrucciones del fabricante.
Ŷ (VFRQYHQLHQWHHPSXMDUKDFLDDIXHUDORVHVWDQWHV
HVWiQGDUHVKDVWDHOWRSHRHPSXMDUHOHVWDQWHH[WHQVLEOH
hasta la posición completamente abierta para levantar
comidas pesadas. Esto también es una precaución contra
quemaduras por tocar superficies calientes de la puerta o
las paredes del horno.
Ŷ 1RGHMHSURGXFWRVWDOHVFRPRSDSHOXWHQVLOLRVGHFRFLQDQL
comida en el horno cuando éste no se encuentre en uso.
Los artículos guardados en el horno se pueden incendiar.
Ŷ 1XQFDFRORTXHORVXWHQVLOLRVGHFRFLQDSLHGUDVSDUDSL]]D
u horneado o cualquier otro tipo de aluminio o cobertor en
la base del horno. Estos ítems pueden atrapar el calor o
GHUUHWLUVHRFDVLRQDQGRGDxRVVREUHHOSURGXFWR\HOULHVJR
de descargas, humo o incendios.
ADVERTENCIA
INSTRUCCIONES DE SEGURIDAD DEL HORNO CON LIMPIEZA AUTOMÁTICA
La función de limpieza automática usa el horno en temperaturas lo suficientemente altas como para consumir la suciedad de
comida que haya dentro del horno. Para un funcionamiento seguro, siga estas instrucciones.
Ŷ 1RWRTXHODVVXSHUILFLHVGHOKRUQRGXUDQWHHOFLFORGH
OLPSLH]DDXWRPiWLFD0DQWHQJDDORVQLxRVDOHMDGRVGHO
horno durante la limpieza automática. Si no se siguen estas
instrucciones, se podrán producir quemaduras.
Ŷ $QWHVGHXVDUHOFLFORGHOLPSLH]DDXWRPiWLFDGHOKRUQRUHWLUH
los estantes de color gris brillante (en algunos modelos), la
VRQGDFXDOTXLHUSDSHOGHDOXPLQLR\FXDOTXLHUEDQGHMDSDUD
DVDUUHMLOODXRWURVXWHQVLOLRV6yORVHSXHGHQGHMDUGHQWUR
del horno los estantes para horno cubiertos de porcelana.
Ŷ $QWHVGHXWLOL]DUHOFLFORGHOLPSLH]DDXWRPiWLFDOLPSLH
la grasa y restos de comida que haya en el horno. Una
cantidad excesiva de grasa se puede incendiar, lo cual
SXHGHSURGXFLUGDxRVFRQKXPRHQVXKRJDU
Ŷ 6LHOPRGRGHOLPSLH]DDXWRPiWLFDIXQFLRQDGHIRUPD
incorrecta, apague el horno y desconecte el suministro de
corriente. Solicite el servicio de un técnico calificado.
Ŷ 1ROLPSLHODMXQWDGHODSXHUWD/DMXQWDGHODSXHUWDHV
esencial para un buen sellado. Se debe tener cuidado de
QRIURWDUGDxDUQLPRYHUODMXQWD
Ŷ 1RXVHOLPSLDGRUHVSDUDKRUQR1RVHGHEHUiXVDU
limpiadores comerciales para horno ni revestimientos de
protección para hornos de ningún tipo en o alrededor de
cualquier parte del horno.
INFORMACIÓN IMPORTANTE DE SEGURIDAD
LEA TODAS LAS INSTRUCCIONES ANTES DE USAR

6 49-80824
LEA Y GUARDE ESTAS INSTRUCCIONES
El equipo de acceso remoto instalado en este horno fue probado
y cumple con los límites establecidos para un dispositivo digital
de clase B, según la parte 15 de la Normativa de la FCC. Estos
OtPLWHVIXHURQGLVHxDGRVSDUD
(a) brindar una protección razonable contra interferencias nocivas
en una instalación residencial. Este equipo genera, usa y puede
emitir energía de radiofrecuencia y, si no se instala y utiliza de
acuerdo con las instrucciones, puede ocasionar interferencias
SHUMXGLFLDOHVHQODVFRPXQLFDFLRQHVGHUDGLR6LQHPEDUJRQRVH
garantiza que no se presenten interferencias en una instalación
HQSDUWLFXODU6LHOHTXLSRSURYRFDLQWHUIHUHQFLDVSHUMXGLFLDOHV
para la recepción de radio o televisión, lo cual puede comprobar
HQFHQGLHQGR\DSDJDQGRHOHTXLSRVHDFRQVHMDDOXVXDULRTXH
intente corregir la interferencia con una de las siguientes medidas:
Ŷ 5HRULHQWHRUHXELTXHODDQWHQDUHFHSWRUD
Ŷ $XPHQWHODVHSDUDFLyQHQWUHHOHTXLSR\HOUHFHSWRU
Ŷ &RQHFWHHOHTXLSRDXQWRPDFRUULHQWHGHXQFLUFXLWRGLIHUHQWH
del tomacorriente al que se encuentra conectado el receptor.
Ŷ 3DUDVROLFLWDUD\XGDFRQVXOWHFRQHOSURYHHGRUPLQRULVWDRD
un técnico experimentado de radio/ TV.
(b) tolerar cualquier interferencia recibida, incluyendo las
interferencias que puedan provocar un funcionamiento no
deseado del dispositivo.
Observe que todos los cambios o modificaciones sobre el
dispositivo de comunicación inalámbrico instalado en este horno
que no estén expresamente aprobados por el fabricante podrían
anular la autoridad del usuario para operar el equipamiento.
Cómo Retirar la Película Protectora de Envío y la Cinta de Embalaje
Con cuidado tome un extremo de la película protectora de envío
con los dedos y lentamente retire la misma de la superficie del
electrodoméstico. No utilice ningún producto filoso para retirar la
película. Retire toda la película antes de usar el electrodoméstico
por primera vez.
3DUDDVHJXUDUTXHQRKD\DGDxRVVREUHHODFDEDGRGHO
producto, la forma más segura de retirar el adhesivo de la cinta
GHHPEDODMHHQHOHFWURGRPpVWLFRVQXHYRVHVDSOLFDQGRXQ
GHWHUJHQWHOtTXLGRKRJDUHxRSDUDODYDUSODWRV$SOLTXHFRQXQD
WHODVXDYH\GHMHTXHVHVHTXH
NOTA: El adhesivo deberá ser eliminado de todas las partes. No
se puede retirar si se hornea con éste dentro.
ADVERTENCIA DE LA PROPOSICIÓN 65 DEL ESTADO DE CALIFORNIA
ADVERTENCIA
Este producto contiene uno o más químicos que el Estado de California entiende que producen
FiQFHU\GHIHFWRVHQHOQDFLPLHQWRXRWURVGDxRVUHSURGXFWLYRV
/RVKRUQRVFRQOLPSLH]DDXWRPiWLFDSXHGHQRFDVLRQDUH[SRVLFLRQHVGHEDMRQLYHODDOJXQDVGHODVVXVWDQFLDVGHOD3URSRVLFLyQ
65, incluyendo monóxido de carbono, durante el ciclo de limpieza. La exposición a sustancias puede ser minimizada abriendo
una ventana o usando un extractor o campana.
INFORMACIÓN IMPORTANTE DE SEGURIDAD
LEA TODAS LAS INSTRUCCIONES ANTES DE USAR

49-80824 7
Controles del Horno
Horno de Pared
Controles del Horno Simple de Pared
1. Convection Cooking Modes (Modos de
Cocción por Convección): Los modos de cocción por
FRQYHFFLyQXWLOL]DQXQDFLUFXODFLyQGHDLUHLQFUHPHQWDGDSDUDPHMRUDUHO
rendimiento. El tipo de beneficio depende del modo. Su horno cuenta con
los siguientes modos de cocción por convección: Bake (Hornear), Bake Multi
Rack (Honear en Estantes Múltiples), Roast (Dorar), Broil Hi (Asar Alto), Broil
/R$VDU%DMR\%URLO&ULVS$VDU&URFDQWH3DUDPiVLQIRUPDFLyQFRQVXOWH
la sección de Modos de Cocción.
2. Traditional Cooking Modes (Modos de
Cocción Tradicionales): Su horno cuenta con los siguientes
modos de cocción tradicionales: Bake (Hornear), Broil Hi (Asar Alto), Broil
/R$VDU%DMR3URRI/HXGDU\:DUP&DOHQWDU3DUDPiVLQIRUPDFLyQ
consulte la sección de Modos de Cocción.
3. Clean (Limpieza): El horno cuenta con dos modos de limpieza:
Self Clean (Limpieza Automática) y Steam Clean (Limpieza con Vapor). Para
acceder a información importante sobre el uso de estos modos, consulte la
sección de Limpieza del Horno.
4. Start (Iniciar): Se deberá presionar para comenzar cualquier función
de cocción, limpieza o por tiempo.
5. Cancel/Off (Cancelar/ Apagar): Cancelar TODAS las
RSHUDFLRQHVGHOKRUQRH[FHSWRHOUHORM\HOWHPSRUL]DGRU
6. Cook Time (Tiempo de Cocción): Cuenta el tiempo
de cocción y apaga el horno cuando el tiempo de cocción está completo.
Presione la tecla Cook Time (Tiempo de Cocción), use las teclas
numéricas para programar un tiempo de cocción en horas y minutos,
y luego presione Start (Iniciar). Esto sólo puede ser usado con Traditional
Bake (Horneado Tradicional), Convection Bake (Hornear por Convección),
Convection Bake Multi (Hornear por Multi Convección), y Convection Roast
(Dorar por Convección).
7. Clock (Reloj): &RQILJXUHODKRUDGHOUHORMGHOKRUQR3UHVLRQHODWHFOD
Clock (Reloj)\ODVWHFODVQXPpULFDVSDUDSURJUDPDUHOUHORM$VHJ~UHVHGH
seleccionar AM o PM. Presione Start (Iniciar) para guardar la configuración
de la hora.
8. Timer (Temporizador): Funciona como un temporizador
con cuenta regresiva: Presione la tecla Timer (Temporizador) y las teclas
numéricas para programar el tiempo en horas y minutos. Presione la tecla
Start (Iniciar) El horno continuará funcionando cuando la cuenta regresiva
del temporizador se haya completado. Para apagar el temporizador, presione
la tecla Timer (Temporizador).
9. Delay Time (Tiempo de Retraso): Genera un retraso
cuando el horno es encendido. Use esta tecla para configurar el momento en
que desea que el horno se inicie. Presione la tecla Delay Time (Tiempo de
Retraso) y use las teclas numéricas para programar la hora del día en que
desea que el horno se encienda. Presione el modo de cocción deseado y la
temperatura y luego presione Start (Iniciar). Si lo desea, también puede ser
programado un tiempo de cocción. Esto sólo puede ser usado con Traditional
Bake (Horneado Tradicional), Convection Bake (Hornear por Convección),
Convection Bake Multi (Hornear por Multi Convección), Convection Roast
(Dorar por Convección) y Self-Clean (Limpieza Automática).
NOTA: Al usar la función de tiempo de retraso, las comidas que se echan
a perder rápidamente, tales como leche, huevos, pescado, rellenos, ave
\FHUGRQRVHGHEHUiQGHMDUUHSRVDUSRUPiVGHKRUDDQWHV\GHVSXpV
de la cocción. La temperatura ambiente estimula el desarrollo de bacterias
nocivas. Asegúrese de que la luz del horno esté apagada, ya que el calor de
la lámpara acelerará el crecimiento de bacterias nocivas.
10. Probe (Sonda): Monitorea la temperatura interna de la comida
y apaga el horno cuando la comida alcanza la temperatura programada.
Inserte la sonda, programe el modo de cocción, y programe la temperatura
de la sonda. Para más información, consulte la sección de Modos de
Cocción. La sonda sólo puede ser usada con las funciones Traditional
Bake (Horneado Tradicional), Convection Bake (Hornear por Convección) y
Convection Roast (Dorar por Convección).
11. Oven Light(s) (Luz(es) del Horno): Enciende o apaga
la luz(es) del horno.
12. Remote Enable (Acceso Remoto)
(en algunos modelos):
CÓMO CONECTAR EL HORNO
Off (Apagado) - El horno no está conectado. Abra la aplicación y luego
mantenga presionada la tecla Remote Enable (Acceso Remoto) durante 5
segundos para iniciar el proceso de conexión.
Slow flash (parpadeo lento) - El horno está en modo de búsqueda y está
buscando una red.
Rapid flash (parpadeo rápido) -6HSURGXMRXQHUURUGXUDQWHHOSURFHVRGH
conexión.
Solid (Sólido) - El horno está conectado a la red y puede ser controlado
en forma remota a través de un dispositivo móvil conectado cuando está en
funcionamiento, pero no puede ser iniciado en forma remota.
INICIO DEL HORNO EN FORMA REMOTA
REMOTE (Remoto)
Para poder iniciar el horno en forma remota, presione la tecla Remote
Enable (Acceso Remoto) y el ícono REMOTE (Remoto) se encenderá
en la pantalla. El horno puede ser iniciado ahora en forma remota con un
dispositivo conectado. Abrir una puerta del horno o apagar el horno hará
que se apague el ícono REMOTE (Remoto). El ícono REMOTE (Remoto)
debe estar iluminado para iniciar el horno de forma remota. No se requiere el
ícono REMOTE (Remoto) para cambiar las configuraciones del horno o para
apagar el mismo.
Luego de usar el horno, recuerde verificar que el ícono REMOTE (Remoto)
esté iluminado, si desea iniciar el horno de forma remota en el futuro.
13. Lock Controls (Controles de Bloqueo): Bloquean
el control de modo que al presionar las teclas no se activen los controles.
Mantenga presionada la tecla Lock Controls (Controles de Bloqueo)
durante tres segundos para bloquear o desbloquear el control. La función
Cancel/Off (Cancelar/ Apagar) siempre está activa, incluso cuando el
control está bloqueado.
2346 785
11 10
1312
19

8 49-80824
Controles del Horno
Horno de Pared
Controles del Horno Doble de Pared
1. Upper Oven and Lower Oven (Horno Superior
y Horno Inferior): Designa cuál horno usar. Presione la tecla
Upper Oven (Horno Superior) o Lower Oven (Horno Inferior) para
seleccionar un horno, y luego presione la tecla del modo de cocción
deseado. El control del horno activará por omisión el horno superior.
2. Convection Cooking Modes (Modos de
Cocción por Convección): Los modos de cocción por
FRQYHFFLyQXWLOL]DQXQDFLUFXODFLyQGHDLUHLQFUHPHQWDGDSDUDPHMRUDUHO
rendimiento. El tipo de beneficio depende del modo. Su horno cuenta con
los siguientes modos de cocción por convección: Bake (Hornear), Bake Multi
Rack (Honear en Estantes Múltiples), Roast (Dorar), Broil Hi (Asar Alto), Broil
/R$VDU%DMR\%URLO&ULVS$VDU&URFDQWH3DUDPiVLQIRUPDFLyQFRQVXOWH
la sección de Modos de Cocción.
3. Traditional Cooking Modes (Modos de
Cocción Tradicionales): Su horno cuenta con los siguientes
modos de cocción tradicionales: Bake (Hornear), Broil Hi (Asar Alto), Broil
/R$VDU%DMR3URRI/HXGDU\:DUP&DOHQWDU3DUDPiVLQIRUPDFLyQ
consulte la sección de Modos de Cocción.
4. Clean (Limpieza): El horno cuenta con dos modos de limpieza:
Self Clean (Limpieza Automática) y Steam Clean (Limpieza con Vapor). Para
acceder a información importante sobre el uso de estos modos, consulte la
sección de Limpieza del Horno.
5. Start (Iniciar): Se deberá presionar para comenzar cualquier función
de cocción, limpieza o por tiempo.
6. Cancel/Off (Cancelar/ Apagar): Cancelar TODAS las
RSHUDFLRQHVGHOKRUQRH[FHSWRHOUHORM\HOWHPSRUL]DGRU
7. Cook Time (Tiempo de Cocción): Cuenta el tiempo
de cocción y apaga el horno cuando el tiempo de cocción está completo.
Presione la tecla Cook Time (Tiempo de Cocción), use las teclas
numéricas para programar un tiempo de cocción en horas y minutos,
y luego presione Start (Iniciar). Esto sólo puede ser usado con Traditional
Bake (Horneado Tradicional), Convection Bake (Hornear por Convección),
Convection Bake Multi (Hornear por Multi Convección), y Convection Roast
(Dorar por Convección).
8. Clock (Reloj): &RQILJXUHHOWLHPSRGHOUHORMGHOKRUQR3UHVLRQH
la tecla Clock (Reloj)\ODVWHFODVQXPpULFDVSDUDSURJUDPDUHOUHORM
Asegúrese de seleccionar AM o PM. Presione Start (Iniciar) para guardar la
configuración de la hora.
9. Timer (Temporizador): Funciona como un temporizador
con cuenta regresiva: Presione la tecla Timer (Temporizador) y las teclas
numéricas para programar el tiempo en horas y minutos. Presione la tecla
Start (Iniciar) El horno continuará funcionando cuando la cuenta regresiva
del temporizador se haya completado. Para apagar el temporizador, presione
la tecla Timer (Temporizador).
10. Delay Time (Tiempo de Retraso): Genera un retraso
cuando el horno es encendido. Use esta tecla para configurar el momento en
que desea que el horno se inicie. Presione la tecla Delay Time (Tiempo de
Retraso) y use las teclas numéricas para programar la hora del día en que
desea que el horno se encienda. Presione el modo de cocción deseado y la
temperatura y luego presione Start (Iniciar). Si lo desea, también puede ser
programado un tiempo de cocción. Esto sólo puede ser usado con Traditional
Bake (Horneado Tradicional), Convection Bake (Hornear por Convección),
Convection Bake Multi Rack (Hornear por Convección con Estantes Múltiples),
Convection Roast (Dorar por Convección) y Self-Clean (Limpieza Automática).
NOTA: Al usar la función de tiempo de retraso, las comidas que se echan
a perder rápidamente, tales como leche, huevos, pescado, rellenos, ave
\FHUGRQRVHGHEHUiQGHMDUUHSRVDUSRUPiVGHKRUDDQWHV\GHVSXpV
de la cocción. La temperatura ambiente estimula el desarrollo de bacterias
nocivas. Asegúrese de que la luz del horno esté apagada, ya que el calor de
la lámpara acelerará el crecimiento de bacterias nocivas.
11. Probe (Sonda): Monitorea la temperatura interna de la comida
y apaga el horno cuando la comida alcanza la temperatura programada.
Seleccione superior o inferior, inserte la sonda, programe el modo de
cocción, y programe la temperatura de la sonda. Para más información,
consulte la sección de Modos de Cocción. La sonda sólo puede ser usada
con las funciones Traditional Bake (Horneado Tradicional), Convection Bake
(Hornear por Convección) y Convection Roast (Dorar por Convección).
12. Oven Light(s) (Luz(es) del Horno): Enciende o apaga
la luz(es) del horno.
13. Remote Enable (Acceso Remoto)
(en algunos modelos):
CÓMO CONECTAR EL HORNO
Off (Apagado) - El horno no está conectado. Abra la aplicación y luego
mantenga presionada la tecla Remote Enable (Acceso Remoto) durante 5
segundos para iniciar el proceso de conexión.
Slow flash (parpadeo lento) - El horno está en modo de búsqueda y está
buscando una red.
Rapid flash (parpadeo rápido) -6HSURGXMRXQHUURUGXUDQWHHOSURFHVRGH
conexión.
Solid (Sólido) - Ambos hornos están conectados a la red y pueden ser
controlados en forma remota a través de un dispositivo móvil conectado cuando
están en funcionamiento, pero no pueden ser iniciados en forma remota.
INICIO DEL HORNO EN FORMA REMOTA
REMOTE (Remoto)
Para poder iniciar el horno en forma remota, presione la tecla Remote
Enable (Acceso Remoto) y el ícono REMOTE (Remoto) se encenderá en la
pantalla. Cualquiera de los hornos puede ser iniciado ahora en forma remota
con un dispositivo conectado. Abrir cualquiera de las puertas de los hornos
o apagar cualquiera de los hornos hará que se apague el ícono REMOTE
(Remoto). El ícono REMOTE (Remoto) debe estar iluminado para iniciar el
horno de forma remota. No se requiere el ícono REMOTE (Remoto) para
cambiar las configuraciones del horno o para apagar el mismo.
Luego de usar el horno, recuerde verificar que el ícono REMOTE (Remoto)
esté iluminado, si desea iniciar un horno de forma remota en el futuro.
14. Lock Controls (Controles de Bloqueo): Bloquean
el control de modo que al presionar las teclas no se activen los controles.
Mantenga presionada la tecla Lock Controls (Controles de Bloqueo)
durante tres segundos para bloquear o desbloquear el control. La función
Cancel/Off (Cancelar/ Apagar) siempre está activa, incluso cuando el
control está bloqueado.
378694
10 11
14 1213
251

49-80824 9
Funciones
especiales
Uso del Horno
Horno de Pared
Existen numerosas funciones especiales que se controlan a través del uso del teclado alfanumérico.
Ŷ*UDGRV±H[KLELUWHPSHUDWXUDHQ)DKUHQKHLWR
Celsius
Ŷ7RQRGHILQDOL]DFLyQ±7RQRGH)LQDOL]DFLyQGHO
Ciclo
Ŷ6RQLGR±9ROXPHQGHO7RQR
Ŷ&RQILJXUDFLyQ±&RQILJXUDFLyQGHO5HORM
Ŷ$XWR5HFHWD±&RQYHUVLyQGH$XWR5HFHWD
(para Horneado por Convección)
Ŷ$SDJDGRHQKUV±6HDSDJDOXHJRGH
12 horas.
Ŷ6DEiWLFR±0RGR6DEiWLFR
Ŷ&RPSHQVDFLyQGH7HPSHUDWXUD±$MXVWDOD
temperatura del horno (los hornos dobles
cuentan con opciones para horno superior u
horno inferior)
Ŷ%DUUDGH/X]GH1RWLILFDFLyQ±(QFLHQGHR
apaga la luz indicadora
Ŷ3RU2PLVLyQ±5HLQLFLDHOFRQWURODOD
configuración de fábrica
Para modificar las configuraciones de las Funciones Especiales, siga estas pautas.
Mantenga presionadas las teclas Traditional
Bake (Horneado Tradicional) y Traditional
Broil (Asado Tradicional) durante 3 segundos
simultáneamente.
Al ingresar el modo de funciones especiales:
Ŷ Los números 2 y 8 actúan como dirección
KDFLDDUULED\KDFLDDEDMRSDUDSDVDUSRUODV
funciones y sus configuraciones.
Ŷ Los números 4 y 6 actúan como direcciones
de derecha e izquierda para hacer cambios
hacia atrás y hacia adelante a través de las
funciones, a fin de cambiar las configuraciones
de estas funciones.
Ŷ El número 5 actúa como tecla de activación.
Mantenga presionadas las teclas Traditional Bake
(Horneado Tradicional) y Traditional Broil (Asado
Tradicional) durante 3 segundos simultáneamente
para salir del modo de funciones especiales.
3RUHMHPSOR$MXVWHGHOD7HPSHUDWXUDGHO+RUQR
1. Mantenga presionadas las teclas Traditional
Bake (Horneado Tradicional) y Traditional
Broil (Asado Tradicional) durante 3 segundos
simultáneamente para ingresar al modo de
funciones especiales.
2. Presione la tecla con el número 2 hasta que
en la pantalla se lea “UPPEr tE-P oFFSEt”
(Compensación de Tiempo) (los hornos de
pared doble cuentan con una selección para los
KRUQRVDOWR\EDMR
3. Presione la tecla con el número 6 para modificar
la configuración de funciones especiales.
4. Presione las teclas con los números 2 u 8 para
incrementar o reducir la temperatura de a un
grado Fahrenheit hasta + 35º F o hasta -35º F.
5. Presione al tecla con el número 5 para guardar
el cambio deseado.
6. Presione la tecla número 4 para regresar a las
demás funciones.
7. Mantenga presionadas las teclas Traditional
Bake (Horneado Tradicional) y Traditional
Broil (Asado Tradicional) durante 3 segundos
simultáneamente para salir del modo de
funciones especiales.
123
456
78
0
9
Cook
Time
Set
Clock
AM/PM
13
Enter
=
7
0
9
Cook
Time
Set
Clock
AM/PM

10 49-80824
Funciones
especiales
(Cont.)
Uso del Horno
Horno de Pared
Fahrenheit o Celsius (dEGrEE)
El control del horno está configurado para usar
unidades de temperatura Fahrenheit, pero se
puede cambiar a unidades de temperatura Celsius,
si se prefiere.
Tono de Finalización del Ciclo
(End tonE)
Se trata de un tono que indica el final de un tiempo.
Puede cambiarlo para que tenga un tono (bEEP) o
un tono con repetición continua (Con bEEP).
Volumen del Tono (SoUnd)
Esta función permite que el volumen del tono del
KRUQRVHDDMXVWDGRHQWUHDOWRPHGLRSRURPLVLyQ
EDMRRDSDJDGR
Configuración del Reloj (SEttinG)
Esta función especifica cómo se exhibirá la hora
GHOGtD/DVRSFLRQHVVRQHOKRUDULRGHXQUHORM
estándar de 12 horas con selecciones AM y PM (12
Hr), de estilo militar de 24 horas (24 Hr), o sin que
se muestre (oFF).
Conversión de Auto Receta
(AUto rECiPE)
Al usar los modos de cocción Convection Bake
(Hornear por Convección) o Convection Bake
Multi (Honeado por Convección Múltiple), se
reducirá de forma automática la temperatura de
cocción programada. Se debe observar que esta
opción no convierte los tiempos de horneado, sino
sólo la temperatura.
Apagado en 12 Horas
(12 Hr SHUtoFF)
Cuando esta función sea activada, el horno se
apagará de forma automática luego de 12 horas de
uso continuo.
Ajuste de la Temperatura del Horno
(UPPEr tE-P oFFSEt) (Superior e
Inferior en algunos modelos)
Esta función permite que la temperatura del horno
VHDDMXVWDGDKDVWD)PiVFDOLHQWHR)PiV
fría. Use esta función si piensa que la temperatura
de su horno es demasiado caliente o demasiado
fría y desea modificarla. Para los modelos con
horno doble, los hornos superior e inferior se
ajustan de forma separada (UPPEr tE-P OFFSET
and Lo-Er tE-P oFFSEt).(VWHDMXVWHDIHFWDORV
modos Tradicional Bake (Horneado Tradicional),
Convection Bake (Horneado por Convección)
y Convection Bake Multi Rack (Horneado por
Convección en Estantes Múltiples).
Barra de Luz de Notificación
(LiGHt bAr)
Esta función usa una barra de luz entre la puerta
y el panel de control para una indicación visual
fácil del avance del precalentamiento y el tiempo
de cocción. Esta función puede ser encendida o
apagado en las funciones especiales de su horno.
Esta función se utiliza con los modos Convection
Bake (Hornear por Convección), Convection
Bake Multi (Hornear por Convección Múltiple),
Convection Broil (Asar por Convección), Convection
Roast (Dorar por Convección), Traditional Bake
(Horneado Tradicional), Traditional Broil (Asado
7UDGLFLRQDO:DUP&DOLHQWH3URRI/HXGDU
Self Clean (Limpieza Automática), Cook Time
(Tiempo de Cocción) y Timer (Temporizador). En
un horno de pared doble, la luz de notificación
indica el funcionamiento actual del horno superior
únicamente. A continuación se da una descripción
de las diferentes condiciones de iluminación.
APAGADO - Ninguna
función del horno o
del temporizador están
funcionando o la función fue
apagada en las funciones
especiales.
BARRA TITILANTE - El
horno se está precalentando.
La barra de luz titilará
hasta que la temperatura
configurada del horno haya
sido alcanzada.
BARRA DE PROGRESO
- Progresará lentamente
hasta haber una barra
completamente iluminada al
avanzar la cuenta regresiva
del contador.
NOTA: Si se usa el botón Cook Time (Tiempo de
Cocción) la barra de luz y el horno se apagarán
cuando el temporizador llegue a cero. Si el botón
Timer (Temporizador) es usado, la barra de luz
permanecerá sólida cuando el tiempo llegue a cero.
BARRA SÓLIDA - El
horno se encuentra
en la temperatura y/o
función configurada o el
temporizador de su cocina se
completó.
NOTA: La barra de progreso para funciones por
tiempo tiene prioridad sobre las funciones sólidas o
titilantes, si ambas se usan al mismo tiempo.
Por Omisión (dEFAULt)
Esta función reinicia todas las funciones especiales a
las configuraciones por omisión originales del horno.

49-80824 11
Modo
Sabático
(SAbbAtH)
Uso del Horno
Horno de Pared
El modo sabático desactiva las luces del horno, (la luz del horno no se encenderá cuando la puerta sea
abierta y la barra de luz de notificación será desactivada), todos los sonidos (el control no emitirá un
SLWLGRFXDQGRVHSUHVLRQHXQERWyQORVPRGRV&RQYHFWLRQ&RQYHFFLyQORVPRGRV%URLO$VDU:DUP
(Calentar), Proof (Levar), y las funciones de tiempo. El modo Sabbath (Sabático) sólo puede ser usado
con la función Traditional Bake (Horneado Tradicional). Esta función se activa conforme con los requisitos
Sabáticos Judíos de la Estrella K.
NOTA: Si se produce un corte de corriente mientras se encuentra en Sabbath Mode (Modo Sabático), la
unidad regresará a dicho modo cuando la corriente sea restablecida.
Ingrese Sabbath Mode (Modo
Sabático)
Mantenga presionadas las teclas Traditional
Bake (Horneado Tradicional) y Traditional Broil
(Asado Tradicional) al mismo tiempo durante tres
segundos. Use la tecla 2 u 8 para pasar a través
de las opciones de las funciones especiales a
“SAbbAtH” (Sabático) y luego presione la tecla
número 6 para permitir que la tecla 2 u 8 cambien
la configuración de la función sabática de “oFF”
(Apagado) a “on” (Encendido).
Presione la tecla número 5 para ingresar la
selección Mantenga presionadas las teclas
Traditional Bake (Horneado Tradicional) y
Traditional Broil (Asado Tradicional) durante
3 segundos para salir del modo de funciones
especiales. El ícono ] aparecerá en la pantalla,
indicando que la unidad se encuentra en Sabbath
0RGH0RGR6DEiWLFR(OUHORMQRDSDUHFHUi
Observe que si cuenta con un horno de pared
doble, al colocar el control en el modo Sabático,
ambos hornos están ahora en el modo sabático y
están disponibles para la cocción.
Inicie Sabbath Bake (Horneado
Sabático)
Presione Traditional Bake (Horneado Traditcional).
El control hará que la temperatura se configure
por omisión en 350ºF, pero puede usar las teclas
numéricas para ingresar una temperatura entre 170ºF
y 550ºF y presionar Start (Iniciar). No se emitirá
ningún sonido cuando las teclas sean presionadas.
En un momento al azar entre los 30 segundos y 1
minuto, el ícono ][ aparecerá en la pantalla indicando
que el horno está en funcionamiento.
Para hornos con pared doble, ambos hornos
pueden ser usados mientras se encuentra en
el modo Sabbath (Sabático). Presione la tecla
Upper Oven and Lower Oven (Horno Superior
y Horno Inferior), antes de presionar Traditional
Bake (Horneado Tradicional). Por omission, el
horno superior es seleccionado si la tecla Upper
Oven and Lower Oven (Horno Superior y Horno
Inferior) no es presionada primero. Si usará ambos
hornos, espere hasta que un horno indique que
está funcionando antes de iniciar el segundo horno.
Ajuste la Temperatura Durante el
Horneado Sabático
Presione Traditional Bake (Horneado
Tradicional), use las teclas numéricas para
ingresar una nueva temperatura entre 170ºF
y 550ºF, y presione Start (Iniciar). No se
emitirá ningún sonido cuando las teclas sean
presionadas. Debido a que no hay ninguna
indicación durante el cambio de temperatura,
se puede usar un termómetro para horno para
confirmar cambios de temperatura.
Con hornos de pared doble, presione la tecla
Upper Oven and Lower Oven (Horno Superior
y Horno Inferior), antes de presionar Traditional
Bake (Horneado Tradicional). Por omisión, el
horno superior es seleccionado si la tecla Upper
Oven and Lower Oven (Horno Superior y Horno
Inferior) no es presionada primero. Si usará ambos
hornos, espere hasta que un horno indique que
está funcionando antes de iniciar o de apagar el
segundo horno.
Horneado con Temporizador
Durante el Modo Sabático
Si desea usar la función Cook Time (Tiempo de
Cocción) para hornear en el horno y luego hacer
que el horno se apague de forma automática, no
ingrese el modo Sabbath (Sabático). Necesitará
cambiar Cycle End Tone (Tono de Fin del Ciclo)
de un pitido continuo a un pitido simple, apagar
Tone Volume (Volumen del Tono), y apagar la luz
del horno usando el panel de control o retirando la
lámpara de luz. Luego puede programar el horno
en el tiempo de cocción deseado, a través de la
función de horneado.
Salga del Modo Sabático
Para finalizar un ciclo de horneado, presione
Cancel/Off (Cancelar/ Apagar). El ícono ]
[ cambiará al ícono ], indicando que el horno se
apagó.
Mantenga presionadas las teclas Traditional
Bake (Horneado Tradicional) y Traditional Broil
(Asado Tradicional) al mismo tiempo durante tres
segundos. Use la tecla 2 u 8 para pasar a través
de las opciones de las funciones especiales a
“SAbbAtH” (Sabático) y luego presione la tecla
número 6 para permitir que la tecla 2 u 8 cambien
la configuración de la función Sabbath (Sabático)
de “on (Encendido) a “oFF” (Apagado).
Presione la tecla número 5 para ingresar la
selección Mantenga presionadas las teclas
Traditional Bake (Horneado Tradicional) y
Traditional Broil (Asado Tradicional) durante
3 segundos para salir del modo de funciones
HVSHFLDOHV(OUHORMDSDUHFHUiQXHYDPHQWH
indicando que el horno ya no está en Sabbath
Mode (Modo Sabático).

12 49-80824
Estantes del
Horno
Uso del Horno
Horno de Pared
El horno cuenta con seis posiciones de
estantes. En la Guía de Cocción, se brindan
recomendaciones de posiciones de los estantes
SDUDGLIHUHQWHVWLSRVGHFRPLGDV6HDMXVWDXQ
estante en una dirección para afectar los resultados
GHFRFFLyQ3RUHMHPSORVLVHSUHILHUHQSDUWHV
superiores más oscuras en tartas, panecillos o
galletas, pruebe moviendo la comida a un estante
que se encuentre una posición más arriba. Si
encuentra que las comidas están demasiado
doradas en la parte superior, pruebe moviendo las
PLVPDVPiVDEDMRODSUy[LPDYH]
Al hornear con múltiples ollas y en múltiples
estantes, asegúrese de que haya por lo menos
´HQWUHODVROODVDILQGHGHMDUVXILFLHQWH
espacio para que fluya el aire.
Estantes del Horno
Es posible que su horno cuente con estantes
extensibles y/o estantes planos tradicionales.
Para evitar posibles quemaduras, coloque los
estantes en la posición deseada antes de encender
el horno.
Estantes Extensibles
Los estantes extensibles cuentan con la función
Install (Instalar), que se bloquea en los soportes de
los estantes (guías) a ambos lados. Una vez que
la función Install (Instalación) queda correctamente
EORTXHDGDVLHPSUHHPSXMHKDFLDDIXHUDHOHVWDQWH
desde el riel frontal superior hasta la posición de
detención en su máxima extensión, al colocar o
retirar utensilios.
Si resulta difícil extender estos estantes, lubrique
los mismos con lubricante de grafito, provisto con el
horno. Retire el estante del horno, retire cualquier
obstrucción en el recorrido deslizable con una toalla
de papel, agite el lubricante de grafito y coloque 4
gotitas en los dos recorridos inferiores de los lados
izquierdo y derecho. Abra y cierre el estante varias
veces para distribuir el lubricante.
Para ordenar más lubricante de grafito, consulte las
secciones de Accesorios y Soporte al Consumidor
al final de este manual.
Para Retirar un Estante Extensible:
$VHJ~UHVHGHTXHHOHVWDQWHVHDHPSXMDGR
totalmente dentro del horno.
2. Tome el estante tanto desde su riel frontal
VXSHULRUFRPRGHVXVPDQLMDVLQIHULRUHV\
levante directamente para desbloquear el
estante de los soportes del estante.
3. De manera firme, mientras sostiene tanto el
ULHOIURQWDOVXSHULRUFRPRODVPDQLMDVLQIHULRUHV
HPSXMHHOHVWDQWHKDFLDDGHODQWH(QFDVRGH
ser necesario, tome el estante sobre ambos
lados. Luego retire el mismo del horno.
El horno
tiene 6
posiciones
de estantes
0DQLMD
0DQLMD
Riel Frontal Superior
Riel Frontal Superior
0DQLMD
0DQLMD
Riel Frontal Superior
Función de Instalación
Levante para
desbloquear
desde el
soporte del
estante

49-80824 13
Estantes del
Horno (Cont.)
Uso del Horno
Horno de Pared
Estantes Extensibles (Cont.)
Para Reemplazar un Estante Extensible:
1. Coloque la posición trasera del estante sobre
los soportes del estante (guías), como se
muestra en la imagen.
6RVWHQJDHOULHOIURQWDOVXSHULRU\ODVPDQLMDV
LQIHULRUHV\HPSXMHHOHVWDQWHKDVWDTXHOD
función de instalación se bloquee en el soporte
del estante frontal.
Si resulta difícil reemplazar o retirar los estantes
extensibles, limpie los soportes de los estantes del
horno con aceite de cocina. No quite el aceite de
cocina del espacio de deslizamiento.
Estantes Planos Tradicionales
Los estantes poseen bloqueadores, de modo que
al colocarlos correctamente sobre los soportes se
detendrán antes de salirse completamente y no se
inclinarán. Al colocar y retirar utensilios de cocina,
HPSXMHODSDUULOODKDVWDTXHVHGHWHQJD
Para Retirar un Estante
(PSXMHHOPLVPRKDFLDXVWHGLQFOLQHHOIUHQWHKDFLD
DUULED\HPSXMHKDFLDDIXHUD
Para Reemplazar un Estante
Incline el frente del estante hacia arriba, cuelgue la
SDUWHWUDVHUDXELFDQGRORVHQODFHVGHEDMRGHORV
VRSRUWHVGHORVHVWDQWHVHPSXMHHOHVWDQWHKDFLD
atrás (hasta trabarlo en los bloqueadores) y haga
TXHGHVFLHQGDKDVWDVXSRVLFLyQ(PSXMHHOHVWDQWH
hasta que quede introducido completamente.
Si resulta difícil deslizar y/o retirar estantes planos,
coloque un poco de aceite de cocina en una tela
suave o en una toalla de papel y frote los costados
del estante y cada soporte del mismo.
Papel de
Aluminio y
Cobertores
del Horno
PRECAUCIÓN
No use ningún tipo de aluminio o cobertor de horno para cubrir el fondo
del horno. Estos ítems pueden atrapar el calor o derretirse, ocasionando daños sobre el producto y
el riesgo de descargas, humo o incendios. Los daños por uso inadecuado de estos ítems no están
cubiertos por la garantía del producto.
6HSRGUiXVDUDOXPLQLRSDUDHYLWDUGHUUDPHVFRORFDQGRXQDKRMDVREUHXQHVWDQWHLQIHULRUYDULDVSXOJDGDV
GHEDMRGHODFRPLGD1RXVHPiVDOXPLQLRTXHHOQHFHVDULR\QXQFDFXEUDWRWDOPHQWHHOHVWDQWHGHXQ
horno con papel de aluminio. Mantenga el aluminio a por lo menos 1 1/2” de las paredes del horno, para
evitar una circulación deficiente del calor.
PRECAUCIÓN
Tenga cuidado al retirar un estante de la posición más baja, ya que la puerta
podrá estar caliente.
Bloqueo
del Estante
Frontal
Sostenga el riel frontal superior
\ODVPDQLMDVLQIHULRUHV\
HPSXMHHOHVWDQWHKDVWDTXH
la función de instalación se
bloquee en el soporte frontal.
Estante plano
Bloqueador
Soporte del
estante
Enlace de ubicación

14 49-80824
Uso del Horno
Horno de Pared
Modos de
Cocción
6XQXHYRKRUQRSRVHHXQDYDULHGDGGHPRGRVGHFRFFLyQSDUDTXHSXHGDREWHQHUORVPHMRUHVUHVXOWDGRV
Estos modos se describen a continuación. Para acceder a recomendaciones para comidas específicas,
consulte la sección de la Guía de Cocción. Recuerde que es posible que su nuevo horno funcione de
manera diferente que aquel que está reemplazando.
Modos de Horneado y Dorado
Seleccione un modo para hornear y dorar
basado en el tipo y cantidad de comida que está
preparando. Al preparar comidas horneadas tales
como tartas, galletas y masas, siempre precaliente
el horno primero. Siga las recomendaciones de la
receta sobre la colocación de la comida. Si no se
brindan pautas, centre la comida en el horno.
Horneado Tradicional
El modo de horneado tradicional está pensado
para la cocción en un solo estante. Este modo
usa el calor principalmente desde el elemento
inferior, pero también desde el elemento superior
para cocinar la comida. Para usar este modo,
presione la tecla Bake (Hornear) en Traditional
(Tradicional), ingrese una temperatura, y luego
presione Start (Iniciar). El precalentamiento
generalmente se recomienda al usar este modo.
Horneado por Convección con Aire
Directo
El modo de horneado por convección está pensado
para la cocción en un solo estante. Este modo
utiliza el calor del elemento inferior y también
GHORVHOHPHQWRVVXSHULRU\WUDVHURMXQWRFRQHO
movimiento de aire directamente descendente desde
la parte superior del horno, para que la cocción
VHDPiVSDUHMD(OKRUQRHVWiHTXLSDGRFRQOD
función Auto Recipe Conversion (Conversión de
Receta Automática); de modo que no es necesario
convertir la temperatura al usar este modo. Para
usar este modo, presione la tecla Bake (Hornear) en
Convection (Convección), ingrese una temperatura,
y luego presione Start (Iniciar). El precalentamiento
generalmente se recomienda al usar este modo.
Honeado por Convección en
Estantes Múltiples
El modo Convection Bake Multi Rack (Honeado por
Convección en Estantes Múltiples) está pensado
para honear en múltiples estantes al mismo
tiempo. Este modo utiliza el calor principalmente
desde el elemento trasero, pero también calienta
GHVGHORVHOHPHQWRVVXSHULRUHLQIHULRUMXQWR
con el movimiento de aire desde el ventilador por
FRQYHFFLyQSDUDPHMRUDUXQDFRFFLyQSDUHMD(O
horno está equipado con la función Auto Recipe
Conversion (Conversión de Receta Automática); de
modo que no es necesario convertir la temperatura
al usar este modo. Es posible que el tiempo
de horneado sea un poco más prolongado con
estantes múltiples, en comparación con lo que se
espera con un solo estante. Para usar este modo,
presione la tecla Bake Multi Rack (Horneado en
Estantes Múltiples) en Convection (Convección),
ingrese una temperatura, y luego presione Start
(Iniciar). Siempre realice el precalentamiento al
usar este modo.
Dorado por Convección con Aire
Directo
El modo Convection Roast (Dorado por
Convección) está pensado para dorar cortes
enteros de carne en un solo estante. Este
modo utiliza el calor de los elementos inferior,
VXSHULRU\WUDVHURMXQWRFRQHOPRYLPLHQWRGHO
aire directamente desde la parte superior del
KRUQRDILQGHPHMRUDUHOGRUDGR\UHGXFLUHO
tiempo de cocción. No es necesario convertir la
temperatura. Cuando use este modo, o si usa la
sonda, controle la comida antes que el tiempo
sugerido en la receta. Para usar este modo,
presione la tecla Roast (Dorar) en Convection
(Convección), ingrese una temperatura, y luego
presione Start (Iniciar). No es necesario realizar el
precalentamiento al usar este modo.
Modo para Asar
Siempre ase con la puerta cerrada. El elemento
para asar en el horno es muy potente. Monitoree la
comida de cerca al asar. Tenga cuidado al asar en
posiciones de estantes superiores, ya que colocar
la comida más cerca del elemento para asar
incrementa el humo, salpicaduras y la posibilidad
de que se incendien las grasas. No se recomienda
asar en el estante de la posición 6.
Intente asar las comidas que normalmente haría a
ODSDUULOOD$MXVWHODVSRVLFLRQHVGHORVHVWDQWHVSDUD
DMXVWDUODLQWHQVLGDGGHOFDORUDODFRPLGD&RORTXH
las comidas más cerca del elemento para asar,
cuando se desee una superficie más cocinada y
un interior poco cocido. Las comidas más gruesas
y las comidas cuyo interior debe ser cocinado
deberían ser asadas en un estante en una posición
DOHMDGDGHOXVDGRSDUDDVDURXVDQGRODVIXQFLRQHV
7UDGLFLRQDO%URLO/R$VDGR7UDGLFLRQDO%DMRR
&RQYHFWLRQ%URLO/R$VDGRSRU&RQYHFFLyQ%DMR
3DUDXQPHMRUUHQGLPLHQWRFHQWUHODFRPLGDGHEDMR
del elemento calentador para asar.
Asado Tradicional Alto
El modo Traditional Broil Hi (Asado Tradicional Alto)
usa calor intenso del elemento superior para soasar
las comidas. Use la función Broil Hi (Asado Alto)
para cortes más delgados de carne y/o comidas
que prefiera que quedan menos cocinadas en su
interior. Para usar este modo, presione la tecla
Broil (Asar) una vez en Traditional (Tradicional)
y luego presione Start (Iniciar). No es necesario
realizar el precalentamiento al usar este modo.

49-80824 15
Modos de
Cocción
(Cont.)
Uso del Horno
Horno de Pared
Asado Tradicional Bajo
El modo Traditional Broil Lo (Asado Tradicional
%DMRXVDPHQRVFDORULQWHQVRGHOHOHPHQWR
superior para cocinar la comida completamente
mientras también se realiza el dorado superficial.
8VHODIXQFLyQ%URLO/R$VDGR%DMRSDUDFRUWHV
de carne más gruesos y/o comidas que desee
que queden completamente cocinadas. Para
usar este modo, presione la tecla Broil (Asar)
dos veces en Traditional (Tradicional) y luego
presione Start (Iniciar). No es necesario realizar el
precalentamiento al usar este modo.
Asado por Convección Alto con
Aire Directo
El modo Convection Broil Hi (Asado por
Convección Alto) usa calor intenso desde el
HOHPHQWRVXSHULRUMXQWRFRQHOPRYLPLHQWRGHODLUH
directamente desde la parte superior del horno
SDUDPHMRUDUODFRFFLyQ\HOGRUDGR3DUDXVDU
este modo, presione la tecla Broil (Asar) una vez
en Convection (Convección) y luego presione
Start (Iniciar)3DUDREWHQHUPHMRUHVUHVXOWDGRV
precaliente durante 5 minutos al usar este modo.
Asado por Convección Bajo con
Aire Directo
El modo Convection Broil Lo (Asado por Convección
%DMRXVDFDORUPHQRVLQWHQVRGHVGHHOHOHPHQWR
VXSHULRUMXQWRFRQHOPRYLPLHQWRGHODLUHGLUHFWDPHQWH
desde la parte superior del horno. Para usar este
modo, presione la tecla Broil (Asar) dos veces en
Convection (Convección) y luego presione Start
(Iniciar)3DUDREWHQHUPHMRUHVUHVXOWDGRVSUHFDOLHQWH
durante 5 minutos al usar este modo.
Asado por Convección Crocante
con Aire Directo
El modo Convection Broil Crisp (Asado por
Convección Crocante) está pensado como un
modo de acabado al final del ciclo de cocción,
para agregar dorado superficial a un plato tal
como una cazuela o una barbacoa. Para usar este
modo, presione la tecla Broil (Asar) tres veces en
Convection (Convección) y luego presione Start
(Iniciar). Monitoree la comida de cerca para evitar
un dorado excesivo.
Leudar
(OPRGR3URRI/HXGDUHVWiGLVHxDGRSDUDHOHYDU
(fermentar y leudar) masas de pan. Presione
la tecla Proof (Leudar) y luego presione Start
(Iniciar). Cubra bien la masa para evitar que se
seque. El pan se elevará más rápidamente que a
temperatura ambiente.
Calentar
(OPRGR:DUP&DOHQWDUHVWiGLVHxDGRSDUD
mantener comidas calientes hasta durante 3 horas.
Para usar este modo, presione la tecla Warm
(Caliente) y luego presione Start (Iniciar). Cubra
las comidas que necesitan mantener la humedad
y no cubra aquellas comidas que deberían quedar
crocantes. No se requiere precalentar las mismas.
1RXVHODIXQFLyQ:DUP&DOHQWDUSDUDFDOHQWDU
FRPLGDIUtDH[FHSWRJDOOHWDVFUXMLHQWHVSDSDV
fritas o cereales secos. También se recomienda
que la comida no se mantenga caliente por más de
dos horas.
Sonda
Ubicación Correcta de la Sonda
Luego de preparar la comida y de colocarla en la olla, siga estas instrucciones para una ubicación correcta
de la sonda.
Ŷ ,QVHUWHODVRQGDHQODFRPLGDGHPRGRTXH
la punta de la sonda se apoye en el centro
de la parte más gruesa de la comida. Para
XQPHMRUUHQGLPLHQWRODVRQGDGHEHUtDVHU
completamente insertada en la comida. Si la
sonda no es ubicada correctamente, es posible
que no mida con precisión la temperatura de la
parte más fría de la comida. Algunas comidas,
SDUWLFXODUPHQWHODVPiVSHTXHxDVQRVRQ
adecuadas para la cocción con el uso de una
VRQGDGHELGRDVXVIRUPDVRWDPDxRV
Ŷ 1RGHEHUtDWRFDUHOKXHVRODJUDVDQLHOFDUWtODJR
ADVERTENCIA
El consumo de comida semicruda puede hacer que se contraigan
enfermedades producidas por la comida. Use la sonda de acuerdo con las siguientes
instrucciones, a fin de asegurar que todas las partes de la comida alcancen temperaturas de
cocción mínimamente seguras. Puede encontrar recomendaciones de temperaturas de cocción
mínimamente seguras en www.foodsafety.gov o en www.IsItDoneYet.gov.
La temperatura interna de la comida con frecuencia se usa como indicador de que está lista,
especialmente al dorar o preparar carne de ave. El modo Probe (Sonda) monitorea la temperatura
interna de la comida y apaga el horno cuando esta última alcanza la temperatura programada.
Controle siempre la temperatura en múltiples partes de la comida, utilizando un termómetro de
comidas luego de realizar la cocción, a fin de asegurar que todas las partes de la misma hayan
alcanzado una temperatura interna mínimamente segura en dicha comida.

16 49-80824
Uso del Horno
Horno de Pared
Sonda
(Cont.)
Ubicación Correcta de la Sonda
(Cont.)
Ŷ 3DUDFRFLQDUXQDYHHQWHUDLQVHUWHODVRQGDHQ
la parte más gruesa de la pechuga.
Ŷ 3DUDGRUDUVLQKXHVRVLQVHUWHODVRQGDHQHO
centro del dorado.
Ŷ 3DUDFRFLQDUMDPyQRFRUGHURFRQKXHVRV
inserte la sonda en el centro de la articulación o
GHOP~VFXORPiVEDMR\ODUJR
Ŷ 3DUDSUHSDUDUFD]XHODVRSODWRVWDOHVFRPR
pastel de carne, inserte la sonda en el centro
del plato.
Ŷ 3DUDFRFLQDUSHVFDGRLQVHUWHODVRQGDMXVWR
arriba de la agalla en la zona más carnosa
paralela a columna.
Uso de la Sonda
Para usar la sonda sin precalentamiento:
1. Inserte la sonda en la comida (consulte sobre la
Ubicación Correcta de la Sonda).
2. Coloque la comida en el horno y conecte la
sonda en su correspondiente tomacorriente en
el horno.
3. Programe la configuración deseada para la
sonda y el modo de cocción, presionando
la tecla Probe (Sonda) e ingresando la
temperatura interna deseada para la comida,
luego presione la tecla de modo de cocción
(Horneado Tradicional, Horneado por
Convección, o Dorado por Convección) e
ingrese la temperatura de cocción deseada. La
temperatura interna máxima de la comida que
se puede configurar es 200° F.
Para usar la sonda con
precalentamiento:
1. Presione la tecla del modo de cocción deseado
(Horneado Tradicional, Horneado por
Convección, o Dorado por Convección) e
ingrese la temperatura de cocción deseada.
2. Inserte la sonda en la comida (consulte sobre la
Ubicación Correcta de la Sonda).
3. Una vez que el horno fue precalentado, coloque
la comida en el mismo y conecte la sonda en su
correspondiente tomacorriente, asegurándose
de que esté completamente insertada. Tenga
cuidado, ya que las paredes del horno y el
tomacorriente de la sonda están calientes.
4. Programe la temperatura de la sonda
presionando la tecla Probe (Sonda) e
ingresando la temperatura interna deseada para
la comida. La temperatura interna máxima de la
comida que se puede configurar es 200° F.
Pautas para el Cuidado de la Sonda
NOTA: algunos modelos con horno doble cuentan
con una sonda sólo en el horno superior.
Ŷ 6LVHXVDXQDVRQGDTXHQRVHDODSURYLVWDFRQ
HVWHSURGXFWRVHSRGUiQSURGXFLUGDxRVVREUH
la sonda.
Ŷ 8VHODVPDQLMDVGHODVRQGDDOHQFKXIDU\
desenchufar la misma, luego de insertar o de
retirar la sonda de la carne o del tomacorriente.
Ŷ 3DUDHYLWDUGDxRVVREUHODVRQGDQRXVH
DJDUUDGHUDVSDUDHPSXMDUHOFDEOHDOUHWLUDUOR
Ŷ 3DUDHYLWDUURPSHUODVRQGDDVHJ~UHVHGH
que la comida haya sido completamente
descongelada antes de insertarla.
Ŷ 3DUDHYLWDUSRVLEOHVTXHPDGXUDVQR
desenchufe la sonda del tomacorriente del
horno hasta que este último se haya enfriado.
Ŷ 1XQFDGHMHODVRQGDGHQWURGHOKRUQRGXUDQWH
un ciclo de limpieza automática o de limpieza
con vapor.
Ŷ 1RJXDUGHODVRQGDGHQWURGHOKRUQR
Utensilios
Pautas de Uso de Utensilios
(OPDWHULDOHODFDEDGR\HOWDPDxRGHORVXWHQVLOLRV
afectan el horneado.
Las ollas oscuras, revestidas y opacas absorben
el calor más rápidamente que las ollas claras y
brillantes. Al usar ollas que absorben el calor más
rápidamente, las comidas podrán resultar más
doradas, crocantes y con una capa más gruesa.
Si utiliza utensilios oscuros y revestidos, controle
la comida antes del tiempo mínimo de cocción. Si
se obtienen resultados no deseados con este tipo
de utensilios, considere la posibilidad de reducir la
temperatura del horno en 25º F la próxima vez.
Las ollas brillantes pueden producir resultados de
KRUQHDGRPiVSDUHMRVHQWRUWDV\JDOOHWDV
Las ollas de vidrio y cerámica calientan con
lentitud, pero retienen bien el calor.
Estos tipos de ollas funcionan bien con platos tales
como tartas y postres con natilla.
Las ollas con aislante de aire calientan lentamente
y pueden producir fondos dorados.
Mantenga los utensilios limpios para una cocción
PiVSDUHMD

49-80824 17
Uso del Horno
Horno de Pared
TIPO DE COMIDA
MODO(S)
RECOMENDADO(S)
POSICIÓN(ES)
DE ESTANTES
RECOMENDADA SUGERENCIAS ADICIONALES
Productos Horneados
Tortas con capas, tortas
rectangulares, roscas,
panecillos, pan rápido en un
Solo Estante
Horneado por Convección
Horneado Tradicional
3 Use utensilios brillantes.
Tortas con capas* en Múltiples
Estantes
Horneado por Convección
Múltiples Estantes
Horneado Tradicional
2 y 4
(VWDQWHH[WHQVLEOHHQODSRVLFLyQPiVDOWDVLVHXVD$VHJ~UHVHGHTXHKD\DXQIOXMRGH
aire adecuado (Vea la ilustración).
Tortas de grasa (pastel de ángel)
Horneado por Convección
Horneado Tradicional
1 Use utensilios brillantes.
Galletas, galletitas, bizcochitos
en un Solo Estante
Horneado por Convección 3 Use utensilios brillantes.
Galletas, galletitas, bizcochitos
en Múltiples Estantes
Horneado por Convección
Múltiples Estantes
2 y 4
1, 3 y 5
Use la posición 4 para 2 estantes extensibles, y la posición 3 para 3 estantes.
$VHJ~UHVHGHTXHKD\DXQIOXMRGHDLUHDGHFXDGR
Bife y Cerdo
Hamburguesas Asado Tradicional Alto 5
8VHHOHVWDQWHH[WHQVLEOHSDUDKDPEXUJXHVDVHVSDFLDGDVGHIRUPDSDUHMDHQXQD
olla con parrilla para asar a fin de obtener una parte externa bien soasada y una parte
interna poco cocida, cocine el primer lado aproximadamente 3 minutos y cocine el
VHJXQGRODGRDSUR[LPDGDPHQWHPLQXWRV0XHYDODFRPLGDKDFLDDEDMRSDUDTXH
TXHGHPiVSUHSDUDGD\PHQRVVRDVDGD3DUDXQPHMRUUHQGLPLHQWRFHQWUHODFRPLGD
GHEDMRGHOHOHPHQWRTXHHPLWHFDORUSDUDDVDU
Bifes y Chuletas
Asado por Convección Alto
Asado Tradicional Alto
5
Use una olla para asar; precaliente 5 minutos si usará el Modo para Asar por
&RQYHFFLyQ0XHYDODFRPLGDKDFLDDEDMRSDUDTXHTXHGHPiVSUHSDUDGD\PHQRV
VRDVDGD3UHVWHDWHQFLyQDODFRPLGDDODVDUOD3DUDXQPHMRUUHQGLPLHQWRFHQWUHOD
FRPLGDGHEDMRGHOHOHPHQWRFDOHQWDGRUSDUDDVDU
Dorados Dorado por Convección 2 o 3
Use una olla chata tal como una olla para asar. No se requiere precalentarla. Use la
función sonda.
Ave
Pollo entero Dorado por Convección 2 o 3 Use una olla chata tal como una olla para asar. Use la función sonda.
Pechugas, patas, muslos con
huesos
Asar Alto 1
Si se empanó o cubrió con salsa, evite los modos Broil Hi (Asar Alto). Ase del lado
GHODSLHOKDFLDDEDMRSULPHUR3UHVWHDWHQFLyQDODFRPLGDDODVDUOD3DUDXQPHMRU
UHQGLPLHQWRFHQWUHODFRPLGDGHEDMRGHOHOHPHQWRFDOHQWDGRUSDUDDVDU
$VDGR%DMR
Horneado por Convección
Horneado Tradicional
3
Pechugas de pollo deshuesadas
$VDGRSRU&RQYHFFLyQ%DMR
Horneado por Convección
Horneado Tradicional
3
Precaliente durante 5 minutos si usará la Función de Asado por Convección. Mueva la
FRPLGDPiVDEDMRSDUDTXHTXHGHPiVSUHSDUDGD\PHQRVVRDVDGD\PiVDUULEDSDUD
VRDVDUGRUDUDODVDU3DUDXQPHMRUUHQGLPLHQWRFHQWUHODFRPLGDGHEDMRGHOHOHPHQWR
calentador para asar.
Pavo entero Dorado por Convección 1 o 2 Usa una olla chata tal como una olla para asar. Use la función sonda.
Pechuga de Pavo Dorado por Convección 2 o 3 Use una olla chata tal como una olla para asar. Use la función sonda.
Pescado
$VDGRSRU&RQYHFFLyQ%DMR
$VDGR%DMR
5 (mitad del grosor o
menos)
4 (>1/2 pulgada)
Precaliente 5 minutos al Asar por Convección. Preste atención a la comida al asarla.
3DUDXQPHMRUUHQGLPLHQWRFHQWUHODFRPLGDGHEDMRGHOHOHPHQWRFDOHQWDGRUSDUDDVDU
Cazuelas
Horneado por Convección
Horneado Tradicional
3
Use el modo Convection Broil Crisp (Asado por Convección Crocante) durante los
últimos 2 a 5 minutos del horneado para derretir/ dorar quesos o superficies crocantes.
Comidas Congeladas a Conveniencia
Pizza, papas fritas, tator tots,
patitas de pollo fritas, aperitivos
en un Solo Estante
Horneado por Convección
Horneado Tradicional
3
Use el modo Convection Broil Crisp (Asado por Convección Crocante) durante los
~OWLPRVDPLQXWRVGHFRFFLyQSDUDGHMDUFURFDQWHODSDUWHH[WHULRU
Pizza, papas fritas, tator tots,
patitas de pollo fritas, aperitivos
en Múltiples Estantes
Horneado por Convección
Múltiples Estantes
2 y 4
Si usará el modo Crisp (Crocante), coloque ambas ollas en el estante superior si el
espacio lo permite; de otra forma prepare una por vez en el estante superior.
*Al hornear cuatro tortas con capas a la vez, use los estantes 2
y 4. Coloque las ollas como se muestra, de modo que no quede
una olla encima de la otra.
Cocine la comida completamente para evitar que se produzcan
enfermedades a partir de la comida. Puede encontrar
recomendaciones sobre temperatura mínima para cocinar de
forma segura en www.IsItDoneYet.gov. Asegúrese de usar un
termómetro de comidas para medir la temperatura de las mismas.
Guía de Cocción

18 49-80824
Cuidado y Limpieza
Horno de Pared
Horno
Panel de Control
Una buena idea es limpiar el panel de control luego
GHFDGDXVR/LPSLHFRQXQMDEyQVXDYH\DJXDR
YLQDJUH\DJXDHQMXDJXHFRQDJXDOLPSLD\SXOD
en seco con una tela suave. No use limpiadores
abrasivos, limpiadores líquidos fuertes, almohadillas
para fregar de plástico ni limpiadores de horno en
HOSDQHOGHFRQWUROGDxDUiQHODFDEDGR
Exterior del Horno
No use limpiadores de horno, limpiadores abrasivos,
OLPSLDGRUHVOtTXLGRVIXHUWHVHVWURSDMRVGHDFHUR
almohadillas para fregar de plástico, ni polvos
limpiadores en el interior o el exterior del horno.
/LPSLHHOPLVPRFRQDJXD\MDEyQRXQDVROXFLyQGH
YLQDJUH\DJXD(QMXDJXHFRQDJXDOLPSLD\VHTXH
con una tela seca. Al limpiar supeficies, asegúrese
de que estén a temperatura ambiente y fuera del
contacto con la luz solar. Si las manchas en el
borde de la ventana de la puerta son persistentes,
XVHXQOLPSLDGRUDEUDVLYRVXDYHRXQDHVSRQMD
FRQHVWURSDMRSDUDREWHQHUXQPHMRUUHVXOWDGR(O
GHUUDPHGHDGRERMXJRVGHIUXWDVDOVDVGHWRPDWH
y líquidos para humedecer que contengan ácidos
pueden ocasionar descoloración y se deberán
OLPSLDUGHLQPHGLDWR'HMHTXHODVVXSHUILFLHV
FDOLHQWHVVHHQIUtHQ\OXHJROLPSLH\HQMXDJXH
Superficies de Acero Inoxidable
1RXVHYLUXWDVGHDFHURpVWDVGDxDUiQOD
superficie. Para limpiar la superficie de acero
LQR[LGDEOHXVHDJXDWLELDFRQMDEyQRXQOLPSLDGRU
o pulidor para acero inoxidable. Siempre limpie
la superficie en la dirección del veteado. Siga las
instrucciones del limpiador para limpiar la superficie
de acero inoxidable. Para realizar consultas sobre
la adquisición de productos, incluyendo limpiadores
o pulidores para electrodomésticos de acero
inoxidable, consulte las secciones de Accesorios y
Soporte al Consumidor al final de este manual.
Interior del Horno
El interior de su nuevo horno puede ser limpiado
de forma manual o utilizando los modos Steam
Clean (Limpieza con Vapor) o Self Clean (Limpieza
Automática).
(OGHUUDPHGHDGRERMXJRVGHIUXWDVDOVDVGH
tomate y líquidos para humedecer que contengan
ácidos pueden ocasionar descoloración y se deberán
limpiar de inmediato. Espere a que las superficies
FDOLHQWHVVHHQIUtHQ\OXHJROLPSLH\HQMXDJXH
Limpieza Manual
No use limpiadores de horno, limpiadores abrasivos,
OLPSLDGRUHVOtTXLGRVIXHUWHVHVWURSDMRVGHDFHUR
almohadillas para fregar, ni polvos limpiadores en el
LQWHULRUGHOKRUQR/LPSLHHOPLVPRFRQDJXD\MDEyQ
RXQDVROXFLyQGHYLQDJUH\DJXD(QMXDJXHFRQ
agua limpia y seque con una tela seca. Al limpiar
supeficies, asegúrese de que estén a temperatura
ambiente y fuera del contacto con la luz solar.
Modo de Limpieza con Vapor
La limpieza con vapor está pensada para limpiar
SHTXHxRVGHUUDPHVXVDQGRDJXD\DXQD
WHPSHUDWXUDGHOLPSLH]DPiVEDMDTXHODIXQFLyQ
Self-Clean (Limpieza Automática).
Para usar la función Steam Clean (Limpieza con
Vapor), limpie las grasas y suciedades del horno.
Vierta una taza de agua en la parte inferior del
horno. Cierre la puerta. Presione la tecla Steam
Clean (Limpieza con Vapor) y luego presione Start
(Iniciar). La puerta del horno se trabará. No podrá
abrir la puerta durante los 30 minutos de la limpieza
con vapor, ya que esto reducirá su rendimiento.
Al finalizar el ciclo de limpieza al vapor, la puerta
se destrabará. Limpie cualquier exceso de agua y
cualquier suciedad que haya quedado.
Asegúrese de que la corriente eléctrica esté apagada y que todas las superficies estén frías antes de
limpiar cualquier parte del horno.

49-80824 19
Cuidado y Limpieza
Horno de Pared
Horno
(Cont.)
Interior del Horno (Cont.)
Modo de Limpieza Automática
Lea las Instrucciones de Seguridad del Horno
con Limpieza Automática, en el comienzo de este
manual antes de usar el modo Self Clean (Limpieza
Automática).
IMPORTANTE: Las emanaciones producidas por el
ciclo de autolimpieza de cualquier horno afectan la
salud de algunas aves de manera notoria. Procure
llevar sus aves a otra habitación bien ventilada.
Este modo usa temperaturas muy altas para limpiar
el interior del horno. Cuando use esta función,
la puerta del horno se trabará. Antes de utilizar
el ciclo de limpieza automática, limpie la grasa
y restos de comida que haya en el horno. Retire
todos los artículos del horno, excepto los estantes
esmaltados (color oscuro). Los estantes brillantes
o de plata, la sonda de carnes, y cualquier utensilio
u otros artículos deberían ser retirados del horno
antes de iniciar un ciclo de limpieza automática.
Cierre la puerta. Presione la tecla Self Clean
(Limpieza Automática) y se exhibirá un tiempo
de limpieza automática por omisión. El tiempo
de limpieza puede ser modificado en cualquier
momento entre las 3:00 y las 5:00 horas, usando
las teclas numéricas para ingresar un tiempo
diferente y presionando Start (Iniciar). Si desea
usar el tiempo por omisión, presione la tecla Start
(Iniciar) inmediatamente luego de presionar la
tecla Self Clean (Limpieza Automática) El horno
se apagará de forma automática cuando el ciclo
de limpieza automática sea completado. La puerta
permanecerá bloqueada hasta que el horno se
haya enfriado. Una vez que el horno se haya
enfriado, limpie cualquier ceniza que haya quedado
en el horno.
En modelos de horno doble, se puede programar
un ciclo de limpieza de ambos hornos al mismo
tiempo. El último horno retrasará de forma
automática su comienzo hasta el final del ciclo de
limpieza del primer horno.
Sonda
La sonda de temperatura se puede limpiar con
DJXD\MDEyQRFRQXQDDOPRKDGLOODGHHVWURSDMR
OOHQDGHMDEyQ(QIUtHODVRQGDGHWHPSHUDWXUD
antes de su limpieza. Fregue las manchas difíciles
FRQXQDDOPRKDGLOODGHHVWURSDMROOHQDGHMDEyQ
HQMXDJXH\VHTXH
Para ordenar sondas de temperatura adicionales,
consulte las secciones de Accesorios y Soporte al
Consumidor al final de este manual.
Ŷ 1RVXPHUMDODVRQGDGHWHPSHUDWXUDHQDJXD
Ŷ 1RJXDUGHODVRQGDGHWHPSHUDWXUDGHQWURGHO
horno.
Ŷ 1XQFDGHMHODVRQGDGHWHPSHUDWXUDGHQWURGHO
horno durante un ciclo de limpieza automática o
de limpieza con vapor.

20 49-80824
Cuidado y Limpieza
Horno de Pared
Estantes
del Horno
Los estantes que fueron provistos con el horno
(estantes oscuros esmaltados, no brillantes) pueden
permanecer en el horno durante el ciclo de limpieza
DXWRPiWLFD\DTXHHVWHFLFORQRORVGDxDUi
Para limpiar los estantes de forma manual, use
DJXDFDOLHQWH\MDEyQ$VHJ~UHVHGHQRODYDUHO
espacio de deslizamiento de un estante extensible.
Si resulta difícil retirar los estantes del horno,
coloque un poco de aceite vegetal en una tela
seca o toalla de papel y frote sobre los soportes
de los estantes del horno. No limpie el aceite en el
espacio de deslizamiento del estante extensible.
De forma periódica, luego de varios ciclos de
limpieza automática, los espacios de deslizamiento
del estante extensible deberán ser lubricados
XWLOL]DQGROXEULFDQWHGHJUDILWRHQYLDGRMXQWRFRQ
su horno de pared. Para ordenar más lubricante
de grafito, consulte las secciones de Accesorios y
Soporte al Consumidor al final de este manual.
1. Retire el estante extensible del horno. Consulte
la sección de Estantes Extensibles del Horno.
2. Extienda totalmente el estante sobre una mesa
o mesada. Se podrá colocar papel de periódico
GHEDMRGHOHVWDQWHSDUDXQDOLPSLH]DIiFLO
3. Si hay restos en las pistas de deslizamiento,
limpie los mismos con una toalla de papel.
NOTA: Cuando el lubricante de grafito se haya
acabado, deberá ser reemplazado.
4. Agite el lubricante de grafito antes de abrir el
mismo. Comenzando con el mecanismo de
deslizamiento del lado izquierdo del estante,
FRORTXHFXDWURJRWDVSHTXHxDVGH
lubricante en los dos (2) espacios inferiores de
deslizamiento, cerca de los rulemanes de apoyo.
5. Repita esto sobre el mecanismo del lado
derecho del estante.
6. Abra y cierre el estante varias veces para
distribuir el lubricante.
7. Reemplace la tapa del lubricante y agite el
mismo nuevamente. Dé vuelta el estante y
repita los pasos 3, 4, 5 y 6.
8. Cierre el estante, gire el estante con el lado
derecho hacia arriba y coloque el mismo en
el horno. Consulte la sección de Estantes
Extensibles del Horno..
9. Repita los pasos anteriores con cada estante.
NOTA: No rocíe con esprái de cocina o cualquier
otro lubricante en esprái

49-80824 21
Cuidado y Limpieza
Horno de Pared
Posición de retiro
Bloqueo de la bisagra
Ranura
(PSXMHORVEORTXHRVGHODELVDJUD
KDFLDDEDMRSDUDGHVEORTXHDU
Puertas de
Horno
Puerta del Horno Desmontable
La puerta es muy pesada. Tenga cuidado al retirar y levantar la puerta.
1ROHYDQWHODSXHUWDXVDQGRODPDQLMD
Para retirar la puerta:
1. Abra la puerta totalmente.
(PSXMHORVEORTXHRVGHODELVDJUDKDFLD
DEDMRHQGLUHFFLyQDODHVWUXFWXUDGHODSXHUWD
hasta la posición desbloqueada. Es posible
que necesite una herramienta tal como un
GHVWRUQLOODGRUSHTXHxRGHSXQWDSODQD
3. Firmemente tome ambos lados de la puerta por
la parte superior.
4. Cierre la puerta hasta la posición de retiro
de la misma. La puerta debería ser abierta
aproximadamente a 3”, sin obstrucción sobre la
misma.
5. Levante la puerta hacia arriba y afuera, hasta
que los brazos de las bisagras queden fuera de
las ranuras.
Para reemplazar la puerta:
1. Firmemente tome ambos lados de la puerta por
la parte superior.
2. Comenzando desde el lado izquierdo, con
la puerta en el mismo ángulo de la posición
de retiro, apoye la hendidura del brazo de la
bisagra en el extremo inferior de la ranura de la
bisagra. La abertura en el brazo de la bisagra
deberá estar totalmente apoyada en la parte
inferior de la ranura. Repita el procedimiento del
lado derecho.
3. Abra la puerta totalmente. Si la puerta no
se abre totalmente, la hendidura no está
correctamente apoyada en el extremo inferior
de la ranura.
(PSXMHORVEORTXHRVGHODELVDJUDFRQWUDOD
estructura frontal de la cavidad del horno, hasta
la posición de bloqueo.
5. Cierre la puerta del horno.
Extremo inferior de la ranura
Bloqueo de la
bisagra
Brazo de la
bisagra
Hendidura
(PSXMHHO
bloqueo de la
bisagra hacia
arriba hasta
que quede
bloqueado
Brazo de la bisagra

22 49-80824
Cuidado y Limpieza
Horno de Pared
Luz del
Horno
Reemplazo de la Lámpara del Horno
1. Desconecte la corriente desde el fusible
principal o el panel del disyuntor.
2. Retire los estantes del horno.
3. Deslice un destornillador de punta plana entre
ODFDMD\ODWDSDGHOX]GHYLGULR
4. Apoye la tapa de luz de vidrio con dos dedos para
evitar que se caiga al fondo del horno. Tenga
cuidado de no astillar la cubierta del horno.
5. De forma suave, gire la punta del destornillador
SDUDDIORMDUODWDSDGHOX]GHYLGULR
6. Retire la tapa de luz de vidrio.
7. Retire la lámpara sosteniendo firmemente y
deslizando la misma hacia afuera, hasta que las
GRVFODYLMDVKD\DQGHMDGRHOVRSRUWHGHFHUiPLFD
8. No toque el vidrio de la nueva lámpara con los
dedos. Esto hará que la lámpara falle al dar luz.
Tome la lámpara de reemplzado con una toalla
OLPSLDRXQSDxXHORGHSDSHOFRQODVFODYLMDV
KDFLDDEDMR$OLxHODVGRVFODYLMDVHQHOVRSRUWHGH
cerámica, presionando suavemente hasta que la
lámpara quede asegurada en la ficha de cerámica.
9. Deslice las lentes protectoras del soporte
y presione hasta que las pinzas queden
HQJDQFKDGDVHQODFDMD
10. Vuelva a conectar la corriente.
ADVERTENCIA
PELIGRO DE DESCARGA O QUEMADURAS: Antes de reemplazar la lámpara
de luz del horno, desconecte la conexión eléctrica del horno del fusible principal
o del panel del disyuntor. Si esto no se cumple, se podrá producir una descarga
eléctrica o un incendio.
PRECAUCIÓN
RIESGO DE INCENDIO: La tapa de vidrio y la lámpara de luz se deberán retirar
cuando estén frías. Tocar el vidrio caliente sin protección en las manos o con un
trapo húmedo puede ocasionar quemaduras.

49-80824 23
Antes de
solicitar
el servicio
técnico
¡Ahorre tiempo y dinero! Primero revise los cuadros que aparecen en las siguientes páginas y
es posible que no necesite solicitar reparaciones.
&RQVHMRVSDUDOD6ROXFLyQGH3UREOHPDV
Horno de Pared
Problema Causa Posible Qué Hacer
Mi horno nuevo
no cocina como
el anterior.
¿Hay algún
problema con las
configuraciones
de temperatura?
Su horno nuevo cuenta con un sistema
de cocción diferente con relación al
anterior y, por lo tanto, es posible que
cocine de forma diferente.
En los primeros usos, use los tiempos y
temperaturas de su receta con cuidado. Si aún
piensa que su horno nuevo cocina con demasiado
FDORURGHPDVLDGRIUtRSRGUiDMXVWDUHOWHUPRVWDWR
usted mismo para aplicar su preferencia de cocción
HVSHFtILFD3DUDDMXVWDUODWHPSHUDWXUDGHOKRUQR
consulte la sección de Funciones Especiales.
NOTA:(VWHDMXVWHDIHFWDODVWHPSHUDWXUDVGHORV
modos Traditional Bake (Horneado Tradicional),
Convection Bake (Hornear por Convección) y
Convection Bake Multi (Horneado por Convección
Múltiple); éste no afectará los modos Convection
Roast (Dorar por Convección), Traditional Broil
(Asado Tradicional), Convection Broil (Asar por
Convección) o Clean (Limpiar).
La comida no se
hornea de forma
apropiada
Controles del horno configurados de
forma incorrecta.
Consulte la sección Modos de Cocción.
La posición del estante es incorrecta o
el estante no está nivelado.
Consulte la sección Modos de Cocción y la Guía de
Cocción.
Uso de una cacerola incorrecta o de
XQDFDFHURODGHWDPDxRLQFRUUHFWR
Consulte la sección Utensilios.
La temperatura del horno debe ser
DMXVWDGD
Consulte la sección Funciones Especiales.
Sustitución de ingredientes Sustituir ingredientes puede modificar el resultado
de la receta.
La comida no
asa de forma
apropiada
Controles del horno configurados de
forma incorrecta.
Asegúrese de seleccionar el modo correcto para
asar. NOTA: El modo para cocción crocante por
convección no es para asar comidas.
Se usó una posición incorrecta del
estante.
Para acceder a sugerencias de ubicación de
estantes, consulte la Guía de Cocción.
Se cocinó comida en una olla caliente. Asegúrese de que el utensilio esté frío
Utensilio de cocina inadecuado para
asar.
8VHXQDROODHVSHFtILFDPHQWHGLVHxDGDSDUDDVDU
El papel de aluminio usado para la
ROOD\ODUHMLOODSDUDDVDUQRVHDMXVWy
ni cortó de forma apropiada, según lo
recomendado.
Si usará papel de aluminio, deberá usarse conforme
con las aberturas de la olla.
En algunas áreas, es posible que el
QLYHOGHFRUULHQWHYROWDMHVHDEDMR
Precaliente el elemento para asar durante 10
minutos.
La temperatura
del horno es
demasiado
caliente o
demasiado fría
La temperatura del horno debe ser
DMXVWDGD
Consulte la sección Funciones Especiales.
El horno no
funciona o parece
no funcionar
Es posible que un fusible de su hogar
se haya quemado o que el disyuntor se
haya desconectado.
Reemplace el fusible o reinicie el disyuntor.
Controles del horno configurados de
forma incorrecta.
Consulte la sección Uso del Horno.
El horno se encuentra en Sabbath
Mode (Modo Sabático)
Verifique que el horno no esté en Sabbath Mode
(Modo Sabático). Consulte la sección Funciones
Especiales.
Sonido de
“chisporroteo” o
“traqueo”
Éste es el sonido de metal
calentándose o enfriándose durante las
funciones de cocción y limpieza..
Esto es normal.

24 49-80824
Antes de
solicitar
el servicio
técnico
&RQVHMRVSDUDOD6ROXFLyQGH3UREOHPDV
Horno de Pared
Problema Causa Posible Qué Hacer
¿Por qué la estufa
hace un sonido de
“clic” cuando uso el
horno?
6XHVWXIDIXHGLVHxDGDSDUDPDQWHQHUXQ
FRQWUROPiVDMXVWDGRVREUHODWHPSHUDWXUD
del horno. Es posible que escuche que los
elementos de calentamiento del horno hagan
sonidos de “clic” con mayor frecuencia que
FRQKRUQRVPiVDQWLJXRVSDUDORJUDUPHMRUHV
resultados durante los ciclos de horneado,
asado, convección y limpieza automática.
Esto es normal.
El reloj y el
temporizador no
funcionan
Es posible que un fusible de su hogar se
haya quemado o que el disyuntor se haya
desconectado.
Reemplace el fusible o reinicie el
disyuntor.
La luz del horno no
funciona
/DOiPSDUDHVWiIORMDRSUHVHQWDGHIHFWRV Llame al servicio técnico.
La luz de funcionamiento del interruptor está
rota.
Llame al servicio técnico.
El modo de limpieza
automática del
horno no funciona
La temperatura del horno es demasiado
caliente como para configurar la limpieza
automática.
Espere a que el horno se enfríe y reinicie
los controles.
Los controles del horno están configurados de
forma incorrecta.
Consulte la sección de Limpieza del
Horno.
Exceso de humo
durante un ciclo de
limpieza
Suciedad o grasa excesiva. Presione la tecla Cancel/Off (Cancelar/
Apagar) Abra las ventanas para liberar
el humo en la habitación. Espere hasta
que la luz de la función LOCKED
(Bloqueado) desaparezca. Limpie el
exceso de suciedad y reinicie el ciclo de
limpieza.
Humo excesivo al
asar
La comida está demasiado cerca del
quemador.
%DMHODSRVLFLyQGHOHVWDQWHFRQFRPLGD
La puerta del horno
no se abrirá luego
de un ciclo de
limpieza
El horno está demasiado caliente. Espere a que el horno se enfríe por
GHEDMRGHODWHPSHUDWXUDGHEORTXHR
El horno no limpia
luego de un ciclo de
limpieza
Los controles del horno están configurados de
forma incorrecta.
Consulte la sección de Limpieza del
Horno.
El horno estaba demasiado sucio. Limpie derrames excesivos antes de
iniciar el ciclo de limpieza. Es posible
que, en hornos con mucha suciedad, sea
necesario usar la limpieza automática
nuevamente o usarla durante un período
de tiempo más prolongado.
“DOOR
” titila en la
pantalla
El ciclo de limpieza automática fue
seleccionado pero la puerta no está cerrada.
Cierre la puerta del horno. Espere a que
la puerta del horno finalice el bloqueo.
"DOOR
" (Puerta) titilará mientras la puerta
del horno está bloqueada para iniciar el ciclo
de autolimpieza y vapor.
Esto es normal.
La luz “DOOR
” está encendida
cuando desea
cocinar.
La puerta del horno está bloqueada debido
a que la temperatura interior del horno no
GHVFHQGLySRUGHEDMRGHODWHPSHUDWXUDGH
bloqueo.
Presione la tecla Cancel/Off (Cancelar/
Apagar)'HMHTXHHOKRUQRVHHQIUtH
“F – y un número
o letra” titila en la
pantalla
Tiene un código de error de función. Presione la tecla Cancel/Off (Cancelar/
Apagar) Permita que el horno se enfríe
durante una hora. Vuelva a poner el horno
en funcionamiento.
Si el código de función se repite. Desconecte totalmente la corriente de la
cocina durante por lo menos 30 minutos y
vuelva a conectar la misma. Si el código
de error de función se repite, llame al
servicio técnico.

49-80824 25
Antes de
solicitar
el servicio
técnico
&RQVHMRVSDUDOD6ROXFLyQGH3UREOHPDV
Horno de Pared
Problema Causa Posible Qué Hacer
La pantalla queda en
blanco
Es posible que un fusible de su hogar se
haya quemado o que el disyuntor se haya
desconectado.
Reemplace el fusible o reinicie el
disyuntor.
(OUHORMHVWiDSDJDGR Consulte la sección Funciones
Especiales.
El horno se encuentra en Sabbath Mode
(Modo Sabático)..
Verifique que el horno no esté en Sabbath
Mode (Modo Sabático). Consulte la
sección Funciones Especiales.
Corte de corriente, el
reloj titila
Corte o exceso de corriente
5HLQLFLHHOUHORM6LHOKRUQRHVWXYRHQXVR
deberá reiniciar el mismo presionando
la tecla Cancel/ Off (Cancelar/ Apagar)
FRQILJXUDQGRHOUHORM\UHLQLFLDQGRFXDOTXLHU
función de cocción.
Olor a “quemado”
o “aceite” desde la
ventilación
Esto es normal en un horno nuevo y
desaparecerá con el tiempo.
Para acelerar el proceso, configure un
ciclo de limpieza automática por un
mínimo de 3 horas. Consulte la sección
de Limpieza del Horno.
Olor fuerte Un olor en la aislación alrededor del interior
del horno es normal desde las primeras veces
en que el horno es usado.
Esto es temporario y desaparecerá luego
de varios usos o de un ciclo de limpieza
automática.
Ruido del ventilador Es posible que un ventilador de enfriamiento
se active automáticamente.
Esto es normal. El ventilador de
enfriamiento se encenderá para enfriar las
partes internas. Es posible que funcione
hasta durante una hora y media, una vez
que el horno se haya apagado.
La puerta de vidrio
del horno parece
estar “teñida” o
tener un color
“arcoíris”. ¿Es esto
un defecto?
No. El vidrio del horno interno está cubierto
FRQXQDEDUUHUDGHFDORUTXHUHIOHMDHVWH
último nuevamente hacia el horno, a fin de
evitar la pérdida de calor y de mantener fría la
puerta externa mientras se hornea.
(VWRHVQRUPDO%DMRFLHUWDVOXFHV\
ángulos, es posible que visualice esta
tinta o arcoíris.
A veces el horno
tarda más en
precalentarse a la
misma temperatura
Utensilio o comida en el horno El utensilio o la comida en el horno hará
que éste tarde más en precalentarse.
Retire estos artículos para reducir el
tiempo de precalentamiento.
Número de estantes en el horno Agregar más estantes al horno hará que
éste tarde más en precalentarse. Retire
algunos estantes.
Diferentes modos de cocción Los diferentes modos de cocción utilizan
diferentes métodos de precalentamiento
para calentar el horno en un modo de
cocción específico. Algunos modos
tardarán más que otros (tales como:
horneado por convección múltiple).
El horno no funciona
en forma remota
3UREOHPDVHQHOHQUXWDGRUQRKD\VHxDO
inalámbrica, etc.
Para solicitar asistencia con la
conectividad de red inalámbrica,
comuníquese al 800.444.1845.
El horno no está conectado.

26 49-80824
Garantía
Horno de Pared
GARANTÍA DE SU HORNO DE PARED DE MONOGRAM
Abroche su recibo aquí. Para acceder al servicio técnico de acuerdo con la
garantía deberá contar con la prueba de la fecha original de compra.
EXCLUSIÓN DE GARANTÍAS IMPLÍCITAS
Su único y exclusivo recurso es la reparación del producto como se establece en la presente Garantía Limitada. Las
JDUDQWtDVLPSOtFLWDVLQFOX\HQGRJDUDQWtDVGHFRPHUFLDELOLGDG\DSWLWXGSDUDXQREMHWLYRSDUWLFXODUVHHQFXHQWUDQ
OLPLWDGDVDXQDxRRHOSHUtRGRPiVFRUWRSHUPLWLGRSRUODOH\
ELEMENTOS
CUBIERTOS
Desde la Fecha
de la Compra
Original
Garantías Extendidas: Adquiera una garantía extendida de Monogram y conozca los descuentos
especiales que están disponibles mientras su garantía aún está vigente. Visite Monogram.com o
comuníquese al 800.444.1845 para conocer más sobre cómo hacer su adquisición.
Garante: GE Appliances, a Haier company
(VWDJDUDQWtDVHH[WLHQGHDOFRPSUDGRURULJLQDO\DFXDOTXLHUGXHxRVXEVLJXLHQWHGHSURGXFWRVFRPSUDGRVSDUDXVR
KRJDUHxRGHQWURGH((886LHOSURGXFWRVHHQFXHQWUDHQXQiUHDGRQGHQRVHHQFXHQWUDGLVSRQLEOHXQSURYHHGRU
DXWRUL]DGRGHOVHUYLFLRWpFQLFRXVWHGVHUiUHVSRQVDEOHSRUHOFRVWRGHXQYLDMHRVHOHSRGUiUHTXHULUTXHWUDLJDHO
producto a una ubicación Autorizada del Servicio Técnico. En Alaska, la garantía excluye el costo de envío o llamadas
GHOVHUYLFLRDVXKRJDU$OJXQRVHVWDGRVQRSHUPLWHQODH[FOXVLyQROLPLWDFLyQGHGDxRVIRUWXLWRVRFRQVHFXHQWHV(VWD
garantía le da derechos legales específicos y es posible que tenga otros derechos legales que varían entre un estado y
otro. Para conocer cuáles son sus derechos legales, consulte a la oficina de asuntos del consumidor local o estatal o al
Fiscal de su estado.
QUÉ NO
CUBRE LA
GARANTÍA
Ŷ9LDMHVGHOWpFQLFRGHOVHUYLFLRDVXKRJDUSDUD
enseñarle sobre cómo usar el producto.
Ŷ,QVWDODFLyQHQWUHJDRPDQWHQLPLHQWRLQDGHFXDGRV
Ŷ)DOODVGHOSURGXFWRHQFDVRGHDEXVRPDOXVR
modificación o uso para propósitos diferentes al
original o uso comercial.
Ŷ5HHPSOD]RGHIXVLEOHVGHODFDVDRUHLQLFLRGH
disyuntores.
Ŷ'DxRVRFDVLRQDGRVVREUHHOSURGXFWRSRUDFFLGHQWH
incendio, inundaciones o catástrofes naturales.
Ŷ'DxRVLQFLGHQWDOHVRFRQVHFXHQWHVFDXVDGRVSRU
posibles defectos sobre este producto.
Ŷ'DxRFDXVDGRGHVSXpVGHODHQWUHJD
Ŷ3URGXFWRQRDFFHVLEOHSDUDEULQGDUHOVHUYLFLR
requerido.
Ŷ6ROLFLWHHOVHUYLFLRWpFQLFRSDUDUHSDUDURUHHPSOD]DU
las lámparas, excepto las lámparas LED.
GARANTÍA LIMITADA DE DOS AÑOS
3RUGRVDxRVGHVGHODIHFKDRULJLQDOGHFRPSUDOHEULQGDUHPRVVLQFRVWRSLH]DV\WUDEDMRVGHOVHUYLFLRWpFQLFRHQVX
hogar para la reparación o reemplazo de cualquier parte del horno que presente fallas debido a defectos de fabricación.
Todo el servicio de garantía es provisto por nuestros Centros de Servicio de Fabricación, o un técnico autorizado de
Customer Care®. Para programar una visita del servicio técnico a través de Internet, visítenos en Monogram.com o
comuníquese al Servicio Preferido de Monogram (Monogram Preferred Service) (800.444.1845). Cuando llame para
solicitar el servicio, tenga los números de serie y modelo disponibles.
3DUDUHDOL]DUHOVHUYLFLRWpFQLFRGHVXHOHFWURGRPpVWLFRVHSRGUiUHTXHULUHOXVRGHGDWRVGHOSXHUWRGHDERUGDMHSDUD
su diagnóstico. Esto da al técnico del servicio de fábrica la habilidad de diagnosticar de forma rápida cualquier problema
FRQVXHOHFWURGRPpVWLFR\D\XGDD0RQRJUDPDPHMRUDUVXVSURGXFWRVDOEULQGDUOHD0RQRJUDPODLQIRUPDFLyQVREUH
su electrodoméstico. Si no desea que los datos de su electrodoméstico sean enviados a Monogram, solicitamos que le
indique a su técnico no entregar los datos a Monogram en el momento del servicio.

49-80824 27
Accesorios
Olla para Asar Extra Grande (17 ¾ ” x 1 ¼” x 19 ½ “)
Piezas
Estantes del horno
Elementos del horno
Lámparas de luz
Sonda
Suministros de Limpieza
Limpiadores de Acero Inoxidable CitriShine™
Limpiador de Electrodomésticos de Acero Inoxidable CeramaBryte
Lubricante de Grafito
Accesorios
Horno de Pared
Accesorios
¿Busca Algo Más?
¡Monogram ofrece una variedad de accesorios
para mejorar sus experiencias de cocción y
mantenimiento!
Para acceder a números telefónicos e información
GHVLWLRV:HEFRQVXOWHODSiJLQDGH6RSRUWHSDUD
el Consumidor.
Estos y otros productos están disponibles:

28 49-80824
Con la adquisición de su nuevo electrodoméstico Monogram, esté seguro
de que si alguna vez necesita información o asistencia de Monogram, allí
estaremos. ¡Todo lo que tiene que hacer es llamar!
Registre su
Electrodoméstico
¡Registre su electrodoméstico nuevo a través de Internet, según su conveniencia! Un registro puntual de su
SURGXFWRSHUPLWLUiXQDPHMRUFRPXQLFDFLyQ\XQVHUYLFLRPiVSXQWXDOGHDFXHUGRFRQORVWpUPLQRVGHVX
JDUDQWtDHQFDVRGHVXUJLUODQHFHVLGDG7DPELpQSXHGHHQYLDUXQDFDUWDHQODWDUMHWDGHLQVFULSFLyQSUHLPSUHVD
que se incluye con el material embalado. En EE.UU.: Monogram.com
Servicio
Programado
El servicio de reparación de expertos de Monogram está a sólo un paso de su puerta. Conéctese a través de
,QWHUQHW\SURJUDPHVXVHUYLFLRDVXFRQYHQLHQFLDFXDOTXLHUGtDGHODxR
En EE.UU.: Monogram.com
o comuníquese al 800.444.1845 durante el horario de atención comercial.
Garantías
Extendidas
Conectividad
Remota
Piezas y
Accesorios
Adquiera una garantía extendida de GE Appliances y conozca los descuentos especiales que están disponibles
mientras su garantía aún está vigente.
En EE.UU.: Monogram.com
o comuníquese al 800.444.1845 durante el horario de atención comercial.
Para solicitar asistencia para la conectividad de red inalámbrica (para modelos con acceso remoto),
visite nuestro sitio web en Monogram.com o comuníquese al 800.444.1845 en EE.UU.
Aquellos individuos calificados para realizar el servicio técnico de sus propios electrodomésticos podrán solicitar
HOHQYtRGHSLH]DVRDFFHVRULRVGLUHFWDPHQWHDVXVKRJDUHVVHDFHSWDQODVWDUMHWDV9,6$0DVWHU&DUG\
Discover). Ordene hoy a través de Internet durante las 24 horas, todos los días.
En EE.UU.: Monogram.com
o de forma telefónica al 800.444.1845 durante el horario de atención comercial.
Las instrucciones que figuran en este manual cubren los procedimientos que serán realizados por cualquier
usuario. Otros servicios técnicos generalmente deben ser derivados a personal calificado del servicio. Se
deberá tener cuidado, ya que una reparación indebida podrá hacer que el funcionamiento no sea seguro.
Soporte para el Consumidor
Horno de Pared
49-80824
12-17 GEA
Impreso en Estados Unidos
-
 1
1
-
 2
2
-
 3
3
-
 4
4
-
 5
5
-
 6
6
-
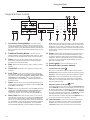 7
7
-
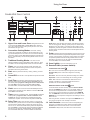 8
8
-
 9
9
-
 10
10
-
 11
11
-
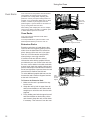 12
12
-
 13
13
-
 14
14
-
 15
15
-
 16
16
-
 17
17
-
 18
18
-
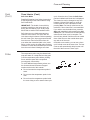 19
19
-
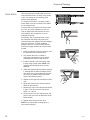 20
20
-
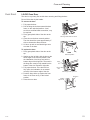 21
21
-
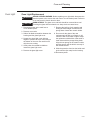 22
22
-
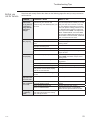 23
23
-
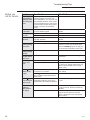 24
24
-
 25
25
-
 26
26
-
 27
27
-
 28
28
-
 29
29
-
 30
30
-
 31
31
-
 32
32
-
 33
33
-
 34
34
-
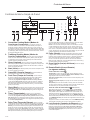 35
35
-
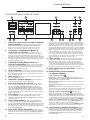 36
36
-
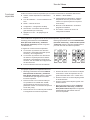 37
37
-
 38
38
-
 39
39
-
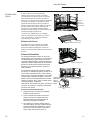 40
40
-
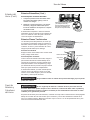 41
41
-
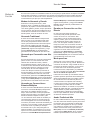 42
42
-
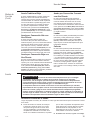 43
43
-
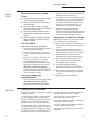 44
44
-
 45
45
-
 46
46
-
 47
47
-
 48
48
-
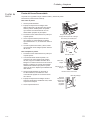 49
49
-
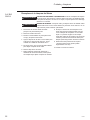 50
50
-
 51
51
-
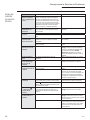 52
52
-
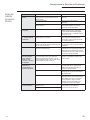 53
53
-
 54
54
-
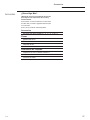 55
55
-
 56
56


GE Monogram ZET9550SHSS DL d1d28d7f47f074cfe4435c6e7a60
- Categoría
- Medir, probar
- Tipo
- DL d1d28d7f47f074cfe4435c6e7a60
en otros idiomas
- English: GE Monogram ZET9550SHSS