
DSC-
RX100/RX100M2
49mm
49mm
OFF
1
2
3
4
1
2
OFF
-2
3
-3
4
5
1
6
-6
7
-7
-1
OFF
53 mm 9 mm
12 g
1 1
1 1
/Operating Instructions/Mode d’emploi/
Manual de instrucciones/Bedienungsanleitung/
Gebruiksaanwijzing/Bruksanvisning/Istruzioni per l’uso/
Manual de instruções/
Οδηγίες λειτουργίας
/Instrukcja
obsługi/Návod na obsluhu/Használati útmutató/
Instrucţiuni
de utilizare
/Betjeningsvejledning/Návod k obsluze/
Käyttöohjeet/
Инструкция по эксплуатации
/
/
/
/
VFA-49R1
Filter Adaptor
Adaptateur de filtre
© 2013 Sony Corporation Printed in China
4-472-087-01 (1)
2
3
6
Before operating the product, please read this manual
thoroughly and retain it for future reference.
< Notice for the customers in the
countries applying EU Directives >
This product has been manufactured by or on behalf
of Sony Corporation, 1-7-1 Konan Minato-ku Tokyo,
108-0075 Japan. Inquiries related to product compliance
based on European Union legislation shall be addressed to
the authorized representative, Sony Deutschland GmbH,
Hedelfinger Strasse 61, 70327 Stuttgart, Germany. For any
service or guarantee matters, please refer to the addresses
provided in the separate service or guarantee documents.
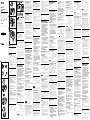
Features
The VFA-49R1 is a Filter Adaptor made especially for
DSC-RX100/RX100M2 Sony Digital Still Cameras
(referred to below as “camera”).
Attaching the filter adaptor to the camera enables
attachment of a 49 mm diameter filter.
Notes on Use
When using a flash with the camera, the filter adaptor
may partially block the light of the flash in certain
shooting situations. In this case, remove the filter
adaptor.
When carrying the camera, remove the filter adaptor.
The diameter of the filter adaptor’s filter screw is 49
mm.
Do not lift or move the camera main body by the filter
adaptor.
Do not attach anything other than a filter to the filter
adaptor.
Be careful not to apply an excessive force to the edge of
the filter adaptor or it may come away from the lens.
If the power of the camera is turned off with the filter
adaptor attached, the lens of the camera retracts. Be
careful not to catch your finger between the filter
adaptor and the camera.
Identifying the Parts
1 Filter adaptor
2 Base ring
3 Guide ring
4 Remover
Attaching the Filter
Adaptor to the Camera
1 Wipe any dirt from the rim of the lens where
the base ring is to be attached.
2 Turn off the power of the camera and then
put the guide ring on the lens part of the
camera. (See illustration -2)
3 Remove the release paper from the base
ring. Fit the base ring into the center hole of
the guide ring. (See illustration -3)
4 Remove the guide ring.
5 Press the surface of the base ring with your
finger to firmly attach it.
Adhesion is not stable for several hours after attaching
the base ring.
Start using the camera again about one day after
attaching the base ring.
6 Attach the filter (sold separately) to the filter
adaptor. (See illustration -6)
7 Fit the filter adaptor into the base ring until
it clicks into place. (See illustration -7)
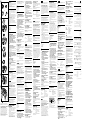
Detaching the Filter Adaptor
(See illustration
)
Press the knob of the filter adaptor (-1) to unlock it, and
then remove it from the base ring.
Detaching the Base Ring
(See illustration
)
Turn off the power of the camera. Wind the remover
between the base ring and lens barrel and pull it slowly to
remove the base ring.
Notes
The removed base ring cannot be reused because its
adhesive force is reduced.
Specifications
Dimensions (Approx.) 53 mm × 9 mm
(Diameter × Length)
(2 1/8 in. × 3/8 in.)
Mass Approx. 12 g (0.5 oz)
Included items Filter adaptor (1), Base ring (1),
Guide ring (1), Remover (1),
Set of printed documentation
Design and specifications are subject to change without
notice.
Avant d’utiliser ce produit, veuillez lire cette notice avec
attention et la conserver pour toute référence future.
1
3
2
4
< Avis aux consommateurs des pays
appliquant les Directives UE >
Ce produit a été fabriqué par ou pour le compte de Sony
Corporation, 1-7-1 Konan Minato-ku Tokyo, 108-0075
Japon. Toutes les questions relatives à la conformité des
produits basées sur la législation européenne doivent être
adressées à son représentant, Sony Deutschland GmbH,
Hedelfinger Strasse 61, 70327 Stuttgart, Allemagne.
Pour toute question relative au Service Après-Vente ou
à la Garantie, merci de bien vouloir vous référer aux
coordonnées qui vous sont communiquées dans les
documents « Service (SAV) » ou Garantie.
Caractéristiques
Le VFA-49R1 est un adaptateur de filtre conçu
spécialement pour les appareils photo numériques Sony
DSC-RX100/RX100M2 (désignés ci-dessous par le terme
appareil photo ).
En fixant cet adaptateur de filtre à l’appareil photo vous
pourrez rattacher un filtre de 49 mm de diamètre.
Remarques sur l’emploi
Lorsqu’un flash est utilisé avec l’appareil photo,
l’adaptateur de filtre peut bloquer partiellement la
lumière du flash dans certaines situations de prise de
vue. Si c’est le cas, déposez l’adaptateur de filtre.
Pour transporter l’appareil photo, déposez l’adaptateur
de filtre.
Le diamètre de filetage de l’adaptateur de filtre est de 49
mm.
Ne soulevez pas et ne déplacez pas l’appareil photo en le
prenant par l’adaptateur de filtre.
Rattachez un filtre et rien d’autre à l’adaptateur de filtre.
Veillez à ne pas exercer de force excessive sur le bord
de l’adaptateur de filtre car il pourrait se détacher de
l’objectif.
Si l’alimentation de l’appareil photo est coupée quand
l’adaptateur de filtre est rattaché, l’objectif de l’appareil
photo se rétracte. Faites attention de ne pas vous laisser
prendre le doigt entre l’adaptateur de filtre et l’appareil
photo.
Description des éléments
1 Adaptateur de filtre
2 Bague d’appui
3 Bague de guidage
4 Extracteur
Fixation de l’adaptateur
de filtre à l’appareil photo
1 Nettoyez le bord de l’objectif à l’endroit où
la bague d’appui doit être posée.
2 Éteignez l’appareil photo puis mettez la
bague de guidage sur l’objectif de l’appareil
photo. (Voir l’illustration -2)
3 Détachez le papier de la bague d’appui.
Insérez la bague d’appui dans le trou central
de la bague de guidage. (Voir l’illustration
-3)
4 Déposez la bague de guidage.
5 Appuyez sur la surface de la bague d’appui
avec le doigt pour bien la fixer.
L’adhésion n’est résistante que plusieurs heures après la
fixation de la bague d’appui.
N’utilisez l’appareil photo qu’environ un jour après la
fixation de la bague d’appui.
6 Posez le filtre (vendu séparément) sur
l’adaptateur de filtre. (Voir l’illustration
-6)
7 Insérez l’adaptateur de filtre dans la bague
d’appui de sorte qu’il s’encliquette. (Voir
l’illustration -7)
Dépose de l’adaptateur de filtre
(Voir l’illustration
)
Appuyez sur le bouton de l’adaptateur de filtre (-1) pour
le débloquer et détachez-le de la bague d’appui.
Dépose de la bague d’appui
Voir l’illustration
)
Éteignez l’appareil photo. Enroulez l’extracteur entre la
bague d’appui et le barillet de l’objectif et tirez-le lentement
pour détacher la bague d’appui.
Remarques
Une fois détachée, la bague d’appui ne peut pas être
réutilisée car son adhérence est réduite.
Spécifications
Dimensions (environ) 53 mm × 9 mm
(Diamètre × Longueur)
(2 1/8 po. × 3/8 po.)
Poids Environ 12 g (0,5 oz)
Articles inclus Adaptateur de filtre (1), Bague
d’appui (1), Bague de guidage (1),
Extracteur (1), Jeu de documents
imprimés
La conception et les spécifications peuvent être modifiées
sans préavis.
Antes de utilizar el producto, lea detenidamente este
manual y consérvelo para futuras referencias.
< Aviso para los clientes de países en los
que se aplican las directivas de la UE >
Este producto ha sido fabricado por, o en nombre de Sony
Corporation, 1-7-1 Konan Minato-ku Tokyo, 108-0075
Japón. Las consultas relacionadas con la conformidad
del producto basadas en la legislación de la Unión
Europea deben dirigirse al representante autorizado,
Sony Deutschland GmbH, Hedelfinger Strasse 61, 70327
Stuttgart, Alemania. Para cualquier asunto relacionado con
el servicio o la garantía, por favor diríjase a la dirección
indicada en los documentos de servicio o garantía
adjuntados con el producto.
Características
El VFA-49R1 es un adaptador para filtro hecho
especialmente para las cámaras fotográficas digitales DSC-
RX100/RX100M2 Sony (a partir de ahora “cámara”).
La fijación del adaptador para filtro a la cámara permite
fijar un filtro de 49 mm de diámetro.
Notas sobre la utilización
Cuando utilice un flash con la cámara, el adaptador para
filtro puede bloquear parcialmente la luz del flash en
ciertas situaciones de fotografiado. En este caso, retire el
adaptador para filtro.
Cuando transporte la cámara, retire el adaptador para
filtro.
El diámetro de la rosca del filtro del adaptador para
filtro es de 49 mm
No levante ni mueva el cuerpo principal de la cámara
por el adaptador para filtro.
No fije nada que no sea un filtro al adaptador para filtro.
Tenga cuidado para no aplicar fuerza excesiva al borde
del adaptador para filtro ya que podría separarse del
objetivo.
Si desconecta la alimentación de la cámara con el
adaptador para filtro instalado, el objetivo de la cámara
se replegará. Tenga cuidado de no pillarse los dedos
entre el adaptador para filtro y la cámara.
Identificación de las
partes
1 Adaptador para filtro
2 Aro base
3 Aro guía
4 Extractor
Fijación del adaptador
para filtro a la cámara
1 Elimine la suciedad del borde el objetivo
donde vaya a fijar el aro base.
2 Desconecte la alimentación de la cámara
y después ponga el aro guía en la parte
del objetivo de la cámara. (Consulte la
ilustración -2)
3 Retire el papel protector del aro base. Fije
el aro base al orificio central del aro guía.
(Consulte la ilustración -3)
4 Retire el aro guía.
5 Presione la superficie del aro base con su
dedo para fijarlo firmemente.
La adhesión no será estable durante varias horas
después de de haber fijado el aro base.
Comience a utilizar de nuevo la cámara un día
aproximadamente después de haber fijado el aro base.
6 Fije el filtro (vendido aparte) al adaptador
para filtro. (Consulte la ilustración -6)
7 Fije el adaptador para filtro en el aro base
hasta que chasquee en su lugar. (Consulte la
ilustración -7)
Extracción del adaptador para filtro
(Consulte la ilustración
)
Presione la perilla del adaptador para filtro (-1) para
desbloquearlo, y retírelo del aro base.
Extracción del aro base
(Consulte la ilustración
)
Desconecte la alimentación de la cámara. Bobine el
extractor entre el aro base y el barrilete del objetivo y tire
lentamente de él para retirar el aro base.
Notas
El aro base retirado no podrá volver a utilizarse debido a la
reducción de su fuerza adhesiva.
Especificaciones
Dimensiones (Aprox.) 53 mm × 9 mm
(Diámetro × Longitud)
Peso Aprox. 12 g
Elementos incluidos Adaptador para filtro (1), Aro base
(1), Aro guía (1), Extractor (1),
Juego de documentación impresa
El diseño y las especificaciones están sujetos a cambio sin
previo aviso.
Lesen Sie diese Anleitung vor Inbetriebnahme des
Produkts bitte genau durch und bewahren Sie sie zum
späteren Nachschlagen sorgfältig auf.
< Hinweis für Kunden in Ländern, in
denen EU-Richtlinien gelten >
Dieses Produkt wurde von oder für Sony Corporation,
1-7-1 Konan Minato-ku Tokio, 108-0075 Japan hergestellt.
Bei Fragen zur Produktkonformität auf Grundlage der
Gesetzgebung der Europäischen Union kontaktieren Sie
bitte den Bevollmächtigten Sony Deutschland GmbH,
Hedelfinger Strasse 61, 70327 Stuttgart, Deutschland.
Für Kundendienst oder Garantieangelegenheiten
wenden Sie sich bitte an die in den Kundendienst- oder
Garantiedokumenten genannten Adressen.
Merkmale und Funktionen
Der VFA-49R1 ist ein Filter-Adapter, speziell für die Sony
Digital-Standbildkameras DSC-RX100/RX100M2 (im
Folgenden als „Kamera“ bezeichnet) hergestellt.
Bringen Sie den Filter-Adapter an der Kamera an, um
einen Filter mit 49 mm Durchmesser verwenden zu
können.
Hinweise zur Verwendung
Bei Verwendung eines Blitzes mit der Kamera kann
der Filter-Adapter das Blitzlicht in bestimmten
Aufnahmesituationen blockieren. Nehmen Sie in diesem
Fall den Filter-Adapter wieder ab.
Nehmen Sie beim Tragen der Kamera den Filter-
Adapter ab.
Der Durchmesser der Filterschraube des Filter-Adapters
ist 49 mm.
Heben Sie die Kamera nicht am Hauptkörper oder
Filter-Adapter an.
Bringen Sie keine anderen Teile am Filter-Adapter an.
Achten Sie darauf, keine zu starke Kraft auf die Kante
des Filter-Adapters anzuwenden, da er sich sonst vom
Objektiv lösen kann.
Wenn die Kamera bei angebrachtem Filter-Adapter
ausgeschaltet wird, wird das Objektiv der Kamera
eingefahren. Achten Sie darauf, sich nicht mit dem
Finger zwischen dem Filter-Adapter und der Kamera zu
verfangen.
Identifikation der Teile
1 Filter-Adapter
2 Basisring
3 Führungsring
4 Abnehmer
Anbringen des Filter-
Adapters an der Kamera
1 Wischen Sie jeglichen Schmutz vom
Rand des Objektivs ab, wo der Basisring
angebracht werden soll.
2 Schalten Sie die Stromversorgung
der Kamera aus, und schieben Sie den
Führungsring auf den Objektivteil der
Kamera. (Siehe Abbildung -2)
3 Nehmen Sie das Deckpapier vom
Basisring ab. Setzen Sie den Basisring in
das Mittenloch am Führungsring. (Siehe
Abbildung -3)
4 Nehmen Sie den Führungsring ab.
5 Drücken Sie die Oberfläche des Basisrings
mit Ihrem Finger, um ihn fest anzubringen.
Die Anhaftung ist mehrere Stunden nach dem
Anbringen des Basisrings lang nicht stabil.
Verwenden Sie die Kamera erst nach Ablauf eines Tages
nach dem Anbringen des Basisrings.
6 Bringen Sie den Filter (getrennt erhältlich)
an den Filter-Adapter an. (Siehe Abbildung
-6)
7 Setzen Sie den Filter-Adapter in den
Basisring, bis er hörbar einrastet. (Siehe
Abbildung -7)
Abnehmen des Filter-Adapters
(siehe Abbildung
)
Drücken Sie den Knopf des Filter-Adapters (-1) zum
Lösen und nehmen Sie ihn dann vom Basisring ab.
Abnehmen des Basisrings
(siehe Abbildung
)
Schalten Sie die Stromversorgung der Kamera aus.
Wickeln Sie den Abnehmer zwischen dem Basisring und
dem Objektivtubus auf und ziehen Sie ihn langsam zum
Abnehmen des Basisrings.
Hinweise
Der abgenommene Basisring kann nicht wieder verwendet
werden, weil seine Anhaftkraft verringert ist.
Technische Daten
Abmessungen (ca.) 53 mm × 9 mm
(Durchmesser × Länge)
Gewicht Ca. 12 g
Mitgeliefertes Zubehör Filter-Adapter (1), Basisring (1),
Führungsring (1), Abnehmer (1),
Anleitungen
Änderungen bei Design und technischen Daten bleiben
ohne vorherige Ankündigung vorbehalten.
Voordat u dit product gebruikt, dient u deze handleiding
grondig te lezen en te bewaren voor toekomstige naslag.
< Kennisgeving voor klanten in
de landen waar EU-richtlijnen van
toepassing zijn >
Dit product werd geproduceerd door of in opdracht
van Sony Corporation, 1-7-1 Konan Minato-ku Tokyo,
108-0075 Japan. Vragen met betrekking tot product
conformiteit gebaseerd op EU-wetgeving kunnen worden
gericht aan de gemachtigde vertegenwoordiger, Sony
Deutschland GmbH, Hedelfinger Strasse 61, 70327
Stuttgart, Duitsland. Voor service- of garantiezaken
verwijzen wij u door naar de adressen in de afzonderlijke
service of garantie documenten.
Kenmerken
De VFA-49R1 is een filteradapter speciaal gemaakt voor
Sony digitale fotocamera’s DSC-RX100/RX100M2 (hierna
genoemd "camera").
Door de filteradapter aan de camera te bevestigen krijgt u
een filterdoorsnede van 49 mm.
Opmerkingen over het
gebruik
Wanneer u een flitser bij de camera gebruikt, kan
de filteradapter het licht van de flitser in bepaalde
opnamesituaties gedeeltelijk blokkeren. Verwijder in dat
geval de filteradapter.
Verwijder de filteradapter wanneer u de camera draagt.
De doorsnede van de schroef van de filteradapter van de
filter is 49 mm.
Til of beweeg de behuizing van de camera niet via de
filteradapter.
Bevestig niets anders dan een filter aan de filteradapter.
Zorg ervoor dat u geen overmatige kracht uitoefent op
de rand van de filteradapter omdat deze anders kan
losraken van de lens.
Als de camera uitgaat terwijl de filteradapter is
bevestigd, wordt de lens van de camera ingetrokken.
Zorg ervoor dat uw vinger niet bekneld raakt tussen de
filteradapter en de camera.
Vaststellen van de
onderdelen
1 Filteradapter
2 Basisring
3 Geleidering
4 Verwijderaar
De filteradapter aan de
camera bevestigen
1 Veeg vuil van de rand van de lens waar de u
de basisring wilt bevestigen.
2 Zet de camera uit en plaats de geleidering
op het lensgedeelte van de camera. (Zie
afbeelding -2)
3 Verwijder het verpakkingspapier van
de basisring. Plaats de basisring in het
middengat van de geleidering. (Zie
afbeelding -3)
4 Verwijder de geleidering.
5 Druk op het oppervlak van de basisring met
uw vinger om deze stevig te bevestigen.
De hechting is gedurende meerdere uren niet stabiel na
het bevestigen van de basisring.
Start pas met het gebruiken van uw camera één dag na
het bevestigen van de basisring.
6 Bevestig de filter (apart verkocht) aan de
filteradapter. (Zie afbeelding -6)
7 Plaats de filteradapter in de basisring tot
deze op zijn plaats klikt. (Zie afbeelding
-7)
De filteradapter losmaken
(zie afbeelding
)
Druk op de knop van de filteradapter (-1) om deze te
ontgrendelen en verwijder hem van de basisring.
De basisring losmaken
(zie afbeelding
)
Zet de camera uit. Draai de verwijderaar tussen de
basisring en de lenshouder en trek er langzaam aan om de
basisring te verwijderen.
Opmerkingen
De verwijderde basisring kan niet opnieuw worden
gebruikt omdat de hechtkracht is afgenomen.
Technische gegevens
Afmetingen (Ongeveer) 53 mm × 9 mm
(doorsnede × lengte)
Gewicht Ongeveer 12 g
Bijgeleverde toebehoren Filteradapter (1), Basisring (1),
Geleidering (1), Verwijderaar (1),
Handleiding en documentatie
Wijzigingen in ontwerp en technische gegevens
voorbehouden, zonder kennisgeving.
Läs noga igenom denna bruksanvisning innan produkten
tas i bruk. Spara bruksanvisningen.
< Anmärkning för kunder i de länder
som följer EU-direktiv >
Denna produkt har tillverkats av eller på uppdrag av Sony
Corporation, 1-7-1 Konan Minato-ku Tokyo, 108-0075
Japan. Frågor som rör produkternas överensstämmelse,
grundar sig på Europeiska unionens lagstiftning skall
ställas till den auktoriserade representanten, Sony
Deutschland GmbH, Hedelfinger Strasse 61, 70327
Stuttgart, Tyskland. För service och garantiärenden,
vänligen se de adresser som finns i de separata service och
garantihandlingarna.
Egenskaper
VFA-49R1 är en filteradapter gjord speciellt för DSC-
RX100/RX100M2 Sony digitala stillbildskameror (nedan
kallad ”kamera”).
När filteradaptern monteras på kameran går det att
montera ett filter på 49 mm diameter.
Att tänka på vid användning
När en blixt används med kameran, kan
filteradaptern delvis blockera ljuset från blixten i vissa
tagningssituationer. Ta i sådant fall bort filteradaptern.
När du bär kameran, ta bort filteradaptern.
Diametern på filteradapterns filtergänga är 49 mm.
Lyft inte och flytta inte kamerahuset i filteradaptern.
Montera inte någonting annat än ett filter på
filteradaptern.
Var noga med att inte utsätta kanten på filteradaptern
för alltför hårt tryck, annars kan den lossna från
objektivet.
Om strömmen till kameran stängs av med filteradaptern
monterad, skjuts kamerans objektiv in. Var försiktig så
att fingrarna inte kommer i kläm mellan filteradaptern
och kameran.
Delarnas namn
1 Filteradapter
2 Basring
3 Styrring
4 Borttagare
Montera filteradaptern på
kameran
1 Torka av smuts från kanten av objektivet där
basringen ska fästas.
2 Stäng av strömmen till kameran och sätt
sedan styrringen på kamerans objektivdel.
(Se illustration -2)
3 Ta bort släppapperet från basringen. Passa
in basringen i centrumhålet på styrringen.
(Se illustration -3)
4 Ta bort styrringen.
5 Tryck på basringens yta med fingret för att
fästa den säkert.
Det dröjer flera timmar innan basringen sitter säkert
efter att ha satts på.
Börja använda kameran igen ungefär en dag efter att ha
satt på basringen.
6 Montera filtret (säljs separat) på
filteradaptern. (Se illustration -6)
7 Passa in filteradaptern i basringen tills den
klickar på plats. (Se illustration -7)
Borttagning av filteradaptern
(se illustration
)
Tryck på den utskjutande delen på filteradaptern (-1)
för att låsa upp den, och ta bort den från basringen.
Borttagning av basringen
(se illustration
)
Stäng av strömmen till kameran. Sno borttagaren mellan
basringen och objektivet och dra den långsamt för att ta
bort basringen.
Obs!
Den borttagna basringen kan inte återanvändas eftersom
dess vidhäftningskraft är reducerad.
Specifikationer
Storlek (Ca.) 53 mm × 9 mm (Diameter × längd)
Vikt Ca. 12 g
Inkluderade artiklar Filteradapter (1), Basring (1), Styrring
(1), Borttagare (1), Uppsättning
tryckt dokumentation
Utförande och specifikationer kan ändras utan föregående
meddelande.
Prima di usare il prodotto raccomandiamo di leggere con
attenzione le presenti istruzioni e di conservarle quindi per
ogni futura necessità.
< Avviso per i clienti residenti nei paesi
che applicano le direttive UE >
Questo prodotto è stato fabbricato da o per conto di Sony
Corporation, 1-7-1 Konan Minato-ku Tokyo, 108-0075
Giappone. Eventuali richieste in merito alla conformità
del prodotto in ambito della legislazione Europea,
dovranno essere indirizzate al rappresentante autorizzato,
Sony Deutschland GmbH, Hedelfinger Strasse 61, 70327
Stuttgart, Germania. Per qualsiasi informazione relativa
al servizio o la garanzia, si prega di fare riferimento agli
indirizzi riportati separatamente sui documenti relativi
all’assistenza o sui certificati di garanzia.
Caratteristiche
L’unità VFA-49R1 è un Adattatore per filtro progettato
specificamente per le fotocamera digitali DSC-RX100/
RX100M2 Sony (di seguito indicate con il termine
“fotocamera”).
L’applicazione dell’adattatore per filtro alla fotocamera
consente di applicare un filtro da 49 mm di diametro.
Note sull’uso
Quando si utilizza un flash con la fotocamera,
l’adattatore per filtro potrebbe bloccare parzialmente la
luce del flash in alcune situazioni di ripresa. In tal caso,
rimuovere l’adattatore per filtro.
Quando si trasporta la fotocamera, rimuovere
l’adattatore per filtro.
Il diametro della vite del filtro dell’adattatore per filtro è
di 49 mm.
Non sollevare o spostare il corpo della fotocamera
afferrando l’adattatore per filtro.
Non applicare all’adattatore per filtro nulla oltre al filtro
stesso.
Fare attenzione a non applicare forza eccessiva al bordo
dell’adattatore per filtro, altrimenti potrebbe separarsi
dall’obiettivo.
Se si spegne l’alimentazione della fotocamera con
l’adattatore per filtro applicato, l’obiettivo della
fotocamera si ritrae. Fare attenzione a non pizzicarsi le
dita tra l’adattatore per filtro e la fotocamera.
Identificazione delle parti
1 Adattatore per filtro
2 Anello di base
3 Anello guida
4 Accessorio per rimozione
Applicazione
dell’adattatore per filtro
alla fotocamera
1 Eliminare ogni traccia di sporco dal bordo
dell’obiettivo nel punto in cui andrà
applicato l’anello di base.
2 Spegnere la fotocamera quindi poggiare
l’anello guida sulla parte dell’obiettivo della
fotocamera. (Vedere la figura -2)
3 Rimuovere la carta di protezione dall’anello
di base. Montare l’anello di base sul foro
centrale dell’anello guida. (Vedere la figura
-3)
4 Rimuovere l’anello guida.
5 Premere la superficie dell’anello di base con
il dito per applicarlo saldamente.
L’aderenza non si sarà stabilizzata fino a diverse ore
dopo l’applicazione dell’anello di base.
Iniziare a utilizzare la fotocamera di nuovo un giorno
dopo aver applicato l’anello di base.
6 Applicare il filtro (venduto separatamente)
all’adattatore per filtro. (Vedere la figura
-6)
7 Montare l’adattatore per filtro nell’anello di
base fino a quando scatta in sede. (Vedere la
figura -7)
Distacco dell’adattatore per filtro
(vedere la figura
)
Premere l’aletta dell’adattatore per filtro (-1) per
sbloccarlo, quindi rimuoverlo dall’anello di base.
Distacco dell’anello di base
(vedere la figura
)
Spegnere la fotocamera. Infilare l’accessorio per rimozione
tra l’anello di base e il corpo dell’obiettivo e tirarlo
lentamente per rimuovere l’anello di base.
Note
Non è possibile riutilizzare l’anello di base in quanto la
forza adesiva è ridotta.
Caratteristiche tecniche
Dimensioni (circa) 53 mm × 9 mm
(diametro × lunghezza)
Peso Circa 12 g
Accessori inclusi Adattatore per filtro (1), anello di
base (1), anello guida (1), accessorio
per rimozione (1), corredo di
documentazione stampata
Disegno e caratteristiche tecniche sono soggetti a
modifiche senza preavviso.
Antes de utilizar o produto, leia este manual até ao fim e
guarde-o para consultas futuras.
< Nota para os clientes nos países que
apliquem as Directivas da UE >
Este produto foi fabricado por ou em nome da Sony
Corporation, 1-7-1 Konan Minato-ku Tokyo, 108-0075
Japão. As questões relativas à conformidade dos produtos
com base na legislação da União Europeia devem ser
dirigidas ao representante autorizado, Sony Deutschland
GmbH, Hedelfinger Strasse 61, 70327 Stuttgart, Alemanha.
Para quaisquer assuntos de serviço ou garantia, consulte
os endereços fornecidos nos documentos de serviço ou de
garantia.
Características
O VFA-49R1 é um Adaptador de Filtros fabricado
especificamente para as Câmaras Fotográficas Digitais
DSC-RX100/RX100M2 da Sony (referidas abaixo como
“câmara”).
Montar o adaptador de filtros na câmara permite montar
um filtro com 49 mm de diâmetro.
Notas de utilização
Quando utilizar um flash com a câmara, o adaptador
de filtros pode bloquear parcialmente a luz do flash
em certas condições de disparo. Nesse caso, retire o
adaptador de filtros.
Quando transportar a câmara, retire o adaptador de
filtros.
O diâmetro da rosca para o filtro do adaptador de filtros
é de 49 mm.
Não levante nem mova o corpo principal da câmara
pelo adaptador de filtros.
Não monte outro acessório que não um filtro no
adaptador de filtros.
Tenha cuidado para não aplicar força excessiva na
extremidade do adaptador de filtros ou pode afastar-se
da objectiva.
Se a corrente da câmara for desligada com o adaptador
de filtros fixo, a objetiva da câmara retrai-se. Tenha
cuidado para não entalar os dedos entre o adaptador de
filtros e a câmara.
Identificação das peças
1 Adaptador de filtros
2 Anel de base
3 Anel guia
4 Tira-anéis
Montar o adaptador de
filtros na câmara
1 Remova a sujidade da armação da objectiva
onde o anel de base será montado.
2 Desligue a câmara e, em seguida, coloque o
anel guia na parte da objectiva da câmara.
(Consulte a ilustração -2)
3 Retire o papel de libertação do anel de base.
Instale o anel de base no orifício central do
anel guia. (Consulte a ilustração -3)
4 Retire o anel guia.
5 Pressione a superfície do anel de base com o
dedo para montá-la firmemente.
A aderência não é estável durante várias horas após
montar o anel de base.
Comece a utilizar a câmara novamente cerca de um dia
após montar o anel de base.
6 Monte o filtro (vendido à parte) no
adaptador de filtros. (Consulte a ilustração
-6)
7 Instale o adaptador de filtros no anel de
base até encaixar no sítio. (Consulte a
ilustração -7)
Desmontar o adaptador de filtros
(consulte a ilustração
)
Pressione o manípulo do adaptador de filtros (-1) para
destrancá-lo e, em seguida, retire-o do anel de base.
Desmontar o anel de base
(consulte a ilustração
)
Desligue a câmara. Enrole o tira-anéis entre o anel de base
e o corpo da objectiva e puxe-o lentamente para retirar o
anel de base.
Notas
O anel de base retirado não pode ser reutilizado porque a
sua força adesiva é reduzida.
1
2
1
Características técnicas
Dimensões (Aprox.) 53 mm × 9 mm
(Diâmetro × Comprimento)
Peso Aprox. 12 g
Itens incluídos Adaptador de filtros (1), Anel de base
(1), Anel guia (1), Tira-anéis (1),
Documentos impressos
O design e as especificações estão sujeitos a alterações sem
aviso prévio.
Πριν θέσετε σε λειτουργία αυτό το προϊόν, διαβάστε
προσεκτικά το παρόν εγχειρίδιο και κρατήστε το για
ελλοντική αναφορά.
< Σημείωση για τους πελάτες στις χώρες
που ισχύουν οι οδηγίες της Ε.Ε. >
Αυτό το προϊόν έχει κατασκευαστεί από ή για λογαριασό
τη Sony Corporation, 1-7-1 Konan Minato-ku Τόκυο,
108-0075 Ιαπωνία. Ερωτήσει σχετικά ε την συόρφωση
του προϊόντο ω προ τη νοοθεσία τη Ευρωπαϊκή
Ένωση θα πρέπει να απευθύνονται στον εξουσιοδοτηένο
εκπρόσωπο Sony Deutschland GmbH, Hedelfinger
Strasse 61, 70327 Stuttgart, Γερανία. Για οποιοδήποτε
θέα υποστήριξη ή εγγύηση του προϊόντο, παρακαλώ
ανατρέξατε στι διευθύνσει που παρέχονται στα ειδικά
έγγραφα υποστήριξη ή εγγύηση.
Χαρακτηριστικά
Το VFA-49R1 είναι ένα προσαρογέα φίλτρου
κατασκευασένο ειδικά για τι ψηφιακέ φωτογραφικέ
ηχανέ DSC-RX100/RX100M2 τη Sony (αναφέρονται
παρακάτω ω "κάερα").
Η σύνδεση του προσαρογέα φίλτρου στην κάερα
επιτρέπει τη σύνδεση φίλτρου διαέτρου 49 mm.
Σημειώσεις σχετικά με τη
χρήση
Όταν χρησιοποιείτε φλα ε την κάερα, ο
προσαρογέα φίλτρου ενδέχεται να εποδίσει ερικώ
το φω του φλα σε ορισένε καταστάσει λήψη. Σε
αυτήν την περίπτωση, αφαιρέστε τον προσαρογέα
φίλτρου.
Κατά τη εταφορά τη κάερα, αφαιρέστε τον
προσαρογέα φίλτρου.
Η διάετρο τη βίδα φίλτρου του προσαρογέα
φίλτρου είναι 49 mm.
Μη σηκώνετε ή ετακινείτε το κύριο έρο τη κάερα
από τον προσαρογέα φίλτρου.
Μη συνδέσετε τίποτα άλλο εκτό από ένα φίλτρο στον
προσαρογέα φίλτρου.
Προσέξτε να ην ασκήσετε υπερβολική δύναη στην
άκρη του προσαρογέα φίλτρου, καθώ πορεί να
αποσυνδεθεί από το φακό.
Αν η κάερα απενεργοποιηθεί ενώ ο προσαρογέα
φίλτρου είναι συνδεδεένο, ο φακό τη κάερα
συπτύσσεται. Προσέξτε να ην πιάσετε το δάκτυλό
σα εταξύ του προσαρογέα φίλτρου και τη κάερα.
Προσδιορισμός των
μερών
1 Προσαρογέα φίλτρου
2 ακτύλιο βάση
3 ακτύλιο οδηγό
4 Εργαλείο αφαίρεση
Σύνδεση του
προσαρμογέα φίλτρου
στην κάμερα
1 Σκουπίστε τυχόν βρομιά από τη στεφάνη
του φακού όπου θα συνδεθεί ο δακτύλιος
βάσης.
2 Απενεργοποιήστε την κάμερα και έπειτα
τοποθετήστε το δακτύλιο οδηγό στο τμήμα
του φακού της κάμερας. (Βλ. εικόνα -2)
3 Αφαιρέστε το χαρτί απελευθέρωσης από το
δακτύλιο βάσης. Τοποθετήστε το δακτύλιο
βάσης στην κεντρική οπή του δακτύλιου
οδηγού. (Βλ. εικόνα -3)
4 Αφαιρέστε το δακτύλιο οδηγό.
5 Πιέστε την επιφάνεια του δακτύλιου βάσης
με το δάκτυλό σας για να συνδεθεί γερά.
Η επικόλληση δεν είναι σταθερή για αρκετέ ώρε ετά
από τη σύνδεση του δακτυλίου βάση.
Ξεκινήστε να χρησιοποιείτε την κάερα πάλι περίπου
ια έρα ετά από την επικόλληση του δακτυλίου
βάση.
6 Συνδέστε το φίλτρο (πωλείται ξεχωριστά)
στον προσαρμογέα φίλτρου. (Βλ. εικόνα
-6)
7 Τοποθετήστε τον προσαρμογέα φίλτρου
στο δακτύλιο βάσης μέχρι να ασφαλίσει στη
θέση του με ένα κλικ. (Βλ. εικόνα -7)
Αποσύνδεση του προσαρμογέα φίλτρου
(Βλ. εικόνα
)
Πιέστε το κουπί του προσαρογέα φίλτρου (-1) για
να τον απασφαλίσετε και έπειτα αφαιρέστε τον από το
δακτύλιο βάση.
Αποσύνδεση του δακτύλιου βάσης
(Βλ. εικόνα
)
Απενεργοποιήστε την κάερα. Περάστε το εργαλείο
αφαίρεση εταξύ του δακτύλιου βάση και του φακού και
τραβήξτε το αργά για να αφαιρέσετε το δακτύλιο βάση.
Σημειώσεις
Ο δακτύλιο βάση που αφαιρέσατε δεν πορεί να
επαναχρησιοποιηθεί καθώ η δύναη συγκόλληση του
έχει ειωθεί.
Προδιαγραφές
ιαστάσει (Περίπου) 53 mm × 9 mm
(ιάετρο × Μήκο)
Μάζα Περίπου 12 g
Περιεχόενα αντικείενα Προσαρογέα φίλτρου (1),
ακτύλιο βάση (1),
ακτύλιο οδηγό (1),
Εργαλείο αφαίρεση (1),
Σύνολο έντυπη τεκηρίωση
Ο σχεδιασό και οι προδιαγραφέ υπόκεινται σε αλλαγή
χωρί προειδοποίηση.
Przed użyciem zakupionego produktu należy dokładnie
zapoznać się z niniejszą instrukcją obsługi, po czym
zachować ją na przyszłość.
< Uwaga dla klientów w krajach
stosujących dyrektywy UE >
Produkt ten został wyprodukowany przez lub na zlecenie
Sony Corporation, 1-7-1 Konan Minato-ku Tokio, 108-
0075 Japonia.
Przedsiębiorcą wprowadzającym produkt do obrotu na
terytorium Rzeczypospolitej Polskiej jest Sony Europe
Limited, The Heights, Brooklands, Weybridge, Surrey
KT13 0XW, Wielka Brytania. Zapytania dotyczące
zgodności produktu z wymaganiami prawa Unii
Europejskiej należy kierować do Sony Deutschland GmbH,
Hedelfinger Strasse 61, 70327 Stuttgart, Niemcy.
W kwestiach dotyczących usług serwisowych lub gwarancji
należy korzystać z adresów kontaktowych podanych
w oddzielnych dokumentach dotyczących usług
serwisowych lub gwarancji.
Charakterystyka
VFA-49R1 to adapter filtra przeznaczony specjalnie
do aparatów cyfrowych Sony DSC-RX100/RX100M2
(nazywanych dalej „aparatami”).
Po podłączeniu adaptera filtra do aparatu można podłączyć
filtr o średnicy 49 mm.
Uwagi dotyczące
użytkowania
Podczas wykorzystywania z aparatem lampy błyskowej
w niektórych warunkach fotografowania adapter filtra
może częściowo blokować światło lampy. W takim
przypadku adapter filtra należy zdjąć.
Przed przenoszeniem aparatu adapter filtra należy zdjąć.
Średnica śruby filtra adaptera filtra wynosi 49 mm.
Nie podnosić ani nie przenosić głównego korpusu
aparatu za adapter filtra.
Nie podłączać do adaptera filtra przedmiotów innych
niż filtr.
Uważać, by nie wywierać zbyt dużej siły na krawędź
adaptera filtra, ponieważ może on zsunąć się
z obiektywu.
Jeśli zasilanie aparatu zostanie wyłączone
z podłączonym adapterem filtra, obiektyw aparatu
się zamknie. Należy zachować ostrożność, aby nie
przyskrzynić palców między adapterem filtra
a aparatem.
Oznaczenie części
1 Adapter filtra
2 Pierścień podstawowy
3 Pierścień prowadzący
4 Przyrząd do demontażu
Podłączanie adaptera
filtra do aparatu
1 Zetrzeć wszelkie zabrudzenia z krawędzi
obiektywu, w miejscu, w którym będzie
podłączany pierścień podstawowy.
2 Wyłączyć zasilanie aparatu, a następnie
umieścić pierścień prowadzący na
obiektywie aparatu (patrz ilustracja -2)
3 Zdjąć papier zabezpieczający z pierścienia
podstawowego. Włożyć pierścień
podstawowy do środkowego otworu
pierścienia prowadzącego (patrz ilustracja
-3)
4 Zdjąć pierścień prowadzący.
5 Przycisnąć palcem powierzchnię
pierścienia podstawowego, aby go dobrze
przymocować.
Mocowanie będzie trwałe dopiero kilka godzin po
zamocowaniu pierścienia podstawowego.
Z aparatu można ponownie korzystać mniej więcej
dzień po zamocowaniu pierścienia podstawowego.
6 Podłączyć filtr (dostępny w oddzielnej
sprzedaży) do adaptera filtra (patrz
ilustracja -6)
7 Włożyć adapter filtra do pierścienia
podstawowego, tak by usłyszeć odgłos
zatrzaśnięcia (patrz ilustracja -7)
Odłączanie adaptera filtra
(patrz ilustracja
)
Nacisnąć pokrętło adaptera filtra (-1), aby go
odblokować i zdjąć z pierścienia podstawowego.
Odłączanie pierścienia podstawowego
(patrz ilustracja
)
Wyłączyć zasilanie aparatu. Przeciągnąć przyrząd do
demontażu między pierścieniem podstawowym a tubusem
obiektywu i powoli pociągnąć, aby zdjąć pierścień
podstawowy.
Uwagi
Zdjętego pierścienia podstawowego nie można użyć
ponownie, ponieważ jego przyczepność będzie znacznie
zmniejszona.
Dane techniczne
Wymiary (ok.) 53 mm × 9 mm (średnica × długość)
Waga Ok. 12 g
W zestawie Adapter filtra (1), pierścień podstawowy
(1), pierścień prowadzący (1), przyrząd
do demontażu (1), zestaw drukowanej
dokumentacji
Konstrukcja i dane techniczne mogą ulec zmianie bez
uprzedzenia.
7
La página se está cargando ...
Transcripción de documentos
4-472-087-01 (1) < Avis aux consommateurs des pays appliquant les Directives UE > 7 Ce produit a été fabriqué par ou pour le compte de Sony Corporation, 1-7-1 Konan Minato-ku Tokyo, 108-0075 Japon. Toutes les questions relatives à la conformité des produits basées sur la législation européenne doivent être adressées à son représentant, Sony Deutschland GmbH, Hedelfinger Strasse 61, 70327 Stuttgart, Allemagne. Pour toute question relative au Service Après-Vente ou à la Garantie, merci de bien vouloir vous référer aux coordonnées qui vous sont communiquées dans les documents « Service (SAV) » ou Garantie. フィルターアダプター Filter Adaptor Adaptateur de filtre 滤镜转接环 取扱説明書 /Operating Instructions/Mode d’emploi/ Manual de instrucciones/Bedienungsanleitung/ Gebruiksaanwijzing/Bruksanvisning/Istruzioni per l’uso/ Manual de instruções/Οδηγίες λειτουργίας/Instrukcja obsługi/Návod na obsluhu/Használati útmutató/Instrucţiuni de utilizare/Betjeningsvejledning/Návod k obsluze/ Käyttöohjeet/Инструкция по эксплуатации/ / / / Caractéristiques Before operating the product, please read this manual thoroughly and retain it for future reference. 1 < Notice for the customers in the countries applying EU Directives > VFA-49R1 2 © 2013 Sony Corporation Printed in China 1 This product has been manufactured by or on behalf of Sony Corporation, 1-7-1 Konan Minato-ku Tokyo, 108-0075 Japan. Inquiries related to product compliance based on European Union legislation shall be addressed to the authorized representative, Sony Deutschland GmbH, Hedelfinger Strasse 61, 70327 Stuttgart, Germany. For any service or guarantee matters, please refer to the addresses provided in the separate service or guarantee documents. Features The VFA-49R1 is a Filter Adaptor made especially for DSC-RX100/RX100M2 Sony Digital Still Cameras (referred to below as “camera”). Attaching the filter adaptor to the camera enables attachment of a 49 mm diameter filter. Notes on Use お買い上げいただきありがとうございます。 主な特長 本機はソニー製デジタルスチルカメラ(以下、カメラとする)DSCRX100/RX100M2用のフィルターアダプターです。 本機を取り付けることにより、カメラに49mm径のフィルターを 装着できます。 使用上のご注意 ˎ フラッシュを使って撮影するときは、撮影状況によってはフィ ルターアダプターがフラッシュ光を妨げ、影ができることがあ ります。その場合はフィルターアダプターをはずしてください。 ˎ カメラを持ち運ぶ際は、フィルターアダプターをカメラ本体か らはずしてください。 ˎ フィルター対応ネジ径は、49mmです。 ˎ フィルターアダプターを持ってカメラ本体を持ち上げたり、移 動させたりしないでください。 ˎ フィルター以外のものは装着しないでください。 ˎ フィルターアダプターの先端に過剰な力が加わると、はずれる 可能性がありますのでご注意ください。 ˎ フィルターアダプターを装着した状態でカメラの電源がOFFに なると、レンズ部が収納されるため、フィルターアダプターとカ メラ本体との間で指などを挟む可能性がありますのでご注意く ださい。 1 2 各部の名前 3 4 1 2 3 4 フィルターアダプター ベースリング ガイドリング リムーバー 取り付けかた 1 2 2 3 4 5 6 7 3 レンズ先端部が汚れている場合は、汚れをきれい にふき取る。 カメラの電源をOFFにして、ガイドリングをレン ズ部にかぶせる。 (イラスト-2 ) ベースリングの剥離紙をはがし、ガイドリング中 央の穴に収まるように置いて貼り付ける。 (イラス ト-3 ) ガイドリングをはずす。 ベースリング全体を指で押さえて、しっかりと接 着させる。 接着後、数時間は接着力が安定しません。 約1日経過してから、ご使用を開始してください。 フィルターアダプターに、フィルター(別売)を装 着する。 (イラスト-6 ) フィルターアダプターをベースリングに「カチッ」 と音がするまで押し込む。 (イラスト-7 ) フィルターアダプターのはずしかた(イラスト) フィルターアダプター(-1 )のツマミを押し込み、ロックを解除 してベースリングからはずす。 ベースリングのはがしかた(イラスト) カメラの電源をOFFにして、リムーバーをベースリングと鏡筒の 間に巻き付け、ゆっくりと引いてはがす。 ご注意 6 ˎˎWhen using a flash with the camera, the filter adaptor may partially block the light of the flash in certain shooting situations. In this case, remove the filter adaptor. ˎˎWhen carrying the camera, remove the filter adaptor. ˎˎThe diameter of the filter adaptor’s filter screw is 49 mm. ˎˎDo not lift or move the camera main body by the filter adaptor. ˎˎDo not attach anything other than a filter to the filter adaptor. ˎˎBe careful not to apply an excessive force to the edge of the filter adaptor or it may come away from the lens. ˎˎIf the power of the camera is turned off with the filter adaptor attached, the lens of the camera retracts. Be careful not to catch your finger between the filter adaptor and the camera. Identifying the Parts 1 2 3 4 Filter adaptor Base ring Guide ring Remover Attaching the Filter Adaptor to the Camera 1 Wipe any dirt from the rim of the lens where the base ring is to be attached. 2 Turn off the power of the camera and then put the guide ring on the lens part of the camera. (See illustration -2) 3 Remove the release paper from the base ring. Fit the base ring into the center hole of the guide ring. (See illustration -3) 4 Remove the guide ring. 5 Press the surface of the base ring with your finger to firmly attach it. Adhesion is not stable for several hours after attaching the base ring. Start using the camera again about one day after attaching the base ring. 6 Attach the filter (sold separately) to the filter adaptor. (See illustration -6) 7 Fit the filter adaptor into the base ring until it clicks into place. (See illustration -7) Detaching the Filter Adaptor (See illustration ) Press the knob of the filter adaptor (-1) to unlock it, and then remove it from the base ring. Detaching the Base Ring (See illustration ) Turn off the power of the camera. Wind the remover between the base ring and lens barrel and pull it slowly to remove the base ring. Notes The removed base ring cannot be reused because its adhesive force is reduced. 一度はがしたベースリングは、接着力が低下しているため再使用 はできません。 Specifications 主な仕様 Dimensions (Approx.) 53 mm × 9 mm (Diameter × Length) (2 1/8 in. × 3/8 in.) Mass Approx. 12 g (0.5 oz) Included items Filter adaptor (1), Base ring (1), Guide ring (1), Remover (1), Set of printed documentation 外形寸法(約):53 mm × 9 mm (直径×長さ) 約 12 g 質量: 同梱物: フィルターアダプター( 1 )、ベースリング( 1 )、 ガイドリング( 1 )、リムーバー( 1 )、印刷物一式 仕様および外観は、改良のため予告なく変更することがあります が、ご了承ください。 Design and specifications are subject to change without notice. Avant d’utiliser ce produit, veuillez lire cette notice avec attention et la conserver pour toute référence future. Le VFA-49R1 est un adaptateur de filtre conçu spécialement pour les appareils photo numériques Sony DSC-RX100/RX100M2 (désignés ci-dessous par le terme « appareil photo »). En fixant cet adaptateur de filtre à l’appareil photo vous pourrez rattacher un filtre de 49 mm de diamètre. Remarques sur l’emploi ˎˎLorsqu’un flash est utilisé avec l’appareil photo, l’adaptateur de filtre peut bloquer partiellement la lumière du flash dans certaines situations de prise de vue. Si c’est le cas, déposez l’adaptateur de filtre. ˎˎPour transporter l’appareil photo, déposez l’adaptateur de filtre. ˎˎLe diamètre de filetage de l’adaptateur de filtre est de 49 mm. ˎˎNe soulevez pas et ne déplacez pas l’appareil photo en le prenant par l’adaptateur de filtre. ˎˎRattachez un filtre et rien d’autre à l’adaptateur de filtre. ˎˎVeillez à ne pas exercer de force excessive sur le bord de l’adaptateur de filtre car il pourrait se détacher de l’objectif. ˎˎSi l’alimentation de l’appareil photo est coupée quand l’adaptateur de filtre est rattaché, l’objectif de l’appareil photo se rétracte. Faites attention de ne pas vous laisser prendre le doigt entre l’adaptateur de filtre et l’appareil photo. Description des éléments 1 2 3 4 Adaptateur de filtre Bague d’appui Bague de guidage Extracteur Fixation de l’adaptateur de filtre à l’appareil photo 1 Nettoyez le bord de l’objectif à l’endroit où la bague d’appui doit être posée. 2 Éteignez l’appareil photo puis mettez la bague de guidage sur l’objectif de l’appareil photo. (Voir l’illustration -2) 3 Détachez le papier de la bague d’appui. Insérez la bague d’appui dans le trou central de la bague de guidage. (Voir l’illustration -3) 4 Déposez la bague de guidage. 5 Appuyez sur la surface de la bague d’appui avec le doigt pour bien la fixer. L’adhésion n’est résistante que plusieurs heures après la fixation de la bague d’appui. N’utilisez l’appareil photo qu’environ un jour après la fixation de la bague d’appui. 6 Posez le filtre (vendu séparément) sur l’adaptateur de filtre. (Voir l’illustration -6) 7 Insérez l’adaptateur de filtre dans la bague d’appui de sorte qu’il s’encliquette. (Voir l’illustration -7) Dépose de l’adaptateur de filtre (Voir l’illustration ) Appuyez sur le bouton de l’adaptateur de filtre (-1) pour le débloquer et détachez-le de la bague d’appui. Dépose de la bague d’appui Voir l’illustration ) Éteignez l’appareil photo. Enroulez l’extracteur entre la bague d’appui et le barillet de l’objectif et tirez-le lentement pour détacher la bague d’appui. Remarques Une fois détachée, la bague d’appui ne peut pas être réutilisée car son adhérence est réduite. Spécifications Dimensions (environ) 53 mm × 9 mm (Diamètre × Longueur) (2 1/8 po. × 3/8 po.) Poids Environ 12 g (0,5 oz) Articles inclus Adaptateur de filtre (1), Bague d’appui (1), Bague de guidage (1), Extracteur (1), Jeu de documents imprimés La conception et les spécifications peuvent être modifiées sans préavis. Antes de utilizar el producto, lea detenidamente este manual y consérvelo para futuras referencias. < Aviso para los clientes de países en los que se aplican las directivas de la UE > Este producto ha sido fabricado por, o en nombre de Sony Corporation, 1-7-1 Konan Minato-ku Tokyo, 108-0075 Japón. Las consultas relacionadas con la conformidad del producto basadas en la legislación de la Unión Europea deben dirigirse al representante autorizado, Sony Deutschland GmbH, Hedelfinger Strasse 61, 70327 Stuttgart, Alemania. Para cualquier asunto relacionado con el servicio o la garantía, por favor diríjase a la dirección indicada en los documentos de servicio o garantía adjuntados con el producto. Características El VFA-49R1 es un adaptador para filtro hecho especialmente para las cámaras fotográficas digitales DSCRX100/RX100M2 Sony (a partir de ahora “cámara”). La fijación del adaptador para filtro a la cámara permite fijar un filtro de 49 mm de diámetro. Notas sobre la utilización ˎˎCuando utilice un flash con la cámara, el adaptador para filtro puede bloquear parcialmente la luz del flash en ciertas situaciones de fotografiado. En este caso, retire el adaptador para filtro. ˎˎCuando transporte la cámara, retire el adaptador para filtro. ˎˎEl diámetro de la rosca del filtro del adaptador para filtro es de 49 mm ˎˎNo levante ni mueva el cuerpo principal de la cámara por el adaptador para filtro. ˎˎNo fije nada que no sea un filtro al adaptador para filtro. ˎˎTenga cuidado para no aplicar fuerza excesiva al borde del adaptador para filtro ya que podría separarse del objetivo. ˎˎSi desconecta la alimentación de la cámara con el adaptador para filtro instalado, el objetivo de la cámara se replegará. Tenga cuidado de no pillarse los dedos entre el adaptador para filtro y la cámara. Identificación de las partes 1 2 3 4 Adaptador para filtro Aro base Aro guía Extractor Fijación del adaptador para filtro a la cámara 1 Elimine la suciedad del borde el objetivo donde vaya a fijar el aro base. 2 Desconecte la alimentación de la cámara y después ponga el aro guía en la parte del objetivo de la cámara. (Consulte la ilustración -2) 3 Retire el papel protector del aro base. Fije el aro base al orificio central del aro guía. (Consulte la ilustración -3) 4 Retire el aro guía. 5 Presione la superficie del aro base con su dedo para fijarlo firmemente. La adhesión no será estable durante varias horas después de de haber fijado el aro base. Comience a utilizar de nuevo la cámara un día aproximadamente después de haber fijado el aro base. 6 Fije el filtro (vendido aparte) al adaptador para filtro. (Consulte la ilustración -6) 7 Fije el adaptador para filtro en el aro base hasta que chasquee en su lugar. (Consulte la ilustración -7) Extracción del adaptador para filtro (Consulte la ilustración ) Presione la perilla del adaptador para filtro (-1) para desbloquearlo, y retírelo del aro base. Extracción del aro base (Consulte la ilustración ) Desconecte la alimentación de la cámara. Bobine el extractor entre el aro base y el barrilete del objetivo y tire lentamente de él para retirar el aro base. ˎˎDer Durchmesser der Filterschraube des Filter-Adapters ist 49 mm. ˎˎHeben Sie die Kamera nicht am Hauptkörper oder Filter-Adapter an. ˎˎBringen Sie keine anderen Teile am Filter-Adapter an. ˎˎAchten Sie darauf, keine zu starke Kraft auf die Kante des Filter-Adapters anzuwenden, da er sich sonst vom Objektiv lösen kann. ˎˎWenn die Kamera bei angebrachtem Filter-Adapter ausgeschaltet wird, wird das Objektiv der Kamera eingefahren. Achten Sie darauf, sich nicht mit dem Finger zwischen dem Filter-Adapter und der Kamera zu verfangen. Identifikation der Teile 1 2 3 4 Filter-Adapter Basisring Führungsring Abnehmer Anbringen des FilterAdapters an der Kamera 1 Wischen Sie jeglichen Schmutz vom Rand des Objektivs ab, wo der Basisring angebracht werden soll. 2 Schalten Sie die Stromversorgung der Kamera aus, und schieben Sie den Führungsring auf den Objektivteil der Kamera. (Siehe Abbildung -2) 3 Nehmen Sie das Deckpapier vom Basisring ab. Setzen Sie den Basisring in das Mittenloch am Führungsring. (Siehe Abbildung -3) 4 Nehmen Sie den Führungsring ab. 5 Drücken Sie die Oberfläche des Basisrings mit Ihrem Finger, um ihn fest anzubringen. Die Anhaftung ist mehrere Stunden nach dem Anbringen des Basisrings lang nicht stabil. Verwenden Sie die Kamera erst nach Ablauf eines Tages nach dem Anbringen des Basisrings. 6 Bringen Sie den Filter (getrennt erhältlich) an den Filter-Adapter an. (Siehe Abbildung -6) 7 Setzen Sie den Filter-Adapter in den Basisring, bis er hörbar einrastet. (Siehe Abbildung -7) Abnehmen des Filter-Adapters (siehe Abbildung ) Drücken Sie den Knopf des Filter-Adapters (-1) zum Lösen und nehmen Sie ihn dann vom Basisring ab. Abnehmen des Basisrings (siehe Abbildung ) Schalten Sie die Stromversorgung der Kamera aus. Wickeln Sie den Abnehmer zwischen dem Basisring und dem Objektivtubus auf und ziehen Sie ihn langsam zum Abnehmen des Basisrings. Hinweise < Hinweis für Kunden in Ländern, in denen EU-Richtlinien gelten > Dieses Produkt wurde von oder für Sony Corporation, 1-7-1 Konan Minato-ku Tokio, 108-0075 Japan hergestellt. Bei Fragen zur Produktkonformität auf Grundlage der Gesetzgebung der Europäischen Union kontaktieren Sie bitte den Bevollmächtigten Sony Deutschland GmbH, Hedelfinger Strasse 61, 70327 Stuttgart, Deutschland. Für Kundendienst oder Garantieangelegenheiten wenden Sie sich bitte an die in den Kundendienst- oder Garantiedokumenten genannten Adressen. Merkmale und Funktionen Der VFA-49R1 ist ein Filter-Adapter, speziell für die Sony Digital-Standbildkameras DSC-RX100/RX100M2 (im Folgenden als „Kamera“ bezeichnet) hergestellt. Bringen Sie den Filter-Adapter an der Kamera an, um einen Filter mit 49 mm Durchmesser verwenden zu können. Hinweise zur Verwendung ˎˎBei Verwendung eines Blitzes mit der Kamera kann der Filter-Adapter das Blitzlicht in bestimmten Aufnahmesituationen blockieren. Nehmen Sie in diesem Fall den Filter-Adapter wieder ab. ˎˎNehmen Sie beim Tragen der Kamera den FilterAdapter ab. De hechting is gedurende meerdere uren niet stabiel na het bevestigen van de basisring. Start pas met het gebruiken van uw camera één dag na het bevestigen van de basisring. 6 Bevestig de filter (apart verkocht) aan de filteradapter. (Zie afbeelding -6) 7 Plaats de filteradapter in de basisring tot deze op zijn plaats klikt. (Zie afbeelding -7) De filteradapter losmaken (zie afbeelding ) Abmessungen (ca.) 53 mm × 9 mm (Durchmesser × Länge) Gewicht Ca. 12 g Mitgeliefertes Zubehör Filter-Adapter (1), Basisring (1), Führungsring (1), Abnehmer (1), Anleitungen < Kennisgeving voor klanten in de landen waar EU-richtlijnen van toepassing zijn > Dit product werd geproduceerd door of in opdracht van Sony Corporation, 1-7-1 Konan Minato-ku Tokyo, 108-0075 Japan. Vragen met betrekking tot product conformiteit gebaseerd op EU-wetgeving kunnen worden gericht aan de gemachtigde vertegenwoordiger, Sony Deutschland GmbH, Hedelfinger Strasse 61, 70327 Stuttgart, Duitsland. Voor service- of garantiezaken verwijzen wij u door naar de adressen in de afzonderlijke service of garantie documenten. Kenmerken De VFA-49R1 is een filteradapter speciaal gemaakt voor Sony digitale fotocamera’s DSC-RX100/RX100M2 (hierna genoemd "camera"). Door de filteradapter aan de camera te bevestigen krijgt u een filterdoorsnede van 49 mm. Opmerkingen over het gebruik ˎˎWanneer u een flitser bij de camera gebruikt, kan de filteradapter het licht van de flitser in bepaalde opnamesituaties gedeeltelijk blokkeren. Verwijder in dat geval de filteradapter. ˎˎVerwijder de filteradapter wanneer u de camera draagt. ˎˎDe doorsnede van de schroef van de filteradapter van de filter is 49 mm. ˎˎTil of beweeg de behuizing van de camera niet via de filteradapter. ˎˎBevestig niets anders dan een filter aan de filteradapter. ˎˎZorg ervoor dat u geen overmatige kracht uitoefent op de rand van de filteradapter omdat deze anders kan losraken van de lens. ˎˎAls de camera uitgaat terwijl de filteradapter is bevestigd, wordt de lens van de camera ingetrokken. Zorg ervoor dat uw vinger niet bekneld raakt tussen de filteradapter en de camera. 4 Ta bort styrringen. 5 Tryck på basringens yta med fingret för att fästa den säkert. Det dröjer flera timmar innan basringen sitter säkert efter att ha satts på. Börja använda kameran igen ungefär en dag efter att ha satt på basringen. 6 Montera filtret (säljs separat) på filteradaptern. (Se illustration -6) 7 Passa in filteradaptern i basringen tills den klickar på plats. (Se illustration -7) Borttagning av filteradaptern (se illustration ) Tryck på den utskjutande delen på filteradaptern (-1) för att låsa upp den, och ta bort den från basringen. Borttagning av basringen (se illustration ) Stäng av strömmen till kameran. Sno borttagaren mellan basringen och objektivet och dra den långsamt för att ta bort basringen. Obs! Den borttagna basringen kan inte återanvändas eftersom dess vidhäftningskraft är reducerad. Specifikationer Storlek (Ca.) 53 mm × 9 mm (Diameter × längd) Vikt Ca. 12 g Inkluderade artiklar Filteradapter (1), Basring (1), Styrring (1), Borttagare (1), Uppsättning tryckt dokumentation Utförande och specifikationer kan ändras utan föregående meddelande. Druk op de knop van de filteradapter (-1) om deze te ontgrendelen en verwijder hem van de basisring. Prima di usare il prodotto raccomandiamo di leggere con attenzione le presenti istruzioni e di conservarle quindi per ogni futura necessità. De basisring losmaken (zie afbeelding ) < Avviso per i clienti residenti nei paesi che applicano le direttive UE > Zet de camera uit. Draai de verwijderaar tussen de basisring en de lenshouder en trek er langzaam aan om de basisring te verwijderen. Opmerkingen De verwijderde basisring kan niet opnieuw worden gebruikt omdat de hechtkracht is afgenomen. Technische gegevens Afmetingen (Ongeveer) 53 mm × 9 mm (doorsnede × lengte) Gewicht Ongeveer 12 g Bijgeleverde toebehoren Filteradapter (1), Basisring (1), Geleidering (1), Verwijderaar (1), Handleiding en documentatie Wijzigingen in ontwerp en technische gegevens voorbehouden, zonder kennisgeving. Technische Daten Voordat u dit product gebruikt, dient u deze handleiding grondig te lezen en te bewaren voor toekomstige naslag. Lesen Sie diese Anleitung vor Inbetriebnahme des Produkts bitte genau durch und bewahren Sie sie zum späteren Nachschlagen sorgfältig auf. 1 Veeg vuil van de rand van de lens waar de u de basisring wilt bevestigen. 2 Zet de camera uit en plaats de geleidering op het lensgedeelte van de camera. (Zie afbeelding -2) 3 Verwijder het verpakkingspapier van de basisring. Plaats de basisring in het middengat van de geleidering. (Zie afbeelding -3) 4 Verwijder de geleidering. 5 Druk op het oppervlak van de basisring met uw vinger om deze stevig te bevestigen. < Anmärkning för kunder i de länder som följer EU-direktiv > Especificaciones El diseño y las especificaciones están sujetos a cambio sin previo aviso. De filteradapter aan de camera bevestigen Läs noga igenom denna bruksanvisning innan produkten tas i bruk. Spara bruksanvisningen. Änderungen bei Design und technischen Daten bleiben ohne vorherige Ankündigung vorbehalten. Dimensiones (Aprox.) 53 mm × 9 mm (Diámetro × Longitud) Peso Aprox. 12 g Elementos incluidos Adaptador para filtro (1), Aro base (1), Aro guía (1), Extractor (1), Juego de documentación impresa 1 Filteradapter 2 Basisring 3 Geleidering 4 Verwijderaar Der abgenommene Basisring kann nicht wieder verwendet werden, weil seine Anhaftkraft verringert ist. Notas El aro base retirado no podrá volver a utilizarse debido a la reducción de su fuerza adhesiva. Vaststellen van de onderdelen Denna produkt har tillverkats av eller på uppdrag av Sony Corporation, 1-7-1 Konan Minato-ku Tokyo, 108-0075 Japan. Frågor som rör produkternas överensstämmelse, grundar sig på Europeiska unionens lagstiftning skall ställas till den auktoriserade representanten, Sony Deutschland GmbH, Hedelfinger Strasse 61, 70327 Stuttgart, Tyskland. För service och garantiärenden, vänligen se de adresser som finns i de separata service och garantihandlingarna. Egenskaper VFA-49R1 är en filteradapter gjord speciellt för DSCRX100/RX100M2 Sony digitala stillbildskameror (nedan kallad ”kamera”). När filteradaptern monteras på kameran går det att montera ett filter på 49 mm diameter. Att tänka på vid användning ˎˎNär en blixt används med kameran, kan filteradaptern delvis blockera ljuset från blixten i vissa tagningssituationer. Ta i sådant fall bort filteradaptern. ˎˎNär du bär kameran, ta bort filteradaptern. ˎˎDiametern på filteradapterns filtergänga är 49 mm. ˎˎLyft inte och flytta inte kamerahuset i filteradaptern. ˎˎMontera inte någonting annat än ett filter på filteradaptern. ˎˎVar noga med att inte utsätta kanten på filteradaptern för alltför hårt tryck, annars kan den lossna från objektivet. ˎˎOm strömmen till kameran stängs av med filteradaptern monterad, skjuts kamerans objektiv in. Var försiktig så att fingrarna inte kommer i kläm mellan filteradaptern och kameran. Delarnas namn 1 Filteradapter 2 Basring 3 Styrring 4 Borttagare Montera filteradaptern på kameran 1 Torka av smuts från kanten av objektivet där basringen ska fästas. 2 Stäng av strömmen till kameran och sätt sedan styrringen på kamerans objektivdel. (Se illustration -2) 3 Ta bort släppapperet från basringen. Passa in basringen i centrumhålet på styrringen. (Se illustration -3) Questo prodotto è stato fabbricato da o per conto di Sony Corporation, 1-7-1 Konan Minato-ku Tokyo, 108-0075 Giappone. Eventuali richieste in merito alla conformità del prodotto in ambito della legislazione Europea, dovranno essere indirizzate al rappresentante autorizzato, Sony Deutschland GmbH, Hedelfinger Strasse 61, 70327 Stuttgart, Germania. Per qualsiasi informazione relativa al servizio o la garanzia, si prega di fare riferimento agli indirizzi riportati separatamente sui documenti relativi all’assistenza o sui certificati di garanzia. Caratteristiche L’unità VFA-49R1 è un Adattatore per filtro progettato specificamente per le fotocamera digitali DSC-RX100/ RX100M2 Sony (di seguito indicate con il termine “fotocamera”). L’applicazione dell’adattatore per filtro alla fotocamera consente di applicare un filtro da 49 mm di diametro. Note sull’uso ˎˎQuando si utilizza un flash con la fotocamera, l’adattatore per filtro potrebbe bloccare parzialmente la luce del flash in alcune situazioni di ripresa. In tal caso, rimuovere l’adattatore per filtro. ˎˎQuando si trasporta la fotocamera, rimuovere l’adattatore per filtro. ˎˎIl diametro della vite del filtro dell’adattatore per filtro è di 49 mm. ˎˎNon sollevare o spostare il corpo della fotocamera afferrando l’adattatore per filtro. ˎˎNon applicare all’adattatore per filtro nulla oltre al filtro stesso. ˎˎFare attenzione a non applicare forza eccessiva al bordo dell’adattatore per filtro, altrimenti potrebbe separarsi dall’obiettivo. ˎˎSe si spegne l’alimentazione della fotocamera con l’adattatore per filtro applicato, l’obiettivo della fotocamera si ritrae. Fare attenzione a non pizzicarsi le dita tra l’adattatore per filtro e la fotocamera. Identificazione delle parti 1 Adattatore per filtro 2 Anello di base 3 Anello guida 4 Accessorio per rimozione Applicazione dell’adattatore per filtro alla fotocamera 1 Eliminare ogni traccia di sporco dal bordo dell’obiettivo nel punto in cui andrà applicato l’anello di base. 2 Spegnere la fotocamera quindi poggiare l’anello guida sulla parte dell’obiettivo della fotocamera. (Vedere la figura -2) 3 Rimuovere la carta di protezione dall’anello di base. Montare l’anello di base sul foro centrale dell’anello guida. (Vedere la figura -3) 4 Rimuovere l’anello guida. 5 Premere la superficie dell’anello di base con il dito per applicarlo saldamente. L’aderenza non si sarà stabilizzata fino a diverse ore dopo l’applicazione dell’anello di base. Iniziare a utilizzare la fotocamera di nuovo un giorno dopo aver applicato l’anello di base. 6 Applicare il filtro (venduto separatamente) all’adattatore per filtro. (Vedere la figura -6) 7 Montare l’adattatore per filtro nell’anello di base fino a quando scatta in sede. (Vedere la figura -7) Distacco dell’adattatore per filtro (vedere la figura ) Premere l’aletta dell’adattatore per filtro (-1) per sbloccarlo, quindi rimuoverlo dall’anello di base. Distacco dell’anello di base (vedere la figura ) Spegnere la fotocamera. Infilare l’accessorio per rimozione tra l’anello di base e il corpo dell’obiettivo e tirarlo lentamente per rimuovere l’anello di base. Características técnicas Dimensões (Aprox.) 53 mm × 9 mm (Diâmetro × Comprimento) Peso Aprox. 12 g Itens incluídos Adaptador de filtros (1), Anel de base (1), Anel guia (1), Tira-anéis (1), Documentos impressos Περιεχόμενα αντικείμενα Προσαρμογέας φίλτρου (1), Δακτύλιος βάσης (1), Δακτύλιος οδηγός (1), Εργαλείο αφαίρεσης (1), Σύνολο έντυπης τεκμηρίωσης Ο σχεδιασμός και οι προδιαγραφές υπόκεινται σε αλλαγή χωρίς προειδοποίηση. Note O design e as especificações estão sujeitos a alterações sem aviso prévio. Przed użyciem zakupionego produktu należy dokładnie zapoznać się z niniejszą instrukcją obsługi, po czym zachować ją na przyszłość. Caratteristiche tecniche Πριν θέσετε σε λειτουργία αυτό το προϊόν, διαβάστε προσεκτικά το παρόν εγχειρίδιο και κρατήστε το για μελλοντική αναφορά. < Uwaga dla klientów w krajach stosujących dyrektywy UE > Non è possibile riutilizzare l’anello di base in quanto la forza adesiva è ridotta. Dimensioni (circa) 53 mm × 9 mm (diametro × lunghezza) Peso Circa 12 g Accessori inclusi Adattatore per filtro (1), anello di base (1), anello guida (1), accessorio per rimozione (1), corredo di documentazione stampata Disegno e caratteristiche tecniche sono soggetti a modifiche senza preavviso. Antes de utilizar o produto, leia este manual até ao fim e guarde-o para consultas futuras. < Nota para os clientes nos países que apliquem as Directivas da UE > Este produto foi fabricado por ou em nome da Sony Corporation, 1-7-1 Konan Minato-ku Tokyo, 108-0075 Japão. As questões relativas à conformidade dos produtos com base na legislação da União Europeia devem ser dirigidas ao representante autorizado, Sony Deutschland GmbH, Hedelfinger Strasse 61, 70327 Stuttgart, Alemanha. Para quaisquer assuntos de serviço ou garantia, consulte os endereços fornecidos nos documentos de serviço ou de garantia. Características O VFA-49R1 é um Adaptador de Filtros fabricado especificamente para as Câmaras Fotográficas Digitais DSC-RX100/RX100M2 da Sony (referidas abaixo como “câmara”). Montar o adaptador de filtros na câmara permite montar um filtro com 49 mm de diâmetro. Notas de utilização ˎˎQuando utilizar um flash com a câmara, o adaptador de filtros pode bloquear parcialmente a luz do flash em certas condições de disparo. Nesse caso, retire o adaptador de filtros. ˎˎQuando transportar a câmara, retire o adaptador de filtros. ˎˎO diâmetro da rosca para o filtro do adaptador de filtros é de 49 mm. ˎˎNão levante nem mova o corpo principal da câmara pelo adaptador de filtros. ˎˎNão monte outro acessório que não um filtro no adaptador de filtros. ˎˎTenha cuidado para não aplicar força excessiva na extremidade do adaptador de filtros ou pode afastar-se da objectiva. ˎˎSe a corrente da câmara for desligada com o adaptador de filtros fixo, a objetiva da câmara retrai-se. Tenha cuidado para não entalar os dedos entre o adaptador de filtros e a câmara. Identificação das peças 1 Adaptador de filtros 2 Anel de base 3 Anel guia 4 Tira-anéis Montar o adaptador de filtros na câmara 1 Remova a sujidade da armação da objectiva onde o anel de base será montado. 2 Desligue a câmara e, em seguida, coloque o anel guia na parte da objectiva da câmara. (Consulte a ilustração -2) 3 Retire o papel de libertação do anel de base. Instale o anel de base no orifício central do anel guia. (Consulte a ilustração -3) 4 Retire o anel guia. 5 Pressione a superfície do anel de base com o dedo para montá-la firmemente. A aderência não é estável durante várias horas após montar o anel de base. Comece a utilizar a câmara novamente cerca de um dia após montar o anel de base. 6 Monte o filtro (vendido à parte) no adaptador de filtros. (Consulte a ilustração -6) 7 Instale o adaptador de filtros no anel de base até encaixar no sítio. (Consulte a ilustração -7) Desmontar o adaptador de filtros (consulte a ilustração ) Pressione o manípulo do adaptador de filtros (-1) para destrancá-lo e, em seguida, retire-o do anel de base. Αυτό το προϊόν έχει κατασκευαστεί από ή για λογαριασμό της Sony Corporation, 1-7-1 Konan Minato-ku Τόκυο, 108-0075 Ιαπωνία. Ερωτήσεις σχετικά με την συμμόρφωση του προϊόντος ως προς τη νομοθεσία της Ευρωπαϊκής Ένωσης θα πρέπει να απευθύνονται στον εξουσιοδοτημένο εκπρόσωπο Sony Deutschland GmbH, Hedelfinger Strasse 61, 70327 Stuttgart, Γερμανία. Για οποιοδήποτε θέμα υποστήριξης ή εγγύησης του προϊόντος, παρακαλώ ανατρέξατε στις διευθύνσεις που παρέχονται στα ειδικά έγγραφα υποστήριξης ή εγγύησης. Produkt ten został wyprodukowany przez lub na zlecenie Sony Corporation, 1-7-1 Konan Minato-ku Tokio, 1080075 Japonia. Przedsiębiorcą wprowadzającym produkt do obrotu na terytorium Rzeczypospolitej Polskiej jest Sony Europe Limited, The Heights, Brooklands, Weybridge, Surrey KT13 0XW, Wielka Brytania. Zapytania dotyczące zgodności produktu z wymaganiami prawa Unii Europejskiej należy kierować do Sony Deutschland GmbH, Hedelfinger Strasse 61, 70327 Stuttgart, Niemcy. W kwestiach dotyczących usług serwisowych lub gwarancji należy korzystać z adresów kontaktowych podanych w oddzielnych dokumentach dotyczących usług serwisowych lub gwarancji. Χαρακτηριστικά Charakterystyka < Σημείωση για τους πελάτες στις χώρες που ισχύουν οι οδηγίες της Ε.Ε. > Το VFA-49R1 είναι ένας προσαρμογέας φίλτρου κατασκευασμένος ειδικά για τις ψηφιακές φωτογραφικές μηχανές DSC-RX100/RX100M2 της Sony (αναφέρονται παρακάτω ως "κάμερα"). Η σύνδεση του προσαρμογέα φίλτρου στην κάμερα επιτρέπει τη σύνδεση φίλτρου διαμέτρου 49 mm. Σημειώσεις σχετικά με τη χρήση ˎˎΌταν χρησιμοποιείτε φλας με την κάμερα, ο προσαρμογέας φίλτρου ενδέχεται να εμποδίσει μερικώς το φως του φλας σε ορισμένες καταστάσεις λήψης. Σε αυτήν την περίπτωση, αφαιρέστε τον προσαρμογέα φίλτρου. ˎˎΚατά τη μεταφορά της κάμερας, αφαιρέστε τον προσαρμογέα φίλτρου. ˎˎΗ διάμετρος της βίδας φίλτρου του προσαρμογέα φίλτρου είναι 49 mm. ˎˎΜη σηκώνετε ή μετακινείτε το κύριο μέρος της κάμερας από τον προσαρμογέα φίλτρου. ˎˎΜη συνδέσετε τίποτα άλλο εκτός από ένα φίλτρο στον προσαρμογέα φίλτρου. ˎˎΠροσέξτε να μην ασκήσετε υπερβολική δύναμη στην άκρη του προσαρμογέα φίλτρου, καθώς μπορεί να αποσυνδεθεί από το φακό. ˎˎΑν η κάμερα απενεργοποιηθεί ενώ ο προσαρμογέας φίλτρου είναι συνδεδεμένος, ο φακός της κάμερας συμπτύσσεται. Προσέξτε να μην πιάσετε το δάκτυλό σας μεταξύ του προσαρμογέα φίλτρου και της κάμερας. ˎˎPodczas wykorzystywania z aparatem lampy błyskowej w niektórych warunkach fotografowania adapter filtra może częściowo blokować światło lampy. W takim przypadku adapter filtra należy zdjąć. ˎˎPrzed przenoszeniem aparatu adapter filtra należy zdjąć. ˎˎŚrednica śruby filtra adaptera filtra wynosi 49 mm. ˎˎNie podnosić ani nie przenosić głównego korpusu aparatu za adapter filtra. ˎˎNie podłączać do adaptera filtra przedmiotów innych niż filtr. ˎˎUważać, by nie wywierać zbyt dużej siły na krawędź adaptera filtra, ponieważ może on zsunąć się z obiektywu. ˎˎJeśli zasilanie aparatu zostanie wyłączone z podłączonym adapterem filtra, obiektyw aparatu się zamknie. Należy zachować ostrożność, aby nie przyskrzynić palców między adapterem filtra a aparatem. Oznaczenie części 1 Adapter filtra 2 Pierścień podstawowy 3 Pierścień prowadzący 4 Przyrząd do demontażu 1 Προσαρμογέας φίλτρου 2 Δακτύλιος βάσης 3 Δακτύλιος οδηγός 4 Εργαλείο αφαίρεσης Podłączanie adaptera filtra do aparatu Σύνδεση του προσαρμογέα φίλτρου στην κάμερα 1 Σκουπίστε τυχόν βρομιά από τη στεφάνη του φακού όπου θα συνδεθεί ο δακτύλιος βάσης. 2 Απενεργοποιήστε την κάμερα και έπειτα τοποθετήστε το δακτύλιο οδηγό στο τμήμα του φακού της κάμερας. (Βλ. εικόνα -2) 3 Αφαιρέστε το χαρτί απελευθέρωσης από το δακτύλιο βάσης. Τοποθετήστε το δακτύλιο βάσης στην κεντρική οπή του δακτύλιου οδηγού. (Βλ. εικόνα -3) 4 Αφαιρέστε το δακτύλιο οδηγό. 5 Πιέστε την επιφάνεια του δακτύλιου βάσης με το δάκτυλό σας για να συνδεθεί γερά. Η επικόλληση δεν είναι σταθερή για αρκετές ώρες μετά από τη σύνδεση του δακτυλίου βάσης. Ξεκινήστε να χρησιμοποιείτε την κάμερα πάλι περίπου μια μέρα μετά από την επικόλληση του δακτυλίου βάσης. 6 Συνδέστε το φίλτρο (πωλείται ξεχωριστά) στον προσαρμογέα φίλτρου. (Βλ. εικόνα -6) 7 Τοποθετήστε τον προσαρμογέα φίλτρου στο δακτύλιο βάσης μέχρι να ασφαλίσει στη θέση του με ένα κλικ. (Βλ. εικόνα -7) 1 Zetrzeć wszelkie zabrudzenia z krawędzi obiektywu, w miejscu, w którym będzie podłączany pierścień podstawowy. 2 Wyłączyć zasilanie aparatu, a następnie umieścić pierścień prowadzący na obiektywie aparatu (patrz ilustracja -2) 3 Zdjąć papier zabezpieczający z pierścienia podstawowego. Włożyć pierścień podstawowy do środkowego otworu pierścienia prowadzącego (patrz ilustracja -3) 4 Zdjąć pierścień prowadzący. 5 Przycisnąć palcem powierzchnię pierścienia podstawowego, aby go dobrze przymocować. Mocowanie będzie trwałe dopiero kilka godzin po zamocowaniu pierścienia podstawowego. Z aparatu można ponownie korzystać mniej więcej dzień po zamocowaniu pierścienia podstawowego. 6 Podłączyć filtr (dostępny w oddzielnej sprzedaży) do adaptera filtra (patrz ilustracja -6) 7 Włożyć adapter filtra do pierścienia podstawowego, tak by usłyszeć odgłos zatrzaśnięcia (patrz ilustracja -7) Odłączanie adaptera filtra (patrz ilustracja ) Nacisnąć pokrętło adaptera filtra (-1), aby go odblokować i zdjąć z pierścienia podstawowego. Αποσύνδεση του προσαρμογέα φίλτρου (Βλ. εικόνα ) Odłączanie pierścienia podstawowego (patrz ilustracja ) Αποσύνδεση του δακτύλιου βάσης (Βλ. εικόνα ) Uwagi Πιέστε το κουμπί του προσαρμογέα φίλτρου (-1) για να τον απασφαλίσετε και έπειτα αφαιρέστε τον από το δακτύλιο βάσης. Desmontar o anel de base (consulte a ilustração ) Notas Ο δακτύλιος βάσης που αφαιρέσατε δεν μπορεί να επαναχρησιμοποιηθεί καθώς η δύναμη συγκόλλησης του έχει μειωθεί. O anel de base retirado não pode ser reutilizado porque a sua força adesiva é reduzida. Uwagi dotyczące użytkowania Προσδιορισμός των μερών Απενεργοποιήστε την κάμερα. Περάστε το εργαλείο αφαίρεσης μεταξύ του δακτύλιου βάσης και του φακού και τραβήξτε το αργά για να αφαιρέσετε το δακτύλιο βάσης. Desligue a câmara. Enrole o tira-anéis entre o anel de base e o corpo da objectiva e puxe-o lentamente para retirar o anel de base. VFA-49R1 to adapter filtra przeznaczony specjalnie do aparatów cyfrowych Sony DSC-RX100/RX100M2 (nazywanych dalej „aparatami”). Po podłączeniu adaptera filtra do aparatu można podłączyć filtr o średnicy 49 mm. Σημειώσεις Προδιαγραφές Διαστάσεις (Περίπου) Μάζα 53 mm × 9 mm (Διάμετρος × Μήκος) Περίπου 12 g Wyłączyć zasilanie aparatu. Przeciągnąć przyrząd do demontażu między pierścieniem podstawowym a tubusem obiektywu i powoli pociągnąć, aby zdjąć pierścień podstawowy. Zdjętego pierścienia podstawowego nie można użyć ponownie, ponieważ jego przyczepność będzie znacznie zmniejszona. Dane techniczne Wymiary (ok.) 53 mm × 9 mm (średnica × długość) Waga Ok. 12 g W zestawie Adapter filtra (1), pierścień podstawowy (1), pierścień prowadzący (1), przyrząd do demontażu (1), zestaw drukowanej dokumentacji Konstrukcja i dane techniczne mogą ulec zmianie bez uprzedzenia.-
 1
1
-
 2
2


Sony VFA-49R1 Manual de usuario
- Tipo
- Manual de usuario
- Este manual también es adecuado para
En otros idiomas
- français: Sony VFA-49R1 Manuel utilisateur
- italiano: Sony VFA-49R1 Manuale utente
- English: Sony VFA-49R1 User manual
- Deutsch: Sony VFA-49R1 Benutzerhandbuch
- русский: Sony VFA-49R1 Руководство пользователя
- Nederlands: Sony VFA-49R1 Handleiding
- português: Sony VFA-49R1 Manual do usuário
- slovenčina: Sony VFA-49R1 Používateľská príručka
- dansk: Sony VFA-49R1 Brugermanual
- polski: Sony VFA-49R1 Instrukcja obsługi
- čeština: Sony VFA-49R1 Uživatelský manuál
- svenska: Sony VFA-49R1 Användarmanual
- suomi: Sony VFA-49R1 Ohjekirja
- română: Sony VFA-49R1 Manual de utilizare
Documentos relacionados
-
Sony ADP-BH1 Manual de usuario
-
-
-
-
-
-
-
Sony CYBER-SHOT DSC-RX100M2 Manual de usuario
-
Sony MPK-URX100A El manual del propietario
-