
Residential Assist Bar
INSTALLATION, OPERATING AND CARE INSTRUCTIONS
Barre d'appui pour résidence
INSTRUCTIONS D'INSTALLATION, DE FONCTIONNEMENT ET D'ENTRETIEN
Barra residencial de apoyo
INSTRUCCIONES DE INSTALACIÓN, OPERACIÓN Y CUIDADO
10 YEAR WARRANTY
Garantie de 10 ans
Garantía de 10 años
CP4718
Rev 06/05/2013
©2012 Liberty Hardware Manufacturing Corporation, A MASCO COMPANY
140 Business Park Drive • Winston-Salem, NC 27107
www.libertyhardware.com
Made in China /Hecho en China/Fabriqué Chine
1-800-542-3789
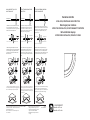
1. Drill 5/8-inch hole into wallboard on non-stud
side only. Insert the #10-24 x 3-inch machine
screw supplied with the anchor through the shelf
bracket and into the buttery anchor.
5/8”
2. While holding the buttery anchor and the
shelf bracket, slide the anchor through the drilled
hole until the wings open. Tighten the #10-24 x
3-inch machine screw until the shelf bracket is
ush with the wall.
BUTTERFLY ANCHOR
3. Fasten and tighten shelf bracket to anchor and
studs. Then place shelf on top and align pegs with
the holes. Press rmly to snap shelf into place.
Buttery Anchor
Ancrage Papillon
Anclaje de Mariposa
#10-24 x 3-inch machine screw
Shelf bracket
ANCHOR INSTRUCTIONS FOR
NON-STUD MOUNT
INSTRUCTIONS D'ANCRAGE POUR
SANS POTEAU
INSTRUCCIONES DE ANCLAJE PARA
MONTAJE SIN MONTANTE
1. Percez un trou de 5/8po dans le panneau
mural uniquement à l'écart des montants de
cloison. Insérez la vis à métaux n°10-24x3po
fournie avec l'ancrage à travers le support de
tablette puis dans l'ancrage papillon.
1. Perfore un agujero de 5/8" en el panel de pared,
solamente en el lado sin montante. Inserte el tornillo
para metales #10-24 de 3 pulgadas proporcionado
con el anclaje por el soporte del estante y en el
anclaje de mariposa.
2. Tout en maintenant l'ancrage papillon et le
support de tablette, faites glisser l'ancrage à
travers le trou percé jusqu'à ce que les ailes
s'ouvrent. Serrez la vis à métaux n°10-24x3po
jusqu'à ce que le support de tablette soit à eur
du mur.
2. Mientras sostiene el anclaje de mariposa y el
soporte del estante, deslice el anclaje por el agujero
perforado hasta que las aletas se abran. Apriete el
tornillo para metales #10-24 de 3 pulgadas hasta que
el soporte del estante quede a ras con la pared.
3. Fixez et resserrez le support pour tablette aux
points d'ancrage et aux montants. Puis placez la
tablette sur le dessus et alignez les crochets avec
les trous. Appuyez fermement sur la tablette pour
bien l'enclencher.
5. Asegura y aprieta el soporte del estante al
anclaje y los barrotes. Luego, coloca el
estante en la parte superior y alinea las
clavijas con los oricios. Presiona
rmemente para encajar el estante en
su lugar.
3. Asegura y aprieta el soporte del estante al anclaje y
los barrotes. Luego, coloca el estante en la parte
superior y alinea las clavijas con los oricios. Presiona
rmemente para encajar el estante en su lugar.
Vis à métaux n°10-24 x 3po
Tornillo para metales #10-24 de 3 pulgadas
ANCRAGE PAPILLON
ANCLAJE DE MARIPOSA
DIAMÈTRE 5/8PO
DIÁMETRO DE 5/8"
Soporte del estante
Support de tablette
Transcripción de documentos
ANCHOR INSTRUCTIONS FOR NON-STUD MOUNT INSTRUCTIONS D'ANCRAGE POUR SANS POTEAU INSTRUCCIONES DE ANCLAJE PARA MONTAJE SIN MONTANTE Butterfly Anchor Ancrage Papillon Anclaje de Mariposa 1. Drill 5/8-inch hole into wallboard on non-stud side only. Insert the #10-24 x 3-inch machine screw supplied with the anchor through the shelf bracket and into the butterfly anchor. 1. Percez un trou de 5/8 po dans le panneau mural uniquement à l'écart des montants de cloison. Insérez la vis à métaux n°10-24 x 3 po fournie avec l'ancrage à travers le support de tablette puis dans l'ancrage papillon. 1. Perfore un agujero de 5/8" en el panel de pared, solamente en el lado sin montante. Inserte el tornillo para metales #10-24 de 3 pulgadas proporcionado con el anclaje por el soporte del estante y en el anclaje de mariposa. Shelf bracket #10-24 x 3-inch machine screw 5/8” BUTTERFLY ANCHOR Support de tablette Vis à métaux n°10-24 x 3 po DIAMÈTRE 5/8 PO Residential Assist Bar INSTALLATION, OPERATING AND CARE INSTRUCTIONS Soporte del estante DIÁMETRO DE 5/8" ANCRAGE PAPILLON Barre d'appui pour résidence INSTRUCTIONS D'INSTALLATION, DE FONCTIONNEMENT ET D'ENTRETIEN Barra residencial de apoyo INSTRUCCIONES DE INSTALACIÓN, OPERACIÓN Y CUIDADO ANCLAJE DE MARIPOSA Tornillo para metales #10-24 de 3 pulgadas 2. While holding the butterfly anchor and the shelf bracket, slide the anchor through the drilled hole until the wings open. Tighten the #10-24 x 3-inch machine screw until the shelf bracket is flush with the wall. 2. Tout en maintenant l'ancrage papillon et le support de tablette, faites glisser l'ancrage à travers le trou percé jusqu'à ce que les ailes s'ouvrent. Serrez la vis à métaux n°10-24 x 3 po jusqu'à ce que le support de tablette soit à fleur du mur. 2. Mientras sostiene el anclaje de mariposa y el soporte del estante, deslice el anclaje por el agujero perforado hasta que las aletas se abran. Apriete el tornillo para metales #10-24 de 3 pulgadas hasta que el soporte del estante quede a ras con la pared. 3. Fasten and tighten shelf bracket to anchor and studs. Then place shelf on top and align pegs with the holes. Press firmly to snap shelf into place. 3. Fixez et resserrez le support pour tablette aux points d'ancrage et aux montants. Puis placez la tablette sur le dessus et alignez les crochets avec les trous. Appuyez fermement sur la tablette pour bien l'enclencher. 3. Asegura y aprieta el soporte del estante al anclaje y los barrotes. Luego, coloca el estante en la parte superior y alinea las clavijas con los orificios. Presiona firmemente para encajar el estante en su lugar. ©2012 Liberty Hardware Manufacturing Corporation, A MASCO COMPANY 140 Business Park Drive • Winston-Salem, NC 27107 www.libertyhardware.com Made in China /Hecho en China/Fabriqué Chine 1-800-542-3789 5. Asegura y aprieta el soporte del estante al anclaje y los barrotes. Luego, coloca el estante en la parte superior y alinea las clavijas con los orificios. Presiona firmemente para encajar el estante en su lugar. CP4718 Rev 06/05/2013 10 YEAR WARRANTY Garantie de 10 ans Garantía de 10 años-
 1
1

en otros idiomas
- français: Delta DF702PC Guide d'installation
- English: Delta DF702PC Installation guide