La página se está cargando...

SUMMER WAVES
®
SAND FILTER PUMP
FOR ABOVE GROUND SWIMMING POOLS
ST1100 (10”) / ST1600 (12”) models
Should you encounter a problem with your Polygroup® Product, please DO NOT return the product to the place of purchase. All Warranty claims must be made
directly to Polygroup®. Prior to contacting Customer Service, please first review the Troubleshooting Guide in the Installation Manual, or review the FAQ and
instructional videos at support.polygroupstore.com. If you are still unable to correct the problem, please contact Polygroup® Customer Service at (888) 919-0070. Please
have the product type, model number and your purchase receipt ready, so that our Customer Service Representative can assist you in resolving the problem. You may
be asked to return all or part of the product for inspection and/or repair. Do not return any product to Polygroup® without a Return Merchandise Authorization number.
LIMITED WARRANTY
Polygroup
®
Limited (Macao Commercial Offshore), (hereinafter “Polygroup
®
”) warrants to the original purchaser only, the Sand Filter Pump against defects in material
and workmanship for 180 days from the date of purchase. Original Purchaser must retain proof of such purchase in the form of an original store sales receipt
and must produce such upon request by Polygroup
®
or its designated agents. Warranty claims cannot be processed without a valid proof of purchase.
This Limited Warranty applies only to the original purchaser of the product and is limited solely to the repair or replacement of the product, to be decided in Polygroup
®
’s
sole discretion. Consequential damages, including claims for loss of water, pool chemicals, damage, or labor are not covered under this Limited Warranty. This Warranty
will be declared invalid should the Purchaser modify or repair the product themselves or by unauthorized persons; use non-Polygroup
®
parts or accessories with the
product; use the product in contravention of the manufacturer’s Instructions; use improper voltage; abuse the product in any way; or through accident or negligence.
Normal wear-and-tear is not covered under this Warranty, nor are acts of God outside the control of Polygroup
®
.
IN NO EVENT SHALL Polygroup
®
, THEIR AUTHORIZED AGENTS, RELATED ENTITIES, OR EMPLOYEES BE LIABLE TO THE BUYER OR ANY OTHER PARTY
FOR DIRECT OR CONSEQUENTIAL DAMAGES. Some states or countries, or others jurisdictions do not allow the exclusion or limitation of incidental or
consequential damages, so the above limitation or exclusion may not apply to you.
For answers to common questions, setup videos and troubleshooting tips, please visit
support.polygroupstore.com or call Customer Service: (888) 919-0070
DO NOT RETURN PRODUCT TO STORE
To order parts and accessories,
please visit www.polygroupstore.com
READ AND KEEP THESE INSTRUCTIONS FOR FUTURE REFERENCE
OWNER’S MANUAL
DISTRIBUTED BY: Polygroup
®
LIMITED (MACAO COMMERCIAL OFFSHORE)
Unit J, 10
th
Floor, Macau Square, Av do Infante D.Henrique, No.43-53A, Macau
Manual #
09C3A40USA15

TABLE OF CONTENTS
Warnings ......................................................................................................................................................... 3 ~ 6
Preliminary Steps & Sand Pump Power Information & Part List ...................................................................... 7 ~ 8
Setup Instructions ............................................................................................................................................ 9 ~ 13
Operating Instructions .................................................................................................................................... . 14
Pump Motor Protection & Pool Maintenance & Pool Water Care ................................................................... 15
Troubleshooting Guide .................................................................................................................................... 16
Replacement Parts Ordering Info .................................................................................................................... 17
Winterising, Disassembly & Storage ............................................................................................................... 17
Asme Compliant Suction Fitting Information ................................................................................................... 18
2
Should you encounter any problems, contact Customer Service at (888) 919-0070 from 8 AM to 5 PM Mon. thru Fri.
MST. Extended operating days and hours during peak season requirements.

IMPORTANT SAFETY INSTRUCTIONS
When installing and using this electrical equipment, basic safety precautions should always be followed, including the following :
READ AND FOLLOW ALL INSTRUCTIONS
Keep for Future Reference. Failure to follow these warnings and instructions can result in serious injury or death to users, especially children
NOTICE: CUSTOMERS THAT PURCHASE POOLS MAY BE REQUIRED BY LOCAL OR STATE LAW TO INCUR ADDITIONAL EXPENSES WHEN
INSTALLING A POOL, IN ORDER TO COMPLY WITH STATE OR LOCAL LAWS REGARDING FENCING AND OTHER SAFETY REQUIREMENTS.
CUSTOMERS SHOULD CONTACT THEIR LOCAL BUILDING CODE ENFORCEMENT OFFICE FOR FURTHER DETAILS. POLYGROUP® IS NOT
RESPONSIBLE FOR ANY ADDITIONAL EXPENSES THAT YOU MAY INCUR.
Safety Care for Children
1. Children, especially children younger than five years, are at high risk of drowning. Drowning occurs silently and quickly and can occur in as little as 2 in. (5 cm) of water.
2. Keep children in your direct sight, stay close, and actively supervise them when they are in or near this pool and when you are filling and emptying this pool.
3. When searching for a missing child, check the pool first, even if the child is thought to be in the house.
4. Locate pumps and filters in such a way that children cannot climb on them and gain access to the pool.
5. WARNING: To reduce the risk of injury, do not permit children to use this product unless they are closely supervised at all times.
Swimming Pool Barriers
Very Important: Swimming pool barriers, which restrict access to the pool by small children, may be required by law. A barrier is necessary to provide protection against
potential drowning and near drowning. Barriers are not a substitute for constant supervision of children. Check state or local laws and codes before setting up pool.
Swimming Pool Equipments
1. The use of artificial pool lighting is at the discretion of the pool owner. Lighting, when installed, should be in accordance with Article 680 of the
National Electrical Code (NEC) or its latest approved edition and in consultation with a licensed electrical professional.
2. Keep all electrical lines, radios, speakers and other electrical appliances away from the pool.
3. Do not place pool near or under overhead electrical lines.
4. All electrical components installed in and/ or adjacent to an aboveground/onground residential swimming pool shall be installed in accordance with and shall comply
with the requirements of the latest published edition of NFPA 70, National Electrical Code (NEC
®
) Article 680, Swimming pools, fountains, and similar installations,
and any state or local code.
Filter Pump Awareness
1. WARNING: Risk of Electric Shock. Connect only to a grounding type receptacle. This product is provided with a ground-fault circuit-interrupter. If replacement of
the plug or cord is needed, use only identical replacement parts.
2. WARNING: To reduce the risk of electric shock, replace damaged cord immediately.
3. WARNING: To reduce the risk of electric shock, do not use extension cord to connect unit to electric supply; provide a properly located outlet.
4. CAUTION: To reduce the risk of electric shock, the pool must be installed no closer than 6 feet (1.8 m) from any electrical outlet. Do not place portable appliances
closer than 5 feet (1.5 m) from the pool.
5. CAUTION: This pump is for use with storable pools only. Do not use with permanently-installed pools. A storable pool is constructed so that it is capable of being
readily disassembled for storage and reassembled to its original integrity. A permanently-installed pool is constructed in or on the ground or in a building such that it
cannot be readily disassembled for storage.
WARNING
3
Should you encounter any problems, contact Customer Service at (888) 919-0070 from 8 AM to 5 PM Mon. thru Fri.
MST. Extended operating days and hours during peak season requirements.
OWNER’S MANUAL
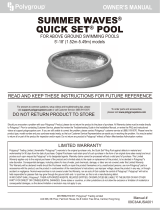
DO NOT SIT ON
OR LAY OVER
POOL WALL
YOU CAN BE PERMANENTLY
INJURED.
WARNING
AVOID ENTRAPMENT!
STAY AWAY FROM DRAINS & SUCTION
FITTINGS.
YOUR HAIR, BODY & JEWELRY
CAN GET SUCKED INTO DRAIN.
YOU COULD
BE HELD UNDER WATER & DROWN. DO NOT
USE POOL IF DRAIN OR SUCTION OUTLET
COVER IS MISSING OR BROKEN.
DANGER
PREVENT DROWNING!
CLOSELY WATCH CHILDREN WHO
ARE IN OR NEAR THIS POOL. CHILDREN
UNDER 5 ARE AT HIGHEST RISK FOR
DROWNING. EMPTY POOL OR PREVENT
ACCESS WHEN NOT IN USE.
NO DIVING!
SHALLOW WATER
YOU CAN BREAK
YOUR NECK AND BE
PARALYZED.

1. Entrapment Avoidance: There shall be no protrusions or other obstruction in the swimming area, which may cause entrapment or entanglement of the user. If
a suction outlet cover is missing or broken, do not use the pool. Suction can cause body part entrapment, hair and jewelry entanglement, evisceration, or drowning.
Repair or replace the suction outlet cover before allowing the pool to be used.
2. DANGER! TO AVOID SERIOUS INJURY OR DEATH, CLOSE THE POOL OR SPA TO BATHERS IF ANY SUCTION OUTLET COVER/GRATE IS MISSING,
BROKEN OR INOPERATIVE.
3. Never play or swim near drains or suction fittings. Your body or hair may be trapped causing permanent injury or drowning.
4. Never enter the pool or spa if a suction fitting or drain cover is loose, broken, or missing.
5. Immediately notify the pool/spa owner or operator if you find a drain cover loose, broken or missing.
Drowning Risk
1. Keep unsupervised children from accessing the pool by installing fencing or other approved barrier around all sides of pool. State or local laws or codes may require
fencing or other approved barriers. Check state or local laws and codes before setting up pool.
2. Toys, chairs, tables or similar objects that a young child could climb shall be at least four feet (4’) [121.92 cm] from the pool. The pump filter system shall be
positioned so as to prevent it being used as a means of access to the pool by young children. Do not leave toys inside pool when finished using, since toys and
similar items might attract a child to the pool.
3. Position furniture (for example, tables, chairs) away from pool and so that children cannot climb on it to gain access to the pool.
Electrocution Risk
1. Keep all electrical lines, radios, speakers and other electrical appliances away from the pool.
2. Do not place pool near or under overhead electrical lines.
4
Should you encounter any problems, contact Customer Service at (888) 919-0070 from 8 AM to 5 PM Mon. thru Fri.
MST. Extended operating days and hours during peak season requirements.
6. CAUTION: For continued protection against possible electric shock this unit is to be mounted to the base in accordance with the installation instructions.
7. Do not bury cord. Locate cord to minimize abuse from lawn mowers, hedge trimmers, and other equipment.
8. The unit is provided with a ground-fault circuit-interrupter (GFCI). To test the GFCI, push the test button. The GFCI should interrupt power. Push the reset button.
Power should be restored. If the GFCI fails to operate in this manner, the GFCI is defective. If the GFCI interrupts power to the pump without the test button being
pushed, a ground current is flowing, indicating the possibility of an electric shock. Do not use this pump. Disconnect the pump and have the problem corrected by
a qualified service representative before using.
9. The Filter Pump is to be assembled by an adult; care should be taken in the unpacking and assembly of the Filter Pump, this pool may contain accessible
potentially hazardous sharp edges or sharp points that are a necessary part of the function of the Filter Pump.
10. If a drain or suction outlet cover is missing or broken, do not use the pool. Suction can cause body part entrapment, hair and jewelry entanglement, evisceration,
or drowning. Repair or replace the drain or suction outlet cover before allowing the pool to be used.. During nighttime pool use, artificial lighting shall be used to
illuminate all safety signs, ladders, steps, deck surfaces and walks.
11. The floor of the pool shall be visible at all times from the outside perimeter of the pool.
12. Post a list of emergency telephone numbers such as the nearest available police, fire, ambulance and/or rescue unit. These numbers are to be kept near the
telephone, which is closest to the pool.
13. Basic lifesaving equipment, including one of the following should be on hand at all times:
• A light, strong, rigid pole (shepherds crook) not less than twelve feet (12’) [366 cm] long.
• A minimum one-fourth inch (1/4”) [6.35 mm] diameter rope as long as one and one half (1-1/2) times the maximum width of the pool or fifty feet (50’) [15.24 meters],
whichever is less, which has been firmly attached to a Coast Guard-approved ring buoy having an outside diameter of approximately fifteen inches (15”) [38.1 cm],
or similarly approved flotation device.
14. Pool shall be located at a minimum distance of 6 ft (1.83 m) from any receptacle, and all 125-volt 15- and 20-ampere receptacles located within 20 ft (6.0 m) of the
pool shall be protected by a ground fault circuit interrupter (GFCI), where distances are by measuring the shortest path the supply cord of an appliance connected
to the receptacle would follow, without piercing a floor, wall, ceiling, doorway with hinged or sliding door, window opening, or other effective permanent barrier, to
the inside wall of the pool.
Circulation Systems
1. Installers shall follow written instructions regarding positioning of all equipment connected to the circulation systems.
2. The installer shall follow written instruction provided for operation of the circulation system components.
3. All circulation system components and pump that require replacement or servicing shall be installed according to the pump’s instruction manual.
4. Circulation equipment shall be installed per manufacturer’s instructions to provide proper mounting and support, to prevent damage from misalignment, settlement,
and vibration, and to minimize the potential for the accumulation of debris and moisture. Please refer to pump’s instruction manual.
Chemicals
For safety sake, ensure the deepest part of the pool is always visible. The user must properly maintain the clarity of the pool water at all times. Check the pH and
chlorine levels periodically and make sure they are within the recommended limits. Additional water treatment chemicals might be needed from time to time. Have
the water sample tested by a local pool supply store to determine if additional chemical is needed. Turn on the pump for the recommended hours daily. If you are
unsure of the time frames please refer to support.polygroupstore.com for the recommended Pump Operation Hours based on pool types and sizes. Clean and
replace filter cartridge frequently. Replace only with genuine Polygroup
®
/ Summer Wave
®
Brand filter cartridge. Refer to the Filter Pump manual for
additional water care information.
Entrapment Risk

First Aid
1. Keep a working phone and a list of emergency numbers near the pool.
2. Become certified in cardiopulmonary resuscitation (CPR). In the event of an emergency, immediate use of CPR can make a lifesaving difference.
Special Warning
1. Local building codes may require obtaining a building or electrical permit. Installer shall follow regulations on setback, barriers, devices and other conditions.
2. Safety signs shall comply with requirements of ANSI-Z535 and to use signal wording.
3. DO NOT attempt to assemble this pool in adverse weather conditions, windy conditions or when the temperature is below 60°F.
4. This is a storable filter pump, which should be disassembled and stored when temperatures are expected to fall below 32°F.
Extra Safety Warning
1. Adult supervision is always required.
2. Parents should learn CPR.
3. Keep all electrical radios, speakers and other appliances away from the swimming pool.
4. When you touch the filter, pump, or electrical parts, be sure the ground under your feet is “Bone Dry.”
5. All electrical outlets should have a GFCI and connections should be a minimum of 6 feet (1.83 m) from the outside perimeter of the wall of the pool.
From 6–10 feet (1.83–3.05 m), there should be either a fixed connection (outlet box) or twistlock connection with a GFCI.
6. Connect power cords to a 3-wire grounding-type outlet only.
7. Keep all breakable objects out of the pool area.
8. Alcohol consumption and pool activities do not mix. Never allow anyone to swim, dive or slide while under the influence of alcohol or drugs.
9. Severe electrical shock could result if you install your pump or filter on a deck. The pump or filter could fall into the water, causing severe shock or electrocution.
10. Do not install on a deck or other surface at, above, or slightly below the top rail of the pool.
11. Do not use the filter pump during severe weather conditions, i.e. electrical storms, tornadoes, etc.
12. Be aware of overhead power lines when vacuuming your pool or using a telescoping pole.
13. Check regularly for signs of wear that could make the pool unsafe.
14. Please contact pool site dealer or manufacturer for additional safety signs if deemed necessary.
15. For pool service, select a certified pool professional.
For additional safety information, see www.APSP.org.
Consumer Awareness Booklets and Information Source
Contact: U.S. Consumer Product Safety Commission at www.CPSC.gov/cpscpub/pubs/pool/pdf, Pub. #362 “Safety Barrier Guidelines for Home Pools”.
1. The Sensible Way to Enjoy Your Aboveground/Onground Swimming Pool
2. Children Aren’t Waterproof
3. Layers of Protection
4. Pool and Spa Emergency Procedures for Infants and Children
5. Be Safety Aware Copies of the above brochures are available free from the APSP. Go to: www.APSP.org.
Safety Education Programs and Materials Educational programs and materials (i.e., seminars, workshops, brochures, videos, instructional guides) are available from
the APSP, other aquatic safety groups, and by private firms. As a means of communicating useful safety information to pool owners/operators, and users, industry
members are permitted to provide such information to owners/operators and to request or require owners/operators to sign a statement that they have received, read,
and will follow the guidelines.
Other sources of safety information:
• www.cdc.gov
• www.cpsc.gov
• www.drowningpreventionalliance.com
• www.nspf.org
• www.safekids.org
ANSI American National Standards Institute
25 West 43rd Street, New York NY 10036
Contact: 212-642-4900
www.ansi.org
APSP Association of Pool & Spa Professionals
(formerly National Spa and Pool Institute)
2111 Eisenhower Avenue, Suite 500
Alexandria VA 22314-4679
Contact: 703-838-0083
www.apsp.org
5
Should you encounter any problems, contact Customer Service at (888) 919-0070 from 8 AM to 5 PM Mon. thru Fri.
MST. Extended operating days and hours during peak season requirements.
OWNER’S MANUAL

6
Should you encounter any problems, contact Customer Service at (888) 919-0070 from 8 AM to 5 PM Mon. thru Fri.
MST. Extended operating days and hours during peak season requirements.
ASME American Society of Mechanical Engineers
Two Park Avenue, New York NY 10016-5990
Contact: 800-843-2763 (U.S. & Canada) 973-882-1170 (outside North America)
www.asme.org
NSPI National Spa and Pool Institute (see APSP)
UL Underwriters Laboratories
333 Pfingsten Road,Northbrook IL 60062-2096
Contact: 877-854-3577 or 847-272-8800
www.ul.com
NSF NSF International
P.O. Box 130140
789 N. Dixboro Road
Ann Arbor MI 48105
Contact: 800-673-6275 or 734-769-8010
www.nsf.org
ASTM ASTM International (formerly American Society of Testing & Materials)
100 Barr Harbor Drive, P.O. BOX C700
West Conshohocken, PA 19428-2959
Contact: 877-909-2786 (USA & Canada) or 610-832-9585 (International)
www.astm.org
NEC National Electrical Code (see NFPA)
NFPA National Fire Protection Association
1 Batterymarch Park, Quincy MA 02169-7471
Contact: 800-344-3555 (U.S. & Canada) or 617-770-3000 (International)
www.nfpa.org
Filtration Systems
Any equipment connected to the circulation systems shall be positioned so as to prevent their being used as a means of access to the pool by young children. (See
the latest published edition of ANSI/ APSP-8 Model Barrier Code for Residential Swimming Pools, Spas, and Hot Tubs.)
Barrier
Barrier is necessary to provide protection against potential drowning and near drowning and that barriers are not a substitute for the constant supervision of children.
(See latest published edition of ANSI/APSP-8 Model Barrier Code for Residential Swimming Pools, Spas, and Hot Tubs.)
Risk of Drowning, Entrapment, and Diving Accidents
Publications are available that describe the risk of drowning, entrapment, and diving accidents. Available publications related to pool safety include the Association
of Pool and Spa Professionals’ (APSP) booklets entitled: The Sensible Way to Enjoy Your Aboveground/ Onground Swimming Pool, Children Aren’t Waterproof, Pool
and Spa Emergency Procedures for Infants and Children, Layers of Protection, and the latest published edition of ANSI/APSP-8 Model Barrier Code for
Residential Swimming Pools, Spas, and Hot Tubs.
Installer Responsibilities
All of these components shall be positioned so as to prevent their being used as a means of access to the pool by young children.
(See Barrier Code for Residential Swimming Pools, Spas, and Hot Tubs.)
SAVE THESE INSTRUCTIONS

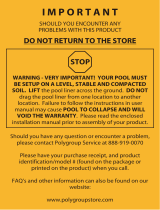
SAND PUMP POWER INFORMATION
PARTS LIST
1. READ ALL INSTRUCTIONS CAREFULLY and get a thorough understanding of what is required to assemble your ST series Filter Pump.
2. Before you begin to assemble the pool, identify, count, and check all parts needed for assembly.
3. It is recommended that you have some PETROLEUM JELLY on hand for lubricating the gaskets.
4. Installer shall follow written instructions provided for operation of the filter pump systems.
5. All electrical components shall be installed in accordance with Article 680 of the National Electrical Code (NEC) “Swimming Pools, Fountains and Similar
Installations” or its latest approved edition.
6. The ST Series Pump systems are manufactured by Polygroup
®
and ETL control number 4000608 and 4006317 - double insulated and grounded - 120 Volts A.C.
- 60 Hz. (ALL Units must have a minimum of 105 Volts A.C. to start and run properly.)
Sand Specifications:
Fill the tank with #20 silica sand ONLY. You can purchase the sand from your local home improvement or building material store.
WARNING: Using the incorrect sand may damage the filtration system and will void the warranty.
PRELIMINARY STEPS
12” SAND FILTER (WITH CP2000 PUMP)
SAND PUMP MODEL
10” SAND FILTER (WITH CP2000 PUMP)
350 watts
350 watts
WATTAGE AMPERAGE
3.0amps
3.0amps
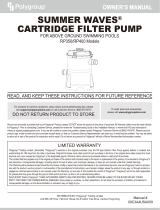
PARTS NAME QTY. PARTS NAME QTY.
Drain Valve Cap
GFCI Power Cord Set (Image Reference Only)
Sand Guard
Clamp
CAM-SHAFT Bolt Cap
6-Port Valve O-Ring
1
1
1
2
1
6
2
1
5
1
1
1
1
1
1
1
1
1
1
1
6-Port Valve
6-Port Valve Drain Outlet Cap
Pressure Gauge
Long Hose
Hose Clamp
Lock Pin
Pump
1.5” Fitting O-Ring
6-Port valve Drain Outlet View glass
6-Port Valve Handle
ITEMS ITEMS
1
2
3
4
5
6
7
8
9
10
11
12
13
14
15
16
17
18
19
20
Sand Tank Base
Sand Tank
Center Pipe
A) ST1100
B) ST1600
A) ST1100
B) ST1600
A) ST1100
B) ST1600
A) ST1100 12”Hose
B) ST1600 10”Hose
Short Hose
7
Should you encounter any problems, contact Customer Service at (888) 919-0070 from 8 AM to 5 PM Mon. thru Fri.
MST. Extended operating days and hours during peak season requirements.
OWNER’S MANUAL
21
22
23
24
25
26
27
28
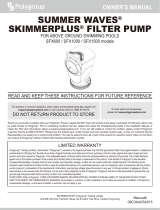
Fitting Gasket
1
1
1
1
2
1
1
2
Suction Fitting
Suction Fitting Thrust Washer (SF Washer)
Fitting Lock Nut
Suction Fitting Cap (SF/Service Cap)
Return Fitting
Return Fitting Diverter (RF Diverter)
Return Fitting Plug (RF/Service Plug)

10
20
11
12
19
9
7
8
6
2
3
1
5
18
18
13
13
15
15
16
15
15
14
17
18
18
18
16
4
8
Should you encounter any problems, contact Customer Service at (888) 919-0070 from 8 AM to 5 PM Mon. thru Fri.
MST. Extended operating days and hours during peak season requirements.
27
26
5
21
24
28
RETURN FITTING
25
22
5
21
23
24
SUCTION FITTING

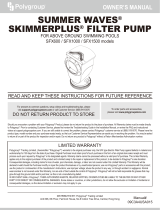
4. 1Snap the Pump on to the Sand 7 Tank Base 1
1. Set up the pool by following all the instructions that came with the
pool. Do not fill water until the Filter Pump is properly
installed. Locate the Outlet and Inlet openings on the pool wall.
SETUP INSTRUCTIONS
17
1
Inlet
Outlet
WARNING:
CLIMBING HAZZARD! PLEASE PREVENT CHILDREN FROM CLIMBING ON THE FILTRATION SYSTEM TO GAIN ACCESS TO THE POOL.
Before assembling your product, please take a few minutes to check the contents and become familiar with all the parts.
9
Should you encounter any problems, contact Customer Service at (888) 919-0070 from 8 AM to 5 PM Mon. thru Fri.
MST. Extended operating days and hours during peak season requirements.
OWNER’S MANUAL
2. Install the Suction Fitting 22 on the outlet opening of the pool.
24
23
21
22
3. Install the Return Fitting 26 on the Inlet opening of the pool.
21
24
26
27
Outside Pool Wall
Inside Pool Wall
Inside Pool Wall
Outside Pool Wall

7.
Put the Center Pipe inside the Sand T
2
ank . Position the
5Center Pipe at the bottom center of the Sand Tank .2
5
5
2
6
5
10
Should you encounter any problems, contact Customer Service at (888) 919-0070 from 8 AM to 5 PM Mon. thru Fri.
MST. Extended operating days and hours during peak season requirements.
secure the Pump with the Sand
17
Tank Base
1
5. Insert and push the Lock Pins all the way down to
16
6. With the Drain Valve of the Sand T 2ank pointing outward.
Place the Sand T
2
ank on the Sand Tank Base .
1
2
1
ALIGN
Drain Valve
16
17
1
PUSH
8. Place the Sand Guard 6 over the top opening of the
Center Pipe 5 .

2
10
12
5
ALIGN
10
9
2
5
9. Remove the Sand Guard and save for future use.
6
6
10.
Place the 6-Port Valve onto the Sand Tank . Make sure the 6-Port
Valve O-Ring is present at the bottom flange of the 6-Port Valve
. Make sure the center tube extending from the valve fits securely
with the Center Pipe . Rotate the 6-Port Valve so that the
Pressure Gauge is facing the same direction as the Drain Valve.
10
10
10
12
5
9
2
11
Should you encounter any problems, contact Customer Service at (888) 919-0070 from 8 AM to 5 PM Mon. thru Fri.
MST. Extended operating days and hours during peak season requirements.
OWNER’S MANUAL
8. Fill the tank with #20 silica sand ONLY. You can purchase the sand from your local home improvement or building material store.
5
2
Sand
Slowly pour the sand into the Sand Tank 2 until the sand level is between the Min and Max marks on the Center Pipe
5
.

CAM-HANDLE
CAM-BOLT
CAM-HANDLE
13. Turn the CAM-HANDLE so that the CAM-BOLT is inserted
into the slot on the other jaw.
14. Hold the CAM-HANDLE with one hand and start turning in
a clockwise direction.
12
Should you encounter any problems, contact Customer Service at (888) 919-0070 from 8 AM to 5 PM Mon. thru Fri.
MST. Extended operating days and hours during peak season requirements.
10
2
7
7
PUSH
11. 7Apply the Clamp to the flange of the 6-Port Valve 10
12.
7
Close the Clamp 7 by pushing the 2 jaws as close together as
and the Sand Tank
2
.
IMPORTANT: Align the hinge on the Clamp with the
7
ridge on the flange of the 6-Port Valve .
10
ALIGN
possible.

17.
Connect the Short hose between the Pump Outlet
and the 6-Port Valve Inlet. Tighten the Hose Clamp
with a flat blade screwdriver.
14
15
18. The sand filter pump is now fully assembled. Connect the sand filter
pump to the pool with the Long Hoses supplied with the pump.
Connect the pool Outlet to the Pump Inlet. And tighten the Hose
15
Clamp with a flat blade screwdriver. Connect the 6-Port Valve
Outlet to the pool Inlet Port. Tighten the Hose Clamp with a flat
15
blade screwdriver.
13
15
14
15
6-Port Valve Inlet
Pump Outlet
15
15
13
13
15
15
Outlet Port
Inlet Port
6-Port Valve Outlet
Pump inlet
13
Should you encounter any problems, contact Customer Service at (888) 919-0070 from 8 AM to 5 PM Mon. thru Fri.
MST. Extended operating days and hours during peak season requirements.
OWNER’S MANUAL
8
16. Insert the CAM-SHAFT 8 Bolt Cap to the end of the CAM-BOLT.
15. Continue to turn the CAM-HANDLE to tighten the jaw until no
more turns can be made. Align the CAM-HANDLE with the
Clamp
7
and push the CAM-HANDLE toward the Sand
Tank .
2
CAM-HANDLE
2
7

POWER SWITCH
Outlet port
Inlet port
11
12
1. Make sure all the Hoses are secured to the fittings on the pump and pool.
2. Always press down the 6-port Valve Handle before switching position.
3. Always turn off the pump power before switching positions on the 6-port valve.
4. It is critical to the backwash the sand before using the pump to clean the pool water. This will
8.
•
• Press down the 6-Port Valve Handle and turn to the “BACKWASH” position.
• Turn on the power of the Pump .
• Pool water is now circulating backward through the sand bed
to the drain outlet. Continue BACKWASH until the drain water
becomes clean and clear.
• Turn off the Pump and switch the handle to the “RINSE” position.
9. To start filtering the pool, turn the 6-Port Valve Handle to the “FILTER”
position and then switch on the Pump . Record down the sand tank pressure
reading from the Pressure Gauge . This reading indicates the initial tank
pressure when the sand bed is clean.
13
Follow these steps to BACKWASH the sand before first use:
Remove the 6-Port Valve Drain Outlet Cap from the 6-Port V
11 10
alve . (Optionally, a
1.5” [38mm] hose can be connected to the drain port to direct the waste water to a nearby drain.)
17
17
17
Turn on the Pump for ONE minute, this will clean up and level out the sand bed.
Turn of
17
f the Pump and replace the drain cap when done.
17
12
14
20
prevent fine sand flowing into the pool and also wash off any dirt or debris within the sand.
20
20
5. Make sure the power switch is in the “OFF” position. Plug the GFCI Power Cord Set to
4
a grounded power outlet.
6. IMPORTANT: To power up the filter pump, press the RESET button on the GFCI Power Cord Set
4
.
7. Fill the pool until the water level reaches the pool fill line.
Press
"RESET"
Button
To Start
Pump
Operation
How to use the GFCI plug
*Do not connect
to a timer device
4
14
Should you encounter any problems, contact Customer Service at (888) 919-0070 from 8 AM to 5 PM Mon. thru Fri.
MST. Extended operating days and hours during peak season requirements.
FUNCTIONS OF THE 6-PORT VALVE
WARNING: NEVER CHANGE POSITIONS ON THE 6-PORT VALVE WITH THE PUMP MOTOR RUNNING.
FUNCTION WATER FLOW DIRECTION
For normal filtration and regular vacuuming. Pool > Pump > Sand (forward) > Pool
Pool > Pump > Sand (backward) > Drain Outlet
Pool > Pump > Sand (forward) > Drain Outlet
Pool > Pump > Drain Outlet
Pool > Pump > Pool
To reverse the water flow and wash the sand bed. Backwash the
sand before first use and every 2 weeks. Always remove the drain
outlet cap when backwashing. Replace drain cap when done.
To cleanup and level out the sand bed after backwash.
Always remove the drain outlet cap when rinsing.
Replace drain cap when done.
For vacuuming directly to drain and lowering of water level. Always
remove the drain outlet cap when using the "WASTE" setting.
To recirculate water without filtering.
To shut off all flow between the pool and sand filter.
DO NOT TURN ON THE PUMP.
VALVE POSITION
FILTER
BACKWASH
RINSE
WASTE
RECIRCULATE
CLOSED
1
2
3
No Flow.
DO NOT TURN ON THE PUMP.
No flow.For winterizing and storage.NULL
OPERATING INSTRUCTIONS
WARNING: ALWAYS TURN OFF THE PUMP POWER BEFORE SWITCHING POSITIONS ON THE 6-PORT VALVE.
14
13
13
17
20
10
10. BACKWASH the tank when the pressure is 1-1.5 bar (14.5 - 21.8 Psi) above the
initial pressure. Or, BACKWASH the sand filter once every TWO weeks to
maintain water cleanliness.
11. To turn off the filter pump, press the power button on the Pump 17 and unplug the GFCI power cord 4 .
17

PUMP MOTOR PROTECTION
POOL MAINTENANCE
1. BACKWASH the sand bed when the pressure reading is 1-1.5 bar (14.5 - 21.8 Psi) above the initial pressure; or, BACKWASH the sand bed at least once every TWO
weeks.
2. Discard all the sand at the end of the season, wash the pump components, sand tank and 6-port valve thoroughly with fresh water before storage. Fill up with new
sand at the beginning of the swimming season.
3. Check and adjust pH and chlorine levels daily using required chemicals. See the "POOL WATER CARE” Section below.
4. Check filter pump output daily. If flow is reduced, see the “TROUBLESHOOTING GUIDE” Section below.
5. Check filter pump, hoses and fittings for leaks. If a leak is found, see the “TROUBLESHOOTING GUIDE” Section below.
6. Check seams in pool periodically. Minor repairs may be made with the repair patch kit (supplied with pool). Additional patches are available from Polygroup
®
at
polygroupstore.com or your local pool supply store.
POOL WATER CARE
1. The following items are required and readily available from your local pool supply store:
• TEST KIT - Used to check chlorine and pH levels.
• 1” CHLORINE TABLETS - Used to disinfect pool water and help control the growth of algae.
• pH CONTROL CHEMICALS - Used to adjust pH levels Up (Soda Ash) or Down (Acid).
• ALGAECIDES - Used to eliminate algae.
• SUPERCHLORINATOR - Used to destroy combined chlorine, ammonia, nitrogen, and organic
compounds.
• LEAF NET with handle - Used to remove leaves, trash, insects, etc. from pool. This item can be purchased
at polygroupstore.com.
• CHLORINE DISPENSER (available in most pool supply stores).
2. Use test kit daily to check pH and chlorine levels. Adjust accordingly using the required chemicals.
NOTE: Excessive levels of chlorine or low pH levels will damage pool liner.
3. The pool can be cleaned using a garden hose powered vacuum from Polygroup
®
or a pool supply store.
4. Using a foot bath near the pool to wash off your feet prior to entering the pool will assist in keeping the pool clean.
5. Well water often presents special problems with water chemistry. If you must use well water, take a sample to
your local pool chemical supplier for analysis before adding ANY chemicals.
6. Refer to the retail package box or visit the support pages at support.polygroupstore.com for the capacity of your pool. You will need this information to determine
the amount of chemicals you will need to correct the pool water.
NOTE: It is recommended to use a 5 gallon bucket of water to mix and dissolve your chemicals and then applying directly to the pool water. Follow manufacturer’s
label directions on all chemicals.
• Most pool supply stores will test your pool water for free and advise you of what chemicals you need, and the correct amount to use for your pool. You will need to
tell them the pool capacity in gallons.
7. IMPORTANT: We cannot over-stress the importance of proper and adequate daily chemical treatment. Chlorine and pH levels must be properly maintained at all
times. PUMP AND FILTER ALONE WILL NOT PREVENT ALGAE FROM GROWING IN POOL WATER; THIS CAN ONLY BE DONE BY MAINTAINING
PROPER CHLORINE AND pH LEVELS AT ALL TIMES.
• Maintain pH level between 7.3 and 7.8.
• Maintain chlorine level between 1.0 and 1.6 ppm (parts per million).
• Superchlorinate your pool at least every other week.
• NOTE:
1. Hot weather/heavy use may require pH and chlorine levels to be maintained on the upper side of the scale and superchlorination of the pool every week.
2. Using a pool cover and/or solar cover (available at polygroupstore.com) will assist in maintaining your pH and chlorine levels by reducing the amount of
3. evaporation from your pool.
CAUTION: Concentrated chlorine levels and low pH levels will damage pool. You must follow the instructions for the pool chemicals you use, as to quantity
and recommended usage. NEVER drop lumps or pellets of chemicals in pool; this may present a hazard to swimmers and/or damage your liner.
15
Should you encounter any problems, contact Customer Service at (888) 919-0070 from 8 AM to 5 PM Mon. thru Fri.
MST. Extended operating days and hours during peak season requirements.
OWNER’S MANUAL
IMPORTANT! Your f ilter pump is protected by a thermal switch. The switch senses the temperature of the filter pump. If it gets too hot, the switch will stop the
pump from running until it cools off. To restart the pump press the reset button on the GFCI when the filter pump has cooled down. This is a safety device to prevent
pump damage and prolong service life. If your pump is automatically turning off, it is because of high pool water temperature and/or low water flow through the pump.
If this happens you need to check the water flow and cor rect it if needed, as this filter pump uses the water flow for cooling. You may also want to run the pump at night
when the temperature is lower.

TROUBLESHOOTING GUIDE
PROBLEM CAUSE SOLUTION
1 Pump motor
fails to start
2 Sand filter
doesn't
clean pool
3 Sand filter
doesn't pump
water or flow
is very slow
4 Pump
doesn't
Work
5 6-port valve/
cover leaking
6 Hose leaking
7 Pressure gauge
doesn't Work
8 Sand is
flowing back
into the pool
A The motor is not plugged in.
Or GFCI not activated
A GFCI power cord must be plugged into a grounded 3-prong power outlet.
B Check the line voltage, it must be in the range of 105 to 125 Volts A.C.
B Low voltage
B Load with filter sand, see "sand loading instructions” on Page 10, Step 7.
B No filtering media in tank.
A Improper chlorine or pH levels
C Reset the GFCI plug and/or circuit breaker. If problem persists,
have the circuit checked by a qualified electrician.
C GFCI plug and/or circuit
breaker tripped
A Adjust the chlorine and pH level. Consult your local swimming
pool supply store.
A Clear any obstructions in the pool outlet fitting and pump intake hose.
A Clogged inlet or discharge.
C Set valve to “FILTER” position.
C Wrong 6-port valve setting position.
D Operate the filter for longer periods.D Excessively dirty pool.
E Clean the strainer at the pool outlet fitting.
E Obstructed pool outlet fitting is
restricting the water flow
B Tighten hose clamps, check hoses for damage and check pool water level.B An air leak on the intake line.
C Backwash the sand bed more frequently.C Sand media clogged with dirt.
B Clean strainer screens at pool inlet.B Strainer screen clogged up.
A Remove the 6-port valve and ensure that the o-ring is in present.
A Sand tank o-ring missing.
A Tighten/reinstall hoses clamp(s).A Hose clamp(s) not securely tight.
B Clean sand tank o-ring with garden hose water.
B Sand tank o-ring dirty.
C Tighten the hose clamps.
C Hose clamps are not tight.
B Ensure o-ring is in place and not damaged.B Hose connection fitting o-ring missing.
A Clear any obstructions in the intake by unscrewing it from the 6-port valve.A Clogged inlet of the pressure gauge.
B Contact Customer Service.B Pressure gauge damage.
B Discard all the used sand and replace with new sand. B Sand bed is calcified.
D Contact Customer Service.D 6-port valve damage.
C Tighten hose clamps, check hose for damage.C An air leak on the intake hose.
D Contact Customer Service.
A Fill pool to correct water level.A Low water level.
D Replace about 1" (25mm) of sand. Replace all the sand if problem persists.
D Let the motor cool down and restart again.
D Motor too hot and overload
protection has shut motor off.
D Crusting or caking on the
filtering sand surface.
E Remove any pool vacuuming device attached to the system line.
E Pool vacuuming device
attached to the system.
D Faulty motor or the
impeller is jammed.
A Use only No.20 silica sand with particle size range 0.45 to 0.85mm
(0.018 to 0.033 inches)and a Uniformity Coefficient less than 1.75.
A Sand is too small.
WARNING: TURN OFF THE PUMP AND UNPLUG THE POWER CORD BEFORE TROUBLESHOOTING THE FILTER PUMP.
16
Should you encounter any problems, contact Customer Service at (888) 919-0070 from 8 AM to 5 PM Mon. thru Fri.
MST. Extended operating days and hours during peak season requirements.

WINTERIZING, DISASSEMBLY & STORAGE
REPLACEMENT PARTS ORDERING INFO
1. First, unplug the GFCI Power Cord of the system.
2. Loosen all Hose Clamps . Remove the Hose and allow water to drain.
3. Remove Drain Valve Cap from the Sand Tank and allow water to drain. Replace and tighten the drain Valve Cap .
4
15
3
3
2
13
4. Clean and lubricate all Fitting O-Rings with petroleum jelly
18
.
5. Turn the Control Valve Handle to "NULL" position.
6. Allow the sand filter pump to dry completely. Store the sand filter pump in a cool and dry location away from direct sun light.
7. All items should be stored in a dry environment that remains above 32 degrees Fahrenheit at all times.
14
17
Should you encounter any problems, contact Customer Service at (888) 919-0070 from 8 AM to 5 PM Mon. thru Fri.
MST. Extended operating days and hours during peak season requirements.
OWNER’S MANUAL
ST1600
Key#
ST1100
PART # PART #
Description
Sand Tank Base
Sand Tank
Drain Valve Cap
Center Pipe
Sand Guard
Clamp
CAM-SHAFT Bolt Cap
6-Port Valve O-Ring
6-Port Valve
6-Port Valve Drain Outlet Cap
Pressure Gauge
59” Hose
ST1100 14” Hose
ST1600 12” Hose
Hose Clamp
Locking Pin
Pump
1.5” Fitting O-Ring
6-Port Valve Handle
6-Port valve Drain Outlet Window
1
2
3
5
6
7
8
9
10
11
12
13
14
15
16
17
18
19
20
P58PP1782E09
P58PP2884G8U
P58000000W05
P58PF0800W05
P586402000W1
P58PF8891P01
P58897023E09
P58897023G8U
P58PP2021K01
P58135001K01
P58PF8880E09
P58PF8910E09
P58PF8910G8U
P58340000000
P584150006W1
P584150014W1
--
P5842504500A
P58PP1759E09
P58PP1759G8U
P580C201SFW5
P530C2000S8U
P58037000K01
P58PF8950E09
P58PF8950G8U
P58PF8960C01
P58PP2884A09
P58000001W05
P58PF0800W05
P586402001W1
P58PF8891P01
P58897023E09
P58897023G8U
P58PP2021K01
P58135001K01
P58PF8880E09
P58PF8910E09
P58PF8910G8U
P58340000000
P584150006W1
--
P584150012W1
P5842504500A
P58PP1759E09
P58PP1759G8U
P580C201SFW5
P530C2000S8U
P58037000K01
P58PF8950E09
P58PF8950G8U
P58PF8960C01
--

ASME COMPLIANT SUCTION FITTING INFORMATION
9. The suction outlet PSF-100A or PSF-100B is to be replaced every 5 years.
10. No tool is required for installation.
11. Service and Winterizing Instructions
CAUTION! DO NOT EXCEED THE MAXIMUM ALLOWABLE FLOW RATE:
1. 45 Gallons per minute (2,700 Gallons per hour).
2. Carefully observe and inspect the suction outlet for damage and tampering before each use of the pool.
3. Missing, broken or cracked suction outlets must be replaced before using the pool.
4. Loose suction fittings should be reattached or replaced before using the pool.
5. Remove and store Suction Outlet assembly if temperatures are expected to fall below 32° F.
1. PSF-100A and PSF-100B Suction Outlets are certified by IAPMO in accordance with the ASME/ANSI A112.19.8b-2009 Suction Fitting for use in Swimming Pools,
Wading Pools, Spas, and Hot Tubs.
2. This is a submerged suction outlet for use with above ground swimming pools.
3. For single drain only. Use only ONE outlet for each pump.
4. Do not locate this suction outlet on sitting areas or on the backrest for such seating area.
5. Install this outlet at location recommended by the pool manufacturer.
6. The maximum allowable flow rate of this suction outlet is 45 gallons per minute (2,700 gallons per hour).
7. Connection Hose:
• Model PSF-100-A is to be connected with 1 1/4” (31.8mm) diameter hose.
• Model PSF-100-B is to be connected with 1 1/2” (38.1mm) diameter hose.
8. The suction outlet is to be mounted at the suction outlet opening as specified by the manufacturer of the above ground pool. The diameter of this opening should be
within the range of 1.77” to 1.85” (45.0mm to 47.0mm). Refer to the following diagram for detailed assembly instructions:
PSF-100A AND PSF-100B SUCTION OUTLET
(FOR ABOVE GROUND POOLS)
Swimming Pool
Water Hose
Hose Clamp
Lock Nut, To Be Tightened By Hand
Rubber Gasket
Water Cap, To Be Installed
Only During Pump Maintenance
Or Filter Change
Suction Fitting, PSF-100A
Or PSF-100B
Flat Washer
18
Should you encounter any problems, contact Customer Service at (888) 919-0070 from 8 AM to 5 PM Mon. thru Fri.
MST. Extended operating days and hours during peak season requirements.
OWNER’S MANUAL

BOMBA FILTRANTE DE ARENA
SUMMER WAVES
®
PARA PISCINAS SOBRE SUELO
Modelos ST1100 (10“) / ST1600 (12“)
LEA ESTAS INSTRUCCIONES Y CONSÉRVELAS PARA FUTURAS CONSULTAS
MANUAL DEL USUARIO
DISTRIBUIDO POR: Polygroup
®
LIMITED (MACAO COMMERCIAL OFFSHORE)
Unit J, 10
th
Floor, Macau Square, Av do Infante D.Henrique, No.43-53A, Macao
Manual #
09C3A40USA15
GARANTÍA LIMITADA
Polygroup® Limited (empresa comercial extraterritorial de Macao), (en adelante, “Polygroup®”) garantiza solo al comprador original la bomba eléctrica de tipo
ST ante defectos en el material y mano de obra durante 180 días desde la fecha de compra. El comprador original debe conservar el justificante de compra en
forma de recibo de venta original de la tienda, que deberá presentar si así se lo solicita Polygroup® o sus agentes delegados. Las reclama ciones de garantía
no pueden procesarse sin un justificante de compra válido. Esta garantía limitada solo se aplica al comprador original del producto y se limita a la reparación o
sustitución del producto, a discreción de Polygroup®. Los daños consiguientes, incluidas reclamaciones por pérdidas de agua, químicos para piscinas, daños
o uso no están cubiertos por esta garantía limitada.
Esta garantía no se considerará válida en caso de modificación o reparación del producto por parte del comprador o de personas no autorizadas, uso de
e piezas o accesorios no originales de Polygroup® en el producto, uso del producto contraviniendo las instrucciones del fabricante, uso de voltaje inadecuado,
cualquier tipo de abuso del producto o en caso de accidente o negligencia. Esta garantía no cubre el desgaste normal, así como los casos de fuerza mayor
fuera del control de Polygroup®.
EN NINGÚN CASO SERÁN RESPONSABLES Polygroup®, SUS AGENTES AUTORIZADOS, ENTIDADES ASOCIADAS O EMPLEADOS ANTE EL COMPRA
DOR O TERCEROS POR DAÑOS DIRECTOS O CONSIGUIENTES. Algunos estados o países, u otras jurisdicciones, no permiten la exclusión o limitación de
daños accidentales o consiguientes, en cuyo caso no se aplicarán las anteriores limitaciones o exclusiones.
Si le surge algún problema con su producto Polygroup®, NO devuelva el producto al establecimiento de compra. Las reclamaciones por garantía deben realizarse
directamente a Polygroup®. Antes de ponerse en contacto con el servicio de atención al cliente, revise la guía de resolución de problemas, en el manual de
instalación, o consulte las FAQ en support.polygroupstore.com Si continúa sin poder resolver el problema, póngase en contacto con el servicio de atención al cliente
de Polygroup® al (888)919-0070. Por favor tenga preparado el tipo de producto y el comprobante de compra. Nuestro representante del servicio de atención al
cliente le ayudará a resolver el problema. Puede ser necesario que nos envíe parte del producto o el producto en su totalidad para inspección y/o reparación. No
devuelva ningún producto a Polygroup® sin un número de autorización de devolución.
Para dudas sobre la instalación o resolución de problemas, visite
support.polygroupstore.com Servicio de atención al cliente: (888)919-0070
NO DEVUELVA EL PRODUCTO A LA TIENDA
Para pedir piezas y accesorios,
visite www.polygroupstore.com

Índice
Advertencias .................................................................................................................................................... 3 ~ 6
Pasos preliminares y Información sobre la potencia de la bomba de arena y Lista de piezas......................... 7 ~ 8
Instrucciones de montaje ................................................................................................................................. 9 ~ 13
Instrucciones de operación ...............................................................................................................................14
Protección del motor de la bomba y Mantenimiento de la piscina y Tratamiento del agua de la piscina
................ 15
Guía de resolución de problemas .................................................................................................................... 16
Información sobre el pedido de piezas de repuesto .........................................................................................17
Desmontaje y almacenamiento de la bomba de arena.....................................................................................17
Información sobre el accesorio de succión en conformidad con asme ........................................................... 18
2
En caso de problemas, póngase en contacto con el servicio de atención al cliente en el (888) 919-0070, de L a V de 8h a 17h.
MST. Los horarios de atención se amplían durante temporada alta.

3
En caso de problemas, póngase en contacto con el servicio de atención al cliente en el (888) 919-0070, de L a V de 8h a 17h.
MST. Los horarios de atención se amplían durante temporada alta.
MANUAL DEL USUARIO
INSTRUCCIONES IMPORTANTES DE SEGURIDAD
Al instalar y usar este equipo electrónico, deben seguirse siempre ciertas instrucciones básicas de seguridad, incluidas las siguientes:
LEA Y SIGA TODAS LAS INSTRUCCIONES
Consérvelas para futuras consultas. El incumplimiento de estas advertencias e instrucciones puede provocar lesiones graves o la muerte de los usuarios, especialmente los niños.
AVISO: LOS CLIENTES QUE ADQUIERAN PISCINAS PODRÍAN ESTAR OBLIGADOS POR LA LEGISLACIÓN ESTATAL O LOCAL A ABONAR GASTOS
ADICIONALES AL INSTALAR UNA PISCINA, EN CUMPLIMIENTO DE LAS LEYES ESTATALES O LOCALES RELATIVAS AL VALLADO Y OTROS REQUISITOS
DE SEGURIDAD. LOS CLIENTES DEBEN PONERSE EN CONTACTO CON LAS AUTORIDADES LOCALES CORRESPONDIENTES PARA MÁS
INFORMACIÓN. POLYGROUP NO ES RESPONSABLE POR GASTOS ADDICIONALES QUE PUEDAN OCCURIR.
Precauciones de seguridad para los niños
1. Los niños, especialmente los menores de 5 años, tienen un alto riesgo de ahogarse. Los ahogamientos suceden de manera silenciosa y rápida, pudiendo suceder en
tan poco como 5 cm de agua.
2. Mantenga a los niños dentro de su campo de visión, permanezca cerca y vigílelos activamente cuando estén cerca o dentro de la piscina y cuando esté llenando y
vaciando la piscina.
3. Al buscar un niño perdido, compruebe primero la piscina, incluso aunque piense que el niño está en casa.
4. Sitúe las bombas y filtros de manera que los niños no puedan subirse a ellos para acceder a la piscina.
5. ADVERTENCIA: Para reducir el riesgo de lesiones, no permita a los niños utilizar este producto a menos que estén bajo estrecha supervisión en todo momento.
Vallas para piscina
Muy importante: Las vallas para piscina, que restringen el acceso a la piscina a los niños pequeños, pueden ser un requisito legal. Las vallas son necesarias para
proporcionar protección contra un posible ahogamiento o casi ahogamiento. Las vallas no sustituyen la vigilancia constante de los niños. Consulte las normas y
códigos estatales y locales antes de instalar la piscina.
Equipamiento de la piscina
1. El uso de iluminación artificial para piscinas depende del dueño de la piscina. Una vez instalada, la iluminación debe cumplir el art. 680 del Código Eléctrico Nacional
(NEC) o la última edición aprobada y debe contar con el asesoramiento de un profesional autorizado.
2. Mantenga los cables eléctricos, radios, altavoces y otros aparatos eléctricos legos de la piscina.
3. No coloque la piscina cerca o debajo de cables eléctricos.
4. Todos los componentes instalados en y/o adyacentes a una piscina sobre tierra residencial deben instalarse en conformidad con los requisitos de la última edición
publicada del NFPA 70, Código Eléctrico Nacional (NEC
®
), art. 680, Piscinas, fuentes e instalaciones similares, así como con cualquier código estatal o local.
Sensibilización con respecto a la bomba de filtración
1. ADVERTENCIA: Riesgo de descarga eléctrica. Conéctela únicamente a un receptáculo con conexión a tierra. Este producto incluye un disyuntor diferencial. En
caso de que sea necesario sustituir el enchufe o el cable, utilice únicamente piezas de repuesto que sean idénticas.
2. ADVERTENCIA: Para reducir el riesgo de descarga eléctrica, sustituya el cable dañado inmediatamente.
3. ADVERTENCIA: Para reducir el riesgo de descarga eléctrica, no utilice alargadores para enchufar la unidad en la toma de corriente; utilice una toma que esté
correctamente situada.
4. ATENCIÓN: Para reducir el riesgo de descarga eléctrica, la piscina debe colocarse a 1,8 m, como mínimo, de cualquier toma de corriente. No coloque los aparatos
móviles a menos de 1,5 m de distancia de la piscina.
ADVERTENCIA
NO SE SIENTE
NI SE TUMBE
SOBRE LA PARED
DE LA PISCINA
PUEDE SUFRIR LESIONES
PERMANENTES
ADVERTENCIA
EVITE QUEDAR ATRAPADO!
ALÉJESE DE LOS ACCESORIOS DE DRENAJE O
SUCCIÓN. EL PELO, EL CUERPO Y LAS ALHAJAS
PUEDEN SER SUCCIONADOS POR EL SYSTEMA DE
DRENADO. CORRIENDO RIESGO DE QUEDAR ATRAPADO
BAJO EL AGUA Y AHOGARSE. NO USE LA PISCINA SI LA
TAPA DEL DRENAJE O DE LA BOCA DE SUCCIÓN DE
SALIDA ESTÁ ROTA O FALTANDO .
PELIGRO
¡EVITE AHOGAMIENTOS!
VIGILE DE CERCA A LOS NIÑOS CUANDO
ESTÉN EN LA PISCINA O EN SUS ALREDEDORES.
EN EL CASO DE NIÑOS MENORES DE 5 AÑOS, EL
RIESGO DE AHOGAMIENTO ES MAYOR. VACÍE LA
ALBERCA O PREVENGA EL ACCESO A ELLA
CUANDO NO SE ENCUENTRE EN USO.
NO SE PERMITE
ZAMBULLIDAS!
AGUA POCO PROFUNDA
¡PROHIBIDO ZAMBULLIRSE DE
CLAVADO! RIESGO DE
FRACTURA DELCUELLO Y
PARÁLISIS.

4
En caso de problemas, póngase en contacto con el servicio de atención al cliente en el (888) 919-0070, de L a V de 8h a 17h.
MST. Los horarios de atención se amplían durante temporada alta
5. ATENCIÓN: Esta bomba ha sido diseñada para usarla únicamente con piscinas almacenables. No debe utilizarla con piscinas de instalación permanente. Una
piscina almacenable ha sido fabricada de modo que puede desmontarse fácilmente para guardarla y volver a montarse íntegramente como al principio. Una piscina
de instalación permanente se construye sobre o debajo del suelo, o de forma que no puede ser desmontada para guardarse.
6. ATENCIÓN: Para mantener la protección continua contra posibles descargas eléctricas, esta unidad debe montarse sobre una base en conformidad con las
instrucciones de instalación.
7. No entierre el cable. Coloque el cable de forma que reduzca al máximo la posibilidad de que resulte dañado por cortacéspedes, cortasetos y otros equipos.
8. La unidad incluye un disyuntor diferencial (GFCI, por sus siglas en inglés). Para probarlo, pulse el botón de prueba. El disyuntor diferencial debe interrumpir el
suministro eléctrico. Pulse el botón de reinicio (reset). El suministro debería restablecerse. Si el disyuntor diferencial no funciona de esta forma, significa que está
defectuoso. Si el disyuntor diferencial interrumpe el suministro eléctrico a la bomba sin haber pulsado el botón de prueba, significa que hay una corriente de fuga, lo
que indica que puede producirse una descarga eléctrica. No utilice esa bomba. Desconéctela y llévela a un representante de servicio cualificado para que solucione
el problema antes de usarla.
9. La Bomba de Filtro debe ser montada por un adulto; hay que tener cuidado al desembalarla y montarla, ya que puede contener bordes y puntos afilados
potencialmente peligrosos que son partes necesarias para el funcionamiento de la Bomba de Filtro.
10. No use la piscina en caso de que falte o esté rota alguna tapa de las salidas de succión o drenaje. La succión puede provocar que quede atrapada alguna parte
del cuerpo, que se enreden el cabello o las joyas o ahogamiento. Repare o cambie las tapas de las salidas de succión o drenaje antes de utilizar la piscina. Durante
el uso nocturno de la piscina, utilice iluminación artificial para iluminar todas las señales de seguridad, escaleras, escalones, cubiertas y caminos.
11. El fondo de la piscina debe ser visible en todo momento desde el perímetro exterior de la piscina.
12. Coloque una lista de números de teléfono de emergencia, como la comisaría, bomberos, ambulancias y/o unidades de rescate más cercanas. Estos números
deben mantenerse cerca del teléfono más cercano a la piscina.
13. Tenga siempre a mano un equipo básico de salvamento, que incluya uno de los siguientes:
• Una vara rígida, resistente y ligera (un cayado) con una longitud no inferior a 366 cm.
• Una cuerda de al menos 6,35 mm de diámetro con una longitud igual a la mitad de la anchura máxima de la piscina o 15,24 m, la que sea inferior, que esté firmemente
sujeta a un flotador de salvamento aprobado con un diámetro exterior de aproximadamente 38,1 cm, o un dispositivo de flotación aprobado similar.
14. La piscina debe estar situada a una distancia mínima de 1,83 m de cualquier toma de corriente, y todas las tomas de 125 V 15-20 A situadas en un radio de 6 m
de la piscina deben protegerse con un interruptor diferencial (GFCI), donde las distancias sean, por medida, la ruta más corta que seguiría el cable de alimentación
de un aparato conectado al receptáculo, sin penetrar un suelo, pared, techo, marco con puerta abisagrada o corredera, apertura de una ventana o cualquier otra
barrera permanente eficaz, hasta la pared interior de la piscina.
Sistemas de circulación
1. Los instaladores deberán seguir las instrucciones escritas relativas a la posición de todos los equipos conectados a los sistemas de circulación.
2. El instalador deberá seguir las instrucciones escritas suministradas para utilizar los componentes de los sistemas de circulación.
3. Todos los componentes y bombas del sistema de circulación que deban sustituirse o repararse deberán instalarse siguiendo el manual de instrucciones de la bomba.
4. El equipo de circulación deberá instalarse siguiendo las instrucciones del fabricante para proporcionarle un montaje y soporte adecuado, para evitar daños
derivados de una mala alineación, colocación y vibración, y para minimizar la posibilidad de acumulación de residuos y humedad. Consulte el manual de
instrucciones de la bomba.
Productos químicos
Por motivos de seguridad, asegúrese de que la parte más profunda de la piscina siempre esté visible. El usuario debe llevar a cabo en todo momento un
mantenimiento adecuado del agua de la piscina para que esté limpia. Compruebe los niveles de pH y cloro periódicamente y asegúrese de que están dentro de los
límites recomendados. De vez en cuando, podrían ser necesarios productos químicos adicionales para tratar el agua. Lleve a analizar una muestra de agua a la tienda
local de suministros de piscina para determinar si necesita más productos químicos. Active el sistema de bomba del filtro durante al menos 6 horas al día. Limpie y
cambie el cartucho del filtro con frecuencia. Reemplazar solo con un cartucho de filtro original de la marca Polygroup
®
/ Summer Waves
®
. Consulte el manual de la
bomba del filtro para más información sobre el cuidado del agua.
Riesgo de quedar atrapado
1. Evitar quedarse atrapado: No debe haber salientes u otros obstáculos en la zona de baño que puedan causar que el usuario quede atrapado o enredado. No use
la piscina en caso de que falte o esté rota alguna tapa de las salidas de succión. La succión puede provocar que quede atrapada alguna parte del cuerpo, que se
enreden el cabello o las joyas o ahogamiento. Repare o sustituya la tapa de la salida de succión antes de dejar que se use la piscina.
2. ¡PELIGRO! PARA EVITAR LESIONES GRAVES O LA MUERTE, CIERRE LA PISCINA O SPA A LOS BAÑISTAS EN CASO DE QUE FALTE O ESTÉ ROTA Y/O
INOPERATIVA ALGUNA REJILLA/TAPA DE LAS SALIDAS DE SUCCIÓN.
3. No juegue ni nade cerca de las válvulas de succión o drenaje. Podrían quedar atrapados su cabello o su cuerpo, causándole lesiones permanentes o ahogamiento.
4. No entre a la piscina o spa en caso de que alguna válvula de succión o tapa de drenaje esté suelta, rota o falte.
5. En caso de encontrar una tapa de drenaje suelta, rota o notar que falta, notifíqueselo inmediatamente al operador o propietario de la piscina/spa.
Riesgo de ahogamiento.
1. Evite que los niños accedan a la piscina sin vigilancia instalando una valla u otra barrera aprobada alrededor de la piscina. Las leyes o códigos estatales o locales
pueden exigir una valla u otras barreras aprobadas. Consulte las normas y códigos estatales y locales antes de instalar la piscina.
2. Los juguetes, sillas, mesas y objetos similares a los que un niño podría subirse deben tener una altura mínima de 121,92 cm respecto a la piscina. El sistema del

5
En caso de problemas, póngase en contacto con el servicio de atención al cliente en el (888) 919-0070, de L a V de 8h a 17h.
MST. Los horarios de atención se amplían durante temporada alta
MANUAL DEL USUARIO
filtro de la bomba debe colocarse de manera que no pueda ser usado por los niños pequeños como medio de acceso a la piscina. No deje juguetes dentro de la
piscina al terminar de usarla, ya que los juguetes y objetos similares podrían atraer a los niños a la piscina.
3. Coloque los muebles (por ejemplo, mesas o sillas) lejos de la piscina para que los niños no puedan subirse a ellos para acceder a la piscina.
Riesgo de electrocución
1. Mantenga los cables eléctricos, radios, altavoces y otros aparatos eléctricos legos de la piscina.
2. No coloque la piscina cerca o debajo de cables eléctricos.
Primeros auxilios
1. Tenga siempre un teléfono en funcionamiento y una lista de número de emergencia cerca de la piscina.
2. Aprenda la técnica de la resucitación cardiopulmonar (CPR). En caso de emergencia, realizar inmediatamente la CPR puede salvar una vida.
Advertencia especial
1. Los códigos de construcción locales pueden exigir la obtención de un permiso de construcción o instalación eléctrica. El instalador debe seguir las normativas sobre
escollos, barreras, dispositivos y otros requisitos.
2. Las señales de seguridad deben cumplir los requisitos de la ANSI-Z535 y usar señalización de advertencia.
3. NO intente montar la piscina en condiciones climatológicas adversas, en caso de viento o cuando la temperatura sea inferior a 15,5 ºC.
4. La Bomba de Filtro es almacenable, por lo que debería desmontarse y guardarse cuando se esperen temperaturas por debajo de 0 ºC.
Advertencia de seguridad adicional
1. Siempre es necesaria la supervisión de un adulto.
2. Los padres deben aprender a realizar la CPR.
3. Mantenga los radios eléctricos, altavoces y otros aparatos eléctricos legos de la piscina.
4. Cuando toque el filtro, la bomba o las piezas eléctricas, asegúrese de que el suelo que pisa está totalmente seco.
5. Todas las tomas eléctricas deben tener un disyuntor diferencial y las conexiones deben estar a 1,83 m, como mínimo, del perímetro de la pared de la piscina.
A partir de 1,83 m-3,05 m, debe haber una connexion fija (caja de distribución) o una conexión de trabas giratorias con un disyuntor diferencial.
6. Conecte los cables de alimentación a una toma de corriente con conexión a tierra.
7. Mantenga todos los objetos que se puedan romper fuera de la zona de la piscina.
8. El consumo de alcohol no es compatible con las actividades de piscina. No deje que nadie nade, bucee o se deslice bajo la influencia del alcohol o las drogas.
9. Existe riesgo de descarga eléctrica si instala la bomba o el filtro en una plataforma. La bomba o el filtro podrían caer al agua, provocando descargas graves o
electrocución.
10. No instalar sobre una plataforma u otra superficie en, sobre o ligeramente por debajo del riel superior de la piscina.
11. No use la bomba de filtro durante condiciones climatológicas adversas, es decir, tormentas, tornados, etc.
12. Al aspirar la piscina o usar el mango telescópico, tenga en cuenta los cables eléctricos que pueda haber sobre usted.
13. Compruebe regularmente si existen signos de desgaste o pernos sueltos que puedan comprometer la seguridad de la plataforma.
14. Póngase en contacto con el distribuidor o fabricante de la piscina para obtener más señales de seguridad si lo considera necesario.
15. Acuda a un técnico de piscinas profesional para el servicio de mantenimiento de la piscina.
Para más información entre en www.APSP.org
Folleto de sensibilización del consumidor y fuente de información
Contacto: U.S. Consumer Product Safety Commission at www.CPSC.gov/cpscpub/pubs/pool/pdf, Pub. #362 “Safety Barrier Guidelines for Home Pools”.
1. La manera sensata de disfrutar de su piscina sobre suelo
2. Los niños no son a prueba de agua
3. Capas de protección
4. Procedimientos de emergencias en piscinas y spas para bebés y niños
5. Existen copias gratuitas de los folletos anteriores sobre seguridad del APSP. Vaya a: www.APSP.org.
Existen programas educativos y materiales sobre los programas educativos (es decir, seminarios, talleres, folletos, vídeos, guías) del APSP, otros grupos de seguridad
acuática y empresas privadas. Con el objetivo de comunicar información de seguridad útil a los dueños/operadores y usuarios de piscinas, está permitido que los miembros
de la industria suministren esta información a los dueños/operadores y que soliciten o exijan a los dueños/operadores una declaración firmada de que han recibido, leído y
seguirán las instrucciones.
Otras fuentes de información de seguridad:
• www.cdc.gov
• www.cpsc.gov
• www.drowningpreventionalliance.com
• www.nspf.org
• www.safekids.org

6
En caso de problemas, póngase en contacto con el servicio de atención al cliente en el (888) 919-0070, de L a V de 8h a 17h.
MST. Los horarios de atención se amplían durante temporada alta.
ANSI American National Standards Institute
25 West 43rd Street, New
York NY 10036
Contacto: 212-
642-4900
www.ansi.org
APSP Association of Pool & Spa Professionals
(formerly National Spa and Pool Institute)
2111 Eisenhower Avenue, Suite 500
Alexandria VA 22314-4679
Contacto: 703-838-0083
www.apsp.org
ASME American Society of Mechanical Engineers
Two Park Avenue, New York NY 10016-5990
Contacto: 800-843-2763 (U.S. & Canada) 973-882-1170 (outside North America)
www.asme.org
NSPI National Spa and Pool Institute (s
ee
APSP)
UL Underwriters Laboratories
333 Pfingsten Road, Northbrook IL 60062-2096
Contacto: 877-854-3577 or 847-272-8800
www.ul.com
NSF NSF International
P.O. Box 130140
789 N. Dixboro Road
Ann Arbor MI 48105
Contacto: 800-673-6275 or 734-769-8010
www.nsf.org
ASTM ASTM International (formerly
American Society of Testing & Materials)
100 Barr Harbor Drive, P.O. BOX C700
West Conshohocken, PA 19428-2959
Contacto: 877-909-2786 (USA & Canada) or 610-832-9585 (International)
www.astm.org
NEC National Electrical Code (see NFPA)
NFPA National Fire Protection Association
1 Batterymarch Park, Quincy MA 02169-7471
Contacto: 800-344-3555 (U.S. & Canada) or 617-770-3000 (International)
www.nfpa.org
Sistemas de filtración
Hay
que
colocar cualquier equipo conectado a
los sistemas de
ventilación de
manera que los niños no
lo puedan usar como medio de acceso a
la piscina. (Véase la
última edición publicada del Código sobre dispositivos de seguridad ANSI/APSP-8 para piscinas, spas y bañeras de hidromasaje de uso residencial).
Barrera
Las barreras son necesarias para ofrecer protección ante posibles ahogamientos y casi ahogamientos, y no son un sustituto de la supervisión constante de los niños.
(Véase la última edición publicada del Código sobre dispositivos de seguridad ANSI/APSP-8 para piscinas, spas y bañeras de hidromasaje de uso residencial).
Riesgo de accidentes de ahogamiento, atrapamiento y buceo
Hay publicaciones disponibles que describen el riesgo de accidentes de ahogamiento, atrapamiento y buceo. Las publicaciones relacionadas con la seguridad de la
piscina disponibles incluyen folletos de la Asociación de profesionales de piscina y spa (APSP) titulados: The Sensible Way to Enjoy Your Aboveground/
Onground Swimming Pool [La forma sensata de disfrutar de su piscina desmontable y fija ], Children Aren't Waterproof [Los niños no son a prueba de agua],
Pool and Spa Emergency Procedures for Infants and Children [Procedimientos de emergencia en piscinas y spas para bebés y niños], Layers of Protection [Capas
de protección], y la última edición publicada del Código sobre dispositivos de seguridad ANSI/APSP-8 para piscinas, spas y bañeras de hidromasaje de uso
residencial.
Responsabilidades del instalador
La instalación de todos estos componentes debe realizarse de manera que los niños no lo puedan usar como medio de acceso a la piscina.
(Véase el Código de Carrier sobre piscinas, spas y bañeras de hidromasaje residenciales).
GUARDE ESTAS INSTRUCCIONES

INFORMACIÓN SOBRE LA POTENCIA DE LA
BOMBA DE ARENA
LISTA DE PIEZAS
1. LEA ATENTAMENTE TODAS LAS INSTRUCCIONES y comprenda bien lo que hace falta para montar la bomba de filtración de la serie ST.
2. Antes de empezar a montar la piscina, identifique, cuente y compruebe todas las piezas necesarias para el montaje.
3. Se recomienda tener VASELINA a mano para lubricar las juntas.
4. El instalador deberá seguir las instrucciones suministradas por escrito sobre el funcionamiento de los sistemas la bomba de filtración.
5. Todos los componentes eléctricos deberán instalarse de acuerdo con el artículo 680 del Códico Eléctrico Nacional, “Piscinas, fuentes e instalaciones similares” o
su última edición aprobada.
6. Los sistemas de bomba de filtración de la serie CP son fabricados por Polygroup® con el número de control de ETL 400608 y 4006317, con doble aislamiento y
conexión a tierra, 120 VCA y 60 Hz. (Todas las unidades deben contar con 105 VCA como mínimo para empezar a funcionar correctamente).
PASOS PRELIMINARES
FILTRO DE ARENA DE 12” (CON LA BOMBA CP2000-S)
MODELO DE LA BOMBA DE ARENA
FILTRO DE ARENA DE 10” (CON LA BOMBA CP2000-S)
350 watts
350 watts
VATAJE AMPERAJE
3.0 amps
3.0 amps
7
En caso de problemas, póngase en contacto con el servicio de atención al cliente en el (888) 919-0070, de L a V de 8h a 17h.
MST. Los horarios de atención se amplían durante temporada alta.
MANUAL DEL USUARIO
NOMBRE DE LAS PIEZAS
Cant.
NOMBRE DE LAS PIEZAS
Cant.
Tapón del Drenaje
Cable y adaptador con disyuntor diferencial
Guardia de arena
Abrazadera
Tornillo para la Abrazadera
Empaque de la válvula de 6 puertos
1
1
1
2
1
6
2
1
5
1
1
1
1
1
1
1
1
1
1
1
Válvula de 6 puertos
Tapón del drenaje de la válvula de 6 puertos
Calibrador de Presión
Manguera larga
Abrazadera de la manguera
Pasador de bloqueo
Bomba
Anillo negro 1,5”
Ventana del drenaje de la válvula de 6 puertos
Mango de la válvula de 6 puertos
ELEMENTOS ELEMENTOS
1
2
3
4
5
6
7
8
9
10
11
12
13
14
15
16
17
18
19
20
Base del depósito
de arena
Depósito de arena
Pipa central
A) ST1100
B) ST1600
A) ST1100
B) ST1600
A) ST1100
B) ST1600
A) ST1100 12” Manguera
B) ST1600 10” Manguera
Manguera corta
21
22
23
24
25
26
27
28
Empaque de Retorno
1
1
1
1
2
1
1
2
Accesorio de succión
Junta de succión (arandela SF)
Tuerca de succión
Tapón del accesorio de succión (tapón SF)
Accesorio de retorno
Desviador de la boquilla de retorno
Tapón (uso para servicio solamente)
Especificaciones de la arena:
Llene el tanque con arena de sílice # 20 SOLAMENTE. Usted puede comprar la arena de su local de mejoras para el hogar o tienda de material
de construcción.
ADVERTENCIA: El uso de arena incorrecta puede dañar el sistema de filtración y anulará la garantía.

10
20
11
12
19
9
7
8
6
2
3
1
5
18
18
13
13
15
15
16
15
15
14
17
18
18
18
16
4
8
En caso de problemas, póngase en contacto con el servicio de atención al cliente en el (888) 919-0070, de L a V de 8h a 17h.
MST. Los horarios de atención se amplían durante temporada alta
27
26
5
21
24
28
Accesorio de retorno
25
22
5
21
23
24
Accesorio de succión

4. 17Encaje la bomba en la base del depósito de arena .1
1. Instale la piscina siguiendo todas las instrucciones suministra-
das con la misma. No la llene de agua hasta que haya instalado
correctamente la bomba de filtración. Coloque los orificios de
entrada y salida en la pared de la piscina.
INSTRUCCIONES DE MONTAJE
17
1
Orificio de
Entrada
Orificio de Salida
ADVERTENCIA: COLOQUE ESTE PRODUCTO APARTADO DE LA PISCINA A FIN DE EVITAR QUE LOS NIÑOS SE SUBAN A ÉL Y ACCEDAN A LA PISCINA.
Antes de montar el producto, dedique unos minutos a revisar el contenido y familiarícese con todas las piezas.
9
En caso de problemas, póngase en contacto con el servicio de atención al cliente en el (888) 919-0070, de L a V de 8h a 17h.
MST. Los horarios de atención se amplían durante temporada alta
MANUAL DEL USUARIO
2. Instale el accesorio de succión 22 en la abertura de
salida de la piscina.
24
23
21
22
3. Instale el adaptador de retorno 26 en la abertura de
entrada de la piscina.
21
24
26
27
Parte Fuera de La Piscina
Parte Fuera de La Piscina
Parte Interior
de La Piscina
Parte Interior
de La Piscina

7.
Meta el pipa dentro del depósito de arena .
2
Deje que el pipa se asiente en el centro del5
/ depósito de arena .2
5
8. Conecte la guardia contra arena a la apertura superior
6
del Pipa Central .5
5
2
6
5
10
En caso de problemas, póngase en contacto con el servicio de atención al cliente en el (888) 919-0070, de L a V de 8h a 17h.
MST. Los horarios de atención se amplían durante temporada alta
17
asegurar la bomba a la base del depósito de arena .
1
5. Coloque los pasadores de bloqueo hasta abajo para
16
2
1
ALINEAR
Válvula
de drenaje
16
17
1
PRESIONAR
6. Con la válvula de desagüe del depósito de arena
colocada hacia fuera. Coloque el depósito de arena
en su base .
1
2
2

2
10
12
5
ALINEAR
10
9
2
5
futuros usos.
10. Remueva la guardia contra arena y consérvela para
6
6
10
5
9
11
En caso de problemas, póngase en contacto con el servicio de atención al cliente en el (888) 919-0070, de L a V de 8h a 17h.
MST. Los horarios de atención se amplían durante temporada alta
MANUAL DEL USUARIO
9. Llene el depósito con arena de sílice #20 UNICAMENTE. Puede comprar la arena en una tienda de bricolaje o almacén de materiales de
construcción. Vaya echando arena poco a poco en el depósito de arena hasta que el nivel de arena esté entre las marcas de mínimo
y máximo del pipa central .
5
2
Arena
2
5
2
11.
Coloque la válvula de 6 puertos en el depósito de arena .
Asegúrese de que el anillo negro de la válvula de 6 puertos se
encuentre en la parte de abjo de la válvula de 6 puertos .
Asegúrese de que la pipa central, extendida desde la válvula, está
correctamente encajada en la pipa central . Gire la válvula de 6
puertos de manera que el calibrador de presión quede
posicionado enla misma dirección que la válvula de drenaje
10
10
12

PASADOR DE LA VALVULA
PERNO DEL EJE DE LEVAS
MANGO
DE LA
VALVULA
14. Gire el Mango de manera que el Pasador quede
introducido en la ranura de la otra mordaza.
15. Sujete el Mango con una mano y empiece a girarlo hacia
la derecha.
12
En caso de problemas, póngase en contacto con el servicio de atención al cliente en el (888) 919-0070, de L a V de 8h a 17h.
MST. Los horarios de atención se amplían durante temporada alta
10
2
7
7
PRESIONAR
12. 7Coloque la abrazadera en la reborde de la válvula de 6
10
puertos y el depósito de arena .
2
13.
7
Cierre la abrazadera acercando las 2 mordazas lo máximo posible.
ALINEAR
I
MPORTANTE: Alinie la bisagra a la abrazadera 7 con
cresta de la valvual de 6 puertos 10

18. Conecte la manguera pequeña entre la salida de la bomba
y la entrada de la válvula de 6 puertos. Ajuste la abrazadera
en la manguera con un destornillador de cabeza plana.
19. Ahora la bomba de arena está totalmente montada. Conecte la
15
14
15
Entrada de la válvula de 6 puertos
Salida de la bomba
15
15
13
13
15
15
Puerto
de salida
Puerto
de entrada
bomba de arena a la piscina con las mangueras largas suminis tradas
con la bomba. Conecte la salida de la piscina a la entrada de la
bomba. Y ajuste la abrazadera a la manguera con un destornillador de
cabeza plana. Conecte la salida de la válvula de 6 puertos al puerto
de entrada de la piscina.
Ajuste la abrazadera a la manguera con un
destornillador de cabeza plana.
Salida de la válvula de 6 puertos
Entrada de la bomba
13
En caso de problemas, póngase en contacto con el servicio de atención al cliente en el (888) 919-0070, de L a V de 8h a 17h.
MST. Los horarios de atención se amplían durante temporada alta
MANUAL DEL USUARIO
8
17. Inserte el tapón en el tornillo para la abrazadera.
16. Siga girando el Mango para apretar la mordaza hasta que no
pueda girarse
más. Alinee el PASADOR/TORNILLO con la
abrazadera 7 y empújelo hacia el depósito de arena .
PASADOR DEL EJE DE LEVAS
2
7
2
8

11
12
INSTRUCCIONES DE OPERACIÓN
Pulse
el botón
"RESET"
para
arrancar
la bomba
*No conectar a
un temporizador
Cómo utilizar el tapón del GFCI
1. Asegúrese de que todas las mangueras están bien sujetas a la bomba de la piscina.
2. Presione siempre el mango de la válvula de 6 puertos antes de cambiar de posición.
3.
4.
5.
•
colocarse una manguera de 1.5” [38mm] al puerto de desagüe para enviar el agua residual a un
desagüe cercano).
• Ahora el agua de la piscina está circulando a contracorriente a través del lecho de
arena hacia la salida de desagüe. Continúe realizando el CONTRALAVADO hasta
que el agua drenada esté limpia y clara.
• Apague la bomba y cambie el mango a la posición “ENJUAGUE”.
Apague la bomba cuando haya finalizado. Apague la bomba cuando haya
acabado.
9. Para empezar a filtrar la piscina, coloque el mango de la válvula de 6 puertos
en la posición “FILTRADO” y luego active la bomba . Compruebe la presión del
depósito de arena que aparece en el manómetro . Esta lectura indica la presión
inicial del depósito cuando el lecho de arena está limpio.
10. Realice un CONTRALAVADO del depósito cuando la presión esté 1-1,5 bar
(14,5 – 21,8 Psi) por encima de la presión inicial. O, realice un CONTRALAVADO
del filtro de arena cada DOS semanas para mantener el agua limpia.
13
11
Retire el tapón del drenaje de la válvula 6 puertos . (Opcionalmente, puede
10
17
17
17
17
12
14
20
Apague siempre la bomba al cambiar de posición.
Es muy importante hacer una resaca de la arena antes de usar la bomba para limpiar el agua de la
piscina. Esto evitará que entre arenilla a la piscina y también limpiará cualquier suciedad o residuo de la
arena.
Asegúrese de que el botón de encendido está en posición “OFF” (apagado). Conecte el cable de
alimentación del interruptor diferencial a una toma de corriente con conexi
4
ón a tierra.
• Presione el mango de la válvula de 6 puertos 10 y colóquela en posición “RESACA”.
• Active la bomba .
17
20
6. IMPORTANTE: Para poner en marcha la bomba de la depuradora, pulse el botón RESET (resetear) del
cable de alimentación DDR.
4
.
7. Llene la piscina hasta que el nivel del agua alcance la línea de llenado de la piscina.
8. Siga lo pasos siguientes para continuar con una RESACA de la arena antes del primer uso:
4
14
En caso de problemas, póngase en contacto con el servicio de atención al cliente en el (888) 919-0070, de L a V de 8h a 17h.
MST. Los horarios de atención se amplían durante temporada alta
EL SWITCH DEL MOTOR
Salida
Entrada
14
13
13
17
20
10
FUNCIONES DE LA VÁLVULA DE 6 PUERTOS
CUIDADO: NUNCA CAMBIE DE POSICIONES EN LA VALVULA DE 6 PUERTOS CUANDO ESTE PRENDIDA LA BOMBA
FUNCIÓN DIRECCIÓN DEL FLUJO DE AGUA
Para una filtración normal y una succión habitual.
Piscina > Bomba > Arena (hacia el frente) > Piscina
Piscina > Bomba > Arena (retroceder) > Boca de drenaje
Piscina > Bomba > Arena (hacia el frenter) > Boca de drenage
Piscina > Bomba > Boca de drenaje
Piscina > Bomba > Piscina
Para invertir el flujo de agua y lavar la cama de arena. Realice una
resacade la arena antes de usar por primera vez y cada dos
semanas. Siempre remueva el tapón del drenaje antes de hacer
una resaca. Reemplaze el tapón cuando termine.
Para limpiar y nivelar la cama de arena después de la resaca,
siempre remueva el tapón cuando enjuague. Reemplaze el tapón
cuando termine.
Para aspirar directamente y bajar el nivel del
agua. Siempre remueva.
Para recircular el agua sin filtración.
Para cerrar todos los flujos entre la piscina y la depuradora de arena.
NO ENCIENDA LA BOMBA.
1
2
3
POSICIÓN DE LA VÁLVULA
FILTRADAR
(BACKWASH)
RESACA
ENJUAGUE
RESIDUO
RECIRCULACIÓN
CERRADO
No hay flujo.
NO ENCIENDA LA BOMBA.
No hay flujo.
Para el acondicionamiento en el invierno y el almacenamiento.
NULO
11. Para apagar el sistema de filtro, presione el botón de encender y desenchufe
17
el cable .
4

PROTECCIÓN DEL MOTOR DE LA BOMBA
¡IMPORTANTE! La bomba de filtración está protegida con un interruptor térmico. El interruptor capta la temperatura de la bomba de filtración. Si se calienta demasiado, el
interruptor parará el funcionamiento de la bomba hasta que se enfríe. Una vez se haya enfriado, la bomba de filtración volverá a funcionar automáticamente. Se trata de un
dispositivo de seguridad que sirve para evitar que la bomba se dañe y ampliar su vida útil. Si la bomba se apaga automáticamente, es porque la temperatura del agua de la
piscina es elevada y/o porque el flujo de agua que pasa por la bomba es escaso. Si esto ocurre, tiene que revisar el flujo de agua y corregirlo si es necesario, ya que esta
bomba de filtración utiliza el flujo de agua para enfriarse. Si quiere, también puede poner en funcionamiento la bomba durante la noche, cuando la temperatura es más baja.
MANTENIMIENTO DE LA PISCINA
1. Realice un CONTRALAVADO del depósito cuando la presión esté 1-1,5 bar (14,5 – 21,8 Psi) por encima de la presión inicial. o contralve el deposito por lo menos una
vez cada DOS semanas.
2. Elimine toda la arena al final de la temporada y lave bien todos los componentes de la bomba, el depósito de arena y la válvula de 6 puertos con agua limpia antes de
guardarlos. Vuelva a llenar el tanque con arena al principio de la próxima temporada..
3.
Compruebe y ajuste cada día los niveles de pH y cloro utilizando los productos químicos adecuados. Consulte la sección abajo "TRATAMIENTO DEL AGUA DE LA PISCINA”.
4. Compruebe la salida de la bomba filtrante a diario. Si el flujo se reduce, consulte la sección abajo “GUÍA DE RESOLUCIÓN DE PROBLEMAS”.
5.
Compruebe si hay alguna fuga en la bomba filtrante, las mangueras y los accesorios. Si encuentra una fuga, consulte la sección abajo “GUÍA DE RESOLUCIÓN DE
PROBLEMAS”.
6. Compruebe las costuras de la piscina periódicamente. Puede realizar pequeñas reparaciones con el juego de parches para reparaciones (suministrado con la piscina).
Puede obtener parches adicionales en Polygroup
®
a polygroupstore.com o en su tienda de suministros de piscina.
TRATAMIENTO DEL AGUA DE LA PISCINA
1. Los siguientes artículos son necesarios y puede encontrarlos en su tienda local de suministros para piscinas:
• KIT DE PRUEBA. Se utiliza para comprobar los niveles de cloro y pH.
• PASTILLAS DE CLORO. Se usan para desinfectar el agua de la piscina y ayudan a controlar el crecimiento de algas.
• PRODUCTOS QUÍMICOS PARA CONTROLAR EL pH. Se utilizan para ajustar el nivel de pH hacia arriba (carbonato
de sodio) o hacia abajo (ácido).
• ALGUICIDAS. Se utilizan para eliminar las algas.
• SUPERCLORADOR. Se utiliza para destruir la combinación de cloro, amoniaco, nitrógeno y compuestos orgánicos.
• RED PARA HOJAS con mango. Se utiliza para quitar hojas, suciedad, insectos, etc. de la piscina.
• DISPENSADOR DE CLORO (disponible en la mayoría de las tiendas de material de piscinas).
15
En caso de problemas, póngase en contacto con el servicio de atención al cliente en el (888) 919-0070, de L a V de 8h a 17h.
MST. Los horarios de atención se amplían durante temporada alta
MANUAL DEL USUARIO
2. Utilice el kit de prueba cada día para comprobar los niveles de pH y cloro. Ajuste según corresponda utilizando los
productos químicos adecuados.
NOTA : Niveles excessivos de cloro o niveles bajos de pH pueden dañar su lona de piscine y también cambiar el color de la lona.
3. Se puede limpiar la piscina con una aspiradora usando una mangera de jardín de Polygroup® o puede comprarla en una tienda de suministros para piscina.
4. Puede utilizar una cubeta cercade la piscina para lavarse los pies antes de entrar, eso ayudará a mantener la piscina limpia.
5. El agua de pozo a veces puede presentar problemas especiales con la química del agua. Si tiene que usar agua de pozo, lleve una muestra a su proveedor local
de productos químicos para hacer análisisantes que añada CUALQUIER sustancia química.
6. Consulte el MANUAL DE INSTRUCCIONES DE LA PISCINA para saber su capacidad o visite nuestras páginas de apoyo en support.polygroupstore.com. Necesitará
esa información para determinar la cantidad de químicos que sean necesarios para corregir el agua de su piscina.
NOTA: Se recomienda usar un cubo de agua 5 gallones (19 l) para mezclar y disolver los químicos y, a continuación, seguir directamente las instrucciones de la
etiqueta del fabricante.
*La mayoría de las tiendas de suministros para piscinas le harán una prueba del agua de su piscina gratuitamente y le aconsejarán sobre qué productos químicos
debe utilizar para su piscina. Tendrá que decirles la capacidad de la piscina en galones.
7. IMPORTANTE. No podemos darle excesiva importancia al tratamiento químico adecuado diario. Los niveles de cloro y pH deben tomarse adecuadamente de forma
puntual. LA BOMBA Y EL FILTRO POR SÍ MISMOS NO EVITARÁN LA APARICIÓN DE ALGAS EN EL AGUA DE LA PISCINA; ESTO SOLO PUEDE EVITARSE
MANTENIENDO EL NIVEL ADECUADO DE CLORO Y pH EN TODO MOMENTO.
• Mantenga el nivel de pH entre 7.3 y 7.8.
• Mantenga el nivel de cloro entre 1.0 y 1.6 ppm (partes por millón).
• Debe superclorinar su piscina al menos una vez cada dos semanas.
NOTA:
1. El clima cálido/uso intensivo pueden requerir unos niveles de pH y cloro situados en la parte alta de la escala y el super clorinación de la piscina.
2. Utilizando una cubierta de piscina y/o una cubierta térmica (disponible en polygroupstore.com) ayudará a mantener los niveles de pH y cloro reduciendo la
cantidad de evaporación de la piscina. CUIDADO. El nivel de cloro concentrado y el nivel de pH dañarán la piscina. Debe seguir las instrucciones de cantidad y
uso recomendado de los químicos que utiliza para la piscina.
NUNCA deje caer terrones o productos químicos en la piscina; esto puede suponer un riesgo para los nadadores y/o dañar el recubrimiento de la piscina.

GUÍA DE RESOLUCIÓN DE PROBLEMAS
PROBLEMA CAUSA SOLUCIÓN
1 El motor no
arranca
2 La depuradora de
arena no limpia la
piscina
3 La depuradora de
arena no bombea
el agua o es muy
lenta
4 La bomba no
funciona
5 válvula de 6 puertos/
Fuga en la cubierta
6 Fuga en la manguera
7 El manómetro no
funciona
8 La arena vuelve
a la piscina
A El motor no está conectado. O el
interruptor diferencial no está activado.
A El cable de alimentación del interruptor diferencial debe estar conectado a
un tomacorriente conectado a tierra.
B Compruebe la tensión de alimentación, debe ser de entre 105 y 125 V.B Voltaje bajo
B Cargaue con arena para filtros (consultar “instrucciones para cargar arena”).
B No hay medios de filtrado en el depósito.
A Niveles inadecuados de cloro o pH.
C Reinicie el enchufe del disyuntor y/o el interruptor de circuito. Si el problema
continúa, lleve el circuito a un electricista cualificado para que lo revise.
C El tapón del disyuntor diferencial y/o el
interruptor de circuito se ha desconectado
A Ajuste el nivel de cloro y pH. Acuda a su tienda de suministros de piscina.
A Limpie cualquier obstrucción de la boca de salida de la piscina y de la
manguera de entrada de la bomba.
A Descarga o entrada atascada.
C Coloque la válvula en posición “FILTRADO”.C
Posición incorrecta de la válvula de 6 puertos.
D Haga funcionar el filtro durante periodos más largos.D Piscina excesivamente sucia.
E Limpie el filtro del accesorio de salida de la piscina
E La boca de salida de la piscina obstruida
está limitando el flujo de agua.
B Ajuste las abrazaderas de la manguera y compruebe que las mangueras no
están dañadas y el nivel de agua de la piscina.
B Fuga de aire en el conducto de entrada.
C Realice contralavados al filtro de arena con más frecuencia.
C Los medios de filtración de arena están
atascados con suciedad.
B Limpie las pantallas del colador (accesorio de succión) de la toma de la piscina.
B Pantalla de la rejilla obstruida.
A Retire la válvula de 6 puertos y asegúrese de que este el anllo negro.
A Falta la junta tórica del depósito de arena.
A Apriete/reinstale las abrazaderas de la manguera.
A Las abrazaderas de la manguera no están
bien sujetas.
B Limpie la junta tóricael anillo negro del depósito de arena con una manguera de jardín.
B Junta tórica del depósito de arena sucia.
C Apriete las abrazaderas de las mangueras.C Abrazaderas de la manguera flojas.
B Asegúrese de que la junta tórica está en su sitio y no está dañada.
B Falta la junta tórica de ajuste de conexión
de la manguera.
A Limpie cualquier obstrucción en la toma de entrada desatornillándola de la
válvula de 6 puertos.
A Toma de entrada del manómetro atascada.
B Póngase en contacto con el servicio de atención al cliente.B Manómetro dañado.
B Elimine toda la arena usada y reemplácela por arena nueva.B El lecho de arena está calcificado.
D Póngase en contacto con el servicio de atención al cliente.D Válvula de 6 puertos dañada.
C Ajuste las abrazaderas de la manguera y compruebe si la manguera está dañada.C Fuga de aire en la manguera de entrada.
D Póngase en contacto con el servicio de atención al cliente.
A Rellene la piscina para corregir el nivel de agua.A Nivel de agua bajo.
D Reemplace unos 25mm de arena. Reemplace toda la arena si el problema persiste.
D Deje que se enfríe el motor y vuelva a arrancarlo.
D
El motor está demasiado caliente y la
protección contra sobrecargas está apagada.
D Encostramiento o apelmazamiento en la
superficie de arena del filtro.
E Retire cualquier tipo de aspiradora de la piscina pegados al conducto del sistema.
E Dispositivo de aspiración de la piscina
conectado al sistema.
D Motor defectuoso o impulsor atascado.
A Arena silícica del n.º 20 de un solo uso con un rango de partículas de entre
0,45 y 0,85 mm y un coeficiente de uniformidad de menos de 1,75.
A La arena es demasiado pequeña.
ADVERTENCIA: DESENCHUFE EL CABLE DE ALIMENTACIÓN ANTES DE SOLUCIONAR CUALQUIER PROBLEMA EN LA BOMBA DE FILTRACIÓN.
16
En caso de problemas, póngase en contacto con el servicio de atención al cliente en el (888) 919-0070, de L a V de 8h a 17h.
MST. Los horarios de atención se amplían durante temporada alta

DESMONTAJE Y ALMACENAMIENTO DE LA
BOMBA DE ARENA
INFORMACIÓN SOBRE EL PEDIDO DE PIEZAS DE REPUESTO
17
En caso de problemas, póngase en contacto con el servicio de atención al cliente en el (888) 919-0070, de L a V de 8h a 17h.
MST. Los horarios de atención se amplían durante temporada alta
MANUAL DEL USUARIO
1. Primero, desenchufe el cable de alimentación DDR del sistema.
2. Afloje todas las abrazaderas . Retire la manguera y deje que se drene el agua.
3. Quite el tapón de la válvula de desagüe del contenedor de arena y deje que el agua se drene. Vuelva a poner el tapón de la válvula de desagüe y apriételo .
4
15
3
3
2
13
4. Limpie y lubrique todas las juntas tóricas con vaselina.
18
5. Gire el mango de control a la posición "NULL" (nulo).
6. Deje que la bomba de arena se seque por completo. Guarde la bomba de arena en un lugar fresco y seco que esté libre de la luz directa del sol.
7. Todas la parte se deben almacenar en un ambiente seco que se mantiene por encima de 32 grados Fahrenheit en todo momento.
14
ST1600
Nº Llave
ST1100
N.º DE PIEZA N.º DE PIEZA
Description
Base del depósito de arena
Depósito de arena
Tapón de la válvula de desagüe
Conducto central
Protección contra arena
Abrazadera
Tapón para tornillo del árbol de levas
Junta tórica de la válvula de 6 puertos
Válvula de 6 puertos
Tapón de salida de desagüe de la válvula de 6 puertos
Manómetro
Manguera de 59" (1,50 m)
ST1100 14” Manguera
ST1600 12” Manguera
Abrazadera de la manguera
Pasador de bloqueo
Bomba
Junta tórica de ajuste 1,5”
Ventana de desagüe de la válvula de 6 puertos
Mango de la válvula de 6 puertos
1
2
3
5
6
7
8
9
10
11
12
13
14
15
16
17
18
19
20
P58PP1782E09
P58PP2884G8U
P58000000W05
P58PF0800W05
P586402000W1
P58PF8891P01
P58897023E09
P58897023G8U
P58PP2021K01
P58135001K01
P58PF8880E09
P58PF8910E09
P58PF8910G8U
P58340000000
P584150006W1
P584150014W1
--
P5842504500A
P58PP1759E09
P58PP1759G8U
P580C201SFW5
P530C2000S8U
P58037000K01
P58PF8950E09
P58PF8950G8U
P58PF8960C01
P58PP2884A09
--
P58000001W05
P58PF0800W05
P586402001W1
P58PF8891P01
P58897023E09
P58897023G8U
P58PP2021K01
P58135001K01
P58PF8880E09
P58PF8910E09
P58PF8910G8U
P58340000000
P584150006W1
--
P584150012W1
P5842504500A
P58PP1759E09
P58PP1759G8U
P580C201SFW5
P530C2000S8U
P58037000K01
P58PF8950E09
P58PF8950G8U
P58PF8960C01

INFORMACIÓN SOBRE EL ACCESORIO DE SUCCIÓN EN
CONFORMIDAD CON ASME
9. El orificio de salida de succión PSF-100A o PSF-100B debe sustituirse cada 5 años.
10. No es necesario utilizar herramientas para la instalación.
11. Instrucciones de mantenimiento y acondicionamiento para el invierno
¡ATENCIÓN! NO SUPERE EL CAUDAL MÁXIMO PERMITIDO:
1. 45 galones por minuto (2700 galones o 10 220,6 l por hora).
2. Observe e inspeccione con atención el orificio de salida de succión para ver si está dañado o alterado cada vez que vaya a utilizar la piscina.
3. Los orificios de salida de succión perdidos, rotos o agrietados deben sustituirse antes de utilizar la piscina.
4. Si el accesorio de succión está suelto hay que volver a conectarlo o sustituirlo antes de utilizar la piscina.
5. Retire y guarde el conjunto del orificio de salida de succión si la temperatura baja a menos de 0 ºC (32 °F).
1. Los orificios de salida de succión PSF-100A y PSF-100B tienen la certificación de la IAPMO de acuerdo con la norma ASME/ANSI A112.19.8b-2009 Accesorio de
succión para piscinas, piscinas infantiles, spas y bañeras de hidromasaje.
2. Se trata de un orificio de salida de succión sumergido que se utiliza en piscinas por encima del nivel del suelo.
3. Solo para drenaje individual. Utilice solo UN orificio de salida en cada bomba.
4. No coloque este orificio de salida de succión en zonas para sentarse o en el respaldo de dicha zona.
5. Instale este orificio de salida en el lugar recomendado por el fabricante de la piscina.
6. El caudal máximo permitido de este orificio de salida de succión es de 45 galones por minuto (2700 galones o 10 220,6 litros por hora).
7. Manguera de conexión:
• El modelo PSF-100-A debe conectarse a una manguera con un diámetro de 1 1/4” (31,8 mm).
• El modelo PSF-100-B debe conectarse a una manguera con un diámetro de 1 1/2” (38,1mm).
8. El orificio de salida de succión debe montarse en la abertura especificada por el fabricante de la piscina situada por encima del nivel del suelo. El diámetro de esta
abertura deberá ser de entre 1,77” y 1,85” (entre 45 mm y 47 mm). Consulte en el siguiente diagrama las instrucciones de montaje detalladas:
PSF-100A Y PSF-100B ORIFICIO DE SALIDA DE SUCCIÓN
(PARA PISCINAS SOBRE SUELO)
Piscina
Manguera de agua
Abrazadera de la manguera
Contratuerca, debe apretarse a mano
Tapón de agua, solo debe
instalarse mientras se lleva a cabo
el mantenimiento de la bomba
Empaque
Accesorio de succión,
PSF-100A o PSF-100B
Arandela plana
18
En caso de problemas, póngase en contacto con el servicio de atención al cliente en el (888) 919-0070, de L a V de 8h a 17h.
MST. Los horarios de atención se amplían durante temporada alta.
MANUAL DEL USUARIO
1/36