
KN2116v/KN2132v/KN4116v/KN4132v KVM Over the NET™ Quick Start Guide
KN2116v/KN2132v/KN4116v/KN4132v KVM Over the NET™Guide de démarrage rapide
KN2116v/KN2132v/KN4116v/KN4132v KVM Over the NET™Kurzanleitung
KN2116v/KN2132v/KN4116v/KN4132v KVM Over the NET™ Guía rápida
Requirements
Remote User Computers
• For best results we recommend that the computers used to access the switch have
at least a P III 1 GHz processor, with their screen resolution set to 1024 x 768.
• Browsers must support 128 bit SSL encryption.
• For best results, a network transfer speed of at least 512kbps is recommended.
Servers
Servers are the computers connected to the switch via KVM Adapter Cables. The
following equipment must be installed on these servers:
• A VGA, SVGA or Multisync port
• For USB KVM Adapter Cable Connections: a Type A USB port and USB host
controller
• For PS/2 KVM Adapter Cable Connections: 6-pin mini-DIN keyboard and mouse
ports
KVM Adapter Cables
• KA7120, KA7130, KA7170 KA7140, KA9140, KA7175, KA7176, KA7177, KA7166,
KA7168, KA7169
Operating Systems*
• Supported operating systems for remote user computers include Windows 2000
and higher, and those capable of running the Java Runtime Environment (JRE) 6,
Update 3, or higher (Linux, Mac, Sun, etc.).
• Supported operating systems for the servers connected to the switch’s ports
include Windows, Linux, Unix, Novell, Mac, and DOS.
Browser
*
• Supported browsers for users that log into the include Internet Explorer, Chrome,
Firefox, Safari, Opera, Mozilla, and Netscape.
* Please refer to the user manual for further remote user computers operation
system, browser and video support information.
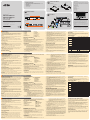
Hardware Review
A
Confi guration système
Ordinateurs clients distants
• Pour des résultats optimaux, il est conseillé que les ordinateurs accédant au
commutateur disposent au minimum d'un processeur P III de 1 GHz et d’une
résolution d'écran de 1024 x 768.
• Les navigateurs doivent prendre en charge le cryptage SSL 128 bits.
• Pour des résultats optimaux, une vitesse de transfert réseau d'au moins 512 Kbit/s
est recommandée.
Serveurs
Un serveur est un ordinateur connecté au commutateur via les câbles adaptateurs
KVM. Les composants suivants doivent être installés sur ces serveurs :
• Une carte graphique VGA, SVGA ou Multisync
• Pour le branchement du câble adaptateur KVM USB : un port USB de type A et un
contrôleur d'hôte USB
• Pour le branchement du câble adaptateur KVM PS/2 : ports clavier et souris mini-
DIN à 6 broches
Câbles adaptateurs KVM
• KA7120, KA7130, KA7170 KA7140, KA9140, KA7175, KA7176, KA7177, KA7166,
KA7168, KA7169
Systèmes d'exploitation*
Les systèmes d'exploitation pris en charge pour les ordinateurs clients distants
se connectant aux KVM Over the Net™ sont les suivants : Windows 2000 et
versions supérieures, ainsi que les systèmes prenant en charge Sun Java Runtime
Environment (JRE) 6, Mise à jour 3 ou supérieure.
Les systèmes d'exploitation pris en charge pour les serveurs connectés aux ports du
commutateur incluent Windows, Linux, Unix, Novell, Mac et DOS.
Navigateur*
Les navigateurs pris en charge pour les utilisateurs se connectant à ce commutateur
incluent Internet Explorer, Chrome, Firefox, Safari, Opera, Mozilla, et Netscape.
Systemvoraussetzungen
Computer entfernter Benutzer
• Um optimale Ergebnisse zu erzielen, sollten die Computer, von denen Sie auf den
Switch zugreifen möchten, mindestens einen P III-Prozessor mit 1 GHz besitzen
und eine Bildschirmaufl ösung von 1024 x 768 unterstützen.
• Der Web-Browser muss eine SSL-Verschlüsselung mit 128 Bit unterstützen.
• Wir empfehlen eine Internet-Verbindung von mindestens 512 Kbps.
Server
Als Server werden alle Computer bezeichnet, die mit dem Switch über KVM-
Adapterkabel verbunden sind. Für jeden Server muss Folgendes installiert werden:
• Eine VGA-, SVGA- oder Multisync-Grafi kkarte
• Für Verbindungen über das USB-KVM-Adapterkabel: ein USB-Host-Controller und
ein USB-Anschluss Typ A
• Für Verbindungen über das PS/2-KVM-Adapterkabel: je ein 6-poliger Mini-DIN-
Tastatur- und Mausport (PS/2)
KVM-Adapterkabel
• KA7120, KA7130, KA7170 KA7140, KA9140, KA7175, KA7176, KA7177, KA7166,
KA7168, KA7169
Betriebssysteme*
Die unterstützten Betriebssysteme für Computer entfernter Benutzer, die sich mit
dem KVM Over the NET™ verbinden, beinhalten Windows 2000 und höher sowie
alle Betriebssysteme, die das Sun Java Runtime Environment (JRE) 6, Update 3
oder höher unterstützen (Linux, Mac, Sun, usw.).
Zu den unterstützten Betriebssystemen, die auf dem Server der Gegenstelle laufen
müssen, die mit dem Switch verbunden sind, gehören Windows, Linux, Unix, Novell,
Mac, und DOS.
Browser*
Benutzer, die sich mit dem Gerät verbinden, müssen einen der folgenden Web-
Browser verwenden: Internet Explorer, Chrome, Firefox, Safari, Opera, Mozilla oder
Netscape.
* Im Benutzerhandbuch fi nden Sie weitere Hinweise zu unterstützten Computer
entfernter Benutzer, Betriebssystemen, Browsern und Bildaufl ösungen.
Requisitos del sistema
Ordenadores de usuarios remotos
• Para obtener los mejores resultados, se recomienda que los ordenadores que
acceden al conmutador tengan como mínimo un procesador P III a 1 GHz y una
resolución de pantalla de 1024 x 768.
• El navegador debe admitir el cifrado SSL de 128 bits.
• Para una descarga más efi caz se recomienda una conexión a Internet de por lo
menos 512 Kbps.
Servidores
Se denominan servidores a los ordenadores que están conectados al concentrador
a través de cables adaptadores KVM.
En cada servidor se tienen que instalar los siguientes componentes:
• Una tarjeta gráfi ca VGA, SVGA o Multisync
• Para la conexión del cable adaptador KVM USB: un puerto USB de tipo A y una
controladora USB
• Para la conexión del cable adaptador KVM PS/2: Puertos para teclado y ratón
mini-DIN de 6 patillas
Cables adaptadores KVM
• KA7120, KA7130, KA7170 KA7140, KA9140, KA7175, KA7176, KA7177, KA7166,
KA7168, KA7169
Sistemas operativos*
Los sistemas operativos admitidos para los ordenadores cliente locales que se
conectan al KVM Over the NET™ son Windows 2000 y versiones superiores,
así como los sistemas que admiten Java Runtime Environment (JRE) 6 de Sun,
actualización 3 o posterior.
Entre los sistemas operativos admitidos para los servidores conectados a los
puertos del conmutador se incluyen Windows, Linux, Unix, Novell, Mac y DOS.
Navegador*
Entre los navegadores admitidos para los usuarios que se conectan al dispositivo se
Front View
1. Power LED
2. Port LEDs
3. LAN LEDs
4. USB Ports
5. Reset Switch
6. Audio Ports
7. Port Switching Buttons
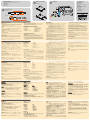
Hardware Installation
B
Rack Mounting
The KVM Over the NET™ can be mounted in a 19" (1U) rack. The mounting
brackets can screw into either the front or the back of the unit so that it can attach to
the front or the back of the rack.
To mount the unit at the front of the rack, do the following:
1. Remove the two screws at the front or the rear.
2. Screw the mounting brackets into the sides of the unit at the front or the rear.
3. Slide the unit into the front or rear of the rack and secure it to the rack.
Installation
1. Plug your Local Console's keyboard, monitor, and mouse into the unit's Console
Ports. Each port is color coded and marked with an appropriate icon
Note: 1. You can use any combination of keyboard and mouse connections. For
example, you can use a PS/2 keyboard with a USB mouse.
2. USB keyboards and mice can plug into the USB ports on the front panel,
as well as into the ports in the console port section.
3. The KVM Over the NET™ does not support distances that exceed 20m
between itself and the local monitor.
2. Use Cat. 5e/6 cable to connect any available KVM port to a KVM Adapter Cable
that is appropriate for the server you are installing.
Note: The distance between the KVM Over the NET™ and the KVM Adapter
Cable must not exceed 40m.
3. Plug the connectors on the KVM Adapter Cable into the appropriate ports of the
server you are installing.
* Veuillez consulter le manuel d’utilisation pour plus d’informations sur les ordinateurs
clients distants, systèmes d’exploitation, les navigateurs et les systèmes vidéo pris
en charge.
Description du matériel
A
vue avant
1. Voyant d'alimentation
2. Voyants des ports
3. Voyants LAN
4. Ports USB
5. Bouton de réinitialisation
6. Ports Audio
7. Boutons de changement de port
Installation matérielle
B
Montage sur bâti
Le KVM Over the Net™ peut être monté sur un bâti de 48 cm (1U). Vous pouvez
visser les supports de montage à l'avant ou à l'arrière de l'appareil selon l'endroit où
vous souhaitez monter ce dernier (à l'avant ou à l'arrière du bâti).
Pour monter l'appareil à l'avant du bâti, procédez comme suit :
1. Retirez les deux vis du panneau avant ou arrière de l'appareil, comme indiqué sur
le schéma ci-dessous :
2. Vissez ensuite les supports du montage sur les côtés avant ou arrière de
l'appareil, comme indiqué sur le schéma ci-dessous :
3. Faites glisser l'ensemble vers l'avant ou l'arrière du bâti et fi xez-le au bâti.
Installation
1. Branchez le clavier, la souris et le moniteur de la console locale sur les ports de
console de l'appareil. Chaque port est identifi é par un codage couleur et l'icône
correspondante.
Hardwareübersicht
A
vorderseitige Ansicht
1. LED-Betriebsanzeige
2. Port-LED-Anzeigen
3. LAN-LED-Anzeigen
4. USB-Ports
5. Schalter zum Zurücksetzen
6. Audio-Ports
7. Portumschalter-Tasten
Hardware installieren
B
Rack-Montage
Der KVM Over the NET™ kann in einen 19"-Schrank (1U) eingebaut werden.
Die zugehörigen Montagerahmen können Sie entweder auf der Vorder- oder der
Rückseite des Gerätes anbringen, sodass Sie das System auf der Vorder- bzw.
Rückseite des Racks verschrauben.
Um das Gerät vorne im Rack einzubauen, gehen Sie folgendermaßen vor:
1. Entfernen Sie die beiden Schrauben auf der Vorder- bzw. Rückseite (siehe
folgende Abbildung).
2. Verschrauben Sie die Halterungen an der Vorder- bzw. Rückseite des Gerätes
(siehe Diagramm unten):
3. Schieben Sie das Gerät von vorne oder hinten in das Rack und schrauben es
fest.
Installieren
1. Verbinden Sie Tastatur, Monitor und Maus der lokalen Konsole mit den
Konsolports des Gerätes. Die Stecker und Buchsen sind farblich und mit einem
Symbol gekennzeichnet.
Hinweis: 1. Sie können die Tastatur- und Maustypen beliebig kombinieren. Zum
Beispiel können Sie eine PS/2-Tastatur zusammen mit einer USB-
Maus verwenden.
2. USB-Tastaturen und –Mäuse können bequem an die USB-
Anschlüsse der Vorderseite angeschlossen wenden, aber bei Bedarf
auch an die des Konsolportabschnitts.
3. Die Entfernung zwischen dem KVM Over the NET™ und dem lokalen
Monitor darf maximal 20 m betragen.
2. Verbinden Sie einen beliebigen KVM-Port mit einem KVM-Adapterkabel, das für den
anzuschließenden Computer geeignet ist. Verwenden Sie dazu ein Kat. 5e/6-Kabel.
incluyen Internet Explorer, Chrome, Firefox, Safari, Opera, Mozilla y Netscape.
* Para más información sobre los ordenadores de usuarios remotos sistemas
operativos, navegadores y resoluciones admitidos, consulte el manual del usuario.
Presentación del hardware
A
vista frontal
1 Indicador LED de alimentación
2 Indicadores LED de los puertos
3 Indicadores LED LAN
4 Puertos USB
5 Interruptor de reseteo
6. Puertos de audio
7. Botones de conmutación entre puertos
Instalación del hardware
B
Montaje en rack
Se puede montar el KVM Over the NET™ en un rack de 19" (1U). Puede atornillar
los raíles en la parte frontal o posterior de la unidad según prefi era montar la unidad
en la parte frontal o posterior del rack.
Para montarla en la parte frontal del rack, haga lo siguiente:
1. Retire los dos tornillos de la parte frontal o posterior, como se indica en el
siguiente diagrama:
2. Atornille los raíles delante y detrás en los laterales de la unidad (véase el
diagrama siguiente)
3. Deslice la unidad en el rack y atorníllela al frontal y la parte trasera del rack
Instalación
1. Conecte los dispositivos de consola locales a la unidad. Para ello, emplee el
cable de consola 5 en 1 incluido.
Nota: 1. Puede conectar teclados y ratones de tipo diferente. Por ejemplo, puede
conectar un teclado PS/2 y un ratón USB.
4. Plug a cable from the LAN or WAN into the KVM Over the NET™ switch primary
network interface socket.
5. (Optional) Plug another cable from the LAN or WAN into the KVM Over the
NET™ switch backup (secondary) network interface socket.
6. (Optional) Use Cat 5e/6 cable to connect the KVM Over the NET™ switch PON
port to an SA0142 Adapter. Connect the Adapter to the PON IN port of a PN0108
Power Over the NET™ unit.
7. (Optional) Use Cat 5e/6 cable to connect the KVM Over the NET™ switch
Modem port to an SA0142 Adapter. Connect the Adapter's serial connector to the
modem's DB-9 port.
8. Use the grounding wire supplied with this package to ground the unit by
connecting one end of the wire to the grounding terminal, and the other end of the
wire to a suitable grounded object.
9. Plug the power cord(s) supplied with this package into the switch's power socket,
and then into an AC power source. When using a single power socket, be sure to
turn on the correct power switch. When using both power sockets, either of the
power switches can be used to turn on the KVM switch, or turn on both power
switches to enable dual power
After the KVM Over the NET™ is cabled up you can turn on the power. After it is
powered up, you can turn on the servers.
Administrator Setup
Once the KVM Over the NET™ has been cabled up, the Super Administrator needs
to set the unit up for user operation using the local console. When the local console
has been connected up and the KVM Over the NET™ turned on, a login prompt
appears on the console monitor.
Since this is the fi rst time you are logging in, use the default Username:
administrator; and the default Password: password. For security purposes, use the
User Management function to change these to a unique Username and Password.
Then, select Device Management → Network to set up the switch for network
operation.
To change default username and password → Select User Management →
Administrator > Modify to change the default Super Administrator username and
password to something unique.
Remarques : 1. Vous pouvez également utiliser des claviers et souris de type
différent. Vous pouvez par exemple utiliser un clavier PS/2 avec
une souris USB.
2. Les claviers et souris USB peuvent être branchés sur les ports
USB situés à l'avant de l'appareil, ainsi que sur les ports de la
section des ports de console situés à l'arrière.
3. La distance entre le KVM Over the Net™ et le moniteur local ne
doit pas dépasser 20 m.
2. Utilisez un câble de catégorie 5 e/6 pour connecter un port KVM disponible à un
câble adaptateur KVM adapté à l'ordinateur que vous installez.
Remarque : la distance entre le câble adaptateur KVM et le KVM Over the Net™
ne doit pas dépasser 40 m.
3. Branchez les connecteurs du câble adaptateur KVM sur les ports appropriés de
l'ordinateur que vous installez.
4. Reliez un câble réseau LAN ou WAN au connecteur d'interface réseau principal
du KVM Over the Net™.
5. (Facultatif) Reliez un autre câble réseau LAN ou WAN au connecteur d'interface
réseau de secours (secondaire) du KVM Over the Net™.
6. (Facultatif) Utilisez un câble de catégorie 5e/6 pour relier le port PON du KVM
Over the Net™ à un adaptateur SA0142. Branchez l'adaptateur sur le port
d'entrée PON d'un appareil PN0108 Power Over the Net™.
7. (Facultatif) Utilisez un câble de catégorie 5e/6 pour relier le port modem du
KVM Over the Net™ à un adaptateur SA0142. Branchez le connecteur série de
l'adaptateur sur le port DB-9 du modem.
8. Pour mettre l'appareil à la terre, reliez l'extrémité du câble de mise à la terre fourni
à la prise de terre et l'autre extrémité à un objet correctement mis à la terre.
9. Reliez le câble d'alimentation fourni à la prise d'alimentation du KVM Over the
Net™, puis à une prise de courant.
Une fois le KVM Over the Net™ correctement branché, vous pouvez l'allumer.
Allumez ensuite les ordinateurs.
Confi guration de l'administrateur
Une fois le KVM Over the Net™ branché, le super administrateur doit confi gurer
l'appareil pour les utilisateurs à l'aide de la console locale. Après avoir connecté
Hinweis: Die Entfernung zwischen dem KVM Over the NET™ und dem KVM-
Adapterkabel darf nicht mehr als 40 m betragen.
3. Verbinden Sie den Stecker des KVM-Adapterkabels mit den betreffenden Ports
des anzuschließenden Computers.
4. Verbinden Sie ein LAN- oder WAN-Kabel mit dem RJ-45-Anschluss des KVM
Over the NET™.
5. (Optional) Verbinden Sie ein weiteres LAN- oder WAN-Kabel mit dem zweiten
(Backup-) Netzwerkanschluss des KVM Over the NET™.
6. (Optional) Verwenden Sie Kat. 5e/6-Kabel, um den PON-Port des KVM Over the
NET™ mit einem SA0142-Adapter zu verbinden. Verbinden Sie anschließend den
Adapter mit dem Port PON IN eines PN0108 Power Over the Net™ Gerätes.
7. (Optional) Verwenden Sie Kat. 5e/6-Kabel, um den Modemport des KVM Over the
NET™ mit einem SA0142-Adapter zu verbinden. Verbinden Sie anschließend den
seriellen Anschluss des Adapters mit dem DB-9-Anschluss des Modems.
8. Erden Sie das Gerät mithilfe des mitgelieferten Erdleiters. Verbinden Sie dazu das
eine Ende des Leiters mit der Erdungsschelle und das andere Ende mit einem
geerdetem Gegenstand.
9. Verbinden Sie das mitgelieferte Netzkabel mit der Stromeingangsbuchse am KVM
Over the NET™ und dem Stromnetz.
Nachdem der KVM Over the NET™ verkabelt wurde, können Sie ihn einschalten.
Nachdem das Gerät eingeschaltet wurde, können Sie auch die angeschlossenen
Computer einschalten.
Administrator-Einrichtun
Nachdem die Kabelverbindungen des KVM Over the NET™ hergestellt sind,
müssen vom Super-Administrator über die lokale Konsole die Benutzer-Funktionen
eingerichtet werden. Nachdem die lokale Konsole verbunden und der KVM Over the
NET™ eingeschaltet ist, erscheint ein Anmeldefenster auf dem Konsolmonitor:
Wenn Sie sich zum ersten Mal anmelden, verwenden Sie den vorgegebenen
Benutzernamen: administrator; und das Standardkennwort lautet: password.
Wir empfehlen Ihnen, den vorgegebenen Benutzernamen sowie das Kennwort
umgehend über die Option "Benutzerverwaltung" zu ändern.
Wählen Sie "Geräteverwaltung"→"Netzwerk", um die Netzwerkfunktionen für den
Switch einzurichten.
Um den voreingestellten Benutzernamen und das zugehörige Kennwort zu ändern,
wählen Sie Benutzerverwaltung → Administrator → Bearbeiten und geben einen
eindeutigen Benutzernamen und ein entsprechendes Kennwort für den Super
Administrator ein.
2. Los teclados y ratones USB se pueden conectar a los puertos USB
situados en el panel frontal de la unidad así como a los puertos de la
sección de consola local situados en el panel posterior.
3. La distancia entre el KVM Over the NET™ y el monitor local no debe
superar los 20 m.
2. Conecte cualquier puerto KVM disponible al cable adaptador KVM adecuado para
el ordenador que vaya a instalar. Para ello, use un cable de categoría 5e/6.
Nota: la distancia entre el KVM Over the NET™ y el cable adaptador KVM no
debe exceder 40 m.
3. Enchufe los conectores del cable adaptador KVM a los puertos correspondientes
del ordenador que quiera instalar.
4. Conecte un cable LAN o WAN al puerto de interfaz de red principal del el KVM
Over the NET™.
5. (Opcional) Conecte otro cable LAN o WAN al puerto de interfaz de red de
respaldo (secundario) del el KVM Over the NET™.
6. (Opcional) Utilice un cable de categoría 5e/6 para conectar el puerto PON del
KVM Over the NET™ a un adaptador SA0142. Conecte el adaptador al puerto de
entrada PON de una unidad PN0108 Power Over the Net™.
7. (Opcional) Utilice un cable de categoría 5e/6 para conectar el puerto de módem
del KVM Over the NET™ a un adaptador SA0142. Enchufe el conector serie del
adaptador al puerto DB-9 del módem.
8. Para conectar la unidad a tierra, conecte un extremo del cable de tierra incluido a
la toma de tierra y el otro extremo a un objeto correctamente conectado a tierra.
9. Conecte el/los cable(s) de alimentación incluido(s) a la entrada de alimentación
del KVM Over the NET™ y luego a una toma eléctrica. Si sólo quiere conectar
una toma eléctrica, deberá encender el equipo con el interruptor de alimentación
adecuado. Si lo conecta a dos tomas, cualquiera de los interruptores de
alimentación servirá para encender el concentrador KVM. O encienda los dos
para obtener una alimentación doble.
Una vez conectado el conmutador KVM Over the NET™, puede encenderlo. A
continuación, encienda los ordenadores.
To add users, select User Management → Users, then click Add.
Operation
The KVM Over the NET™ can be accessed from an internet browser and a Java or
Window Client application (AP) program. After you have successfully logged in, the
main page comes up for operation.
Specifi cations
Function KN2116v / KN2132v / KN4116v / KN4132v
Connectors
LAN 2 x RJ-45 Female (Black)
Modem 1 x RJ-45 Female (Black)
USB 3 x USB Type A Female (White)
PON 1 x RJ-45 Female (Black)
Switches
Reset 1 x Semi-recessed Pushbutton
Power 2 x Rocker Switch
Port Selection 2 x Pushbutton
LEDs
On Line 16/32 (Green)
Selected 16/32 (Red)
Power 1 (Blue)
Link 10/100/1000 Mbps 2 (Red / Red + Green / Green)
Environment
Operating Temp. 0 – 50
°
C
Storage Temp. -20 – 60
°
C
Humidty 0 – 80% RH, Non-condensing
Model Dimensions
(L x W x H)
Weight Power Consumption
KN2116v 43.84 x 41.21 x 4.40 cm 5.91 kg
Single Power: 115V/32.6W; 230V/33.4W
Dual Power: 115V/38W; 230V/38.7W
KN2132v 43.84 x 41.21 x 4.40 cm 5.97 kg
Single Power: 115V/38W; 230V/38.8W
Dual Power: 115V/43W; 230V/43.7W
KN4116v 43.84 x 41.21 x 4.40 cm 6.04 kg
Single Power: 115V/34.7W; 230V/35.5W
Dual Power: 115V/41W; 230V/41.5W
KN4132v 43.84 x 41.21 x 4.40 cm 6.08 kg
Single Power: 115V/40.1W; 230V/41W
Dual Power: 115V/46W; 230V/46.6W
la console locale et allumé le KVM Over the Net™, une fenêtre de connexion
(ouverture de session) s'affi che sur l'écran de la console :
Lors de la première connexion, utilisez le nom d'utilisateur par défaut administrator
et le mot de passe par défaut password. Pour des raisons de sécurité, utilisez la
fonction "User Management" (Gestion des utilisateurs) pour les remplacer par un
nom d'utilisateur et un mot de passe uniques.
Sélectionnez "Device Management" (Gestion des périphériques)→"Network"
(Réseau) pour confi gurer le commutateur pour une utilisation en réseau.
Pour modifi er le nom d’utilisateur et le mot de passe par défaut, sélectionnez User
Management (Gestion des utilisateurs) → Administrator (Administrateur) → Modify
(Modifi er). Vous pourrez ainsi choisir un nom d’utilisateur et un mot de passe de
super administrateur plus uniques.
Pour ajouter des utilisateurs, sélectionnez User Management (Gestion des
utilisateurs) → Users (Utilisateurs) puis cliquez sur Add (Ajouter).
Utilisation
Vous pouvez accéder au commutateur KVM Over the NET™ à l'aide d'un navigateur
Internet ou d'un programme d'application Java ou client Windows. Une fois que vous
êtes connecté, la page principale apparaît et vous pouvez commencer à utiliser
l'unité.
Um Benutzer hinzuzufügen, wählen Sie „Benutzerverwaltung“ → „Benutzer“ und
klicken auf Hinzufügen.
Bedienung
Sie können auf den KVM Over the NET™ über einen Web-Browser, eine Java-
Applikation oder einen Windows-Client zugreifen. Sobald Sie erfolgreich angemeldet
sind, erscheint der Hauptbildschirm zur Bedienung.
Technische Daten
Funktion KN2116v / KN2132v / KN4116v / KN4132v
Anschlüsse
LAN 2 x RJ-45 Buchse (schwarz)
Modem 1 x RJ-45 Buchse (schwarz)
USB 3 x USB Type A Buchse (weiß)
PON 1 x RJ-45 Buchse (schwarz)
Schalter
Reset 1 x halbverdeckter Drucktaster
Power 2 x Kippschalter
Port Selection 2 x Drucktasten
LED-
Anzeigen
On Line 16/32 (grün)
Selected 16/32 (rot)
Power 1 (blau)
Link 10/100/1000 Mbps 2 (rot / rot + grün / grün)
Umgebung
Betriebstemperatur 0 – 50˚C
Lagertemperatur -20 – 60˚C
Feuchtigkeit 0 -80% rel. Luftfeuchte, nicht kondensierend
Funktion
Abmessungen
(L x B x H)
Gewicht Stromverbrauch
KN2116v
43.84 x 41.21 x
4.40 cm
5.91 kg
Einfache Stromversorgung: 115V/32.6W; 230V/33.4W
Duale Stromversorgung: 115V/38W; 230V/38.7W
KN2132v
43.84 x 41.21 x
4.40 cm
5.97 kg
Einfache Stromversorgung: 115V/38W; 230V/38.8W
Duale Stromversorgung: 115V/43W; 230V/43.7W
KN4116v
43.84 x 41.21 x
4.40 cm
6.04 kg
Einfache Stromversorgung: 115V/34.7W; 230V/35.5W
Duale Stromversorgung: 115V/41W; 230V/41.5W
KN4132v
43.84 x 41.21 x
4.40 cm
6.08 kg
Einfache Stromversorgung: 115V/40.1W; 230V/41W
Duale Stromversorgung: 115V/46W; 230V/46.6W
Confi guración del administrador
Une vez conectado el KVM Over the NET™, el superadministrador debe confi gurar
la unidad para los usuarios mediante la consola local. Después de conectar la
consola local y de encender el KVM Over the NET™, aparecerá un cuadro de
diálogo de inicio de sesión:
La primera vez que se conecte, especifi que el nombre de usuario predeterminado
administrator; y la contraseña predeterminada es: password. Por motivos de
seguridad, utilice la función "User Management" (Gestión de usuarios) para
cambiarlos por un nombre de usuario y una contraseña únicos.
Seleccione "Device Management" (Administración de dispositivos) → "Network"
(Red) para confi gurar el conmutador para un uso en red.
Para cambiar el nombre de usuario y la contraseña predeterminados, seleccione >
“Administración de usuarios” → “Administrador” → “Modifi car” e introduzca valores
únicos para el nombre de usuario y la contraseña del Súper Administrador.
Para agregar usuarios, seleccione “Administración de usuarios” → “Usuarios” y
haga clic en Agregar.
Funcionamiento
Puede acceder al KVM Over the NET™ mediante un navegador Web, un programa
de aplicación cliente de Java o de Windows. Después de conectarse con éxito,
aparecerá la página principal donde podrá administrar el funcionamiento de la
unidad.
B
C
Package Contents
1 KN2116v, KN2132v, KN4116v, KN4132v KVM Over the NET™ Switch
2 SA0142 Serial Adapters (RJ45-F to DB9-M; DTE to DCE)
2 Power Cords
2 Utility Power Cords
1 Rack Mount Kit
1 Foot Pad Set (4 pcs.)
1 User Instructions
Front View
Rack Mounting
Rear View
Hardware Installation
Installation
Rear View
1. Power Socket
2. Power Switch
3. Secondary LAN Port
4. PON Port
5. Grounding Terminal
6. Primary LAN Port
7. Modem Port
8. Local Console Port(s)
9. KVM Ports
vue arrière
1. Prise d'alimentation
2. Bouton marche-arrêt
3. Port LAN secondaire
4. Port PON
5. Prise de terre
6. Port LAN principal
7. Port modem
8. Section de console locale
9. Ports KVM
rückseitige Ansicht
1. Netzeingangsbuchse
2. Netzschalter
3. Zweiter LAN-Port
4. PON-Anschluss
5. Erdungsanschluss
6. Erster LAN-Port
7. Modemport
8. Lokaler Konsolabschnitt
9. KVM-Ports
vista posterior
1. Entrada de alimentación
2. Interruptor de alimentación
3. Puerto LAN secundario
4. Puerto PON
5. Toma de tierra
6. Puerto LAN principal
7. Puerto para módem
8. Puertos de consola local
9. Puertos KVM
1 3
2
4 5 7
6
8
2 3 41
6 7
9
5
Phillips head hex
M3 x 6
Phillips head hex
M3 x 6
Phillips head hex
M3 x 8
Phillips head hex
M3 x 8
2
9
8
3
2
4
5
6
7
1
4
7
1
PN0108
Modem
© Copyright 2014 ATEN
®
International Co., Ltd.
ATEN and the ATEN logo are trademarks of ATEN International Co., Ltd. All rights reserved. All
other trademarks are the property of their respective owners.
This product is RoHS compliant.
Part No.
PAPE-1215-E00G
Printing Date: 12/2014
ATEN Altusen
™
KN2116v/KN2132v
KN4116v/KN4132v
KVM Over the NET™
Quick Start Guide
Important Notice
Considering environmental protection, ATEN does not provide a fully
printed user manual for this product. If the information contained in the
Quick Start Guide is not enough for you to confi gure and operate your
product, please visit our website www.aten.com, and download
the full user manual.
Online Registration
http://eservice.aten.com
Technical Phone Support
International:
886-2-86926959
North America:
1-888-999-ATEN Ext: 4988
United Kingdom:
44-8-4481-58923
All information, documentation, firmware, software utilities, and
specifi cations contained in this package are subject to change without
prior notification by the manufacturer. Please visit our website http://
www.aten.com/download/?cid=dds for the most up-to-date versions.
EMC Information
FEDERAL COMMUNICATIONS COMMISSION INTERFERENCE STATEMENT:
This equipment has been tested and found to comply with the limits for a Class A
digital device, pursuant to Part 15 of the FCC Rules. These limits are designed to provide
reasonable protection against harmful interference when the equipment is operated
in a commercial environment. This equipment generates, uses, and can radiate radio
frequency energy and, if not installed and used in accordance with the instruction
manual, may cause harmful interference to radio communications. Operation of this
equipment in a residential area is likely to cause harmful interference in which case the
user will be required to correct the interference at his own expense.
FCC Caution: Any changes or modifi cations not expressly approved by the party
responsible for compliance could void the user's authority to operate this equipment.
CE Warning: This is a class A product. In a domestic environment this product may cause
radio interference in which case the user may be required to take adequate measures.
Suggestion: Shielded twisted pair (STP) cables must be used with the unit to ensure
compliance with FCC & CE standards.
The following contains information that relates to China:
A
Hardware Review
La página se está cargando...
Transcripción de documentos
Package Contents 1 KN2116v, KN2132v, KN4116v, KN4132v KVM Over the NET™ Switch 2 SA0142 Serial Adapters (RJ45-F to DB9-M; DTE to DCE) 2 Power Cords 2 Utility Power Cords 1 Rack Mount Kit 1 Foot Pad Set (4 pcs.) 1 User Instructions B Hardware Installation Important Notice Considering environmental protection, ATEN does not provide a fully printed user manual for this product. If the information contained in the Quick Start Guide is not enough for you to configure and operate your product, please visit our website www.aten.com, and download the full user manual. Phillips head hex M3 x 8 Rack Mounting Phillips head hex M3 x 6 Online Registration http://eservice.aten.com Phillips head hex M3 x 8 Technical Phone Support International: 886-2-86926959 Phillips head hex M3 x 6 United Kingdom: 44-8-4481-58923 A ATEN Altusen™ Hardware Review The following contains information that relates to China: Front View KN2116v/KN2132v KN4116v/KN4132v 2 1 3 C Installation 6 PN0108 KVM Over the NET™ Quick Start Guide © Copyright 2014 ATEN® International Co., Ltd. North America: 1-888-999-ATEN Ext: 4988 5 4 6 5 1 other trademarks are the property of their respective owners. 2 3 EMC Information 7 FEDERAL COMMUNICATIONS COMMISSION INTERFERENCE STATEMENT: This equipment has been tested and found to comply with the limits for a Class A digital device, pursuant to Part 15 of the FCC Rules. These limits are designed to provide reasonable protection against harmful interference when the equipment is operated in a commercial environment. This equipment generates, uses, and can radiate radio frequency energy and, if not installed and used in accordance with the instruction manual, may cause harmful interference to radio communications. Operation of this equipment in a residential area is likely to cause harmful interference in which case the user will be required to correct the interference at his own expense. FCC Caution: Any changes or modifications not expressly approved by the party responsible for compliance could void the user's authority to operate this equipment. CE Warning: This is a class A product. In a domestic environment this product may cause radio interference in which case the user may be required to take adequate measures. Suggestion: Shielded twisted pair (STP) cables must be used with the unit to ensure compliance with FCC & CE standards. 2 Rear View ATEN and the ATEN logo are trademarks of ATEN International Co., Ltd. All rights reserved. All 1 9 3 4 8 This product is RoHS compliant. Part No. PAPE-1215-E00G Printing Date: 12/2014 2 4 1 7 5 6 7 9 8 All information, documentation, firmware, software utilities, and specifications contained in this package are subject to change without prior notification by the manufacturer. Please visit our website http:// www.aten.com/download/?cid=dds for the most up-to-date versions. Modem KN2116v/KN2132v/KN4116v/KN4132v KVM Over the NET™ Quick Start Guide Requirements • For best results we recommend that the computers used to access the switch have at least a P III 1 GHz processor, with their screen resolution set to 1024 x 768. • Browsers must support 128 bit SSL encryption. • For best results, a network transfer speed of at least 512kbps is recommended. Servers Servers are the computers connected to the switch via KVM Adapter Cables. The following equipment must be installed on these servers: • A VGA, SVGA or Multisync port • For USB KVM Adapter Cable Connections: a Type A USB port and USB host controller • For PS/2 KVM Adapter Cable Connections: 6-pin mini-DIN keyboard and mouse ports KVM Adapter Cables • KA7120, KA7130, KA7170, KA7140, KA9140, KA7175, KA7176, KA7177, KA7166, KA7168, KA7169 Operating Systems* • Supported operating systems for remote user computers include Windows 2000 and higher, and those capable of running the Java Runtime Environment (JRE) 6, Update 3, or higher (Linux, Mac, Sun, etc.). • Supported operating systems for the servers connected to the switch’s ports include Windows, Linux, Unix, Novell, Mac, and DOS. Browser* • Supported browsers for users that log into the include Internet Explorer, Chrome, Firefox, Safari, Opera, Mozilla, and Netscape. * Please refer to the user manual for further remote user computers operation system, browser and video support information. Hardware Review Rear View Front View Remote User Computers A 1. Power LED 2. Port LEDs 3. LAN LEDs 4. USB Ports 5. Reset Switch 6. Audio Ports 7. Port Switching Buttons Hardware Installation 1. Power Socket 2. Power Switch 3. Secondary LAN Port 4. PON Port 5. Grounding Terminal 6. Primary LAN Port 7. Modem Port 8. Local Console Port(s) 9. KVM Ports B Rack Mounting The KVM Over the NET™ can be mounted in a 19" (1U) rack. The mounting brackets can screw into either the front or the back of the unit so that it can attach to the front or the back of the rack. To mount the unit at the front of the rack, do the following: 1. Remove the two screws at the front or the rear. 2. Screw the mounting brackets into the sides of the unit at the front or the rear. 3. Slide the unit into the front or rear of the rack and secure it to the rack. Installation 1. Plug your Local Console's keyboard, monitor, and mouse into the unit's Console Ports. Each port is color coded and marked with an appropriate icon Note: 1. You can use any combination of keyboard and mouse connections. For example, you can use a PS/2 keyboard with a USB mouse. 2. USB keyboards and mice can plug into the USB ports on the front panel, as well as into the ports in the console port section. 3. The KVM Over the NET™ does not support distances that exceed 20m between itself and the local monitor. 2. Use Cat. 5e/6 cable to connect any available KVM port to a KVM Adapter Cable that is appropriate for the server you are installing. Note: The distance between the KVM Over the NET™ and the KVM Adapter Cable must not exceed 40m. 3. Plug the connectors on the KVM Adapter Cable into the appropriate ports of the server you are installing. 4. Plug a cable from the LAN or WAN into the KVM Over the NET™ switch primary network interface socket. 5. (Optional) Plug another cable from the LAN or WAN into the KVM Over the NET™ switch backup (secondary) network interface socket. 6. (Optional) Use Cat 5e/6 cable to connect the KVM Over the NET™ switch PON port to an SA0142 Adapter. Connect the Adapter to the PON IN port of a PN0108 Power Over the NET™ unit. 7. (Optional) Use Cat 5e/6 cable to connect the KVM Over the NET™ switch Modem port to an SA0142 Adapter. Connect the Adapter's serial connector to the modem's DB-9 port. 8. Use the grounding wire supplied with this package to ground the unit by connecting one end of the wire to the grounding terminal, and the other end of the wire to a suitable grounded object. 9. Plug the power cord(s) supplied with this package into the switch's power socket, and then into an AC power source. When using a single power socket, be sure to turn on the correct power switch. When using both power sockets, either of the power switches can be used to turn on the KVM switch, or turn on both power switches to enable dual power After the KVM Over the NET™ is cabled up you can turn on the power. After it is powered up, you can turn on the servers. Administrator Setup Once the KVM Over the NET™ has been cabled up, the Super Administrator needs to set the unit up for user operation using the local console. When the local console has been connected up and the KVM Over the NET™ turned on, a login prompt appears on the console monitor. Since this is the first time you are logging in, use the default Username: administrator; and the default Password: password. For security purposes, use the User Management function to change these to a unique Username and Password. Then, select Device Management → Network to set up the switch for network operation. To change default username and password → Select User Management → Administrator > Modify to change the default Super Administrator username and password to something unique. To add users, select User Management → Users, then click Add. Operation The KVM Over the NET™ can be accessed from an internet browser and a Java or Window Client application (AP) program. After you have successfully logged in, the main page comes up for operation. Specifications Function LAN Modem Connectors USB PON Reset Switches Power Port Selection On Line Selected LEDs Power Link 10/100/1000 Mbps Operating Temp. Environment Storage Temp. Humidty Model KN2116v / KN2132v / KN4116v / KN4132v 2 x RJ-45 Female (Black) 1 x RJ-45 Female (Black) 3 x USB Type A Female (White) 1 x RJ-45 Female (Black) 1 x Semi-recessed Pushbutton 2 x Rocker Switch 2 x Pushbutton 16/32 (Green) 16/32 (Red) 1 (Blue) 2 (Red / Red + Green / Green) 0 – 50°C -20 – 60°C 0 – 80% RH, Non-condensing Dimensions (L x W x H) Weight Power Consumption Single Power: 115V/32.6W; 230V/33.4W Dual Power: 115V/38W; 230V/38.7W Single Power: 115V/38W; 230V/38.8W KN2132v 43.84 x 41.21 x 4.40 cm 5.97 kg Dual Power: 115V/43W; 230V/43.7W Single Power: 115V/34.7W; 230V/35.5W KN4116v 43.84 x 41.21 x 4.40 cm 6.04 kg Dual Power: 115V/41W; 230V/41.5W Single Power: 115V/40.1W; 230V/41W KN4132v 43.84 x 41.21 x 4.40 cm 6.08 kg Dual Power: 115V/46W; 230V/46.6W KN2116v 43.84 x 41.21 x 4.40 cm 5.91 kg KN2116v/KN2132v/KN4116v/KN4132v KVM Over the NET™Guide de démarrage rapide Configuration système Ordinateurs clients distants • Pour des résultats optimaux, il est conseillé que les ordinateurs accédant au commutateur disposent au minimum d'un processeur P III de 1 GHz et d’une résolution d'écran de 1024 x 768. • Les navigateurs doivent prendre en charge le cryptage SSL 128 bits. • Pour des résultats optimaux, une vitesse de transfert réseau d'au moins 512 Kbit/s est recommandée. Serveurs Un serveur est un ordinateur connecté au commutateur via les câbles adaptateurs KVM. Les composants suivants doivent être installés sur ces serveurs : • Une carte graphique VGA, SVGA ou Multisync • Pour le branchement du câble adaptateur KVM USB : un port USB de type A et un contrôleur d'hôte USB • Pour le branchement du câble adaptateur KVM PS/2 : ports clavier et souris miniDIN à 6 broches Câbles adaptateurs KVM * Veuillez consulter le manuel d’utilisation pour plus d’informations sur les ordinateurs clients distants, systèmes d’exploitation, les navigateurs et les systèmes vidéo pris en charge. Description du matériel A vue arrière vue avant 1. Prise d'alimentation 2. Bouton marche-arrêt 3. Port LAN secondaire 4. Port PON 5. Prise de terre 6. Port LAN principal 7. Port modem 8. Section de console locale 9. Ports KVM 1. Voyant d'alimentation 2. Voyants des ports 3. Voyants LAN 4. Ports USB 5. Bouton de réinitialisation 6. Ports Audio 7. Boutons de changement de port Installation matérielle B Montage sur bâti Systèmes d'exploitation* Le KVM Over the Net™ peut être monté sur un bâti de 48 cm (1U). Vous pouvez visser les supports de montage à l'avant ou à l'arrière de l'appareil selon l'endroit où vous souhaitez monter ce dernier (à l'avant ou à l'arrière du bâti). Pour monter l'appareil à l'avant du bâti, procédez comme suit : 1. Retirez les deux vis du panneau avant ou arrière de l'appareil, comme indiqué sur le schéma ci-dessous : 2. Vissez ensuite les supports du montage sur les côtés avant ou arrière de l'appareil, comme indiqué sur le schéma ci-dessous : 3. Faites glisser l'ensemble vers l'avant ou l'arrière du bâti et fixez-le au bâti. Les systèmes d'exploitation pris en charge pour les serveurs connectés aux ports du commutateur incluent Windows, Linux, Unix, Novell, Mac et DOS. Installation • KA7120, KA7130, KA7170, KA7140, KA9140, KA7175, KA7176, KA7177, KA7166, KA7168, KA7169 Les systèmes d'exploitation pris en charge pour les ordinateurs clients distants se connectant aux KVM Over the Net™ sont les suivants : Windows 2000 et versions supérieures, ainsi que les systèmes prenant en charge Sun Java Runtime Environment (JRE) 6, Mise à jour 3 ou supérieure. Navigateur* Les navigateurs pris en charge pour les utilisateurs se connectant à ce commutateur incluent Internet Explorer, Chrome, Firefox, Safari, Opera, Mozilla, et Netscape. 1. Branchez le clavier, la souris et le moniteur de la console locale sur les ports de console de l'appareil. Chaque port est identifié par un codage couleur et l'icône correspondante. Remarques : 1. Vous pouvez également utiliser des claviers et souris de type différent. Vous pouvez par exemple utiliser un clavier PS/2 avec une souris USB. 2. Les claviers et souris USB peuvent être branchés sur les ports USB situés à l'avant de l'appareil, ainsi que sur les ports de la section des ports de console situés à l'arrière. 3. La distance entre le KVM Over the Net™ et le moniteur local ne doit pas dépasser 20 m. 2. Utilisez un câble de catégorie 5 e/6 pour connecter un port KVM disponible à un câble adaptateur KVM adapté à l'ordinateur que vous installez. Remarque : la distance entre le câble adaptateur KVM et le KVM Over the Net™ ne doit pas dépasser 40 m. 3. Branchez les connecteurs du câble adaptateur KVM sur les ports appropriés de l'ordinateur que vous installez. 4. Reliez un câble réseau LAN ou WAN au connecteur d'interface réseau principal du KVM Over the Net™. 5. (Facultatif) Reliez un autre câble réseau LAN ou WAN au connecteur d'interface réseau de secours (secondaire) du KVM Over the Net™. 6. (Facultatif) Utilisez un câble de catégorie 5e/6 pour relier le port PON du KVM Over the Net™ à un adaptateur SA0142. Branchez l'adaptateur sur le port d'entrée PON d'un appareil PN0108 Power Over the Net™. 7. (Facultatif) Utilisez un câble de catégorie 5e/6 pour relier le port modem du KVM Over the Net™ à un adaptateur SA0142. Branchez le connecteur série de l'adaptateur sur le port DB-9 du modem. 8. Pour mettre l'appareil à la terre, reliez l'extrémité du câble de mise à la terre fourni à la prise de terre et l'autre extrémité à un objet correctement mis à la terre. 9. Reliez le câble d'alimentation fourni à la prise d'alimentation du KVM Over the Net™, puis à une prise de courant. Une fois le KVM Over the Net™ correctement branché, vous pouvez l'allumer. Allumez ensuite les ordinateurs. la console locale et allumé le KVM Over the Net™, une fenêtre de connexion (ouverture de session) s'affiche sur l'écran de la console : Lors de la première connexion, utilisez le nom d'utilisateur par défaut administrator et le mot de passe par défaut password. Pour des raisons de sécurité, utilisez la fonction "User Management" (Gestion des utilisateurs) pour les remplacer par un nom d'utilisateur et un mot de passe uniques. Sélectionnez "Device Management" (Gestion des périphériques)→"Network" (Réseau) pour configurer le commutateur pour une utilisation en réseau. Pour modifier le nom d’utilisateur et le mot de passe par défaut, sélectionnez User Management (Gestion des utilisateurs) → Administrator (Administrateur) → Modify (Modifier). Vous pourrez ainsi choisir un nom d’utilisateur et un mot de passe de super administrateur plus uniques. Pour ajouter des utilisateurs, sélectionnez User Management (Gestion des utilisateurs) → Users (Utilisateurs) puis cliquez sur Add (Ajouter). Utilisation Vous pouvez accéder au commutateur KVM Over the NET™ à l'aide d'un navigateur Internet ou d'un programme d'application Java ou client Windows. Une fois que vous êtes connecté, la page principale apparaît et vous pouvez commencer à utiliser l'unité. Configuration de l'administrateur Une fois le KVM Over the Net™ branché, le super administrateur doit configurer l'appareil pour les utilisateurs à l'aide de la console locale. Après avoir connecté KN2116v/KN2132v/KN4116v/KN4132v KVM Over the NET™Kurzanleitung Systemvoraussetzungen Hardwareübersicht • Um optimale Ergebnisse zu erzielen, sollten die Computer, von denen Sie auf den Switch zugreifen möchten, mindestens einen P III-Prozessor mit 1 GHz besitzen und eine Bildschirmauflösung von 1024 x 768 unterstützen. • Der Web-Browser muss eine SSL-Verschlüsselung mit 128 Bit unterstützen. • Wir empfehlen eine Internet-Verbindung von mindestens 512 Kbps. 1. LED-Betriebsanzeige 2. Port-LED-Anzeigen 3. LAN-LED-Anzeigen 4. USB-Ports 5. Schalter zum Zurücksetzen 6. Audio-Ports 7. Portumschalter-Tasten Computer entfernter Benutzer Server Als Server werden alle Computer bezeichnet, die mit dem Switch über KVMAdapterkabel verbunden sind. Für jeden Server muss Folgendes installiert werden: • Eine VGA-, SVGA- oder Multisync-Grafikkarte • Für Verbindungen über das USB-KVM-Adapterkabel: ein USB-Host-Controller und ein USB-Anschluss Typ A • Für Verbindungen über das PS/2-KVM-Adapterkabel: je ein 6-poliger Mini-DINTastatur- und Mausport (PS/2) KVM-Adapterkabel • KA7120, KA7130, KA7170, KA7140, KA9140, KA7175, KA7176, KA7177, KA7166, KA7168, KA7169 Betriebssysteme* Die unterstützten Betriebssysteme für Computer entfernter Benutzer, die sich mit dem KVM Over the NET™ verbinden, beinhalten Windows 2000 und höher sowie alle Betriebssysteme, die das Sun Java Runtime Environment (JRE) 6, Update 3 oder höher unterstützen (Linux, Mac, Sun, usw.). Zu den unterstützten Betriebssystemen, die auf dem Server der Gegenstelle laufen müssen, die mit dem Switch verbunden sind, gehören Windows, Linux, Unix, Novell, Mac, und DOS. Browser* Benutzer, die sich mit dem Gerät verbinden, müssen einen der folgenden WebBrowser verwenden: Internet Explorer, Chrome, Firefox, Safari, Opera, Mozilla oder Netscape. * Im Benutzerhandbuch finden Sie weitere Hinweise zu unterstützten Computer entfernter Benutzer, Betriebssystemen, Browsern und Bildauflösungen. A rückseitige Ansicht vorderseitige Ansicht Hardware installieren Rack-Montage 1. Netzeingangsbuchse 2. Netzschalter 3. Zweiter LAN-Port 4. PON-Anschluss 5. Erdungsanschluss 6. Erster LAN-Port 7. Modemport 8. Lokaler Konsolabschnitt 9. KVM-Ports B Der KVM Over the NET™ kann in einen 19"-Schrank (1U) eingebaut werden. Die zugehörigen Montagerahmen können Sie entweder auf der Vorder- oder der Rückseite des Gerätes anbringen, sodass Sie das System auf der Vorder- bzw. Rückseite des Racks verschrauben. Um das Gerät vorne im Rack einzubauen, gehen Sie folgendermaßen vor: 1. Entfernen Sie die beiden Schrauben auf der Vorder- bzw. Rückseite (siehe folgende Abbildung). 2. Verschrauben Sie die Halterungen an der Vorder- bzw. Rückseite des Gerätes (siehe Diagramm unten): 3. Schieben Sie das Gerät von vorne oder hinten in das Rack und schrauben es fest. Installieren 1. Verbinden Sie Tastatur, Monitor und Maus der lokalen Konsole mit den Konsolports des Gerätes. Die Stecker und Buchsen sind farblich und mit einem Symbol gekennzeichnet. Hinweis: 1. Sie können die Tastatur- und Maustypen beliebig kombinieren. Zum Beispiel können Sie eine PS/2-Tastatur zusammen mit einer USBMaus verwenden. 2. USB-Tastaturen und –Mäuse können bequem an die USBAnschlüsse der Vorderseite angeschlossen wenden, aber bei Bedarf auch an die des Konsolportabschnitts. 3. Die Entfernung zwischen dem KVM Over the NET™ und dem lokalen Monitor darf maximal 20 m betragen. 2. Verbinden Sie einen beliebigen KVM-Port mit einem KVM-Adapterkabel, das für den anzuschließenden Computer geeignet ist. Verwenden Sie dazu ein Kat. 5e/6-Kabel. Hinweis: Die Entfernung zwischen dem KVM Over the NET™ und dem KVMAdapterkabel darf nicht mehr als 40 m betragen. 3. Verbinden Sie den Stecker des KVM-Adapterkabels mit den betreffenden Ports des anzuschließenden Computers. 4. Verbinden Sie ein LAN- oder WAN-Kabel mit dem RJ-45-Anschluss des KVM Over the NET™. 5. (Optional) Verbinden Sie ein weiteres LAN- oder WAN-Kabel mit dem zweiten (Backup-) Netzwerkanschluss des KVM Over the NET™. 6. (Optional) Verwenden Sie Kat. 5e/6-Kabel, um den PON-Port des KVM Over the NET™ mit einem SA0142-Adapter zu verbinden. Verbinden Sie anschließend den Adapter mit dem Port PON IN eines PN0108 Power Over the Net™ Gerätes. 7. (Optional) Verwenden Sie Kat. 5e/6-Kabel, um den Modemport des KVM Over the NET™ mit einem SA0142-Adapter zu verbinden. Verbinden Sie anschließend den seriellen Anschluss des Adapters mit dem DB-9-Anschluss des Modems. 8. Erden Sie das Gerät mithilfe des mitgelieferten Erdleiters. Verbinden Sie dazu das eine Ende des Leiters mit der Erdungsschelle und das andere Ende mit einem geerdetem Gegenstand. 9. Verbinden Sie das mitgelieferte Netzkabel mit der Stromeingangsbuchse am KVM Over the NET™ und dem Stromnetz. Nachdem der KVM Over the NET™ verkabelt wurde, können Sie ihn einschalten. Nachdem das Gerät eingeschaltet wurde, können Sie auch die angeschlossenen Computer einschalten. Administrator-Einrichtun Nachdem die Kabelverbindungen des KVM Over the NET™ hergestellt sind, müssen vom Super-Administrator über die lokale Konsole die Benutzer-Funktionen eingerichtet werden. Nachdem die lokale Konsole verbunden und der KVM Over the NET™ eingeschaltet ist, erscheint ein Anmeldefenster auf dem Konsolmonitor: Wenn Sie sich zum ersten Mal anmelden, verwenden Sie den vorgegebenen Benutzernamen: administrator; und das Standardkennwort lautet: password. Wir empfehlen Ihnen, den vorgegebenen Benutzernamen sowie das Kennwort umgehend über die Option "Benutzerverwaltung" zu ändern. Wählen Sie "Geräteverwaltung"→"Netzwerk", um die Netzwerkfunktionen für den Switch einzurichten. Um den voreingestellten Benutzernamen und das zugehörige Kennwort zu ändern, wählen Sie Benutzerverwaltung → Administrator → Bearbeiten und geben einen eindeutigen Benutzernamen und ein entsprechendes Kennwort für den Super Administrator ein. Um Benutzer hinzuzufügen, wählen Sie „Benutzerverwaltung“ → „Benutzer“ und klicken auf Hinzufügen. Bedienung Sie können auf den KVM Over the NET™ über einen Web-Browser, eine JavaApplikation oder einen Windows-Client zugreifen. Sobald Sie erfolgreich angemeldet sind, erscheint der Hauptbildschirm zur Bedienung. Technische Daten Anschlüsse Schalter LEDAnzeigen Umgebung Funktion LAN Modem USB PON Reset Power Port Selection On Line Selected Power Link 10/100/1000 Mbps Betriebstemperatur Lagertemperatur Feuchtigkeit Funktion Abmessungen (L x B x H) 43.84 x 41.21 x KN2116v 4.40 cm 43.84 x 41.21 x KN2132v 4.40 cm 43.84 x 41.21 x KN4116v 4.40 cm 43.84 x 41.21 x KN4132v 4.40 cm Gewicht 5.91 kg 5.97 kg 6.04 kg 6.08 kg KN2116v / KN2132v / KN4116v / KN4132v 2 x RJ-45 Buchse (schwarz) 1 x RJ-45 Buchse (schwarz) 3 x USB Type A Buchse (weiß) 1 x RJ-45 Buchse (schwarz) 1 x halbverdeckter Drucktaster 2 x Kippschalter 2 x Drucktasten 16/32 (grün) 16/32 (rot) 1 (blau) 2 (rot / rot + grün / grün) 0 – 50˚C -20 – 60˚C 0 -80% rel. Luftfeuchte, nicht kondensierend Stromverbrauch Einfache Stromversorgung: 115V/32.6W; 230V/33.4W Duale Stromversorgung: 115V/38W; 230V/38.7W Einfache Stromversorgung: 115V/38W; 230V/38.8W Duale Stromversorgung: 115V/43W; 230V/43.7W Einfache Stromversorgung: 115V/34.7W; 230V/35.5W Duale Stromversorgung: 115V/41W; 230V/41.5W Einfache Stromversorgung: 115V/40.1W; 230V/41W Duale Stromversorgung: 115V/46W; 230V/46.6W KN2116v/KN2132v/KN4116v/KN4132v KVM Over the NET™ Guía rápida Requisitos del sistema Ordenadores de usuarios remotos • Para obtener los mejores resultados, se recomienda que los ordenadores que acceden al conmutador tengan como mínimo un procesador P III a 1 GHz y una resolución de pantalla de 1024 x 768. • El navegador debe admitir el cifrado SSL de 128 bits. • Para una descarga más eficaz se recomienda una conexión a Internet de por lo menos 512 Kbps. Servidores Se denominan servidores a los ordenadores que están conectados al concentrador a través de cables adaptadores KVM. En cada servidor se tienen que instalar los siguientes componentes: • Una tarjeta gráfica VGA, SVGA o Multisync • Para la conexión del cable adaptador KVM USB: un puerto USB de tipo A y una controladora USB • Para la conexión del cable adaptador KVM PS/2: Puertos para teclado y ratón mini-DIN de 6 patillas Cables adaptadores KVM • KA7120, KA7130, KA7170, KA7140, KA9140, KA7175, KA7176, KA7177, KA7166, KA7168, KA7169 Sistemas operativos* Los sistemas operativos admitidos para los ordenadores cliente locales que se conectan al KVM Over the NET™ son Windows 2000 y versiones superiores, así como los sistemas que admiten Java Runtime Environment (JRE) 6 de Sun, actualización 3 o posterior. Entre los sistemas operativos admitidos para los servidores conectados a los puertos del conmutador se incluyen Windows, Linux, Unix, Novell, Mac y DOS. Navegador* Entre los navegadores admitidos para los usuarios que se conectan al dispositivo se incluyen Internet Explorer, Chrome, Firefox, Safari, Opera, Mozilla y Netscape. * Para más información sobre los ordenadores de usuarios remotos sistemas operativos, navegadores y resoluciones admitidos, consulte el manual del usuario. Presentación del hardware vista frontal 1 Indicador LED de alimentación 2 Indicadores LED de los puertos 3 Indicadores LED LAN 4 Puertos USB 5 Interruptor de reseteo 6. Puertos de audio 7. Botones de conmutación entre puertos A vista posterior 1. Entrada de alimentación 2. Interruptor de alimentación 3. Puerto LAN secundario 4. Puerto PON 5. Toma de tierra 6. Puerto LAN principal 7. Puerto para módem 8. Puertos de consola local 9. Puertos KVM Instalación del hardware B Montaje en rack Se puede montar el KVM Over the NET™ en un rack de 19" (1U). Puede atornillar los raíles en la parte frontal o posterior de la unidad según prefiera montar la unidad en la parte frontal o posterior del rack. Para montarla en la parte frontal del rack, haga lo siguiente: 1. Retire los dos tornillos de la parte frontal o posterior, como se indica en el siguiente diagrama: 2. Atornille los raíles delante y detrás en los laterales de la unidad (véase el diagrama siguiente) 3. Deslice la unidad en el rack y atorníllela al frontal y la parte trasera del rack Instalación 1. Conecte los dispositivos de consola locales a la unidad. Para ello, emplee el cable de consola 5 en 1 incluido. Nota: 1. Puede conectar teclados y ratones de tipo diferente. Por ejemplo, puede conectar un teclado PS/2 y un ratón USB. 2. Los teclados y ratones USB se pueden conectar a los puertos USB situados en el panel frontal de la unidad así como a los puertos de la sección de consola local situados en el panel posterior. 3. La distancia entre el KVM Over the NET™ y el monitor local no debe superar los 20 m. 2. Conecte cualquier puerto KVM disponible al cable adaptador KVM adecuado para el ordenador que vaya a instalar. Para ello, use un cable de categoría 5e/6. Nota: la distancia entre el KVM Over the NET™ y el cable adaptador KVM no debe exceder 40 m. 3. Enchufe los conectores del cable adaptador KVM a los puertos correspondientes del ordenador que quiera instalar. 4. Conecte un cable LAN o WAN al puerto de interfaz de red principal del el KVM Over the NET™. 5. (Opcional) Conecte otro cable LAN o WAN al puerto de interfaz de red de respaldo (secundario) del el KVM Over the NET™. 6. (Opcional) Utilice un cable de categoría 5e/6 para conectar el puerto PON del KVM Over the NET™ a un adaptador SA0142. Conecte el adaptador al puerto de entrada PON de una unidad PN0108 Power Over the Net™. 7. (Opcional) Utilice un cable de categoría 5e/6 para conectar el puerto de módem del KVM Over the NET™ a un adaptador SA0142. Enchufe el conector serie del adaptador al puerto DB-9 del módem. 8. Para conectar la unidad a tierra, conecte un extremo del cable de tierra incluido a la toma de tierra y el otro extremo a un objeto correctamente conectado a tierra. 9. Conecte el/los cable(s) de alimentación incluido(s) a la entrada de alimentación del KVM Over the NET™ y luego a una toma eléctrica. Si sólo quiere conectar una toma eléctrica, deberá encender el equipo con el interruptor de alimentación adecuado. Si lo conecta a dos tomas, cualquiera de los interruptores de alimentación servirá para encender el concentrador KVM. O encienda los dos para obtener una alimentación doble. Una vez conectado el conmutador KVM Over the NET™, puede encenderlo. A continuación, encienda los ordenadores. Configuración del administrador Une vez conectado el KVM Over the NET™, el superadministrador debe configurar la unidad para los usuarios mediante la consola local. Después de conectar la consola local y de encender el KVM Over the NET™, aparecerá un cuadro de diálogo de inicio de sesión: La primera vez que se conecte, especifique el nombre de usuario predeterminado administrator; y la contraseña predeterminada es: password. Por motivos de seguridad, utilice la función "User Management" (Gestión de usuarios) para cambiarlos por un nombre de usuario y una contraseña únicos. Seleccione "Device Management" (Administración de dispositivos) → "Network" (Red) para configurar el conmutador para un uso en red. Para cambiar el nombre de usuario y la contraseña predeterminados, seleccione > “Administración de usuarios” → “Administrador” → “Modificar” e introduzca valores únicos para el nombre de usuario y la contraseña del Súper Administrador. Para agregar usuarios, seleccione “Administración de usuarios” → “Usuarios” y haga clic en Agregar. Funcionamiento Puede acceder al KVM Over the NET™ mediante un navegador Web, un programa de aplicación cliente de Java o de Windows. Después de conectarse con éxito, aparecerá la página principal donde podrá administrar el funcionamiento de la unidad.-
 1
1
-
 2
2


ATEN KN2116v Guía de inicio rápido
- Categoría
- Conmutadores KVM
- Tipo
- Guía de inicio rápido
en otros idiomas
- français: ATEN KN2116v Guide de démarrage rapide
- italiano: ATEN KN2116v Guida Rapida
- English: ATEN KN2116v Quick start guide
- Deutsch: ATEN KN2116v Schnellstartanleitung
- 日本語: ATEN KN2116v クイックスタートガイド
Artículos relacionados
-
ATEN KN1116v Guía de inicio rápido
-
ATEN KN8132V Guía de inicio rápido
-
-
ATEN KN1116VA Guía de inicio rápido
-
ATEN KN2116VA Guía de inicio rápido
-
ATEN SN9116 Guía de inicio rápido
-
ATEN CN8600 Guía de inicio rápido
-
-
ATEN CN8000 KVM on the NET Guía de inicio rápido
-