LG 98UB9800 El manual del propietario
- Categoría
- Televisores LCD
- Tipo
- El manual del propietario

98UB9800 105UC9
Click! User Guide
OWNER’S MANUAL
LED TV*
* LG LED TVs are LCD TVs with LED backlighting.
Please read this manual carefully before operating your TV
and retain it for future reference.
*MFL67987178*
P/NO : MFL67987178 (1506-REV04)
www.lg.com

2
ENGLISH
IMPORTANT SAFETY INSTRUCTIONS
IMPORTANT SAFETY INSTRUCTIONS
Always comply with the following precautions to avoid dangerous situations and ensure peak
performance of your product.
WARNING/CAUTION
RISK OF ELECTRIC SHOCK
DO NOT OPEN
TO REDUCE THE RISK OF ELECTRIC
SHOCK DO NOT REMOVE COVER (OR
BACK). NO USER SERVICEABLE PARTS
INSIDE. REFER TO QUALIFIED SERVICE
PERSONNEL.
The lightning flash with arrowhead
symbol, within an equilateral triangle, is
intended to alert the user to the presence
of uninsulated dangerous voltage within the
product’s enclosure that may be of
sufficient magnitude to constitute a risk of
electric shock to persons.
The exclamation point within an
equilateral triangle is intended to alert
the user to the presence of important
operating and maintenance (servicing)
instructions in the literature accompanying
the appliance.
WARNING/CAUTION
- TO REDUCE THE RISK OF FIRE AND
ELECTRIC SHOCK, DO NOT EXPOSE THIS
PRODUCT TO RAIN OR MOISTURE.
WARNING
If you ignore the warning message, you
may be seriously injured or there is a
possibility of accident or death.
CAUTION
If you ignore the caution message, you may
be slightly injured or the product may be
damaged.
NOTE
The note helps you understand and use
the product safely. Please read the note
carefully before using the product.
Read these instructions.
Keep these instructions.
Follow all instructions.
Heed all warnings.
• Do not allow the television to become wet.
• Clean only with a dry cloth.
• Do not block any ventilation openings. Install
in accordance with the manufacturer’s
instructions.
• Do not install near any heat sources such
as radiators, heat registers, stoves, or other
apparatus (including amplifiers) that produce
heat.
• Do not defeat the safety purpose of the
polarized or grounding-type plug. A polarized
plug has two blades with one wider than
the other. A grounding type plug has two
blades and a third grounding prong. The
wide blade or the third prong are provided
for your safety. If the provided plug does not
fit into your outlet, consult an electrician for
replacement of the obsolete outlet (Can differ
by country).
• Do not press strongly upon the panel with a
hand or a sharp object such as a nail, pencil
or pen, or make a scratch on it.

3
ENGLISH
IMPORTANT SAFETY INSTRUCTIONS
• Protect the power cord from being walked on
or pinched particularly at plugs, convenience
receptacles, and the point where they exit
from the apparatus.
• Only use attachments/accessories specified
by the manufacturer.
• Use only with a cart, stand, tripod, bracket,
or table specified by the manufacturer, or
sold with the apparatus. When a cart is used,
use caution when moving the cart/apparatus
combination to avoid injury from tip-over.
• Unplug this apparatus during lightning storms
or when unused for long periods of time.
• Refer all servicing to qualified service
personnel. Servicing is required when
the apparatus has been damaged in any
way, such as power-supply cord or plug is
damaged, liquid has been spilled or objects
have fallen into the apparatus, the apparatus
has been exposed to rain or moisture, does
not operate normally, or has been dropped.
• Do not stick metal objects or any other
conductive material into the power cord. Do
not touch the end of the power cord while it
is plugged in.
• Keep the packing anti-moisture material
or vinyl packing out of the reach of
children. Anti-moisture material is harmful
if swallowed. If swallowed by mistake,
induce vomiting and go to the nearest
hospital. Additionally, vinyl packing can
cause suffocation. Keep it out of the reach of
children.
• CAUTION concerning the Power Cord
(Can differ by country):
Check the specification page of this owner’s
manual to be certain. Do not connect too
many appliances to the same AC power
outlet as this could result in fire or electric
shock. Do not overload wall outlets.
Overloaded wall outlets, loose or damaged
wall outlets, extension cords, frayed power
cords, or damaged or cracked wire insulation
are dangerous. Any of these conditions could
result in electric shock or fire. Periodically
examine the cord of your appliance, and
if its appearance indicates damage or
deterioration, unplug it, discontinue use of
the appliance, and have the cord replaced
with an exact replacement part by an
authorized service. Protect the power cord
from physical or mechanical abuse, such as
being twisted, kinked, pinched, closed in a
door, or walked upon. Pay particular attention
to plugs, wall outlets, and the point where
the cord exits the appliance. Do not move
the TV with the power cord plugged in. Do
not use a damaged or loose power cord. Be
sure do grasp the plug when unplugging the
power cord. Do not pull on the power cord to
unplug the TV.
• Warning - To reduce the risk of fire or
electrical shock, do not expose this product
to rain, moisture or other liquids. Do not
touch the TV with wet hands. Do not install
this product near flammable objects such
as gasoline or candles, or expose the TV to
direct air conditioning.
• Do not expose to dripping or splashing and
do not place objects filled with liquids, such
as vases, cups, etc. on or over the apparatus
(e.g. on shelves above the unit).

4
ENGLISH
IMPORTANT SAFETY INSTRUCTIONS
• Grounding
(Except for devices which are not grounded.)
Ensure that you connect the earth ground
wire to prevent possible electric shock
(i.e. a TV with a three-prong grounded AC
plug must be connected to a three-prong
grounded AC outlet). If grounding methods
are not possible, have a qualified electrician
install a separate circuit breaker. Do not try to
ground the unit by connecting it to telephone
wires, lightning rods, or gas pipes.
Short-circuit
Breaker
Power
Supply
• As long as this unit is connected to the AC
wall outlet, it is not disconnected from the AC
power source even if the unit is turned off.
• Do not attempt to modify this product in
any way without written authorization from
LG Electronics. Unauthorized modification
could void the user’s authority to operate this
product.
• Outdoor Antenna Grounding
(Can differ by country):
If an outdoor antenna is installed, follow
the precautions below. An outdoor antenna
system should not be located in the vicinity
of overhead power lines or other electric light
or power circuits, or where it can come in
contact with such power lines or circuits as
death or serious injury can occur. Be sure the
antenna system is grounded so as to provide
some protection against voltage surges
and built-up static charges. Section 810 of
the National Electrical Code (NEC) in the
U.S.A. provides information with respect to
proper grounding of the mast and supporting
structure, grounding of the lead-in wire to
an antenna discharge unit, size of grounding
conductors, location of antenna discharge
unit, connection to grounding electrodes and
requirements for the grounding electrode.
Antenna grounding according to the National
Electrical Code, ANSI/NFPA 70
Ground Clamp
Grounding Conductor
(NEC Section 810-21)
Antenna Lead in Wire
Electric Service
Equipment
Antenna Discharge Unit
(NEC Section 810-20)
Ground Clamp
Power Service Grounding
Electrode System
(NEC Art 250, Part H)
NEC: National Electrical Code
• Cleaning
When cleaning, unplug the power cord and
wipe gently with a soft cloth to prevent
scratching. Do not spray water or other
liquids directly on the TV as electric shock
may occur. Do not clean with chemicals such
as alcohol, thinners, or benzine.
• Moving
Make sure the product is turned off,
unplugged, and all cables have been
removed. It may take 2 or more people to
carry larger TVs. Do not press or put stress
on the front panel of the TV.
• Ventilation
Install your TV where there is proper
ventilation. Do not install in a confined space
such as a bookcase. Do not cover the product
with cloth or other materials while plugged.
Do not install in excessively dusty places.
• If you smell smoke or other odors coming
from the TV, unplug the power cord and
contact an authorized service center.
• Keep the product away from direct sunlight.
• Never touch this apparatus or antenna during
a lightning storm.
• When mounting a TV on the wall, make sure
not to install the TV by hanging the power
and signal cables on the back of the TV.
• Do not allow an impact shock, any objects to
fall into the product, and do not drop anything
onto the screen.
• DISCONNECTING DEVICE FROM THE MAIN
POWER
The Power Plug is the disconnecting device.
In case of an emergency, the Power Plug
must remain readily accessible.
• Batteries
Store the accessories (battery, etc.) in a safe
location out of the reach of children.
• This apparatus uses batteries. In your
community there might be regulations that
require you to dispose of these batteries
properly due to environmental considerations.
Please contact your local authorities for
disposal or recycling information.
• Do not dispose of batteries in a fire.
• Do not short circuit, disassemble, or allow
the batteries to overheat.

5
ENGLISH
IMPORTANT SAFETY INSTRUCTIONS
• Do not use high voltage electrical equipment
near the TV, (e.g. bug zapper).
This may result in product malfunction.
• Dot Defect
The panel is a high technology product with
resolution of two million to six million pixels.
In a very few cases, you could see fine dots
on the screen while you’re viewing the TV.
Those dots are deactivated pixels and do not
affect the performance and reliability of the
TV.
• Generated Sound
Cracking noise A cracking noise that occurs
when watching or turning off the TV is
generated by plastic thermal contraction
due to temperature and humidity. This noise
is common for products where thermal
deformation is required.
Electrical circuit humming/panel buzzing
A low level noise is generated from a high-
speed switching circuit, which supplies a
large amount of current to operate a product.
It varies depending upon the product.
This generated sound does not affect the
performance and reliability of the product.
• Take care not to touch the ventilation
openings. When watching the TV for a long
period, the ventilation openings may become
hot. This does not affect the performance of
the product or cause defects in the product.
• Do not install this product on a wall if it
could be exposed to oil or oil mist. This may
damage the product and cause it to fall.
• If the TV feels cold to the touch, there may
be a small flicker when it is turned on. This
is normal; there is nothing wrong with TV.
Some minute dot defects may be visible on
the screen, appearing as tiny red, green, or
blue spots. However, they have no adverse
effect on the TV’s performance. Avoid
touching the LCD screen or holding your
finger(s) against it for long periods of time.
Doing so may produce some temporary
distortion effects on the screen.
Preventing image burn or burn-in on your
TV screen
• If a fixed image displays on the TV screen for
a long period of time, it will be imprinted and
become a permanent disfigurement on the
screen. This is image burn or burn-in and not
covered by the warranty.
• Watching the TV for a long period of time
with the screen ratio of 4:3 (for the 21:9
model, 4:3 and 16:9) may cause image
burn-in on the letterboxed area of the screen.
When watching the TV for a long period of
time, please use the default screen ratio of
16:9 or 21:9 depending upon the product.
• Avoid displaying a fixed image on the TV
screen for a long period of time (2 or more
hours for LCD, 1 or more hours for the
Plasma TV) to prevent image burn.

6
ENGLISH
IMPORTANT SAFETY INSTRUCTIONS
Viewing 3D Imaging (For 3D models)
WARNING
Viewing Environment
• Viewing Time
- When watching 3D content, take 5 to 15 minute breaks every hour. Viewing 3D content for a long
period of time may cause headache, dizziness, fatigue or eye strain.
Those that have a photosensitive seizure or chronic illness
• Some users may experience a seizure or other abnormal symptoms when they are exposed to a
flashing light or particular pattern from 3D content.
• Do not watch 3D videos if you feel nauseous, are pregnant and/ or have a chronic illness such as
epilepsy, cardiac disorder, or blood pressure disease, etc.
• 3D Content is not recommended for those who suffer from stereo blindness or stereo anomaly.
Double images or discomfort in viewing may be experienced.
• If you have strabismus (cross-eyed), amblyopia (weak eyesight), or astigmatism, you may have
trouble sensing depth and easily feel fatigue due to double images. It is advised to take more
frequent breaks than the average adult.
• If your eyesight varies between your right and left eye, correct your eyesight prior to watching 3D
content.
Symptoms which require discontinuation or refraining from watching 3D content
• Do not watch 3D content when you feel fatigue from lack of sleep, overwork, or intoxication.
• When these symptoms are experienced, stop using/watching 3D content and get enough rest until
the symptom subsides.
- Consult your doctor when the symptoms persist. Symptoms may include headache, eyeball pain,
dizziness, nausea, palpitation, blurriness, discomfort, double image, define visual inconvenience, or
fatigue.

7
ENGLISH
IMPORTANT SAFETY INSTRUCTIONS
CAUTION
Viewing Environment
• Viewing Distance
- Maintain a distance of at least twice the screen’s diagonal length when watching 3D content. If you
feel discomfort in viewing 3D content, move further away from the TV.
Viewing Age
• Infants / Children
- Usage/ Viewing 3D content for children under the age of 5 are prohibited.
- Children under the age of 10 may overreact and become overly excited because their vision is in
development (for example: trying to touch the screen or trying to jump into it. Special monitoring
and extra attention is required for children watching 3D content.
- Children have greater binocular disparity of 3D presentations than adults because the distance
between the eyes is shorter than one of adults. Therefore they will perceive more stereoscopic
depth compared to adults for the same 3D image.
• Teenagers
- Teenagers under the age of 19 may be stimulated to light coming from 3D videos. Advise them not
to watch 3D videos for a long time when they are tired.
• Elderly
- The elderly may perceive less of a 3D effect than the youth. Do not sit closer to the TV than the
recommended distance.
Cautions when using the 3D glasses
• Only use LG 3D glasses. Otherwise, you may not be able to view 3D videos properly.
• Do not use 3D glasses instead of your normal glasses, sunglasses, or protective goggles.
• Using modified 3D glasses may cause eye strain or image distortion.
• Do not keep your 3D glasses in extremely high or low temperatures. It will cause deformation.
• The 3D glasses are fragile and are easily scratched. Use a soft, clean piece of cloth when wiping
the lenses. Do not scratch the lenses of the 3D glasses with sharp objects or clean/wipe them with
chemicals.

8
ENGLISH
LICENSES / OPEN SOURCE SOFTWARE NOTICE INFORMATION
LICENSES
Supported licenses may differ by model. For more information about licenses, visit
www.lg.com
.
OPEN SOURCE SOFTWARE NOTICE INFORMATION
To obtain the source code under GPL, LGPL, MPL, and other open source licenses, that is contained in
this product, please visit
http://opensource.lge.com
.
In addition to the source code, all referred license terms, warranty disclaimers and copyright notices are
available for download.
LG Electronics will also provide open source code to you on CD-ROM for a charge covering the cost of
performing such distribution (such as the cost of media, shipping, and handling) upon email request to
. This offer is valid for three (3) years from the date on which you purchased the
product.
•Image shown may differ from your TV.
•Your TV’s OSD (On Screen Display) may differ slightly from that shown in this manual.
•The available menus and options may differ from the input source or product model that you are
using.
•New features may be added to this TV in the future.
NOTE

9
ENGLISH
TABLE OF CONTENTS
TABLE OF CONTENTS
2 IMPORTANT SAFETY
INSTRUCTIONS
6 Viewing 3D Imaging (For 3D models)
8 LICENSES
8 OPEN SOURCE SOFTWARE
NOTICE INFORMATION
9 TABLE OF CONTENTS
10 INSTALLATION PROCEDURE
10 ASSEMBLING AND PREPARING
10 Unpacking
12 Optional Extras
13 Parts and Buttons
14 - Using the Joystick Button
15 Lifting and Moving the TV
16 Setting Up the TV
16 - Attaching the Stand
17 - Mounting on a Table
18 - Tidying Cables
18 - Attaching the AV Port Cover
19 - Using Sliding Speaker
20 Using Built-In Camera
21 - Preparing Built-In Camera
21 - Name of Parts for the Built-In Camera
21 - Checking the Camera’s Shooting
Range
22 MAKING CONNECTIONS
22 Connecting to an Antenna or Cable
23 Connecting to an HD Receiver, DVD
Player, or VCR
23 - HDMI Connection
24 - DVI to HDMI Connection
25 - Connecting to a Mobile Phone
26 - Component Connection
27 - Composite Connection
28 Connecting to a PC
28 - HDMI Connection or DVI to HDMI
Connection
30 Connecting to an Audio System
30 - Digital Optical Audio Connection
31 Connecting Headphones
32 Connecting a USB Device
33 MAGIC REMOTE FUNCTIONS
34 Registering Magic Remote
34 How to use Magic Remote
34 Precautions to Take when Using the
Magic Remote
35 USING THE USER GUIDE
35 EXTERNAL CONTROL DEVICE
SETUP
36 SPECIFICATIONS
38 MAINTENANCE
38 Cleaning Your TV
38 - Screen, Frame, Cabinet, and Stand
38 - Power Cord
38 TROUBLESHOOTING

10
ENGLISH
INSTALLATION PROCEDURE / ASSEMBLING AND PREPARING
INSTALLATION PROCEDURE
1 Open the package and make sure all the accessories are included.
2 Attach the stand to the TV set.
3 Connect an external device to the TV set.
4 Make sure the network connection is available.
You can use the TV network functions only when the network connection is made.
* When the TV is turned on for the first time after being shipped from the factory, initialization of the
TV may take approximately one minute.
ASSEMBLING AND PREPARING
Unpacking
Check your product box for the following items. If there are any missing accessories, contact the local
dealer where you purchased your product. The illustrations in this manual may differ from the actual
product and item.
•Do not use any unapproved items to ensure the safety and product’s lifespan.
•Any damages or injuries by using unapproved items are not covered by the warranty.
•In case of some model, the thin film on screen is a part of TV, So don’t take it off.
CAUTION
• The items supplied with your product may vary depending upon the
model.
• Product specifications or contents of this manual may be changed
without prior notice due to upgrade of product functions.
• For an optimal connection, HDMI cables and USB devices should
have bezels less than 10 mm thick and 18 mm width.
• Use an extension cable that supports USB 2.0 if the USB cable or
USB flash drive does not fit into your TV’s USB port.
• Use a certified cable with the HDMI logo attached. If you do not
use a certified HDMI cable, the screen may not display or a connection error may occur.
•Recommended HDMI cable types
- High-Speed HDMI
®
/
TM
cable
- High-Speed HDMI
®
/
TM
cable with Ethernet
NOTE
B
A
A
B
*A 10 mm
*B 18 mm

11
ENGLISH
ASSEMBLING AND PREPARING
Owner’s Manual Magic Remote
(See page 33.)
Batteries (AA)
(Depending upon model)
(See page 33.)
Cinema 3D Glasses
(Depending upon model)
The number of 3D glasses
may differ depending upon
the model or country.
Power Cord
(Depending upon model)
HDMI Cable
(Depending upon model)
(See pages 23 and 28.)
( For 98UB9800)
1
2
Component Video Cable
(See page 26.)
Composite Video Cable
(See pages 26 and 27.)
Stand Base
(See page 16.)
( For 98UB9800) ( For 98UB9800) ( For 105UC9)
Wrench
(See page 16.)
AV Port Cover / Screw
1 EA, M3 x L8
(See page 18.)
AV Port Cover
(See page 19.)
( For 98UB9800) ( For 98UB9800)
Cable Management
(See page 18.)
Cable Holder
(See page 18.)

12
ENGLISH
ASSEMBLING AND PREPARING
Optional Extras
Optional extras can be changed or modified for quality improvement without any notification.
Contact your dealer for buying these items.
These devices only work with certain models.
The model name or design may be changed due to the manufacturer’s circumstances or policies.
AG-F***
Cinema 3D Glasses
AG-F***DP
Dual Play Glasses
AN-MR500
Magic Remote
LG Audio Device
Remote Control Sensor
Intelligent Sensor
1
LG Logo Light

13
ENGLISH
ASSEMBLING AND PREPARING
Parts and Buttons
Screen
Built-in Camera
Joystick Button
2
Remote Control Sensor
Intelligent Sensor
1
LG Logo Light
(For 98UB9800)
1. Intelligent sensor - Adjusts the image quality and brightness based on the surrounding environment.
2. Joystick button is located below the screen of TV.
•Do not place any objects or body parts in area between TV Screen and Speaker Stand assembly.
It could cause personal Injury or damage to product. (For 105UC9)
CAUTION
• You can set the LG Logo Light or power indicator light to on or off by selecting GENERAL in the main
menu. (Depending upon model)
NOTE
(For 105UC9)
Sliding Speaker
Joystick Button
2
Speakers
Built-in Camera
Screen
Power Indicator
Remote Control Sensor
Intelligent Sensor
1

14
ENGLISH
ASSEMBLING AND PREPARING
Using the Joystick Button
You can operate the TV by pressing the button or moving the joystick left, right, up, or down.
Basic functions
Power On
When the TV is turned off, place your finger on the joystick button, press it once
,
and release it.
Power Off
When the TV is turned on, place your finger on the joystick button, press it once
for a few seconds
, and release it.
Volume Control
If you place your finger over the joystick button and move it left or right, you can
adjust the volume level you want.
Channels Control
If you place your finger over the joystick button and move it up or down, you can
scroll through the saved channels you want.
•With your finger over the joystick button and move it up, down, left, or right; be careful not to press
the joystick button. If you press the joystick button first, you may not be able to adjust the volume
level and/or scroll through saved channels.
NOTE
Adjusting the menu
When the TV is turned on, press the joystick button one time.
You can adjust the Menu items ( , , ) moving the joystick button left or right.
TV OFF
Turns the power off.
CLOSE
Clears on-screen displays and returns to TV viewing.
INPUT
Changes the input source.

15
ENGLISH
ASSEMBLING AND PREPARING
Lifting and Moving the TV
When moving or lifting the TV, read the
following to prevent the TV from being
scratched or damaged and for safe
transportation regardless of its type and size.
•Avoid touching the screen at all times, as
this may result in damage to the screen.
•Do not place the product on the floor with its
front facing down without padding. Failure to
do so may result in damage to the screen.
CAUTION
• It is recommended to move the TV in the
box or packing material that the TV originally
came in.
• Before moving or lifting the TV, disconnect
the power cord and all cables.
• When holding the TV, the
screen should face away from
you to avoid damage.
• Hold the top and bottom of the TV frame
firmly. Make sure not to hold the transparent
part, speaker, or speaker grill area.
• Use at least two people to
move a large TV.
• When transporting the TV by
hand, hold the TV as shown in
the following illustration.
• When transporting the TV, do not expose the
TV to jolts or excessive vibration.
• When transporting the TV, keep the TV
upright; never turn the TV on its side or tilt
towards the left or right.

16
ENGLISH
ASSEMBLING AND PREPARING
Setting Up the TV
You can mount your TV to a wall or attach
the stand if you wish to place the TV on an
entertainment center or other furniture.
Attaching the Stand
If you are not mounting the TV to a wall, use
the following instructions to attach the stand.
• When attaching the stand to the TV set,
place the screen facing down on a cushioned
table or flat surface to protect the screen
from scratches.
• Make sure that the screws are fastened
tightly. (If they are not fastened securely
enough, the TV may tilt forward after being
installed.)
• Do not fasten the screws with excessive
force otherwise they may be worn out and
become loose.
CAUTION
(For 98UB9800)
1
1
2
1
2
• The stand screws are already attached at the
back of the TV. Please use these attached
screws to assemble the TV and stand.
NOTE
Mold
2
1
2
1
2
3
1
2
1
2
Stand Base
Wrench
M6 x L47
6 EA
Wrench

17
ENGLISH
ASSEMBLING AND PREPARING
Mounting on a Table
1
Lift and tilt the TV into its upright position on
a table.
- Leave a 10 cm (minimum) space from the
wall for proper ventilation.
10 cm
10 cm
10 cm
10 cm
2 Connect the power cord to a wall outlet.
•Do not place the TV near or on sources
of heat, as this may result in fire or other
damage.
CAUTION
Securing the TV to a wall (optional)
(For 98UB9800) (For 105UC9)
1 Insert and tighten the eye-bolts, or TV
brackets and bolts on the back of the TV.
- If there are bolts inserted at the eye-bolts
position, remove the bolts first.
2 Mount the wall brackets with the bolts to
the wall. Match the location of the wall
bracket and the eye-bolts on the rear of the
TV.
3 Connect the eye-bolts and wall brackets
tightly with a sturdy rope or cable. Make
sure to keep the rope parallel to the flat
surface.
•Make sure that children do not climb on or
hang on the TV.
CAUTION
•Use a platform or cabinet that is strong and
large enough to support the TV securely.
•Brackets, bolts, and ropes are optional. You
can obtain additional accessories from your
local dealer.
NOTE

18
ENGLISH
ASSEMBLING AND PREPARING
Tidying Cables
(For 98UB9800)
Gather and bind the cables with the
Cable Holder and Cable management.
Cable Management
Cable Holder
Cable Management
(For 105UC9)
Gather and bind the cables with the
Cable management.
Cable Management
• Do not move the TV by holding the cable
holder and cable management, as the cable
holders may break, and injuries and damage
to the TV may occur.
CAUTION
Attaching the AV Port Cover
1
Insert the cover holder attached to the AV
port cover into the hole of the main body of
the product as illustrated.
2 - For 98UB9800: Attach the AV port cover
onto the AV port part. The cover remains
attached by magnet.
- For 105UC9: Attach the AV port cover by
inserting it into the left hole of the port.
The cover remains attached by magnet.
(For 98UB9800)
1
AV Port Cover
Cover Holder
2

19
ENGLISH
ASSEMBLING AND PREPARING
(For 105UC9)
1
2
1
2
1
AV Port Cover
2
1
Cover
Holder
2
•If you do not attach the cover holder, the
cover may fall off and cause injury.
CAUTION
Using Sliding Speaker
(For 98UB9800)
Sliding Speaker
1 When TV is turned ON, the hidden Speaker
slides out from inside the TV.
2 Go to (Home) (Settings) Sound
Sound Out Sliding Speaker to set
Sliding Speaker.
• Please do not use excessive force during
operation of internal sliding Speaker as it may
cause it to malfunction.
• Make sure Speaker is in OPEN position when
viewing TV as sound will be abnormal or
distorted.
3 When transporting the TV, make sure that
the Sliding Speaker is closed. If the Sliding
Speaker is open when being transported,
it may become damaged, resulting in
malfunction.
• To close the Sliding Speaker, go to
Sound Sound Out Sliding Speaker
select Open When TV Is Turned On and
press the
(POWER) button.

20
ENGLISH
ASSEMBLING AND PREPARING
•When the Sliding Speaker is operating (when
the TV is turned on/off), ensure that children
do not put their hands near the operating
part of the speaker (at the bottom of the TV)
and that they do not crawl into the space
below the TV.
- Their hands may get caught and injured due
to the operation of the speaker.
•Do not store objects below the TV.
- This may cause a problem in the operating
part of the speaker.
CAUTION
Using Built-In Camera
You can make a Skype video call or use the
motion recognition function using the built-in
camera of the TV.
This TV does not support the use of an external
camera.
• Before using the built-in camera, you must
recognize the fact that you are legally
responsible for the use or misuse of the
camera by the relevant national laws
including the criminal law.
• The relevant laws include the Personal
Information Protection law which regulates
the processing and transferring of personal
information and the law which regulates the
monitoring by camera in a workplace and
other places.
• When using the built-in camera, the user
must gain consent from the persons being
observed. Please avoid using the camera in
the following manner. We suggest avoiding
the following situations:
(1) Using the camera in areas where the
use of camera is generally prohibited such
as restroom, locker room, fitting room, and
security area.
(2) Using the camera while causing the
infringement of privacy.
(3) Using the camera while causing the
violation of the relevant regulations or laws.
NOTE

21
ENGLISH
ASSEMBLING AND PREPARING
Preparing Built-In Camera
1
Pull up the built-in camera at the back of the
TV.
Angle Adjustment Lever
Slide
•Remove the protective film before using the
built-in camera.
NOTE
2 You can adjust the angle of the camera with
the angle adjustment lever on the back of
the built-in camera.
[Side View]
3˚
5˚
5˚
3˚
Lever Lens
3 Pull down the built-in camera when you are
not using it.
Name of Parts for the Built-In
Camera
Camera Lens
Protective film
Microphone
Checking the Camera’s Shooting
Range
1
Press the (Home) button to access the
Home menu.
2 Select Camera and then
press the Wheel (OK) button.
•The optimal distance from the camera
to use the motion recognition function is
between 1.5 m and 4.5 m.
NOTE

22
ENGLISH
MAKING CONNECTIONS
MAKING CONNECTIONS
You can connect various external devices to the TV. Supported external devices are: HD receivers, DVD
players, VCRs, audio systems, USB storage devices, PC, gaming devices, and other external devices.
For more information on external device’s connection, refer to the manual provided with each device.
•If you record a TV program on a DVD recorder or VCR, make sure to connect the TV signal input
cable to the TV through a DVD recorder or VCR. For more information about recording, refer to the
manual provided with the connected device.
•The external device connections shown may differ slightly from illustrations in this manual.
•Connect external devices to the TV regardless about the order of the TV port.
•If you connect a gaming device to the TV, use the cable supplied with the gaming device.
•Refer to the external equipment’s manual for operating instructions.
NOTE
Connecting to an Antenna or Cable
Connect an antenna, cable, or cable box to watch TV while referring to the following. The illustrations
may differ from the actual items and an RF cable is optional.
VHF Antenna
UHF Antenna
Coaxial (75Ω) Coaxial (75Ω)
(*Not provided) (*Not provided)
Antenna
Terminal
Wall Jack
or
•To improve the picture quality in a poor
signal area, purchase a signal amplifier.
•Use a signal splitter to use 2 TVs or more.
•If the antenna is not installed properly,
contact your dealer for assistance.
•DTV Audio Supported Codec: MPEG, AAC,
HE-AAC, Dolby Digital.
• This TV cannot receive ULTRA HD (3840 x
2160 pixels) broadcasts directly because the
related standards have not been confirmed.
NOTE
•Make sure not to bend the copper wire of
the RF cable.
Copper wire
•Complete all connections between devices,
and then connect the power cord to the
power outlet to prevent damage to your TV.
CAUTION

23
ENGLISH
MAKING CONNECTIONS
Connecting to an HD Receiver, DVD Player, or VCR
Connect a HD receiver, DVD player, or VCR to the TV and select an appropriate input mode.
•HDMI specifications may be different for each input port, so make sure to check the device
specifications before connecting.
• The HDMI IN 3 port is especially suitable for the specifications to enjoy ULTRA HD Video (4:4:4,
4:2:2) of 4K @ 50/60 Hz. However, video or audio may not be supported
depending upon the
specifications of the external equipment. In that case, use any other HDMI IN port.
• Contact customer service for more information on the HDMI specifications of each input port.
NOTE
HDMI Connection
HDMI is the best way to connect a device.
Transmits digital video and audio signals from an external device to the TV. Connect the external device
and the TV with the HDMI cable as shown in the following illustration.
•Use the latest High Speed HDMI™ Cable that supports CEC (Customer Electronics Control) function.
•High Speed HDMI™ Cables are tested to carry an HD signal up to 1080p and higher.
•HDMI Audio Supported Format: DTS (44.1 kHz / 48 kHz), AC3 (32 kHz / 44.1 kHz / 48 kHz),
PCM (32 kHz / 44.1 kHz / 48 kHz / 96 kHz / 192 kHz).
• When you use an HDMI cable (HDMI port 3), it is recommended that you use the cable provided.
If you use a regular HDMI cable, use a high-speed HDMI cable (3 m or less). (Depending upon model)
NOTE
HDMI
Blu-Ray / HD Cable Box / HD STB / DVD
HDMI Cable
(Depending upon model)
4K @ 50/60 Hz Support Format
Resolution
Frame
rate
(Hz)
Color Depth / Chroma Sampling
8 bit 10 bit 12 bit
3840 X 2160p
4096 X 2160p
50.00
59.94
60.00
YCbCr
4:2:0
YCbCr 4:2:0
1
YCbCr 4:2:2
1
YCbCr
4:4:4
1
- -
RGB
4:4:4
1
- -
1. Supported at HDMI IN 3 Port only
ARC (Audio Return Channel)
• When connected with a high-speed HDMI
cable, digital audio can be sent to a compatible
device without an additional optical audio
cable.
• ARC is only supported on the HDMI (4K @ 60 Hz)
/ DVI IN 2 (ARC)
port. An external audio device
that supports ARC should be connected to
HDMI (4K @ 60 Hz) / DVI IN 2 (ARC)
if you wish
to use ARC.

24
ENGLISH
MAKING CONNECTIONS
DVI to HDMI Connection
Transmits the digital video signal from an external device to the TV. Connect the external device and
the TV with the DVI-HDMI cable as shown in the following illustration. To transmit an audio signal,
connect an audio cable.
•When using the HDMI/DVI cable, only single link is supported.
NOTE
AUDIO OUT
DVI OUT
(*Not provided)
(*Not provided)
Blu-Ray / HD Cable Box / DVD

25
ENGLISH
MAKING CONNECTIONS
Connecting to a Mobile Phone
Mobile High-definition Link (MHL) is an interface for transmitting digital audio/visual signals from mobile
phones to television sets.
•Connect the mobile phone to the HDMI (4K @ 60 Hz) / DVI IN 4 (MHL) port to view the phone
screen on the TV.
•This only works with an MHL-enabled phone.
•With some MHL supporting mobile phones, you can use the TV remote to control the phone.
•An MHL passive cable is needed to connect the TV and a mobile phone.
•Remove the MHL cable from the TV when:
- the MHL function is disabled
- your mobile device is fully charged in standby mode
NOTE
(*Not provided)
MHL Cable
Mobile phone

26
ENGLISH
MAKING CONNECTIONS
Component Connection
Transmits analog video and audio signals from an external device to the TV. Connect the external
device and the TV with a component cable as shown in the following illustration.
•If cables are installed incorrectly, it could cause the image to display in black and white or with
distorted color.
•Check to ensure the cables are matched with the corresponding color connection.
NOTE
VIDEOAUDIO
L RYP
R PB
GREENGREEN
GREEN
(Use the component video cable provided.)
BLUE
BLUE
REDRED
YELLOW
YELLOW
(Use the composite video cable provided.)
WHITE
WHITE
REDRED
Blu-Ray / HD Cable Box / DVD
(*Not provided)
(*Not provided)

27
ENGLISH
MAKING CONNECTIONS
Composite Connection
Transmits analog video and audio signals from an external device to the TV. Connect the external
device and the TV with the composite cable as shown in the following illustration.
•If you have a mono VCR, connect the audio cable from the VCR to the AUDIO L/MONO jack of the
TV.
•Check to ensure the cables are matched with the corresponding color connection.
NOTE
VIDEO
L(MONO)
AUDIO
R
YELLOW YELLOW
WHITEWHITE
REDRED
Blu-Ray / HD Cable Box / DVD / VCR
(*Not provided)
YELLOW
(Use the composite video cable provided.)

28
ENGLISH
MAKING CONNECTIONS
Connecting to a PC
•It is recommended to use an HDMI connection for the best image quality.
•Depending upon the graphics card, DOS mode video may not work if a HDMI to DVI Cable is in use.
•In PC mode, there may be noise associated with the resolution, vertical pattern, contrast or
brightness. If noise is present, change the PC output to another resolution, change the refresh rate
to another rate or adjust the brightness and contrast on the PICTURE menu until the picture is clear.
•The synchronization input form for horizontal and vertical frequencies is separate.
•Depending upon the graphics card, some resolution settings may not allow the image to be
positioned on the screen properly.
•If you are using DVI out from a PC, you have to connect analog audio separately. Refer to the
instructions on the next page.
•When using the HDMI/DVI cable, only single link is supported.
• If ULTRA HD content is played on your PC, video or audio may become disrupted intermittently
depending on your PC’s performance.
• HDMI specifications may be different for each input port, so make sure to check the device
specifications before connecting.
• The HDMI IN 3 port is especially suitable for the specifications to enjoy ULTRA HD Video (4:4:4,
4:2:2) of HDMI 4K @ 50/60 Hz. However, video or audio may not be supported
depending upon the
specifications of the external equipment. In that case, use any other HDMI IN port.
• Contact customer service for more information on the HDMI specifications of each input port.
NOTE
HDMI Connection or DVI to HDMI Connection
Choose method A or B to make connection.
Method A: HDMI Connection
HDMI
PC
HDMI Cable
(Depending upon model)

29
ENGLISH
MAKING CONNECTIONS
Method B: DVI to HDMI Connection
AUDIO OUT
DVI OUT
(*Not provided)
(*Not provided)
PC

30
ENGLISH
MAKING CONNECTIONS
Connecting to an Audio System
You can use an optional external audio system instead of the built-in speaker.
Digital Optical Audio Connection
Transmits a digital audio signal from the TV to an external device. Connect the external device and the
TV with the optical audio cable as shown in the following illustration.
•Do not look into the optical output port. Looking at the laser beam may damage your vision.
•Audio with ACP (Audio Copy Protection) function may block digital audio output.
NOTE
OPTICAL AUDIO IN
(*Not provided)
Digital Audio
System

31
ENGLISH
MAKING CONNECTIONS
Connecting Headphones
Listening to sound with headphones.
•Do not use headsets (earphones) at high volume or for a long time. It may cause damage to your
hearing.
•AUDIO menu options are disabled when headphones are connected.
•When changing AV MODE with a headphone connected, the change is applied to video but not to
audio.
•Optical Digital Audio Out is not available when connecting a headphone.
•Headphone impedance: 16 Ω
•Max audio output: 0.627 mW to 1.334 mW
•Headphone jack size: 3.5 mm
NOTE
(*Not provided)
Headphone

32
ENGLISH
MAKING CONNECTIONS
Connecting a USB Device
Connect a USB storage device such as USB flash memory, external hard drive, or a USB memory card
reader to the TV.
•To use Time Machine function, make sure your USB drive is connected to the
USB IN 1 Time Machine Ready port.
•Some USB Hubs may not work. If a USB device connected using a USB Hub is not detected,
connect it directly to the USB port on the TV.
•Connecting guide for USB 3.0 :
Some USB device may not work if it does not meet USB 3.0 standard. In this case, connect it to
USB IN 2 or USB IN 3 port.
NOTE
(*Not provided)
USB
USB Hub
(*Not provided)

33
ENGLISH
MAGIC REMOTE FUNCTIONS
(POWER)
Turns the TV on or off.
Wheel (OK)
Press the center of the Wheel
button to select a menu. You can
change channels by using the
Wheel button.
(EXIT to LIVE)
Switches among broadcast
(antenna) and various inputs.
Color buttons
These access special functions in
some menus.
(
: Red, : Green,
: Yellow, : Blue)
VOL
Adjusts the volume level.
Displays the Screen Remote.
• Accesses the Universal Control
Menu in some regions.
• Pressing and holding the
button will display a menu to
select an external device that is
connected to the TV.
Used for viewing 3D video.
• Pressing and holding the
button will display a menu to
resize an image. (For 105UC9)
(MUTE)
Mutes all sounds.
CH
Scrolls through the saved
channels.
(BACK)
Returns to the previous screen.
(Home)
Accesses the Home menu.
(up/down/left/right)
Press the up, down, left or right
button to scroll the menu. If you
press buttons while the
pointer is in use, the pointer will
disappear from the screen and
Magic Remote will operate like a
general remote control. To display
the pointer on the screen again,
shake Magic Remote to the left
and right.
(Voice recognition)
Network connection is required
to use the voice recognition
function.
1. Press the voice recognition
button.
2. Speak when the voice display
window appears on the left of
the TV screen.
• Use the Magic Remote no
further than 10 cm from your
face.
• The voice recognition may fail
when you speak too fast or too
slowly.
• The recognition rate may
vary depending upon the
user’s characteristics (voice,
pronunciation, intonation, and
speed) and the environment
(noise and TV volume).
MAGIC REMOTE FUNCTIONS
• Image shown may differ from your TV.
When the message
Magic remote battery is low. Change the battery
. is displayed,
replace the battery. To install batteries, open the battery cover, replace batteries
(1.5 V AA) matching and ends to the label inside the compartment, and close the battery cover.
Failure to match the correct polarities of the battery may cause the battery to burst or leak, resulting
in fire, personal injury, or ambient pollution. Be sure to point the remote control at the remote control
sensor on the TV. To remove the batteries, perform the installation actions in reverse.
• Do not mix old and new batteries, as this may damage the remote control.
CAUTION
This remote uses infrared light. When in use, it should be pointed in the direction of the TV’s remote sensor.

34
ENGLISH
MAGIC REMOTE FUNCTIONS
Registering Magic Remote
The Magic Remote operates by pairing with
your TV.
How to register the Magic Remote
(Wheel)
To use the Magic Remote, first pair it
with your TV.
1 Put batteries into the Magic
Remote and turn the TV on.
2 Point the Magic Remote at your TV
and press the
Wheel (OK) on
the remote control.
• If the TV fails to register the Magic
Remote, try again after turning the
TV off and back on.
How to deregister the Magic Remote
(BACK)
(Home)
Press the
(BACK) and (Home)
buttons at the same time, for
five seconds, to unpair the Magic
Remote with your TV.
• Pressing and holding the
(EXIT to LIVE) button will let
you cancel and re-register Magic
Remote at once.
How to use Magic Remote
• Shake the Magic Remote slightly
to the right and left or press
(Home), , buttons to
make the pointer appear on the
screen. (In some TV models, the
pointer will appear when you turn
the Wheel button.)
• If the pointer has not been used for
a certain period of time or Magic
Remote is placed on a flat surface,
then the pointer will disappear.
• If the pointer does not move as
you wish, shake Magic Remote to
the left and right. The pointer will
move to the center of the screen.
• The Magic Remote depletes
batteries faster than a normal
remote due to the additional
features.
Precautions to Take when Using
the Magic Remote
• Use the Magic remote within the maximum
communication distance 10 m. Using the
remote control beyond this distance, or
with an object obstructing it, may cause a
communication failure.
• A communication failure may occur due to
nearby devices. Electrical devices such as
a microwave oven or wireless LAN product
may cause interference, as these use the
same bandwidth (2.4 GHz) as the Magic
remote.
• The Magic remote may be damaged or may
malfunction if it is dropped or receives a
heavy impact.
• Take care not to bump into nearby furniture
or other people when using the Magic
remote.
• Manufacturer and installer cannot provide
service related to human safety as the
applicable wireless device has possibility of
electric wave interference.
• It is recommended that an Access Point (AP)
be located more than 1 m away from the
TV. If the AP is installed closer than 1 m, the
Magic remote may not perform as expected
due to frequency interference.

35
ENGLISH
USING THE USER GUIDE / EXTERNAL CONTROL DEVICE SETUP
USING THE USER GUIDE
User Guide allows you to easily access detailed
TV information.
1 Press (Home) button to access the
Home menu.
2 Select User Guide and press the
Wheel (OK) button.
EXTERNAL CONTROL
DEVICE SETUP
To obtain the external control device setup
information, please visit
www.lg.com
.

36
ENGLISH
SPECIFICATIONS
SPECIFICATIONS
Product specifications may be changed without prior notice due to upgrade of product functions.
Power requirement AC 100 - 240 V ~ 50 / 60 Hz
Television System NTSC, PAL-M/N, SBTVD
Program Coverage VHF 2-13, UHF 14-69, DTV 2-69, CATV 1-135
External Antenna Impedance 75 Ω
Environment
condition
Operating Temperature 0 °C to 40 °C
Operating Humidity Less than 80 %
Storage Temperature -20 °C to 60 °C
Storage Humidity Less than 85 %
MODELS
98UB9800
(98UB9800-SB)
Dimensions
(W x H x D)
With stand 2,303 x 1,603 x 466.2 (mm)
Without stand 2,212 x 1,270 x 114.3 (mm)
Weight
With stand 102.2 kg
Without stand 97.2 kg
Current Value / Power consumption 6.1 A / 610 W
MODELS
105UC9
(105UC9-SA)
Dimensions
(W x H x D)
With stand 2,494 x 1,512 x 486 (mm)
Weight With stand 155 kg
Current Value / Power consumption 7.7 A / 770 W

37
ENGLISH
SPECIFICATIONS
Wireless module (LGSWF41) Specifications
Standard IEEE 802.11a/b/g/n/ac
Frequency range
2400 to 2483.5 MHz
5150 to 5250 MHz
5725 to 5850 MHz
Output power(Max.)
802.11a: 11.5 dBm
802.11b: 14.5 dBm
802.11g: 16.5 dBm
802.11n - 2.4 GHz: 16.5 dBm
802.11n - 5 GHz: 14.5 dBm
802.11ac - 5 GHz : 14.5 dBm
• Because band channel used by the country could be different, the user cannot change or adjust the operating
frequency and this product is set for the regional frequency table.
• This device should be installed and operated with minimum distance 20 cm between the device and your body.
And this phrase is for the general statement for consideration of user environment.
• Contains FCC ID: BEJLGSWF41 / Contains IC: 2703H-LGSWF41
Bluetooth module (BM-LDS401) Specifications
Standard Bluetooth Version 3.0
Frequency range 2400 to 2483.5 MHz
Output power(Max.) 10 dBm or Lower
• Contains FCC ID : BEJLDS401 / Contains IC : 2703H-LDS401

38
ENGLISH
MAINTENANCE / TROUBLESHOOTING
MAINTENANCE
Cleaning Your TV
Clean your TV regularly to keep it at peak performance and to extend the product’s lifespan.
•Before cleaning, turn the power off and disconnect the power cord and all other cables.
•When the TV is left unattended or unused for a long time, disconnect the power cord from the wall
outlet to prevent possible damage from lightning or power surges.
CAUTION
Screen, Frame, Cabinet, and Stand
To remove dust or light dirt, wipe the surface with a dry, clean, and soft cloth.
To remove major dirt, wipe the surface with a soft cloth dampened in clean water or a diluted mild
detergent. Then wipe immediately with a dry cloth.
•Do not push, rub, or hit the surface with your fingernail or a sharp object, as this may result in
scratches on the screen and image distortions.
•Do not use any chemicals, such as waxes, benzene, alcohol, thinners, insecticides, air fresheners, or
lubricants, as these may damage the screen’s finish and cause discoloration.
•Do not spray liquid onto the surface. If water enters the TV, it may result in fire, electric shock, or
malfunction.
CAUTION
Power Cord
Remove the accumulated dust or dirt on the power cord regularly.
TROUBLESHOOTING
Problem Solution
Cannot control the TV with
the remote control.
• Check if anything such as tape has been placed over the receiver.
• Check if there is any obstacle between the product and the remote
control.
• Replace the batteries with new fresh ones.
No image display and no
sound is produced.
• Check if the product is turned on.
• Check if the power cord is connected to a wall outlet.
• Check if there is a problem in the wall outlet by connecting other
products.
The TV turns off suddenly.
• Check the power control settings. The power supply may be interrupted.
• Check if the Sleep Timer / Timer Power Off feature is activated in the
TIMERS settings.
• If there is no signal while the TV is on, the TV will turn off automatically
after 15 minutes of inactivity.


The model and serial numbers of the TV are
located on the back and on one side of the
TV. Record them below should you ever need
service.
MODEL
SERIAL

Clic! Guía del Usuario
MANUAL DEL USUARIO
TELEVISOR LED*
* Los televisores con LED de LG tienen pantallas LCD
con luces de fondo LED.
Lea atentamente este manual antes de poner en marcha
el equipo y consérvelo para futuras consultas.
98UB9800 105UC9
www.lg.com

2
ESPAÑOL
INSTRUCCIONES DE SEGURIDAD IMPORTANTES
INSTRUCCIONES DE SEGURIDAD IMPORTANTES
Siga siempre estas instrucciones para evitar situaciones peligrosas y garantizar el rendimiento máximo
del producto.
ADVERTENCIA/PRECAUCIÓN
RIESGO DE CHOQUE
ELECTRICO NO ABRIR
PARA REDUCIR EL RIESGO DE
DESCARGAS ELÉCTRICAS, NO QUITE LA
CUBIERTA (O LA PARTE POSTERIOR).
EL USUARIO NO PUEDE CAMBIAR
NI REPARAR LOS COMPONENTES
INTERNOS. CONSULTE ÚNICAMENTE AL
PERSONAL DE SERVICIO CALIFICADO.
El símbolo de relámpago con una
punta de flecha, dentro de un triángulo
equilátero, tiene como fin alertar al usuario
sobre la presencia en el producto de voltaje
peligroso sin aislar que puede tener la
potencia suficiente para presentar riesgo de
descargas eléctricas a los usuarios.
El signo de admiración dentro de un
triángulo equilátero tiene el fin de
alertar al usuario sobre la presencia de
instrucciones importantes de
funcionamiento y de mantenimiento
(servicio) en el folleto que acompaña al
equipo.
ADVERTENCIA/PRECAUCIÓN
- PARA REDUCIR EL RIESGO DE
INCENDIOS O DESCARGAS ELÉCTRICAS,
NO EXPONGA EL PRODUCTO A LA
LLUVIA O LA HUMEDAD.
ADVERTENCIA
Si ignora el mensaje de advertencia, puede
sufrir lesiones graves, accidentes o la
muerte.
PRECAUCIÓN
Si ignora el mensaje de precaución, puede
sufrir heridas leves o provocar daños en el
producto.
NOTA
La nota le ayuda a comprender y a utilizar
el producto de forma segura. Lea la
nota cuidadosamente antes de utilizar el
producto.
Lea estas instrucciones.
Conserve estas instrucciones.
Siga todas las instrucciones.
Preste atención a las
advertencias.
• No use el aparato cerca del agua.
• Limpie únicamente con un paño seco.
• No tape ni bloquee las aberturas de
ventilación. Realice la instalación siguiendo las
instrucciones del fabricante.
• No instale el producto cerca de fuentes de
calor como radiadores, rejillas de calefacción
central, estufas u otro tipo de aparatos que
emitan calor (incluidos los amplificadores).
• No anule el propósito de seguridad del enchufe
polarizado o del enchufe a tierra. Un enchufe
polarizado tiene dos clavijas, una más ancha
que la otra. Un enchufe a tierra tiene dos
clavijas y un tercer terminal de puesta a tierra.
La clavija ancha o el terminal de puesta a
tierra se proveen para proteger al usuario. Si
el enchufe del equipo no entra en la toma,
consulte a un electricista para cambiar el
tomacorriente (puede variar según el país).
• No ejerza demasiada presión sobre el panel
con la mano ni con objetos punzantes, como
un clavo, una lapicera o un lápiz, ni raye la
superficie.

3
ESPAÑOL
INSTRUCCIONES DE SEGURIDAD IMPORTANTES
• Asegúrese de que el cable de alimentación
esté protegido para evitar que lo pisen o
aplasten, especialmente en los enchufes, los
tomacorrientes o el punto de salida desde el
aparato.
• Use únicamente los accesorios recomendados
por el fabricante.
• Use el producto únicamente en mesas
portátiles, pies, trípodes, soportes o mesas
indicados por el fabricante o provistos con el
aparato. Al emplear una mesa portátil, tenga
cuidado al moverla con el aparato encima, para
evitar daños por caídas.
• Desenchufe el aparato durante tormentas
eléctricas o si no planea usarlo durante un
periodo prolongado.
• Consulte todas las cuestiones de servicio
de mantenimiento al personal de servicio
calificado. El servicio es necesario cuando el
aparato sufre algún tipo de daño, por ejemplo,
cuando un cable de suministro eléctrico o un
conector está dañado, se derrama líquido o se
cae un objeto dentro del aparato, el aparato se
expone a la lluvia o a la humedad, no funciona
en forma normal o sufre una caída.
• No inserte objetos de metal u otro material
conductor en el cable de alimentación. No
toque el extremo del cable de alimentación
mientras esté enchufado.
• Mantenga el material de empaque contra la
humedad y el empaque de vinilo fuera del
alcance de los niños. El material contra la
humedad es dañino si se ingiere. Si se ingiere
por error, se debe inducir el vómito e ir al
hospital más cercano. Además, el empaque de
vinilo puede provocar asfixia. Manténgalo fuera
del alcance de los niños.
• PRECAUCIÓN con respecto al cable de
alimentación (puede variar según el país):
Consulte la página de especificaciones
en el manual del usuario. No conecte
demasiados aparatos a la misma toma de
ca dado que podría provocar incendios o
descargas eléctricas. No sobrecargue los
tomacorrientes de la pared. Asegúrese de
que los tomacorrientes de la pared no estén
sobrecargados, sueltos ni dañados, y que
los alargues, los cables de alimentación
y el aislamiento de los cables no estén
desgastados, ya que estas condiciones son
peligrosas. Cualquiera de estos casos podría
provocar incendios o descargas eléctricas.
Examine regularmente el cable del aparato;
si le parece que está dañado o deteriorado,
desenchúfelo y no use más ese cable. Llame
al personal de servicio técnico autorizado
para que lo reemplace por uno exactamente
igual. Proteja el cable de alimentación de
daños físicos o mecánicos, es decir, que no
se tuerza, doble, deforme, que no quede
atrapado al cerrar una puerta y que no lo
pisen. Preste especial atención a los enchufes,
tomacorrientes de la pared y al punto de salida
del cable en el aparato. No mueva el televisor
con el cable de alimentación enchufado. No
use un cable de alimentación que esté suelto
o dañado. Al desenchufar el cable, asegúrese
de hacerlo desde el enchufe. No tire del cable
para desenchufar el televisor.
• Advertencia - para disminuir los riesgos de
incendio o descargas eléctricas, no exponga el
producto a la lluvia, la humedad u otro tipo de
líquidos. No toque el televisor con las manos
mojadas. No instale el producto cerca de
objetos inflamables como combustible o velas,
ni lo exponga al aire acondicionado directo.
• No exponga el producto a ningún tipo de goteo
ni salpicaduras, y no coloque sobre o por
encima del televisor (por ejemplo, en estantes
que pudieran encontrarse arriba de la unidad)
ningún tipo de objeto que contenga líquido,
como floreros, tazas, etc.

4
ESPAÑOL
INSTRUCCIONES DE SEGURIDAD IMPORTANTES
• Puesta a tierra
(Excepto dispositivos sin conexión a tierra.)
Asegúrese de que el cable de puesta a
tierra esté conectado para evitar descargas
eléctricas (es decir, un televisor con
un enchufe de ca de tres clavijas debe
conectarse a un tomacorriente de ca con
puesta a tierra de tres clavijas). Si no puede
colocarse ninguna puesta a tierra, solicite a un
electricista calificado que instale un disyuntor.
No intente improvisar una puesta a tierra con
conexiones a cables de teléfono, pararrayos o
tuberías de gas.
Interruptor
diferencial
Alimentación
• Mientras la unidad esté conectada al
tomacorriente de ca de la pared, no se
desconectará de la fuente de alimentación de
ca, aún cuando el aparato esté apagado.
• No intente modificar este producto de ninguna
manera sin autorización previa por escrito de
LG Electronics. Cualquier tipo de modificación
sin autorización previa podría anular la
autoridad del usuario para usar el producto.
• Puesta a tierra con una antena exterior
(puede variar según el país):
Si instala una antena exterior, tome las
siguientes precauciones. No se debe instalar
el sistema de antena exterior cerca de las
líneas aéreas de transmisión de energía, de
ningún circuito o luz eléctrica, ni en ningún
lugar donde pudiera entrar en contacto con
este tipo de cables eléctricos o circuitos, dado
que podría provocar daños graves o incluso
la muerte. Asegúrese de que el sistema de
antena tenga una puesta a tierra para proteger
contra sobretensiones y acumulaciones de
cargas estáticas. La Sección 810 del Código
Nacional de Electricidad (NEC) de los Estados
Unidos establece la forma de realizar una
puesta a tierra correcta del mástil, de la
estructura de soporte, del cable de bajada
a una unidad de descarga de la antena, el
tamaño de los conductores de puesta a tierra,
la ubicación de la unidad de descarga de la
antena, y la conexión y los requisitos de los
electrodos de puesta a tierra
Puesta a tierra de la antena según el Código
Nacional de Electricidad, ANSI/NFPA 70
Abrazadera de
puesta a tierra
Conductor de puesta a tierra
(NEC, Sección 810-21)
Cable de entrada de la
antena
Equipo de servicio
eléctrico
Unidad de descarga de
la antena (NEC, Sección
810-20)
Abrazadera de
puesta a tierra
Sistema de electrodos de
conexión a tierra del servicio
de energía (NEC, Artículo
250, Parte H)
NEC: National Electrical Code
(Código Nacional de Electricidad)
• Limpieza
Al efectuar la limpieza, desenchufe el cable
de alimentación y limpie suavemente con un
paño suave para no rayar la superficie. No
rocíe con agua ni otros líquidos directamente
sobre el televisor, dado que podría provocar
una descarga eléctrica. No limpie con
productos químicos como alcohol, diluyentes
o bencina.
• Traslados
Asegúrese de que el aparato esté apagado,
desenchufado y que no quede ningún cable
conectado. Es posible que se necesiten dos
personas para trasladar los televisores de gran
tamaño. No ejerza presión ni empuje el panel
frontal del televisor.
• Ventilación
Instale el televisor en un lugar bien ventilado.
No lo coloque en un lugar cerrado como, por
ejemplo, un estante para libros. No cubra el
producto con telas ni ningún otro material
mientras esté enchufado. No lo instale en
lugares con demasiado polvo.
• Si huele humo u otros olores que provienen
de la TV, desconecte el cable de alimentación
y comuníquese con un centro de servicio
autorizado.
• Mantenga el aparato alejado de la luz solar
directa.
• Nunca toque el aparato o la antena durante
una tormenta eléctrica o con truenos.
• Al montar el televisor en la pared, asegúrese
de que los cables de alimentación y de señal
no queden colgando en la parte posterior.
• No permita que se golpee el producto o que
algún objeto se caiga dentro de él, ni que se
golpee la pantalla.
• DESCONEXIÓN DEL DISPOSITIVO DE LA
ALIMENTACIÓN PRINCIPAL
El enchufe de alimentación se desconecta del
dispositivo. En caso de una emergencia, el
enchufe debe de estar siempre accesible.
• Baterías
Guarde los accesorios (baterías, etc.) en un
lugar seguro lejos del alcance de los niños.
• Este aparato usa baterías. Puede ser que
en su comunidad existan normativas que
requieren que deseche estas baterías de
forma correcta debido a las consideraciones
ambientales. Póngase en contacto con la
autoridad local para obtener información
acerca del desecho o reciclaje.
• No deseche las baterías en el fuego.
• No provoque cortes de circuitos, desarme ni
permita que las baterías se sobrecalienten.

5
ESPAÑOL
INSTRUCCIONES DE SEGURIDAD IMPORTANTES
• No utilice equipo de alto voltaje cerca de la TV,
(por ejemplo, matamoscas).
Esto puede causar que el producto funcione
mal.
• Aparición de puntos
El panel es un producto de alta tecnología con
una resolución de entre dos y seis millones
de píxeles. En raras ocasiones, es posible que
note la presencia de pequeños puntos en la
pantalla mientras mira televisión. Estos puntos
son píxeles desactivados y no afectan el
rendimiento ni la fiabilidad del televisor.
• Reproducción de ruidos
Crujidos: es posible que se produzcan crujidos
cuando esté mirando televisión o al apagar el
televisor; se trata de un ruido generado por
la contracción térmica del plástico debido a
la temperatura y la humedad. Este ruido es
común en productos donde se requiere la
deformación térmica. Zumbidos en el circuito
eléctrico o el panel: se trata de un ruido
de bajo nivel, generado por un circuito de
conmutación de alta velocidad, que suministra
una gran cantidad de corriente para que un
producto pueda funcionar. Varía según cada
producto. Este ruido no afecta el rendimiento
ni la fiabilidad del producto.
• Tenga cuidado de no tocar las aberturas de
ventilación. Al mirar televisión durante largos
periodos, las aberturas de ventilación pueden
calentarse. Esto no afecta el rendimiento ni
causa defectos en el producto.
• No instale este producto en una pared si
podría ser expuesto a aceite o vapor de aceite.
Esto podría dañar el producto y hacer que se
caiga.
• Si siente que el televisor está frío al tocarlo,
es posible que ocurra un pequeño parpadeo
cuando lo prenda. Se trata de algo normal
y no significa que el televisor esté dañado.
También es posible que aparezcan pequeños
puntos en la pantalla, de color rojo, verde o
azul. Sin embargo, no afectan el rendimiento
del televisor. No toque la pantalla LCD ni
coloque los dedos sobre ella durante mucho
tiempo. Esto podría producir algunos efectos
de distorsión temporales en la pantalla.
Cómo evitar el efecto de degradación de
la imagen por sobreexposición o
quemadura de pantalla del televisor
• Si se muestra una imagen fija en la pantalla
del televisor durante un período largo, esta
quedará impresa y se convertirá en una
distorsión permanente de la pantalla. A este
desperfecto se lo conoce como degradación
de la imagen por sobreexposición o
quemadura de pantalla y no está cubierto por
la garantía.
• Ver la televisión durante un largo periodo
de tiempo o con la relación de aspecto de
pantalla de 4:3 (para los modelos 21:9, 4:3
y 16:9) puede causar una degradación de
imagen en las bandas oscuras de la pantalla.
Cuando vea televisión durante un largo
periodo de tiempo, por favor utilice la relación
de aspecto predeterminada de 16:9 o 21:9
dependiendo del producto.
• Evite emitir imágenes fijas en la pantalla del
televisor durante períodos prolongados
(2 horas o más para LCD, 1 hora o más para
TV de plasma) para evitar la degradación de
imagen.

6
ESPAÑOL
INSTRUCCIONES DE SEGURIDAD IMPORTANTES
Ver imágenes en 3D (en televisores 3D)
ADVERTENCIA
Entorno de visualización
• Tiempo de visualización
- Cuando vea contenido en 3D, tome un descanso de 5 a 15 minutos cada hora. Ver contenido en 3D
durante un período prolongado puede causar dolor de cabeza, mareos, fatiga o fatiga visual.
Personas que experimenten convulsiones por fotosensibilidad o enfermedades
crónicas
• Algunos usuarios pueden experimentar convulsiones o síntomas anormales cuando se exponen a una
luz destellante o a un patrón específico proveniente de contenido en 3D.
• No vea videos en 3D si experimenta náuseas, si está embarazada o sufre de una enfermedad crónica
como epilepsia, afecciones cardiacas o enfermedades relacionadas con la presión arterial, etc.
• Se recomienda que las personas que sufran de ceguera estereoscópica o anomalías estereoscópicas
no vean contenido en 3D. Puede experimentar imágenes dobles o incomodidad al ver contenido en
3D.
• Si sufre de estrabismo (visión cruzada), ambliopía (ojo vago) o astigmatismo, puede experimentar
problemas al percibir la profundidad y sentir fatiga con facilidad debido a las imágenes dobles. Se
recomienda tomar descansos más frecuentes que el adulto promedio.
• Si su vista experimenta variaciones entre su ojo derecho y su ojo izquierdo, realícese un examen a la
vista antes de ver contenido en 3D.
Síntomas que requieren descontinuación o abstinencia de ver contenido en 3D
• No vea contenido en 3D cuando experimente fatiga debido a falta de sueño, exceso de trabajo o por
el consumo de bebidas alcohólicas.
• Si experimenta éstos síntomas, deje de ver contenido en 3D y descanse hasta que los síntomas
desaparezcan.
- Consulte a su médico si los síntomas persisten. Entre los síntomas se pueden encontrar dolor de
cabeza, dolor ocular, mareos, visión borrosa, incomodidad, imágenes dobles, incomodidad visual o
fatiga.

7
ESPAÑOL
INSTRUCCIONES DE SEGURIDAD IMPORTANTES
PRECAUCIÓN
Entorno de visualización
• Distancia de visualización
- Mantenga una distancia de al menos dos veces la longitud diagonal de la pantalla cuando vea
contenido en 3D. Si siente incomodidad al ver contenido en 3D, aléjese del TV.
Edad de visualización recomendada
• Infantes / Niños
- Se prohíbe el uso y visualización de contenido en 3D a niños menores de 5 años de edad.
- Los niños menores de 10 años de edad pueden reaccionar exageradamente y alborotarse
demasiado debido a que su visión se encuentra en desarrollo (por ejemplo: tratar de tocar la
pantalla o saltar hacia ella). Se requiere supervisar y dedicar atención especial a niños que vean
contenido en 3D.
- Los niños presentan una disparidad binocular para ver contenido en 3D mayor que la de los adultos,
debido a que la distancia que separa los ojos es menor que la de los adultos. Por lo tanto, los niños
perciben una profundidad estereoscópica mayor en comparación con los adultos al ver la misma
imagen 3D.
• Adolescentes
- Los adolescentes menores de 19 años de edad pueden recibir una mayor estimulación a la luz
proveniente de videos en 3D. Recomiéndeles no ver videos en 3D durante un período de tiempo
prolongado si están cansados.
• Personas mayores
- Las personas de edad avanzada pueden percibir un efecto menor del contenido en 3D en
comparación con los jóvenes. La distancia desde donde usted está sentado y el TV no debe ser
inferior a la recomendada.
Use los anteojos 3D con precaución
• Asegúrese de usar anteojos 3D LG. De lo contrario, no podrá ver correctamente los videos en 3D.
• No use anteojos 3D en lugar de sus anteojos normales, anteojos de sol o gafas protectoras.
• Usar anteojos 3D modificados puede causar fatiga visual o imágenes distorsionadas.
• No guarde sus anteojos 3D a temperaturas extremadamente altas o bajas. Provocará que se
deformen.
• Los anteojos 3D son frágiles y se rayan fácilmente. Siempre use una tela suave y limpia para limpiar
las lentes. No raye las lentes de los anteojos 3D con objetos afilados ni las limpie con productos
químicos.

8
ESPAÑOL
LICENCIAS / SOFTWARE DE CÓDIGO ABIERTO
LICENCIAS
Las licencias admitidas pueden variar según el modelo. Para obtener más información sobre las
licencias, visite
www.lg.com
.
SOFTWARE DE CÓDIGO ABIERTO
Para obtener el código fuente bajo GPL, LGPL, MPL y otras licencias de código abierto que contiene
este producto, visite
http:// opensource.lge.com
.
Además del código fuente, se pueden descargar los términos de la licencia, las anulaciones de la
garantía y los avisos de derechos de autor.
LG Electronics también le proporcionará el código fuente abierto en un CD-ROM con un cargo que
cubra el costo de realizar tal distribución (como el costo de los medios, el envío y el manejo) con una
previa solicitud por correo electrónico a
. Esta oferta es válida durante tres (3)
años a partir de la fecha de adquisición del producto.
• La imagen puede ser diferente a la de su televisor.
• El OSD (On Screen Display, Despliegue En la Pantalla) de su TV puede ser un poco diferente que
este manual.
• Los menús y las opciones disponibles pueden variar según la fuente de entrada que utilice.
• Es posible que se agreguen nuevas funciones a este televisor en el futuro.
NOTA

9
ESPAÑOL
contenido
CONTENIDO
2 INSTRUCCIONES DE SEGURIDAD
IMPORTANTES
6 Ver imágenes en 3D (en televisores 3D)
8 LICENCIAS
8 SOFTWARE DE CÓDIGO ABIERTO
9 CONTENIDO
10 PROCEDIMIENTO DE
INSTALACIÓN
10 MONTAJE Y PREPARACIÓN
10 Desempacar
12 Complementos opcionales
13 Componentes y botones
14 - Uso del botón de control
15 Levantar y trasladar el televisor
16 Configurar el televisor
16 - Colocar la base de la televisión
17 - Montar sobre una mesa
18 - Sujetar los cables
18 - Instalar la cubierta del puerto AV
19 - Uso de la bocina deslizable
20 Usar la cámara integrada
21 - Preparación de la cámara integrada
21 - Nombre de las piezas de la cámara
integrada
21 - Comprobación del rango de disparo
de la cámara
22 ESTABLECER CONEXIONES
22 Conexión de una antena o un cable
23 Conexión a un receptor de HD,
reproductor de DVD o VCR
23 - Conexión HDMI
24 - Conexión DVI a HDMI
25 - Conexión a un teléfono móvil
26 - Conexión por componente
27 - Conexión compuesta
28 Conexión a un dispositivo PC
28 - Conexión HDMI o Conexión DVI a
HDMI
30 Conexión a un sistema de audio
30 - Conexión de audio óptico digital
31 Conexión a audífonos
32 Cómo conectar un dispositivo USB
33 FUNCIONES DEL CONTROL
REMOTO MÁGICO
34 Registrando el Control Remoto Mágico
34 Como usar el Control Remoto Mágico
34 Precauciones que debe seguir al utilizar
el Control Remoto Mágico
35 COMO UTILIZAR LA GUÍA DEL
USUARIO
35 CONFIGURACIÓN DE CONTROL
DEL DISPOSITIVO EXTERNO
36 ESPECIFICACIONES
38 MANTENIMIENTO
38 Limpieza del televisor
38 - Pantalla, marco, gabinete y base
38 - Cable de alimentación
38 SOLUCIÓN DE PROBLEMAS

10
ESPAÑOL
PROCEDIMIENTO DE INSTALACIÓN / MONTAJE Y PREPARACIÓN
PROCEDIMIENTO DE INSTALACIÓN
1 Abra el paquete y asegúrese de que todos los accesorios estén incluidos.
2 Instale la base del televisor.
3 Conecte un dispositivo externo al televisor.
4 Asegúrese de que la conexión de red esté disponible.
Solo podrá usar las funciones de red del TV cuando se haya establecido la conexión a la red.
* Cuando se enciende la TV por primera vez después de ser enviada desde la fábrica, la inicialización
de la TV puede tardar aproximadamente un minuto.
MONTAJE Y PREPARACIÓN
Desempacar
Verifique que la caja del producto contenga los siguientes elementos. Si falta algún accesorio,
comuníquese con el distribuidor local mediante el cual adquirió el producto. Las ilustraciones de este
manual pueden diferir del producto que usted adquirió.
• No use ningún producto no autorizado para garantizar la seguridad y la vida útil del producto.
• Ningun daño o lesiones por el uso de elementos no autorizados no están cubiertos por la garantía.
• Algunos modelos parecen tener un plástico fino sobre la pantalla. Esta forma parte de la pantalla, así
que no la retire.
PRECAUCIÓN
• Los artículos suministrados con el producto adquirido pueden variar
según el modelo.
• Es posible que cambien las especificaciones del producto o el
contenido del manual sin previo aviso debido a las actualizaciones
de las funciones del producto.
• Para que la conexión sea óptima, los cables HDMI y los dispositivos
USB tienen que tener biseles que no superen los 10 mm de
espesor y 18 mm de ancho.
• Utilice un cable de extensión que sea compatible con USB 2.0, en
caso de que el cable USB o la tarjeta de memoria USB no encajen en el puerto USB del TV.
• Utilice un cable certificado con el logotipo de HDMI adjunto. Si no utiliza un cable HDMI certificado,
es posible que la pantalla no muestre imágenes o que ocurra un error de conexión.
• Tipos de cable HDMI recomendados
- Cable HDMI
®
/
TM
de alta velocidad
- Cable HDMI
®
/
TM
de alta velocidad con Ethernet
NOTA
B
A
A
B
*A 10 mm
*B 18 mm

11
ESPAÑOL
MONTAJE Y PREPARACIÓN
Manual del usuario Control Remoto Mágico
(Consulte p. 33)
Baterías (AA)
(Según el modelo)
(Consulte p. 33)
Anteojos para Cinema 3D
(Según el modelo)
La cantidad de anteojos
3D puede variar según el
modelo o el país.
Cable de alimentación
(Según el modelo)
Cable HDMI
(Según el modelo)
(Consulte p. 23 y 28)
(Para 98UB9800)
1
2
Cable de video componente
(Consulte p. 26)
Cable de video compuesto
(Consulte p. 26 y 27)
Base de Soporte
(Consulte p. 16)
(Para 98UB9800) (Para 98UB9800) (Para 105UC9)
Llave
(Consulte p. 16)
Cubierta del puerto AV /
Tornillo
1 PZ, M3 x L8
(Consulte p. 18)
Cubierta del puerto AV
(Consulte p. 19)
(Para 98UB9800) (Para 98UB9800)
Organizador de cables
(Consulte p. 18)
Sujetacables
(Consulte p. 18)

12
ESPAÑOL
MONTAJE Y PREPARACIÓN
Complementos opcionales
Los complementos opcionales se pueden cambiar o modificar para mejorar la calidad, sin necesidad de
aviso previo.
Para adquirir estos elementos, comuníquese con su distribuidor.
Estos dispositivos solo funcionarán en ciertos modelos.
Es posible que el nombre o el diseño del modelo hayan cambiado, debido a las circunstancias o
políticas del fabricante.
AG-F***
Anteojos para Cinema 3D
AG-F***DP
Anteojos Dual Play
AN-MR500
Remoto Mágico
Dispositivo de audio de LG
Sensor del control remoto
Sensor inteligente
1
Luz del logotipo LG

13
ESPAÑOL
MONTAJE Y PREPARACIÓN
Componentes y botones
1. Sensor inteligente: ajusta la calidad y el brillo de la imagen en función del entorno.
2. El botón de control se encuentra debajo de la pantalla de la TV.
• No coloque ningún objeto o partes del cuerpo en la zona entre la pantalla de la TV y el montaje de la
base de la bocina. Puede causar lesiones personales o dañar el producto. (Para 105UC9)
PRECAUCIÓN
• Puede activar o desactivar la luz del logotipo LG seleccionando GENERAL en los menús principales.
(Según el modelo)
NOTA
(Para 98UB9800)
(Para 105UC9)
Pantalla
Cámara integrada
Botón de control
2
Sensor del control remoto
Sensor inteligente
1
Luz del logotipo LG
Bocina deslizable
Botón de control
2
Bocinas
Cámara integrada
Pantalla
Indicador de encendido
Sensor del control remoto
Sensor inteligente
1

14
ESPAÑOL
MONTAJE Y PREPARACIÓN
Uso del botón de control
Simplemente puede operar las funciones de la TV, presionando o moviendo el botón de control hacia
arriba, abajo, izquierda o derecha.
Funciones Básicas
Encendido
Cuando la TV está apagada, coloque el dedo en el botón de control y presione
una vez y suéltelo.
Apagado
Cuando la TV está encendida, coloque el dedo en el botón de control y presione
unos segundos y suéltelo.
Control de
Volumen
Si coloca su dedo sobre el botón de control y lo mueve hacia la izquierda o la
derecha, puede ajustar el nivel de volumen que desee.
Control de
Canales
Si coloca su dedo sobre el botón de control y lo mueve hacia arriba o abajo,
puede desplazarse a través de los canales guardados que desee.
• Con el dedo sobre el botón de control, muévalo hacia arriba, abajo, izquierda o derecha, tenga
cuidado de no presionar el botón de control. Si pulsa el botón de control primero, no podrá ajustar el
nivel de volumen o desplazarse por los canales guardados.
NOTA
Ajustar el Menú
Cuando la TV está encendida, presione el botón de control una vez. Puede ajustar los elementos del
menú ( , , ) moviendo el botón de control hacia la izquierda o la derecha.
TV APAGADO
Apagar alimentación.
CERRAR
Limpia la visualización en pantalla y vuelve al modo de TV.
ENTRADA
Accesar a las fuentes de entrada.

15
ESPAÑOL
MONTAJE Y PREPARACIÓN
Levantar y trasladar el televisor
Si desea levantar o trasladar el televisor, lea las
instrucciones a continuación para no rayar o
dañar el aparato, y para transportarlo de forma
segura, independientemente del tamaño o tipo
de aparato.
• No toque la pantalla. De lo contrario, podría
dañarla.
• No coloque el producto en el piso con la
parte frontal hacia abajo sin una almohadilla.
Al hacerlo puede causar daños a la pantalla.
PRECAUCIÓN
• Se recomienda trasladar el televisor en la caja
o el material de empaque en el que lo recibió
al comprarlo.
• Antes de mover o levantar el televisor,
desconecte el cable de alimentación y el
resto de los cables.
• Cuando sostenga el televisor, la
pantalla debe quedar alejada de
usted para evitar algun daño.
• Sostenga con firmeza la parte superior e
inferior del marco del televisor. Asegúrese de
no sostenerlo por la parte transparente, por la
bocina o por el área de rejillas de las bocinas.
• Utilizar al menos dos personas
para mover un televisor grande.
• Al transportar el televisor con
las manos, sosténgalo como se
indica en esta ilustración.
• Al transportar el televisor, no lo someta a
sacudones o vibración excesiva.
• Al transportar el televisor manténgalo en
posición vertical, nunca lo apoye sobre uno
de los costados, ni lo incline hacia la derecha
o la izquierda.

16
ESPAÑOL
MONTAJE Y PREPARACIÓN
Configurar el televisor
Puede instalar su TV en la pared o si desea
colocar la TV en un centro de entretenimiento u
otro mueble, colóquele la base.
Colocar la base de la televisión
Si no instala el televisor en una pared, siga
estas instrucciones para colocar la base de la
televisión.
• Al instalar la base del televisor, ponga
la pantalla hacia abajo sobre una mesa
acolchada o una superficie plana para evitar
rayas.
• Asegúrese de que los tornillos estén
completamente ajustados. (Si no están lo
suficientemente ajustados, el TV puede
inclinarse hacia delante después de
instalarse.)
• No ajuste los tornillos con demasiada fuerza,
de lo contrario, se pueden desgastar y aflojar.
PRECAUCIÓN
1
2
1
2
1
2
• Los tornillos de la base de soporte se fijan
en la parte posterior del televisor. Por favor
use estos tornillos adjuntos para montar el
televisor y la base de soporte.
NOTA
Molde
Llave
(Para 98UB9800)
1
2
1
2
1
2
1
2
Base de
Soporte
Llave
M6 x L47
6 PZ
3

17
ESPAÑOL
MONTAJE Y PREPARACIÓN
Montar sobre una mesa
1
Levante el televisor y déjelo en posición
vertical sobre la mesa.
- Deje un espacio mínimo de 10 cm entre
el televisor y la pared para asegurar una
ventilación adecuada.
10 cm
10 cm
10 cm
10 cm
2 Conecte el cable de alimentación al
tomacorriente de la pared.
• No colocar la television cerca de fuentes de
calor, puede resultar quemada u ocasionar
otro daño.
PRECAUCIÓN
Fijación del televisor a la pared (opcional)
(Para 98UB9800) (Para 105UC9)
1 Inserte y ajuste los tornillos de ojo del
televisor en su parte posterior.
- En caso de que haya tornillos insertados,
primero retírelos.
2 Utilice los tornillos para colocar los soportes
correspondientes en la pared. Acople el
soporte de la pared con los tornillos de ojo a
la parte posterior del televisor.
3 Conecte los tornillos de ojo y los soportes
con un cordón fuerte y ajústelos con
firmeza. Asegúrese de mantener el cordón
en posición horizontal a la superficie plana.
• Asegúrese de que los niños no se suban al
televisor ni se cuelguen de él.
PRECAUCIÓN
• Utilice una plataforma o un armario que
sea lo suficientemente fuerte y grande para
sostener el televisor de manera segura.
• Los soportes, los tornillos y los cordones son
opcionales. Puede solicitar otros accesorios a
través de su distribuidor local.
NOTA

18
ESPAÑOL
MONTAJE Y PREPARACIÓN
Sujetar los cables
(Para 98UB9800)
Agrupe y ate los cables con el sujetacables y
organizador de cables.
Organizador de cables
Sujetacables
Organizador de cables
(Para 105UC9)
Agrupe y ate los cables con el organizador de
cables.
Organizador de cables
• No mueva el televisor tirando del
sujetacables y organizador de cables, debido
a que el sujetador del cable se puede
romper, y causar daños en el televisor.
PRECAUCIÓN
Instalar la cubierta del puerto AV
1
Inserte el Sostenedor de la cubierta AV
conectado a la cubierta del puerto AV en el
orificio del cuerpo principal del producto tal
como se ilustra.
2 - Para 98UB9800: Coloque la cubierta del
puerto AV. La cubierta permanece
colocada mediante un imán.
- Para 105UC9: Para instalar la cubierta del
puerto AV, insértela en el agujero que se
encuentra a la izquierda del puerto.
La cubierta permanece colocada mediante
un imán.
(Para 98UB9800)
1
Cubierta del
puerto AV
Cubierta del
puerto AV
2

19
ESPAÑOL
MONTAJE Y PREPARACIÓN
(Para 105UC9)
1
2
1
2
1
Cubierta del
puerto AV
2
1
Sostenedor de
la cubierta AV
2
• Si no instala la cubierta de seguridad, es
posible que la cubierta se caiga y pueda
causar lesiones.
PRECAUCIÓN
Uso de la bocina deslizable
(Para 98UB9800)
Bocina deslizable
1 Cuando el televisor está ENCENDIDO, la
bocina escondida se desliza hacia fuera
desde el interior del TV.
2 Para establecer la bocina deslizable vaya a
(Home) (Configuración) Audio
Salida de Audio Bocinas deslizables.
• No emplee fuerza excesiva durante el
funcionamiento de la bocina deslizable
interior, ya que puede provocar que funcione
mal.
• Cuando vea TV, asegúrese de que la bocina
se encuentre en la posición ABIERTO, porque
el sonido será anormal o estará distorsionado.
3 Cuando transporte la TV, asegúrese de que
la bocina deslizable esté cerrado.
Si la bocina deslizable está abierta cuando
la transporte, podría dañarse y tener como
resultado un mal funcionamiento.
• Para cerrar la bocina deslizable, vaya a
Audio Salida de Audio Bocinas deslizables y
seleccione Abrir cuando la TV esté encendida
y presione el botón de (Encendido).

20
ESPAÑOL
MONTAJE Y PREPARACIÓN
• Cuando la bocina deslizable esté en
funcionamiento (con la TV encendida/
apagada), asegúrese de que los niños no
pongan las manos cerca de la parte operativa
de la bocina deslizable (en la parte inferior de
la TV) y de que no gateen por el espacio bajo
la TV.
- Sus manos podrían quedar atrapadas y
sufrir lesiones a causa del funcionamiento
la bocina deslizable.
• No coloque ningún objeto debajo de la TV.
- Podrían causar interferencia con el
funcionamiento de la bocina
PRECAUCIÓN
Usar la cámara integrada
Al utilizar la cámara integrada de la TV usted
puede hacer videollamadas en Skype o usar la
función de reconocimiento de movimiento.
Esta TV no admite el uso de una cámara
externa.
• Antes de usar la cámara integrada, usted
debe tener en cuenta el hecho de que es
legalmente responsable por el buen o mal
uso de la cámara frente las leyes nacionales
correspondientes, incluida la ley criminal.
• Las leyes correspondientes incluyen la ley
de Protección de la información personal, la
cual regula el proceso y la transferencia de
información personal, y la ley que regula el
monitoreo a través de cámaras en lugares de
trabajo y otros lugares.
• Al utilizar la cámara integrada, el usuario debe
obtener el consentimiento de las personas
que están siendo observadas.
(1) Utilizar la cámara en áreas donde su uso
está generalmente prohibido, tales como
servicios sanitarios, vestuarios, probadores
de ropa y áreas de seguridad.
(2) Utilizar la cámara si su uso causa algún
tipo de violación a la privacidad.
(3) Utilizar la cámara si su uso causa
la violación de regulaciones y leyes
correspondientes.
NOTA

21
ESPAÑOL
MONTAJE Y PREPARACIÓN
Preparación de la cámara integrada
1
Tire hacia arriba la cámara integrada que se
encuentra en la parte posterior de la TV.
Palanca de ajuste de
ángulo
Deslizador
• Quite el plástico protector antes de usar la
cámara integrada.
NOTA
2 Puede ajustar el ángulo de la cámara con
la palanca de ajuste de ángulo que se
encuentra en la parte posterior de la cámara
integrada.
<Vista lateral>
3˚
5˚
5˚
3˚
Palanca Lente
3 Baje la cámara integrada cuando no la esté
usando.
Nombre de las piezas de la cámara
integrada
Lente de la
cámara
Plástico
protector
Micrófono
Comprobación del rango de disparo
de la cámara
1
Presione el botón (Home) para ingresar
al menú Home.
2 Seleccione Cámara luego presione el
botón Rueda (OK).
• La distancia óptima desde la cámara para
usar la función de reconocimiento de
movimiento es entre 1,5 m y 4,5 m.
NOTA

22
ESPAÑOL
ESTABLECER CONEXIONES
ESTABLECER CONEXIONES
Se pueden conectar dispositivos externos al TV. Los dispositivos externos compatibles son: receptores
de HD, reproductores de DVD, VCR, sistemas de audio, dispositivos de almacenamiento USB, PC,
dispositivos de juegos, etc. Para más información acerca de la conexión de dispositivos externos,
diríjase al manual que viene con cada dispositivo.
• Si graba un programa de TV en una grabadora de DVD o VCR, asegúrese de conectar el cable de
entrada de señal al televisor a través de uno de estos dos dispositivos. Para obtener más información
acerca de la grabación, consulte el manual proporcionado con el dispositivo conectado.
• Las conexiones de dispositivos externos que se muestran pueden ser levemente diferentes de las
ilustraciones en este manual.
• Conecte los dispositivos externos al televisor independientemente del orden del puerto del aparato.
• Si conecta un dispositivo de juegos al TV, utilice el cable que se proporciona con dicho dispositivo.
• Consulte el manual del equipo externo para conocer las instrucciones de funcionamiento.
NOTA
Conexión de una antena o un cable
Para mirar televisión, conecte una antena, un cable o una caja de cable. Las ilustraciones pueden diferir
de los elementos reales y el cable RF es opcional.
Antena VHF
Antena UHF
Coaxial (75Ω) Coaxial (75Ω)
(*No incluido) (*No incluido)
Antena
Terminal
Enchufe
de pared
o
• Asegúrese de no doblar el alambre de cobre
del cable de RF.
Alambre de cobre
• Primero conecte todos los dispositivos entre
sí y luego conecte el cable de alimentación
al tomacorriente, para que el televisor no
resulte dañado.
PRECAUCIÓN
• Para mejorar la calidad de imagen en
un area de baja señal, favor de comprar
un amplificador de señal e instalar
adecuadamente.
• Utilice un divisor de señal para más de
2 televisores.
• Si la antena no está correctamente instalada,
póngase en contacto con su distribuidor.
• Códec de audio DTV compatible: MPEG,
AAC, HE-AAC, Dolby Digital.
• Esta TV no puede recibir transmisiones
ULTRA HD (3 840 x 2 160 píxeles)
directamente, debido a que los estándares
relacionados no se han confirmado.
NOTA

23
ESPAÑOL
ESTABLECER CONEXIONES
Conexión a un receptor de HD, reproductor de DVD o VCR
Conecte un receptor de HD, reproductor de DVD o VCR al televisor y seleccione el modo de entrada
apropiado.
• Las especificaciones de HDMI pueden ser diferentes para cada puerto de entrada, así que debe
asegurarse de revisar las especificaciones del dispositivo antes de conectarlo.
• El puerto HDMI IN 3 esta especialmente adecuado a las especificaciones para disfrutar Video
ULTRA HD (4:4:4, 4:2:2) de 4K @ 50/60 Hz . Sin embargo, el video o el audio pueden no ser
compatibles dependiendo de las especificaciones del equipo externo. En ese caso, utilice cualquier
otro puerto HDMI IN.
• Contacte al servicio al cliente para obtener más información sobre las especificaciones de HDMI de
cada puerto de entrada.
NOTA
Conexión HDMI
La conexión HDMI es la mejor manera de conectar un dispositivo.
Transmite las señales de audio y video digitales de un dispositivo externo al televisor. Conecte el
dispositivo externo y el televisor con el cable HDMI tal como se muestra en la siguiente ilustración.
• Utilice el cable HDMI™ de alta velocidad más reciente con la función CEC (control electrónico por
parte del cliente).
• Los cables HDMI™ de alta velocidad están probados para transportar señales HD de hasta
1 080 progresivo y superiores.
• Formato de audio HDMI compatible: DTS (44,1 kHz / 48 kHz), AC3 (32 kHz / 44,1 kHz / 48 kHz),
PCM (32 kHz / 44,1 kHz / 48 kHz / 96 kHz / 192 kHz).
• Al usar un cable HDMI, se recomienda usar el cable incluido. Si usa un cable HDMI normal, use uno
de alta velocidad (3 m o menos). (Según el modelo)
NOTA
HDMI
Blu-Ray / Caja de cable HD / HD STB / DVD
Cable HDMI
(Según el modelo)
Formato compatible con 4K @ 50/60 Hz
Resolución
Frecuencia
de imagen
(Hz)
Profundidad de color /
Muestreo de crominancia
8 bit 10 bit 12 bit
3 840 X 2 160
progresivo
4 096 X 2 160
progresivo
50,00
59.94
60,00
YCbCr
4:2:0
YCbCr 4:2:0
1
YCbCr 4:2:2
1
YCbCr
4:4:4
1
- -
RGB
4:4:4
1
- -
1. Sólo es compatible en el puerto HDMI IN 3
ARC (canal de retorno de audio)
• Al estar conectado un cable HDMI de alta
velocidad, el audio digital puede enviarse a un
dispositivo compatible sin un cable de audio
óptico adicional.
• El canal de retorno de audio (ARC) solo es
compatible con el puerto HDMI (4K @ 60 Hz) / DVI
IN 2 (ARC). Si desea utilizar un canal de retorno
de audio (ARC), deberá conectar un dispositivo de
audio externo compatible con ARC a una entrada
HDMI (4K @ 60 Hz) / DVI IN 2 (ARC) .

24
ESPAÑOL
ESTABLECER CONEXIONES
Conexión DVI a HDMI
Transmite las señales de video digital de un dispositivo externo al televisor. Conecte el dispositivo
externo y el televisor con el cable DVI-HDMI tal como se muestra en la siguiente ilustración. Para
transmitir una señal de audio, conecte un cable de audio.
• Al utilizar un cable HDMI/DVI, sólo es compatible con un enlace único de DVI.
NOTA
AUDIO OUT
DVI OUT
(*No incluido)
(*No incluido)
Blu-Ray / Caja de cable HD / DVD

25
ESPAÑOL
ESTABLECER CONEXIONES
Conexión a un teléfono móvil
El enlace de alta definición móvil (MHL, por sus siglas en inglés) es una interfaz de transmisión de
señales audiovisuales digitales de teléfonos móviles a televisores.
• Conecte el teléfono móvil al puerto HDMI (4K @ 60 Hz) / DVI IN 4 (MHL) para ver la pantalla del
teléfono en el TV.
• Esto solo funciona en teléfonos habilitados con MHL.
• Con teléfonos móviles compatibles con MHL, puedes usar el control remoto del TV para controlar el
teléfono.
• Se necesita el cable MHL pasivo para conectar el TV y un teléfono móvil.
• Quite el cable MHL del TV cuando:
- la función MHL no esté funcionando.
- su dispositivo móvil está completamente cargado en modo de espera.
NOTA
(*No incluido)
Cable MHL
Teléfono móvil

26
ESPAÑOL
ESTABLECER CONEXIONES
Conexión por componente
Transmite las señales de audio y video analógicas de un dispositivo externo al televisor. Conecte
el dispositivo externo y el televisor con el cable componente tal como se muestra en la siguiente
ilustración.
• Si la instalación de los cables no es la adecuada, podría proyectarse una imagen en blanco y negro o
con colores distorsionados.
• Revise y compruebe que los cables coincidan con las conexiones de color correspondientes.
NOTA
VIDEOAUDIO
L RYP
R PB
VERDE
VERDE
(Utilice el cable de video componente
suministrado.)
AZUL
ROJO
AMARILLO
AMARILLO
(Utilice el cable de video compuesto
suministrado.)
BLANCO
ROJO
Blu-Ray / Caja de cable HD / DVD
(*No incluido)
(*No incluido)
VERDE
AZUL
ROJO
BLANCO
ROJO

27
ESPAÑOL
ESTABLECER CONEXIONES
Conexión compuesta
Transmite las señales de audio y video analógicas de un dispositivo externo al televisor. Conecte
el dispositivo externo y el televisor con el cable compuesto tal como se muestra en la siguiente
ilustración.
• Si posee una VCR monofónica, conecte el cable de audio de la VCR a la toma AUDIO L/MONO del
televisor.
• Revise y compruebe que los cables coincidan con las conexiones de color correspondientes.
NOTA
VIDEO
L(MONO)
AUDIO
R
AMARILLO
AMARILLO
BLANCO
BLANCO
ROJO ROJO
Blu-Ray / Caja de cable HD / DVD / VCR
(*No incluido)
AMARILLO
(Utilice el cable de video compuesto suministrado.)

28
ESPAÑOL
ESTABLECER CONEXIONES
Conexión a un dispositivo PC
• Se recomienda utilizar el televisor con la conexión HDMI para obtener una calidad de imagen óptima.
• Según la tarjeta gráfica, es posible que no funcione el modo DOS cuando se utiliza un cable HDMI a
DVI.
• En el modo PC, es posible que exista ruido asociado con la resolución, patrones verticales, contraste
o brillo. Si se producen ruidos, cambie la resolución de la salida de la PC, cambie la frecuencia de
actualización o ajuste el brillo y el contraste en el menú IMAGEN hasta que la imagen mejore.
• La forma de onda de la entrada de sincronización para las frecuencias horizontales y verticales es
diferente.
• Según la tarjeta gráfica, es posible que algunos ajustes de resolución no permitan que la imagen se
ubique en la pantalla de forma correcta.
• Si esta usando la salida DVI de una PC, tiene que conectar el audio análogo por separado. Tome
como referencia las instrucciones de la siguiente página.
• Al utilizar un cable HDMI/DVI, sólo es compatible con un enlace único de DVI.
• Si reproduce contenido ULTRA HD en su PC, el video o el audio pueden sufrir interrupciones
intermitentes, dependiendo del rendimiento de su PC.
• Las especificaciones de HDMI pueden ser diferentes para cada puerto de entrada, así que debe
asegurarse de revisar las especificaciones del dispositivo antes de conectarlo.
• El puerto HDMI IN 3 esta especialmente adecuado a las especificaciones para disfrutar Video
ULTRA HD
(4:4:4, 4:2:2) de 4K @ 50/60 Hz. Sin embargo, el video o el audio pueden no ser compatibles dependiendo
de las especificaciones del equipo externo. En ese caso, utilice cualquier otro puerto HDMI IN.
• Contacte al servicio al cliente para obtener más información sobre las especificaciones de HDMI de
cada puerto de entrada.
NOTA
Conexión HDMI o Conexión DVI a HDMI
Escoja el método A o B para realizar la conexión.
Método A: Conexión HDMI
HDMI
PC
Cable HDMI
(Según el modelo)

29
ESPAÑOL
ESTABLECER CONEXIONES
Método B: Conexión DVI a HDMI
AUDIO OUT
DVI OUT
(*No incluido)
(*No incluido)
PC

30
ESPAÑOL
ESTABLECER CONEXIONES
Conexión a un sistema de audio
Utilice un sistema de audio externo opcional en lugar de la bocina incorporada.
Conexión de audio óptico digital
Transmite señales de audio digital del televisor a un dispositivo externo.
Conecte el dispositivo externo y el televisor con el cable de audio óptico tal como se muestra en la
siguiente ilustración.
• No mire hacia el puerto de salida óptica. Mirando el rayo láser puede dañar su visión.
• Audio de ACP (Protección de copiar Audio) puede bloquear la función de salida de audio digital.
NOTA
OPTICAL AUDIO IN
(*No incluido)
Sistema de
audio digital

31
ESPAÑOL
ESTABLECER CONEXIONES
Conexión a audífonos
Escuche el audio a través de los audífonos.
• No utilice los audífonos a un volumen elevado por un periodo prolongado.
• Las opciones del menú AUDIO se desactivan cuando los audífonos están conectados.
• Al cambiar al Modo AV con los audífonos conectados, el cambio de modo se aplica al video pero no
al audio.
• La salida de audio digital óptica no está disponible al conectar los audífonos.
• Impedancia de los audífonos: 16 Ω
• Salida de audio máxima: de 0,627 mW a 1,334 mW
• Tamaño del conector para audífonos: 3,5 mm
NOTA
(*No incluido)
Audífonos

32
ESPAÑOL
ESTABLECER CONEXIONES
Cómo conectar un dispositivo USB
Conecte un dispositivo de almacenamiento USB como una memoria USB Flash, un disco duro externo
o un lector de tarjetas de memoria USB al televisor.
• Para utilizar la función Time Machine, asegúrese que el dispositivo éste conectado al puerto
USB IN 1 Time Machine Ready.
• Es posible que algunos concentradores USB no funcionen. Si no se detecta un dispositivo USB
conectado mediante un concentrador USB, conéctelo directamente al puerto USB del TV.
• Guía de conexión para USB 3.0:
algunos dispositivos USB pueden no funcionar si no cumplen con el estándar USB 3.0. Si eso
sucede, conecte el dispositivo en el puerto USB IN 2 o USB IN 3.
NOTA
(*No incluido)
USB
USB Hub
(*No incluido)

33
ESPAÑOL
Funciones del control remoto mágico
FUNCIONES DEL CONTROL REMOTO MÁGICO
• La imagen puede ser diferente a la de su televisor.
Cuando aparezca el mensaje
Batería baja en el Control Remoto Mágico
.
reemplace la batería. Para reemplazar las baterías, abra la tapa del compartimiento de baterías,
reemplace las baterías (AA de 1,5 Vcc)
y haga coincidir los extremos con la etiqueta que se
encuentra dentro del compartimiento. A continuación, cierre la tapa. Si no coincide correctamente la polaridad de la batería
podría hacer que la batería explote o gotee y provocar un incendio, lesiones en personas o la contaminación ambiental.
Asegúrese de que el control remoto apunte hacia el sensor correspondiente del TV. Para extraer las baterías, realice los
pasos de instalación a la inversa.
• No use baterías nuevas junto con otras usadas, ya que esto puede dañar el control remoto.
PRECAUCIÓN
Este control remoto utiliza luz infrarroja. Al usarlo, es necesario apuntarlo en dirección al sensor remoto del TV.
(Encendido)
Enciende o apaga el TV.
Rueda (OK)
Presione el centro del botón Rueda
para seleccionar un menú.
Puede cambiar los canales utilizando
el botón Rueda.
(Salir a TV en vivo)
Cambia a la transmisión de TV en
vivo o la fuente de entrada.
Botones de color
Permiten acceder a funciones
especiales en algunos menús.
(
: Rojo, : Verde,
: Amarillo, : Azul)
VOL
Ajusta el nivel del volumen.
Muestra el Remoto de Pantalla.
• Accede al menú de Control remoto
Universal en algunas regiones.
• Mantener pulsado el botón
mostrará un menú para
seleccionar un dispositivo externo
que está conectado a la TV.
Sirve para ver video en 3D.
• Al mantener pulsado el botón se
mostrará un menú para cambiar el
tamaño de una imagen. (Para 105UC9)
(SILENCIO)
Silencia todos los sonidos.
CH
Permite desplazarse por los
programas o canales guardados.
(Atrás)
Regresa a la pantalla anterior.
(Home)
Accede al menú Home.
(arriba/abajo/
izquierda/derecha)
Presione los botones arriba,
abajo, izquierda o derecha para
desplazarse por el menú.
Si presiona los botones
mientras el puntero
está en uso, éste desaparecerá
de la pantalla y el Control
Remoto Mágico funcionará
como un control remoto
común. Para ver el puntero en
la pantalla nuevamente, agite
el Control Remoto Mágico a la
izquierda y a la derecha.
(Reconocimiento de voz)
Se requiere de una conexión
de red para utilizar la función de
reconocimiento de voz.
1. Presione el botón de
reconocimiento de voz.
2. Hable cuando se active la
ventana Reproducir voz en la
parte izquierda de la pantalla
de la TV.
• Utilice el Control Remoto
Mágico a no más de 10 cm
de su rostro.
• El reconocimiento de voz
puede fallar si habla muy
rápido o muy lento.
• La velocidad de
reconocimiento puede
variar dependiendo de las
características del usuario
(voz, pronunciación,
entonación y velocidad) y del
ambiente (ruido y volumen
de la TV).

34
ESPAÑOL
Funciones del control remoto mágico
Registrando el Control Remoto
Mágico
El Control Remoto Mágico funciona al vincularlo
con el TV.
Como registrar el Control Remoto Mágico
(Rueda)
Para utilizar el Control Remoto
Mágico, primero emparéjelo con su
TV.
1 Coloque las baterías en el Control
Remoto Mágico y encienda la TV.
2 Apunte el Control Remoto Mágico
hacia la TV y presione el botón
Rueda (OK).
• Si no puede registrar el Control
Remoto Mágico, inténtelo
nuevamente después de apagar y
volver a encender la TV.
Como desemparejar el Control Remoto
Mágico
(Atrás)
(Home)
Presione los botones
(Atrás) y
(Home) al mismo tiempo, durante
cinco segundos, para desemparejar
el Control Remoto Mágico con su TV
• Mantener pulsado el botón
(Salir a TV en vivo) le permitirá
cancelar y volver a registrar el
Control Remoto Mágico a la vez.
Como usar el Control Remoto
Mágico
• Agite suavemente el Control
Remoto Mágico hacia la derecha
y a la izquierda o presione los
botones (Home), , para
que el puntero aparezca en la
pantalla. (En algunos modelos de
TV, el puntero aparecerá cuando
gire el botón Rueda.)
• El puntero desaparecerá, si el
puntero no se ha utilizado durante
un cierto período de tiempo o el
Control Remoto Mágico se coloca
sobre una superficie plana.
• Si el puntero no responde
correctamente, puede
restablecerlo moviéndolo hacia el
borde de la pantalla.
• El Control Remoto Mágico
consume las baterías más rápido
que un control remoto normal
debido a sus funciones adicionales.
Precauciones que debe seguir
al utilizar el Control Remoto
Mágico
• Use el Control Remoto Mágico dentro de la
distancia de comunicación máxima 10m.
El uso del control remoto fuera de esta
distancia o con un objeto que obstruya la
comunicación puede provocar un error.
• Otros dispositivos cercanos pueden generar
errores en la comunicación. Los dispositivos
eléctricos como los hornos de microondas
o un producto con una LAN inalámbrica
pueden causar interferencias, ya que utilizan
el mismo ancho de banda (2,4 GHz) que el
Control Remoto Mágico.
• Este control remoto puede dañarse o
funcionar mal si se cae o recibe un golpe
fuerte.
• Al utilizar este Control Remoto Mágico,
procure no golpearlo contra los muebles
cercanos u otras personas.
• El fabricante y el instalador no pueden brindar
servicios relacionados con la seguridad de las
personas, ya que es posible que el dispositivo
inalámbrico genere interferencias de ondas
eléctricas.
• Se recomienda ubicar el punto de acceso (AP)
a más de 1 m de distancia del TV. Si el punto
de acceso se instala a una distancia menor
que 1 m, es posible que el Control Remoto
Mágico no funcione según lo esperado
debido a la interferencia de las frecuencias.

35
ESPAÑOL
COMO utilizar la Guía del usuariO / CONFiGuraCiÓN de CONtrOl del disPOsitiVO eXterNO
COMO UTILIZAR LA GUÍA
DEL USUARIO
La Guía del usuario le permite acceder de forma
más sencilla a la información detallada del TV.
1 Presione el botón (Home) para acceder al
menú de Home.
2 Seleccione Guía del Usuario y presione el
botón Rueda (OK).
CONFIGURACIÓN
DE CONTROL DEL
DISPOSITIVO EXTERNO
Para obtener la información del control de
dispositivo externo de configuración, por favor
visite
www.lg.com
.

36
ESPAÑOL
ESPECIFICACIONES
ESPECIFICACIONES
Las especificaciones del producto pueden cambiar sin previo aviso debido a las actualizaciones de las
funciones de los productos.
Potencia requerida AC 100 - 240 V ~ 50 / 60 Hz
Sistema de televisión NTSC, PAL-M/N, SBTVD
Cobertura de programas VHF 2-13, UHF 14-69, DTV 2-69, CATV 1-135
Impedancia de antena externa 75 Ω
Condición de
ambiente
Temperatura de funcionamiento
0 °C a 40 °C
Humedad de funcionamiento
Menos de 80 %
Temperatura de almacenamiento
-20 °C a 60 °C
Humedad de almacenamiento
Menos de 85 %
MODELOS
98UB9800
(98UB9800-SB)
Dimensiones
(Ancho x altura x profundidad)
Con base 2 303 x 1 603 x 466,2 (mm)
Sin base 2 212 x 1 270 x 114,3 (mm)
Peso
Con base 102,2 kg
Sin base 97,2 kg
Corriente de consumo / Consumo de la potencia 6,1 A / 610 W
MODELOS
105UC9
(105UC9-SA)
Dimensiones
(Ancho x altura x profundidad)
Con base 2 494 x 1 512 x 486 (mm)
Peso Con base 155 kg
Corriente de consumo / Consumo de la potencia 7,7 A / 770 W

37
ESPAÑOL
ESPECIFICACIONES
Módulo inalámbrico (LGSWF41) Especificación
Estándar IEEE 802.11a/b/g/n/ac
Rango de frecuencias
2 400 a 2 483,5 MHz
5 150 a 5 250 MHz
5 725 a 5 850 MHz
Potencia de salida
(máxima)
802.11a: 11,5 dBm
802.11b: 14,5 dBm
802.11g: 16,5 dBm
802.11n - 2,4 GHz: 16,5 dBm
802.11n - 5 GHz: 14,5 dBm
802.11ac - 5 GHz : 14,5 dBm
• Como el canal de banda en uso por el país puede ser diferente, el usuario no puede cambiar o ajustar la frecuencia
de operación y este producto está configurado para la tabla de frecuencias regional.
• Este dispositivo debe ser instalado y utilizado a una distancia mínima de 20 cm entre el dispositivo y su cuerpo.
Esta frase es por declaración general para la consideración de entorno del usuario.
• Contiene FCC ID : BEJLGSWF41 / Contiene IC : 2703H-LGSWF41
Módulo Bluetooth (BM-LDS401) Especificación
Estándar Versión Bluetooth 3.0
Rango de frecuencias 2 400 a 2 483,5 MHz
Potencia de salida (máxima) 10 dBm o menor
• Contiene FCC ID : BEJLDS401 / Contiene IC : 2703H-LDS401

38
ESPAÑOL
MANTENIMIENTO / SOLUCIÓN DE PROBLEMAS
MANTENIMIENTO
Limpieza del televisor
Limpie regularmente el televisor para que siga funcionando con el máximo rendimiento y para extender
la vida útil del producto.
• Antes de proceder con la limpieza, apague el equipo y desconecte el cable de alimentación y todos
los cables.
• Cuando deje el TV desatendido o no lo utilice durante mucho tiempo, desconecte el cable de
alimentación de la toma de corriente para evitar posibles daños por descargas o sobrecargas de
energía.
PRECAUCIÓN
Pantalla, marco, gabinete y base
Para quitar el polvo o la suciedad leve, pase un paño seco, limpio y suave por la superficie.
Para eliminar suciedad de mayor importancia, limpie la superficie con un paño suave humedecido con
agua limpia o un detergente suave diluido. Después, pase de inmediato un paño seco.
• No ejerza presión, refriegue ni golpee la superficie con las uñas o un objeto punzante, dado que
puede rayar la pantalla y producir distorsiones en la imagen.
• No utilice sustancias químicas (como ceras, bencina, alcohol, tíner, insecticidas, desodorantes de
ambientes o lubricantes) dado que pueden dañar el acabado de la pantalla y causar decoloración.
• No rocíe líquido sobre la superficie. Si entra agua en el televisor, puede ocasionar incendios,
descargas eléctricas o mal funcionamiento.
PRECAUCIÓN
Cable de alimentación
Quite con regularidad el polvo o la tierra acumulados en el cable de alimentación.
SOLUCIÓN DE PROBLEMAS
Problema Solución
No se puede controlar el
televisor con el control
remoto.
• Compruebe si puso cualquier cosa sobre el receptor, como por ejemplo
cinta adhesiva.
• Compruebe que no haya ningún obstáculo entre el producto y el control
remoto.
• Sustituya las pilas por unas nuevas.
No se muestra ninguna
imagen ni se emite sonido.
• Compruebe si el producto está encendido.
• Compruebe si el cable de alimentación está conectado a la toma de la
pared.
• Conecte otros productos para comprobar si hay un problema con la toma
de la pared.
El televisor se apaga de
repente.
• Compruebe la configuración del control de energía. Es posible que el
suministro eléctrico se interrumpa.
• Compruebe si la función de Temporizador / Apagado por Temporizador
está activada en la configuración de TEMPORIZADOR.
• Si no hay señal mientras el televisor está encendido, este se apagará
automáticamente después de 15 minutos de inactividad.


Los números de modelo y de serie del televisor
se encuentran ubicados en la parte posterior
del aparato. Regístrelos en el siguiente espacio
por si alguna vez necesita recurrir al servicio
técnico.
MODELO
SERIE

OWNER’S MANUAL
EXTERNAL CONTROL
DEVICE SETUP
Please read this manual carefully before operating the set and retain it for
future reference.
www.lg.com

2
ENG
ENGLISH
2
KEY CODES
KEY CODES
• This feature is not available for all models.
Code
(Hexa)
Function Note
Code
(Hexa)
Function Note
00 CH +, PR + R/C Button 53 List R/C Button
01 CH -, PR - R/C Button 5B Exit R/C Button
02 Volume + R/C Button 60 PIP(AD) R/C Button
03 Volume - R/C Button 61 Blue R/C Button
06 > (Arrow Key / Right Key) R/C Button 63 Yellow R/C Button
07 < (Arrow Key / Left Key) R/C Button 71 Green R/C Button
08 Power R/C Button 72 Red R/C Button
09 Mute R/C Button 79 Ratio / Aspect Ratio R/C Button
0B Input R/C Button 91 AD (Audio Description) R/C Button
0E SLEEP R/C Button 7A User Guide R/C Button
0F TV, TV/RAD R/C Button 7C Smart / Home R/C Button
10 - 19 * Number Key 0 - 9 R/C Button 7E SIMPLINK R/C Button
1A Q.View / Flashback R/C Button 8E ►► (Forward) R/C Button
1E FAV (Favorite Channel) R/C Button 8F ◄◄ (Rewind) R/C Button
20 Text (Teletext) R/C Button AA Info R/C Button
21 T. Opt (Teletext Option) R/C Button AB Program Guide R/C Button
28 Return (BACK) R/C Button B0 ► (Play) R/C Button
30 AV (Audio / Video) Mode R/C Button B1
ꕗ (Stop / File List)
R/C Button
39 Caption/Subtitle R/C Button BA
ꕘ (Freeze / Slow Play /
Pause)
R/C Button
40 Λ
(Arrow Key / Cursor Up)
R/C Button BB Soccer R/C Button
41
V (Arrow Key / Cursor
Down)
R/C Button BD
ꔄ (REC)
R/C Button
42 My Apps R/C Button DC 3D R/C Button
43 Menu / Settings R/C Button 99 AutoConfig R/C Button
44 OK / Enter R/C Button 9F App / * R/C Button
45 Q.Menu R/C Button
4C List, - (ATSC Only) R/C Button
* Key code 4C (0x4C) is available on ATSC/ISDB models which use major/minor channel.
(For South Korea, Japan, North America, Latin America except Colombia models)

3
ENGENGLISH
3
EXTERNAL CONTROL DEVICE SETUP
EXTERNAL CONTROL DEVICE SETUP
• Image shown may differ from your TV.
Connect the USB to Serial converter/RS-232C input jack to an external control device (such as a computer
or an A/V control system) to control the product’s functions externally.
Note: The type of control port on the TV can be different between model series.
* Please be advised that not all models support this type of connectivity.
* Cable is not provided.
USB to Serial converter with USB Cable
USB Type
USB IN
(TV)
(PC )
(PC )
RS-232C IN
(CONTROL & SERVICE)
(TV)
(TV)
(PC )
(TV)
(PC )
SERVICE ONLY
RS-232C IN
(CONTROL & SERVICE)
RS-232C IN
(CONTROL & SERVICE)
1
3
2
1
3
2
• LGTV supports PL2303 chip-based (Vendor ID : 0x0557, Product ID : 0x2008) USB to serial converter
which is not made nor provided by LG.
• It can be purchased from computer stores that carry accessories for IT support professionals.
RS-232C With RS232C Cable
DE9 (D-Sub 9pin) Type
• You need to purchase the RS-232C (DE9, D-Sub 9pin female-to-female type) to RS-232C cable required
for the connection between the PC and the TV, which is specified in the manual.
USB IN
(TV)
(PC )
(PC )
RS-232C IN
(CONTROL & SERVICE)
(TV)
(TV)
(PC )
(TV)
(PC )
SERVICE ONLY
RS-232C IN
(CONTROL & SERVICE)
RS-232C IN
(CONTROL & SERVICE)
1
3
2
1
3
2
The connection interface may differ from your TV.

4
ENG
ENGLISH
4
EXTERNAL CONTROL DEVICE SETUP
Phone jack Type
• You need to purchase the phone-jack to RS-232 cable required for the connection between the PC and
the TV, which is specified in the manual.
* For other models, connect to the USB port.
* The connection interface may differ from your TV.
USB IN
(TV)
(PC )
(PC )
RS-232C IN
(CONTROL & SERVICE)
(TV)
(TV)
(PC
)
(TV)
(PC )
SERVICE ONLY
RS-232C IN
(CONTROL & SERVICE)
RS-232C IN
(CONTROL & SERVICE)
1
3
2
1
3
2
- or
USB IN
(TV)
(PC )
(PC )
RS-232C IN
(CONTROL & SERVICE)
(TV)
(TV)
(PC )
(TV)
(PC
)
SERVICE ONLY
RS-232C IN
(CONTROL & SERVICE)
RS-232C IN
(CONTROL & SERVICE)
1
3
2
1
3
2
Customer Computer RS-232C configurations
3-Wire Configurations(Not standard)
1
6
5
9
PC TV
RXD 2 2 TXD
TXD 3 1 RXD
GND 5 3 GND
OR
RXD 3 2 TXD
TXD 2 1 RXD
GND 5 3 GND
D-Sub 9 Phone
RS-232C
(Serial port)
Set ID
For Set ID number, see "Real Data Mapping" on p.6
1. Press SETTINGS to access the main menus.
2. Press the Navigation buttons to scroll to (*General → About this TV or OPTION) and press OK.
3. Press the Navigation buttons to scroll to SET ID and press OK.
4. Scroll left or right to select a set ID number and select CLOSE. The adjustment range is 1-99.
5. When you are finished, press EXIT.
* (Depending on model)

5
ENGENGLISH
5
EXTERNAL CONTROL DEVICE SETUP
Communication Parameters
• Baud rate : 9600 bps (UART)
• Data length : 8 bits
• Parity : None
• Stop bit : 1 bit
• Communication code : ASCII code
• Use a crossed (reverse) cable.
Command reference list
(Depending on model)
COMMAND1 COMMAND2
DATA
(Hexadecimal)
COMMAND1 COMMAND2
DATA
(Hexadecimal)
01. Power* k a 00 to 01 15. Balance k t 00 to 64
02. Aspect
Ratio
k c (p.7)
16. Color
(Colour)
Temperature
x u 00 to 64
03. Screen
Mute
k d (p.7)
17. ISM
Method (Only
Plasma TV)
j p (p.8)
04. Volume
Mute
k e 00 to 01 18. Equalizer j v (p.8)
05. Volume
Control
k f 00 to 64
19. Energy
Saving
j q 00 to 05
06. Contrast k g 00 to 64
20. Tune
Command
m a (p.9)
07.
Brightness
k h 00 to 64
21. Channel
(Programme)
Add/Del(Skip)
m b 00 to 01
08. Color/
Colour
k i 00 to 64 22. Key m c Key Codes
09. Tint k j 00 to 64
23. Control
Backlight,
Control Panel
Light
m g 00 to 64
10.
Sharpness
k k 00 to 32
24. Input
select (Main)
x b (p.11)
11. OSD
Select
k l 00 to 01
25. 3D (Only
3D models)
x t (p.11)
12. Remote
Control Lock
Mode
k m 00 to 01
26. Extended
3D (Only 3D
models)
x v (p.11)
13. Treble k r 00 to 64
27. Auto
Configure
j u (p.12)
14. Bass k s 00 to 64
* Note: During playing or recording media, all commands except Power (ka) and Key (mc) are not
executed and treated as NG.
With RS232C cable, TV can communicate "ka command" in power-on or power-off status. but with
USB-to-Serial converter cable, the command works only if TV is on.

6
ENG
ENGLISH
6
EXTERNAL CONTROL DEVICE SETUP
Transmission / Receiving Protocol
Transmission
[Command1][Command2][ ][Set ID][ ][Data][Cr]
[Command 1] : First command to control the TV. (j, k, m or x)
[Command 2] : Second command to control the TV.
[Set ID] : You can adjust the [Set ID] to choose desired monitor ID number in option menu.
Adjustment range in TV is 1 to 99. If [Set ID] value is selected to ‘0’, every connected set
can be controlled.
* [Set ID] is indicated as decimal (1 to 99) on menu and as Hexadecimal (0x00 to 0x63) on
transmission/receiving protocol.
[DATA] : To transmit command data (hexadecimal). Transmit ‘FF’ data to read status of command.
[Cr] : Carriage Return - ASCII code ‘0x0D’
[ ] : Space – ASCII code ‘0x20’
OK Acknowledgement
[Command2][ ][Set ID][ ][OK][Data][x]
* The set transmits ACK (acknowledgement) based on this format when receiving normal data. At this time,
if the data is data read mode, it indicates present status data. If the data is data write mode, it returns the
data of the PC computer.
Error Acknowledgement
[Command2][ ][Set ID][ ][NG][Data][x]
* The set transmits ACK (acknowledgement) based on this format when receiving abnormal data from
non-viable functions or communication errors.
Data 00: Illegal Code
Real data mapping (Hexadecimal b Decimal)
* When you enter the [data] in hexadecimal, refer to following conversion table.
* Channel Tune (ma) Command uses two-byte hexadecimal value([data]) to select channel number.
00 : Step 0 32 : Step 50 (Set ID 50) FE : Step 254
01 : Step 1 (Set ID 1) 33 : Step 51 (Set ID 51) FF : Step 255
... ... ...
0A : Step 10 (Set ID 10) 63 : Step 99 (Set ID 99) 01 00 : Step 256
... ... ...
0F : Step 15 (Set ID 15) C7 : Step 199 27 0E : Step 9998
10 : Step 16 (Set ID 16) C8 : Step 200 27 0F : Step 9999
... ... ...

7
ENGENGLISH
7
EXTERNAL CONTROL DEVICE SETUP
* Commands may work differently depending on model and signal.
01. Power (Command: k a)
► To control Power *On or Off of the set.
Transmission[k][a][ ][Set ID][ ][Data][Cr]
Data 00 : Power Off 01 : *Power On
Ack [a][ ][Set ID][ ][OK/NG][Data][x]
► To Show TV is Power On or *Off
Transmission [k][a][ ][Set ID][ ][FF][Cr]
Ack [a][ ][Set ID][ ][OK][Data][x]
* Similarly, if other functions transmit ‘FF’ data
based on this format, Acknowledgement feedback
presents status about each function.
02. Aspect Ratio (Command: k c)
(Main Picture Size)
► To adjust the screen format. (Main picture format)
You can also adjust the screen format using the
Aspect Ratio in the Q.MENU. or PICTURE menu.
Transmission [k][c][ ][Set ID][ ][Data][Cr]
Data 01 : Normal screen
(4:3)
02 : Wide screen
(16:9)
04 : Zoom
05 : Zoom 2
(Latin America
except Colombia
Only)
06 : Set by Program/
Original
07 : 14:9
(Europe, Colombia, Mid-East,
Asia except South Korea and
Japan)
09 : * Just Scan
0B : Full Wide
(Europe, Colombia, Mid-
East, Asia except South
Korea and Japan)
10 to 1F : Cinema Zoom 1 to 16
0c : 21:9 (Depending on model)
Ack [c][ ][Set ID][ ][OK/NG][Data][x]
* Using the PC input, you select either 16:9 or 4:3
screen aspect ratio.
* In DTV/HDMI/Component mode (high-definition),
Just Scan is available.
* Full wide mode may work differently based on
model and is supported for DTV fully, and ATV,
AV partially.
03. Screen Mute (Command: k d)
► To select screen mute on/off.
Transmission [k][d][ ][Set ID][ ][Data][Cr]
Data 00 : Screen mute off (Picture on)
Video mute off
01 : Screen mute on (Picture off)
10 : Video mute on
Ack [d][ ][Set ID][ ][OK/NG][Data][x]
* In case of video mute on only, TV will display On
Screen Display(OSD). But, in case of Screen mute
on, TV will not display OSD.
04. Volume Mute (Command: k e)
► To control volume mute on/off.
You can also adjust mute using the MUTE button
on remote control.
Transmission [k][e][ ][Set ID][ ][Data][Cr]
Data 00 : Volume mute on (Volume off)
01 : Volume mute off (Volume on)
Ack [e][ ][Set ID][ ][OK/NG][Data][x]
05. Volume Control (Command: k f)
► To adjust volume.
You can also adjust volume with the volume
buttons on remote control.
Transmission [k][f][ ][Set ID][ ][Data][Cr]
Data Min : 00 to Max : 64
Ack [f][ ][Set ID][ ][OK/NG][Data][x]
06. Contrast (Command: k g)
► To adjust screen contrast.
You can also adjust contrast in the PICTURE
menu.
Transmission [k][g][ ][Set ID][ ][Data][Cr]
Data Min : 00 to Max : 64
Ack [g][ ][Set ID][ ][OK/NG][Data][x]
07. Brightness (Command: k h)
► To adjust screen brightness.
You can also adjust brightness in the PICTURE
menu.
Transmission [k][h][ ][Set ID][ ][Data][Cr]
Data Min : 00 to Max : 64
Ack [h][ ][Set ID][ ][OK/NG][Data][x]
08. Color/Colour (Command: k i)
► To adjust the screen Color(Colour).
You can also adjust colour in the PICTURE menu.
Transmission [k][i][ ][Set ID][ ][Data][Cr]

8
ENG
ENGLISH
8
EXTERNAL CONTROL DEVICE SETUP
Data Min : 00 to Max : 64
Ack [i][ ][Set ID][ ][OK/NG][Data][x]
09. Tint (Command: k j)
► To adjust the screen tint.
You can also adjust tint in the PICTURE menu.
Transmission [k][j][ ][Set ID][ ][Data][Cr]
Data Red : 00 to Green : 64
Ack [j][ ][Set ID][ ][OK/NG][Data][x]
10. Sharpness (Command: k k)
► To adjust the screen sharpness.
You can also adjust sharpness in the PICTURE
menu.
Transmission [k][k][ ][Set ID][ ][Data][Cr]
Data Min : 00 to Max : 32
Ack [k][ ][Set ID][ ][OK/NG][Data][x]
11. OSD Select (Command: k l)
► To select OSD (On Screen Display) on/off when
controlling remotely.
Transmission [k][l][ ][Set ID][ ][Data][Cr]
Data 00 : OSD off 01 : OSD on
Ack [l][ ][Set ID][ ][OK/NG][Data][x]
12. Remote control lock mode (Command: k m)
► To lock the front panel controls on the monitor and
remote control.
Transmission [k][m][ ][Set ID][ ][Data][Cr]
Data 00 : Lock off 01 : Lock on
Ack [m][ ][Set ID][ ][OK/NG][Data][x]
* If you are not using the remote control, use this
mode.
When main power is off & on (plug-off and plug-in,
after 20 - 30 seconds), external control lock is
released.
* In the standby mode (DC off by off timer or ‘ka’,
‘mc’ command), and if key lock is on, TV will not
turn on by power on key of IR & Local Key.
13. Treble (Command: k r)
► To adjust treble.
You can also adjust in the AUDIO menu.
Transmission [k][r][ ][Set ID][ ][Data][Cr]
Data Min : 00 to Max : 64
Ack [r][ ][Set ID][ ][OK/NG][Data][x]
* (Depending on model)
14. Bass (Command: k s)
► To adjust Bass.
You can also adjust in the AUDIO menu.
Transmission [k][s][ ][Set ID][ ][Data][Cr]
Data Min : 00 to Max : 64
Ack [s][ ][Set ID][ ][OK/NG][Data][x]
* (Depending on model)
15. Balance (Command: k t)
► To adjust balance.
You can also adjust balance in the AUDIO menu.
Transmission [k][t][ ][Set ID][ ][Data][Cr]
Data Min : 00 to Max : 64
Ack [t][ ][Set ID][ ][OK/NG][Data][x]
16. Color(Colour) Temperature (Command: x u)
► To adjust colour temperature. You can also adjust
Color(Colour) Temperature in the PICTURE menu.
Transmission [x][u][ ][Set ID][ ][Data][Cr]
Data Min : 00 to Max : 64
Ack [u][ ][Set ID][ ][OK/NG][Data][x]
17. ISM Method (Command: j p) (Only Plasma TV)
► To control the ISM method. You can also adjust
ISM Method in OPTION menu.
Transmission [j][p][ ][Set ID][ ][Data][Cr]
Data Min : 02: Orbiter
08: Normal
20: Color(Colour) Wash
Ack [p][ ][Set ID][ ][OK/NG][Data][x]
18. Equalizer (Command : j v)
► Adjust EQ of the set.
Transmission [j][v][ ][Set ID][ ][Data][Cr]
0 0 0 0 0 0 0 0
MSB
Frequency Data
LSB
7 6 5
Frequency
4 3 2 1 0 Step
0 0 0
1st Band
0 0 0 0 0
0(decimal)
0 0 1
2nd Band
0 0 0 0 1
1(decimal)
0 1 0
3rd Band
... ... ... ... ...
...
0 1 1
4th Band
0 0 0 1 1
19(decimal)

9
ENGENGLISH
9
EXTERNAL CONTROL DEVICE SETUP
1 0 0
5th Band
0 0 1 0 1
20(decimal)
Acknowledgement [v][ ][Set ID][ ][OK/NG][Data][x]
* It depends on model, and can adjust when sound
mode is EQ adjustable value.
19. Energy Saving (Command: j q)
► To reduce the power consumption of the TV. You
can also adjust Energy Saving in PICTURE menu.
Transmission [j][q][ ][Set ID][ ][Data][Cr]
Data
00 : Off
01 : Minimum
02 : Medium
03 : Maximum
04 : Auto (For LCD TV / LED TV) /
Intelligent sensor (For PDP TV)
05 : Screen off
* (Depending on model)
Ack [q][ ][Set ID][ ][OK/NG][Data][x]
20. Tune Command (Command: m a)
* This command may work differently depending on
model and signal.
• For Europe, Mid-East, Colombia, Asia except
South Korea and Japan Model
► Select channel to following physical number.
Transmission [m][a][ ][Set ID][ ][Data 00][ ]
[Data 01][ ][Data 02][Cr]
* Analog Antenna/Cable
[Data 00][Data 01] Channel Data
Data 00 : High byte channel data
Data 01 : Low byte channel data
- 00 00 ~ 00 C7 (Decimal : 0 ~ 199)
Data 02 : Input Source (Analog)
- 00 : Antenna TV (ATV)
- 80 : Cable TV (CATV)
* Digital Antenna/Cable/Satellite
[Data 00][Data 01]: Channel Data
Data 00 : High Channel data
Data 01 : Low Channel data
- 00 00 ~ 27 0F (Decimal: 0 ~ 9999)
Data 02 : Input Source (Digital)
- 10 : Antenna TV (DTV)
- 20 : Antenna Radio (Radio)
- 40 : Satellite TV (SDTV)
- 50 : Satellite Radio (S-Radio)
- 90 : Cable TV (CADTV)
- a0 : Cable Radio (CA-Radio)
* Tune Command Examples:
1. Tune to the Analog antenna (PAL) Channel 10.
Set ID = All = 00
Data 00 & 01 = Channel Data is 10 = 00 0a
Data 02 = Analog Antenna TV = 00
Result = ma 00 00 0a 00
2. Tune to the digital antenna (DVB-T) Channel 01.
Set ID = All = 00
Data 00 & 01 = Channel Data is 1 = 00 01
Data 02 = Digital Antenna TV = 10
Result = ma 00 00 01 10
3. Tune to the satellite (DVB-S) Channel 1000.
Set ID = All = 00
Data 00 & 01 = Channel Data is 1000 = 03 E8
Data 02 = Digital Satellite TV = 40
Result = ma 00 03 E8 40
Ack [a][ ][Set ID][ ][OK][Data 00][Data 01]
[Data 02][x][a][ ][Set ID][ ][NG][Data 00][x]
• For South Korea, North/Latin America except
Colombia Model
► To tune channel to following physical/major/minor
number.
Transmission [m][a][ ][0][ ][Data00][ ][Data01]
[ ][Data02][ ][Data03][ ][Data04][ ][Data05][Cr]
Digital channels have a Physical, Major, and Minor
channel number. The Physical number is the actual
digital channel number, the Major is the number that
the channel should be mapped to, and the Minor is
the sub-channel. Since the ATSC tuner automatically
maps the channel from the Major / Minor number,
the Physical number is not required when sending a
command in Digital.
* Analog Antenna/Cable
Data 00 : Physical Channel Number
- Antenna (ATV) : 02~45 (Decimal: 2 ~ 69)
- Cable (CATV) : 01, 0E~7D (Decimal : 1, 14~125)
[Data 01 ~ 04]: Major/Minor Channel Number
Data 01 & 02: xx (Don't care)
Data 03 & 04: xx (Don't care)
Data 05: Input Source (Analog)
- 00 : Antenna TV (ATV)
- 01 : Cable TV (CATV)
* Digital Antenna/Cable
Data 00 : xx (Don't care)
[Data 01][Data 02]: Major Channel Number
Data 01 : High byte Channel Data
Data 02 : Low byte Channel Data
- 00 01 ~ 27 0F (Decimal: 1 ~ 9999)
[Data 03][Data 04]: Minor Channel Number
Data 03 : High byte Channel Data
Data 04 : Low byte Channel Data
Data 05 : Input Source (Digital)
- 02 : Antenna TV (DTV) – Use Physical Channel
Number
- 06 : Cable TV (CADTV) – Use Physical Channel

10
ENG
ENGLISH
10
EXTERNAL CONTROL DEVICE SETUP
Number
- 22 : Antenna TV (DTV) – Don’t Use Physical
Channel Number
- 26 : Cable TV (CADTV) - Don’t Use Physical
Channel Number
- 46 : Cable TV (CADTV) – Use Major Channel
Number Only (One Part Channel)
Two bytes are available for each major and minor
channel data, but usually the low byte is used alone
(high byte is 0).
* Tune Command Examples:
1. Tune to the Analog cable (NTSC) channel 35.
Set ID = All = 00
Data 00 = Channel Data is 35 = 23
Data 01 & 02 = No Major = 00 00
Data 03 & 04 = No Minor = 00 00
Data 05 = Analog Cable TV = 01
Total = ma 00 23 00 00 00 00 01
2. Tune to the digital antenna (ATSC) channel 30-3.
Set ID = All = 00
Data 00 = Don’t know Physical = 00
Data 01 & 02 = Major is 30 = 00 1E
Data 03 & 04 = Minor is 3 = 00 03
Data 05 = Digital Antenna TV = 22
Total = ma 00 00 00 1E 00 03 22
Ack [a][ ][Set ID][ ][OK][Data 00][Data 01]
[Data 02][Data 03][Data 04][Data 05]
[x][a][ ][Set ID][ ][NG][Data 00][x]
• For Japan Model
► To tune channel to following physical/major/minor
number.
Transmission [m][a][ ][0][ ][Data00][ ][Data01]
[ ][Data02][ ][Data03][ ][Data04][ ][Data05][Cr]
* Digital Antenna/Satellite
Data 00: xx (Don't care)
[Data 01][Data 02]: Major Channel Number
Data 01: High byte Channel Data
Data 02: Low byte Channel Data
- 00 01 ~ 27 0F (Decimal: 1 ~ 9999)
[Data 03][Data 04]: Minor/Branch Channel Number
(Don’t care in Satellite)
Data 03: High byte Channel Data
Data 04: Low byte Channel Data
Data 05 : Input Source (Digital/Satellite for Japan)
- 02 : Antenna TV (DTV)
- 07 : BS (Broadcasting Satellite)
- 08 : CS1 (Communication Satellite 1)
- 09 : CS2 (Communication Satellite 2)
* Tune Command Examples:
1
Tune to the digital antenna (ISDB-T) channel 17-1
.
Set ID = All = 00
Data 00 = Don’t know Physical = 00
Data 01 & 02 = Major is 17 = 00 11
Data 03 & 04 = Minor/Branch is 1 = 00 01
Data 05 = Digital Antenna TV = 02
Total = ma 00 00 00 11 00 01 02
2. Tune to the BS (ISDB-BS) channel 30.
Set ID = All = 00
Data 00 = Don’t know Physical = 00
Data 01 & 02 = Major is 30 = 00 1E
Data 03 & 04 = Don’t Care = 00 00
Data 05 = Digital BS TV = 07
Total = ma 00 00 00 1E 00 00 07
* This feature is varied based on the model.
Ack [a][ ][Set ID][ ][OK][Data 00][Data 01]
[Data 02][Data 03][Data 04][Data 05]
[x][a][ ][Set ID][ ][NG][Data 00][x]
21. Channel(Programme) Add/Del(Skip)
(Command: m b)
► To skip current channel(programme) for next time.
Transmission [m][b][ ][Set ID][ ][Data][Cr]
Data 00 : Del(ATSC,ISDB)/Skip(DVB) 01 : Add
Ack [b][ ][Set ID][ ][OK/NG][Data][x]
* Set the saved channel status to del(ATSC, ISDB)/
skip(DVB) or add.
22. Key (Command: m c)
► To send IR remote key code.
Transmission [m][c][ ][Set ID][ ][Data][Cr]
Data Key code - p.2.
Ack [c][ ][Set ID][ ][OK/NG][Data][x]
23. Control Backlight (Command: m g)
• For LCD TV / LED TV
► To control the backlight.
Transmission [m][g][ ][Set ID][ ][Data][Cr]
Data Min : 00 to Max : 64
Ack [g][ ][Set ID][ ][OK/NG][Data][x]
Control Panel Light (Command: m g)
• For Plasma TV
► To control the panel light.
Transmission [m][g][ ][Set ID][ ][Data][Cr]
Data Min : 00 to Max : 64
Ack [g][ ][Set ID][ ][OK/NG][Data][x]

11
ENGENGLISH
11
EXTERNAL CONTROL DEVICE SETUP
24. Input select (Command: x b)
(Main Picture Input)
► To select input source for main picture.
Transmission [x][b][ ][Set ID][ ][Data][Cr]
Data
00 : DTV
02 : Satellite DTV
ISDB-BS (Japan)
03 : ISDB-CS1 (Japan)
04 : ISDB-CS2 (Japan)
11 : CATV
01 : CADTV
10 : ATV
20 : AV or AV1 21 : AV2
40 : Component1
60 : RGB
41 : Component2
90 : HDMI1
92 : HDMI3
91 : HDMI2
93 : HDMI4
Ack [b][ ][Set ID][ ][OK/NG][Data][x]
* This function depends on model and signal.
25. 3D(Command: x t) (only 3D models)
(Depending on model)
► To change 3D mode for TV.
Transmission [x][t][ ][Set ID][ ][Data 00][ ][Data 01]
[ ][Data 02][ ][Data 03][Cr]
* (Depending on model)
Data Structure
[Data 00] 00 : 3D On
01 : 3D Off
02 : 3D to 2D
03 : 2D to 3D
[Data 01] 00 : Top and Bottom
01 : Side by Side
02 : Check Board
03 : Frame Sequential
04 : Column interleaving
05 : Row interleaving
[Data 02] 00 : Right to Left
01 : Left to Right
[Data 03] 3D Effect(3D Depth): Min : 00 - Max : 14
(*transmit by Hexadecimal code)
* [Data 02], [Data 03] functions depend on model
and signal.
* If [Data 00] is 00 (3D On), [Data 03] has no
meaning.
* If [Data 00] is 01 (3D off) or 02 (3D to 2D), [Data
01], [Data 02] and [Data 03] have no meaning.
* If [Data 00] is 03 (2D to 3D), [Data 01] and
[Data 02] have no meaning.
* If [Data 00] is 00 (3D On) or 03 (2D to 3D), [Data
03] works when 3D Mode (Genre) is manual only.
* All 3D pattern options ([Data 01]) may not be
available according to broadcasting/video signal.
[Data 00] [Data 01] [Data 02] [Data 03]
00 O O O
01 X X X
02 X X X
03 X O O
X : don’t care
Ack [t][ ][Set ID][ ][OK][Data00][Data01][Data02]
[Data03][x]
[t][ ][Set ID][ ][NG][Data00][x]
26. Extended 3D(Command: x v) (only 3D models)
(Depending on model)
► To change 3D option for TV.
Transmission [x][v][ ][Set ID][ ][Data 00][ ]
[Data 01][Cr]
[Data 00] 3D option
00 : 3D Picture Correction
01 : 3D Depth (3D Mode is Manual Only)
02 : 3D Viewpoint
06 : 3D Color Correction
07 : 3D Sound Zooming
08 : Normal Image View
09 : 3D Mode (Genre)
[Data 01] It has own range for each 3D option
determined by [Data 00].
1) When [Data 00] is 00
00 : Right to Left
01 : Left to Right
2) When [Data 00] is 01, 02
Data Min: 0 - Max: 14 (*transmit by Hexadecimal
code)
Data value range(0 - 20) converts Viewpoint range
(-10 - +10) automatically (Depending on model)
* This option works when 3D Mode (Genre) is manual
only.
3) When [Data 00] is 06, 07
00 : Off
01 : On
4) When [Data 00] is 08
00 : Revert to 3D video from 3D-to-2D
converted 2D video
01 : Change 3D video to 2D video, except
2D-to-3D video
* If conversion condition doesn’t meet, command is
treated as NG.
5) When [Data 00] is 09
00 : Standard
02 : Cinema
04 : Manual
01 : Sport
03 : Extreme
05 : Auto
Ack [v][ ][Set ID][ ][OK][Data00][Data01][x]
[v][ ][Set ID][ ][NG][Data00][x]

12
ENG
ENGLISH
12
EXTERNAL CONTROL DEVICE SETUP
27. Auto Configure (Command: j u)
(Depending on model)
► To adjust picture position and minimize image
shaking automatically. It works only in RGB (PC)
mode.
Transmission [j][u][ ][Set ID][ ][Data][Cr]
Data 01 : To set
Ack [u][ ][Set ID][ ][OK/NG][Data][x]

MANUAL DEL USUARIO
CONFIGURACIÓN DE
DISPOSITIVOS DE CONTROL
EXTERNOS
Lea atentamente este manual antes de poner en funcionamiento el equipo y
consérvelo para futuras consultas.
www.lg.com

2
ESP
ESPAÑOL
2
CÓDIGOS DE TECLA
CÓDIGOS DE TECLA
• Esta función no está disponible en todos los modelos.
Código
(Hexa)
Función Nota
Código
(Hexa)
Función Nota
00 CH +, PR + Botón RC 53 Lista Botón RC
01 CH -, PR - Botón RC 5B Salir Botón RC
02 Volumen + Botón RC 60 PIP(AD) Botón RC
03 Volumen - Botón RC 61 Azul Botón RC
06
> (Tecla de flecha/Tecla
derecha)
Botón RC 63 Amarillo Botón RC
07
< (Tecla de flecha/Tecla
izquierda)
Botón RC 71 Verde Botón RC
08 Encendido Botón RC 72 Rojo Botón RC
09 Silencio Botón RC 79
Relación/Relación de
Aspecto
Botón RC
0B Entrada Botón RC 91 AD (Descripción audio) Botón RC
0E SLEEP Botón RC 7A Guía del usuario Botón RC
0F TV, TV/RAD Botón RC 7C Smart/Inicio Botón RC
10 - 19 * Tecla Número 0 - 9 Botón RC 7E SIMPLINK Botón RC
1A Q.View/Flashback Botón RC 8E ►► (Adelantar) Botón RC
1E FAV (Canal favorito) Botón RC 8F ◄◄ (Retroceder) Botón RC
20 Texto (Teletexto) Botón RC AA Info Botón RC
21 T. Opt (Opción teletexto) Botón RC AB Guía de Programación Botón RC
28 Regresar (ATRÁS) Botón RC B0 ► (Reproducir) Botón RC
30 Modo AV (Audio/Video) Botón RC B1 ꕗ (Detener/Lista Archivo) Botón RC
39 Subtítulo Botón RC BA
ꕘ
(Congelar/
Reproducción lenta/
Pausa)
Botón RC
40
Λ
(Tecla de flecha/Cursor
arriba)
Botón RC BB Fútbol Botón RC
41
V (Tecla de flecha/Cursor
arriba)
Botón RC BD ꔄ (GRABAR) Botón RC
42 Mis Apls. Botón RC DC 3D Botón RC
43 Menú/Configuración Botón RC 99 Configuración automática Botón RC
44 OK/Aceptar Botón RC 9F App / * Botón RC
45 Q.Menu (menú rápido) Botón RC 9B TV, PC Botón RC
4C ListA, - (Solo ATSC) Botón RC
* El código de tecla 4C (0x4C) está disponible en los modelos ATSC/ISDB que utilizan un canal mayor/
menor.
(Para Corea del Sur, Japón, Norte América, Latinoamérica, excepto para modelos de Colombia)

3
ESPESPAÑOL
3
CONFIGURACIÓN DE DISPOSITIVOS DE CONTROL EXTERNOS
CONFIGURACIÓN DE DISPOSITIVOS DE
CONTROL EXTERNOS
• Es posible que la imagen que se muestra no sea exactamente igual a la de su TV.
Conecte el USB al convertidor de serie/conector de entrada RS-232C, a un dispositivo de control externo
(como una computadora o un sistema de control A/V) para controlar externamente las funciones del
producto.
Nota: El tipo de puerto de control de la TV puede variar según la serie de los modelos.
* Tenga en cuenta que no todos los modelos admiten este tipo de conectividad.
* Cable no proporcionado.
USB a convertidor de serie con cable USB
Tipo de USB
USB IN
(TV)
(PC )
(PC )
RS-232C IN
(CONTROL & SERVICE)
(TV)
(TV)
(PC )
(TV)
(PC )
SERVICE ONLY
RS-232C IN
(CONTROL & SERVICE)
RS-232C IN
(CONTROL & SERVICE)
1
3
2
1
3
2
• LGTV admite el uso de un USB a convertidor de serie basado en chip PL2303 (ID de proveedor: 0x0557,
ID de producto: 0x2008) que LG no fabrica ni incluye.
• Puede adquirirse en tiendas de computadoras que venden accesorios para profesionales de soporte de
TI.
RS-232C con cable RS232C
Tipo DE9 (D-Sub 9pin)
• Necesita comprar el cable RS-232C (DE9, D-Sub 9pin tipo hembra-hembra) a RS-232C necesario para
la conexión entre la PC y la TV, el cual se especifica en el manual.
USB IN
(TV)
(PC )
(PC )
RS-232C IN
(CONTROL & SERVICE)
(TV)
(TV)
(PC )
(TV)
(PC )
SERVICE ONLY
RS-232C IN
(CONTROL & SERVICE)
RS-232C IN
(CONTROL & SERVICE)
1
3
2
1
3
2
Es posible que la interfaz de conexión no sea exactamente igual a la de su TV.

4
ESP
ESPAÑOL
4
CONFIGURACIÓN DE DISPOSITIVOS DE CONTROL EXTERNOS
Tipo de adaptador telefónico
• Para realizar la conexión entre la PC y la TV, que se especifica en el manual, debe comprar el cable de
conector telefónico a RS-232.
* Para otros modelos, conecte al puerto USB.
* Es posible que la interfaz de conexión no sea exactamente igual a la de su TV.
USB IN
(TV)
(PC )
(PC )
RS-232C IN
(CONTROL & SERVICE)
(TV)
(TV)
(PC
)
(TV)
(PC )
SERVICE ONLY
RS-232C IN
(CONTROL & SERVICE)
RS-232C IN
(CONTROL & SERVICE)
1
3
2
1
3
2
o
USB IN
(TV)
(PC )
(PC )
RS-232C IN
(CONTROL & SERVICE)
(TV)
(TV)
(PC )
(TV)
(PC
)
SERVICE ONLY
RS-232C IN
(CONTROL & SERVICE)
RS-232C IN
(CONTROL & SERVICE)
1
3
2
1
3
2
Computadora del cliente Configuraciones de RS-232C
Configuraciones de 3 cables (no estándar)
1
6
5
9
PC TV
RXD 2 2 TXD
TXD 3 1 RXD
GND 5 3 GND
O
RXD 3 2 TXD
TXD 2 1 RXD
GND 5 3 GND
D-Sub 9 Teléfono
RS-232C
(Puerto serie)
Set ID
Para establecer el número de ID, consulte "Asignación de datos reales" en la página página 6
1. Presione SETTINGS para acceder a los menús principales.
2. Presione los botones de navegación para desplazarse hasta (General → Acerca de este TV o
OPTION) y luego presione OK.
3. Presione los botones de navegación para desplazarse hasta SET ID y luego presione OK.
4. Desplácese hacia la izquierda o hacia la derecha para establecer un número de ID y seleccione
CLOSE. El rango de ajuste es de 1 a 99.
5. Al finalizar, presione EXIT.
*(según el modelo)

5
ESPESPAÑOL
5
CONFIGURACIÓN DE DISPOSITIVOS DE CONTROL EXTERNOS
Parámetros de comunicación
• Velocidad en baudios : 9600 bps (UART)
• Longitud de datos: 8 bits
• Paridad: Ninguna
• Bit de parada: 1 bit
• Código de comunicación: código ASCII
• Use un cable cruzado (reversa).
Lista de referencia de comandos
(según el modelo)
COMANDO 1 COMANDO 2
Datos
(Hexadecimal)
COMANDO 1 COMANDO 2
Datos
(Hexadecimal)
01. Encendido* k a 00 a 01 15. Balance k t 00 a 64
02. Relación
de Aspecto
k c (página 7)
16.
Temperatura
del
color
x u 00 a 64
03. Silencio de
pantalla
k d (página 7)
17. Método de
ISM (Solo TV
Plasma)
j p (página 8)
04. Silencio de
volumen
k e 00 a 01 18. Ecualizador j v (página 8)
05. Control de
Volumen
k f 00 a 64
19. Ahorro de
energía
j q 00 a 05
06. Contraste k g 00 a 64
20. Comando
Sintonizar
m a (página 9)
07. Brillo k h 00 a 64
21. Canal
(Programa)
Agregar/Borrar
(Saltar)
m b 00 a 01
08. Color k i 00 a 64 22. Tecla m c
CÓDIGOS
de tecla
09. Tinte k j 00 a 64
23. Controlar
Luz de fondo,
Luz del panel
de control
m g 00 a 64
10. Nitidez k k 00 a 32
24. Selección
de entrada
(Ppal.)
x b (página 11)
11. Seleccionar
OSD
k l 00 a 01
25. 3D (Solo
modelos 3D)
x t (página 11)
12. Modo de
bloqueo de
control remoto
k m 00 a 01
26. 3D
Extendido
(Solo modelos
3D)
x v (página 11)
13. Agudos k r 00 a 64
27.
Conguración
automática
j u (página 12)
14. Graves k s 00 a 64
* Nota: Durante la reproducción o grabación de medios, todos los comandos, excepto Power
(Alimentación) (ka) y Key (Tecla) (mc), no se ejecutan y se reconocen como NG.
Con el cable RS232C, la TV puede comunicar el "comando ka" en estado encendido u apagado.
pero con el cable conversor de USB a serie, el comando funciona solo si la TV está encendida.

6
ESP
ESPAÑOL
6
CONFIGURACIÓN DE DISPOSITIVOS DE CONTROL EXTERNOS
Protocolo de Transmisión/Recepción
Transmission
[Command1][Command2][ ][Set ID][ ][Data][Cr]
[Command 1] : Primer comando para controlar la TV. (j, k, m o x)
[Command 2] : Segundo comando para controlar la TV.
[Set ID] : Puede ajustar [Set ID] para elegir el número de ID del monitor que desea en el menú de
opciones.
El rango de ajuste en la TV es de 1 a 99. Si el valor [Set ID] se selecciona en "0", se
puede controlar cada conjunto conectado.
* [Set ID] se indica como decimal (1 a 99) en el menú y como hexadecimal (0x00 a 0x63)
en el protocolo de transmisión/recepción.
[DATA] : Para transmitir los datos de comando (hexadecimal). Transmite datos "FF" para leer el
estado del comando.
[Cr] : Retorno de carro: código ASCII "0x0D"
[ ] : Espacio: código ASCII "0x20"
Reconocimiento de aceptación
[Command2][ ][Set ID][ ][OK][Data][x]
El televisor transmite mensajes de ACK (reconocimiento) sobre la base de este formato cuando recibe
datos normales. En este momento, si los datos se encuentran en modo de lectura, indica los datos de
estado actuales. Si los datos se encuentran en modo de escritura, devuelve los datos de la PC.
Reconocimiento de error
[Command2][ ][Set ID][ ][NG][Data][x]
* El conjunto transmite mensajes de ACK (reconocimiento) sobre la base de este formato cuando recibe
datos anormales de unciones no viables o errores de comunicación.
Datos 00: código ilegal
Asignación de datos reales (Hexadecimal b Decimal)
* Cuando ingresa los [data] en hexadecimal, consulte la tabla de conversión a continuación.
* El Comando de sintonización de canales (ma) utiliza un valor hexadecimal de dos bytes ([data]) para
seleccionar el número de canal.
00: Paso 0 32: Paso 50 (Set ID 50) FE: Paso 254
01: Paso 1 (Set ID 1) 33: Paso 51 (Set ID 51) FF: Paso 255
... ... ...
0A: Paso 10 (Set ID 10) 63: Paso 99 (Set ID 99) 01 00: Paso 256
... ... ...
0F: Paso 15 (Set ID 15) C7: Paso 199 27 0E: Paso 9998
10: Paso 16 (Set ID 16) C8: Paso 200 27 0F: Paso 9999
... ... ...

7
ESPESPAÑOL
7
CONFIGURACIÓN DE DISPOSITIVOS DE CONTROL EXTERNOS
* Según el modelo y la señal, los comandos podrán funcionar de un modo diferente.
01. Potencia (Command: k a)
► Para controlar el encendido o apagado del
dispositivo.
Transmission[k][a][ ][Set ID][ ][Data][Cr]
Dato 00: Apagado 01: *Encendido
Ack [a][ ][Set ID][ ][OK/NG][Data][x]
► Para mostrar que la TV está encendida o
*apagada
Transmission[k][a][ ][Set ID][ ][Data][Cr]
Ack [a][ ][Set ID][ ][OK][Data][x]
* De igual manera, si otras funciones transmiten datos
“FF” de acuerdo con este formato, la retroalimentación
de reconocimiento presenta el estado de cada función.
02. Relación de aspecto (Command: k c)
(Tamaño de la imagen principal)
► Para ajustar el formato de la pantalla. (Formato
de imagen principal)
También puede ajustar el formato de pantalla
mediante la opción Relación de aspecto en el
Q.MENU. o en el menú PICTURE.
Transmission [k][c][ ][Set ID][ ][Data][Cr]
Dato 01: Pantalla normal
(4:3)
02: Pantalla amplia
(16:9)
04: Zoom
05: Zoom 2
(Solo Latinoamérica,
excepto Colombia)
06: Por Programa
07: 14:9
(Europa, Colombia, Oriente
Medio, Asia, excepto Corea
del Sur y Japón)
09: * Original
0B: Ancho total
(Europa, Colombia,
Oriente Medio, Asia,
excepto Corea del Sur y
Japón)
10 a 1F: Zoom cine 1
a 16
Ack [c][ ][Set ID][ ][OK/NG][Data][x]
* Usando la entrada de PC, seleccione la relación
de aspecto de la pantalla de 16:9 o 4:3.
* En el modo DTV/HDMI/Componente (alta
definición), Sólo búsqueda está disponible.
* El modo ancho completo puede funcionar de
modo diferente según el modelo y es totalmente
compatible con DTV y parcialmente compatible
con ATV y AV.
03. Screen Mute (Silencio de pantalla) (Command:
k d)
► Para seleccionar el silenciador de la pantalla en
Encendido o Apagado.
Transmission [k][d][ ][Set ID][ ][Data][Cr]
Datos 00: Silenciador de pantalla apagado
(imagen encendida)
Silenciador de video apagado.
01: Silenciador de pantalla encendido
(imagen apagada)
10: Silenciador de video encendido
Ack [d][ ][Set ID][ ][OK/NG][Data][x]
* Solo en caso el caso del silenciador de video activado,
la TV mostrará la visualización en pantalla (OSD).
Pero si está activado el silencio de la pantalla, el
televisor no mostrará dicha visualización (OSD).
04. Silenciador de volumen (Command: k e)
► Para activar o desactivar el silencio del
volumen.
También es posible ajustar el silenciador a
través del botón MUTE del control remoto.
Transmission [k][e][ ][Set ID][ ][Data][Cr]
Datos 00: Silenciador de volumen encendido
(Volumen apagado)
01: Silenciador de volumen apagado
(Volumen encendido)
Ack [e][ ][Set ID][ ][OK/NG][Data][x]
05. Volume Control (Control de volumen)
(Command: k f)
► Para ajustar el volumen.
También puede ajustar el volumen con los
botones de volumen en el control remoto.
Transmission [k][f][ ][Set ID][ ][Data][Cr]
Datos Mín. : 00 a Máx.: 64
Ack [f][ ][Set ID][ ][OK/NG][Data][x]
06. Contraste (Command: k g)
► Para ajustar el contraste de la pantalla.
También puede ajustar el contraste en el menú
PICTURE.
Transmission [k][g][ ][Set ID][ ][Data][Cr]
Datos Mín. : 00 a Máx.: 64
Ack [g][ ][Set ID][ ][OK/NG][Data][x]
07. Brillo (Command: k h)
► Para ajustar el brillo de la pantalla.
También puede ajustar el brillo en el menú
PICTURE.
Transmission [k][h][ ][Set ID][ ][Data][Cr]
Datos Mín. : 00 a Máx.: 64
Ack [h][ ][Set ID][ ][OK/NG][Data][x]
08. Color (Command: k i)
► Para ajustar el Color de la pantalla.
También puede ajustar el color en el menú
PICTURE.
Transmission [k][i][ ][Set ID][ ][Data][Cr]

8
ESP
ESPAÑOL
8
CONFIGURACIÓN DE DISPOSITIVOS DE CONTROL EXTERNOS
Datos Mín. : 00 a Máx.: 64
Ack [i][ ][Set ID][ ][OK/NG][Data][x]
09. Tinte (Command: k j)
► Para ajustar el tinte de la pantalla.
También puede ajustar el tinte en el menú
PICTURE.
Transmission [k][j][ ][Set ID][ ][Data][Cr]
Datos Rojo: 00 a Verde: 64
Ack [j][ ][Set ID][ ][OK/NG][Data][x]
10. Nitidez (Command: k k)
► Para ajustar la nitidez de la pantalla.
También puede ajustar la nitidez en el menú
PICTURE.
Transmission [k][k][ ][Set ID][ ][Data][Cr]
Datos Mín. : 00 a Máx.: 32
Ack [k][ ][Set ID][ ][OK/NG][Data][x]
11. OSD Select (Selección de OSD) (Command: k l)
► Para seleccionar el encendido o apagado
del modo de visualización en pantalla (OSD)
durante el control remoto.
Transmission [k][l][ ][Set ID][ ][Data][Cr]
Dato 00: OSD apagado 01: OSD encendido
Ack [l][ ][Set ID][ ][OK/NG][Data][x]
12. Remote control lock mode (Modo de bloqueo
del control remoto) (Command: k m)
► Para bloquear el control remoto y los controles
del panel frontal del televisor.
Transmission [k][m][ ][Set ID][ ][Data][Cr]
Dato 00: Bloqueo
desactivado
01: Bloqueo activado
Ack [m][ ][Set ID][ ][OK/NG][Data][x]
* Si no está utilizando el control remoto, use este
modo.
Cuando la potencia principal se apaga y
enciende (se desconecta y conecta, después
de 20 a 30 segundos), se lanza el bloqueo del
control externo.
* En modo de espera (CC apagada mediante la
hora de apagado o el comando “ka”, “mc”) si
está activado el bloqueo de teclas, la TV no se
encenderá al presionar la tecla de encendido de
IR o la tecla local.
13. Treble (Agudos) (Command: k r)
► Para ajustar los agudos.
También puede ajustarlos en el menú AUDIO.
Transmission [k][r][ ][Set ID][ ][Data][Cr]
Datos Mín. : 00 a Máx.: 64
Ack [r][ ][Set ID][ ][OK/NG][Data][x]
* (según el modelo )
14. Graves (Command: k s)
► Para ajustar los bajos.
También puede ajustarlos en el menú AUDIO.
Transmission [k][s][ ][Set ID][ ][Data][Cr]
Datos Mín. : 00 a Máx.: 64
Ack [s][ ][Set ID][ ][OK/NG][Data][x]
* (según el modelo )
15. Balance (Command: k t)
► Para ajustar el balance.
También puede ajustar el balance en el menú
AUDIO.
Transmission [k][t][ ][Set ID][ ][Data][Cr]
Datos Mín. : 00 a Máx.: 64
Ack [t][ ][Set ID][ ][OK/NG][Data][x]
16. Color Temperature (Temperatura de color)
(Command: x u)
► Para ajustar la temperatura de color. También
puede ajustar Color Temperature (Temperatura
de color) en el menú PICTURE.
Transmission [x][u][ ][Set ID][ ][Data][Cr]
Datos Mín. : 00 a Máx.: 64
Ack [u][ ][Set ID][ ][OK/NG][Data][x]
17. ISM Method (Método de ISM) (Command: j p)
(solo en televisores plasma)
► Para controlar el método de ISM. También
puede ajustar el Método de ISM en el menú
OPTION.
Transmission [j][p][ ][Set ID][ ][Data][Cr]
Datos Mín.: 02: Orbiter (Orbitador)
08: Normal
20: Color Wash (Decolorado)
Ack [p][ ][Set ID][ ][OK/NG][Data][x]
18. Ecualizador (Command : j v)
► Ajustar el EQ (ecualizador) del conjunto.
Transmission [j][v][ ][Set ID][ ][Data][Cr]
0 0 0 0 0 0 0 0
MSB
Frecuencia Datos
LSB
7 6 5
Frecuencia
4 3 2 1 0 Paso
0 0 0
1er. Banda
0 0 0 0 0
0 (decimal)
0 0 1
2er. Banda
0 0 0 0 1
1 (decimal)
0 1 0
3er. Banda
... ... ... ... ...
...

9
ESPESPAÑOL
9
CONFIGURACIÓN DE DISPOSITIVOS DE CONTROL EXTERNOS
0 1 1
4er. Banda
0 0 0 1 1
19 (decimal)
1 0 0
5er. Banda
0 0 1 0 1
20 (decimal)
Acknowledgement [v][ ][Set ID][ ][OK/NG][Data][x]
* Depende del modelo, y puede ajustarse cuando
el modo de sonido es un valor de EQ ajustable.
19. Ahorro de energía (Command: j q)
► Para reducir el consumo de energía de la TV.
También puede ajustar el Ahorro de energía en
el menú PICTURE.
Transmission [j][q][ ][Set ID][ ][Data][Cr]
Datos
00: apagado
01: mínimo
02: medio
03: máximo
04: Automático (para TV LCD/TV LED)/
Intelligent sensor (Sensor inteligente) (para
PDP TV)
05: apagado de Pantalla
* (según el modelo)
Ack [q][ ][Set ID][ ][OK/NG][Data][x]
20. Tune Command (Comando de sintonización)
(Command: m a)
* Este comando puede funcionar de un modo diferente
según el modelo y de la señal.
• Para los modelos de Europa, Oriente Medio,
Colombia, Asia, excepto Corea del Sur y Japón
► Seleccione el canal de los siguientes números
físicos.
Transmission [m][a][ ][Set ID][ ][Data 00][ ]
[Data 01][ ][Data 02][Cr]
* Analógica Antena/Cable
[Data 00][Data 01] Datos de canales
Datos 00: datos de canal de bytes altos
Datos 01: datos de canal de bytes bajos
- 00 00 ~ 00 C7 (decimal: 0 ~ 199)
Datos 02: fuente de entrada (análogica)
- 00: TV Antena (ATV)
- 80: TV por cable (CATV)
* Digital Antena/Cable/Satélite
[Data 00][Data 01]: datos de canales
Datos 00: datos de canal de bytes altos
Datos 01: datos de canal de bytes bajos
- 00 00 ~ 27 0F (decimal: 0 ~ 9999)
Datos 02: fuente de entrada (digital)
- 10: TV Antena (DTV)
- 20: Radio Antena (Radio)
- 40: TV satelital (SDTV)
- 50: Radio satelital (S-Radio)
- 90: TV por cable (CADTV)
- a0: Radio por cable (CA-Radio)
* Ejemplos de comandos de sintonización:
1. Sintonizar el canal Antena analógico (PAL) 10.
Set ID = Todo = 00
Datos 00 & 01 = Datos de canal es 10 = 00 0a
Datos 02 = TV Antena analógica = 00
Resultado = ma 00 00 0a 00
2. Sintonizar el canal Antena digital (DVB-T) 01.
Set ID = Todo = 00
Datos 00 & 01 = Datos de canal es 1 = 00 01
Datos 02 = TV Antena digital = 10
Resultado = ma 00 00 01 10
3. Sintonizar el canal satelital (DVB-S) 1000.
Set ID = Todo = 00
Datos 00 & 01 = Datos de canal es 1000 = 03 E8
Datos 02 = Satélite de TV digital = 40
Resultado = ma 00 03 E8 40
Ack [a][ ][Set ID][ ][OK][Data 00][Data 01]
[Data 02][x][a][ ][Set ID][ ][NG][Data 00][x]
• Para los modelos de Corea del Sur, América del
Norte, América Latina, excepto Colombia.
► Para sintonizar los canales en el siguiente
número físico/mayor/menor.
Transmission [m][a][ ][0][ ][Data00][ ][Data01]
[ ][Data02][ ][Data03][ ][Data04][ ][Data05][Cr]
Los canales digitales poseen un número de
canal físico, mayor y menor. El número físico
es el número de canal digital real, el mayor es
el número al cual el canal se debe asignar y
el menor es el subcanal. Como el sintonizador
ATSC asigna automáticamente el canal al número
mayor/menor, cuando se envía un comando
en modo Digital, no es necesario especificar el
número físico.
* Analógica Antena/Cable
Datos 00 : número de canal físico
- Antena (ATV): 02~45 (decimal: 2 ~ 69)
- cable (CATV): 01, 0E~7D (decimal: 1, 14~125)
Datos 01 y 04: número de canal mayor/menor
Datos 01 y 02: xx (no importa)
Datos 03 y 04: xx (no importa)
Datos 05: fuente de entrada (analógica)
- 00: TV Antena (ATV)
- 01: TV por cable (CATV)
* Antena digital/Cable
Datos 00: xx (no importa)
[Data 01][Data 02]: número de canal mayor
Datos 01: datos de canal de bytes altos
Datos 02: datos de canal de bytes bajos
- 00 01 ~ 27 0F (decimal: 1 ~ 9999)
[Data 03][Data 04]: número de canal menor
Datos 03: datos de canal de bytes altos
Datos 04: datos de canal de bytes bajos
Datos 05: fuente de entrada (digital)
- 02: TV Antena (DTV): usar número de canal
físico
- 06: Cable de TV (CADTV): usar número de
canal físico

10
ESP
ESPAÑOL
10
CONFIGURACIÓN DE DISPOSITIVOS DE CONTROL EXTERNOS
- 22: TV Antena (DTV): no usar número de
canal físico
- 26: Cable de TV (CADTV): no usar un número
de canal físico
- 46: Cable de TV (CADTV): usar solo un
número de canal mayor (canal de una
parte)
Hay dos bytes disponibles para cada dato de
canal mayor y menor, pero generalmente, solo se
usa el byte más bajo (los bytes altos son de 0).
* Ejemplos de comandos de sintonización:
1. Sintonice el canal de cable analógico (NTSC)
35.
Set ID = Todo = 00
Datos 00 = Datos de canal es 35 = 23
Datos 01 & 02 = No Mayor = 00 00
Datos 03 & 04 = No Menor = 00 00
Datos 05 = Cable de TV analógico = 01
Total = ma 00 23 00 00 00 00 01
2. Sintonice el canal Antena digital (ATSC) 30-3.
Set ID = Todo = 00
Datas 00 = No conoce Físico = 00
Datos 01 & 02 = Mayor es 30 = 00 1E
Datos 03 & 04 = Menor es 3 = 00 03
Datos 05 = TV Antena digital = 22
Total = ma 00 00 00 1E 00 03 22
Ack [a][ ][Set ID][ ][OK][Data 00][Data 01]
[Data 02][Data 03][Data 04][Data 05]
[x][a][ ][Set ID][ ][NG][Data 00][x]
• Para modelos de Japón
► Para sintonizar los canales en el siguiente
número físico/mayor/menor.
Transmission [m][a][ ][0][ ][Data00][ ][Data01]
[ ][Data02][ ][Data03][ ][Data04][ ][Data05][Cr]
* Antena digital/Satélite
Datos 00: xx (no importa)
[Data 01][Data 02]: número de canal mayor
Datos 01: datos de canal de bytes altos
Datos 02: datos de canal de byte bajos
- 00 01 ~ 27 0F (decimal: 1 ~ 9999)
[Data 03][Data 04]: Número de canal menor/
sucursal
(No importa en satélite)
Datos 03: datos de canal de bytes altos
Datos 04: datos de canal de byte bajos
Datos 05: fuente de entrada (digital/satelital para
Japón)
- 02: TV Antena (DTV)
- 07: BS (satélite de transmisión)
- 08: CS1 (satélite de comunicación 1)
- 09: CS2 (satélite de comunicación 2)
* Ejemplos de comandos de sintonización:
1
Sintonizar el canal Antena digital (ISDB-T) 17-1
.
Set ID = Todo = 00
Datos 00 = No conoce Físico = 00
Datos 01 & 02 = Mayor es 17 = 00 11
Datos 03 & 04 = Menor/Sucursal es 1 = 00 01
Datos 05 = TV Antena digital = 02
Total = ma 00 00 00 11 00 01 02
2. Sintonizar el canal BC (ISDB-BS) 30.
Set ID = Todo = 00
Datos 00 = No conoce Físico = 00
Datos 01 & 02 = Mayor es 30 = 00 1E
Datos 03 & 04 = No importa = 00 00
Datos 05 = TV BC Digital = 07
Total = ma 00 00 00 1E 00 00 07
* Esta función varía según el modelo.
Ack [a][ ][Set ID][ ][OK][Data 00][Data 01]
[Data 02][Data 03][Data 04][Data 05]
[x][a][ ][Set ID][ ][NG][Data 00][x]
21. Canal (Programa) Agregar/Borrar (Saltar)
(Command: m b)
► Para saltar el canal actual (programa) para otra
ocasión.
Transmission [m][b][ ][Set ID][ ][Data][Cr]
Dato 00: Borrar(ATSC, ISDB)/Saltar
(DVB)
01: Agregar
Ack [b][ ][Set ID][ ][OK/NG][Data][x]
* Establecer el estado del canal guardado en
borrar (ATSC, ISDB)/saltar (DVB) o agregar.
22. Key (Tecla) (Command: m c)
► Para enviar el código de tecla del control
remoto IR.
Transmission [m][c][ ][Set ID][ ][Data][Cr]
Datos Código de tecla - página 2.
Ack [c][ ][Set ID][ ][OK/NG][Data][x]
23. Control BackLight (Control de la luz de fondo)
(Command: m g)
• Para TV LCD/TV LED
► Para controlar luz de pantalla.
Transmission [m][g][ ][Set ID][ ][Data][Cr]
Datos Mín. : 00 a Máx.: 64
Ack [g][ ][Set ID][ ][OK/NG][Data][x]
• Para TV plasma
► Para controlar la luz del panel
Transmission [m][g][ ][Set ID][ ][Data][Cr]
Datos Mín. : 00 a Máx.: 64
Ack [g][ ][Set ID][ ][OK/NG][Data][x]

11
ESPESPAÑOL
11
CONFIGURACIÓN DE DISPOSITIVOS DE CONTROL EXTERNOS
24. Input select (Selección de entrada) (Command:
x b)
(Entrada de la imagen principal)
► Para seleccionar la fuente de entrada para la
imagen principal.
Transmission [x][b][ ][Set ID][ ][Data][Cr]
Datos
00: DTV
02 : Satelital DTV
ISDB-BS (Japón)
03: ISDB-CS1 (Japón)
04: ISDB-CS2 (Japón)
11: CATV
01: CADTV
10: ATV
20: AV o AV1 21: AV2
40: Componente1 41: Componente 2
60: RGB
90: HDMI1
92: HDMI3
91: HDMI2
93: HDMI4
Ack [b][ ][Set ID][ ][OK/NG][Data][x]
* Esta función varía según el modelo y la señal.
25. 3D (Command: x t) (solo modelos 3D)
(Depende del modelo)
► Para cambiar el modo 3D del TV.
Transmission [x][t][ ][Set ID][ ][Data 00][ ][Data
01]
[ ][Data 02][ ][Data 03][Cr]
* (según el modelo )
Datos estructura
[Data 00] 00: 3D encendido
01: 3D apagado
02: 3D a 2D
03: 2D a 3D
[Data 01] 00: Top and Bottom (Superior e Inferior)
01: Side by Side (Vertical)
02: Check Board (Comprobar panel)
03: Frame Sequential (Fotogramas
secuenciales)
04: Column interleaving (Intercalado en
columna)
05: Row interleaving (Intercalado en fila)
[Data 02] 00: Derecha a Izquierda
01: Izquierda a Derecha
[Dato 03] Efecto 3D (profundidad 3D): Mín.: 00 -
Máx.: 14
(*transmite por código hexadecimal)
* Si [Data 00] es 00 (3D encendido), [Data 03] no
es relevante.
* Si [Data 00] es 01 (3D apagado) o 02 (3D a
2D), [Data 01], [Data 02] y [Data 03] no son
relevantes.
* Si [Data 00] es 03 (2D a 3D), [Data 01] y
[Data 02] no son relevantes.
* Si [Data 00] es 00 (3D encendido) o 03 (2D a
3D), [Data 03] funciona solo cuando el modo 3D
(género) es manual.
* Es posible que todas las opciones del patrón de
3D ([Datos 01]) no estén disponibles según la
transmisión/señal de video.
[Data 00] [Data 01] [Data 02] [Data 03]
00 O O O
01 X X X
02 X X X
03 X O O
X: no importa
Ack [t][ ][Set ID][ ][OK][Data00][Data01]
[Data02]
[Data03][x]
[t][ ][Set ID][ ][NG][Data00][x]
26. 3D extendido (Command: x v) (solo modelos
3D)
(Depende del modelo)
► Para cambiar la opción 3D del televisor.
Transmission [x][v][ ][Set ID][ ][Data 00][ ]
[Data 01][Cr]
[Data 00] Opción 3D
00: Corrección de imagen 3D
01: Profundidad 3D (Modo 3D es Solo
manual)
02: Punto de vista 3D
06 : Corrección de Color 3D
07 : Ampliación de Sonido 3D
08 : Vista de imagen normal
09 : Modo 3D (Tipo)
[Data 01] Cuenta con su propio rango para cada
opción 3D determinada por [Data 00].
1) Cuando [Data 00] es 00
00: Derecha a Izquierda
01: Izquierda a Derecha
2) Cuando [Data 00] es 01, 02
Dato Mín.: 0 - Máx.: 14 (*transmite por código
hexadecimal)
El rango de valores de datos (0 - 20) convierte el
rango de visión (-10 - +10) de forma automática
(según el modelo)
* Esta función funciona cuando el modo 3D
(género) es solo manual.
3) Cuando [Data 00] es 06, 07
00: encendido
01: apagado
4) Cuando [Data 00] es 08
00: revertir a video 3D de video
2D convertido de 3D a 2D
01: cambiar video 3D a video 2D, excepto
video 2D a 3D
* Si la condición de la conversión no se cumple, el
comando se trata como NG.
5) Cuando [Data 00] es 09
00: Estándar
02: Cine
04: Manual
01: Deportes
03: Extremo
05: Automático
Ack [v][ ][Set ID][ ][OK][Data00][Data01][x]
[v][ ][Set ID][ ][NG][Data00][x]

12
ESP
ESPAÑOL
12
CONFIGURACIÓN DE DISPOSITIVOS DE CONTROL EXTERNOS
27. Configuración automática (Comando: j u)
► Para ajustar la ubicación de la imagen y
reducir su temblor de manera automática. La
configuración automática solo funciona en el
modo RGB-PC.
Transmission [j][u][ ][Set ID][ ][Data][Cr]
Dato 01: Ejecutar Conguração automática
Ack [u][ ][Set ID][ ][OK/NG][Data][x]
-
 1
1
-
 2
2
-
 3
3
-
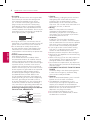 4
4
-
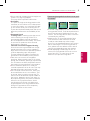 5
5
-
 6
6
-
 7
7
-
 8
8
-
 9
9
-
 10
10
-
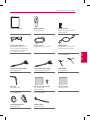 11
11
-
 12
12
-
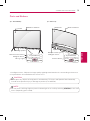 13
13
-
 14
14
-
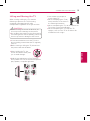 15
15
-
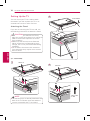 16
16
-
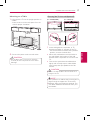 17
17
-
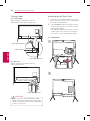 18
18
-
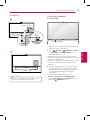 19
19
-
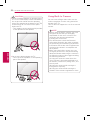 20
20
-
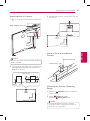 21
21
-
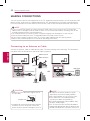 22
22
-
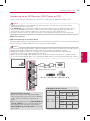 23
23
-
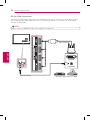 24
24
-
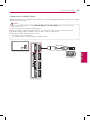 25
25
-
 26
26
-
 27
27
-
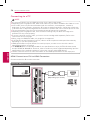 28
28
-
 29
29
-
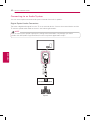 30
30
-
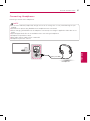 31
31
-
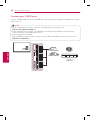 32
32
-
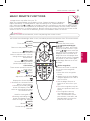 33
33
-
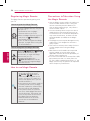 34
34
-
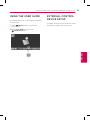 35
35
-
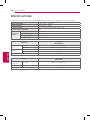 36
36
-
 37
37
-
 38
38
-
 39
39
-
 40
40
-
 41
41
-
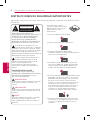 42
42
-
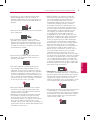 43
43
-
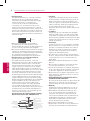 44
44
-
 45
45
-
 46
46
-
 47
47
-
 48
48
-
 49
49
-
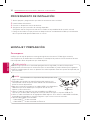 50
50
-
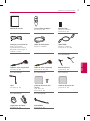 51
51
-
 52
52
-
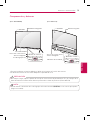 53
53
-
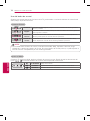 54
54
-
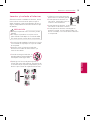 55
55
-
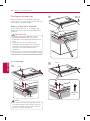 56
56
-
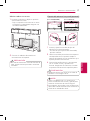 57
57
-
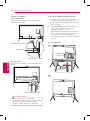 58
58
-
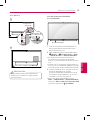 59
59
-
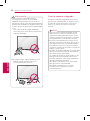 60
60
-
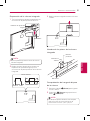 61
61
-
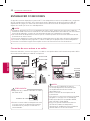 62
62
-
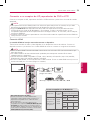 63
63
-
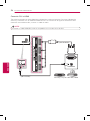 64
64
-
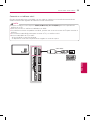 65
65
-
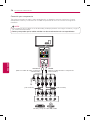 66
66
-
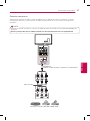 67
67
-
 68
68
-
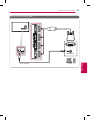 69
69
-
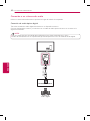 70
70
-
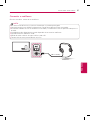 71
71
-
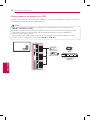 72
72
-
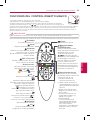 73
73
-
 74
74
-
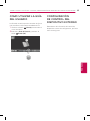 75
75
-
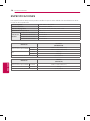 76
76
-
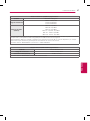 77
77
-
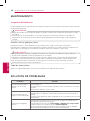 78
78
-
 79
79
-
 80
80
-
 81
81
-
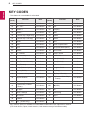 82
82
-
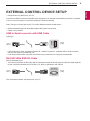 83
83
-
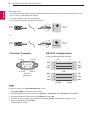 84
84
-
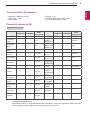 85
85
-
 86
86
-
 87
87
-
 88
88
-
 89
89
-
 90
90
-
 91
91
-
 92
92
-
 93
93
-
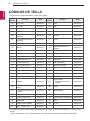 94
94
-
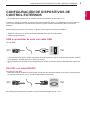 95
95
-
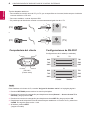 96
96
-
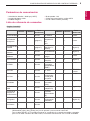 97
97
-
 98
98
-
 99
99
-
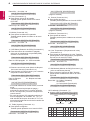 100
100
-
 101
101
-
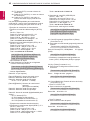 102
102
-
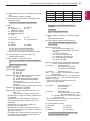 103
103
-
 104
104


LG 98UB9800 El manual del propietario
- Categoría
- Televisores LCD
- Tipo
- El manual del propietario
en otros idiomas
- English: LG 98UB9800 Owner's manual